

Page 1

Contents
1 GENERAL INFORMATION............................ 5
1.1 INSTRUCTION....................................... 5
1.2 NOTES FOR SAFE................................5
1.3 APPEARANCE.......................................7
1.4 ICONS.................................................. 10
2 GETTING STARTED.................................... 11
2.1 INSTALL AND R EM O VE BATTERY...... 11
2.2 HEADSET AND MICROSD CARD.......12
2.3 CHARGE THE BATTERY..................... 12
3 BASIC FUNCTION....................................... 14
3.1 POWER ON AND OFF......................... 14
3.2 STANDBY MODE.................................14
3.3 MAKE A CALL......................................16
3.4 ANSWER / END A CALL ...................... 18
4 WRITE TEXT................................................18
4.1 INPUT METHOD..................................18
4.2 INPUT SPECIAL CHARACTER............19
5 MESSAGES................................................. 19
5.1 SMS .....................................................20
1
Page 2

5.2 MMS..................................................... 24
6 LOG.............................................................27
6.1 ALL CALLS........................................... 27
6.2 SENT SMS...........................................28
6.3 DELETE CALL LOG............................. 28
6.4 CALL DURATION.................................29
6.5 MESSAGE LOG...................................29
7 CONTACTS..................................................29
7.1 CONTACTS.......................................... 30
7.2 SETTINGS...........................................30
7.3 GROUPS..............................................31
7.4 SPEED DIALS...................................... 31
7.5 DELETE ALL CONTACTS....................31
8 SETTINGS................................................... 32
8.1 PROFILES............................................32
8.2 DISPLAY SETTINGS............................33
8.3 TIME AND DATE..................................34
8.4 CALL SETTINGS..................................34
8.5 PHONE SETTINGS..............................35
8.6 SECURITY SETTINGS.........................35
8.7 DOWNLOAD SETTINGS......................36
2
Page 3

8.8 NETWORK SETTINGS........................36
9 MEDIA DATA ...............................................36
10 ENTERTAINMENT.....................................38
10.1 MP3....................................................38
10.2 MP4....................................................39
10.3 CAMERA............................................ 39
10.4 ALBUM...............................................40
10.5 FM RADIO..........................................40
10.6 GAMES.............................................. 41
11 A PPLICAT ION............................................41
11.1 A TV.....................................................42
11.2 VOICE MEMO.................................... 43
11.3 CALCULATOR.................................... 43
11.4 STOPWATCH.....................................43
11.5 ORGANISER......................................44
11.6 SCRATCHPAD................................... 45
11.7 E-BOOK READER..............................45
12 ESURFING.................................................45
13 SAFETY INFORMATION ........................... 47
14 CARE AND MAINTENANCE..................... 49
3
Page 4

15 FCC WARNING STATEMENT....................52
4
Page 5

1 General Information
1.1 Instruction
Please read this User Guide carefully to
make sure your phone work well.
This device is a CDMA 2000 phone (Non
UIM card). The main function includes
ATV, rings, incoming call, file manager
(support microSD card), taking pictures
and sound videos, MP3, MP4 play,
E-Book; WAP, FM radio, MMS and so on.
These functions can make your life more
convenient and fun.
1.2 Notes for Safe
Follow any restrictions. Switch the
phone off near medical
equipment.
Do not use the phone at a
refueling point. Do not use near
fuel or chemicals.
Do not use any voltage over the
restriction. Use only external
devices approved by factory.
5
Page 6

Do not unarm phone or battery
and do not do any changes on
them. The warranty is voided
once the armed label is corrupted.
Battery out of use please
disposes and follows the local
regulation.
Electrical devices like televisions,
radios and computers, may be
disturbed by RF energy that affects your
mobile phone performance.
Follow any restrictions. Wireless
devices can cause interference in
aircraft. Please turn off your mobile phone
or set it to FLY MODE before boarding.
Obey all local laws. Always keep
your hands free to operate the
vehicle while driving. Your first
consideration while driving should be road
safety.
WARNING: Improperly use of the device will
result in warranty voided.
6
Page 7

1.3 Appearance
(1) Earpiece
(2) LCD Display
(3) Left Soft Key
(4) WAP Quick Key
(5) Send Key
(6) Dial Button
7
Page 8
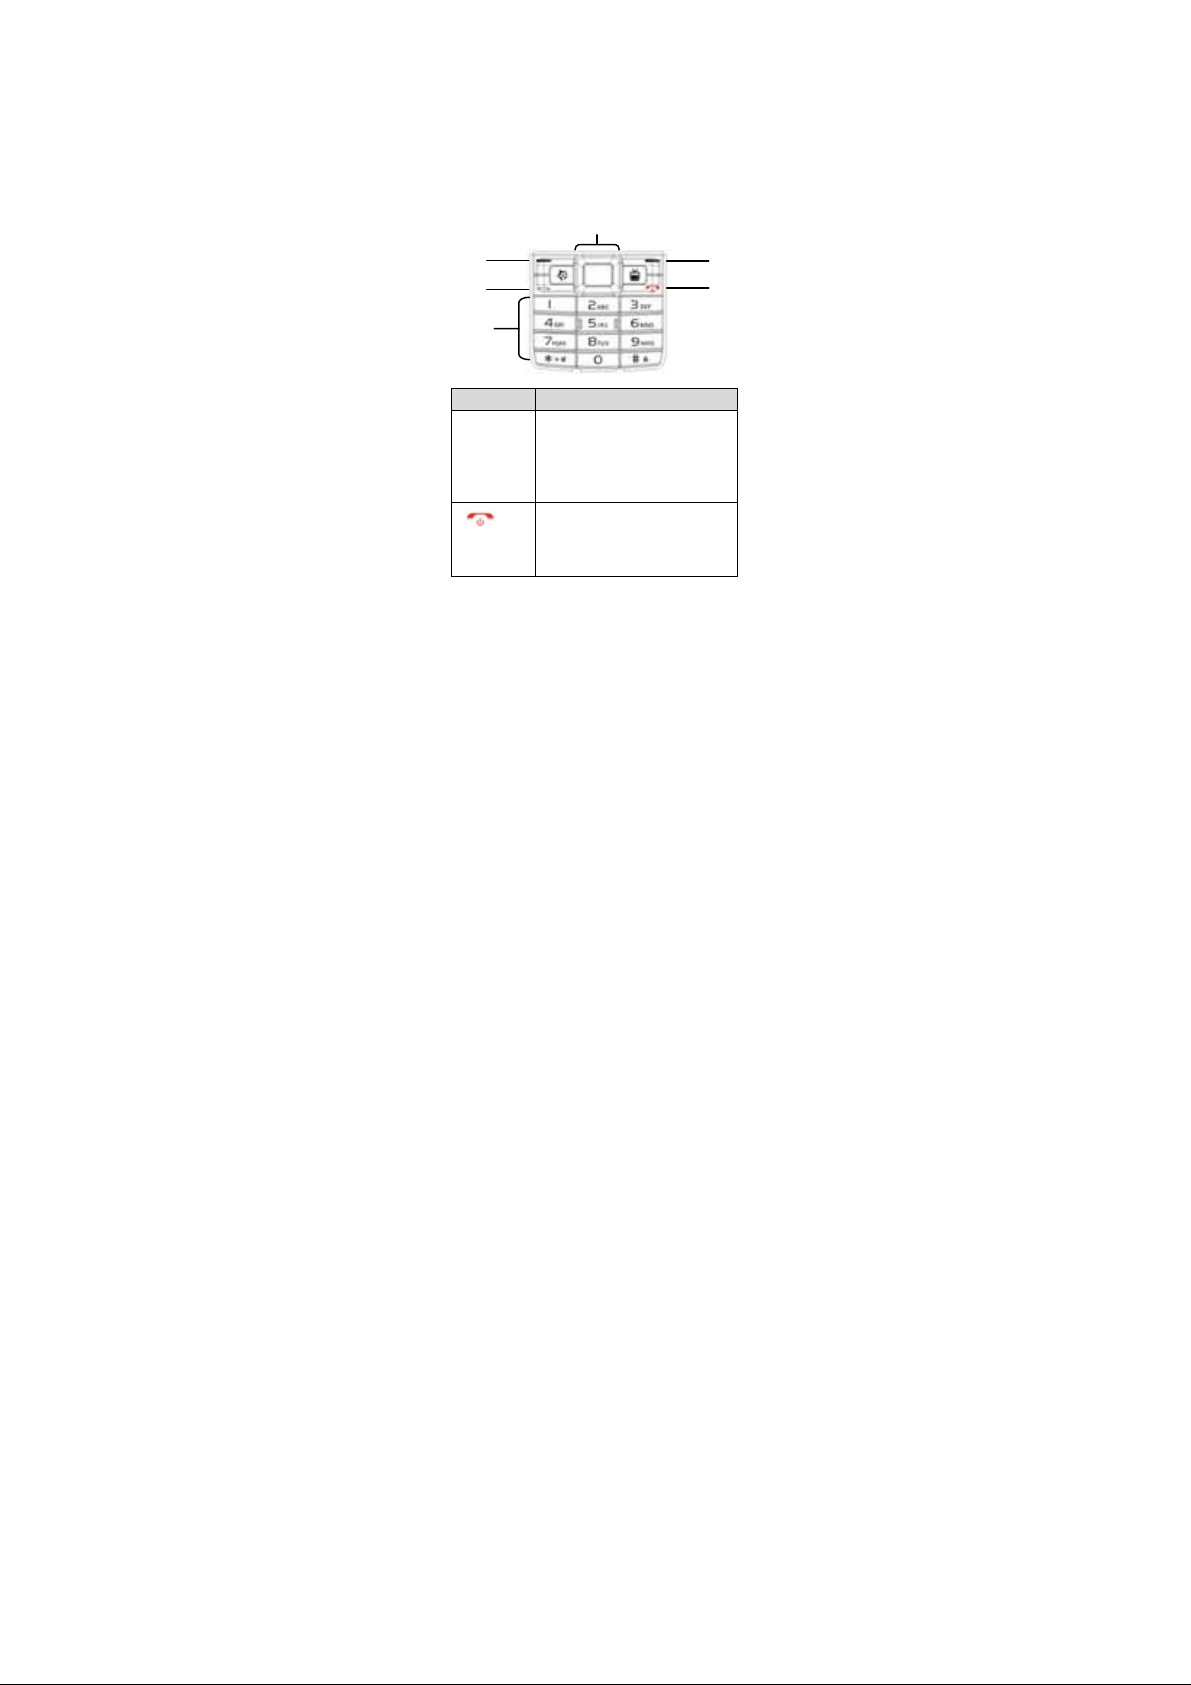
(7) Microphone
3
6
(8) Camera
(9) Mirror
(10) Battery Cover
(11) Right Soft Key
(12) TV Quick Key
(13) End / Power Key
(14) Selection Key
(15) Scroll Key
(16) Speaker
1
(17) UIM Card (no
support)
(18) Battery
(19) T-Flash Card
(20) TV Antenna
(21) Micro USB
(22) Hole for cell
phone charm
(23) Foot Stand
4/5
Name Description
- These two function keys
1.Left/Right
Function
Key
2.
Power/End
Key
located at the right and left top
corner on the keypad. They are
function depend on the menu
at the bottom of screen.
- Terminate call.
- Switch power on or off.
- Return to idle screen from
function list.
8
1
2
Page 9

3.
Dial
Key
4.OK Key
5.Direction
Keys
6.Number
Keys
Key
Key
- Making call out.
- Answer incoming calls.
- Browse callshistory from idle
screen.
- Confirm function in some
menus.
- Scroll in function list or phone
book.
- Scroll cursors in user edit
status.
- Enter the specific function
from idle screen.
- Scroll up/ down/ right/ left
direction.
- Input numbers, letters and
symbols
- Lock keypad quickly.
- Switch input modes in user
edit status
- Input symbols in user edit
status.
- Input “+”, “P”, “T” when
dialing numbers.
- Switch between current mode
and silent mode in idle screen
9
Page 10
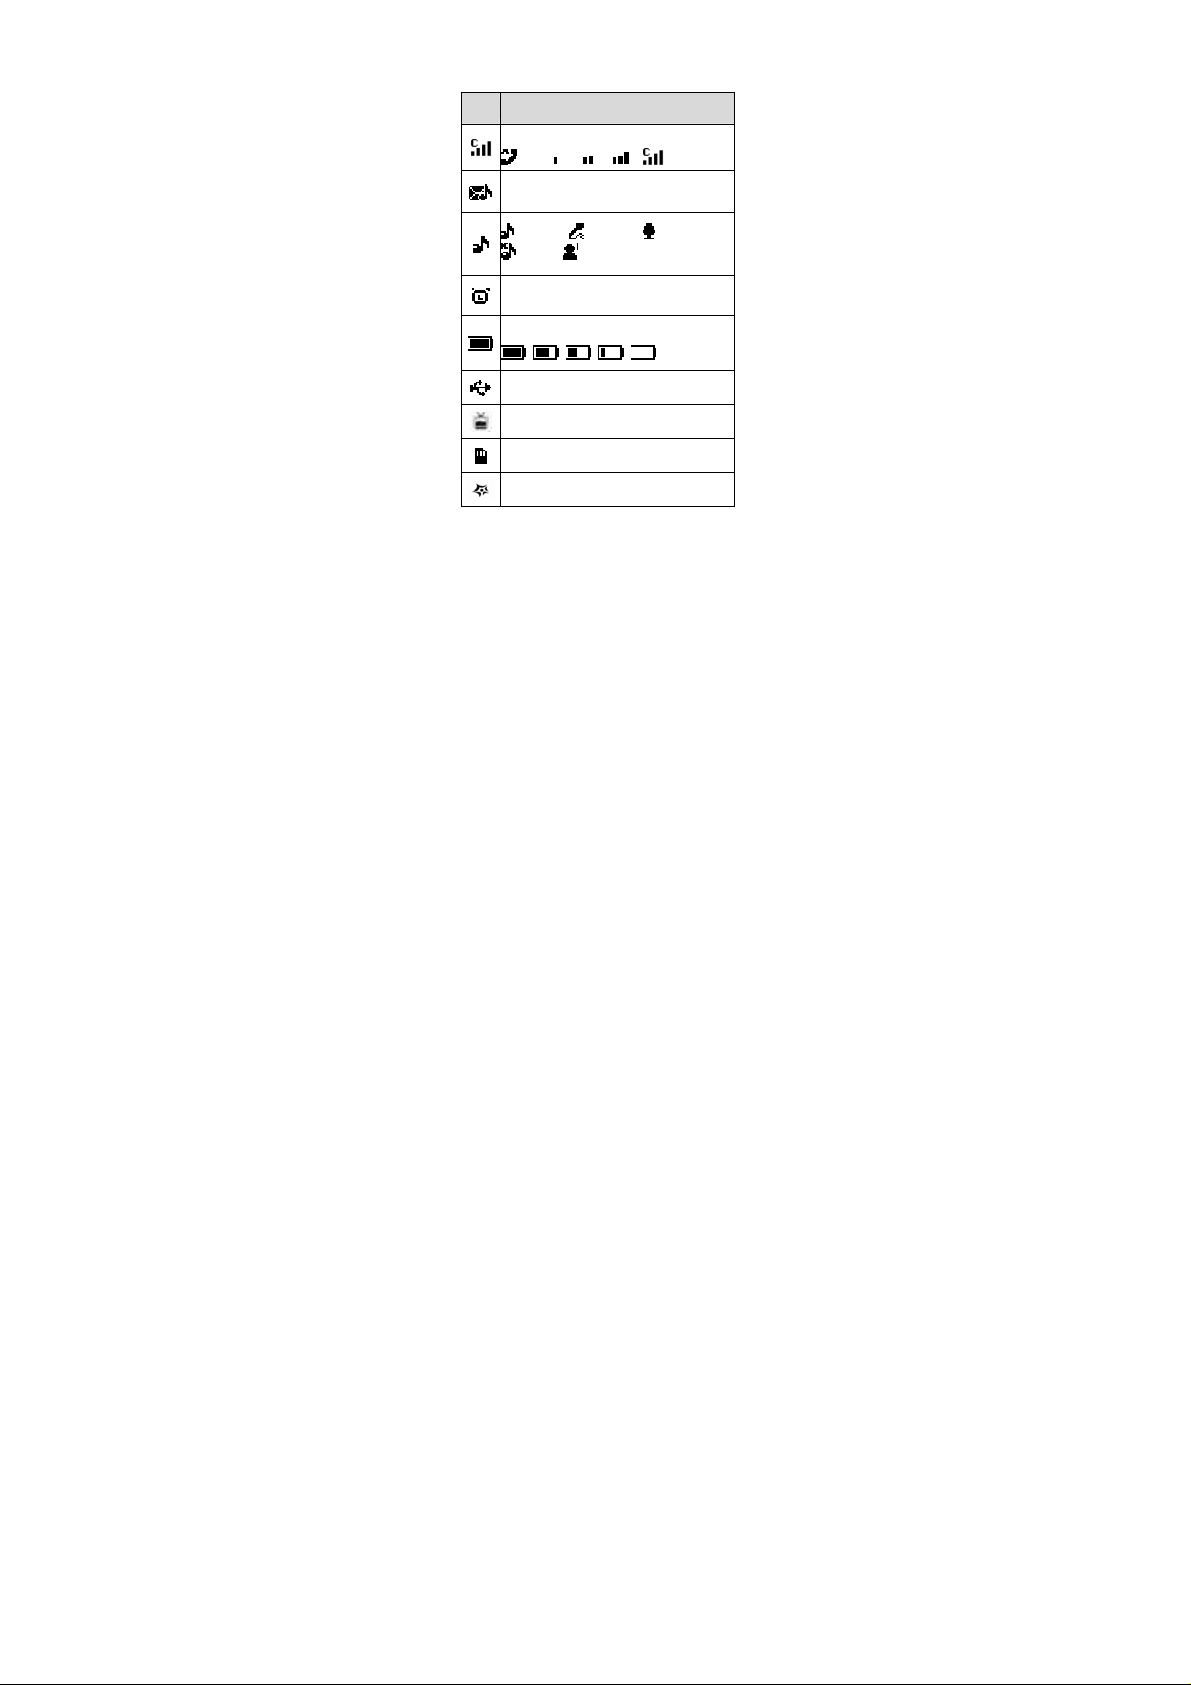
1.4 Icons
A
Icon Content
CDMA Network signal strength
New message
general meeting outdoor
silent my style1
larm
Battery level : high -> low
USB charging.
Shortcut to access TV
microSD card
Shortcut to access Application
10
Page 11

2 Getting started
Dimension:106.5(L)x45(W) x 12.5(H) mm
Weight (include battery):75g
Battery: 900 Ah
Note: Always switch off the power and
disconnect the charger and any other
device before removing the back cover.
Avoid touching electronic components
while changing the cover. Always store
and use the device with the cover
attached.
2.1 Install and remove battery
Turn off the phone, remove the back cover
of the device, and observe the battery
aligned with the gold-colored contacts
and insert the battery into the battery slot.
To remove the battery, insert your finger
into the finger grip and lift the battery from
its compartment.
Note: Always switch the device off and
disconnect the charger before removing
the battery.
11
Page 12

2.2 Headset and Micro S D card
Headset
Plug the headset connector into the Port
connector at the bottom of your phone.
Put the headset on your ear. With the
headset connected, you can make,
answer, and end calls as usual.
MicroSD card
Remove the back cover and battery of the
device; microSD card slot is in the right
top side on battery slot. Insert the card
into microSD card slot with the contact
surface facing down, and press it until it
locks into place. To remove microSD card,
pull out the SD card lightly from the slot.
NOTE: Do not remove the memory card
during any operation when the card is
being accessed. This may damage the
memory card as well as the device, and
data stored on the card may be corrupt.
2.3 Charge the battery
¾ USB Charging
Connect the USB cable to computer and
the socket on the bottom of your device.
When charging, the battery level icon will
12
Page 13

display the status. If you power on the
device and connect to computer, it can be
treated as a U-Flash disk for data
transfer.
¾ Charger Charging
Charger can charge the battery of your
mobile phone. Following is the battery
charging step:
1. Connect through the USB interface by
data cable.
2. Insert the cable to your mobile phone’s
interface.
3. Insert the charger to the proper power
socket.
4. Then charging animation will stop after
charging done.
NOTE: If the battery is not enough to
power on your mobile phone, it may take a
longer time than usual before the charging
animation appears on the display.
WARNING: To make sure the local
standard voltage and frequency match up
your charger’s rated voltage and power.
13
Page 14

3 Basic Function
3.1 Power on and off
To switch the phone on or off, press and
hold the power key
3.2 Standby mode
At standby mode you can quickly access
your most frequently used applications,
and view at a glance if you have missed
calls or new messages, options as below:
Press left function key to “Menu”
Press right function key to “Names”
(contacts)
Press dial key to call history.
Press * key for 2 sec to turn on/ off
silent function.
.
14
Page 15

Press # key for 2 sec to lock the keypad
quickly
Unlock the keypad, please press
upper-right function key then press # key.
Shortcut setting :
There are five different shortcuts you can
choose in standby mode.
Default shortcut:
- Changeable: Dial screen, Profiles,
Contacts, Messages, Call log,
- Unchangeable: missed calls, new
messages, today’s appointment
(Please refer to picture in Topic 3.2
Standby mode)
You can change the shortcuts assigned
for selection keys in the standby mode as
follow procedure:
Select Menu > Settings > Phone settings>
Shortcut >Shortcut application
15
Page 16

1. Select one of shortcut entry from
Shortcut 1-5.
2. Shortcut list included dial, messages,
contacts, log, Media data, Profile, MP3,
MP4, FM, Camera, Calculator, Alarm,
Calendar, WAP, MMS, and ATV.
3. You can choose your frequently use
function in the shortcut list.
3.3 MAKE A CALL
You can start a call in several ways:
Using the keypad
Enter the phone number, including the
area code, and press the
Then press the
call or to cancel the call attempt.
For the international calls, press * twice
for the international prefix (the + character
End key to end the
16
Dial key.
Page 17

replaces the international success code),
enter the country code, the area code
without the lead 0, if necessary, and the
phone number.
Using the contact list
At the standby mode, press right function
key to “Name” access contacts and scroll
to the entry you wish to view. Then press
Dial key to make the call, or
the
press Details to view details of the entry.
Using the last dialed number
At the standby mode, press the Dial
key once to display the last dialed number.
Then select the number (or name) you
wish to redial and press the
Dial
key.
Call function:
During a call, press left function key the
options as below:
1. Hand free: use your phone as a
loudspeaker during a call
2. Mute: to put all active calls on mute
3. New call: during a call, dial another call
to have a conference call with two
participants.
17
Page 18

4. End all calls: end all calls
5. Send DTMF: to send tone strings
6. Start record: start to record the phone
call.
3.4 Answer / End a call
To answer an incoming call, press the
Call key. To decline the call without
answering, press the
End key.
4 Write text
In any user edit window, including edit
phone book, messages and memo, press
the # key to switch the input method
editor.
4.1 Input method
To change the character case, press # to
switch uppercase or lowercase. Press a
key once to insert the first letter on the key,
twice for the second letter, etc. If you
pause briefly, the last letter in the display
is accepted and cursor appears and
awaits the next entry. The character
cases are indicated as below:
ABC indicate the uppercase
abc indicate the lowercase
18
Page 19

123 indicates number mode
To write text with the keypad, press a
number key, 2 to 9, repeatedly until the
desired character appears. There are
more characters available for a number
key than are printed on the key. If the next
letter you want is located on t he same key
as the present one, wait until the cursor is
displayed, and enter the letter. To insert a
number, press and hold the number key.
To switch between the different character
cases and modes,
4.2 Input special character
To access the most common punctuation
marks and special characters, repeatedly
press the number key 1 or press * to
select a special characters in the
character list. To confirm a word by
adding a space, press 0.
5 Messages
You can read, write, send and save text
and multimedia messages. The
messaging services can only be used if
they are supported by your network or
19
Page 20

service provider.
5.1 SMS
¾ New message
Select Menu > Messages > SMS
New message
¾
Message options as below:
Send: send this message
Save: save this message
Insert template : insert quick text to
message
Insert contact: insert contact
Sending options : select emergency or
delivery report
¾
Inbox
Select Menu > Messages > SMS > Inbox,
20
Page 21

you can store your received messages
here. If inbox is full, you cannot receive
new messages any more. Meanwhile the
idle screen will display an icon showing
the inbox is full. You can receive new
messages again after you delete some
messages.
Select Menu > Messages > Inbox, options
as below
Reply: reply message
Reply MMS: reply multimedia message
Call back: use message number to call
back
Delete: erase massages
Use detail: use number, URL detail
Move: move to archive
Forward: forward massages
Lock: lock and unlock messages
Mark: mark messages
Mark all: mark all messages
Detail info: view detail information
Sentbox / Outbox / Draft
¾
Select Menu > Messages > SMS > Outbox /
Sentbox/Draft
Outbox: store failed sent messages.
Sentbox: store sent messages
Drafts: store the messages without
21
Page 22

sending for reediting
Note: Whether outbox, sentbox, drafts the
options are same as inbox, please see
inbox options function.
¾
Archive
Select Menu > Messages > SMS > Archive
Messages can restore in Archive.
¾
Templates
Select Menu>Messages>SMS>Templates
There are some common phrases in your
mobile phone, you can insert text quickly.
¾
Delete messages
Select Menu > Messages > SMS > Delete
message to delete the message in inbox,
sentbox, outbox, draft, archive, and all
messages.
¾
Voice mail
Select Menu>Messages>SMS>Voice mail
Once you have voicemail, message will be
received from your network service
provider.
NOTE: The voice mails is a network service
to which you my need to subscribe. For
22
Page 23

more information, please contact your
service provider.
Message settings
¾
Select Menu>Messages > SMS > Message
settings to set up message features,
options as below:
Send options:
• Priority: select normal or Emergency
• Validity: select default, thirty minutes,
1、2、12 hours,1、2、3 days
• Delivery report: select on/off delivery
report
• Save sent message
• Callback number: Setting or Edit
callback number
• Voice mail number: edit number
Signature: setting or edit signature
Other settings:
- Message Replace: when full of
massage received or send. New message
could replace sentbox or inbox.
NOTE:
When have a new message
waiting and the memory for the messages
is full, before you can save the waiting
message, delete old messages to free
memory space.
23
Page 24

Memory status
¾
Select Menu>Messages > SMS > Memory
Status. You can view Phone memory
status
NOTE:
The phone can storage up to 300
messages
5.2 MMS
This function needs the supporting of
network operators. You can consult your
network provides.
Select Menu > Messages > MMS
¾
Create
To: add recipient or select from recipient
list
24
Page 25

CC: add recipient or select from recipient
list
Bcc: add recipient or select from recipient
list
Subject: edit subject, press “OK” after
finished.
MMS content: edit MMS or press left
function key “Options”. You can see more
options such as Done, Preview, Add
picture, Add sound, Add video, Add
business card, Add calendar note, Add
new slide, Previous slide, Next slide, Slide
duration, Send setting, Receive Setting,
Save, Delete, Input select.
To send the message, select “send”
¾
Inbox
View: view the messages
Edit: edit messages
Call: call
Send: send multimedia messages
Delete: delete multimedia messages
Use number: use number to call, save
to contact, add to contact, replace
contact, send MMS or send SMS
Use URL: use URL in MMS
Use email: use email in MMS
Message detail: view messages detail
25
Page 26

information
Sentbox / Draftbox / Outbox
¾
Outbox: store failed sent messages.
Sentbox: store the sent messages
Drafts: store the messages without
sending for reediting
NOTE: Whether outbox, sentbox, drafts
the options are the same as inbox, please
see inbox options function.
¾
Delete all
Delete messages in Inbox, Sent box, Draft
box, Outbox, or All messages.
¾
MMS settings
To set up MMS message features, options
as below:
Receive setting
• Local net receive
• International roam receive
• Allow to send report
• Reject anonymous msg
• Reject advertisement msg
Send setting
• Delivery report
26
Page 27

• Priority
• Expire date
Server setting
Memory status
Storage setting
6 Log
At standby mode, press Dial key to view
call history.
6.1 All calls
To view the information on your calls, select
Menu > Log > all calls
It can view all call history including:
Missed calls
Received calls
Dialed calls
27
Page 28

Whether viewing missed, received, or
dialed calls, the menu “Options” are the
same:
Details:view details
Delete:delete call record
Call:call the number
IP Call:use IP number to make a call
Send message:send a message to the
number
Send MMS:send a multimedia message
to the number
Save to contact: enter new name for
the number and save it
Add to contact: add number to contact
list
Replace contact:replace contact for
existing number
6.2 Sent SMS
Store sent messages.
6.3 Delete call log
You can delete:
All calls
Missed calls
Received calls
Dialed calls
Sent calls
28
Page 29

6.4 Call duration
You can view the duration time of calls:
Last call duration
Dialed call duration
Received call duration
All call’s duration.
6.5 Message log
Sent text messages : all sent text
messages
Received text messages:all received
text messages
7 Contacts
You can save names and phone numbers
(Contacts) in the phone memory and
search and recall them to make a phone
call or to create a message.
29
Page 30

7.1 Contacts
Select Menu > Contacts > Contacts
Add Detail: you can add number, ringer,
picture
Details: add some contact detail
Search:find a name or select from
contact list.
Add new contact:add new contact to
your contacts list.
Delete contact:delete contact
Send message:edit message then sent
text message
Send mms: edit short multimedia
message then sent MMS message
7.2 Settings
Select Menu>Contacts>Settings to view
30
Page 31

memory status in phone.
NOTE: The phone contacts list can hold
up to 500 contacts,
7.3 Groups
Select Menu>Contacts>Groups.
You can set five different groups, Names,
Incoming rings, Pictures, and Group
members, options as below:
View: view contact group
Add new group: add new contact group
Group details: edit group names, tones,
images
Delete group: delete contact group
7.4 Speed dials
Select Menu>Contacts>Speed dials to
assign a phone number to one of the
speed-dialing keys, 2 to 99. At standby
mode, press a speed-dialing key, then
press the
Dial key.
7.5 Delete all contacts
Select Menu > Contacts > Delete all
contacts to delete contacts from phone
memory.
31
Page 32

8 Settings
8.1 Profiles
The phone has various setting groups
called profiles, which you can customize
with ringing tones for different events and
environment.
Select Menu > Settings > Profiles
There are some profile styles:
General
Silent
Meeting
You can select your favorite profiles, and
from the following options:
¾ Activate: to activate the selected
32
Outdoor
My style1
My style2.
Page 33

profiles
¾ Personalize:
Incoming call alert: select “Ringing”,
“ring once”, “Beep once”, “Off”
Ringing tone: select favorite ring
tone
Ringing volume: scroll up or down
to adjust volume
Vibrating alert: set vibrating alert
tone
Message alert tone: set message
alert tone
Keypad tones: scroll up/ down to
adjust volume
Warning tones: set warning tone
¾ Timed: to set the end time of profile
8.2 Display settings
Select Menu > Settings > Display settings
and from the available options:
Wallpaper: select the favorite wallpaper
Themes: use default theme, or use
other theme
Brightness: scroll up/down to adjust
brightness
Backlight: always on, 7,15,30 seconds
33
Page 34

8.3 Time and date
To change the clock type, time, time zone,
and date settings, select Menu>Settings>
Time and date, options as below:
Clock: set hide clock, Digital clock or
analog clock
Time format: set 24-hour or 12-hour
Date format: set date display
YYYY,MM,DD / MM,DD,YYY / DD,MM/YYY
8.4 Call settings
Select Menu>Settings>Call settings
Any key answer: set on/ off any key
answer
IP number : set IP number
Speed dialing: set on/ off
International prefix: set manual or
prefix code
Roam call alert: set on/ off to roam call
alert
Network service: set call divert or call
waiting
Answer machine enable: set the
answer machine
Answer machine set: you can set 3
kinds of answer machine
Call restrictions: set the phone call
restriction. (Default is 0000)
34
Page 35

8.5 Phone settings
Select Menu>Settings>Phone setting s
Language: setting language
Memory status: view free memory and
Media data status
Shortcut:
• Shortcut mode: set on/ off
• Shortcut application: you can set 5
favorite shortcuts in standby mode
Automatic key guard: set keypad lock
Automatic playlist build : set on/ off
DTMF tones: select burst or continues
tones
Welcome: edit welcome and press
“save”
Power on/off volume: scroll up/down to
adjust volume
Airplane mode: set on/off
Phone info: view phone information
8.6 Security settings
Select Menu>Settings>Security settings to
enter lock code to set security options as
below: (default is 12345)
Lock phone: select unlock/ on power
up/ lock now
Change security code: set new lock
code
Voice Privacy: set the phone encryption
35
Page 36

to keep your phone call private.
(Optional: Contact your service provider
for more information about this
service.)
Reset to default: reset to default setting
8.7 Download settings
Select Menu>Settings>Download settings
to set as automatic setting in phone or
memory card. You also can set manual
download
8.8 Network settings
Select Menu>Settings>Network settings to
set your network.
• Roaming
- Automatic
- Solo local
• Band: Automatic
- Automatic
- Solo PCS (1900)
- Solo Cellular (800)
9 Media data
It provides you the functions such as
browsing media files, checking storage
space and manages media files. Default
36
Page 37

files are Music, Graphics, Recordings, My
video, Themes files.
Select Menu > Media data, include:
Music
• Alerttones
• Ringtones
Graphics
• Wallpapers
Recordings
My video
Themes
Options as below:
Open: Enter the folder.
Details: view data details.
Sort: setting the sorting rule
Add Folder: create a new folder in the
specific folder.
Memory status: view memory status
37
Page 38

10 Entertainment
Select Menu>Entertainment
10.1 MP3
The device includes an audio player for
listening to music tracks or other MP3
sound files. You can play MP3 from
microSD card. It also supports
loudspeaker. You can set 4 Playlists from
“my playlists 1-4”
To open the audio player, select Menu >
Entertainment > MP3
Operate the audio player with the virtual
keys on the display as below:
38
Page 39

■ : Stop
ff : Next song
X : Play
|| : Pause
ee : Previous song
: Press OK key to switch play
style such as repeat one,
NOTES: Listen to music at a moderate
level. Continuous exposure to high volume
may damage your hearing. Do not hold
the device near your ear when the
loudspeaker is in use, because the volume
may be extremely loud.
repeat all, random
10.2 MP4
Select Menu>Entertainment>MP4
Access the menu, you can enter film list
and press “Option” to choose a movie clip
to play. Add, delete, and delete all
While playing, scroll up “VOL+” or down
“VOL-” to adjust volume. Scroll left ee
or right ff to switch the previous or
next film.
10.3 Camera
Select Menu>Entertainment>Camera
Camera setting options as below:
39
Page 40

Take movie: change camera to take
video
Size: set photo size 640*480, 320*240,
screen
Brightness:1~5 brightness rates
Effect: select “Standard”, “Black &
white”, “Archaize”, “Reverse”
White Balance: select “Auto”, Tungsten
Lamp, fluorescent light, sunny, cloudy
Auto timer: set delay 5,10, 15 seconds
Quality: photo quality high/ middle/ low
Shutter music: 4 shutter music
Photo folder: open photo folder
Note: make sure SD card is inserted when
you want to take pictures.
10.4 Album
Select Menu>Entertainment>Album
You can see the photo and edit photo in
the album. There are some functions such
as open, delete, move, copy, rename,
details, sort, add folder, memory status,
set as wallpaper, send by MMS and so on.
10.5 FM radio
Select Menu>Entertainment>FM radio
You can listen to FM radio channel, refer
to the following step:
40
Page 41

To start the search, briefly press left or
right to change the radio frequency in 0.1
MHz step.
To adjust the volume, press up and down.
To save a station to a memory location,
CH 0 to 9, * & #, press “Options” and
select edit channels and it can be saved in
the list your selected.
Note: Please pull out the antenna first
before you use FM radio. You can not use
radio when the battery is low.
10.6 Games
Select Menu>Entertainment>Games
Kongming chess
Memory game
11 Application
41
Page 42

Select Menu>Application or Press “ ”
to access the application menu
directly.
11.1 ATV
Select Menu>Application>ATV
Access menu, you can watch analog TV
or press “ ” on the keypad to access TV
directly. While playing, scroll left or right to
adjust ATV volume. Scroll up or down to
switch previous or next channel. Press
“OK” key to switch full screen.
Press left function key to set analog TV
channel, options as below:
1. Access “Location Setting” to select
your location.
2. Access “Auto scan” to search your
location channel.
3. Back to analog TV menu, you can see
the channel you have found. Press up and
down to choose your favorite channel.
Note: Before you search analog TV
channel, or watch analog TV, put out the
antenna first.
42
Page 43

11.2 Voice memo
Select Menu>Application>Voice memo
Voice memo options as below:
Memo list: view voice memo list
Record list: view voice record list
Answering rec.: you can record 3
answering records
11.3 Calculator
Select Menu>Application>Calculator
The calculator can add, subtract, multiply,
divide the value.
Enter the first number in the calculation.
Press the scroll key (up/down/left/right
key) to enter add (+), subtract (-), multiply
(*), and divide (/) characters, then press
“OK” key to calculate the value. Press *
key for a decimal point if necessary. Press
# key for change positive/negative
number.
11.4 Stopwatch
Select Menu>Application>Stopwatch
Your phone has 10 stopwatches that can
be used to track time. The stopwatch
displays time in hours, minutes, seconds.
Press OK key to start, press right function
key to return.
43
Page 44

11.5 Organizer
Select Menu>Application>Organizer
World clock
You can view the local time of some cities
around the world, and set your city for
world clock.
Calendar
The calendar keeps track of reminders,
calls you need to make, meetings, and
birthdays. It can even sound an alarm for
any of these events. Monthly view provides
an overview of the selected month and
weeks. It also allows you to jump to a
specific date. Any days or dates that
appear in bold font contain calendar notes
such as a meeting or reminder.
Alarm
You can set 4 alarms in the phone at most,
options as blow:
Alarm time: set alarm time
Repeat alarm: repeat alarm days
Alarm tone: select alarm tone
Snooze time-out: select snooze
time-out in 5, 10, 30, 60 minutes or
others
44
Page 45

11.6 Scratchpad
Select Menu>Application>Scratchpad
You can write something or diary in
scratchpad. Press left function key to
open, add, delete, and delete all
scratchpad.
11.7 E-book reader
Select Menu>Application>E-book reader
You can save txt format files (E-book) into
the microSD card, E-BOOK folder. Press
“Open” to select the file to reading text.
12 eSurfing
¾ WAP
WAP user can visit surf homepage,
display existed bookmarks, save the
45
Page 46

website you have visited r ecently, store the
information sent from the service provider
and setting WAP.
Home: browse the home page
Bookmark: page bookmark as mark
page or favorites
History: select visit, details, delete,
delete all
Save this page: enter title and save
current web page
View saved pages: view sa ved pages in
the folder open, rename, delete, delete
all and create a new folder
Reload: reload current network page
Go to URL: add new URL or select one
URL, select options as visit, edit, mark
page, delete, delete all.
Visit control: select back or forward
page
Advanced: advanced function such as
push message, save items, show URL,
clear Cache, clear cookies and about
WAP information.
Settings: to set HTTP proxy, Push
setting, Cache setting, Cookie setting,
SSL3.2 setting, view certificates,
restore setting.
Exit: exit network
46
Page 47

¾ UTK
UTK is operator service. You may get
detailed information from your local operator
company.
13 Safety information
Battery information
Your device is powered by a
rechargeable battery.
The battery can be charged and
discharged hundreds of times, but it will
eventually wear out. When the talk and
standby times are noticeably shorter
than normal, please replace a new
battery.
Use only the approved batteries, and
recharge your battery only with the
approved chargers designated for this
device.
Unplug the charger from the electrical
plug and the device when not in use. Do
not leave a fully charged battery
connected to a charger, since
overcharging may shorten its lifetime. If
left unused, a fully charged battery will
lose its charge over time.
47
Page 48

Operating Environment
Remember to follow special regulations
in any area and always switch off your
device when its use is prohibited or
when it may cause interference or
danger. Use the device only in its
normal operating positions. Do not
keep the device near credit cards and
other magnetism medium, some
accessories can bring magnetism that
may be delete the data.
Pacemaker manufacturers recommend
that a minimum separation of 6in
(20cm) should be maintained between
a wireless phone and a pacemaker to
avoid potential interference' with the
pacemaker. These recommendations
are consistent with the independent
research by and recommendations of
Wireless Technology Research. To
minimize the potential interference,
persons with pacemakers should do as
below:
Always keep the device more than 6 in
(20 cm) from their pacemaker when the
device is switched on.
Not carry the device in a breast pocket.
Hold the device to the ear opposite the
pacemaker
48
Page 49

If you have any reason to suspect that
interference is taking place, switch off
your device immediately.
Hearing aids
Some digital wireless devices may
interfere with some hearing
Small children
Your device and its enhancements may
contain small parts. Keep them out of
the reach of small children.
Other medical devices
Operation of any radio transmitting
equipment, including wireless phones,
may interfere with the functionality of
inadequately protected medical devices.
Switch off your phone in health care
facilities when any regulations are posted
in these areas instructing you to
14 Care and maintenance
Your device is a product of superior design
and craftsmanship and should be treated
with care. The following suggestions will
help you protect your warranty coverage.
Keep the device dry. Precipitation,
49
Page 50

humidity, and all types of liquids or
moisture can contain minerals that will
corrode electronic circuits. If your
device does get wet, remove the
battery, and allow the device to dry
completely before replacing it.
Do not use or store the device in dusty,
dirty areas. Its moving parts and
electronic components can be
damaged.
Do not store the device in hot areas.
High temperatures can shorten the life
of electronic devices, damage batteries,
and warp or melt certain plastics.
Do not store the device in cold areas.
When the device returns to its normal
temperature, moisture can form inside
the device and damage electronic
circuit boards.
Do not attempt to open the device other
than as instructed in this guide.
Do not drop, knock, or shake the
device. Rough handling can break
internal circuit boards and fine
mechanics.
Do not use harsh chemicals, cleaning
solvents, or strong detergents to clean
the device.
Do not paint the device. Paint can clog
50
Page 51

the moving parts and prevent proper
operation.
Use a soft, clean, dry cloth to clean any
lenses, such as camera, proximity
sensor, and light sensor lenses.
Use only the supplied or an approved
replacement antenna. Unauthorized
antennas, modifications, or
attachments could damage the device
and may violate regulations governing
radio devices.
Use chargers indoors.
Always create a backup of data you
want to keep, such as contacts and
calendar notes.
To reset the device from time to time
for optimum performance, power off
the device and remove the battery.
51
Page 52

15 FCC Warning Statement
A. For FCC 15b devices
This equipment has been tested and
found to comply with the limits for a Class
B digital device, pursuant to part 15 of the
FCC rules. These limits are designed to
provide reasonable protection against
harmful interference in a residential
installation. This equipment generates,
uses and can radiate radio frequency
energy and, if not installed and used in
accordance with the instructions, may
cause harmful interference to radio
communications. However, there is no
guarantee that interference will not occur
in a particular installation. If this
equipment does cause harmful
interference to radio or television
reception, which can be determined by
turning the equipment off and on, the user
is encouraged to try to correct the
interference by one or more of the
following measures:
-Reorient or relocate the receiving
antenna.
-Increase the separation between the
equipment and receiver.
-Connect the equipment into an outlet on
a circuit different from that to which the
52
Page 53

receiver is connected.
-Consult the dealer or an experienced
radio/TV technician for help.
B. FCC Part 15.21 information for user
You are cautioned that changes or
modifications not expressly approved by
the party responsible for compliance
could void your authority to operate the
equipment.
FCC RF Radiation Exposure Statement:
1. This Transmitter must not be colocated or operating in conjunction
with any other antenna or transmitter.
This equipment has been tested and
found to comply with the limits for a Class
B digital device, pursuant to part 15 of the
FCC rules. These limits are designed to
provide reasonable protection against
harmful interference in a residential
installation. This equipment generates,
uses and can radiate radio frequency
energy and, if not installed and used in
accordance with the instructions, may
cause harmful interference to radio
communications. However, there is no
guarantee that interference will not occur
in a particular installation. If this
equipment does cause harmful
interference to radio or television
53
Page 54

reception, which can be determined by
turning the equipment off and on, the user
is encouraged to try to correct the
interference by one or more of the
following measures:
-Reorient or relocate the receiving
antenna.
-Increase the separation between the
equipment and receiver.
-Connect the equipment into an outlet on
a circuit different from that to which the
receiver is connected.
-Consult the dealer or an experienced
radio/TV technician for help.
You are cautioned that changes or
modifications not expressly approved by
the party responsible for compliance
could void your authority to operate the
equipment.
This device complies with Part 15 of the
FCC Rules. Operation is subject to the
following two conditions: (1) this device
may not cause harmful interference and (2)
this device must accept any interference
received, including interference that may
cause undesired operation
D. For portable devices without colocation condition
FCC RF Radiation Exposure Statement:
54
Page 55

1. This Transmitter must not be co-
located or operating in conjunction
with any other antenna or transmitter.
2. This equipment complies with FCC RF
radiation exposure limits set forth for
an uncontrolled enviroement. This
device and its antenna must not be
co-located or operation in conjunction
with any other antenna or transmitter.
IMPORTANT NOTE:
Federal Communication Commission
(FCC) Radiation Exposure Statement
This EUT is compliance with SAR for
general population/uncontrolled
exposure limits in ANSI/IEEE
C95.1-1999 and had been tested in
accordance with the measurement
methods and procedures specified in
OET Bulletin 65 Supplement C. This
equipment should be installed and
operated with minimum distance
1.5cm between the radiator & your
body.
55
 Loading...