

Page 1

Avvio
User Manual
Avvio 9781
Page 2
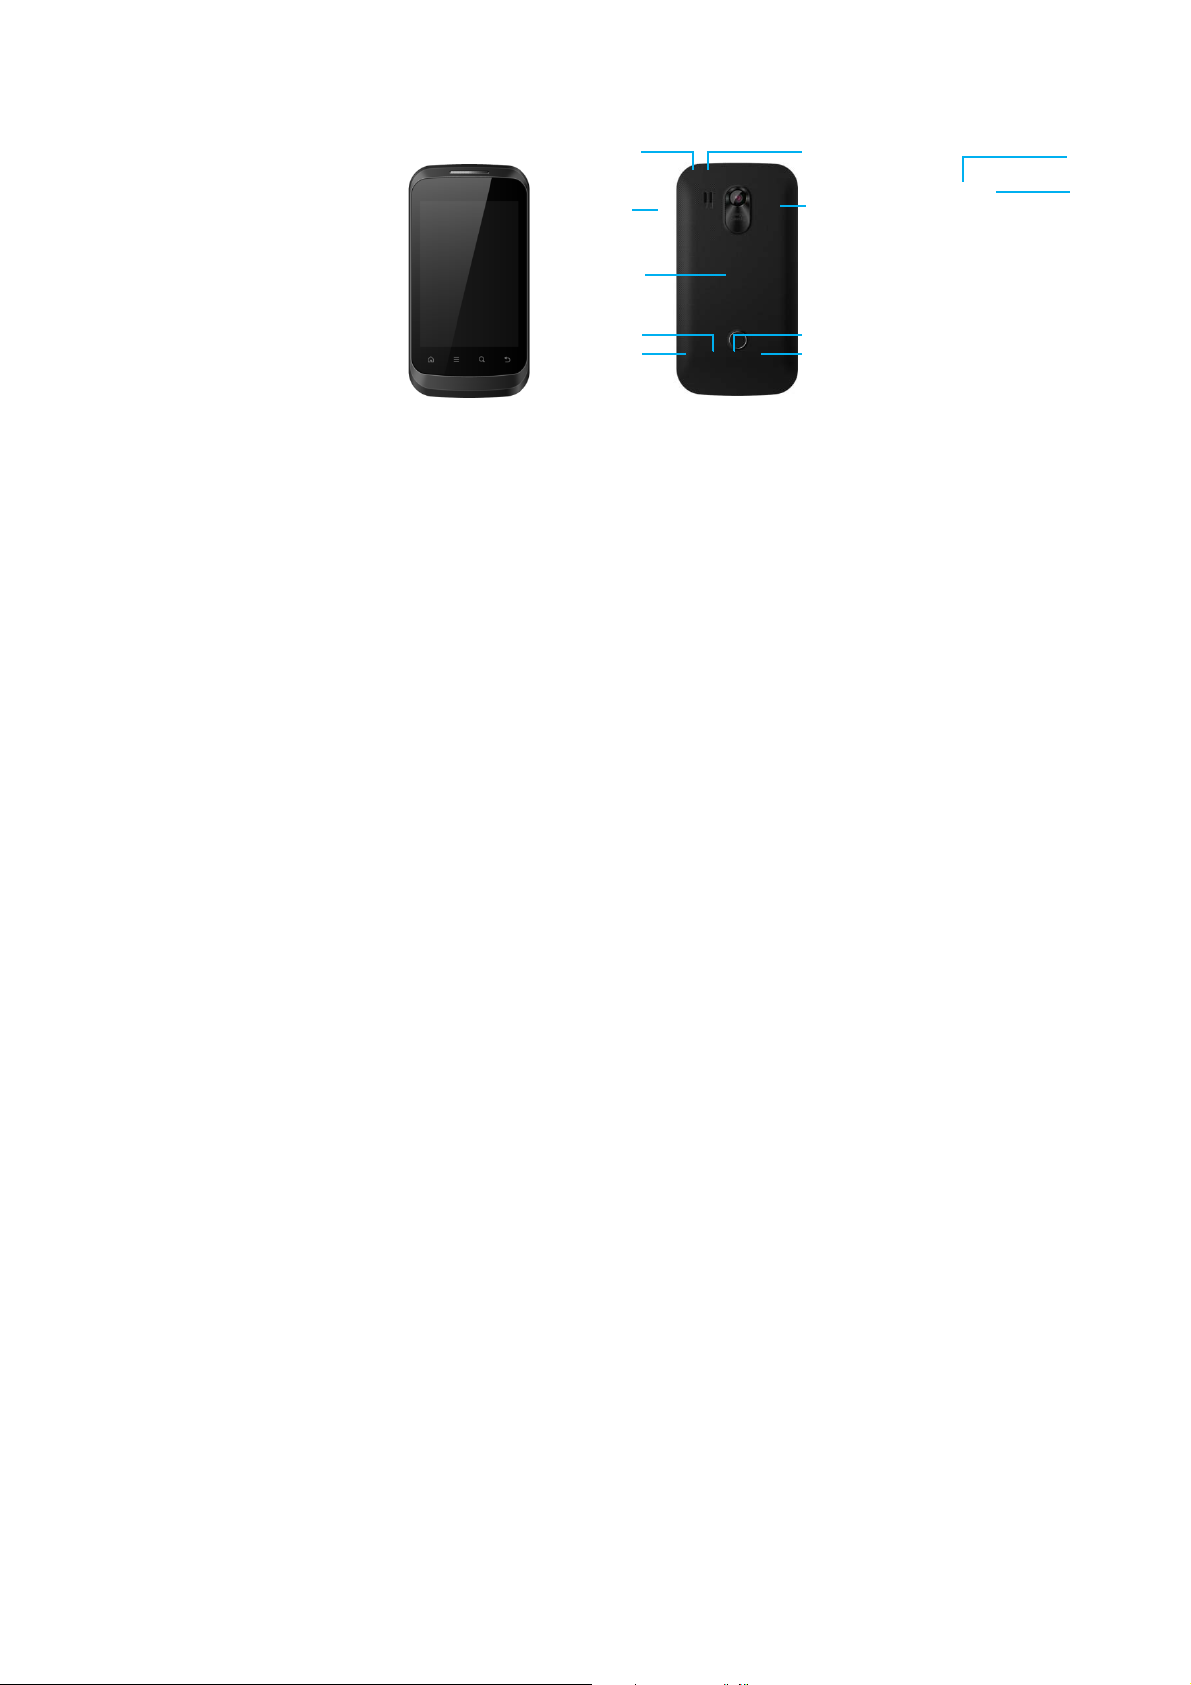
Your phone
Headphone
Charger/Micro USB
port connector
Touch screen
Menu
Home
Power key
Side volume
Searc
Back
Loudspeaker
Camera
Page 3

Home screen
You may activate functions of this device by
operations on the touch screen. There are five
main screens, which could be switched by
sliding to the left or the right. Tap [Home Key] in
any interface to go back to the main screen. Tap
an application icon on the main screen to start
that application. Tap Apps P anel to find all
applications.
Status
Application icons
Apps Panel
Keys
Learn about the main keys:
Key Definition Function
Power key
Menu key
-Press to turn on/off
the screen display.
-Press and hold to
access the Phone
options, choose
Silent, Airplane
mode, Power off or
Mobile Data.
-Open options menu
available on the
current screen.
-Hide the onscreen
options menu while
it's opened.
Your phone 1
Page 4

Your phone 2
Home key
Back key
Search
key
Volume
key
-Return to the home
screen.
-Press and hold to
open the list of
recent applications.
-Back to the
previous screen or
exit.
-Hide the onscreen
keyboard while it’s
opened.
-Open the search
input box.
-Volume up/down.
-Press to turn to
silent mode while
there is a call.
Notification Panel
When you get a new notification, you can open
the Notifications panel to see what event
notification or new information you have
received. The Notifications panel lets you quickly
switch between recently-opened apps.
To open the Notifications panel, press and hold
the status bar, then slide your finger downward.
If you have several notifications, you can scroll
down the screen to see them all.
You can also open the Notifications panel on the
Home screen by tapping >Notifications.
Page 5
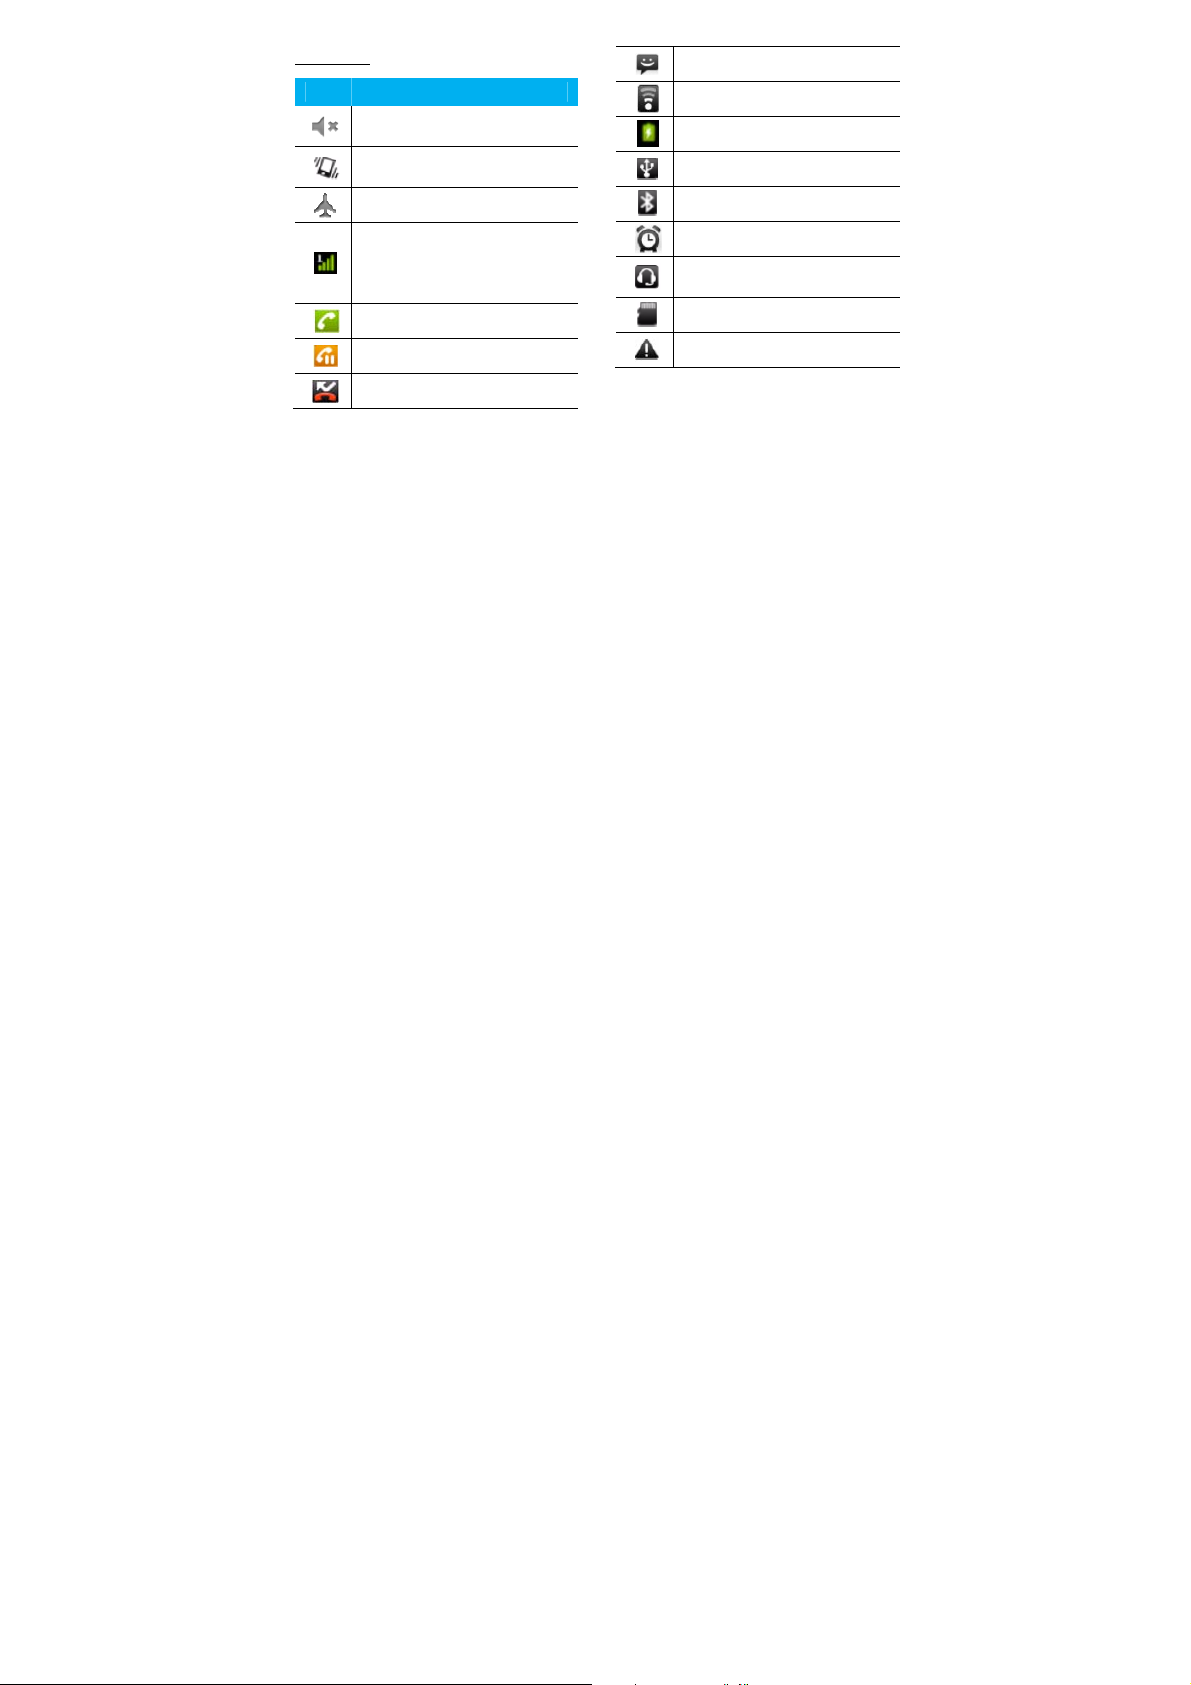
Status Icon
Icons Function
Your phone will not ring when
receiving a call.
Your phone will vibrate when
receiving a call.
Flight mode activated.
Your phone is connected to a
GSM/CDMA network. The more
bars are shown the better the
reception is.
Call in progress.
Call on hold.
You have a missed call.
New SMS or MMS.
WLAN is activated.
The bars indicate the battery level.
Connect to PC.
Bluetooth is activated.
The alarm clock is activated.
The headset is plugged into the
phone.
Indicate the memory card is used.
Error occurred or caution required.
Your phone 3
Page 6

Table of contents
GETTINGSTARTED...........................................5
InstallSIM/UIMCardandBattery..............5
InsertaMemoryCard................................6
ChargingtheBattery..................................7
Tur nYo u rPhoneOnandOff......................8
Password....................................................8
BASICFUNCTION.............................................9
Calls............................................................9
Messaging................................................10
Email.........................................................11
MULTIMEDIA.................................................13
Camera.....................................................
Music........................................................14
FMPlayer.................................................15
Table of contents 4
13
SEARCHANDWEB........................................16
Searchsettings.........................................16
Webbrowser...........................................16
INTERNETCONNECTIO NS.............................. 17
Bluetooth.................................................17
WLAN.......................................................18
SETTINGS......................................................19
Soundsetting...........................................19
Screensettings.........................................19
Securitysetting........................................20
SAFETY&PRECAUTION.................................21
SafetyNotice............................................21
Careandmaintenance.............................22
TroubleShooting......................................23
EnvironmentalInstructions.....................24
Page 7

Getting started
Install SIM/UIM Card and Battery
Always turn off your device before installing or
replacing the SIM card and battery.
Battery performance depends on many factors,
including network configuration, signal strength,
the temperature of the environment in which you
operate your device, the features and/or settings
you select and use, items attached to connecting
ports, and your voice, data, and other program
usage patterns.
To reduce risk of fire or burns:
- Do not attempt to open, disassemble, or service
the battery pack.
- Do not crush, puncture, short external contacts,
or dispose of in fire or water.
- Do not expose to temperatures above 60°C
(140°F).
- Replace only with the battery pack designated
for this product.
- Recycle or dispose of used battery as stipulated
by local regulations.
Remove The Rear Cover:
(1) If the phone is on, press and hold on/off
key for 3 seconds to turn it off.
(2) Hold the device with the front panel
facing down, and remove the rear cover.
Remove the Battery:
(3) Lift up as indicated in the mark and
remove the battery
Gettting started 5
Page 8

(4) Insert the SIM card:
(5) Place the SIM card in the phone with the
gold-colored contacts facing down.
Insert the Battery:
(6) Make sure the battery contacts are
facing correctly, and push the other side
of the battery gently until it is completely
fixed in the battery slot.
Getting started 6
(7) Replace the battery cover.
Make sure the battery contacts are facing
correctly.
Insert a Memory Card
Insert the Micro SD Card
Page 9

Turn off the phone, and remove the rear cover
and battery.
See the image below for additional information:
1. Push the card door 2. Lift the card
door
3. Insert the card 4. Put down and lock
the
card door
Remove the Micro SD Card
Before removing a memory card, first unmount it
for safe removal.
(1) In idle screen, tap > System
settings >
Storage > Unmount SD card.
(2) Press down the card holder and push out
the memory card.
Recommend to use originally equipped Micro SD
card, or Micro SD card of San Disk or Kingston
and other leading brands. Please confirm the
compatibility of Micro SD card with this device.
Please keep the children from MicroSD card to
avoid any unexpected swallow.
Charging the Battery
Charging the battery by the travel charger:
(1) Make sure the battery in the phone.
(2) Connect the shielded USB cable to the
travel charger.
(3) Insert the lead of the shielded USB cable
to USB slot on the phone carefully, and
Gettting started 7
Page 10

connect the charger to a standard wall
outlet.
(4) During normal charging, the battery
status icon will show up. When the
battery is fully charged, the icon will no
longer move.
(5) After battery is fully, unplug the travel
charger from the power outlet and
disconnect the charger from the phone.
New batteries are shipped partially charged.
Before you start using your device, it is
recommended to charge the battery as new
batteries perform best after several full
charge/discharge cycles.
Please charge timely as over discharge will
damage the battery.
It is normal that smart phone generates slight
heat in charging.
Getting started 8
Turn Your Phone On and Off
Please check there is battery with enough power
in your phone, and press on/off key for 3
seconds to turn on/ off your phone.
Password
Pattern
You can protect your phone from unauthorized
use by creating a personal screen unlock
pattern.
PIN Code
PIN code (Personal Identification Number)
avoids your SIM card being used illegally. PIN
code is provided with SIM card. For more
information, please consult the service operator.
Password
Page 11

You can set a personal password to unlock
screen and enter the home page.
continuously, SIM card will be locked. Please
resort to the service operator for help to decode.
If wrong PIN code is input for three times
Basic function
Calls
Make a call from Dialer
1. Tap Phone in the main screen to enter dialer
interface.
2. Input the phone number you want to dial in
the interface, tap to make a call.
“ ” can be used to delete mistake number.
Answer/Reject a call
(1) Answer a call: when a call comes in,
slide the green button right to answer the
call.
(2) Reject a call: when a call comes in, slide
the red button left to reject the call.
When a call is in progress, use the buttons
onscreen to mute or unmute the microphone or to
turn the speakerphone on or off.
When a call is in progress, you can tap Hold and
then tap Add call to add a new call, the first call
will be hold automatically.
Use Speed dial
(3) Tap Phone in the main screen to enter
dialer interface, and tap to open the
speed dial setting screen.
(4) Tap the numbers to add the contact you
want to use as speed dial.
Gettting started 9
Page 12

(5) Then press and hold the corresponding
number to dial out. For example, if you
assign a contact’s number to the number
2 key, you can just press and hold 2 to
dial the number.
The number 1 key is generally reserved for your
voicemail. Press and hold this key to call
voicemail and retrieve your voicemail messages.
Call a phone number in a text message or
email
1. Tap and hold the phone number within the
message or email to have menu options.
2. Select to call with the SIM card you want.
Make an emergency call
Tap Phone in the main screen to enter dialer
interface, and dial the emergency number for
your locale, and then tap .
Basic function 10
Messaging
Send a SMS/MMS message
(1) In the idle mode, tap Messaging>New
message.
(2) Edit or add the receiver from Contacts
.
(3) Edit the text message in the text box.
(4) Tap >Attach to add
Pictures/Videos/Audio/ VCard/Slideshow
if you want to sent an MMS message.
(5) Tap to send message or tap to
save the message as a draft.
There is a limit on the number of characters for a
single text message. If you exceed the limit, your
text message will be delivered as one but will be
billed as more than one message.
Your text message automatically becomes a
multimedia message if you enter an email
Page 13

address as the recipient, add a message subject,
attach an item, or compose a very long message.
Message setting options
You can set storage, SMS signature etc. by
tapping Messaging >>Settings.
Email
You may receive and send emails via Email.
Set up Email
1. In the applications menu, tap Email.
2. Input email address and password, tap Next,
and give this account a name, your name
(displayed on outgoing messages) and
signature, tap Done.
You may also use Manual setup for the email
account:
1. Input email address and password.
2. Tap Manual setup to select the type of
account.
3. Finish details like server.
4. Tap Next to complete the setup.
When you are finished setting up the email
account, the email messages are downloaded to
your device.
Consult your mail service provider for the mail
server conf iguration.
Send emails
You may send emails to one or more recipients.
Before sending, add the recipient email address,
or select from Contacts.
Basic function 11
Page 14

(1) In the applications menu, tap Email.
(2) Tap > Compose for the editing
interface.
(3) Tap recipient and input the recipient’s
email address. If necessary, tap
>Add Cc/Bcc to input other recipient’s
email address for cc or bcc.
(4) Tap Subject and input the subject.
(5) Tap Compose Mail and input the text.
(6) Tap > Add attachment to in sert the
file as needed.
(7) Tap Send to send the email.
Receive emails
(1) In the applications menu, tap Email.
(2) Tap > Refresh.
(3) The device will connect to the server and
download emails. All emails received will
be saved in the Inbox.
Basic function 12
(4) Tap the email to read.
(5) During reading, tap and tap
forward to forward the email to others;
or tap Reply to edit and send the email
to the sender
Page 15

y
Multimedia
Camera
Learn about camera function. Let you take
photos as desired by using your phone.
Galler
Switch button
Shutter button
Take a photo/Record a video
(1) In the application menu, tap camera.
(2) Tap Settings menu to set the camera if
necessary.
(3) Drag Switch button to switch between
Settings
camera and camcorder mode.
(4) Tap to start taking photos in camera
mode.
(5) Tap to start recording videos in
camcorder mode.
(6) After taking photos/recording videos,
select Gallery to view.
Camera settings
Before taking photos/recording videos,
customize your camera settings in Settings
menu.
(1) Tap to set the Exposure/Picture
size/Picture quality/Color effect/ISO/Anti
Banding/Saturation/Sharpness, etc.
(2) Tap to turn on/off Store location
function.
Multimedia 13
Page 16

(3) Tap to set White balance.
(4) Tap and scroll the bar to Zoom.
(5) Tap to select camera (front or back
camera).
Music
You can play your favorite music through music
player.
Please install the memory card with music saved
before playing music.
Play Music
(1) In the application menu, tap Music.
Select the song you want to start
playback.
(2) In now playing screen, tap >Add to
playlist, you can place the song in
current playlist, or create a new playlist.
Multimedia 14
(3) In now playing screen, tap >Use as
ringtone, you can set the current music
as ringtone.
Functio
Definition
Play and resume playback.
Pause playback.
Select previous track.
Select next track.
Select the play mode:
• Repeating current song
• Repeating all song
Activate Shuffle mode, play
current in randomly
Page 17

Select to enter into playlist.
When listening to music, adjust the volume to a
moderate level. Continuous exposure to high
volume may impair your hearing.
FM Player
To listen to the FM Player, you must connect
headset, which serves as the radio antenna.
The first time you open FM Player; it
automatically scans for available FM stations,
save them as presets, and plays the first station
found.
Function Definition
Tap to add a new frequency.
Tap to search the radio
frequency automatically.
Press to turn on/off Radio.
Tap to view all presets list.
Multimedia 15
Page 18

Search and Web
You can search for information on the phone
and on the Web by using Google Search.
Search settings
(1) Tap > >Search settings.
(2) Tap Google search to set whether to
show web suggestions or not.
(3) Tap Searchable items to select items you
want included when doing a search.
(4) Tap Clear shortcuts to clear shortcuts to
recently chosen search suggestions.
Web browser
Open the web browser and start surfing the
Search and Web 16
Web.
Going to a webpage
(1) Tap Browser to enter the wap, then tap
URL field on top of the screen to input
the web address.
(2) Tap >Windows to open multiple
browser windows or switch among them.
(3) Tap >Bookmarks to add the current
web as a bookmark.
(4) Tap >More to add bookmark, view
page information, share pages and
others.
You can swipe your finger on the screen to
navigate and view other areas of the webpage or
pinch to zoom in/out.
Page 19

Internet connections
Bluetooth
The device supports wireless Bluetooth
connection to create wireless connections
between the device and the Bluetooth earphone;
hands free vehicle-mounted phone equipment,
computer or other devices for data exchange.
Turn on/ off Bluetooth
(1) In the applications menu, tap Settings>
Wireless & networks.
(2) Tap Bluetooth to select or clear Bluetooth
check box.
Turn off Bluetooth when not in use to save battery
power, or in places where using a wireless device
is prohibited, such as on board an aircraft and in
hospitals.
Receive data via Bluetooth
(1) Turn on the Bluetooth function, then tap
Settings> Wireless &
networks>Bluetooth settings
>Discoverable to make device found.
(2) Tap Scan for devices.
(3) Select a device, enter a pair password and
select Pair to pair with the other device.
(4) On the receiving device, accept the file.
Some devices, especially headsets or hands-free
car kits, may have a fixed Bluetooth PIN, such as
0000. If the other device has a PIN, you must enter
it.
Send data via Bluetooth
(1) Select a file or item, such as a contact,
calendar event, or media file from an
appropriate application or file.
(2) Tap >Share>Bluetooth.
Internet connections 17
Page 20

(3) Select a paired Bluetooth device on the
list, and then the file will be sent directly.
WLAN
You may connect to Wi-Fi for wireless internet
and download.
Connect to WLAN
(1) In the applications menu, tap Settings>
Wireless & networks.
(2) Tap WLAN to select or clear W LAN check
box.
WLAN search and connection
(1) In the applications menu, tap Settings>
Wireless & networks> WLAN settings.
(2) Tap WLAN to turn on and search. If WLAN
is on, tap >Scan. The device will list
the networks in the range being searched.
(3) Tap the network to be connected, and tap
Internet connections 18
Connect.
If necessary, input the wireless password and
other information, then tap Connect. The wireless
indicator will show in the status line after the
device reaches the network.
Page 21

Settings
Sound setting
Volume
(1) In the applications menu, tap Settings>
Sound >Volume.
(2) Scroll the incoming volume indicator to
adjust, select and tap OK to save.
(3) In the main screen, press the volume on
the side to adjust the current volume.
Press the volume down key to set as
vibration mode and silent mode.
Press the [Power Key] for a while, and tap the
silent mode in this option menu as a short cut to
activate the silent mode.
Ringtone Settings
You can select the ringtone you like to set as
incoming ringtone.
(1) In the applications menu, tap
Settings>Sound >Phone ringtone.
(2) Scroll the ringtone list up and down, tap
the ringtone name to listen; select one and
tap OK to save.
Screen settings
Set wallpaper
(1) In the main screen, tap and hold to
open the options.
(2) Tap Wallpaper and select from Gallery,
Live wallpapers or Wallpapers.
(3) Scroll the wallpaper thumbnails to select
the wallpaper you like and tap Set
wallpaper.
Live wallpaper
You may set the screen with live wallpaper.
Settings 19
Page 22

(1) In the main screen, tap and hold to
open the menu options.
(2) Tap Wallpaper and select from Live
wallpapers.
(3) Select the wallpaper you like and tap Set
wallpaper.
Brightness setting
(1) In the applications menu, tap
Settings>Display>Brightness.
(2) Scroll to adjust the brightness, tap OK to
save.
Screen timeout setting
You can set the screen timeout time to adjust the
time before the screen automatically locks.
(1) In the applications menu, tap
Settings>Display>Screen timeout.
(2) Select and tap the screen timeout time to
finish the settings.
Settings 20
Security setting
Factory data reset
(1) In the applications menu, tap Settings>
Privacy.
(2) Tap Factory data reset.
(3) Tap Reset phone
(4) Tap Erase everything and the phone will
restart and reset to the factory data.
Page 23

Safety & Precaution
Safety Notice
Before using the phone, please read and follow the rules
below carefully.
If you dial or answer a call while driving, please
use the hands-free device (e.g. earphone,
vehicle hands-free system, phone hands-free
system) or use your phone after parking the
vehicle.
Please switch off your phone where you see
signs forbidding phone use. Such signs can be
found in medical centers or establishments
containing medical equipment.
The phone may interfere with the
communication network of airplanes, so please
make sure your phone is switched off during the
flight.
Safety & Precaution 21
To avoid the risk of any explosion, please switch
off the phone at petrol stations and places which
are near fuel, chemical solvent or other
dangerous substances.
Please switch off your phone in areas where
there could be a risk of explosion and in areas
where you are asked to switch off bidirectional
radios. Pay attention and adhere to any rules
and regulations concerning mobile phone use.
All phones can be subject to interference, which
could affect its performance.
In order to ensure high performance and to
avoid damage the phone, please use the
original accessories and battery. Avoid using
products which are not compatible.
Keep this product away from excessive
moisture and extreme temperatures.
Page 24

Please neither burn the phone battery nor use it
as ordinary rubbish, as this could endanger life
and damage to the environment. Please obey
the environmental policy of the local
government and dispose of and recycle them in
time.
If you need to connect your phone to other
devices, please read the user guide carefully to
ensure the procedure is carried out safety.
Keep small parts (e.g. SIM card) out of the
reach of children to prevent batteries from being
swallowed or causing other dangers.
Please back up the important information of
phone and be sure to have a second copy in
case data is lost from your phone.
Safety & Precaution 22
Make sure the phone is switched on and has
service coverage before inputting the
emergency number. Press the call key for your
SOS
position to be located. Please don’t end call
unless told to do so.
Care and maintenance
Your device is a product of superior design and
craftsmanship and should be treated with care. The
suggestions below will help you protect your warranty
coverage.
• Keep the device dry. Precipitation, humidity, and all types
of liquids or moisture can contain minerals that will corrode
electronic circuits. If your device does get wet, remove the
battery and allow the device to dry completely before
replacing it.
• Do not use or store the device in dusty, dirty areas. Its
moving parts and electronic components can be damaged.
• Do not store the device in hot areas. High temperatures
can shorten the life of electronic devices, damage batteries,
and warp or melt certain plastics.
• Do not store the device in cold areas. When the device
returns to its normal temperature, moisture can form inside
the device and damage electronic circuit boards.
Page 25

• Do not use harsh chemicals, cleaning solvents, or strong
detergents to clean the device.
• Do not paint the device. Paint can clog the moving parts
and prevent proper operation.
• Use a soft, clean, dry cloth to clean any lenses (such as
camera, proximity sensor, and light sensor lenses)
• Use only the supplied or an approved replacement
antenna. Unauthorized antennas, modifications, or
attachments could damage the device and may violate
regulations governing radio devices.
• Use charges indoors.
• Always create a backup of data you want to keep (such
as contacts and calendar notes) before sending your
device to a service facility. All of the above suggestions
apply equally to your device, battery, charger, or any
enhancement. If any device is not working properly, take it
to the nearest authorized service facility for service.
Safety & Precaution 23
Trouble Shooting
Your phone displays “Call not allowed” or “No
service.”
• When you are in an area with weak signals or poor
reception, you may lose reception. Move to another area
and try again.
• You cannot access some options without a subscription.
Contact your service provider for more details.
You enter a number, but the call is not dialed.
• Ensure that you have pressed the Dial key.
• Ensure that you have accessed the right cellular network.
• Ensure that you have not set call barring for the phone
number.
Another caller cannot reach you.
• Ensure that your phone is turned on.
• Ensure that you have accessed the right cellular network.
• Ensure that you have not set call barring for the phone
Page 26

number.
Another caller cannot hear you speaking.
• Ensure that you are not covering the built-in microphone.
• Ensure that the microphone is close to your mouth.
• If using a headset, ensure that it is properly connected.
The phone beeps and the battery icon flashes.
Your battery is low. Recharge or replace the battery to
continue using the phone.
The audio quality of the call is poor.
• Ensure that you are not blocking the phone’s internal
antenna.
• When you are in an area with weak signals or poor
reception, you may lose reception. Move to another area
and try again.
You select a contact to call, but the call is not dialed.
• Ensure that the correct number is stored in the contact
list.
• Re-enter and save the number, if necessary.
The battery does not charge properly or sometimes the
phone turns itself off.
Safety & Precaution 24
• The battery terminals may be dirty. Wipe both
gold-colored contacts with a clean, soft cloth and try
charging the battery again.
• If the battery will no longer charge completely, dispose of
the old battery properly and replace it with a new battery.
Environmental Instructions
Parts
Phone
Battery
Accessories
O: Indicates the content of this hazardous substance in the
all materials of the device is lower than the required volume
in the standard of SJ/T 11363-2006.
X: Indicates the content of this hazardous substance in the
Hazardous Substance
Pb Hg Cd Cr6+ PBB PBDE
X O O O O O
X O O O O O
X O O O O O
Page 27

all materials of the device is higher than the required
volume in the standard of SJ/T 11363-2006.
Note: this device is marked with“X” because at present
there is no alternative technology or parts for replacement.
FCC Regulations:
This device complies with part 15 of the FCC Rules.
Operation is subject to the following two conditions: (1)
This device may not cause harmful interference, and (2)
this device must accept any interference received,
including interference that may cause undesired operation.
This device has been tested and found to comply with the
limits for a Class B digital device, pursuant to Part 15 of the
FCC Rules. These limits are designed to provide
reasonable protection against harmful interference in a
residential installation. This equipment generates, uses
and can radiated radio frequency energy and, if not
installed and used in accordance with the instructions, may
cause harmful interference to radio communications.
However, there is no guarantee that interference will not
Safety & Precaution 25
occur in a particular installation If this equipment does
cause harmful interference to radio or television reception,
which can be determined by turning the equipment off and
on, the user is encouraged to try to correct the interference
by one or more of the following measures:
-Reorient or relocate the receiving antenna.
-Increase the separation between the equipment and
receiver.
-Connect the equipment into an outlet on a circuit different
from that to which the receiver is connected.
-Consult the dealer or an experienced radio/TV technician
for help.
Changes or modifications not expressly approved by the
party responsible for compliance could void the user‘s
authority to operate the equipment.
RF Exposure Information
This phone is designed and manufactured not to exceed
the emission limits for exposure to radio frequency (RF)
Page 28

energy set by the Federal Communications Commission of
the United States, Industry Canada of Canada.
During SAR testing, this device was set to transmit at its
highest certified power level in all tested frequency bands,
and placed in positions that simulate RF exposure in usage
against the head with no separation, and near the body
with the separation of 10 mm. Although the SAR is
determined at the highest certified power level, the actual
SAR level of the device while operating can be well below
the maximum value. This is because the phone is
designed to operate at multiple power levels so as to use
only the power required to reach the network. I n general,
the closer you are to a wireless base station antenna, the
lower the power output.
The exposure standard for wireless devices employing a
unit of measurement is known as the Specific Absorption
Rate, or SAR. The SAR limit set by the FCC is 1.6W/kg,
Safety & Precaution 26
and 1.6W/kg by Industry Canada.
This device is complied with SAR for general population
/uncontrolled exposure limits in ANSI/IEEE C95.1-1992
and Canada RSS 102, and had been tested in accordance
with the measurement methods and procedures specified
in OET Bulletin 65 Supplement C, and Canada RSS 102.
This device has been tested, and meets the FCC, IC RF
exposure guidelines when tested with the device directly
contacted to the body.
The FCC has granted an Equipment Authorization for this
model phone with all reported SAR levels evaluated as in
compliance with the FCC RF exposure guidelines. SAR
information on this model phone is on file with the FCC and
can be found under the Display Grant section of
www.fcc.gov/oet/ea/fccid after searching on FCC ID:
WVBA9781.
Page 29

For this device, the highest reported SAR value for usage
against the head is 1.50 W/kg, for usage near the body is
1.48W/kg.
While there may be differences between the SAR levels of
various phones and at various positions, they all meet the
government requirements.
SAR compliance for body-worn operation is based on a
separation distance of 10 mm between the unit and the
human body. Carry this device at least 10 mm away from
your body to ensure RF exposure level compliant or lower
to the reported level. To support body-worn operation,
choose the belt clips or holsters, which do not contain
metallic components, to maintain a separation of 10
mm between this device and your body.
RF exposure compliance with any body-worn accessory,
which contains metal, was not tested and certified, and use
such body-worn accessory should be avoided.
Safety & Precaution 27
 Loading...