

Page 1

User Manual
Avvio 785S
1
Page 2

Content
For your Safety .................................................................. 4
Get started ........................................................................ 8
Insert SIM card ...................................................................... 8
Insert Memory card .............................................................. 9
Install Battery ........................................................................ 9
Charge the Battery or Connect to a computer .................... 10
Notices on using the battery ............................................... 11
PIN code ............................................................................. 12
Icons and indicators ............................................................ 14
Mobile Phone Profile....................................................... 17
Make it yours .................................................................. 18
Switch on/off ...................................................................... 19
Sleep mode ......................................................................... 19
Adjusting the volume .......................................................... 19
Add Widgets and more icons to Home Screen .................... 21
Lock and Unlock the Screen ................................................ 22
Connect your phone to a computer .................................... 23
Copy files to and from the SD card ..................................... 23
Enter Launcher ................................................................ 24
Open and Switch Applications ............................................ 24
Switch to Recently Used Application................................... 25
Use of Menu Function ..................................................... 26
Browser .............................................................................. 26
Calculator............................................................................ 26
Calendar ............................................................................. 27
Camera ............................................................................... 28
2
Page 3

Clock ................................................................................... 31
Downloads .......................................................................... 32
Email ................................................................................... 32
File manager ....................................................................... 32
FM Radio............................................................................. 33
Gallery ................................................................................ 34
Gmail .................................................................................. 35
Latitude .............................................................................. 36
Maps ................................................................................... 36
Local ................................................................................... 36
Messaging ........................................................................... 37
Music .................................................................................. 42
Navigations ......................................................................... 42
People ................................................................................. 42
Phone ................................................................................. 44
Play store ............................................................................ 46
Search ................................................................................. 48
Settings ............................................................................... 49
SIM Toolkit .......................................................................... 57
Sound Recorder .................................................................. 57
Talk ..................................................................................... 58
Video player ........................................................................ 59
Frequently Asked Questions (FAQ) ................................... 60
Keyboard............................................................................. 60
Wi-Fi ................................................................................... 61
Bluetooth ............................................................................ 65
Maintenance & Safety ..................................................... 73
3
Page 4

FFoorr yyoouurr SSaaffeettyy
For your safety and proper use of the mobile phone,
please read the following guidelines carefully:
Do not switch the mobile phone on when close to
chemical factory, gas station or other explosive objects.
While driving, please use headset for safety purposes,
unless otherwise in emergency, always stop the car on
roadside to have a call conversation.
Because the use of the mobile phone can cause
interference in the aircraft, never use the mobile phone
in an aircraft. The use of the mobile phone is dangerous
and illegal; do switch off the mobile phone before
boarding.
Pay special attention to the use of the mobile phone
near heart pacemaker, deaf-aid and some other medical
equipment, because the mobile phone can cause
interference with them.
Non genuine accessories will harm your device and
could result in warranty cancellation
4
Page 5

Do not dismantle the mobile phone without
permission. In case of failure, please contact the supplier
as soon as possible.
Do not plug the charger into the mobile phone and
charge without battery. Always power off the mobile
phone when taking out the battery; otherwise the
memory of the phone may be damaged.
When charging the mobile phone, always keep it in the
place with good ventilation, heat sink and away from
flammable and explosive objects.
In order to avoid demagnetization, always keep the
mobile phone away from magnetic objects such as CD,
credit card etc.
Ensure the mobile phone not to contact any liquid;
once such case occurs, remove the battery and contact
the supplier immediately.
Do not use the mobile phone in the environment with
too high or too low temperature, never expose the
5
Page 6

mobile phone under strong sunshine or too wet
environment. The suitable temperature for the phone
and accessories is 0℃-40℃. The height to use the phone
shall be less than 2,000m.
Do not use liquid or wet cloth with a strong cleanser to
clean the mobile phone.
This mobile phone has shooting, video and audio
recording functions, which shall be used as per the
related laws and regulations.
Always keep the mobile phone out of children’s reach.
Do not throw or vibrate the mobile phone because
violent treatment to the mobile phone may damage the
inner circuits and precise structures.
Please do not discard the waste battery into general
household garbage. Please deal with the waste battery
according to the provisions.
Warning: Company will not bear any responsibility for
any incompliance with the above guidelines or improper
6
Page 7

use of the mobile phone. Our company keeps the right to
make modifications to any of the content here in this
user guide without public announcement in advance. The
content of this manual may vary from the actual content
displayed on a mobile phone. In such case, the latter
shall govern.
7
Page 8
GGeett ssttaarrtteedd
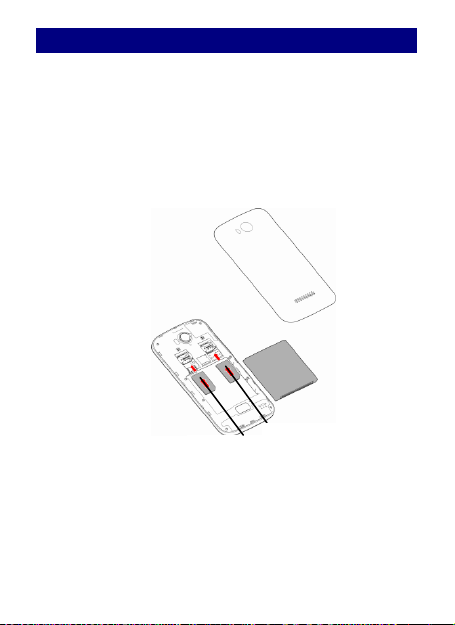
IInnsseerrtt SSIIMM ccaarrdd
TThhee pphhoonnee iiss aa DDuuaall SSIIMM mmoobbiillee pphhoonnee aalllloowwiinngg yyoouu ttoo
uussee tthhee ffaacciilliittyy ooff ttwwoo nneettwwoorrkkss..
TToo iinnsseerrtt SSIIMM ccaarrdd((ss))::
11)) SSwwiittcchh ooffff tthhee mmoobbiillee pphhoonnee aanndd rreemmoovvee tthhee rreeaarr
ccoovveerr aanndd bbaatttteerryy..
22)) IInnsseerrtt tthhee SSIIMM ccaarrdd ccoorrrreeccttllyy iinn tthhee ccaarrdd sslloott((ss)) ((SSeeee
ffiigguurree bbeellooww))
33)) FFiinnaallllyy iinnsseerrtt tthhee bbaatttteerryy aanndd rreeppllaaccee tthhee rreeaarr ccoovveerr ooff
tthhee mmoobbiillee pphhoonnee..
SIM1 Card
SIM 2 Card
8
Page 9
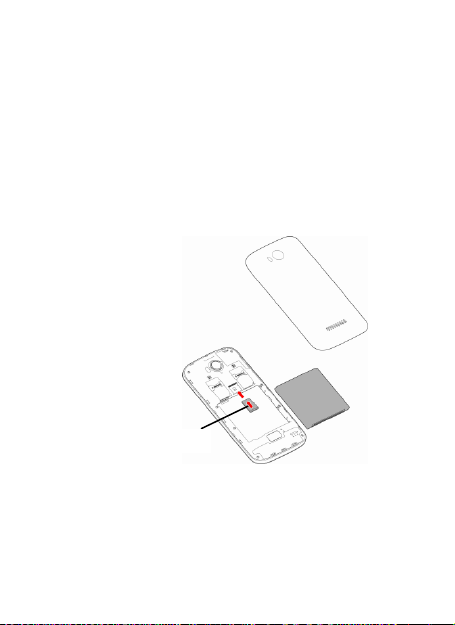
IInnsseerrtt MMeemmoorryy ccaarrdd
11)) PPoowweerr ooffff tthhee mmoobbiillee pphhoonnee aanndd rreemmoovvee tthhee rreeaarr
ccoovveerr aanndd bbaatttteerryy..
22)) IInnsseerrtt tthhee MMiiccrroo SSDD ccaarrdd iinnttoo tthhee sslloott..
33)) FFiinnaallllyy iinnsseerrtt tthhee bbaatttteerryy aanndd tthhee rreeaarr ccoovveerr ooff tthhee
mmoobbiillee pphhoonnee..
NNoottee:: UUssee oonnllyy ccoommppaattiibbllee mmeemmoorryy ccaarrddss ffoorr uussee wwiitthh
tthhiiss ddeevviiccee.. IInnccoommppaattiibbllee mmeemmoorryy ccaarrddss mmaayy ddaammaaggee tthhee
ccaarrdd oorr tthhee ddeevviiccee aanndd ccoorrrruupptt tthhee ddaattaa ssttoorreedd iinn tthhee
ccaarrdd..
IInnssttaallll BBaatttteerryy
TThhee mmoobbiillee pphhoonnee mmuusstt bbee uusseedd wwiitthh oorriiggiinnaall bbaatttteerryy aanndd
aacccceessssoorriieess.. WWhheenn tthhee bbaatttteerryy iiss iiddllee,, iitt iiss rreeccoommmmeennddeedd
ttoo ppuutt iitt iinnttoo tthhee pprrootteeccttiioonn bbooxx..
Micro SD card
9
Page 10
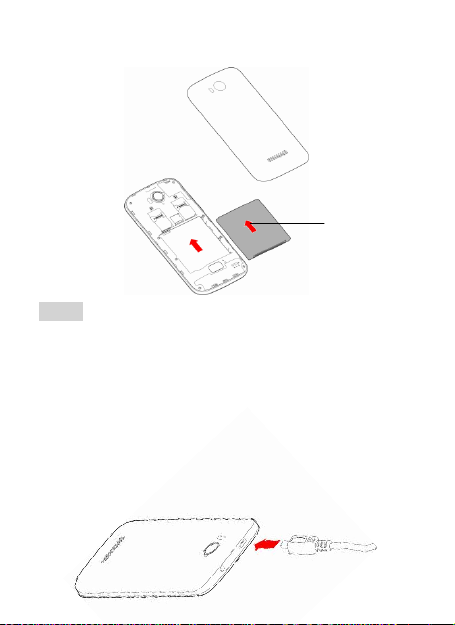
pprreevveenntt tthhee bbaatttteerryy ccoonnttaacctt ppaattcchh bbeeiinngg ddaammaaggeedd.. ((SSeeee
ffiigguurree bbeellooww))
CChhaarrggee tthhee BBaatttteerryy oorr CCoonnnneecctt ttoo aa ccoommppuutteerr
YYoouu ccaann cchhaarrggee yyoouurr bbaatttteerryy uussiinngg tthhee cchhaarrggeerr oorr ccoonnnneecctt
tthhee UUSSBB ccaabbllee ((ssuupppplliieedd wwiitthh tthhiiss pphhoonnee)) ttoo tthhee
ccoommppuutteerr..
NNoottee:: PPlleeaassee uussee tthhee ssppeecciiffiicc bbaatttteerryy,, ootthheerrwwiissee iitt mmaayy
ccaauussee eexxpplloossiioonn..
Battery
Note: DDoo iinnssttaallll tthhee bbaatttteerryy aass ppeerr tthhee ddiiaaggrraamm ssoo aass
10
Page 11

uusseedd ttoo cchhaarrggee tthhee bbaatttteerryy,, pplleeaassee cchheecckk ffiirrsstt iiff tthheeyy aarree
oorriiggiinnaall oorr rreeccooggnniizzeedd bbyy tthhee oorriiggiinnaall mmaannuuffaaccttuurreerr.. TThhee
uussee ooff ootthheerr aacccceessssoorriieess mmaayy ddaammaaggee yyoouurr mmoobbiillee pphhoonnee
aanndd ccaauussee rriisskkss!! AAllwwaayyss uussee tthheemm iinnddoooorr aanndd ddrryy ppllaacceess..
YYoouu ccaann uussee aa sshhiieellddeedd UUSSBB ccaabbllee ccoonnnneeccttiinngg ttoo tthhee
ccoommppuutteerr ffoorr ddaattaa ccoommmmuunniiccaattiioonn..
NNoottiicceess oonn uussiinngg tthhee bbaatttteerryy
Warning: WWhheenn aa ttrraavveell cchhaarrggeerr aanndd iittss aacccceessssoorriieess aarree
The performance of the battery is affected by many
factors, including radio barrier network settings, signal
strength, work temperature, chosen and used functions
or settings as well as phone accessories, data or other
applications.
For optimal performances, please follow the rules below:
New battery or the battery has been idle for a long
time, need charging for longer time also. The standard
voltage scope for the battery is 3.6V-4.2V.
While charging, keep the battery at room
temperature or similar temperature.
As time pass by, the battery will gradually be worn
and thus need longer time to charge. This is normal.
However, after normal charging, if call duration decreases
but charging time increases, you need to buy another
battery from the original manufacturer or authorized by
11
Page 12

the original manufacturer. The battery of inferior quality
PPIINN ccooddee
can damage your mobile phone and cause danger!
If the phone is overused at low battery when
charging, there might need a longer time for the charge
indicator to be shown on the screen.
Note: Please dispose of the battery according to the local
regulations. Try to recycle the battery as possible. Do not
treat the waste battery as common waste.
Warning: Do not throw the battery into the fire so as to
prevent fire. A broken battery may cause explosion.
Most SIM cards are preset with a PIN (personal
identification number) that is provided by your mobile
operator. When prompted, enter the preset PIN, and
then tap Enter. If you enter the wrong PIN three times,
the SIM card is locked. You can unblock it with the PUK
(PIN Unblocking Key) obtained from your mobile operator.
See "Restoring a SIM card that has been locked out" in
the Security chapter for details.
PIN1 Code: It is the personal identification number used
to enter SIM and able to prevent others using SIM card
without permission. If the mobile phone has activated
the PIN1 code protection, when the mobile phone is
switched on, the screen will display “Input PIN”. In the
process of inputting PIN1 code, the screen will use “.” to
represent the input content. While obtaining SIM, you
can obtain its PIN1 code.
PIN2 Code: It is the personal identification number used
12
Page 13

for some special functions such as paid call etc.
PUK Code and PUK2 Code(8-digit)
To change the locked PIN code, you need to use PUK
(Personal Unblocking Key) code. To change the locked
PIN2 code, you need to use PUK2 code. If these two
codes are not provided together with the SIM cards, ask
the local service provider for them.
To learn how to enable or disable the SIM PIN, see
"Protecting Your SIM card with a PIN" in the Security
chapter.
Warning: If the PIN code is inputted wrongly for three
consecutive times, the SIM card will be locked. Please
contact the network operator immediately for help.
Attempting to unlock the code may make the SIM card
ineffective permanently.
13
Page 14
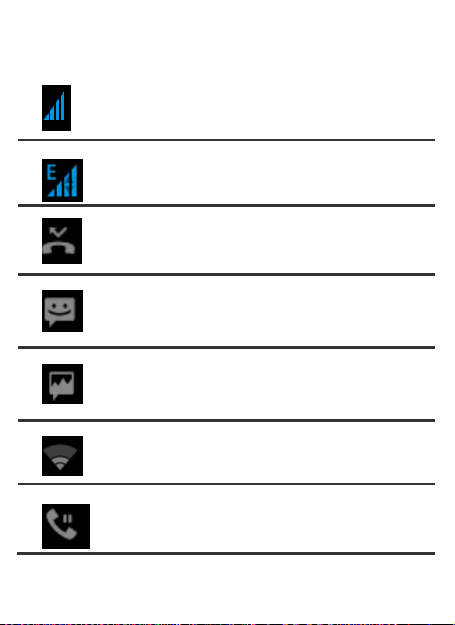
IIccoonnss aanndd iinnddiiccaattoorrss
Signal Strength: Shows the strength of the
receiving signal. Greater the number of bars,
stronger the signal strength.
GPRS: Shows the strength of the receiving
GPRS signal. Greater the number of bars,
stronger the signal strength.
Missed Calls: Appears when there is missed
call(s).
Text Message: Appears when a new incoming
text message is received and is unread.
Unread MMS: Appears when a new
multimedia message is received and is
unread.
WiFi On: Appears when WiFi is on. Greater
the number of bars, better the signal strength
Call on hold: Appears when the call is on
hold.
Some of the following icon will appear on the status bar.
14
Page 15
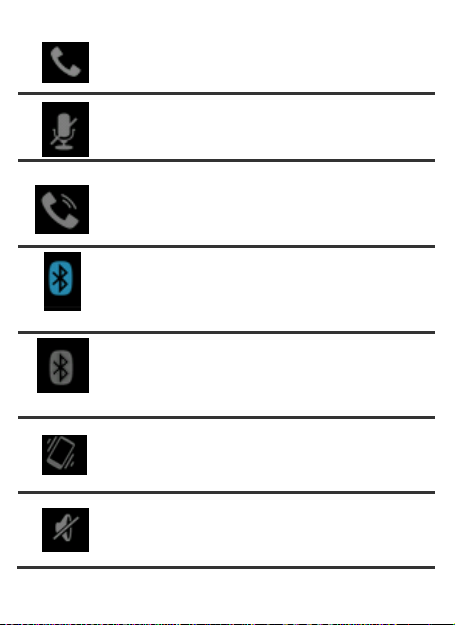
Call: Appears when you are in the call.
Mute: While mute is on, the contact can’t
hear your voice.
Speaker: While this is on, the loudspeaker is
on.
Bluetooth Headset: Appears when the
Bluetooth headset is connected.
Bluetooth Connected: Appears w hen the
Bluetooth device is connected.
Vibrator On: Appears when the Vibration
mode is active.
Silent: Appears when totally decreased the
volume from Vibrate mode.
15
Page 16
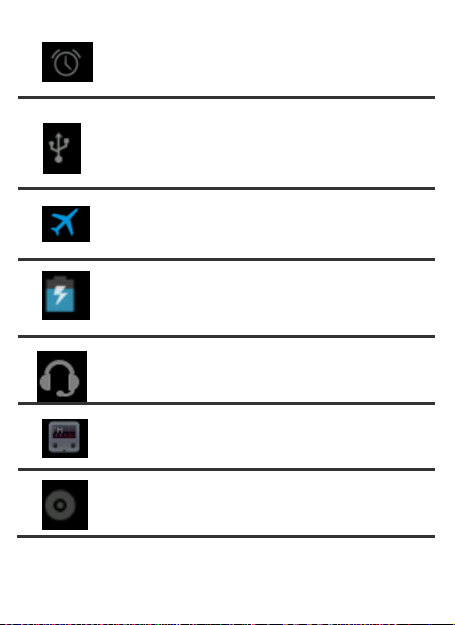
Alarm On: Appears when you set the alarm.
USB: Appears when USB is connected
Flight mode: Appears when Flight mode is
on.
Battery Strength: Shows the level of your
battery. The more bars you see, the more
power you have left.
Headset: appears when you insert an
earphone into the headset.
FM Radio: Appears when you turn on the FM
radio.
Music: Appears when song is playing.
16
Page 17
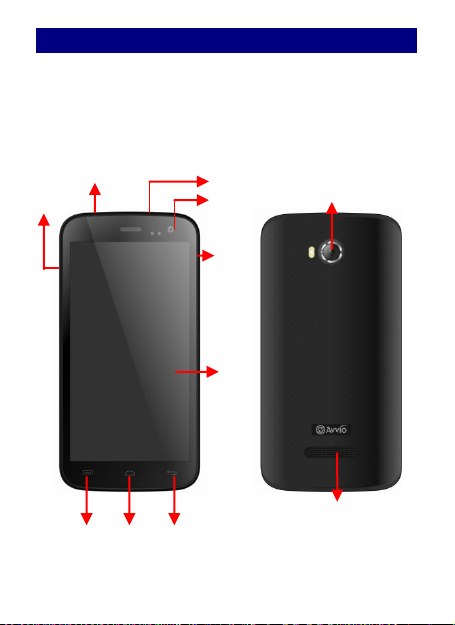
MMoobbiillee PPhhoonnee PPrrooffiillee
TThhee ssmmaarrtt pphhoonnee ssuuppppoorrttss 33GG CCaarrdd aanndd ggiivveess yyoouu
mmaarrvveelloouuss ffeeeelliinnggss ttoo eexxppeerriieennccee oonn CCaammeerraa,, VViiddeeoo
rreeccoorrddeerr,, FFMM rraaddiioo,, MMuussiicc aanndd SSoouunndd rreeccoorrddeerr.. LLeett yyoouu
iinnssttaallll vvaarriioouuss AAPPPPss,, ggaammeess,, aanndd mmoorree ((ssuuppppoorrttss AAPPKK
ffoorrmmaatt)) bbyy ddoowwnnllooaaddiinngg ffrroomm AAnnddrrooiidd MMaarrkkeett..
Headset port
USB Jack
Front camera
Menu
Home
Back
Volume
Camera Lens
Speaker
LCD
Power
17
Page 18
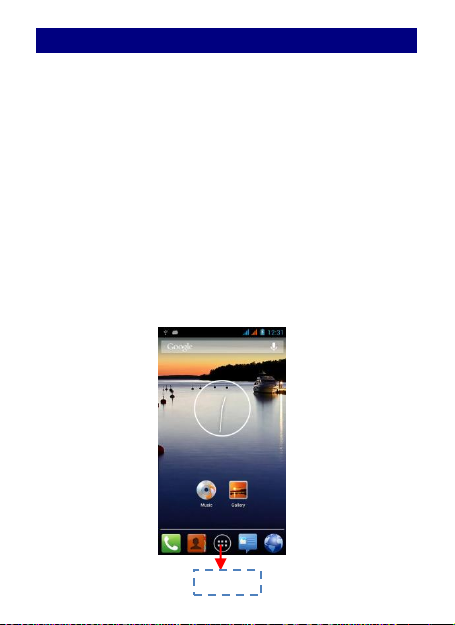
MMaakkee iitt yyoouurrss
aa)) HHoommee ssccrreeeenn:: IItt iiss yyoouurr ssttaarrttiinngg ppooiinntt ttoo aacccceessss aallll tthhee
ffeeaattuurreess oonn yyoouurr pphhoonnee.. IItt ddiissppllaayyss aapppplliiccaattiioonn iiccoonnss,,
wwiiddggeettss,, sshhoorrttccuuttss,, aanndd ootthheerr ffeeaattuurreess.. LLoonngg pprreessss hhoommee
ssccrreeeenn aanndd aadddd SShhoorrttccuuttss,, WWiiddggeettss,, FFoollddeerrss aanndd
WWaallllppaappeerr..
bb)) NNoottiiffiiccaattiioonn BBaarr:: AAtt tthhee ttoopp ooff tthhee ssccrreeeenn,, tthhee SSttaattuuss
bbaarr ddiissppllaayyss tthhee ttiimmee,, ssttaattuuss,, aanndd nnoottiiffiiccaattiioonnss.. IIff tthheerree iiss
aa nneeww mmeessssaaggee,, mmiisssseedd ccaallll oorr ssoommeetthhiinngg iinn tthhee
nnoottiiffiiccaattiioonn bbaarr,, yyoouu ccaann ddrraagg iitt ddoowwnn ttoo ooppeenn nnoottiiffiiccaattiioonn
ppaanneell aanndd cclliicckk tthhee ddeessiirreedd oonnee ttoo hhaavvee aa vviieeww.. WWhheenn yyoouu
ffiinniisshheedd,, yyoouu ccaann cclloossee iitt bbyy ddrraaggggiinngg tthhee ppaanneell uupp oorr
pprreessssiinngg ““BBaacckk””..
cc)) LLaauunncchheerr:: TToouucchh tthhee LLaauunncchheerr iiccoonn aatt tthhee bboottttoomm ooff
tthhee ssccrreeeenn ttoo vviieeww aallll iinnssttaalllleedd aapppplliiccaattiioonnss..
Launcher
18
Page 19

SSwwiittcchh oonn//ooffff
SSlleeeepp mmooddee
AAddjjuussttiinngg tthhee vvoolluummee
Once you installed your SIM card, battery and Micro SD
card, press the POWER button to switch on your phone.
The moment you long press the POWER button, it will
show the phone options, choose to touch the “Power off”
on the screen to turn the unit off.
To make your phone to enter sleep mode, go to settings
→ Display →Sleep.
1. Switching to Sleep mode
◆Manual: Quick pressing the Power button will turn the
display off temporarily and your phone will go to sleep
mode.
◆Automatic: If you leave the phone idle for a certain
period of time, your phone will change to Sleep mode
automatically.
2. Waking up from Sleep mode
Your phone wakes up automatically when you have an
incoming call. To wake up your phone manually, press the
POWER button, and tap the Lock Icon then drag to the
Home Button icon to Unlock (see figure below).
1. Adjusting the ringer volume:
(1) Press VOLUME UP or VOLUME DOWN buttons on the
left side of the phone to adjust the ringer volume.
19
Page 20

(2)When it’s in the lowest level already, pressing the
VOLUME DOWN once will change the phone to Vibration
Mode. While in Vibration Mode, the vibration icon will
appear on the status bar.
(3)When it’s in Vibration Mode already, pressing the
VOLUME UP once will change to Ringer Mode.
(4) To switch the phone to Silent Mode directly and
quickly, press and hold Power button, and then, when the
option menu appears, tap Silent icon.
2. Adjusting the media volume
(1) Press VOLUME UP or VOLUME DOWN buttons on the
left side of the phone to adjust the media volume to the
level you want. At the same time, the music/video
volume window appears on the screen, which displays
20
Page 21

the level of volume synchronously with your adjustment.
AAdddd WWiiddggeettss aanndd mmoorree iiccoonnss ttoo HHoommee SSccrreeeenn
3. You can also adjust the volume through settings
screen.
Press HOME > Applications, and then tap Settings >Audio
profiles> tap General > Volume. When the volume
window appears, drag the slider to the left to lower the
volume or to the right to increase the volume. You can
adjust the volume of ringtone and alarm here. Tap OK to
close the window.
a) Adding widgets and icons to home screen
Enter Launcher and long press and hold an application till
the screen vibrates, and then release your finger hold.
b) Rearranging or removing widgets and icons on your
Home screen
1) Long press and hold the widget or icon you want to
move. Once the phone vibrates, don't release your hold
on the icon. Drag the widget or icon to a new location on
the screen.
2) Press and hold on an icon till the phone vibrates, and
drag the widgets or icon to remove!
21
Page 22

LLoocckk aanndd UUnnlloocckk tthhee SSccrreeeenn
Press power button to enter Sleep mode and meanwhile
the screen will be locked; press power button again to
wake up and then drag the lock to the right side to
unlock.
22
Page 23

CCoonnnneecctt yyoouurr pphhoonnee ttoo aa ccoommppuutteerr
CCooppyy ffiilleess ttoo aanndd ffrroomm tthhee SSDD ccaarrdd
Once you use the USB cable to connect your phone to a
computer, the LED will turn red if the battery is not full. It
will charge the phone automatically. When the charge is
finished, the LED will turn green. The status bar displays
“USB connected”. Drag down the indications on status bar.
You can set the USB connection from the following
aspects:
1. USB debugging connected
◆USB debugging
Select to choose debug mode when USB is connected
◆Stay awake
Choose to make the screen never sleep while charging
◆Allow mock locations
2. USB connected
Turn on/off USB storage here. Select to copy files to/from
your computer.
1. Connect your phone to the computer with the
supplied USB cable.
2. When the USB icon appears on the notification bar,
slide down then tap USB connected.
3. On the computer, the connected phone is recognized
as a removable disk. Navigate to this removable disk and
open it.
4. Then you can copy the files from the computer to the
root folder of the storage card in the phone and vice
versa.
23
Page 24

5. Disconnect the phone from the computer:
EEnntteerr LLaauunncchheerr
OOppeenn aanndd SSwwiittcchh AApppplliiccaattiioonnss
TThhee LLaauunncchheerr hhoollddss iiccoonnss ffoorr aallll ooff tthhee aapppplliiccaattiioonnss oonn
yyoouurr pphhoonnee,, iinncclluuddiinngg aannyy aapppplliiccaattiioonn tthhaatt yyoouu
ddoowwnnllooaaddeedd ffrroomm AAnnddrrooiidd MMaarrkkeett oorr ootthheerr ssoouurrcceess.. OOnn
tthhee HHoommee ssccrreeeenn,, ttoouucchh tthhee LLaauunncchheerr IIccoon
n
mmaaiinn mmeennuu.. PPrreessss HHoommee iiccoonn oorr BBaacckk iiccoonn ttoo cclloossee tthhee
LLaauunncchheerr..
TToouucchh aann aapppplliiccaattiioonn ttoo
ooppeenn iitt..
SSlliiddee tthhee LLaauunncchheerr lleefftt oorr
rriigghhtt ttoo bbrriinngg mmoorree iiccoonnss
iinnttoo vviieeww..
Remove the USB cable as your computer’s safety
requirement.
24
ttoo ooppeenn tthhee
Page 25

SSwwiittcchh ttoo RReecceennttllyy UUsseedd AApppplliiccaattiioonn
PPrreessss aanndd hhoolldd tthhee iiccoonn ffoorr aa ffeeww sseeccoonnddss..
TToouucchh ttoo ooppeenn tthhee
aapppplliiccaattiioonn
25
Page 26

UUssee ooff MMeennuu FFuunnccttiioonn
BBrroowwsseerr
CCaallccuullaattoorr
TToouucchh iitt ttoo sswwiittcchh oonn oorr ooffff DDaattaa
ccoonnnneeccttiioonn
Switch on Data connection or WiFi
To browse the web, you need switch on Data connection.
If there is WiFi around, you can switch on WiFi to use it
browse the web. Some may need a password.
Enter Launcher > Calculator and it will go to calculator
screen. You can use your phone as a calculator here.
Press Menu to Clear history or go to advanced panel. On
advanced panel, press MENU>Basic panel to go back.
Note: The precision of this calculator is limited and can
be used only for simple calculation.
26
Page 27

CCaalleennddaarr
Use your phone's Calendar to create and manage your
events, meetings, and appointments.
Tap menu and choose the desired icon on the above, you
can see some of the following events:
◆New event: to create a new event.
◆Refresh
◆Search: to search and view the events before.
◆Calendars to display
◆Settings: 1) General settings: User can Hide declined
events, Show week number, Week starts on, Use home
zone, Home time zone and Clear search history etc. 2)
About Calendar: User can check the calendar version
information.
27
Page 28

CCaammeerraa
Tap here to enter Video Mode.
You can take photos and shoot videos with your camera,
and the photos will be stored in the T-card by default.
Ensure that you plug Micro SD card into the smart phone.
Camera Screen
28
Page 29

Viewfinder screen
Tap here to enter Camera Mode.
The camera displays in landscape view only.
Take a picture
Tap this icon
Shutter Sound
The camera will play a shutter sound when you press the
shutter release.
Review screen
After capturing a photo or video, the Review screen will
display the photo or the starting image of the video that
you have just captured. You can tap the onscreen buttons
to delete the photo or video, view it in the Gallery
application, or share it.
Switching between Camera and Video Mode
Enter Video mode:
29
Page 30

Shooting videos
TTaapp tthhee ccoonnttrrooll ttoo tthhee vviiddeeoo ppoossiittiioonn
AAddjjuusstt tthhee qquuaalliittyy,, eeffffeecctt,, aanndd ootthheerr sseettttiinnggss iiff yyoouu
wwiisshh..
PPooiinntt tthhee lleennss ttoo tthhee sscceennee yyoouu wwaanntt ttoo ccaappttuurree
TToouucchh tthhee ssttaarrtt vviiddeeoo iiccoonn..
TToouucchh tthhee ssttoopp vviiddeeoo iiccoonn ttoo ssttoopp sshhoooottiinngg..
30
Page 31

CClloocckk
Touch to set alarm.
About the Clock widget
The Clock widget that's by default added on the Home
screen shows your current date, time and location.
Deleting the alarm clock
Press and hold on the alarm for a few seconds, the
available options will display.
Tap Delete alarm and tap OK to confirm, then the alarm
would be deleted.
You can also tap the alarm, and choose Delete on the
screen.
Editing the alarm clock
Press and hold on the alarm for a few seconds, the
available options will be displayed.
Tap Edit alarm and edit it on the setting screen, tap Done
31
Page 32

or Delete after you finished.
DDoowwnnllooaaddss
EEmmaaiill
FFiillee mmaannaaggeerr
You can also tap the alarm, and edit it on the screen, tap
Done or Delete after.
Turning the alarm clock on or off
Press and hold on the alarm for a few seconds, the
available options will be displayed.
Tap Turn alarm on or off and tap OK to confirm.
When you are downloading certain file or data, you can
go to downloads to check the status.
Before sending or receiving emails, you need to create
and activate an email account. Only some “Plus”
accounts include POP access allowing this program to
connect. If you don’t have, please launch the web
browser to gain access to these email accounts.
You can manage the files and corresponding parameters.
When the SD card is inserted into the mobile, you can
mount the SD card in the settings firstly. Then you can
manage the corresponding parameter in the SD card. You
can also play the audio music and video, and read the
text e-book.
32
Page 33

FFMM RRaaddiioo
Connect a headset first to the headphone jack to use FM
Radio. FM Radio uses the stereo headset as the FM radio
antenna, if you don’t connect a headset and open FM
Radio application, the screen will appear “Plug in
earphone.” The earphone is used as antenna of the FM
radio.
Listen to the radio
1. Slide red bar left to tune the radio frequency by -0.1
MHz.
2. Slide red bar right to tune the radio frequency by +0.1
MHz.
3. Tap to view the Channel list.
4. Tap / forward and backward to FM station.
5. Tap to pause/play FM radio.
At the first time you open FM radio, and it automatically
33
Page 34

scans for available FM stations, saves them as presets and
GGaalllleerryy
plays the first FM station found.
About the Gallery application
In using the Gallery application, you can view photos and
watch videos that you've taken with your phone's camera,
downloaded, or copied onto your storage card.
For photos that are in your storage card, you can do basic
editing such as rotate and crop.
You can also easily make a photo as your contact picture
or wallpaper and share photos to your friends.
In Camera or Video screen, touch the right bottom icon
to enter Gallery screen.
Viewing photos and videos
After selecting an album from the Gallery application's
Albums screen, you can browse through the photos and
videos of that album either in filmstrip or grid view. Tap a
photo or video to view it in full screen.
a. Browsing in filmstrip or grid view
By default, photos and videos are presented in a
horizontal filmstrip. Slide your finger left or right across
the filmstrip to go through the photos and videos.
Whether you're in filmstrip or grid view, you can press
and hold on a photo or video and then tap menu, you will
have corresponding options.
34
Page 35

GGmmaaiill
Zooming in or out on a photo
Tap the screen twice quickly to zoom in, and then tap the
screen twice quickly again to zoom out. Or Pinch the
photo to zoom in or out.
Watching video
The screen automatically switches to landscape mode
when you play a video. Use the onscreen controls to play,
pause, fast-forward or backward the video.
Gmail is Google's web-based email service. Gmail is
configured when you first set up your phone. Depending
on your synchronization settings, Gmail on your phone is
automatically synchronized with one or more Gmail Mail
accounts on the web.
35
Page 36

LLaattiittuuddee
MMaappss
LLooccaall
Google latitude is based on Google maps, and it can spot
the current location in time.
Google Maps lets you track your current location, view
real-time traffic situations, and receive detailed
directions to your destination. It also provides a search
tool where you can locate places of interest or an address
on a vector or aerial map, or view locations in street
level.
You need an active mobile data or Wi-Fi connection to
use Google Maps.
Note: Google Maps application does not cover every
country or city.
Google places let you write the key words for searching a
new place. After you find the desired place, you can
grade for this location.
36
Page 37

MMeessssaaggiinngg
EEnntteerr MMeessssaaggiinngg,, aanndd tthheenn ccoommppoossee nneeww mmeessssaaggee.. YYoouu
ttoouucchh aa tteexxtt ffiieelldd wwhheerree yyoouu wwaanntt ttoo eenntteerr tteexxtt,, ttoo ooppeenn
tthhee kkeeyybbooaarrdd..
aa.
.
WWhheenn yyoouu aarree ccoommppoossiinngg aa nneeww tteexxtt mmeessssaaggee,, yyoouu
ccaann sseelleecctt tteexxtt ffoorr ccuuttttiinngg oorr ccooppyyiinngg.. TThhee sseelleecctteedd tteexxtt iiss
hhiigghhlliigghhtteedd iinn bblluuee.. TToouucchh tthhee tteexxtt ffiieelldd oorr ppoorrttiioonn tthhaatt
ccoonnttaaiinnss tteexxtt.. YYoouu ccaann sseelleecctt aallll ccoonntteexxttss,, ccooppyy,, ccuutt aanndd
ppaassttee..
bb.
.
WWhheenn aa nneeww mmeessssaaggee ccoommeess,, yyoouu ccaann rreeaadd bbyy
ddrraaggggiinngg nnoottiiffiiccaattiioonn ppaanneell aanndd cclliicckk tthhee mmeessssaaggee,, oorr
eenntteerriinngg MMeessssaaggee ttoo rreeaadd iitt ddiirreeccttllyy..
TTaapp tthhiiss ttoo sseelleecctt
ddeessiirreedd ccoonnttaacctt ffrroomm
pphhoonneebbooookk..
TToouucchh oonnccee ttoo ccaappiittaalliizzee
tthhee nneexxtt lleetttteerr yyoouu ttyyppee..
TToouucchh aanndd hhoolldd ffoorr ccaappss..
PPrreessss ssppaaccee oorr aa
ppuunnccttuuaattiioonn mmaarrkk ttoo
eenntteerr tthhee hhiigghhlliigghhtteedd
ssuuggggeessttiioonn..
37
Page 38

11.. LLoonngg pprreessss oonnee ooff tthhee aallll mmeessssaaggee tthhrreeaadd,, yyoouu ccaann
ddeelleettee tthhee mmeessssaaggee tthhrreeaadd..
22.. TToouucchh aanndd hhoolldd aa mmeessssaaggee iinn aa mmeessssaaggee
ccoonnvveerrssaattiioonn wwiinnddooww..
33.. TToouucchh FFoorrwwaarrdd iinn tthhee mmeennuu tthhaatt ooppeennss..
44.. AAdddd aa ccoonnttaacctt..
55.. TToouucchh SSeenndd iiccoonn ttoo sseenndd tthhee mmeessssaaggee..
TToo ooppeenn yyoouurr mmeessssaaggee iinnbbooxx,, pprreessss HHOOMMEE>>
AApppplliiccaattiioonnss >>MMeessssaaggiinngg
IIff tthhee lliisstt ooff mmeessssaaggeess ddooeess nnoott ffiitt oonn tthhee ssccrreeeenn,, yyoouu ccaann
ssccrroollll ddoowwnn ttoo vviieeww mmoorree mmeessssaaggeess bbyy sswwiippiinngg yyoouurr
ffiinnggeerr oonn tthhee ssccrreeeenn..
11.. BBoolldd tteexxtt iinnddiiccaatteess uunnrreeaadd mmeessssaaggeess iinn tthhee tthhrreeaadd..
22.. TTaapp ttoo ooppeenn tthhee mmeessssaaggee oorr mmeessssaaggee tthhrreeaadd aanndd rreeaadd
Touch to lock the message.
Tap to forward the message.
Reading messages
38
Page 39

tthhee tteexxtt oorr vviieeww tthhee ppiiccttuurree mmeessssaaggee..
IIff yyoouu aarree oonn hhoommee ssccrreeeenn,, tthhiiss iiccoonn oonn ssttaattuuss bbaarr
iinnddiiccaatteess tthheerree aarree nneeww mmeessssaaggeess..
33.. TThhee iiccoonnss oonn tthhee lleefftt ssiiddee ooff tthhee mmeessssaaggee iinnddiiccaattee
wwhhiicchh SSIIMM ccaarrdd iitt ccaammee ffrroomm..
Sending text and multimedia messages
1. You can send short text messages (SMS) and
multimedia messages (MMS) to other mobile phones by
pressing HOME>Applications > Messaging, and then
compose new message.
2. On the All messages screen, tap Compose New
Message and the compose screen opens.
3. When done, tap “Send” to send the text message.
When the message is sending, it will appear “Sending”
beside that message; when it has been sent out, it will
show the time of sending out.
If you exceed the limit on the number of characters for a
single text message, your text message will be delivered
as one but will be billed as more than one message.
These are called concatenated messages. Multimedia
messages can contain text and a picture, a recorded voice,
an audio or video file, or a picture slideshow.
4. Tap the icon, and then select the contacts to which
you want to send the message.
You can also select contact groups as recipients. When
you have selected all the message recipients, tap ADD.
You can add a subject line by pressing MENU and then
39
Page 40

tapping Add subject.
is displayed in the status bar.
To receive delivery reports and know when a picture
message is received, in the All messages screen, press
MENU, and then tap Settings. Select the Delivery reports
check box in the MMS settings section.
Saving and resuming a draft message
While composing a text or multimedia message, press
BACK to automatically save your message as a draft. And
the screen shows “Draft”. To resume composing the
message:
1. Tap the message to resume editing it.
2. When you finish editing the message, tap Send.
Message conversations
Text and multimedia messages that are sent to and
received from a contact (or a number) are grouped into
conversations or message threads in the All messages
screen. Threaded text or multimedia messages let you
see exchanged messages (similar to a chat program) with
a contact on the screen.
Options of a particular message thread
On a certain message thread screen, tap Menu will
appear the options as below:
1. Video call: To make a video call with your contact.
2. Add subject: To add subject to that message and it will
automatically converted to multimedia message.
3. Delete message: To delete the message.
40
Page 41

4. Insert quick text.
5. Insert smiley: Insert chosen smiley.
6. Insert contact: Insert more contacts to send the
message.
7. Settings: You can delete messages, set text message
limit, Request delivery report, manage SIM card
messages etc.
Options of a particular message
Press and hold on a phone number of a certain message,
and you’ll get the following options:
1. Copy message text: Copy the text of that message for
further use.
2. Save message to SIM card
3. Forward: Forward the message to others
4. Lock: You can lock a message so that it will not be
deleted even if you delete the other messages in the
conversation.
When a message has been locked, a lock icon will
display aside that message.
Press and hold on a locked message, then choose unlock
it on the options.
5. View details
6. Delete: Delete the selected message.
New message notifications
To change the notification for new text and multimedia
messages, see "Options of messages" chapter.
41
Page 42

A new message icon also appears in the notifications
MMuussiicc
NNaavviiggaattiioonnss
PPeeooppllee
TToouucchh aa ttaabb ttoo
vviieeww yyoouurr
lliibbrraarryy iinn oonnee
ooff ffoouurr wwaayyss..
TToouucchh ttoo ooppeenn tthhee
aallbbuumm,, ssoonnggss oorr
ppllaayylliisstt..
area of the status bar to notify you of a new text or
multimedia message.
To open the message, press and hold the status bar, and
then slide the status bar down to open the Notifications
panel.
When you copy music to your SD card, the Music player
searches the card for music files and builds a catalog of
your music, based on information about each file that is
stored in the file itself.
Google navigation is based on Google maps, and it can
spot the current exact location in time.
In contacts, you can easily manage your communications
with contacts via phone, messaging, and email.
42
Page 43

If you are synchronizing contacts with your Google
account, with your PC, and/or with an Exchange Server,
any contacts stored in those accounts are displayed in
contacts.
Search for contact
Press HOME > Applications>Contacts Menu> Search
Tap the name of the contact you want to search on input
frame. As you type, the matching contact will display
automatically below. If no matching contacts found, the
screen will show “Contact not found”.
Add a contact
Tap and enter Contacts and then add a contact (see
figure below.)
Tap “ ” to add a new contact to Phone or SIM card.
43
Page 44

PPhhoonnee
OOnn tthhee ssttaarrtt ssccrreeeenn cchhoooosseeaanndd eenntteerr aa ccoommpplleettee pphhoonnee
nnuummbbeerr ttoo mmaakkee aa ccaallll..
SSlliiddee tthhee ssccrreeeenn ttoo rriigghhtt
SSlliiddee tthhee ssccrreeeenn ttoo rriigghhtt
Make a call
Make a call
44
Page 45

Call log
IInn ccaallll lloogg ooppttiioonnss,, yyoouu ccaann MMaakkee aa ccaallll,, aadddd nneeww ccoonnttaacctt aanndd sseenndd
mmeessssaaggee eettcc..
TToouucchh tthhee iiccoonn
ttoo DDiiaall oouutt..
SShhoorrtt pprreessss tthhiiss ppllaaccee..
SShhoorrtt pprreessss tthhiiss ppllaaccee ttoo
aadddd tthhee nneeww CCoonnttaacctt..
45
Page 46

Reject a Call by Sending a busy Message
PPllaayy ssttoorree
aa.
.
AAdddd aa GGooooggllee aaccccoouunntt
While there is an incoming call, you are inconvenient to
accept the call, and then you can send a busy message for
rejecting the call.
Drag the circle up to , some busy messages will show
on the screen, short tap any of them to send out.
Google play gives you games, books, business, education
entertainment, medical, music and audio etc, and you
can enter for your entertainment purpose. You must add
a Google account to the device to enter the application.
Download Applications From Android Market
46
Page 47

bb.
.
EEnntteerr AAnnddrrooiidd MMaarrkkeett ((PPllaayy SSttoorree)) aanndd ddoowwnnllooaadd
aappppss..
EEnntteerr SSeettttiinngg >>AAppppss,, tthheenn mmaannaaggee tthhee aapppplliiccaattiioonnss..
AAss yyoouu iinnssttaallll ddoowwnnllooaaddeedd AAppppss,, yyoouu nneeeedd sswwiittcchh oonn ““UUnnkknnoowwnn
ssoouurrcceess”” iinn SSeeccuurriittyy sseettttiinnggss..
Manage Applications/ Move to SD card
47
Page 48

SSeeaarrcchh
You can search for information on your phone and on the
Web by using the Quick Search Box.
1. Setting Web and Quick Search Box options
(1)Tap Quick Search and enter Quick Search Box,
then tap “Menu”, you’ll see “Search Settings” options as
below:
◆Search engine
◆web search suggestions
2. Searching the Web and your phone using the Quick
Search Box
If you are in an application such as Mail, press the
SEARCH button to toggle between doing a search in the
application only and searching your phone and the Web.
(2) Enter the search item in the Quick Search Box. As
you type, matching items on your phone and suggestions
from Google web search are shown as a list.
The suggested items that appear will depend on the
options that you have selected in the search settings.
See "Applications>Browser>More>Settings" for details.
(3) Do one of the following:
48
Page 49

If what you're searching for is in the list of suggestions,
SSeettttiinnggss
tap it in the list. The item opens in the appropriate
application. If what you're searching for is not in the list,
tap to search the Web. The web browser opens,
displaying results of a Google search on the Web.
You can also search the web by pressing
HOME>BROWSER. Then, your phone will enter the search
page.
SIM management
Manage SIM card.
When you installed SIM card, you will see the default SIM
here and set general settings.
SIM Information
Default SIM: Voice call, Video call, Messaging and
Data connection.
General settings: Roaming and Contacts & SIM.
Wi-Fi
Turn on or off WiFi here.
49
Page 50

Bluetooth
Turn on or off Bluetooth, user can use BT to transfer data
and files.
Data usage
Turn on or off Mobile data.
More
Airplane mode
Choose the check box to disable all wireless connections.
VPN settings
Tap Add VPN and then choose one of the following:
◆Add PPTP VPN(Point-to-point Tunneling Protocol)
◆Add L2TP VPN(Layer 2 Tunneling Protocol)
◆Add L2TP/IPSec PSK VPN(Pre-shared key based
L2TP/IPSec VPN)
◆Add L2TP/IPSec CRT VPN(Certificate based L2TP/IPSec
VPN)
And then set VPN name, VPN server, enable L2TP secret,
DNS search domains to finish it. Press Menu, then tap
Save to confirm or tap cancel.
Tethering& portable hotspot
Share your phone’s mobile data connection via USB or as
a portable Wi-Fi hotspot.
Mobile networks
Set options for roaming, networks, APNs here.
◆Data usage: Connect or disconnect to data services
when roaming.
50
Page 51

◆Access Point Names
◆Network operators
Select a network operator.
GPRS transfer pref.
> Data prefer
> Call prefer
Audio profiles
1. General
◆General
Vibrate: vibrate phones for incoming calls
Volume: Adjust the volume of Ringtone, Media, Alarm
and Use incoming call volume for notifications checkbox.
◆Incoming calls
Voice/Video call ringtone: Choose incoming phone
ringtone here. All ringtones are listed below, tap any one
it will play automatically and the icon beside will turn
green. Then tap OK to select it and save.
◆ Notifications
Default Notification: Choose notification ringtone here.
All ringtones are listed below, tap any one it will play
automatically and the icon beside will turn green. Then
tap OK to select it and save.
◆ Feedback
Dial pad touch tones: Select to play tones when using
dial pad
Touch sound: Select to play sound when touching screen.
Screen lock sounds: Select to play sounds when locking
51
Page 52

and unlocking the screen.
Vibrate on touch: Select to vibrate when pressing soft
keys and on certain UI interactions
2. Silent
Silent only
3. Meeting
Vibrate only
4. Outdoor
Loudest ring and vibrate
Display
You can define display settings here.
1. Brightness
Adjust the brightness level here (by dragging the
brightness slider to the left to decrease or to the right to
increase the screen Brightness)
2. Wallpaper
To set wallpaper by choosing sources from Gallery, Live
Wallpaper and Wallpapers.
3. Auto-rotate screen: Decide whether to rotate the
screen automatically.
4. Sleep: After a period of inactivity, the phone screen
turns off to conserve battery power. You can set the idle
time before the screen turns off here. Choose from the
following options: 15seconds, 30 seconds, 1 minute, 2
minutes, 5minutes, 10 minutes and 30 minutes.
5. Font size: You can use the font size.
6. TV out
52
Page 53

Storage
You can check out the space of your phone or SD card
here.
Preferred install location: Change the preferred
installation location for new apps.
Default write disk: You can choose the storage path in SD
card or Phone storage.
Unmount SD card: Unmount the SD card so you can
safely remove it.
Erase SD card: Erase all data on the SD card, such as
music and photos.
Battery
You can see the use of the battery.
Apps
You can manage installed application here.
Accounts & sync
Tap to add Corporate or Google account here.
If choose this checkbox, applications sync data
automatically.
Location access
My Location
◆ Google’s location service
Let apps use data from sources such as Wi-Fi and mobile
networks to determine your approximate location
53
Page 54

◆ GPS Satellites
Let apps use GPS to pinpoint your location.
◆ GPS EPO assistance
Use GPS data to speed up GPS positioning; enter EPO
settings to modify EPO configurations.
◆ A-GPS
Use assistant data to speed up the fixed time of location
with GPS.
◆ Location and Google search
Let Google use your location to improve search results
and other devices.
Security
1. Screen security
◆Set up screen lock
Choose to lock screen with a slide, pattern, PIN, password
or none.
2. Encryption
Require a numeric PIN or password to decrypt your
phone each time you power it on.
3. Set up SIM card lock
Lock SIM card or Change SIM PIN here, operate SIM1 or
SIM2 respectively.
4. Passwords
Make passwords visible
54
Page 55

5. Device administration
◆Device administrators
◆ Unknown sources
Allow installation of non-market applications or not.
6. Credential storage
◆Trusted credentials
Display trusted CA certificates
◆Install from SD card
Install encrypted certificates from SD card
◆Clear storage
Clear credential storage of all contents and reset its
password.
Language & input
Select language and input method.
Backup and reset
◆Backup my data: Backup app data, Wifi passwords, and
other settings to Google servers.
◆DRM reset
Deletes all DRM licenses
◆Factory data reset
Erases all data on phone
You can return your phone to its original state, as it was
when it left the factory. This is also called a hard reset.
You might want to do this if you are giving your phone to
a friend or relative and you want to remove all your data
55
Page 56

first, or if your phone has a persistent problem that is not
solved by powering off the phone and then powering it
on again.
A factory reset is a drastic measure. It permanently
erases all your personal data and customized settings,
and also removes any programs you have installed. Make
sure that you have backed up the information and files
you want to keep.
If your phone hangs or freezes, we recommend that you
do a "soft" reset instead of a hard/factory reset. To
perform a soft reset, remove the battery, wait for a few
seconds, and then re-install it. After re-installing the
battery, turn on the phone.
After you do a factory reset or update your phone, you
will be asked if you want to restore the backed up data
after you turn on your phone. Make sure that the micro
SD card where you backed up the data is installed on the
phone.
Date & time
Adjust/set date and time here, etc.
Schedule power on/off
Schedule power on/off here
Accessibility
See phone options.
Developer options
You can enable various systematic settings.
56
Page 57

i.e. ◆USB debugging
SSIIMM TToooollkkiitt
SSoouunndd RReeccoorrddeerr
Debug mode when USB is connected
◆Stay awake checkbox
Screen will never sleep while charging or not
◆Allow mock locations
About phone
Details of the phone are to be found here.
STK service is the tool kit of SIM card. This phone
supports the service function .The specific items are
depended by SIM card and network.
Sound Recorder is useful for recording quick thoughts.
You can also record your voice and set it as a ringtone.
You need to have a micro SD card installed on your phone
to use Sound Recorder.
57
Page 58

TTaallkk
Recording your voice
1. Hold the device's microphone near your mouth.
2. Tap to start recording a voice clip. “Recording”
appears when it is recording a voice clip.
Tap to stop recording. It will appear “Save” and
“Cancel”, and you can tap “Save”, then “Save succeeded”
which indicates finishing the recording. Tap Play icon can
play the recording you have just recorded.
3. Press Menu, then you can Browse Records and enter
to All recording screen. The records you saved will be
listed on the screen, showing their title, create time, and
size. Tap on any record will enter music playing screen
and you can play back the voice recording. Press and hold
on the record for a few seconds, these options will
appear:
(1) Use for ringtone: Choose this will use this record voice
as the ringtone of your phone.
(2) Rename: You can rename the sound clip here.
(3) Delete: Choose to delete the recording.
(4) Share it to: You can share the recording to: Bluetooth,
Email, Gmail, Messaging or Skype. And select the
checkbox below to “Use by default for this action.”
Google talk gives you good feeling to communicate with
your friends all around the world.
58
Page 59

VViiddeeoo ppllaayyeerr
It allows you to play your video sources.
59
Page 60

FFrreeqquueennttllyy AAsskkeedd QQuueessttiioonnss ((FFAAQQ))
KKeeyybbooaarrdd
Using the onscreen keyboard
When you start a program or select a field that requires
text or numbers, the onscreen keyboard becomes
available.
Using the landscape onscreen keyboard
When entering text, you can choose to use the landscape
orientation of the onscreen keyboard. Turn the phone
sideways to use a larger keyboard that lets you type
easily using two thumbs.
The Orientation check box in HOME >Applications>
Settings >Display >Auto-rotate screen needs to be
selected for the screen orientation to automatically
change.
The landscape orientation keyboard is not supported in
all applications.
Use the following keys while entering text using the
onscreen keyboard:
◆Press at the bottom of the keyboard to switch to
the numeric and symbol keyboard. And then you can
enter numbers, symbols and press ALT to turn the page
down or up.
◆ This is the Shift key. Tap to enter an uppercase letter
for the first letter. The next letter you type will be at
lowercase.
◆Tap twice to turn on caps lock and a green dot will
show on the icon. Then all letters you entered will be at
60
Page 61

uppercase letters.
WWii--FFii
◆ This is the Backspace key. Tap to delete the previous
character.
Wi-Fi provides wireless Internet access over distances of
about 300 feet (100 meters). To use Wi-Fi on your phone,
you need access to a wireless access point or "hotspot".
The availability and range of the Wi-Fi signal depends on
the number, infrastructure, and other objects through
which the signal passes.
Turning Wi-Fi on and connecting to a wireless network
1. Press HOME >Applications> Settings >Wireless &
networks
2. Select Wi-Fi settings, choose the Wi-Fi check box to
turn Wi-Fi on. The phone will scan for available wireless
networks.
3. Tap Wi-Fi settings. The network names and security
settings of detected Wi-Fi networks are displayed in the
Wi-Fi networks section.
4. Tap a Wi-Fi network to connect. If you selected an
open network, you will be automatically connected to the
network. If you selected a network that is secured with
WEP, enter the key and then tap Connect.
When your phone is connected to a wireless network, the
Wi-Fi icon appears in the status bar and tells you the
approximate signal strength (number of bands that light
up).
61
Page 62

The next time your phone connects to a previously
accessed secured wireless network, you will not be
prompted to enter the key or other security information
again, unless you reset your phone to its factory default
settings.
Checking the wireless network status
1. Press HOME >Applications>Settings > Wireless &
networks
2. On the Wireless & networks screen, tap Wi-Fi
settings, and then tap the wireless network that the
phone is currently connected to.
A message box is then displayed showing the Wi-Fi
network name, status, speed, signal strength, and more.
If you want to remove the wireless network settings on
your phone, tap Forget on this window. You need to enter
the settings again if you want to connect to this wireless
network.
Connecting to another Wi-Fi network
1. On the Wireless& Network settings screen. It displays
Wi-Fi settings and Wi-Fi networks.
2. Wi-Fi settings include: Wi-Fi (Turn it on or off here) and
Network Notification (Notify or not when an open
network is available.
3. Wi-Fi networks: It shows all the networks the phone
scanned. If it needs the password to connect, there will
be the icon beside the name of that network.
4. Tap the network you want to connect, then input the
password if necessary, tap Connect.
62
Page 63

5. If the wireless network you want to connect to is not in
the list of detected networks, scroll down the screen,
then tap Add Wi-Fi network. Enter Network SSID, choose
the Security, and then tap Save.
Connecting to a virtual private network (VPN)
From your phone, you can add, set up, and manage
virtual private networks (VPNs) that allow you to connect
and access resources inside a secured local network, such
as your corporate network.
Preparing your phone for VPN connection
Depending on the type of VPN you are using at work, you
may be required to enter your login credentials and/or
install security certificates before you can connect to your
company's local network. You can get this information
from your network administrator.
Also, your phone must first establish a Wi-Fi or data
connection before you can initiate a VPN connection. For
information about setting up and using these connections
on your phone, see "Data connection" and "Wi-Fi" in this
chapter.
Setting up secure credential storage
If your network administrator instructs you to download
and install security certificates, you must first set up the
phone's secure credential storage.
1. Press HOME >Applications>Settings >Location&
Security, and then tap Set password.
2. Enter a new password (at least 8 characters without
any spaces) for the credential storage, scroll down and
63
Page 64

confirm the password, and then tap OK.
3. Select the Use secure credentials check box.
You can then download and install the certificates
needed to access your local network. Your network
administrator can tell you how to do this.
Adding a VPN connection
1. Press HOME >Applications> Settings > Wireless &
networks > VPN settings
2. Tap Add VPN, and then tap the type of VPN you want
to add. There are defaulted types as below: Add PPTP
VPN; Add L2TP VPN; Add L2TP VPN; Add L2TP/IPSec PSK
VPN; Add L2TP/IPSec CRT VPN.
3. Tap the VPN settings and set them up according to
the security details you have obtained from your network
administrator.
4. When finished, press MENU, and then tap Save.
The VPN is then added to the VPNs section of the VPN
settings screen.
Connecting to a VPN
1.Press HOME >Applications>Settings > Wireless &
networks > VPN settings.
2. In the VPNs section, tap the VPN that you want to
connect to.
3. When prompted, enter your log in credentials, and
then tap Connect. When you are connected, the VPN
connected icon appears in the notification area of
the title bar.
4. Open the web browser to access resources such as
64
Page 65

intranet sites on your corporate network. See "Using your
BBlluueettooootthh
phone's web browser" for more information.
Disconnecting from a VPN
1. Press and hold the title bar, and then slide down
your finger to open the Notifications panel.
2. Tap the VPN connection to return to the VPN settings
screen, and then tap the VPN connection to disconnect
from it.
When your phone has disconnected from the VPN, the
VPN disconnected icon displayed in the notification area
of the title bar.
Wi-Fi Settings
See all of Wi-Fi settings on the chapter of “Wireless &
Network”.
Using Bluetooth
Bluetooth is a short-range wireless communications
technology that allows devices to exchange information
over a distance of about eight meters without requiring a
physical connection.
Turn off Bluetooth when not in use to conserve battery
power, or in places where using a wireless device is
prohibited, such as on board an aircraft and in hospitals.
Turning Bluetooth on or off
1. Press HOME > Applications> MENU>Settings > Wireless
& networks
65
Page 66

2. Select or clear the Bluetooth check box.
An even easier way to turn Bluetooth on or off is with the
Bluetooth icon on the Status Bar.
Changing the phone name
The phone name identifies your phone to other devices.
1. Press HOME >Applications>MENU>Settings > Wireless
& networks
2. If the Bluetooth check box is not selected, select it to
turn Bluetooth on.
3. Tap Bluetooth settings > Device name.
Connecting a Bluetooth headset or car kit
You can listen to music over a Bluetooth stereo headset,
or have hands-free conversations using a compatible
Bluetooth headset or car kit. It's the same procedure to
set up stereo audio and hands-free.
For you to listen to music with your headset or car kit, the
headset or car kit must support the A2DP Bluetooth
profile.
1. Press HOME > MENU>Applications> Settings >
Wireless & networks > Bluetooth settings
2. If Bluetooth is not switched on, tap the Bluetooth
check box to switch it on.
3. Make sure that the headset is discoverable, so that
your phone can find the headset. Refer to the
instructions that came with the headset to find out how
to set it in discoverable mode.
66
Page 67

4. Tap Scan for devices. Your phone will start to scan for
Bluetooth devices within range.
5. When you see the name of your headset displayed in
the Bluetooth devices section, tap the name. Your phone
then automatically tries to pair with the headset.
6. If automatic pairing fails, enter the pass code supplied
with your headset. The pairing and connection status is
displayed below the hands-free headset or car kit name in
the Bluetooth devices section. When the Bluetooth
headset or car kit is connected to your phone, the
Bluetooth connected icon is displayed in the status bar.
Depending on the type of headset or car kit you have
connected, you can then start using the headset or car kit
to listen to music and/or make and receive phone calls.
Reconnecting a headset or car kit
When you have paired a headset with your phone, you
should be able to reconnect it automatically by turning
on Bluetooth on your phone, and then turning on the
headset.
However, sometimes you will need to reconnect manually,
for example if you have been using your headset with
another Bluetooth device.
1. Press HOME > MENU>Applications>Settings >
Wireless& networks >Bluetooth
2. If Bluetooth is not switched on, tap the Bluetooth
check box to switch it on.
3. Make sure that the headset is discoverable.
4. Tap the headset's name in the Bluetooth devices
67
Page 68

section.
5. If prompted to enter a password, try 0000 or 1234,
or consult the headset/car kit documentation to find the
password.
If you still cannot reconnect to the headset or car kit,
follow the instructions in "Un-pairing from a Bluetooth
device" in this chapter, and then follow the instructions
under "Connecting a Bluetooth headset or car kit" above.
Disconnecting or unpairing from a Bluetooth device
Disconnecting a Bluetooth device
1. Press HOME > MENU>Applications> Settings > Wireless
& networks > Bluetooth settings
2. Choose a device has been connected.
3. Tap Disconnect.
Unpairing from a Bluetooth device
You can make your phone forget its pairing connection
with another Bluetooth device. To connect to the other
device again, you may need to enter or confirm a
password again.
1. Press HOME > MENU>Applications>Settings >
Wireless & networks > Bluetooth settings
2. In the Bluetooth devices section, press and hold the
device to unpair.
3. Tap Unpair.
Sending and receiving information using Bluetooth
You can use Bluetooth to transfer information between
your phone and another Bluetooth- enabled device such
68
Page 69

as a phone or notebook computer. The first time you
transfer information between your phone and another
device, you need to enter or confirm a security password.
After that, your phone and the other device are paired,
and you will not need to exchange password to transfer
information in the future.
Sending information from your phone to another device
You can send the following types of information,
depending on the device you are sending to:
Images and videos
Calendar events
Contacts
Audio files
1. Set the receiving device to discoverable mode. You
may also need to set it to "Receive Beams" or "Receive
Files". Refer to the device's documentation for
instructions on receiving information over Bluetooth.
2. On the phone, open the application that contains the
information or file you want to send.
For example, if you want to transfer a photo, press HOME,
and then tap >photos
3. Follow the steps for the type of item you want to
send:
photo or video (in Camera). After capturing a photo, on
the preview screen, tap the Share button , and
then choose Bluetooth.
Photos and videos (in Photos). On the Albums tab, tap an
album. Tap the Share button, tap Bluetooth, select the
items you want to share, and then tap Next.
69
Page 70

Calendar event. In the Calendar's Day view, Agenda view,
or Week view, press and hold the event.
Contact. On the People screen's All tab, press and hold
the contact, and then tap Send contact as vCard. Tap the
down arrow icon, and then select Bluetooth from the
displayed list.
4. If you are prompted to turn on Bluetooth, tap Yes.
5. Tap the name of the receiving device.
6. If prompted, accept the connection on the receiving
device, and enter the same password on both your
phone and the other device, or confirm the
auto-generated password.
7. On the receiving device, accept the file.
The location where the information is saved depends on
the type of information and the receiving device.
If you send another file type to a Windows computer, it is
normally saved in the Bluetooth
Exchange folder within your personal document folders.
On Windows XP, the path may be: C:\Documents and
Settings \[your username]\ My Documents\ Bluetooth
Exchange
On Windows Vista, the path may be: C:\Users\[your
username]\Documents
If you send a file to another device, the saved location
may depend on the file type. For example, if you send an
image file to another mobile phone, it may be saved in a
folder named "Images".
Receiving information from another device
Your device is capable of receiving a wide variety of file
70
Page 71

types with Bluetooth, including photos, music tracks, and
documents such as PDFs.
To receive files from another device, you need to have an
SD card installed in your phone.
1. Press HOME > MENU>Applications> Settings >
Wireless & networks > Bluetooth settings
2. If Bluetooth is not switched on, tap the Bluetooth
check box to switch it on.
3. Tap the Discoverable check box.
4. On the sending device, send one or more files to
your phone. Refer to the device's documentation for
instructions on sending information over Bluetooth.
5. If prompted, enter the same password on both your
phone and the other device, or confirm the
auto-generated password. A Bluetooth authorization
request is displayed on your phone.
6. If you want to automatically receive files from the
sending device in future, select the Always trust device
check box.
7. Tap OK.
8. When your phone receives a file transfer request
notification, slide down the notifications panel, and then
tap Accept.
9. When a file is transferred, a notification is displayed.
To open the file immediately, slide down the notifications
panel, and then tap the relevant notification.
When you open a received file, what happens next
depends on the file type:
Media files and documents are usually opened directly in
71
Page 72

a compatible application. For example, if you open a
music track, it starts playing in the Music application.
72
Page 73

MMaaiinntteennaannccee && SSaaffeettyy
PPlleeaassee rreeaadd aanndd oobbsseerrvvee tthhee ffoolllloowwiinngg iinnffoorrmmaattiioonn ffoorr
ssaaffee aanndd pprrooppeerr uussee ooff yyoouurr pphhoonnee aanndd ttoo pprreevveenntt
ddaammaaggee.. AAllssoo,, kkeeeepp tthhee uusseerr gguuiiddee iinn aann aacccceessssiibbllee ppllaaccee
aatt aallll tthhee ttiimmeess aafftteerr rreeaaddiinngg iitt..
11.
.
AAfftteerr ssaalleess sseerrvviiccee
KKiinnddllyy rreeffeerr ttoo tthhee WWaarrrraannttyy CCaarrdd pprroovviiddeedd iinn tthhee ssaalleess
ppaacckkaaggee bbooxx..
22.
.
CChhaarrggeerr aanndd AAddaapptteerr SSaaffeettyy
CChhaarrggeerr aanndd aaddaapptteerr aarree ddeessiiggnneedd ffoorr iinnddoooorr uussee oonnllyy..
33.
.
BBaatttteerryy IInnffoorrmmaattiioonn aanndd CCaarree
o
o
PPlleeaassee uussee tthhee ssppeecciiffiicc bbaatttteerryy,, ootthheerrwwiissee iitt wwiillll
ccaauussee eexxpplloossiioonn..
o
o
PPlleeaassee ddiissppoossee ooff yyoouurr bbaatttteerryy pprrooppeerrllyy..
o
o
DDoo nnoott ddiissaasssseemmbbllee oorr sshhoorrtt--cciirrccuuiitt tthhee bbaatttteerryy..
o
o
KKeeeepp tthhee bbaatttteerryy’’ss mmeettaall ccoonnttaaccttss cclleeaann..
o
o
RReecchhaarrggee tthhee bbaatttteerryy aafftteerr lloonngg ppeerriiooddss ooff nnoonn--uussee
ttoo mmaaxxiimmiizzee bbaatttteerryy lliiffee..
o
o
BBaatttteerryy lliiffee wwiillll vvaarryy dduuee ttoo uussaaggee ppaatttteerrnnss aanndd
eennvviirroonnmmeennttaall ccoonnddiittiioonnss..
o
o
TThhee sseellff--pprrootteeccttiioonn ffuunnccttiioonn ooff tthhee bbaatttteerryy ccuuttss tthhee
ppoowweerr ooff tthhee pphhoonnee wwhheenn iittss ooppeerraattiioonn iiss iinn aann aabbnnoorrmmaall
ssttaattuuss.. IInn tthhiiss ccaassee,, rreemmoovvee tthhee bbaatttteerryy ffrroomm tthhee pphhoonnee,,
rreeiinnsseerrtt iitt,, aanndd ttuurrnn tthhee pphhoonnee oonn..
44.
.
GGeenneerraall NNoottiiccee
73
Page 74

UUssiinngg aa ddaammaaggeedd bbaatttteerryy oorr ppllaacciinngg aa bbaatttteerryy iinn yyoouurr
mmoouutthh mmaayy ccaauussee sseerriioouuss iinnjjuurryy..
o
o
DDoo nnoott ppllaaccee iitteemmss ccoonnttaaiinniinngg mmaaggnneettiicc ccoommppoonneennttss
ssuucchh aass aa ccrreeddiitt ccaarrdd,, pphhoonnee ccaarrdd,, bbaannkk bbooookk,, oorr ssuubbwwaayy
ttiicckkeett nneeaarr yyoouurr pphhoonnee.. TThhee mmaaggnneettiissmm ooff tthhee pphhoonnee mmaayy
ddaammaaggee tthhee ddaattaa ssttoorreedd iinn tthhee mmaaggnneettiicc ssttrriipp..
o
o
TTaallkkiinngg oonn yyoouurr pphhoonnee ffoorr lloonngg ppeerriioodd ooff ttiimmee mmaayy
rreedduuccee ccaallll qquuaalliittyy dduuee ttoo hheeaatt ggeenneerraatteedd dduurriinngg uussee..
o
o
WWhheenn tthhee pphhoonnee iiss nnoott uusseedd ffoorr aa lloonngg ppeerriioodd ttiimmee,,
ssttoorree iitt iinn aa ssaaffee ppllaaccee wwiitthh tthhee ppoowweerr ccoorrdd uunnpplluuggggeedd..
o
o
UUssiinngg tthhee pphhoonnee iinn pprrooxxiimmiittyy ttoo rreecceeiivviinngg eeqquuiippmmeenntt
((ii..ee.. TTVV oorr RRaaddiioo)) mmaayy ccaauussee iinntteerrffeerreennccee ttoo tthhee pphhoonnee..
o
o
DDoo nnoott iimmmmeerrssee yyoouurr pphhoonnee iinn wwaatteerr.. IIff tthhiiss hhaappppeennss,,
rreemmoovvee tthhee bbaatttteerryy aanndd ttaakkee iitt ttoo aann AAuutthhoorriizzeedd SSeerrvviiccee
CCeenntteerr..
o
o
DDoo nnoott ppaaiinntt yyoouurr pphhoonnee..
o
o
TThhee ddaattaa ssaavveedd iinn yyoouurr pphhoonnee mmiigghhtt bbee ddeelleetteedd dduuee
ttoo ccaarreelleessss uussee,, rreeppaaiirr ooff tthhee pphhoonnee,, oorr uuppggrraaddee ooff tthhee
ssooffttwwaarree.. PPlleeaassee bbaacckkuupp yyoouurr iimmppoorrttaanntt pphhoonnee nnuummbbeerrss..
((RRiinngg ttoonneess,, tteexxtt mmeessssaaggeess,, vvooiiccee mmeessssaaggeess,, ppiiccttuurree,, aanndd
vviiddeeooss ccoouulldd aallssoo bbee ddeelleetteedd..)) TThhee mmaannuuffaaccttuurreerr iiss nnoott
lliiaabbllee ffoorr ddaammaaggee dduuee ttoo tthhee lloossss ooff ddaattaa..
o
o
DDoo nnoott ttuurrnn yyoouurr pphhoonnee oonn oorr ooffff wwhheenn tthhee pphhoonnee iiss
cclloossee ttoo yyoouurr eeaarr..
55..
TTrroouubblleesshhoooottiinng
g
1. Unable to switch on: Does the battery have power?
Is the battery placed correctly?
2. SIM failed: The SIM card is dirty. Clean it. Reinstall the
74
Page 75

SIM card. The SIM card is damaged. Replace it.
3. Poor signals: Check the signal strength icon on the
screen. If the icon contains 4 bars, it indicates the signal is
the strongest; if below 1 bars, it indicates the signal is
very poor.
4. Unable to dial out: Maybe you have set Hide My Caller
ID but your network operator does not provide this
service for you. Strong interference exists around you.
Maybe you have activated the call restriction function.
Maybe you have activated Line 2 but your network
operator does not provide this service for you.
5. Unable to charge the battery: The battery may
discharge too much; so it cannot be charged until it is
connected for certain time. Its performance has
worsened.
6. Unable to register to the network: Too weak signals or
strong interference.SIM card installed properly? Bad
contact or SIM card damaged? If the SIM card is broken,
please contact the network operator to replace it.
7. Photos taken are too dark: Check if the too low photo
brightness is set. Check if ambient ray is too dark.
8. Photos taken are too unclear: Check if the object taken
is moving. Check if the mobile phone shivers slightly
while you press shutter.
9. Photos taken is distorted: The object taken may be too
close to camera lens.
10. Unable to access service menus: Maybe the SIM card
does not support service function.
75
Page 76

FFCCCC RReegguullaattiioonnss::
TThhiiss mmoobbiillee pphhoonnee ccoommpplliieess wwiitthh ppaarrtt 1155 ooff tthhee FFCCCC RRuulleess..
OOppeerraattiioonn iiss ssuubbjjeecctt ttoo tthhee ffoolllloowwiinngg ttwwoo ccoonnddiittiioonnss:: ((11)) TThhiiss
ddeevviiccee mmaayy nnoott ccaauussee hhaarrmmffuull iinntteerrffeerreennccee,, aanndd ((22)) tthhiiss
ddeevviiccee mmuusstt aacccceepptt aannyy iinntteerrffeerreennccee rreecceeiivveedd,, iinncclluuddiinngg
iinntteerrffeerreennccee tthhaatt mmaayy ccaauussee uunnddeessiirreedd ooppeerraattiioonn..
TThhiiss mmoobbiillee pphhoonnee hhaass bbeeeenn tteesstteedd aanndd ffoouunndd ttoo ccoommppllyy
wwiitthh tthhee lliimmiittss ffoorr aa CCllaassss BB ddiiggiittaall ddeevviiccee,, ppuurrssuuaanntt ttoo PPaarrtt
1155 ooff tthhee FFCCCC RRuulleess.. TThheessee lliimmiittss aarree ddeessiiggnneedd ttoo pprroovviiddee
rreeaassoonnaabbllee pprrootteeccttiioonn aaggaaiinnsstt hhaarrmmffuull iinntteerrffeerreennccee iinn aa
rreessiiddeennttiiaall iinnssttaallllaattiioonn.. TThhiiss eeqquuiippmmeenntt ggeenneerraatteess,, uusseess aanndd
ccaann rraaddiiaatteedd rraaddiioo ffrreeqquueennccyy eenneerrggyy aanndd,, iiff nnoott iinnssttaalllleedd aanndd
uusseedd iinn aaccccoorrddaannccee wwiitthh tthhee iinnssttrruuccttiioonnss,, mmaayy ccaauussee hhaarrmmffuull
iinntteerrffeerreennccee ttoo rraaddiioo ccoommmmuunniiccaattiioonnss.. HHoowweevveerr,, tthheerree iiss nnoo
gguuaarraanntteeee tthhaatt iinntteerrffeerreennccee wwiillll nnoott ooccccuurr iinn aa ppaarrttiiccuullaarr
iinnssttaallllaattiioonn IIff tthhiiss eeqquuiippmmeenntt ddooeess ccaauussee hhaarrmmffuull
iinntteerrffeerreennccee ttoo rraaddiioo oorr tteelleevviissiioonn rreecceeppttiioonn,, wwhhiicchh ccaann bbee
ddeetteerrmmiinneedd bbyy ttuurrnniinngg tthhee eeqquuiippmmeenntt ooffff aanndd oonn,, tthhee uusseerr iiss
eennccoouurraaggeedd ttoo ttrryy ttoo ccoorrrreecctt tthhee iinntteerrffeerreennccee bbyy oonnee oorr mmoorree
ooff tthhee ffoolllloowwiinngg mmeeaassuurreess::
--RReeoorriieenntt oorr rreellooccaattee tthhee rreecceeiivviinngg aanntteennnnaa..
--IInnccrreeaassee tthhee sseeppaarraattiioonn bbeettwweeeenn tthhee eeqquuiippmmeenntt aanndd
rreecceeiivveerr..
--CCoonnnneecctt tthhee eeqquuiippmmeenntt iinnttoo aann oouuttlleett oonn aa cciirrccuuiitt ddiiffffeerreenntt
ffrroomm tthhaatt ttoo wwhhiicchh tthhee rreecceeiivveerr iiss ccoonnnneecctteedd..
--CCoonnssuulltt tthhee ddeeaalleerr oorr aann eexxppeerriieenncceedd rraaddiioo//TTVV tteecchhnniicciiaann
ffoorr hheellpp..
76
Page 77

FFCCCC NNoottee::
CCaauuttiioonn:: CChhaannggeess oorr mmooddiiffiiccaattiioonnss nnoott eexxpprreessssllyy aapppprroovveedd bbyy
tthhee ppaarrttyy rreessppoonnssiibbllee ffoorr ccoommpplliiaannccee ccoouulldd vvooiidd tthhee uusseerr‘‘ss
aauutthhoorriittyy ttoo ooppeerraattee tthhee eeqquuiippmmeenntt..
RRFF EExxppoossuurree IInnffoorrmmaattiioonn ((SSAARR))
TThhiiss pphhoonnee iiss ddeessiiggnneedd aanndd mmaannuuffaaccttuurreedd nnoott ttoo eexxcceeeedd tthhee
eemmiissssiioonn lliimmiittss ffoorr eexxppoossuurree ttoo rraaddiioo ffrreeqquueennccyy ((RRFF)) eenneerrggyy
sseett bbyy tthhee FFeeddeerraall CCoommmmuunniiccaattiioonnss CCoommmmiissssiioonn ooff tthhee
UUnniitteedd SSttaatteess..
DDuurriinngg SSAARR tteessttiinngg,, tthhiiss ddeevviiccee wwaass sseett ttoo ttrraannssmmiitt aatt iittss
hhiigghheesstt cceerrttiiffiieedd ppoowweerr lleevveell iinn aallll tteesstteedd ffrreeqquueennccyy bbaannddss,,
aanndd ppllaacceedd iinn ppoossiittiioonnss tthhaatt ssiimmuullaattee RRFF eexxppoossuurree iinn uussaaggee
aaggaaiinnsstt tthhee hheeaadd wwiitthh nnoo sseeppaarraattiioonn,, aanndd nneeaarr tthhee bbooddyy wwiitthh
tthhee sseeppaarraattiioonn ooff 1100 mmmm.. AAlltthhoouugghh tthhee SSAARR iiss ddeetteerrmmiinneedd aatt
tthhee hhiigghheesstt cceerrttiiffiieedd ppoowweerr lleevveell,, tthhee aaccttuuaall SSAARR lleevveell ooff tthhee
ddeevviiccee wwhhiillee ooppeerraattiinngg ccaann bbee wweellll bbeellooww tthhee mmaaxxiimmuumm
vvaalluuee.. TThhiiss iiss bbeeccaauussee tthhee pphhoonnee iiss ddeessiiggnneedd ttoo ooppeerraattee aatt
mmuullttiippllee ppoowweerr lleevveellss ssoo aass ttoo uussee oonnllyy tthhee ppoowweerr rreeqquuiirreedd
ttoo rreeaacchh tthhee nneettwwoorrkk.. IInn ggeenneerraall,, tthhee cclloosseerr yyoouu aarree ttoo aa
wwiirreelleessss bbaassee ssttaattiioonn aanntteennnnaa,, tthhee lloowweerr tthhee ppoowweerr oouuttppuutt..
TThhee eexxppoossuurree ssttaannddaarrdd ffoorr wwiirreelleessss ddeevviicceess eemmppllooyyiinngg aa uunniitt
ooff mmeeaassuurreemmeenntt iiss kknnoowwnn aass tthhee SSppeecciiffiicc AAbbssoorrppttiioonn RRaattee,, oorr
SSAARR.. TThhee SSAARR lliimmiitt sseett bbyy tthhee FFCCCC iiss 11..66WW//kkgg..
77
Page 78

TThhiiss ddeevviiccee iiss ccoommpplliieedd wwiitthh SSAARR ffoorr ggeenneerraall ppooppuullaattiioonn
//uunnccoonnttrroolllleedd eexxppoossuurree lliimmiittss iinn AANNSSII//IIEEEEEE CC9955..11--11999922 aanndd
hhaadd bbeeeenn tteesstteedd iinn aaccccoorrddaannccee wwiitthh tthhee mmeeaassuurreemmeenntt
mmeetthhooddss aanndd pprroocceedduurreess ssppeecciiffiieedd iinn IIEEEEEE11552288.. TThhiiss ddeevviiccee
hhaass bbeeeenn tteesstteedd aanndd mmeeeettss tthhee FFCCCC RRFF eexxppoossuurree gguuiiddeelliinneess
wwhheenn tteesstteedd wwiitthh tthhee ddeevviiccee ddiirreeccttllyy ccoonnttaacctteedd ttoo tthhee bbooddyy..
TThhee FFCCCC hhaass ggrraanntteedd aann EEqquuiippmmeenntt AAuutthhoorriizzaattiioonn ffoorr tthhiiss
mmooddeell pphhoonnee wwiitthh aallll rreeppoorrtteedd SSAARR lleevveellss eevvaalluuaatteedd aass iinn
ccoommpplliiaannccee wwiitthh tthhee FFCCCC RRFF eexxppoossuurree gguuiiddeelliinneess.. SSAARR
iinnffoorrmmaattiioonn oonn tthhiiss mmooddeell pphhoonnee iiss oonn ffiillee wwiitthh tthhee FFCCCC aanndd
ccaann bbee ffoouunndd uunnddeerr tthhee DDiissppllaayy GGrraanntt sseeccttiioonn ooff
wwwwww..ffcccc..ggoovv//ooeett//eeaa//ffcccciidd aafftteerr sseeaarrcchhiinngg oonn FFCCCC IIDD::
WWVVBBAA778855XX..
FFoorr tthhiiss ddeevviiccee,, tthhee hhiigghheesstt rreeppoorrtteedd SSAARR vvaalluuee ffoorr uussaaggee
aaggaaiinnsstt tthhee hheeaadd iiss 00..5533 WW//kkgg,, ffoorr uussaaggee nneeaarr tthhee bbooddyy iiss
11..2233 WW//kkgg..
WWhhiillee tthheerree mmaayy bbee ddiiffffeerreenncceess bbeettwweeeenn tthhee SSAARR lleevveellss ooff
vvaarriioouuss pphhoonneess aanndd aatt vvaarriioouuss ppoossiittiioonnss,, tthheeyy aallll mmeeeett tthhee
ggoovveerrnnmmeenntt rreeqquuiirreemmeennttss..
SSAARR ccoommpplliiaannccee ffoorr bbooddyy--wwoorrnn ooppeerraattiioonn iiss bbaasseedd oonn aa
sseeppaarraattiioonn ddiissttaannccee ooff 1100 mmmm bbeettwweeeenn tthhee uunniitt aanndd tthhee
hhuummaann bbooddyy.. CCaarrrryy tthhiiss ddeevviiccee aatt lleeaasstt 1100 mmmm aawwaayy ffrroomm
yyoouurr bbooddyy ttoo eennssuurree RRFF eexxppoossuurree lleevveell ccoommpplliiaanntt oorr lloowweerr ttoo
tthhee rreeppoorrtteedd lleevveell.. TToo ssuuppppoorrtt bbooddyy--wwoorrnn ooppeerraattiioonn,, cchhoooossee
78
Page 79

tthhee bbeelltt cclliippss oorr hhoollsstteerrss,, wwhhiicchh ddoo nnoott ccoonnttaaiinn mmeettaalllliicc
ccoommppoonneennttss,, ttoo mmaaiinnttaaiinn aa sseeppaarraattiioonn ooff 1100 mmmm bbeettwweeeenn
tthhiiss ddeevviiccee aanndd yyoouurr bbooddyy..
RRFF eexxppoossuurree ccoommpplliiaannccee wwiitthh aannyy bbooddyy--wwoorrnn aacccceessssoorryy,,
wwhhiicchh ccoonnttaaiinnss mmeettaall,, wwaass nnoott tteesstteedd aanndd cceerrttiiffiieedd,, aanndd uussee
ssuucchh bbooddyy--wwoorrnn aacccceessssoorryy sshhoouulldd bbee aavvooiiddeedd..
79
 Loading...