

Page 1

Avvio 775S
User’s Manual
PN: 5839005752
Page 2

ALL RIGHTS RESERVED
© 2013. All rights are reserved. No part of this document
may be reproduced without permission.
While all efforts have been made to ensure the accuracy
of all contents in this manual, we assume no liability for
errors or omissions or statements of any kind in this
manual, whether such errors or omissions or statements
resulting from negligence, accidents, or any other cause.
The contents of this manual are subject to change
without notice.
Protect our environment! We strive to produce products
in compliance with global environmental standards.
Please consult your local authorities for proper disposal.
Note: User ’s Manual is Just to guide the user about the
functionality of the phone. This does not seems any
certificate of technology. Some functions may very due to
modifications and up gradations of software or due to
print mistake.
Page 3

FCC Regulations:
This device complies with part 15 of the FCC Rules.
Operation is subject to the following two conditions: (1)
This device may not cause harmful interference, and (2)
this device must accept any interference received,
including interference that may cause undesired
operation.
This device has been tested and found to comply with
the limits for a Class B digital device, pursuant to Part 15
of the FCC Rules. These limits are designed to provide
reasonable protection against harmful interference in a
residential installation. This equipment generates, uses
and can radiated radio frequency energy and, if not
installed and used in accordance with the instructions,
may cause harmful interference to radio communications.
However, there is no guarantee that interference will not
occur in a particular installation If this equipment does
cause harmful interference to radio or television reception,
which can be determined by turning the equipment off
and on, the user is encouraged to try to correct the
interference by one or more of the following measures:
-Reorient or relocate the receiving antenna.
-Increase the separation between the equipment and
receiver.
-Connect the equipment into an outlet on a circuit
different from that to which the receiver is connected.
-Consult the dealer or an experienced radio/TV
technician for help.
Page 4

Changes or modifications not expressly approved by the
party responsible for compliance could void the user‘s
authority to operate the equipment.
(Below statements are for products >20cm to human
body when in use, like router, module...)
RF Exposure Information
This device meets the government’s requirements for
exposure to radio waves.
This device is designed and manufactured not to exceed
the emission limits for exposure to radio frequency (RF)
energy set by the Federal Communications Commission
of the U.S. Government.
This device complies with FCC radiation exposure limits
set forth for an uncontrolled environment. In order to
avoid the possibility of exceeding the FCC radio
frequency exposure limits, human proximity to the
antenna shall not be less than 20cm (8 inches) during
normal operation.
The antenna(s) used for this transmitter must not be
co-located or operating in conjunction with any other
antenna or transmitter.
Page 5

TABLE OF CONTENTS
ALL RIGHTS RESERVED .......................................... 1
TABLE OF CONTENTS.............................................. 4
SAFETY PRECAUTIONS ........................................... 7
GENERAL INFORMATION ........................................ 1
Antenna ....................................................................... 1
Network Service .......................................................... 1
Accessories ................................................................. 1
UNDERSTANDING YOUR DRVICE ................................ 2
PHONE OVERVIEW ................................................... 3
Position of Keys .......................................................... 3
GETTING STARTED .................................................. 4
Installing Card & Battery ............................................. 4
Installing SIM Card and Battery .................................. 4
Installing Memory Card ............................................... 5
Charging the Battery ................................................... 6
Powering on/off device ................................................ 6
Turning On the Device ................................................ 6
Turning Off the Device ................................................ 7
BASIC OPERATIONS ................................................. 8
To Make Calls ............................................................. 8
Answer/Reject an Incoming Call ................................. 8
Other Options during the call ...................................... 8
To put a call on hold .................................................... 8
To set up conference calls .......................................... 9
Manage other voice call features ................................ 9
Messaging ................................................................... 9
Creating a Message .................................................... 9
Receiving and Managing Messages ........................... 9
To reply to a text message ........................................ 10
Page 6

To forward a text message ........................................ 10
To delete all text messages ....................................... 10
To copy message text ............................................... 10
Multimedia Message ................................................. 11
Contacts .................................................................... 11
To add a Contact ....................................................... 11
To import contacts ..................................................... 12
Browser ..................................................................... 12
To open a web page .................................................. 13
To scroll the page ...................................................... 13
To set the Home page ............................................... 13
Email ......................................................................... 13
Setting up an Email Account ..................................... 13
HOME SCREEN ....................................................... 14
Status Bar.................................................................. 14
Application Tab .......................................................... 15
Notification Panel ...................................................... 15
Customizing Screen .................................................. 16
Shortcuts ................................................................... 16
Widgets ..................................................................... 16
Setting the wallpaper ................................................ 16
Rotating Your Mobile Phone Screen ......................... 17
MULTIMEDIA ............................................................ 17
Flie Manager ............................................................. 17
Play Music ................................................................. 17
Camera ..................................................................... 17
Capturing an Image .................................................. 17
Capturing a Video ..................................................... 18
Capturing Panorama ................................................. 18
Capturing smiles detect ............................................ 18
Sound Recorder ........................................................ 19
Gallery ....................................................................... 19
Page 7

FM Radio .................................................................. 19
NETWORK ............................................................... 19
Wi-Fi .......................................................................... 19
Note:.......................................................................... 20
3 G ............................................................................ 20
Bluetooth ................................................................... 21
SETTINGS ................................................................ 21
SIM Manager ............................................................ 21
Wireless & Netwoks .................................................. 22
Audio Profiles ............................................................ 22
Display ...................................................................... 22
Storage ...................................................................... 22
Battery ....................................................................... 23
Applications ............................................................... 23
Add Account .............................................................. 23
Location Access ........................................................ 23
Security ..................................................................... 23
Language and input .................................................. 24
Backup & Reset ........................................................ 24
Date and Time ........................................................... 24
Schedule Power ON/OFF ......................................... 25
Accessibility .............................................................. 25
About Phone ............................................................. 25
APPLICATIONS & UTILITIES .................................. 25
Calculator .................................................................. 25
Clock ......................................................................... 25
Gmail ......................................................................... 26
Maps ......................................................................... 26
Play Store .................................................................. 26
SPECIFICATIONS .................................................... 27
APPENDIX ................................................................ 28
Troubleshooting ........................................................ 28
Page 8

Do not use wireless phones while driving.
Switch off wireless devices in aircraft. The
signal may cause interference. Using them
on aircraft is illegal.
Do not use mobile phones where blasting is
in progress. Follow any regulations and rules
strictly.
Do not use mobile phones at Petrol stations.
Don’t use near fuel or chemicals. Do not
dispose your battery or mobile in a fire.
Follow any regulations or rules in hospital
and health care facilities. Switch phone off
near medical equipment.
All wireless devices may get interference that
could affect performance.
The repair or installation of the device should
be done at Authorized service centers
Use only approved accessories and
batteries.
Use only in normal position. Do not expose
your phone to extreme high temperatures
above +60C(+140F). Do not use anything
SAFETY PRECAUTIONS
Before using your phone, please read the following
important information to eliminate or reduce any
possibility of causing damage and personal injury.
Page 9

static to clean your phone.
Ensure the phone is turned on and in service.
Enter the emergency number, then press
Pick Up key. Give your location. Do not end
the call until told to do so.
Improper use will invalidate the warranty! These safety
instructions also apply to original accessories.
Page 10

GENERAL INFORMATION
Antenna
Use of other antenna devices could damage your mobile
phone and reduce performance. Your phone has a
built-in antenna. Don’t touch the antenna area
unnecessarily when the phone is switched on. Contact
with the antenna affects call quality and may cause the
phone to operate at a higher power level than otherwise
needed.
Network Service
A lot of features described in this manual are called
network service. They are special services provided by
wireless service providers. You should subscribe to these
services from your home service provider and learn
instructions on uses before you select the network you
want to use.
Accessories
Li-Ion battery is the manufacturer-approved rechargeable
battery available for your phone. May be some batteries
performs best after several full charge/discharge cycles.
Use batteries, chargers and accessories approved by the
phone manufacturer with this particular model. The use of
any other types will invalidate any approval or warranty
applying to the phone, and may be dangerous.
Please consult with your dealer for availability of
approved accessories.
1
Page 11

UNDERSTANDING YOUR DRVICE
Avvio 775 is a multifunction telephone,such as Andriod
version 4.2, Wi-Fi, 1.2 GHz Dual Core Processor, 8.0
MP Auto focus Camera.
2
Page 12

1. Earpiece
2. Touch Screen
3. Home Key
4. Menu Key
5. Back Key
6. Front camera lens
7. Earphone Jack
8. USB port
9.Volume control key
10. Power Key
11. Camera lens
12. LED flash light
13. Battery cover
14. Speaker
PHONE OVERVIEW
Position of Keys
3
Page 13
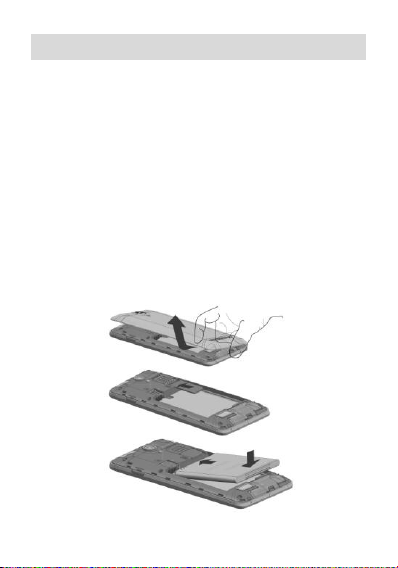
GETTING STARTED
Installing Card & Battery
lease switch off your device before inserting or removing
the battery/SIM card or memory card.
Installing SIM Card and Battery
In order to install battery and SIM card in the device,
please follow the steps mentioned below:
Remove the back cover of the device.
Hold the device with the front facing downwards
and pull the battery cover.
Insert the SIM cards in the device.
Attach the battery.
Push the battery cover until it clicks into place.
4
Page 14

Installing Memory Card
The phone supports T-Flash card, which is a multimedia
memory card used to multiply the memory of the phone.
The T-flash card is small and should be pulled out
/installed carefully and prudently in order to avoid any
kind of damage.
Switch off your phone.
Remove the battery cover.
Slide the T-Flash card into the slot.
Attach the battery.
Push the battery cover until it clicks into
place.
5
Page 15

Charging the Battery
The phone prompts a warning tone and message stating
insufficient battery when the power of your phone is low.
Please follow the instructions mentioned below to charge
your phone:
Plug the connector of the charger into the
jack of the phone.
Plug the charger into a standard AC wall
Note:
When is shown on the screen, it indicates that there
is not enough power and you should now charge your
phone. When charging is complete, the battery icon will
stop flashing.
Charging……. Fully Charged……
You must fully charge the battery before using the phone for
the first time. It is recommended to charge the battery for four
hours before using the phone for the first time.
If the phone is turned on during charging, you can still
make or answer calls, but this will consume battery power,
thus will extend the charging time of the phone.
You can use a shielded USB cable connecting to the computer
For data communication.
outlet.
Powering on/off device
Turning On the Device
6
Page 16

After installing the SIM cards and charging the battery,
you are now ready to turn on your device.
Long press the Power Key to turn on the device.
The first screen that appears is known as the
home/idle Screen.
Drag the lock icon sidewards to unlock the
screen.
If the screen turns off, then short press the Power
Key to turn on the display.
Turning Off the Device
Press and hold the Power Key
A pop-up window appears, select Power off.
Select OK to confirm.
7
Page 17

BASIC OPERATIONS
To Make Calls
If the icon appears on the screen, then you can
make or receive calls.
To make a call, please follow the steps mentioned below:
Enter the Main Menu, select Phone.
Enter the phone number using the on-screen
keyboard.
Tap to delete a wrong number. Tap
and hold it to erase the entire number.
After entering phone number, tap .
To end the call, tap .
Answer/Reject an Incoming Call
When you receive an incoming call, a notification
message appears on the screen. In order to accept the
call, drag towards right. If you wish to reject the call,
drag towards left.
Other Options during the call
To put a call on hold
If you are having a call conversation and there is another
incoming call, tap to put the first call on hold.
8
Page 18

To set up conference calls
If you are already having a call conversation,
select add another call to set up
conference calls.
Manage other voice call features
During a call, please select:
Silence: to mute or unmute the microphone.
Suspend: to hold the call.
Hand Free: to open loud speaker.
Add: add or make another call.
Keyboard: use the dial pad.
Messaging
Your device features, sending and receiving of SMS
(Short Message Service) and MMS (Multimedia Message
Service). Go to Main Menu and then select Messaging.
Creating a Message
Tap Compose new message.
In To field; enter the recipient’s phone number.
Type message in the Type to compose field.
Tap to Send.
Receiving and Managing Messages
When you send and receive messages to or from a
contact, these messages are grouped as a message
thread. A message thread looks like an exchanged
conversation.
9
Page 19

To reply to a text message
Enter the Main Menu, select Messaging.
Select a message thread to open it.
Select Type to compose to enter your message.
Tap to Send.
To forward a text message
Enter the Main Menu, select Messaging.
Tap to view a message thread.
Press and hold a message to view the message
options.
Select Forward.
In the To field, enter the recipient’s phone
number.
Tap to Send.
To delete all text messages
Enter the Main Menu, select Messaging.
Tap Menu > Delete all threads.
All the messages will be deleted.
To copy message text
You can use this function to copy the text from a message
to a new message you are composing.
Enter the Main Menu, select Messaging.
Select a message thread to open it.
Press and hold the message to view the
submenu options.
10
Page 20

Select ‘Copy ’.
Go to Compose new message.
Press and hold Type to compose.
Select ‘Paste’ to paste the copied text to your
new message.
Multimedia Message
A Multimedia message or MMS can contain letters, an
image, an audio or video file. To create and send a MMS,
please follow the steps mentioned below:
Enter the Main Menu, select Messaging.
Tap Compose new message.
Select Menu > Add subject.
In the To field, enter the recipient’s phone
number or email address and enter the Subject.
To insert a picture or video file, tap >
Attach.
To insert text, tap Type to Compose, and then
enter your message.
Contacts
Contacts refer to the phonebook that lets you store
names, phone numbers, e-mail addresses and other
information. You can save information such as name,
picture, phone numbers, e-mail addresses, etc for each
contact listed in your Contacts menu.
To add a Contact
Enter the Main Menu select Phone.
11
Page 21

Enter number > Tap Menu > Add to contacts >
Create New contact.
Select the storage
You can enter contact information such as name,
phone number, email address etc, if you select
storage as “Phone”.
Tap Done to save the contact.
Tip: Or enter the Main Menu and select People,
tap create New contact.
To import contacts
Enter the Main Menu select People.
Tap Menu > Import/Export.
Select to import contacts from Phone contact/
Phone storage/ SIM Card/ SD Card.
Select a particular source to import the contacts
from.
Select Next.
Select the destination, such as Phone to copy
contacts to.
Select Next.
Select “Select All” to import all contacts or mark
the required contacts.
Select “OK”
Browser
Browser is a tool which enables you to access the
Internet.
12
Page 22

To open a web page
Enter the Main Menu, select Browser.
Tap the address bar.
Type the URL and select Go.
Tap Menu to access more functions, such as
bookmarks/history and other browser related
settings.
To scroll the page
Use finger gestures to scroll up or down.
To scroll left or right, tap and swipe your finger
towards right/left.
To set the Home page
While viewing a web page, tap Menu > Settings >
General > Set home page.
Enter the URL of the page,you can also enter the
Settings in the home page
Email
Your device allows you to compose, read and send
emails.
Setting up an Email Account
Enter the Main Menu, tap Email.
Enter your Email address and Password.
Tap Next. The device will automatically retrieve
email settings.
Select your desired settings
13
Page 23

Network intensity of SIM card
Battery level of the device
New short message
Missed call notification
Call in progress
USB connected
GPRS network is in use.
Bluetooth is activated
Wi-Fi is connected.
Tap Next.Your account is set up,and email is on
its way.
Tap Next.Completed into the email
HOME SCREEN
From Home screen, you can quickly access common
features, view notifications of missed calls, received
messages and check connection status.
Status Bar
The Status bar icons indicate different types of
information. The table below lists various icons that might
appear on the status bar of the device.
14
Page 24

Application Tab
Tap Application Drawer to access applications and
settings of the device. The Application tab enables you to
access the Main Menu and choose among the various
utilities/ features available in the device.
Notification Panel
Your mobile phone will notify you when you receive a
new message or there is an upcoming event. The
notification panel also informs you of alarms and settings.
Open the notification panel to see your network operator
or to view a message, reminder, or event notification.
Opening the Notification Panel
1. When a new notification icon appears on the
notification bar, place your finger on the notification bar
and flick down to open the notification panel.
Enter the interface by dragging the top of the screen.
2. On the panel, you can:
• Touch a notification to open the related application.
• Touch Clear to clear all notifications.
15
Page 25

• Tap to delete notifications.
Closing the Notification Panel
Touch and hold the bottom of the panel. Then flick up to
close it.
Customizing Screen
The device features a touch screen with idle displays and
access to utilities at just one-touch. So swipe right or left
to navigate through various screens accessing your
favorite features without entering the main menu. Each
screen can be customized by adding various widgets,
shortcuts and folders.
Shortcuts
In order to add a shortcut on the screen:
Long press on the desired application to add on
the screen.
Widgets
Save time with live updates right on Home screen and get
all of your personalized updates at one place.
Setting the wallpaper
You can customize the wallpaper of your Home screen
with default wallpaper or with pictures taken from your
device.
In the idle mode, tap Menu Key > Wallpaper.
Select your desired wallpaper from the various
options:
Gallery
Live Wallpapers
Video Wallpaper
16
Page 26

Wallpapers
Rotating Your Mobile Phone Screen
The orientation of most screens will change to
landscape or portrait view when you rotate your
phone sideways.
On the Home screen, select Menu Key > System
settings > Display > Auto-rotate screen to
open/close this function.
MULTIMEDIA
Flie Manager
You can browse, open and manage the data saved in the
Device and Memory card by accessing the File Manager
sub-menu. The device provides a certain space for users
to manage files and supports the T-Flash card. You can
use the file browser to conveniently manage various
directories and files on the T-Flash card.
Play Music
Use the “Play Music” to play music files.
Camera
Your device is equipped with camera and camcorder,
which enables you to capture photos and videos. The
rear camera is 8.0 megapixels.
Capturing an Image
Select Camera. The screen will automatically
switch to landscape view.
17
Page 27

Aim the phone at the subject, then tap to
take the shot.
Capturing a Video
Select Camera. Tap switch to video mode.
Aim the phone at the subject.
To start recording or saving, select .
To stop recording, select .
Capturing Panorama
Select Camera. Tap select Panorama
mode.
Aim the phone at the subject, then tap to
take the shot.
Capturing smiles detect
Select Camera. Tap select smile detect
mode.
Aim the phone at the subject, then tap to
take the shot.
You can view/play your videos stored on your SD Card
through the Video Player.
Tap select Application tab > Video Player the
videos on the memory card.
18
Page 28

Sound Recorder
You can use the sound recorder to record sounds and
also select to save the recordings in your phone.
Tap select Application tab > Sound Recorder.
When in the sound recorder interface, press menu key to
select recording mode.
Gallery
You can view the captured images, recorded video clips,
and downloaded images in the Gallery.
The picture folder and video folder will be displayed.
Select to view the camera pictures or camera videos. The
images or videos will be displayed in thumbnails.
FM Radio
You can use your phone to listen to FM radio stations
once the original Headset is plugged into the connector.
Please press the side key to adjust music volume. Tap
the ( / ) to search or adjust the
channels.Tap shut down the FM radio.
NETWORK
Wi-Fi
Connect to a wireless network to browse Internet.
Enter Main Menu and tap System Settings.
Tap ‘ON’ to activate Wi-Fi.
19
Page 29

Tap Wi-Fi > Network notification to start
detecting networks. The available networks will
then be listed.
Tap Wi-Fi network to add a connection.
Note:
If the device before the connection is successful,
the equipment information will be saved in the
pop-up window selected connection, select forget
to remove device information.
If the device does not encrypt selected
connection in the pop-up window to connect.
If the device is encrypted, the pop-up window will
appear, enter the password.
Network connection is successful; the status bar
icon appears Wi-Fi connection.
3 G
The device supports WCDMA protocol. Please make
sure that you device is turned off, then insert or remove
the SIM card.
Settings > Wireless & Netwroks > More > Mobile
Netwroks > Network Mode
Power off insert USIM or SIM card
Power on
Open setting, select Wireless & Networks, tap
‘More’
Select mobile network ,enter ‘access point
names’ interface
20
Page 30

Select a card
Touch menu button, select New APN;
Set as below:
Name: (any name like airtel);
APN: airtelgprs.com;
Touch menu button, select save;
Go back to access point names interface, confirm
the new APN selected.
Bluetooth
You can transfer data, such as music to other device
using Bluetooth. Search the device and accept/transfer
data. The received data is automatically stored in the
directory.
Access Settings by entering the main menu
Check Bluetooth to turn on Bluetooth
To make your device discoverable, select
bluetooth settings and check discoverable.
SETTINGS
Select Settings to view and adjust the settings of your
device. The Settings menu is categorized into: Wireless &
networks, Audio profiles, Display, Storage, Battery, Apps,
Add account, Location access, Security, Language &
input, Backup & reset and System.
SIM Manager
Your SIM cards which can be managed by accessing
the SIM Management sub-menu. You can view/change
21
Page 31

the roaming settings of the cards using this menu.
Wireless & Netwoks
Access this sub-menu to change/view the Wi-Fi,
Bluetooth, Mobile Networks and VPN settings. Please
refer to network section for detailed information on Wi-Fi
and bluetooth.
Audio Profiles
Your device provides four pre-defined user profiles that
allow the operations of the device to best suit the
environment you are in. The profiles are General, Silent,
Meeting and Outdoor. Press the Menu Key to add reset
the default profiles.
Display
With this function you can configure the display
characteristics of the device including brightness,
Auto-rotate screen, etc.
Storage
View and manage the data storage of your device:
Total Space and Available Space: Lists the amount of
space on the microSD card installed in your device and
the amount you have used to store photos, videos, music,
and other files.
Un-mount SD Card: Un-mounts the microSD card from
your device so that you can format the card or safely
remove it when the device is on.
Available Space: The amount of internal phone storage
used by the operating system, its components,
applications (including those you downloaded), and their
permanent and temporary data.
22
Page 32

Battery
You can check the battery status of the device by
accessing this sub-menu.
Applications
This sub-menu enables you to manage all the installed,
running and applications saved in the device memory and
SD card. You can remove and manage installed
applications, view and control running applications, allow
installation of non we build in market applications.
Add Account
Use the Add accounr to add, remove, and manage
your Google and other supported accounts. You also use
these settings to control how and whether all applications
send, receive, and sync data on their own schedules, and
whether all applications can synchronize user data
automatically.
Location Access
Your device supports Global Positioning System. The
settings related to the location, EPO and AGPS can be
configured using this sub-menu.
Security
You can protect your device from unauthorized users by
setting the PIN code or entering a password.
Enable or Disable SIM card PIN
When PIN code is enabled, you are required to enter the
PIN code before making a call.
Go to Application Drawer > Settings > Security.
On the SIM card lock tab, select Set up SIM card
lock.
23
Page 33

Select a SIM card.
Tap Lock SIM card to use PIN. Check to enable,
uncheck to disable.
Enter the current PIN code.
To change the PIN code, select Change PIN.
Enter the old PIN code.
Enter the new PIN code and confirm.
Setup Screen Lock
You can set up a lock for your screen in form of Pattern,
PIN code or password.
Go to Settings > Security
Set up screen lock
Select a desired form (Slide, Voice UnLock,
Pattern, PIN or password)
Language and input
Use the Language & Keyboard settings to select the
language for the text on your device and for configuring
the onscreen keyboard, including words that you’ve
added to its dictionary.
Backup & Reset
You can use the Privacy settings to manage your
personal information, such as back up my data,
automatic restore and factory date reset.
Date and Time
You can select to set date, time and time zone using
this sub-menu.
Use Automatic unless you need to override the network
values.
Use 24-hour format: Select to set 24-hour formats on or
24
Page 34

off.
Choose date format: Select from a variety of formats.
Schedule Power ON/OFF
You can set the time for auto power on /off. Do turn the
status on before using that function, and then the time
Accessibility
You can use the Accessibility settings to configure any
accessibility plug-ins you have installed on your device.
About Phone
You can view system information Including System
updates, Status, Legal information, Model number,
Android version and so on.
APPLICATIONS & UTILITIES
For your entertainment purpose, your device is
provided with several interesting games, applications and
utilities. Please ensure that you have GPRS setting in
your device to access the applications. Contact your
operator for GPRS settings.
Calculator
Calculator helps you perform basic arithmetic functions,
such as addition, subtraction, multiplication and division.
Clock
The clock function gives you an access to alarm clock.
Tap Application Tab to enter the Main Menu.
Select Clock.
25
Page 35

Select Set alarm, tap to add alarm
Select choose what you need to the time of
the city
Enter is Night mode and Settings.
Gmail
Gmail is Google's web-based email service. Google
Mail is configured when you first set up your device.
Depending on your synchronization settings, Google Mail
on your device is automatically synchronized with your
Google Mail account on the web.
Go to Main Menu > Gmail.
Select Existing or New sign in your Google account.
Follow the on screen instructions to login or create your
Gmail username and password.
Once logged in, you can begin reading and sending
emails from your Gmail account.
Maps
Places helps you discover nearby places you'll love.
Quickly search for Restaurants, Cafes, Bars and other
places, while on the go. Places also makes it easy to
quickly rate the places you visit. By rating places you'll
get place recommendations based on the places you like
and recommendations from your friends.
Play Store
Play store allows you to find and download
applications and fun games for your device.
26
Page 36

Screen
5 inch (FWVGA)
Battery
1500 mAh
Dimensions
142.5 X 73 X 11.15 mm
Weight
188g
Network
GSM: 850/900/1800
/1900MHz
UMTS:1900/850 MHz
Standby Time
Up to 350 hours*
Maximum Talk Time
Up to 10 hours*
Power Adapter
Input: 100-240V/1000mA
Go to Main Menu > Play Store and setup your
Google account.
Select New to create a new account or Sign in to
sign in your existing account.
Once you are signed in you can begin searching and
downloading programs from the market. Tap Apps to view
the list of applications available and tap Games to view
the list of games available.
SPECIFICATIONS
*The standby time and maximum talk time depend upon
the network signals and settings.
27
Page 37

Problems
Solutions
Can not
answer or
make a
call
Make sure that the phone has been
switched on.
Make sure that the battery is charged.
Make sure that the signal intensity is high
enough.
Make sure the own number function in
the call setting is system preset or
number sending.
Make sure the line switch in call setting is
the system preset line. Check whether
you have set up call barring or fixed
dialing or any other safety function.
Check whether you have set up call
diverts. Check whether you have inserted
the proper SIM card correctly.
Low voice
Check if the volume has been set too low.
No ring
Check whether you have set up the”
Silent” option.
Check whether the ring volume is not too
low
Move away from a noisy place to check if
APPENDIX
Troubleshooting
This section lists some problems that you might meet while
using your phone. If you feel that your phone do not operate
normally, please reset settings first, and then follow
Troubleshooting Guide. If you are still unable to solve
problems, please contact the authorized service center or the
store from where you purchased the phone.
28
Page 38

you can hear the phone ringing.
Check whether you have set up call
diverts.
LCD
unclear
Check whether the contrast has been set
too low.
T-Flash
card
detect
slowly
Format your T-Flash card with your
phone.
Note: To protect your files from getting
lost, please backup the important
information into the safe place before you
formatting card.
29
Page 39

TThhiiss mmoobbiillee pphhoonnee ccoommpplliieess wwiitthh ppaarrtt 1155 ooff tthhee FFCCCC RRuulleess..
OOppeerraattiioonn iiss ssuubbjjeecctt ttoo tthhee ffoolllloowwiinngg ttwwoo ccoonnddiittiioonnss:: ((11)) TThhiiss
ddeevviiccee mmaayy nnoott ccaauussee hhaarrmmffuull iinntteerrffeerreennccee,, aanndd ((22)) tthhiiss ddeevviiccee
mmuusstt aacccceepptt aannyy iinntteerrffeerreennccee rreecceeiivveedd,, iinncclluuddiinngg iinntteerrffeerreennccee
tthhaatt mmaayy ccaauussee uunnddeessiirreedd ooppeerraattiioonn..
TThhiiss mmoobbiillee pphhoonnee hhaass bbeeeenn tteesstteedd aanndd ffoouunndd ttoo ccoommppllyy wwiitthh
tthhee lliimmiittss ffoorr aa CCllaassss BB ddiiggiittaall ddeevviiccee,, ppuurrssuuaanntt ttoo PPaarrtt 1155 ooff
tthhee FFCCCC RRuulleess.. TThheessee lliimmiittss aarree ddeessiiggnneedd ttoo pprroovviiddee
rreeaassoonnaabbllee pprrootteeccttiioonn aaggaaiinnsstt hhaarrmmffuull iinntteerrffeerreennccee iinn aa
rreessiiddeennttiiaall iinnssttaallllaattiioonn.. TThhiiss eeqquuiippmmeenntt ggeenneerraatteess,, uusseess aanndd
ccaann rraaddiiaatteedd rraaddiioo ffrreeqquueennccyy eenneerrggyy aanndd,, iiff nnoott iinnssttaalllleedd aanndd
uusseedd iinn aaccccoorrddaannccee wwiitthh tthhee iinnssttrruuccttiioonnss,, mmaayy ccaauussee hhaarrmmffuull
iinntteerrffeerreennccee ttoo rraaddiioo ccoommmmuunniiccaattiioonnss.. HHoowweevveerr,, tthheerree iiss nnoo
gguuaarraanntteeee tthhaatt iinntteerrffeerreennccee wwiillll nnoott ooccccuurr iinn aa ppaarrttiiccuullaarr
iinnssttaallllaattiioonn IIff tthhiiss eeqquuiippmmeenntt ddooeess ccaauussee hhaarrmmffuull iinntteerrffeerreennccee
ttoo rraaddiioo oorr tteelleevviissiioonn rreecceeppttiioonn,, wwhhiicchh ccaann bbee ddeetteerrmmiinneedd bbyy
ttuurrnniinngg tthhee eeqquuiippmmeenntt ooffff aanndd oonn,, tthhee uusseerr iiss eennccoouurraaggeedd ttoo ttrryy
ttoo ccoorrrreecctt tthhee iinntteerrffeerreennccee bbyy oonnee oorr mmoorree ooff tthhee ffoolllloowwiinngg
mmeeaassuurreess::
--RReeoorriieenntt oorr rreellooccaattee tthhee rreecceeiivviinngg aanntteennnnaa..
--IInnccrreeaassee tthhee sseeppaarraattiioonn bbeettwweeeenn tthhee eeqquuiippmmeenntt aanndd rreecceeiivveerr..
--CCoonnnneecctt tthhee eeqquuiippmmeenntt iinnttoo aann oouuttlleett oonn aa cciirrccuuiitt ddiiffffeerreenntt
ffrroomm tthhaatt ttoo wwhhiicchh tthhee rreecceeiivveerr iiss ccoonnnneecctteedd..
--CCoonnssuulltt tthhee ddeeaalleerr oorr aann eexxppeerriieenncceedd rraaddiioo//TTVV tteecchhnniicciiaann ffoorr
hheellpp..
FFCCCC NNoottee::
CCaauuttiioonn:: CChhaannggeess oorr mmooddiiffiiccaattiioonnss nnoott eexxpprreessssllyy aapppprroovveedd bbyy
tthhee ppaarrttyy rreessppoonnssiibbllee ffoorr ccoommpplliiaannccee ccoouulldd vvooiidd tthhee uusseer
r
‘
‘
ss
aauutthhoorriittyy ttoo ooppeerraattee tthhee eeqquuiippmmeenntt..
FCC Regulations:
30
Page 40

TThhiiss pphhoonnee iiss ddeessiiggnneedd aanndd mmaannuuffaaccttuurreedd nnoott ttoo eexxcceeeedd tthhee
eemmiissssiioonn lliimmiittss ffoorr eexxppoossuurree ttoo rraaddiioo ffrreeqquueennccyy ((RRFF)) eenneerrggyy
sseett bbyy tthhee FFeeddeerraall CCoommmmuunniiccaattiioonnss CCoommmmiissssiioonn ooff tthhee UUnniitteedd
SSttaatteess..
DDuurriinngg SSAARR tteessttiinngg,, tthhiiss ddeevviiccee wwaass sseett ttoo ttrraannssmmiitt aatt iittss
hhiigghheesstt cceerrttiiffiieedd ppoowweerr lleevveell iinn aallll tteesstteedd ffrreeqquueennccyy bbaannddss,, aanndd
ppllaacceedd iinn ppoossiittiioonnss tthhaatt ssiimmuullaattee RRFF eexxppoossuurree iinn uussaaggee
aaggaaiinnsstt tthhee hheeaadd wwiitthh nnoo sseeppaarraattiioonn,, aanndd nneeaarr tthhee bbooddyy wwiitthh
tthhee sseeppaarraattiioonn ooff 1100 mmmm.. AAlltthhoouugghh tthhee SSAARR iiss ddeetteerrmmiinneedd aatt
tthhee hhiigghheesstt cceerrttiiffiieedd ppoowweerr lleevveell,, tthhee aaccttuuaall SSAARR lleevveell ooff tthhee
ddeevviiccee wwhhiillee ooppeerraattiinngg ccaann bbee wweellll bbeellooww tthhee mmaaxxiimmuumm
vvaalluuee.. TThhiiss iiss bbeeccaauussee tthhee pphhoonnee iiss ddeessiiggnneedd ttoo ooppeerraattee aatt
mmuullttiippllee ppoowweerr lleevveellss ssoo aass ttoo uussee oonnllyy tthhee ppoowweerr rreeqquuiirreedd ttoo
rreeaacchh tthhee nneettwwoorrkk.. IInn ggeenneerraall,, tthhee cclloosseerr yyoouu aarree ttoo aa
wwiirreelleessss bbaassee ssttaattiioonn aanntteennnnaa,, tthhee lloowweerr tthhee ppoowweerr oouuttppuutt..
TThhee eexxppoossuurree ssttaannddaarrdd ffoorr wwiirreelleessss ddeevviicceess eemmppllooyyiinngg aa uunniitt
ooff mmeeaassuurreemmeenntt iiss kknnoowwnn aass tthhee SSppeecciiffiicc AAbbssoorrppttiioonn RRaattee,, oorr
SSAARR.. TThhee SSAARR lliimmiitt sseett bbyy tthhee FFCCCC iiss 11..66WW//kkgg..
TThhiiss ddeevviiccee iiss ccoommpplliieedd wwiitthh SSAARR ffoorr ggeenneerraall ppooppuullaattiioonn
//uunnccoonnttrroolllleedd eexxppoossuurree lliimmiittss iinn AANNSSII//IIEEEEEE CC9955..11--11999922 aanndd
hhaadd bbeeeenn tteesstteedd iinn aaccccoorrddaannccee wwiitthh tthhee mmeeaassuurreemmeenntt
mmeetthhooddss aanndd pprroocceedduurreess ssppeecciiffiieedd iinn IIEEEEEE11552288.. TThhiiss ddeevviiccee
hhaass bbeeeenn tteesstteedd aanndd mmeeeettss tthhee FFCCCC RRFF eexxppoossuurree gguuiiddeelliinneess
wwhheenn tteesstteedd wwiitthh tthhee ddeevviiccee ddiirreeccttllyy ccoonnttaacctteedd ttoo tthhee bbooddyy..
TThhee FFCCCC hhaass ggrraanntteedd aann EEqquuiippmmeenntt AAuutthhoorriizzaattiioonn ffoorr tthhiiss
mmooddeell pphhoonnee wwiitthh aallll rreeppoorrtteedd SSAARR lleevveellss eevvaalluuaatteedd aass iinn
ccoommpplliiaannccee wwiitthh tthhee FFCCCC RRFF eexxppoossuurree gguuiiddeelliinneess.. SSAARR
iinnffoorrmmaattiioonn oonn tthhiiss mmooddeell pphhoonnee iiss oonn ffiillee wwiitthh tthhee FFCCCC aanndd
ccaann bbee ffoouunndd uunnddeerr tthhee DDiissppllaayy GGrraanntt sseeccttiioonn ooff
RF Exposure Information (SAR)
31
Page 41

wwwwww..ffcccc..ggoovv//ooeett//eeaa//ffcccciidd aafftteerr sseeaarrcchhiinngg oonn FFCCCC IIDD::
WWVVBBAA777755XX..
FFoorr tthhiiss ddeevviiccee,, tthhee hhiigghheesstt rreeppoorrtteedd SSAARR vvaalluuee ffoorr uussaaggee
aaggaaiinnsstt tthhee hheeaadd iiss 11..0033WW//kkgg,, ffoorr uussaaggee nneeaarr tthhee bbooddyy iiss
11..4455WW//kkgg..
WWhhiillee tthheerree mmaayy bbee ddiiffffeerreenncceess bbeettwweeeenn tthhee SSAARR lleevveellss ooff
vvaarriioouuss pphhoonneess aanndd aatt vvaarriioouuss ppoossiittiioonnss,, tthheeyy aallll mmeeeett tthhee
ggoovveerrnnmmeenntt rreeqquuiirreemmeennttss..
SSAARR ccoommpplliiaannccee ffoorr bbooddyy--wwoorrnn ooppeerraattiioonn iiss bbaasseedd oonn aa
sseeppaarraattiioonn ddiissttaannccee ooff 1100 mmmm bbeettwweeeenn tthhee uunniitt aanndd tthhee hhuummaann
bbooddyy.. CCaarrrryy tthhiiss ddeevviiccee aatt lleeaasstt 1100 mmmm aawwaayy ffrroomm yyoouurr bbooddyy ttoo
eennssuurree RRFF eexxppoossuurree lleevveell ccoommpplliiaanntt oorr lloowweerr ttoo tthhee rreeppoorrtteedd
lleevveell.. TToo ssuuppppoorrtt bbooddyy--wwoorrnn ooppeerraattiioonn,, cchhoooossee tthhee bbeelltt cclliippss oorr
hhoollsstteerrss,, wwhhiicchh ddoo nnoott ccoonnttaaiinn mmeettaalllliicc ccoommppoonneennttss,, ttoo
mmaaiinnttaaiinn aa sseeppaarraattiioonn ooff 1100 mmmm bbeettwweeeenn tthhiiss ddeevviiccee aanndd
yyoouurr bbooddyy..
RRFF eexxppoossuurree ccoommpplliiaannccee wwiitthh aannyy bbooddyy--wwoorrnn aacccceessssoorryy,,
wwhhiicchh ccoonnttaaiinnss mmeettaall,, wwaass nnoott tteesstteedd aanndd cceerrttiiffiieedd,, aanndd uussee
ssuucchh bbooddyy--wwoorrnn aacccceessssoorryy sshhoouulldd bbee aavvooiiddeedd..
32
 Loading...