

Page 1
1
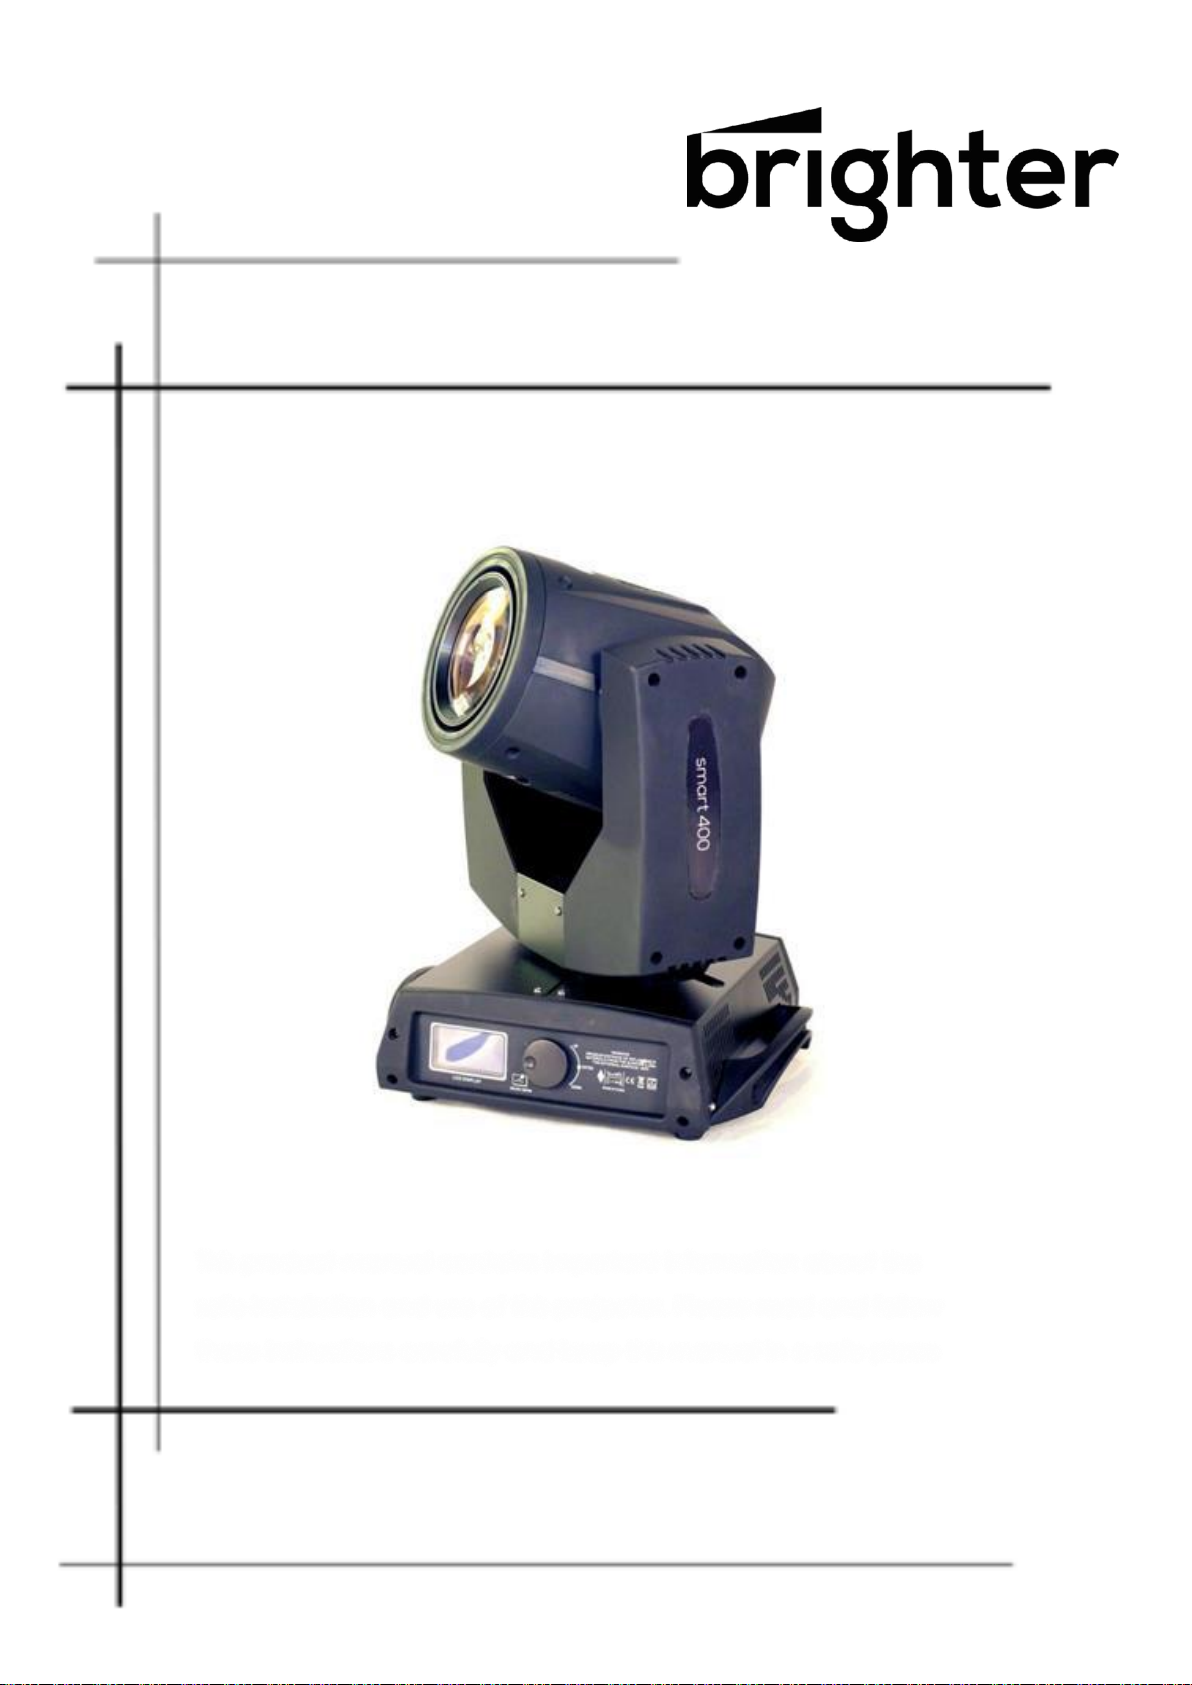
Smart 400
Beam
This product manual contains important information about the
safe installation and use of this projector. Please read and follow
these instructions carefully and keep this manual in a safe place
User manual
Please read the instructions carefully before use
Page 2

2
TABLE OF CONTENTS
1. Safety Instructions .......................................................................................................................................... 3
2. Unpacking ....................................................................................................................................................... 4
3. Features & Specifications ............................................................................................................................... 4
5. Operating Instructions .................................................................................................................................... 5
6. Installation...................................................................................................................................................... 5
7. DMX-512 Control Connections ....................................................................................................................... 6
8. Menu Operations ........................................................................................................................................... 6
9. DMX Channels ................................................................................................................................................ 8
10. Maintenance and Cleaning ......................................................................................................................... 16
STATEMENT
The product has full capability and intact packing when leaves factory. All the users should
comply with provided warnings and manual. Any damages caused by misuse are not
included in our guarantee. We cannot be responsible for any malfunctions & problems
owing to ignoring the manual.
Page 3

3
1. Safety Instructions
Please keep this User Guide for future consultation. If you sell the unit to another user, be
sure that they also receive this instruction booklet.
Unpack and check carefully there is no transportation damage before using the unit.
Before operating, ensure that the voltage and frequency of power supply match the power
requirements of the unit.
It’s important to ground the yellow/green conductor to earth in order to avoid electric shock.
The unit is for indoor use only. Use only in a dry location.
The unit must be installed in a location with adequate ventilation, at least 50cm from
adjacent surfaces. Be sure that no ventilation slots are blocked.
Disconnect main power before replacement or servicing.
Make sure there are no flammable materials close to the unit while operating as it is fire
hazard.
Use safety cable when fixes this unit. DO NOT handle the unit by taking its head only, but
always by taking its base.
Maximum ambient temperature is Ta: 40℃. DO NOT operate it where the temperature is
higher than this Unit surface temperature may reach up to 85℃.
DO NOT touch the housing bare-hands during its operation. Turn off the power and allow
about 15 minutes for the unit to cool down before replacing or serving.
In case of serious operating problem, stop using the unit immediately. Never try to repair
the unit by yourself. Repairs carried out by unskilled people can lead to damage or
malfunction. Please contact the nearest authorized technical assistance centre. Always use
the same type spare parts.
DO NOT touch any wire during operation as high voltage might be causing electric shock.
Warning:
To prevent or reduce the risk of electrical shock or fire, do not expose the unit to rain or
moisture.
DO NOT open the unit within five minutes after switching off.
The housing, the lenses, or the ultraviolet filter must be replaced if they are visibly
damaged.
Caution:
There are no user serviceable parts inside the unit. DO NOT open the housing or attempt any
repairs by yourself. If your unit requires service, please contact your nearest dealer.
Installation:
The unit should be mounted via its screw holes on the bracket. Always ensure that the unit is firmly
fixed to avoid vibration and slipping while operating. And make sure that the structure to which you
Page 4

4
are attaching the unit is secure and is able to support a weight of 10 times of the unit’s weight. Always
use a safety cable that can hold 12 times of the weight of the unit when installing the fixture.
The equipment must be fixed by professionals. And it must be fixed at the safe place where it is not
available for other people.
2. Unpacking
Please carefully unpack it when you receive the fixture and check whether it is damaged during the
transportation. And please check whether the following items are included inside the box:
1 x User manual
2 x bracket
1 x DMX cable
1 x power wire
1 x warranty card
3. Features & Specifications
Voltage:AC100-240V 50/60HZ
Lamp: Osram
Power: 230W
Colour temperature: 8000K
Average life: 2000h
Channels: Standard 16 control channels.
Colour system: 14 kinds HQ imported colour
Gobo system: 1 aphotic gobo, 17 gobos + white colour,
Beam angle : parallel beam angel 0 – 3.8°
Focus: linear adjustment
Prism : rotation 8-face prism, Bilateral rotation. Beam effect could stretch and
close.
Atomization effect: 0-100% linear atomization effect.
Dimmer: 0-100% linear adjustment.
Pan/Tilt : X axis 540° Y axis 250°automatically accurate positioning
IP protection rating: IP20: protected against the entry of solid bodies larger than 12mm.No
protection against the entry of liquids.
Motor: 13pcs Stepper motor (x.y is three-phase motor).
Automatic break in power supply in case of overheating or failed operation of cooling
system,
Size: 400mm X330mm X475mm
Weight: 17 kg
Page 5

5
Characteristic functions:
If you turn off optical shutter for 5 seconds, the power will automatically reduce 35% , to
extend the service life of the lamp.
Monitoring the lamp and cooling fan speed, when the fan speed is lower than 500RPM, lamp
will extinguish to protect the lamp.
5. Operating Instructions
The moving head is for spot effect for on-site decoration purpose.
Don’t turn on the fixture if it’s been through severe temperature difference like after
transportation because it might damage the light due to the environment changes. So make
sure to operate the fixture until it is in normal temperature.
This light should be keep away from strong shaking during any transportation or movement.
Don’t pull up the light by only the head, or it might cause damages to the mechanical parts.
Don’t expose the fixture in overheat, moisture or environment with too much dust when
installing it. And don’t lay any power cables on the floor. Or it might cause electronics shock
to the people.
Make sure the installation place is in good safety condition before installing the fixture.
Make sure to put the safety chain and check whether the screws are screwed properly when
installing the fixture.
Make sure the lens are in good condition. It’s recommended to replace the units if there are
any damages or severe scratch.
Make sure the fixture is operated by qualified personnel who know the fixture before using.
Keep the original packages if any second shipments is needed.
Don’t try to change the fixtures without any instruction by the manufacturer or the
appointed repairing agencies.
It is not in warranty range if there are any malfunctions from not following the user manual
to operate or any illegal operation, like shock short circuit, electronic shock, lamp broke, etc.
6. Installation
The unit should be mounted via its screw holes on the bracket. Always ensure that the unit is firmly
fixed to avoid vibration and slipping while operating. And make sure that the structure to which you
are attaching the unit is secure and is able to support a weight of 10 times of the unit’s weight. Always
use a safety cable that can hold 12 times of the weight of the unit when installing the fixture.
The equipment must be fixed by professionals. And it must be fixed at the safe place where it is not
available for other people.
Page 6
6
7. DMX-512 Control Connections
This product accepts the international standard DM 512 ( 1990) of the digital control signal.
Please use the 3 pin or 5pin XLR plugs&socket offed by factory to connect the first projector’s input to
the second projector output, and connect the second projectors output to the third projectors input
and so on. Eventually connect the last projectors output.
The projectors control signal output or input by using the 3 or 5 pin XLR pug and socket. If need to
lengthen the communication cable(standard meter is 2 meters),please make sure the both side of 3 or 5
pin plug is one to one.(one to one, two to two, three to three ).Otherwise ,the communication cable will
be interrupted. The communicate cable is 2-cord screened cable 75Ω resistance with each core having
at least a 0.5mm diameter.
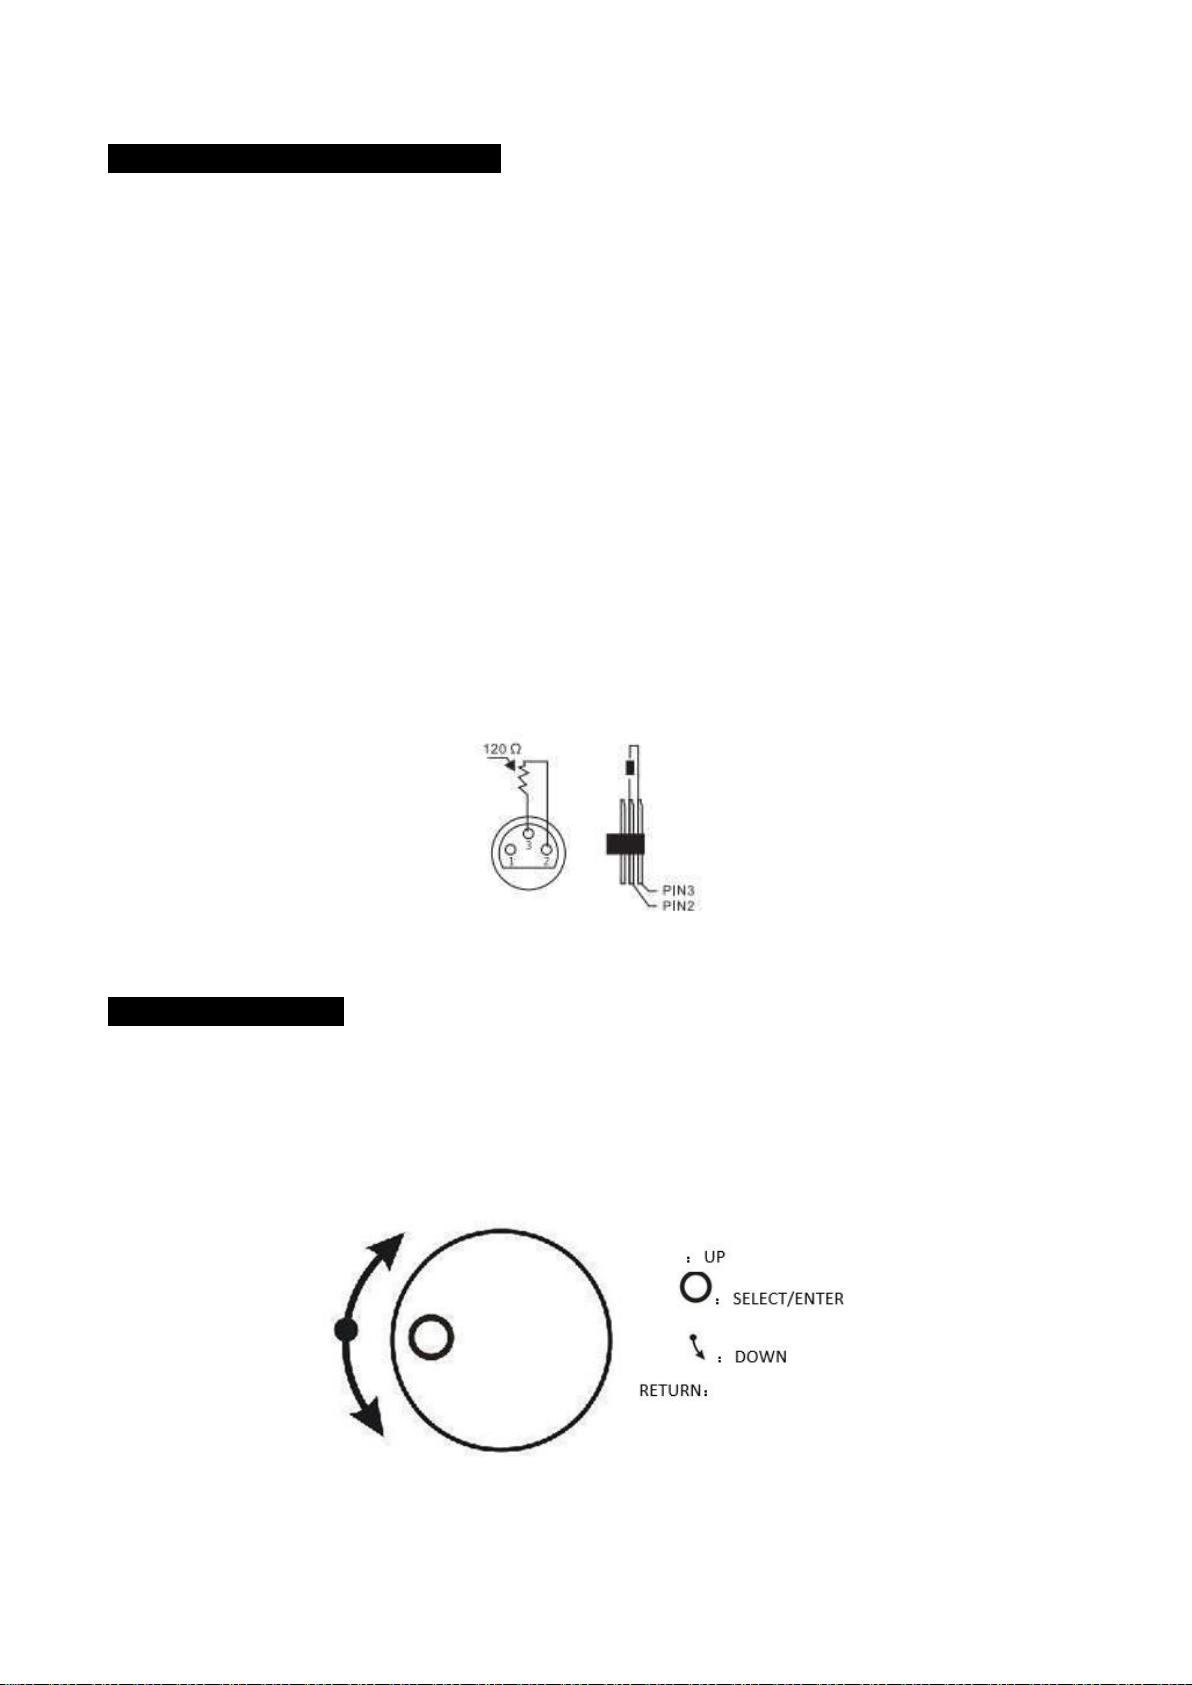
It is highly recommend to use the DMX signal terminator for the installation to avoid the electronic noise
damage the digital control signal. Simply speaking, DMX terminator is an XLR CINNEXTOR WITH A 120Ω
1/2 W resistor connected across pin 2 and 3. Which is plugged into the output socket on the last projector
in the chain. See illustrations below:
8. Menu Operations
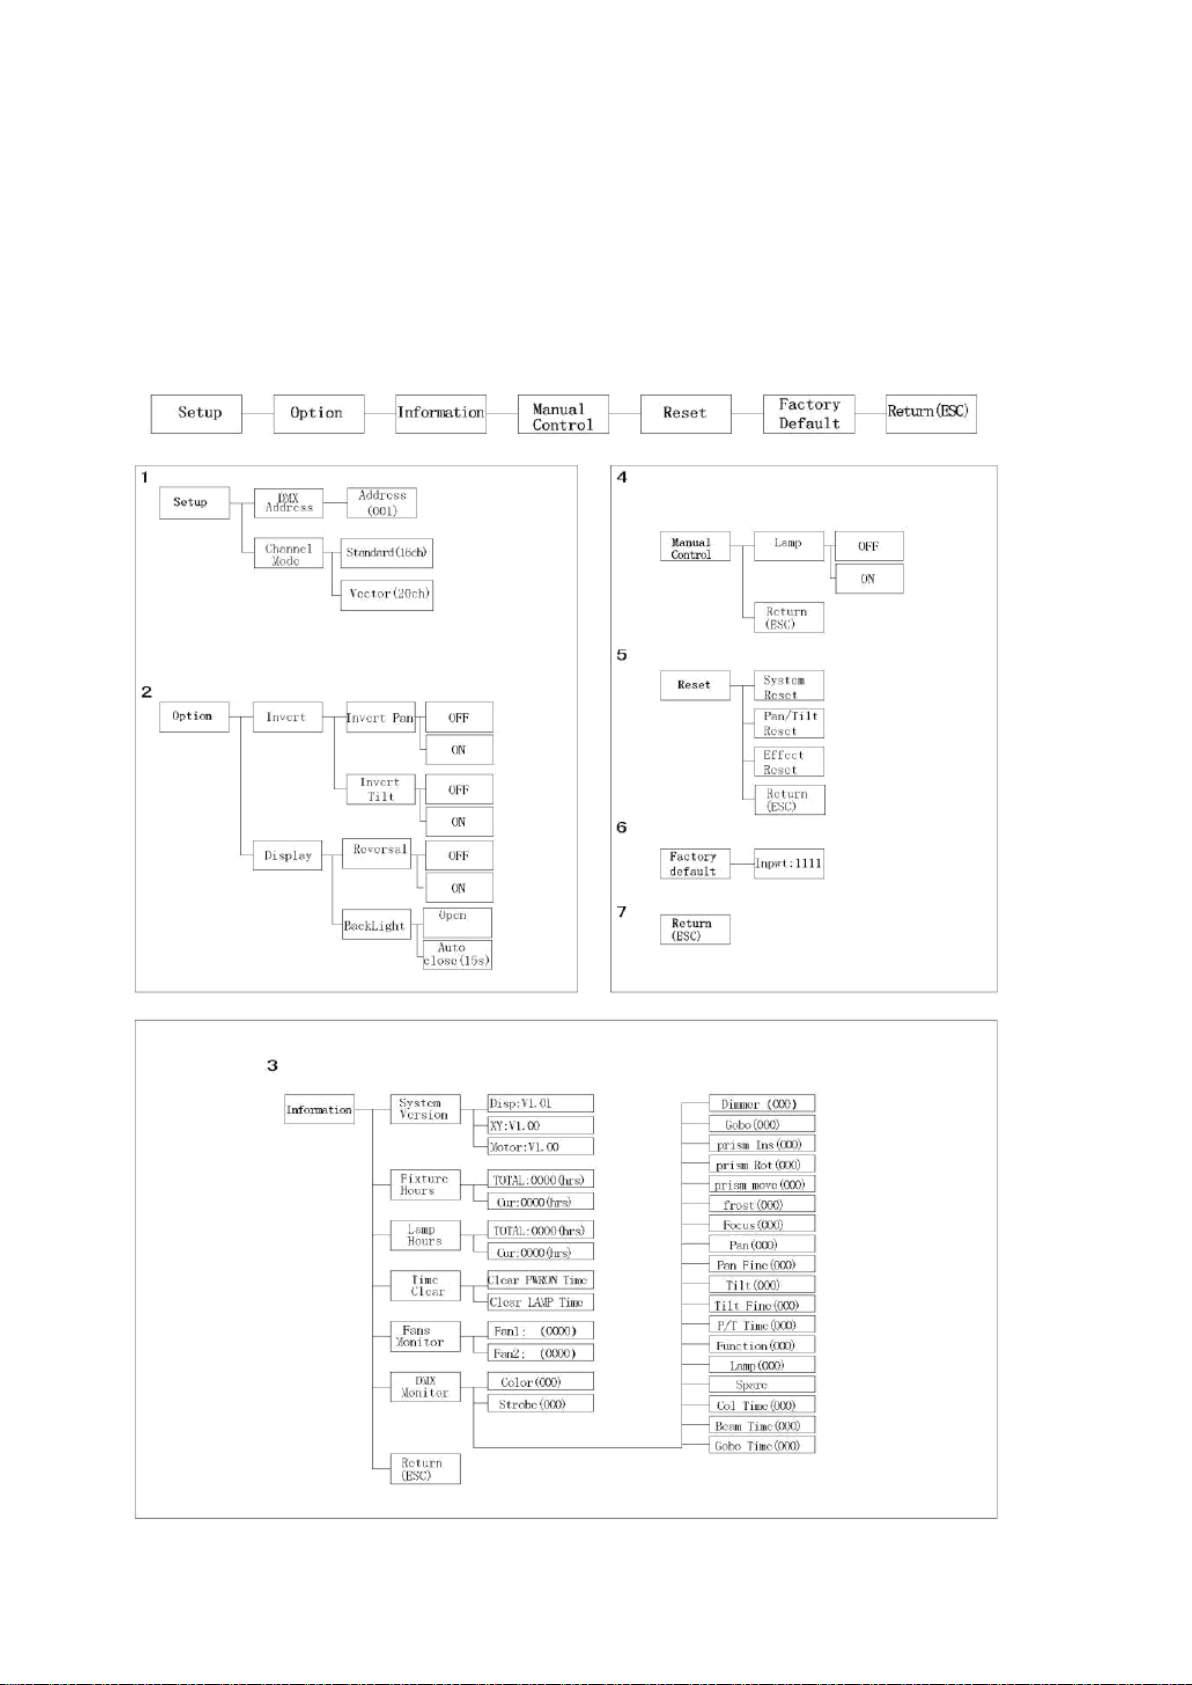
Control panel:
Rotating button and the LCD display. It allows to set address code and the function menu.
Page 7
7
LED pilot lamp:
POWER: Power signal lamp, red LED keeps bright means working normally.
DMX:DMX512 signal pilot lamp, green LED keeps bright means working normally.
ADJUST: LCD display brightness adjustment.
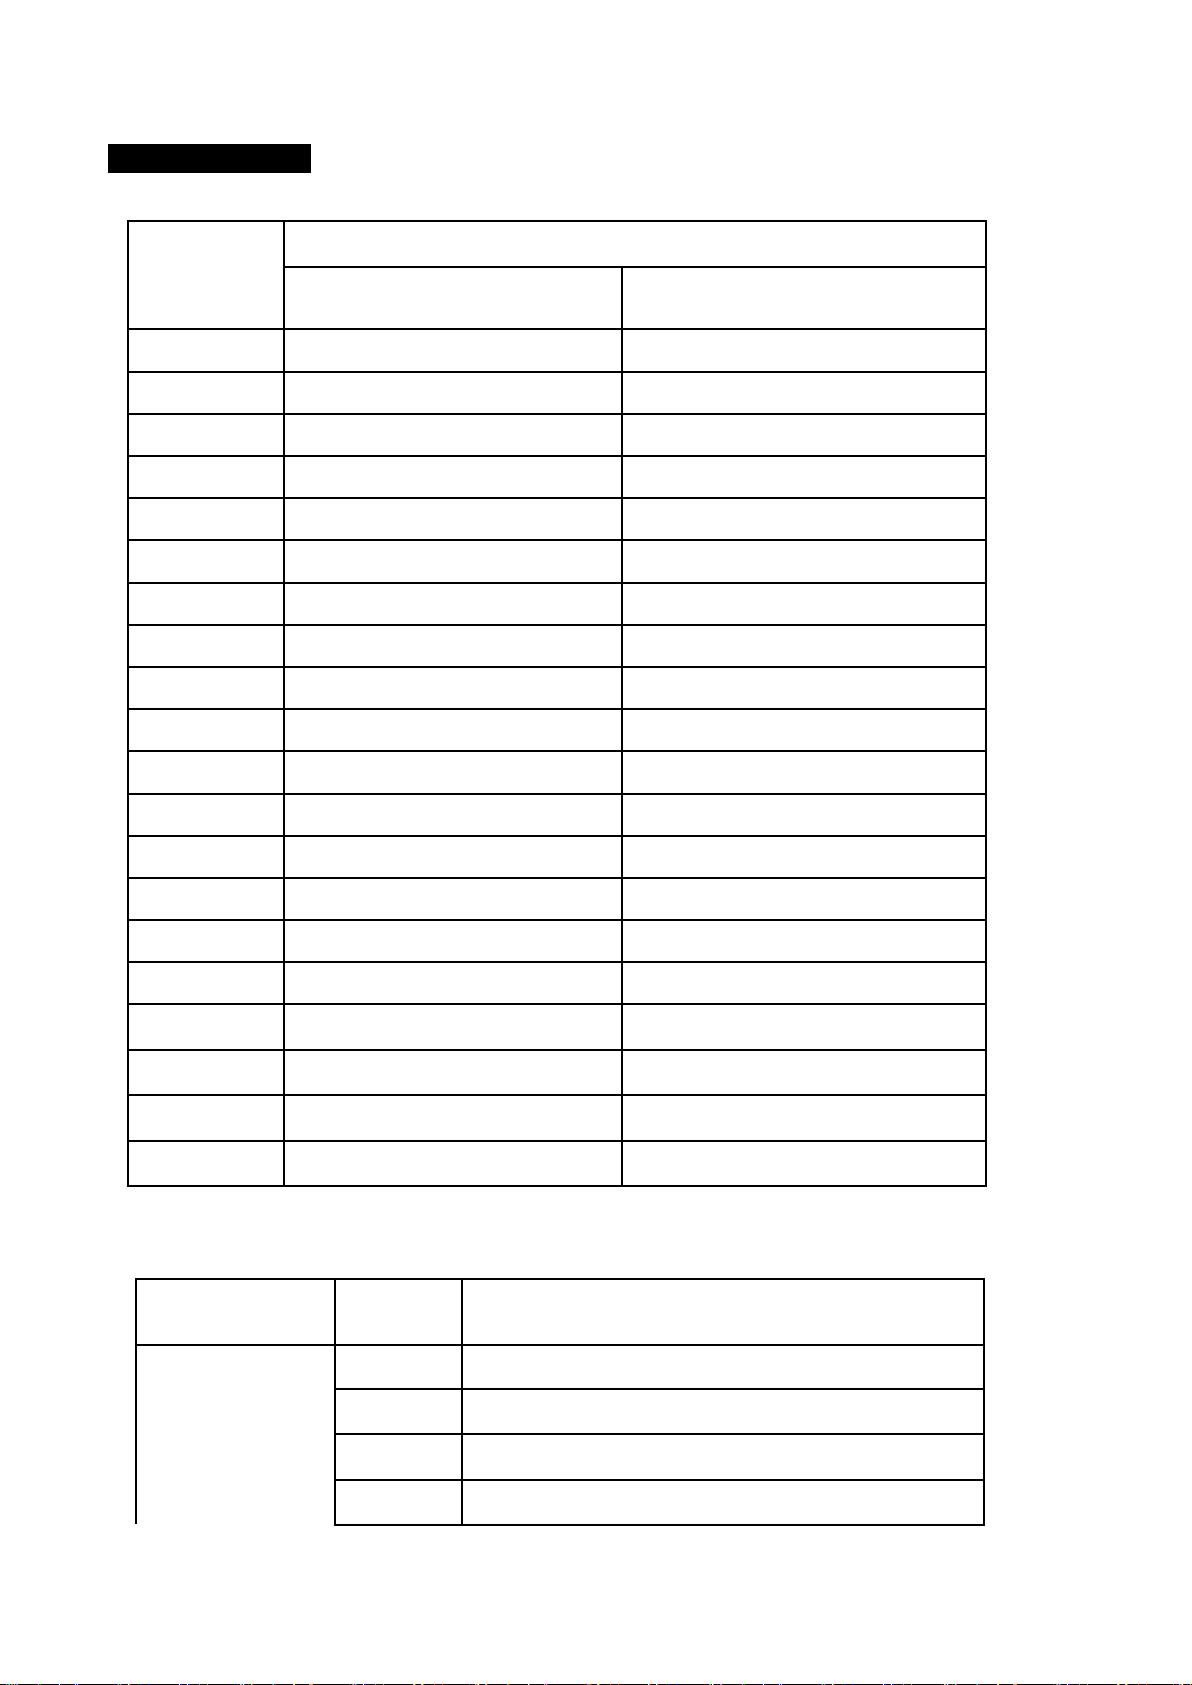
Menu function:
Page 8
8
9. DMX Channels
CHANNEL
CHANNEL MODE
STANDARD (16)
EXTENDED (20)
1
COLOR WHEEL
COLOR WHEEL
2
STROBE
STROBE
3
DIMMER
DIMMER
4
FIXGOBO
FIXGOBO
5
PRISM INS
PRISM INS
6
PRISM ROT
PRISM ROT
7
PRISM MOVE
PRISM MOVE
8
FROST
FROST
9
FOCUS
FOCUS
10
PAN
PAN
11
PAN FINE
PAN FINE
12
TILT
TILT
13
TILT FINE
TILT FINE
14
PTTIME
PTTIME
15
FUNCTION
FUNCTION
16
LAMP ON/OFF
LAMP ON/OFF
17 PAN-TILTTIME
18 COLOUR TIME
19 BEAM TIME
20 GOBO TIME
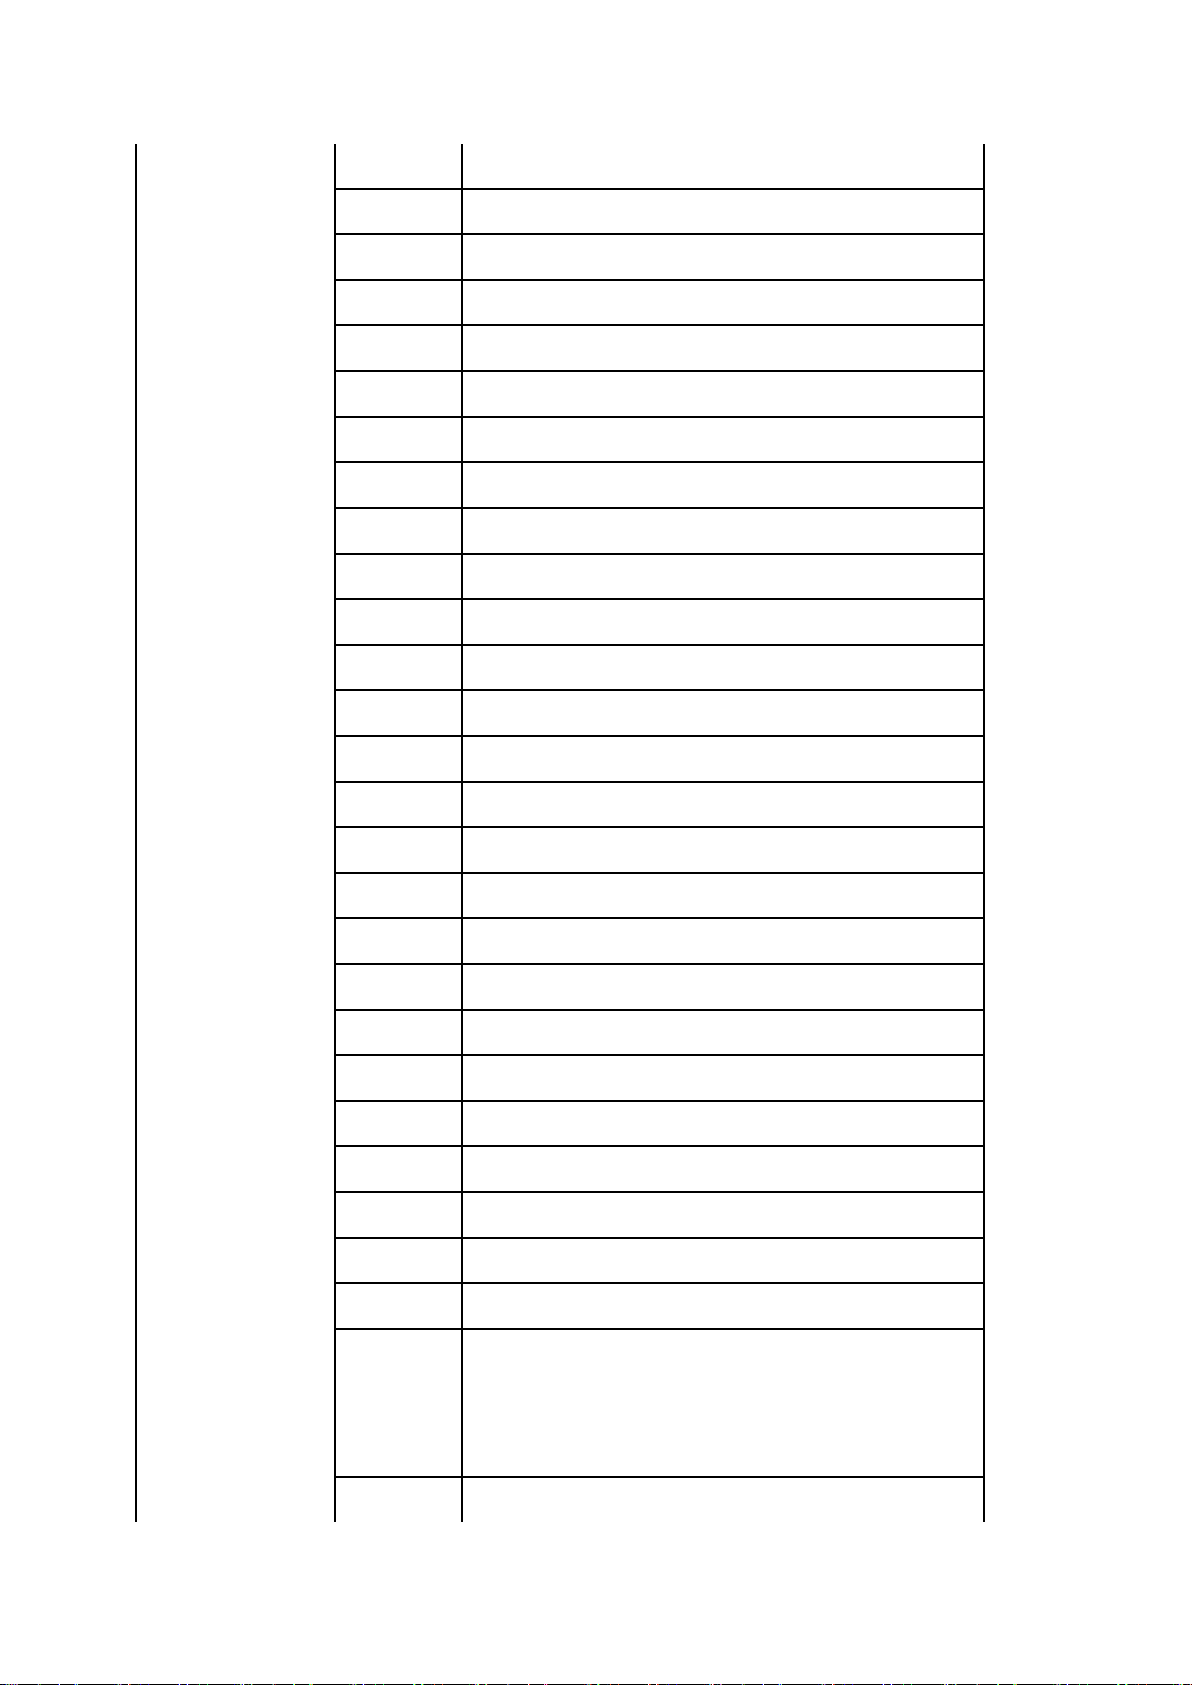
CHANNEL
DMX
VALUE
EFFECT
1CH:COLOR
0-4
WHITE
5-8
WHITE+DARK RED
9-12
DARK RED
13-17
DARK RED +ORANGE
Page 9
9
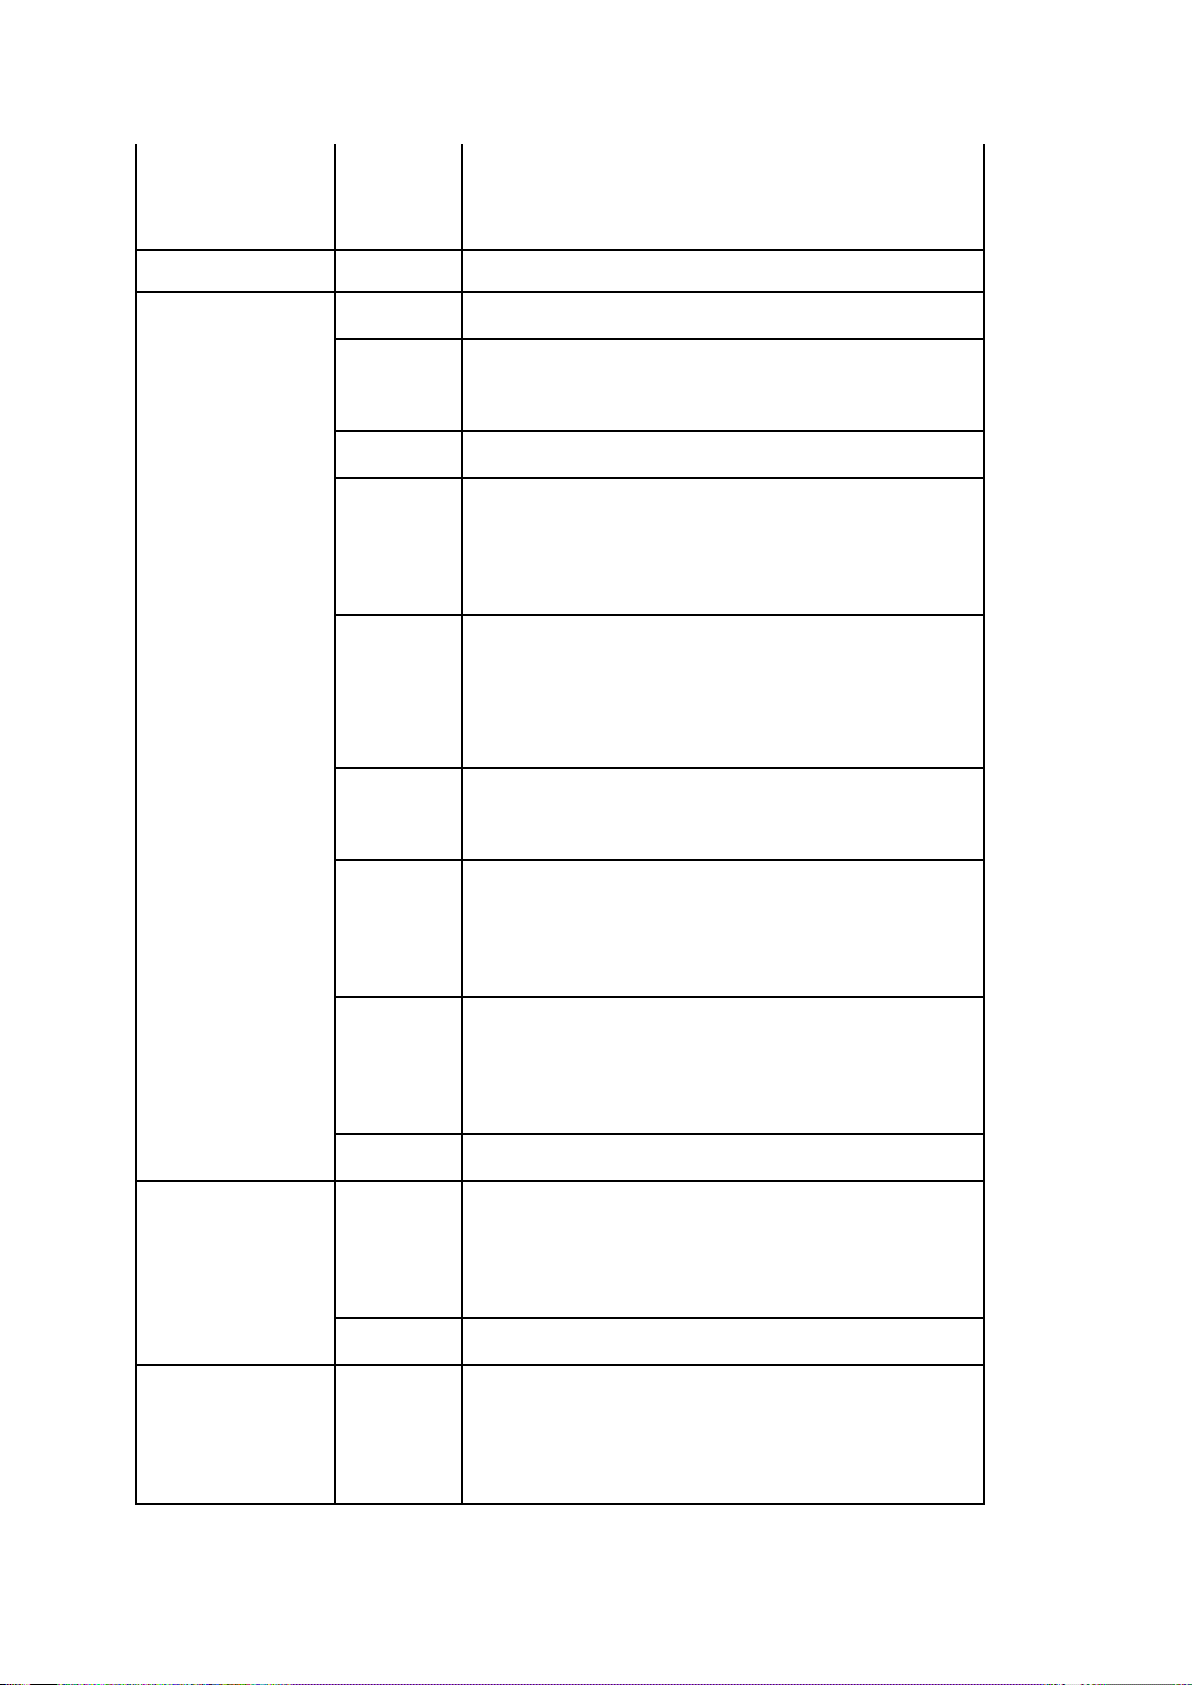
18-21
ORANGE
22-25
ORANGE+AQUAMARINE
26-29
AQUAMARINE
30-34
AQUAMARINE+DARK GREEN
35-38
DARK GREEN
39-42
DARK GREEN+GREEN
43-46
GREEN
47-51
GREEN+LAVENDER
52-55
LAVENDER
56-59
LAVENDER+PINK
60-63
PINK
64-68
PINK+YELLOW
69-72
YELLOW
73-76
YELLOW+ MAGENTA
77-81
MAGENTA
82-85
MAGENTA+CYAN
86-89
CYAN
90-93
CYAN+CTO2
94-98
CTO2
99-102
CTO2+CTO1
103-106
CTO1
107-110
CTO1+CTB
111-115
CTB
116-119
CTB+DARK BLUE
120-123
DARK BLUE
124-127
DARK BLUE/WHITE
128-191
CLOCKWISE RAINBOW
FROM FAST TO SLOW
192-255
ANTICLOCKWISE RAINBOW
Page 10
10
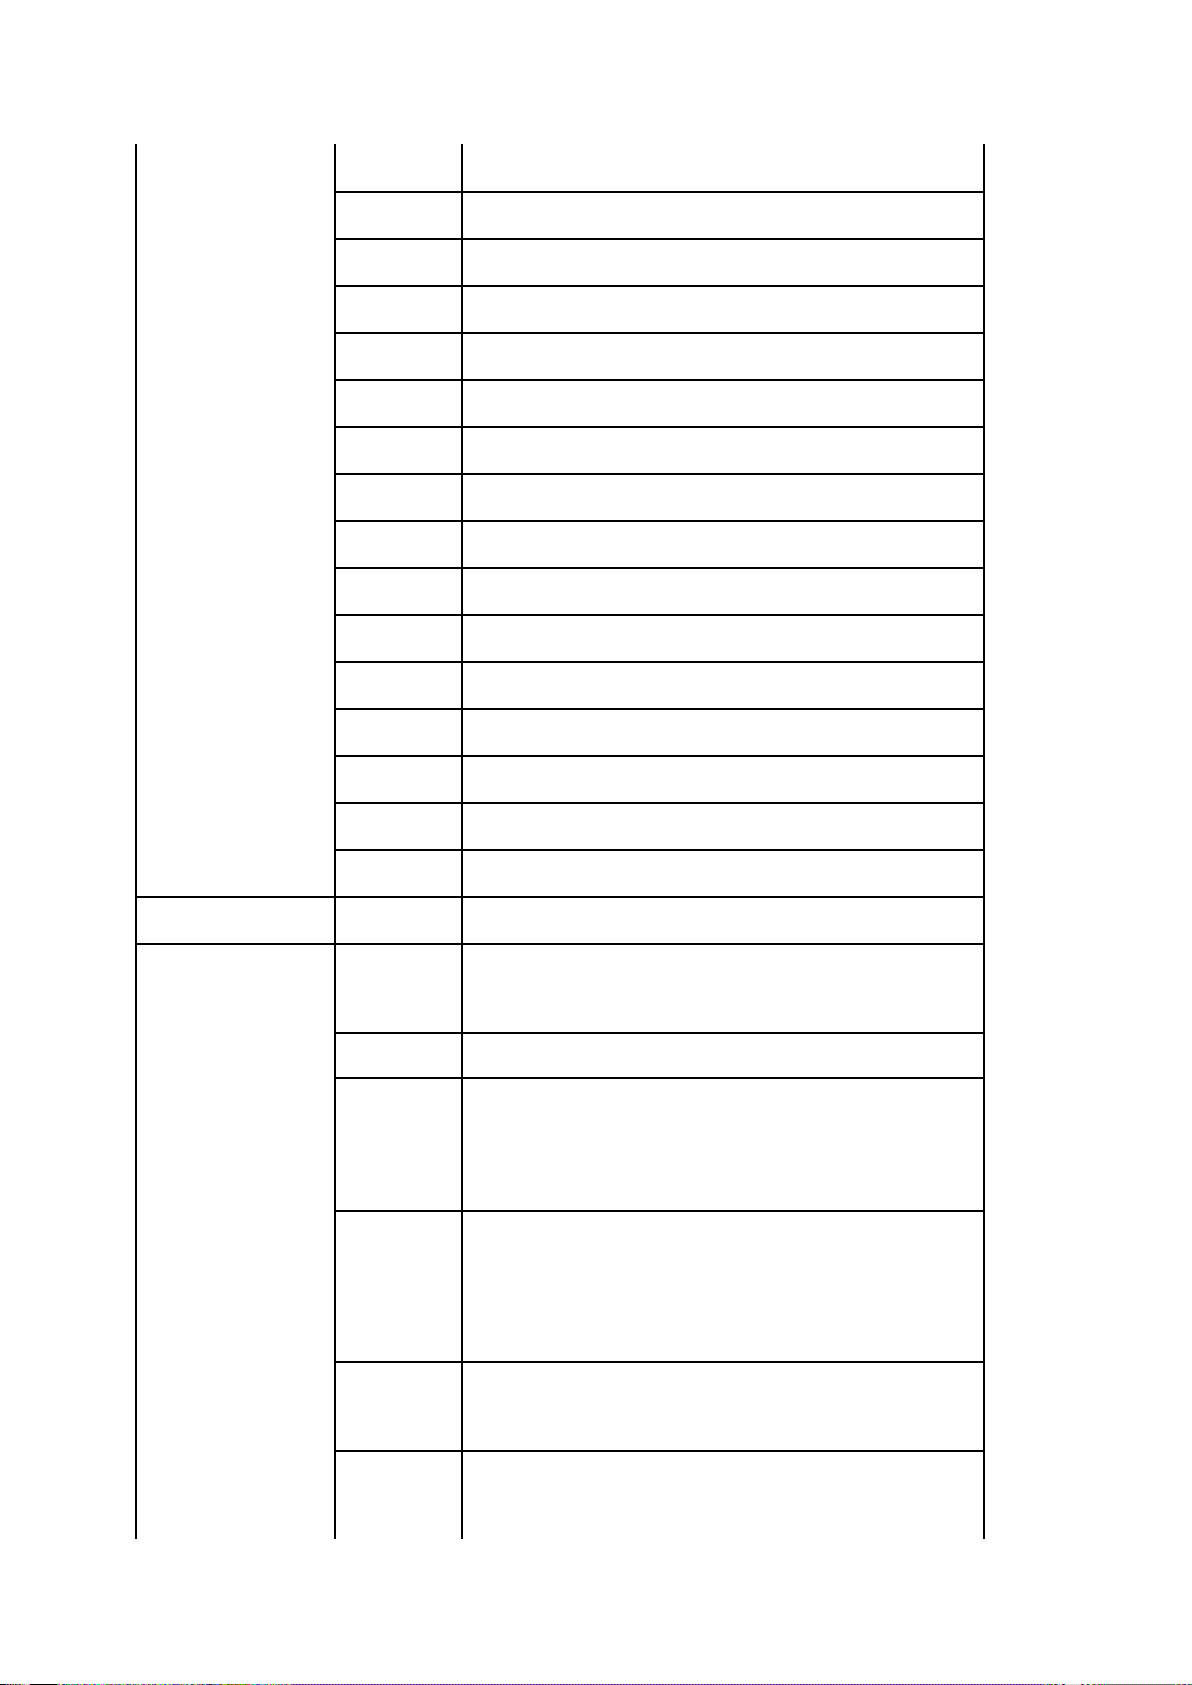
FROM SLOW TO FAST
2CH:STROBE
0-3
CLOSED LIGHT
4-7
OPEN LIGHT
8-97
STROBE FROM SLOW TO
FAST
98-101
OPEN LIGHT
102-126
PULSE ON
,STROBE
FROM
SLOW TO FAST
127-151
PULSE OFF,STROBE
FROM
SLOW TO FAST
152-155
LIGHT ON
156-180
RANDOM PULSE ON,STROBE
FROM SLOW TO FAST
181-205
RANDOM PULSE OFF,STROBE
FROM SLOW TO FAST
206-209
LIGHT ON
210-249
RANDOM
STROBE
FROM
SLOW TO FAST
250-255
LIGHT OFF
3CH:DIMMER
0-225
DIMMER
FROM DARK TO
BRIGHT
Page 11
11
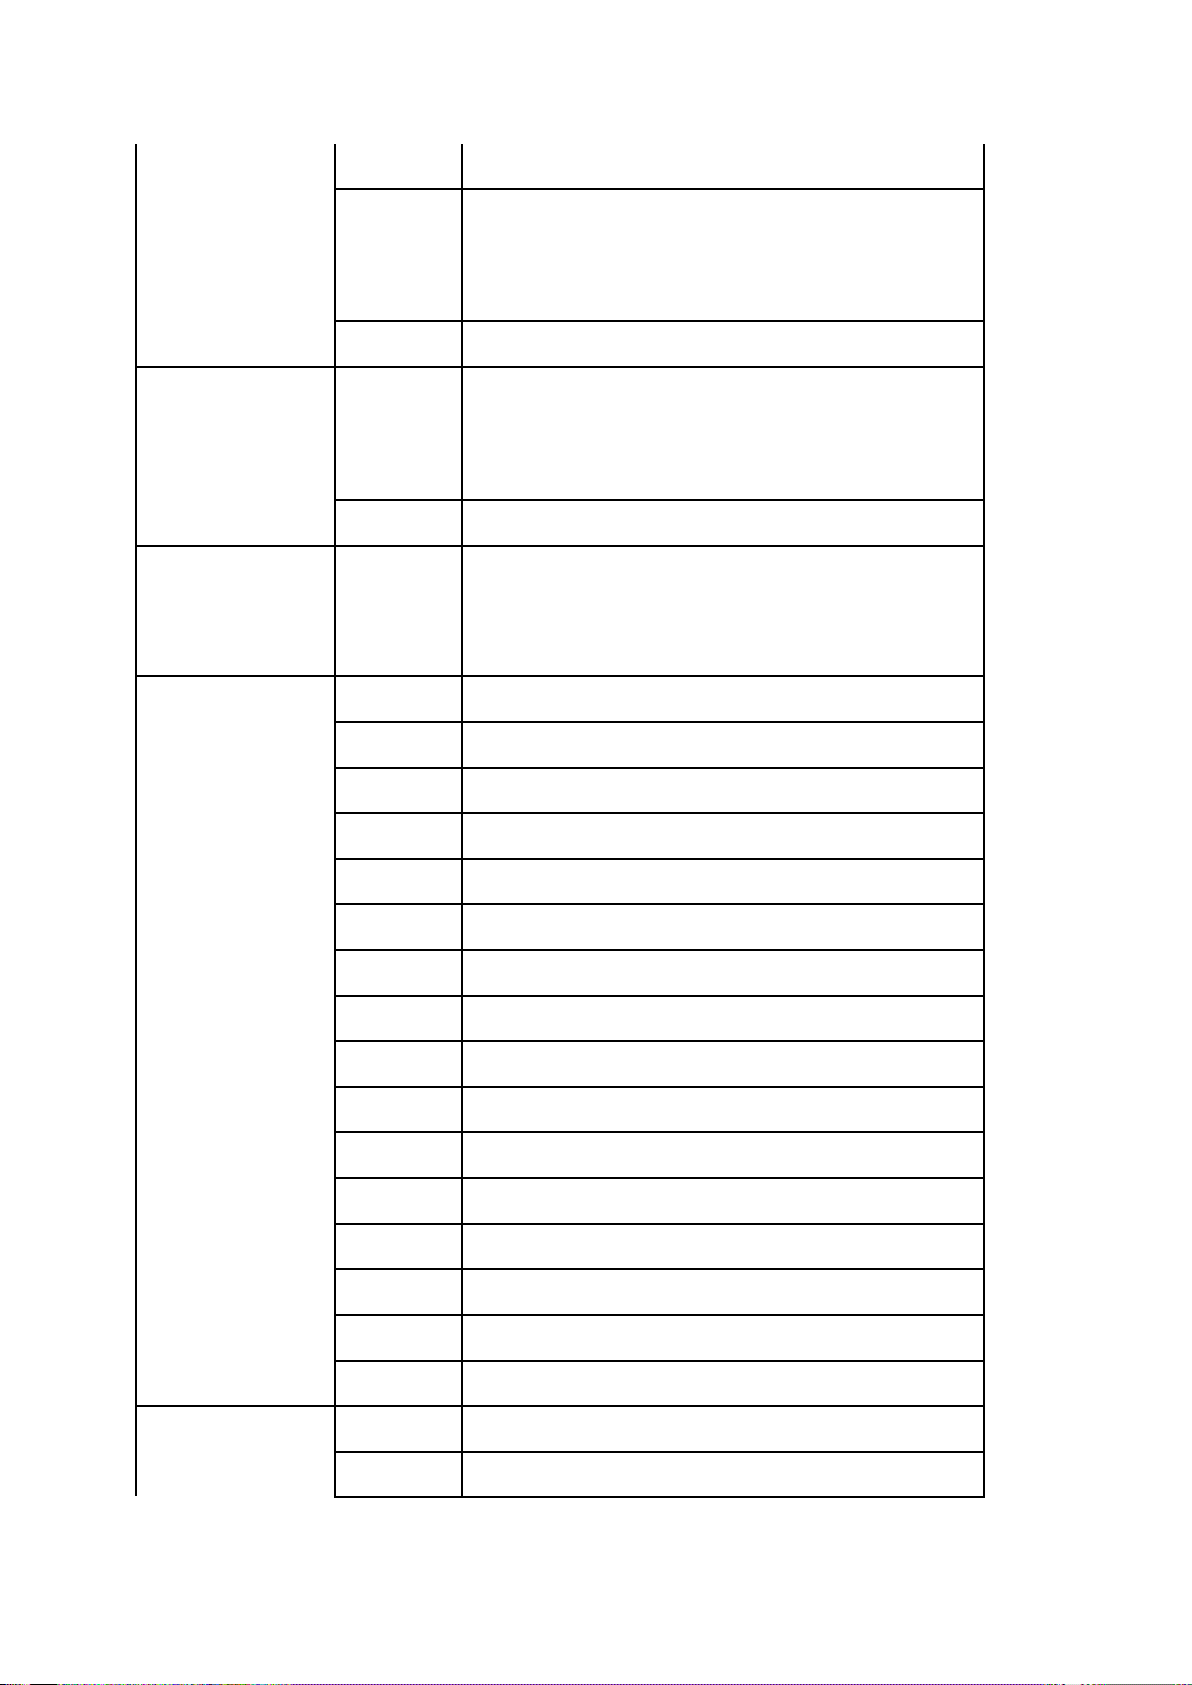
4CH:GOBO
0-3
WHITE
4-7
GOBO1
8-11
GOBO2
12-15
GOBO3
16-19
GOBO4
20-23
GOBO5
24-27
GOBO6
28-31
GOBO7
32-35
GOBO8
36-39
GOBO9
40-43
GOBO10
44-47
GOBO11
48-51
GOBO12
52-55
GOBO13
56-59
GOBO14
60-63
GOBO15
4-7
OPEN LIGHT
8-97
STROBE FROM SLOW TO
FAST
98-101
OPEN LIGHT
102-126
PULSE ON
,STROBE
FROM
SLOW TO FAST
127-151
PULSE OFF,STROBE
FROM
SLOW TO FAST
152-155
LIGHT ON
156-180
RANDOM PULSE ON,STROBE
FROM SLOW TO FAST
Page 12
12
181-205
RANDOM PULSE OFF,STROBE
FROM SLOW TO FAST
206-209
LIGHT ON
210-249
RANDOM
STROBE
FROM
SLOW TO FAST
250-255
LIGHT OFF
3CH:DIMMER
0-225
DIMMER
FROM DARK TO
BRIGHT
4CH:GOBO
0-3
WHITE
4-7
GOBO1
8-11
GOBO2
12-15
GOBO3
16-19
GOBO4
20-23
GOBO5
24-27
GOBO6
28-31
GOBO7
32-35
GOBO8
36-39
GOBO9
40-43
GOBO10
44-47
GOBO11
48-51
GOBO12
52-55
GOBO13
56-59
GOBO14
60-63
GOBO15
64-67
GOBO16
68-71
GOBO17
Page 13
13
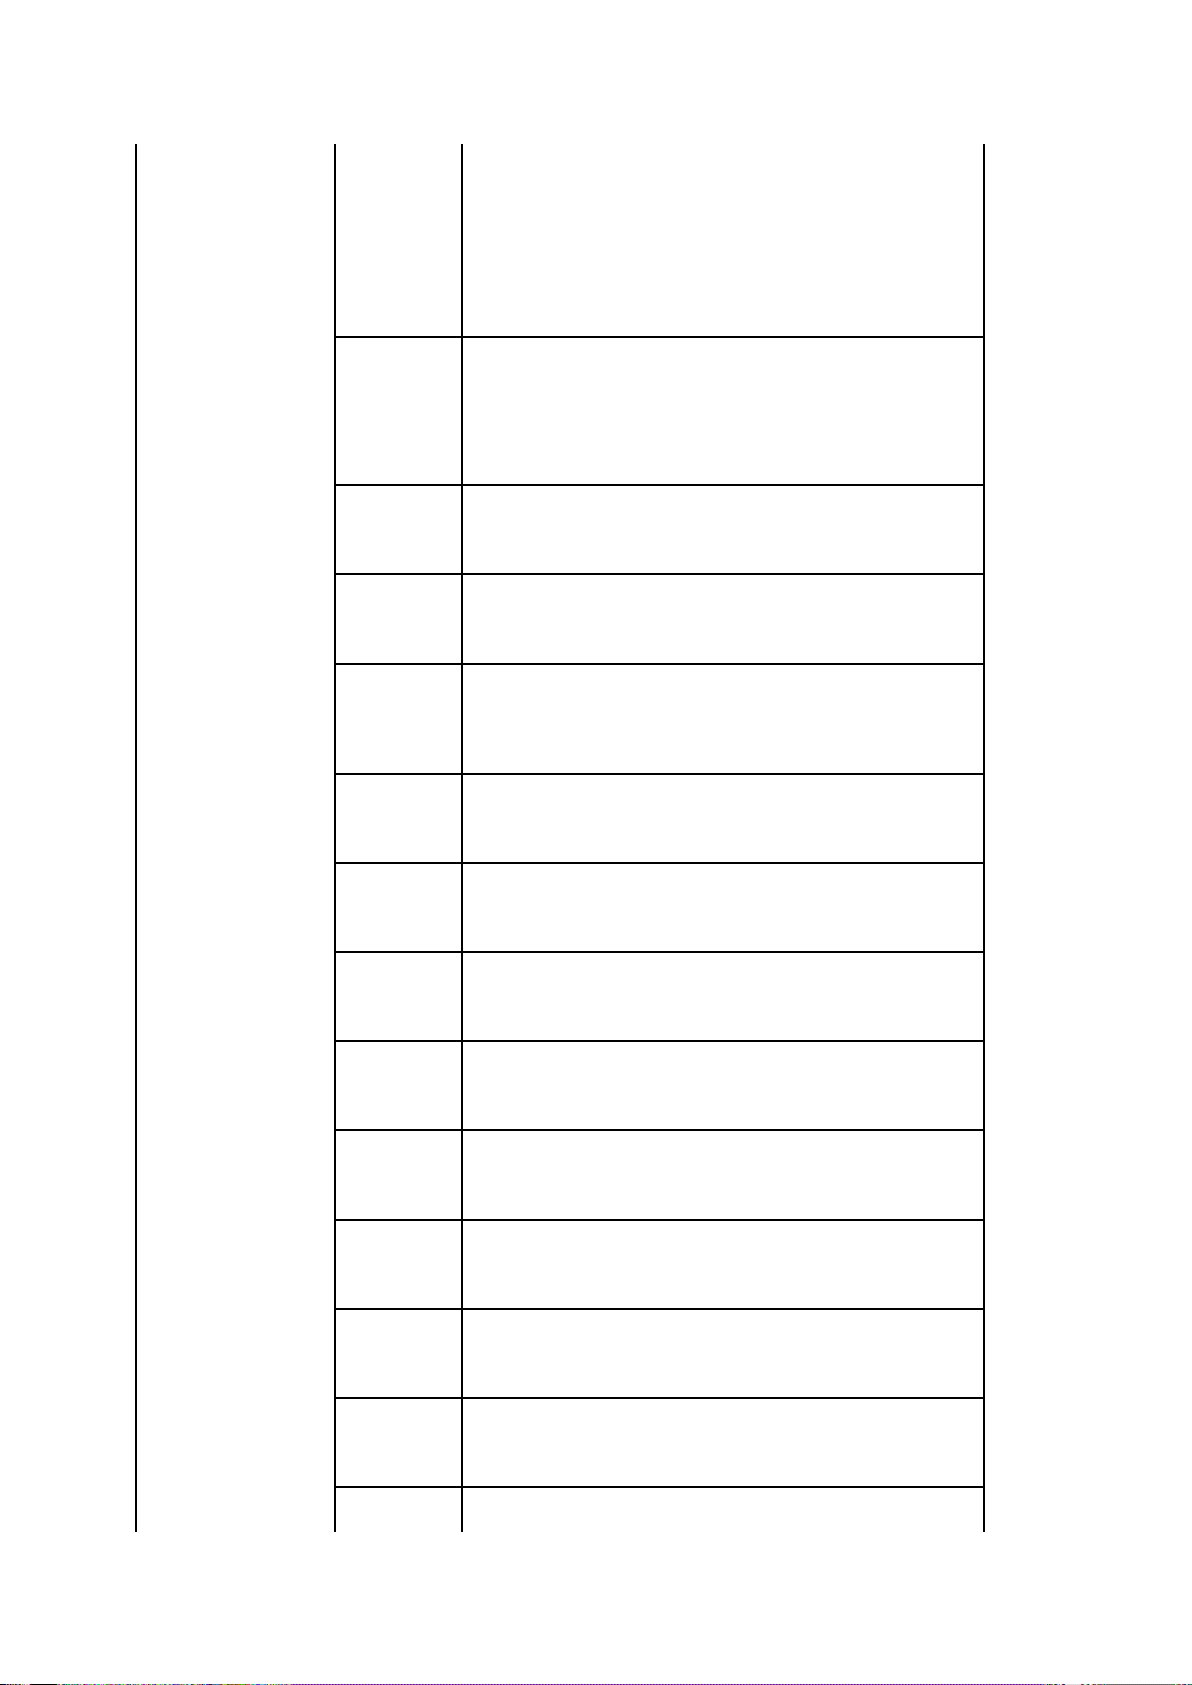
72-115
GOBO ANTICLOCKWISE
RAINBOW FROM SLOW TO
FAST
116-159
GOBO CLOCKWISE RAINBOW
FROM FAST TO SLOW
160-166
GOBO 1 SHAKE FROM SLOW
TO FAST
167-172
GOBO 2 SHAKE FROM SLOW
TO FAST
173-179
GOBO SHAKE FROM
SLOW TO FAST
180-185
GOBO 4 SHAKE FROM SLOW
TO FAST
186-191
GOBO 5 SHAKE FROM SLOW
TO FAST
192-198
GOBO 6 SHAKE FROM SLOW
TO FAST
199-204
GOBO7
SHAKE FROM SLOW
TO FAST
205-211
GOBO 8 SHAKE FROM SLOW
TO FAST
212-217
GOBO 9 SHAKE FROM SLOW
TO FAST
218-223
GOBO 10 SHAKE FROM SLOW
TO FAST
224-230
GOBO 11 SHAKE FROM SLOW
TO FAST
231-236
GOBO 12 SHAKE FROM SLOW
Page 14
14
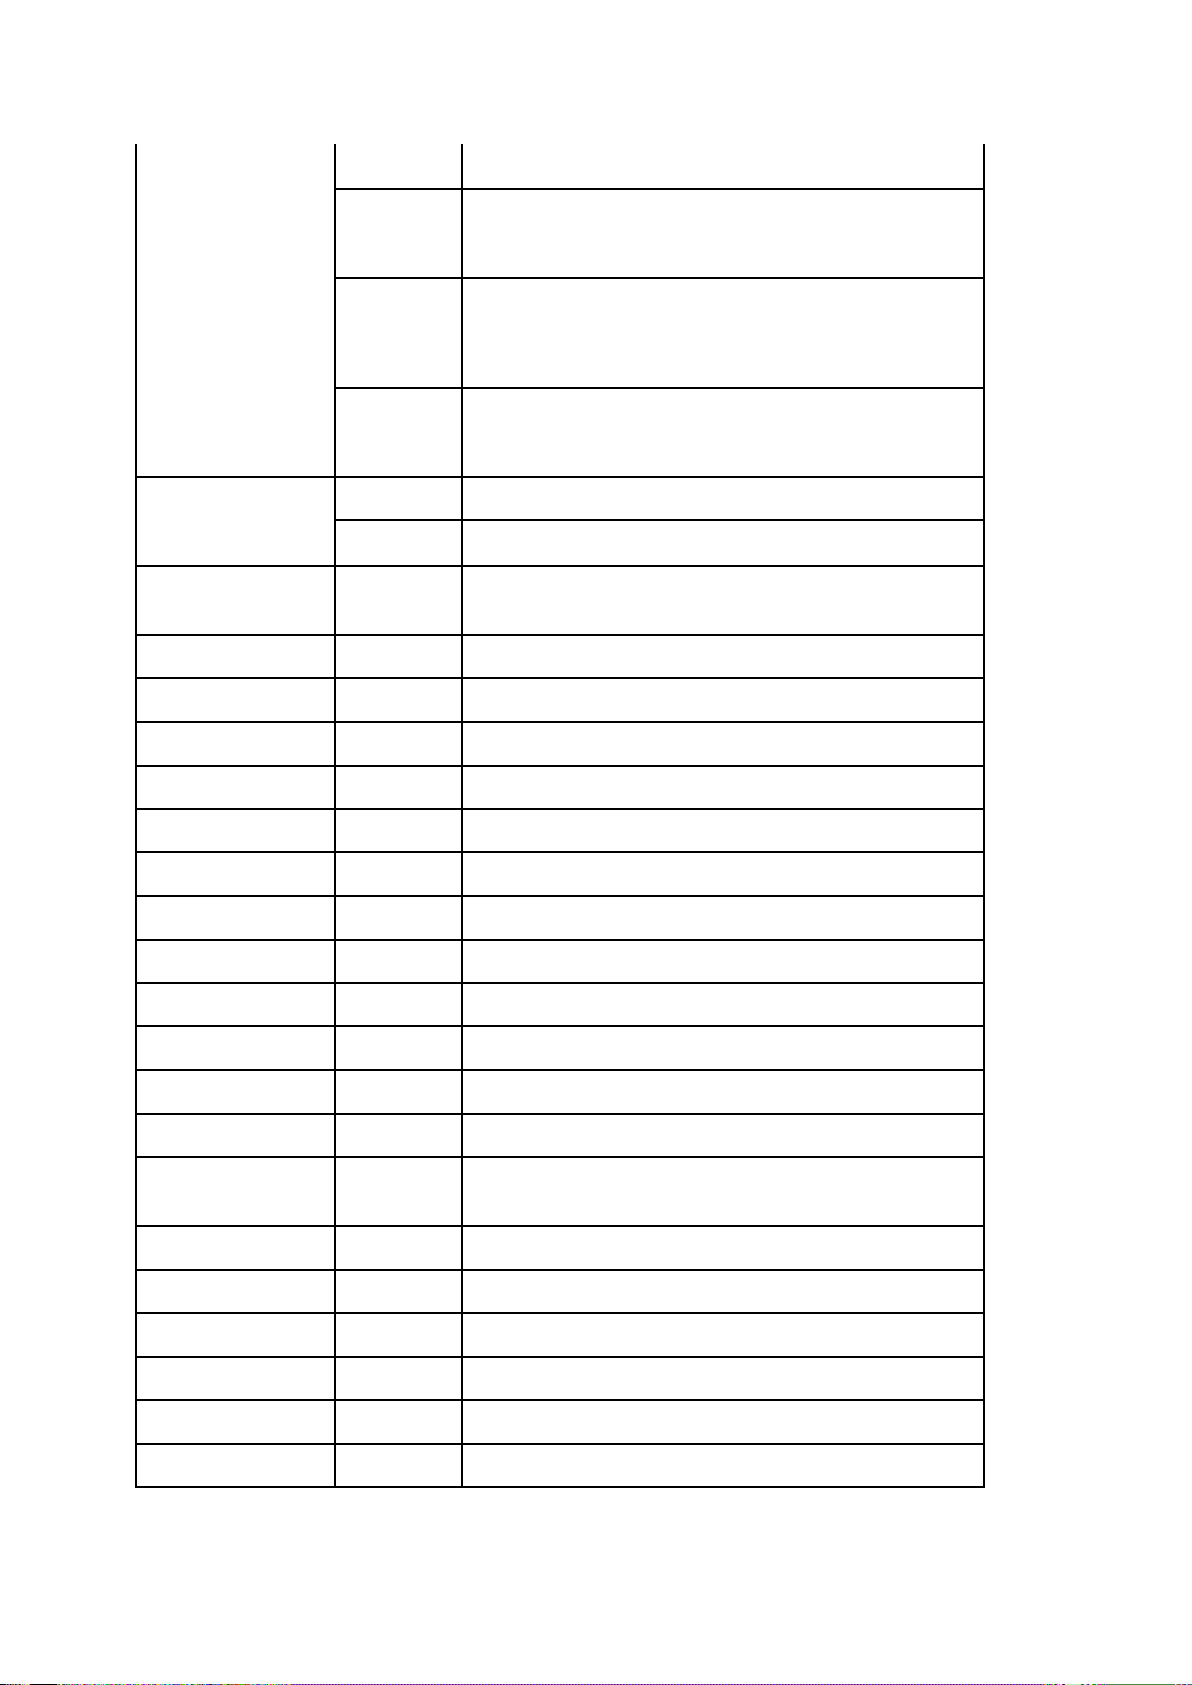
TO FAST
237-243
GOBO 13 SHAKE FROM SLOW
TO FAST
244-249
GOBO 14 SHAKE FROM SLOW
TO FAST
250-255
GOBO 15 SHAKE FROM SLOW
TO FAST
5CH:PRISM
0-127
WITHOUT PRISM
128-255
WITH
PRISM
6CH:PRISM
ROTATION
0-63
0-360° POSITION
64-127
CLOCKWISE ROTATION FROM
FAST TO SLOW
128-191
ANTICLOCKWISE ROTATION
FROM FAST TO SLOW
192-207
90° SHAKE FROM SLOW TO
FAST
208-223
180°SHAKE FROM SLOW TO
FAST
224-239
270° SHAKE FROM SLOW TO
FAST
240-255
360° SHAKE FROM SLOW TO
FAST
7CH:PRISM
ZOOM
0-255
No Function
8CH:FROST
0-255
0-100% LINEAR ATOMIZATION
9CH:FOCUS
0-255
0-100% LINEAR FOCUS
10CH:PAN
0-255
0-540°
11CH:PAN FINE
0-255
0-1.8°
12CH:TILT
0-255
0-270°
13CH:TILT FINE
0-255
0-1.8°
Page 15
15
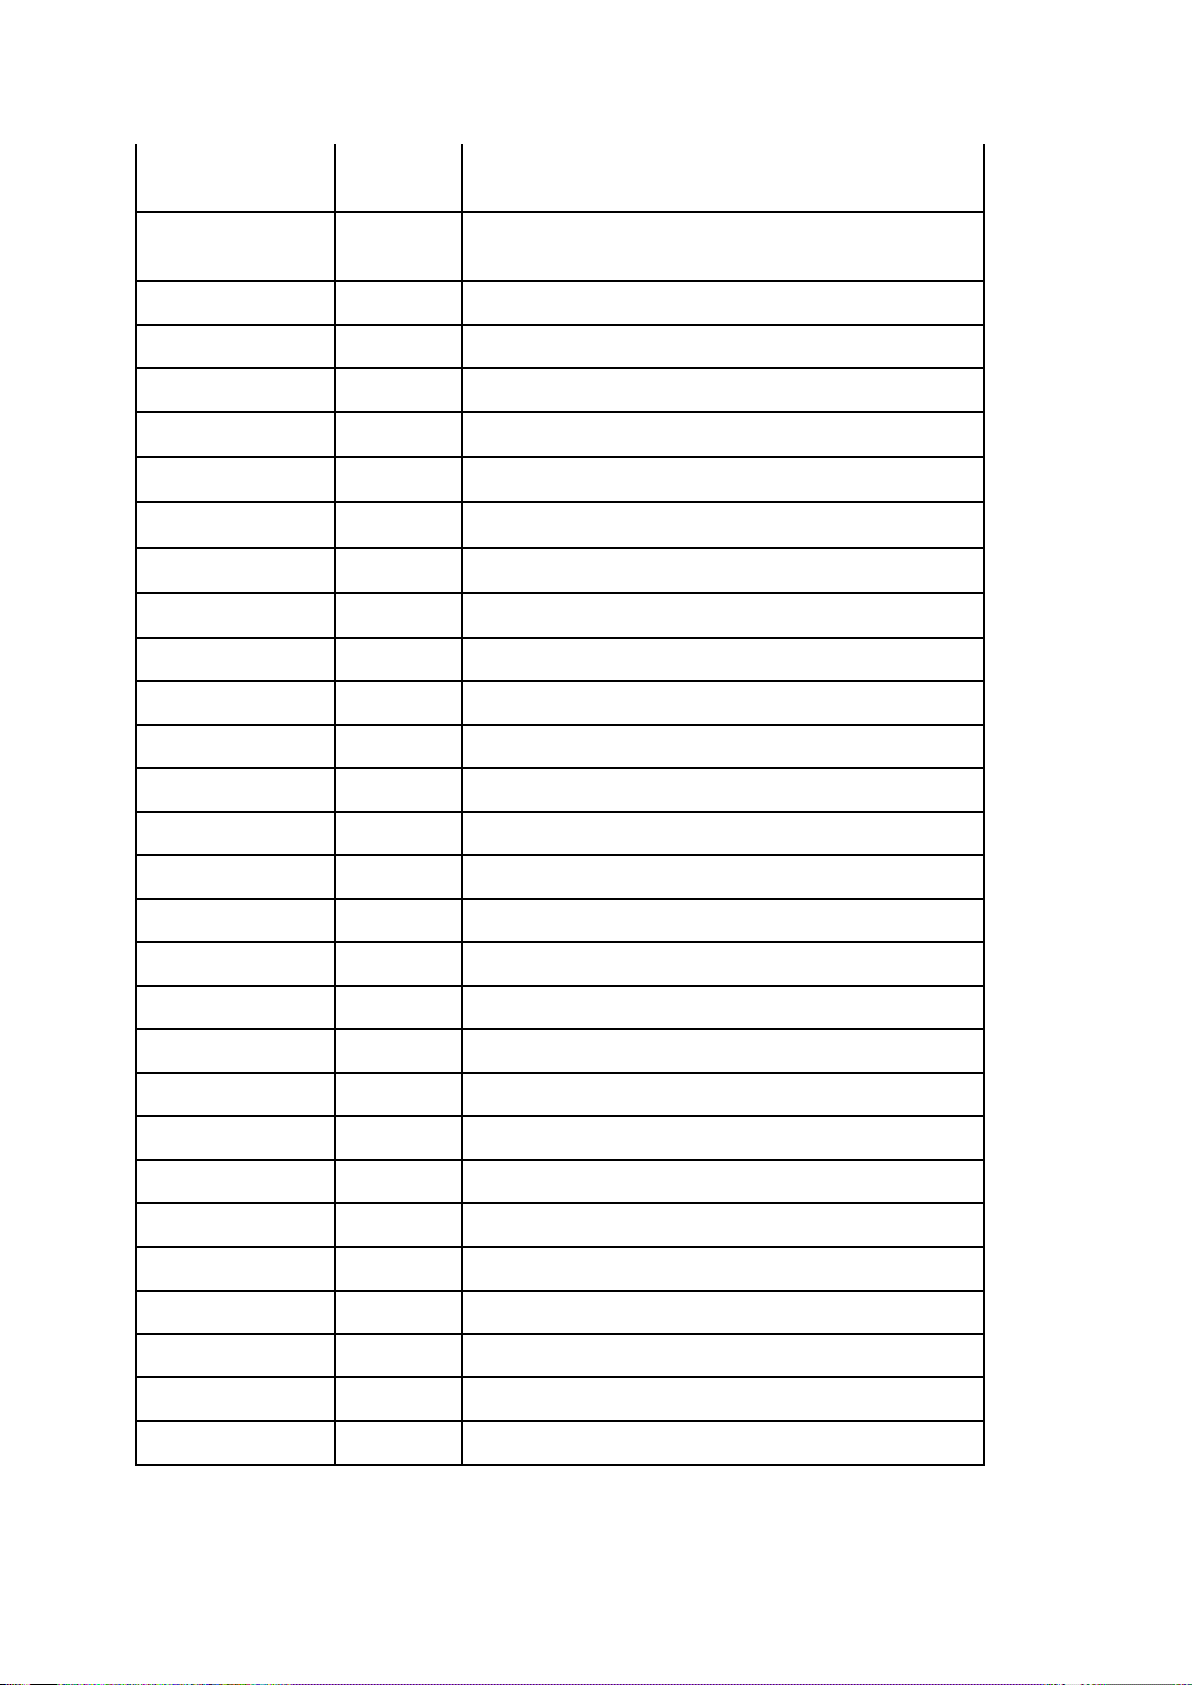
14CH:PAN-TILT
SPEED
0-255
SPEED FROM FAST TO SLOW
15CH:
FUNCTION
0-13
UNUSED RANGE
14-24
PAN-TILT MOVES,BLACKOUT
25-35
CHANGE GOBOS, BLACKOUT
36-46
CHANGE COLORS,BLACK OUT
47-57
CHOOSE PRISMS,BLACK OUT
58-68
CHOOSE FROST,BLACK OUT
69-79
XY、GOBO、COLOR、FROST,
CHANGING,BLACKOUT
80-90
GOBO、COLOR、
FROST,FUNCTION
CHANGES,BLACKOUT
91-101
UNUSED RANGE
102-112
DISPLAY SCREEN ON
113-123
DISPLAY SCREEN OFF
124-134
SCREEN
BACKWARD(5SECONDS)
135-145
SCREEN
FORWARD(5SECONDS)
146-156
UNUSED RANGE
157-167
HEAD MOTOR RESET
168-178
PAN-TILT RESET
179-189
WHOLE MACHINE RESET
16CH:LAMP
0-31
UNUSED RANGE
32-63
LAMP POWER REDUCTION (ACTION)
64-159
UNUSED RANGE
160-191
TURN OFF (5 SECONDS)
192-223
UNUSED RANGE
224-255
TURN ON(5 SECONDS)
Page 16

16
10. Maintenance and Cleaning
The following points have to be considered during the inspection:
All screws for installing the devices or parts of the device have to be tightly connected and must
not be corroded.
There must not be any deformations on the housing, color lenses, fixations and installation
spots (ceiling, suspension, trussing).
Mechanically moved parts must not show any traces of wearing and must not rotate with
unbalances.
The electric power supply cables must not show any damage, material fatigue or sediments.
Further instructions depending on the installation spot and usage have to be adhered by a
skilled installer and any safety problems have to be removed.
In order to make the lights in good condition and extend the life time, we suggest a regular
cleaning to the lights.
Clean the inside and outside lens each week to avoid the weakness of the lights due to
accumulation of dust.
Clean the fan each week.
A detailed electric check by approved electrical engineer each three month, make sure that the
circuit contacts are in good condition, prevent the poor contact of circuit from overheating.
We recommend to clean the device frequently. Please use a moist, lint-free cloth. Never use alcohol
solvents.
There are no serviceable parts inside the device. Please refer to the instructions under “Installation
instructions”.
If you need any spare parts, please order genuine parts from your local dealer.
 Loading...