

Page 1
1
Eye 360 Led
LED WASH
This product manual contains important information about the
safe installation and use of this projector. Please read and follow
these instructions carefully and keep this manual in a safe place
User manual
Please read the instructions carefully before use
Page 2

2
TABLE OF CONTENTS
1. Safety Instructions ........................................................................................................................................... 3
2. Installation ....................................................................................................................................................... 4
3. Features & Specifications ................................................................................................................................ 5
5. Operating Instructions ..................................................................................................................................... 6
7. DMX-512 Control Connections ........................................................................................................................ 7
8. Menu ............................................................................................................................................................... 8
9. DMX Channels ................................................................................................................................................. 9
10. Maintenance and Cleaning .......................................................................................................................... 10
11. Troubleshooting .......................................................................................................................................... 11
STATEMENT
The product has full capability and intact packing when leaves factory. All the users should
comply with provided warnings and manual. Any damages caused by misuse are not
included in our guarantee. We cannot be responsible for any malfunctions & problems
owing to ignoring the manual.
Page 3

3
1. Safety Instructions
• Please keep this User Guide for future consultation. If you sell the unit to another user, be
sure that they also receive this instruction booklet.
• Unpack and check carefully there is no transportation damage before using the unit.
• Before operating, ensure that the voltage and frequency of power supply match the power
requirements of the unit.
• It’s important to ground the yellow/green conductor to earth in order to avoid electric shock.
• The unit is for indoor use only. Use only in a dry location.
• The unit must be installed in a location with adequate ventilation, at least 50cm from
adjacent surfaces. Be sure that no ventilation slots are blocked.
• Disconnect main power before replacement or servicing.
• Make sure there are no flammable materials close to the unit while operating as it is fire
hazard.
• Use safety cable when fixes this unit. DO NOT handle the unit by taking its head only, but
always by taking its base.
• Maximum ambient temperature is Ta: 40℃. DO NOT operate it where the temperature is
higher than this Unit surface temperature may reach up to 85℃.
• DO NOT touch the housing bare-hands during its operation. Turn off the power and allow
about 15 minutes for the unit to cool down before replacing or serving.
• In case of serious operating problem, stop using the unit immediately. Never try to repair
the unit by yourself. Repairs carried out by unskilled people can lead to damage or
malfunction. Please contact the nearest authorized technical assistance centre. Always use
the same type spare parts.
• DO NOT touch any wire during operation as high voltage might be causing electric shock.
Warning:
• To prevent or reduce the risk of electrical shock or fire, do not expose the unit to rain or
moisture.
• DO NOT open the unit within five minutes after switching off.
• The housing, the lenses, or the ultraviolet filter must be replaced if they are visibly
damaged.
Caution:
There are no user serviceable parts inside the unit. DO NOT open the housing or attempt any
repairs by yourself. If your unit requires service, please contact your nearest dealer.
Page 4
4
2. Installation
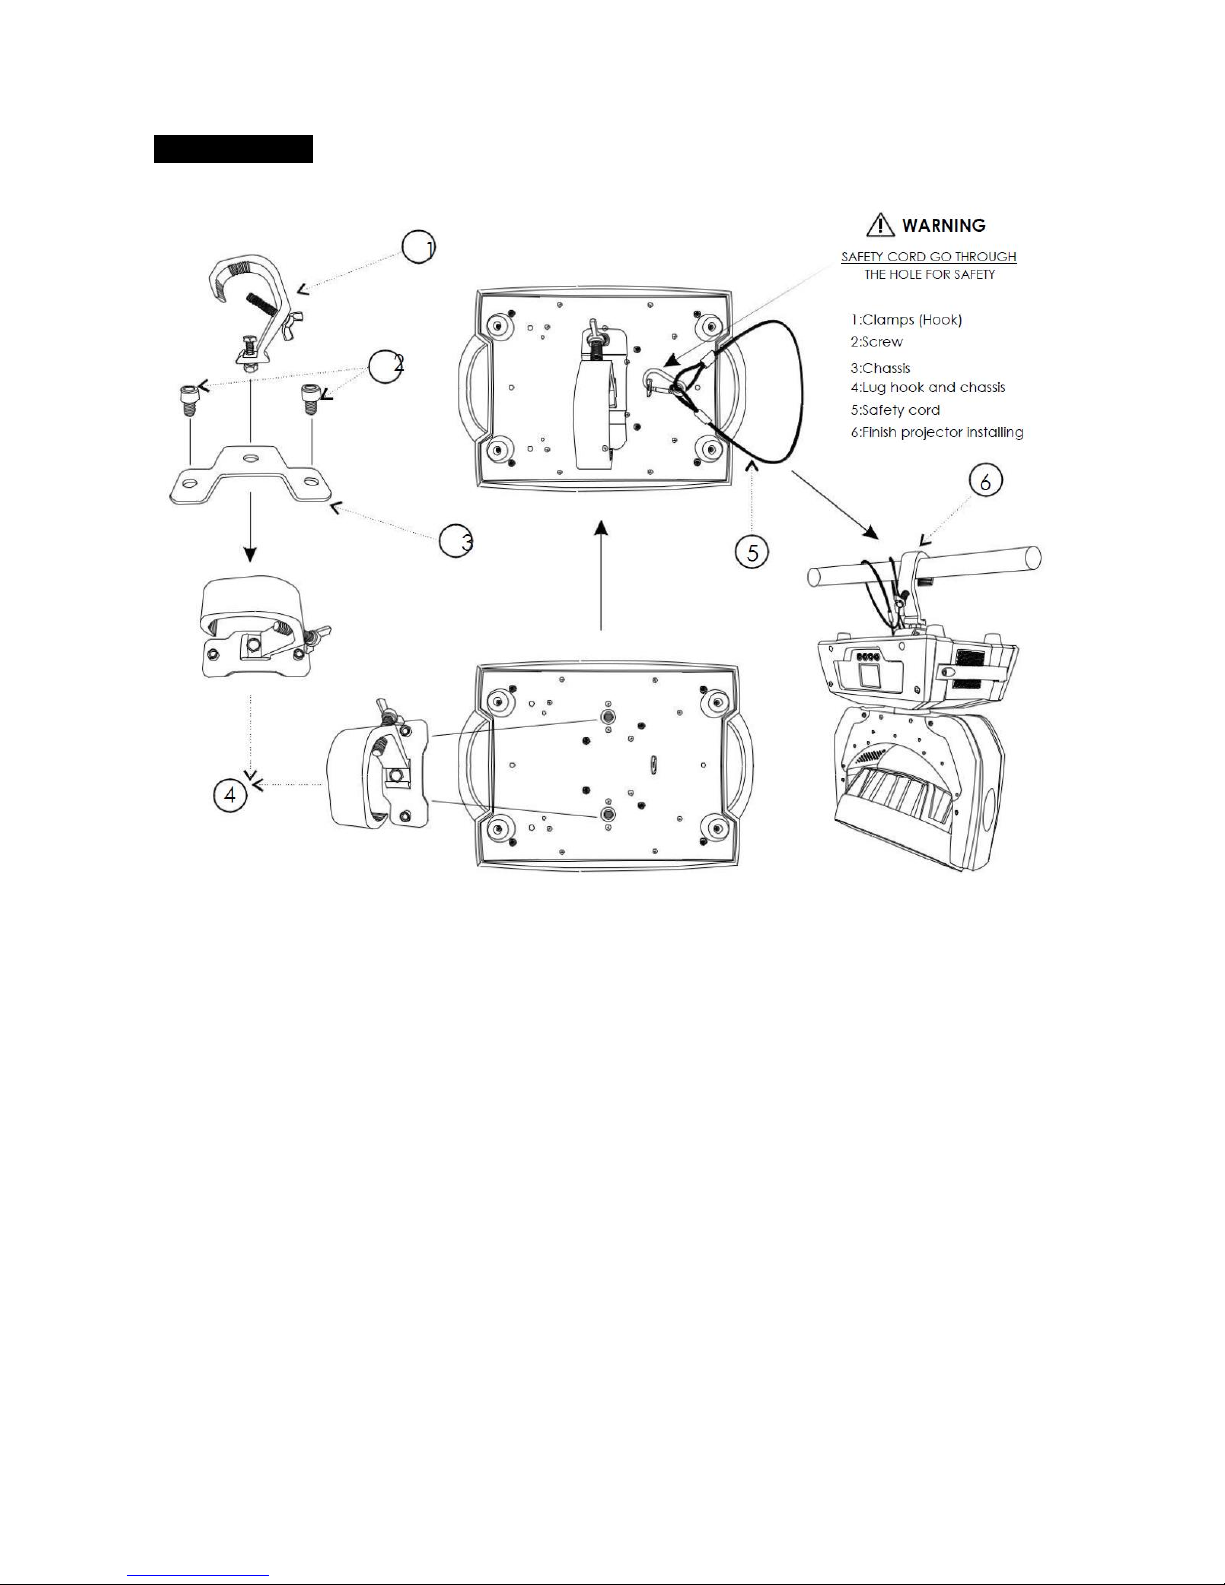
Take 1 hook and 1 safety cord out from the package and x the hook on the chassis, and fasten the
hook with the chassis to the underside of fixture with 2 screws, Hang the fixture on the structure
and fasten the screws attached to the hook. (See the WARNING on the underside of the base as
shown above) Always ensure that the projector is firmly anchored to avoid vibration and slipping
whilst functioning. Always ensure that the structure, that you are going to mount the projector on,
is secure and is strong enough to support a weight of each projector.
WARNING:
The projector MUST be lifted or carried by the HANDLES instead of clamps.
For safety the safety cord should afford 10 times of the unit’s weight.
Page 5

5
3. Features & Specifications
VOLTAGES:
100V~240V AC,50/60Hz
POWER CONSUMPTION:
400W@220V
LED:
Power consumption: 12W(RGBW)
Quantity: 36pcs
Manufacturers Rated LED Lifespan: 50000 Hours
COLOURS:
RGBW linear color mixing
DIMMER:
0-100% linearly adjustable
STROBE:
Electronic Strobe 0 ~25F.P.S
PAN AND TILT:
PAN(0°~540°) and TILT(0°~270) , User-selectable Pan/Tilt ranges
ZOOM ANGLE:
10°~55°
CONTROL:
DMX512, 3 pins interfaces DMX Control Protocol
18 channels in standard mode, and 25 channels in extended mode, Master/Salve Synchronous
Control Mode:
DMX512 / Master-Slave / Auto
HOUSING:
Flame retardant engineering plastic shell/cast aluminum, Ip20
WORK ENVIRONMENT TEMPERATURE:
-10°C~40°C
CARTONS PACKING DIMENSION:
Inner: 460x335x385 (mm) Outer: 435x345x480 (mm)
WEIGHT:
Net weight :9.6Kgı Gross Weight: 13.0Kg
DIMENSIONS [mm]:
Page 6

6
4. Operating Instructions
• The moving head is for spot effect for on-site decoration purpose.
• Don’t turn on the fixture if it’s been through severe temperature difference like after
transportation because it might damage the light due to the environment changes. So make
sure to operate the fixture until it is in normal temperature.
• This light should be keep away from strong shaking during any transportation or movement.
• Don’t pull up the light by only the head, or it might cause damages to the mechanical parts.
• Don’t expose the fixture in overheat, moisture or environment with too much dust when
installing it. And don’t lay any power cables on the floor. Or it might cause electronics shock
to the people.
• Make sure the installation place is in good safety condition before installing the fixture.
• Make sure to put the safety chain and check whether the screws are screwed properly when
installing the fixture.
• Make sure the lens are in good condition. It’s recommended to replace the units if there are
any damages or severe scratch.
• Make sure the fixture is operated by qualified personnel who know the fixture before using.
• Keep the original packages if any second shipments is needed.
• Don’t try to change the fixtures without any instruction by the manufacturer or the
appointed repairing agencies.
• It is not in warranty range if there are any malfunctions from not following the user manual
to operate or any illegal operation, like shock short circuit, electronic shock, lamp broke, etc.
Page 7
7
5. DMX-512 Control Connections
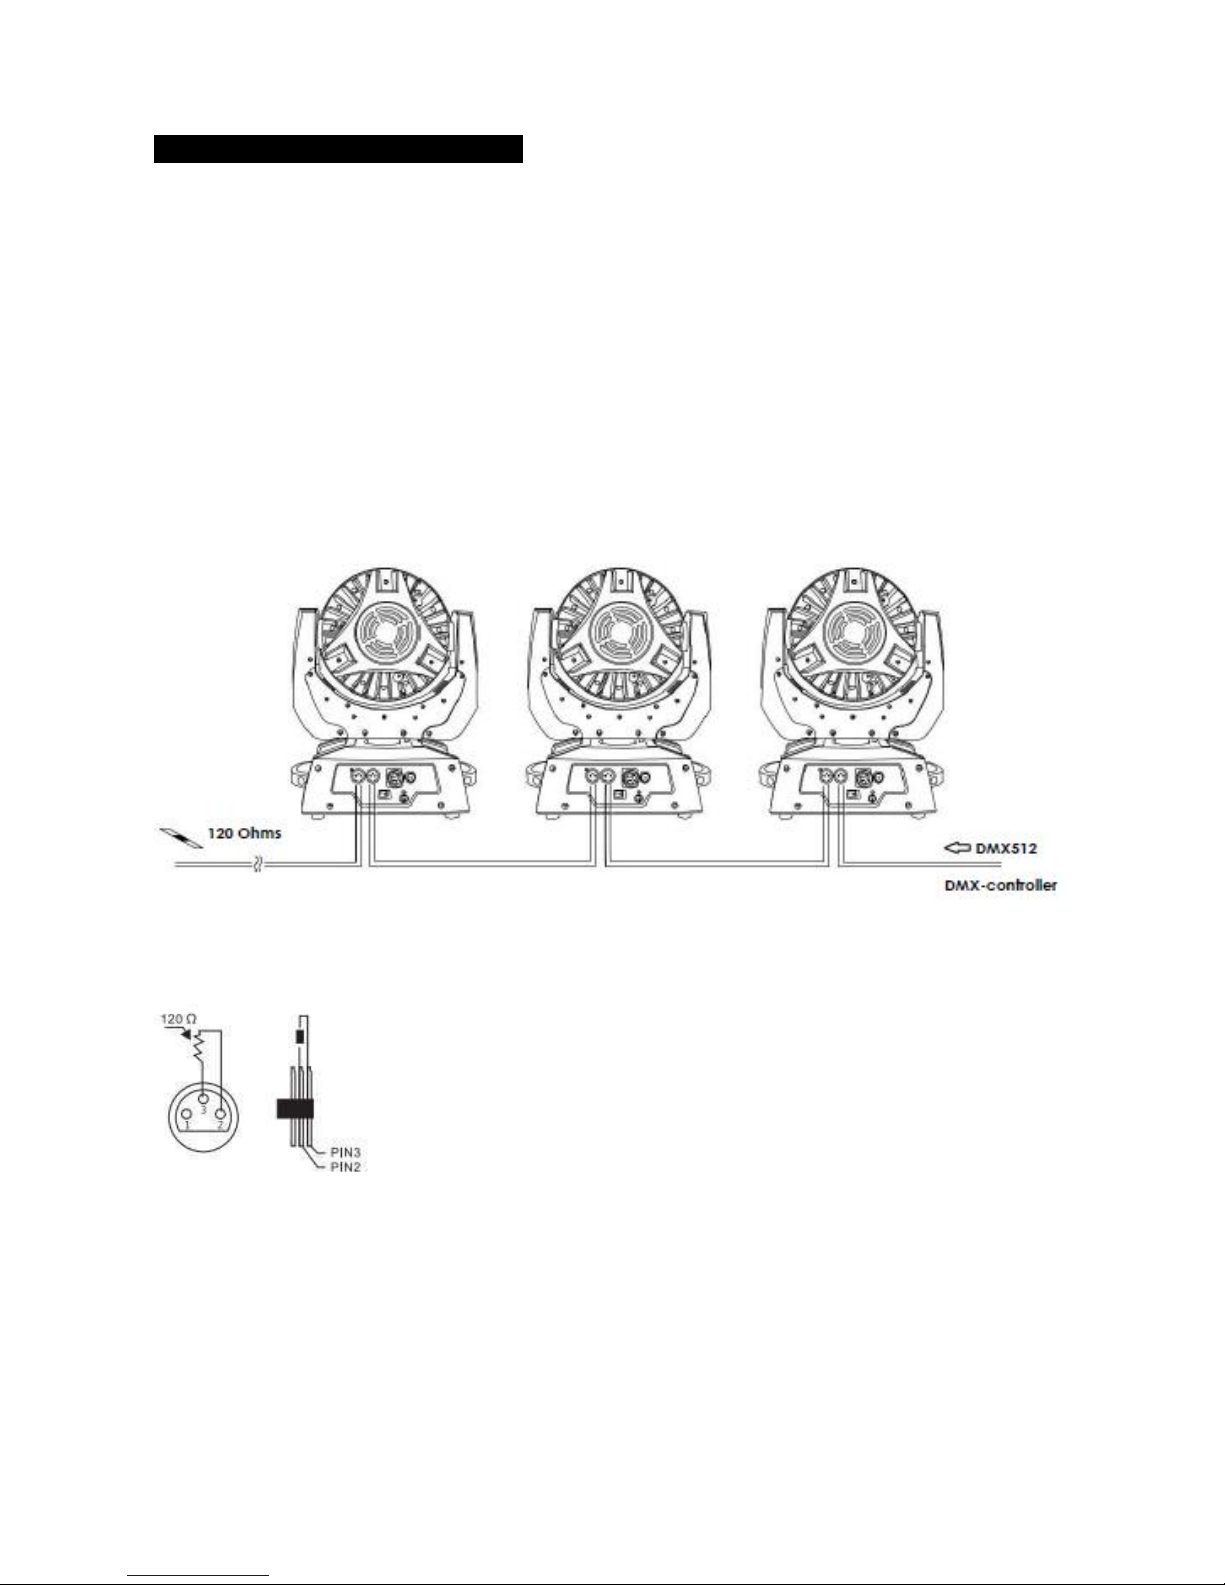
Connection between controller and projector and between one projector and another must be made
with a 2 core-screened cable, with each core having at least a 0.5mm diameter. Connection to and
from the projector is via cannon 3 pin XLR plugs and sockets. The XLR's are connected as shown in
the figure above.
Note: Ensure that none of the pins touch the metallic body of the plug or each other. The body of
the plug is not connected in any way. The projector accepts digital control signals in protocol
DMX512 (1990).
Connect the controller’s output to the first fixture’s input, and connect the first fixture’s output to
the second fixture’s input and connect the rest fixtures in the same way. Eventually connect the last
fixture’s output to a DMX terminator as shown in the figure below.
TERMINATOR:
Page 8
8
6. Menu
Setting DMX Start Address
Each projector must be given a DMX start address, so that, the correct projector responds to the
correct control signals. This DMX start address is the channel number from which the projector
starts to “listen” to the digital control information being sent out from the controller. The fixture
have 3 DMX modes. There are simple mode, standard mode and extended mode. For example
standard mode has 15 channels, so set the No. 1 projector’s address 001, No. 2 projector’s address
016, No. 3 projector’s address 031, No. 4 projector’s address 046 and so on.
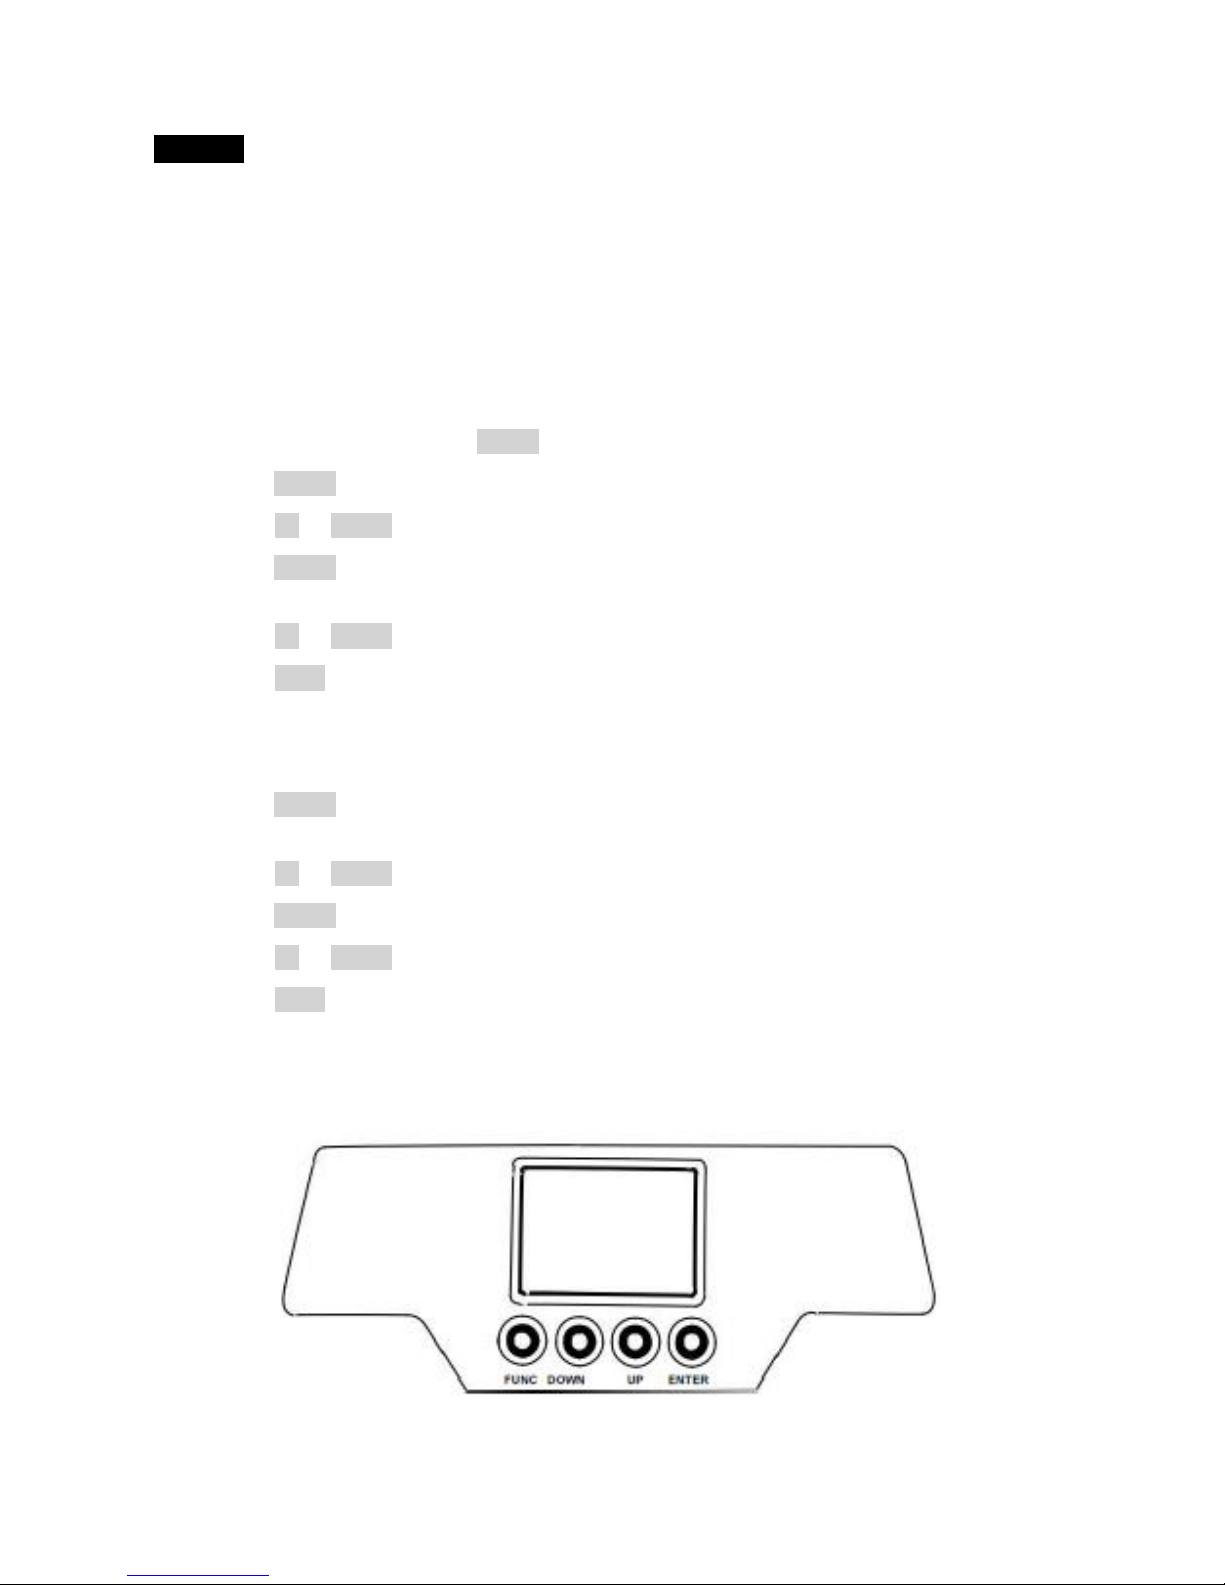
Launch the projector. Press button ENTER more than 5 seconds to unlock panel.
Press button ENTER to display DMX address.
Press button UP or DOWN , you can set the address.
Press button ENTER to confirm, which means the projector has saved the Start Address
automatically, when powered on next time, it will display the value saved last time.
Press button UP or DOWN to change values (add or subtract).
Press button FUNC, to return to the upper menu one by one.
Configuration:
Press button ENTER to unlock panel. Menu will be displayed on the screen. Each menu has its own
sub-menu. Each menu has specific function. Please refer to “Operation Menu” below for details.
Press button UP or DOWN if you want to browse or change through the various Setup Options.
Press button ENTER to save your settings or enter the next menu.
Press button UP or DOWN to change values.(Add or subtract)
Press button FUNC , it will return to the upper menu one by one.
Page 9
9
7. DMX Channels
18 Mode chanel Function Instruction
1
Pan 0-255
2
Tilt 0-255
3
Pan Fine 0-255 (16 bit)
4
Tilt Fine 0-255 (16 bit)
5
Motor Speed 0-255 From fast to slow
6
Dimmer 0-255 (0-100% dimming)
7
Shutter 0-255 Strobe Slow to fast (0 is open)
8
Red 0-255 (linear)
9
Green 0-255 (linear)
10
Blue 0-255 (linear)
11
White 0-255 (linear)
12 Chose Color 0-255 (build in color makro)
13 Ring Control
0-60: all rings work together
61-120: First Ring
121-180: Second Ring
181-255: Third Ring
14 Makro
0-10 No Makro
10< Makro ON
15
Makro Speed 0-255 From slow to fast
16
Zoom 0-255 Zoom range
17 XY Motor
0-64: no effect
64-128: X motor reverse
129-192: Y motor reverse
193-255: XY motor reverse
18 Reset
0-64: No effect
65-128: Auto mode
129-192: Sound mode
193-255: Reset
Page 10

10
10. Maintenance and Cleaning
To prolong a Projector’s life, regular maintenance should be done for its LED optical system, to
ensure that the system is in its best operational condition. If the projector does not work properly,
check the fuses on the power socket of the projector, if it is burned, they should only be replaced
by fuses of the same specification. Should these be damaged, call a qualified technician before
replacement. The projector has thermal protection device that will switch off the projector in case
of overheating. Should this occur, check if the fans work normally or fan and fan shield are blocked
by dust.
Any maintenance work should only be carried out by qualified technicians.
25 Mode chanel Function Instruction
1
Pan 0-255
2
Tilt 0-255
3
Pan Fine 0-255 (16 bit)
4
Tilt Fine 0-255 (16 bit)
5
Motor Speed 0-255 From fast to slow
6
Dimmer 0-255 (0-100% dimming)
7
Shutter 0-255 Strobe Slow to fast (0 is open)
8
Red 0-255 (linear) Ring 1
9
Green 0-255 (linear) Ring 1
10
Blue 0-255 (linear) Ring 1
11
White 0-255 (linear) Ring 1
12
Red 0-255 (linear) Ring 2
13
Green 0-255 (linear) Ring 2
14
Blue 0-255 (linear) Ring 2
15
White 0-255 (linear) Ring 2
16
Red 0-255 (linear) Ring 3
17
Green 0-255 (linear) Ring 3
18
Blue 0-255 (linear) Ring 3
19
White 0-255 (linear) Ring 3
20 Chose Color 0-255 (build in color makro)
21 Makro
0-10 No Makro
10< Makro ON
22
Makro Speed 0-255 From slow to fast
23
Zoom 0-255 Zoom range
24 XY Motor
0-64: no effect
64-128: X motor reverse
129-192: Y motor reverse
193-255: XY motor reverse
225 Reset
0-64: No effect
65-128: Auto mode
129-192: Sound mode
193-255: Reset
Page 11
11
It is definitely necessary to keep a projector clean for its reliable use. Cooling fans and their shield
should be cleaned every 15days. LED lamps’ lens and cover should be cleaned regularly for
optimized light output.
Cleaning frequency depends on how often a projector is used and its operational environment. A
soft cloth and typical glass cleaning products should be used. It is recommended to clean the
external optics at least once every 20 days.
Do not use any organic solvent, e.g. alcohol, to clean t housing of the apparatus.
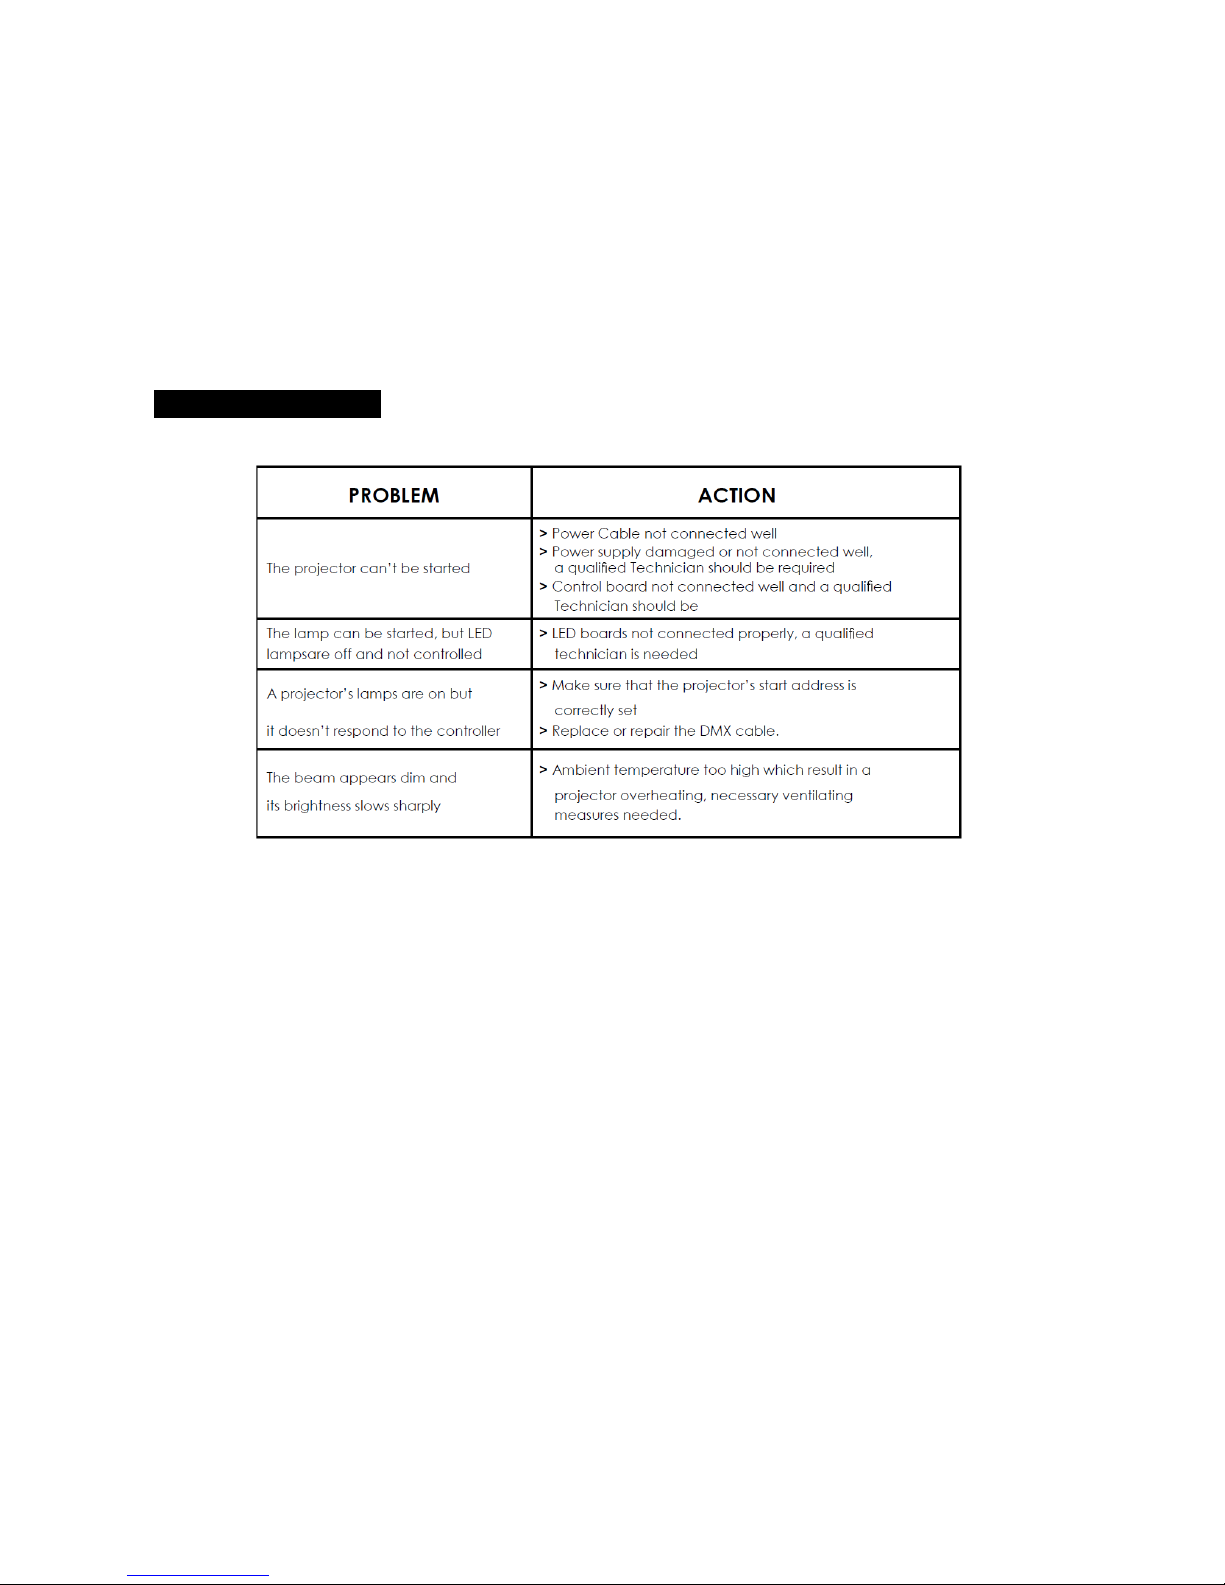
11. Troubleshooting
 Loading...