

Briggs & Stratton 2691185-00, 2691187-00, 2691248-00, 2691217-02, 2691282-00 Operator's Manual
...
Operator’s Manual
Brugsanvisning
Bedienungsanleitung
Εγχειρίδιο Λειτουργίας
Manual del operario
Ohjekirja
Manuel d'utilisation
Manuale per l'operatore
Gebruikershandleiding
Brukerhåndbok
Manual do utilizador
Handbok
Copyright © Briggs & Stratton Corporation.
Milwaukee, WI, USA. All rights reserved.
80012812WST
Revision: D
1730264
1
2
A B
4
3
2
1
C
A
B
D
E
1730202
1
2
3
4
C
5
7
9
D
2
E
6
8
10

en
3
4
10 psi
(0,68 bar)
5
12-14 psi
(0,82-0,96 bar)
A
C
B
D
6
7
A
B
1730202
C
3
+
8
10
Total Trip / Hours Clock
RESET MODE
9
( )
(2x)
( )
(3x)
COVER
WARNING
DO NOT REMOVE
C
E
V
EMO
R
ER
V
OT
O
N
C
WARNING
DO
D
12
C B
A
11
13
B
.030˝
(0.76 mm)
D
4

en
14
Products Covered by This Manual
The following products are covered by this manual:
2691184-00, 2691185-00, 2691187-00, 2691217-00, 2691217-01,
2691217-02, 2691248-00, 2691281-00, 2691282-00, 2691343-01,
2691344-00, 2691345-00, 2691345-01, 2691346-00, 2691346-01,
2691346-02, 2691349-00, 2691349-01, 2691387-00, 2691387-01,
2691406-00, 2691407-00
CONTENTS
Operator Safety .............................................................. 6
Features and Controls..................................................... 11
Operation ........................................................................ 12
Maintenance ................................................................... 16
Troubleshooting .............................................................. 20
Specications ................................................................. 22
The images in this document are representative. Your unit
may vary from the images displayed.
LEFT and Right are shown from the operator's position
5
Operator Safety
Important Safety Instructions
SAVE THESE INSTRUCTIONS - This manual contains
important instructions that should be followed during the
initial set-up, the operation, and the maintenance of the
equipment. Save these original instructions for future
reference.
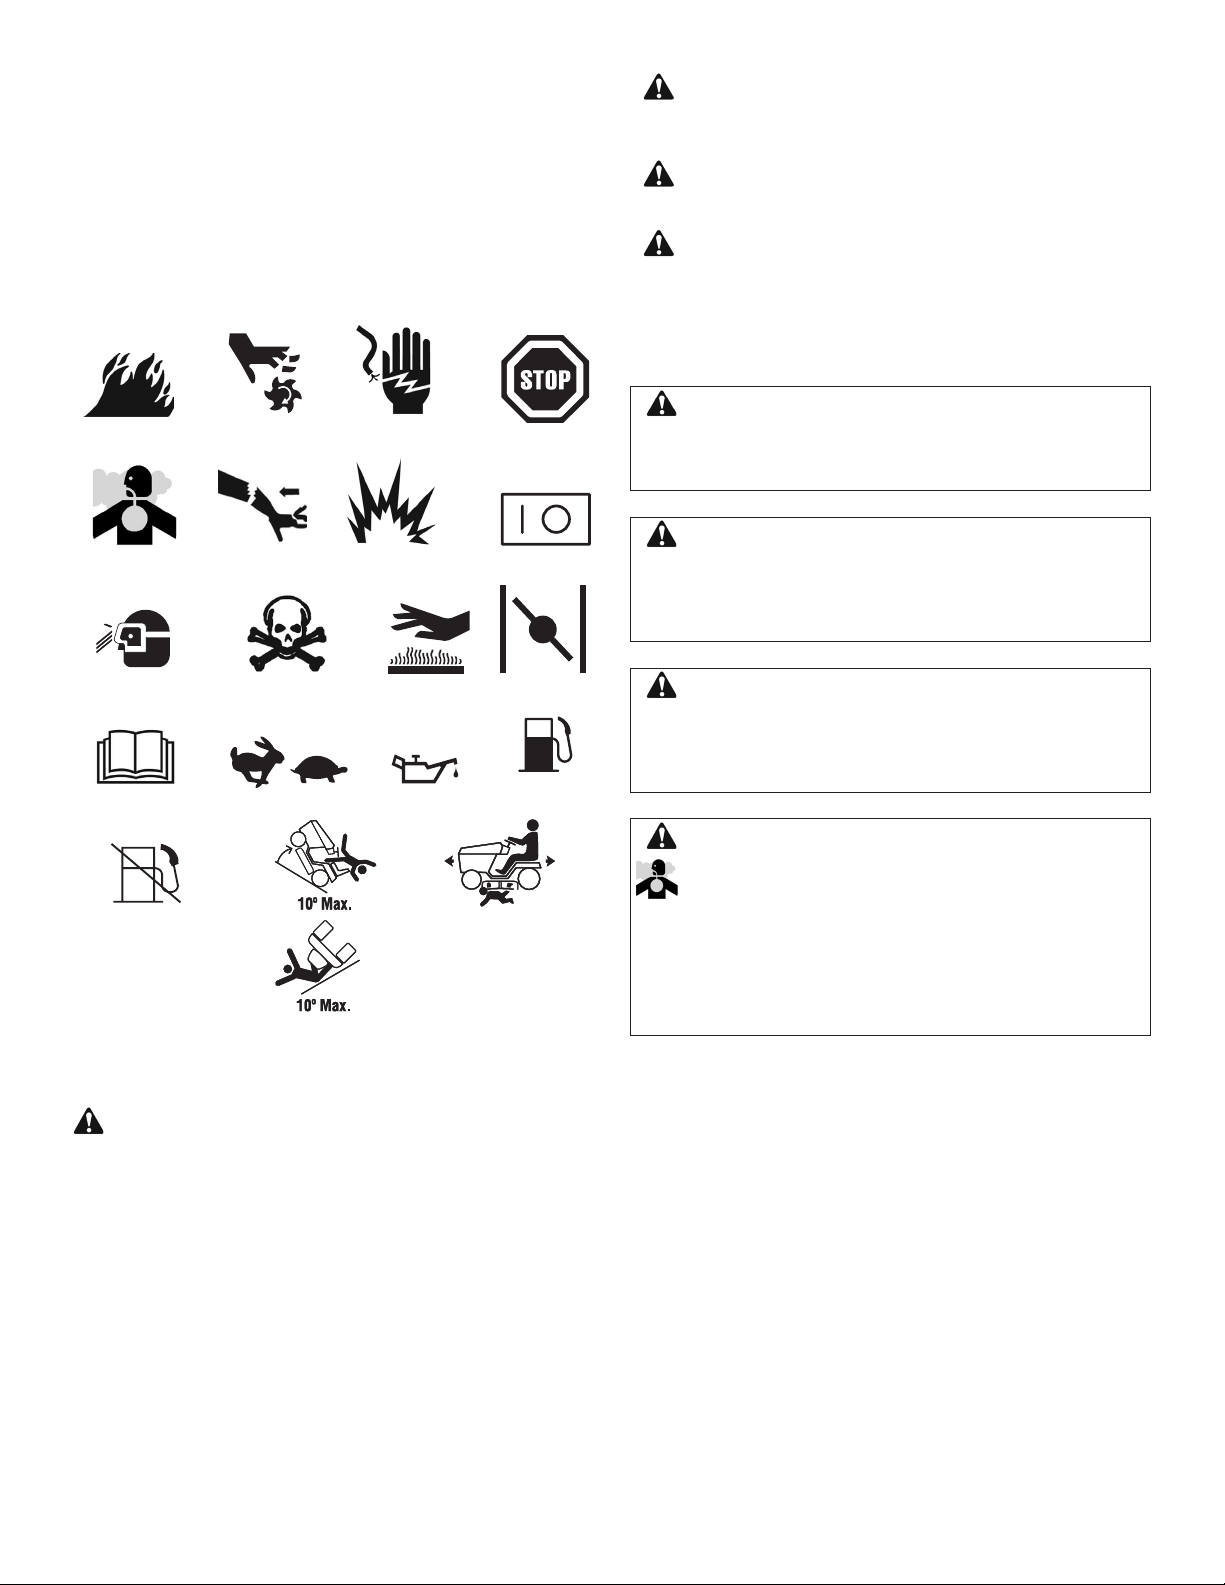
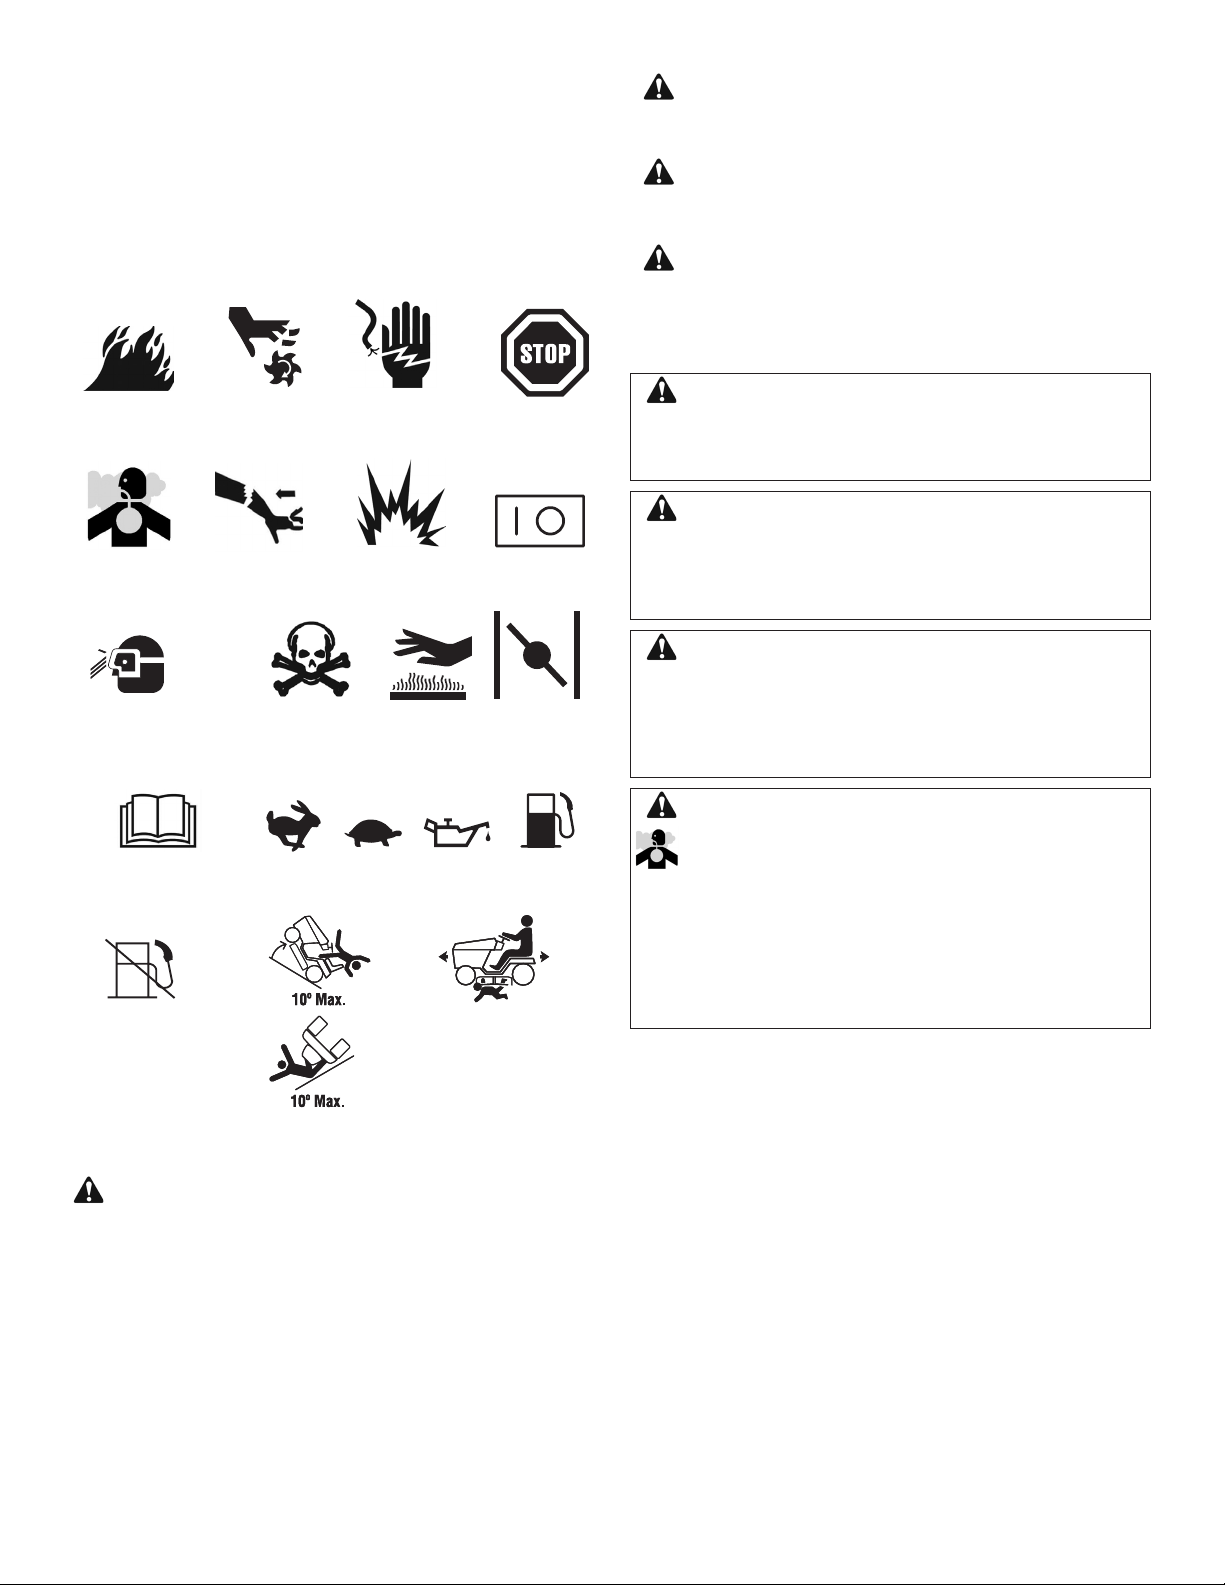
Safety Symbols and Meanings
FIRE MOVING
PARTS
SHOCK STOP
DANGER indicates a hazard which, if not
avoided, will result in death or serious injury.
WARNING indicates a hazard which, if not
avoided, could result in death or serious injury.
CAUTION indicates a hazard which, if not
avoided, could result in minor or moderate
injury.
NOTICE indicates a situation that could result in
damage to the product.
WARNING
The engine exhaust from this product contains
chemicals known to the State of California to cause
cancer, birth defects, or other reproductive harm.
TOXIC
FUMES
WEAR EYE
PROTECTION
READ
MANUAL
FUEL
SHUT-OFF
KICKBACK EXPLOSION ON OFF
HAZARDOUS
CHEMICAL
FAST SLOW OIL FUEL
ROLL-OVER
HAZARD
HOT
SURFACE
FUEL AMPUTATION
HAZARD
CHOKE
WARNING
Certain components in this product and its related
accessories contain chemicals known to the State
of California to cause cancer, birth defects, or other
reproductive harm. Wash hands after handling.
WARNING
Battery posts, terminals, and related accessories
contain lead and lead compounds - chemicals known to
the State of California to cause cancer, birth defects, or
other reproductive harm. Wash hands after handling.
WARNING
Running engine gives off carbon monoxide, an
odorless, colorless, poison gas.
Breathing carbon monoxide can cause headache,
fatigue, dizziness, vomiting, confusion, seizures,
nausea, fainting or death.
• Operate equipment ONLY outdoors.
• Keep exhaust gas from entering a confined area through
windows, doors, ventilation intakes, or other openings.
The safety alert symbol is used to identify safety
information about hazards that can result in personal injury.
A signal word (DANGER, WARNING, or CAUTION) is used
with the alert symbol to indicate the likelihood and the
potential severity of injury. In addition, a hazard symbol may
be used to represent the type of hazard.
6

en
Read these safety rules and follow them closely. Failure to obey these rules could result in loss of control of unit,
severe personal injury or death to you, or bystanders, or damage to property or equipment. This mowing deck
is capable of amputating hands and feet and throwing objects. The triangle in text signifies important
cautions or warnings which must be followed.
GENERAL OPERATION
1. Read, understand, and follow all instructions in the manual
and on the unit before starting.
2. Do not put hands or feet near rotating parts or under the
machine. Keep clear of the discharge opening at all times.
3. Only allow responsible adults, who are familiar with the
instructions, to operate the unit (local regulations can
restrict operator age).
4. Clear the area of objects such as rocks, toys, wire, etc.,
which could be picked up and thrown by the blade(s).
5. Be sure the area is clear of other people before mowing.
Stop the unit if anyone enters the area.
6. Never carry passengers.
7. Do not mow in reverse unless absolutely necessary.
Always look down and behind before and while travelling in
reverse.
8. Never direct discharge material toward anyone. Avoid
discharging material against a wall or obstruction.
Material may ricochet back toward the operator. Stop the
blade(s) when crossing gravel surfaces.
9. Do not operate the machine without the entire grass
catcher, discharge guard (deflector), or other safety
devices in place.
10. Slow down before turning.
11. Never leave a running unit unattended. Always disengage
the PTO, set parking brake, stop engine, and remove
starter insert before dismounting.
12. Disengage blades (PTO) when not mowing. Shut off
engine and wait for all parts to come to a complete stop
before cleaning the machine, removing the grass catcher,
or unclogging the discharge guard.
13. Operate the machine only in daylight or good artificial light.
14. Do not operate the unit while under the influence of alcohol
or drugs.
15. Watch for traffic when operating near or crossing
roadways.
16. Use extra care when loading or unloading the unit into a
trailer or truck.
17. Always wear eye protection when operating this unit.
18. Data indicates that operators, age 60 years and above,
are involved in a large percentage of power equipmentrelated injuries. These operators should evaluate their
ability to operate the equipment safely enough to protect
themselves and others from injury.
19. Follow the manufacturer’s recommendations for wheel
weights or counterweights.
20. Keep in mind the operator is responsible for accidents
occurring to other people or property.
21. All drivers should seek and obtain professional and
practical instruction.
22. Always wear substantial footwear and trousers. Never
operate when barefoot or wearing sandals.
23. Before using, always visually check that the blades and
blade hardware are present, intact, and secure. Replace
worn or damaged parts.
24. Disengage attachments before: refueling, removing an
attachment, making adjustments (unless the adjustment
can be made from the operator’s position).
25. When the machine is parked, stored, or left unattended,
lower the cutting means unless a positive mechanical lock
is used.
26. Before leaving the operator’s position for any reason,
engage the parking brake, disengage the PTO, stop the
engine, and remove the starter insert.
27. To reduce fire hazard, keep the unit free of grass, leaves,
& excess oil. Do not stop or park over dry leaves, grass, or
combustible materials.
TRANSPORTING AND STORAGE
1. When transporting the unit on an open trailer, make sure
it is facing forward, in the direction of travel. If the unit is
facing backwards, wind lift could damage the unit.
2. Always observe safe refueling and fuel handling practices
when refueling the unit after transportation or storage.
3. Never store the unit (with fuel) in an enclosed poorly
ventilated structure. Fuel vapors can travel to an ignition
source (such as a furnace, water heater, etc.) and cause
an explosion. Fuel vapor is also toxic to humans and
animals.
4. Always follow the engine manual instructions for storage
preparations before storing the unit for both short and long
term periods.
5. Always follow the engine manual instructions for proper
start-up procedures when returning the unit to service.
6. Never store the unit or fuel container inside where there is
an open flame or pilot light, such as in a water heater. Allow
unit to cool before storing.
7

SLOPE OPERATION
Slopes are a major factor related to loss-of-control and tipover accidents, which can result in severe injury or death.
Operation on all slopes requires extra caution. If you
cannot back up the slope or if you feel uneasy on it, do not
operate on it.
Control of a ride-on machine sliding on a slope will not be
regained by the application of the brake. The main reasons
for loss of control are: insufficient tire grip on the ground,
speed too fast, inadequate braking, the type of machine
is unsuitable for its task, lack of awareness of the ground
conditions, incorrect hitching and load distribution.
1. Mow up and down slopes, not across.
2. Watch for holes, ruts, or bumps. Uneven terrain could
overturn the unit. Tall grass can hide obstacles.
3. Choose a slow speed so that you will not have to stop or
change speeds while on the slope.
4. Do not mow on wet grass. Tires may lose traction.
5. Always keep unit in gear especially when traveling down
slopes. Do not shift to neutral and coast downhill.
6. Avoid starting, stopping, or turning on a slope. If tires
lose traction, disengage the blade(s) and proceed slowly
straight down the slope.
7. Keep all movement on slopes slow and gradual. Do
not make sudden changes in speed or direction, which
could cause the machine to rollover.
8. Use extra care while operating machines with grass
catchers or other attachments; they can affect the
stability of the unit. Do not use on steep slopes.
9. Do not try to stabilize the machine by putting your foot on
the ground (ride-on units).
10. Do not mow near drop-offs, ditches, or embankments.
The mower could suddenly turn over if a wheel is over
the edge of a cliff or ditch, or if an edge caves in.
11. Do not use grass catchers on steep slopes.
12. Do not mow slopes if you cannot back up them.
13. See your authorized dealer/retailer for recommendations
of wheel weights or counterweights to improve stability.
14. Remove obstacles such as rocks, tree limbs, etc.
15. Use slow speed. Tires may lose traction on slopes even
through the brakes are functioning properly.
16. Do not turn on slopes unless necessary, and then, turn
slowly and gradually downhill, if possible.
WARNING
Never operate on slopes greater than 17.6 percent (10°)
which is a rise of 3-1/2 feet (106 cm) vertically in 20 feet
(607 cm) horizontally.
When operating on slopes use additional wheel weights
or counterweights. See your dealer/retailer to determine
which weights are available and appropriate for your
unit.
Select slow ground speed before driving onto slope.
In addition to front weights, use extra caution when
operating on slopes with rear-mounted grass catchers.
Mow UP and DOWN the slope, never across the face,
use caution when changing directions and DO NOT
START OR STOP ON SLOPE.
CHILDREN
Tragic accidents can occur if the operator is not alert to the
presence of children. Children are often attracted to the unit
and the mowing activity. Never assume that children will
remain where you last saw them.
1. Keep children out of the mowing area and under the
watchful care of another responsible adult.
2. Be alert and turn unit off if children enter the area.
3. Before and during reverse operation, look behind and
down for small children.
4. Never carry children, even with the blade(s) off. They may
fall off and be seriously injured or interfere with safe unit
operation. Children who have been given rides in the past
may suddenly appear in the mowing area for another ride
and be run over or backed over by the machine.
5. Never allow children to operate the unit.
6. Use extra care when approaching blind corners, shrubs,
trees, or other objects that may obscure vision.
TOWED EQUIPMENT (RIDE-ON UNITS)
1. Tow only with a machine that has a hitch designed for
towing. Do not attach towed equipment except at the
hitch point.
2. Follow the manufacturer’s recommendations for weight
limit for towed equipment and towing on slopes.
3. Never allow children or others in or on towed equipment.
4. On slopes, the weight of the towed equipment may
cause loss of traction and loss of control.
5. Travel slowly and allow extra distance to stop.
6. Do not shift to neutral and coast down hill.
8

en
SERVICE AND MAINTENANCE
Safe Handling of Gasoline
1. Extinguish all cigarettes, cigars, pipes, and other sources
of ignition.
2. Use only approved gasoline containers.
3. Never remove the gas cap or add fuel with the engine
running. Allow the engine to cool before refueling.
4. Never fuel the machine indoors.
5. Never store the machine or fuel container where there is an
open flame, spark, or pilot light such as near a water heater
or other appliance.
6. Never fill containers inside a vehicle or on a truck bed with
a plastic bed liner. Always place containers on the ground
away from your vehicle before filling.
7. Remove gas-powered equipment from the truck or
trailer and refuel it on the ground. If this is not possible,
then refuel such equipment on a trailer with a portable
container, rather than from a gasoline dispenser nozzle.
8. Keep nozzle in contact with the rim of the fuel tank or
container opening at all times until fueling is complete. Do
not use a nozzle lock-open device.
9. If fuel is spilled on clothing, change clothing immediately.
10. Never over-fill the fuel tank. Replace gas cap and tighten
securely.
11. Use extra care in handling gasoline and other fuels. They
are flammable and vapors are explosive.
12. If fuel is spilled, do not attempt to start the engine but
move the machine away from the area of spillage and
avoid creating any source of ignition until fuel vapors have
dissipated.
13. Replace all fuel tank caps and fuel container caps securely.
Service & Maintenance
1. Never run the unit in an enclosed area where carbon
monoxide fumes may collect.
2. Keep nuts and bolts, especially blade attachment bolts,
tight and keep equipment in good condition.
3. Never tamper with safety devices. Check their proper
operation regularly and make necessary repairs if they are
not functioning properly.
4. Keep unit free of grass, leaves, or other debris build-up.
Clean up oil or fuel spillage and remove any fuel-soaked
debris. Allow machine to cool before storage.
5. If you strike an object, stop and inspect the machine.
Repair, if necessary, before restarting.
6. Never make adjustments or repairs with the engine
running.
7. Check grass catcher components and the discharge guard
frequently and replace with manufacturer’s recommended
parts, when necessary.
8. Mower blades are sharp. Wrap the blade or wear gloves,
and use extra caution when servicing them.
9. Check brake operation frequently. Adjust and service as
required.
10. Maintain or replace safety and instructions labels, as
necessary.
11. Do not remove the fuel filter when the engine is hot as
spilled gasoline may ignite. Do not spread fuel line clamps
further than necessary. Ensure clamps grip hoses firmly
over the filter after installation.
12. Do not use gasoline containing METHANOL, gasohol
containing more than 10% ETHANOL, gasoline additives,
or white gas because engine/fuel system damage could
result.
13. If the fuel tank must be drained, it should be drained
outdoors.
14. Replace faulty silencers/mufflers.
15. Use only factory authorized replacement parts when
making repairs.
16. Always comply with factory specifications on all settings
and adjustments.
17. Only authorized service locations should be utilized for
major service and repair requirements.
18. Never attempt to make major repairs on this unit unless
you have been properly trained. Improper service
procedures can result in hazardous operation, equipment
damage and voiding of manufacturer’s warranty.
19. On multiple blade mowers, take care as rotating one blade
can cause other blades to rotate.
20. Do not change engine governor settings or over-speed
the engine. Operating the engine at excessive speed can
increase the hazard of personal injury.
21. Disengage drive attachments, stop the engine, remove the
starter insert, and disconnect the spark plug wire(s) before:
clearing attachment blockages and chutes, performing
service work, striking an object, or if the unit vibrates
abnormally. After striking an object, inspect the machine for
damage and make repairs before restarting and operating
the equipment.
22. Never place hands near the moving parts, such as a hydro
pump cooling fan, when the tractor is running. (Hydro
pump cooling fans are typically located on top of the
transaxle).
23. Units with hydraulic pumps, hoses, or motors:
WARNING: Hydraulic fluid escaping under pressure may
have sufficient force to penetrate skin and cause serious
injury. If foreign fluid is injected into the skin it must be
surgically removed within a few hours by a doctor familiar
with this form of injury or gangrene may result. Keep
body and hands away from pin holes or nozzles that
eject hydraulic fluid under high pressure. Use paper or
cardboard, and not hands, to search for leaks. Make sure
all hydraulic fluid connections are tight and all hydraulic
hoses and lines are in good condition before applying
pressure to the system. If leaks occur, have the unit
serviced immediately by your authorized dealer.
24. WARNING: Improper release of springs can result in
serious personal injury. Springs should be removed by an
authorized technician.
25. Models equipped with an engine radiator:
WARNING: To prevent serious bodily injury from hot
coolant or steam blow-out, never attempt to remove the
radiator cap while the engine is running. Stop the engine
and wait until it is cool. Even then, use extreme care when
removing the cap.
9

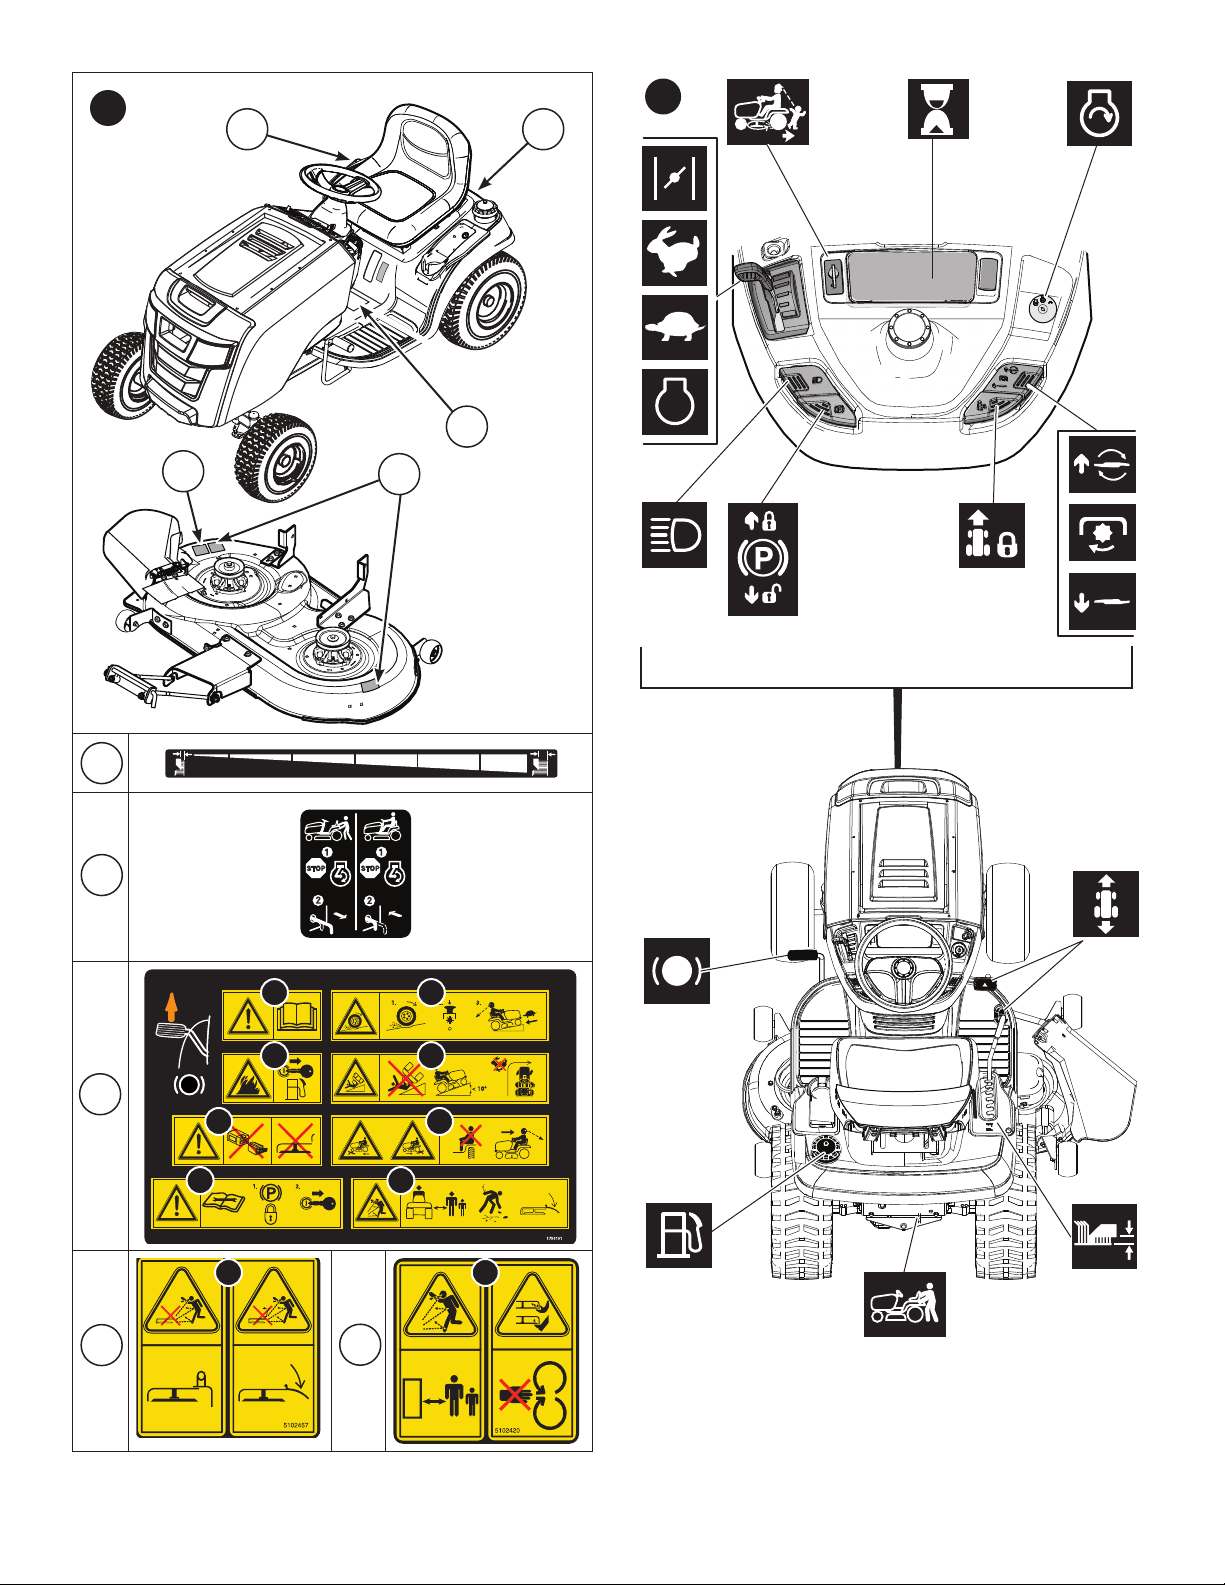
Safety Decals
See Figure 1 (callouts A to E) for location and pictures
of decals.
Safety Icon
See Figure 1 (callouts C to E) for location of icons. See
below for an explanation of these icons.
All and instructional messages on your rider and mower
should be carefully read and obeyed. Personal bodily injury
can result when these instructions are not followed. The
information is for your safety and it is important! The safety
decals below are on your rider and mower.
If any of these decals are lost or damaged, replace them at
once. See an authorized dealer for replacements.
These labels are easily applied and will act as a constant
visual reminder to you, and others who may use the
equipment, to follow the safety instructions necessary for
safe, effective operation.
Callout Decal Description
A
B
C
D
E
Control and Attachment Lift
Transmission Release
DANGER - Main Panel
Thrown Objects Hazard
Amputation and Thrown Objects Hazard
Decal:
Decal:
Danger,
Danger,
1. WARNING: Read and understand the Operator’ Manual
before using this machine. Know the location and
function of all controls. Do not operate this machine
unless you are trained.
2. DANGER - LOSS OF TRACTION, SLIDING,
STEERING AND CONTROL ON SLOPES HAZARD:
If machine stops forward motion or starts sliding on a
slope, stop the blades and drive slowly off the slope.
3. DANGER: FIRE HAZARD: Keep unit free of grass,
leaves and excess oil. Do not add fuel while engine is
hot or running. Stop engine, remove key and allow to
cool for at least 3 minutes prior to adding fuel. Do not
add fuel indoors, in an enclosed trailer, garage or other
enclosed areas. Clean up spilled fuel. Do not smoke
while operating this machine.
4. DANGER - TIPPING AND SLIPPING HAZARD: Mow
up and down slopes not across. Do not operate on
slopes over 10 degrees. Avoid sudden and sharp (fast)
turns while on slopes.
5. DANGER - AMPUTATION AND DISMEMBERMENT
HAZARD: To avoid injury from rotating blades and
moving parts, keep safety devices (guards, shields and
switches) in place and working.
6. Do not mow when children or others are around. Never
carry riders especially children even with the blades off.
Do not mow in reverse unless absolutely necessary.
Look down and behind – before and while backing.
7. Consult technical literature before performing technical
repairs or maintenance. When leaving the machine,
shutoff engine, set the parking brake to the lock position
and remove the ignition key.
8. Keep by-standers and children a safe distance away.
Remove objects that can be thrown by the blade. Do not
mow without discharge chute in place.
9. Do not mow without discharge chute or entire grass
catcher in place.
10. To avoid injury from rotating blades, stay clear of deck
edge and keep others away.
10

en
Features and Controls
See Figure 2 for location.
Brake Pedal
Depressing the brake pedal applies the tractor
brake.
Cruise Control
This locks the ground speed control in forward.
The cruise control has five lock positions.
Fuel Tank
To remove the cap, turn counterclockwise.
Ground Speed Pedals
The forward ground speed pedal controls the
tractor’s forward ground speed. The reverse
ground speed pedal controls the tractor’s reverse
ground speed.
Headlight Switch
This turns the tractor headlights on and off.
Mower Height of Cut Adjustment
The mower cutting height adjustment lever
controls the cutting height. The cutting height can
be set to one of seven positions between 1.5” and
4.0” (3,8 and 10,2 cm).
Parking Brake
This locks the parking brake when the tractor is
stopped. See Parking Brake section.
Reverse Mowing Option (RMO)
This allows the operator to mow (or use other
PTO driven attachments) while traveling in
reverse. To activate, turn the RMO key after the
PTO is engaged. The L.E.D. light will illuminate,
and the operator can then mow in reverse. Each
time the PTO is engaged, the RMO needs to be
reactivated if desired.
Ignition Switch
The ignition switch starts and stops the engine, it
has three positions:
OFF: Stops the engine and shuts off the
electrical system.
RUN: Allows the engine to run and powers
the electrical system.
START: Cranks the engine for starting.
Throttle/Choke Control (Choke-A-Matic)
The throttle/choke controls the engine speed
and choke. Move the throttle/choke control to
the FAST position to increase engine speed
and SLOW position to decrease engine speed.
Always operate at full throttle. Move the throttle/
choke control to the CHOKE position for starting
a cold engine. A warm engine may not require
choking.
Power Take-Off (PTO) Switch
The PTO (Power Take-Off ) switch engages and
disengages the mower blade clutch. To engage
the PTO, pull UP on the switch. Push DOWN to
disengage.
NOTE: The operator must be seated rmly in the
tractor seat for the PTO to function.
Transmission Release Lever
This releases the transmission so that the tractor
can be pushed by hand.
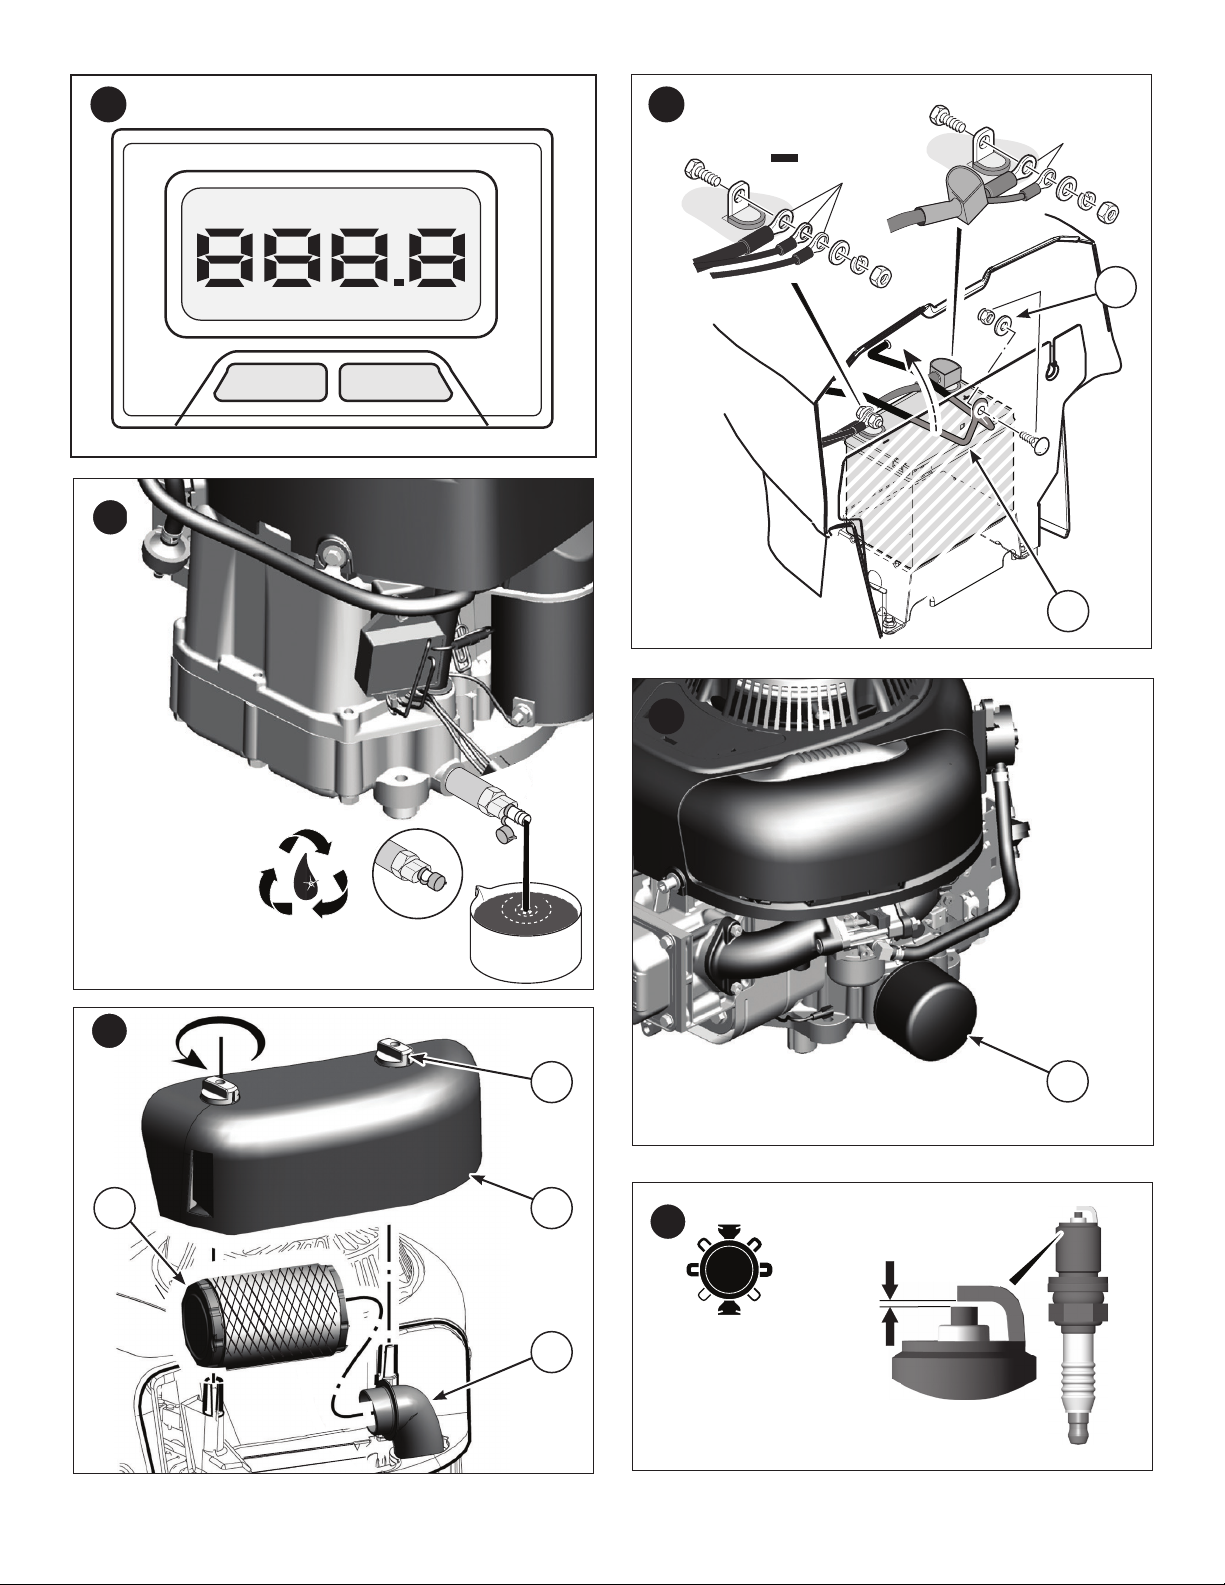
Hourmeter (if equipped)
The hour meter measures the number of hours
the key has been in the RUN position.
11
Operation
General Operating Safety
Be sure to read all information in the Operator Safety
section before attempting to operate this unit. Become
familiar with all of the controls and how to stop the unit.
Check Tire Pressure
Tires should be checked periodically to provide the
optimum traction and to guarantee the best cut (see Figure
3).
NOTE: These pressures may dier slightly from the “Maximum Ination” stamped on the side walls of the tires.
WARNING
If the unit does not pass a safety test, do not operate it.
See an authorized dealer.
Safety Interlock System Tests
This unit is equipped with a Safety Interlock System. Do not
attempt to bypass or tamper with the switches/devices.
Test 1 — Engine should NOT crank if:
• PTO switch is ON, OR
• Brake pedal is NOT fully depressed (parking brake OFF).
Test 2 — Engine SHOULD crank and start if:
• Operator is sitting in seat, AND
• PTO switch is OFF, AND
• Brake pedal is fully depressed (parking brake ON).
Test 3 — Engine should SHUT OFF if:
• Operator rises off seat.
Test 4 — Check Mower Blade Stopping Time
Mower blades and mower drive belt should come to a
complete stop within five seconds after electric PTO switch
is turned OFF. If mower drive belt does not stop within five
seconds, see an authorized dealer.
Test 5 — Check Reverse Mow Option (RMO)
• Engine should shut off if reverse travel is attempted if
the PTO has been switched on and RMO has not been
activated.
• RMO light should illuminate when RMO has been
activated.
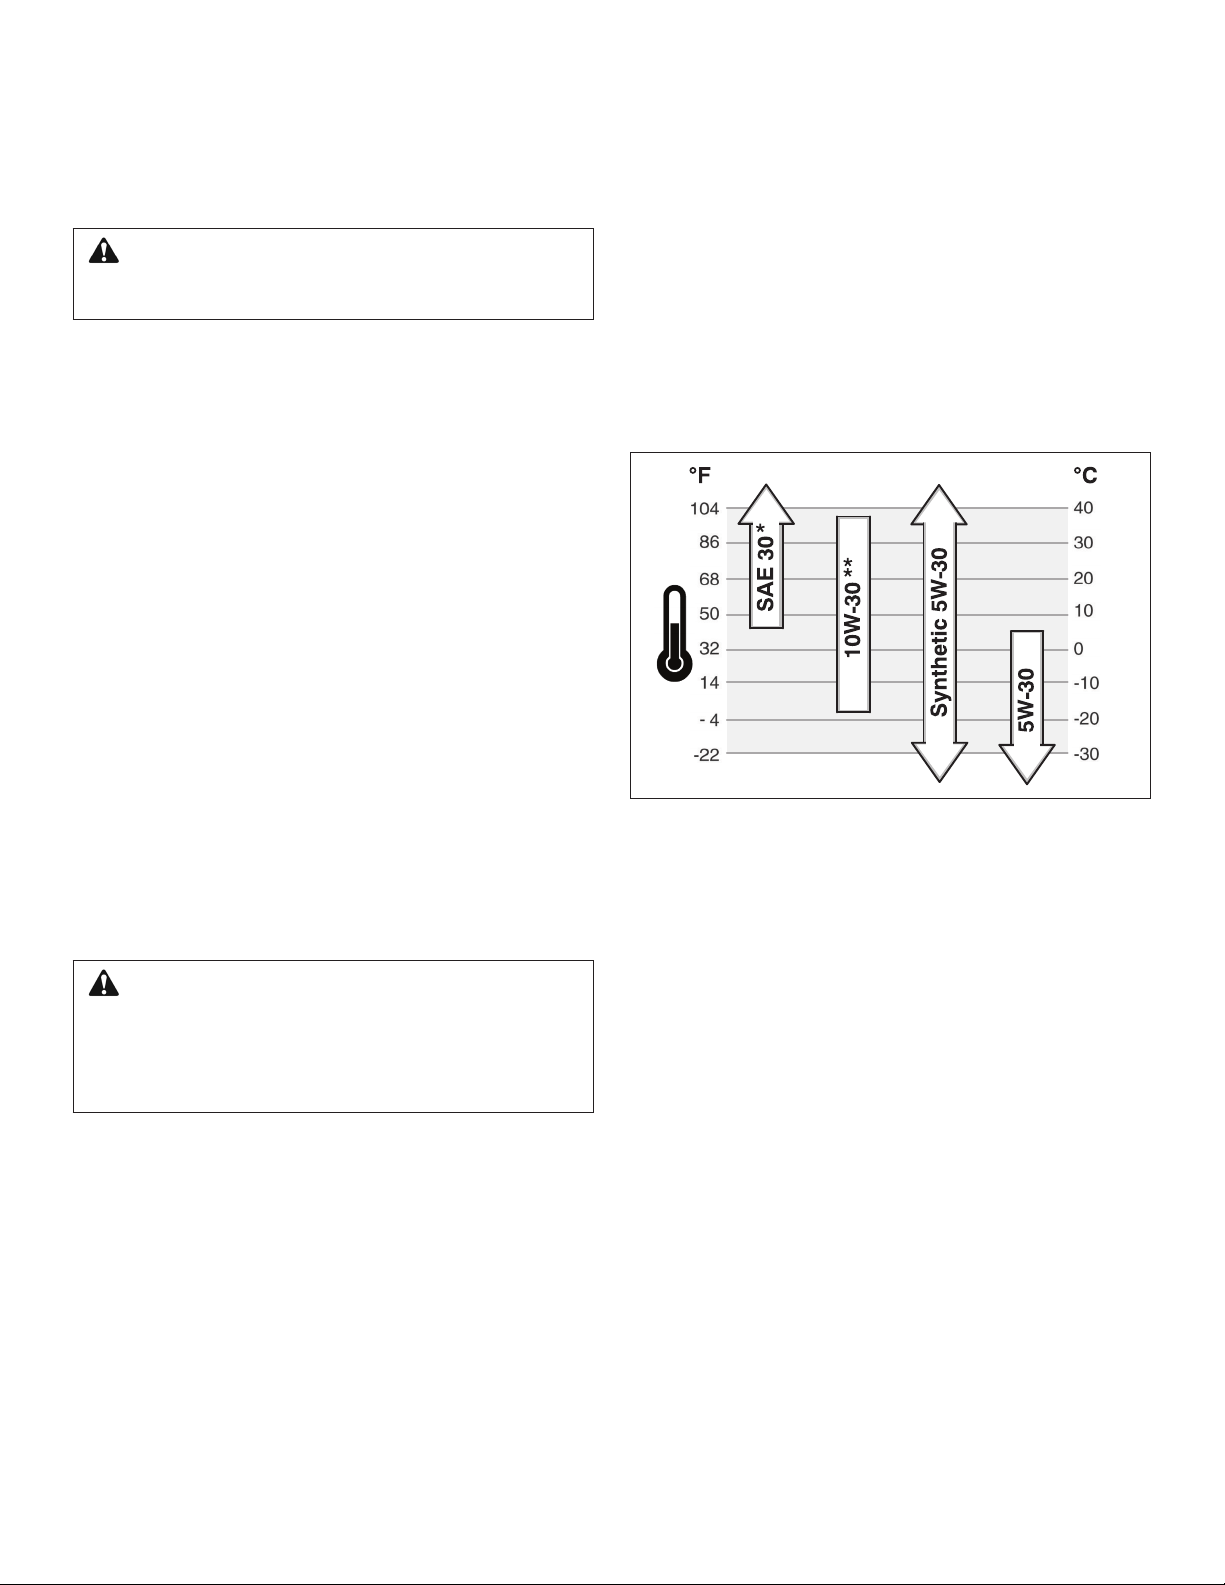
Oil Recommendations
We recommend the use of Briggs & Stratton Warranty
Certified oils for best performance. Other high-quality
detergent oils are acceptable if classified for service SF,
SG, SH, SJ or higher. Do not use special additives.
Outdoor temperatures determine the proper oil viscosity for
the engine. Use the chart to select the best viscosity for the
outdoor temperature range expected.
* Below 40°F (4°C) the use of SAE 30 will result in hard starting.
** Above 80°F (27°C) the use of 10W-30 may cause increased oil
consumption. Check oil level more frequently.
WARNING
Mowing in reverse can be hazardous to bystanders.
Tragic accidents can occur if the operator is not alert
to the presence of children. Never activate the RMO if
children are present. Children are often attracted to the
unit and the mowing activity.
12

en
Check or Add Oil
Before adding or checking the oil
• Place the tractor on a level surface (see Figure 4).
• Clean the oil fill area of any debris.
1. Remove the dipstick (A, Figure 5) and wipe with a clean
cloth.
2. Insert and tighten the dipstick.
3. Remove the dipstick and check the oil level. It should be
at the FULL mark (B) on the dipstick.
4. If low, add oil slowly into the engine oil fill (C). Do not
overfill. After adding oil, wait one minute and then
recheck the oil level.
NOTE: Do not add oil at the quick oil drain (if equipped).
5. Replace and tighten the dipstick.
Oil Pressure
If the oil pressure is too low, a pressure switch (if equipped)
will either stop the engine or activate a warning device on
the equipment. If this occurs, stop the engine and check the
oil level with the dipstick.
If the oil level is below the ADD mark, add oil until it reaches
the FULL mark. Start the engine and check for proper
pressure before continuing to operate.
If the oil level is between the ADD and FULL marks, do not
start the engine. Contact an authorized dealer to have the oil
pressure problem corrected.
Fuel Recommendations
Fuel must meet these requirements:
• Clean, fresh, unleaded gasoline.
• A minimum of 87 octane/87 AKI (91 RON). High altitude
use, see below.
• Gasoline with up to 10% ethanol (gasohol) is acceptable.
NOTICE: Do not use unapproved gasolines, such as E15
and E85. Do not mix oil in gasoline or modify the engine to
run on alternate fuels. Use of unapproved fuels will damage
the engine components and void the engine warranty.
To protect the fuel system from gum formation, mix a fuel
stabilizer into the fuel. See Storage. All fuel is not the
same. If starting or performance problems occur, change
fuel providers or change brands. This engine is certified to
operate on gasoline. The emissions control system for this
engine is EM (Engine Modifications)
High Altitude
At altitudes over 5,000 feet (1524 meters), a minimum 85
octane/85 AKI (89 RON) gasoline is acceptable. To remain
emissions compliant, high altitude adjustment is required.
Operation without this adjustment will cause decreased
performance, increased fuel consumption, and increased
emissions. See an authorized Briggs & Stratton Dealer for
high altitude adjustment information.
Operation of the engine at altitudes below 2,500 feet
(762 meters) with the high altitude adjustment is not
recommended.
Adding Fuel
WARNING
Fuel and its vapors are extremely flammable and
explosive.
Fire or explosion can cause severe burns or death.
When Adding Fuel
• Turn engine off and let engine cool at least 3 minutes
before removing the fuel cap.
• Fill fuel tank outdoors or in well-ventilated area.
• Do not overfill fuel tank. To allow for expansion of the
fuel, do not fill above the bottom of the fuel tank neck.
• Keep fuel away from sparks, open flames, pilot lights,
heat, and other ignition sources.
• Check fuel lines, tank, cap, and fittings frequently for
cracks or leaks. Replace if necessary.
• If fuel spills, wait until it evaporates before starting
engine.
1. Clean the fuel cap area of dirt and debris. Remove the
fuel cap (A, Figure 6). Also see Features and Controls
section.
2. Fill the fuel tank (B) with fuel. To allow for expansion of
the fuel, do not fill above the bottom of the fuel tank neck
(C).
3. Reinstall the fuel cap.
13

Starting the Engine
WARNING
Fuel and its vapors are extremely flammable and
explosive.
Fire or explosion can cause severe burns or death.
When Starting Engine
• Ensure that spark plug, muffler, fuel cap, and air
cleaner (if equipped) are in place and secured.
• Do not crank engine with spark plug removed.
• If engine floods, set choke (if equipped) to OPEN/
RUN position, move throttle (if equipped) to FAST
position and crank until engine starts.
WARNING
Engines give off carbon monoxide, an odorless,
colorless, poison gas.
Breathing carbon monoxide can cause nausea, fainting,
or death.
Fire or explosion can cause severe burns or death.
• Start and run engine outdoors.
• Do not start or run engine in enclosed area, even if
doors or windows are open.
1. Check the oil level (see Check and Add Engine Oil).
2. Make sure equipment drive controls are disengaged.
3. Sit in the seat and lift UP the seat adjustment lever,
position as desired, and release the lever to lock the seat
in position.
4. Engage the parking brake. Fully depress the brake pedal,
pull UP on the parking brake control, and release the
brake pedal.
5. Disengage PTO switch by pushing IN.
6. Set the throttle/choke control to the CHOKE position.
7. Insert the key into the ignition switch and turn it to the
ON/START position.
8. After the engine starts, move the throttle/choke control to
half speed. Warm up the engine by running it for at least
30 seconds.
9. Set throttle/choke control to the FAST position.
In the event of an emergency the engine can be
stopped by simply turning the ignition switch to STOP.
Use this method only in emergency situations. For normal
engine shut down follow the procedure given in Stopping
the Tractor and Engine.
NOTE: If the engine does not start after repeated attempts,
contact an authorized dealer.
Driving the Tractor
1. Sit in the seat and adjust the seat so that you can
comfortably reach all the controls and see the dashboard
display (see Features and Controls).
2. Engage the parking brake. Fully depress the brake
pedal, pull UP on the parking brake control, and release
the brake pedal.
3. Make sure the PTO switch is disengaged.
4. Start the engine (see Starting the Engine).
5. Disengage the parking brake. Fully depress the brake
pedal, press DOWN on the parking brake control, and
release the brake pedal.
6. Depress the forward ground speed control pedal to travel
forward. Release the pedal to stop. Note that the further
down the pedal is depressed the faster the tractor will
travel.
7. Stop the tractor by releasing the ground speed control
pedals, setting the parking brake, and stopping the
engine (see Stopping the Tractor and Engine).
Mowing
1. Set the cutting height to the desired level using
the mower cutting height lever (see Features and
Controls).
2. Engage the parking brake. Make sure the PTO switch is
disengaged.
3. Start the engine (see Starting the Engine).
4. Set the throttle/choke control to the FAST position.
5. Engage the PTO to activate the mower blades.
6. Disengage the parking brake then begin mowing.
7. When finished mowing, shut off the PTO.
8. STOP the engine (see Stopping the
Tractor and Engine).
WARNING
The engine will shut off if the reverse ground speed
pedal is depressed while the PTO is on and the RMO
has not been activated. The operator should always turn
the PTO off prior to driving across on roads, paths, or
any area that may be used by other vehicles. Sudden
loss of drive could create a hazard.
14

en
Reverse Mowing Option (RMO)
WARNING
Mowing in reverse can be hazardous to bystanders.
Tragic accidents can occur if the operator is not alert
to the presence of children. Never activate the RMO if
children are present. Children are often attracted to the
unit and the mowing activity.
The Reverse Mowing Option (RMO) allows the operator to
mow in reverse (see Features and Controls). To activate,
turn the RMO key after the PTO is engaged. The L.E.D. light
will illuminate, and the operator can then mow in reverse.
Each time the PTO is engaged the RMO needs to be
reactivated if desired. The key should be removed to restrict
access to the RMO.
Pushing the Tractor by Hand
1. Disengage the PTO and turn the engine off.
2. Pull the transmission release (A, Figure 7) back
approximately 2-3/8" (6 cm) to lock into released
position.
3. The tractor can now be pushed by hand.
WARNING
Towing the unit will cause transmission damage. Do
not use another vehicle to push or pull this unit. Do not
actuate the transmission release lever while the engine
is running.
Adjusting the Mower Cutting Height
Use the mower cutting height adjustment lever to raise or
lower the cutting height (see Features and Controls).
The cutting height has seven positions between 1.5” and
4.0” (3,8 and 10,2 cm).
Hourmeter (if equipped)
The Hourmeter (Figure 8) displays the total hours, trip hours,
and digtal clock.
Display Total Hours, Trip Hours, and Clock
NOTE: Whenever you start up the unit, the Total Hours are
displayed. The Total Hours will automatically reset to 0 after
999.9.
1. Press MODE for less than 1 second to display the Trip
Hours.
2. Press RESET for greater than 3 seconds to reset the Trip
Hours to 0.
3. Press MODE for less than 1 second to display the Clock
(see Set the Clock section).
4. Press MODE for less than 1 second to return to Total
Hours.
4. Press RESET to adjust the minutes.
5. Press MODE for less than 1 second to save the setting.
Parking Brake
Use the parking brake control to engage or disengage the
parking brake when the tractor is stopped (Features and
Controls).
Engage the Parking Brake - To engage the parking brake,
fully depress the brake pedal, pull UP on the parking brake
control, and release the brake pedal.
Disengage the Parking Brake - To disengage the parking
brake, fully depress the brake pedal, press DOWN on the
parking brake control, and release the brake pedal.
Cruise Control
TO ENGAGE:
1. Depress the forward ground speed pedal (see Features
and Controls).
2. Pull up the cruise control when the desired speed is
reached. The cruise will lock in one of its five locking
positions.
TO DISENGAGE:
1. Depress the brake pedal.
OR
2. Depress the forward ground speed pedal.
Stopping the Tractor and Engine
WARNING
Fuel and its vapors are extremely flammable and
explosive.
Fire or explosion can cause severe burns or death.
• Do not choke the carburetor to stop the engine.
1. Release the ground speed pedals to return to the
NEUTRAL position (see Features and Controls).
2. While still on the lawn, disengage the PTO switch, then
wait for all moving parts to stop.
3. Move the throttle control (or throttle/choke control) to
SLOW position and turn the ignition key to OFF. Remove
the key.
4. Engage the parking brake. Fully depress the brake pedal,
pull UP on the parking brake control, and release the
brake pedal.
In the event of an emergency the engine can be
stopped by simply turning the ignition switch to STOP.
Set the Clock
1. Press MODE for greater than 3 seconds. The hours will
flash on the display.
2. Press RESET to adjust the hours.
3. Press MODE for less than 1 second to save the setting.
The minutes will flash on the display.
15

Maintenance
Maintenance Chart
TRACTOR AND MOWER
Every 8 Hours or Daily
Check safety interlock system
ENGINE
First 5 Hours
Change engine oil
Every 8 Hours or Daily
Check engine oil level
Every 25 Hours or Annually *
Clean debris off tractor and mower deck
Clean debris from engine compartment
Every 25 Hours or Annually *
Check tire pressure
Check mower blade stopping time
Check tractor and mower for loose hardware
Every 50 Hours or Annually *
Clean battery and cables
Check tractor brakes
See Dealer Annually to
Lubricate tractor and mower
Check mower blades **
* Whichever comes first
** Check blades more often in regions with sandy soils or high dust
conditions.
WARNING
Unintentional sparking can result in fire or electric
shock.
Unintentional start-up can result in entanglement,
traumatic amputation, or laceration.
Before performing adjustments or repairs:
• Disconnect the spark plug wire and keep it away from
the spark plug.
• Disconnect battery at negative terminal (only engines
with electric start).
• Use only correct tools.
• Do not tamper with governor spring, links, or other parts
to increase engine speed.
• Replacement parts must be of the same design and
installed in the same position as the original parts. Other
parts may not perform as well, may damage the unit,
and may result in injury.
• Do not strike the flywheel with a hammer or hard object
because the flywheel may shatter during operation.
Clean engine air filter and pre-cleaner **
Every 50 Hours or Annually *
Change engine oil
Replace oil filter
Annually
Replace air filter
Replace pre-cleaner
See Dealer Annually to
Inspect muffler and spark arrester
Replace spark plug
Replace fuel filter
Clean engine air cooling system
* Whichever comes first
** Clean more often in dusty conditions or when airborne debris is present.
Check Tire Pressure
Tires should be checked periodically to provide the
optimum traction and to guarantee the best cut (see Figure
3).
NOTE: These pressures may dier slightly from the “Maximum Ination” stamped on the side walls of the tires.
Check Mower Blade Stopping Time
WARNING
If the mower blade does not come to a complete stop
within 5 seconds, the clutch must be adjusted. Do not
operate the machine until the proper adjustment has
been performed by an authorized dealer.
Check the mower blade for proper function (see Safety
Interlock System Tests). The blade should stop rotating in
5 seconds or less after moving the blade control to the OFF
position.
16

en
Battery Maintenance
Changing the Battery
WARNING
When removing or installing battery cables,
disconnect the negative cable FIRST and
reconnect it LAST. If not done in this order, the
positive terminal can be shorted to the frame by a tool.
WARNING
Battery posts, terminals, and related accessories
contain lead and lead compounds - chemicals known to
the State of California to cause cancer, birth defects, or
other reproductive harm. Wash hands after handling.
Cleaning the Battery and Cables
1. Disconnect the NEGATIVE (black) cables first.
2. Disconnect the POSITIVE (red) cables last.
3. Remove and Install the battery as shown in Figure 9
4. Clean the battery platform with a solution of baking soda
and water.
5. Clean the battery terminals and cable ends with a wire
brush and battery terminal cleaner until shiny.
6. Coat the assembled terminals with petroleum jelly or
non-conducting grease.
7. Connect the POSITIVE (red) cables first.
8. Connect the NEGATIVE (black) cables last.
WARNING
Keep open flames and sparks away from the battery; the
gasses coming from it are highly explosive. Ventilate the
battery well during charging.
A dead battery or one too weak to start the engine may
be the result of a defect in the charging system or other
electrical component. If there is any doubt about the cause
of the problem, see your dealer. If you need to replace the
battery, follow the steps under Cleaning the Battery and
Cables.
To charge the battery, follow the instructions provided by
the battery charger manufacturer as well as all warnings
included in the safety rules sections of this book. Charge
the battery until fully charged. Do not charge at a rate higher
than 10 amps.
Changing the Engine Oil
WARNING
Fuel and its vapors are extremely flammable and
explosive.
Fire or explosion can cause severe burns or death.
When Changing Oil
• If you drain the oil from the top oil fill tube, the fuel tank
must be empty or fuel can leak out and result in a fire
or explosion.
1. Run engine until warm.
2. Place the tractor on a level surface (see Figure 4).
3. Stop the engine.
4. Clean oil fill and filter areas of any debris. Remove
dipstick and lay on clean cloth (see Figure 5).
5. Remove the oil drain cap as shown in Figure 10. Drain
the oil into an approved container. After the oil has
drained, install the oil drain cap.
6. Remove the oil filter (see Figure 11) and dispose of
properly.
7. Lightly lubricate the oil filter gasket with fresh, clean oil.
8. Install the oil filter by hand until the gasket contacts the
oil filter adapter, then tighten the oil filter 1/2 to 3/4 turns.
9. Add oil (see Check and Add Engine Oil).
17

Servicing the Air Filter
Servicing the Muer
WARNING
Fuel and its vapors are extremely flammable and
explosive.
Fire or explosion can cause severe burns or death.
• Never start or run the engine with the air cleaner
assembly or air filter removed..
NOTICE: Do not use pressurized air or solvents to clean the
filter. Pressurized air can damage the filter and solvents will
dissolve the filter.
1. Remove the fasteners (A, Figure 12) and the air filter
cover (B).
2. To remove the filter (C), lift the end of the filter and then
pull the filter off the intake (D).
3. To loosen debris, gently tap the filter on a hard surface. If
the filter is excessively dirty, replace with a new filter.
4. Wash the pre-cleaner in liquid detergent and water. Then
allow it to thoroughly air dry. Do not oil the pre-cleaner.
5. Assemble the dry pre-cleaner to the filter.
6. Install the filter on the intake. Push the end of the filter
into the base as shown. Make sure filter fits securely in
the base.
7. Install air filter cover and secure with fasteners.
Check Spark Plug Gap
Use a spark plug feeler gauge to check the gap between the
two electrodes. When the gap is correct, the gauge will drag
slightly as you pull it through the gap (see Figure 13).
WARNING
Running engine produces heat. Engine parts,
especially muffler, become extremely hot.
Severe thermal burns can occur on contact.
Combustible debris, such as leaves, grass, brush,
etc. can catch fire.
• Allow muffler, engine cylinder and fins to cool before
touching.
• Remove visible debris from engine compartment.
WARNING
Replacement parts must be the same position as the
original parts or fire could result.
To service the muffler, see an authorized dealer.
Servicing the Spark Plugs
WARNING
Unintentional sparking can result in fire or electric
shock.
Unintentional start-up can result in entanglement,
traumatic amputation, or laceration.
When testing for spark:
• Use approved spark plug tester.
• Do not check for spark with spark plug removed.
CAUTION: Spark plugs have different heat ranges. It is
important that the correct spark plug is used, otherwise,
engine damage can occur.
If necessary, use the spark plug gauge to adjust the gap by
gently bending the curved electrode without touching the
center electrode or the porcelain.
Install Spark Plug
Finger tighten, then tighten with wrench (see Figure 14).
• 180 in-lbs (20 Nm), OR
• 1/2 turn when reinstalling the original spark plug.
1/4 turn when installing a new spark plug.
Clean Spark Plug
Clean with wire brush and sturdy knife. Do NOT use
abrasives (D, Figure 5).
18

en
Storage
WARNING
Never store the unit (with fuel) in an enclosed,
unventilated structure. Fuel vapors can travel to an
ignition source (such as a furnace, water heater,
etc.) and cause an explosion. Fuel vapor is also toxic to
humans and animals.
When Storing Fuel Or Equipment With Fuel in Tank
• Store away from furnaces, stoves, water heaters, or
other appliances that have pilot lights or other ignition
sources because they can ignite fuel vapors.
Equipment
Disengage the PTO, set the parking brake, and remove the
ignition key.
Store battery in a cool, dry place and keep fully charged
during storage. If the battery is left in the unit, disconnect the
negative cable.
Fuel System
Fuel can become stale when stored over 30 days. Stale fuel
causes acid and gum deposits to form in the fuel system
or on essential carburetor parts. To keep fuel fresh, use
Briggs & Stratton® Advanced Formula Fuel Treatment
& Stabilizer, available wherever Briggs & Stratton genuine
service parts are sold.
Engine Oil
While the engine is still warm, change the engine oil. See
Changing the Engine Oil section.
Before starting the unit after it has been stored:
• Check all fluid levels. Check all maintenance items.
• Perform all recommended checks and procedures found in
this manual.
• Allow the engine to warm up for several minutes before use.
There is no need to drain gasoline from the engine if a fuel
stabilizer is added according to instructions. Run the engine
for 2 minutes to circulate the stabilizer throughout the fuel
system before storage.
19

Troubleshooting
Troubleshooting the Tractor
PROBLEM LOOK FOR REMEDY
Brake pedal not depressed. Fully depress brake pedal.
Engine will not
turnover or start.
Engine starts hard
or runs poorly.
Engine knocks.
Excessive oil
consumption.
PTO (electric clutch) switch is in ON
position.
Cruise control engaged. Move knob to NEUTRAL/OFF position.
Out of fuel. If engine is hot, allow it to cool, then refill the fuel tank.
Battery terminals require cleaning. See Cleaning the Battery and Cables section.
Battery discharged or dead. Recharge or replace battery.
Wiring loose or broken.
Fuel mixture too rich. Clean air filter.
Low oil level. Check/add oil as required.
Using wrong grade oil. See Oil Recommendations Chart.
Using wrong grade oil. See Oil Recommendations Chart.
Too much oil in crankcase. Drain excess oil.
Place in OFF position.
Visually check wiring. If wires are frayed or broken, see
authorized dealer.
Engine exhaust is
black.
Engine runs, but
tractor will not drive.
Tractor steers hard
or handles poorly.
For all other maintenance and operation issues, please contact your authorized dealer.
20
Dirty air filter. See Servicing the Air Filter Assembly section.
Ground speed control pedals not
depressed.
Transmission release lever in PUSH
position.
Parking brake is engaged. Disengage parking brake.
Improper tire inflation. See Check Tire Pressure section.
Depress pedals.
Move into DRIVE position.

en
Troubleshooting the Mower
PROBLEM LOOK FOR REMEDY
Mower cut is uneven.
Mower cut is rough
looking.
Engine stalls easily
with mower engaged.
Mower not leveled properly.
Tractor tires not properly inflated. See Check Tire Pressure section.
Engine speed too slow. Set to full throttle.
Ground speed too fast. Slow down.
Engine speed too slow. Set to full throttle.
Ground speed to fast. Slow down.
Dirty or clogged air filter. See Servicing the Air Filter Assembly section.
Cutting height set too low. Cut tall grass at maximum cutting height during first pass.
Engine not up to operating
temperature.
Level mower deck. See Leveling the Mower Deck
section.
Run engine for several minutes to warm-up.
Engine runs and
tractor drives, but
mower will not drive.
For all other maintenance and operation issues, please contact your authorized dealer.
Starting mower in tall grass. Start the mower in a cleared area.
PTO not engaged. Engage the PTO.
21

Specifications
Item Briggs & Stratton Briggs & Stratton Briggs & Stratton
Cylinder Single Twin Twin
Displacement 30.59 cu in. (501 cc) 40.03 cu in. (656 cc) 44.18 cu in. (724 cc)
Electrical System Alternator: 9 amp Regulated
Battery: 12V-195 CCA
Engine Oil Capacity 48 oz (1,4 L) 62 - 64 oz (1,8 - 1,9 L) 62 - 64 oz (1,8 - 1,9 L)
Spark Plug Gap 0.030 in. (0,76 mm) 0.030 in. (0,76 mm) 0.03 in. (0,76 mm)
Spark Plug Torque 180 in-lbs (20 Nm) 180 in-lbs (20 Nm) 180 in-lbs (20 Nm(
Fuel Tank Capacity 3.5 gal (13,2 L) 3.5 gal (13,2 L) 3.5 gal (13,2 L)
Armature Air Gap 0.010 - 0.014 in. (0,25 - 0,36
mm)
Intake Value
Clearance
Exhaust Valve
Clearance
* This spark ignition system complies with Canadian ICES-002.
0.003 - 0.005 in. (0,08 - 0,13
mm)
0.005 - 0.007 in. (0,13 - 0,18
mm)
Alternator: 9 amp Regulated
Battery: 12V-195 CCA
0.008 - 0.012 in. (0,20 - 0,30
mm)
0.004 - 0.006 in. (0,10 - 0,15
mm)
0.004 - 0.006 in. (0,10 - 0,15
mm)
Alternator: 9 amp Regulated
Battery: 12V-230 CCA
0.008 - 0.012 in. (0,20 - 0,30
mm)
0.004 - 0.006 in. (0,10 - 0,15
mm)
0.004 - 0.006 in. (0,10 - 0,15
mm)
Power Ratings
The gross power rating for individual gasoline engine models is labeled in accordance with SAE (Society of Automotive
Engineers) code J1940 Small Engine Power & Torque Rating Procedure, and is rated in accordance with SAE J1995.
Torque values are derived at 2600 RPM for those engines with “rpm” called out on the label and 3060 RPM for all others;
horsepower values are derived at 3600 RPM. The gross power curves can be viewed at www.BRIGGSandSTRATTON.
COM. Net power values are taken with exhaust and air cleaner installed whereas gross power values are collected without
these attachments. Actual gross engine power will be higher than net engine power and is affected by, among other things,
ambient operating conditions and engine-to-engine variability. Given the wide array of products on which engines are
placed, the gasoline engine may not develop the rated gross power when used in a given piece of power equipment. This
difference is due to a variety of factors including, but not limited to, the variety of engine components (air cleaner, exhaust,
charging, cooling, carburetor, fuel pump, etc.), application limitations, ambient operating conditions (temperature, humidity,
altitude), and engine-to-engine variability. Due to manufacturing and capacity limitations, Briggs & Stratton may substitute
an engine of higher rated power for this engine.
Parts and Accessories
See an authorized dealer.
22

da
Omfattede produkter i denne manual
Følgende produkter er omfattet af denne manual:
2691184-00, 2691185-00, 2691187-00, 2691217-00, 2691217-01, 2691217-02, 2691248-00, 2691281-00, 2691282-00,
2691343-01, 2691344-00, 2691345-00, 2691345-01, 2691346-00, 2691346-01, 2691346-02, 2691349-00, 2691349-01,
2691387-00, 2691387-01, 2691406-00, 2691407-00
INDHOLD
Førersikkerhed ................................................................ 6
Funktioner og betjeningsanordninger.............................. 11
Betjening ......................................................................... 12
Vedligeholdelse .............................................................. 16
Fejlnding ....................................................................... 20
Specikationer ................................................................ 22
Billederne i dette dokument er repræsentative. Din maskine kan variere fra de viste billeder.
VENSTRE og HØJRE er set fra førerens position.
5
Førersikkerhed
Vigtige sikkerhedsinstruktioner
OPBEVAR DENNE VEJLEDNING - Denne brugsanvisning
indeholder vigtige instruktioner, der bør følges under den
første opsætning, betjening og vedligeholdelse af udstyret.
Gem disse originale anvisninger til fremtidig brug.
Sikkerhedssymboler og deres betydninger
FARE indikerer en fare, som, hvis den ikke
undgås, vil forårsage dødsfald eller alvorlig
personskade.
ADVARSEL indikerer en fare, som hvis den ikke
undgås, kan resultere i dødsfald eller alvorlig
personskade.
FORSIGTIG indikerer en fare som, kan medføre
lettere eller moderat personskade.
BEMÆRK indikerer en situation, som kan medføre
beskadigelse af produktet.
BRAND BEVÆGELIGE
GIFTIGE
GASARTER
BRUG
SIKKERHEDSBRILLER
LÆS
BRUGSANVISNINGEN
BRÆNDSTOF
AFBRYDELSE
TILBAGESLAG EKSPLOSION TIL/FRA
DELE
FARLIGT
KEMIKALIE
HURTIG LANGSOM OLIE BRÆNDSTOF
STØD STOP
VARM
OVERFLADE
AMPUTATION AF
CHOKER
FARE FOR
LEMMER
ADVARSEL
Udstødningen fra motoren på dette produkt indeholder
kemikalier, som ifølge staten Californien kan forårsage
kræft, fosterskader eller forplantningsskader.
ADVARSEL
Visse dele på dette produkt og dets tilbehør indeholder
kemikalier, som ifølge staten Californien kan forårsage
kræft, fosterskader eller forplantningsskader. Vask
hænder efter håndtering.
ADVARSEL
Batteripoler, terminaler og tilsvarende tilbehør
indeholder bly og blyholdige stoffer, kemikalier
som ifølge staten Californien kan forårsage kræft,
fosterskader eller forplantningsskader. Vask hænder
efter håndtering.
ADVARSEL
Kørende motorer udsender kulilte, en lugtfri,
dødbringende luftart.
Indånding af kulilte kan forårsage hovedpine,
træthed, svimmelhed, opkast, forvirring, anfald, kvalme,
besvimelse eller dødsfald.
• Brug KUN udstyret udendørs.
• Sørg for at forhindre udstødning i at komme
ind på et lukket område gennem vinduer, døre,
ventilationskanaler eller andre åbninger.
FARE FOR RULNING
Sikkerhedssymbolet er anvendt til at vise
sikkerhedsoplysninger om farer der kan medføre
personskade. Et signalord (FARE, ADVARSEL eller
FORSIGTIG) bliver brugt sammen med alarmsymbolet for
at illustrere sandsynligheden og den mulige grad af skade.
Desuden kan et faresymbol bruges til at illustrere faretypen.
6

da
Læs disse sikkerhedsregler og følg dem nøje. Hvis du ikke følger disse regler, kan det medføre, at du
mister herredømmet over maskinen, alvorlig personskade eller død for dig selv eller de omkringstående
eller beskadigelse af ejendom eller udstyr. Dette klippeaggregat er i stand til at amputere hænder og
fødder samt kaste genstande. Trekanten i teksten angiver vigtige advarsler, som du skal følge.
ALMINDELIG BETJENING
1. Du skal læse, forstå og følge alle instruktioner i
vejledningen og på maskinen før du starter den.
2. Hold ikke dine hænder eller fødder nær ved roterende dele
eller under maskinen. Hold dig væk fra udkaståbningen.
3. Lad kun ansvarlige voksne med kendskab til betjeningen
bruge maskinen (lokale regulativer kan påbyde en
aldersgrænse).
4. Ryd området for løse genstande såsom sten, legetøj,
kabler osv., der kan opfanges og kastes af kniven(e).
5. Vær sikker på at der ikke er andre i området før du slår
græsset. Stop maskinen hvis andre kommer ind på
området.
6. Kør aldrig med passagerer.
7. Slå ikke græs i bakgear medmindre det er ubetinget
nødvendigt. Se altid ned og bagud før og mens du
bevæger dig baglæns.
8. Ret aldrig udkastet materiale mod andre. Undgå at udkaste
materiale mod en væg eller forhindring. Materiale kan blive
kastet tilbage mod føreren. Stop kniven(e) når du kører
over grus.
9. Brug ikke maskinen medmindre hele opsamleren,
udkastbeskyttelsen (skærmen) eller andre
sikkerhedsforanstaltninger er på plads.
10. Sænk farten af inden du drejer.
11. Lad aldrig maskinen stå uden opsyn mens den er i gang.
Du skal altid koble skærene fra (kraftudtaget), trække
parkeringsbremsen, stoppe motoren og fjerne nøglerne før
du forlader maskinen.
12. Du skal koble knivene fra (kraftudtaget) når du ikke slår
græs. Sluk for motoren og vent til alle dele står fuldstændigt
stille før du rengør maskinen, fjerner opsamleren eller
renser udkastbeskyttelsen.
13. Brug kun maskinen i dagslys eller godt kunstlys.
14. Brug aldrig enheden mens du er påvirket af alkohol eller
narkotika.
15. Hold øje med trafik når du arbejder nær ved, eller krydser
en vej.
16. Vær ekstra forsigtig når du læsser maskinen af eller på en
anhænger eller lastbil.
17. Benyt altid øjenbeskyttelse når du bruger denne maskine.
18. Det har vist sig at brugere på 60 år og over er involveret
i en stor del af kvæstelser i forbindelse med motordrevet
udstyr. Disse brugere bør overveje deres egen evne til at
betjene udstyret på en sikker måde uden at være til fare for
dem selv eller andre.
19. Følg producentens anbefalinger angående hjulvægte og
modvægte.
20. Husk at brugeren er ansvarlig for ulykker og person- og
ejendomsskader.
21. Enhver fører bør opsøge faglig og praktisk vejledning.
22. Du skal altid have kraftige sko og bukser på. Brug aldrig
maskinen med bare fødder eller sandaler.
23. Før brug skal du altid efterse om knivene og
knivarmaturerne forefindes, er i orden og fastgjort. Udskift
slidte og beskadigede dele.
24. Du skal frakoble udstyr før: benzinpåfyldning, afmontering
af udstyr, justeringer (medmindre justeringen kan foretages
fra førersædet).
25. Når maskinen er parkeret, under opbevaring eller uden
opsyn skal du sænke klippeaggregatet medmindre du
anvender en mekanisk lås.
26. Før du forlader førersædet, og uanset grunden, skal du
altid trække parkeringsbremsen (hvor den forefindes),
koble kraftudtaget fra, stoppe motoren og udtage nøglen.
27. For at reducere brandfare, skal du holde maskinen fri for
græs, blade og overskydende olie. Stop eller parker ikke
ovenpå tørre blade, græs eller brændbare materialer.
TRANSPORT OG OPBEVARING
1. Når du transporterer maskinen på en åben anhænger, skal
du sørge for den vender fremad i kørselsretningen. Hvis
maskinen vender baglæns, kan den beskadiges af vindløft.
2. Følg altid sikre fremgangsmåder for opfyldning og omgang
med brændstof når du fylder maskinen igen efter transport
eller opbevaring.
3. Opbevar aldrig maskinen (med brændstof) i en indelukket,
dårligt ventileret bygning. Brændstofdampe kan bevæge
sig til en antændelseskilde (såsom et fyr, vandvarmer osv.)
og forårsage en eksplosion. Brændstofdampe er endvidere
giftige for mennesker og dyr.
4. Følg altid motormanualens vejledninger vedrørende
forberedelser til opbevaring før du opbevarer maskinen i
kortere eller længere perioder.
5. Følg altid motormanualens vejledninger vedrørende
korrekte opstartsprocedurer, når du igen tager maskinen i
brug.
6. Opbevar aldrig maskinen eller en brændstofbeholder
indendørs hvor der er åben ild eller en tændflamme,
som f.eks. i en vandvarmer. Lad maskinen køle af inden
opbevaring.
7

BETJENING PÅ SKRÅNINGER
Skråninger er en væsentlig årsag til ulykker hvor man
mister herredømmet eller vælter og som kan medføre
alvorlige kvæstelser eller død. Arbejde på enhver skråning
kræver ekstra forsigtighed. Hvis du ikke kan gå baglæns
op ad en skråning eller hvis du ikke er tryg ved det, skal du
ikke arbejde på den.
På en skråning kan man ikke genvinde herredømmet over
en plæneklipper ved at bremse. Hovedårsagerne til at
man mister herredømmet er: dæk med utilstrækkeligt greb
på underlaget, for høj hastighed, utilstrækkelig bremsning,
maskintypen er uegnet til opgaven, manglende kendskab
til jordforholdene, forkert tilkobling og vægtfordeling.
1. Slå græs tværs over skråningen, ikke op og ned.
2. Hold udkig efter huller, furer og forhøjninger. Ujævnt
terræn kan vælte maskinen. Højt græs kan skjule
forhindringer.
3. Vælg en lav hastighed så du ikke behøver at stoppe eller
ændre hastighed mens du er på skråningen.
4. Slå ikke på vådt græs. Dækkene kan miste deres greb.
5. Maskinen skal altid være i gear, især ved kørsel på
skråninger. Lad ikke maskinen løbe i frigear ned ad
bakke.
6. Undgå at starte, stoppe eller dreje på en skråning. Hvis
dækkene mister deres grev, frakobl kniven(ene) og
fortsæt langsomt lige ned ad skråningen.
7. Sørg for at al bevægelse på skråninger er langsom og
gradvis. Foretag ikke pludselige ændringer i hastighed
eller retning som kunne få maskinen til at vælte.
8. Vær ekstra forsigtig når du bruger maskiner med
opsamlere eller andet udstyr; de kan påvirke maskinens
stabilitet. Undlad at bruge på stejle skråninger.
9. Du må ikke forsøge at stabilisere maskinen ved at sætte
din fod på jorden (ridere).
10. Slå ikke græs nær skrænter, grøfter eller jordvolde.
Plæneklipperen kan pludselig vælte hvis et hjul rager
over kanten på en skrænt eller grøft eller hvis en kant
styrter sammen.
11. Brug ikke opsamlere på stejle skråninger.
12. Slå ikke græs på skråninger hvis du ikke kan bakke op
ad dem.
13. Henvend dig til din autoriserede forhandler angående
anbefalinger om hjulvægte og modvægte.
14. Fjern forhindringer, såsom sten, grene osv.
15. Benyt lav hastighed. Dækkene kan miste deres greb på
skråninger selvom bremserne fungerer godt.
16. Drej ikke på skråninger medmindre det er yderst
påkrævet; hvis du drejer, gør det da langsomt og gradvist
nedad, såvidt muligt.
ADVARSEL
Arbejd aldrig på skråninger med en stigning over 17,6
procent (10°) som er en stigning på 106 cm (3-1/2
fødder) lodret per 607 cm (20 fødder) vandret.
Når du arbejder på skråninger, brug ekstra hjulvægte
eller modvægte. Henvend dig til din forhandler/
detailhander for at finde ud af, hvilke passende vægte er
til rådighed for maskinen.
Vælg en lav hastighed før du kører ind på skråningen.
Udover de forreste vægte, skal der også udvises ekstra
forsigtighed når du arbejder på skråninger med en
bagmonteret opsamler.
Slå OP og NED ad skåningen, aldrig tværs over
overfladen, og vær forsigtig når du ændrer retning. DU
MÅ IKKE STARTE ELLER STOPPE PÅ EN SKRÅNING.
BØRN
Der kan ske alvorlige ulykker hvis føreren ikke er
opmærksom på børns tilstedeværelse. Børn tiltrækkes ofte
til enheden og aktiviteterne i forbindelse med græsslåning.
Gå aldrig ud fra at børn vil blive, hvor du så dem sidst.
1. Hold børn væk fra græsslåningsområdet og under opsyn
af en anden ansvarlig voksen.
2. Vær opmærksom og sluk for maskinen hvis der kommer
børn ind på området.
3. Før og mens du bakker skal du altid se ned og bagud og
passe på små børn.
4. Tag aldrig børn med på maskinen, selv med kniven(e) slået
fra. De kan falde af og blive alvorligt kvæstet eller være i
vejen for sikker brug af maskinen. Børn, som før har fået
en køretur, kan pludselig dukke op i græsslåningsområdet
for at få en tur mere og blive kørt ned eller bakket ned af
maskinen.
5. Lad aldrig børn bruge maskinen.
6. Udvis ekstra forsigtighed, når du nærmer dig hjørner med
dårligt sigt, buske, træer eller andre genstande, der kan
blokere dit udsyn.
PÅHÆNGSUDSTYR (RIDERE)
1. Brug kun en maskine til bugsering hvis den har en
tilkoblingsanordning beregnet til at bugsere med.
Du må ikke koble påhængsudstyr til andet end
tilkoblingspunktet.
2. Følg producentens anbefalinger angående
vægtbegrænsning for påhængsudstyr og bugsering på
skråninger.
3. Lad aldrig børn eller andre være i eller på
påhængsudstyr.
4. På skråninger kan vægten af påhængsudstyr medføre at
maskinen mister grebet og føreren mister herredømmet.
5. Kør langsomt og påregn ekstra afstand til at stoppe.
6. Lad ikke maskinen løbe i frigear ned ad bakke.
8

da
SERVICE OG VEDLIGEHOLDELSE
Sikker Omgang med Benzin
1. Sluk alle cigaretter, cigarer, piber og andre
antændelseskilder.
2. Brug kun godkendte benzindunke.
3. Fjern aldrig benzindækslet eller fyld benzin på med
motoren i gang. Lad motoren køle ned før du fylder benzin
på.
4. Fyld aldrig benzin på indendørs.
5. Opbevar aldrig maskinen eller en brændstofbeholder hvor
der er åben ild, gnist eller en tændflamme, som f.eks. nær
en vandvarmer eller andre el-apparater.
6. Du må aldrig fylde beholdere inde i et køretøj eller på ladet
af en lastbil med ladbeklædning af plastik. Du skal altid
placere beholdere på jorden og med afstand til dit køretøj
før du påfylder dem.
7. Fjern benzindrevet udstyr fra lastbilen eller anhængeren
og fyld det op på jorden. Hvis dette er umuligt, må du fylde
dette udstyr på anhængeren op med en benzindunk, i
stedet for direkte fra en benzinpumpe.
8. Hold pumpens tud mod kanten af tankens eller
beholderens åbning uafbrudt indtil du er færdig med at
fylde op. Brug ikke en tudlås-åbningsindretning.
9. Hvis du har spildt brændstof på tøjet skal du øjeblikkelig
skifte tøj.
10. Overfyld aldrig benzintanken. Sæt benzindækslet på igen
og stram det forsvarligt.
11. Vær ekstra forsigtig ved omgang med benzin og andet
brændstof. De er brændbare og dampene kan eksplodere.
12. Hvis du har spildt brændstof må du ikke prøve at starte
motoren, men flyt maskinen væk fra stedet hvor du har
spildt og undgå at bruge nogen form for antænding indtil
brændstofdampene er forsvundet.
13. Sæt alle dæksler til benzintank og benzindunke forsvarligt
på igen.
Service & Vedligeholdelse
1. Lad aldrig maskinen gå i et lukket område hvor der kan
samles kuliltedampe.
2. Sørg for at møtrikker og bolte, især boltene som holder
knivene, er fastspændte og hold udstyret i god stand.
3. Lav aldrig om på sikkerhedsanordninger. Kontroller med
jævne mellemrum om de virker ordentligt og foretag
nødvendige reparationer, hvis de ikke er funktionsdygtige.
4. Hold maskinen fri for græs, blade og andet ophobet affald.
Tør spildt olie eller brændstof op og fjern alle affaldsrester
der er tilsølet i brændstof. Lad maskinen køle af før
opbevaring.
5. Hvis du rammer en genstand skal du stoppe og undersøge
maskinen. Om nødvendigt må du reparere den inden du
starter igen.
6. Foretag aldrig justeringer eller reparationer mens motoren
går.
7. Du skal undersøge opsamlerkomponenterne og
udkastbeskytteren ofte og, om nødvendigt, udskifte dem
med producentens anbefalede reservedele.
8. Plæneklipperens knive er skarpe. Pak knivene ind
eller brug handsker og udvis ekstra forsigtighed under
servicearbejde.
9. Undersøg bremsefunktionen ofte. Juster og servicer efter
behov.
10. Vedligehold eller udskift sikkerheds- og
instruktionsmærkater efter behov.
11. Du må ikke fjerne brændstoffilteret mens motoren er varm
da spildt benzin kan antændes. Sæt ikke klemmerne til
brændstofledningen med større afstand end nødvendigt.
Sørg for at klemmerne holder slangerne godt fast over
filteret efter montering.
12. Brug ikke benzin indeholdende METANOL,
biobenzin indeholdende mere end 10% ETHANOL,
benzintilsætninger eller renset benzin da det kan
beskadige motoren/brændstofsystemet.
13. Hvis brændstoftanken skal tømmes, skal det gøres
udendørs.
14. Udskift defekte lydpotter/udstødningsrør.
15. Brug kun producentens autoriserede reservedele, når du
reparerer.
16. Følg altid producentens anvisninger for alle indstillinger og
justeringer.
17. Du bør kun anvende autoriserede service værksteder for
mere omfattende service og reparationer.
18. Forsøg aldrig at udføre større reparationer af denne
maskine, hvis du ikke har den nødvendige uddannelse.
Ukorrekte serviceprocedurer kan gøre maskinen farlig
at bruge, beskadige udstyret og annullere producentens
garanti.
19. Vær forsigtig når du drejer en kniv på en plæneklipper med
flere knive da det kan få de andre knive til også at dreje.
20. Du må ikke ændre motorens regulatorindstilling eller
overskride motorens tilladte hastighed. Betjening af
motoren ved for høj hastighed kan øge risikoen for
personskade.
21. Du skal frakoble motordrevet udstyr, slukke motoren,
fjerne nøglen og afbryde tændrørsledningen/erne inden:
du renser blokeringer af udstyret og udkast, før du udfører
servicearbejde, rammer en genstand, eller hvis maskinen
begynder at vibrere mere end normalt. Efter at have ramt
en genstand skal du kontrollere maskinen for skader og
foretage reparationer før du genoptager betjeningen af
den.
22. Hold aldrig dine hænder nær ved bevægelige dele, såsom
en hydrostatisk pumpes køleventilator, mens traktoren er
i gang. (hydrostatiske pumpers køleventilatorer er normalt
placeret ovenpå transmissionsakslen).
23. Maskiner med hydrauliske pumper, slanger eller motorer:
ADVARSEL:Hydraulikvæske der lækker under tryk kan
gennemtrænge huden og medføre alvorlige kvæstelser.
Hvis en fremmed væske presses ind gennem huden
skal den bortopereres indenfor få timer af en læge med
erfaring i denne form for kvæstelse; ellers kan der opstå
koldbrand. Hold både krop og hænder på afstand af små
huller eller dyser som sprøjter hydraulikvæske ud under
højtryk. Anvend papir eller pap, ikke hænder, til at lede
efter lækager. Sørg for at alle hydraulikvæskeforbindelser
er tætte og at alle hydraulikslanger og ledninger er i
god stand før du sætter systemet under tryk. Hvis der
forekommer lækage skal maskinen omgående til service
hos din autoriserede forhandler.
24. ADVARSEL: IUkorrekt udløsning af fjedre kan medføre
alvorlig personskade. Fjedre bør fjernes af en autoriseret
tekniker.
25. Modeller med en motorkøler:
ADVARSEL: For at forebygge alvorlige kvæstelser fra
overophedet kølervæske eller dampudblæsning, må man
aldrig forsøge at fjerne kølerdækslet mens motoren kører.
Sluk motoren og vent til den er kold. Selv da skal du være
yderst forsigtig når du fjerner dækslet.
9

Sikkerhedsmærkater
Se figur 1 (call-outs A til E) for placeringer og billeder
af mærkater.
Sikkerhedsikon
Se figur 1 (call-outs C til E) for placering af ikoner. Se
nedenfor hvis du ønsker en forklaring til ikonerne.
Alle vejledende meddelelser på din rider og plæneklipper
bør læses grundigt og skal overholdes. Det kan medføre
personskade hvis disse vejledninger ikke efterleves.
Informationen er med henblik på din egen sikkerhed og den
er vigtig! Sikkerhedsmærkaterne nedenfor findes på din
rider og plæneklipper.
Hvis nogle af disse mærker forsvinder eller beskadiges skal
de omgående udskiftes. Kontakt en autoriseret forhandler
med henblik på udskiftning.
Mærkerne er nemme at påsætte og vil være en vedvarende
iøjnefaldende påmindelse til dig, og andre som måtte bruge
udstyret, om at følge sikkerhedsinstruktionerne der er
nødvendige for sikker og effektiv drift.
Call-out Beskrivelse af mærkat
A
B
C
D
E
Kontrol- og løfteredskab
Frigørelse af transmission
Slyngede Genstandsfare
Amputation og slyngede genstande
Mærkat:
Mærkat:
FARE - Hovedpanel
Fare
Fare
1. ADVARSEL:Læs og gør dig bekendt med
betjeningsvejledningen inden du bruger denne maskine.
Vær bekendt med placeringerne og funktionerne af alle
betjeningshåndtagene. Du må ikke bruge denne maskine
medmindre du har lært at bruge den.
2. FARE FOR TAB AF TRÆKKRAFT, UDSKRIDNING,
STYRING OG MISTET HERREDØMME PÅ
SKRÅNINGER:Hvis maskinen ikke vil køre ligeud eller
begynder at skride på en skråning, skal du standse
græsslåningen og langsomt bevæge dig væk fra
skråningen.
3. FARE: BRANDFARE: Hold maskinen ren for græs,
blade og overskydende olie. Påfyld ikke brændstof
når motoren er varm eller kører. Stop motoren, udtag
nøglen og lad den køle af i mindst 3 minutter før du
fylder brændstof på. Fyld ikke brændstof på indendørs,
i en lukket anhænger, garage eller andre indelukkede
områder. Tør spildt brændstof op. Ryg ikke under
betjening af denne maskine.
4. FARE FOR AT VÆLTE OG SKRIDE:Slå græs op og
ned og ikke på tværs af skråninger. Må ikke betjenes
på skråninger, som er stejlere end 10 grader. Undgå
pludselige og skarpe (hurtige) sving på skråninger.
5. FARE FOR AMPUTATION OG ALVORLIG
LEMLÆSTELSE: For at undgå ulykker under
betjening af plæneklipperen skal du sørge for at
sikkerhedsanordningerne (skærme og kontakter) er på
plads og er funktionsdygtige.
6. Undlad at slå græs når der er børn eller andre personer
i nærheden. Tag aldrig en passager med specielt ikke
børn, heller ikke hvis skærene er slået fra. Slå ikke græs i
bakgear medmindre det er ubetinget nødvendigt. Kig dig
tilbage og nedad inden du begynder at køre baglæns.
7. Referer til den tekniske manual inden du udfører
reparationer og vedligeholdelse. Når du forlader
maskinen, så sluk for den, træk parkeringsbremsen og
udtag tændingsnøglen.
8. Hold uvedkommende og børn på behørig afstand. Fjern
genstande der kan risikere at blive slynget afsted af de
roterende skær. Undlad at slå græs hvis affaldsslisken
ikke er på plads.
9. Undlad at slå græs hvis affaldsslisken eller selve
opsamleren ikke er på plads.
10. For at undgå ulykker under betjening af plæneklipperen,
skal du holde dig på afstand af klippeaggregatets kant og
ligeledes holde andre væk.
10

da
Funktioner og betjeningsanordninger
Se figur 2 for placering.
Bremsepedal
Når der trædes på bremsepedalen, aktiveres
traktorens bremse.
Fartpilot
Dette fastlåser hastighedskontrollen i fremad
retning. Fartpilothåndtaget har fem faste positioner.
Brændstoftank
Drej mod uret for at fjerne dækslet.
Hastighedspedaler
De fremadrettede hastighedspedaler styrer
traktorens hastighed fremad. De bagudadrettede
hastighedspedaler styrer traktorens hastighed
bagud.
Vælg baglæns plæneklipning (RMO)
Dette muliggør at føreren kan slå græs (eller
anvende andet kraftudtagsdrevet udstyr) mens
man kører baglæns. For at aktivere drejes RMO
nøglen efter kraftudtaget er blevet aktiveret.
LED-lampen lyser, og førern kan derefter køre
baglæns. Hver gang PTO/kraftudtaget frakobles,
skal RMO genaktiveres, hvis der er behov for det.
Tændingskontakt
Tændingskontakten starter og stopper motoren.
Den har tre stillinger:
FRA: Stopper motoren og slukker for det
elektriske system.
KØR: Holder motoren igang og forsyner
det elektriske system.
START: Drejer motoren for at starte.
Forlygter kontakt
Denne tænder og slukker for forlygterne på
traktoren.
Plæneklipper Klippehøjdeindstilling
Kontakten for klippehøjdeindstilling regulerer
plæneklipperens klippehøjde. Klippehøjden kan
indstilles til en af syv positioner mellem 3,8 og 10,2
cm (1,5" og 4,0").
Håndbremse
Dette låser håndbremsen når traktoren bliver
standset. Se Håndbremse afsnittet.
PTO/kraftudtagskontakten
Kraftudtagskontakten (PTO) tilkobler og frakobler
klippeaggregatet. For at tilkoble PTO, træk
kontakten OP. Tryk den NED for at frakoble.
BEMÆRK: Bemærk at føreren skal sidde stabilt i
sædet for at kraftudtaget vil fungere.
Gasregulerings/choker håndtag (Choke-OMatic)
Gasregulerings/choker håndtaget regulerer
motorens hastighed og chokeren. Flyt
gasregulerings/chokeren hen på HURTIG
positionen for at øge motorens hastighed og hen
på LANGSOM positionen for at sænke motorens
hastighed. Brug altid fuld gas. Flyt gashåndtaget/
chokeren hen på CHOKER positionen når du
skal starte en kold motor. En varm motor behøver
sandsynligvis ikke choker.
Transmissionens udløserstang
Dette frigør transmissionen således at traktoren
kan skubbes med håndkraft.
Timetæller
Timetæller viser samlet antal akkumulerede
kørselstimer som standard. Optalte timer, når der
trykkes på knappen MODE.
11
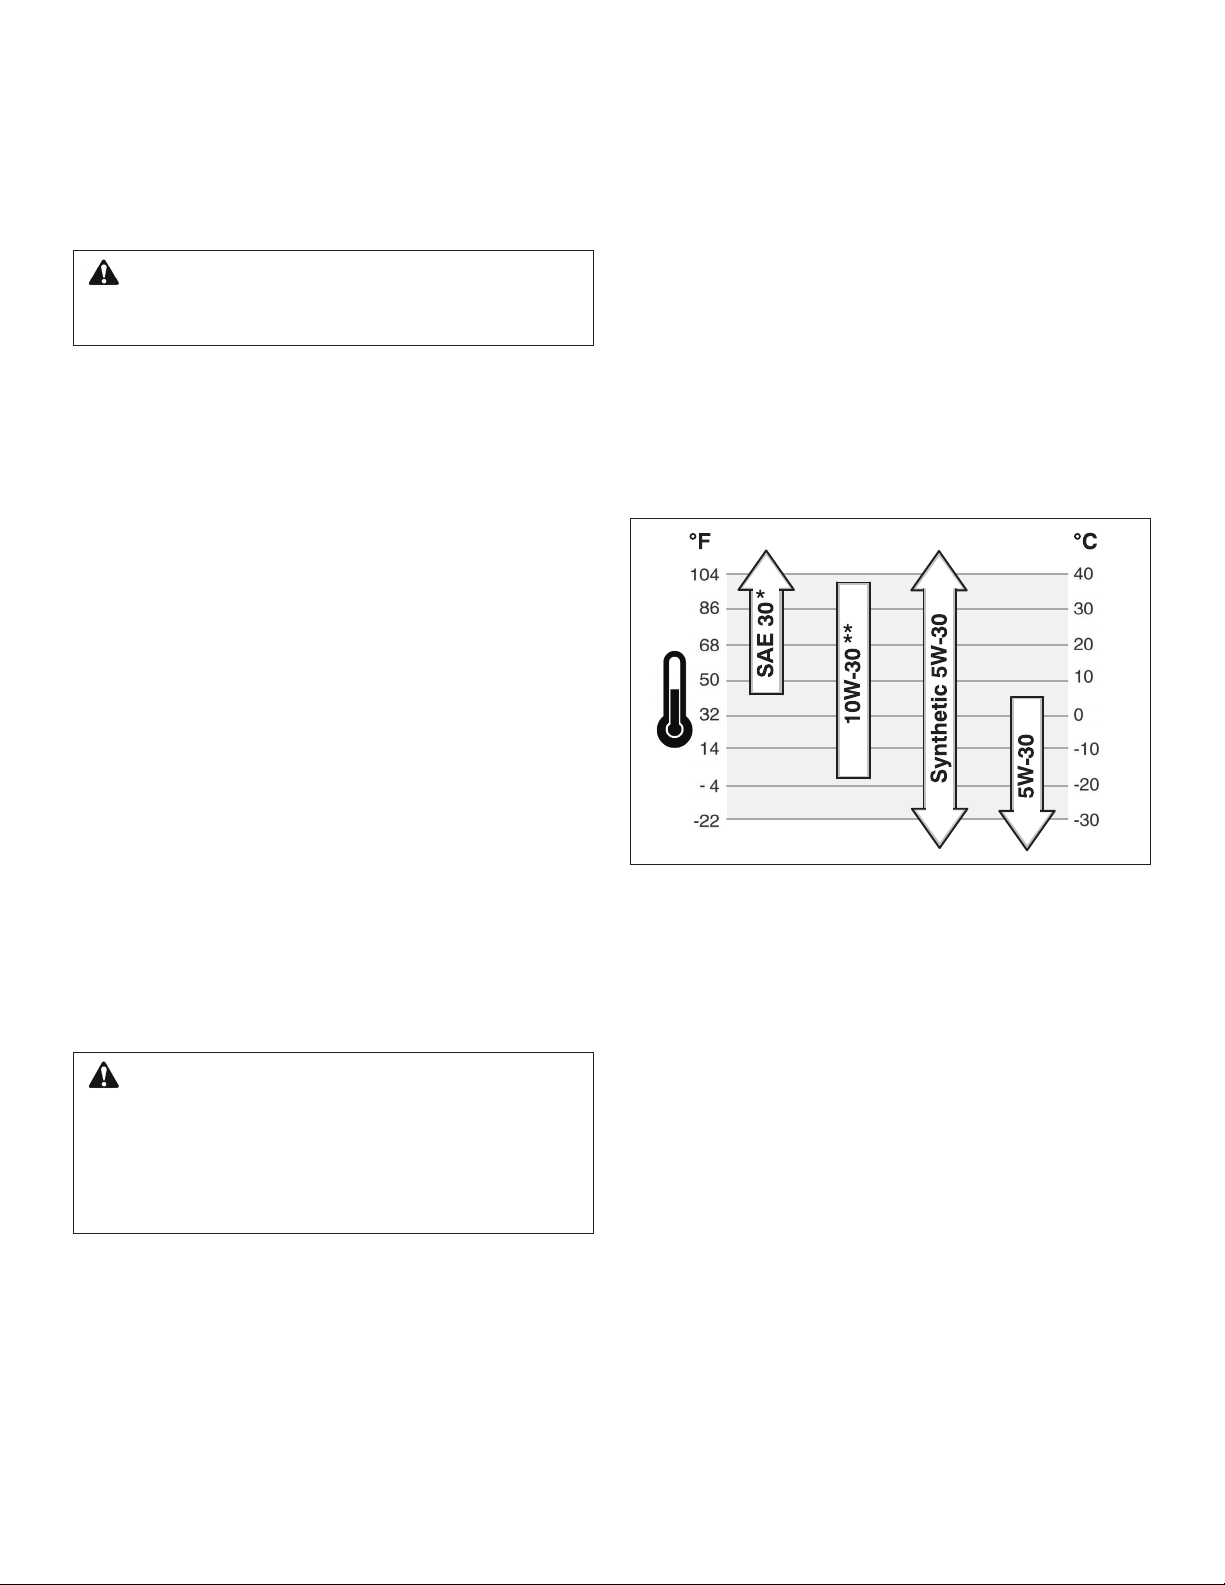
Betjening
Generel Driftsikkerhed
Sørg for at læse al information i Sikkerheds- og
funktionsafsnittene før du forsøger at bruge
denne plæneklipper. Gør dig bekendt med alle
betjeningsanordninger og hvordan man stopper maskinen.
Kontrollér dæktrykket
Dækkene skal kontrolleres med jævne mellemrum for at
give optimalt traktion og for at garantere det bedste resultat
(se figur 3).
BEMÆRK: Bemærk at disse tryk kan være lidt anderledes
end det "Maks Tryk" der er påstemplet på siden af dækkene.
ADVARSEL
Hvis maskinen ikke klarer en sikkerhedsprøve må du
ikke bruge den. Henvend dig til en autoriseret forhandler.
Afprøvning af sikkerhedslåsesystem
Denne maskine er forsynet med
sikkerhedsaflåsningskontakter. Forsøg ikke at omgå eller
pille ved kontakterne/enhederne.
Prøve 1 Motoren bør IKKE starte hvis:
• Kraftudtags-kontakten er TIL ELLER
• Bremsepedalen er IKKE trykket helt i bund
(parkeringsbremse FRA).
Prøve 2 —Motor SKULLE dreje og starte hvis:
• Føreren sidder i sædet OG
• PTO-kontakten er FRA OG
• Bremsepedalen er trykket helt i bund (parkeringsbremse
TIL).
Test 3 — Motor skulle STOPPE hvis:
• Føreren hæver sig fra sædet.
Test 4 — Kontroller stoptiden af plæneklipperens skær
Plæneklipperens skær og drivrem skal stoppe
fuldstændigt indenfor fem sekunder efter den elektriske
kraftudtagskontakt er slået FRA. Hvis plæneklipperens
drivrem ikke stopper indenfor fem sekunder, skal du
henvende dig til en autoriseret forhandler.
Test 5 — Vælg baglæns plæneklipning (RMO)
• Motoren bør stoppe, hvis der gøres forsøg på at bakke,
og hvis PTO/kraftudtaget er tændt, og hvis RMO ikke er
blevet aktiveret.
• RMO lampen bør lyse når RMO er blevet aktiveret.
Olie anbefalinger
Vi anbefaler brugen af Briggs & Stratton garanti
certificerede olier til optimal ydelse. Andre olier af
tilsvarende høj kvalitet er acceptable hvis de er klassifikeret
til service SF, SG, SH, SJ eller højere. Undlad at bruge
specielle tilsætningsstoffer.
Udendørstemperatuer er afgørende for den passende
olieviskositet til motoren. Brug diagrammet til at vælge den
bedste viskositet til det forventede udendørstemperatur
interval.
* Under 4° C (40° F) vil brugen af SAE 30 besværliggøre starten.
** Over 80°F (27°C) kan brugen af 10W-30 medføre forhøjet olieforbrug.
Kontrollér olieniveau oftere.
ADVARSEL
Græsslåning i baglæns retning kan være farligt for
omkringstående. Der kan ske alvorlige ulykker hvis
føreren ikke er opmærksom på børns tilstedeværelse.
Hvis der er børn tilstede, må RMO ikke aktiveres. Børn
tiltrækkes ofte til enheden og aktiviteterne i forbindelse
med græsslåning.
12
 Loading...