

Briggs & Stratton 2691253-00, 2691263-01, 2691253-01, 2691263-00, 2691264-00 Operator's Manual
...
Not for Reproduction
Operator’s Manual
Инструкции за експлоатация
Návod k obsluze
Kasutusjuhend
Priručnik za operatora
Használati útmutató
Vartotojo vadovas
Operatora rokasgrāmata
Instrukcja obsługi
Manual de utilizare
Руководство по эксплуатации
Návod na obsluhu
Priročnik za uporabo
Kullanma Kılavuzu
Copyright © Briggs & Stratton Power Products Group, LLC
Milwaukee, WI, USA. All rights reserved.
80012803EST
Revision C
Not for Reproduction
1
A
1 2
B
3
4
G
5 6
7
8
B
C
A
D
C
D
9
E
F
E
G
B
_
(
)
20
LB
_
(
)
34
LB
10
2
Not for Reproduction
en
2
4
3
2
1
STOPSTOP
3
Not for Reproduction
3
4
Not for Reproduction
en
4
6
A
Size PSI bar
15 x 6,0 14 0,96
20 x 8,0 10 0,68
22 x 9.5 10 0,68
5
A
B
C
B
D
5
Not for Reproduction
7
9
A
B
10
WARNING
COVER
DO NOT REMOVE
A
11
8
( )
(3x)
( )
+
(2x)
COVER
WARNING
DO NOT REMOVE
A
COVER
WARNING
DO NOT REMOVE
B
6
Not for Reproduction
en
12
13
A
14
AB
D
15
C
AB
7

Not for Reproduction
Products Covered by This Manual
The following products are covered by this manual:
2691251-00, 2691251-01, 2691252-00, 2691252-01,
2691253-00, 2691253-01, 2691263-00, 2691263-01,
2691264-00, 2691264-01, 2691265-00, 2691265-01,
2691269-00, 2691270-00, 2691270-01, 2691271-00,
2691271-01, 2691290-00, 2691291-00, 2691291-01,
2691292-00, 2691292-01, 2691296-00, 2691297-00,
2691297-01, 2691298-00, 2691298-01, 2691398-00,
2691399-00, 2691400-00
Manual Contents:
Operator Safety ................................................................. 9
Features and Controls...................................................... 14
Operation ......................................................................... 16
Safety Interlock System Tests .......................................... 16
Maintenance .................................................................... 20
Troubleshooting ............................................................... 24
Specications .................................................................. 26
The images in this document are representative, and
are meant to complement the instructional copy they
accompany. Your unit may vary from the images displayed.
LEFT and RIGHT are as seen from the operator’s position.
8
Not for Reproduction
en
Operator Safety
Important Safety Instructions
SAVE THESE INSTRUCTIONS - This manual contains
important instructions that should be followed during the
initial set-up, the operation, and the maintenance of the
equipment. Save these original instructions for future
reference.
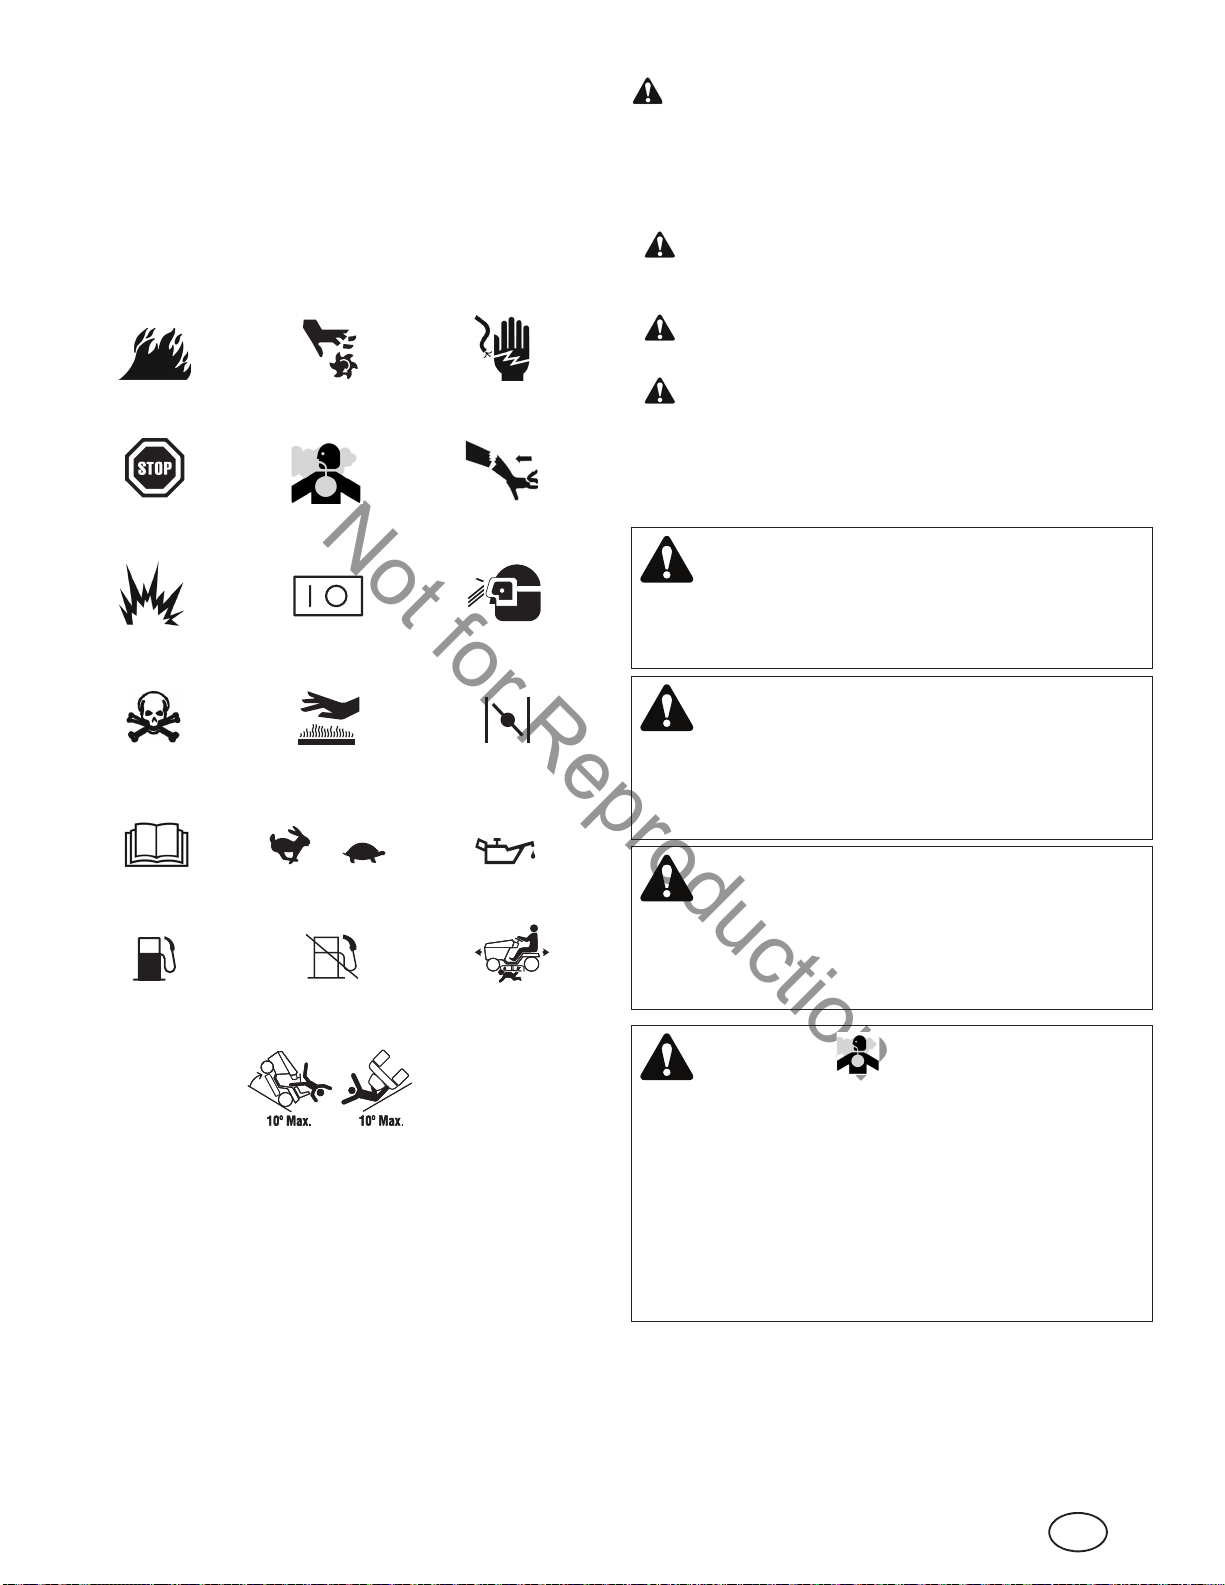
Safety Symbols and Meanings
The safety alert symbol is used to identify safety
information about hazards that can result in personal injury.
A signal word (DANGER, WARNING, or CAUTION) is used
with the alert syOmbol to indicate the likelihood and the
potential severity of injury. In addition, a hazard symbol may
be used to represent the type of hazard.
DANGER indicates a hazard which, if not
avoided, will result in death or serious injury.
WARNING indicates a hazard which, if not
avoided, could result in death or serious injury.
FIRE MOVING
PARTS
STOP TOXIC FUMES KICKBACK
EXPLOSION ON OFF WEAR EYE
HAZARDOUS
CHEMICAL
READ
MANUAL
FUEL FUEL
HOT
SURFACE
FAST SLOW OIL
SHUT-OFF
SHOCK
PROTECTION
CHOKE
AMPUTATION
HAZARD
NOTICE indicates a situation that could result in
damage to the product.
The engine exhaust from this product contains chemicals
known to the State of California to cause cancer, birth
defects, or other reproductive harm.
Certain components in this product and its related
accessories contain chemicals known to the State
of California to cause cancer, birth defects, or other
reproductive harm. Wash hands after handling.
Battery posts, terminals, and related accessories contain
lead and lead compounds - chemicals known to the
State of California to cause cancer, birth defects, or other
reproductive harm. Wash hands after handling.
CAUTION indicates a hazard which, if not
avoided, could result in minor or moderate injury.
WARNING
WARNING
WARNING
WARNING
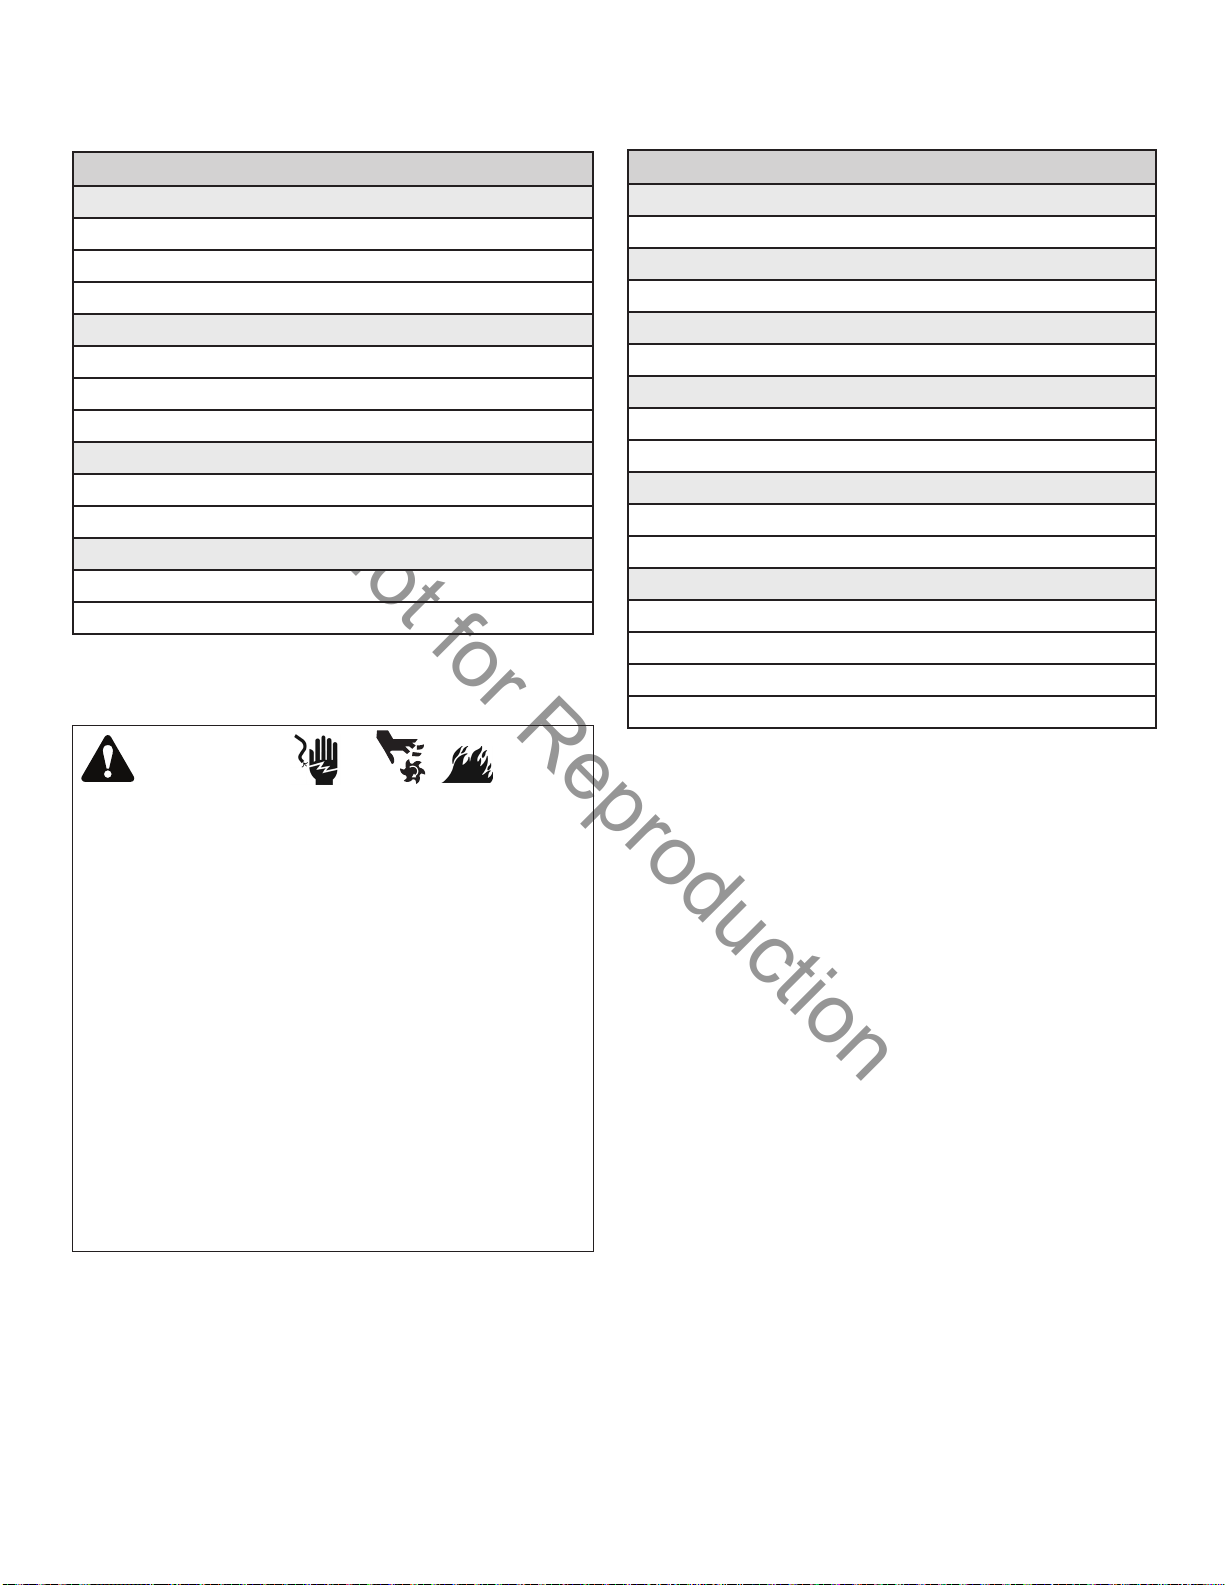
Running engine gives off carbon monoxide, an odorless,
colorless, poison gas.
ROLL-OVER HAZARD
Breathing carbon monoxide can cause headache, fatigue,
dizziness, vomiting, confusion, seizures, nausea, fainting
or death.
• Operate equipment ONLY outdoors.
• Keep exhaust gas from entering a confined area
through windows, doors, ventilation intakes, or other
openings.
9

Not for Reproduction
Read these safety rules and follow them closely. Failure to obey these rules could result in loss of control of unit,
severe personal injury or death to you, or bystanders, or damage to property or equipment. This mowing deck
is capable of amputating hands and feet and throwing objects. The triangle in text signifies important
cautions or warnings which must be followed.
GENERAL OPERATION
1. Read, understand, and follow all instructions in the manual
and on the unit before starting.
2. Do not put hands or feet near rotating parts or under the
machine. Keep clear of the discharge opening at all times.
3. Only allow responsible adults, who are familiar with the
instructions, to operate the unit (local regulations can
restrict operator age).
4. Clear the area of objects such as rocks, toys, wire, etc.,
which could be picked up and thrown by the blade(s).
5. Be sure the area is clear of other people before mowing.
Stop the unit if anyone enters the area.
6. Never carry passengers.
7. Do not mow in reverse unless absolutely necessary.
Always look down and behind before and while travelling in
reverse.
8. Never direct discharge material toward anyone. Avoid
discharging material against a wall or obstruction.
Material may ricochet back toward the operator. Stop the
blade(s) when crossing gravel surfaces.
9. Do not operate the machine without the entire grass
catcher, discharge guard (deflector), or other safety
devices in place.
10. Slow down before turning.
11. Never leave a running unit unattended. Always disengage
the PTO, set parking brake, stop engine, and remove
starter insert before dismounting.
12. Disengage blades (PTO) when not mowing. Shut off
engine and wait for all parts to come to a complete stop
before cleaning the machine, removing the grass catcher,
or unclogging the discharge guard.
13. Operate the machine only in daylight or good artificial light.
14. Do not operate the unit while under the influence of alcohol
or drugs.
15. Watch for traffic when operating near or crossing
roadways.
16. Use extra care when loading or unloading the unit into a
trailer or truck.
17. Always wear eye protection when operating this unit.
18. Data indicates that operators, age 60 years and above,
are involved in a large percentage of power equipmentrelated injuries. These operators should evaluate their
ability to operate the equipment safely enough to protect
themselves and others from injury.
19. Follow the manufacturer’s recommendations for wheel
weights or counterweights.
20. Keep in mind the operator is responsible for accidents
occurring to other people or property.
21. All drivers should seek and obtain professional and
practical instruction.
22. Always wear substantial footwear and trousers. Never
operate when barefoot or wearing sandals.
23. Before using, always visually check that the blades and
blade hardware are present, intact, and secure. Replace
worn or damaged parts.
24. Disengage attachments before: refueling, removing an
attachment, making adjustments (unless the adjustment
can be made from the operator’s position).
25. When the machine is parked, stored, or left unattended,
lower the cutting means unless a positive mechanical lock
is used.
26. Before leaving the operator’s position for any reason,
engage the parking brake, disengage the PTO, stop the
engine, and remove the starter insert.
27. To reduce fire hazard, keep the unit free of grass, leaves,
& excess oil. Do not stop or park over dry leaves, grass, or
combustible materials.
TRANSPORTING AND STORAGE
1. When transporting the unit on an open trailer, make sure
it is facing forward, in the direction of travel. If the unit is
facing backwards, wind lift could damage the unit.
2. Always observe safe refueling and fuel handling practices
when refueling the unit after transportation or storage.
3. Never store the unit (with fuel) in an enclosed poorly
ventilated structure. Fuel vapors can travel to an ignition
source (such as a furnace, water heater, etc.) and cause
an explosion. Fuel vapor is also toxic to humans and
animals.
10
4. Always follow the engine manual instructions for storage
preparations before storing the unit for both short and long
term periods.
5. Always follow the engine manual instructions for proper
start-up procedures when returning the unit to service.
6. Never store the unit or fuel container inside where there is
an open flame or pilot light, such as in a water heater. Allow
unit to cool before storing.

Not for Reproduction
en
SLOPE OPERATION
Slopes are a major factor related to loss-of-control and tipover accidents, which can result in severe injury or death.
Operation on all slopes requires extra caution. If you
cannot back up the slope or if you feel uneasy on it, do not
operate on it.
Control of a ride-on machine sliding on a slope will not be
regained by the application of the brake. The main reasons
for loss of control are: insufficient tire grip on the ground,
speed too fast, inadequate braking, the type of machine
is unsuitable for its task, lack of awareness of the ground
conditions, incorrect hitching and load distribution.
1. Mow up and down slopes, not across.
2. Watch for holes, ruts, or bumps. Uneven terrain could
overturn the unit. Tall grass can hide obstacles.
3. Choose a slow speed so that you will not have to stop or
change speeds while on the slope.
4. Do not mow on wet grass. Tires may lose traction.
5. Always keep unit in gear especially when traveling down
slopes. Do not shift to neutral and coast downhill.
6. Avoid starting, stopping, or turning on a slope. If tires
lose traction, disengage the blade(s) and proceed slowly
straight down the slope.
7. Keep all movement on slopes slow and gradual. Do
not make sudden changes in speed or direction, which
could cause the machine to rollover.
8. Use extra care while operating machines with grass
catchers or other attachments; they can affect the
stability of the unit. Do not use on steep slopes.
9. Do not try to stabilize the machine by putting your foot on
the ground (ride-on units).
10. Do not mow near drop-offs, ditches, or embankments.
The mower could suddenly turn over if a wheel is over
the edge of a cliff or ditch, or if an edge caves in.
11. Do not use grass catchers on steep slopes.
12. Do not mow slopes if you cannot back up them.
13. See your authorized dealer/retailer for recommendations
of wheel weights or counterweights to improve stability.
14. Remove obstacles such as rocks, tree limbs, etc.
15. Use slow speed. Tires may lose traction on slopes even
through the brakes are functioning properly.
16. Do not turn on slopes unless necessary, and then, turn
slowly and gradually downhill, if possible.
Never operate on slopes greater than 17.6 percent (10°)
which is a rise of 3-1/2 feet (106 cm) vertically in 20 feet
(607 cm) horizontally.
When operating on slopes use additional wheel weights
or counterweights. See your dealer/retailer to determine
which weights are available and appropriate for your unit.
Select slow ground speed before driving onto slope.
In addition to front weights, use extra caution when
operating on slopes with rear-mounted grass catchers.
Mow UP and DOWN the slope, never across the face,
use caution when changing directions and DO NOT
START OR STOP ON SLOPE.
CHILDREN
Tragic accidents can occur if the operator is not alert to the
presence of children. Children are often attracted to the unit
and the mowing activity. Never assume that children will
remain where you last saw them.
1. Keep children out of the mowing area and under the
watchful care of another responsible adult.
2. Be alert and turn unit off if children enter the area.
3. Before and during reverse operation, look behind and
down for small children.
4. Never carry children, even with the blade(s) off. They may
fall off and be seriously injured or interfere with safe unit
operation. Children who have been given rides in the past
may suddenly appear in the mowing area for another ride
and be run over or backed over by the machine.
5. Never allow children to operate the unit.
6. Use extra care when approaching blind corners, shrubs,
trees, or other objects that may obscure vision.
WARNING
TOWED EQUIPMENT (RIDE-ON UNITS)
1. Tow only with a machine that has a hitch designed for
towing. Do not attach towed equipment except at the
hitch point.
2. Follow the manufacturer’s recommendations for weight
limit for towed equipment and towing on slopes.
3. Never allow children or others in or on towed equipment.
4. On slopes, the weight of the towed equipment may
cause loss of traction and loss of control.
5. Travel slowly and allow extra distance to stop.
6. Do not shift to neutral and coast down hill.
11

Not for Reproduction
SERVICE AND MAINTENANCE
Safe Handling of Gasoline
1. Extinguish all cigarettes, cigars, pipes, and other sources
of ignition.
2. Use only approved gasoline containers.
3. Never remove the gas cap or add fuel with the engine
running. Allow the engine to cool before refueling.
4. Never fuel the machine indoors.
5. Never store the machine or fuel container where there is an
open flame, spark, or pilot light such as near a water heater
or other appliance.
6. Never fill containers inside a vehicle or on a truck bed with
a plastic bed liner. Always place containers on the ground
away from your vehicle before filling.
7. Remove gas-powered equipment from the truck or
trailer and refuel it on the ground. If this is not possible,
then refuel such equipment on a trailer with a portable
container, rather than from a gasoline dispenser nozzle.
8. Keep nozzle in contact with the rim of the fuel tank or
container opening at all times until fueling is complete. Do
not use a nozzle lock-open device.
9. If fuel is spilled on clothing, change clothing immediately.
10. Never over-fill the fuel tank. Replace gas cap and tighten
securely.
11. Use extra care in handling gasoline and other fuels. They
are flammable and vapors are explosive.
12. If fuel is spilled, do not attempt to start the engine but
move the machine away from the area of spillage and
avoid creating any source of ignition until fuel vapors have
dissipated.
13. Replace all fuel tank caps and fuel container caps securely.
Service & Maintenance
1. Never run the unit in an enclosed area where carbon
monoxide fumes may collect.
2. Keep nuts and bolts, especially blade attachment bolts,
tight and keep equipment in good condition.
3. Never tamper with safety devices. Check their proper
operation regularly and make necessary repairs if they are
not functioning properly.
4. Keep unit free of grass, leaves, or other debris build-up.
Clean up oil or fuel spillage and remove any fuel-soaked
debris. Allow machine to cool before storage.
5. If you strike an object, stop and inspect the machine.
Repair, if necessary, before restarting.
6. Never make adjustments or repairs with the engine
running.
7. Check grass catcher components and the discharge guard
frequently and replace with manufacturer’s recommended
parts, when necessary.
8. Mower blades are sharp. Wrap the blade or wear gloves,
and use extra caution when servicing them.
9. Check brake operation frequently. Adjust and service as
required.
10. Maintain or replace safety and instructions labels, as
necessary.
11. Do not remove the fuel filter when the engine is hot as
spilled gasoline may ignite. Do not spread fuel line clamps
further than necessary. Ensure clamps grip hoses firmly
over the filter after installation.
12. Do not use gasoline containing METHANOL, gasohol
containing more than 10% ETHANOL, gasoline additives,
or white gas because engine/fuel system damage could
result.
13. If the fuel tank must be drained, it should be drained
outdoors.
14. Replace faulty silencers/mufflers.
15. Use only factory authorized replacement parts when
making repairs.
16. Always comply with factory specifications on all settings
and adjustments.
17. Only authorized service locations should be utilized for
major service and repair requirements.
18. Never attempt to make major repairs on this unit unless
you have been properly trained. Improper service
procedures can result in hazardous operation, equipment
damage and voiding of manufacturer’s warranty.
19. On multiple blade mowers, take care as rotating one blade
can cause other blades to rotate.
20. Do not change engine governor settings or over-speed
the engine. Operating the engine at excessive speed can
increase the hazard of personal injury.
21. Disengage drive attachments, stop the engine, remove the
starter insert, and disconnect the spark plug wire(s) before:
clearing attachment blockages and chutes, performing
service work, striking an object, or if the unit vibrates
abnormally. After striking an object, inspect the machine for
damage and make repairs before restarting and operating
the equipment.
22. Never place hands near the moving parts, such as a hydro
pump cooling fan, when the tractor is running. (Hydro
pump cooling fans are typically located on top of the
transaxle).
23. Units with hydraulic pumps, hoses, or motors:
WARNING: Hydraulic fluid escaping under pressure may
have sufficient force to penetrate skin and cause serious
injury. If foreign fluid is injected into the skin it must be
surgically removed within a few hours by a doctor familiar
with this form of injury or gangrene may result. Keep
body and hands away from pin holes or nozzles that
eject hydraulic fluid under high pressure. Use paper or
cardboard, and not hands, to search for leaks. Make sure
all hydraulic fluid connections are tight and all hydraulic
hoses and lines are in good condition before applying
pressure to the system. If leaks occur, have the unit
serviced immediately by your authorized dealer.
24. WARNING: Improper release of springs can result in
serious personal injury. Springs should be removed by an
authorized technician.
25. Models equipped with an engine radiator:
WARNING: To prevent serious bodily injury from hot
coolant or steam blow-out, never attempt to remove the
radiator cap while the engine is running. Stop the engine
and wait until it is cool. Even then, use extreme care when
removing the cap.
12

Not for Reproduction
en
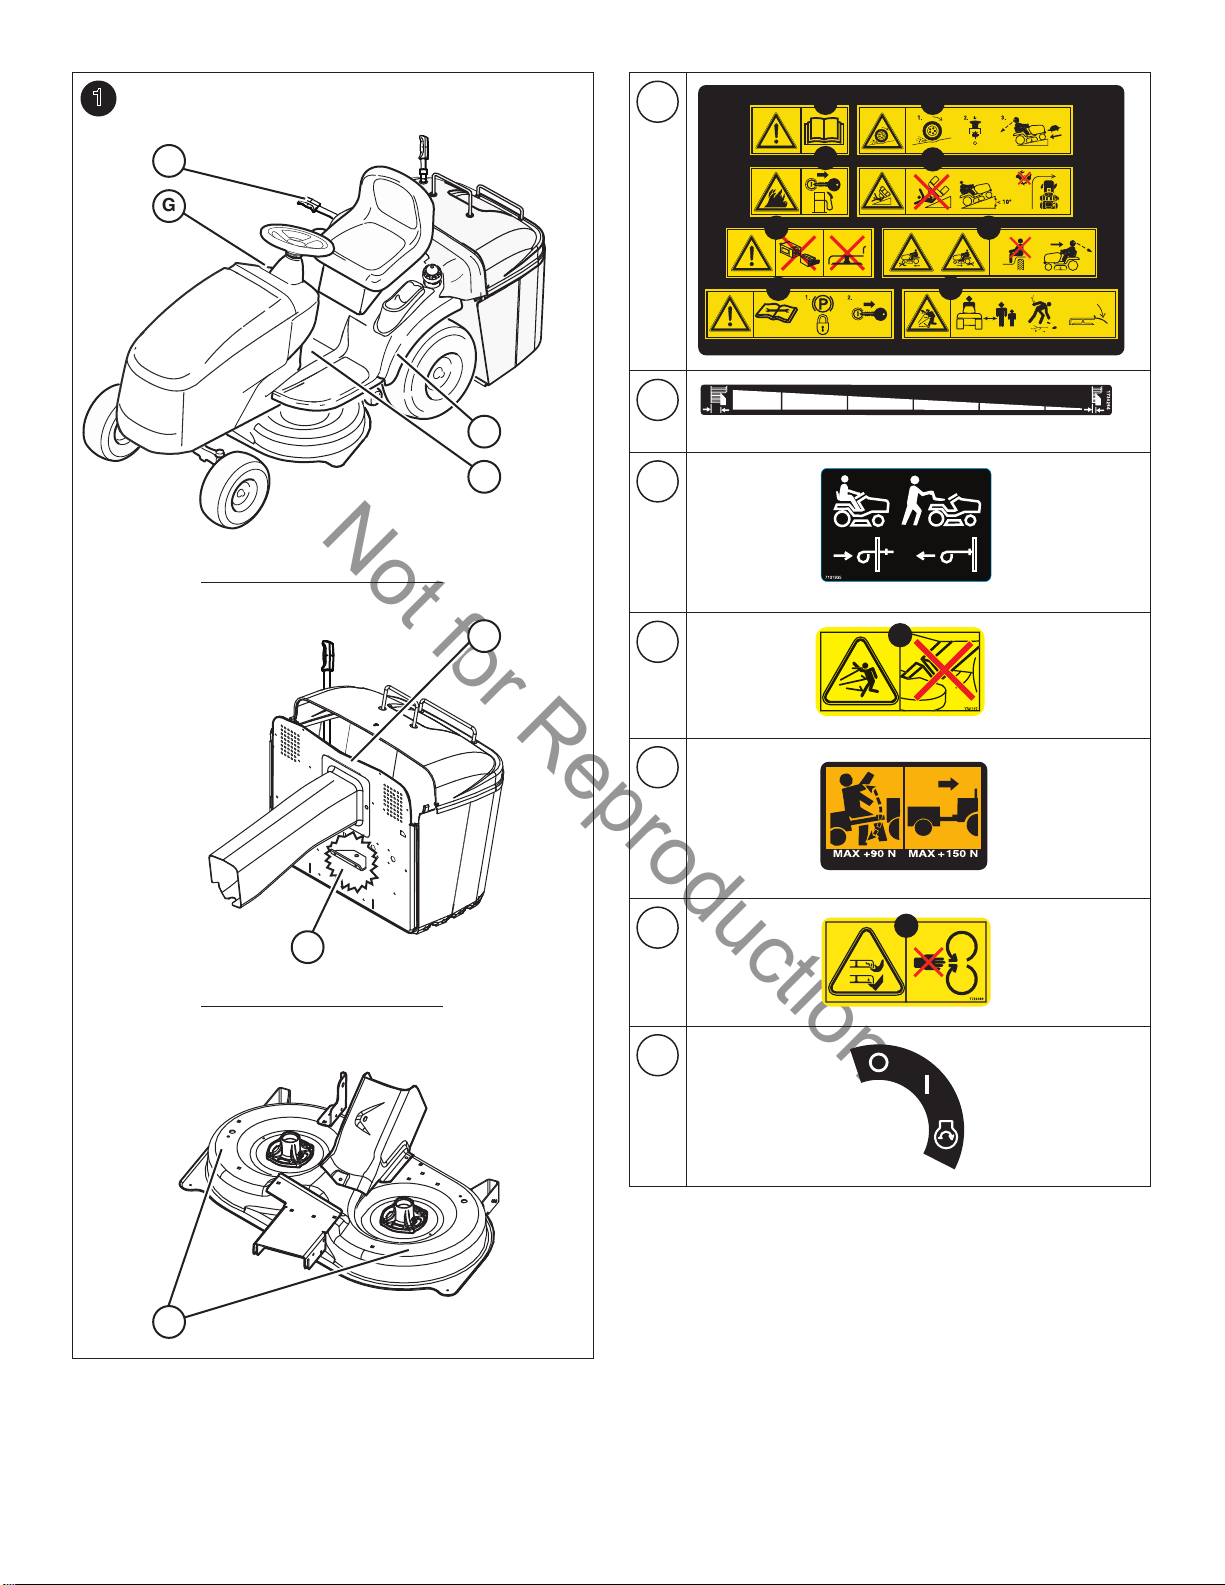
Safety Decals
All safety messages on your rider and mower should be
carefully read and obeyed (see Figure 1 and 2). Personal
bodily injury can result when these instructions are
not followed. The information is for your safety and it is
important! The safety decals below are on your rider and
mower.
If any of these decals are lost or damaged, replace them at
once. See an authorized dealer for replacements.
These labels are easily applied and will act as a constant
visual reminder to you, and others who may use the
equipment, to follow the safety instructions necessary for
safe, effective operation.
Callout Decal Description
A
B
C
D DANGER, Thrown Objects
E DANGER, Drawbar Warning
F DANGER, Rotating Blades
G Decal: Ignition Switch Position
DANGER, Main Panel
Decal: Height of Cut
Decal: Roll Release
Safety Icon
See Figure 1 and 2 (callouts A, D, F) for location of
icons. See below for an explanation of these icons.
1. WARNING: Read and understand the Operator’ Manual
before using this machine. Know the location and
function of all controls. Do not operate this machine
unless you are trained.
2. DANGER - LOSS OF TRACTION, SLIDING,
STEERING AND CONTROL ON SLOPES HAZARD:
If machine stops forward motion or starts sliding on a
slope, stop the blades and drive slowly off the slope.
3. DANGER: FIRE HAZARD: Keep unit free of grass,
leaves and excess oil. Do not add fuel while engine is
hot or running. Stop engine, remove key and allow to
cool for at least 3 minutes prior to adding fuel. Do not
add fuel indoors, in an enclosed trailer, garage or other
enclosed areas. Clean up spilled fuel. Do not smoke
while operating this machine.
4. DANGER - TIPPING AND SLIPPING HAZARD: Mow
up and down slopes not across. Do not operate on
slopes over 10 degrees. Avoid sudden and sharp (fast)
turns while on slopes.
5. DANGER - AMPUTATION AND DISMEMBERMENT
HAZARD: To avoid injury from rotating blades and
moving parts, keep safety devices (guards, shields and
switches) in place and working.
6. Do not mow when children or others are around. Never
carry riders especially children even with the blades
off. Do not mow in reverse unless absolutely necessary.
Look down and behind – before and while backing.
7. Consult technical literature before performing technical
repairs or maintenance. When leaving the machine,
shutoff engine, set the parking brake to the lock position
and remove the ignition key.
8. Keep by-standers and children a safe distance away.
Remove objects that can be thrown by the blade. Do not
mow without discharge chute in place.
9. DANGER - THROWN OBJECTS: Do not operate with-
out first connecting the discharge tube.
10. DANGER - ROTATING BLADES: This mower deck can
amputate limbs. Keep hands and feet away from blades.
13

Not for Reproduction
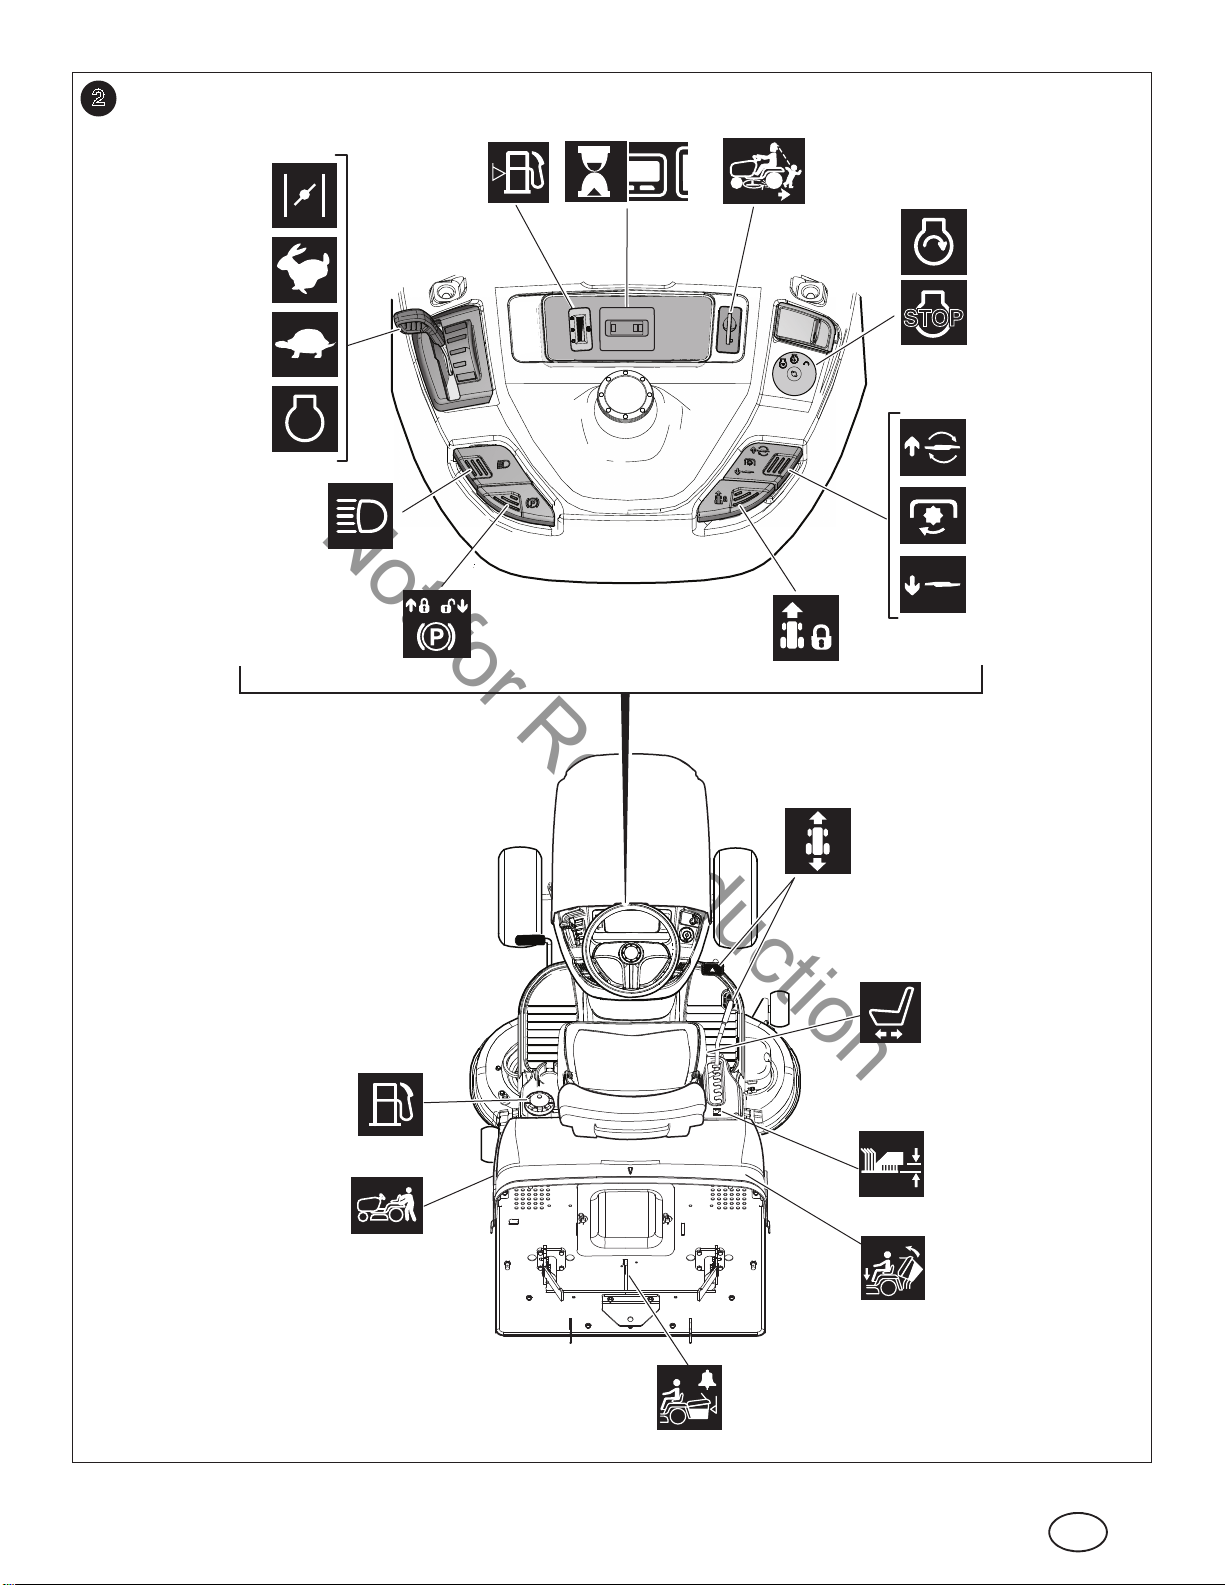
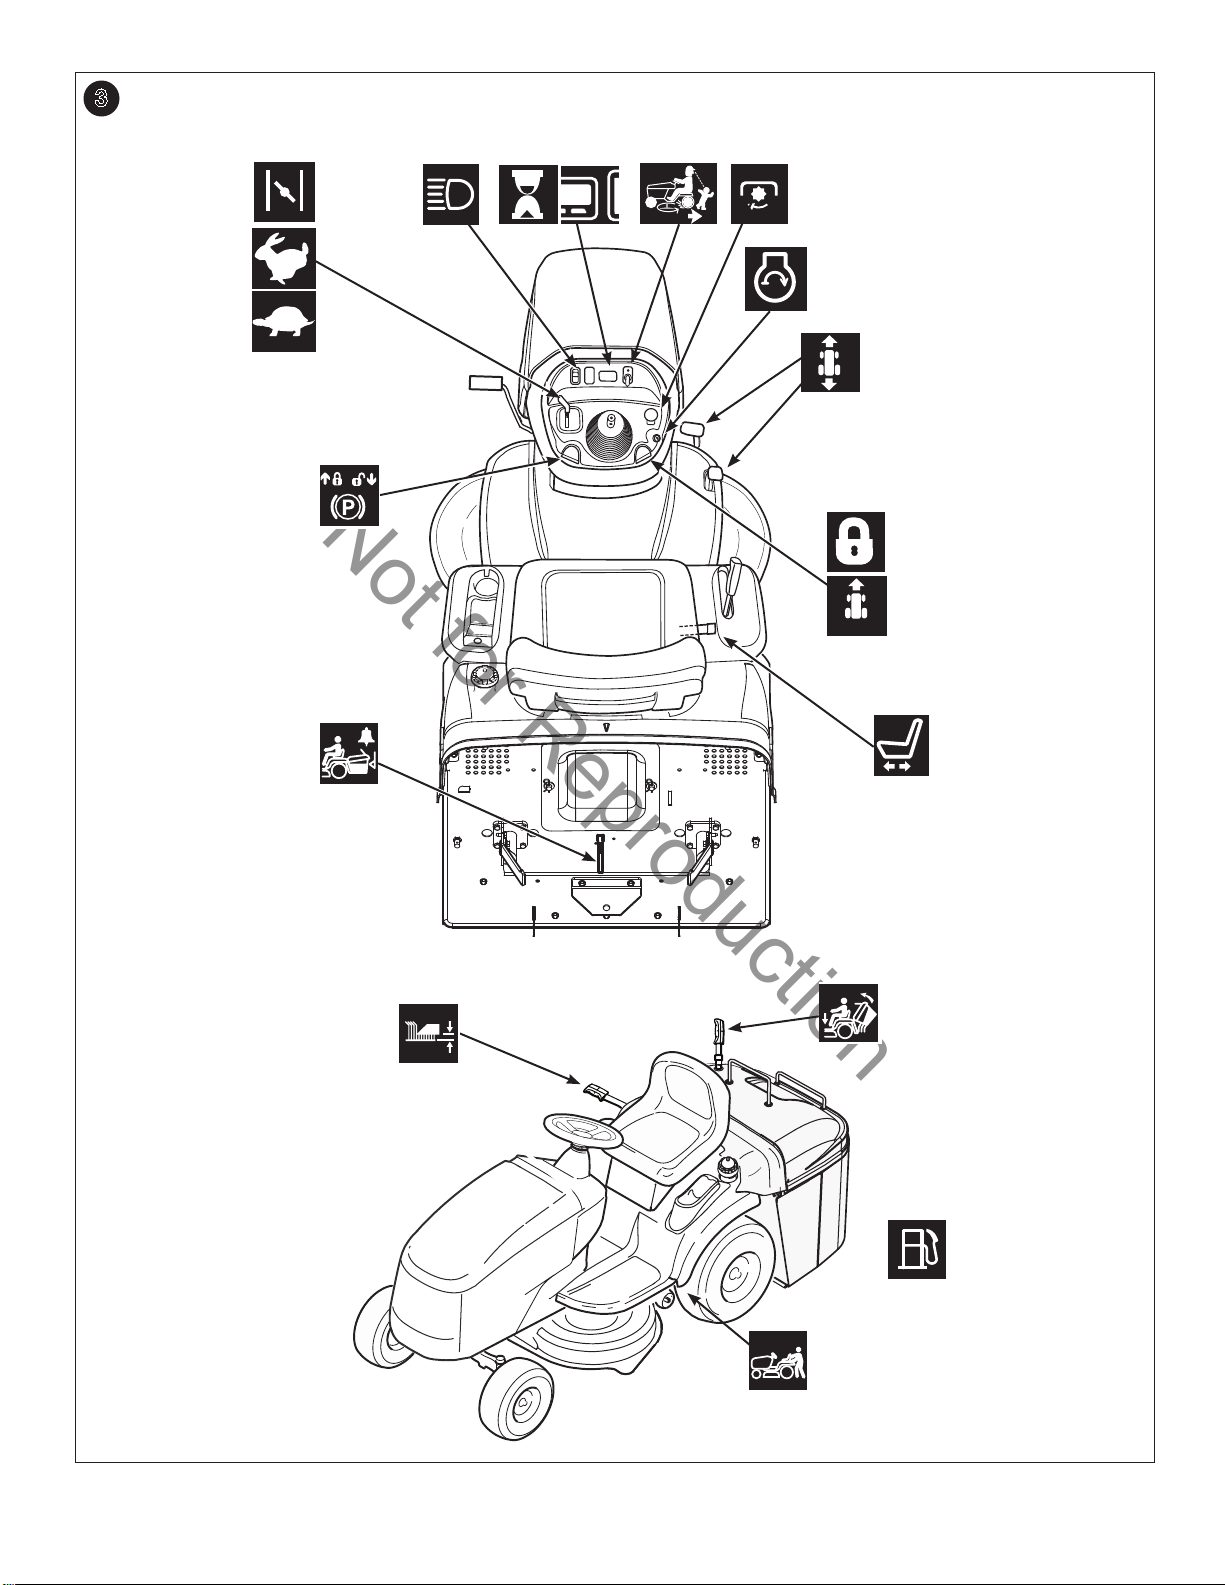
Features and Controls
See Figure 2 for location.
Throttle/Choke Control
(Choke-A-Matic)
The throttle/choke controls the engine speed and
choke (see Figure 2). Move the throttle/choke
control to the FAST position to increase engine
speed and SLOW position to decrease engine
speed. Always operate at full throttle. Move the
throttle/choke control to the CHOKE position for
starting a cold engine. A warm engine may not
require choking.
Ground Speed Pedals
The tractor’s forward ground speed is controlled
by the forward ground speed control pedal. The
tractor’s reverse ground speed is controlled by
the reverse ground speed control pedal.
Depressing either pedal will increase ground
speed. Note that the further down the pedal is
depressed, the faster the tractor will travel.
Seat Adjustment Lever
The seat can be adjusted forward and back.
Move the lever, position the seat as desired, and
release the lever to lock the seat into position.
NOTE: Always operate the rider with the throttle/
choke control in the FAST position.
Headlights
The light switch turns the tractor headlights on and
off.
Reverse Mowing Option (RMO)
The Reverse Mowing Option allows for mowing
(or use of other PTO driven attachments) while
traveling in reverse. If you choose to mow or
operate another attachment in reverse, turn the
RMO key after the PTO is engaged. The L.E.D.
light will illuminate, and the operator can then mow
in reverse. Each time the PTO is disengaged the
RMO needs to be reactivated if desired.
Power Take-Off (PTO) Switch
The PTO (Power Take-Off) switch engages and
disengages attachments that use the PTO. To
engage the PTO, pull UP on the switch. Push
DOWN to disengage.
NOTE: that the operator must be seated firmly in
the tractor seat for the PTO to function.
Ignition Switch
The ignition switch starts and stops the engine, it
has three positions:
OFF Stops the engine and shuts off the
electrical system.
RUN Allows the engine to run and
powers the electrical system.
Catcher Full Alarm
The “catcher full” alarm sounds when the grass
catcher has been filled with cut grass. When the
alarm sounds, disengage the PTO, travel to the
area in which you desire to dump the grass, then
empty the catcher.
NOTE: When using the unit for leaf collection, the
alarm may not be activated by dry leaves.
Parking Brake Knob
This is used to lock the parking brake when the
tractor is stopped. Fully depressing the brake
pedal and pulling up on the knob engages the
parking brake.
Cruise Control
The cruise control is used to lock the ground
speed control in forward. The cruise control has
five lock positions.
Hourmeter (if equipped)
The hourmeter displays the total hours, trip hours,
and digital clock. Also provides maintenance
reminder for oil, air filter, blade sharpening (icon
warning) and battery level indicator.
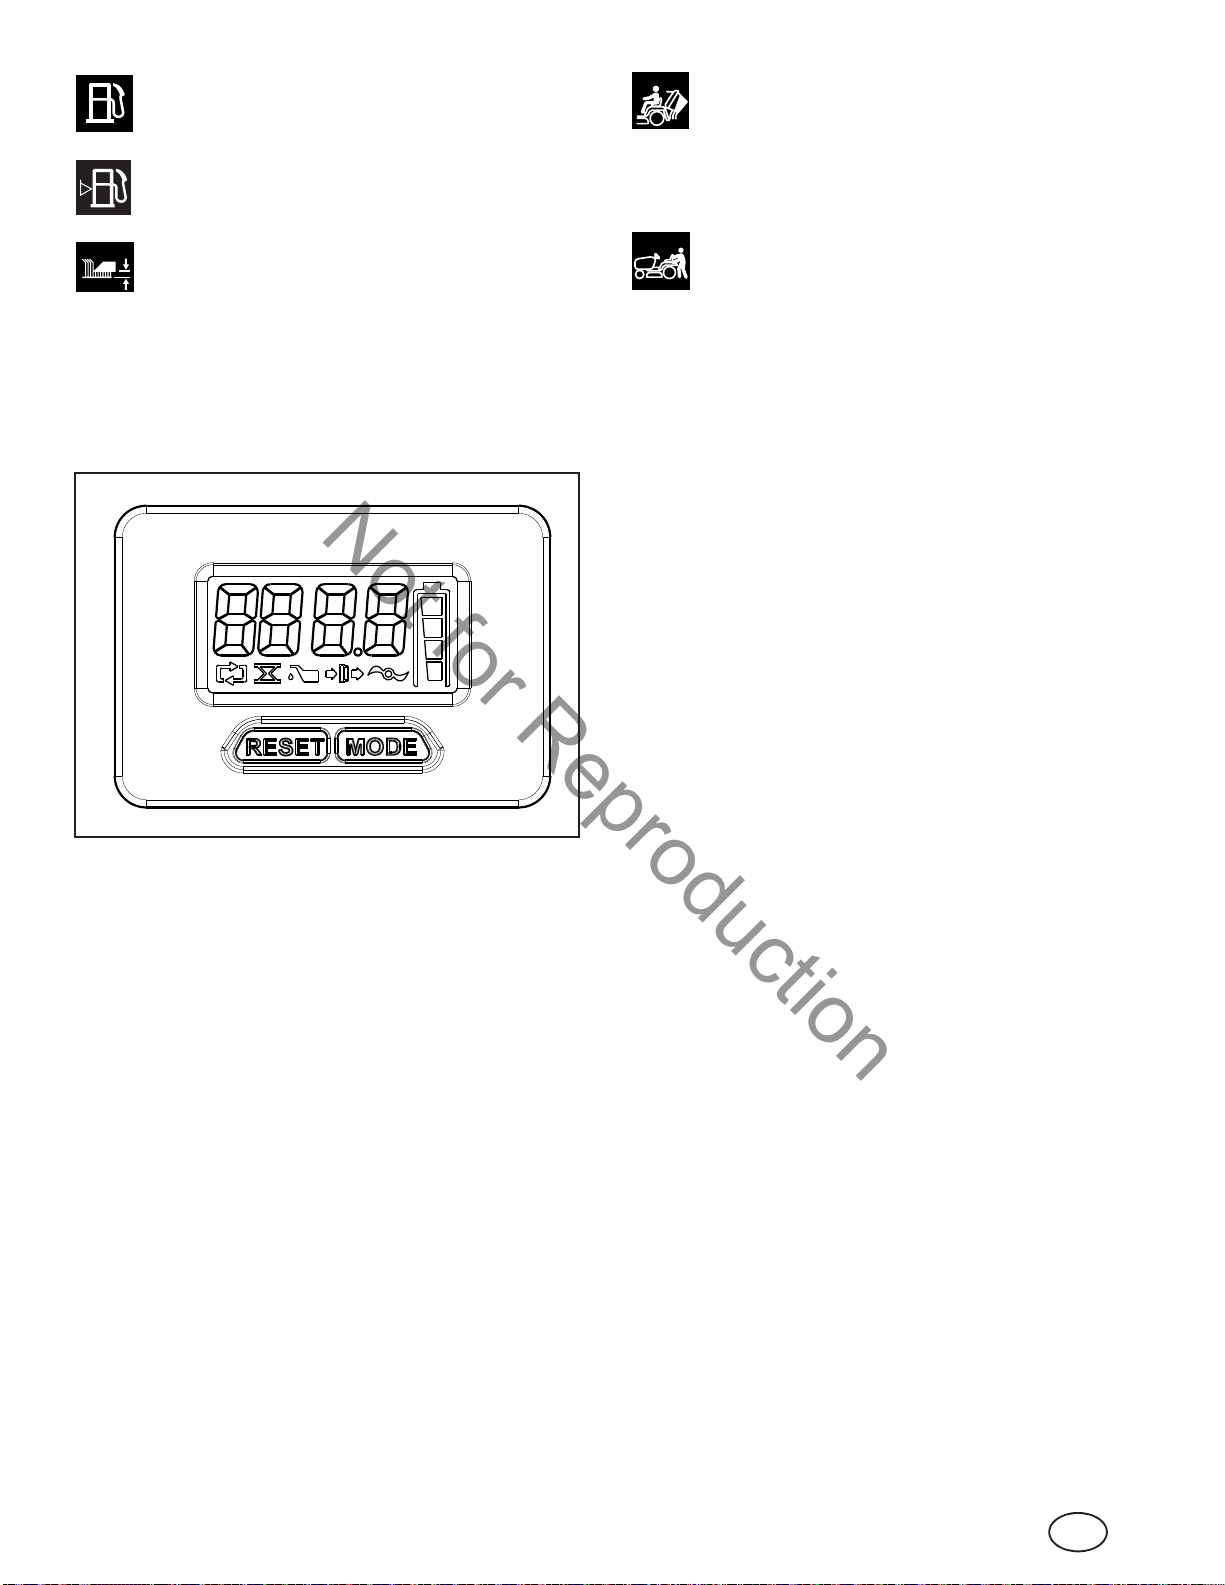
Electronic Dash Panel (if equipped)
The hourmeter displays the total hours, trip hours,
and digital clock. Also provides maintenance
reminder for oil, air filter, blade sharpening (icon
warning) and battery level indicator.
14
START Cranks the engine for starting.
NOTE: Never leave the ignition switch in the RUN
position with the engine stopped–this drains the
battery.
Not for Reproduction
en
Fuel Tank
Turn cap counterclockwise to remove.
Fuel Level Gauge (if equipped)
Displays the fuel level in the tank.
Mower Lift Lever
This controls the mower cutting height. Pull lever
to lower the height and pull up to raise the height.
The cutting height is adjustable between 3,8 cm
(1,5”) and 8,9 cm (3,5”).
Electronic Dash Panel
Catcher Open/Close Lever
This opens the catcher so that it may be emptied
and closes it for mowing. To empty the catcher,
extend the grass catcher handle and pull forward
on the handle. To close, push the lever backward
until the catcher closes and locks. Release the
grass catcher handle.
Transmission Release Lever
This deactivates the transmission so that
the tractor can be pushed by hand. See
Pushing the Tractor By Hand.
Set the Clock
1. Press MODE for greater than 3 seconds. The hours will
flash on the display.
2. Press RESET to adjust the hours.
3. Press MODE for less than 1 second to save the setting.
The minutes will flash on the display.
4. Press RESET to adjust the minutes.
5. Press MODE for less than 1 second to save the setting.
Maintenance Display
OIL CHANGE – This message appears after 50 hours of
run time since the previous reset. After changing the oil and
oil filter, press MODE twice to display OIL HRS, then press
Display Total Hours, Trip Hours, and Clock
NOTE: Whenever you start up the unit, the Total Hours are
displayed. The Total Hours will automatically reset to 0 after
999.9.
1. Press MODE for less than 1 second to display the Trip
Hours.
2. Press RESET for greater than 3 seconds to reset the
Trip Hours to 0.
3. Press MODE for less than 1 second to display the Clock
(see Set the Clock section).
4. Press MODE for less than 1 second to return to Total
and hold the MODE button for 3 seconds to reset the timer
to zero and clear the display.
CHECK AIR FILTER – This message appears after 25
hours of run time since the previous reset. After cleaning or
changing the air filter, press MODE three times to display
AIR FILTER HRS, then press and hold the MODE button for
3 seconds to reset the timer to zero and clear the display.
CHANGE BLADES – This message appears after 100
hours of run time since the previous reset. After changing
the blade, hold the reset button for more than 3 seconds to
reset the timer to zero and clear the display.
LOW BATTERY – This message will appear any time
a battery voltage problem occurs. The display will
automatically clear itself after the battery has been
serviced.
NOTE: When the LOW BATTERY message appears, it has
priority over any other messages. Service the battery first,
then check for other maintenance messages.
15
Not for Reproduction
Operation
General Operating Safety
Be sure to read all information in the Operator Safety
section before attempting to operate this unit. Become
familiar with all of the controls and how to stop the unit.
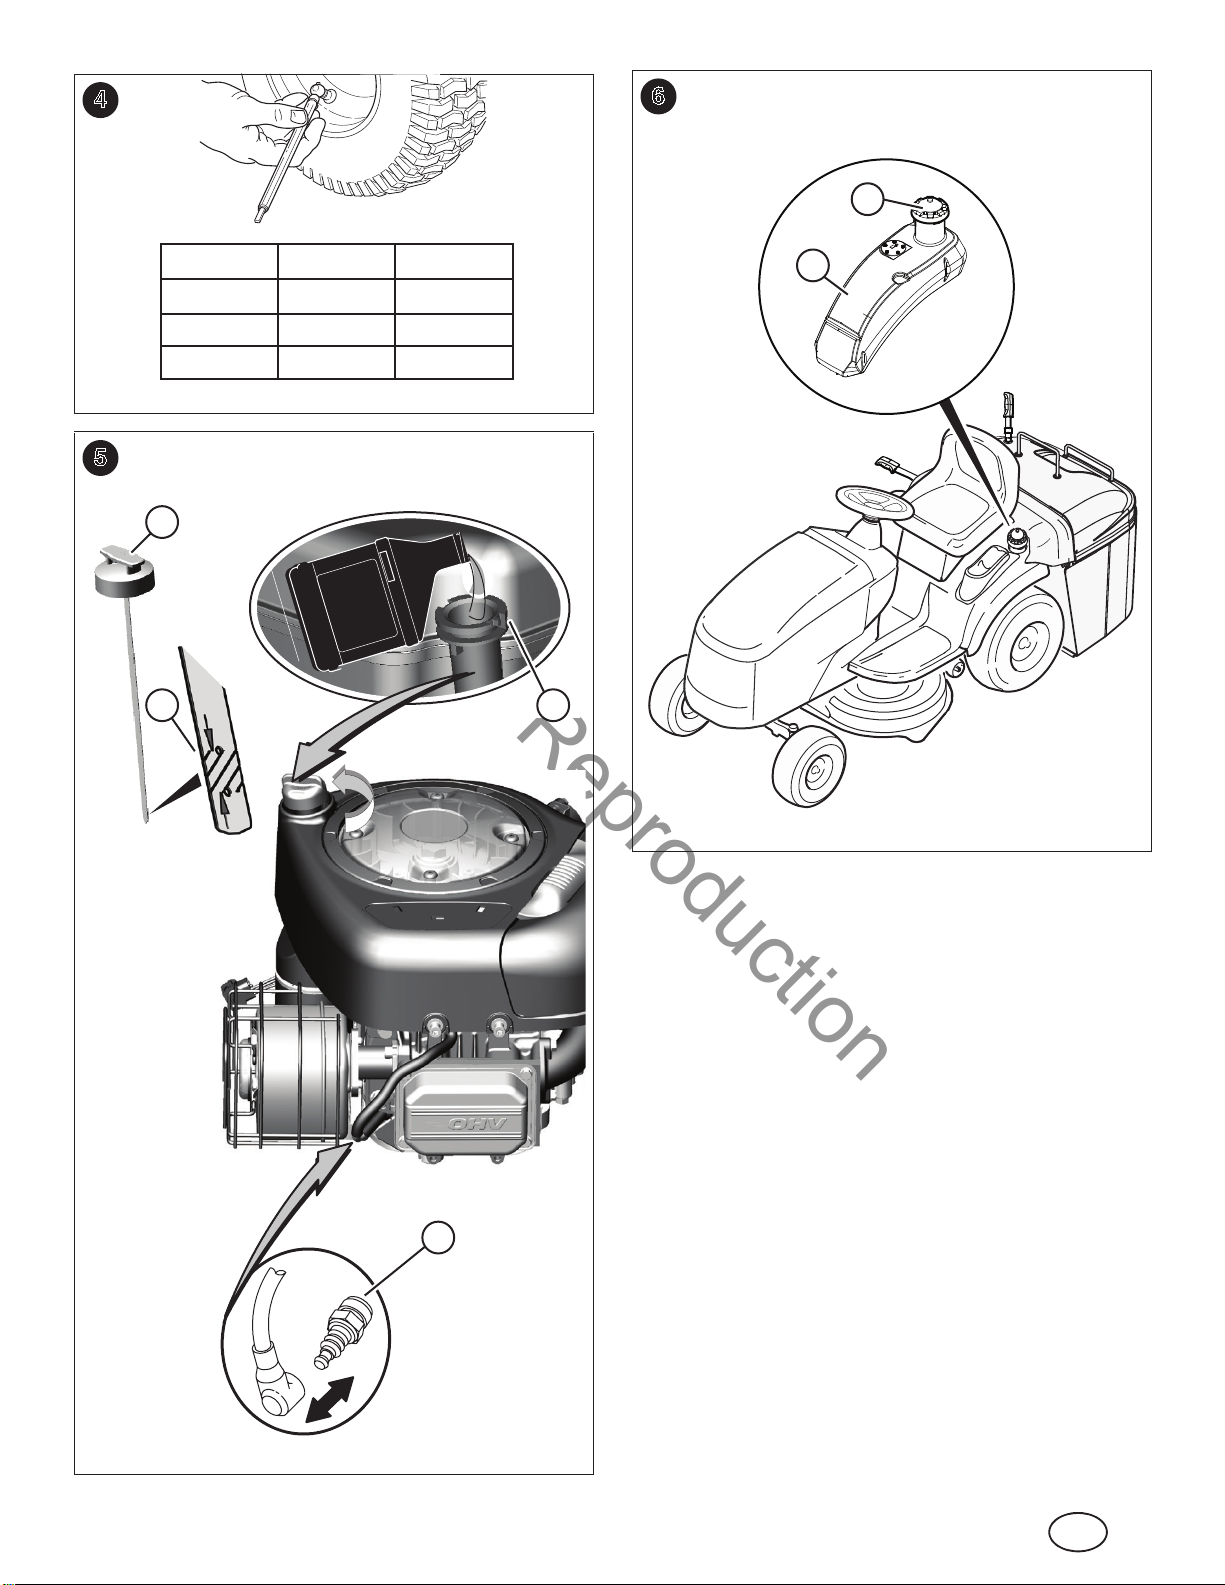
Check Tire Pressure
Tires should be checked periodically to provide the
optimum traction and to guarantee the best cut (see Figure
4).
NOTE: These pressures may differ slightly from the
“Maximum Inflation” stamped on the side walls of the tires.
WARNING
If the unit does not pass a safety test, do not operate it.
See an authorized dealer.
Safety Interlock System Tests
This unit is equipped with a Safety Interlock System. Do not
attempt to bypass or tamper with the switches/devices.
Test 1 — Engine should NOT crank if:
• PTO switch is ON, OR
• Brake pedal is NOT fully depressed (parking brake
OFF).
Test 2 — Engine SHOULD crank and start if:
• Operator is sitting in seat, AND
• PTO switch is OFF, AND
• Brake pedal is fully depressed (parking brake ON),
AND
• The crusie control lever is in NEUTRAL.
Test 3 — Engine should SHUT OFF if:
• Operator rises off seat.
• Collector is not closed when engaging PTO switch.
Test 4 — Check Mower Blade Stopping Time
Mower blades and mower drive belt should come to a
complete stop within five seconds after electric PTO switch
is turned OFF. If mower drive belt does not stop within five
seconds, see an authorized dealer.
Test 5 — Check Reverse Mow Option (RMO)
• Engine should shut off if reverse travel is attempted if
the PTO has been switched on and RMO has not been
activated.
• RMO light should illuminate when RMO has been
activated.
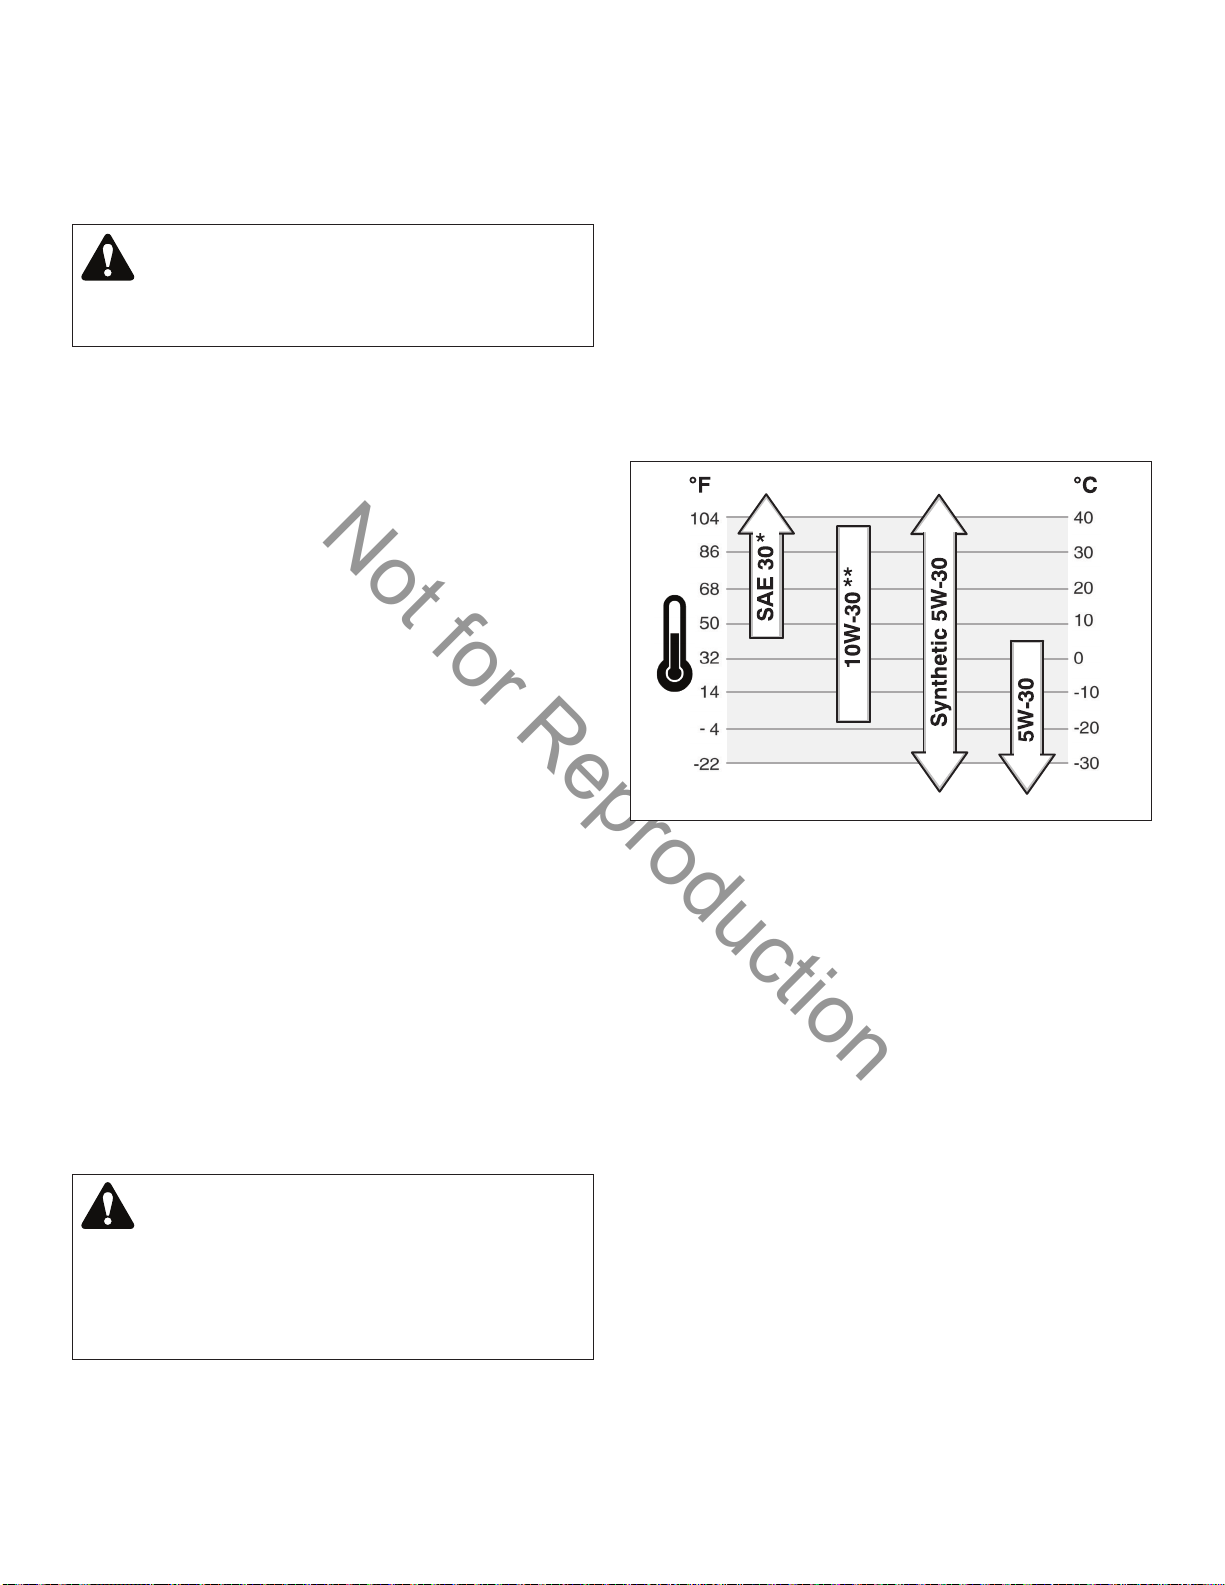
Oil Recommendations
We recommend the use of Briggs & Stratton Warranty
Certified oils for best performance. Other high-quality
detergent oils are acceptable if classified for service SF,
SG, SH, SJ or higher. Do not use special additives.
Outdoor temperatures determine the proper oil viscosity for
the engine. Use the chart to select the best viscosity for the
outdoor temperature range expected.
* Below 40°F (4°C) the use of SAE 30 will result in hard starting.
** Above 80°F (27°C) the use of 10W-30 may cause increased oil
consumption. Check oil level more frequently.
WARNING
Mowing in reverse can be hazardous to bystanders. Tragic
accidents can occur if the operator is not alert to the
presence of children. Never activate the RMO if children
are present. Children are often attracted to the unit and
the mowing activity.
16
Not for Reproduction
en
Checking/Adding Oil
Before adding or checking the oil
• Place engine level.
• Clean the oil fill area of any debris.
1. Remove the dipstick (A, Figure 5) and wipe with a
clean cloth.
2. Insert and tighten the dipstick.
3. Remove the dipstick and check the oil level. It should
be at the FULL mark (B) on the dipstick.
4. If low, add oil slowly into the engine oil fill (C). Do not
overfill. After adding oil, wait one minute and then
recheck the oil level.
NOTE: Do not add oil at the quick oil drain (if equipped).
5. Replace and tighten the dipstick.
High Altitude
At altitudes over 5,000 feet (1524 meters), a minimum
85 octane / 85 AKI (89 RON) gasoline is acceptable. For
carbureted engines, high altitude adjustment is required
to remain emissions compliant. Operation without this
adjustment will cause decreased performance, increased
fuel consumption, and increased emissions. Contact
a Briggs & Stratton Authorized Service Dealer for high
altitude adjustment information.
Operation of the engine at altitudes below 2,500 feet
(762 meters) with the high altitude adjustment is not
recommended. For Electronic Fuel Injection (EFI) engines,
no high altitude adjustment is necessary.
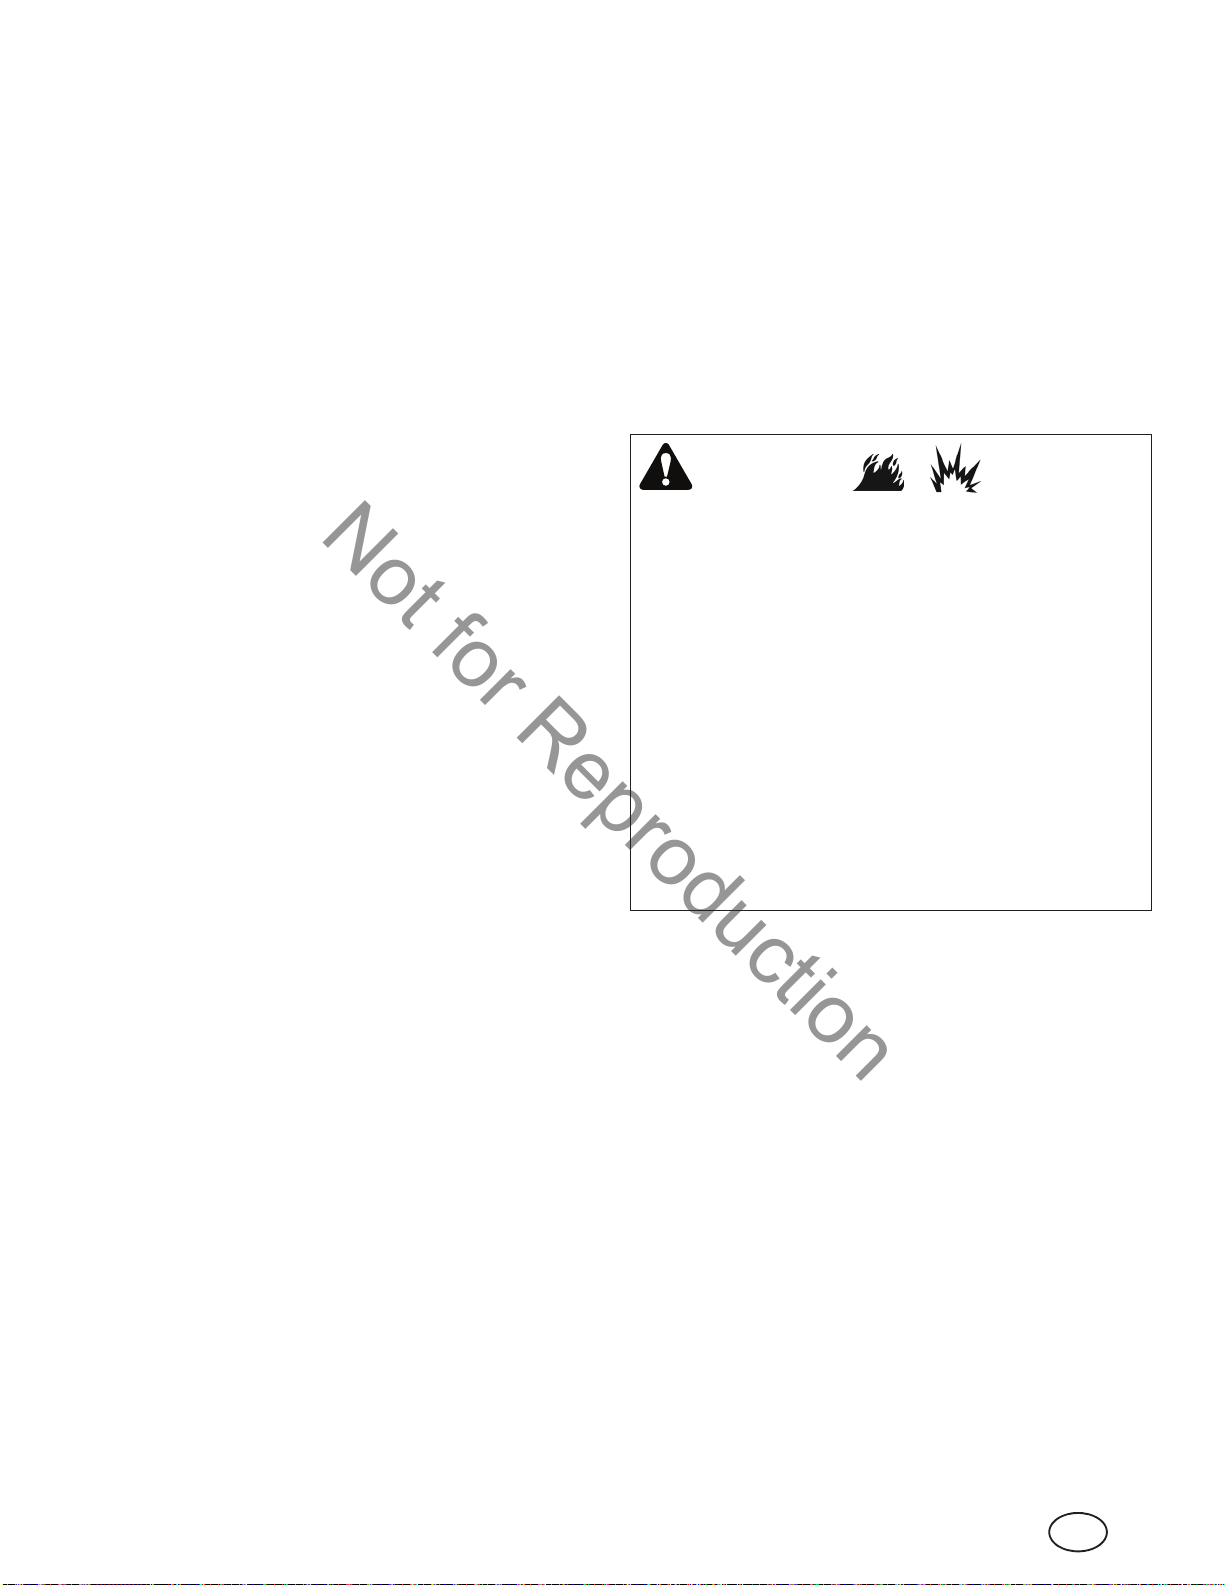
Adding Fuel
WARNING
Oil Pressure
If the oil level is below the ADD mark, add oil until it reaches
the FULL mark. Start the engine and check for proper
pressure before continuing to operate.
If the oil level is between the ADD and FULL marks, do not
start the engine. Contact an authorized dealer to have the
oil pressure problem corrected.
Fuel Recommendations
Fuel must meet these requirements:
• Clean, fresh, unleaded gasoline.
• A minimum of 87 octane / 87 AKI (91 RON). For high
altitude use, see below.
• Gasoline with up to 10% ethanol (gasohol) is
acceptable.
CAUTION: Do not use unapproved gasolines, such as E85.
Do not mix oil in gasoline or modify the engine to run on
alternate fuels. This will damage the engine components
and void the engine warranty.
To protect the fuel system from gum formation, mix a fuel
stabilizer into the fuel. See the Storage section. All fuel is
not the same. If starting or performance problems occur,
change fuel providers or change brands. This engine is
certified to operate on gasoline. The emissions control
system for this engine is EM (Engine Modifications).
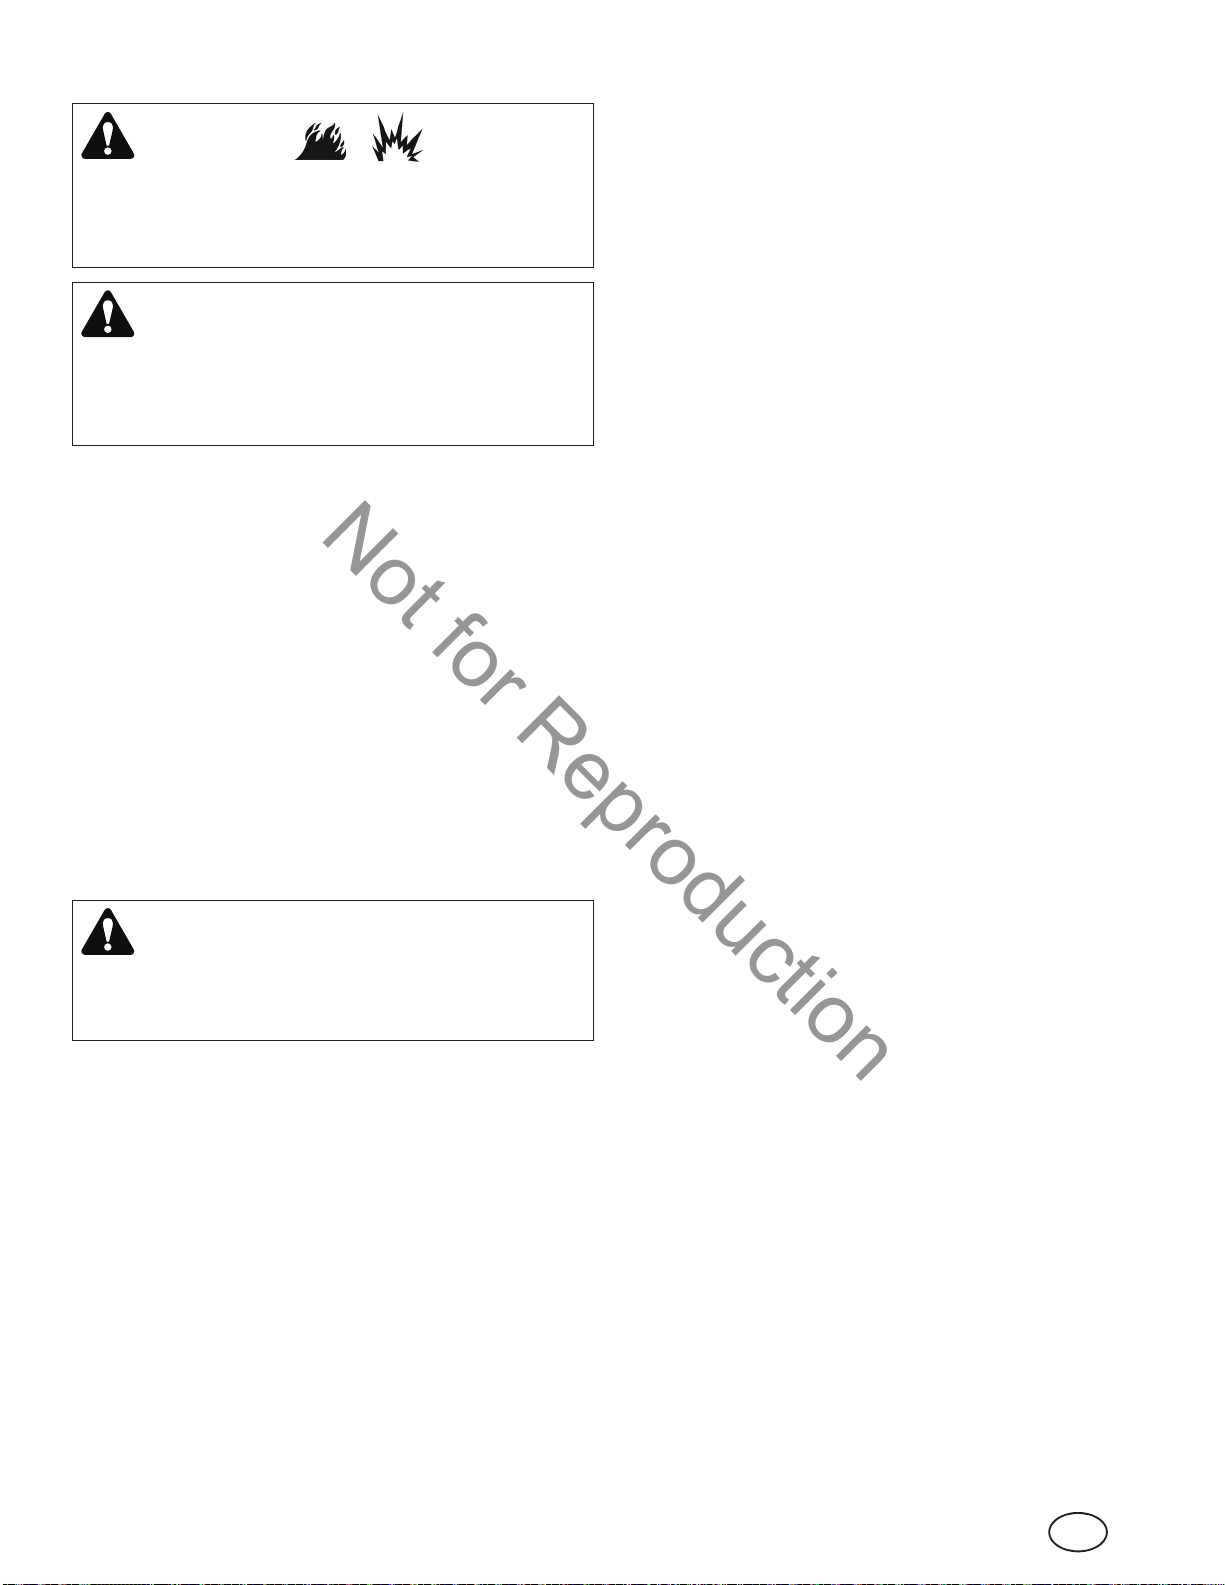
Fuel and its vapors are extremely flammable and
explosive.
Fire or explosion can cause severe burns or death.
When Adding Fuel
• Turn engine off and let engine cool at least 3 minutes
before removing the fuel cap.
• Fill fuel tank outdoors or in well-ventilated area.
• Do not overfill fuel tank. To allow for expansion of the
fuel, do not fill above the bottom of the fuel tank neck.
• Keep fuel away from sparks, open flames, pilot lights,
heat, and other ignition sources.
• Check fuel lines, tank, cap, and fittings frequently for
cracks or leaks. Replace if necessary.
• If fuel spills, wait until it evaporates before starting
engine.
1. Remove the fuel cap (A, Figure 6).
2. Clean the fuel cap area of dirt and debris.
3. Fill the fuel tank (B) with fuel. To allow for expansion
of the fuel, do not fill above the bottom of the fuel tank
neck (C).
4. Reinstall the fuel cap.
17
Not for Reproduction
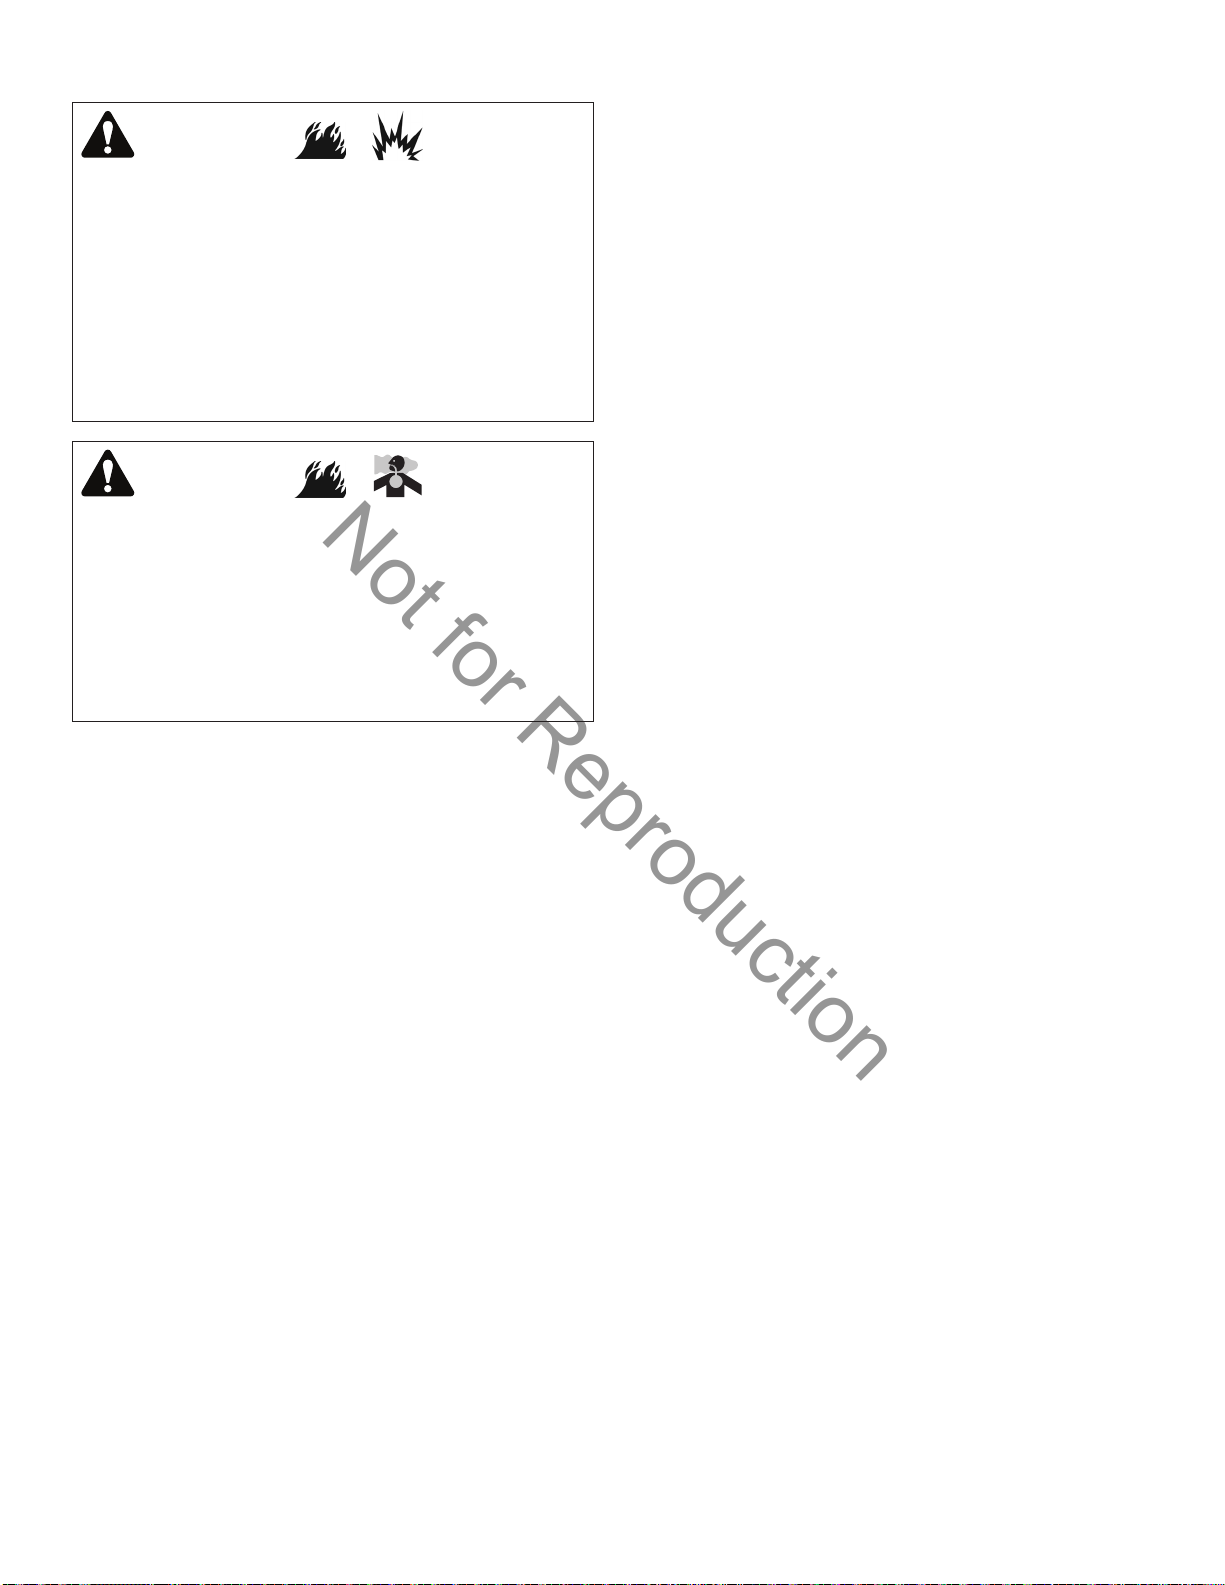
Starting the Engine
WARNING
Fuel and its vapors are extremely flammable and
explosive.
Fire or explosion can cause severe burns or death.
When Starting Engine
• Ensure that spark plug, muffler, fuel cap, and air
cleaner (if equipped) are in place and secured.
• Do not crank engine with spark plug removed.
• If engine floods, set choke (if equipped) to OPEN/RUN
position, move throttle (if equipped) to FAST position
and crank until engine starts.
WARNING
Engines give off carbon monoxide, an odorless, colorless,
poison gas.
Breathing carbon monoxide can cause nausea, fainting,
or death.
Fire or explosion can cause severe burns or death.
• Start and run engine outdoors.
• Do not start or run engine in enclosed area, even if
doors or windows are open.
1. Check the oil level (see Check and Add Engine Oil).
2. Make sure equipment drive controls are disengaged.
3. Move the throttle/choke control to the CHOKE
position.
NOTE: Choke is usually unnecessary when restarting a
warm engine.
4. Insert the key into the ignition switch and turn it to the
ON/START position.
5. After the engine starts, move the throttle/choke
control to the FAST position. Warm up the engine by
running it for at least a minute before engaging the
blade rotation control or driving the rider.
6. After warming the engine, Always operate the rider
with the throttle/choke control in the FAST position.
Driving the Tractor
1. Sit in the seat and adjust the seat so that you can
comfortably reach all the controls and see the
dashboard display (see Features and Controls).
2. Engage the parking brake. Fully depress the brake
pedal, pull UP on the parking brake control, and release
the brake pedal.
3. Make sure the PTO switch is disengaged.
4. Start the engine (see Starting the Engine).
5. Disengage the parking brake. Fully depress the brake
pedal, press DOWN on the parking brake control, and
release the brake pedal.
6. Depress the forward ground speed control pedal to
travel forward. Release the pedal to stop. Note that
the further down the pedal is depressed the faster the
tractor will travel.
7. Stop the tractor by releasing the ground speed control
pedals, setting the parking brake, and stopping the
engine (see Stopping the Tractor and Engine).
Mowing
1. Set the cutting height to the desired level using
the mower cutting height lever (see Features and
Controls).
2. Engage the parking brake. Make sure the PTO switch is
disengaged.
3. Start the engine (see Starting the Engine).
4. Set the throttle/ choke control to the FAST position.
5. Engage the PTO to activate the mower blades.
6. Begin mowing.
NOTE: When the “catcher full” alarm sounds, turn off
the PTO immediately to prevent the discharge tube from
plugging. Travel to the desired location and empty the
catcher (see Emptying the Catcher).
7. When finished mowing, shut off the PTO.
8. STOP the engine (see Stopping the
Tractor and Engine).
In the event of an emergency the engine can be
stopped by simply turning the ignition switch to STOP.
Use this method only in emergency situations. For normal
engine shut down follow the procedure given in Stopping
the Tractor and Engine.
NOTE: If the engine does not start after repeated attempts,
contact an authorized dealer.
18
Not for Reproduction
en
Reverse Mowing Option (RMO)
WARNING
Mowing in reverse can be hazardous to bystanders. Tragic
accidents can occur if the operator is not alert to the
presence of children. Never activate the RMO if children
are present. Children are often attracted to the unit and
the mowing activity.
The Reverse Mowing Option (RMO) allows the operator to
mow in reverse (see Features and Controls). To activate,
turn the RMO key after the PTO is engaged. The L.E.D. light
will illuminate, and the operator can then mow in reverse.
Each time the PTO is engaged the RMO needs to be
reactivated if desired. The key should be removed to restrict
access to the RMO.
Cruise Control
TO ENGAGE:
1. Pull up on the cruise control knob (see Features and
Controls).
2. Depress the forward ground speed pedal.
3. Lift up the cruise control knob when desired speed is
reached. The Cruise will lock in one of its five locking
positions.
TO DISENGAGE:
1. Depress the brake pedal (see Features and Controls).
or
2. Depress the foward ground speed pedal.
Stopping the Tractor and Engine
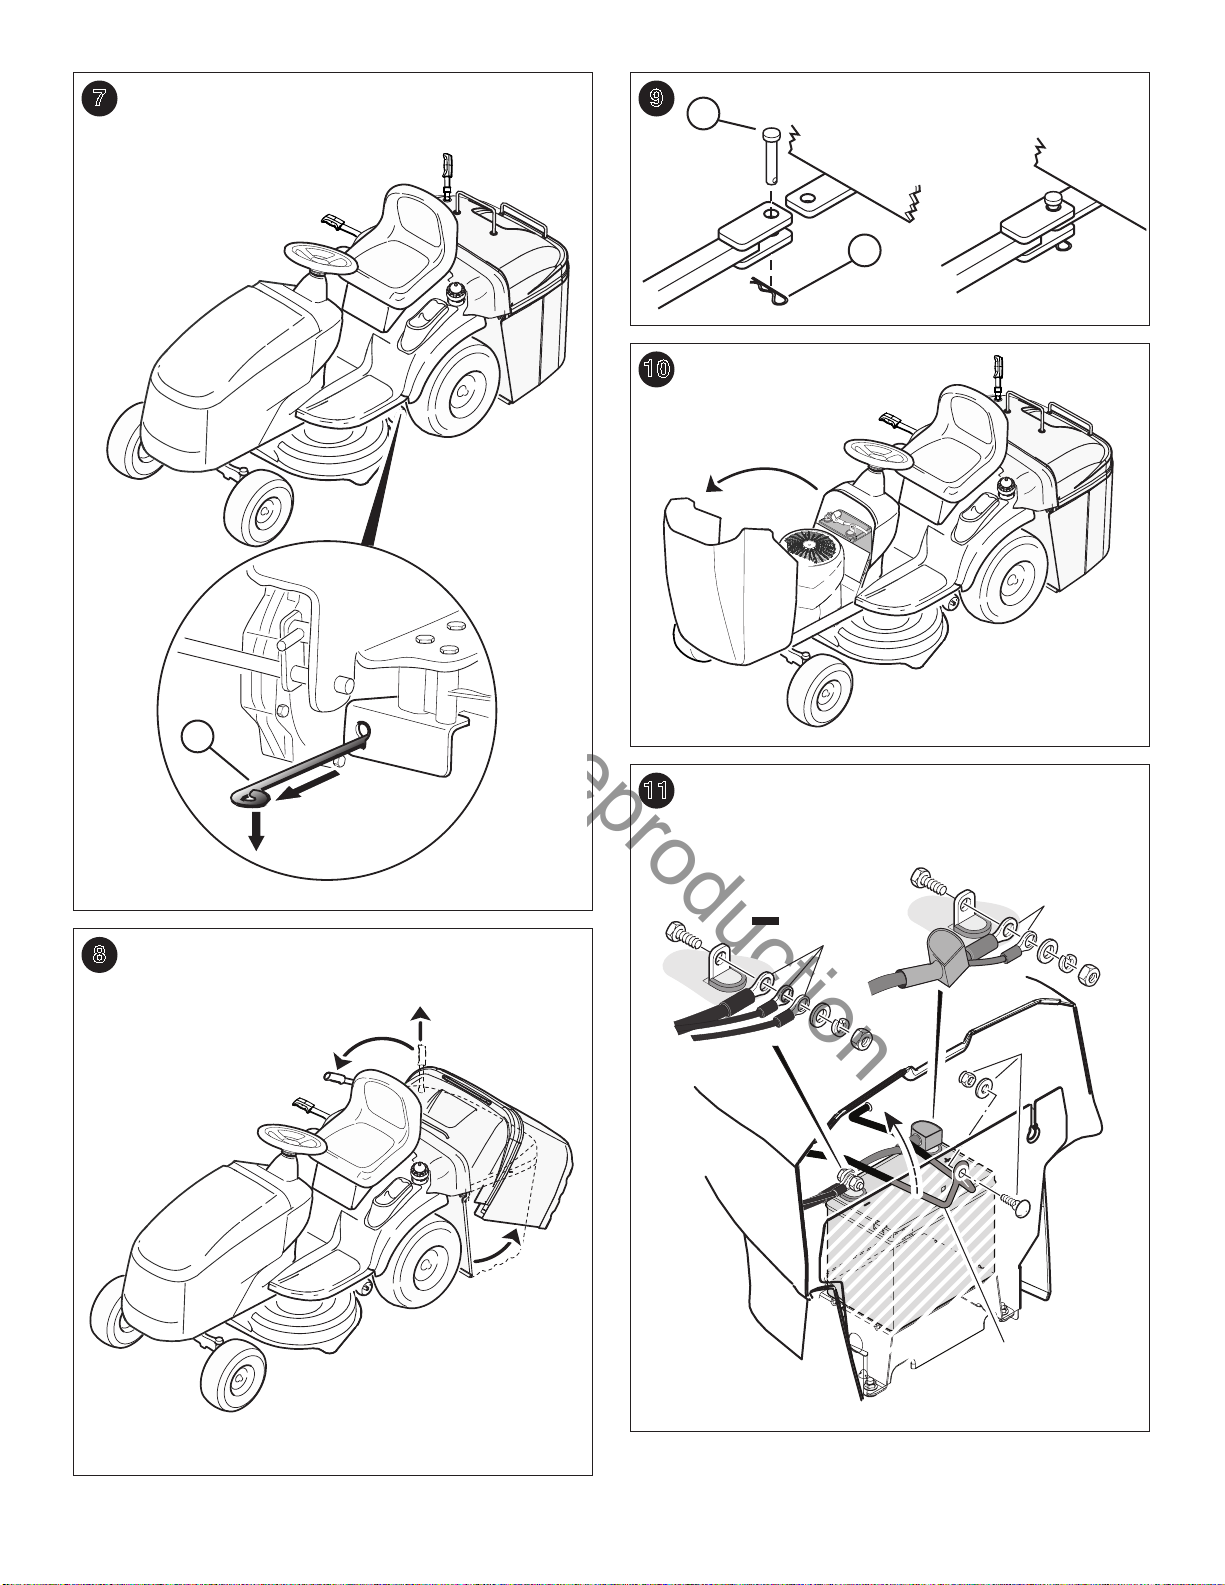
Pushing the Tractor by Hand
1. Disengage the PTO and turn the engine off (see
Features and Controls).
2. Pull the lever (A, Figure 7) toward the front of the unit
and push down to lock in place. The tractor can now be
pushed by hand.
3. Pull up and push toward the rear of the unit to engage
the transmission. The tractor can now be driven.
WARNING
Towing the unit will cause transmission damage. Do
not use another vehicle to push or pull this unit. Do not
actuate the transmission release lever while the engine is
running.
Parking Brake Function
Applying the Parking Brake - To lock the parking brake,
release the ground speed pedals, fully depress the brake
pedal, pull UP on the parking brake knob, and then release
brake pedal (see Features and Controls).
Releasing the Parking Brake - To release the parking
brake, fully depress the brake pedal and push the parking
brake knob DOWN (see Features and Controls).
Attaching a Trailer
The maximum horizontal drawbar force allowed is 150
Newton. The maximum vertical drawbar force is 90
Newton. This equates to a 113 kg (250 lbs) trailer on a 10
degree hill. Secure the trailer with an appropriately sized
clevis pin (A, Figure 9) and clip (B).
Fuel and its vapors are extremely flammable and
explosive.
Fire or explosion can cause severe burns or death.
• Do not choke the carburetor to stop the engine.
1. Return the ground speed control(s) to neutral.
2. Disengage the PTO and wait for all moving parts to stop.
3. Move the throttle control (or throttle/choke control)
to SLOW position and turn the ignition key to OFF.
Remove the key.
Emptying the Catcher
1. Extend the grass catcher handle and rotate forward until
the grass catcher assembly is completely open at the
bottom (see Figure 8).
2. Empty the grass from the catcher.
3. Move the tractor forward a short distance. This will keep
the pile of grass from keeping the catcher from closing.
4. Rotate the grass catcher assembly back to the closed
position before mowing.
Cutting Height Adjustment
The mower lift lever is used to lower and raise the deck to
the desired cutting height (see Features and Controls).
The cutting height is adjustable between 3,8 cm (1,5”) and
8,9 cm (3,5”).
To lower the deck, pull back slightly on the mower lift lever,
push it to the left and slide it down. To raise the deck, pull
up on the mower lift lever and lock in notch to the right.
WARNING
19
Not for Reproduction
Maintenance
Maintenance Chart
TRACTOR AND MOWER
Every 8 Hours or Daily
Check safety interlock system
Clean debris off tractor and mower deck
Clean debris from engine compartment
Every 25 Hours or Annually *
Check tire pressure
Check mower blade stopping time
Check tractor and mower for loose hardware
Every 50 Hours or Annually *
Clean battery and cables
Check tractor brakes
See Dealer Annually to
Lubricate tractor and mower
Check mower blades **
* Whichever comes first
** Check blades more often in regions with sandy soils or high dust
conditions.
WARNING
Unintentional sparking can result in fire or electric shock.
ENGINE
First 5 Hours
Change engine oil
Every 8 Hours or Daily
Check engine oil level
Every 25 Hours or Annually *
Clean engine air filter and pre-cleaner **
Every 50 Hours or Annually *
Change engine oil
Replace oil filter
Annually
Replace air filter
Replace pre-cleaner
See Dealer Annually to
Inspect muffler and spark arrester
Replace spark plug
Replace fuel filter
Clean engine air cooling system
* Whichever comes first
** Clean more often in dusty conditions or when airborne debris is present.
Check Tire Pressure
Unintentional start-up can result in entanglement,
traumatic amputation, or laceration.
Before performing adjustments or repairs:
• Disconnect the spark plug wire and keep it away from
the spark plug.
• Disconnect battery at negative terminal (only engines
with electric start).
• Use only correct tools.
• Do not tamper with governor spring, links, or other
parts to increase engine speed.
• Replacement parts must be of the same design and
installed in the same position as the original parts.
Other parts may not perform as well, may damage the
unit, and may result in injury.
• Do not strike the flywheel with a hammer or hard object
because the flywheel may shatter during operation.
Tires should be checked periodically to provide the
optimum traction and to guarantee the best cut (see Figure
4).
NOTE: These pressures may differ slightly from the
“Maximum Inflation” stamped on the side walls of the tires.
ride.
Check Mower Blade Stopping Time
Mower blades and mower drive belt should come to a
complete stop within five seconds after the electric PTO
switch is turned off.
1. With tractor in neutral, PTO disengaged and operator in
seat, start the engine.
2. Engage the PTO and wait several seconds. Disengage
the PTO.
3. If mower drive belt does not stop within five seconds,
see an authorized dealer.
Check Tire Pressure
Tires should be checked periodically to provide the
optimum traction and to guarantee the best cut (see Figure
7).
NOTE: These pressures may differ slightly from the
“Maximum Inflation” stamped on the side walls of the tires.
20
Not for Reproduction
en
Battery Maintenance
Changing the Engine Oil
WARNING
When removing or installing battery cables, disconnect
the negative cable FIRST and reconnect it LAST. If not
done in this order, the positive terminal can be shorted to
the frame by a tool.
WARNING
Battery posts, terminals, and related accessories contain
lead and lead compounds - chemicals known to the
State of California to cause cancer, birth defects, or other
reproductive harm. Wash hands after handling.
Cleaning the Battery and Cables
1. Disconnect the NEGATIVE (black) cables first.
2. Disconnect the POSITIVE (red) cables last.
3. Remove the battery as shown in Figure 9.
4. Clean the battery platform with a solution of baking soda
and water.
5. Clean the battery terminals and cable ends with a wire
brush and battery terminal cleaner until shiny.
6. Coat the assembled terminals with petroleum jelly or
non-conducting grease.
7. Install the battery.
8. Connect the POSITIVE (red) cables first.
9. Connect the NEGATIVE (black) cables last.
Used oil is a hazardous waste product and must be
disposed of properly. Do not discard with household waste.
Check with your local authorities, service center, or dealer
for safe disposal/recycling facilities.
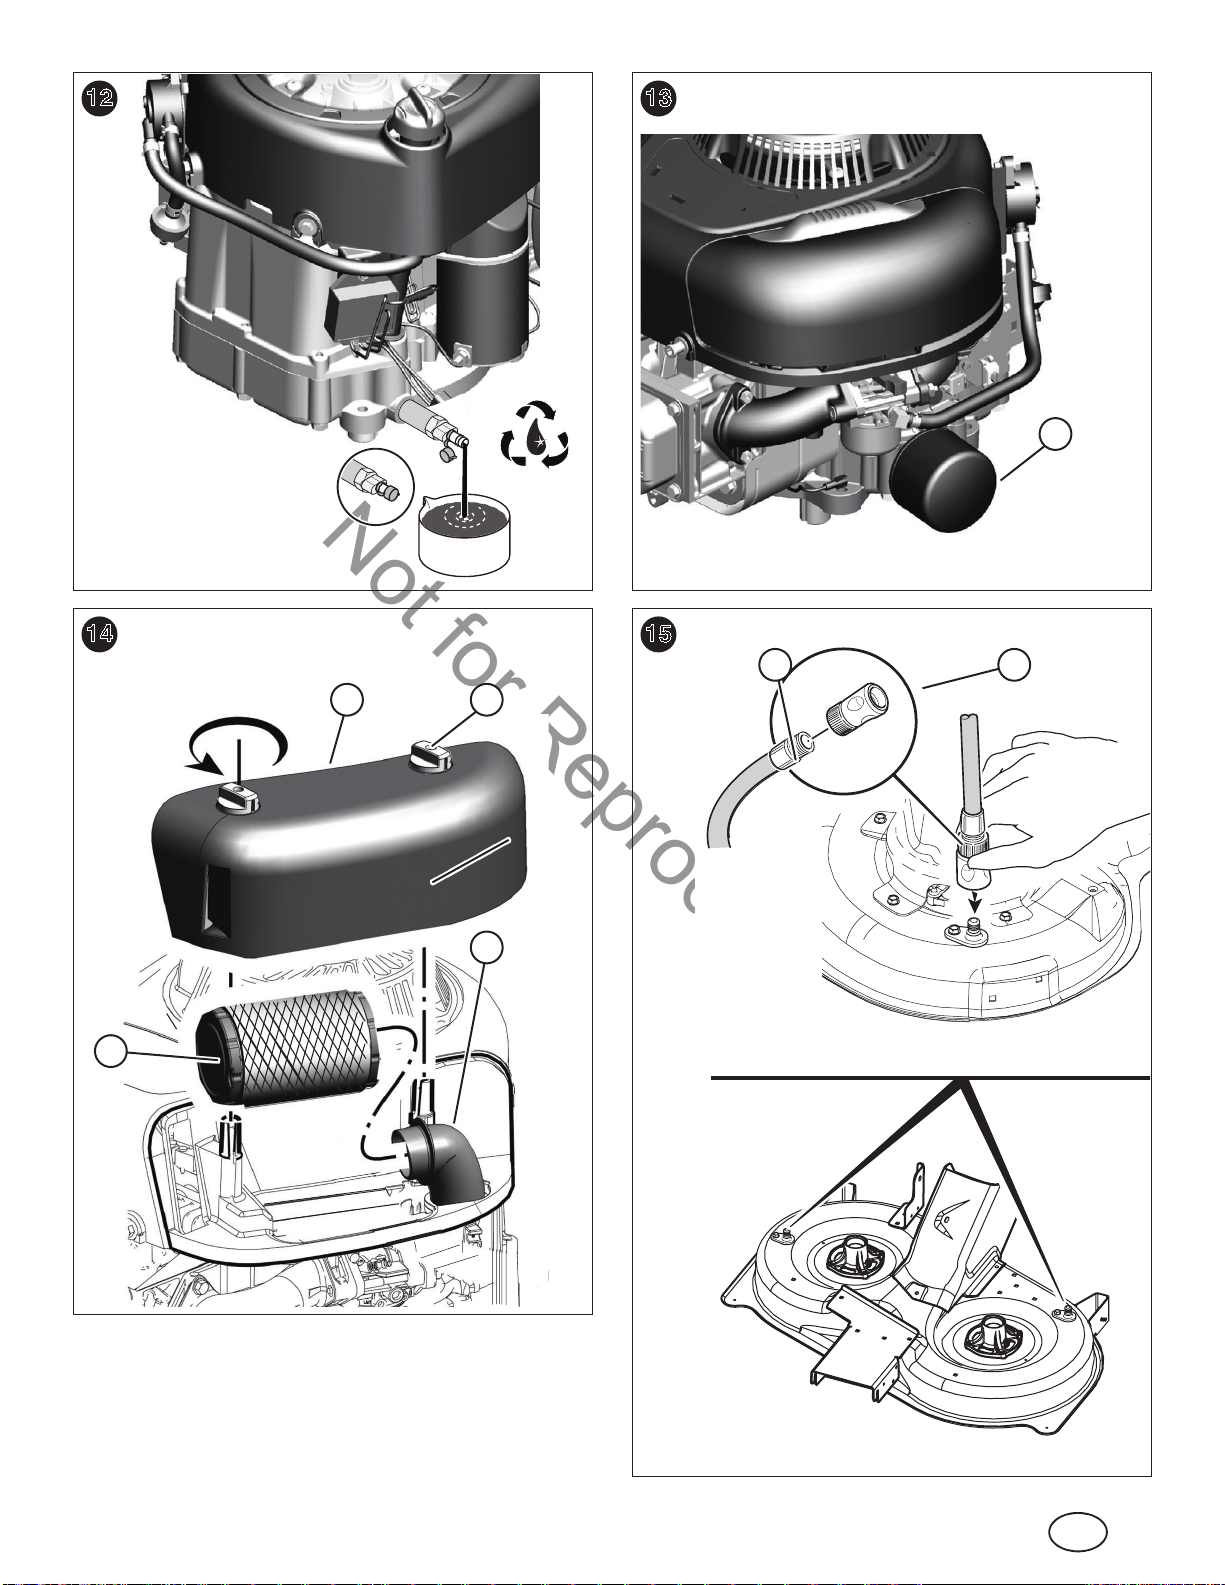
Remove Oil
1. With engine off but still warm, disconnect the spark plug
wire (D, Figure 5) and keep it away from the spark plug.
2. Remove the dipstick (A).
3. Remove the oil drain cap as shown in Figure 12. Drain
the oil into an approved container.
4. After the oil has drained, install the oil drain cap.
Changing the Oil Filter
For replacement intervals, see the Maintenance Chart.
1. Drain the oil from the engine. See Remove Oil section.
2. Remove the oil filter (A, Figure 13) and dispose of
properly.
3. Before you install the new oil filter, lightly lubricate the oil
filter gasket with fresh, clean oil.
4. Install the oil filter by hand until the gasket contacts
the oil filter adapter, then tighten the oil filter 1/2 to 3/4
turns.
5. Add oil. See Add Oil section.
6. Start and run the engine. As the engine warms up,
check for oil leaks.
7. Stop the engine and check the oil level. It should be at
the FULL mark on the dipstick.
Charging the Battery
WARNING
Keep open flames and sparks away from the battery; the
gasses coming from it are highly explosive. Ventilate the
battery well during charging.
A dead battery or one too weak to start the engine may
be the result of a defect in the charging system or other
electrical component. If there is any doubt about the cause
of the problem, see your dealer. If you need to replace the
battery, follow the steps under Cleaning the Battery and
Cables.
To charge the battery, follow the instructions provided by
the battery charger manufacturer as well as all warnings
included in the safety rules sections of this book. Charge
the battery until fully charged. Do not charge at a rate higher
than 10 amps.
If you need to replace the battery, see the Cleaning the
Battery and Cables section.
Add Oil
• Place engine level.
• Clean the oil fill area of any debris.
• See the Specifications section for oil capacity.
1. Remove the dipstick (A, Figure 5) and wipe with a
clean cloth.
2. Pour the oil slowly into the engine oil fill (C). Do not
overfill. After adding oil, wait one minute and then
check the oil level.
3. Install and tighten the dipstick.
4. Remove the dipstick and check the oil level. It should be
at the FULL mark (B) on the dipstick.
5. Install and tighten the dipstick.
21

Not for Reproduction
Servicing Air Filter
WARNING
Fuel and its vapors are extremely flammable and
explosive.
Fire or explosion can cause severe burns or death.
• Never start or run the engine with the air cleaner
assembly or air filter removed.
NOTICE: Do not use pressurized air or solvents to clean
the filter. Pressurized air can damage the filter and solvents
will dissolve the filter.
1. Remove the fasteners (A, Figure 14) and the air filter
cover (B).
2. To remove the filter (C), lift the end of the filter and
then pull the filter off the intake (D).
3. To loosen debris, gently tap the filter on a hard surface.
If the filter is excessively dirty, replace with a new
filter.
4. Wash the pre-cleaner in liquid detergent and water.
Then allow it to thoroughly air dry. Do not oil the pre-
cleaner.
5. Assemble the dry pre-cleaner to the filter.
6. Install the filter on the intake. Push the end of the filter
into the base as shown. Make sure filter fits securely in
the base.
7. Install air filter cover and secure with fasteners.
Washing the Mower Deck
NOTE: The washout port allows you to connect a typical
garden hose to the left-hand side of the mower deck to
remove grass and debris from the underside.
WARNING
Before running the mower, make sure the hose is
properly connected and does not come into contact with
the blades. When the mower is running and the blades
are engaged, the person cleaning the mower deck must
be in the operator position, and there are no bystanders.
Failure to follow these precautions may result in serious
injury or death.
1. Place the tractor on a level surface.
2. Attach the quick disconnect (not included) (A, Figure
15) to garden hose (B) and connect to washout port
(C) on on either side of mower deck.
3. Run water to remove grass and debris from underside
of mower deck.
4. Turn the mower on and place in the highest cutting
position.
5. Stop the engine (see Stopping the Tractor and Engine).
6. Remove the garden hose and quick disconnect from
the washout port when completed.
7. Repeat for washout port on other side.
22

Not for Reproduction
en
Storage
WARNING
Never store the unit (with fuel) in an enclosed,
unventilated structure. Fuel vapors can travel to an
ignition source (such as a furnace, water heater, etc.) and
cause an explosion. Fuel vapor is also toxic to humans
and animals.
When Storing Fuel Or Equipment With Fuel in Tank
• Store away from furnaces, stoves, water heaters, or
other appliances that have pilot lights or other ignition
sources because they can ignite fuel vapors.
Equipment
Disengage the PTO, set the parking brake, and remove the
key.
Battery life will be increased if it is removed. Put in a cool,
dry place and keep fully charged during storage. If the
battery is left in the unit, disconnect the negative cable.
Fuel System
Fuel can become stale when stored over 30 days. Stale fuel
causes acid and gum deposits to form in the fuel system
or on essential carburetor parts. To keep fuel fresh, use
Briggs & Stratton® Advanced Formula Fuel Treatment
& Stabilizer, available wherever Briggs & Stratton genuine
service parts are sold.
There is no need to drain gasoline from the engine if a
fuel stabilizer is added according to instructions. Run the
engine for 2 minutes to circulate the stabilizer throughout
the fuel system before storage. If gasoline in the engine has
not been treated with a fuel stabilizer, it must be drained
into an approved container. Run the engine until it stops
from lack of fuel. The use of a fuel stabilizer in the storage
container is recommended to maintain freshness.
Engine Oil
While the engine is still warm, change the engine oil. See
Changing the Oil section.
Before starting the unit after it has been stored:
• Check all fluid levels. Check all maintenance items.
• Perform all recommended checks and procedures
found in this manual.
• Allow the engine to warm up for several minutes before
use.
23

Not for Reproduction
Troubleshooting
Troubleshooting the Tractor
PROBLEM LOOK FOR REMEDY
Brake pedal not
depressed.
Out of fuel. If engine is hot, allow it to cool, then refill the fuel tank.
Fully depress brake pedal.
Engine will not turnover
or start.
Engine starts hard or
runs poorly.
Engine knocks.
Excessive oil
consumption.
Engine exhaust is
black.
Engine runs, but tractor
will not drive.
Battery terminals require
cleaning.
Battery discharged or
dead.
Wiring loose or broken. Visually check wiring. If wires are frayed or broken, see authorized
Fuel mixture too rich. Clean air filter.
Low oil level. Check/add oil as required.
Using wrong grade oil. See Oil Recommendations Chart.
Using wrong grade oil. See Oil Recommendations Chart.
Too much oil in
crankcase.
Dirty air filter. See Servicing the Air Filter section.
Ground speed control
pedals not depressed.
Transmission release
lever in PUSH position.
Parking brake is engaged. Disengage parking brake.
See Cleaning the Battery and Cables section.
Recharge or replace battery.
dealer.
Drain excess oil.
Depress pedals.
Move into DRIVE position.
Tractor steers hard or
handles poorly.
NOTE: For all other problems, contact an Authorized Service Dealer.
Improper tire inflation. See Check Tire Pressure section.
24

Not for Reproduction
en
Troubleshooting the Mower
PROBLEM LOOK FOR REMEDY
Mower cut is uneven.
Tractor tires not properly
inflated.
See Check Tire Pressure section.
Mower cut is rough
looking.
Engine stalls easily
with mower engaged.
Engine runs and tractor
drives, but mower will
not drive.
NOTE: For all other problems, contact an Authorized Service Dealer.
Engine speed too slow. Set to full throttle.
Ground speed too fast. Slow down.
Engine speed too slow. Set to full throttle.
Ground speed to fast. Slow down.
Dirty or clogged air filter. See Servicing Air Filter section.
Cutting height set too low. Cut tall grass at maximum cutting height during first pass.
Engine not up to
operating temperature.
Starting mower in tall
grass.
PTO not engaged. Engage the PTO.
Run engine for several minutes to warm-up.
Start the mower in a cleared area.
25

Not for Reproduction
Specications
ENGINES
Model 4195 Series IntekTM
Displacement 500 cc (30,5 cu in.)
Electrical System Battery: 12 Volt, 195 CCA
Alternator: 9 amp
Oil Capacity 1,4 L (48 oz)
Model 7200 Series IntekTM
Displacement 656 cc (40,03 cu in.)
Electrical System Battery: 12 Volt, 195 CCA
Alternator: 9 amp reg.
Oil Capacity 1,9 L (64 oz)
Model 7220 Series IntekTM
Displacement 656 cc (40,03 cu in.)
Electrical System Battery: 12 Volt, 195 CCA
Alternator: 9 amp reg.
Oil Capacity 1,9 L (64 oz)
Model Professional SeriesTM
Displacement 724 cc (44,18 cu in.)
Electrical System Battery: 12 Volt, 195 CCA
Alternator: 9 amp reg.
Oil Capacity 1,9 L (64 oz)
All Models
Spark Plug Gap 0,76 mm (0.030 in.)
Spark Plug Torque 20 Nm (180 in-lbs)
CHASSIS
Fuel Tank Capacity 11,25 L (2,97 gal)
Front Wheels Tire Size: 15 x 6.0
InationPressure:14psi(0,96bar)
Rear Wheels Tire Size: 20 x 8,0
InationPressure:10psi(0,68bar)
Tire Size: 22 x 9,5
InationPressure:10psi(0,68bar)
TRANSMISSION
Type Hydro Gear® 610
Engine Oil
Synthetic 5W30
MOWER
Width of Cut 96,5 cm (38”)
106,7 cm (42”)
Number of Blades 2
Base Deck Platform Rear Discharge
Cutting Height 3,8-8,9 cm (1,5-3,5”)
Cutting Positions 6
Power Ratings
The gross power rating for individual gasoline engine models is labeled in accordance with SAE (Society of Automotive
Engineers) code J1940 Small Engine Power & Torque Rating Procedure, and is rated in accordance with SAE J1995.
Torque values are derived at 2600 RPM for those engines with “rpm” called out on the label and 3060 RPM for all others;
horsepower values are derived at 3600 RPM. The gross power curves can be viewed at www.BRIGGSandSTRATTON.
COM. Net power values are taken with exhaust and air cleaner installed whereas gross power values are collected without
these attachments. Actual gross engine power will be higher than net engine power and is affected by, among other things,
ambient operating conditions and engine-to-engine variability. Given the wide array of products on which engines are
placed, the gasoline engine may not develop the rated gross power when used in a given piece of power equipment. This
difference is due to a variety of factors including, but not limited to, the variety of engine components (air cleaner, exhaust,
charging, cooling, carburetor, fuel pump, etc.), application limitations, ambient operating conditions (temperature, humidity,
altitude), and engine-to-engine variability. Due to manufacturing and capacity limitations, Briggs & Stratton may substitute
an engine of higher rated power for this engine.
Parts and Accessories
Contact an authorized dealer.
26

Not for Reproduction

Not for Reproduction
Продукти, обхванати от това
ръководство
Следните продукти са обхванати от това ръководство:
2691251-00, 2691251-01, 2691252-00, 2691252-01,
2691253-00, 2691253-01, 2691263-00, 2691263-01,
2691264-00, 2691264-01, 2691265-00, 2691265-01,
2691269-00, 2691270-00, 2691270-01, 2691271-00,
2691271-01, 2691290-00, 2691291-00, 2691291-01,
2691292-00, 2691292-01, 2691296-00, 2691297-00,
2691297-01, 2691298-00, 2691298-01, 2691398-00,
2691399-00, 2691400-00
Съдържание на ръководството:
Безопасност на оператора .............................................. 9
Функции и елементи за управление ............................ 14
Работа ............................................................................ 16
Тестове на предпазната блокираща система .............. 16
Техническо обслужване ................................................ 20
Откриване и отстраняване на неизправности ............ 24
Технически данни .......................................................... 26
Изображенията в този документ са представителни
и са предназначени за допълване на копието с
инструкции, което придружават. Вашето устройство
може да се различава от показаните изображения.
Посоките ЛЯВО и ДЯСНО са както се виждат от
мястото на оператора.
8

Not for Reproduction
bg
Безопасност на оператора
Важни инструкции за безопасност
ЗАПАЗЕТЕ ТЕЗИ ИНСТРУКЦИИ – това ръководство
съдържа важни инструкции, които трябва да бъдат
спазвани по време на първоначалната настройка,
работата и техническото обслужване на оборудването.
Запазете тези оригинални инструкции за бъдещи
справки.
Символи за безопасност и техните
значения
ПОЖАР ДВИЖЕЩИ СЕ
ЧАСТИ
СТОП ТОКСИЧНИ
ИЗПАРЕНИЯ
ЕКСПЛОЗИЯ ВКЛ. ИЗКЛ. НОСЕТЕ
ЕЛЕКТРИЧЕСКИ
УДАР
ОТКАТ
ПРЕДПАЗНИ
СРЕДСТВА ЗА
ОЧИТЕ
ОПАСНО посочва опасност, която, ако не
бъде избегната, ще доведе до смърт или
сериозно нараняване.
ПРЕДУПРЕЖДЕНИЕ посочва опасност,
която, ако не бъде избегната, може да доведе
до смърт или сериозно нараняване.
ВНИМАНИЕ посочва опасност, която, ако не
бъде избегната, би могла да доведе до ниска
или средна степен на нараняване.
ЗАБЕЛЕЖКА посочва ситуация, която би могла да
доведе до повреждане на продукта.
ПРЕДУПРЕЖДЕНИЕ
Изгорелите газове от този продукт съдържат
химически вещества, известни в щата Калифорния
като причинители на рак, увреждания при
новородени или други увреждания, свързани с
репродуктивната способност.
ПРЕДУПРЕЖДЕНИЕ
Някои от съставните елементи на този продукт
и свързаните с тях приспособления съдържат
химически вещества, известни в щата Калифорния
като причинители на рак, увреждания при
новородени или други увреждания, свързани с
репродуктивната способност. След работа с тях
измивайте ръцете си.
ОПАСЕН
ХИМИКАЛ
ПРОЧЕТЕТЕ
РЪКОВОДСТВОTO
ГОРЕЩА
ПОВЪРХНОСТ
БЪРЗО
БАВНО
ЗАДУШАВАНЕ
МАСЛО
Акумулаторните щифтове, клеми и свързаните
с тях приспособления съдържат олово и оловни
съединения – химически вещества, известни в щата
Калифорния като причинители на рак, увреждания
при новородени или други увреждания, свързани
с репродуктивната способност. След работа с тях
измивайте ръцете си.
ГОРИВО СПИРАНЕ НА
ГОРИВОТО
ОПАСНОСТ ОТ ПРЕОБРЪЩАНЕ
Предупредителният символ за безопасност се
ползва за обозначаване на информация за мерки за
безопасност относно опасности, които могат да
доведат до нараняване. Сигналната дума (ОПАСНО,
ПРЕДУПРЕЖДЕНИЕ или ВНИМАНИЕ) се поставя
заедно с предупредителен символ, за да посочи
вероятността и потенциалната сериозност на
нараняването. Освен това даден символ за опасност
може да показва вида на опасността.
ОПАСНОСТ ОТ
АМПУТАЦИЯ
Работещият генератор изпуска въглероден оксид,
който е отровен газ, без мирис и цвят.
Вдишването на въглероден оксид може да причини
главоболие, умора, виене на свят, повръщане,
обърканост, припадъци, гадене, прилошаване или
смърт.
• Работете с оборудването САМО на открито.
• Не позволявайте на отработените газове да
навлизат в затворени помещения през прозорците,
вратите, вентилационните или други отвори.
ПРЕДУПРЕЖДЕНИЕ
ПРЕДУПРЕЖДЕНИЕ
9

Not for Reproduction
Прочетете тези правила за безопасност и ги спазвайте стриктно. Неспазването на тези правила може
да доведе до загуба на контрол върху устройството, тежко нараняване или смърт за вас или околните,
или до повреда на собственост или оборудване. Тази косачка е в състояние да ампутира ръце и крака
и да изхвърля предмети. Триъгълничетата в текста обозначават важни обръщания на внимание или
предупреждения, които трябва да бъдат спазвани.
ОБИЧАЙНА ЕКСПЛОАТАЦИЯ
1. Прочетете, разберете и спазвайте всички инструкции
в ръководството и върху устройството, преди да го
включите.
2. Не поставяйте ръцете или краката си близо до
въртящите се части или под машината. Винаги стойте
встрани от отвора за изхвърляне.
3. Позволявайте само на възрастни, които имат чувство
за отговорност и са запознати с инструкциите, да
работят с устройството (местните нормативни актове
могат да поставят ограничения за възрастта на
оператора).
4. Почистете зоната от предмети, като камъни, играчки,
кабели и т.н., които могат да бъдат захванати и
изхвърлени от ножа(овете).
5. Преди да започнете да косите, уверете се, че в зоната
няма други хора. Спрете устройството, ако някой
влезе в зоната.
6. Никога не возете пътници.
7. Не косете на заден ход, освен ако не е абсолютно
необходимо. Преди и по време на движение на заден
ход винаги гледайте надолу и назад.
8. Никога не насочвайте към някого материала,
изхвърлян през изпускателния отвор. Избягвайте да
насочвате материала, изхвърлян през изпускателния
отвор, към стена или преграда. Материалът може
да рикошира обратно към оператора. Спрете
ножа(овете), когато пресичате чакълени повърхности.
9. Не работете с машината, ако не са поставени целият
уловител на трева, предпазният компонент на изхода
(дефлектор) или други предпазни устройства.
10. Намалявайте скоростта, преди да завиете.
11. Никога не оставяйте работещото устройство без
надзор. Винаги изключвайте PTO (вала за отвеждане
на мощност), задействайте паркинг спирачката,
спирайте двигателя и сваляйте блока на стартера,
преди да започнете демонтаж.
12. Изключвайте ножа(овете) (PTO), когато не косите.
Изключвайте двигателя и изчаквайте всички части
да спрат напълно движението си, преди да почистите
машината, да свалите уловителя на трева или да
освободите предпазния компонент на изхода.
13. Работете само на дневна светлина или на добра
изкуствена светлина.
14. Не работете с устройството, докато сте под влияние
на алкохол или лекарства.
15. Наблюдавайте трафика, когато работите в близост
или когато пресичате пътища.
16. Бъдете още по-внимателни, когато товарите или
разтоварвате устройството в/от ремарке или камион.
17. Винаги носете предпазни средства за очите, когато
работите с това устройство.
18. Данните показват, че при операторите на възраст
60 години и повече рискът от получаване на
наранявания, свързани с работата с механизирани
инструменти, е голям. Тези оператори трябва да
преценят способността си да работят с оборудването
достатъчно безопасно, за да предпазят от нараняване
себе си и другите.
19. Спазвайте препоръките на производителя за
тежестите или противотежестите на колелата.
20. Имайте предвид, че операторът носи отговорност за
инциденти, възникнали с други хора или имущество.
21. Всички водачи трябва да потърсят и получат
професионални и практически указания.
22. Винаги носете подходящи обувки и панталони. Никога
не работете с боси крака или по сандали.
23. Преди да използвате устройството, винаги
проверявайте визуално дали ножовете и
закрепванията им са на място, в изправност и
безопасни. Заменяйте износените или повредени
части.
24. Разединявайте приставките преди: доливане на
гориво, демонтиране на приставка, извършване на
регулировки (освен ако регулировката може да бъде
извършена от мястото на оператора).
25. Когато оставяте машината паркирана, на съхранение
или без надзор, спускайте режещите компоненти,
освен ако не използвате позитивно механично
блокиране.
26. Преди да напуснете мястото на оператора по каквато
и да е причина, включете паркинг спирачката,
изключете вала за отвеждане на мощност, спрете
двигателя и свалете блока на стартера.
27. За да намалите опасността от пожар, поддържайте
устройството свободно от трева, листа и излишно
масло. Не спирайте и не паркирайте върху сухи листа,
трева или горими материали.
ТРАНСПОРТИРАНЕ И СЪХРАНЕНИЕ
1. При транспортиране на устройството върху отворено
ремарке, уверете се, че то е обърнато напред, по
посока на движението. Ако устройството е обърнато
назад, повдиганите от вятъра материали могат да го
повредят.
2. Винаги използвайте практиките за безопасно
доливане на гориво и за боравене с гориво, когато
доливате гориво в устройството след транспортиране
или съхранение.
3. Никога не съхранявайте устройството (с гориво)
в затворено помещение с лоша вентилация.
Изпаренията на горивото може да достигнат до
източник на запалване (като фурна, нагревател
за вода и т.н.) и да предизвикат експлозия. Освен
това изпаренията на горивото са токсични за хора и
животни.
10
4. Винаги спазвайте указанията в ръководството за
двигателя относно подготовката за съхранение, преди
да съхранявате устройството както за кратки, така и
за дълги периоди от време.
5. Винаги спазвайте указанията в ръководството
за двигателя относно правилните процедури за
стартиране, когато отново връщате устройството в
експлоатация.
6. Никога не съхранявайте машината или съд с гориво в
помещение, в което има открит пламък или пилотна
светлина, например на водонагревател. Оставете
устройството да се охлади, преди да го оставите на
съхранение.
 Loading...