

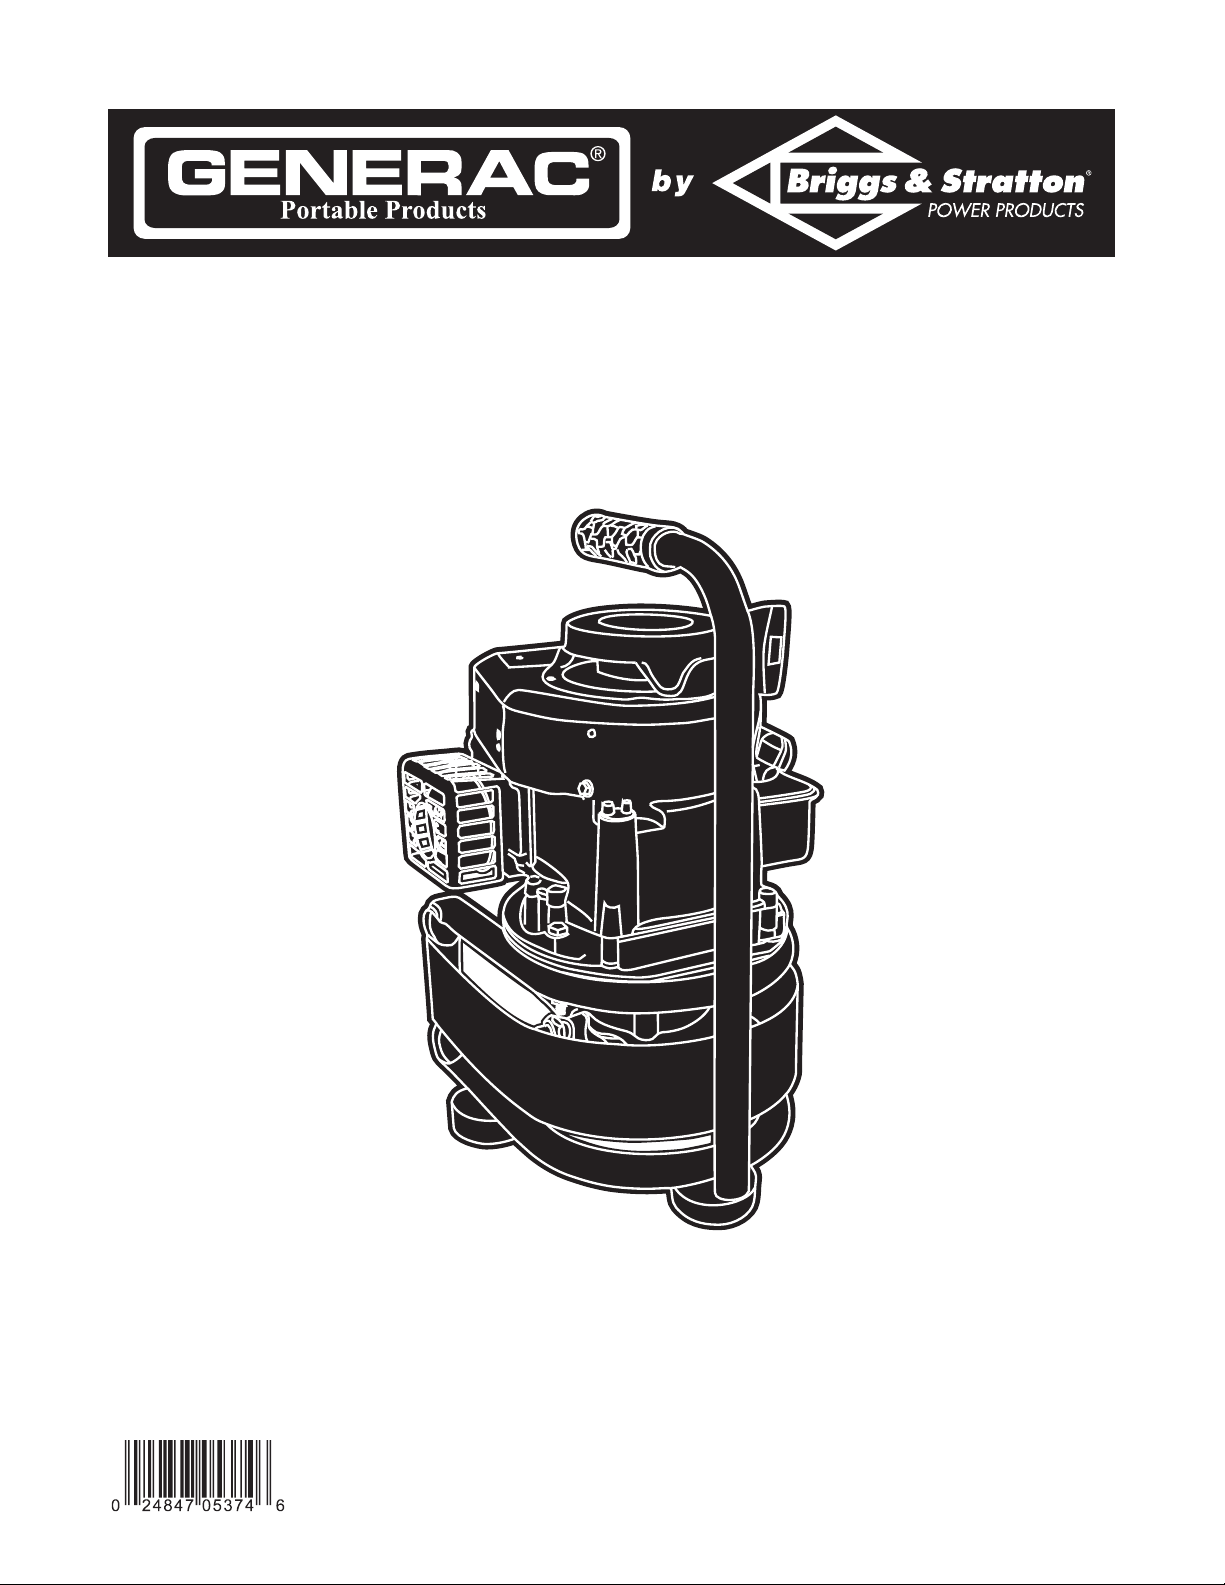
Page 1
Owner’s Manual / Manual del Propietario / Manuel de l'Utilisateur
Questions? Help is just a moment away!
Preguntas? La ayuda es justa un momento lejos!
Vous avez des questions? Vous n'avez pas besoin d'aller loin pour trouver de l'aide!
Call: Pressure Washer Helpline / Llame: Línea Directa del Lavador a Presión /
Appelez: Ligne d'Assistance pour les Pulvérisateur - 1-800-270-1408 M-F 8-5 CT
Model No. 1694-1,2 (1900 PSI Pressure Washer) Manual No. 192464GS Revision 4 (12/18/2003)
1900PSI
BRIGGS & STRATTON POWER PRODUCTS GROUP, LLC
JEFFERSON,WISCONSIN, U.S.A.
Page 2
Generac Portable Products 1900 PSI Pressure Washer
2
TABLE OF CONTENTS
Safety Rules. . . . . . . . . . . . . . . . . . . . . . . . . . . . . . . . . . . . 2-4
Know Your Pressure Washer. . . . . . . . . . . . . . . . . . . . . . . . 5
Assembly. . . . . . . . . . . . . . . . . . . . . . . . . . . . . . . . . . . . . . 6-7
Operation . . . . . . . . . . . . . . . . . . . . . . . . . . . . . . . . . . . . 8-10
Product Specifications . . . . . . . . . . . . . . . . . . . . . . . . . . . . 11
Maintenance . . . . . . . . . . . . . . . . . . . . . . . . . . . . . . . . . 11-13
Storage . . . . . . . . . . . . . . . . . . . . . . . . . . . . . . . . . . . . . . . . 14
Troubleshooting. . . . . . . . . . . . . . . . . . . . . . . . . . . . . . . . . 15
Replacement Parts . . . . . . . . . . . . . . . . . . . . . . . . . . . . 16-17
Notes . . . . . . . . . . . . . . . . . . . . . . . . . . . . . . . . . . . . . . . . . 18
Warranty . . . . . . . . . . . . . . . . . . . . . . . . . . . . . . . . . . . . . . 19
EQUIPMENT
DESCRIPTION
Read this manual carefully and become familiar
with your pressure washer. Know its
applications, its limitations and any hazards
involved.
Every effort has been made to ensure that information in
this manual is accurate and current. However, we reserve
the right to change, alter or otherwise improve the product
and this document at any time without prior notice.
SAFETY RULES
This is the safety alert symbol. It is used to
alert you to potential personal injury hazards.
Obey all safety messages that follow this
symbol to avoid possible injury or death.
The safety alert symbol ( ) is used with a signal word
(DANGER, CAUTION,WARNING), a pictorial and/or a
safety message to alert you to hazards. DANGER indicates
a hazard which, if not avoided, will result in death or serious
injury. WARNING indicates a hazard which, if not avoided,
could result in death or serious injury. CAUTION
indicates a hazard which, if not avoided, might result in
minor or moderate injury. CAUTION, when used
without the alert symbol, indicates a situation that could
result in equipment damage. Follow safety messages to
avoid or reduce the risk of injury or death.
Hazard Symbols and Meanings
In the State of California a spark arrester is required by law
(Section 4442 of the California Public Resources Code).
Other states may have similar laws. Federal laws apply on
federal lands. If you equip the muffler with a spark arrester,
it must be maintained in effective working order.
The engine exhaust from this product contains
chemicals known to the State of California to cause
cancer, birth defects,or other reproductive harm.
WARNING
Fire
Explosion
Toxic Fumes
Hot Surface
Moving Parts
Electrical Shock
Slippery Surface
Fall
Kickback
Flying Objects
Fluid Injection
Page 3
Generac Portable Products 1900 PSI Pressure Washer
3
• Keep water spray away from electric wiring or fatal electric
shock may result.
Spray contact with electrical wiring can result in
electrocution.
WARNING
• Operate pressure washer ONLY outdoors.
• Use a respirator or mask whenever there is a chance that
vapors may be inhaled.
• Read all instructions with mask so you are certain the mask will
provide the necessary protection against inhaling harmful vapors.
Running engine gives off carbon monoxide, an
odorless, colorless, poison gas.
Some chemicals or detergents may be harmful if
inhaled or ingested, causing severe nausea,
fainting or poisoning.
Breathing carbon monoxide will cause nausea,
fainting or death.
DANGER
• Keep spray nozzle between 8 to 24 inches away from cleaning
surface.
• Operate this unit on a stable surface.
• The cleaning area should have adequate slopes and drainage to
reduce the possibility of a fall due to slippery surfaces.
• Be extremely careful if you must use the pressure washer from
a ladder, scaffolding or any other relatively unstable location.
• Firmly grasp spray gun with both hands when using high
pressure spray to avoid injury if gun kicks back.
Use of pressure washer can create puddles and
slippery surfaces.
High pressure spray could cause you to fall if
you are too close to the cleaning surface.
WARNING
WHEN ADDING FUEL
• Turn pressure washer OFF and let it cool at least 2 minutes
before removing gas cap.
• Fill fuel tank outdoors.
• DO NOT overfill tank. Allow space for fuel expansion.
• Keep fuel away from sparks, open flames, pilot lights, heat, and
other ignition sources.
• DO NOT light a cigarette or smoke.
WHEN OPERATING EQUIPMENT
• DO NOT tip engine or equipment at angle which causes fuel
to spill.
• DO NOT spray flammable liquids.
WHEN TRANSPORTING OR REPAIRING EQUIPMENT
• Transport/repair with fuel tank EMPTY or with fuel shutoff
valve OFF.
WHEN STORING FUEL OR EQUIPMENT WITH FUEL
IN TANK
• Store away from furnaces, stoves, water heaters, clothes
dryers or other appliances that have pilot light or other
ignition source because they can ignite fuel vapors.
Fuel and its vapors are extremely flammable and
explosive.
Fire or explosion can cause severe burns or
death.
WARNING
• NEVER aim spray gun at people, animals or plants.
• DO NOT allow CHILDREN to operate pressure washer.
• NEVER repair high pressure hose. Replace it.
• Keep high pressure hose connected to pump and spray gun
while system is pressurized.
The high pressure stream of water that this
equipment produces can pierce skin and its
underlying tissues, leading to serious injury and
possible amputation.
WARNING
Page 4
Generac Portable Products 1900 PSI Pressure Washer
4
• DO NOT tamper with governed speed.
• DO NOT operate pressure washer above rated pressure.
Excessively high or low operating speeds increase risk
of injury and damage to pressure washer.
CAUTION
WHEN ADJUSTING OR MAKING REPAIRS TO YOUR
PRESSURE WASHER
• Disconnect spark plug wire from spark plug and place wire
where it cannot contact spark plug.
Unintentional sparking can result in fire or
electric shock.
WARNING
• DO NOT point spray gun at glass when in jet spray mode.
• NEVER aim spray gun at plants.
High pressure spray may damage fragile items including
glass.
CAUTION
• DO NOT wear loose clothing, jewelry or anything that may
be caught in the starter or other rotating parts.
• Tie up long hair and remove jewelry.
Starter and other rotating parts can entangle
hands, hair, clothing,or accessories.
WARNING
• Always wear eye protection when using this equipment or in
vicinity of where equipment is in use.
High pressure spray can cause paint chips or
other particles to become airborne.
WARNING
• DO NOT secure spray gun in open position.
• DO NOT leave spray gun unattended while machine is
running.
• NEVER use a spray gun which does not have a trigger lock or
trigger guard in place and in working order.
• Always be certain spray gun,nozzles and accessories are
correctly attached.
A pressure washer produces a high pressure spray
which increases risk of injury and damage to unit.
CAUTION
• If you have questions about intended use, ask dealer or
contact Briggs & Stratton Power Products.
• NEVER operate units with broken or missing parts, or
without protective housing or covers.
• DO NOT by–pass any safety device on this machine.
• Before starting pressure washer in cold weather, check all
parts of the equipment to be sure ice has not formed there.
• NEVER move machine by pulling on high pressure hose. Use
handle provided on unit.
• Check fuel system for leaks or signs of deterioration, such as
chafed or spongy hose, loose or missing clamps,or damaged
tank or cap. Correct all defects before operating pressure
washer.
• This equipment is designed to be used with Briggs & Stratton
Power Products authorized parts ONLY. If equipment is used
with parts that DO NOT comply with minimum specifications,
user assumes all risks and liabilities.
Improper treatment of pressure washer can damage it
and shorten its life.
CAUTION
• DO NOT touch hot surfaces.
• Stay clear of exhaust gases.
• Allow equipment to cool before touching.
Running engines produce heat and hot exhaust
gases.Temperature of muffler and nearby areas
can reach or exceed 150°F (65°C).
Fire or severe burns can occur.
WARNING
Page 5
Generac Portable Products 1900 PSI Pressure Washer
5
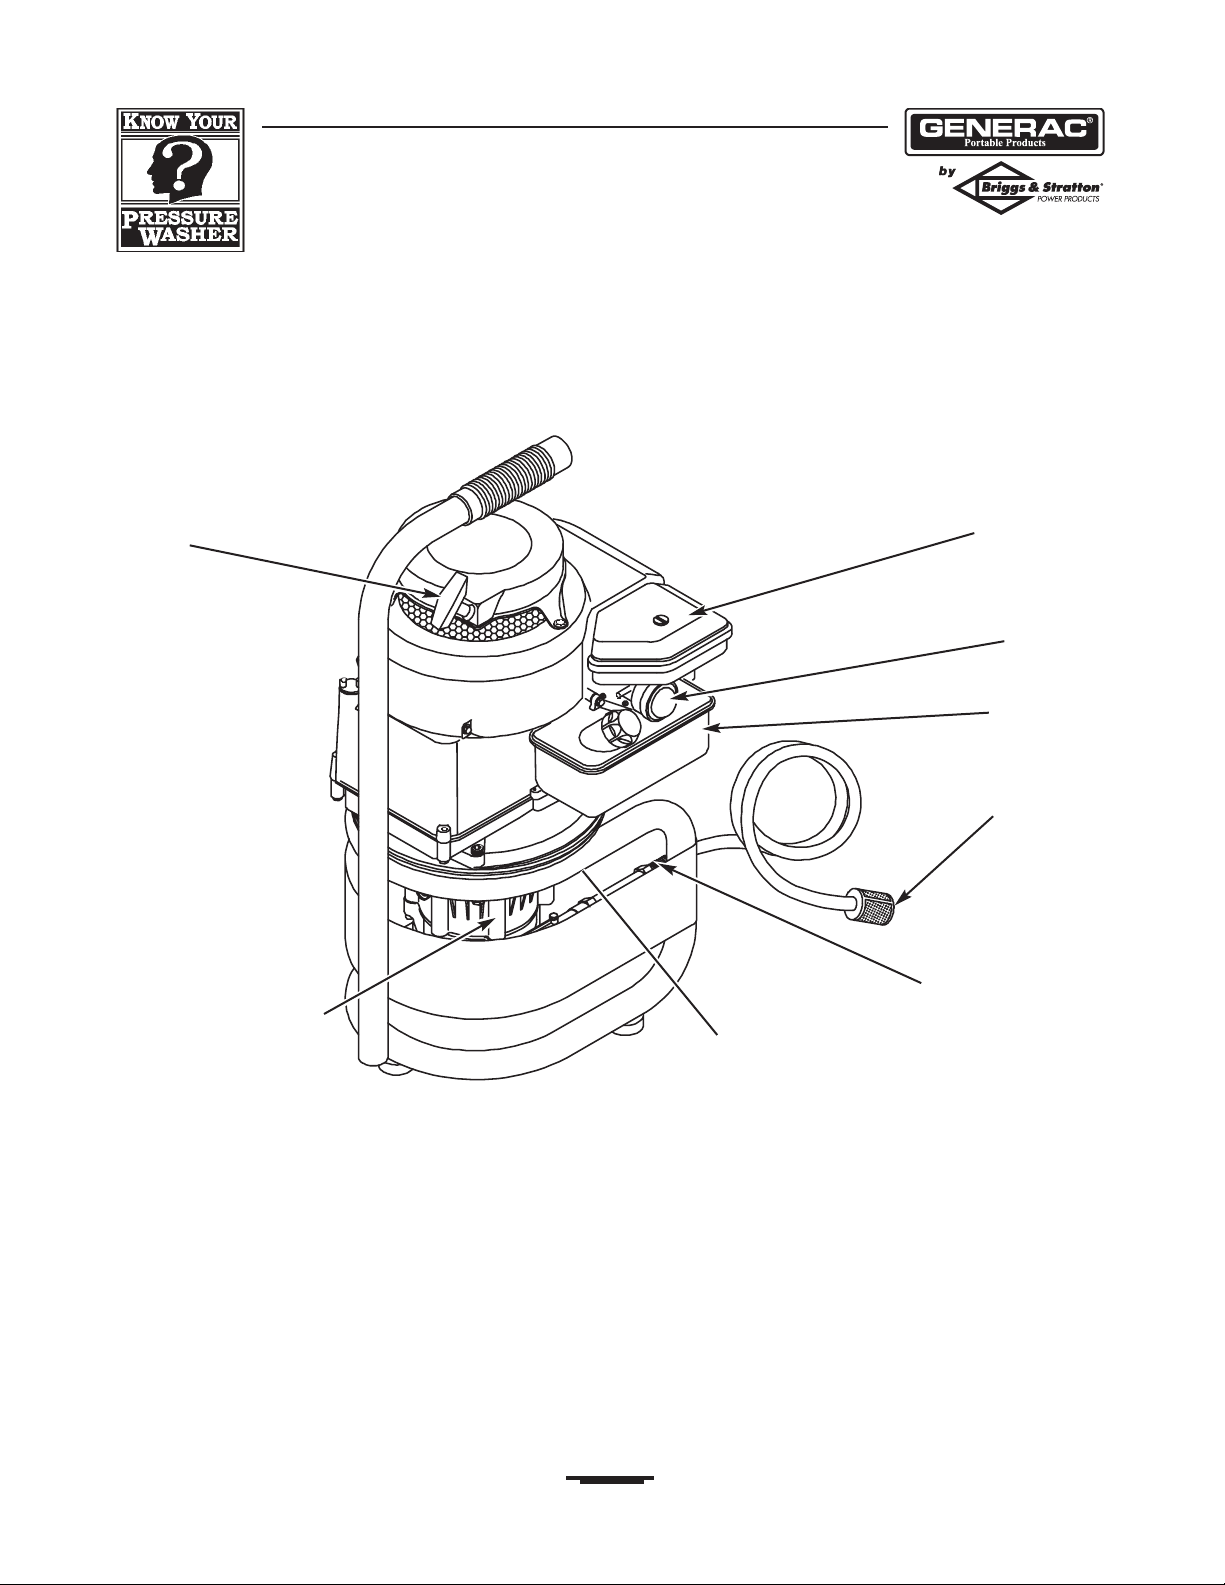
KNOW YOUR PRESSURE WASHER
Read this owner’s manual and safety rules before operating your pressure washer.
Compare the illustrations with your pressure washer to familiarize yourself with the locations of various controls and
adjustments. Save this manual for future reference.
Air Cleaner — Dry type filter element limits the amount
of dirt and dust that gets in the engine.
Automatic Cool Down System — Cycles water
through pump when water reaches 125°-155°F. Warm
water will discharge from pump onto ground.This
system prevents internal pump damage.
Chemical Injection Siphon/Filter — Use to siphon
detergent or other pressure washer chemicals into the low
pressure stream.
Fuel Tank — Fill tank with regular unleaded gasoline.
High Pressure Outlet — Connection for high pressure
hose.
Primer Bulb — Prepares a cold engine for starting.
Pump — Develops high water pressure.
Recoil Starter — Used for starting the engine manually.
Water Inlet — Connection for garden hose.
Air Cleaner
Primer Bulb
Fuel Tank
Water Inlet
Pump equipped with
Automatic Cool Down
System
Recoil Starter
High Pressure Outlet
Chemical Injection
Siphon/Filter
Page 6
Generac Portable Products 1900 PSI Pressure Washer
6
ASSEMBLY
IMPORTANT: Read entire owner’s manual before you
attempt to assemble or operate your new pressure washer.
Remove Pressure Washer From
Carton
• Remove the parts bag, accessories, and inserts included
with pressure washer.
• Slice two corners at the end of carton from top to
bottom so the panel can be folded down flat.
• Remove pressure washer from carton.
Carton Contents
Items in the carton include:
• Main Unit
• Goggles
• High Pressure Hose
• Spray Gun
• Nozzle Extension
• Oil Bottle
• Parts Bag (which includes the following):
• Maintenance Kit
• Owner’s Manual
• Engine Manual
• Owner’s Registration Card
If any of the above parts are missing or damaged, call the
pressure washer helpline at 1–800–270–1408.
PREPARING PRESSURE
WASHER FOR USE
To prepare your pressure washer for operation,you
will need to perform these tasks:
1. Fill out and send in registration card.
2. Add oil to engine crankcase.
3. Add fuel to fuel tank.
4. Connect high pressure hose to spray gun and pump.
5. Connect water supply to pump.
6. Attach nozzle extension to spray gun.
Add Engine Oil and Fuel
• Place pressure washer on a level surface.
• Refer to engine owner’s manual and follow oil and fuel
recommendations and instructions.
NOTE: Check oil often during engine break–in. Refer to
engine owner’s manual for recommendations.
CAUTION
• Refer to engine manual for oil and fuel fill information.
• Damage to equipment resulting from failure to follow this
instruction will void warranty.
Any attempt to crank or start the engine before it has
been properly filled with the recommended oil will result
in equipment failure.
Page 7
Generac Portable Products 1900 PSI Pressure Washer
7
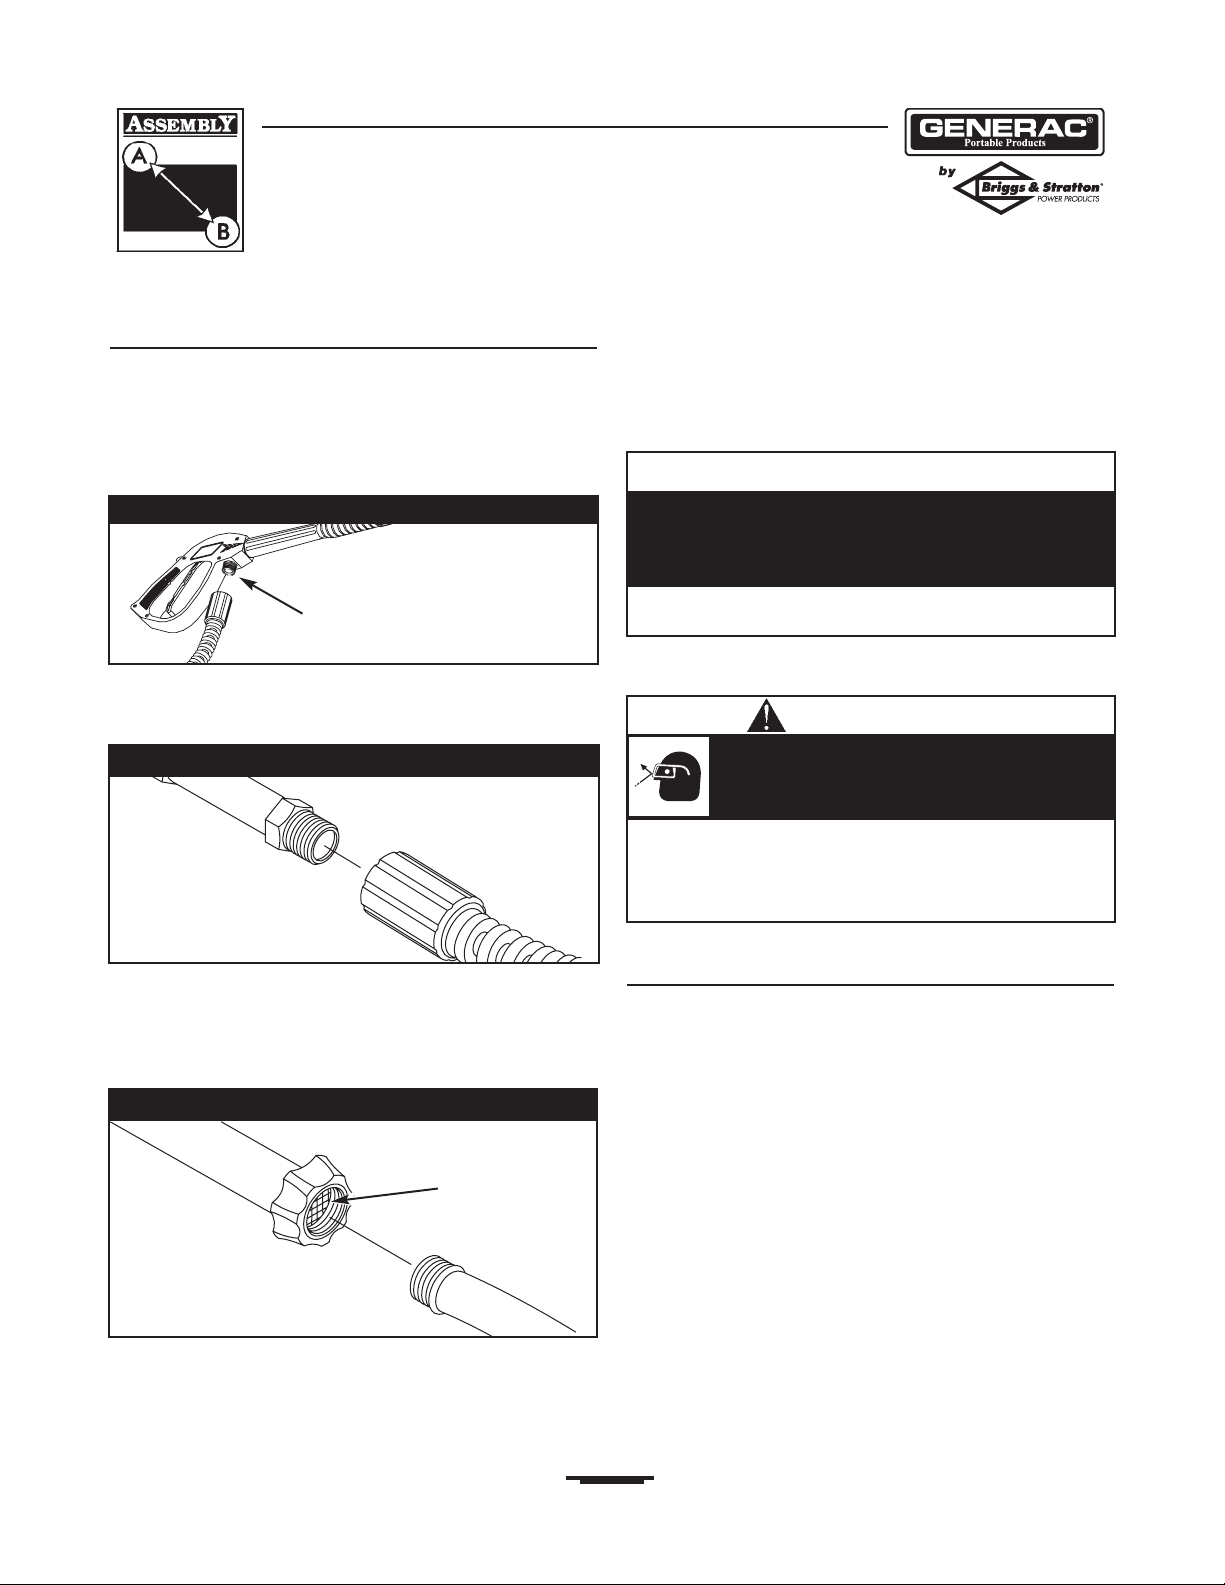
Connect Hose and Water Supply to
Pump
IMPORTANT: To avoid pump damage, you must assemble
the nozzle extension to the spray gun and attach all hoses
before you start the engine.
1. Uncoil high pressure hose and attach one end of hose to
base of spray gun (Figure 1).Tighten by hand.
2. Attach other end of high pressure hose to high pressure
outlet on pump (Figure 2).Tighten by hand.
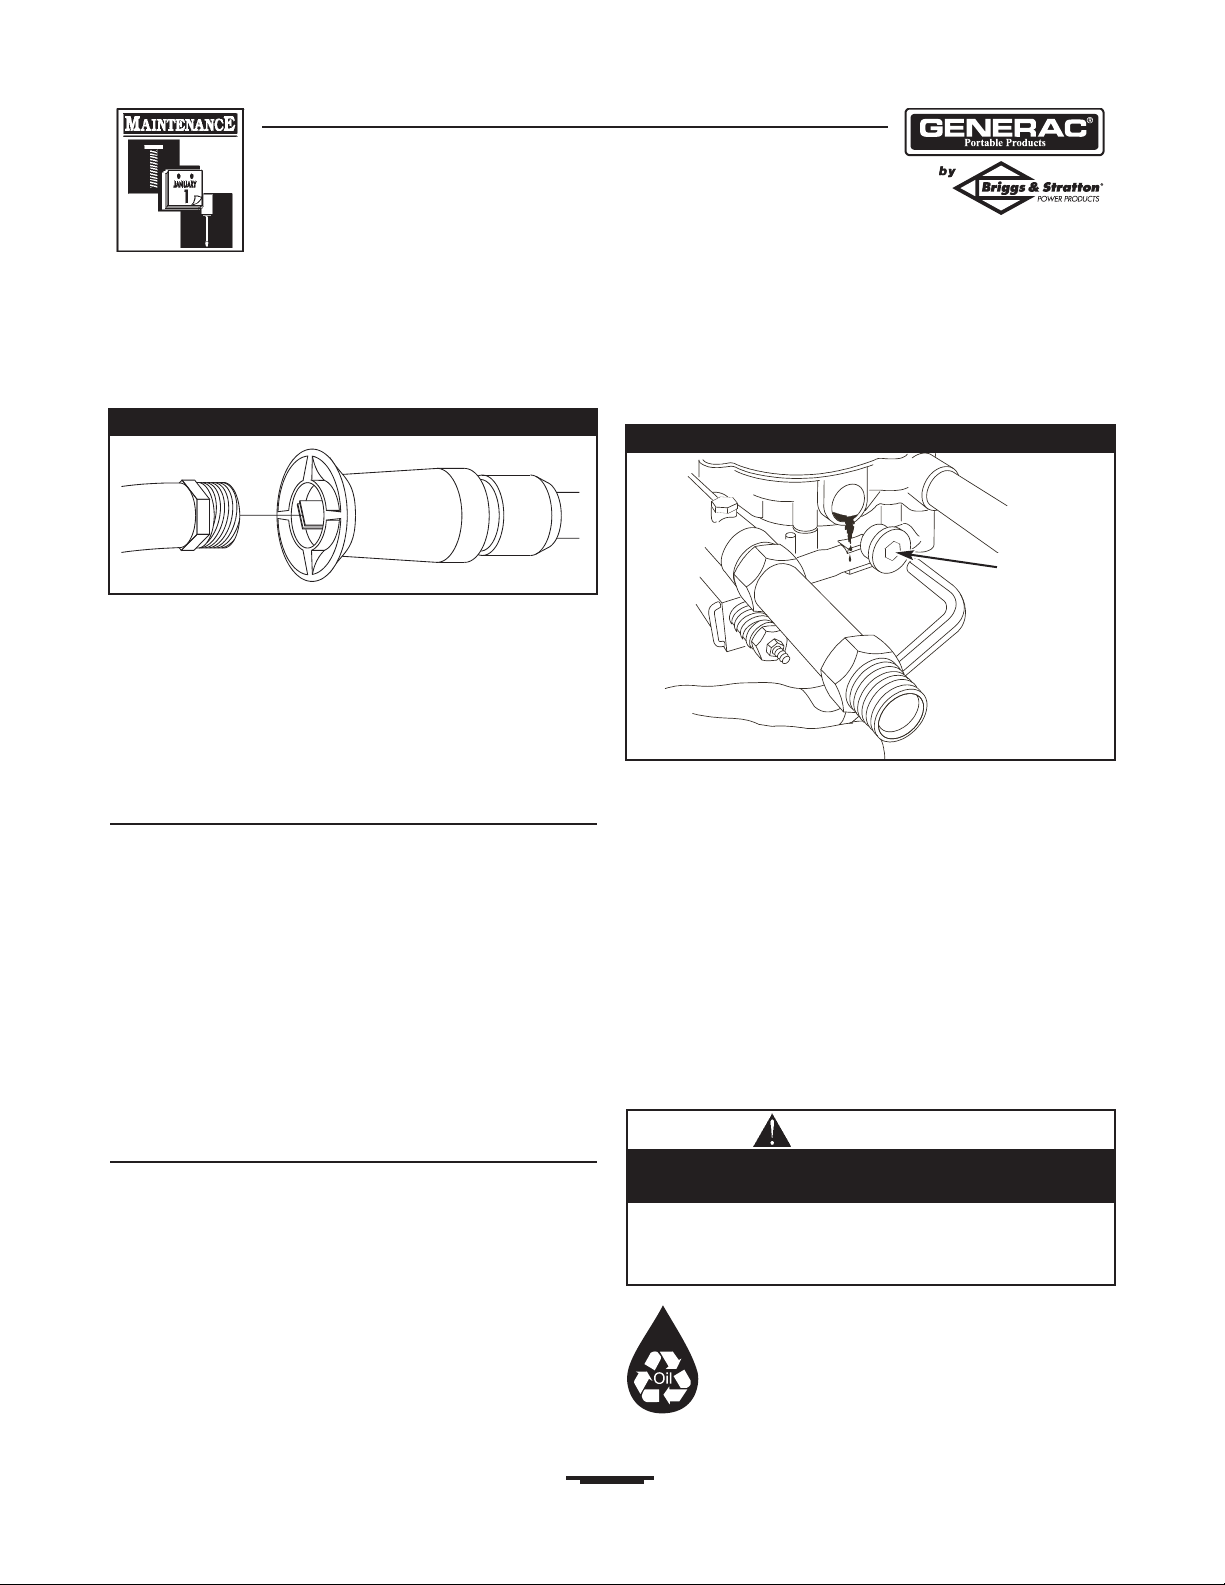
3. Before connecting garden hose to water inlet, inspect
inlet screen (Figure 3). Clean screen if it contains debris
or replace if damaged. DO NOT RUN PRESSURE
WASHER IF SCREEN IS DAMAGED.
4. Run water through garden hose for 30 seconds to clean
out any debris.
IMPORTANT: DO NOT siphon standing water for water
supply. Use ONLY cold water (less than 100°F).
5. Connect garden hose (not to exceed 50 feet in length)
to water inlet.Tighten by hand (Figure 3).
6. Turn ON water and squeeze trigger on gun to purge
pump system of air and impurities.
Checklist Before Starting Engine
Review the unit’s assembly to ensure you have performed
all of the following.
1. Check that oil has been added to proper level in
engine crankcase.
2. Add proper gasoline to fuel tank.
3. Check for properly tightened hose connections (high
pressure and water supply) and there are no kinks,
cuts, or damage to e high pressure hose.
4. Provide a proper water supply at an adequate flow.
5. Be sure to read "Safety Rules" and "How To Use
Pressure Washer" before using pressure washer.
Connect high
pressure hose here
Figure 1 — Connect High Pressure Hose to Spray Gun
Figure 2 — Connect High Pressure Hose to Pump
Inspect inlet
screen, DO NOT
use if damaged;
clean if dirty.
Figure 3 — Connect the Garden Hose to Water Inlet
• Always wear eye protection when using this equipment or in
vicinity of where equipment is in use.
• Before starting the pressure washer, be sure you are wearing
adequate eye protection.
High pressure spray can cause paint chips or
other particles to become airborne.
WARNING
CAUTION
• Damage to equipment resulting from failure to follow this
instruction will void warranty.
There MUST be at least ten feet of unrestricted garden
hose between the pressure washer inlet and any flow
shut off device, such as a ‘Y’ shut-off connector or other
convenience-type water shut-off valve.
Page 8
Generac Portable Products 1900 PSI Pressure Washer
8
HOW TO USE PRESSURE
WASHER
If you have any problems operating your pressure washer,
please call the pressure washer helpline at
1-800-270-1408.
How To Start Pressure Washer
To start your pressure washer for the first time, follow
these instructions step-by-step.This starting information
also applies if you have let the pressure washer sit idle for
at least a day.
1. Place pressure washer near an outside water source
capable of supplying water at a flow rate greater than
3.0 gallons per minute and no less than 20 PSI at
pressure washer end of garden hose.
2. Check that high pressure hose is tightly connected to
spray gun and to pump. See “Preparing Pressure
Washer for Use” for illustrations.
3. Make sure unit is in level position.
4. Connect garden hose to water inlet on pressure
washer pump. Turn ON the water.
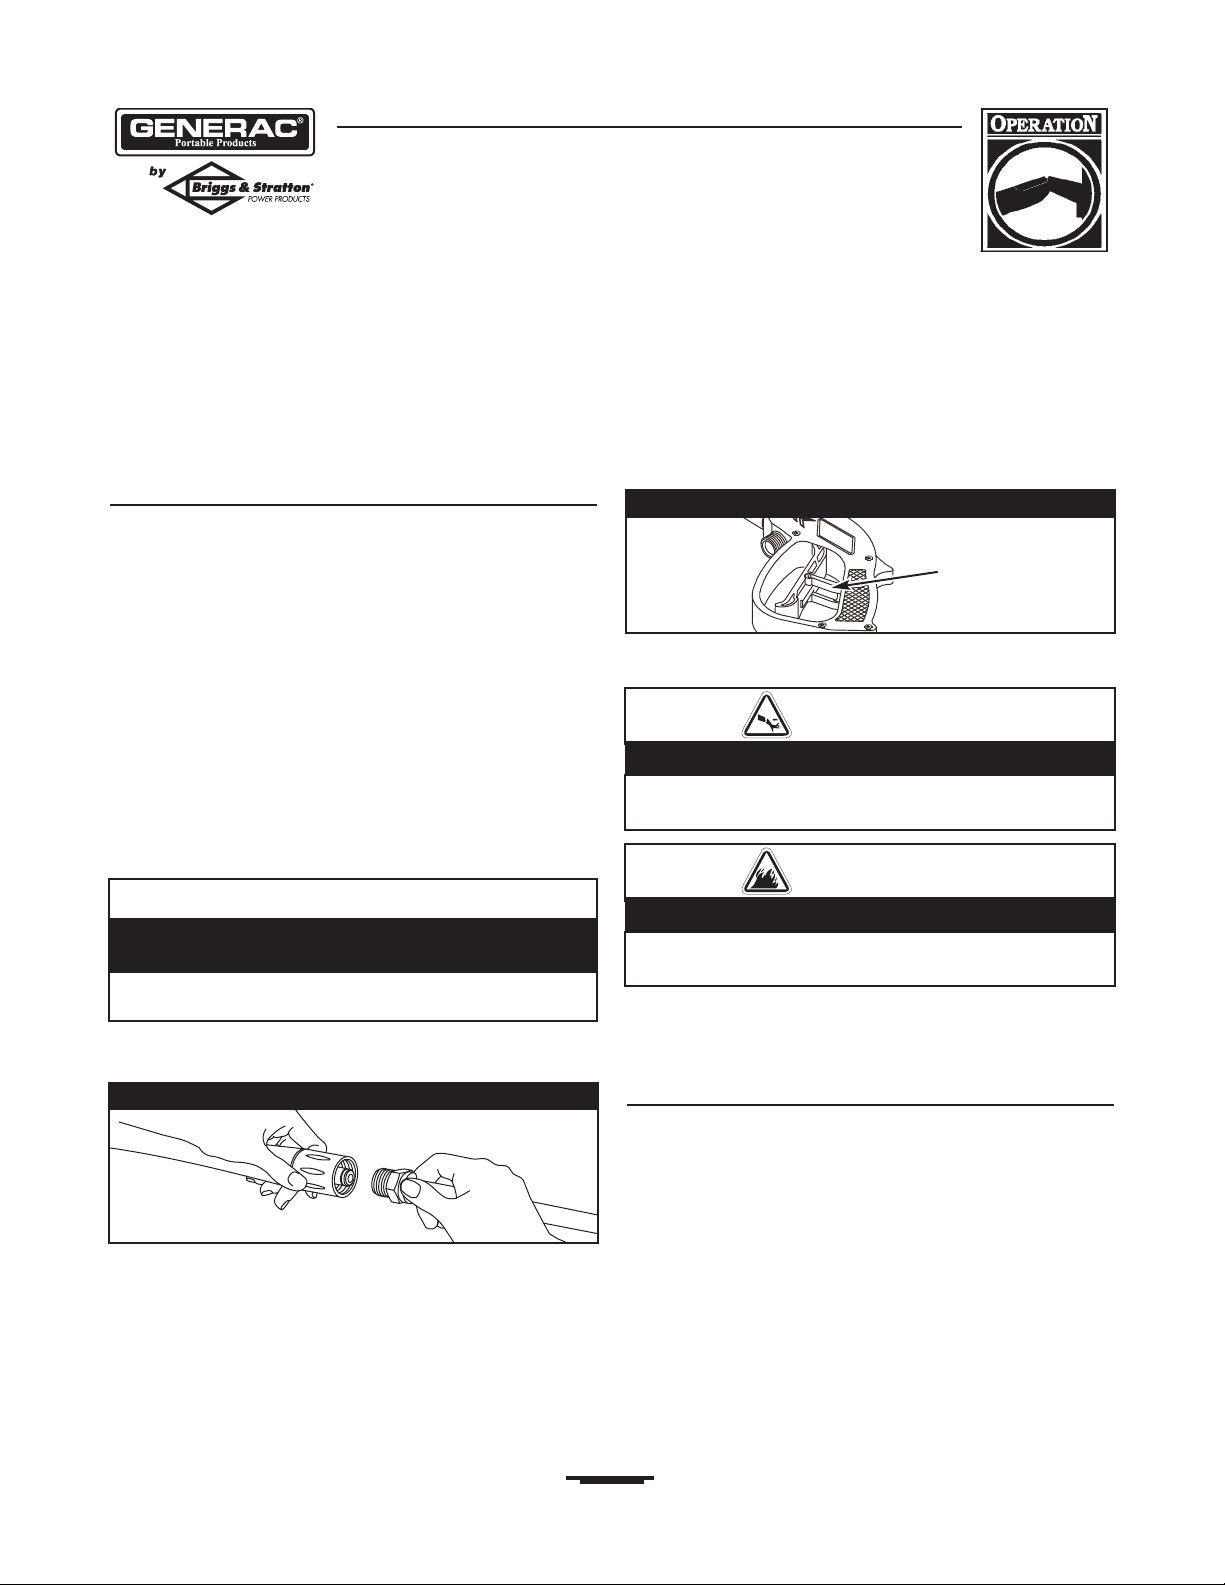
5. Attach adjustable nozzle extension to spray gun
(Figure 4).Tighten by hand.
6. Position nozzle in low pressure mode (see “How To
Use Adjustable Nozzle”) and squeeze trigger on spray
gun to relieve air pressure caused by turning ON
water.Water will flow out of spray gun in thin stream.
Continue to hold trigger until steady stream of water
occurs and no air remains in system.This will make it
easier to pull start the engine. Release trigger.
7. Engage safety latch to spray gun trigger (Figure 5).
8. Start engine according to instructions given in engine
owner’s manual.
NOTE:Always keep the throttle lever in the “Fast”
position when operating the pressure washer.
How To Stop Pressure Washer
• Turn engine off according to instructions given in the
engine owner’s manual.
• Squeeze trigger on the spray gun to relieve
pressure in the hose.
NOTE:A small amount of water will squirt out when
pressure is released.
Figure 4 — Connect Nozzle Extension to Spray Gun
Safety Latch
Figure 5 — Spray Gun with Safety Latch Engaged
CAUTION
• Always use handle to lift equipment.
• NEVER pull on hoses to move equipment.
Avoid fire from equipment tip over.
CAUTION
• Squeeze trigger on spray gun each time recoil starter is
pulled and engine fails to start.
Avoid injury from kickback.
CAUTION
• Damage to equipment resulting from failure to follow this
instruction will void warranty.
DO NOT run the pump without the water supply
connected and turned on.
Page 9
Generac Portable Products 1900 PSI Pressure Washer
9
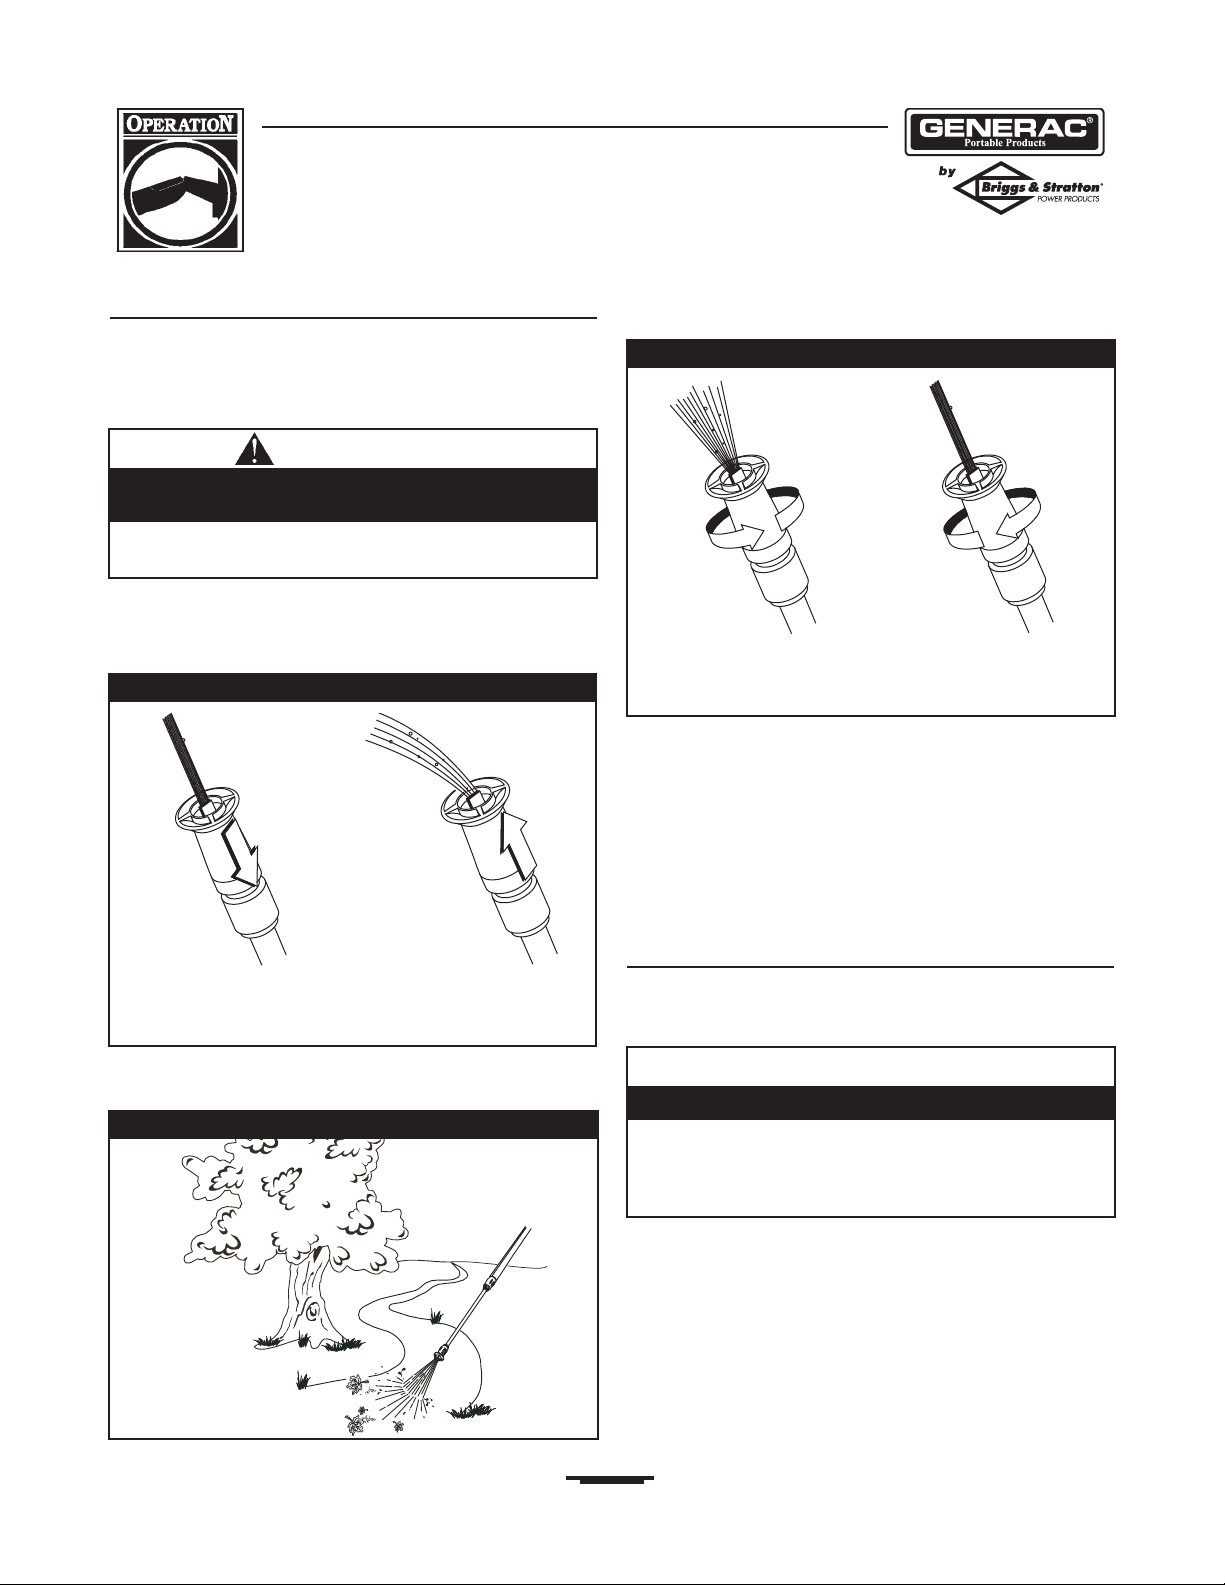
How To Use Adjustable Nozzle
You now should know how to START your pressure
washer and how to STOP it.The information in this
section will tell you how to adjust the spray pattern and to
apply detergent or other cleaning chemicals.
1. Slide nozzle forward to adjust spray to low pressure
mode (Figure 6). Slide nozzle backward to achieve high
pressure.
2. Point nozzle towards a firm surface and press trigger
to test spray pattern (Figure 7).
3. Twisting nozzle adjusts spray pattern from a narrow
pattern to a fan pattern (Figure 8).
4. For most effective cleaning, keep spray nozzle between
8 to 24 inches away from cleaning surface.
5. If spray nozzle is held too close to surface, especially
using high pressure mode, damage to surface may
occur.
6. DO NOT get closer than 6 inches when cleaning tires.
Applying Detergent With Adjustable
Nozzle
IMPORTANT: Use soaps designed specifically for
pressure washers. Household detergents could damage
the pump.
To apply detergent, follow these steps:
1. Review adjustable nozzle use.
2. Prepare detergent solution as required by job.
3. Place filter end of chemical injection hose into detergent
container.
Slide nozzle backward
for High Pressure
Mode
Slide nozzle forward for low
pressure mode and
detergent application
Figure 6 — Adjusting Nozzle for Pressure
Figure 7 — Testing the Spray Pattern
Figure 8 — Adjusting the Nozzle for Spray Pattern
Rotate nozzle
counterclockwise for fan
spray pattern
Rotate nozzle clockwise
for narrow spray pattern
CAUTION
• Starting the engine without all the hoses connected and
without the water turned ON will damage the pump.
• Damage to equipment resulting from failure to follow this
instruction will void warranty.
You must attach all hoses before you start the engine.
• NEVER adjust spray pattern when spraying.
• NEVER put hands in front of nozzle to adjust spray pattern.
A pressure washer produces a high pressure spray
which increases risk of injury and damage to unit.
CAUTION
Page 10
Generac Portable Products 1900 PSI Pressure Washer
10
4. Slide adjustable nozzle forward to low pressure mode.
Detergent cannot be applied with nozzle in high pressure
position.
5. Make sure garden hose is connected to water inlet.
Check that high pressure hose is connected to spray gun
and pump; start engine.
6. Apply detergent to a dry surface, starting at lower
portion of area to be washed and work upward, using
long, even, overlapping strokes.
7. Allow detergent to "soak in" for 3-5 minutes before
washing and rinsing. Reapply as needed to prevent
surface from drying. DO NOT allow detergent to dry on
(prevents streaking).
IMPORTANT: You must flush the chemical injection
system after each use by placing the filter into a bucket of
clean water, then run the pressure washer in low pressure
for 1-2 minutes.
Pressure Washer Rinsing
For Rinsing:
1. Slide nozzle backward to high pressure, press trigger and
wait for detergent to clear.
NOTE:You can also stop detergent from flowing by simply
removing chemical injection hose from bottle.
2. Keep spray gun a safe distance from surface.
3. Apply high pressure spray to a small area, then check
surface for damage. If no damage is found, it is okay to
continue cleaning.
4. Start at top of area to be rinsed, working down with
same overlapping strokes as used for washing and
applying detergent.
Automatic Cool Down System
(Thermal Relief)
If you run the engine on your pressure washer for
3-5 minutes without pressing the trigger on the spray gun,
circulating water in the pump can reach temperatures
above 125°F.The system engages to cool the pump by
discharging the warm water onto the ground.
• Keep spray nozzle between 8 to 24 inches away from cleaning
surface.
• Operate this unit on a stable surface.
• Be extremely careful if you must use the pressure washer from
a ladder, scaffolding or any other relatively unstable location.
• Firmly grasp spray gun with both hands when using high
pressure spray to avoid injury if gun kicks back.
High pressure spray could cause you to fall if
you are too close to the cleaning surface.
WARNING
CAUTION
• When inserting the filter into a detergent solution bottle,
route the tube so as to keep it from inadvertently contacting
the hot muffler.
Keep the chemical injection tube from coming in contact
with the hot muffler.
Page 11
Generac Portable Products 1900 PSI Pressure Washer
11
SPECIFICATIONS
Outlet Pressure . . . . . 1900 psi
Flow Rate . . . . . . . . . . 2.0 gallons per minute (gpm)
Detergent . . . . . . . . . . Use detergent approved for
pressure washers
Water Supply . . . . . . Not to Exceed 100°F
Temperature
Automatic Cool . . . . Will cycle when water
Down System reaches 125°-155°F
Shipping Weight . . . .46 lbs.
GENERAL MAINTENANCE
RECOMMENDATIONS
The pressure washer warranty does not cover items that
have been subjected to operator abuse or negligence.To
receive full value from the warranty, the operator must
maintain the pressure washer as instructed in this manual.
• Some adjustments will need to be made periodically to
properly maintain your pressure washer.
• All maintenance in this manual and the engine owner’s
manual should be made at least once each season.
• Once a year you should check the spray gun and
adjustable nozzle extension assembly for wear.Also clean
or replace the spark plug and clean or replace the engine
air filter. Please refer to engine owner’s manual for more
details.
Before Each Use
1. Check engine oil level.
2. Check water inlet screen for damage.
3. Check in-line filter for damage.
4. Check high pressure hose for leaks.
5. Check chemical injection hose and filter for damage.
6. Check spray gun and adjustable nozzle extension
assembly for leaks.
7. Rinse out garden hose to flush out debris.
PRESSURE WASHER
MAINTENANCE
Check and Clean Inlet Screen
Examine the screen on the water inlet. Clean it if the
screen is clogged or replace it if screen is damaged.
Check High Pressure Hose
The high pressure hose can develop leaks from wear,
kinking, or abuse. Inspect the hose each time before using
it. Check for cuts, leaks, abrasions or bulging of cover,
damage or movement of couplings. If any of these
conditions exist, replace the hose immediately.
Check Chemical Injection Hose
Examine the filter on the detergent tube and clean if
clogged.The tube should fit tightly on the barbed fitting.
Examine the tube for leaks or tears. Replace the filter or
tube if either is damaged.
Check Gun and Adjustable Nozzle
Extension
Examine the hose connection to the spray gun and make
sure it is secure.Test the trigger by pressing it and making
sure it “springs back” into place when you release it. Put
the safety latch in the ON position and test the trigger.You
should not be able to press the trigger.
Purge Pump of Air and
Contaminants
To remove air from the pump, follow these steps:
1. Set up pressure washer as described in “Preparing
Pressure Washer For Use”. Connect water supply and
turn water on.
• NEVER repair high pressure hose. Replace it.
• Replacement hose rating MUST exceed maximum pressure
rating of unit.
The high pressure stream of water that this
equipment produces can pierce skin and its
underlying tissues, leading to serious injury and
possible amputation.
WARNING
Page 12
Generac Portable Products 1900 PSI Pressure Washer
12
2. Pull spray gun trigger and hold.
3. When water stream is steady and constant, engage safety
latch.
To remove contaminants from the pump, follow
these steps:
1. Set up pressure washer as described in “Preparing
Pressure Washer For Use”. Connect water supply and
turn water on.
2. Remove nozzle extension from spray gun.
3. Start engine according to instructions in engine owner’s
manual.
4. Squeeze spray gun trigger and hold.
5. When water stream is steady and constant, engage safety
latch and reattach nozzle extension.
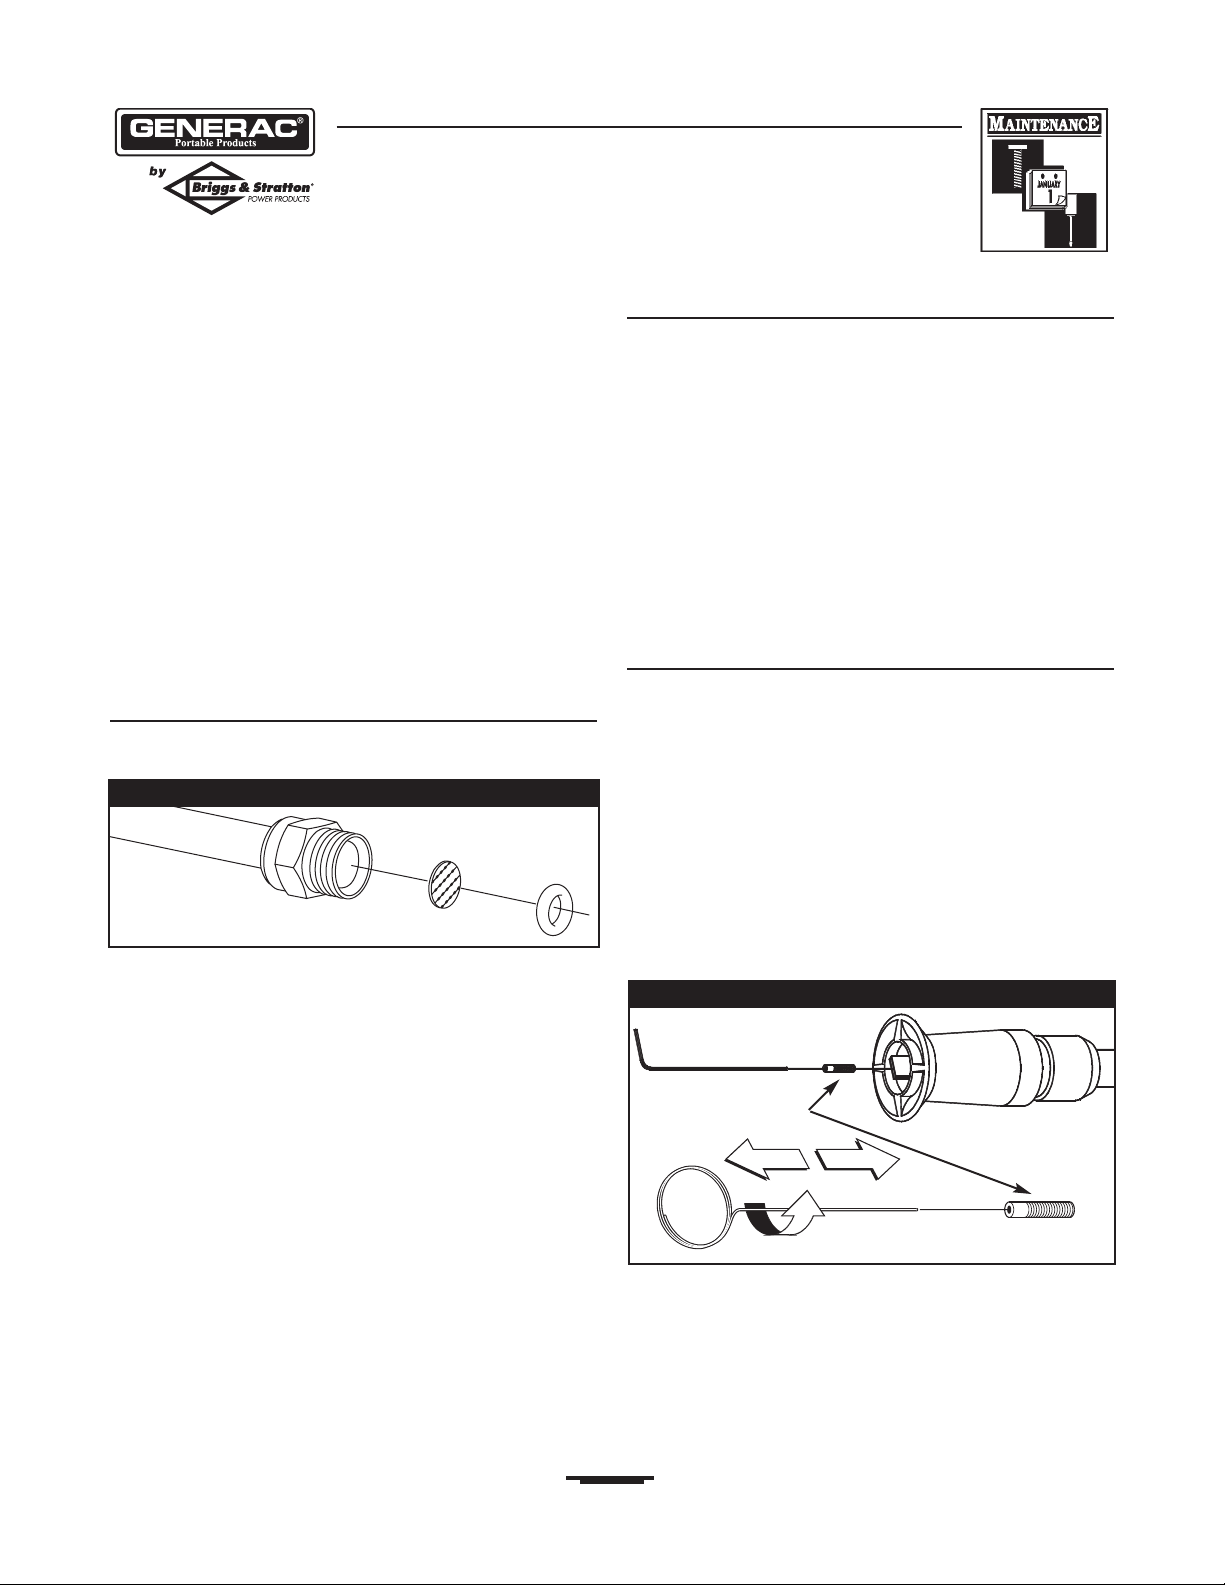
Check In-Line Filter
Refer to Figure 9 and service the in-line filter if it becomes
clogged, as follows:
1. Detach spray gun and nozzle extension from high
pressure hose. Detach nozzle extension from spray gun
and remove o-ring and screen from nozzle extension.
Flush screen, spray gun, and adjustable nozzle extension
with clean water to clear debris.
2. If screen is damaged, o-ring kit contains a replacement
in-line filter screen and o-ring. If undamaged, reuse
screen.
3. Place in-line filter screen into threaded end of nozzle
extension. Direction does not matter. Push screen in
with eraser end of pencil until it rests flat at bottom of
opening.Take care to not bend screen.
4. Place o-ring into threaded end of nozzle extension. Push
o-ring snugly against in-line filter screen.
5. Assemble nozzle extension to spray gun,as described
earlier in this manual.
Cleaning Chemical Injection Hose
If you used the chemical injection hose, you must flush it
with clean water before stopping the engine.
1. Place chemical injection hose in a bucket full of clean
water.
2. Slide adjustable nozzle forward to low pressure
position. Flush for 1-2 minutes.
3. Shut off engine.
IMPORTANT: Simply shutting OFF engine will not
release pressure in the system. When the engine has
shut down, squeeze the trigger on the spray gun to
relieve the pressure in the hose.
Nozzle Maintenance
A pulsing sensation felt while squeezing the spray gun
trigger may be caused by excessive pump pressure.The
principal cause of excessive pump pressure is a orifice
clogged or restricted with foreign materials, such as dirt,
etc.To correct the problem, immediately clean the orifice
using the tools included with your pressure washer and
follow these instructions:
1. Shut off engine and turn off water supply.
2. Detach nozzle extension from spray gun.Twist nozzle
clockwise to stream position. Using 2mm (5/64) allen
wrench, remove orifice from end of nozzle extension
(Figure 10).
3. Remove in-line filter from other end of nozzle extension.
4. Use wire (or small paper clip) to free any foreign
material clogging or restricting orifice (Figure 10).
Nozzle Extension
Filter Screen
O-ring
Figure 9 — Clean In-Line Filter
Orifice
Figure 10 — Removing and Cleaning Orifice
Page 13
Generac Portable Products 1900 PSI Pressure Washer
13
5. Using garden hose, remove additional debris by back
flushing water through nozzle extension (Figure 11). Back
flush between 30 to 60 seconds.Turn adjustable nozzle
extension to stream spray and move nozzle from low to
high while flushing.
6. Reinstall orifice and in-line filter into nozzle extension.
Do Not overtighten orifice with allen wrench.
7. Reconnect nozzle extension to spray gun.
8. Reconnect water supply, turn on water, and start engine.
9. Test pressure washer by operating with nozzle in high
and low positions.
O–Ring Maintenance
Through the normal operation of your pressure washer,
o–rings are used to keep the connections of the hoses and
spray gun tight and leak–free.These o-rings may become
worn or damaged.
An O–Ring Maintenance Kit is provided with your pressure
washer which includes replacement o-rings, rubber washer
and water inlet filter. Refer to the instruction sheet
provided in the kit to service your unit’s o-rings. Note that
you will not use all of the parts in the kit.
To remove a worn or damaged o–ring; use a small flathead
screwdriver to get underneath the o-ring and pry it off.
Pump Maintenance
Changing Pump Oil
Change oil every 50 hours or once yearly, whichever
occurs first.
NOTE:You must purchase a premeasured bottle of pump
oil, item number 190586GS, by contacting the nearest
authorized service center.
Change pump oil as follows:
1. Drain engine oil and fuel from pressure washer.
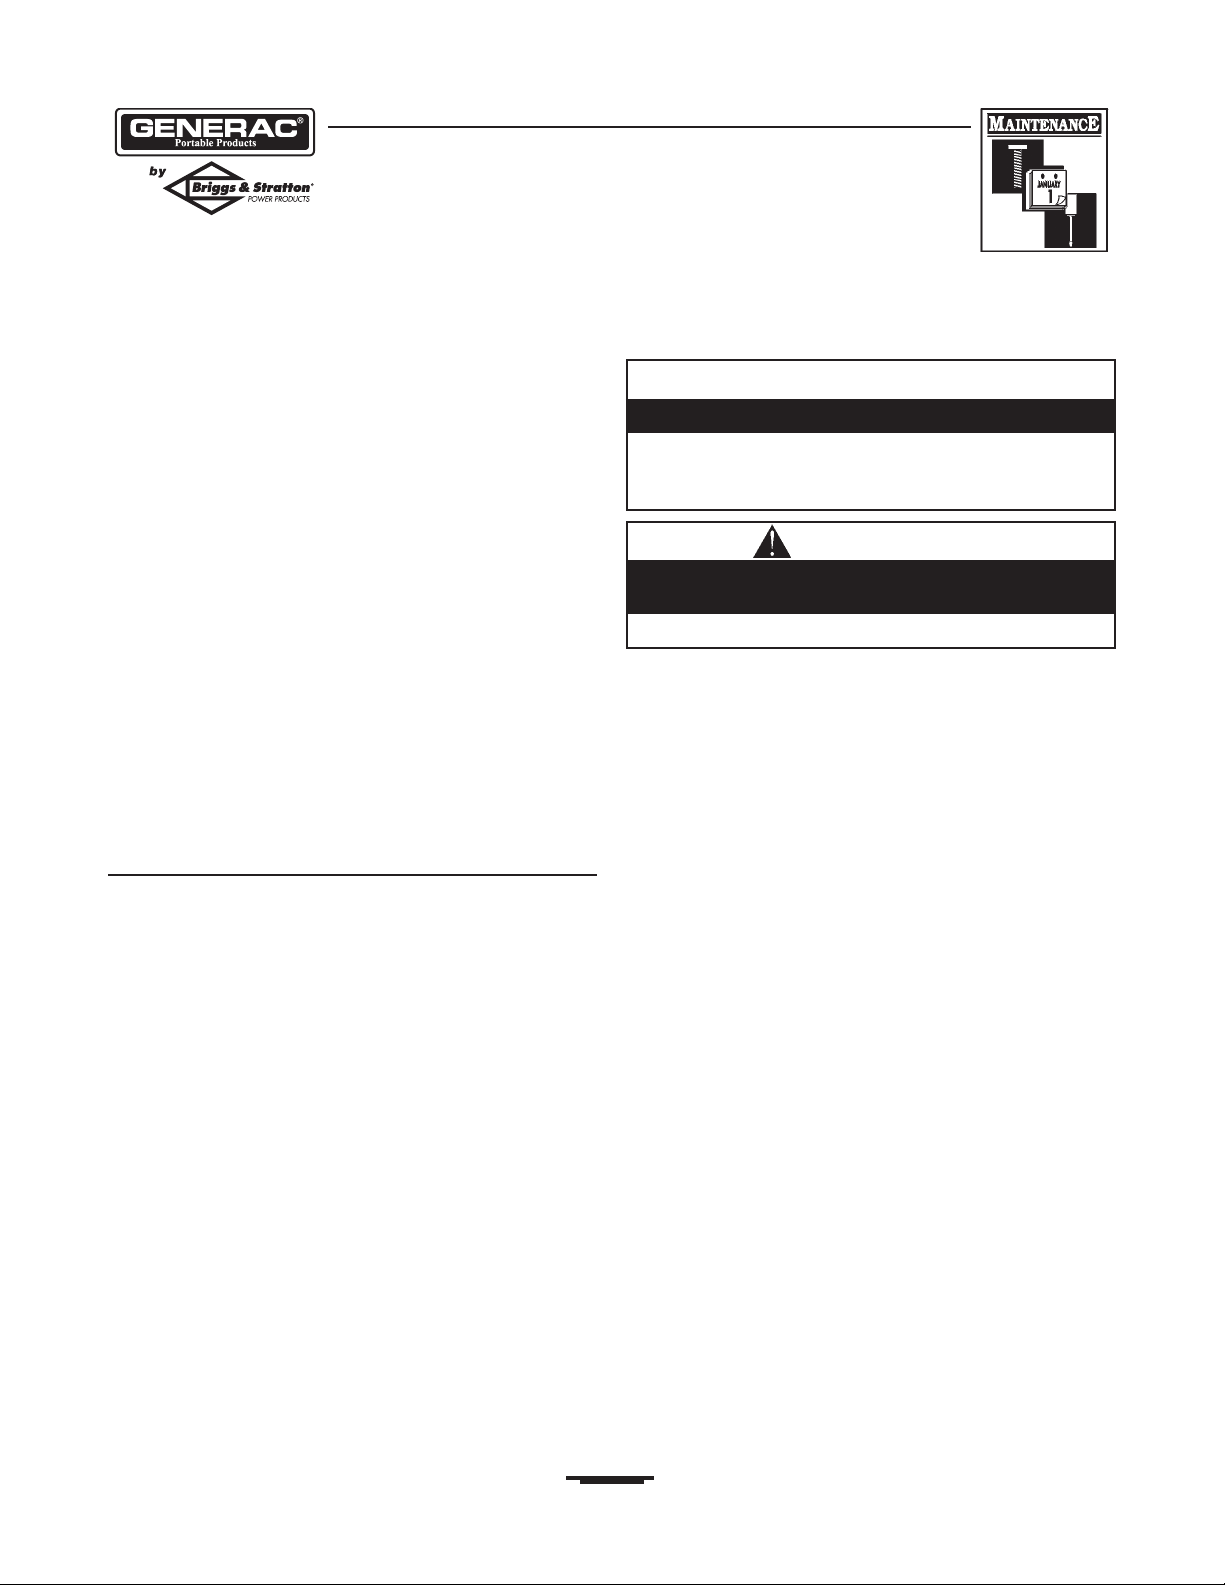
2. Use 8mm allen wrench to remove black pump oil cap,
found between high pressure outlet and garden hose
inlet (Figure 12).
3. Tilt pressure washer to drain oil into an approved
container until it drips slowly from the pump.
4. Tilt pressure washer in opposite direction and empty
premeasured pump oil bottle into same opening (a small
funnel may be helpful).
5. Install black pump oil cap and tighten firmly.
6. Set pressure washer in upright position.Add fuel and
engine oil.
ENGINE MAINTENANCE
See the engine owner’s manual for instructions on how to
properly maintain the engine.
CAUTION! KEEP OUT OF REACH OF
CHILDREN. DON'T POLLUTE. CONSERVE
RESOURCES. RETURN USED OIL TO
COLLECTION CENTERS.
Figure 11 — Backflushing the Nozzle
Oil Cap
Figure 12 - Changing Pump Oil
• Used motor oil has been shown to cause skin cancer in
certain laboratory animals.
• Thoroughly wash exposed areas with soap and water.
Avoid prolonged or repeated skin contact with used
motor oil.
CAUTION
Page 14
14
Generac Portable Products 1900 PSI Pressure Washer
PREPARING THE UNIT
FOR STORAGE
Water should not remain in the unit for long periods of
time. Sediments or minerals can deposit on pump parts and
“freeze” pump action. If you do not plan to use the pressure
washer for more than 30 days, follow this procedure:
1. Flush chemical injection hose by placing filter into pail of
clean water while running pressure washer in low
pressure mode (adjustable nozzle in forward position).
Flush for one to two minutes.
2. Shut off engine and let it cool, then remove high pressure
and garden hoses. Disconnect spark plug wire from spark
plug.
3. Empty pump of all pumped liquids by pulling recoil handle
about 6 times.This should remove most of the liquid in
pump.
4. Use PumpSaver to prevent corrosion build up and
freezing of pump.
5. Store unit in a clean, dry area.
Protecting the Pump
To protect the pump from damage caused by mineral
deposits or freezing, use PumpSaver to treat pump.This
prevents freeze damage and lubricates pistons and seals.
NOTE: PumpSaver is available as an optional accessory. It is
not included with the pressure washer. Contact the nearest
authorized service center to purchase PumpSaver.
To use PumpSaver, make sure the pressure washer is
turned off and disconnected from supply water. Read and
follow all instructions and warnings given on the PumpSaver
container.
NOTE:PumpSaver will drip from pump after treatment
and will stain wood and concrete.
NOTE: If PumpSaver is not available, draw RV antifreeze
(non-alcohol) into the pump by pouring the solution into a
3-foot section of garden hose connected to inlet adapter
and pulling recoil handle twice.
STORING THE ENGINE
See the engine owner’s manual for instructions on how to
properly prepare the engine for storage.
CAUTION
• Failure to do so will permanently damage your pump and
render your unit inoperable.
• Freeze damage is not covered under warranty.
You must protect your unit from freezing temperatures.
• Always wear eye protection when using PumpSaver.
Read and follow all cautions and warnings on the
PumpSaver can label.
CAUTION
Page 15

15
Generac Portable Products 1900 PSI Pressure Washer
TROUBLESHOOTING
Problem
Pump has following problems:
failure to produce pressure,
erratic pressure, chattering, loss
of pressure, low water volume.
Detergent fails to mix with spray.
Engine runs good at no-load but
"bogs" when load is added.
Engine shuts down during
operation.
Cause
1. Nozzle in low pressure mode.
2. Water inlet is blocked.
3. Inadequate water supply.
4. Inlet hose is kinked or leaking.
5. Clogged inlet hose strainer.
6. Water supply is over 100°F.
7. High pressure hose is blocked or
leaks.
8. Gun leaks.
9. Nozzle is obstructed.
10.Pump is faulty.
1. Detergent siphoning tube is not
submerged.
2. Chemical filter is clogged.
3. Dirty in-line filter.
4. Nozzle is in high pressure mode.
Engine speed is too slow.
Out of gasoline.
Correction
1. Pull nozzle backward for high
pressure mode.
2. Clear inlet.
3. Provide adequate water flow.
4. Straighten inlet hose, patch leak.
5. Check and clean inlet hose
strainer.
6. Provide cooler water supply.
7. Clear blocks in outlet hose.
8. Replace gun.
9. Clean nozzle.
10.Contact Briggs & Stratton Power
Products service facility.
1. Insert detergent siphoning tube
into detergent.
2. Clean or replace filter/detergent
siphoning tube.
3. See "Check In-Line Filter".
4. Push nozzle forward for low
pressure mode.
Move throttle control to FAST
position. If engine still "bogs down",
contact engine manufacturer.
Fill fuel tank.
Page 16
Generac Portable Products 1900 PSI Pressure Washer
16
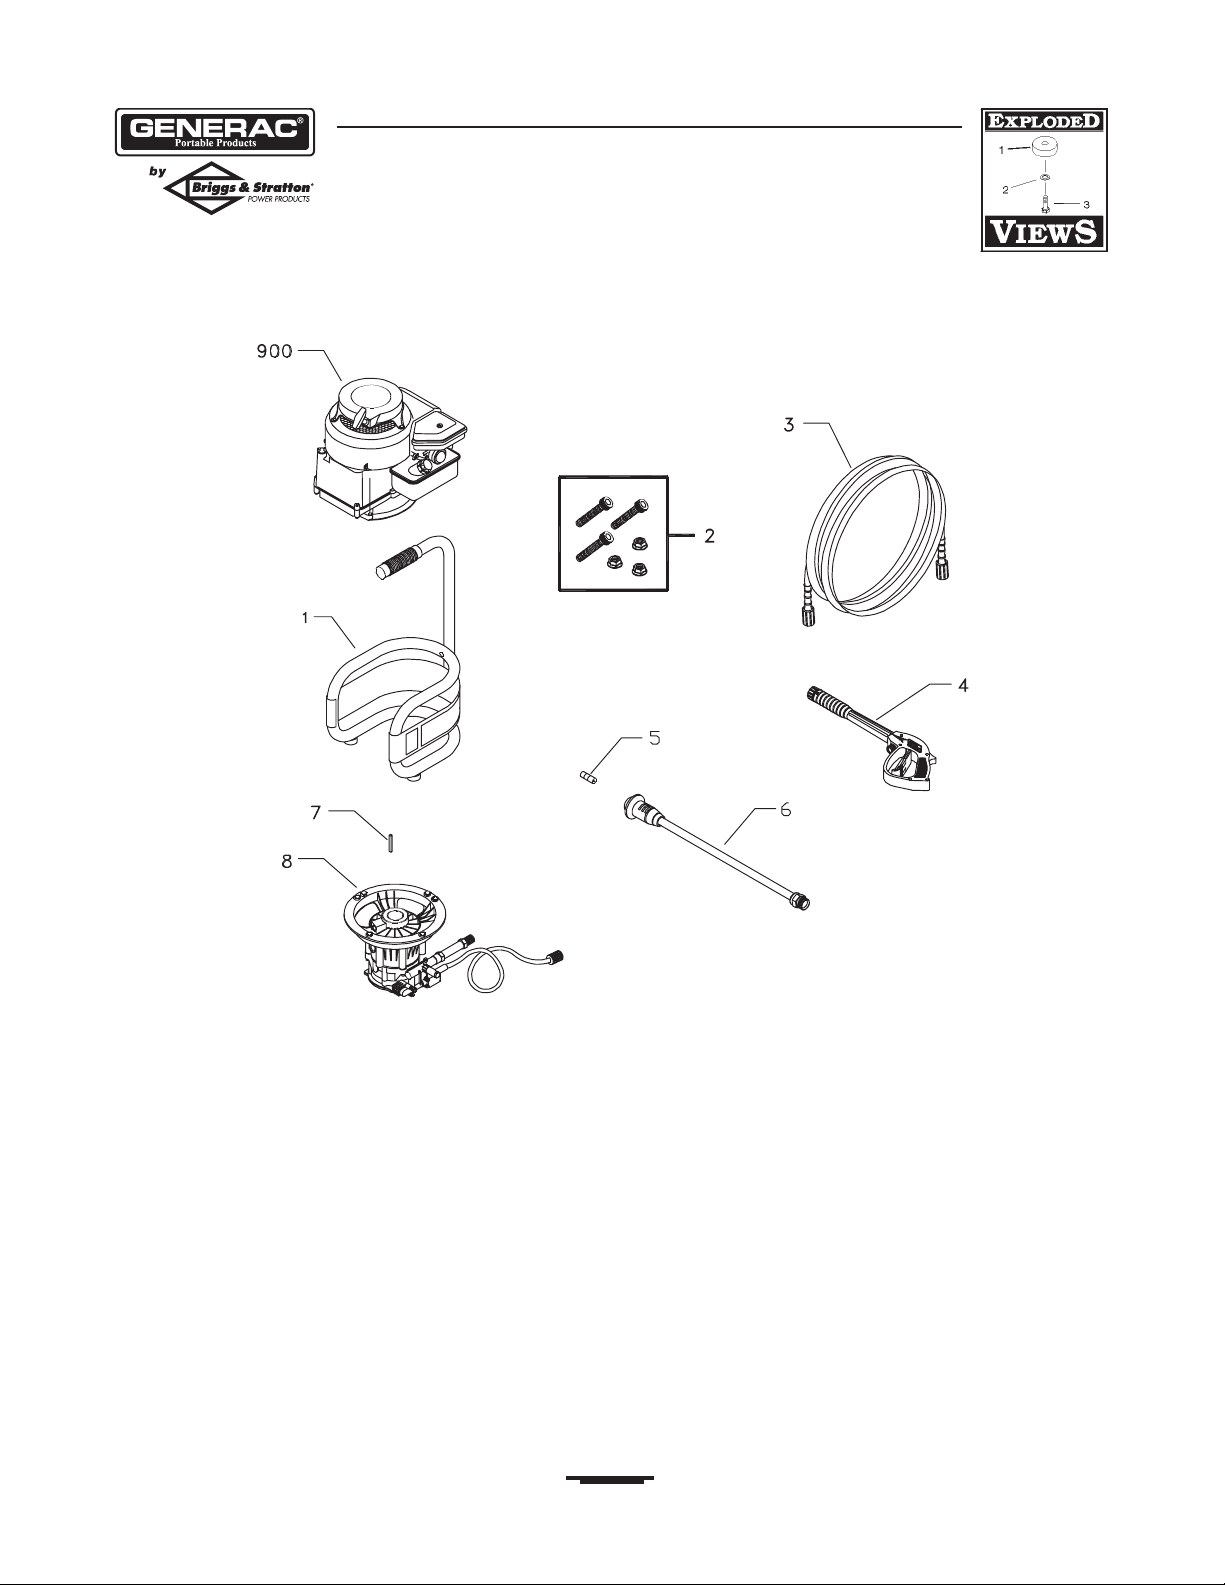
EXPLODED VIEW AND PARTS LIST – MAIN UNIT
Item Part # Description
1 M190259GS BASE
2 192308GS KIT, Pump/Engine Mounting Hardware
3 190249GS HOSE
4 193482GS GUN
5 193609DGS ORIFICE
6 193735DGS WAND,Adjustable Nozzle
7 23139GS KEY
8 194216GS ASSY, Pump (see page 17)
900 NSP ENGINE
Items Not Illustrated
192464GS MANUAL, Owner’s
MS5373 MANUAL, Engine
192674GS KIT, Decal
BB3061BGS BOTTLE, Oil
191922GS KIT, O-RING MAINT & NZZL CLNNG
Page 17

Generac Portable Products 1900 PSI Pressure Washer
17
EXPLODED VIEW AND PARTS LIST – PUMP
Item Part # Description
19 190571GS CAP, Oil
28 190627GS MANIFOLD
29 190575GS O-RING
30 190576GS SCREW
34 190577GS CONNECTION, Chemical Inlet
45 190578GS PIN
46 190629GS VALVE,Seat Plate, Plastic
47 190630GS VALVE,Seat, Plastic
62 190581GS CAP
68 190582GS BALL, SS
69 190584GS O-RING
76 194298GS THERMO RELIEF
Item Part # Description
A NSP ASSY, CASE, PISTON
B 190632GS KIT,WATER INLET,ALUM
C 190634GS KIT, OUTLET,ALUM
E 190591GS KIT,CHECK VALVES
F 190592GS KIT, INLET CHECK
G 190593GS KIT, CHEMICAL INJECTION
H 190628GS KIT, UNLOADER STEM
J 189971GS KIT, CHEMICAL HOSE
K 190636GS KIT, SEAL SET
NOTE: Item letters B - K are service kits and include all
parts shown within the box.
Page 18

Generac Portable Products 1900 PSI Pressure Washer
18
NOTES
Page 19

GENERAC PORTABLE PRODUCTS OWNER EQUIPMENT WARRANTY POLICY
Effective January 1, 2003
WARRANTY PERIOD*
* The warranty period begins on the date of purchase by the first retail consumer or commercial end user, and continues for the
period of time stated in the table above. "Consumer use" means personal residential household use by a retail consumer.
"Commercial use" means all other uses, including use for commercial, income producing or rental purposes. Once equipment has
been used commercially, it shall thereafter be considered to be in commercial use for purposes of this warranty.
** The engine and starting batteries are warranted solely by the manufacturers of those products.
WARRANTY REGISTRATION IS NOT NECESSARY TO OBTAIN WARRANTY ON BRIGGS & STRATTON POWER
PRODUCTS EQUIPMENT. SAVE YOUR PROOF OF PURCHASE RECEIPT. IF YOU DO NOT PROVIDE PROOF OF THE
INITIAL PURCHASE DATE AT THE TIME WARRANTY SERVICE IS REQUESTED,THE MANUFACTURING DATE OF THE
EQUIPMENT WILL BE USED TO DETERMINE THE WARRANTY PERIOD.
About your equipment warranty:
We welcome warranty repair and apologize to you for being inconvenienced. Any Authorized service dealer may perform warranty
repairs. Most warranty repairs are handled routinely,but sometimes requests for warranty service may not be appropriate. For
example, warranty service would not apply if equipment damage occurred because of misuse, lack of routine maintenance, shipping,
handling, warehousing or improper installation.Similarly, the warranty is void if the manufacturing date or the serial number on the
equipment has been removed or the equipment has been altered or modified. During the warranty period, the Authorized service
dealer, at its option,will repair or replace any part that, upon examination, is found to be defective under normal use and service.This
warranty will not cover following repairs and equipment:
• Normal Wear: Outdoor power equipment, like all mechanical devices, needs periodic parts, service and replacement to perform
well.This warranty does not cover repair when normal use has exhausted the life of a part or the equipment.
• Installation and Maintenance: This warranty does not apply to equipment or parts that have been subjected to improper or
unauthorized installation or alteration and modification, misuse, negligence, accident, overloading,overspeeding, improper
maintenance, repair or storage so as, in our judgment, to adversely affect its performance and reliability.This warranty also does not
cover normal maintenance such as adjustments, fuel system cleaning and obstruction (due to chemical, dirt, carbon or lime, etc.).
• Other Exclusions: Also excluded from this warranty are wear items such as quick couplers, oil gauges, belts, o-rings, filters,
pump packing, etc., pumps which have been run without water supplied or damage or malfunctions resulting from accidents,
abuse, modifications, alterations, or improper servicing or freezing or chemical deterioration.Accessory parts such as guns,
hoses, wands and nozzles are excluded from the product warranty.Also excluded is used, reconditioned, and demonstration
equipment; equipment used for prime power in place of utility power and equipment used in life support applications.
BRIGGS & STRATTON POWER PRODUCTS GROUP, LLC
JEFFERSON,WISCONSIN, U.S.A.
LIMITED WARRANTY
"Generac Portable Products is a licensed trademark of Briggs & Stratton Power Products. Briggs & Stratton Power Products will
repair or replace, free of charge, any part, or parts of the equipment** that are defective in material or workmanship or both.
Transportation charges on parts submitted for repair or replacement under this warranty must be borne by purchaser.This
warranty is effective for the time periods and subject to the conditions provided for in this policy. For warranty service, find your
nearest Authorized service dealer by calling 1-800-270-1408.Warranty service may only be performed by a Briggs & Stratton
Power Products Authorized service dealer.
THERE IS NO OTHER EXPRESS WARRANTY. IMPLIED WARRANTIES, INCLUDING THOSE OF MERCHANTABILITY AND
FITNESS FOR A PARTICULAR PURPOSE,ARE LIMITED TO THE TIME PERIOD SPECIFIED, OR TO THE EXTENT PERMITTED
BY LAW. ANY AND ALL IMPLIED WARRANTIES ARE EXCLUDED. LIABILITY FOR CONSEQUENTIAL DAMAGES UNDER
ANY AND ALL WARRANTIES ARE EXCLUDED TO THE EXTENT EXCLUSION IS PERMITTED BY LAW.Some countries or
states do not allow limitations on how long an implied warranty lasts, and some countries or states do not allow the exclusion or
limitation of incidental or consequential damages, so the above limitation and exclusion may not apply to you.This warranty gives
you specific legal rights and you may also have other rights that vary from country to country or state to state.”
PRODUCTS** CONSUMER USE COMMERCIAL USE
Pressure Washer 1 year 90 days
Portable Generator 2 years (2nd year parts only) 1 year
Page 20

Lavadora de Presión 1900 PSI de Generac Portable Products
20
TABLA DE CONTENIDOS
Reglas De Seguridad . . . . . . . . . . . . . . . . . . . . . . . . . . . . . . . . 20-22
Conozca Su Generador . . . . . . . . . . . . . . . . . . . . . . . . . . . . . . . . 23
Ensamblaje . . . . . . . . . . . . . . . . . . . . . . . . . . . . . . . . . . . . . . . . 24-25
Funcionamiento. . . . . . . . . . . . . . . . . . . . . . . . . . . . . . . . . . . . 26-28
Especificaciones Del Producto . . . . . . . . . . . . . . . . . . . . . . . . . . . 29
Mantenimiento. . . . . . . . . . . . . . . . . . . . . . . . . . . . . . . . . . . . . 29-31
Almacenamiento. . . . . . . . . . . . . . . . . . . . . . . . . . . . . . . . . . . . . . 32
Notas . . . . . . . . . . . . . . . . . . . . . . . . . . . . . . . . . . . . . . . . . . . . . . 33
Diagnosticos De Averías. . . . . . . . . . . . . . . . . . . . . . . . . . . . . . . . 34
Piezas De Recambio . . . . . . . . . . . . . . . . . . . . . . . . . . . . . . . . 16-17
Garantia . . . . . . . . . . . . . . . . . . . . . . . . . . . . . . . . . . . . . . . . . . . . 35
DESCRIPCIÓN DEL EQUIPO
Lea este manual de manera cuidadosa y
familiarícese con su lavadora a presión. Conozca
sus usos, sus limitaciones y cualquier peligro
relacionado con el mismo.
Se ha hecho cada esfuerzo posible para asegurarse que la
información que aparece en este manual es exacta y se encuentra
actualizada. Sin embargo,nosotros se reserva el derecho a
cambiar, alterar o de otra manera mejorar, el producto y este
documento en cualquier momento, sin previo aviso.
REGLAS DE SEGURIDAD
Éste es el símbolo de alerta de seguridad. Sirve
para advertir al usuario de un posible riesgo para
su integridad física. Siga todos los mensajes de
seguridad que figuren después de este símbolo
para evitar lesiones o incluso la muerte.
El símbolo de alerta de seguridad ( ) es usado con una palabra
(PELIGRO,ADVERTENCIA, PRECAUCIÓN), un mensaje por
escrito o una ilustración, para alertarlo acerca de cualquier
situación de peligro que pueda existir. PELIGRO indica un riesgo
el cual, si no se evita, causará la muerte o una herida grave.
ADVERTENCIA indica un riesgo el cual, si no se evita, puede
causar la muerte o una herida grave. PRECAUCIÓN indica un
riesgo, el cual, si no se evita, puede causar heridas menores o
moderadas. PRECAUCIÓN, cuando se usa sin el símbolo de
alerta, indica una situación que podría resultar en el daño del
equipo. Siga los mensajes de seguridad para evitar o reducir los
riesgos de heridas e inclusive la muerte.
Símbolos de Peligro y Significados
El escape del motor de este producto contiene
elementos químicos reconocidos en el Estado de
California por producir cáncer, defectos de nacimiento u
otros daños de tipo reproductivo.
ADVERTENCIA
En el estado de California es obligatorio, según la ley, el uso de
apagachispas (Sección 4442 del Código de Recursos Públicos de
California). Otros estados pueden tener leyes similares. Las leyes
federales se aplican en tierras federales. Si equipa el silenciador
con un apagachispas, este deberá ser mantenido en buenas
condiciones de trabajo.
Fuego
Explosión
Gases Tóxicos
Superficie Caliente
Partes en Movimiento
Descarga Eléctrica
Superficies Resbalosas
Caer
Contragolpe
Objetos Voladores
Inyección Líquida
Page 21

Lavadora de Presión 1900 PSI de Generac Portable Products
21
• Mantenga el chorro del agua alejado de alambrados eléctricos, de lo
contrario podrían ocurrir descargas eléctricas fatales.
El contacto del rocío con alambrado eléctrico puede
tener como resultado electrocution.
ADVERTENCIA
• Opere el lavadora de presión SOLAMENTE al aire libre.
• Utilice un respirador o máscara siempre que exista la posibilidad de
inhalar vapores.
• Lea todas las instrucciones de la máscara para asegurarse de que le
brindará la protección necesaria contra la inhalación de vapores
nocivos.
Al motor funcionar, se produce monóxido de
carbono, un gas inodoro y venenoso.
El respirar el monóxido de carbono, producirá
náusea, desmayo o la muerte.
PELIGRO
• Mantenga la boquilla de rociado de 8 a 24 pulgadas de la superficie de
limpieza.
• Opere y almacene esta unidad sobre una superficie estable.
• El área de limpieza deberá tener inclinaciones y drenajes adecuados
para disminuir la posibilidad de caídas debido a superficies resbalosas.
• Sea extremadamente cuidadoso si usa la máquina lavadora a presión
desde una escalera, andamio o cualquier superficie relativamente
inestable.
• Sujete la pistola de la hidrolavadora firmemente con ambas manos
cuando utilice el rociado a alta presión. De esta manera evitará
lesiones producidas por el posible golpe de la pistola hacia atrás.
El uso de lavadora de presión puede crear los
charcos y superficies resbalosas.
El rociado de la alta presión podría hacerlo caer si
está muy cerca de la superficie de limpieza.
ADVERTENCIA
CUANDO AÑADA COMBUSTIBLE
• Apague el lavadora de presión (posición OFF) y déjelo enfriar al menos
por 2 minutos antes de remover la tapa de la gasolina.
• Llene el tanque al aire libre.
• NO llene demasiado el tanque. Permita al menos espacio para la
expansión del combustible.
• Mantenga la gasolina alejada de chispas, llamas abiertas, pilotos, calor y
otras fuentes de ignición.
• NO encienda un cigarrillo o fume.
CUANDO OPERE EL EQUIPO
• NO incline el motor o el equipo, de tal manera que la gasolina se
pueda derramar.
• NO rocíe líquidos inflamables.
CUANDO TRANSPORTE O REPARE EL EQUIPO
• Transporte o repare el equipo con el tanque de combustible vacío, o
con la válvula para apagar el combustible, apagada (posición OFF).
CUANDO ALMACENE O GUARDE EL EQUIPO CON
COMBUSTIBLE EN EL TANQUE
• Almacene alejado de calderas, estufas, calentadores de agua, secadoras
de ropa u otros aparatos electrodomésticos que posean pilotos u
otras fuentes de ignición, porque ellos pueden encender los vapores
de la gasolina.
La gasolina y sus vapores son extremadamente
inflamables y explosivos.
El fuego o una explosión pueden causar quemaduras
severas e inclusive la muerte.
ADVERTENCIA
• NUNCA apunte la pistola a la gente, animales o plantas.
• NO permita en ningún momento que NIÑOS operen la máquina
lavadora a presión.
• NUNCA repare la manguera de alta presión. Remplacela.
• Mantenga conectada la manguera a la máquina o a la pistola de
rociado cuando el sistema esté presurizado.
La corriente de agua de alta presión que produce
este equipo pueden perforar la piel y sus tejidos
profundos, ocasionando lesiones serias y posible
amputación.
ADVERTENCIA
Page 22

22
Lavadora de Presión 1900 PSI de Generac Portable Products
• NO juegue con partes que puedan aumentar o disminuir la velocidad
de mando.
• NO opere la máquina lavadora a presión con un valor de presión
superior a su clasificación de presión.
Hacer funcionar el motor a velocidades excesivas aumenta el
riesgo de lesiones personales.
PRECAUCIÓN
• NO apunte la pistola de rociado al vidrio cuando esté en el modo de
rociado a chorro.
• NUNCA apunte la pistola a plantas.
El rociado de alta presión puede dañar elementos frágiles,
incluyendo el vidrio.
PRECAUCIÓN
• NO use ropa suelta, joyas o elementos que puedan quedar atrapados
en el arranque o en otras partes rotatorias.
• Ate para arriba el pelo largo y quite la joyería.
El arrancador y otras piezas que rotan pueden
enredar las manos, el pelo,la ropa, o los accesorios.
ADVERTENCIA
• Siempre use protección para los ojos cuando utilice este equipo o
cuando esté cerca de donde se esté usando el equipo.
El rociado de alta presión puede hacer que partículas
pequeñas de pintura u otras partículas salgan
disparadas y viajen a altas velocidades.
ADVERTENCIA
CUANDO AJUSTE O HAGA REPARACIONES A SU
MÁQUINA LAVADORA DE PRESIÓN
• Siempre desconecte el alambre de la bujía y colóquelo donde no
pueda entrar en contacto con la bujía.
Chispear involuntario puede tener como resultado el
fuego o el golpe eléctrico.
ADVERTENCIA
• NO toque las superficies calientes.
• Manténgase alejado de los gases de escape.
• Permita que el equipo se enfríe antes de tocarlo.
Los motores en funcionamiento producen calor y
gases de escape a altas temperaturas. La temperatura
del silenciador y de las zonas cercanas puede alcanzar
o superar los 65 ºC (150 ºF)
Se pueden producir incendios o quemaduras graves.
ADVERTENCIA
• NO asegure la pistola de rociado en la posición (open = abierto).
• NO abandone la pistola de rociado cuando la máquina esté en
funcionamiento.
• NUNCA utilice una pistola de rociado que no tenga un seguro para
gatillo o protección para gatillo en su lugar y en buenas condiciones.
• Siempre asegúrese de que la pistola de rociado, boquillas y accesorios
estén conectados correctamente.
El lavadora de presión produce un rocío alto de la presión
cuál riesgo de aumentos de la herida y dañe a la unidad.
PRECAUCIÓN
• Si usted tiene alguna pregunta acerca de las finalidades de uso del
generador, pregúntele a su concesionario o contacte a Briggs &
Stratton Power Products.
• NUNCA deberán ser operadas las unidades con partes rotas o
ausentes, o sin la caja o cubiertas de protección.
• NO eluda ningún dispositivo de seguridad de esta máquina.
• Antes de poner en marcha la máquina lavadora a presión en clima
frío, revise todas las partes del equipo y asegúrese de que no se haya
formado hielo sobre ellas.
• NUNCA mueva la máquina halando la manguera de alta presión.
Utilice la manija que viene con la unidad.
• Revise que el sistema de combustible no presente fugas o signos de
deterioro, como mangueras desgastadas o porosas, sujetadores flojos
o ausentes, tapa o tanque dañados.Corrija todos los defectos antes
de operar la máquina lavadora a presión.
• El equipo de alta presión está diseñado para ser utilizado
UNICAMENTE con las partes autorizadas Briggs & Stratton Power
Products. Si utiliza este equipo con partes que no cumplan con las
especificaciones mínimas, el usuario asume todos los riesgos y
responsabilidades.
El tratamiento inadecuado del lavadora de presión puede
dañarlo y acortar su vida productiva.
PRECAUCIÓN
Page 23

23
Lavadora de Presión 1900 PSI de Generac Portable Products
CONOZCA SU MAQUINA LAVADORA DE PRESION
Lea el manual del propietario y las reglas de seguridad antes de poner en marcha su máquina lavadora a presión.
Compare las ilustraciones con su máquina lavadora a presión para familiarizarse con las ubicaciones de los diferentes controles y ajustes.
Guarde este manual para referencias futuras.
Filtro de Aire - El elemento de filtro tipo seco limita la cantidad
de suciedad y polvo que se introduce en el motor.
Automático se Enfría Sistema - Los ciclos regan por bomba
cuando agua alcanza 125º-155ºF. Entibiar agua descargará de
la bomba en el suelo. Este sistema previene el daño
interno de bomba.
Filtro y Tubo para Recolección de Detergente – Usado para
succionar detergente de la botella de químicos a la corriente de
agua de baja presión.
Tanque del Gasolina - Llene el tanque con gasolina regular sin
contenido de plomo en este punto.
Toma de Alta Presión - Conexión para la manguera de alta
presión.
Bombilla más Principal — Usada para arranque de motores
fríos.
Bomba - Desarrolla alta presión de agua.
Arrancador de Retroceso - Usado para arrancar el motor
manualmente.
Entrada de Agua - Conexión para la manguera de jardín.
Filtro de Aire
Bombilla más Principal
Tanque del Gasolina
Entrada de Agua
Bomba equipped with
Automático se Enfría Sistema
Arrancador de Retroceso
Toma de Alta Presión
Filtro y Tubo para
Recolección de Detergente
Page 24

Lavadora de Presión 1900 PSI de Generac Portable Products
24
MONTAJE
IMPORTANTE: Lea totalmente el manual del propietario antes
que intente ensamblar u operar su lavador a presión.
Remueva el Lavador a Presión del
Empaque
• Remueva la bolsa con las piezas, accesorios y las adiciones
incluidas con el lavador de presión.
• Corte dos esquinas en los extremos del cartón desde la parte
superior hasta la parte inferior, de tal manera que el pánel
pueda ser doblado en forma plana.
• Remueva el lavador a presión del la caja.
Contenido de la Caja
Los Artículos que se Encuentran en la Caja Son:
• Unidad principal
• Gafas de seguridad
• Manguera de alta presión
• Pistola rociadora
• Extensión de la lanza
• Botella de aceite para motor
• Bolsa de accesorios (incluye lo siguiente):
• Juego de mantenimiento
• Manual del propietario
• Manual del motor
• Tarjeta de registro del propietario
Si una de las partes que se mencionan arriba se encuentran
dañadas o hacen falta, llame a la línea directa del lavador a presión,
al 1-800-270-1408.
PREPARANDO EL LAVADOR A
PRESIÓN PARA SU USO
A prepara su arandela de la presión para la operación,
usted necesitará a realiza estas tareas:
1. Llene y mande en tarjeta de matrícula.
2. Añada aceite al motor.
3. Añada gasolina al tanque de combustible.
4. Conecte manguera a alta presión a pistola rociadora y a
bomba.
5. Conecte el suministro de agua a bomba.
6. Conecte boquilla la extensión al pistola rociadora.
Agregar Aceite al Motor y Gasolina
• Coloque la lavadora a presión sobre una superficie nivelada.
• Consulte el manual del propietario del motor para añadir al
motor el aceite y el combustible recomendado.
NOTA: Verifique el aceite del motor de manera frecuente cuando
éste se esfuerce demasiado. Consulte el manual del propietario
del motor para conocer cuáles son las recomendaciones al
respecto.
PRECAUCIÓN
• Consulte el manual del propietario del motor para añadir al motor
el aceite y el combustible recomendado
• El daño a la lavadora a presión, resultado de la desatención a
esta precaución, no será cubierto por la garantía.
Cualquier intento para arancar el motor antes de haberle
proporcionado el mantenimiento apropiado con el aceite
recomendado, podría ocasionar la falla del motor.
Page 25

Lavadora de Presión 1900 PSI de Generac Portable Products
25
Conecte Manguera y Suministro de Agua a
Bomba
IMPORTANTE: Usted deberá armar conectar todas las
mangueras antes de darle arranque al motor. La bomba resultará
dañada si arranca el motor sin tener todas las mangueras
conectadas y el suministro agua abierto.
1. Retroceda la manguera a alta presión y conecte a la base de la
pistola rociadora (Figura 13).Apriete con la mano.
2. Conecte el otro extremo de la manguera a alta presión,a la
salida de alta presión de la bomba (Figura 14).Apriete con la
mano.
3. Antes de que conecte la manguera de jardín a la entrada de
agua, inspeccione el colador de la entrada (Figura 15). Limpie
el colador si tiene residuos o solicite su remplazo si está
dañado. NO HAGA FUNCIONAR LA MÁQUINA
LAVADORA A PRESIÓN SI EL COLADOR DE LA ENTRADA
ESTÁ DAÑADO.
4. Haga correr el agua a través de la manguera de su jardín por
30 segundos para limpiar cualquier escombro que se
encuentre en ella. Corte el agua.
IMPORTANTE: Hace no agua de parar de siphon para el
abastecimiento de agua. Use agua SOLO fría (menos que 100°F).
5. Conecte la manguera de jardín (no exceder 50 pies en la
longitud) a la entrada del agua.Apriete con la mano (Figura 15).
6. ABRA el suministo del agua y abra la válvula de suministro
para purgar la sistema de bomba de aire y impureza.
Lista de Revision Previa al Arranque Motor
Revise la unidad para asegurarse que ha llevado a cabo los
siguientes procedimientos:
1. Revise que haya sido depositado aceite y esté al nivel
correcto en la caja del cigüeñal del motor.
2. Deposite la gasolina adecuada en el tanque del combustible.
3. Revise que todas las conexiones de las mangueras (alta
presión y suministro de agua) estén apretadas correctamente
y que no existan dobleces, cortes o daño de la manguera de
alta presión.
4. Proporcione el suministro de agua adecuado.
5. Asegúrese de leer las secciones "Instrucciones de Seguridad"
y "Cómo Usar Su Lavadora A Presión" antes de usar la
máquina lavadora a presión.
Conecte aquí la manguera
a alta presión
Figura 13 — Conecte la Manguera a alta Presión a la Pistola
Rociadora
Figura 14 — Conectar la Manguera de Alta Presión a la Toma
de Agua
Inspeccione la
rejilla de entrada.
NO la use si está
dañada, límpiela si
se encuentra sucia.
Figura 15 — Conectar la Manguera del Jardín a la Entrada de
Agua
PRECAUCIÓN
• El daño a la lavadora a presión, resultado de la desatención a esta
precaución, no será cubierto por la garantía.
DEBE haber por lo menos diez pies de manguera de jardín libre
entre la entrada de agua de la lavadora a presión y cualquier
dispositivo de control de flujo de agua, sea el caso de un
conector 'Y' o de cualquier otro tipo de válvula.
• Siempre use protección para los ojos cuando utilice este equipo o
cuando esté cerca de donde se esté usando el equipo.
• Antes de darle arranque a la máquina lavadora a presión, asegúrese de
usar protección adecuada para los ojos.
El rociado de alta presión puede hacer que partículas
pequeñas de pintura u otras partículas salgan
disparadas y viajen a altas velocidades.
ADVERTENCIA
Page 26

Lavadora de Presión 1900 PSI de Generac Portable Products
26
CÓMO USAR SU MÁQUINA
LAVADORA A PRESIÓN
Si tiene problemas operando su máquina lavadora a presión, por
favor llame a la línea de ayuda para máquinas lavadoras a presión
al 1-800-270-1408.
Cómo Darle Arranque a su Máquina
Lavadora a Presión
Para darle arranque a su máquina lavadora a presión movida a
motor por primera vez, siga estas instrucciones paso a paso. Esta
información acerca del arranque inicial también se aplica cuando vaya
a darle arranque al motor después de haber dejado de la máquina
lavadora a presión fuera de uso por al menos un día.
1. Coloque la máquina lavadora a presión en un área cercana a
una suministro de agua exterior capaz de abastecer agua a un
volumen mayor de 3.0 galones por minuto en no menos que
20 PSI en el fin de arandela de presión de la manga del jardín.
2. Revise que la manguera de alta presión se encuentre
conectada firmemente a la pistola de rociado y a la bomba.Vea
"Preparando El Lavador A Alta Presión Para Su Uso".
3. Asegúrese que la unidad esté nivelada.
4. Conecte la manguera de jardín a la entrada del agua.Aprietela
con la mano. Abra el suministro de agua.
5. Conecte la extensión de la lanza a la pistola rociadora.
Apriétela con las manos (Figura 16).
6. Apriete el gatillo en la pistola rociadora (asegúrese de que la
lanza se encuentra en el modo de baja presión) para
deshacerse de la presión del aire causada al prender el agua. El
agua se descargara de la pistola del spray en un chorro muy
Delgado.Aguante el gatillo hasta que un chorro continuo de
agua aparece. Esto hará que el comienzo del motor se haga
fácilmente. Suelte el gatillo.
7. Coloque el pasador de seguridad al gatillo de la pistola
rociadora (Figura 17).
8. Pour démarrer le moteur, suivez les instructions qui figurent
dans le manuel d'utilisation.
NOTA: Siempre mantenga la control de válvula de admisión en el
“Rápido” (“Fast”) posicione cuándo operar la arandela de la
presión.
Cómo Detener su Máquina Lavadora a
Presión
• Pour éteindre le moteur, suivez les instructions qui figurent
dans le manuel d'utilisation.
• Apriete el gatillo de la pistola de rociado para
eliminar la presión de la manguera.
NOTA: Observará una pequeña cantidad de agua cuando elimine
la presión.
Figura 16 — Conecte la Extensión de la Lanza a la Pistola
Rociadora
El Pasador de la
Seguridad
Figura 17 — La Pistola Rociadora con el Pasador de
Seguridad en su Posición
PRECAUCIÓN
• Apriete el gatillo de la pistola rociadora cada vez que tire del
arrancador de retroceso y que el motor no arranque.
Evite las lesiones que puede causar el retroceso.
PRECAUCIÓN
• Levante siempre el equipo por el asa.
• NUNCA tire de las mangueras para mover el equipo.
Evite los incendios provocados por la caída del equipo.
PRECAUCIÓN
• El daño a la lavadora a presión, resultado de la desatención a esta
precaución, no será cubierto por la garantía.
NO haga funcionar la bomba si no tiene el suministro
conectado y abierto.
Page 27

Lavadora de Presión 1900 PSI de Generac Portable Products
27
Cómo Usar la Boquilla Ajustable
Usted ya debe saber como darle ARRANQUE a su máquina
lavadora a presión y como DETENERLA. La información de esta
sección le dirá como ajustar el patrón de rociado y como aplicar
detergente u otros químicos de limpieza.
1. Usted también puede ajustar el patrón de rociado girando la
boquilla para que esté concentrado en un patrón de chorro
o un patrón expandido en abanico (Figura 18).
2. Apunte la boquilla hacia el suelo, desenganche el cerrojo de
seguridad y apriete el gatillo para probar el patrón de
rociado (Figura 19).
3. El patrón de rociado se ajusta de un patrón angosto a un
patrón en abanico girando la boquilla (Figura 20).
4. Para una limpieza más efectiva, mantenga la boquilla de
rociado de 8 a 24 pulgadas de la superficie de limpieza.
5. Si coloca la boquilla de rociado demasiado cerca podría
dañar la superficie, especialmente cuando esté usando el
modo de alta presión.
6. NO coloque la boquilla a menos de 6 pulgadas cuando esté
limpiando llantas.
Aplicación del Detergente Usando la
Boquilla Ajustable
IMPORTANTE: Utilice químicos diseñados específicamente para
máquinas lavadoras a presión. Los detergentes caseros podrían
dañar la bomba.
Para aplicar el detergente, siga los siguientes pasos:
1. Revise el uso de la boquilla ajustable.
2. Prepare la solución detergente siguiendo las instrucciones del
fabricante.
3. Coloque el pequeño extremo final del filtro del tubo de
inyección del detergente dentro del contenedor del
detergente.
Mueva la boquilla hacia
atrás para obtener el modo
de alta presión.
Mueva la boquilla hacia adelante
para obtener el modo de baja
presión y para la aplicación del
detergente.
Figura 18 — Ajustar la Presión de Aspersión
Figura 19 — Poner a Prueba el Patrón de Aspersión
Figura 20 — Ajustar el Patrón de Aspersión
Gire la boquilla en sentido
contrario a las manecillas del
reloj para un patrón de
rociado en abanico.
Gire la boquilla en sentido de
las manecillas del reloj para
un patrón de rociado a
chorro.
• NUNCA ajuste el patrón de rociado cuando esté rociando.
• NUNCA coloque las manos en frente de la boquilla para ajustar el
patrón de rociado.
El lavadora de presión produce un rocío alto de la presión
cuál riesgo de aumentos de la herida y dañe a la unidad.
PRECAUCIÓN
PRECAUCIÓN
• Arrancar el motor sin tener todas las mangueras conectadas y sin el
suministro de agua ABIERTO (ON) causará el daño de la bomba.
• El daño a la lavadora a presión, resultado de la desatención a esta
precaución, no será cubierto por la garantía.
Usted deberá conectar todas las mangueras antes de darle
arranque al motor.
Page 28

Lavadora de Presión 1900 PSI de Generac Portable Products
28
4. Mueva la boquilla ajustable hacia adelante para obtener el
modo de baja presión. El detergente no puede ser aplicado si
tiene la boquilla en la posición de alta presión.
5. Asegúrese que la manguera de jardín esté conectada a la
entrada del agua. Revise que la manguera de alta presión esté
conectada a la pistola de rociado y a la bomba. Dele arranque
al motor.
6. Aplique el detergente sobre la superficie seca, comenzando en
la parte inferior del área y dirigiéndose hacia arriba, utilizando
movimientos largos, parejos y superpuestos.
7. Permita que el detergente "penetre" de 3 a 5 minutos antes
de enjuagar.Vuelva a aplicarlo cuando sea necesario para evitar
que la superficie se seque. NO permita que el detergente se
seque. Si permite que el detergente se seque, la superficie
podría quedar con manchas.
IMPORTANTE: Usted deberá lavar el sistema de inyección de
químicos después de cada uso colocando el filtro en un balde de
agua limpia y haciendo funcionar la máquina lavadora a presión de
1 a 2 minutos en el modo de baja presión.
Enjuage de la Máquina Lavadora a Presión
Para Enjuage:
1. Deslice la boquilla hacia atrás a la presión alta y apriete el
disparador. Llevará un pocos segundos para el detergente a
claro.
NOTA: También puede detener la circulación del detergente
retirando el tubo de succión del recipiente.
2. Mantenga la pistola de rociado a una distancia segura del área
que planea rociar.
3. Aplique un rociado de alta presión en un área pequeña,
después revise si la superficie presenta daños. Si no encuentra
daños, puede continuar con el trabajo de limpieza.
4. Comience en la parte superior del área que va a enjuagar,
dirigiéndose hacia abajo con los mismos movimientos
superpuestos que utilizó para el limpieza.
Sistema de Enfriamiento Automático
(Alivio Térmico)
El agua que circula dentro de la bomba puede alcanzar
temperaturas entre los 125º-155ºF si hace funcionar el motor de
su máquina lavadora a presión de 3 a 5 minutos sin oprimir el
gatillo de la pistola de rociado. Cuando el agua alcanza dicha
temperatura, el sistema de enfriamiento automático se activa y
enfría la bomba descargando agua caliente en el piso. Este
sistema evita el daño interno de la bomba.
PRECAUCIÓN
• Cuando coloque el filtro en la botella del químico, coloque el tubo
de manera que no entre en contacto accidentalmente con el
silenciador caliente.
Evite que el tubo de inyección de químicos entre en contacto
con el silenciador caliente.
• Mantenga la boquilla de rociado de 8 a 24 pulgadas de la superficie de
limpieza.
• Opere y almacene esta unidad sobre una superficie estable.
• Sea extremadamente cuidadoso si usa la máquina lavadora a presión
desde una escalera, andamio o cualquier superficie relativamente
inestable.
• Sujete la pistola de la hidrolavadora firmemente con ambas manos
cuando utilice el rociado a alta presión. De esta manera evitará
lesiones producidas por el posible golpe de la pistola hacia atrás.
El rociado de la alta presión podría hacerlo caer si
está muy cerca de la superficie de limpieza.
ADVERTENCIA
Page 29

Lavadora de Presión 1900 PSI de Generac Portable Products
29
ESPECIFICACIONES
Presión de Salida . . . . . . 1900 PSI
Promedio de Flujo . . . . 2.0 galones por minuto (gpm)
Detergente . . . . . . . . . . . Use el detergente adecuado para
lavadores a presión
Temperatura del Suministro
de Agua . . . . . . . . . . . . . .Que no pase de 100ºF
Sistema de . . . . . . . . . . .Funcionará cuando el agua alcance de
Enfriamiento . . . . . . . . . .125º-155ºF
Automático
Peso que Embarca . . . . .46 lbs.
RECOMENDACIONES GENERALES
La garantía de la máquina lavadora a presión no cubre los
elementos que han sido sujetos a abuso o negligencia por parte
del operador. Para hacer válida la cobertura total de la garantía, el
operador deberá mantener la lavadora de presión tal y como se
indica en el manual.
• Algunos ajustes tendrán que hacerse periódicamente para
mantener adecuadamente su máquina lavadora a presión.
• Todos los servicios y ajustes deberán hacerse por lo menos
una vez en cada estación.
• Una vez al año, usted deberá limpiar o remplazar la bujía y el
filtro de aire. Una bujía nueva y un filtro de aire limpio
garantizan una mezcla de combustible-aire adecuada y le ayuda
a su motor a funcionar mejor y a tener una vida útil más
prolongada. Por favor, para mayores detalles, consulte el
manual del propietario del motor.
Antes de Cada Uso
1. Revise el nivel de aceite del motor.
2. Revise si existen daños en el colador de la entrada de agua.
3. Revise si existen daños en el filtro en línea.
4. Revise si existen fugas en la manguera de alta presión.
5. Revise si existen daños en los filtros de químicos.
6. Revise si existen fugas en el conjunto de la extensión para
boquillas y pistola.
7. El aclarado fuera manga de jardín para limpiar fuera
escombros.
MANTENIMIENTO DE LA
MAQUINA LAVADORA A
PRESION
Revise y Limpie el Colador de Entrada
Examine el colador de entrada de la manguera de jardín. Límpielo
si está tapado o remplacelo si está roto.
Revise la Manguera de Alta Presión
Las mangueras de alta presión pueden desarrollar fugas debido al
desgaste, dobleces o abuso. Revise la manguera antes de cada uso.
Revise si existen cortes, fugas, abrasiones, levantamiento de la
cubierta, daño o movimiento de los acoplamientos. Si existe
cualquiera de estas condiciones, remplace la manguera
inmediatamente.
Chequee el Tubo de Sifón del Detergente
Examine el filtro en el tubo del detergente y límpielo si se
encuentra sucio. El tubo debería quedar apretado en la pieza.
Examine el tubo para ver si existe cualquier tipo de goteo o está
roto. Reemplace el filtro o el tubo si alguno de ellos se encuentra
dañado.
Revise la Pistola y la Extensión para
Boquillas
Examine la conexión de la manguera a la pistola y cerciorese de
que esté en buen estado. Pruebe el gatillo oprimiéndolo y
asegurándose de que se devuelve a su sitio cuando lo suelte.
Coloque el cerrojo de seguridad y pruebe el gatillo.Usted no
debe ser capaz de oprimir el gatillo. Remplace la pistola
inmediatamente si falla cualquiera de estas pruebas.
Elimine el Aire y los Contaminantes de la
Bomba
Para retirar el aire de la bomba,siga los siguientes pasos:
1. Instale la máquina lavadora a presión como está descrito en
“Preparando El Lavador A Presión Para Su Uso”. Conecte el
abastecimiento de agua y prenda agua.
• NUNCA repare la manguera de alta presión. Remplacela.
• Remplacela con una manguera que cumpla con la capacidad mínima de
presión de su máquina lavadora a presión.
La corriente de agua de alta presión que produce
este equipo pueden perforar la piel y sus tejidos
profundos, ocasionando lesiones serias y posible
amputación.
ADVERTENCIA
Page 30

Lavadora de Presión 1900 PSI de Generac Portable Products
30
2. Estire el disparador en el fusil del rocío y el asidero.
3. Cuándo el agua es constante y constante, compromete el
picaporte de la seguridad.
Para retirar los contaminantes de la bomba, siga los
siguientes pasos:
1. Instale la máquina lavadora a presión como está descrito en
“Preparando El Lavador A Presión Para Su Uso”. Conecte el
abastecimiento de agua y prenda agua.
2. Quite boquilla la extensión del fusil del rocío.
3. Ponga en marcha el motor de acuerdo a las instrucciones de
“Cómo Darle Arranque a su Máquina Lavadora a Presión”.
4. Hale el gatillo de la pistola y manténgalo apretado.
5. Cuando el suministro de agua sea uniforme y constante,
enganche el cerrojo de seguridad y vuelva a ajustar la
extensión para boquillas.
Revise el Filtro en Línea
Consulte la Figura 21 y suministre servicio al filtro en línea si se
tapa siguiendo estos pasos:
1. Retire la pistola y la extensión para boquillas de la manguera
de alta presión. Retire la extensión para boquillas de la
pistola y retire el anillo 'o' y el colador de la extensión para
boquillas. Lave el colador, pistola y extensión para boquillas
con agua limpia para eliminar toda clase de residuos.
2. Si el colador está dañado, encontrará un colador para el filtro
en línea y un anillo 'o' de repuesto en el juego de anillos 'o'.
Si no está dañado, vuelva a usarlo.
3. Coloque el colador del filtro en línea en el extremo con
rosca de la extensión para boquillas. Su dirección no importa.
Coloque el colador ejerciendo presión con el borrador de
un lápiz hasta que se asiente por completo en el fondo de la
abertura.Tenga cuidado de no doblar el colador.
4. Coloque el anillo 'o' en la ranura respectiva. Empuje el anillo
'o' hasta que quede ajustado contra el colador del filtro en
línea.
5. Conecte la extensión para boquillas a la pistola de rociado de
la manera descrita anteriormente en este manual.
Limpiando el Tubo
Si usted usó el tubo, usted debe lavarlo con agua limpia antes de
parar el motor.
1. Coloque el filtro y la inyección química en un balde lleno de
agua limpia.
2. Deslice boquilla ajustable hacia adelante al modo bajo de la
presión. Lave de 1 a 2 minutos.
3. Apague el motor.
IMPORTANTE: Apagando el motor, simplemente no soltará la
presión en el sistema. Cuando el motor se ha apagado,
apriete el gatillo en la pistola rociadora para deshacerse
de la presión en la manguera.
Mantenimiento de las Boquillas
Si siente una sensación pulsante al momento de apretar el gatillo de
la pistola rociadora, puede que sea causada por la presión excesiva
en la bomba. La causa principal de la presión excesiva en la bomba
es cuando la boquilla se encuentra atascada o tapada con materiales
extraños, tales como tierra, etc. Para corregir el problema, limpie
inmediatamente la boquilla usando las herramientas incluidas con su
lavador a presión y siga las instrucciones siguientes:
1. Apague el motor y apague el suministro de agua.
2. Separe la extensión de la boquilla, de la pistola rociadora.
Gire la boquilla en dirección de las agujas del reloj, a la
posición "stream" (chorro). Usando la llave de Allen de 2mm
(5/64) provista, remueva la boquilla del extremo de la
extensión de la boquilla (Figura 22).
3. Quite el en el filtro de la línea del otro fin de la extensión de
boquilla.
4. Use el alambre incluido en el juego (o un pequeño sujeta
papeles) para liberar cualquier material extraño que esté
tapando la boquilla (Figura 22).
Extensión de la Boquilla
Filtro en Línea
Anillo ‘O’
Figura 21 - Limpieza del Filtro
Boquilla
Figura 22 - Remover y Limpiar la Boquilla
Page 31

Lavadora de Presión 1900 PSI de Generac Portable Products
31
5. Usando una manguera de jardín, remueva cualquier desecho
adicional, poniendo agua en la extensión de la boquilla
(Figura 23). Haga ésto de 30 a 60 segundos. Gire la extensión
de la boquilla ajustable a "stream spray" (chorro rociador) y
mueva la boquilla de "low" (bajo) a "high" (alto), mientras
drene el agua.
6. Instale de nuevo la boquilla y en el filtro en-línea en la
extensión. NO la apriete demasiado con la llave Allen.
7. Conecte de nuevo la extensión de la boquilla a la pistola
rociadora.
8. Conecte de nuevo el suministro de agua,prenda el agua, y
encienda el motor.
9. Pruebe el lavador a presión al hacer funcionar la boquilla en la
posición "high" y "low" o con cada una de las boquillas de
Conexiones rápidas que viene con el lavador a presión.
Mantenimiento de los Anillos 'O'
Durante la operación normal de su máquina lavadora a presión
los anillos 'o' mantienen apretadas y libres de fugas las conexiones
de las mangueras y la pistola, ellos pueden desgastarse o dañarse
con el uso.
Su máquina lavadora a presión viene con un Juego de
Mantenimiento para anillos 'O', el cual contiene anillos 'o',
arandela de caucho y un colador de repuesto para la entrada de la
manguera de jardín. La nota que no todas las partes en el juego se
usarán en su unidad.
Para retirar un anillo 'O' desgastado o dañado; utilice un
destornillador de cabeza plana pequeño, colóquelo por debajo del
anillo 'o' y sáquelo haciendo palanca.
Mantenimiento de la Bomba
Cambio del aceite de la bomba
Cambie el aceite cada 50 horas o una vez al año,lo que suceda antes.
NOTA: Debe adquirir una botella de aceite para la bomba
previamente medido,Nº de pieza 190586GS, avisando el más
cercano servicio autorizado central.
Cambie el aceite como se indica a continuación:
1. Vacíe el aceite del motor y el combustible de la limpiadora a
presión.
2. Use una 8mm llave allen para extraer el tapón negro de
aceite de la bomba que hay entre la salida de presión y la
entrada de la manguera de riego (Figura 24).
3. Incline la limpiadora a presión hacia un lado para que vaciar
completamente la bomba de aceite, y vierta este en un
recipiente homologado.
4. Incline la limpiadora a presión hacia el lado contrario y llene
la bomba con el aceite recomendado a través del mismo
orificio (puede utilizar para ello un embudo pequeño).
5. Instale el tapón negro de aceite de la bomba y apriételo
firmemente.
6. Coloque la limpiadora de presión en su posición normal (de
pie).Añada combustible y aceite de motor.
MANTENIMIENTO DEL MOTOR
Consulte el manual del propietario del motor para las
instrucciones de cómo mantener adecuadamente el motor.
MANTENGA FUERA DE ALCANCE DE NIÑOS. NO
CONTAMINE. CONSERVE los RECURSOS.VUELVA
ACEITE USADO A la COLECCION CENTRA.
Tapón de
Aceite
Figura 24 - Cambio del Aceite de la Bomba
• El aceite usado del motor ha sido mostrado al cancer de la piel de la
causa en ciertos animales del laboratorio.
• Completamente lavado expuso áreas con el jabón y el agua.
Evite el contacto prolongado o repetido de piel con aceite
usado de motor.
PRECAUCIÓN
Figura 23 - Suministrar Flujo de Agua a la Boquilla
Page 32

Lavadora de Presión 1900 PSI de Generac Portable Products
32
PREPARANDO LA UNIDAD PARA
SU ALMACENAMIENTO
El agua no debe permanecer en la unidad por un largo periodo de
tiempo. Los sedimentos o minerales se pueden depositar en las
piezas de la bomba y "congelar" la acción de la bomba. Si usted no
piensa usar el lavador a presión por mas de 30 días, siga este
procedimiento:
1. Vacíe el tubo de detergente, colocando el filtro en un envase
lleno de agua limpia mientras esté corriendo el agua a baja
presión (la lanza ajustable en la posición hacia adelante). Lave
por 1 o 2 minutos.
2. Apague el motor y permita refrescar, entonces quita mangas
altas de presión y jardín. Desconecte el alambre de la bujía.
3. Vacíe todos los líquidos presentes en la bomba, halando la
manecilla de retroceso hasta seis veces.Esto debería remover
la mayor parte de los líquidos presentes en la bomba.
4. El salvador de la bomba de la marca del uso a previene la
corrosión construye y helado de bomba.
5. Almacene la unidad en un lugar limpio y seco.
Proteger la Bomba
A protege al PumpSaver de uso de bomba a previene congelar el
daño y lubrica émbolos y sellos.
NOTA: El PumpSaver, están disponible sólo como un accesorio
opcional. NO es incluido con la arandela de la presión.Avise el
más cercano servicio autorizado central para comprar PumpSaver.
Al uso el PumpSaver, cerciórese la arandela de la presión se apaga
y desconecta del agua del suministro.Lea y siga todas instrucciones
y las advertencias dadas en el contenedor de PumpSaver.
NOTA: PumpSaver goteará de la bomba después que el
tratamiento y manchará madera y cemento.
NOTA: Si el PumpSaver no está disponible, ponga anticongelante
RV (que no contenga alcohol) en la bomba, en una sección de
3 pies de la manguera del jardín conectada a un adaptador y
halando la manecilla dos veces.
ALMACENANDO EL MOTOR
Consulte el manual del propietario del motor para las
instrucciones de cómo preparar adecuadamente el motor para su
almacenamiento.
• Siempre protección de ojo de uso cuando se usa PumpSaver.
Lea y siga todo advierte y las advertencias en el PumpSaver
pueden marcar.
PRECAUCIÓN
PRECAUCIÓN
• Si no lo hace, dañará permanentemente la bomba y la unidad no
podrá funcionar.
• La garantía no cubre el daño de la unidad ocasionado por
congelamiento.
Usted deberá proteger su unidad de las temperaturas de
congelamiento.
Page 33

Lavadora de Presión 1900 PSI de Generac Portable Products
33
NOTAS
Page 34

34
Lavadora de Presión 1900 PSI de Generac Portable Products
REPARACION DE AVERIAS
Problema
La bomba presenta los siguientes
problemas: no produce presión,
produce una presión errada,
traqueteo, pérdida de presión, bajo
volumen de agua.
El detergente no se mezcla con el
rociado.
El motor funciona bien cuando no
tiene cargas, pero funciona "mal"
cuando se conecta una carga.
El motor se apaga durante la
operación.
Causa
1. La boquilla está en el modo de baja
presión.
2. La entrada de agua está bloqueada.
3. Suministro de agua inadecuado.
4. La manguera de entrada está doblada o
presenta fugas.
5. El colador de la manguera de entrada
está tapado.
6. El suministro de agua está por encima
de los 100ºF.
7. La manguera de alta presión está
bloqueada o presenta fugas.
8. La pistola presenta fugas.
9. La boquilla está obstruida.
10. Bomba defectuosa.
1. El tubo de succión de detergente no
está sumergido.
2. El filtro de químicos está tapado.
3. Sucio en el filtro de la línea.
4. La boquilla está en el modo de alta
presión.
La velocidad del motor es demasiado
lenta.
Sin gasolina.
Solución
1. Mueva la boquilla hacia atrás para el
modo de alta presión.
2. Limpie la entrada.
3. Proporcione flujo de agua adecuado.
4. Estire la manguera de entrada, coloque
un parche en la fuga.
5. Revise y limpie el colador de la
manguera de entrada.
6. Proporcione suministro de agua más
fría.
7. Retire las obstrucciones de la
manguera de salida.
8. Remplace la pistola.
9. Limpie la boquilla.
10. Póngase en contacto con el centro de
servicio Briggs & Stratton Power
Products.
1. Coloque el tubo de succión de
detergente en el detergente.
2. Limpie o remplace el filtro/tubo de
succión de detergente.
3. Vea "Cheque En el Filtro de la Línea".
4. Mueva la boquilla hacia adelante para el
modo de baja presión.
Mueva el control de la válvula de
regulación a la posición FAST
(RAPIDO). Si el motor continua
funcionando mal, póngase en contacto
el fabricante del motor.
Llene el tanque de combustible.
Page 35

POLÍTICA PARA EL PROPIETARIO DE EQUIPOS GENERAC PORTABLE PRODUCTS
Efectiva desde el 1ro de Enero, 2003
PERIODO DE GARANTÍA*
* El periodo de garantía comienza en la fecha de compra hecha por el primer consumidor al detal o usuario comercial, y continúa por el periodo
de tiempo que aparece en la tabla arriba mencionada. "Para uso del consumidor" significa, uso residencial por un consumidor al detal."Para uso
comercial" significa, todos los otros casos, incluyendo el uso comercial, para generar un ingreso o por propósitos de alquiler. Una vez que el
equipo ha sido usado comercialmente, debería ser considerado como de uso comercial para las finalidades de esta garantía.
** El motor y las baterías para el encendido, están garantizados por el fabricante de esos productos.
EL REGISTRO DE LA GARANTÍA NO ES NECESARIO PARA OBTENER LA GARANTÍA EN LOS BRIGGS & STRATTON
POWER PRODUCTS. GUARDE SU RECIBO DE COMPRA. SI USTED NO PROVEE LA PRUEBA DE LA FECHA DE LA
COMPRA INICIAL,AL MOMENTO EN QUE SE REQUIERA USAR LA GARANTÍA,LA FECHA DE LA FABRICACIÓN DEL
EQUIPO SERÁ USADA PARA DETERMINAR EL PERIODO DE GARANTÍA.
Acerca de la seguridad de su equipo:
Nosotros reciben las reparaciones bajo la garantía y le pide disculpas por cualquier inconveniencia causada. Cualquier Concesionario de Servicio
Autorizado puede llevar a cabo reparaciones bajo la garantía. La mayoría de las reparaciones bajo la garantía son manejadas normalmente, pero
algunas veces la solicitud del servicio de garantía es posible que no sea apropiada. Por ejemplo, la garantía no será válida si el daño al equipo ocurrió
debido al mal uso, falta de mantenimiento adecuado, manejo, envío, almacenamiento o una instalación inadecuada. De manera similar, la garantía
queda anulada si se ha borrado la fecha de fabricación o el número de serie del equipo o si el equipo ha sido alterado o modificado. Durante el
período de la garantía, el Comerciante Autorizado del Servicio hace, en es la opción, la reparación o reemplaza cualquier parte eso, sobre el examen
se encuentran para ser defectuoso bajo el uso y el servicio normales. Esta garantía no cubrirá las reparaciones y el equipo siguientes:
• Desgaste normal: Equipo eléctrico al aire libre, como todos los aparatos mecánicos, necesita partes, servicio y reemplazo,periódicamente, para
que funcione bien. Esta garantía no cubre la reparación cuando el uso normal ha acabado con la vida de una parte en particular o del equipo.
• Instalación y mantenimiento: Esta garantía no se aplica al equipo o parte que ha estado sujeta a una instalación inadecuada, que no haya
sido autorizada o a cualquier tipo de alteración, el mal uso, negligencia, accidentes, sobrecarga, velocidad excesiva, mantenimiento inadecuado,
reparación o almacenamiento, en nuestro juicio, han afectado desfavorablemente su rendimiento y fiabilidad. Esta garantía también no cubre el
mantenimiento normal tales como ajustes, limpieza del sistema de combustión y la obstrucción (debido a materias químicas, suciedad, carbón
o cal, etc.)
• Otras exclusiones: También se encuentran excluidos de está garantía, el desgaste de los artículos tales como, conectadores, medidores de
aceite, correas, anillos O, filtros, empaque de la bomba, etc. las bombas que se hagan funcionar o trabajar sin agua, o daños y
malfuncionamientos que resulten de accidentes, abusos, modificaciones, alteraciones, un servicio inadecuado, congelamiento o deterioro
químico. Los accesorios tales como pistolas, mangueras, varillas y boquillas están excluidos de la garantía del producto.También se excluye el
equipo usado, reacondicionado y destinado a demostraciones; el equipo utilizado como fuente principal de energía en lugar del servicio de la
compañía proveedora de electricidad y el equipo destinado a aplicaciones utilizadas para mantener la vida.
BRIGGS & STRATTON POWER PRODUCTS GROUP, LLC
JEFFERSON,WISCONSIN, U.S.A.
GARANTÍA LIMITADA
"Generac Portable Products es una marca registrada licenciada de Briggs & Stratton Power Products. Briggs & Stratton Power Products reparará
o sustituirá sin cargo alguno cualquier componente del equipo** que presente defectos de materiales y/o mano de obra. Los gastos de
transporte de las piezas enviadas para reparar o sustituir conforme a los términos de esta garantía correrán a cargo del comprador. Esta
garantía tiene efecto durante el período indicado y conforme a las condiciones estipuladas en la misma. Para obtener servicio en garantía,
localice el distribuidor de servicio autorizado más próximo llamando al 1-800-270-1408. Los distribuidores de servicio autorizado de Briggs &
Stratton Power Products son los únicos que pueden ofrecer servicio en garantía.
NO EXISTE OTRA GARANTÍA EXPRESA.LAS GARANTÍAS IMPLÍCITAS,INCLUYENDO AQUELLAS DE MERCANTIBILIDAD O
CAPACIDAD PARA UN PROPÓSITO PARTICULAR, ESTÁN LIMITADAS AL PERIODO DE TIEMPO ESPECIFICADO, O HASTA EL LÍMITE
PERMITIDO POR LA LEY,TODA Y CUALQUIER GARANTÍA IMPLÍCITA ESTÁ EXCLUIDA. RESPONSABILIDAD POR DAÑOS
CONSECUENTES BAJO CUALQUIER Y TODAS LAS GARANTÍAS, ESTÁN EXCLUIDAS HASTA EL LÍMITE DE EXCLUSIÓN PERMITIDO
POR LA LEY.Algunos países o estados no admiten limitaciones en cuanto a la vigencia de una garantía implícita y algunos no admiten la
exclusión o limitación de daños resultantes o derivados. Por lo tanto, es posible que las limitaciones y exclusiones arriba mencionadas no se
apliquen a su caso. Esta garantía le otorga determinados derechos legales y es posible que usted cuente con otros derechos que pueden variar
de un país a otro o de un estado a otro.”
PRODUCTOS** PARA USO DEL CONSUMIDOR PARA USO COMERCIAL
Lavador de presión 1 año 90 días
Generador portátil 2 años (el segundo año solamente para las partes) 1 año
Page 36

Pulvérisateur á Pression 1900 PSI de Generac Portable Products
36
TABLE DES MATIÈRES
Règles de Sécurité . . . . . . . . . . . . . . . . . . . . . . . . . . . . . . . . . . 36-38
Connaissez Votre Pulvérisateur . . . . . . . . . . . . . . . . . . . . . . . . . . 39
Assemblage . . . . . . . . . . . . . . . . . . . . . . . . . . . . . . . . . . . . . . . 40-41
Opération . . . . . . . . . . . . . . . . . . . . . . . . . . . . . . . . . . . . . . . . 42-44
Caractéristiques du Produit . . . . . . . . . . . . . . . . . . . . . . . . . . . . . 45
Entretien . . . . . . . . . . . . . . . . . . . . . . . . . . . . . . . . . . . . . . . . . 45-47
Rangement . . . . . . . . . . . . . . . . . . . . . . . . . . . . . . . . . . . . . . . . . . 48
Dépannage . . . . . . . . . . . . . . . . . . . . . . . . . . . . . . . . . . . . . . . . . . 49
Remarques. . . . . . . . . . . . . . . . . . . . . . . . . . . . . . . . . . . . . . . . 50-51
Pièces de Rechange . . . . . . . . . . . . . . . . . . . . . . . . . . . . . . . . . 16-17
Garantie . . . . . . . . . . . . . . . . . . . . . . . . . . . . . . . . . . . . . . . . . . . . 52
DESCRIPTION DE L ÉQUIPEMENT
Lisez avec soin ce manuel et familiarisez-vous avec
votre p
ulvérisateur á pression. Connaissez ses
applications, ses limitations et les dangers qu'il
implique.
Tout a été mis en oeuvre pour que les informations contenues
dans ce manuel soient exactes et à jour. Cependant,nous se
réserve le droit de changer, d'altérer ou d'améliorer le produit à
n'importe quel moment sans avis préalable.
RÈGLES DE SÉCURITÉ
Ceci est la sûreté le symbole vif. Il est utilisé pour
vous alerter aux dangers de blessure personnels
potentiels. Obéir tous messages de sûreté qui suivent
ce symbole éviter la blessure ou la mort possibles.
Le symbole indiquant un message de sécurité ( ) est
accompagné d'un mot indicateur (DANGER,ATTENTION,
AVERTISSEMENT), d'un message illustré et/ou d'un message de
sécurité visant à vous avertir des dangers. DANGER indique un
danger qui, s'il n'est pas évité, provoquera des blessures graves,
voire fatales. AVERTISSEMENT indique un danger qui, s'il n'est
pas évité, peut provoquer des blessures graves, voire fatales.
ATTENTION indique un danger qui, s'il n'est pas évité, peut
provoquer des blessures mineures ou légères. Le mot
ATTENTION, lorsqu'il est utilisé sans le symbole d'alerte,
indique une situation pouvant endommager l'équipement. Suivez
les messages de sécurité pour éviter ou réduire les risques de
blessures ou de mort.
Symboles de Danger et Moyens
L’échappement du moteur de ce produit contient des produits
chimiques que l’État de Californie considère comme causant le
cancer, des déformations à la naissance ou d’autres dangers
concernant la reproduction.
AVERTISSEMENT
Dans l'état de Californie un pare-étincelles est requis par la loi
(section 4442 du Code des ressources publiques de Californie).
D'autres états ont des lois similaires. Les lois fédérales
s'appliquent aux terres fédérales. Si vous équipez le silencieux
d'un pare-étincelles, il doit être en bon état de fonctionnement.
Feu
Explosion
Emanations Toxiques
Surface Chaude
Parties en mouvement
Choc Électrique
Surface Glissante
Chute
Effet de Recul
Objets volant
Injection Fluide
Page 37

Pulvérisateur á Pression 1900 PSI de Generac Portable Products
37
LORSQUE VOUS AJOUTEZ DU CARBURANT
• Éteignez le pulvérisateur et laissez-le refroidir au moins 2 minutes
avant de retirer le capuchon du réservoir de carburant.
• Remplissez toujours le réservoir à essence à l'extérieur.
• Ne remplissez pas trop le réservoir. Laissez espace pour l'expansion
de l'essence.
• Éloignez l'essence des étincelles, des flammes, des veilleuses, de la
chaleur et de toute autre source d'inflammation.
• N'allumez pas de cigarette ou ne fumez pas à proximité de l'appareil.
LORSQUE L'ÉQUIPEMENT FONCTIONNE
• Ne penchez pas le moteur ou l'équipement, vous risqueriez de
renverser de l'essence.
• Ne vaporisez pas de liquides inflammables.
LORSQUE VOUS TRANSPORTEZ OU RÉPAREZ
L'ÉQUIPEMENT
• Transportez ou réparez l'appareil lorsque le réservoir d'essence est
VIDE, ou lorsque la soupape d'arrêt d'essence est FERMÉE.
LORSQUE VOUS ENTREPOSEZ L'ESSENCE OU UN
ÉQUIPEMENT AVEC UN RÉSERVOIR À ESSENCE
• Entreposez-le loin des appareils de chauffage, des fours, des
chauffeeau, des sécheuses ou de tout autre appareil électroménager
disposant d'une veilleuse ou de toute autre source d'inflammation
risquant d'enflammer les vapeurs d'essence.
L'essence et ses vapeurs sont extrêmement
inflammables et explosives.
Le feu ou l'explosion risque de provoquer des
blessures graves,pouvant être fatales.
AVERTISSEMENT
• Éloignez le jet d'eau des câbles électriques; cela risquerait de
provoquer des électrocutions.
Le contact de pulvérisation avec l'installation
éléctrique électrique peut résulter dans
l'électrocution.
AVERTISSEMENT
• N visez jamais des personnes, des animaux ou des plantes avec le
pistolet pulvérisateur.
• N'autorisez jamais des ENFANTS à se servir du pulvérisateur.
• Ne réparez jamais les tuyaux à haute pression. Remplacez.
Le jet d'eau sous pression produit par cet
équipement peut percer la peau et les tissus sousjacents, risquant de provoquer des blessures graves
pouvant mener à une amputation.
AVERTISSEMENT
• Faites fonctionner le pulvérisateur SEULEMENT à l'extérieur.
• Utilisez un appareil respiratoire ou un masque lorsqu'il y a des risques
d'inhalation des vapeurs.
• Lisez toutes les instructions qui accompagnent le masque pour être
certain qu'il vous protègera de façon efficace contre l'inhalation des
vapeurs nocives.
Le pulvérisateur, lorsqu'il fonctionne, produit du
monoxyde de carbone, un gaz toxique inodore et
incolore.
Certains produits chimiques ou détergents peuvent
être nocifs s'ils sont inhalés ou ingérés, provoquant
des nausées graves, des évanouissements ou des
empoisonnements.
Le fait de respirer du monoxyde de carbone
provoque des nausées, des évanouissements ou peut
être fatal.
DANGER
• Pour nettoyer de façon plus efficace, tenez le gicleur à une distance de
8 à 24 pouces de la surface à nettoyer.
• Faites fonctionner et rangez cet appareil sur une surface stable.
• La surface à nettoyer doit être inclinée et équipée d'écoulements afin
de réduire la possibilité de chutes dues aux surfaces glissantes.
• Soyez extrêmement prudent si vous devez utiliser le pulvérisateur sur
une échelle, un échafaudage ou tout autre endroit relativement instable.
• Fermement le fusil de pulvérisation de compréhension avec les deux
mains en utilisant l'haute pulvérisation de pression pour éviter la
blessure si le fusil donne un coup de pied le dos.
Usage de pression peut créer puddles et glissant.
Le jet à haute pression risque également de vous faire
tomber si vous êtes trop proche de la surface à
nettoyer.
AVERTISSEMENT
Page 38

Pulvérisateur á Pression 1900 PSI de Generac Portable Products
38
• Ne trafiquez pas vitesse régulée.
• Ne faites pas fonctionner le pulvérisateur à une pression supérieure à
la pression nominale.
En faisant fonctionner le moteur à des vitesses excessives,
vous augmentez les risques de blessures.
ATTENTION
• Ne pointez pas le pistolet pulvérisateur sur du verre lorsqu'il est en
mode pulvérisation.
• N visez jamais des plantes avec le pistolet pulvérisateur.
Le jet à haute pression risque d'endommager les articles
fragiles comme le verre.
ATTENTION
• Ne portez pas de vêtements lâches, de bijoux ou tout ce qui
risquerait d'être pris dans le démarreur ou toute autre pièce rotative.
• Embouteiller des cheveux longs et enlève la bijouterie.
AVERTISSEMENT
LORSQUE VOUS RÉGLEZ OU RÉPAREZ VOTRE
PULVÉRISATEUR À PRESSION
• Débranchez toujours le câble de bougie et placez-le de façon à ce
qu'il ne soit pas en contact avec la bougie.
Unintentional peut résulter dans feu ou électrique.
AVERTISSEMENT
• Protégez toujours vos yeux lorsque vous utilisez cet équipement ou
lorsque vous êtes à proximité de quelqu'un qui l'utilise.
Les jets à haute pression risquent de faire voler des
éclats de peinture ou d'autres particules.
AVERTISSEMENT
Démarreur et autre tourneres peut empêtrer mains,
cheveux, vêtement, ou accessoires.
• Ne touchez pas les surfaces chaudes.
• Ne pas s'approcher des gaz d'échappement.
• Ne JAMAIS déplacer l'équipement lorsqu'il est en fonction.
• Laissez l'équipement refroidir avant de le toucher.
Les moteurs en marche produisent de la chaleur et
des gaz d'échappement chauds. La température du
silencieux et des surfaces environnantes peuvent
atteindre et dépasser 65°C (150°F).
Un incendie ou des blessures graves peuvent survenir.
AVERTISSEMENT
• NE verrouillez PAS le pistolet de pulvérisation dans la position ouverte.
• NE laissez PAS le pistolet de pulvérisation sans surveillance alors que
l'appareil est en marche.
• N'utilisez JAMAIS un pistolet de pulvérisation qui n'est pas muni d'un
verrou d'arme ou d'un pontet installé et en ordre de marche.
• Assurez-vous toujours que le pistolet de pulvérisation, les buses et les
accessoires sont bien fixés.
Le nettoyeur à haute pression produit un jet à haute pression
qui augmente les risques de blessures et de dommages à
l'appareil.
ATTENTION
• Si vous avez des questions à propos de l'utilisation prévue de cet
appareil, consultez votre détaillant ou communiquez avec Briggs &
Stratton Power Products.
• N'utilisez JAMAIS un appareil ayant des pièces brisées ou manquantes
ou sans bâti ou couvercles protecteurs.
• NE neutralisez AUCUN dispositif de sécurité de cette machine.
• Par temps froid, avant de démarrer le nettoyeur à haute pression,
vérifiez-en tous les éléments pour vous assurer qu'aucune glace ne s'y
est formée.
• N'utilisez JAMAIS le tuyau à haute pression comme poignée pour
déplacer l'appareil. Utilisez toujours la poignée de l'appareil.
• Vérifiez la présence de fuites ou les signes de détérioration du
système de combustible, comme un tuyau usé ou spongieux,des
brides de serrage desserrées ou manquantes, ou un réservoir ou un
bouchon endommagé. Réparez toutes les défectuosités avant d'utiliser
le nettoyeur à haute pression.
• Cet appareil est conçu pour être utilisé uniquement avec des pièces
Briggs & Stratton Power Products approuvées. Si l'appareil est utilisé
avec des pièces qui NE sont PAS conformes aux caractéristiques
minimales, tous les risques et responsabilités incomberont à
l'utilisateur.
Le traitement inadéquat du nettoyeur à haute pression peut
l'endommager et réduire sa durée de vie utile.
ATTENTION
Page 39

Pulvérisateur á Pression 1900 PSI de Generac Portable Products
39
CONNAÎTRE VOTRE PULVÉRISATEUR À PRESSION
Lisez ce manuel d'utilisation ainsi que les règles de sécurité avant de faire fonctionner votre pulvérisateur à pression.
Comparez les illustrations avec votre pulvérisateur à haute pression pour vous familiariser avec l'emplacement des différents boutons et
réglages. Conservez ce manuel pour référence ultérieure.
Ampoule plus primordiale - Prépare un moteur froid pour le
démarrage.
Chimique Injection — Usage à siphon ou autre pression
chimique dans le bas pression.
Démarreur à recul - Utilisé pour démarrer le moteur
manuellement.
Filtre à air - Filtre de type sec qui limite la quantité de poussières
et de saletés dans le moteur.
Pompe - Développe une pression élevée.
Prise d'eau - Branchement pour le tuyau d'arrosage.
Prise haute pression - Vous permet de brancher le tuyau à
haute pression.
Réservoir d'essence - Remplissez le réservoir avec de l'essence
ordinaire sans plomb.Laissez toujours de la place pour l'expansion
de l'essence.
Système de refroidissement automatique - Fait circuler l'eau
dans la pompe lorsqu'elle atteint 125° à 155°F. L'eau chaude
s'écoulera de la pompe sur le sol. Ce système empêche la
pompe interne de s'abîmer.
Filtre à air
Ampoule plus primordiale
Réservoir d'essence
Prise d'eau
Pompe equipped with
Système de refroidissement
automatique
Démarreur à recul
Prise haute pression
Chimique Injection
Page 40

Pulvérisateur á Pression 1900 PSI de Generac Portable Products
40
ASSEMBLAGE
IMPORTANT: Lisez entièrement le manuel d'utilisation avant
d'essayer d'assembler ou de faire fonctionner votre nouveau
pulvérisateur.
Déballer le Pulvérisateur du Carton
• Enlevez la sac de pièces, accessoires et insertions qui
accompagne le pulvérisateur.
• Découpez de haut en bas deux angles à l'extrémité du carton,
de façon à ce que le panneau se replie à plat.
• Enlevez le pulvérisateur de la boîte.
Contenu du Carton
Les Articles dans le Carton sont les Suivants:
• Appareil principal
• Lunettes de sécurité
• Tuyau à haute pression
• Pistolet pulvérisateur
• Rallonge de gicleur
• Bouteille d'huile
• Sac de pièces (comprend les pièces suivantes):
• Trousse d'entretien
• Manuel d'utilisation
• Manuel du moteur
• Carte d'inscription de l'utilisateur
Si certaines des pièces énumérées ci-dessus sont manquantes ou
endommagées, appelez la ligne d'assistance pour les pulvérisateurs
au 1-800-270-1408.
PRÉPARER VOTRE
PULVÉRISATEUR POUR
L'UTILISATION
Pour préparer votre pulvérisateur, vous devrez effectuer
les tâches suivantes :
1. Remplissez et envoyez la carte d'inscription.
2. Ajoutez de l'huile au carter du moteur.
3. Ajoutez de l'essence dans le réservoir.
4. Branchez le tuyau à haute pression au pistolet pulvérisateur
et à la pompe.
5. Branchez la source d'alimentation d'eau à la pompe.
6. Fixez la rallonge du gicleur au pistolet pulvérisateur.
Ajouter de l'huile à moteur et du
combustible
• Mettre le pulvérisateur sur une surface à niveau.
• Reportez-vous au manuel d'utilisation du moteur et suivez les
directives et les recommandations relatives à l'huile et au
combustible.
REMARQUE: Vérifiez souvent l'huile lors du rodage du moteur.
Consultez les recommandations contenues dans le manuel
d'utilisation du moteur.
• Reportez-vous au manuel d'utilisation du moteur au sujet de l'huile et
du combustible.
• La garantie sera annulée si des dommages à l'équipement sont
entraînés par le manquement à se conformer à cette directive.
Toute tentative de démarrer le moteur sans qu'il ait été rempli
avec l'huile recommandée entraînera une panne de
l'équipement..
ATTENTION
Page 41

Pulvérisateur á Pression 1900 PSI de Generac Portable Products
41
Raccorder le Tuyau et la Source D'eau à la
Pompe
IMPORTANT: Vous devez attacher tous les tuyaux avant de
démarrer le moteur. Si vous démarrez le moteur sans que tous les
tuyaux soient raccordés et sans arrivée d'eau, vous risquez
d'endommager la pompe.
1. Déroulez le tuyau à haute pression et fixez le à la base du
pistolet pulvérisateur (Figure 25). Serrez manuellement.
2. Fixez l'autre extrémité du tuyau à haute pression à la prise
haute pression sur la pompe (Figure 26). Serrez manuellement.
3. Avant de brancher votre tuyau d'arrosage à la prise d'eau,
inspectez la grille d'entrée (Figure 27). Nettoyez la grille si elle
contient des débris, remplacez-la si elle est endommagée. NE
VOUS SERVEZ PAS DU PULVÉRISATEUR SI LA GRILLE EST
ENDOMMAGÉE.
4. Faites couler de l'eau dans le tuyau d'arrosage pendant
30 secondes pour nettoyer tous les débris. Fermez le robinet
d'eau.
IMPORTANT: NE siphonnez pas de l'eau stagnante pour vous
en servir.Utilisez SEULEMENT de l'eau froide (à moins de 100°F).
5. Connectez le tuyau d'arrosage (ne pas dépasser 50 pieds dans
la longueur) à la prise d'eau. Serrez manuellement (Figure 27).
6. OUVREZ le robinet d'eau et appuyez sur la gâchette du
pistolet pulvérisateur afin de purger l'air et les impuretés du
système de la pompe.
Liste de Vérifications Avant de Démarrer le
Moteur
Examinez l'assemblage de l'appareil pour confirmer que vous avez
effectué tout ce qui suit:
1. Vérifiez qu'il y a de l'huile dans le carter, jusqu'au niveau
approprié.
2. Ajoutez de l'essence dans le réservoir.
3. Vérifiez que les connexions du tuyau sont correctement
serrées (haute pression et eau) et qu'il n'y ait pas de coude,
de coupures ou d'endroits abîmés.
4. Fournissez de l'eau à une cadence appropriée.
5. Assurez-vous d'avoir lu les "Règles de Sécurité" et
"Comment Utiliser Votre Pulvérisateur" avant de l'utiliser.
Connecter l'haut tuyau
de pression ici
Figure 25 — Connecter l'Haut Tuyau de Pression pour
Pistolet Pulvérisateur
Figure 26 — Connecter l'Haut Tuyau de Pression pour
Pomper
Inspecter l'écran
d'arrivée, NE PAS
utiliser si
endommagé;
nettoyer si sale.
Figure 27 — Connecter le Tuyau d'Arrosage à la Prise d'Eau
ATTENTION
• Les dommages infligés au pulvérisateur par suite de ne pas avoir
respecté cette consigne, ne seront pas couverts par la garantie.
Il DOIT y avoir au moins dix pieds de tuyau d'arrosage entre la
prise du pulvérisateur et le robinet d'arrêt de l'eau, par exemple
un connecteur en "Y" ou tout autre valve d'arrêt de l'eau.
• Protégez toujours vos yeux lorsque vous utilisez cet équipement ou
lorsque vous êtes à proximité de quelqu'un qui l'utilise.
• Avant de démarrer le pulvérisateur, assurez-vous de protéger vos
yeux de façon appropriée.
Les jets à haute pression risquent de faire voler des
éclats de peinture ou d'autres particules.
AVERTISSEMENT
Page 42

Pulvérisateur á Pression 1900 PSI de Generac Portable Products
42
COMMENT UTILISER VOTRE
PULVÉRISATEUR
Si vous avez des problèmes à faire fonctionner votre pulvérisateur,
n'hésitez pas à appeler le service d'assistance au 1-800-270-1408.
Mettre Votre Pulvérisateur en Marche
Pour démarrer votre pulvérisateur la première fois, suivez ces
instructions pas à pas. Cette information qui vous aide à mettre
votre pulvérisateur en marche s'applique également s'il est resté
sans fonctionner pendant au moins une journée.
1. Placer la rondelle de pression près d'un hors de la source
d'eau capable d'alimentation d'eau à un taux de flux plus grand
que 3.0 gallons par la minute et aucun moins que 20 PSI à la
fin de rondelle de pression du tuyau de jardin.
2. Vérifiez que le tuyau à haute pression est bien serré sur le
pistolet pulvérisateur et sur la pompe. Consultez les
illustrations de la rubrique "Préparer Votre Pulvérisateur pour
l'Utilisation".
3. Vérifiez que l'appareil est en position horizontale.
4. Branchez le tuyau d'arrosage à la source d'eau sur la pompe
du pulvérisateur. OUVREZ le robinet d'eau.
5. Serrez la gâchette sur le pistolet jusqu'à ce que vous obteniez
un débit d'eau régulier. Cela purgera la pompe de l'air et des
impuretés.
6. Fixez la rallonge du gicleur au pistolet pulvérisateur
(Figure 28). Serrez manuellement.
7. Placez le gicleur en mode basse pression (faites glisser le
gicleur vers l'avant) et serrez la gâchette sur le pistolet
pulvérisateur pour faire sortir la pression provoquée par
l'ARRIVÉE d'eau. L'eau sortira du pistolet en mince filet.
Continuez à tenir la gâchette jusqu'à ce que le débit d'eau soit
régulier et qu'il ne reste plus d'air ou d'eau dans le système.
Relâchez la gâchette.
8. Engagez le verrou de sécurité de la gâchette du pistolet
pulvérisateur (Figure 29).
9. Pour démarrer le moteur, suivez les instructions qui figurent
dans le manuel d'utilisation.
REMARQUE: Toujours garder l'étrangler le levier dans le
“Rapide” la position en opérant la pulvérisateur.
Comment Arrêter Votre Pulvérisateur
• Pour éteindre le moteur, suivez les instructions qui figurent
dans le manuel d'utilisation.
• Appuyez sur la gâchette du pistolet pulvérisateur
pour faire sortir la pression du tuyau.
REMARQUE: Un petite quantité d'eau s'échappe lorsque vous
relâchez la pression.
Figure 28 — Fixez la Rallonge du Gicleur au Pistolet
Pulvérisateur
Verrou de Sécurité
Figure 29 — Pistolet Pulvérisateur avec le Verrou de Sécurité
Engagez
ATTENTION
• Appuyer sur la détente du pistolet de pulvérisation à toutes les fois
que le démarreur est tiré et que le moteur ne démarre pas.
Éviter les blessures causées par l'effet de recul.
ATTENTION
• Toujours utiliser la poignée pour soulever l'équipement.
• Ne JAMAIS utiliser les boyaux pour déplacer l'équipement.
Éviter le risque d'incendie entraîné par le basculement de
l'équipement.
ATTENTION
• Vous devez suivre cet avertissement, au risque d'endommager la
pompe.
Ne faites pas marcher la pompe sans que le nettoyeur à haute
pression soit connecté à la source d'eau ouverte.
Page 43

Pulvérisateur á Pression 1900 PSI de Generac Portable Products
43
Comment Utiliser les Gicleurs Réglables
Vous savez maintenant comment DÉMARRER et ARRÊTER
votre pulvérisateur. L'information fournie dans cette section vous
indique comment régler la forme du jet et appliquer des produits
détergents ou tout autre produit chimique de nettoyage.
1. Faites glisser le gicleur vers l'avant pour régler le jet en mode
basse pression (Figure 30). Faites glisser le gicleur vers
l'arrière pour atteindre la pression élevée.
2. Dirigez le gicleur vers le bas sur une surface dure et appuyez
sur la gâchette pour essayer (Figure 31).
3. En tournant le gicleur, vous réglerez la forme du jet, étroite
ou en éventail (Figure 32).
4. Pour nettoyer de façon plus efficace, tenez le gicleur à une
distance de 8 à 24 pouces de la surface à nettoyer.
5. Si vous placez le gicleur trop près, surtout si vous êtes en
mode haute pression, vous risquez d'abîmer la surface à
nettoyer.
6. NE vous approchez pas à plus de 6 pouces lorsque vous
nettoyez des pneus.
Appliquer des Produits Détergents avec le
Gicleur Réglable
IMPORTANT: Utilisez des savons conçus spécialement
pour les pulvérisateurs. Les produits détergents ménagers
risquent d'endommager la pompe.
Pour appliquer des produits détergents, procédez comme
suit:
1. Consultez la rubrique traitant de l'utilisation des gicleurs
réglables.
2. Préparez une solution détergente comme requis par le
fabricant.
3. Placez la petite extrémité du filtre du tube siphon dans le
récipient de détergent.
Glisser le gicleur en
arrière pour l'Haut Mode
de Pression
Glisse gicleur en avant pour bas
pression et détergent
Figure 30 — Le Gicleur qui Ajuste pour la Pression
Figure 31 — L'essai du Modèle de Pulvérisation
Figure 32 — Ajuster le Gicleur pour le Modèle de Pulvérisation
Tourner le gicleur dans le
sens inverse des aiguilles
d'une montre pour le modèle
de pulvérisation de ventilateur
Tourner le gicleur dans le
sens des aiguilles d'une
montre pour le modèle de
pulvérisation étroit
• Ne réglez jamais la forme du jet lorsque vous pulvérisez.
• Ne placez jamais vos mains en face du gicleur pour régler la forme du
jet.
Les nettoyeurs à haute pression produisent un jet à haute
pression qui accroît les risques de blessures et de dommages à
l'appareil.
AVERTISSEMENT
ATTENTION
• Si vous démarrez le moteur sans que tous les tuyaux soient
branchés et sans que l'eau soit OUVERTE, vous allez abîmer la
pompe.
Vous devez attacher tous les tuyaux avant de démarrer le
moteur.
Page 44

Pulvérisateur á Pression 1900 PSI de Generac Portable Products
44
4. Faites glisser le gicleur réglable vers l'avant en mode basse
pression. Les produits détergents ne peuvent être appliqués
avec le gicleur en position haute pression.
5. Assurez-vous que le tuyau d'arrosage est branché à la prise
d'eau.Vérifiez que le tuyau à haute pression est branché au
pistolet pulvérisateur et à la pompe. Démarrez le moteur.
6. Appliquez le détergent sur une surface sèche, en commençant
par la partie inférieure de la surface à nettoyer et travaillez
vers le haut, avec de longs mouvements réguliers et qui se
chevauchent.
7. Laissez le détergent "tremper" pendant 3 à 5 minutes avant de
laver et de rincer.Appliquez à nouveau, si besoin est, pour
éviter que la surface ne sèche. NE LAISSEZ PAS le détergent
sécher (pour éviter les traces).
IMPORTANT: Vous devez rincer le système d'injection de
produits chimiques après chaque utilisation en plaçant le filtre
dans un seau rempli d'eau claire, puis faire fonctionner le
pulvérisateur à basse pression pendant 1 à 2 minutes.
Rincer le Pulvérisateur
Pour rincer:
1. Faites glisser le gicleur vers l'arrière sur haute pression et
appuyez sur la gâchette. Il faudra quelques secondes pour que
le détergent se vide.
REMARQUE: Vous pouvez également empêcher le détergent de
couler en enlevant simplement le tube siphon de la bouteille.
2. NE placez pas le pistolet pulvérisateur trop près de la surface
que vous désirez pulvériser.
3. Appliquez le jet à haute pression sur une petite surface, puis
vérifiez-la pour voir si elle n'est pas abîmée. Si elle n'est pas
abîmée, vous pouvez continuer.
4. Commencez en haut de l'endroit que vous devez rincer, en
descendant avec les mêmes mouvements qui se chevauchent
comme lorsque vous avez nettoyé.
Système de Refroidissement Automatique
(Surpression Thermique)
Si vous faites tourner le moteur de votre pulvérisateur pendant 3
à 5 minutes sans appuyer sur la gâchette du pistolet pulvérisateur,
l'eau qui circule dans la pompe peut atteindre une température de
125º à 155°F. Lorsque l'eau atteint cette température, le système
de refroidissement automatique se déclenche et refroidit la
pompe en vidant l'eau chaude sur le sol. Ce système
empêche la pompe interne de s'abîmer.
ATTENTION
• Lorsque vous insérez le filtre dans une bouteille de solution de
détergent, placez le tube de manière à ce qu'il n'entre pas en
contact par mégarde avec le silencieux chaud.
Évitez que le tube siphon pour les détergents ne touche le
silencieux chaud.
• Pour nettoyer de façon plus efficace, tenez le gicleur à une distance de
8 à 24 pouces de la surface à nettoyer.
• Faites fonctionner et rangez cet appareil sur une surface stable.
• Soyez extrêmement prudent si vous devez utiliser le pulvérisateur sur
une échelle, un échafaudage ou tout autre endroit relativement
instable.
• Fermement le fusil de pulvérisation de compréhension avec les deux
mains en utilisant l'haute pulvérisation de pression pour éviter la
blessure si le fusil donne un coup de pied le dos.
Le jet à haute pression risque également de vous faire
tomber si vous êtes trop proche de la surface à
nettoyer.
AVERTISSEMENT
Page 45

Pulvérisateur á Pression 1900 PSI de Generac Portable Products
45
CARACTÉRISTIQUES
Pression nominale . . . . . 1900 psi
Débit d'écoulement . . . 2.0 gallons par minute (gpm)
Détergent . . . . . . . . . . . . Utilisez un détergent homologué pour
les pulvérisateurs
Température . . . . . . . . . Ne doit pas dépasser 100°F
De L'eau
Système de . . . . . . . . . . S'enclenche lorsque l'eau
Refroidissement . . . . . . atteint 125° à 155°F
Automatique
Poids à l'Expédition . . . . 46 Livres
RECOMMANDATIONS
D'ENTRETIEN GÉNÉRAL
La garantie du pulvérisateur ne couvre pas les articles qui ont été
soumis à des abus ou des négligences par l'opérateur. Pour percevoir
la valeur intégrale de la garantie, l'opérateur doit entretenir le
pulvérisateur à pression en suivant les directives de ce manuel.
• Il est nécessaire d'effectuer certains réglages régulièrement
pour entretenir votre pulvérisateur à haute pression.
• Toutes les opérations d'entretien mentionnées dans ce manuel
et dans le manuel d'utilisation du moteur doivent être
effectuées au moins une fois à chaque saison.
• Vous devez nettoyer ou remplacer la bougie, nettoyer ou
remplacer le filtre à air au moins une fois par an. Une nouvelle
bougie et un filtre à air propre garantissent un mélange
essence-air approprié et permet à votre moteur de
fonctionner mieux et plus longtemps.Veuillez consulter le
manuel d'utilisation du moteur pour de plus amples détails.
Avant Chaque Utilisation
1. Vérifiez le niveau d'huile du moteur.
2. Vérifiez si la grille de la prise d'eau n'est pas abîmée.
3. Vérifiez si le filtre du tuyau n'est pas abîmé.
4. Vérifiez si le tuyau à haute pression n'a pas de fuite.
5. Vérifiez si le tube siphon pour les détergents et le filtre ne
sont pas endommagés.
6. Vérifiez si le pistolet pulvérisateur et de l'assemblage de la
rallonge réglable du gicleur n'ont pas de fuite.
7. Rincez le tuyau d'arrosage pour évacuer les débris avant de
raccorder le pulvérisateur.
ENTRETIEN DU PULVÉRISATEUR
Vérifiez et Nettoyez la Grille de la Prise
D'eau
Inspectez la grille de la prise d'eau. Nettoyez-la si elle est bouchée
ou remplacez-la si elle est endommagée.
Vérifiez le Tuyau à Haute Pression
Le tuyau à haute pression peut avoir des fuites, s'il est usé, tordu
ou mal utilisé. Inspectez le tuyau avant chaque utilisation.Vérifiez
tous les tuyaux pour les coupures, les fuites, l'abrasion ou le
gonflement du couvercle, ou si certains raccords sont abîmés ou
mobiles. Si vous remarquez quelque chose, remplacez
immédiatement le tuyau.
Vérifiez le Tube Siphon des Produits
Détergents
Examinez le filtre du tube des détergents et nettoyez-le s'il est
bouché. Le tube doit être bien vissé dans le raccord coudé.
Vérifiez si le tube ne fuit pas ou n'est pas usé. Remplacez le filtre
ou le tube s'ils sont endommagés.
Vérifiez le Pistolet et la Rallonge de
Gicleur Réglable
Inspectez le raccord du tuyau sur le pistolet pulvérisateur, s'il est
correctement fixé. Essayez la gâchette en appuyant et en vous
assurant qu'elle "s'enclenche" en place lorsque vous la relâchez.
Placez le verrou de sécurité en position MARCHE et essayez la
gâchette.Vous ne devriez pas pouvoir l'enfoncer. Remplacez le
pistolet si ces tests ne sont pas positifs.
Purgez la Pompe de l'Air et des Impuretés
Pour purger l'air de la pompe, procédez comme suit:
1. Réglez le pulvérisateur comme il est indiqué à la rubrique
"Préparer Votre Pulvérisateur pour l'Utilisation". Raccordez la
source d'alimentation d'eau et ouvrez le robinet.
2. Tirez sur la gâchette du pistolet pulvérisateur et tenez-la.
3. Lorsque l'eau arrive régulièrement, enclenchez le verrou de
sécurité.
• Ne réparez jamais les tuyaux à haute pression. Remplacez.
• Le tuyau de remplacement DOIT résister à une pression supérieure à
la pression nominale du nettoyeur.
Le jet d'eau sous pression produit par cet
équipement peut percer la peau et les tissus sousjacents, risquant de provoquer des blessures graves
pouvant mener à une amputation.
AVERTISSEMENT
Page 46

Pulvérisateur á Pression 1900 PSI de Generac Portable Products
46
Pour purger les impuretés de la pompe, procédez comme
suit:
1. Réglez le pulvérisateur comme il est indiqué à la rubrique
"Préparer Votre Pulvérisateur pour l'Utilisation". Raccordez la
source d'alimentation d'eau et ouvrez le robinet.
2. Enlevez la rallonge de gicleur du pistolet pulvérisateur.
3. Démarrez le moteur selon les instructions que vous trouverez
à la rubrique "Pour Mettre Votre Pulvérisateur en Marche".
4. Apppuyez sur la gâchette du pistolet pulvérisateur et tenez-la.
5. Lorsque l'eau arrive régulièrement, enclenchez le verrou de
sécurité et fixez la rallonge de gicleur.
Vérifier le Filtre Intégré
Consultez la Figure 33 et réparez le filtre intégré s'il est bouché,
en procédant comme suit:
1. Détachez le pistolet pulvérisateur et la rallonge de gicleur du
tuyau à haute pression. Détachez la rallonge de gicleur du
pistolet pulvérisateur et enlevez le joint torique et la grille de
la rallonge de gicleur. Rincez la grille, le pistolet pulvérisateur
et la rallonge de gicleur réglable avec de l'eau propre pour
retirer les débris.
2. Si la grille est endommagée, la trousse de joints toriques
contient une grille de rechange pour le filtre intégré et un
joint torique. Si elle n'est pas abîmée, vous pouvez la
réutiliser.
3. Placez la grille du filtre intégré dans l'extrémité filetée de la
rallonge du gicleur. La direction importe peu. Faites entrer la
grille avec l'extrémité gomme d'un crayon jusqu'à ce qu'elle
s'encastre à plat au fond de l'ouverture. Faites attention de
ne pas plier la grille.
4. Placez le joint torique dans l'encoche. Serrez le joint torique
contre la grille du filtre intégré.
5. Assemblez la rallonge du gicleur au pistolet pulvérisateur,
comme il est expliqué plus haut dans ce manuel.
Nettoyer le Tube Siphon des Produits
Détergents
Si vous avez utilisé le tube siphon de détergent, vous devez le
rincer avec de l'eau propre avant d'arrêter le moteur.
1. Placez le siphon/filtre d'injection de produits chimiques dans
un seau rempli d'eau propre.
2. Faites glisser le gicleur réglable vers l'avant en mode basse
pression. Rincez pendant 1 à 2 minutes.
3. Arrêtez le moteur.
IMPORTANT: En éteignant simplement le moteur, la pression ne
sortira pas du système. Lorsque le moteur est arrêté,
appuyez sur la gâchette du pistolet pulvérisateur pour
faire sortir la pression du tuyau.
Entretien du Gicleur
Vous sentirez des pulsations lorsque vous appuyez sur la gâchette
du pistolet pulvérisateur s'il y a une pression excessive dans la
pompe. La cause principale de cette pression excessive dans la
pompe est un gicleur bouché ou encombré par des matériaux
étrangers, comme de la poussière, etc. Pour régler le problème,
nettoyez immédiatement le gicleur à l'aide des outils qui
accompagnent votre pulvérisateur et procédez comme suit:
1. Éteignez le moteur et fermez l'arrivée d'eau.
2. Détachez la rallonge du pistolet pulvérisateur.Tournez le
gicleur dans le sens des aiguilles d'une montre en position jet.
À l'aide de la clé hexagonale de 2 mm (5/64) fournie, enlevez
le gicleur de l'extrémité de la rallonge (Figure 34).
3. Enlevez le filtre intégré de l'autre extrémité de la rallonge du
gicleur.
4. Utilisez le câble inclus dans la trousse (ou un petit trombone)
pour retirer tout matériau qui bouche ou encombre le
gicleur (Figure 34).
5. À l'aide d'un tuyau d'arrosage, enlevez les débris supplémentaires
en injectant de l'eau à contre courant dans la rallonge du gicleur
(Figure 35). Rincez pendant 30 à 60 secondes environ.Tournez la
rallonge de gicleur réglable pour pulvériser en jet et bougez le
gicleur de haut en bas tout en rinçant.
Rallonge de Gicleur
Grille du Filtre
Joint Torique
Figure 33 — Nettoyer le Filtre Intégré
Gicleur
Figure 34 — Enlever et Nettoyer Gicleur
Figure 35 — Rincez Pendant le Gicleur
Page 47

Pulvérisateur á Pression 1900 PSI de Generac Portable Products
47
6. Réinstallez le gicleur et le filtre intégré dans la rallonge. NE
SERREZ PAS trop le gicleur avec la clé hexagonale.
7. Raccordez la rallonge du pistolet pulvérisateur.
8. Raccordez l'arrivée d'eau, ouvrez le robinet d'eau et
démarrez le moteur.
9. Essayez de faire fonctionner le pulvérisateur avec le gicleur
en position haute et basse.
Entretien du Joint Torique
Lors de l'utilisation normale de votre pulvérisateur, il est probable
que les joints qui empêchent les raccords entre les tuyaux et le
pistolet de fuir, s'usent ou s'abîment.
Vous trouverez une trousse d'entretien des joints avec votre
pulvérisateur qui contient des joints de rechange, des rondelles en
caoutchouc et un filtre pour la prise d'eau. Consultez la fiche
d'instructions fournies dans la trousse pour réparer les joints de
votre appareil.Pour votre appareil,vous n'aurez pas besoin de
toutes les pièces contenues dans la trousse.
Pour enlever un joint usé ou endommagé; utilisez un petit
tournevis plat pour passer sous le joint et l'écarter.
Entretien de la Pompe
Vidange de l'huile
Remplacer l'huile toutes les 50 heures, ou un fois par an, si cette
période échoit la première.
REMARQUE: Se procurer une dose d'huile de pompe (flacon),
référence 190586GS, auprès de l'établissement de service après
vente le plus proche.
Vidanger la pompe selon la procédure suivante:
1. Vidanger l'huile moteur et l'essence du nettoyeur haute
pression.
2. Au moyen d'un clé six pans mâle, déposer le bouchon noir
de vidange d'huile placé entre la sortie haute pression et
l'entrée de tuyau d'arrosage (Figure 36).
3. Incliner le nettoyeur haute pression sur le côté pour
vidanger l'huile complètement de la pompe dans un récipient
homologué pour cet usage.
4. Renverser le nettoyeur haute pression dans la direction
opposée et remplir la pompe avec l'huile recommandée par
le même orifice (un petit entonnoir peut s'avérer utile).
5. Remettre le bouchon noir en place et le serrer fermement.
6. Mettre le nettoyeur haute pression dans sa position normale.
Mettre de l'essence et faire le niveau d'huile moteur.
ENTRETIEN DU MOTEUR
Consultez le manuel d'utilisation du moteur pour savoir comment
entretenir correctement le moteur.
GARDEZ HOS DE PORTÉE DES ENFANTS. NE
POLLUEZ PAS. CONSERVEZ LE SURPLUS.
RAPPORTEZ L'HUILE USAGÉE AUX CENTRES
DE RECYCLAGE.
Bouchon
d'huile
Figure 36 - Vidange de l'huile
• Il a été démontré que l'huile moteur usagée risque de provoquer un
cancer de la peau chez certains animaux de laboratoire.
• Rincez consciencieusement les zones exposées avec de l'eau et du
savon.
Évitez tout contact cutané prolongé ou répété avec l'huile
moteur usagée.
ATTENTION
Page 48

48
Pulvérisateur á Pression 1900 PSI de Generac Portable Products
PRÉPARER L'APPAREIL POUR
L'ENTREPOSAGE
Il ne doit pas rester d'eau dans l'appareil pendant longtemps. Les
dépôts ou le calcaire peuvent se déposer sur les pièces de la
pompe et "geler" l'action de la pompe. Si vous pensez pas utiliser
le pulvérisateur pendant plus de 30 jours d'affilée, procédez
comme suit:
1. Rincez le tube de vidange de détergent en plaçant le filtre
dans seau d'eau propre tout en faisant fonctionner le
pulvérisateur en mode basse pression (l'embout réglable
positionné vers l'avant). Rincez pendant une ou deux minutes.
2. Arrêtez le moteur et laissez-le refroidir, puis enlevez les
tuyaux haute pression et d'arrosage. Débranchez le câble de
la bougie.
3. Vidangez la pompe de tous les liquides en tirant environ
6 fois sur la poignée de recul. Ceci doit suffir pour
débarrasser la pompe de tout liquide.
4. Utilisez PumpSaver pour éviter la corrosion ou que la pompe
ne gèle.
5. Rangez l'appareil dans un endroit propre et sec.
Protection de la Pompe
Pour éviter que la pompe ne s'abîme à cause des dépôts de
calcaire ou du gel, utilisez PumpSaver pour la traiter. Cela évitera
qu'elle ne s'abîme avec le gel et lubrifie les pistons et les joints.
REMARQUE: Le PumpSaver est disponible en option. Il n'est pas
inclus avec le pulvérisateur. Contacter le centre de maintenance
autorisé plus proche pour acheter Pumpsaver.
Pour utiliser PumpSaver, vérifiez que le pulvérisateur ne
fonctionne pas et qu'il est débranché de la prise d'eau. Lisez et
respectez tous les conseils et les avertissements sur la boîte de
PumpSaver.
REMARQUE: PumpSaver va goutter de la pompe après que vous
l'ayez traitée et va tâcher le bois et le ciment.
REMARQUE: Si vous n'avez pas de PumpSaver, mettez de
l'antigel RV (sans alcool) dans la pompe en versant la solution dans
une section de tuyau d'arrosage de 3 pieds raccordée à
l'adaptateur de la prise d'eau et tirez deux fois sur la poignée de
recul.
RANGER LE MOTEUR
Consultez le manuel d'utilisation du moteur pour savoir comment
préparer le moteur pour l'entreposage.
ATTENTION
• Si vous ne le faites pas, vous risquez d'endommager définitivement
votre pompe et de ne plus pouvoir vous servir de votre appareil.
• Les dommages dus au gel ne sont pas couverts par la garantie.
Vous devez protéger votre appareil lorsqu'il gèle.
• Portez toujours une protection oculaire lorsque vous utilisez
PumpSaver.
Lisez et respectez tous les conseils et les avertissements sur
l'étiquette de la boîte de PumpSaver.
ATTENTION
Page 49

49
Pulvérisateur á Pression 1900 PSI de Generac Portable Products
DÉPANNAGE
Problème
La pompe a les problèmes suivants:
pas de pression, pression irrégulière,
pressure, claquement, perte de
pression, faible débit d'eau.
Le détergent ne se mélange pas avec
le jet.
Le moteur tourne sans charge mais
cale quand une charge est ajoutée.
El motor se apaga durante la
operación.
Cause
1. Buse sur basse pression.
2. Entrée d'eau bloquée.
3. Pas assez d'eau qui arrive.
4. Tuyau d'entrée tortillé ou avec fuites.
5. Filtre de tuyau bouché.
6. Eau à plus de 100°F.
7. Tuyau de sortie bloqué ou avec fuites.
8. Le pistolet fuie.
9. La buse est bouchée.
10. La pompe est défectueuse.
1. Le tube n'est pas submergé.
2. Le filtre du tube est bouché.
3. Le filtre intégré sale.
4. La buse est sur haute pression.
Vitesse trop lente du moteur.
Sin gasolina.
Correction
1. Mettre la buse sur haute pression.
2. Dégager l'entrée d'eau.
3. Fournir un débit adéquat.
4. Redresser le tuyau, boucher la fuite.
5. Vérifier et nettoyer le filtre du tuyau
d'entrée.
6. Ayez une eau plus froide.
7. Débloquez le tuyau de sortie.
8. Remplacer le pistolet.
9. Déboucher la buse.
10. Contacter votre concessionnaire
Briggs & Stratton Power Products.
1. Insérer le tube dans le détergent.
2. Nettoyer ou remplacer le tube et/ou le
filtre.
3. Voir "Vérifier le Filtre Intégré".
4. Mettre la buse sur le mode basse
pression.
Mettre l'accélérateur sur FAST. Si le
moteur continue à caler contacter
votre concessionaire fabricant de
moteur.
Llene el tanque de combustible.
Page 50

50
Pulvérisateur á Pression 1900 PSI de Generac Portable Products
REMARQUES
Page 51

51
Pulvérisateur á Pression 1900 PSI de Generac Portable Products
REMARQUES
Page 52

POLITIQUE DE GARANTIE DE L'UTILISATEUR DES PRODUITS GENERAC PORTABLE PRODUCTS
en vigueur à partir du 1er Janvier 2003
PERIODO DE GARANTÍA*
* La période de garantie débute à la date d'achat par le premier acheteur au détail ou par le premier utilisateur commercial final,et se prolonge
pour la durée stipulée dans le tableau ci-dessus. "Usage par un consommateur" signifie utilisation domestique personnelle dans une résidence, par
l'acheteur au détail. "Usage à des fins commerciales" signifie toute autre utilisation,y compris à des fins commerciales, de génération de revenus ou
de location.Aux fins de la présente garantie, dès qu'un équipement a été utilisé commercialement une fois, il est par la suite considéré comme
étant d'usage à des fins commerciales.
** Le moteur et les batteries de démarrage sont garantis uniquement par les fabricants de ces produits.
POUR EXERCER LA GARANTIE SUR TOUT ÉQUIPEMENT FABRIQUÉ PAR BRIGGS & STRATTON POWER PRODUCTS,IL
N'EST PAS NÉCESSAIRE DE L'ENREGISTRER. CONSERVEZ LE REÇU COMME PREUVE D'ACHAT. SI,LORS D'UNE
RÉCLAMATION DE GARANTIE,VOUS NE POUVEZ PROUVER LA DATE INITIALE DE L'ACHAT, NOUS UTILISERONS LA DATE
DE FABRICATION DE L'ÉQUIPEMENT COMME DATE DE RÉFÉRENCE POUR DÉTERMINER LA PÉRIODE DE GARANTIE.
À propos de la garantie de votre équipement:
Nous acceptons de faire effectuer les réparations couvertes par la garantie et tenons à nous excuser pour tout inconvénient subi.Tout
distributeur de service après-vente agréé peut effectuer les réparations couvertes par la garantie. La plupart des réparations couvertes par la
garantie sont traitées automatiquement; cependant, il arrive parfois que les demandes de service en vertu de la garantie soient non fondées. Par
exemple, la garantie ne couvre pas les dommages causés à l'équipement par une utilisation abusive, par un manque d'entretien périodique, durant
l'expédition, la manutention ou l'entreposage, ou en raison d'une installation inadéquate. De même, la garantie sera annulée si la date de
fabrication ou le numéro de série apposé à l'équipement a été enlevé ou si l'équipement a été changé ou modifié. Durant la période de garantie, le
distributeur de service après-vente agréé réparera ou remplacera, à son gré, toute pièce qui, après examen, est trouvée défectueuse à la suite
d'une utilisation et d'un entretien normaux. La présente garantie ne couvre pas les réparations et les équipements suivants:
• Usure normale: Comme pour tous les appareils mécaniques, pour que le matériel motorisé extérieur fonctionne adéquatement, il faut que
celui-ci et certaines de ses pièces soient régulièrement entretenus et remplacés. La présente garantie ne couvre pas les frais de réparation des
pièces ou des équipements dont la durée de vie utile a été épuisée à la suite d'une utilisation normale.
• Installation et entretien: La présente garantie ne couvre pas les équipements ou les pièces qui ont fait l'objet d'une installation ou de
modifications et de changements inadéquats ou non autorisés, d'une mauvaise utilisation, de négligence, d'un accident, d'une surcharge,
d'emballement, d'entretien inadéquat, de réparation ou d'entreposage qui, selon nous,aurait nui à la performance et à la fiabilité du produit. De
plus, la garantie ne couvre pas l'entretien normal tel que le réglage, le nettoyage du circuit d'alimentation et son obstruction (causée par
l'accumulation de produits chimiques, de saletés, de calamine ou de calcaire, etc.).
• Exclusions supplémentaires: Sont également exclues de la présente garantie les pièces qui s'usent telles que les raccords rapides, les jauges
d'huile, les courroies, les joints toriques, les filtres, les garnitures de pompes, etc., les pompes ayant fonctionné sans alimentation en eau ou
tout dommage ou tout mauvais fonctionnement résultant d'un accident, de l'abus, de modifications, de changements ou d'un entretien
inadéquat du système, du gel ou d'une détérioration chimique. La garantie du produit ne couvre pas les pièces accessoires telles que les
pistolets, les boyaux, les lances et les buses. Est aussi exclu tout équipement usé, remis à neuf ou de démonstration, tout équipement utilisé
pour l'alimentation principale en remplacement de l'alimentation de service et tout équipement utilisé pour l'alimentation d'appareils de
maintien des fonctions vitales.
BRIGGS & STRATTON POWER PRODUCTS GROUP, LLC
JEFFERSON,WISCONSIN, U.S.A.
GARANTIE LIMITÉE
"Generac Portable Products est une marque déposéee autorisée de Briggs & Stratton Power Products. Briggs & Stratton Power Products réparera
ou remplacera, sans frais, toute pièce ou pièces d'équipement** défectueuses comportant un vice de matériau ou un défaut de fabrication ou les
deux. En vertu de la présente garantie, les frais de transport des pièces soumises pour réparation ou remplacement sont à la charge de l'acheteur.
La présente garantie sera en vigueur durant les périodes stipulées dans la présente et est assujettie aux conditions stipulées dans la présente. Pour
obtenir des services en vertu de la garantie, trouver le négociant de service Autorisé plus proche en appelant 1-800-270-1408.Seul un distributeur
de service après-vente agréé de Briggs & Stratton Power Products peut effectuer les services en vertu de la présente garantie.
IL N'EXISTE AUCUNE AUTRE GARANTIE EXPRESSE. LES GARANTIES IMPLICITES, INCLUANT CELLES DE QUALITÉ MARCHANDE ET
D'APTITUDE À UN USAGE PARTICULIER,SONT LIMITÉES À LA DURÉE STIPULÉE DE LA GARANTIE OU ENCORE JUSQU'À LA LIMITE
PERMISE PAR LA LOI. TOUTE GARANTIE IMPLICITE EST EXCLUE. LA RESPONSABILITÉ POUR DOMMAGES INDIRECTS EN VERTU DE
N'IMPORTE QUELLE GARANTIE EST EXCLUE DANS LA MESURE OÙ UNE TELLE EXCLUSION EST PERMISE PAR LA LOI. Certains pays ou
États/provinces n'autorisent aucune restriction sur la durée d'une garantie implicite, et certains pays ou États/provinces n'autorisent pas
l'exclusion ou la limitation des dommages consécutifs ou indirects. Par conséquent, les restrictions et exclusions décrites ci-dessus pourraient ne
pas s'appliquer dans votre cas. La présente garantie vous accorde certains droits légaux spécifiques et vous pourriez également en avoir d'autres,
lesquels peuvent varier selon l'État, la province ou le pays."
PRODUITS** UTILISATION PAR LE CONSOMMATEUR UTILISATION COMMERCIALE
Pulvérisateur á Pression 1 an 90 jours
Générateur portatif 2 ans (La deuxième année couvre les pièces uniquement) 1 an
 Loading...