

Briggs & Stratton 030547-00 Owner’s Manual
RIGG &STRATrO N
®
rta I G
rator's I
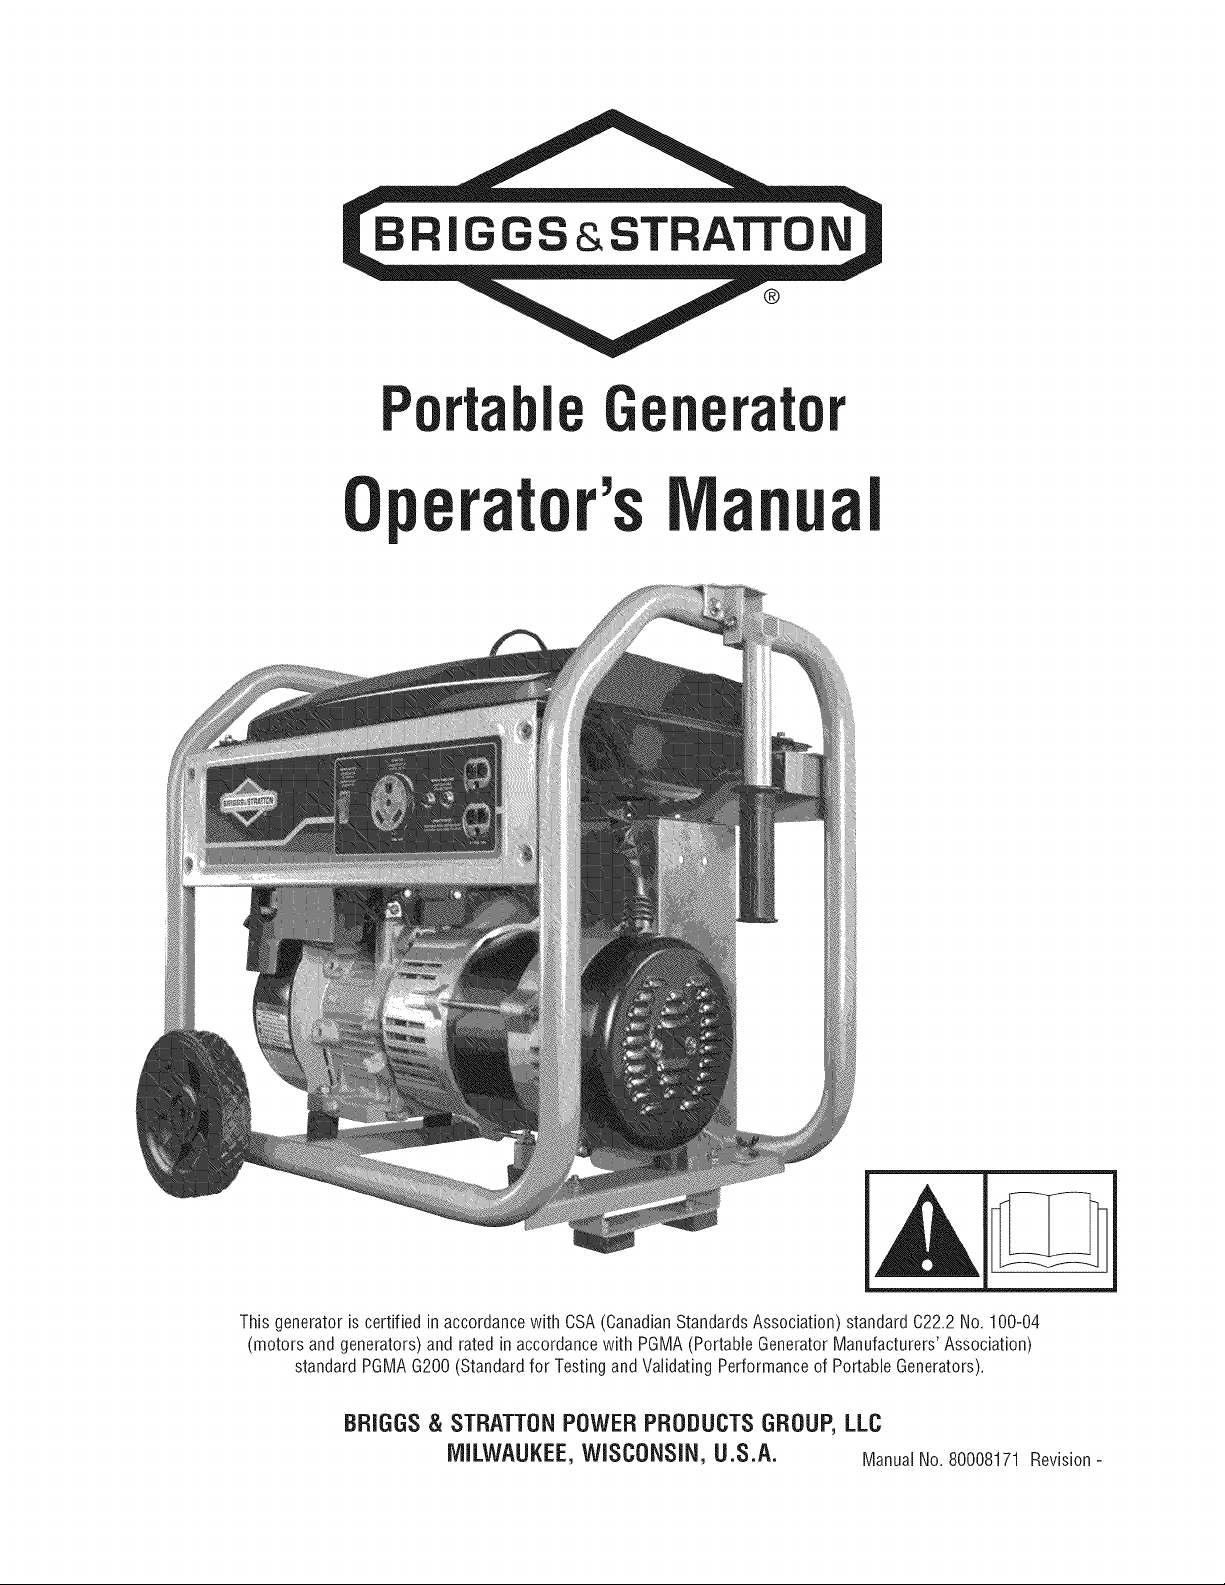
This generator is certified in accordancewith CSA (CanadianStandardsAssociation) standard 022.2 No. 100-04
(motors and generators) and rated in accordancewith PGMA (Portable Generator Manufacturers' Association)
standard PGMAG200 (Standard for Testing and Validating Performanceof Portable Generators).
BRIGGS & STRATTONPOWER PRODUCTS GROUP, LLC
MILWAUKEE, WISCONSIN, U.S.A. Manual No. 80008171 Revision-
Thankyoufor purchasing this quality-built Briggs & Stratton@generator. We are pleased thatyou've placedyour confidence
in the Briggs & Stratton brand. When operatedand maintained according to the instructions inthis manual,your Briggs &
Stratton generator will provide many years of dependableservice.
Thismanualcontainssafety informationto makeyou awareof the hazardsand risks associatedwith generatorproducts and
how to avoidthem. This generator is designed and intended only for supplying electrical powerfor operatingcompatible
electrical lighting, appliances, tools and motor loads, and is not intended for any other purpose, it is important that you read
and understandthese instructions thoroughly before attempting to start or operatethis equipment. Save this original manual
for future reference.
This generator requiresfinal assembly before use. Referto the Assembly section of this manualfor instructions onfinal
assembly procedures. Follow the instructions completely.
Where to FindUs
You never haveto look far to find Briggs & Stratton support andservice for your generator. Consultyour Yellow Pages.There
are over 30,000 Briggs & Stratton authorized service dealersworldwide who provide quality service. You canalso contact
Briggs & Stratton Customer Service by phone at (800) 743-4115, or on the Internet at BRIGGSandSTRATTON.COM.
Generator
Model Number
Revision
Serial Number
Engine
Model Number
Type Number
Code Number
DatePurchased
Copyright © 2013. Briggs & Stratton PowerProducts Group,LLC
Milwaukee, WI, USA.All rights reserved.
BRIGGS& STRATTONPOWERPRODUCTSis a registered
trademark of Briggs & Stratton Corporation
Milwaukee, WI, USA
2 BRIGGSandSTRATTON.COIVl
Table of Contents
Operator Safety ................................. 4
Equipment Description......................................... 4
important Safetyinformation.................................... 4
Assembly ..................................... 7
UnpackGenerator ............................................ 7
Shipment Contents ........................................... 7
install Wheel Kit.............................................. 7
Add EngineOil............................................... 8
Add Fuel.................................................... 8
System Ground .............................................. 9
Connectingto a Building's ElectricalSystem........................ 9
GeneratorLocation ........................................... 9
Featuresand Controls............................ 10
Cord Sets and Receptacles.................................... 11
Operation .................................... 12
Starting the Engine .......................................... 12
ConnectingElectrical Loads.................................... 13
Stopping the Engine.......................................... 13
Warm WeatherOperation ..................................... 13
Don't OverloadGenerator ..................................... 14
Maintenance .................................. 15
MaintenanceSchedule........................................ 15
GeneratorMaintenance....................................... 15
FuelValveMaintenance....................................... 16
Engine Maintenance.......................................... 16
Storage ................................................... 19
Troubleshooting................................ 20
Schematic ................................................. 21
Warranties .................................... 24
Emissions Control System Warranty............................. 24
GeneratorOwnerWarranty .................................... 26
Specifications................................. 28
Product Specifications........................................ 28
Common Service Parts ....................................... 28
Frangais Espa_ol
3
OperatorSafety
EquipmentDescription
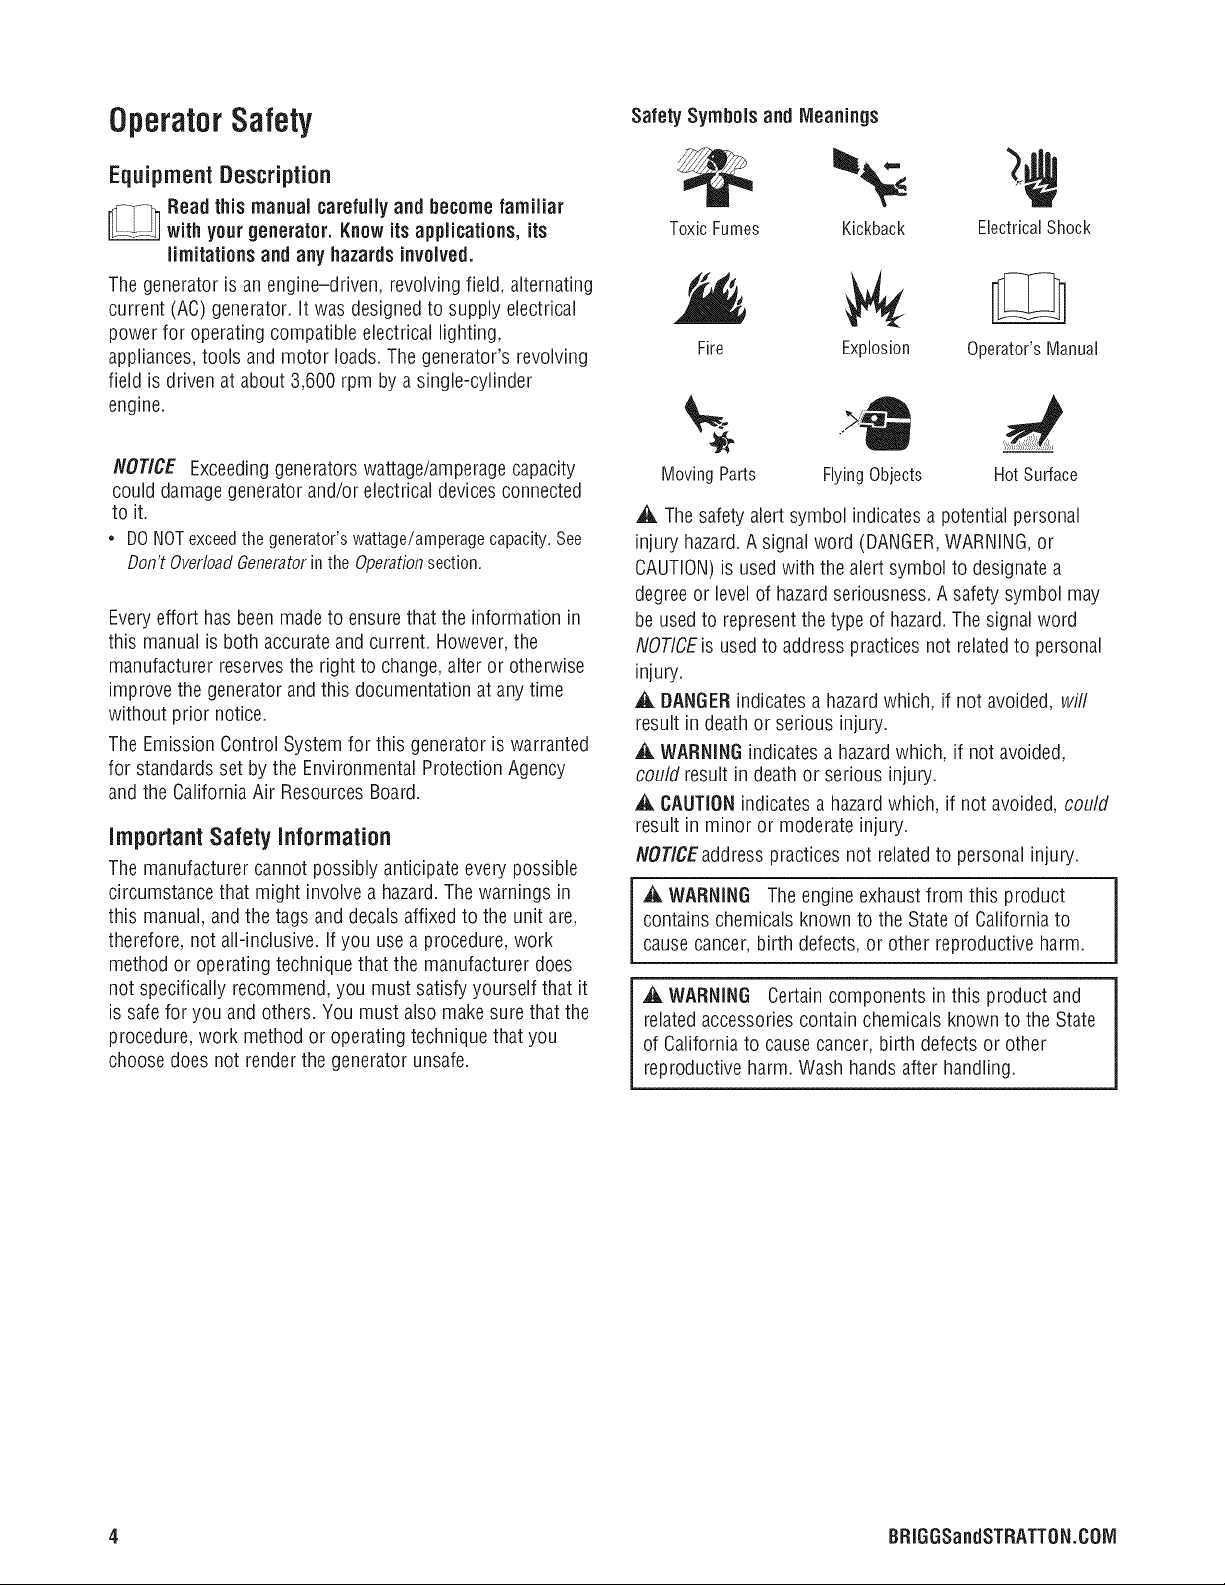
Safety Symbols and Meanings
Readthis manual carefully and becomefamiliar
..... with yourgenerator. Knowits applications, its
limitationsand any hazardsinvolved.
Thegenerator is an engine-driven, revolving field, alternating
current (AC) generator. It was designedto supply electrical
power for operating compatible electrical lighting,
appliances,tools and motor loads. The generator's revolving
field is driven at about 3,600 rpm by a single-cylinder
engine.
NOTICE Exceedinggeneratorswattage/amperagecapacity
could damagegenerator and/orelectrical devicesconnected
to it.
• DONOTexceedthegenerator'swattage/amperagecapacity.See
Don'tOverloadGeneratorintheOperationsection.
Everyeffort hasbeen madeto ensure thatthe information in
this manualis both accurateandcurrent. However,the
manufacturer reservesthe right to change,alter or otherwise
improve the generatorand this documentation at anytime
without prior notice.
The EmissionControl Systemfor this generator is warranted
for standards set by the Environmental Protection Agency
and the California Air Resources Board.
importantSafety information
The manufacturer cannot possibly anticipateevery possible
circumstance that might involve a hazard.Thewarnings in
this manual,and the tags and decals affixedto the unit are,
therefore, not aft-inclusive. If you use a procedure, work
method or operating technique that the manufacturer does
not specifically recommend, you must satisfy yourself that it
is safe for you and others. You must also make surethat the
procedure, work method or operating technique that you
choose does not renderthe generator unsafe.
ToxicFumes Kickback ElectricalShock
Fire
MovingParts FlyingObjects HotSurface
,_. Thesafety alertsymbol indicatesapotential personal
injury hazard.A signalword (DANGER,WARNING,or
CAUTION)is usedwith the alert symbol to designatea
degreeor levelof hazardseriousness. Asafety symbol may
be usedto representthe type of hazard.Thesignal word
NOTICEis usedto address practicesnot relatedto personal
injury.
,_, DANGERindicatesa hazardwhich, if not avoided, will
result in deathor serious injury.
_i_WARNINGindicatesa hazardwhich, if not avoided,
could result in death or serious injury.
,A CAUTIONindicates a hazardwhich, if not avoided, could
result in minor or moderate injury.
NOTICEaddress practices not relatedto personal injury.
_i_WARNING The engineexhaustfrom this product
contains chemicals known to the Stateof California to
cause cancer,birth defects,or other reproductive harm.
WARNING Certaincomponents in this product and
relatedaccessories contain chemicals known to the State
of Californiato cause cancer,birth defects or other
reproductiveharm. Wash handsafter handling.
Explosion Operator'sManual
4 BRIGGSandSTRATTON.COIVi
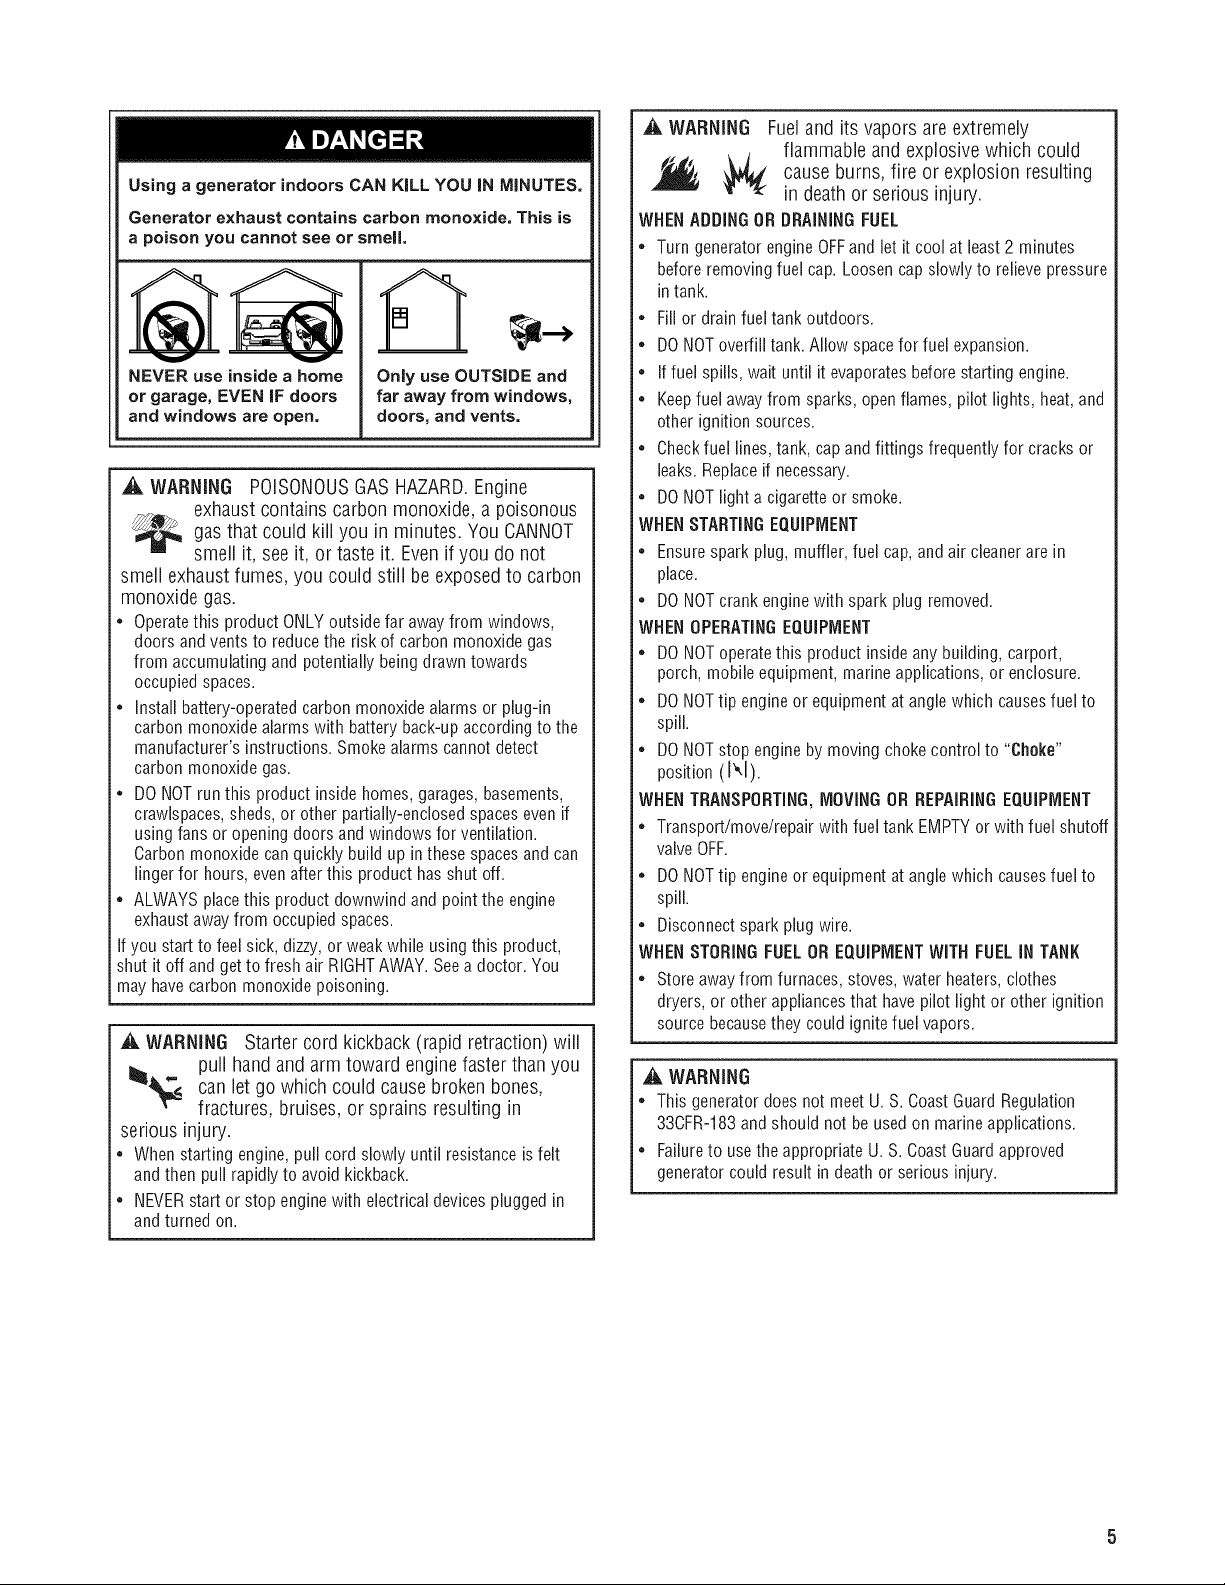
Using a generator indoors CAN KiLL YOU iN MINUTES,
Generator exhaust contains carbon monoxide, This is
a poison you cannot see or smell,
[]
V v
NEVER use inside a home
or garage, EVEN iF doors
arid windows are open,
,A WARNING POISONOUS GAS HAZARD. Engine
exhaust contains carbon monoxide, a poisonous
_gas that could kill in minutes. You CANNOT
smell exhaust fumes, you could still be exposed to carbon
monoxide gas.
• Operatethis product ONLYoutside far awayfrom windows,
from accumulating and potentially beingdrawn towards
• Install battery-operatedcarbon monoxide alarms or plug-in
• DO NOTrun this product inside homes, garages,basements,
• ALWAYS placethis product downwind and point the engine
Ifyou start to feel sick, dizzy, or weak while using this product,
shut it off and getto fresh air RIGHTAWAY.Seea doctor. You
may havecarbon monoxide poisoning.
smell it, see it, or taste it. Even if you do not
doors and vents to reducethe risk of carbon monoxide gas
occupied spaces.
carbon monoxide alarmswith battery back-up according to the
manufacturer's instructions. Smoke alarms cannot detect
carbon monoxide gas.
crawlspaces,sheds, or other partially-enclosedspaces even if
using fans or opening doors and windows for ventilation.
Carbon monoxide canquickly build up in these spacesandcan
linger for hours, evenafter this product has shut off.
exhaustawayfrom occupied spaces.
_i_WARNING Startercord kickback(rapid retraction) will
puii hand and arm toward enginefasterthan you
can letgo which could cause brokenbones,
fractures, bruises, or sprains resulting in
serious injury.
• Whenstartingengine,pullcordslowlyuntilresistanceisfelt
andthenpullrapidlytoavoidkickback.
• NEVERstartor stopenginewithelectricaldevicespluggedin
andturnedon.
Only use OUTSIDE and
far away from windows,
doors, and vents,
you
_i_ WARNING Fuel and its vapors are extremely
flammable and explosive which could
cause burns, fire or explosion resulting
in death or serious injury.
WHENADDINGOR DRAININGFUEL
• Turn generator engineOFFand let it cool at least2 minutes
before removing fuel cap. Loosen capslowly to relieve pressure
in tank.
• Fill or drain fuel tank outdoors.
• DONOToverfill tank. Allow spacefor fuel expansion.
• Iffuel spills, wait until it evaporatesbefore starting engine.
• Keepfuel awayfrom sparks, open flames, pilot lights,heat, and
other ignition sources.
• Checkfuel lines,tank, cap andfittings frequently for cracks or
leaks.Replaceif necessary.
• DONOTlighta cigaretteor smoke.
WHENSTARTINGEQUIPMENT
• Ensure spark plug, muffler, fuel cap, and air cleanerare in
place.
• DO NOTcrank enginewith spark plug removed.
WHENOPERATINGEQUIPMENT
• DO NOToperatethis product inside any building, carport,
porch, mobile equipment, marine applications, or enclosure.
• DONOTtip engine or equipment at anglewhich causesfuel to
spill.
• DONOTstop engineby moving chokecontrol to "Choke"
position IN).
WHENTRANSPORTING,MOVINGORREPAIRINGEQUIPMENT
• Transport/move/repair with fuel tank EMPTYor with fuel shutoff
valveOFF.
• DONOTtip engine or equipment at anglewhich causesfuel to
spill.
• Disconnect spark plug wire.
WHENSTORINGFUELOR EQUIPMENTWITH FUEL iN TANK
• Store awayfrom furnaces, stoves, water heaters,clothes
dryers, or other appliancesthat have pilot light or other ignition
source becausethey could ignite fuel vapors.
,_, WARNING
• This generator does not meet U. S. CoastGuardRegulation
33CFR-183and should not beusedon marine applications.
• Failureto usethe appropriate U. S. CoastGuardapproved
generator could result in deathor serious injury.
_i_WARNING Generator voltage could cause electrical
')dhl shock or burn resulting in death or serious
injury.
• Use listed transfer equipment, suitablefor the intended use,to
prevent backfeed by isolating generator from electric utility
workers.
• When using generator for backup power, notify utility company.
• Use a ground fault circuit interrupter (GFCI)in any damp or
highly conductive area,such as metal decking or steel work.
• DO NOTtouch bare wires or receptacles.
• DO NOTuse generator with electrical cords which are worn,
frayed, bareor otherwise damaged.
• DO NOToperate generator in the rain or wet weather.
• DO NOThandle generator or electricalcords while standing in
water, while barefoot,or while hands or feetare wet.
• DO NOTallow unqualified personsor children to operate or
servicegenerator.
_i_WARNING Starter and other rotating parts could
entangle hands, hair,clothing, or accessories
resulting in serious injury.
• NEVERoperate generator without protective housing or covers.
• DO NOTwear loose clothing, jewelry or anything that could be
caught inthe starter or other rotating parts.
• Tie up long hair and remove jewelry.
,& CAUTION Excessively high operating speeds could
result in minor injury.
Excessively low operatingspeeds impose a heavy load.
• DO NOTtamper with governor spring, links or other partsto
increase enginespeed. Generatorsuppliescorrect rated
frequency and voltage when running at governedspeed.
• DO NOTmodify generator in any way.
_i_WARNING Exhaust heat/gases could ignite
combustibles, structures or damage fuel
_ causing a fire, resulting or
Contact with muffler area could cause burns resulting in
serious injury.
• DO NOTtouch hot parts and AVOID hotexhaust gases.
• Allow equipment to cool beforetouching.
= Keepat least5 feet (1.5 m) of clearance on all sidesof
generator including overhead.
= It is a violation of California PuNic Resource Code,Section
4442, to use or operate the engineon anyforest-covered,
brush-covered, or grass-covered land unlessthe exhaust
system is equipped with aspark arrester, as defined in Section
4442, maintained in effective working order. Other statesor
federal jurisdictions may havesimilar laws.
Contactthe original equipment manufacturer, retailer, or dealer
to obtain a sparkarrester designedfor the exhaust system
installed on this engine.
= Replacementparts must bethe sameand installed in the same
position as the original parts.
,&. WARNING Unintentional sparking could cause fire or
"_,dh electric shock resulting in death or
WHENADJUSTINGORMAKINGREPAIRSTOYOURGENERATOR
• Disconnect the spark plug wire from the spark plug and place
the wire where it cannot contact spark plug.
WHENTESTINGFORENGINESPARK
• Use approved spark plug tester.
• DO NOTcheckfor spark with spark plug removed.
tank in death
serious injury.
serious injury.
NOTICE Exceedinggeneratorswattage/amperagecapacity
could damagegenerator and/or electrical devicesconnected
to it.
• DO NOTexceedthe generator's wattage/amperage capacity. See
Don't OverloadGeneratorin the Operationsection.
• Start generator and letengine stabilize beforeconnecting
electrical loads.
• Connect electrical loads in OFFposition, thenturn ONfor
operation.
• Turn electricalloads OFFand disconnectfrom generatorbefore
stopping generator.
NOTICE improper treatment of generator could damage it
and shorten its life.
• Use generator only for intendeduses.
• If you havequestions about intended use,ask dealeror contact
local service center.
• Operategenerator only on level surfaces.
• DO NOTexpose generator to excessivemoisture,dust, dirt, or
corrosive vapors.
• DO NOTinsert any objects through cooling slots.
• If connected devicesoverheat,turn them off and disconnect them
from generator.
• Shut off generator if:
-electrical output is lost;
-equipment sparks, smokes, or emits flames;
-unit vibrates excessively.
6 BRIGGSandSTRATTON.COIVl
Assembly
Your generator requires someassembly andis readyfor use
after it hasbeen properly serviced with the recommended oil
and fuel.
If you haveany problemswith the assemblyof your generator,
pleasecall the generatorhelplineat 1-800-743-4115. if calling
for assistance,pleasehavethe model, revision,and serial
numberfrom the identificationlabel available.SeeGenerator
ControlsandFeaturesfor identification labellocation.
UnpackGenerator
1. Setthe carton on a rigid, flat surface.
2. Removeeverything from carton exceptgenerator.
3. Opencarton completely by cutting eachcorner from
top to bottom.
4. Leavegeneratoron carton to install wheel kit.
ShipmentContents
The generatoris suppliedwith:
* Engineoil bottle
, Operator'smanual
, Wheelkit
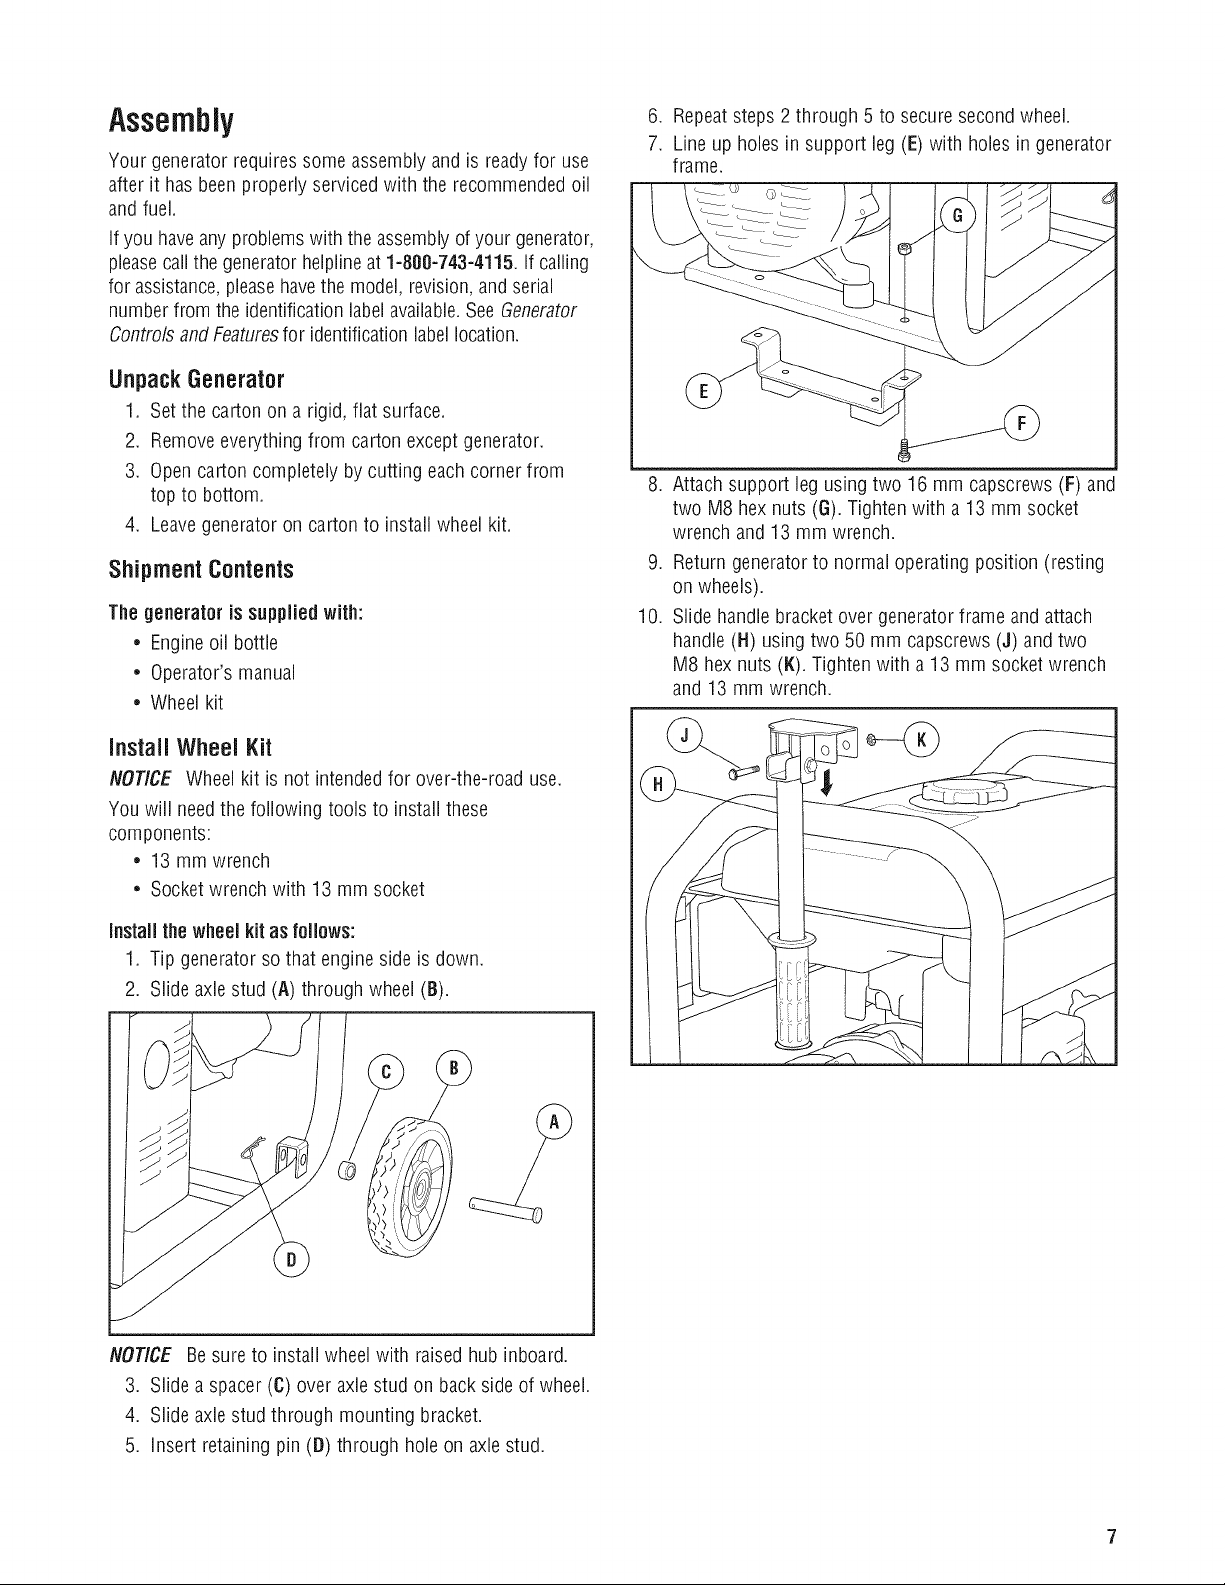
6. Repeatsteps 2through 5 to secure secondwheel.
7. Line up holes in support leg (E) with holes in generator
frame.
8. Attach support leg using two 16 mm capscrews (F) and
two M8 hex nuts (G). Tightenwith a13 mm socket
wrench and 13 mm wrench.
9. Return generator to normal operating position (resting
on wheels).
10. Slidehandle bracket overgenerator frame and attach
handle (H) using two 50 mm capscrews (J) and two
IV18hexnuts (K). Tighten with a 13 mm socket wrench
and 13 mm wrench.
Install Wheel Kit
NOTICE Wheelkit is not intendedfor over-the-road use.
You will needthe following tools to install these
components:
• 13 mm wrench
• Socketwrench with 13mm socket
Install the wheel kit as follows:
1. Tip generator so that engine side is down.
2. Slideaxle stud (A) through wheel (B).
NOTICE Be sureto install wheelwith raisedhub inboard.
3. Slidea spacer (C) over axle stud on back side of wheel.
4. Slideaxle stud through mounting bracket.
5. insert retaining pin (D) through hole on axlestud.
Add EngineOil
1. Placegeneratoron a flat, levelsurface.
2. Cleanarea around oil fill and removeyellow oil fill cap.
3. Using oil funnel (optional), slowly pour contents of
provided oil bottle into oil fill opening.
NOTICE Improper treatment of generator could damage it
and shorten its life.
• DO NOTattempt to crank or start the engine beforeit has been
properly servicedwith the recommended oil.This could result in
an enginefailure.
4. Replaceoil fill cap and fully tighten.
AddFuel
Fuel mustmeet these requirements:
• Clean,fresh, unleadedgasoline.
• A minimum of 87 octane/87AKI (91 RON).Forhigh
altitude use, seeHigh Altitude.
• Gasolinewith up to 10% ethanol (gasohol) isacceptable.
NOTICE Use of unapproved fuels could damagegenerator
and voids warranty.
• DONOTuseunapprovedgasolinesuchasE15andE85.
• DONOTmixoilingasolineormodifyengineto runonalternatefuels.
_i_WARNING Fueland its vapors areextremelyflammable
and explosivewhich could causeburns,
fire or explosionresulting in deathor
serious injury.
WHENADDINGFUEL
• Turn generator engineOFFand let it cool at least 2 minutes
before removing fuel cap. Loosen capslowly to relieve pressure
in tank.
• Fill fuel tank outdoors.
• DONOToverfill tank. Allow spacefor fuel expansion.
• If fuel spills, wait until it evaporatesbefore starting engine.
• Keepfuel awayfrom sparks, open flames, pilot lights, heat,and
other ignition sources.
• Checkfuel lines,tank, cap and fittings frequently for cracks or
leaks. Replaceif necessary.
• DONOTlight a cigaretteor smoke.
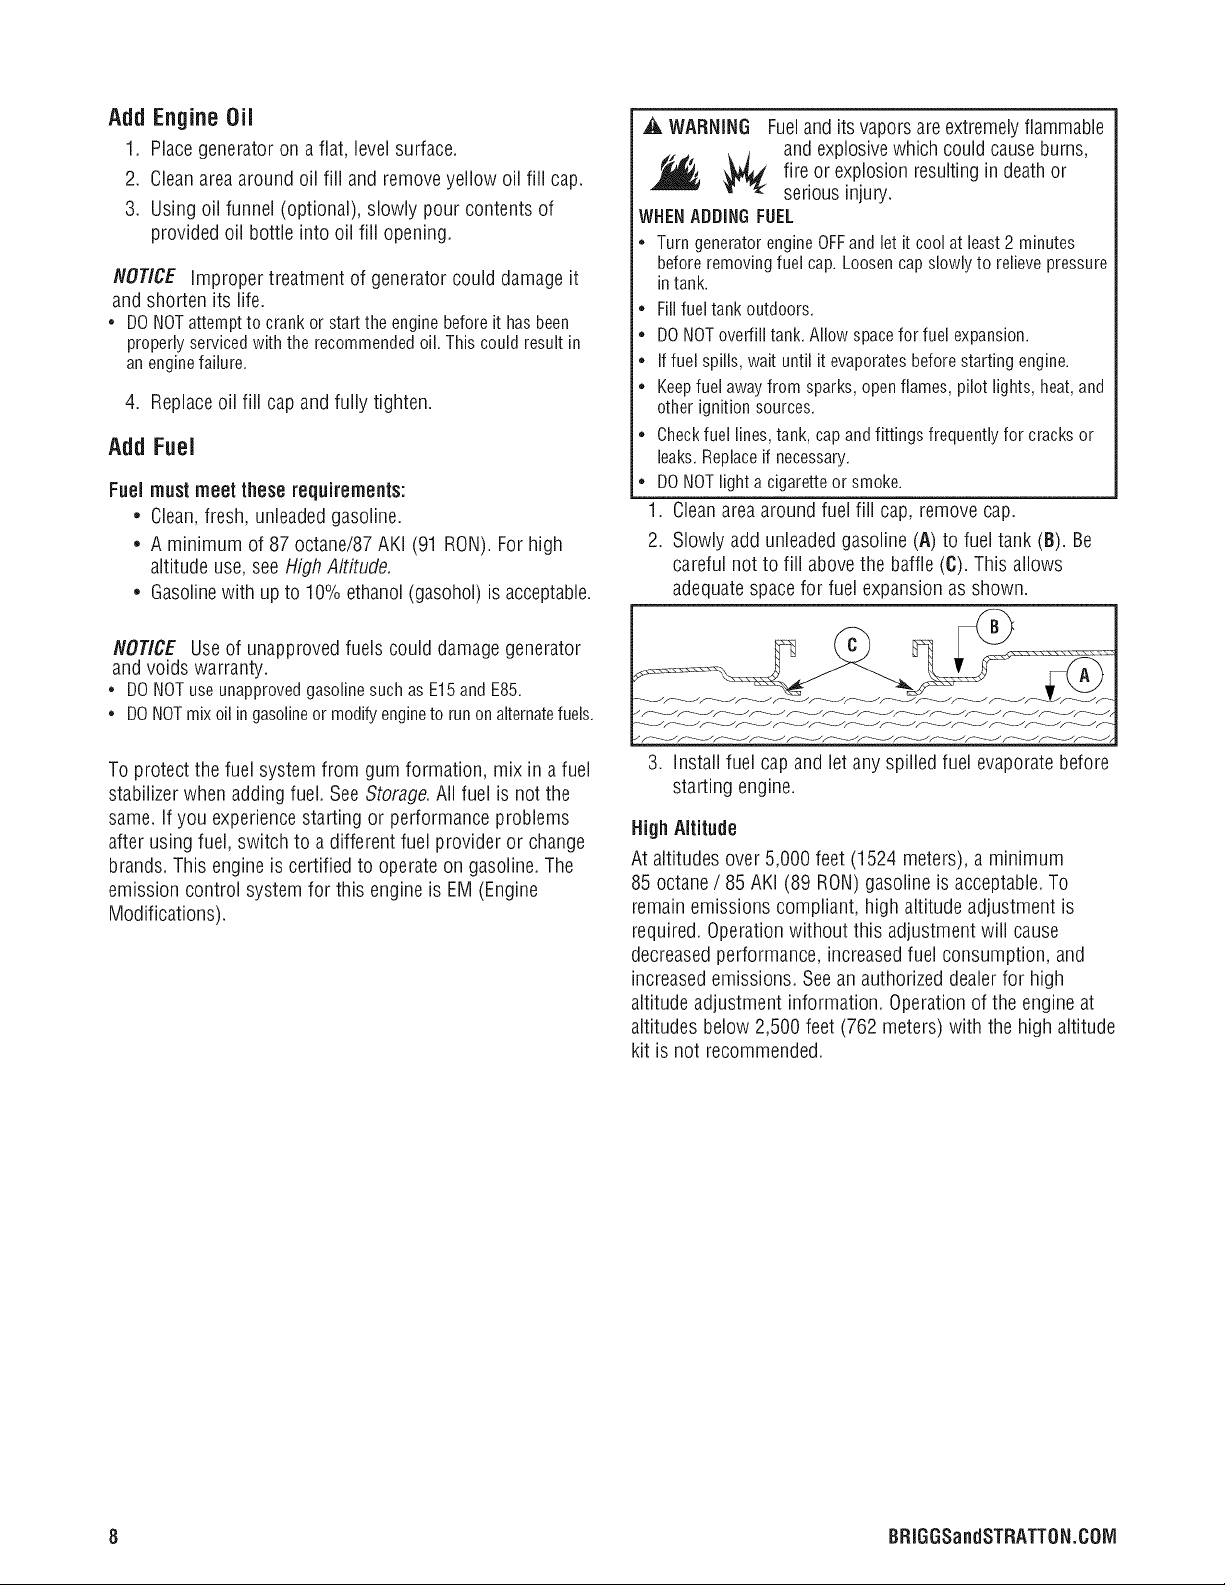
1. Clean area around fuel fill cap, remove cap.
2. Slowly add unleaded gasoline (A) to fuel tank (B). Be
careful not to fill above the baffle (6). This allows
adequate space for fuel expansion as shown.
To protect the fuel system from gum formation, mix ina fuel
stabilizerwhen adding fuel. SeeStorage.All fuel is not the
same. If you experiencestarting or performance problems
after using fuel, switch to a different fuel provider or change
brands. This engine is certified to operate on gasoline. The
emission control system for this engine is EM (Engine
Modifications).
3. Install fuel capand let anyspilled fuel evaporatebefore
starting engine.
HighAltitude
At altitudes over 5,000 feet (1524 meters), a minimum
85 octane/ 85 AKI (89 RON)gasoline is acceptable.To
remainemissions compliant, high altitude adjustment is
required.Operationwithout this adjustmentwiii cause
decreasedperformance,increasedfuel consumption, and
increasedemissions. Seean authorized dealerfor high
altitude adjustment information. Operationof the engine at
altitudes below 2,500 feet (762 meters) with the high altitude
kit is not recommended.
8 BRIGGSandSTRATTON.COIVl

SystemGround
Thegeneratorhasasystemgroundthatconnectsthe
generatorframe componentsto the ground terminalson the
ACoutput receptacles.Thesystemground is connectedto the
ACneutralwire (the neutralis bondedto the generatorframe).
Special Requirements
Theremay be Federalor State OccupationalSafety and
Health Administration (OSHA)regulations, local codes, or
ordinances that applyto the intended useof the generator.
Pleaseconsult a qualified electrician, electrical inspector, or
the local agency havingjurisdiction:
• In some areas,generatorsare requiredto be registered
with local utility companies.
• If the generator is usedat a construction site, there
may be additional regulations which must be observed.
Connecting to a 8uiiding'sElectricalSystem
Connectionsfor standby powerto a building's electrical
system must use a listed transfer switch installed by a
current licensed electrician. Theconnection must isolate the
generator powerfrom the utility power and must comply
with all applicablelaws and electrical codes.
GeneratorLocation
Carbon MonoxidePoisoning
Using a generator indoors CAN KiLL YOU IN MINUTES,
Generator exhaust contains carbon monoxide, This is
a poison you cannot see or smell,
oA
B
V V
NEVER useinsidea home
or garage, EVENIF doors
and windows areopen.
Only use OUTSIDE and
far away from windows,
doors, and vents,
,_. WARNING Generatorvoltage could cause electrical
_dhl shock or burn resulting in deathor serious
miury.
• Uselistedtransferequipment,suitablefor theintendeduse,to
preventbackfeedbyisolatinggeneratorfromelectricutility
workers.
• Whenusinggeneratorfor backuppower,notifyutilitycompany.
• Useagroundfaultcircuitinterrupter(GFCI)inanydampor
highlyconductivearea,suchas metaldeckingorsteelwork.
• DONOTtouchbarewiresor receptacles.
• DONOTusegeneratorwithelectricalcordswhichareworn,
frayed,bareorotherwisedamaged.
• DONOToperategeneratorinthe rainorwetweather.
• DONOThandlegeneratoror electricalcordswhilestandingin
water,whilebarefoot,or whilehandsorfeetarewet.
• DONOTallowunqualifiedpersonsorchildrento operateor
servicegenerator.
Exhaust Port
Pointedaway from
occupied spaces
Operatethis product ONLYoutside far awayfrom windows,
doors and ventsto reducethe risk of carbon monoxide gas
from accumulating and potentially being drawn towards
occupied spaces.Install/maintain battery-operatedcarbon
monoxide alarmsor plug-in carbon monoxide alarms with
battery back-upaccording to the manufacturer's instructions.
DONOTrun this product inside homes, garages,basements,
crawlspaces,sheds,or other partially-enclosedspaceseven if
using fans or opening doors andwindows for ventilation.
ALWAYSplace this product downwind and point the engine
exhaustawayfrom occupied spaces.
Risk of Fire Clearances
_i_WARNING Exhaustheat/gases could ignite
combustibles, structuresor damagefuel tank
causing afire, resultingin deathor serious injury.
• Keep at least5 ft. (1.5 m) clearanceon all sidesof generator
including overhead.

FeaturesandControls
Readthis Operator'sManual and safetyrules before operating yourgenerator.
Comparethe illustrations with your generator, to familiarize yourself with the locations of various controls and
adjustments. Savethis manual for future reference.
A - RockerSwitch -- Setthis switch to ON or I beforeusing
recoil starter. Set switch to OFFor 0 to switch off
engine.
B - 120 Volt AC, 30 Amp Travel Trailer Receptacle -- May
be usedto supply electrical power for the operation of
120 Volt AC, 30 Amp, single phase, 60 Hzelectrical,
travel trailer loads.
C- Circuit Breakers -- Push-to-reset circuit breakers are
providedto protect the generatoragainst electrical
overload.
D - 120 Volt AC, 20 Amp, DuplexReceptacle -- May be
usedto supply electrical power for the operation of
120 Volt AC,20 Amp, single phase,60 Hzelectrical,
lighting, appliance, tool and motor loads.
E- Oil Fill Cap-- Checkandadd engine oil here.
F - Oil DrainPlug-- Drainengine oil here.
G - GroundingFastener -- Consultyour local agency having
jurisdiction for grounding requirements in your area.
H - Spark Arrestor Muffler -- Exhaustmuffler lowers engine
noise and is equippedwith a spark arrester screen.
J - Recoil Starter -- Usedto start the engine manually.
K - Air Cleaner -- Protects engine by filtering dust and
debris out of intake air.
L - ChokeLever -- Usedwhen starting a cold engine.
M - FuelValve -- Usedto turn fuel supply on and off to
engine.
N - Fuel Tank -- Capacityof four (4) U.S.gallons (15.14 I).
items Not Shown:
Engineidentification-- Provides model, type and code of
engine. Pleasehavethese readilyavailableif calling for
assistance.
Identification Label -- Provides model and serial number of
generator. Pleasehavethese readilyavailableif calling for
assistance.
10 BRIGGSandSTRATTON.COIVl
CordSets andReceptacles
Use only high quality, well-insulated, grounded extension
cords with the generator's receptacles.Inspect extension
cords before each use.
Checkthe ratings of all extensioncords before you use
them. Extensioncord sets usedshould be ratedfor AC loads
20 Amps or greater. Checkoperator's manuals of devicesto
be poweredfor the manufacturer's recommendations.
Keepextension cords asshort aspossible to minimize
voltage drop.
,_. WARNING Damagedor overloaded electrical cords
could overheat, arc, and burn resulting in death
or serious injury.
• ONLY use cords ratedfor your loads.
• Follow all safeties on electrical cords.
• Inspect cord sets before eachuse.
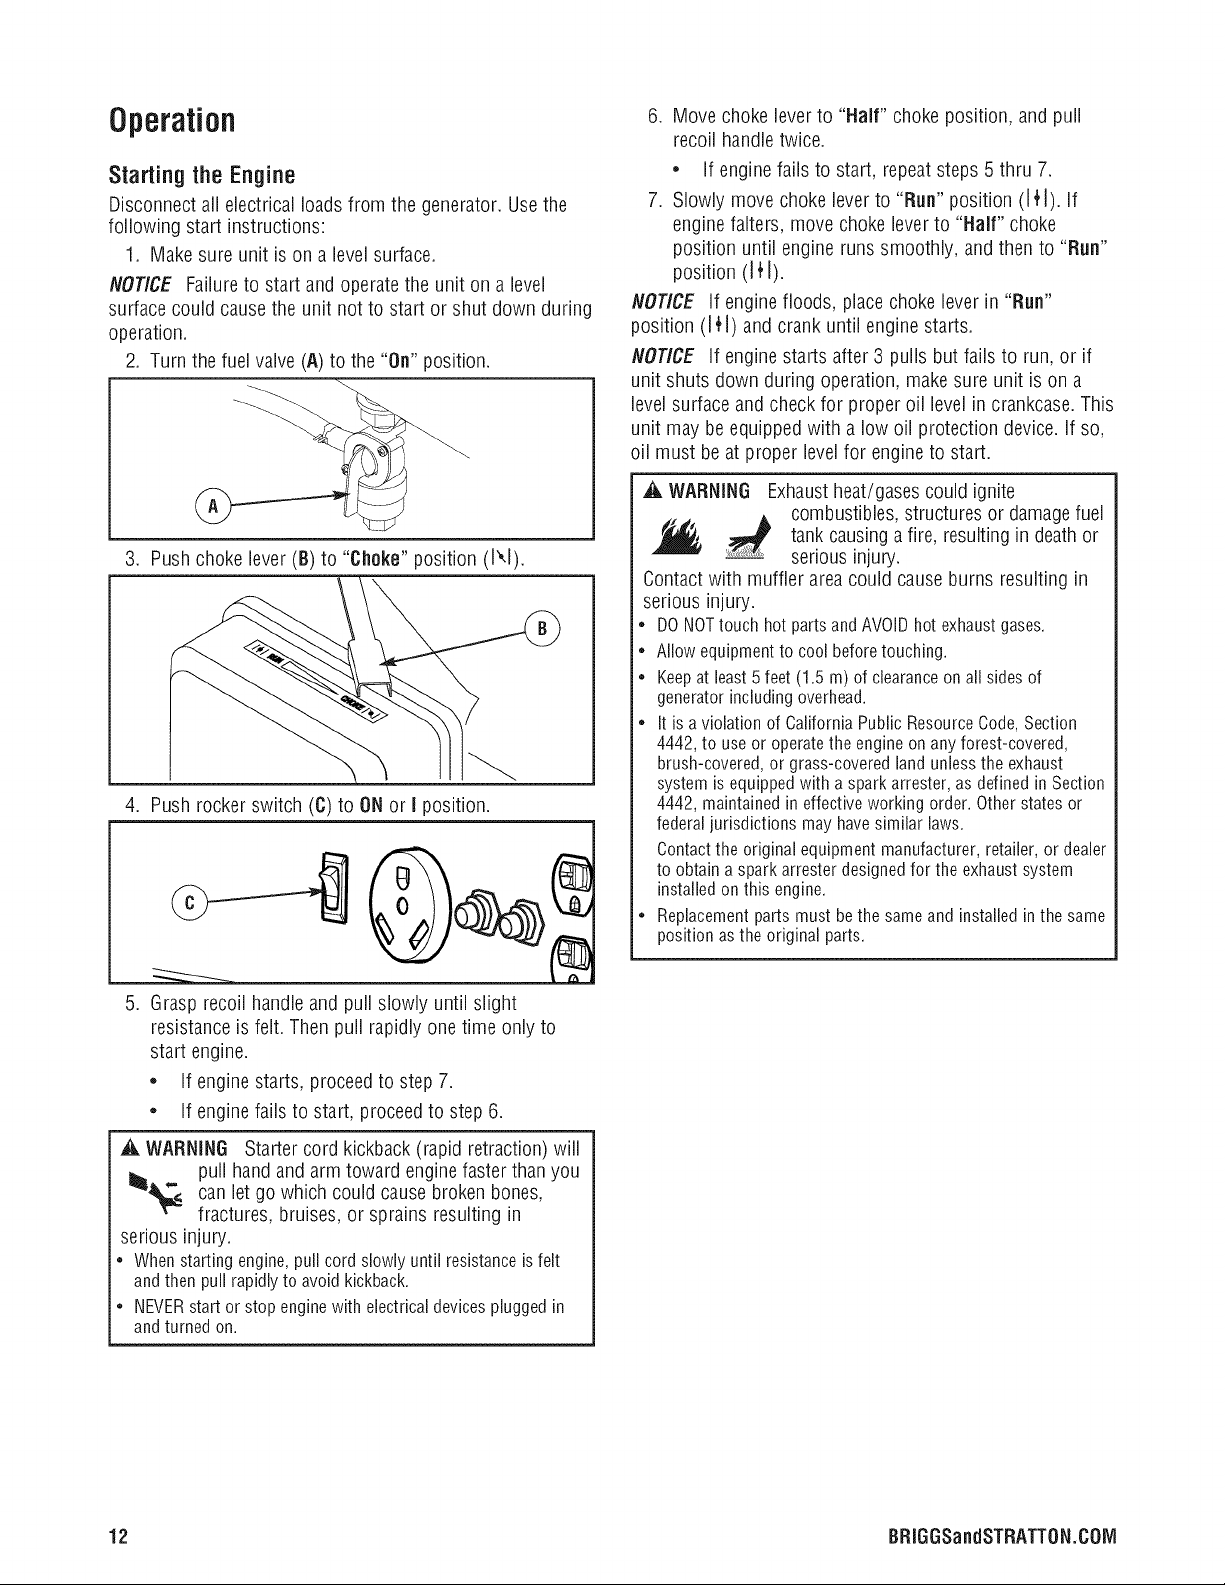
120 Volt AC, 20Amp, Duplex Receptacle
Theduplex receptacleis protected against overload by a
push-to-reset circuit breaker.
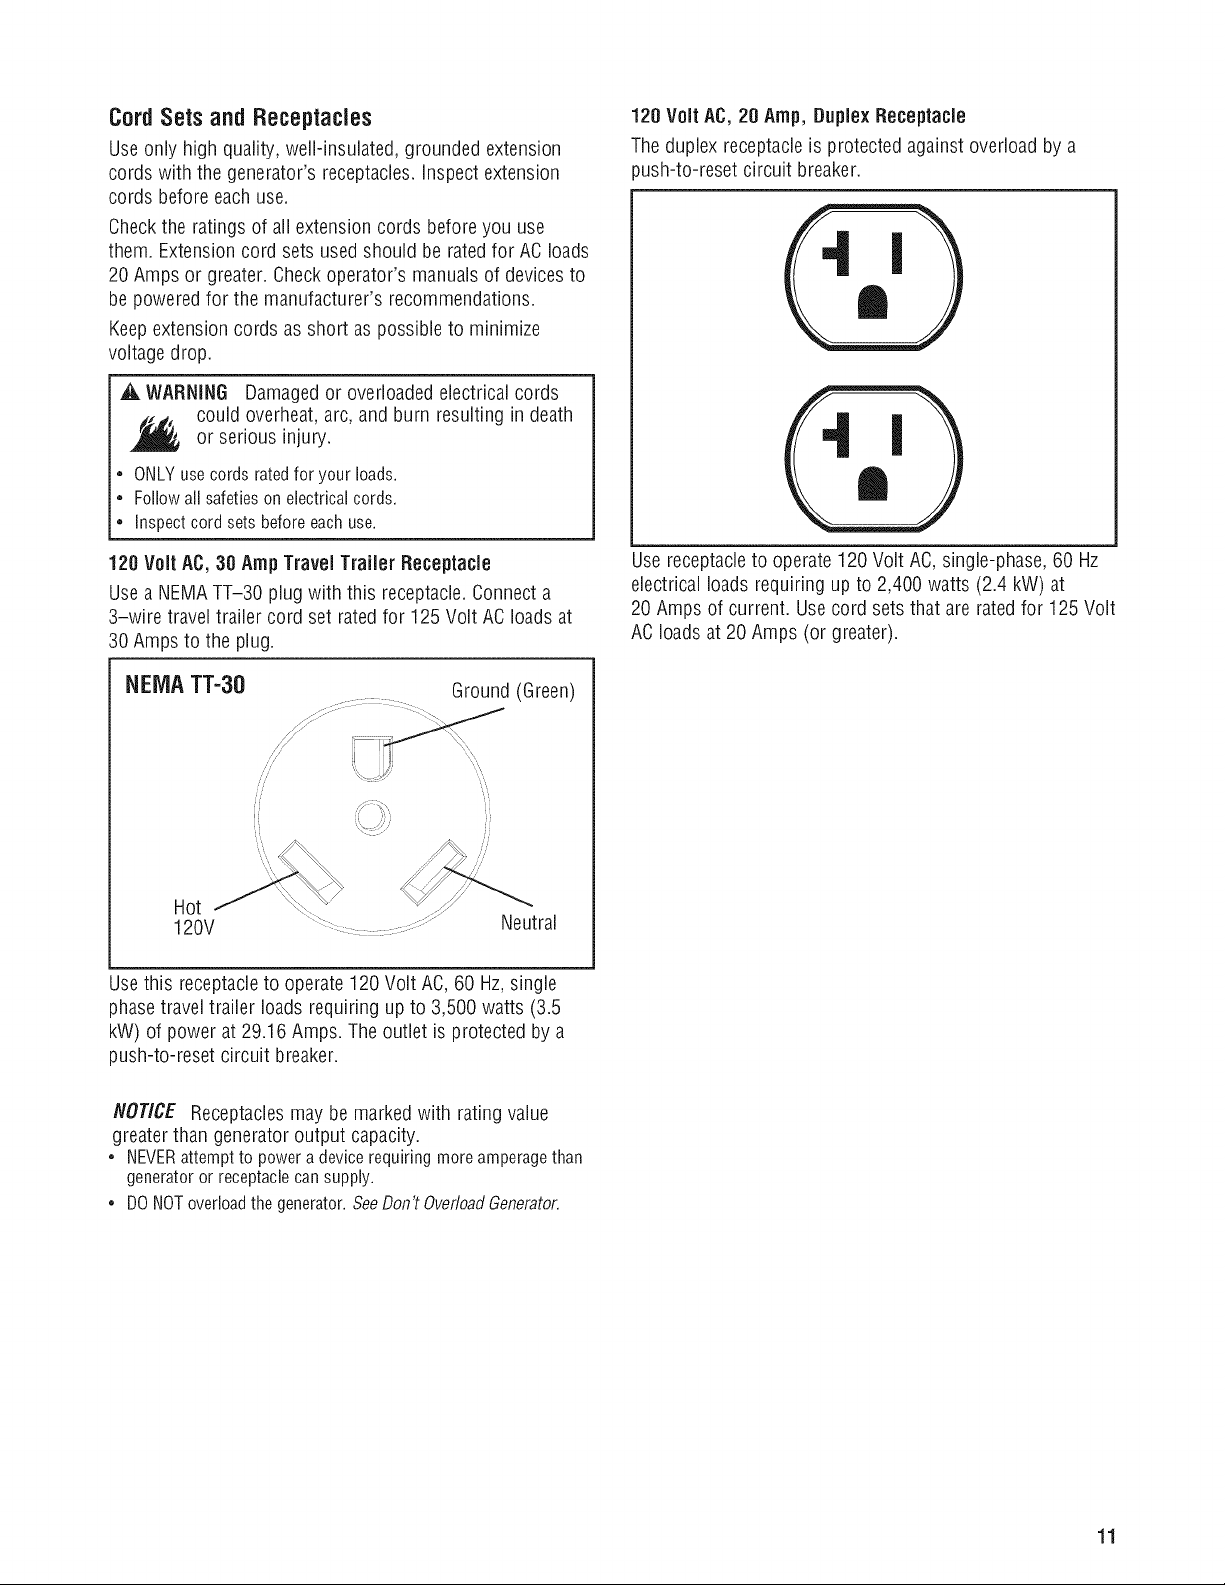
120 VoltAC, 30 Amp TravelTrailer Receptacle
Use aNEIViATT-30 plug with this receptacle.Connecta
3-wire travel trailer cord set ratedfor 125 Volt ACloads at
30 Amps to the plug.
NEIVlATT-30
Ground (Green)
Hot
120V Neutral
Use this receptacleto operate120 Volt AC, 60 Hz,single
phasetravel trailer loads requiring up to 3,500 watts (3.5
kW) of power at29.16 Amps. Theoutlet is protectedby a
push-to-reset circuit breaker.
NOTICE Receptacles may be marked with rating value
greater than generator output capacity.
• NEVERattempt to power adevice requiring more amperagethan
generator or receptaclecan supply.
• DONOToverloadthe generator. SeeDon't OverloadGenerator.
Usereceptacleto operate120 Volt AC, single-phase,60 Hz
electrical loads requiring up to 2,400 watts (2.4 kW) at
20 Amps of current. Usecord setsthat are rated for 125 Volt
ACloads at 20 Amps (or greater).
11
Operation
Startingthe Engine
Disconnect all electrical loads from the generator. Usethe
following start instructions:
1. Makesure unit is on a levelsurface.
NOTICE Failureto start and operatethe unit on a level
surface could causethe unit not to start or shut down during
operation.
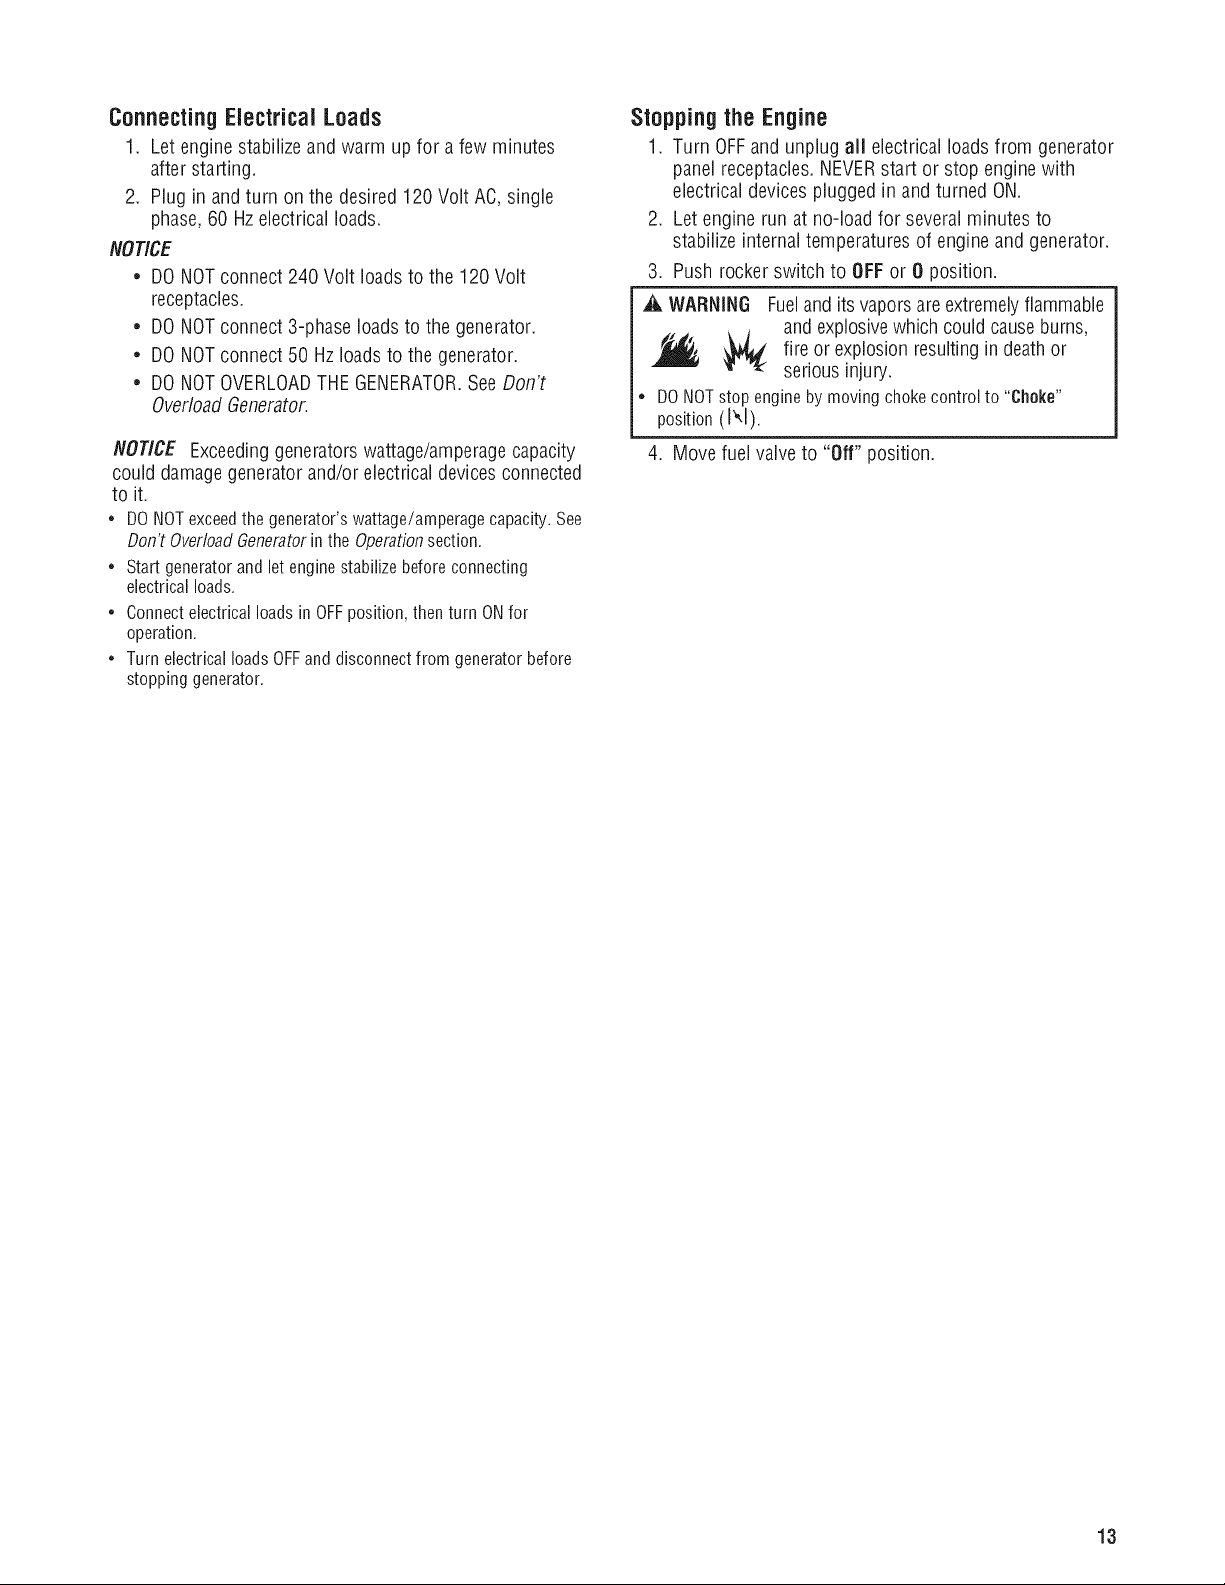
2. Turn thefuel valve (A)to the "On" position.
\
3. Push choke lever (B) to "Choke" position (N).
4. Push rocker switch (C) to ONor I position.
6. Movechoke lever to "Half" choke position, and pull
recoil handletwice.
• If engine fails to start, repeatsteps 5 thru 7.
7. Slowly move choke lever to "Run" position (1+1),If
engine falters, move chokelever to "Half" choke
position until engine runs smoothly, andthen to "Run"
position (1+1).
NOTICE If engine floods, placechoke lever in "Run"
position (1_1)and crank until engine starts.
NOTICE If engine starts after 3 pulls but fails to run, or if
unit shuts down during operation, makesure unit is on a
level surfaceandcheck for proper oil level in crankcase. This
unit may be equipped with a low oil protection device. If so,
oil must be at proper levelfor engine to start.
_i_ WARNING Exhaust heat/gases could ignite
combustibles, structures or damage fuel
.,_ causing a fire, resulting or
Contact with muffler area could cause burns resulting in
serious injury.
• DO NOTtouch hot parts and AVOIDhot exhaust gases.
• Allow equipment to cool beforetouching.
• Keep at least5 feet (1.5 m) of clearanceonall sides of
generator including overhead.
• It is aviolation of California Public Resource Code,Section
4442, to use or operate the engine on any forest-covered,
brush-covered, or grass-covered land unless the exhaust
system is equipped with aspark arrester, as defined in Section
4442, maintained in effective working order. Other states or
federaljurisdictions may have similar laws.
Contactthe original equipment manufacturer, retailer, or dealer
to obtain a spark arrester designedfor the exhaust system
installed on this engine.
• Replacement parts must bethe same and installed in the same
position as the original parts.
tank in death
serious injury.
5. Grasp recoil handleand pull slowly until slight
resistance is felt. Then pull rapidly one time only to
start engine.
• If engine starts, proceedto step 7.
• If engine fails to start, proceed to step 6.
_i_WARNING Starter cord kickback(rapid retraction)will
puii hand and arm toward enginefasterthan you
. an letgo which could cause brokenbones,
fractures, bruises, or sprains resulting in
serious injury.
= Whenstartingengine,pullcordslowlyuntilresistanceisfelt
andthenpullrapidlytoavoidkickback.
• NEVERstartor stopenginewithelectricaldevicespluggedin
andturnedon.
12 BRIGGSandSTRATTON.COM
ConnectingElectricalLoads
1. Let engine stabilizeand warm up for a few minutes
after starting.
2. Plug in andturn onthe desired 120 Volt AC,single
phase, 60 Hzelectrical loads.
NOTICE
* DONOTconnect 240 Volt loads to the 120 Volt
receptacles.
* DONOTconnect 3-phaseloads to the generator.
* DONOTconnect 50 Hzloads to the generator.
* DONOTOVERLOADTHEGENERATOR.SeeDon't
OverloadGenerator.
NOT/CE Exceeding generators wattage/amperage capacity
could damage generator and/or electrical devices connected
to it.
• DO NOTexceedthe generator's wattage/amperage capacity. See
Don't OverloadGeneratorin the Operationsection.
• Start generator and letengine stabilize beforeconnecting
electrical loads.
• Connect electrical loads in OFFposition, thenturn ONfor
operation.
• Turn electricalloads OFFand disconnectfrom generatorbefore
stopping generator.
Stopping the Engine
1. Turn OFFand unplug alJelectrical loads from generator
panel receptacles.NEVERstart or stop enginewith
electrical devicespluggedin andturned ON.
2. Let engine run at no-load for several minutes to
stabilize internaltemperaturesof engine and generator.
3. Push rocker switch to OFFor 0 position.
_i_WARNING Fueland its vapors areextremelyflammable
and explosivewhich could causeburns,
fire or explosionresulting in deathor
serious injury.
• DONOTstopenginebymovingchokecontrolto "Choke"
position(N).
4. Movefuel valve to "Off" position.
13
Don't OverloadGenerator
Capacity
You must make sureyour generator cansupply enough
rated (running) andsurge (starting) watts for the items you
will power at the same time. Follow thesesimple steps:
1. Selectthe itemsyou will power at the same time.
2. Totalthe rated (running) watts of theseitems. This is
the amount of power your generator must produce to
keepyour items running. Seethe table on the right.
3. Estimatehow many surge (starting) watts you will need.
Surge wattageis the short burst of power neededto
start electric motor-driven tools or appliancessuch as a
circular saw or refrigerator. Becausenot all motors start
atthe sametime, total surgewatts can be estimatedby
adding only the item(s) with the highest additionalsurge
watts to the total ratedwatts from step2.
Example:
Running (Rated)
Toolor Appliance
WaterWell Pump
Refrigerator
FurnaceFan
Television
Light (75 Watts)
Total Rated(Running) Watts
HighestAdditional Surge Watts
Total GeneratorOutput Required
Power Management
To prolong the life of your generatorand attacheddevices, it
is important to take carewhen adding electrical loadsto your
generator. Thereshould be nothing connectedto the
generator outlets before starting its engine.The correct and
safe wayto managegeneratorpower is to sequentiallyadd
loads asfollows:
1. With nothing connected to the generator,start the
engine asdescribed in this manual.
2. Plug in andturn onthe first load, preferablythe largest
load you have.
3. Permit the generatoroutput to stabilize (engine runs
smoothly and attacheddeviceoperates properly).
4. Plug in andturn onthe next load.
5. Again, permit the generatorto stabilize.
6. Repeatsteps 4 and 5 for each additional load.
Watts
1200
700
800
500
75
3275 Total
RunningWatts
Additional Starting
(Surge) Watts
21O0
2200
2350
2350 Highest
Starting Watts
= 3275
= 2350
= 5625
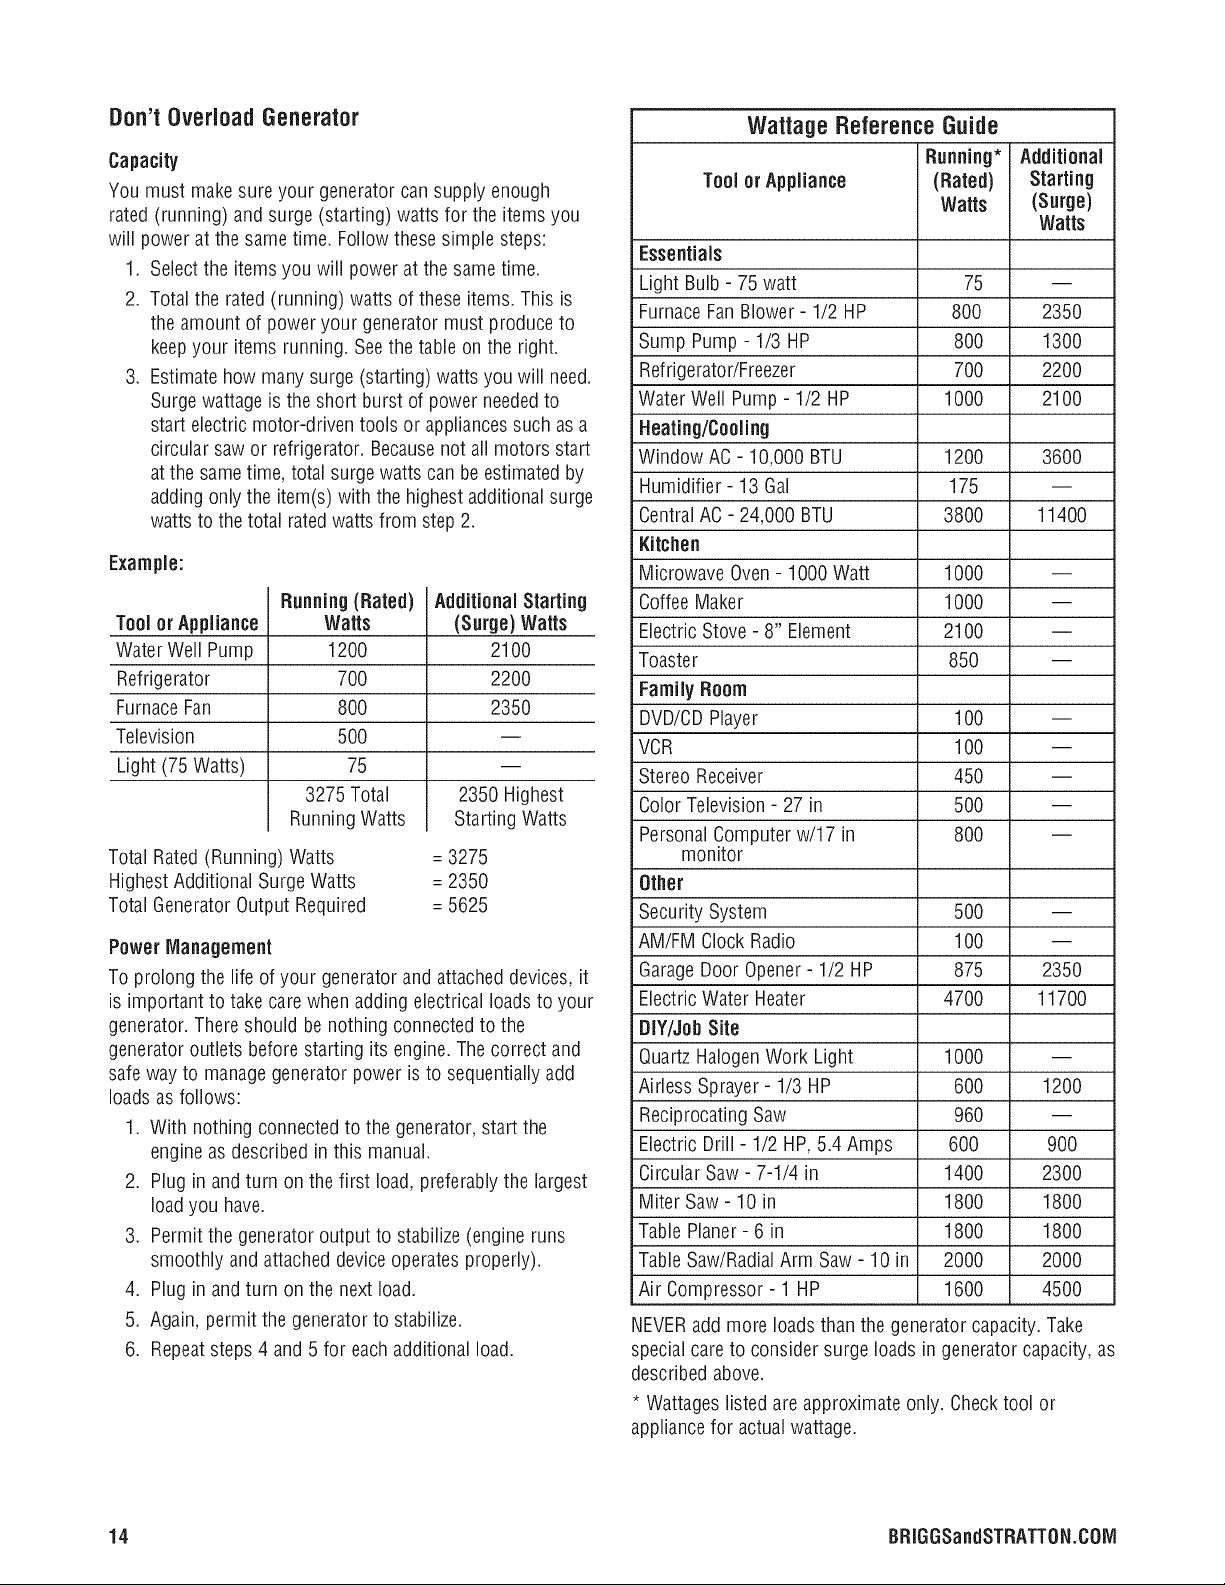
Wattage Reference Guide
Running* Additional
Tool or Appliance (Rated) Starting
Watts (Surge)
Watts
Essentials
Light Bulb - 75 watt 75 --
FurnaceFanBlower- 1/2 HP 800 2350
Sump Pump - 1/3 HP 800 1300
Refrigerator/Freezer 700 2200
Water Well Pump - 1/2 HP 1000 2100
Heating/Cooling
Window AC- 10,000 BTU 1200 3600
Humidifier- 13 Gai 175 --
CentralAC- 24,000 BTU 3800 11400
Kitchen
Microwave Oven- 1000Watt 1000 --
CoffeeMaker 1000 --
Electric Stove - 8" Element 2100 --
Toaster 850 --
Family Room
DVD/CDPlayer 100 --
VCR 100 --
Stereo Receiver 450 --
Color Television- 27 in 500 --
PersonalComputer w/17 in 800 --
monitor
Other
Security System 500 --
AM/FM Clock Radio 100 --
GarageDoor Opener- 1/2 HP 875 2350
ElectricWater Heater 4700 11700
DIf/Job Site
Quartz HalogenWork Light 1000 --
Airless Sprayer- 1/3 HP 600 1200
Reciprocating Saw 960 --
Electric Drill - 1/2 HP, 5.4 Amps 600 900
Circular Saw - 7-1/4 in 1400 2300
Miter Saw- 10 in 1800 1800
TablePlaner - 6 in 1800 1800
TableSaw/RadialArm Saw- 10in 2000 2000
Air Compressor - 1 HP 1600 4500
NEVERadd more loads than the generatorcapacity.Take
special careto consider surge loads in generator capacity,as
described above.
* Wattageslisted are approximate only. Checktool or
appliancefor actual wattage.
14 BRIGGSandSTRATTON.COIVl
Maintenance
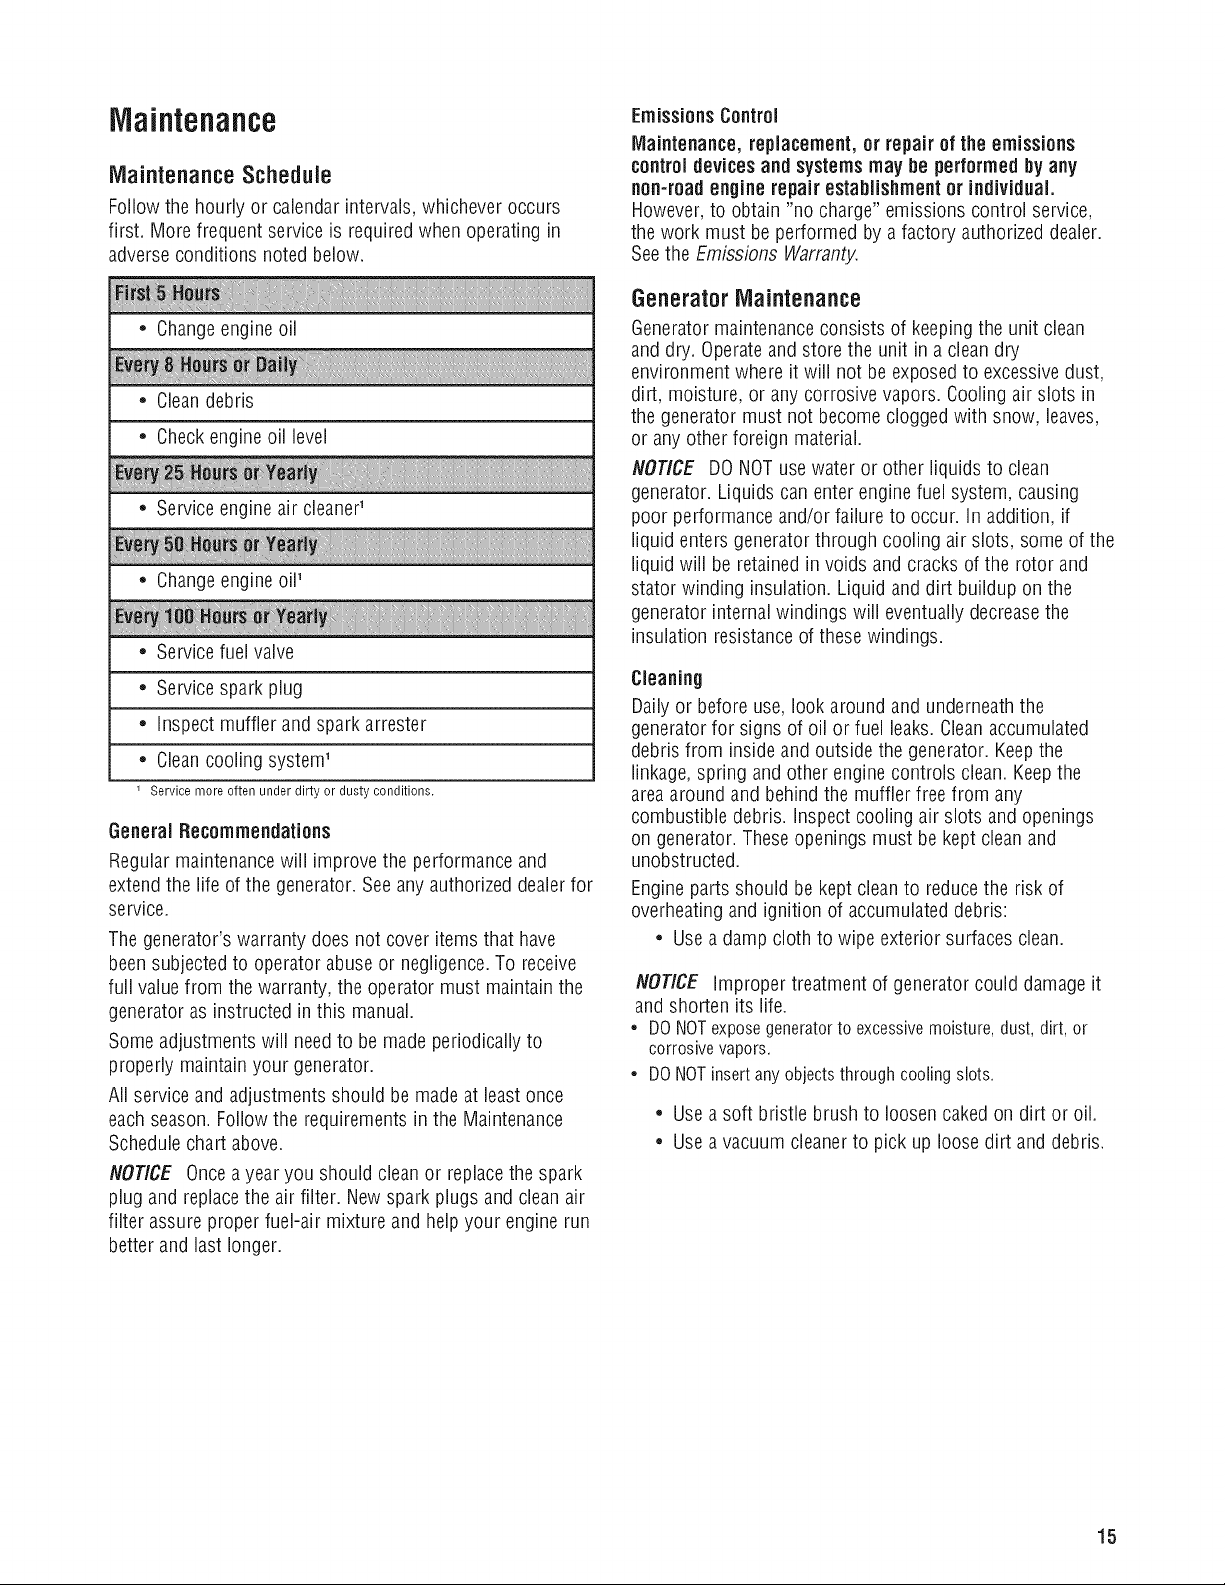
Maintenance Schedule
Follow the hourly or calendarintervals, whichever occurs
first. More frequent serviceis required when operating in
adverseconditions noted below.
• Changeengineoil
• Cleandebris
Checkengineoil level
Service engineair cleaner'
Changeengine oil'
Servicefuel valve
Service sparkplug
inspect muffler and spark arrester
Cleancooling system'
Service more often under dirty or dusty conditions.
GeneralRecommendations
Regular maintenancewill improve the performance and
extend the life of the generator. Seeany authorizeddealer for
service.
Thegenerator's warranty doesnot cover items that have
been subjectedto operator abuseor negligence.To receive
full value from the warranty, the operator must maintain the
generator asinstructed in this manual.
Someadjustments will needto be made periodically to
properly maintain your generator.
All serviceand adjustments should be made at least once
eachseason.Follow the requirementsin the Maintenance
Schedulechart above.
NOTICE Onceayear you should cleanor replace the spark
plug and replacethe air filter. New spark plugs and cleanair
filter assure proper fuel-air mixture and help your engine run
better and last longer.
Emissions Control
Maintenance, replacement,or repair of theemissions
controldevices and systemsmay be performedby any
non-roadengine repair establishment or individual.
However,to obtain "no charge" emissions control service,
the work must be performed by a factory authorized dealer.
Seethe Emissions Warranty.
GeneratorMaintenance
Generatormaintenanceconsists of keepingthe unit clean
and dry. Operateand store the unit in a clean dry
environment where it wiii not be exposedto excessivedust,
dirt, moisture, or any corrosive vapors. Coolingair slots in
the generator must not become cloggedwith snow, leaves,
or any other foreign material.
NOTICE DONOTusewater or other liquids to clean
generator. Liquids can enter engine fuel system, causing
poor performance and/or failure to occur, in addition, if
liquid enters generator through cooling air slots, some of the
liquid will beretained in voids and cracks of the rotor and
stator winding insulation. Liquid and dirt buildup on the
generator internalwindings will eventually decreasethe
insulation resistanceof these windings.
Cleaning
Dailyor before use, look around andunderneaththe
generatorfor signs of oil or fuel leaks. Cleanaccumulated
debris from inside and outsidethe generator. Keepthe
linkage, spring and other engine controls clean. Keepthe
areaaround and behind the muffler free from any
combustible debris, inspect cooling air slots and openings
on generator. Theseopenings must be keptclean and
unobstructed.
Engine partsshould be kept cleanto reducethe risk of
overheating andignition of accumulateddebris:
• Use a damp cloth to wipe exterior surfaces clean.
NOTICE improper treatment of generator could damage it
and shorten its life.
• DO NOTexpose generator to excessivemoisture,dust, dirt, or
corrosive vapors.
• DONOTinsert any objects through cooling slots.
• Use a soft bristle brush to loosen cakedon dirt or oil.
• Use a vacuum cleanerto pick up loose dirt and debris.
15
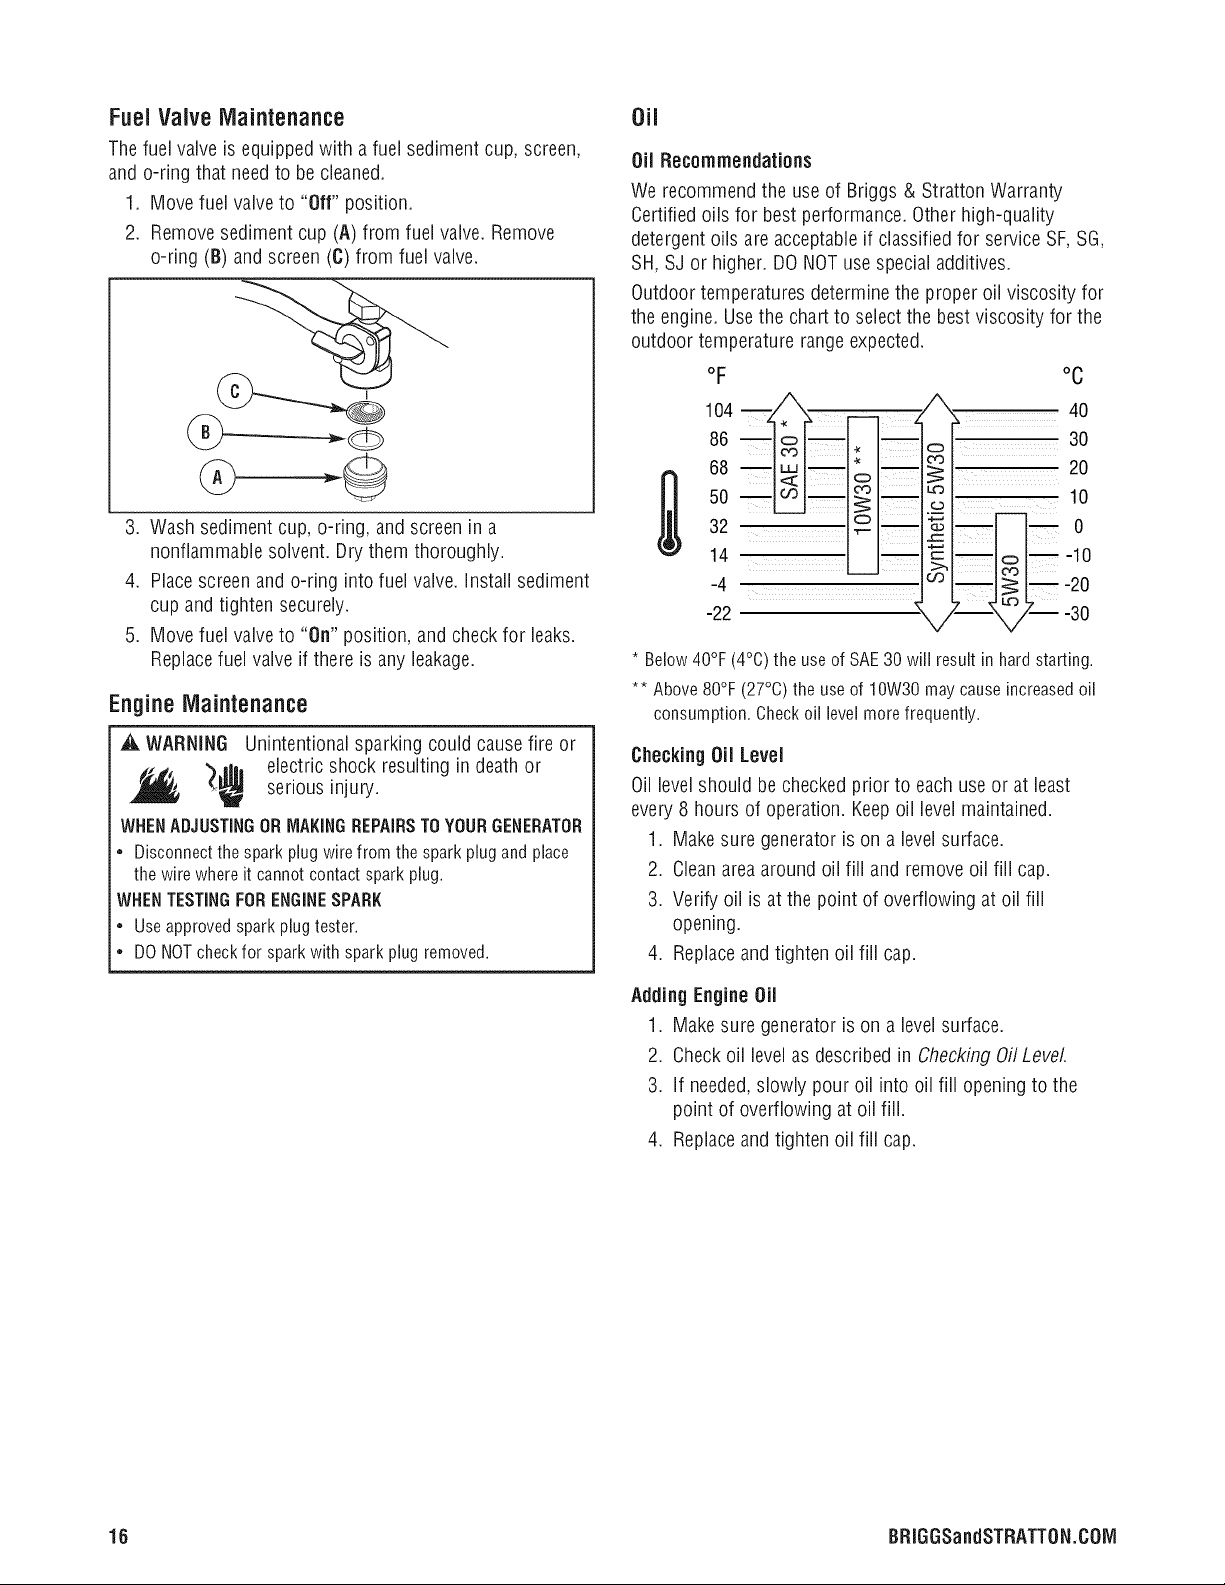
FuelValve Maintenance
Thefuel valveis equipped with a fuel sediment cup, screen,
and o-ring that needto be cleaned.
1. Movefuel valve to "Off" position.
2. Removesediment cup (A) from fuel valve. Remove
o-ring (B) and screen (C)from fuel valve.
3. Wash sediment cup, o-ring, and screen in a
nonflammablesolvent. Drythem thoroughly.
4. Place screen and o-ring intofud valve. Installsediment
cup and tighten securely.
5. Movefuel valveto "On" position,and check for leaks.
Replacefud valve ifthere is anyleakage.
EngineMaintenance
_i_WARNING Unintentional sparking could cause fire or
'_alh electric shock resulting in death or
serious injury.
WHENADJUSTINGORMAKINGREPAIRSTOYOURGENERATOR
• Disconnectthe sparkplugwirefromthesparkplugandplace
thewirewhereit cannotcontactsparkplug.
WHENTESTINGFORENGINESPARK
• Useapprovedsparkplugtester.
• DONOTcheckfor sparkwithsparkplugremoved.
Oil
Oil Recommendations
We recommendthe useof Briggs & Stratton Warranty
Certifiedoils for best performance. Otherhigh-quality
detergent oils are acceptableif classified for serviceSF, SG,
SH, SJ or higher. DONOTuse special additives.
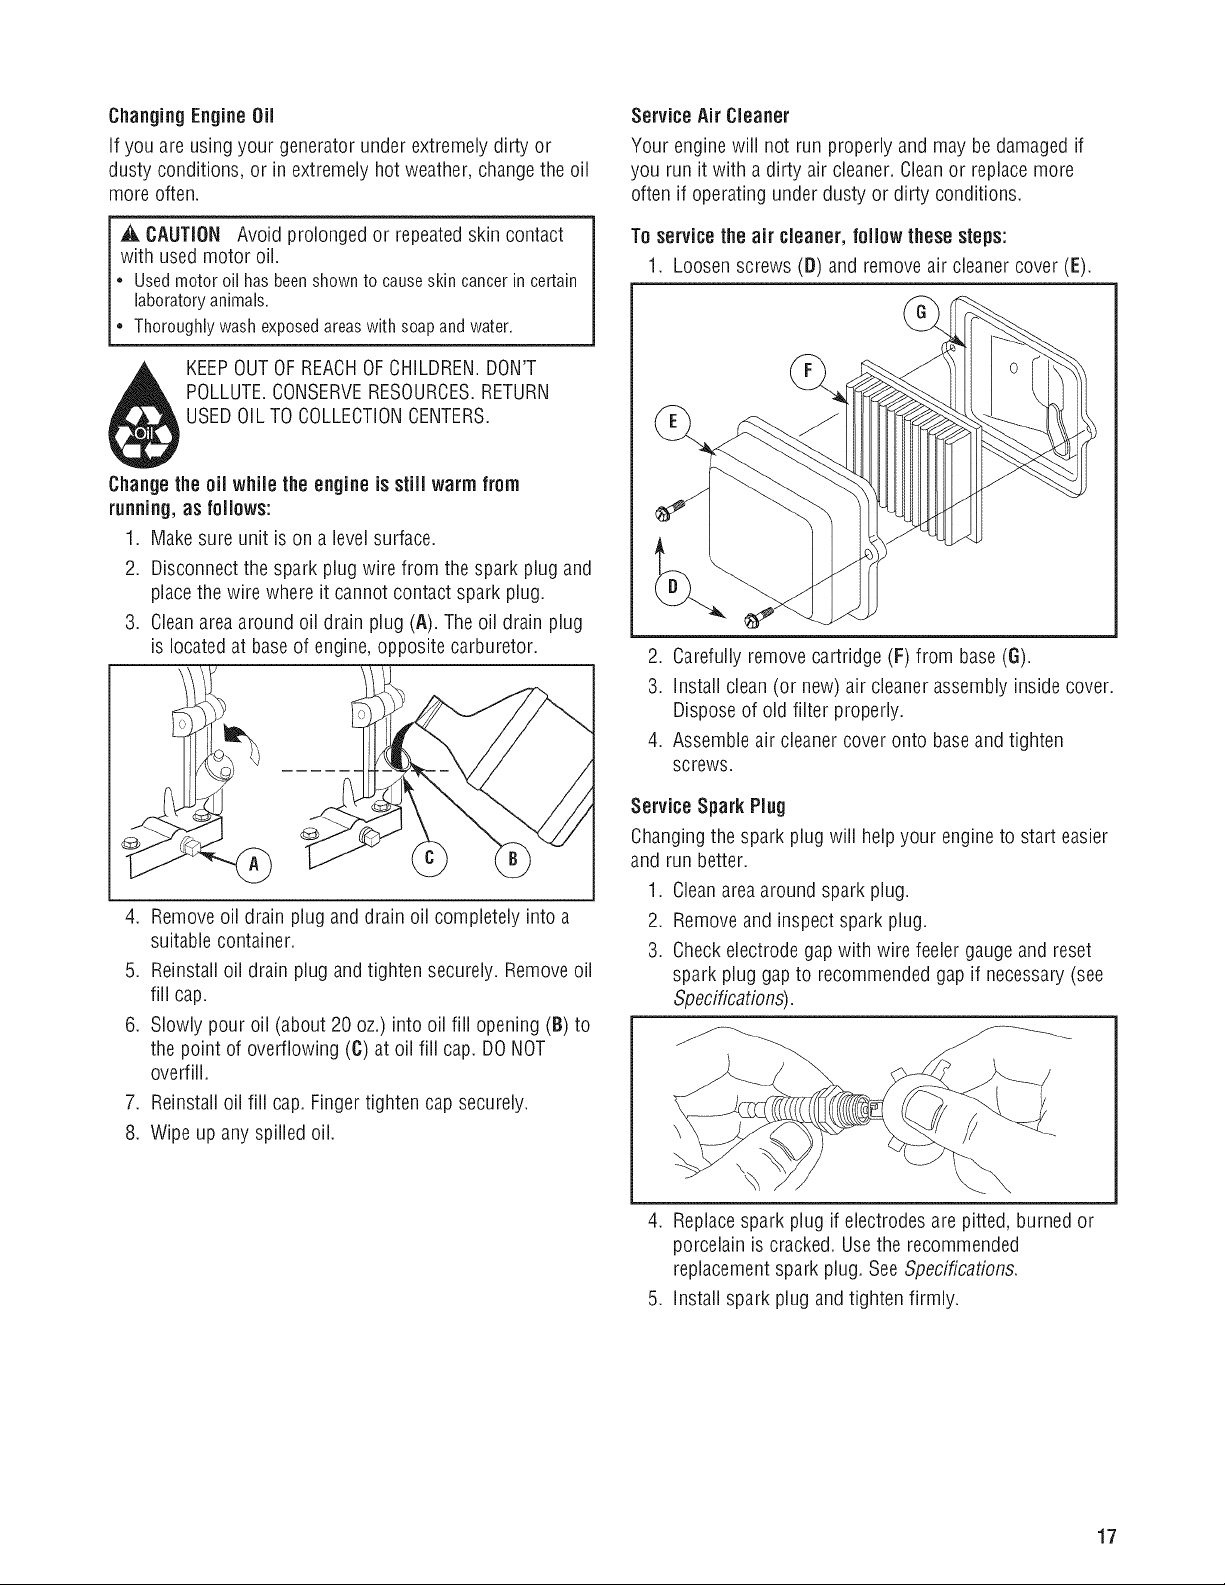
Outdoor temperatures determine the proper oil viscosity for
the engine. Usethe chart to select the bestviscosity for the
outdoor temperature rangeexpected.
oF
104 _ _ __ ,
86 _o_,,
5068__oo__°
32 o
14
-4
-22 '_
* Below 40°F (4°C) the use of SAE30 will result in hard starting.
** Above 80°F (27°C) the useof 10W30 may cause increased oil
consumption. Checkoil level more frequently.
Checking Oil Level
Oil levelshould be checked prior to each useor at least
every 8 hours of operation. Keepoil level maintained.
I. Make sure generatoris on a level surface.
2. Cleanarea around oil fill andremove oil fill cap.
3. Verifyoil is at the point of overflowing at oil fill
opening.
4. Replaceandtighten oil fill cap.
__30
:__10
B_ _ 0
oC
2O
-20
-30
Adding Engine Oil
1. Makesure generatoris on a levelsurface.
2. Checkoil levelas described in CheckingOilLevel
3. if needed,slowly pour oil into oil fill opening to the
point of overflowing at oil fill.
4. Replaceandtighten oil fill cap.
16 BRIGGSandSTRATTON.COM
Changing Engine Oil
if you are usingyour generator under extremely dirty or
dusty conditions, or in extremely hot weather, change the oil
more often.
Service Air Cleaner
Your enginewill not run properly andmay be damagedif
you run it with a dirty air cleaner. Cleanor replace more
often if operating under dusty or dirty conditions.
,& CAUTION Avoid prolonged or repeated skin contact
with used motor oil.
• Used motor oil has been shown to causeskin cancer in certain
laboratory animals.
• Thoroughly wash exposedareaswith soap and water.
KEEPOUTOFREACHOFCHILDREN.DON'T
POLLUTE.CONSERVERESOURCES.RETURN
USEDOILTOCOLLECTIONCENTERS.
Changethe oil while the engine is still warm from
running,as follows:
1. Makesure unit is on a levelsurface.
.
Disconnectthe spark plug wire from the spark plug and
placethe wire where it cannot contact spark plug.
3.
Cleanarea around oil drain plug (A). The oil drain plug
is locatedat baseof engine,opposite carburetor.
4. Removeoil drain plug and drain oil completely into a
suitable container.
5. Reinstalloil drain plug andtighten securely. Removeoil
fill cap.
6. Slowly pour oil (about 20 oz.) into oil fiii opening (B) to
the point of overflowing (C) at oil fill cap. DONOT
overfill.
7. Reinstalloil fill cap. Fingertighten cap securely.
8. Wipe up any spilled oil.
To servicethe air cleaner, follow these steps:
1. Loosen screws (B) and remove air cleanercover (E).
2. Carefully removecartridge (F) from base(G).
3. Install clean(or new)air cleanerassembly inside cover.
Disposeof old filter properly.
4. Assembleair cleanercover onto baseand tighten
screws.
Service Spark Plug
Changingthe spark plug will helpyour engine to start easier
and run better.
1. Cleanarea around spark plug.
2. Removeand inspect spark plug.
3. Checkelectrode gapwith wire feeler gauge andreset
spark plug gap to recommended gap if necessary(see
Specifications).
4. Replacespark plug if electrodesare pitted, burned or
porcelain is cracked. Usethe recommended
replacementspark plug. SeeSpecifications.
5. install spark plug and tighten firmly.
17
inspectMuffler and Spark Arrester
inspect the muffler for cracks, corrosion, or other damage.
Removethe sparkarrester, if equipped,and inspect for
damageor carbon blockage, if replacementparts are
required, make sure to use only original equipment
replacementparts.
,_, WARNING Exhaust heat/gases could ignite
combustibles, structures or damage fuel
tank in death
causing a fire, resulting or
serious injury.
Contact with muffler area could cause burns resulting in
serious injury.
• DONOTtouch hot parts andAVOIDhot exhaustgases.
• Allow equipment to cool beforetouching.
• Keepat least5feet (1.5 m) of clearance on all sides of
generator including overhead.
• It is a violation of California Public ResourceCode,Section
4442, to use or operatethe engine on any forest-covered,
brush-covered, or grass-covered land unlessthe exhaust
system is equipped with a spark arrester, as defined in Section
4442, maintained in effective working order. Other states or
federal jurisdictions may havesimilar laws.
Contactthe original equipment manufacturer, retailer, or dealer
to obtain a spark arrester designedfor the exhaust system
installed on this engine.
• Replacementparts must be the same and installed in the same
position as the original parts.
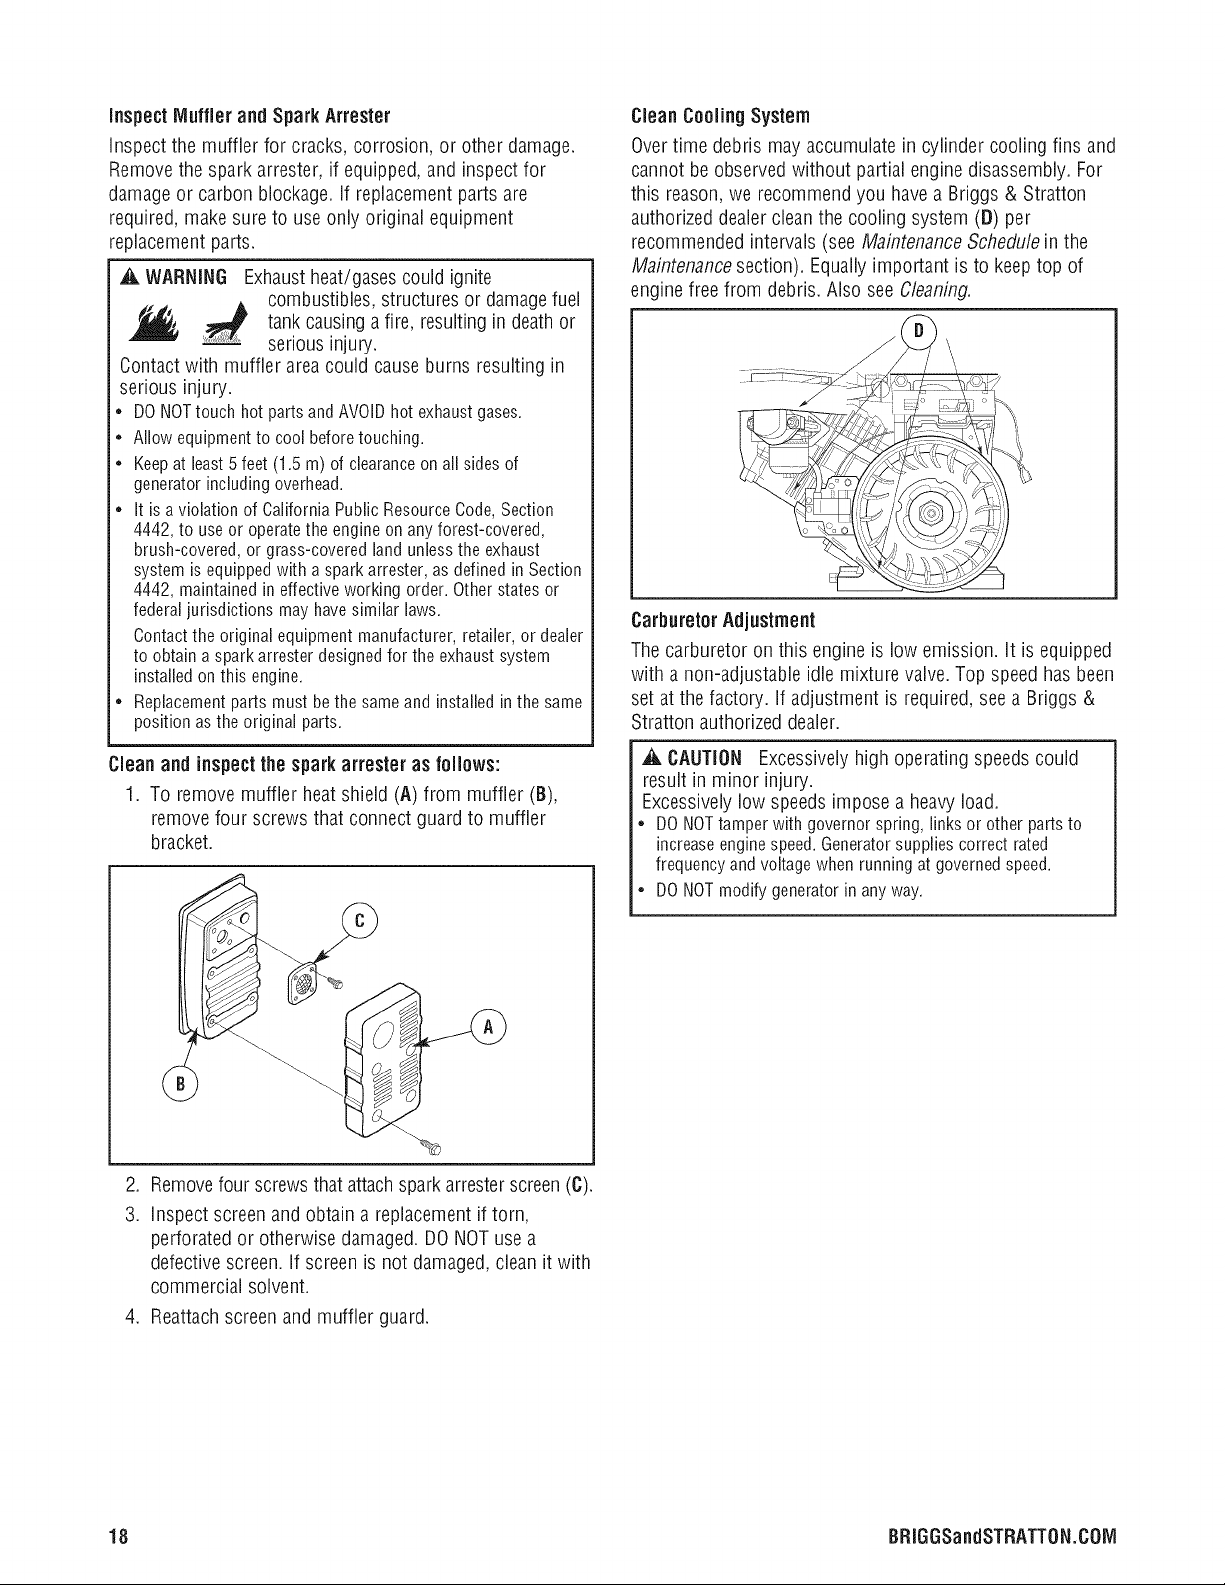
Clean Cooling System
Overtime debris may accumulatein cylinder cooling fins and
cannot be observedwithout partial engine disassembly. For
this reason,we recommend you have a Briggs & Stratton
authorized dealercleanthe cooling system (D) per
recommended intervals (seeMaintenanceSchedule in the
Maintenancesection). Equallyimportant is to keeptop of
engine freefrom debris. Also see Cleaning.
Carburetor Adjustment
Thecarburetor on this engine is low emission, it is equipped
with a non-adjustable idle mixture valve. Top speedhas been
set atthe factory, if adjustment is required,see a Briggs &
Stratton authorized dealer.
Clean and inspectthe sparkattester as follows:
1. To remove muffler heat shield (A) from muffler (B),
removefour screws that connect guard to muffler
bracket.
,
Removefour screwsthat attachsparkarresterscreen(C).
3.
inspect screenand obtain a replacementif torn,
perforated or otherwise damaged. DONOTusea
defective screen,if screen is not damaged,clean it with
commercial solvent.
4. Reattachscreenand muffler guard.
,A CAUTION Excessively high operating speeds could
result in minor injury.
Excessively low speeds impose a heavy load.
• DONOTtamper with governor spring, links or other parts to
increaseenginespeed.Generatorsupplies correct rated
frequency and voltagewhen running at governed speed.
• DONOTmodify generator in any way.
18 BRIGGSandSTRATTON.COIVl
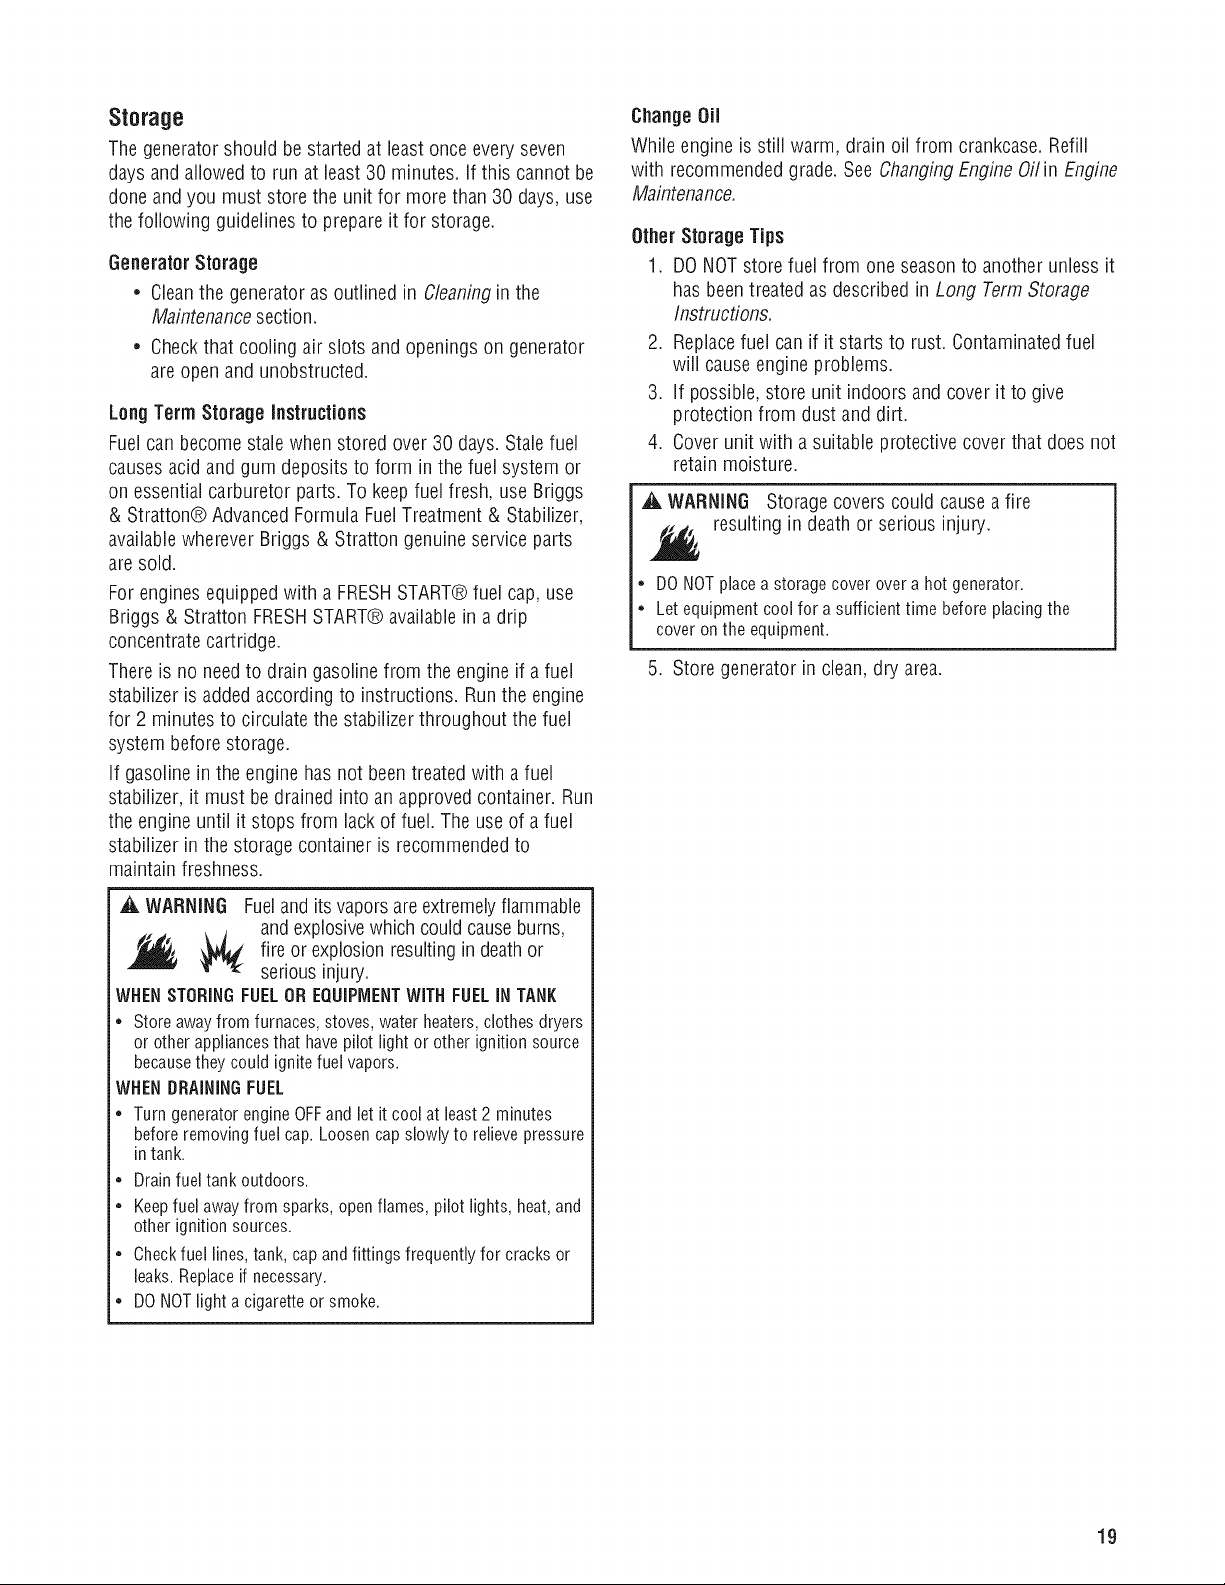
Storage
Thegenerator should be started at least once every seven
days andallowed to run at least 30 minutes. If this cannot be
done andyou must store the unit for more than 30 days,use
the following guidelinesto prepare it for storage.
GeneratorStorage
• Cleanthe generator as outlined in Cleaninginthe
Maintenancesection.
• Checkthat cooling air slots and openingson generator
are openand unobstructed.
LongTermStorage instructions
Fuelcan becomestalewhen stored over 30 days. Stalefuel
causesacid andgum deposits to form inthe fuel system or
on essentialcarburetor parts. To keep fuel fresh, use Briggs
& Stratton® AdvancedFormula FuelTreatment & Stabilizer,
availablewherever Briggs & Stratton genuineservice parts
are sold.
For enginesequippedwith a FRESHSTART® fuel cap, use
Briggs & Stratton FRESHSTART®available in a drip
concentrate cartridge.
Thereis no needto drain gasoline from the engine if a fuel
stabilizer is added accordingto instructions.Runthe engine
for 2 minutes to circulate the stabilizerthroughout the fuel
system before storage.
If gasoline in the engine hasnot beentreated with a fuel
stabilizer, itmust be drained into an approved container. Run
the engine until it stops from lackof fuel. The use of a fuel
stabilizer in the storage container is recommended to
maintain freshness.
ChangeOil
While engine is still warm, drain oil from crankcase. Refill
with recommendedgrade. See ChangingEngine Oilin Engine
Maintenance.
Other Storage Tips
1. DONOTstorefuel from one seasonto another unless it
has beentreated as described in Long TermStorage
Instructions.
2. Replacefuel can if it starts to rust. Contaminatedfuel
will cause engine problems.
3. If possible,store unit indoors and cover it to give
protection from dust and dirt.
4. Coverunit with a suitable protective cover that does not
retain moisture.
WARNING Storagecovers could cause a fire
resulting in death or serious injury.
= DONOTplace astorage cover over a hot generator.
= Let equipment cool for a sufficient time before placingthe
cover onthe equipment.
5. Store generator in clean, dry area.
_i_WARNING Fuelandits vaporsare extremelyflammable
and explosivewhich couldcauseburns,
fire or explosionresultingin deathor
serious injury.
WHENSTORINGFUELOREQUIPMENTWITHFUELiN TANK
• Store awayfrom furnaces, stoves, water heaters,clothes dryers
or other appliancesthat havepilot light or other ignition source
becausethey could ignite fuel vapors.
WHEN DRAININGFUEL
* Turn generatorengine OFFand let it cool at least2 minutes
beforeremoving fuel cap. Loosen cap slowly to relieve pressure
in tank.
• Drainfuel tank outdoors.
• Keepfuel away from sparks, openflames, pilot lights,heat,and
other ignition sources.
• Checkfuel lines,tank, cap andfittings frequently for cracks or
leaks.Replaceif necessary.
• DONOTlighta cigarette or smoke.
19
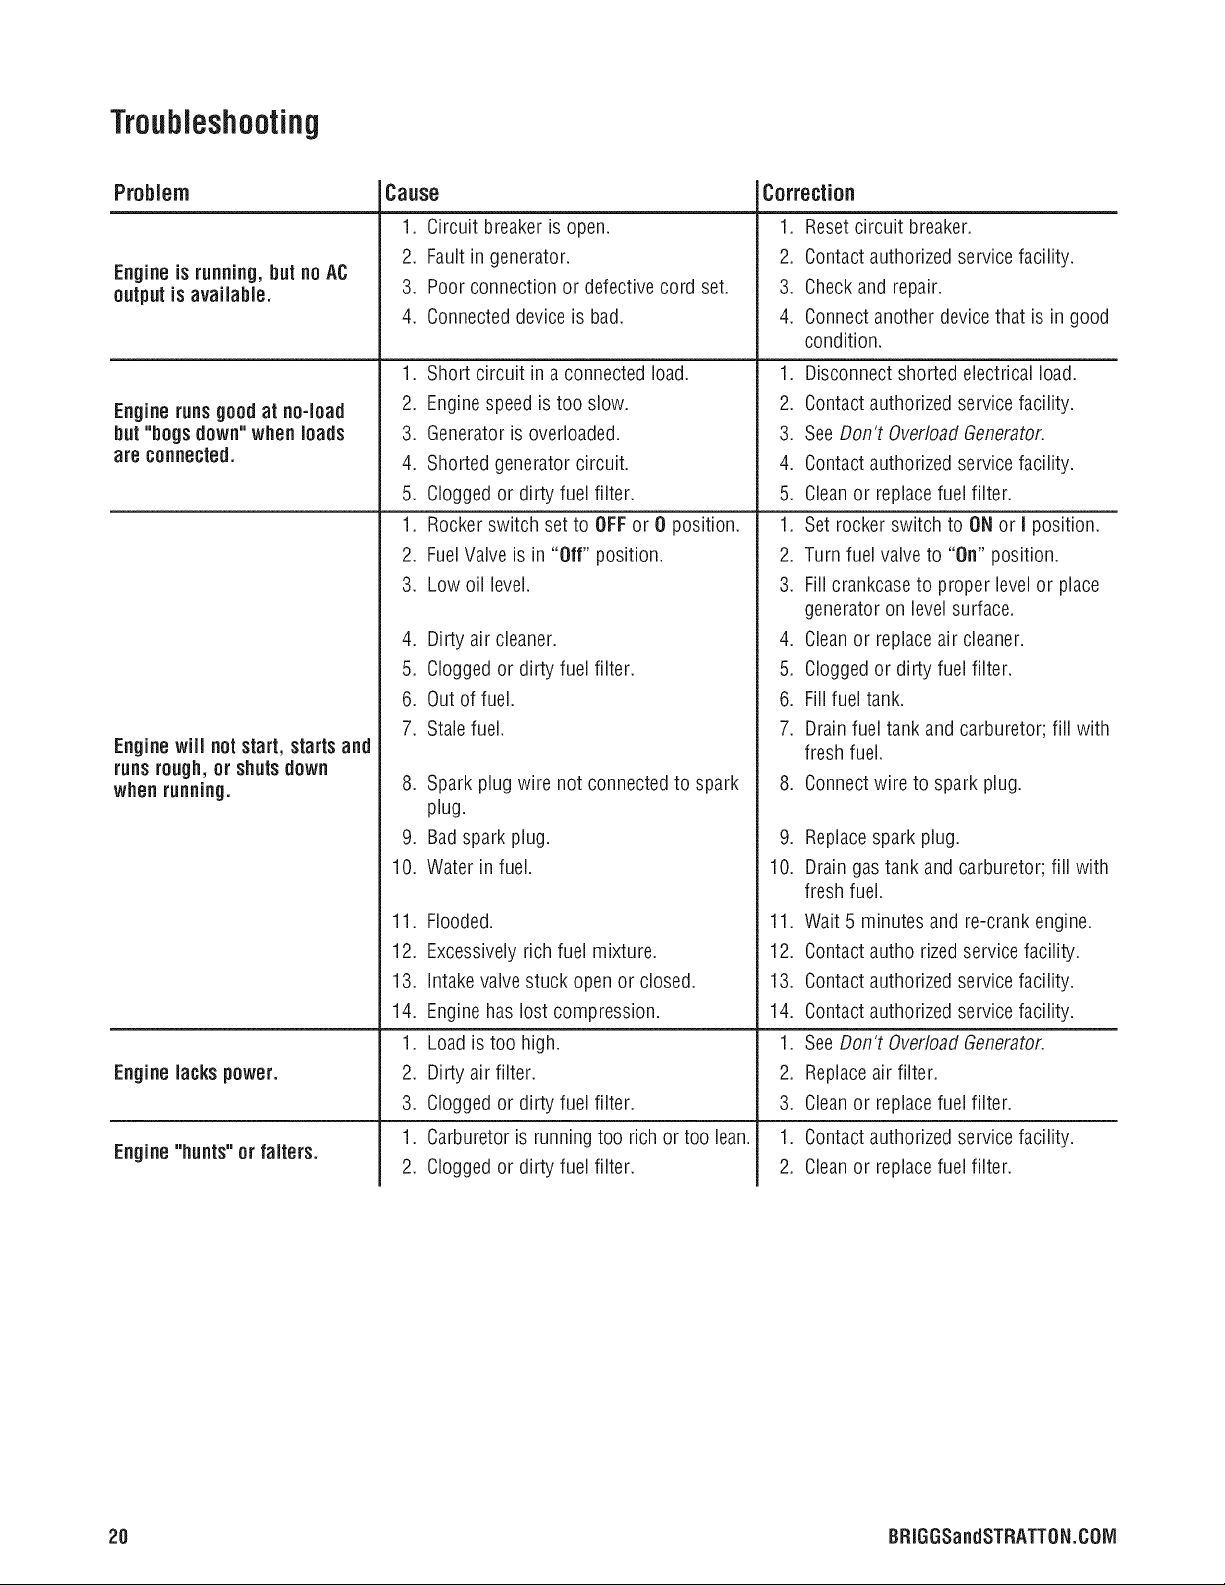
Troubleshooting
Problem
Engineisrunning,but noAC
output is avaiiabJe.
Engine runsgood at no-load
but"bogs down" when loads
are connected.
Engine will notstart, startsand
runsrough,or shutsdown
when running.
Engine lacks power.
Engine "hunts" or falters.
Canse
1. Circuit breakeris open.
2. Faultin generator.
3. Poorconnection or defective cord set.
4. Connecteddeviceis bad.
Short circuit in a connected load. 1.
.
2.
Enginespeed is too slow. 2.
Generatoris overloaded. 3.
3.
4.
Shorted generator circuit. 4.
5.
Cloggedor dirty fuel filter. 5.
1.
Rockerswitch set to OFFor 0 position. 1.
2.
FuelValveis in "Off" position. 2.
3. Low oil level.
4. Dirty air cleaner.
5. Cloggedor dirty fuel filter.
6. Out of fuel.
7. Stalefuel.
.
Spark plug wire not connectedto spark
plug.
9. Badsparkplug.
10. Waterin fuel.
11. Flooded.
12.
Excessivelyrich fuel mixture. 12.
13.
intake valvestuck open or closed. 13.
14.
Engine haslost compression. 14.
1.
Loadis too high. 1.
2.
Dirty air filter. 2.
3.
Cloggedor dirty fuel filter. 3.
1.
Carburetoris runningtoo rich or too lean. 1.
2. Cloggedor dirty fuel filter.
Correction
1. Resetcircuit breaker,
2. Contactauthorizedservice facility.
3. Checkand repair.
4. Connectanotherdevice that is in good
condition.
Disconnectshorted electrical load,
Contactauthorizedservice facility.
SeeDon't OverloadGenerator,
Contactauthorizedservice facility.
Cleanor replacefuel filter.
Set rocker switch to ONor I position.
Turnfuel valveto "On" position.
3. Fillcrankcaseto proper level or place
generatoron levelsurface.
4. Cleanor replaceair cleaner.
5. Cloggedor dirty fuel filter.
6. Fillfuel tank.
7. Drainfuel tank andcarburetor; fill with
fresh fuel.
8. Connectwire to spark plug.
9. Replacesparkplug.
10. Drain gastank and carburetor; fill with
fresh fuel.
11. Wait5 minutes and re-crank engine.
Contactauthorized servicefacility.
Contactauthorizedservice facility.
Contactauthorizedservice facility.
SeeDon't OverloadGenerator.
Replaceairfilter.
Cleanor replacefuel filter.
Contactauthorizedservice facility.
.
Cleanor replacefuel filter.
20 BRIGGSandSTRATTON.COIVl
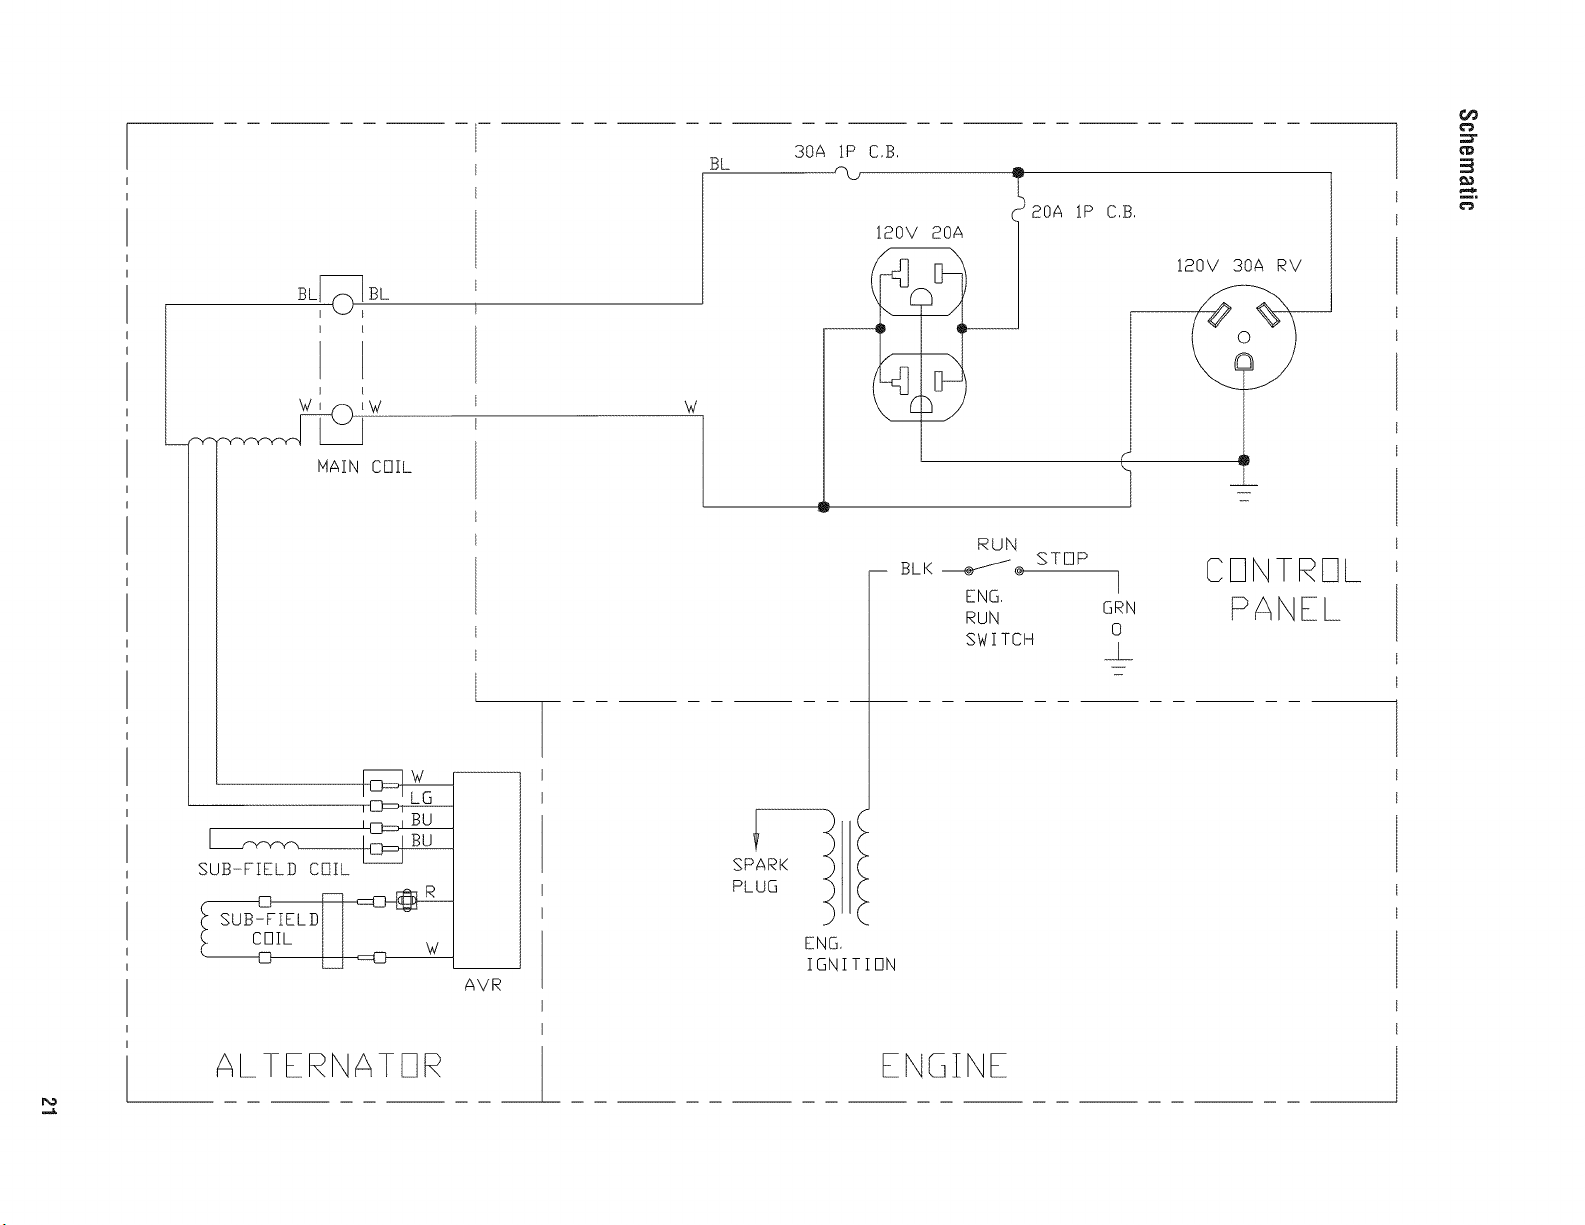
BL_BL
BL
3OA 1P
C,B,
IP C,S,
120V 20A
!20V 30A RV
__I 20A
I
HAIN COIL
UB-FIEL COIL
IL LJ _w_w
AVR
W
RUN
SPARK
PLUG
ENG,
IGNITION
BLK _® STOP
ENG,
RUN
SWITCH
I
GRN
0
_L
CONTROL
PANEL
ALTERNATE1R
ENGINE

Reserved
22 BRIGGSandSTRATTON.COIVl

Reserved
23
 Loading...