

Briggs & Stratton 030448-0 Owner’s Manual
®
PortableGenerator
Operator'sManual
This generator is rated in accordance with CSA (CanadianStandards
Association) standard 022.2 No. 100-04 (motors and generators).
BRIGGS & STRATTONPOWER PRODUCTS GROUP, LLC
JEFFERSON, WISCONSIN, U.S.A.
Manual No. 209443GS Revision - (04/02/2009)
Thankyou for purchasingthis quality-built Briggs& Stratton generator.We arepleasedthat you've placedyour confidence in
the Briggs & Stratton brand. When operatedandmaintained accordingto the instructions inthis manual,your Briggs &
Stratton generator will provide many yearsof dependableservice.
Thismanualcontainssafety information to makeyou awareof the hazardsand risks associatedwith generators andhow to
avoid them. Thisgenerator is designed andintended only for supplying electrical powerfor operatingcompatible electrical
lighting, appliances,tools and motor loads, andis not intendedfor any other purpose. It is important that you read and
understand these instructions thoroughly before attempting to start or operatethis equipment. Save these instructionsfor
future reference.
Thisgenerator requiresfinal assembly beforeuse. Referto the Assemb/ysection of this manual for instructions on final
assembly procedures. Follow the instructions completely.
Whereto FindUs
You never haveto look far to find Briggs & Stratton support and servicefor your generator.Consultyour Yellow Pages.There
are over 30,000 Briggs & Stratton authorizedservicedealersworldwide who provide quality service.You canalso contact
Briggs & Stratton CustomerServiceby phone at (800) 743-4115, or on the Internet at BRIGGSandSTRATTON.COM.
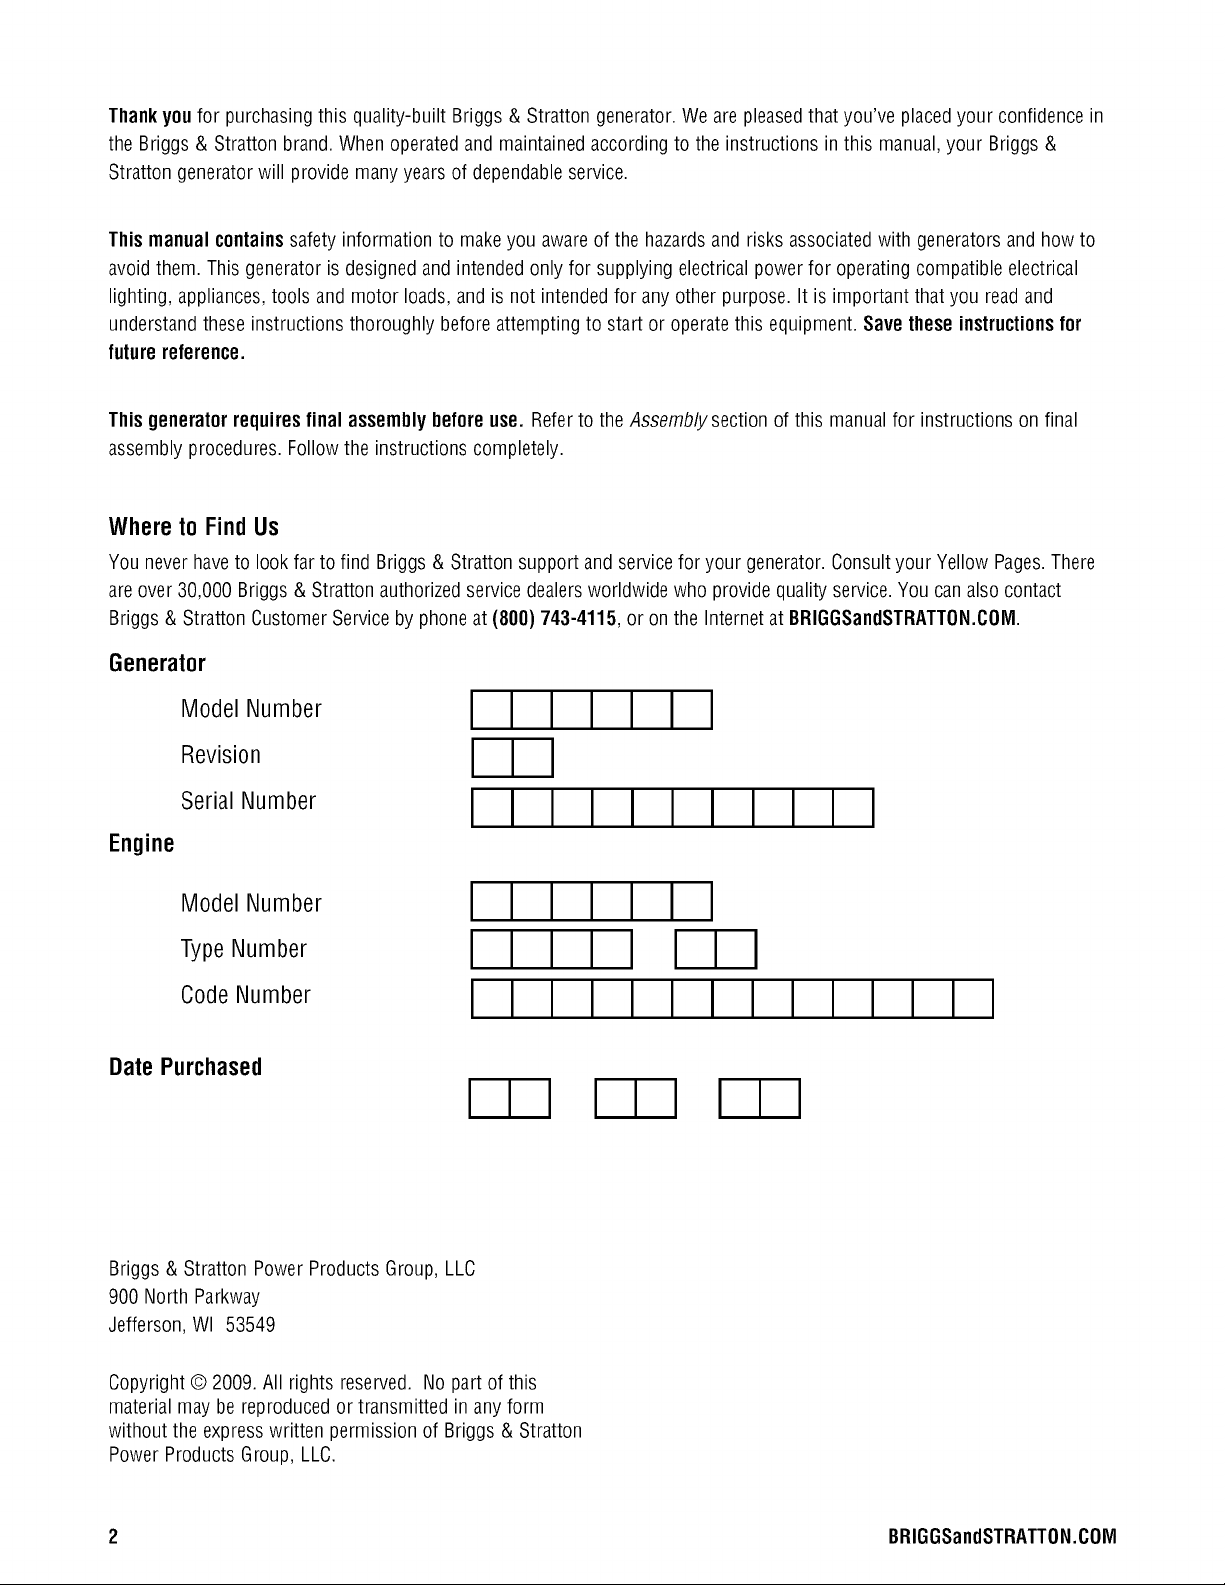
Generator
Model Number
Revision I I I
Serial Number
Engine
Model Number
Type Number LLL_ I I I
Code Number
DatePurchased
Briggs & Stratton Power Products Group, LLC
900 North Parkway
Jefferson, WI 53549
IIIIIIIII
Copyright © 2009. All rights reserved. No part of this
material may bereproduced or transmitted in any form
without the expresswritten permission of Briggs & Stratton
Power Products Group, LLC.
2 BRIGGSandSTRATTON.COIVl
Tableof Contents
Operator Safety ................................. 4
Equipment Description......................................... 4
Important Safety Information.................................... 4
Assembly ..................................... 7
UnpackGenerator ............................................ 7
Install Wheel Kit.............................................. 7
Add Engine Oil............................................... 8
Add Fuel.................................................... 8
System Ground .............................................. 9
Connectingto a Building's Electrical System........................ 9
GeneratorLocation ........................................... 9
FeaturesandControls............................ 10
Cord Setsand Receptacles.................................... 11
Operation .................................... 12
Starting the Engine .......................................... 12
Connecting ElectricalLoads.................................... 13
Stopping the Engine.......................................... 13
Warm Weather Operation ..................................... 13
Don't Overload Generator ..................................... 14
Maintenance .................................. 15
MaintenanceSchedule........................................ 15
GeneratorMaintenance....................................... 15
FuelValveMaintenance....................................... 15
Engine Maintenance.......................................... 16
Storage ................................................... 18
Troubleshooting ................................ 19
Warranties.................................... 20
Emissions Control System Warranty............................. 20
GeneratorOwnerWarranty .................................... 22
Specifications ................................. 24
Product Specifications........................................ 24
Common ServiceParts ....................................... 24
Espafiol
OperatorSafety
Equipment Description
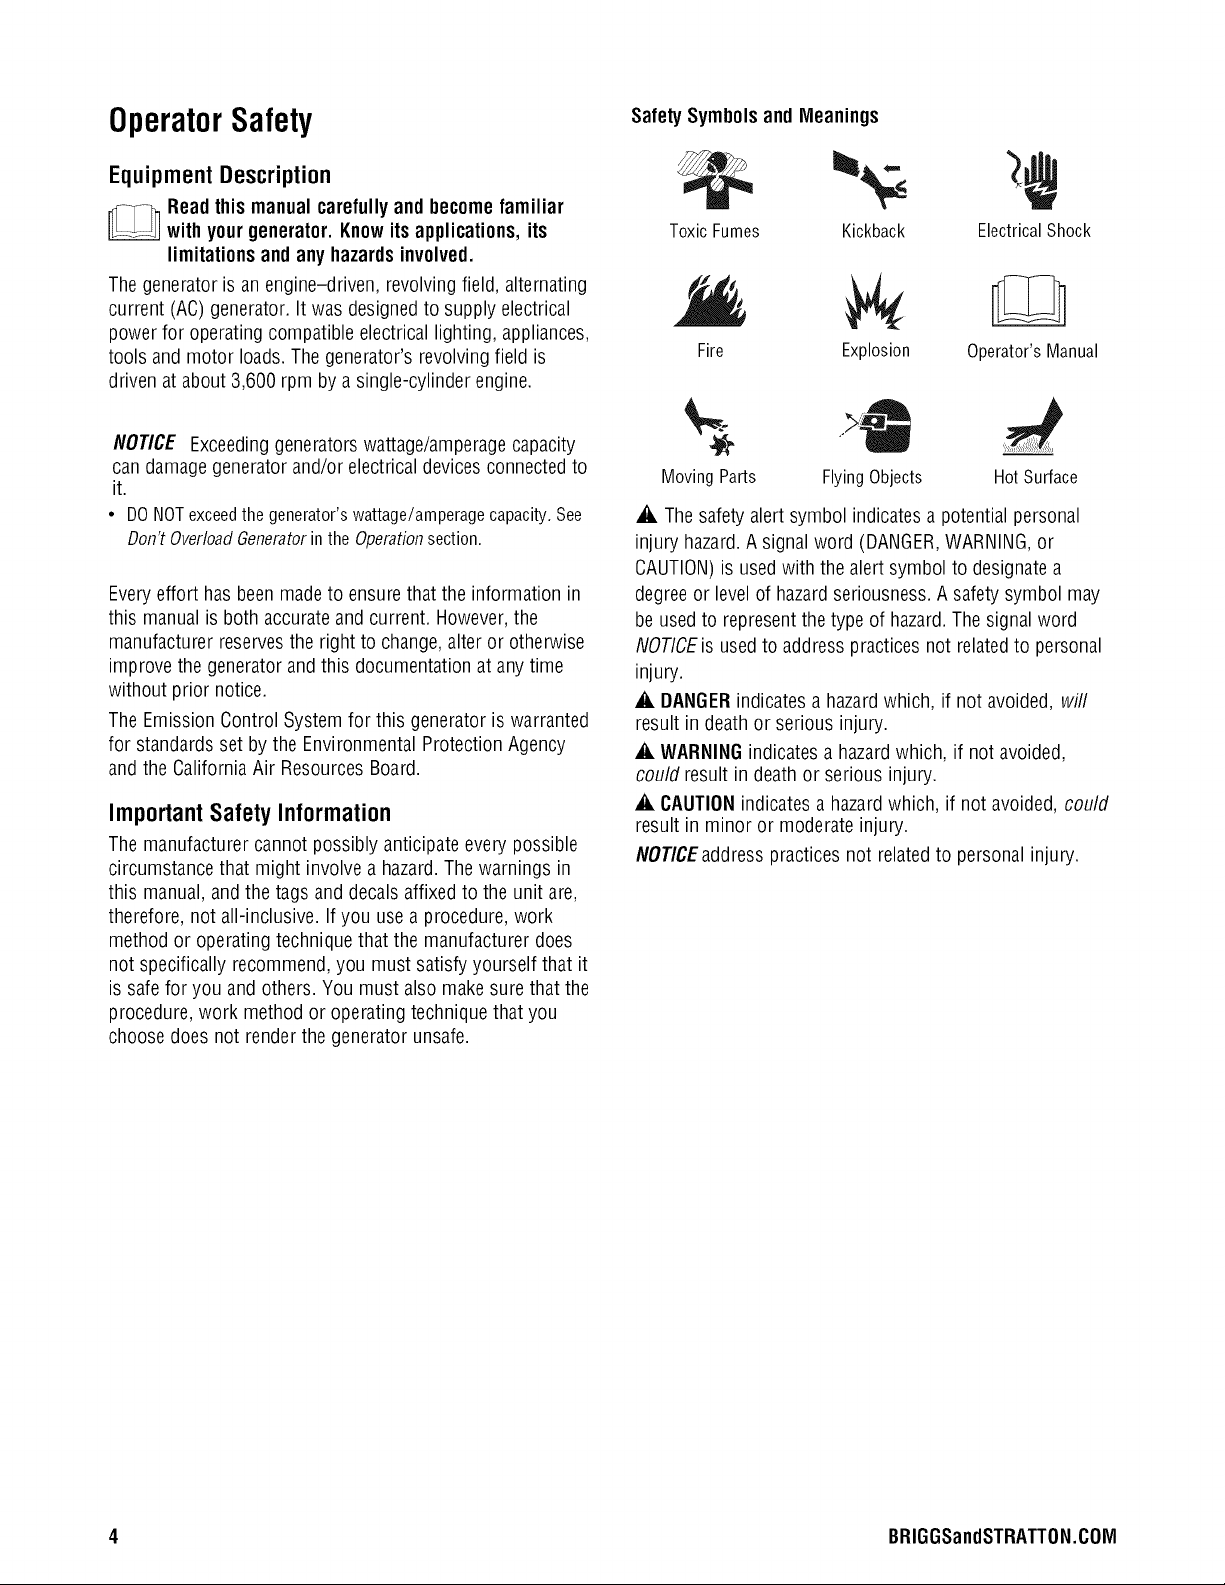
SafetySymbolsand Mleanings
Readthismanualcarefully andbecomefamiliar
...... with your generator. Knowits applications, its
limitationsandanyhazardsinvolved.
Thegeneratoris an engine-driven, revolvingfield, alternating
current (AC)generator. Itwas designedto supply electrical
power for operatingcompatible electricallighting, appliances,
tools and motor loads.Thegenerator's revolvingfield is
driven at about3,600 rpm by a single-cylinderengine.
NOTICE Exceedinggeneratorswattage/amperagecapacity
candamagegeneratorand/or electricaldevicesconnectedto
it.
• DONOTexceedthegenerator'swattage/amperagecapacity.See
Don'tOverloadGeneratorintheOperationsection.
Everyeffort has been madeto ensure that the information in
this manualis both accurateandcurrent. However,the
manufacturer reservesthe right to change,alter or otherwise
improve the generator and this documentation at anytime
without prior notice.
The EmissionControl System for this generator is warranted
for standardsset by the Environmental ProtectionAgency
and the California Air Resources Board.
Important Safety Information
The manufacturercannot possibly anticipateevery possible
circumstance that might involve a hazard.Thewarnings in
this manual,and the tags and decalsaffixedto the unit are,
therefore, not all-inclusive. If you use a procedure, work
method or operating techniquethat the manufacturer does
not specifically recommend,you must satisfy yourself that it
is safefor you and others. Youmust also make surethat the
procedure, work method or operating technique that you
choose does not renderthe generator unsafe.
ToxicFumes Kickback ElectricalShock
Fire
MovingParts FlyingObjects HotSurface
Thesafety alertsymbol indicates a potential personal
injury hazard.A signalword (DANGER,WARNING,or
CAUTION)is used with the alert symbol to designatea
degreeor levelof hazardseriousness. Asafety symbol may
be used to representthe typeof hazard.The signal word
NOTICEis usedto address practicesnot relatedto personal
injury.
_i, DANGER indicates a hazardwhich, if not avoided, will
result in deathor serious injury.
_i, WARNINGindicates a hazardwhich, if not avoided,
could result in death or serious injury.
_i, CAUTIONindicates ahazardwhich, if not avoided, could
result in minor or moderate injury.
NOTICEaddresspractices not relatedto personal injury.
Explosion Operator'sManual
4 BRIGGSandSTRATTON.COIVl
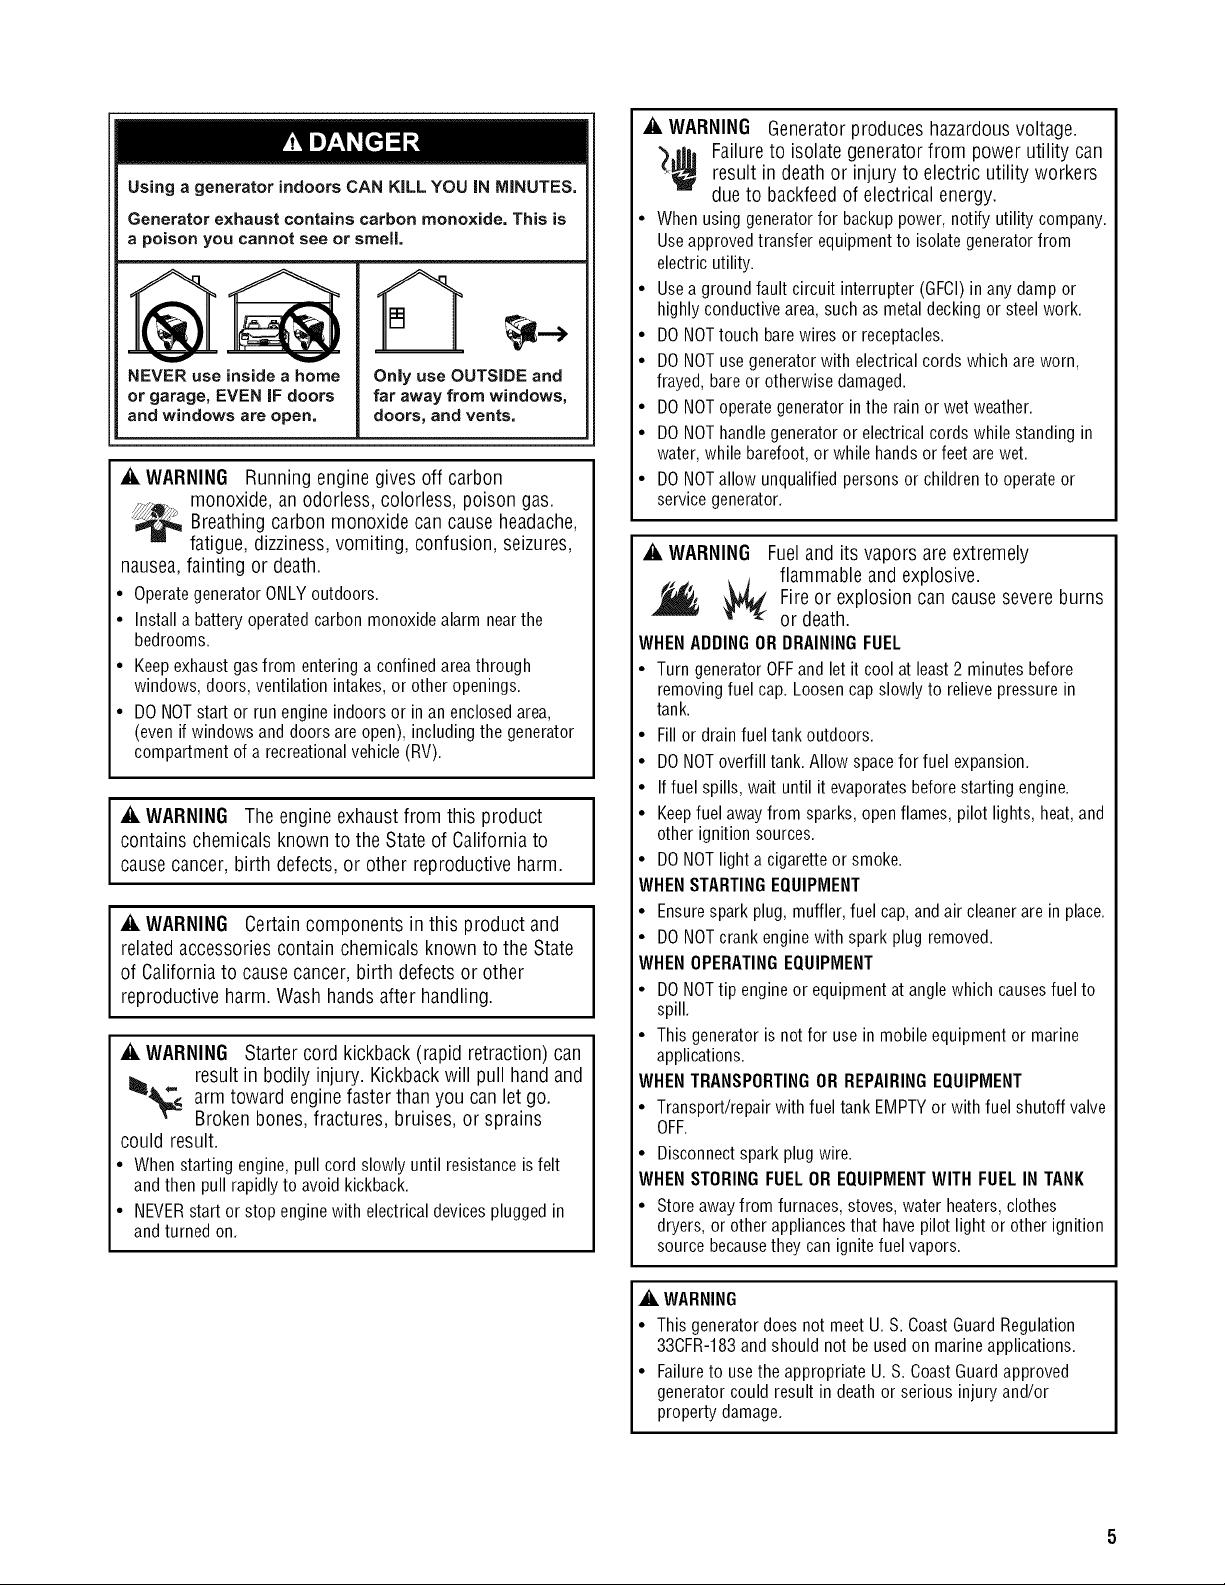
Using a generator indoors CAN KiLL YOU iN MINUTES,
Generator exhaust contains carbon monoxide, This is
a poison you cannot see or smelJ,
V V
NEVER use inside a home
or garage, EVEN iF doors
and windows are open,
Only use OUTSIDE and
far away from windows,
doors, and vents,
_i, WARNING Runningengine givesoff carbon
monoxide, anodorless, colorless, poison gas.
_ Breathing cancause headache,
carbon monoxide
fatigue, dizziness,vomiting, confusion, seizures,
nausea,fainting or death.
• OperategeneratorONLYoutdoors.
• Installa batteryoperatedcarbonmonoxidealarmnearthe
bedrooms.
Keepexhaustgas from entering a confinedareathrough
windows, doors, ventilation intakes,or other openings.
DO NOTstart or run engine indoors or in an enclosedarea,
(even if windows anddoors are open), including the generator
compartment of a recreational vehicle (RV).
_i, WARNING Theengine exhaust from this product
contains chemicalsknown to the Stateof California to
causecancer, birth defects,or other reproductive harm.
_i, WARNING Certaincomponents in this product and
relatedaccessoriescontain chemicals known to the State
of Californiato causecancer, birth defectsor other
reproductive harm. Wash hands afterhandling.
_i, WARNING Startercord kickback (rapid retraction)can
result in bodily injury. Kickbackwill pull hand and
,_. arm toward enginefaster thanyou can let go.
Broken bones,fractures, bruises, or sprains
could result.
• Whenstartingengine,pullcordslowlyuntilresistanceisfelt
andthenpullrapidlytoavoidkickback.
• NEVERstartor stopenginewith electricaldevicespluggedin
andturnedon.
_i, WARNING Generator produces hazardous voltage.
")Jl|l Failure to isolate generator from power utility can
result in death or injury to electric utility workers
due to backfeed of electrical energy.
• When usinggenerator for backup power,notify utility company.
Useapproved transfer equipment to isolate generatorfrom
electric utility.
• Usea ground fault circuit interrupter (GFCI)in any damp or
highly conductive area,such asmetal deckingor steel work.
• DO NOTtouch barewires or receptacles.
• DO NOTuse generator with electrical cords which are worn,
frayed,bare or otherwisedamaged.
• DO NOToperategenerator in the rain or wet weather.
• DO NOThandlegenerator or electricalcords while standing in
water, while barefoot,or while hands orfeet arewet.
• DO NOTallow unqualified personsor children to operate or
servicegenerator.
_i, WARNING Fuel and its vapors are extremely
flammable and explosive.
Fire or explosion can cause severe burns
or death.
WHENADDING OR DRAININGFUEL
• Turn generator OFFand let it cool at least2 minutes before
removing fuel cap. Loosen capslowly to relieve pressurein
tank.
• Fill or drain fuel tank outdoors.
• DONOToverfill tank. Allow spacefor fuel expansion.
• If fuel spills, wait until it evaporatesbefore starting engine.
• Keepfuel awayfrom sparks, open flames, pilot lights, heat,and
other ignition sources.
• DONOTlight a cigaretteor smoke.
WHENSTARTINGEQUIPMENT
• Ensurespark plug, muffler,fuel cap,and air cleanerarein place.
• DO NOTcrank enginewith spark plug removed.
WHENOPERATINGEQUIPMENT
• DONOTtip engine or equipmentat angle which causes fuel to
spill.
• This generator is not for use in mobile equipment or marine
applications.
WHENTRANSPORTINGOR REPAIRINGEQUIPMENT
• Transport/repair with fuel tank EMPTYor with fuel shutoff valve
OFF.
• Disconnectspark plug wire.
WHENSTORINGFUELOR EQUIPMENTWITH FUELIN TANK
• Store awayfrom furnaces, stoves,water heaters,clothes
dryers, or other appliancesthat have pilot light or other ignition
source becausethey can ignitefuel vapors.
A WARNING
This generator does notmeet U. S. CoastGuard Regulation
33CFR-183and should not beused on marine applications.
Failureto usethe appropriate U. S. CoastGuard approved
generator could result in death or serious injury and/or
property damage.

_i, WARNING Contact with muffler area can result in
serious burns.
_ _ Exhaust heat/gases can ignite
combustibles, structures or damage
fuel tank causing a fire.
• DO NOTtouch hot parts and AVOIDhot exhaustgases.
• Allow equipment to cool beforetouching.
• Keepat least5 feet (152 cm) of clearanceon all sidesof
generator including overhead.
• It is aviolation of California Public Resource Code,Section
4442, to use or operate the engineon anyforest-covered,
brush-covered, or grass-covered land unlessthe exhaust
system is equipped with a spark arrester, as defined in Section
4442, maintained in effective working order. Other statesor
federal jurisdictions may have similar laws.
Contactthe original equipment manufacturer, retailer, or dealer
to obtain a sparkarrester designed for the exhaust system
installed on this engine.
• Replacement partsmust bethe same and installed in the same
position asthe original parts.
_i, WARNING Unintentional sparking can result in fire or
_i, CAUTION Excessively high operating speeds increase
risk of injury and damage to generator.
Excessively low speeds impose a heavy load.
• DO NOTtamper with governed speed.Generatorsupplies
correct ratedfrequency andvoltage when running at governed
speed.
• DO NOTmodify generator inany way.
NOTICE Exceeding generators wattage/amperage capacity
can damage generator and/or electrical devices connected to
it.
• DO NOTexceedthe generator's wattage/amperagecapacity. See
Don't OverloadGeneratorin the Operationsection.
• Start generatorand letengine stabilize beforeconnecting
electrical loads.
• Connectelectrical loads in OFFposition, thenturn ONfor
operation.
• Turn electricalloads OFFanddisconnect from generator before
stopping generator.
,_¢ electric shock.
WHENADJUSTINGORMAKINGREPAIRSTO YOURGENERATOR
• Disconnectthe spark plug wire from the spark plug and place
the wire where it cannot contact spark plug.
WHENTESTINGFORENGINESPARK
• Use approved spark plugtester.
• DO NOTcheckfor spark with spark plug removed.
_i, WARNING Starter and other rotating parts can
entangle hands, hair, clothing, or accessories.
• NEVERoperategenerator without protective housing or covers.
• DO NOTwear looseclothing, jewelry or anything that may be
caught in the starter or other rotating parts.
• Tie uplong hair and removejewelry.
NOTICE Improper treatment of generator can damage it
and shorten its life.
• Use generator only for intended uses.
• If you havequestions about intended use,ask dealeror contact
local servicecenter.
• Operategenerator only onlevel surfaces.
• DO NOTexposegenerator to excessivemoisture, dust, dirt, or
corrosive vapors.
• DO NOTinsert anyobjects through cooling slots.
• If connected devicesoverheat, turn them off and disconnect them
from generator.
• Shut off generator if:
-electrical output is lost;
-equipment sparks, smokes, or emits flames;
-unit vibrates excessively.
6 BRIGGSandSTRATTON.COIVI

Assembly
F[-_-_I Read entireoperator'smanualbeforeyou attempt
toassemble oroperateyour newgenerator.
Your generator requiressome assembly and isready for use
after it hasbeen properly servicedwith the recommendedoil
and fuel.
If you haveany problemswith the assemblyof your generator,
pleasecall the generator helplineat (800) 743-4115. If calling
for assistance,pleasehavethe model, revision,and serial
numberfrom the identificationlabel available.SeeGenerator
Featuresand Controlsfor identification labellocation.
UnpackGenerator
1. Setthe carton on a rigid, flat surface.
2. Remove everything from carton exceptgenerator.
3. Opencarton completely by cutting each corner from
top to bottom.
4. Leave generator on cartonto install wheel kit.
The generatoris suppliedwith:
• Engineoil bottle
• Operator's manual
• Wheelkit
Install Wheel Kit
NOTICE Wheelkit is not intendedfor over-the-roaduse.
You will needthe following tools to install thesecomponents:
• 10 mm and 13 mm wrenches
• Socketwrench with 10 mm and 13 mm sockets
• Adjustablewrenches (2)
Install the wheel kit asfollows:
1. Tip generatorso that engine end is up.
2. Placeaxle stud (A) through mounting bracketon
generatorframe.
3. Placea flat washer (B) on axlestud as shown.
4. Use adjustablewrenches to securethe axle stud to
frame with jam nut (C).
5. Placea flat washer (B), then wheel (D) on axleas
shown.
NOTICE Besure to install wheel with raised hubinboard.
6. Use anadjustablewrench to securethe wheel to axle
stud with jam nut.
7. Repeatsteps 2 through 6 for other wheel.
8. Tip generatorso that engine side is down.
9. Line upholes in support leg (E)with holes in generator
frame.
10. Attachsupport leg using two 20 mm bolts (F) andtwo
hex nuts(G). Tightenwith 10 mm and13 mm wrenches.
11. Return generatorto normal operating position (resting
on wheels and support legs).
12. Line upholes in handle(H) with holes in generator
frame. Attach handleusing 10 mm and 13 mm
wrencheswith 35 mm bolts (J) and hex nuts (K).
Add Engine Oil
1. Placegenerator on a flat, levelsurface.
2. Cleanarea aroundoil fill and removeyellow oil fill cap.
3. Using oil funnel (optional), slowly pour contents of
provided oil bottle into oil fill opening.
NOTICE Improper treatment of generator can damage it
and shorten its life.
• DO NOTattempt to crank or start the engine beforeit has been
properly servicedwith the recommended oil. This mayresult in an
enginefailure.
4. Replaceoil fill cap and fully tighten.
_i, WARNING Fueland its vapors areextremely
flammable andexplosive.
Fireor explosion can causesevere burns
or death.
WHENADDINGFUEL
• Turn generator OFFand let it cool at least2 minutes before
removing fuel cap. Loosen capslowly to relieve pressurein
tank.
• Fill fuel tank outdoors.
• DONOToverfill tank. Allow spacefor fuel expansion.
• If fuel spills, wait until it evaporatesbefore starting engine.
• Keepfuel awayfrom sparks, open flames, pilot lights, heat,and
other ignition sources.
• DONOTlight a cigaretteor smoke.
Add Fuel
Fuel mustmeet theserequirements:
• Clean,fresh, unleadedgasoline.
• A minimum of 87 octane/87 AKI (91 RON).High
altitude use, seeHigh Altitude.
• Gasolinewith up to 10% ethanol (gasohol) or up to
15% MTBE(methyl tertiary butyl ether) is acceptable.
NOTICE Avoid generatordamage.
Failureto follow Operator's Manualfor fuel
recommendations voidswarranty.
• DONOTuseunapprovedgasolinesuchasE85.
• DONOTmixoil ingasoline.
• DONOTmodifyengineto runonalternatefuels.
To protect the fuel system from gum formation, mix in a fuel
stabilizerwhen adding fuel. SeeStorage.All fuel is not the
same. Ifyou experiencestarting or performance problems
after using fuel, switch to a different fuel provider or change
brands. This engine is certified to operate on gasoline.The
emission control system for this engine is EM (Engine
Modifications).
.
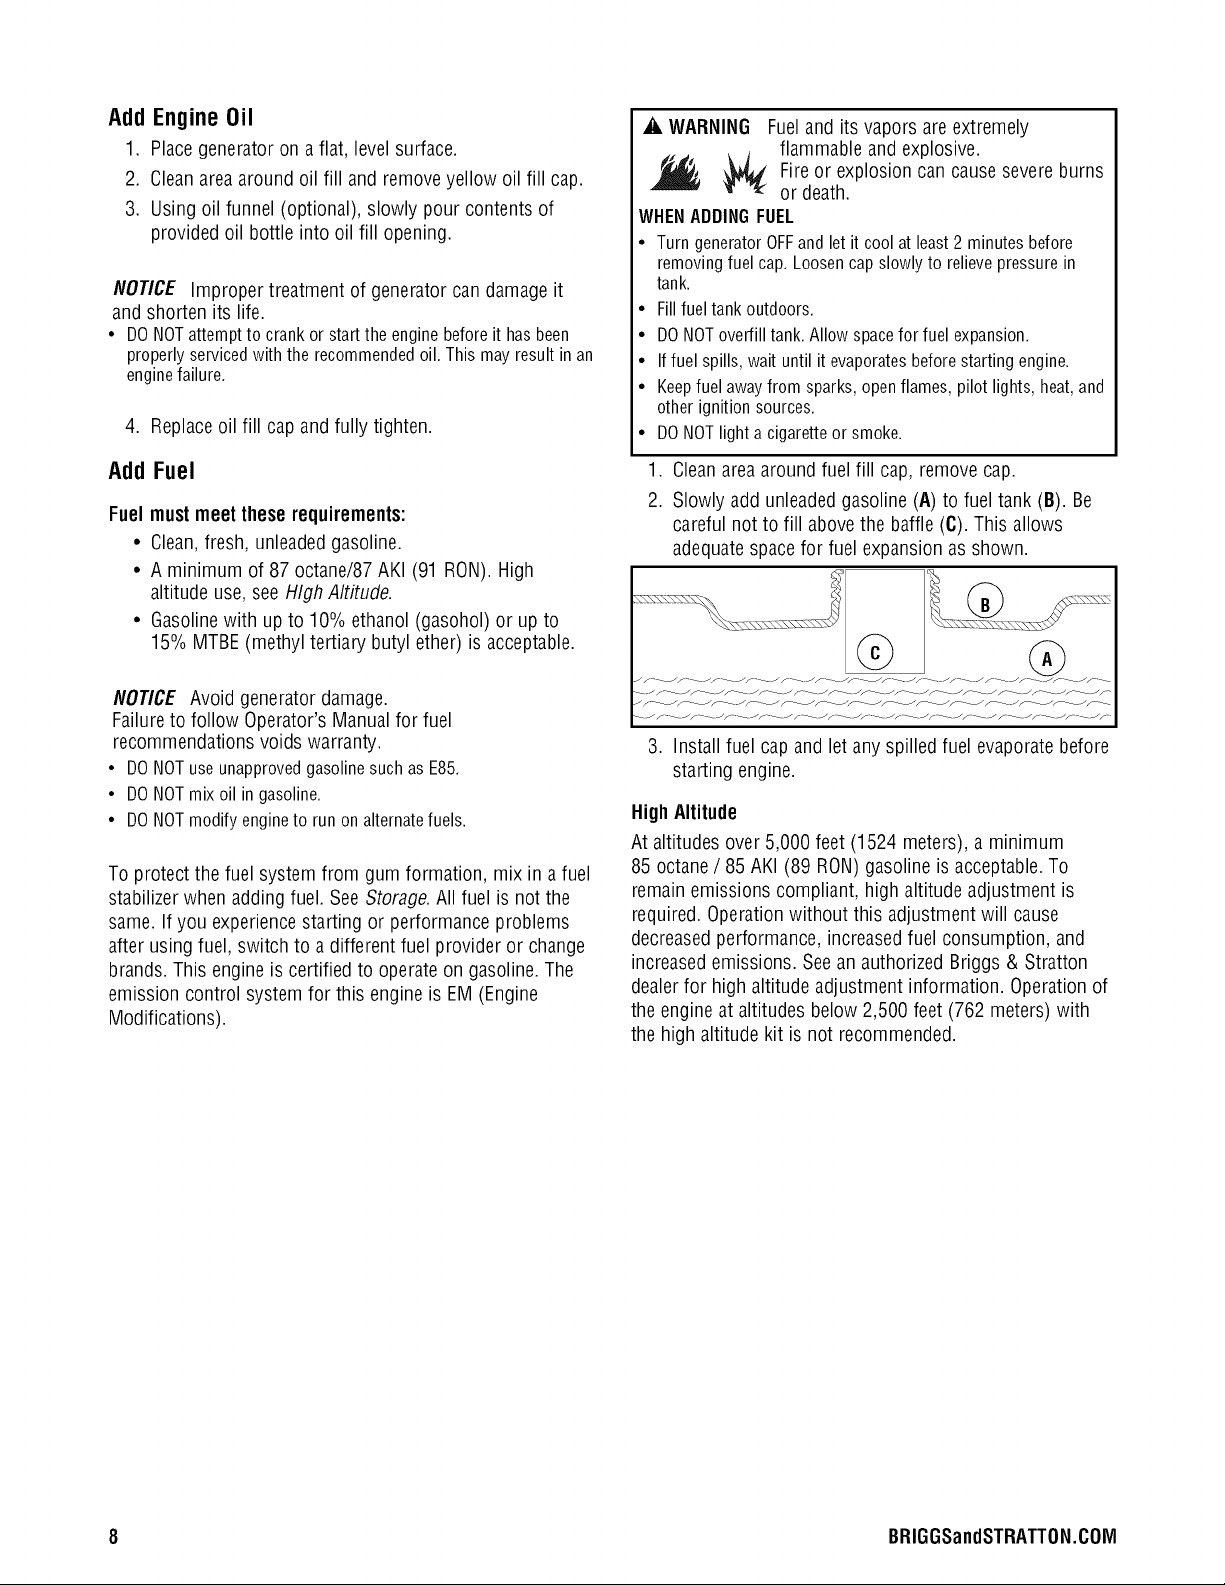
Cleanarea aroundfuel fill cap,remove cap.
2.
Slowly add unleadedgasoline (A) to fuel tank (B). Be
careful not to fill abovethe baffle (C).This allows
adequatespace for fuel expansionasshown.
3. Install fuel capand let anyspilled fuel evaporatebefore
starting engine.
HighAltitude
At altitudes over 5,000 feet (1524 meters), a minimum
85 octane/ 85 AKI (89 RON)gasoline is acceptable.To
remainemissions compliant, high altitude adjustment is
required.Operationwithout this adjustment will cause
decreasedperformance, increasedfuel consumption, and
increasedemissions. Seean authorized Briggs & Stratton
dealerfor highaltitude adjustment information. Operation of
the engineat altitudes below 2,500 feet (762 meters) with
the high altitude kit is not recommended.
8 BRIGGSandSTRATTON.COIVl
SystemGround
Thegenerator hasa system ground thatconnects the
generatorframe components to the ground terminals on the
ACoutput receptacles.The system ground is connected to
the ACneutral wire (the neutral is bonded to the generator
frame).
Special Requirements
Theremay be Federalor StateOccupationalSafetyand
Health Administration (OSHA)regulations, local codes, or
ordinances that applyto the intended useof the generator.
Pleaseconsult a qualified electrician,electrical inspector, or
the local agencyhavingjurisdiction:
• Insome areas,generators are requiredto be registered
with local utility companies.
• If the generator is used at a construction site, there
may be additional regulationswhich must beobserved.
Connecting to a Building'sElectricalSystem
Connectionsfor standby power to a building's electrical
system must bemade bya qualified electrician.The
connection must isolatethe generator power from utility
power or other alternative power sources andmust comply
with all applicablelaws and electrical codes.
GeneratorLocation
Clearancesand Air Movement
_i, WARNING Exhaustheat/gases can ignite
combustibles, structures or damagefuel tank
causing a fire.
• Keepat least5 ft. (152 cm) clearanceon all sidesof generator
including overhead.
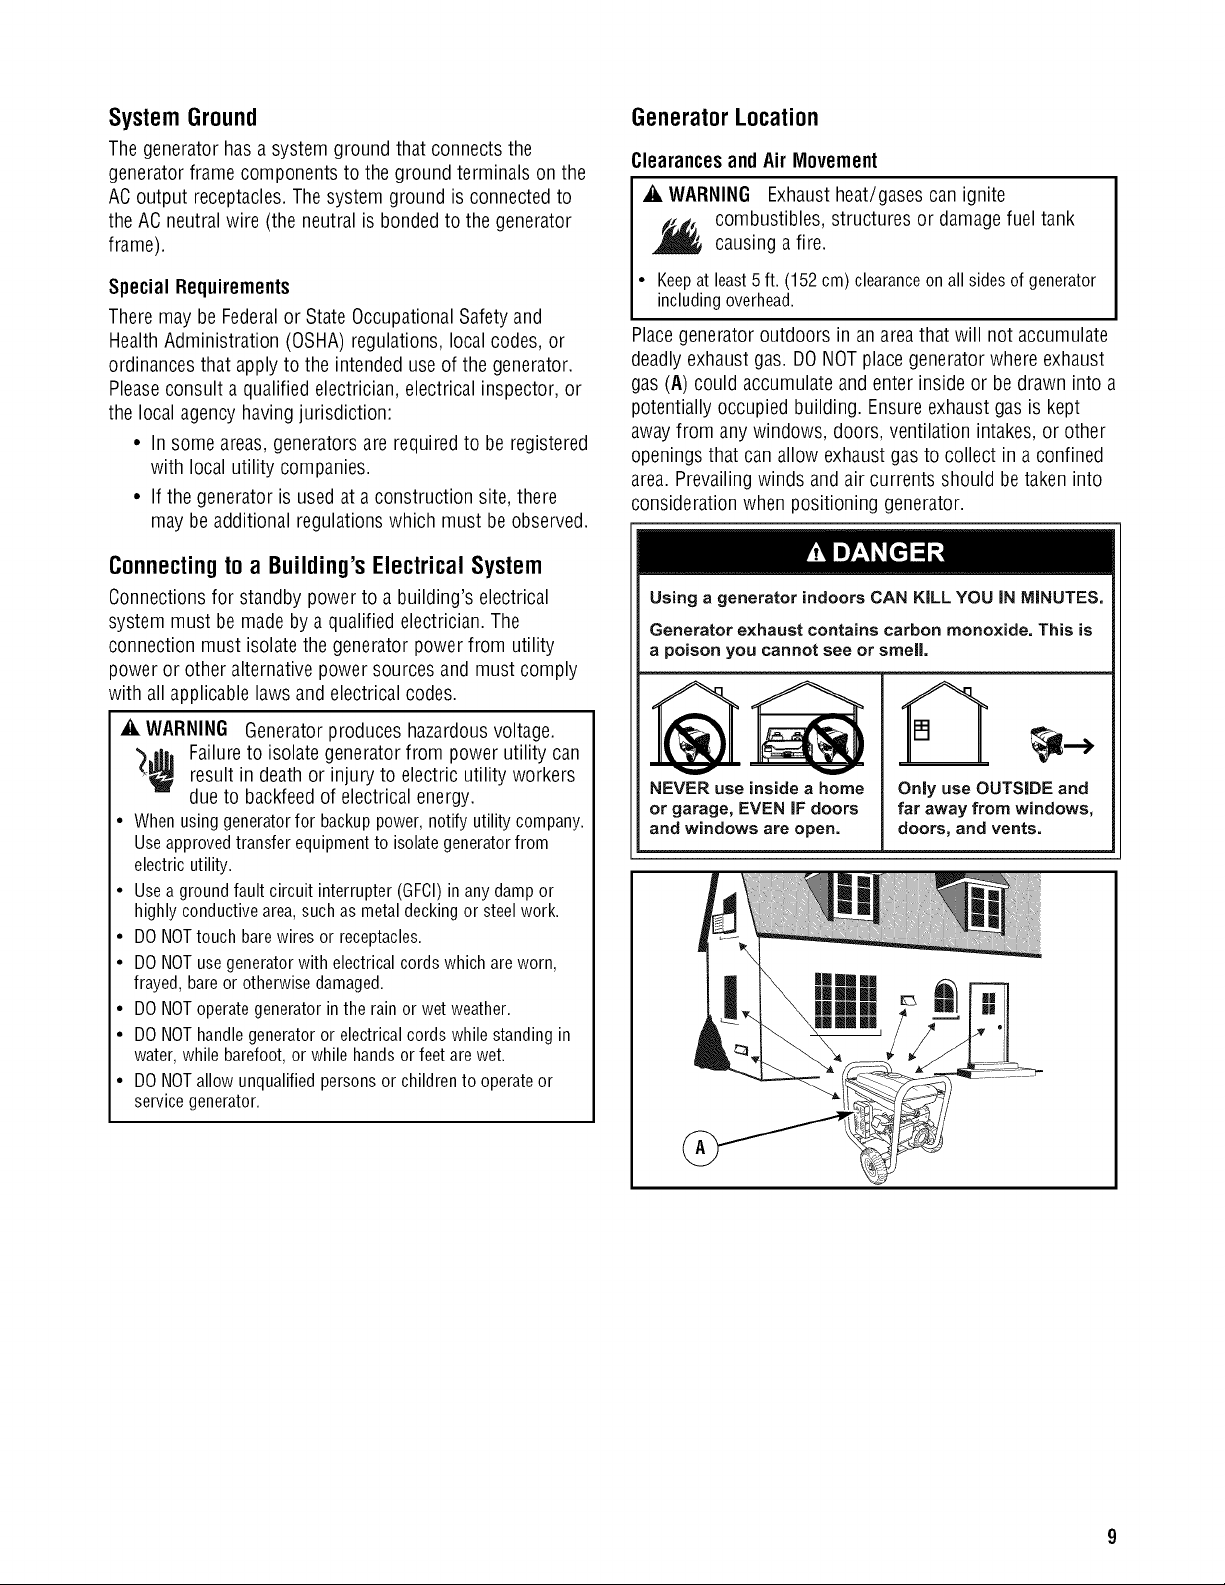
Placegenerator outdoors in an areathat will not accumulate
deadlyexhaust gas. DO NOTplace generator where exhaust
gas (A) could accumulate andenter inside or be drawn into a
potentially occupied building. Ensureexhaust gas is kept
awayfrom any windows, doors, ventilation intakes, or other
openings that canallow exhaustgas to collect in a confined
area.Prevailingwinds and aircurrents should betaken into
consideration when positioning generator.
Using a generator indoors CAN KILL YOU IN MINUTES,
Generator exhaust contains carbon monoxide, This is
a poison you cannot see or smell,
_i, WARNING Generatorproduces hazardousvoltage.
')Jib Failureto isolate generatorfrom power utility can
result in death or injury to electric utility workers
due to backfeed of electrical energy.
• Whenusinggeneratorfor backuppower,notifyutilitycompany.
Useapprovedtransferequipmentto isolategeneratorfrom
electricutility.
• Useagroundfaultcircuitinterrupter(GFCI)in anydampor
highlyconductivearea,suchasmetaldeckingorsteelwork.
• DONOTtouchbarewiresor receptacles.
• DONOTusegeneratorwithelectricalcordswhichareworn,
frayed,bareorotherwisedamaged.
• DONOToperategeneratorinthe rainorwetweather.
• DONOThandlegeneratoror electricalcordswhilestandingin
water,whilebarefoot,or whilehandsorfeetarewet.
• DONOTallowunqualifiedpersonsor childrento operateor
servicegenerator.
NEVER use inside a home
or garage, EVEN IF doors
and windows are open.
B
Only use OUTSIDE and
far away from windows,
doors, and vents.
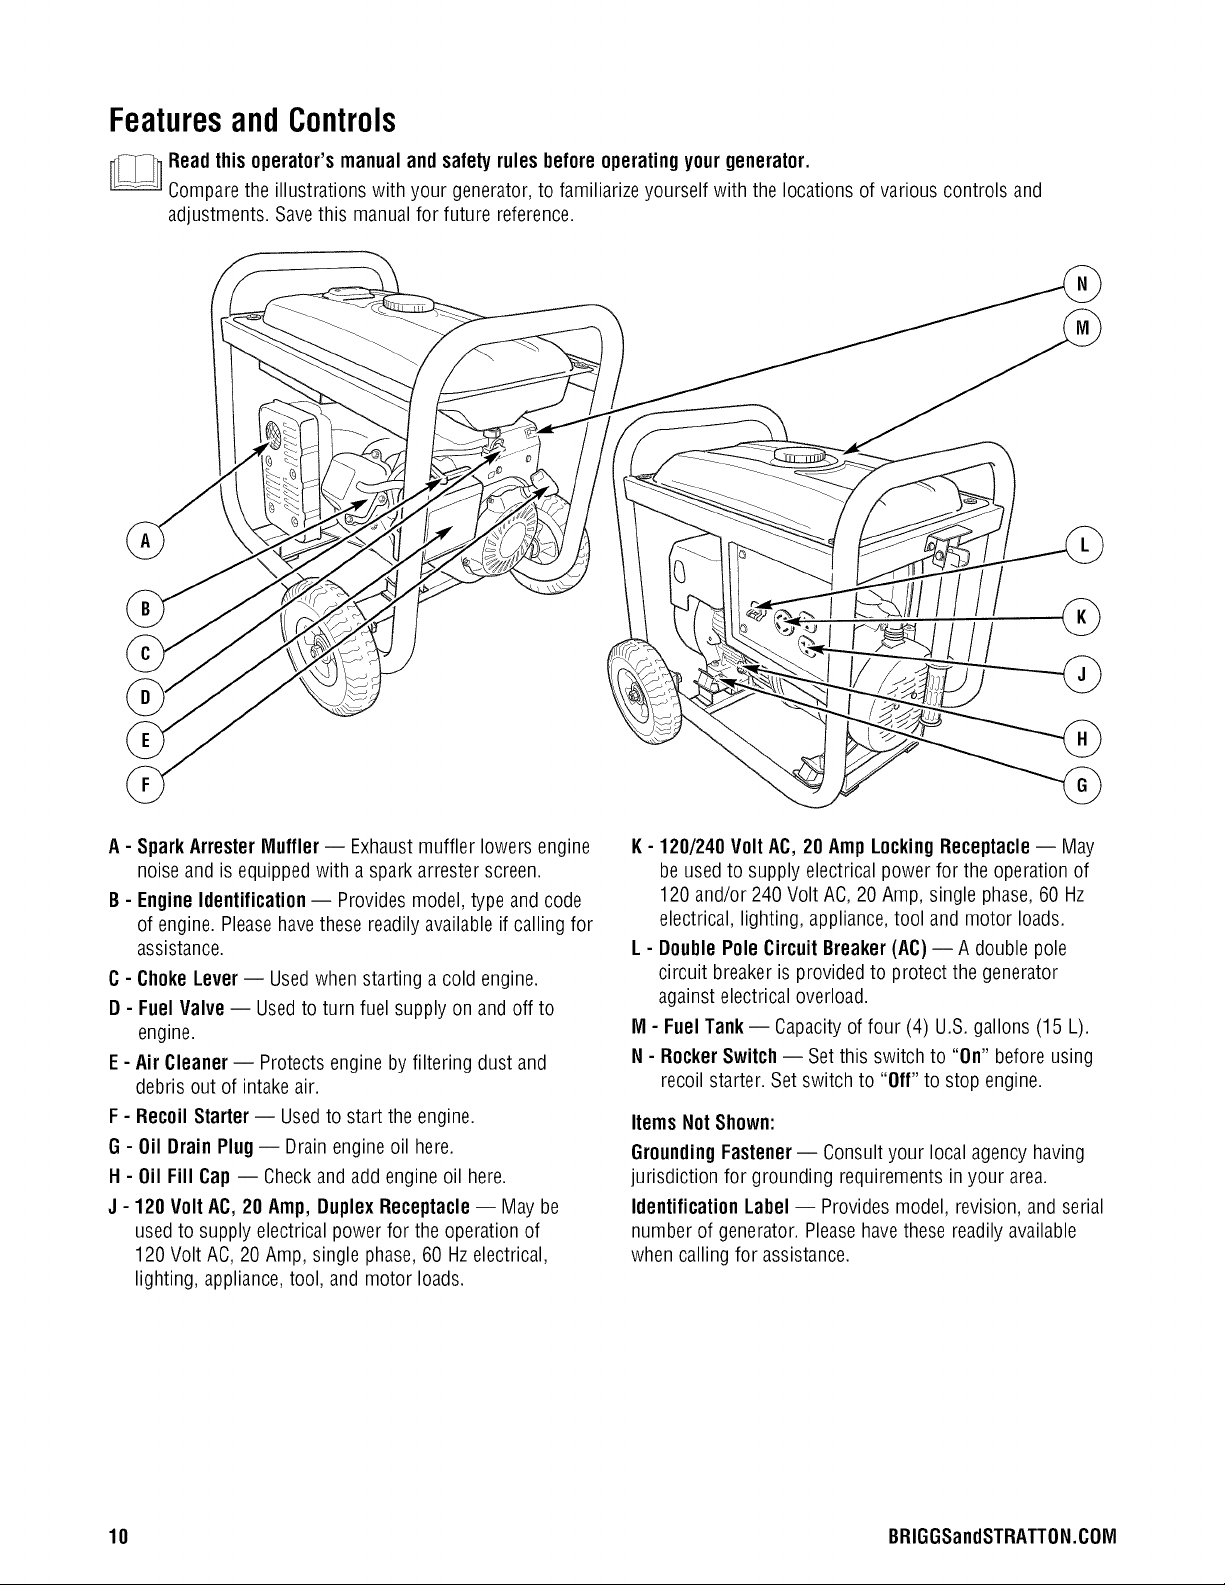
FeaturesandControls
Readthis operator'smanual and safetyrulesbefore operatingyourgenerator.
Comparethe illustrations with your generator, to familiarize yourself with the locations of various controls and
adjustments. Save this manual for future reference.
A- SparkArresterMuffler -- Exhaustmuffler lowers engine
noiseand is equippedwith a spark arresterscreen.
B- EngineIdentification-- Provides model, typeand code
of engine. Pleasehavethese readily available if calling for
assistance.
C- Choke Lever -- Usedwhen starting a cold engine.
D- Fuel Valve-- Usedto turn fuel supply on and off to
engine.
E - Air Cleaner -- Protects engineby filtering dust and
debris out of intake air.
F - Recoil Starter-- Usedto start the engine.
G - 0il DrainPlug-- Drainengine oil here.
H- 0il Fill Cap-- Checkand addengine oil here.
J - 120 Volt AC,20 Amp, Duplex Receptacle-- May be
used to supply electrical power for the operation of
120 Volt AC, 20Amp, single phase, 60 Hzelectrical,
lighting, appliance,tool, and motor loads.
K- 120/240 Volt AC,20 AmpLockingReceptacle-- May
be used to supply electrical power for the operation of
120 and/or 240 Volt AC,20 Amp, single phase,60 I-Iz
electrical, lighting, appliance,tool and motor loads.
L - DoublePole CircuitBreaker(AC)-- A double pole
circuit breakeris providedto protect the generator
against electrical overload.
M - Fuel Tank-- Capacityof four (4) U.S. gallons (15 L).
N - RockerSwitch-- Setthis switch to "On" before using
recoil starter. Set switch to "Off" to stop engine.
Items NotShown:
GroundingFastener-- Consult your local agency having
jurisdiction for grounding requirements in your area.
IdentificationLabel -- Providesmodel, revision, and serial
number of generator.Pleasehavethese readily available
when calling for assistance.
10 BRIGGSandSTRATTON.COIVl
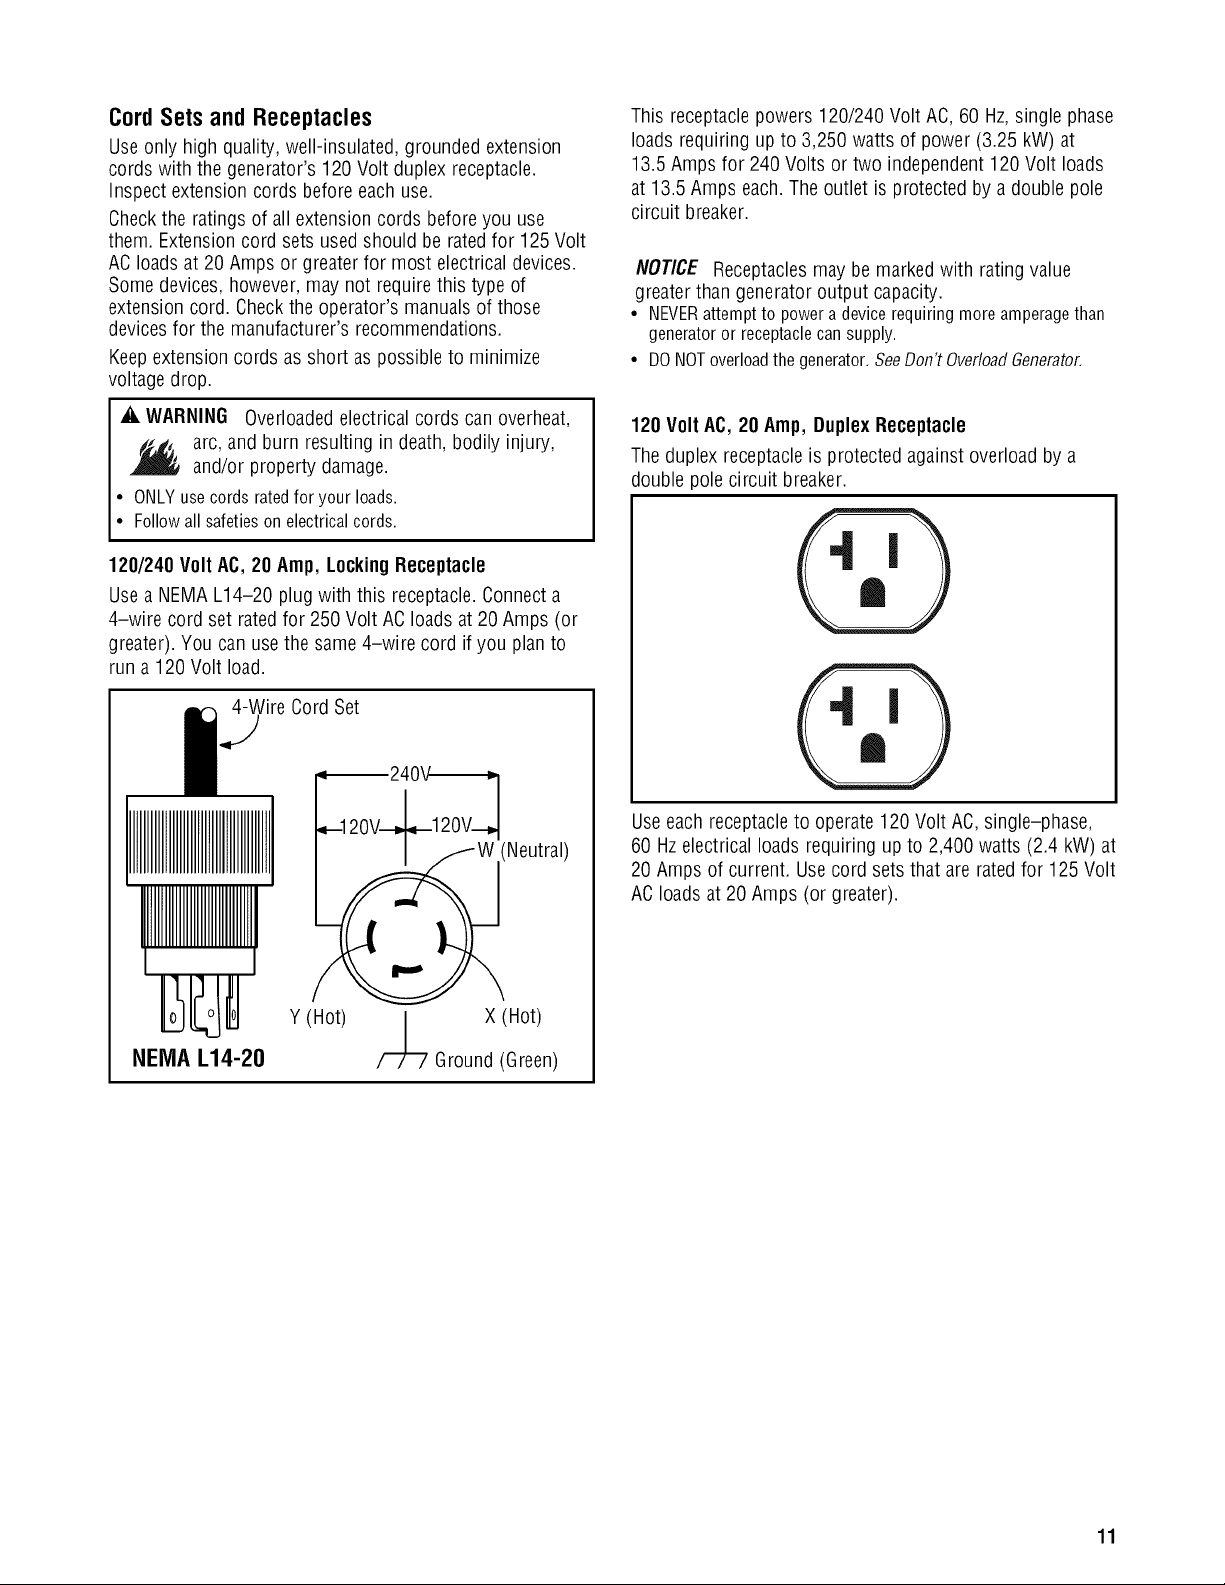
CordSetsandReceptacles
Use only high quality, well-insulated, grounded extension
cords with the generator's 120 Volt duplex receptacle.
Inspect extensioncords before eachuse.
Checkthe ratings of all extensioncords beforeyou use
them. Extensioncord sets usedshould be ratedfor 125 Volt
ACloads at 20Amps or greaterfor most electrical devices.
Somedevices, however, may not require this type of
extension cord. Checkthe operator's manuals of those
devicesfor the manufacturer's recommendations.
Keepextension cords as short as possible to minimize
voltage drop.
This receptaclepowers 120/240 Volt AC, 60 Hz,single phase
loads requiring up to 3,250 watts of power (3.25 kW) at
13.5 Ampsfor 240 Volts or two independent120 Volt loads
at 13.5 Amps each.Theoutlet is protected by a double pole
circuit breaker.
NOTICE Receptacles may be marked with rating value
greater than generator output capacity.
• NEVERattempt to power adevice requiring moreamperagethan
generator or receptacle can supply.
• DONOToverload the generator.SeeDon't OverloadGenerator.
_k WARNING Overloadedelectrical cords can overheat,
arc, and burn resulting in death, bodily injury,
and/or property damage.
• ONLYusecordsratedfor yourloads.
• Followallsafetiesonelectricalcords.
120/240 Volt AC, 20 Amp, LockingReceptacle
Use a NEMA L14-20 plug with this receptacle.Connect a
4-wire cord set ratedfor 250 Volt ACloads at 20Amps (or
greater). You can usethe same4-wire cord if you plan to
run a 120Volt load.
__l,_/Wire Cord Set
(Neutral)
120 Volt AC, 20 Amp, DuplexReceptacle
Theduplex receptacleis protected againstoverload by a
double pole circuit breaker.
Useeachreceptacleto operate120 Volt AC,single-phase,
60 Hz electricalloads requiring up to 2,400 watts (2.4 kW) at
20 Amps of current. Usecord setsthat are ratedfor 125 Volt
ACloads at 20Amps (or greater).
Y(Hot) | X(Hot)
NEMA L14-20 /-7[-7 Ground(Green)
11
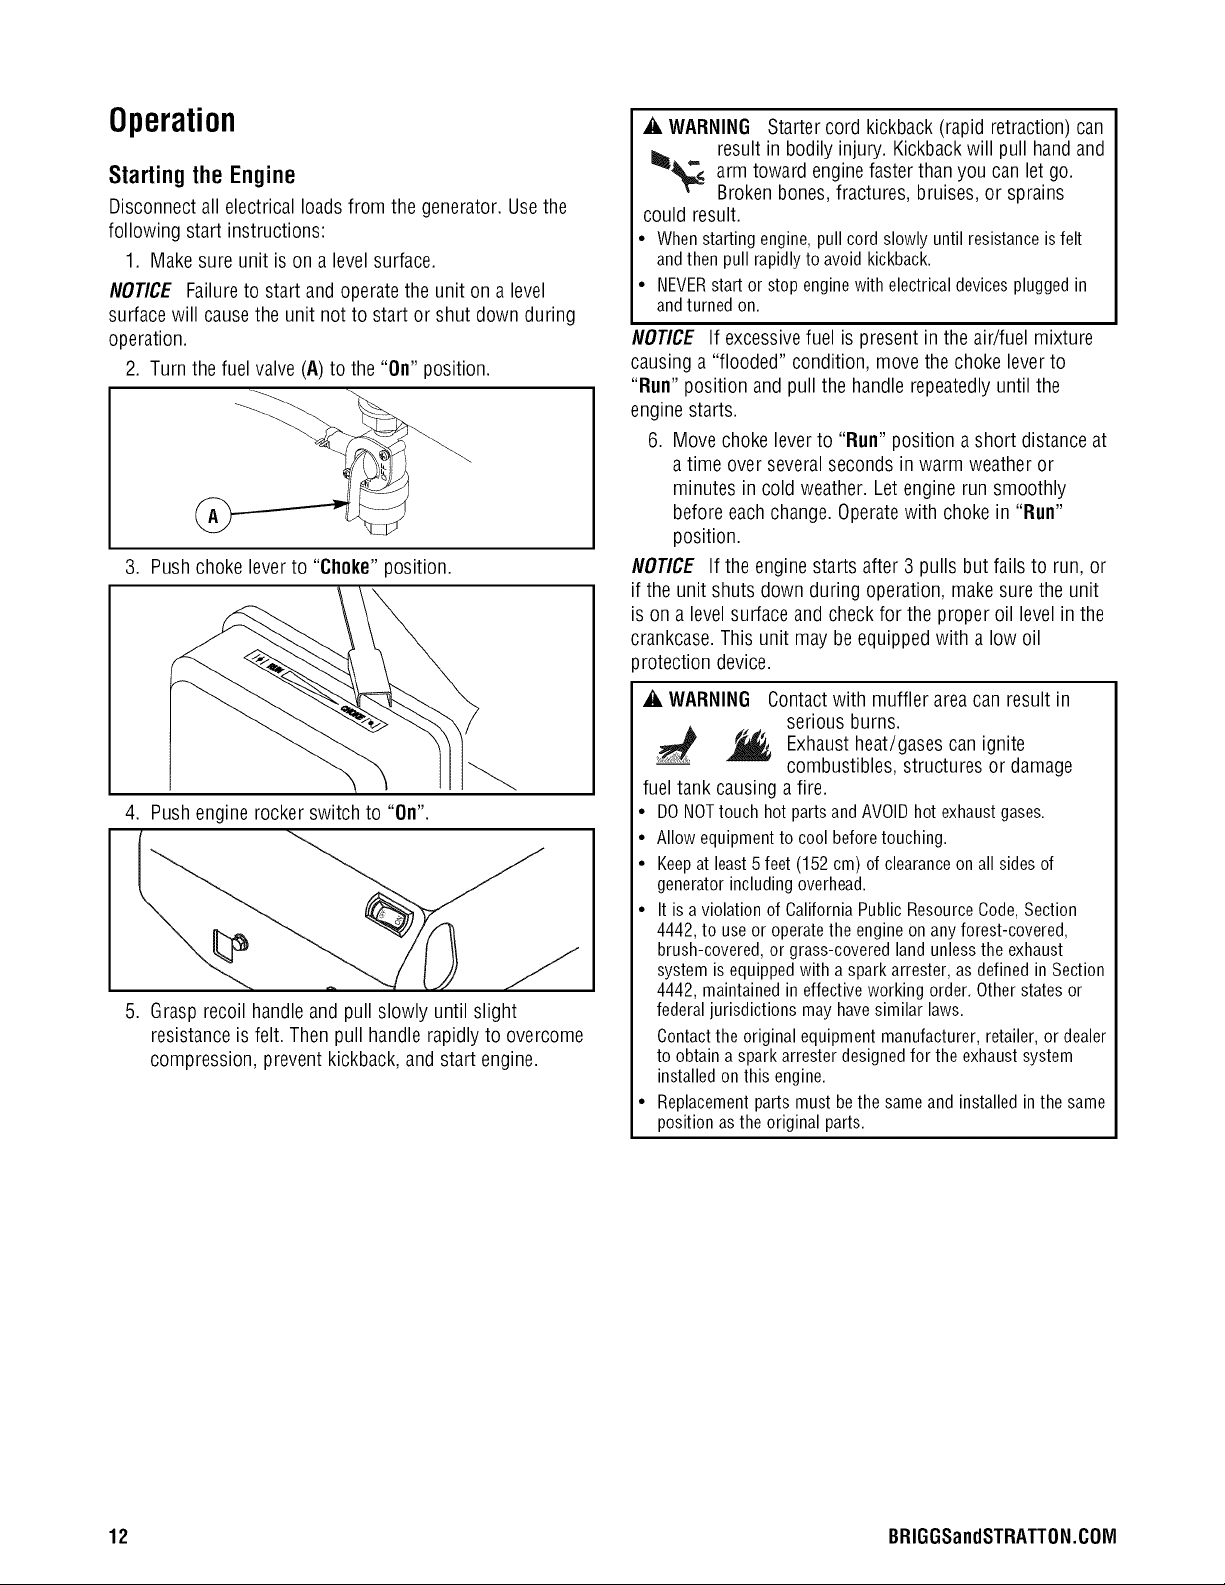
Operation
Starting the Engine
Disconnect allelectrical loads from the generator. Usethe
following start instructions:
1. Make sure unit is on a levelsurface.
NOTICE Failureto start and operatethe unit ona level
surfacewill causethe unit not to start or shut down during
operation.
2. Turn thefuel valve (A)to the "On" position.
3. Push choke leverto "Choke" position.
4. Push engine rockerswitch to "On".
5. Grasp recoil handleand pull slowly until slight
resistance is felt. Then pull handle rapidly to overcome
compression, prevent kickback, and start engine.
_i, WARNING Starter cord kickback (rapid retraction) can
result in bodily injury. Kickbackwill pull hand and
,_arm toward enginefaster than you can let go.
Broken bones,fractures, bruises, or sprains
could result.
• Whenstartingengine,pullcordslowlyuntilresistanceisfelt
andthenpull rapidlyto avoidkickback.
• NEVERstartor stopenginewith electricaldevicespluggedin
andturnedon.
NOTICE If excessivefuel is present in the air/fuel mixture
causing a "flooded" condition, move the choke leverto
"Run" position and pull the handlerepeatedlyuntil the
engine starts.
6. Move choke leverto "Run" position a short distance at
a time over several secondsin warm weather or
minutes in cold weather. Letengine run smoothly
before eachchange. Operatewith choke in "Run"
position.
NOTICE If the engine starts after3 pulls but fails to run, or
if the unit shuts down during operation, make sure the unit
is on a level surfaceand check for the proper oil level in the
crankcase.This unit may beequipped with a low oil
protection device.
_i, WARNING Contact with muffler area can result in
serious burns.
._ ,_ Exhaust heat/gases can ignite
fuel tank causing a fire.
• DO NOTtouch hot parts and AVOIDhot exhaust gases.
• Allow equipment to cool beforetouching.
• Keepat least5 feet (152 cm) of clearanceon all sides of
generator including overhead.
• It is aviolation of California Public Resource Code,Section
4442, to use or operate the engineon any forest-covered,
brush-covered, or grass-covered land unless the exhaust
system is equipped with a spark arrester, as defined in Section
4442, maintained in effective working order. Other statesor
federaljurisdictions may havesimilar laws.
Contactthe original equipment manufacturer, retailer, or dealer
to obtain a spark arrester designedfor the exhaust system
installed on this engine.
• Replacement partsmust bethe same and installed in the same
position asthe original parts.
combustibles, structures or damage
12 BRIGGSandSTRATTON.COIVl
Connecting Electrical Loads
1. Let engine stabilizeand warm up for a few minutes
after starting.
2. Plug in andturn on the desired 120 and/or 240Volt AC,
single phase,60 Hzelectrical loads.
NOTE:
• DONOTconnect 240 Volt loads to the 120 Volt duplex
receptacles.
• DONOTconnect 3-phaseloads to the generator.
• DONOTconnect 50 Hzloads to the generator.
• DONOTOVERLOADTHEGENERATOR.SeeDon't
OverloadGenerator.
NOTICE Exceeding generators wattage/amperage capacity
can damage generator and/or electrical devices connected to
it.
• DO NOTexceedthe generator's wattage/amperagecapacity. See
Don't OverloadGeneratorin the Operationsection.
• Start generatorand letengine stabilize beforeconnecting
electrical loads.
• Connectelectrical loads in OFFposition, thenturn ONfor
operation.
• Turn electricalloads OFFand disconnectfrom generator before
stopping generator.
Stopping the Engine
1. Turn OFFand unplug all electrical loadsfrom generator
panel receptacles. NEVERstart or stop enginewith
electrical devicesplugged in and turned ON.
2. Let engine run at no-loadfor several minutes to
stabilize internaltemperatures of engine and generator.
3. Push engine rockerswitch to "Off" position.
_i, WARNING Backfire,fire or enginedamagecould
occur.
• DONOTstop engineby moving choke control to "Choke"
position (1_1).
4. Move fuel valveto "Off" position.
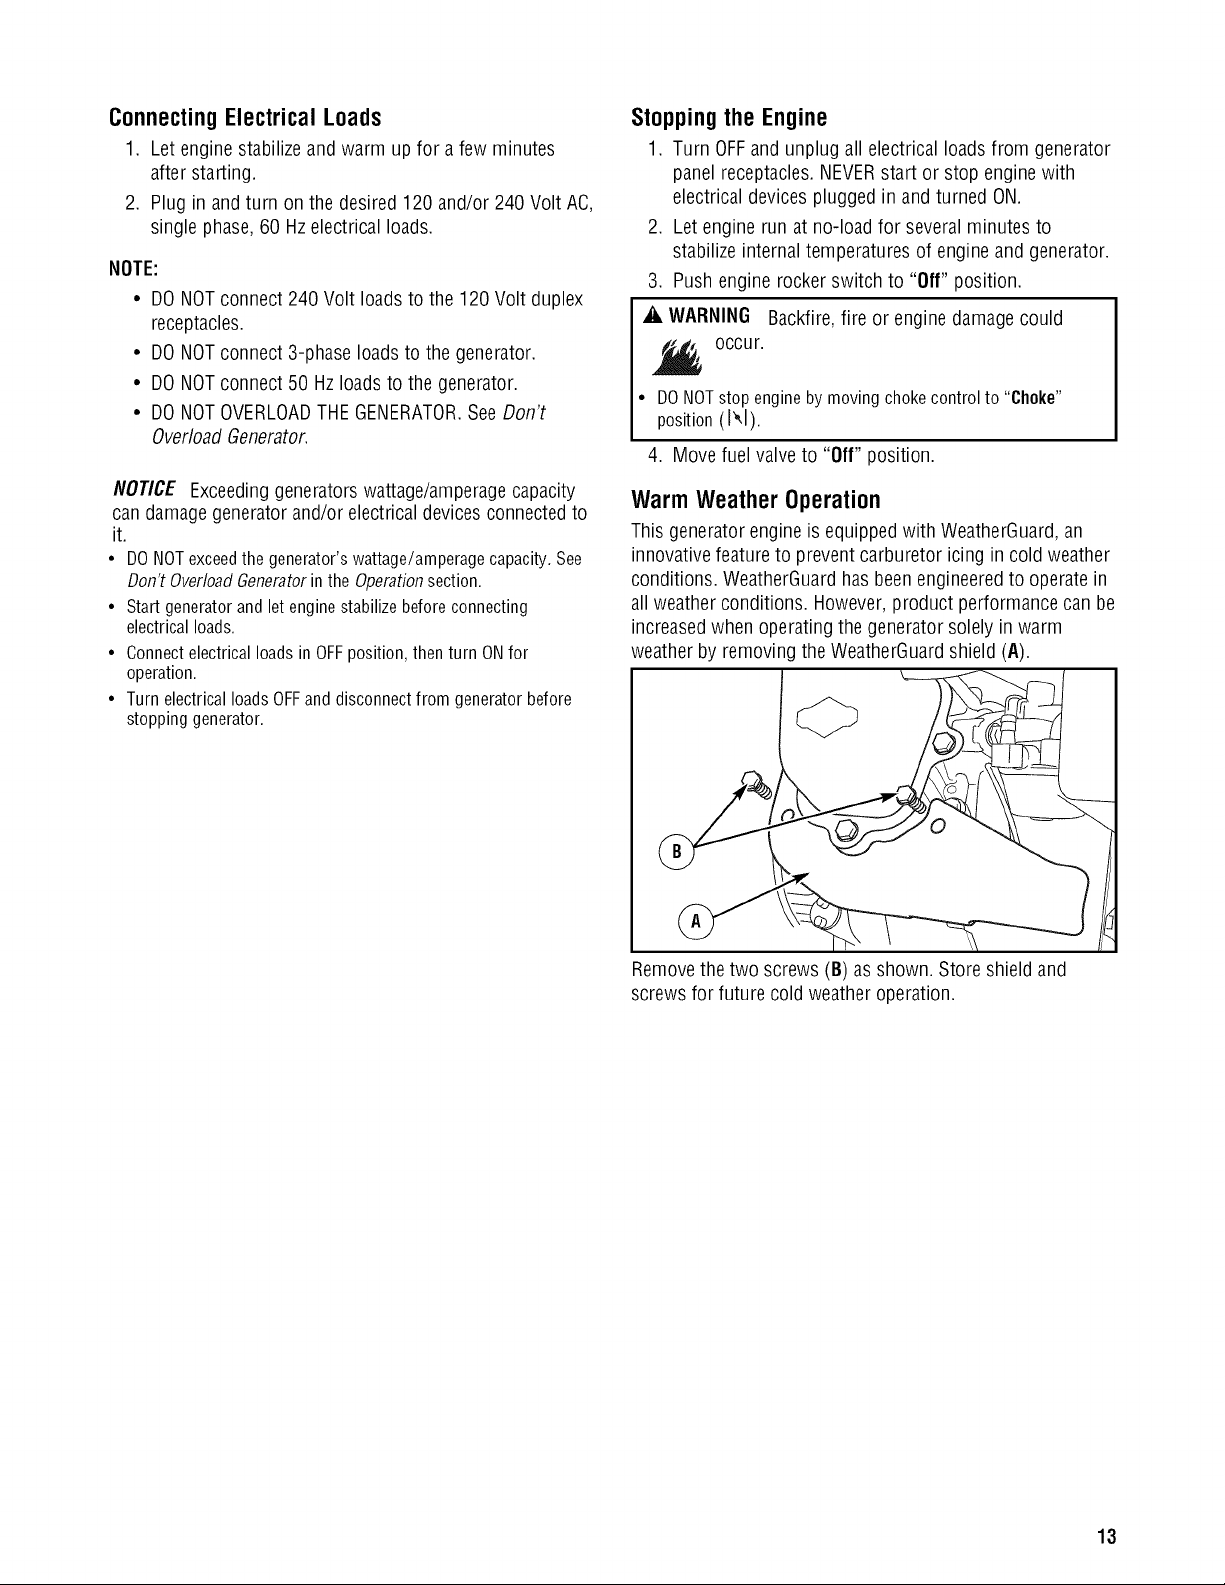
Warm Weather Operation
This generator engineis equippedwith WeatherGuard,an
innovativefeature to preventcarburetor icing in cold weather
conditions. WeatherGuardhas beenengineeredto operatein
all weather conditions. However,product performance can be
increasedwhen operatingthe generator solely in warm
weather by removing the WeatherGuardshield (A).
Remove the two screws (B) as shown. Store shield and
screws for future cold weather operation.
13
Don't OverloadGenerator
Capacity
You must make sure your generator cansupply enough
rated (running) and surge (starting) watts for the items you
will power at the sametime. Follow thesesimple steps:
1. Selectthe itemsyou will power at the sametime.
2. Total the rated (running) watts of these items. This is
the amount of power your generator must produce to
keepyour items running. SeeWattageReferenceGuide.
3. Estimatehow many surge (starting) watts you will need.
Surge wattage is the short burst of power neededto
start electric motor-driven tools or appliancessuch asa
circular saw or refrigerator. Becausenot all motors start
atthe sametime, total surgewatts can be estimatedby
adding only the item(s) with the highestadditional surge
watts to thetotal rated wattsfrom step 2.
Example:
Rated (Running)
Tool orAppliance
Window Air
Conditioner
Refrigerator
DeepFreezer
Television
Light (75 Watts)
Total Rated(Running) Watts = 3075
HighestAdditional Surge Watts = 1800
Total Generator Output Required = 4875
Power Management
To prolong the life of your generatorand attacheddevices, it
is important to take care whenadding electrical loadsto your
generator. There should be nothing connectedto the
generator outlets before starting its engine.Thecorrect and
safe way to managegeneratorpower isto sequentially add
loads asfollows:
1. With nothing connectedto the generator,start the
engine as described inthis manual.
2. Plug in andturn on the first load, preferablythe largest
load you have.
3. Permit the generatoroutput to stabilize (engine runs
smoothly and attacheddeviceoperates properly).
4. Plug in andturn on the next load.
5. Again, permit the generator to stabilize.
6. Repeatsteps 4 and 5for eachadditional load.
Watts
1200
800
500
500
75
3075 Total
Running Watts
AdditionalSurge
(Starting)Watts
1800
1600
5OO
1800 Highest
SurgeWatts
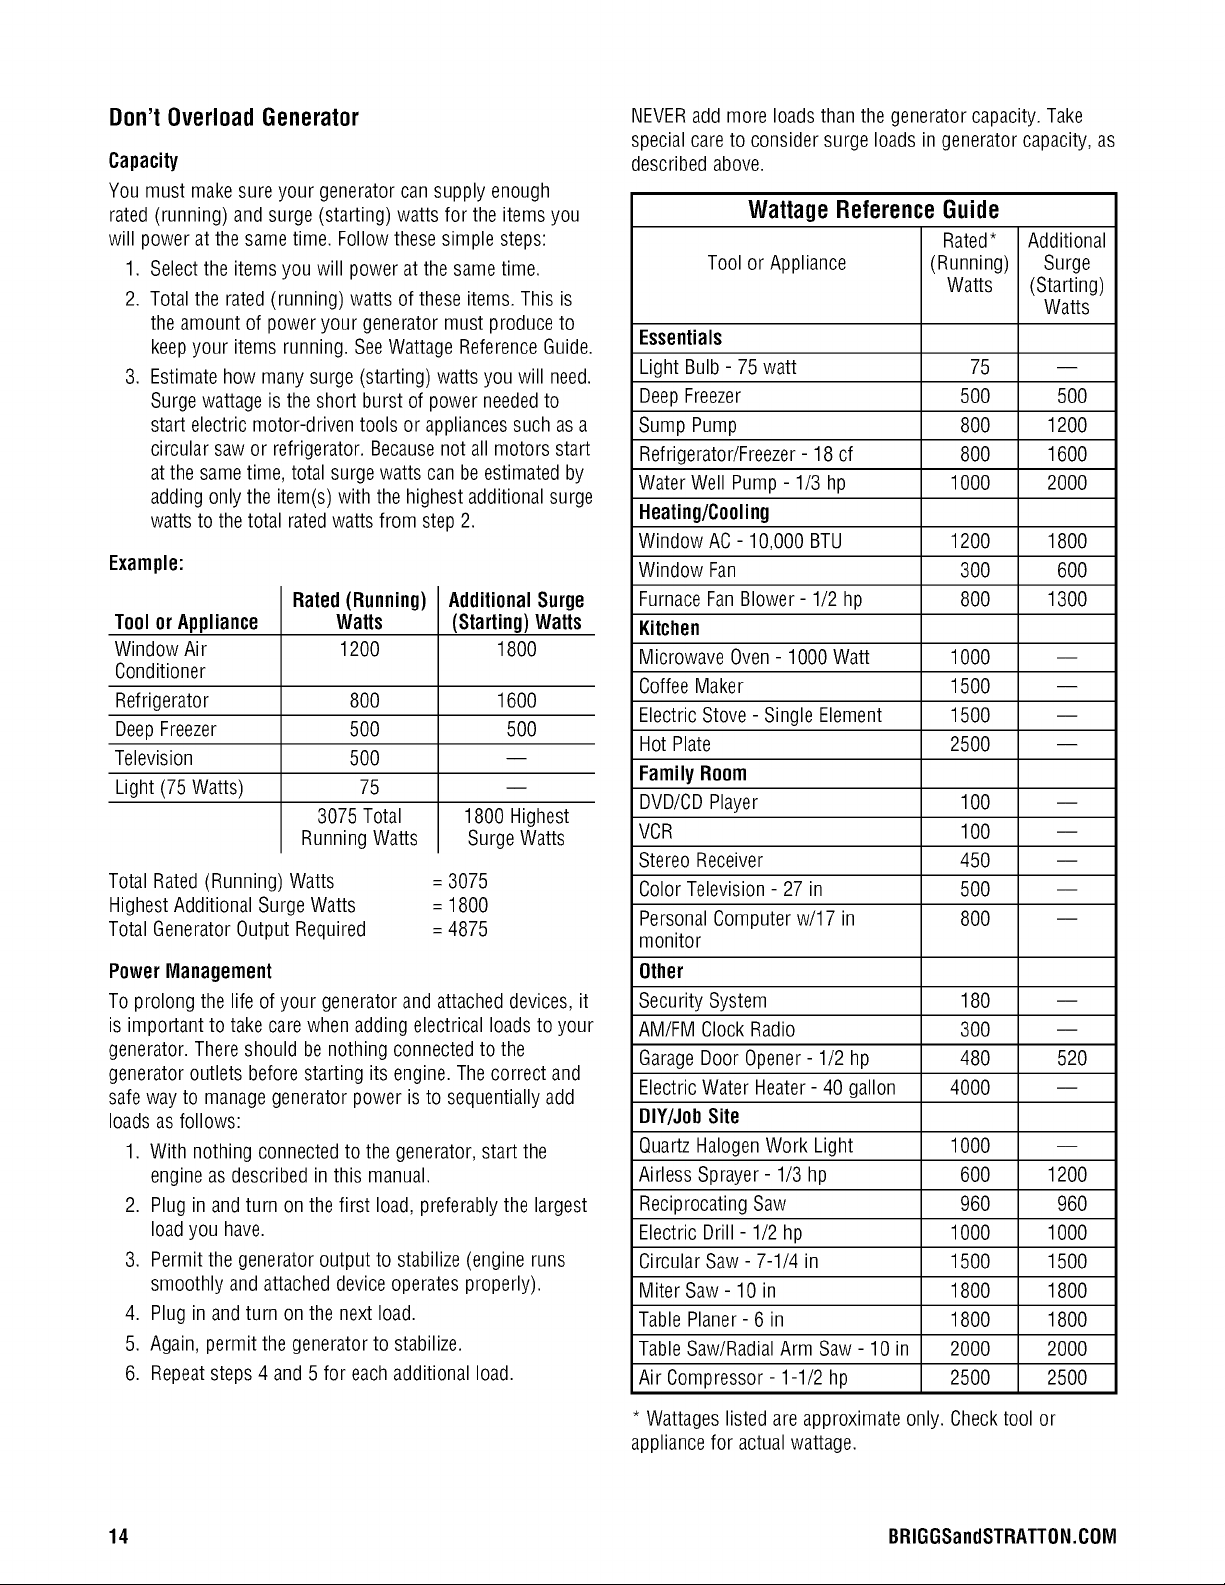
NEVERadd more loads than the generatorcapacity.Take
special care to consider surge loads in generator capacity,as
described above.
Wattage ReferenceGuide
Tool or Appliance
Essentials
Light Bulb - 75 watt
DeepFreezer
Sump Pump
Refrigerator/Freezer- 18 cf
Water Well Pump- 1/3 hp
Heating/Cooling
Window AC- 10,000 BTU
Window Fan
FurnaceFanBlower- 1/2 hp
Kitchen
Microwave Oven- 1000 Watt
CoffeeMaker
Electric Stove- Single Element
Hot Plate
Family Room
DVD/CDPlayer
VCR
Stereo Receiver
Color Television- 27 in
PersonalComputer w/17 in
monitor
Other
Security System
AM/FM Clock Radio
GarageDoor Opener- 1/2 hp
ElectricWater Heater- 40 gallon
DIY/JobSite
Quartz HalogenWork Light
Airless Sprayer- 1/3 hp
Reciprocating Saw
Electric Drill- 1/2 hp
Circular Saw - 7-1/4 in
MiterSaw- 10 in
TablePlaner- 6 in
TableSaw/RadialArm Saw - 10 in
Air Compressor - 1-1/2 hp
Rated*
(Running)
Watts
500 500
800 1200
800 1600
1000 2000
1200 1800
300 600
800 1300
1000
1500
1500
2500
100
100
450
500
800
180
300
480 520
4000
1000
600 1200
960 960
1000 1000
1500 1500
1800 1800
1800 1800
2000 2000
2500 2500
Additional
Surge
(Starting)
Watts
75
* Wattageslisted areapproximate only.
appliancefor actual wattage.
14 BRIGGSandSTRATTON.COM
Checktool or
Maintenance
MaintenanceSchedule
Follow the hourly or calendarintervals, whichever occurs
first. More frequent serviceis required when operating in
adverseconditions noted below.
• Changeengine oil
• Cleandebris
• Checkengineoil level
_,_0_:_, :ii:ii:ii:ii:ii:ii:ii:ii:ii:ii:ii:ii:ii:ii:ii:ii:ii:ii:ii:ii
• Service engineair cleaner'
• Changeengine oil'
• Inspect muffler and sparkarrester
• Servicefuel filter
• Servicespark plug
• Cleancooling system'
1 Service more often under dirty or dusty conditions.
GeneralRecommendations
Regularmaintenancewill improvethe performanceand extend
the life ofthe generator.Seeanyauthorizeddealerfor service.
Thegenerator's warranty does not cover items that have
been subjected to operator abuseor negligence.To receive
full valuefrom the warranty,the operator must maintain the
generator asinstructed in this manual.
Someadjustments will needto be made periodically to
properly maintain your generator.
All serviceand adjustments should bemade at least once
eachseason.Follow the requirements in the Maintenance
Schedulechart above.
NOTICE Oncea year you should cleanor replacethe spark
plug and replacethe air filter. A new spark plug and cleanair
filter assure properfuel-air mixture and help your engine run
better and last longer.
GeneratorMaintenance
Generatormaintenanceconsists of keepingthe unit clean
and dry. Operateand storethe unit in a clean dry
environment where it will not be exposedto excessivedust,
dirt, moisture, or any corrosive vapors. Coolingair slots in
the generator must not become cloggedwith snow, leaves,
or any other foreign material.
NOTICE DONOTuse water or other liquids to clean
generator. Liquids canenter engine fuel system, causing
poor performance and/or failure to occur. In addition, if
liquid enters generator through cooling air slots, some of the
liquid will beretained in voids and cracksof the rotor and
stator winding insulation. Liquid and dirt buildup on the
generator internalwindings will eventually decreasethe
insulation resistanceof these windings.
Cleaning
Dailyor before use,look around and underneaththe
generatorfor signs of oil or fuel leaks. Cleanaccumulated
debris from inside and outsidethe generator. Keepthe
linkage, spring and other enginecontrols clean. Inspect
cooling air slots and openings on generator.These openings
must be keptclean andunobstructed.
Engine parts should be kept cleanto reducethe risk of
overheating and ignition of accumulateddebris:
• Usea damp cloth to wipe exterior surfaces clean.
NOTICE Improper treatment of generator can damage it
and shorten its life.
• DO NOTexposegenerator to excessivemoisture, dust, dirt, or
corrosive vapors.
• DONOTinsert any objectsthrough cooling slots.
• Usea soft bristle brush to loosen cakedon dirt or oil.
• Usea vacuum cleanerto pick up loose dirt and debris.
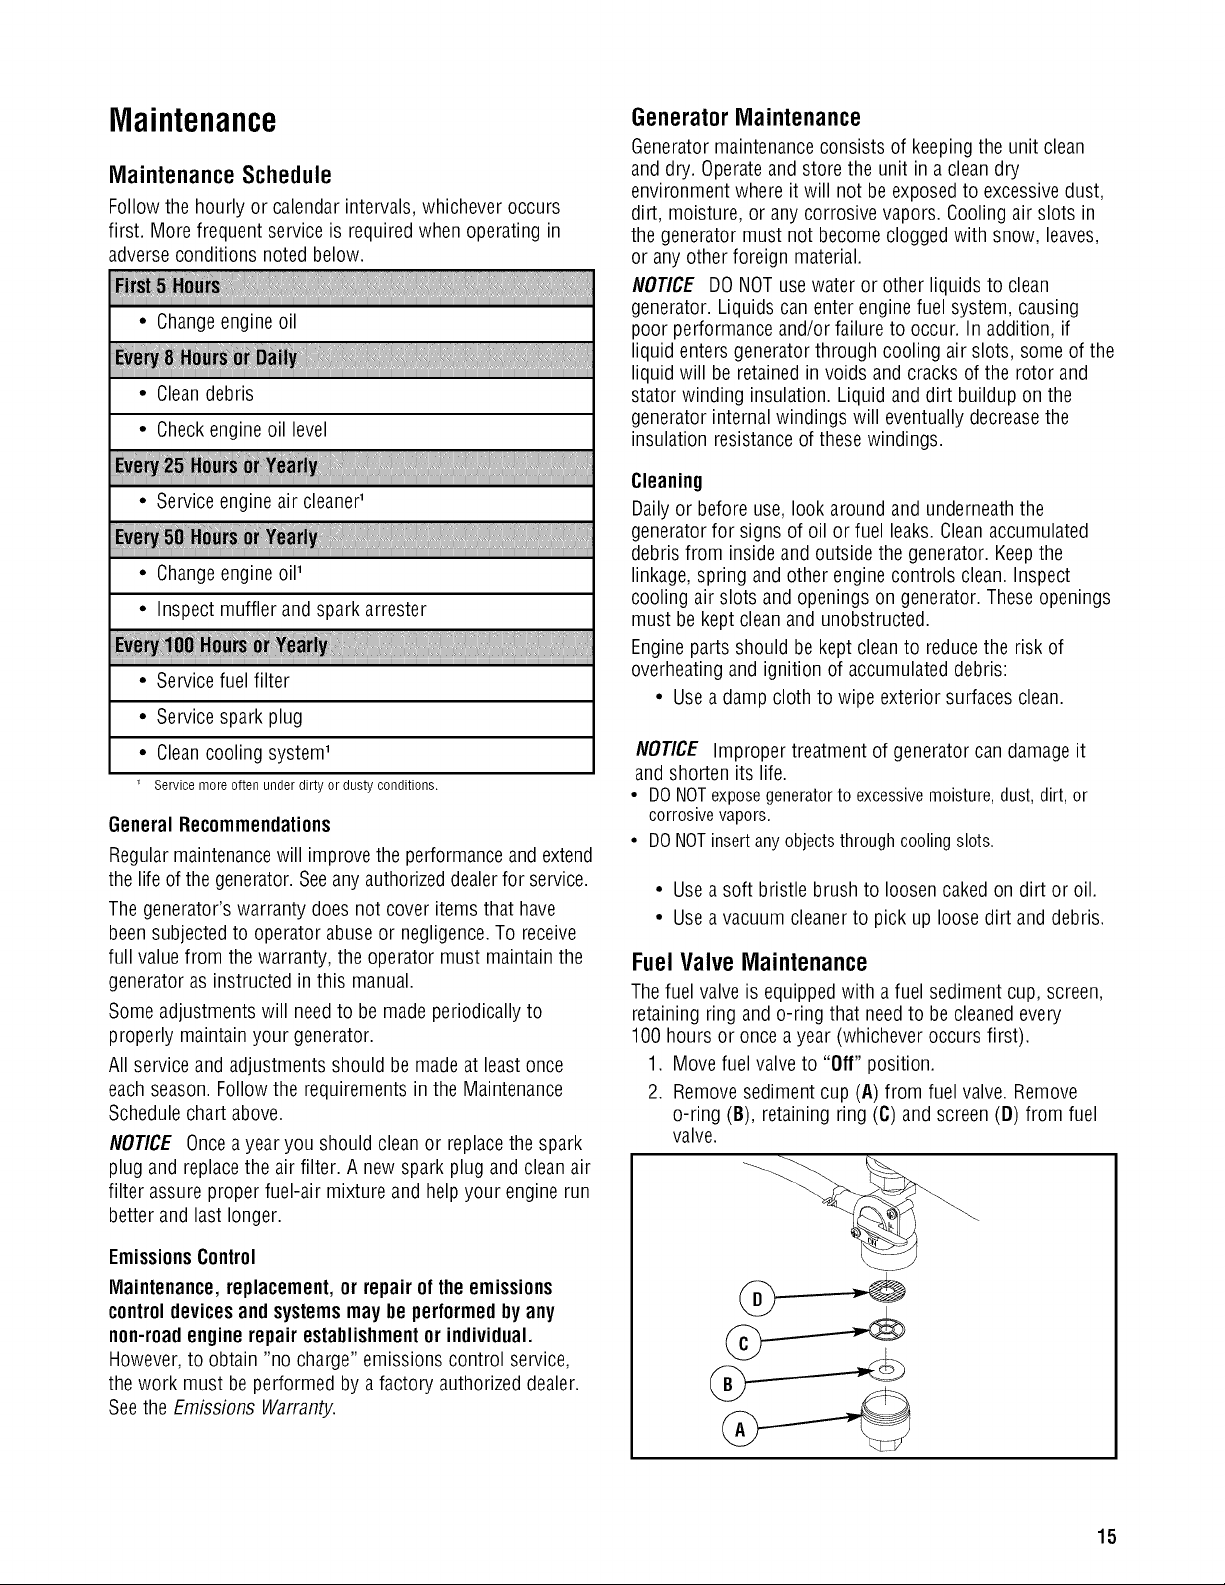
FuelValve Maintenance
Thefuel valve is equippedwith a fuel sediment cup, screen,
retaining ring and o-ring that needto be cleanedevery
100 hours or once a year (whichever occurs first).
1. Move fuel valveto "Off" position.
2. Removesediment cup (A) from fuel valve. Remove
o-ring (B), retaining ring (C)and screen (D) from fuel
valve.
EmissionsControl
Maintenance, replacement, orrepair of the emissions
controldevicesand systemsmay beperformedby any
non-roadengine repair establishmentor individual.
However,to obtain "no charge" emissions control service,
the work must be performed by afactory authorized dealer.
Seethe Emissions Warranty.
15
 Loading...