

Briggs & Stratton 020515-00 Owner’s Manual
$$ure
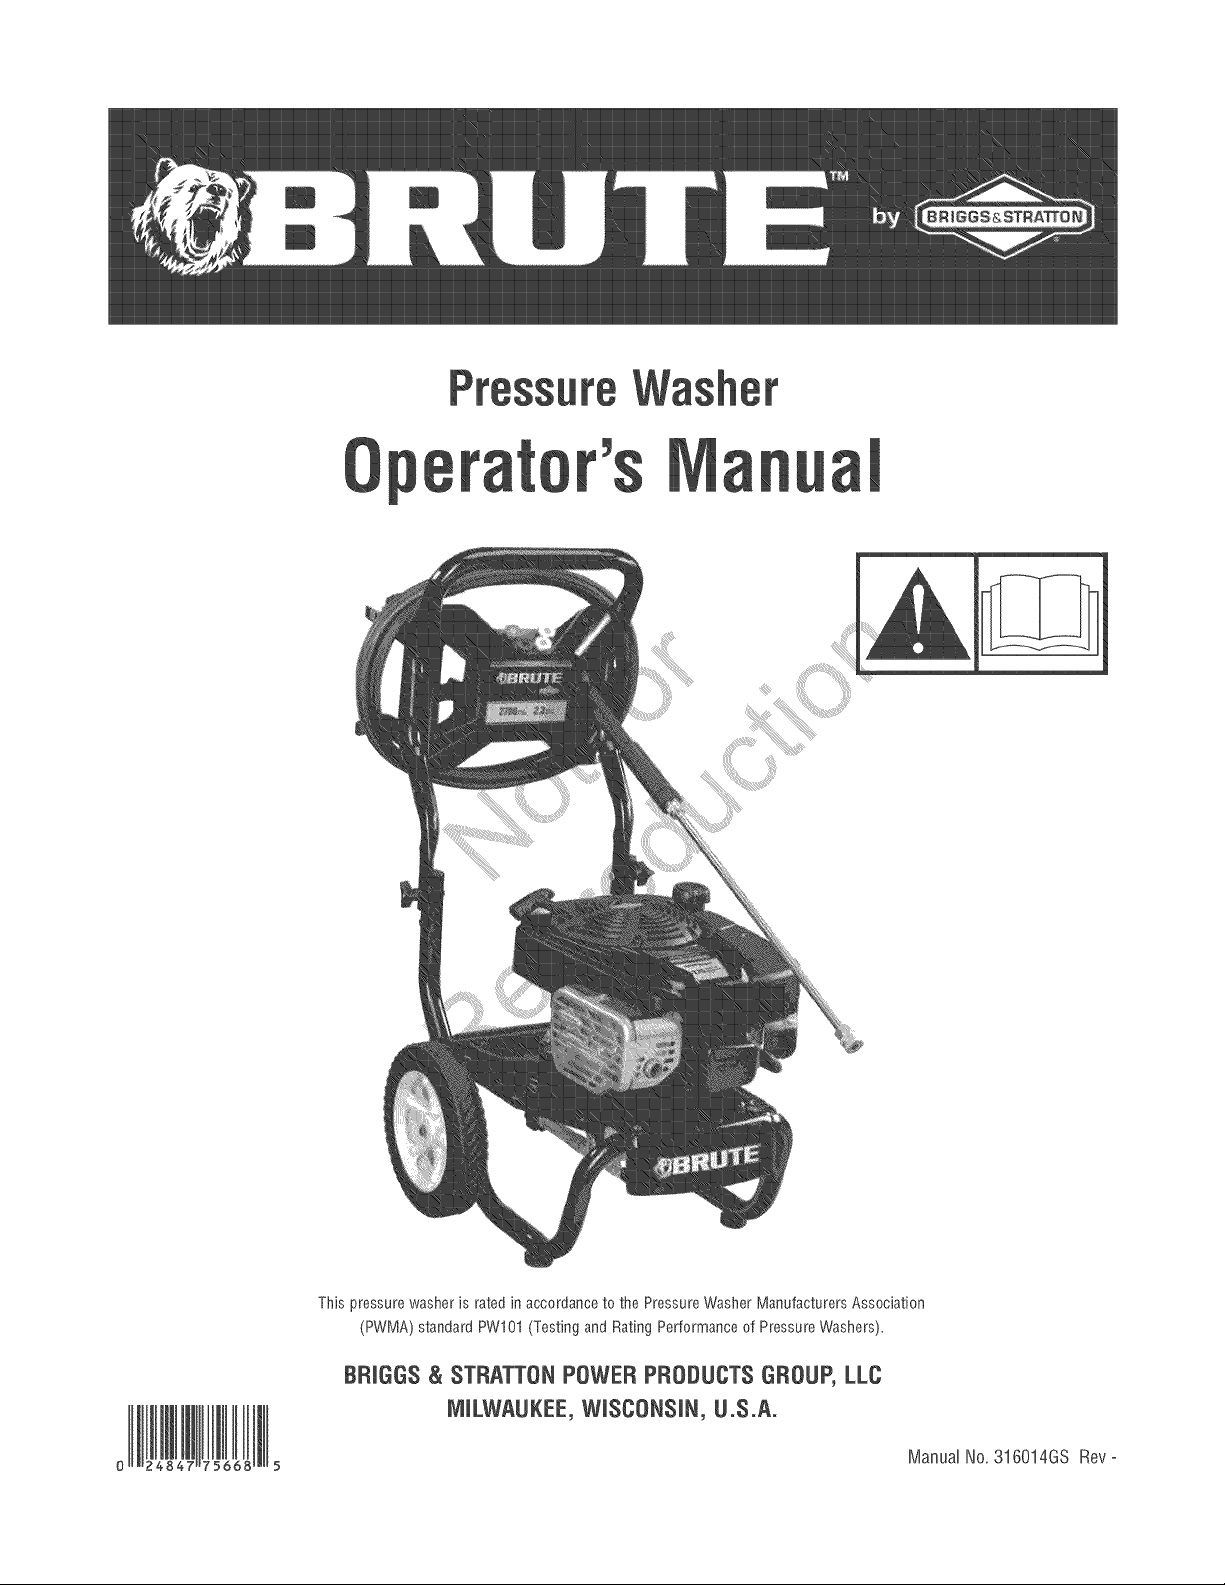
This pressure washer is rated in accordanceto the Pressure Washer Manufacturers Association
(PWMA) standard PW101 (Testing and Rating Performance of Pressure Washers).
BRMGG$& STRATTON POWER PRODUCTS GROUP, LLC
MMLWAUKEE,WM$CONSMN,U.S.A.
o _ 5 Manual No.316014GS Rev -
Thank youfor purchasingthis quality-built Briggs & Stratton@ pressurewasher. We are pleasedthat you've placedyour
confidence in the BRUTFMbrand. When operatedand maintained according to the instructions in this manual, your Briggs &
Stratton pressurewasherwill provide many years of dependableservice.
This manual contains safety information to make you awareof the hazardsand risks associatedwith pressurewashersand
how to avoidthem. BecauseBriggs & Stratton does not necessarilyknow all the applications this pressure washer could be
usedfor, it is important thatyou readand understand these instructions thoroughly before attempting to start or operatethis
equipment. Save these original instructionsfar future reference.
This pressurewasher requires final assembly befareuse. Referto the Assembly sectionof this manual for instructions on
final assembly procedures.Follow the instructions completely.
Where to Find Us
You never haveto look far to find Briggs & Stratton support and servicefor your pressurewasher.Consult your Yellow Pages.
Thereare over 30,000 Briggs & Stratton authorized service dealersworldwide who provide quality service. You canalso
contact Briggs & Stratton CustomerService by phoneat (800) 743-4115, or onthe Internet atwww.brutepower.com.
Pressure Washer
Model Number
Revision
SerialNumber
Engine
Model Number
TypeNumber
CodeNumber
Date Purchased
Copyright © 2012. Briggs & Stratton PowerProducts Group, LLC
Milwaukee, Wl, USA.All rights reserved.
BRUTFMis atrademark
of Briggs & Stratton Power Products, LLC
Milwaukee, Wl, USA
2 www.brutepawer.eam
Table of Contents
Operation .................................... 12
PressureWasher Location..................................... 12
How to Stad Your PressureWasher............................. 12
How to Stop Your PressureWasher ............................. 14
How to UseAccessory Tray.................................... 14
How to UseSprayTips ....................................... 14
Cleaningand Applying Detergent................................ 15
PressureWasher Rinsing ..................................... 16
CleaningDetergentSiphoning Tube.............................. 16
Automatic Cool Down System (Thermal Refiefl..................... 16
Maintenance .................................. 17
MaintenanceSchedule........................................ 17
PressureWasher Maintenance ................................ 17
Engine Maintenance.......................................... 19
After EachUse.............................................. 21
Winter Storage.............................................. 22
Long Term Storage .......................................... 22
Treublesheeting ................................ 23
Warranties .................................... 24
Emissions Control System Warranty ............................. 24
PressureWasher OwnerWarranty............................... 26
Specifications ................................. 28
Product Specifications........................................ 28
Common Service Parts ....................................... 28
EspaSol
OperatorSafety
Equipment Description
Read this ITlanuaJ carefuJJy and became famiJiar
with yourpressurewasher. Know itsappiieafiafls,
its limitations, and any hazardsinvolved.
This pressurewasher operatesat a max of 2,700 PSi (186.1
BARS)and a flow rateof up to 2.3 gallons (8.7 I) per minute.
This high quality residential systemfeatures 10" (25.4 cm)
wheels,axial cam pump with stainless steel pistons,
automatic cool down system, detergentsiphoning system,
nozzleextensionwith quick connectfitting, a variety of quick
connect spray tips, heavyduty 25' (7.6 m) hose,and more.
SeeOUTDOORCLEANING.COMfor more product details.
Everyeffort has been madeto ensure that information in this
manual is accurateand current. However,we reservethe
right to change,alter, or otherwise improve the product and
this document at any time without prior notice.
The Emission Control System for this pressure washer is
warranted for standards set by the Environmental Protection
Agency andthe CaliforniaAir ResourcesBoard.
ElectricalShock
SfipperySurface
Fire Explosion Kickback Projectile
MovingParts FlyingObjects ChemicalBurn HotSurface
Thesafety alert symbol indicatesa potential personal
injury hazard A signal word (DANGER,WARNING,or
6AUTION_s used with the alert symbol to designatea
degreeor levelof hazardseriousness.A safety symbol may
be usedto representthetype of hazard.Thesignal word
NOTICEis usedto address practicesnot relatedto personal
injury.
A DANGERindicatesa hazardwhich, if not avoided, wilt
result in death or serious injury.
,a_WARNINGindicates a hazardwhich, if not avoided,
could result indeath or serious injury.
,a_CAUTIONindicates a hazardwhich, if not avoided, could
result in minor or moderate injury.
NOTICEaddress practices not relatedto personal injury.
Fall
FluidInjection
A WARNING Theengine exhaustfrom this product
contains chemicals known to the Stateof 6alifornia to
cause cancer,birth defects,or other reproductive harm.
,A WARNING This product contains lead and lead
compounds, known to the Stateof Californiato cause
birth defectsor other reproductive harm. Washyour
hands after handling t,_isproduct.
4 www.brutepawer.eam
WARNENG Running engine gives off carbon
monoxide, an odorless, colorless, poison gas.
Breathing carbon monoxide could result in death,
serious injury, headache, fatigue, dizziness,
vomiting, confusion, seizures, nausea or fainting.
Some chemicals or detergents could be harmful if inhaled
or ingested, resulting in death, serious injury, nausea,
fainting or poisoning.
, Operatethis product ONLYoutdoors.
* Keep exhaustgas from entering a confined areathrough
windows, doors, ventilation intakes, or other openings.
* DO NOToperatethis product insideany building, carport,
porch, mobile equipment, marine applications, or enclosure,
evenif windows and doors are open.
* Use a respirator or maskwheneverthere is a chancethat
vapors may beinhaled when using chemicals.
* Readall instructions with mask so you arecertain the mask will
provide the necessaryprotection against inhaling harmful
vapors when using chemicals.
A WARNING Exhaust heat/gases could ignite
combustibles, structures or damage fuel
tank causing a fire, resulting in death,
serious injury and/or property damage.
Contact with muffler area could cause burns resulting in
serious injury.
, DO NOTtouch hot parts and AVOID hot exhaust gases.
* Allow equipment to cool beforetouching.
* Keepat least5 feet (1.5 m) of clearance on ail sides of pressure
washer including overhead.
* it is a violation of California PuNic Resource Code, Section
4442, to use or operate the engineon anyforest-covered,
brush-covered, or grass-covered land unlessthe exhaust
system is equipped with a spark arrester, as defined in Section
4442, maintained in effective working order. Other statesor
federal jurisdictions may have similar laws.
Contactthe original equipment manufacturer, retailer, or dealer
to obtain a sparkarrester designedfor the exhaust system
installed on this engine.
* Replacement parts must bethe sameand installed in the Same
position as the original parts.
A WARNENG Riskof electrocution.
Contactwith power sourcecould causeelectric
shock or burn resulting in deathor serious injury.
* NEVERspray near power source.
A WARNING Use of pressure washer could create puddles
and slippery surfaces causing you to fall
._ resulting in death or serious injury.
Kickback from spray gun could cause
you to fall resulting in death or serious injury.
, Operatepressurewasher from a stable surface.
* Thecleaning areashould have adequateslopesand drainageto
reducethe possibility of a fall due to slippery surfaces.
* Beextremely careful if you must use the pressurewasher from
a ladder,scaffolding, or any other similar location.
* Firmly grasp spray gun with both hands when using high
pressure sprayto avoid injury when spraygun kicks back.
,a, WARNING Fuel and its vapors are extremely flammable
and explosive which could cause burns,
fire or explosion resulting in death,
serious injury and/or property damage.
WHENADDING OR BRAININGFUEL
, Turn pressurewasher engineOFFand let it cool at least 2
minutes before removing fuel cap. Loosen cap slowly to relieve
pressure in tank.
* Fill or drain fuel tank outdoors.
* DONOToverfill tank. Allow spacefor fuel expansion.
* if fuel spills, wait until it evaporatesbefore starting engine.
* Keepfuel awayfrom sparks, open flames, pilot lights, heat,and
other ignition sources.
* Checkfuel lines,tank, cap and fittings frequently for cracks or
leaks. Repbce if necessary.
* DONOTlight a cigarette or smoke.
WHENSTARTINGEQUIPMENT
* Ensurespark plug, muffler, fuel cap,and air cleanerare in place.
* DO NOTcrank enginewith spark plug removed.
WHENOPERATINGEQUIPMENT
* DO NOToperatethis product inside any building, carport,
porch, mobile equipment, marine applications, or enclosure.
o DONOTtip engine or equipment at anglewhich causes fuel to
spill
DONOTsprayfiammabb liquids.
WHENTRANSPORTING,MOVING OR REPAIRINGEQUIPMENT
* Transport/move/repair with fuel tank EMPTYor with fuel shutoff
valveOFF.
* DONOTtip engine or equipment at anglewhich causesfuel to
spill.
o Disconnect spark plug wire.
WHENSTORINGFUELOR EQUIPMENTWITH FUELiN TANK
Store awayfrom furnaces, stoves,water heaters,clothes
dryers, or otherappliancesthat have pilot light orother ignition
source becausetheycould ignite fuel vapors.
_, WARNING Starter cord kickback (rapid retraction) will
pull hand and arm toward engine faster than you
can let go which could cause broken bones,
fractures, bruises, or sprains resulting in serious
injury.
, NEVERpull starter cord without first relieving spray gun
pressure.
* When starting engine, pull cord slowly until resistanceisfelt
andthen pull rapidlyto avoid kickback.
* After eachstarting attempt, where enginefails to run, always
point spray gun in safedirection, pressred button andsqueeze
spray gun trigger to releasehigh pressure.
* Firmly grasp spray gun with both handswhen using high
pressure sprayto avoid injury when spraygun kicks back.
,a, WARNING ChemicalBurn Hazard.
Chemicals could causeburns resulting indeath,
serious injury, and/or property damage.
* DO NOTusecaustic liquid with pressure washer.
* Use ONLYpressurewasher safe detergents/soaps. Followall
manufacturers instructions.
WARNING The high pressure stream of water that
and its underlying tissues, resulting in serious
this equipment produces could cut through skin
injury and possible amputation.
Spray gun traps high water pressure, even when engine is
stopped and water is disconnected, which could result in
serious injury.
. if cut by fluid, call physician immediately. DONOTtreat as a
simple cut.
* DONOTallow CHILDRENto operate pressure washer.
* NEVERrepairhigh pressure hose. Replaceit.
* NEVERrepairleaking connections with sealantof any kind.
Replaceo-ring or seal.
* NEVERconnect high pressure hose to nozzleextension.
* Keep high pressurehose connectedto pump and spraygun
while system is pressurize&
* ALWAYS point spray gun in safedirection, pressred button
andsqueezespray guntrigger to releasehigh pressure, every
time you stop engine.
NEVERaimspray gun at people,animals, or plants.
* DO NOTsecurespray gun inopen position.
* DO NOTleavespray gun unattendedwhile machineis running.
* NEVERuseaspray gun which does not have atrigger lock or
trigger guard in placeand in working order.
Always be certain spray gun, spray tips and accessoriesare
correctly attached.
A WARNING Unintentional sparking could causefire or
electric shock resulting ndeath or
serious injury.
WRENADJUSTINGOR MAKINGREPAIRSTOYOURPRESSURE
WASHER
Disconnectthe spark plug wire from the spark plug and place
the wire where it cannot contact spark plug_
WHENTESTINGFORENGINESPARK
Use approved spark plug tester.
, DONOTcheckfor spark with spark plug removed.
A WARNING Starter and other rotating parts could
resulting in serious injury.
entangle hands, hair, clothing, or accessories
NEVERoperatepressure washerwithout protective housing or
covers.
* DO NOTwear loosedotNng, jewelry or anything that couN be
caught in the starter or other rotating parts.
° Tie up long hairand removejewdry.
A WARNING Risk of eyeor bodily injury.
Spraycould splash back or propel
objects resulting in serious injury.
,, Alwayswear indirect vented (chemical splash) safetygoggles
markedto comply with ANSi Z87.1 when using or in vicinity of
this equipment.
NEVERsubstitute safety glasses or dry-condition goggles for
indirect vented safety goggles.
Alwayswear protective clothing such as a long-sleevedshirt,
long pantsand close-toed shoes.
NEVERoperatepressure washerwhen barefoot or wearing
sandalsor shorts.
A CAUTION Excessively high operating speeds could
result in minor injury and/or pressure washer damage.
Excessively low speeds impose a heavy load.
DO NOTtamper with governor spring, links or other parts to
increase enginespeed. Pressurewasher suppliescorrect rated
pressure andflow when running at governed speed.
DO NOTmodify pressure washer in any way.
NOTICE High pressure spray could damagefragile items
including glass.
- DONOTpointspraygunat glasswhenusingred(0°)spraytip,
o NEVERaimspraygunatplants,
NOTICE improper treatment of pressure washer could
damageit and shorten its life.
. if you havequestions about intended use,ask dealeror contact
qualified service center.
° NEVERoperateunits with brokenor missing parts, orwithout
protective housing or covers.
° DO NOTby-pass any safety device on this machine_
* DONOTtamper with governedspee&
DONOToperate pressurewasher above rated pressure_
DONOTmodify pressurewasher inany way_
Beforestarting pressure washer in cold weather,check all parts of
the equipmentto be sure ice has not formed there_
NEVERmove machine by pulling on hoses_Use handleprovided
on uniL
This equipment is designed to be usedwith Briggs & Stratton
Power Products authorized parts ONLY_if equipment is used with
parts that DONOTcomply with minimum specifications,user
assumesall risks andliabilities_
6 www.bratepower.com
Your pressure washer requires some assembly and is ready
for useafter it has beenproperly serviced with the
recommendedoil and fuel,
if you have anyproblems with the assemblyof your pressure
washer, pleasecall the pressurewasher helpline at
(800) 743-4115. if calling for assistance, pleasehavethe
model, revision, and serial number from the identification
label available,
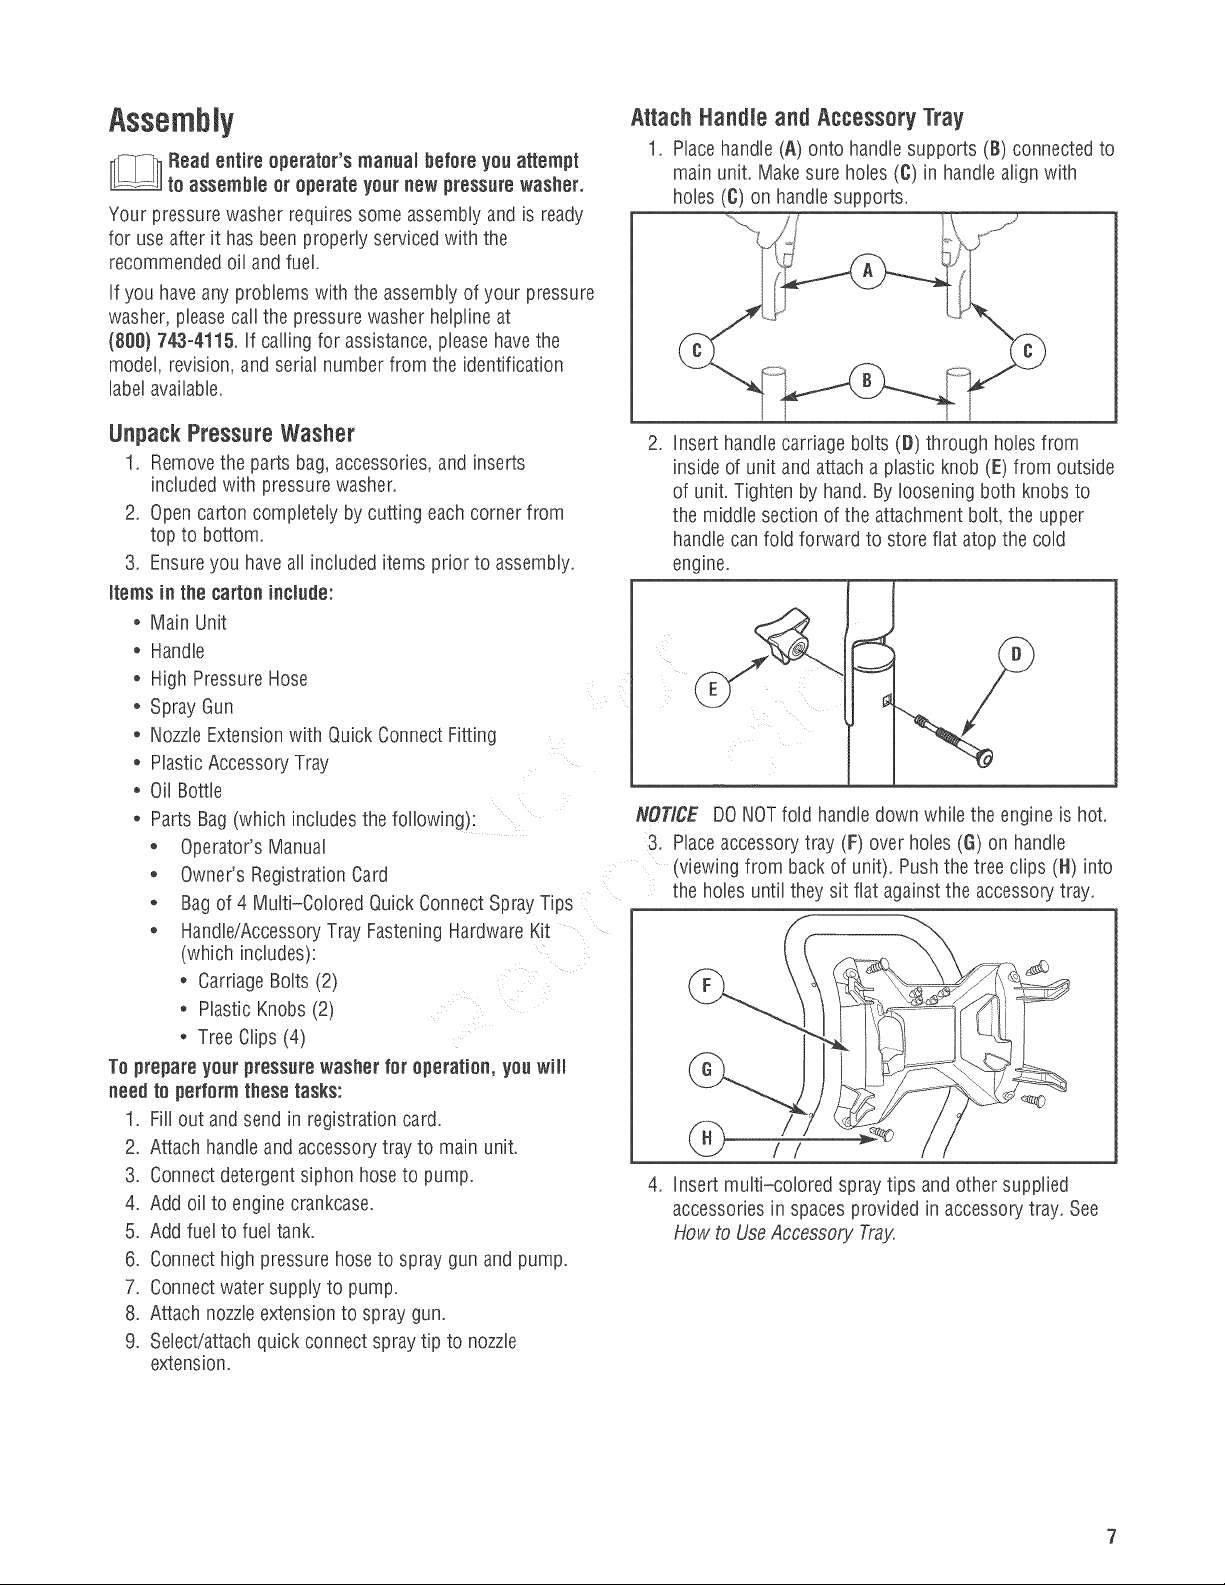
Attach Handle and Accessory Tray
1, Placehandle (A) onto handle supports (B) connectedto
main unit, Makesure hobs (C) in handle align with
hobs (C) on handlesupports,
UnpackPressureWasher
1, Removethe parts bag,accessories, and inserts
included with pressure washer_
2, Opencarton completely by cutting eachcorner from
top to bottom,
3, Ensureyou haveall included items prior to assembly,
items in the carton include:
o Main Unit
o Handle
o High Pressure Hose
o Spray Gun
o NozzleExtensionwith Quick ConnectFitting
o Plastic AccessoryTray
Oil Bottle
o Parts Bag(which includesthe following):
o Operator's Manual
o Owner's RegistrationCard
o Bag of 4 Multi-Colored Quick Connect Spray Tips
o Handle/AccessoryTray FasteningHardwareKit
(which includes):
o CarriageBolts (2)
o Plastic Knobs (2)
o TreeClips (4)
To prepareyourpressurewasher far operation, youwill
need to performthese tasks:
1, Fill out and send in registration card,
2_ Attach handleand accessorytray to main uniL
3, Connectdetergent siphon hoseto pump,
4, Add oil to engine crankcase,
5, Add fuel to fuel tank,
6, Connecthigh pressure hoseto spray gun and pump,
7_ Connectwater supply to pump,
8, Attach nozzleextension to spraygun,
9, Select/attachquick connect spraytip to nozzle
extension,
,
insert handlecarriage bolts (D) through hobs from
inside of unit and attacha plastic knob (E) from outside
of unit,Tighten by hand, By loosening both knobs to
the middle section of the attachment bolt, the upper
handle canfold forward to store fiat atop the cold
engine,
HOTICE DONOTfold handledown while the engineis hot,
3, PBceaccessory tray (F) over hobs (G) on handle
(viewing from back of unit), Push the tree clips (N) into
the hobs until they sit fiat againstthe accessory tray,
(_ //
,
insert multi-colored spray tips and other supplied
accessoriesin spaces provided in accessorytray, See
How to UseAccessory Tray
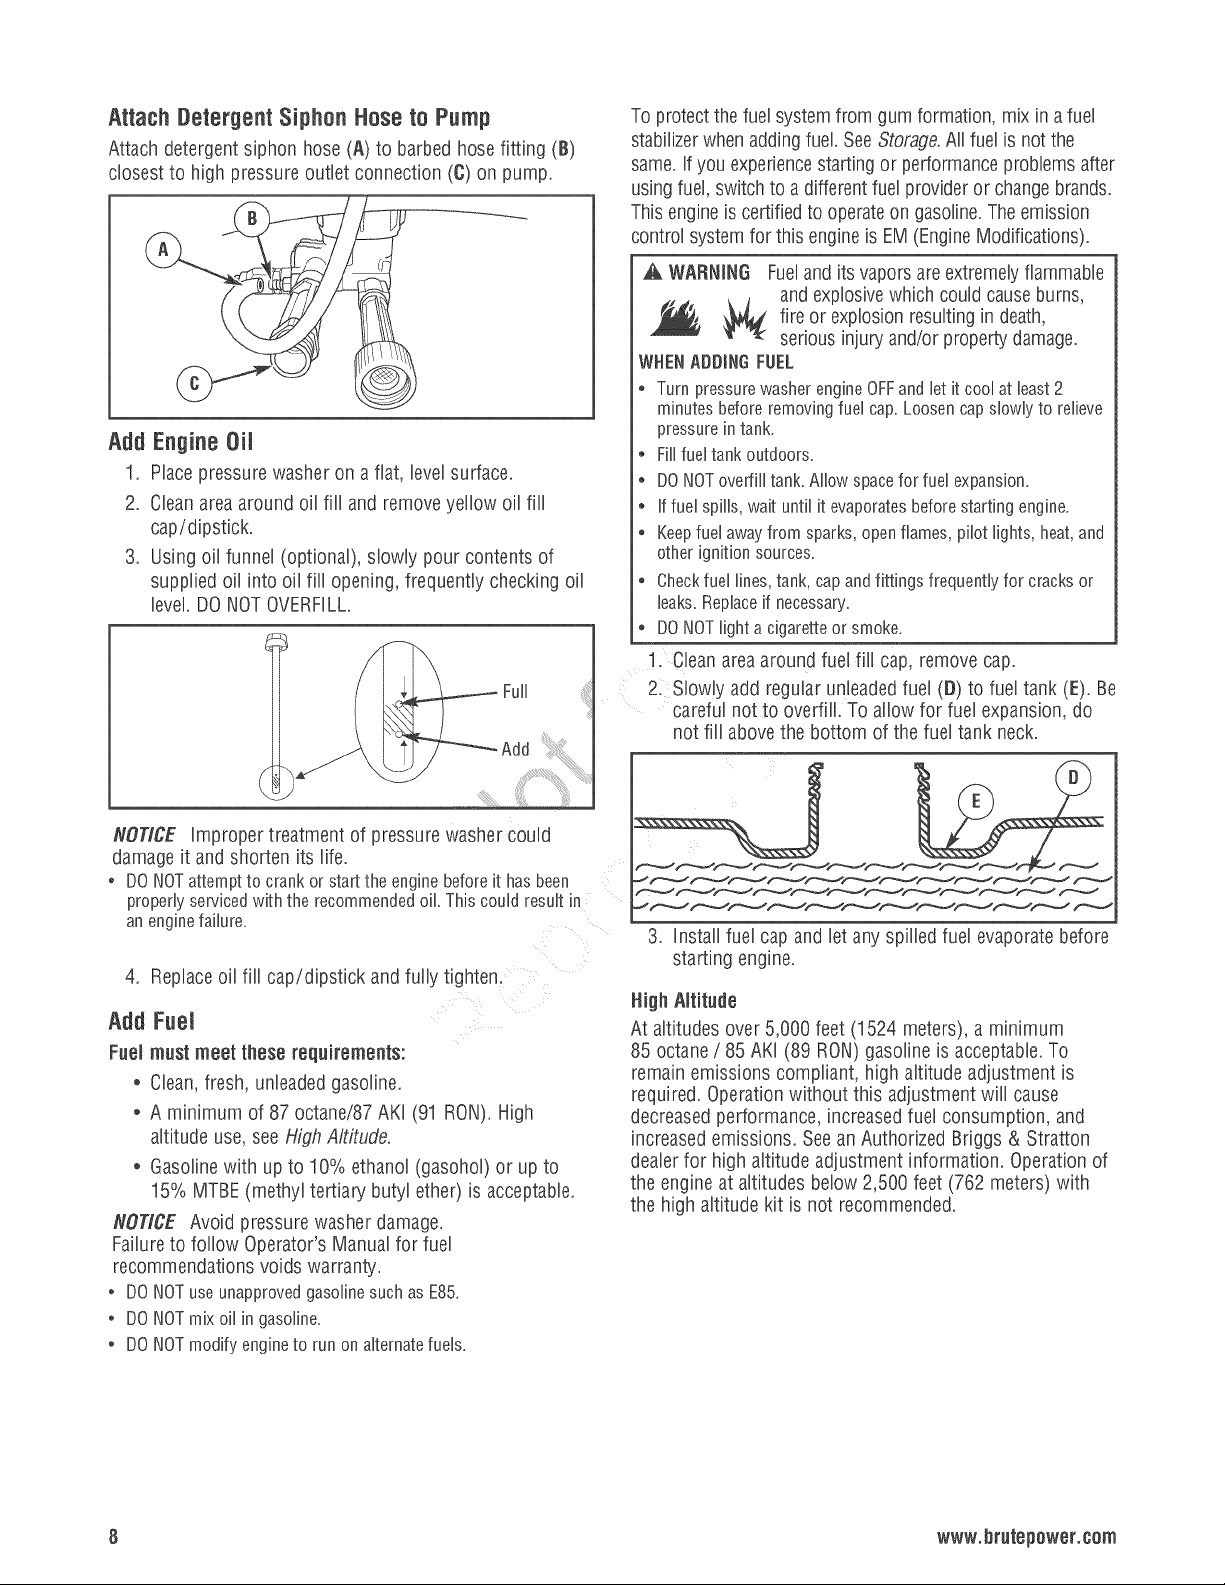
Attach Detergent Siphon Hose to Pump
Attach detergent siphon hose (A/to barbedhose fitting (BI
closest to high pressure outlet connection (C) on pump.
Add Engine Oit
1. Placepressure washer on afiat, levelsurface.
2. Cleanarea around oil fill and removeyellow oil fill
cap/dipstick.
3. Using oil funnel (optional), slowly pour contents of
supplied oil into oil fill opening, frequently checkingoil
level. DONOTOVERFILL.
Full
I
To protectthe fuel systemfrom gum formation, mix ina fuel
stabilizerwhen addingfuel. SeeStorage.All fuel is not the
same.if you experiencestartingor performanceproblems after
usingfuel, switch to a differentfuel provider or changebrands.
This engineiscertifiedto operateon gasoline.Theemission
control systemfor this engineis EM(EngineModifications).
,a, WARNING Fueland its vapors areextremelyflammable
andexplosivewhich could causeburns,
_j( fire or explosionresultingin death,
seriousinjury and/or property damage.
WHENADDINGFUEL
* Turn pressurewasher engineOFFand let it cool at least 2
minutes before removing fuel cap. Loosen cap slowly to relieve
pressure in tank.
Fill fuel tank outdoors.
* DONOToverfill tank. Allow spacefor fuel expansion.
if fuel spills, wait until it evaporatesbefore starting engine.
Keepfuel away from sparks, open flames, pilot lights, heat,and
other ignition sources.
* Checkfuel lines,tank, cap and fittings frequently for cracks or
leaks. Replaceif necessary.
DONOTlight a cigaretteor smoke.
1. Cleanarea around fuel fill cap, remove cap.
2. Slowly add regular unleadedfuel (t:])to fuel tank (E). Be
careful notto overfill. To allow for fuel expansion, do
not fill abovethe bottom of the fuel tank neck.
NOTICE improper treatment of pressure washer could
damage it and shorten its life.
, DO NOTattempt to crank or start the engine beforeit has been
properly servicedwith the recommended oi This could result in
an enginefailure.
4. Replaceoil fill cap/dipstick and fully tighten.
Add Fuel
Fuel must meet these requirements:
, Clean,fresh, unleadedgasoline.
* A minimum of 87 octane/87AKI (91 RON).High
altitude use, seeHigh Aititude.
, Gasolinewith upto 10%ethanol (gasohol) or up to
15% MTBE(methyl tertiary butyl ether) is acceptable.
NOTICE Avoid pressure washer damage.
Failureto follow Operator's Manualfor fuel
recommendations voids warranty.
, DONOTuseunapprovedgasolinesuchasE85.
* DONOTmixoilin gasoline.
DONOTmodifyengineto runonalternatefuels.
•-4"N N
N N
-JN N
3. Install fuel capand let any spilled fuel evaporatebefore
starting eng_ne.
High Altitude
At altitudes over 5.000 feet (1524 meters), a minimum
85 octane/ 85 AKI (89 RON)gasoline is acceptable.To
remain emissions compliant, high altitude adjustment is
required. Operation without this adjustment will cause
decreasedperformance,increasedfuel consumption, and
increasedemissions. Seean Authorized Briggs & Stratton
dealerfor high altitude adjustment information. Operation of
the engineat altitudes below 2,500 feet (762 meters) with
the high altitude kit is not recommended.
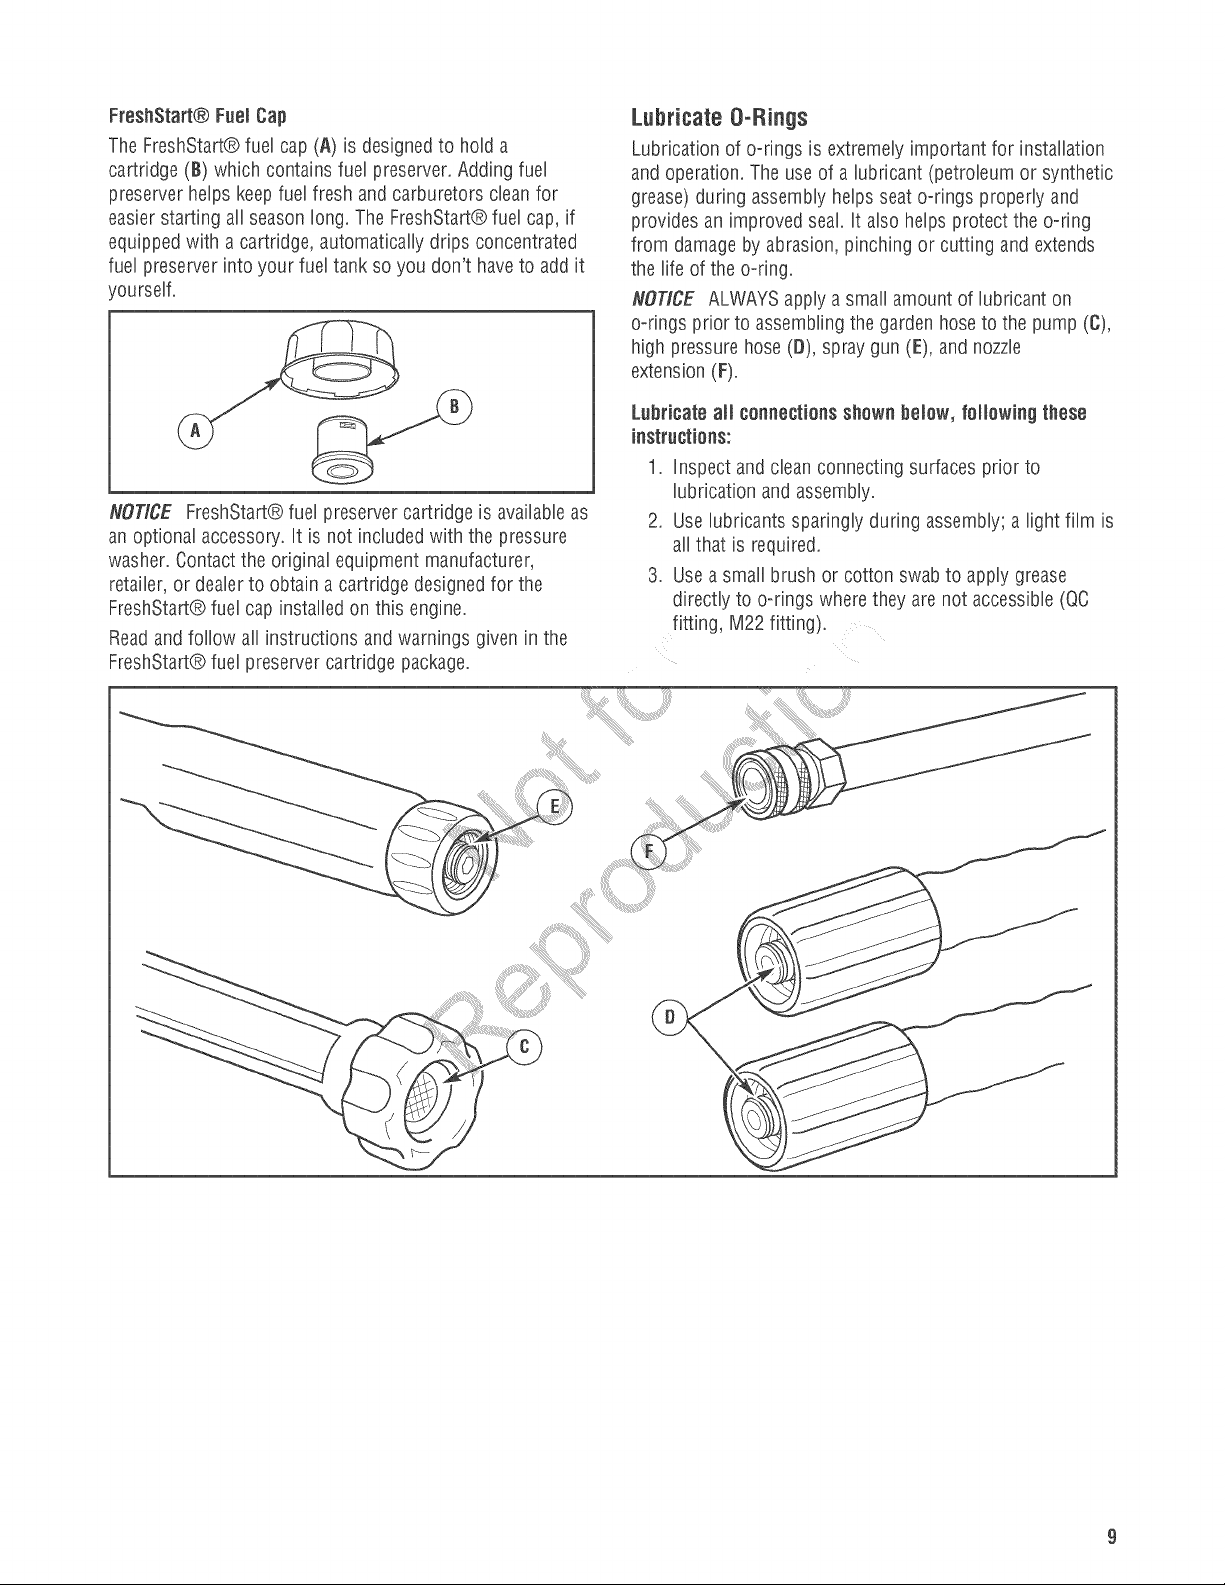
FreshStart@FuemCap
TheFreshStarL'#}.fuelcap(A)isdesignedtoholda
cartridge(B)whichcontainsfuelpreserver.Addingfuel
preserverhelpskeepfuelfreshandcarburetorscleanfor
easierstartingallseasonlong.TheFreshStart@fuelcap,if
equippedwithacartridge,automaticallydripsconcentrated
fuelpreserverintoyourfueltanksoyoudon'thavetoaddit
ourself.
NOTICEFreshStart@fuelpreservercartridgeisavailableas
anoptionalaccessory,itisnotincludedwiththepressure
washer.Contacttheoriginalequipmentmanufacturer,
retailer,ordealertoobtainacartridgedesignedforthe
FreshStart@fuelcapinstalledonthisengine.
Readandfollowallinstructionsandwarningsgiveninthe
FreshStart@fuelpreservercartridgepackage.
Labricate OoRings
Lubrication of o-rings is extremely important for instaflation
and operation. The useof a lubricant (petrobum or synthetic
grease)during assemNy helpsseat o-rings properly and
provides an improved seal. it also helps protect the o-ring
from damageby abrasion, pinching or cutting and extends
the fife of the o-ring.
NOTICE ALWAYSapplya small amount of lubricant on
o-rings priorto assemblingthe garden hoseto the pump (C),
high pressure hose(D), spray gun (E), and nozzle
extension(F).
Labrieateaii connections shown below, following these
instraetions:
1, inspect and cleanconnecting surfaces prior to
lubrication and assembly.
2. Uselubricants sparingly during assembly; afight film is
all that is required.
3. Usea small brush or cotton swab to apply grease
directly to ooringswherethey are not accessible(QC
fitting, M22 fitting).
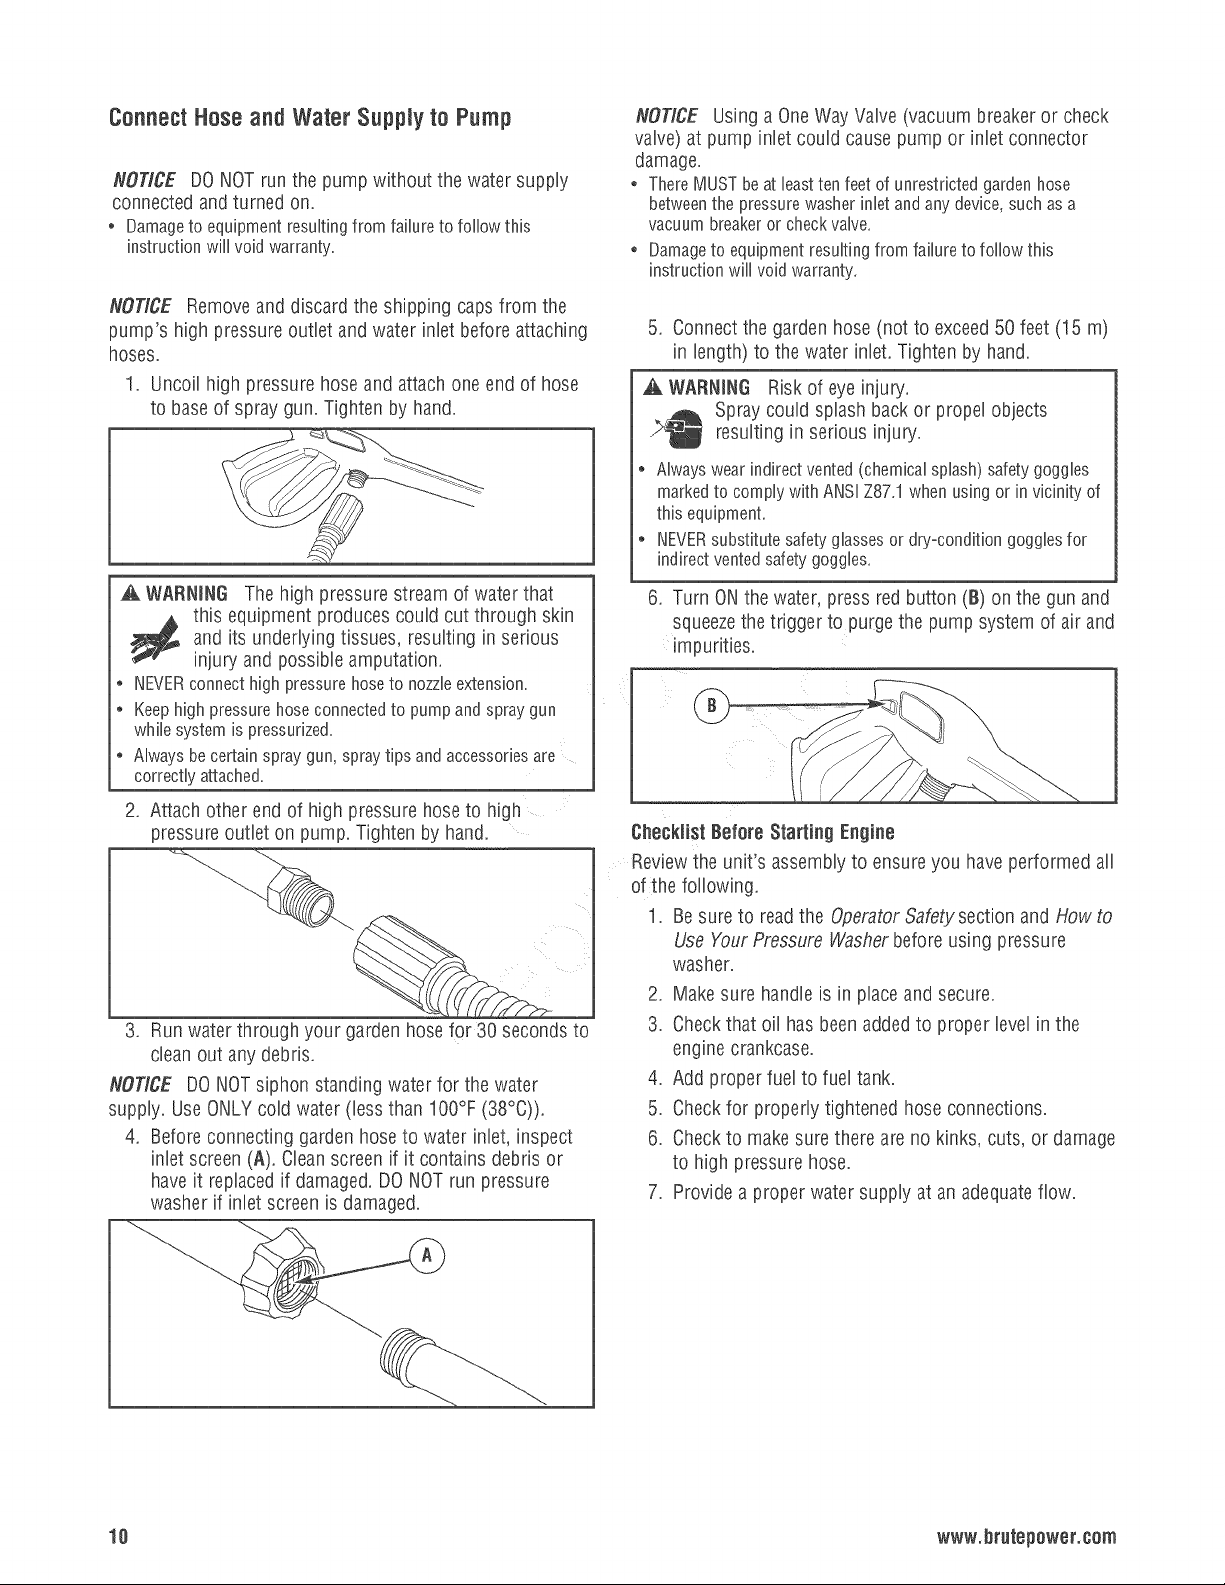
Connect Hose and Water Supply to Pump
NOTICE DONOTrunthe pump without the water supply
connectedand turned on.
, Damagetoequipmentresultingfrom failureto followthis
instructionwillvoidwarranty.
NOTICE Removeand discard the shipping caps from the
pump's high pressureoutlet andwater inlet before attaching
hoses.
1. Uncoil high pressure hose and attachone end of hose
to baseof spray gun. Tighten by hand.
NOTICE Using a OneWayValve (vacuum breakeror check
valve) at pump inlet could cause pump or inlet connector
damage.
, ThereMUSTbeatleasttenfeetof unrestrictedgardenhose
betweenthe pressurewasherinletandanydevice,suchasa
vacuumbreakeror checkvalve.
* Damageto equipment resulting from failure to follow this
instruction will void warranty.
5. Connectthe garden hose (not to exceed50 feet (15 m)
in length) to the water inlet. Tighten by hand.
_k WARNING Riskof eyeinjury.
Spray could splash back or propel objects
resulting in serious injury.
* Always wear indirect vented (chemical splash) safetygoggles
markedto comply with ANSi Z8X1 when usingor in vicinity of
this equipment.
* NEVERsubstitute safetyglasses or dry=condition goggles for
indirect vented safety goggles.
WARNING The high pressure stream of water that
and its underlying tissues, resulting in serious
this equipment produces could cut through skin
injury and possible amputation.
* NEVERconnect high pressure hose to nozzleextension.
Keephigh pressure hose connectedto pump and spray gun
while system is pressurized.
Always be certain spray gun, spray tips and accessoriesare
correctly attached.
2. Attach other end of high pressure hose to high
pressure outlet on pump. Tightenby hand.
3. Run waterthrough your garden hosefor 30 seconds to
cleanout anydebris.
NOTICE DONOTsiphon standing water for the water
supply. UseONLYcold water (lessthan 100°F (38°C)).
4. Beforeconnecting garden hoseto water inlet, inspect
inlet screen (A). Cleanscreen if it contains debris or
haveit replacedif damaged.DONOTrun pressure
washer if inlet screen is damaged.
6. Turn ONthe water, press red button (B) on the gun and
squeezethetrigger to purgethe pump system of air and
impurities.
Checklist Befere Starting Engine
Reviewthe unit's assembly to ensure you haveperformed all
of the following.
1. Besureto readthe OperatorSafetysection and Howto
Use Your Pressure Washerbefore using pressure
washer.
2. Makesure handle is in placeand secure.
3. Checkthat oil hasbeen addedto proper levelin the
engine crankcase.
4. Add proper fuel to fuel tank.
5. Checkfor properly tightened hoseconnections.
6. Checkto make surethere are no kinks,cuts, or damage
to high pressure hose.
7. Provide a proper watersupply at an adequateflow.
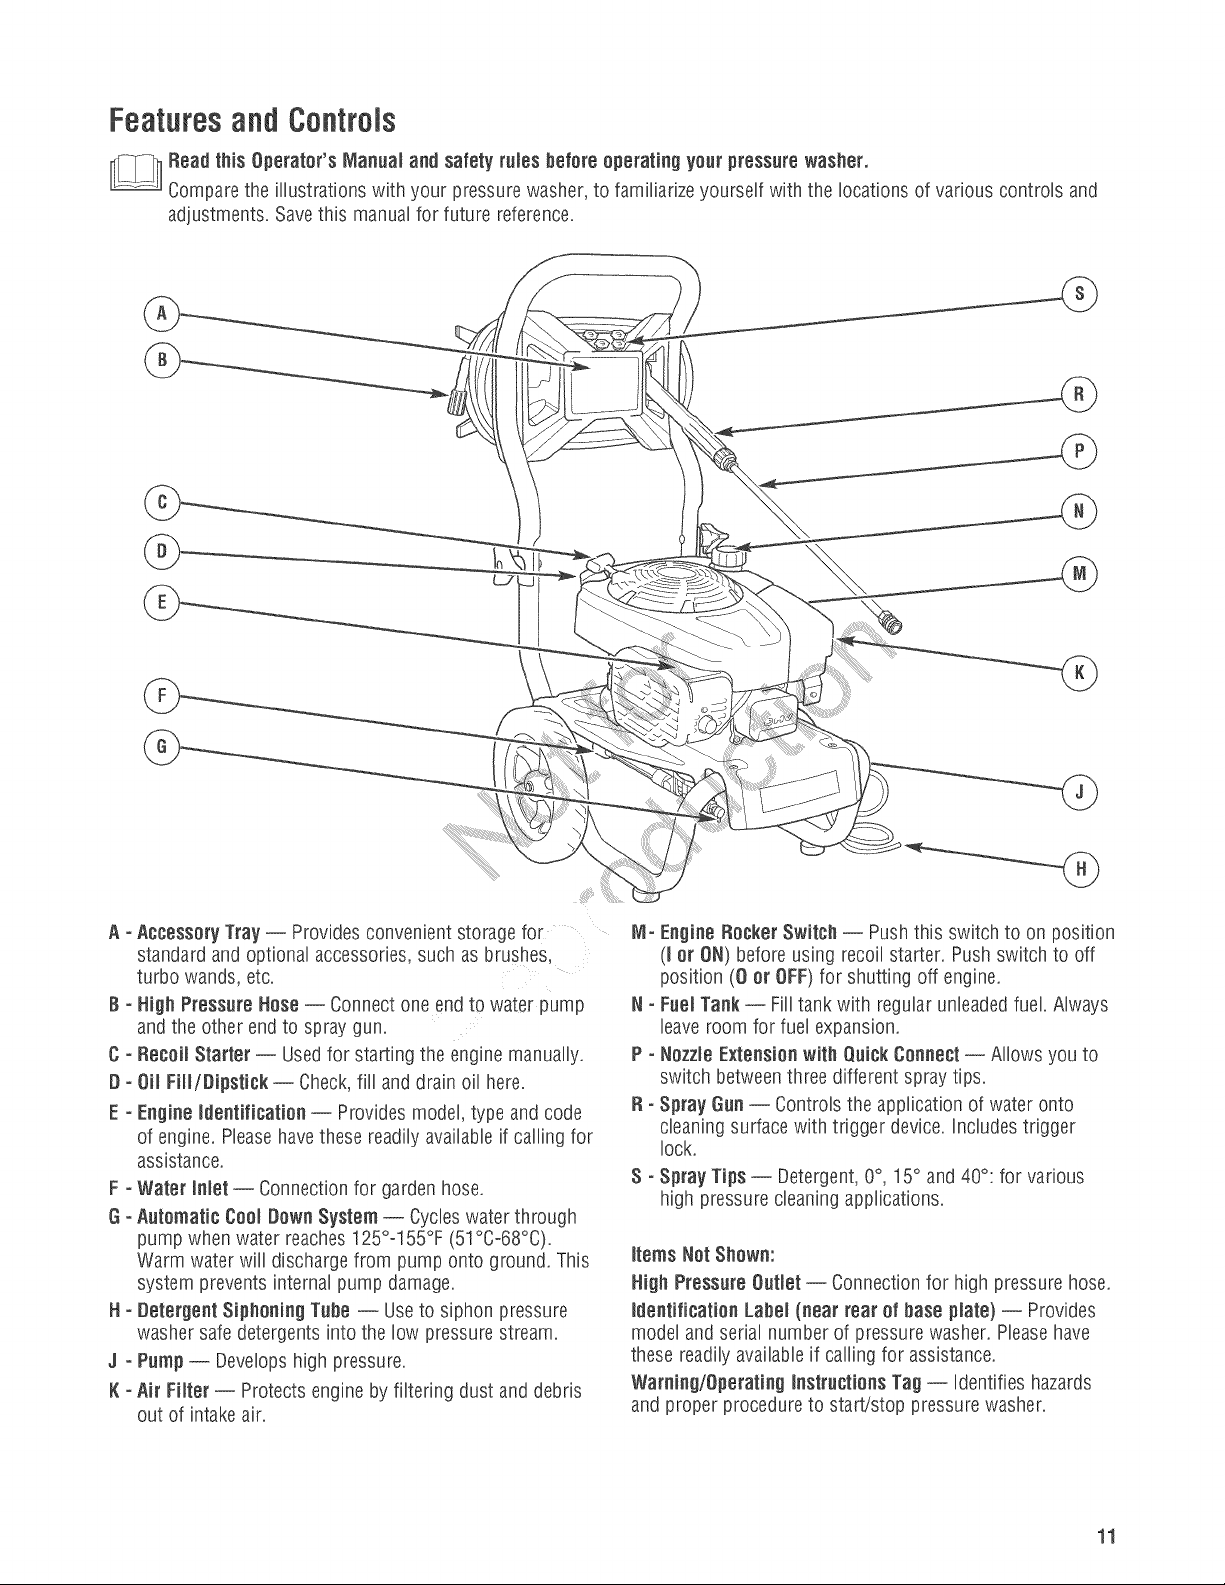
Featuresand Controts
Readthis Operator's Manual and safety rules before operating yourpressurewasher.
Comparethe illustrations with your pressurewasher,to familiarizeyourself with the locations of various controls and
adjustments. Savethis manual for future reference.
A °Accessory Tray -- Providesconvenient storage for
standard and optional accessories, such as brushes,
turbo wands, etc.
B ° Nigh Pressure Nose-- Connectone end to water pump
and the other end to spray gun.
C ° Recoil Starter -- Usedfor starting the engine manually.
D ° Oil Fill/Dipstick -- Check,fill and drain oil here.
E ° EngineIdentification -- Provides model, type andcode
of engine. Pleasehavethese readily availableif calling for
assistance.
F -Water inlet-- Connectionfor garden hose.
I_- Automatic Cool Down System-- Cycleswater through
pump when water reaches125°-155% (51°6-68°0).
Warm water will dischargefrom pump onto ground. This
system preventsinternal pump damage.
N - Detergent Siphoning Tube-- Useto siphon pressure
washer safe detergents into the low pressure stream.
J - Pump-- Developshigh pressure.
K - Air Filter -- Protects engine by filtering dust anddebris
out of intakeair.
IVl-EngineRocker Switch -- Pushthis switch to on position
(I or ON)before using recoil starter. Push switch to off
position (0 or OFF)for shutting off engine.
N - FuelTank -- Filltank with regularunleadedfuel, Always
leaveroom for fuel expansion.
P - Nozzle Extensionwith Quick Connect-- Allowsyou to
switch betweenthree different spray tips.
R ° Spray Gun-- Controls the application of water onto
cleaningsurfacewith trigger device.Includes trigger
IocL
S
Spray Tips -- Detergent,0°, 15° and 40°: for various
high pressure cleaningapplications.
items NotShown:
Nigh Pressure Outlet -- Connectionfor high pressurehose.
Identification Label(near rear of base plate) -- Provides
model and serial number of pressurewasher. Pleasehave
these readily availableif calling for assistance.
Warning/Operating Instructions Tag -- identifies hazards
and proper procedureto staWstop pressure washer.
11
ifyouhaveanyproblemsoperatingyourpressurewasher,
pleasecallthepressurewasherhelplineat(800}743-4115.
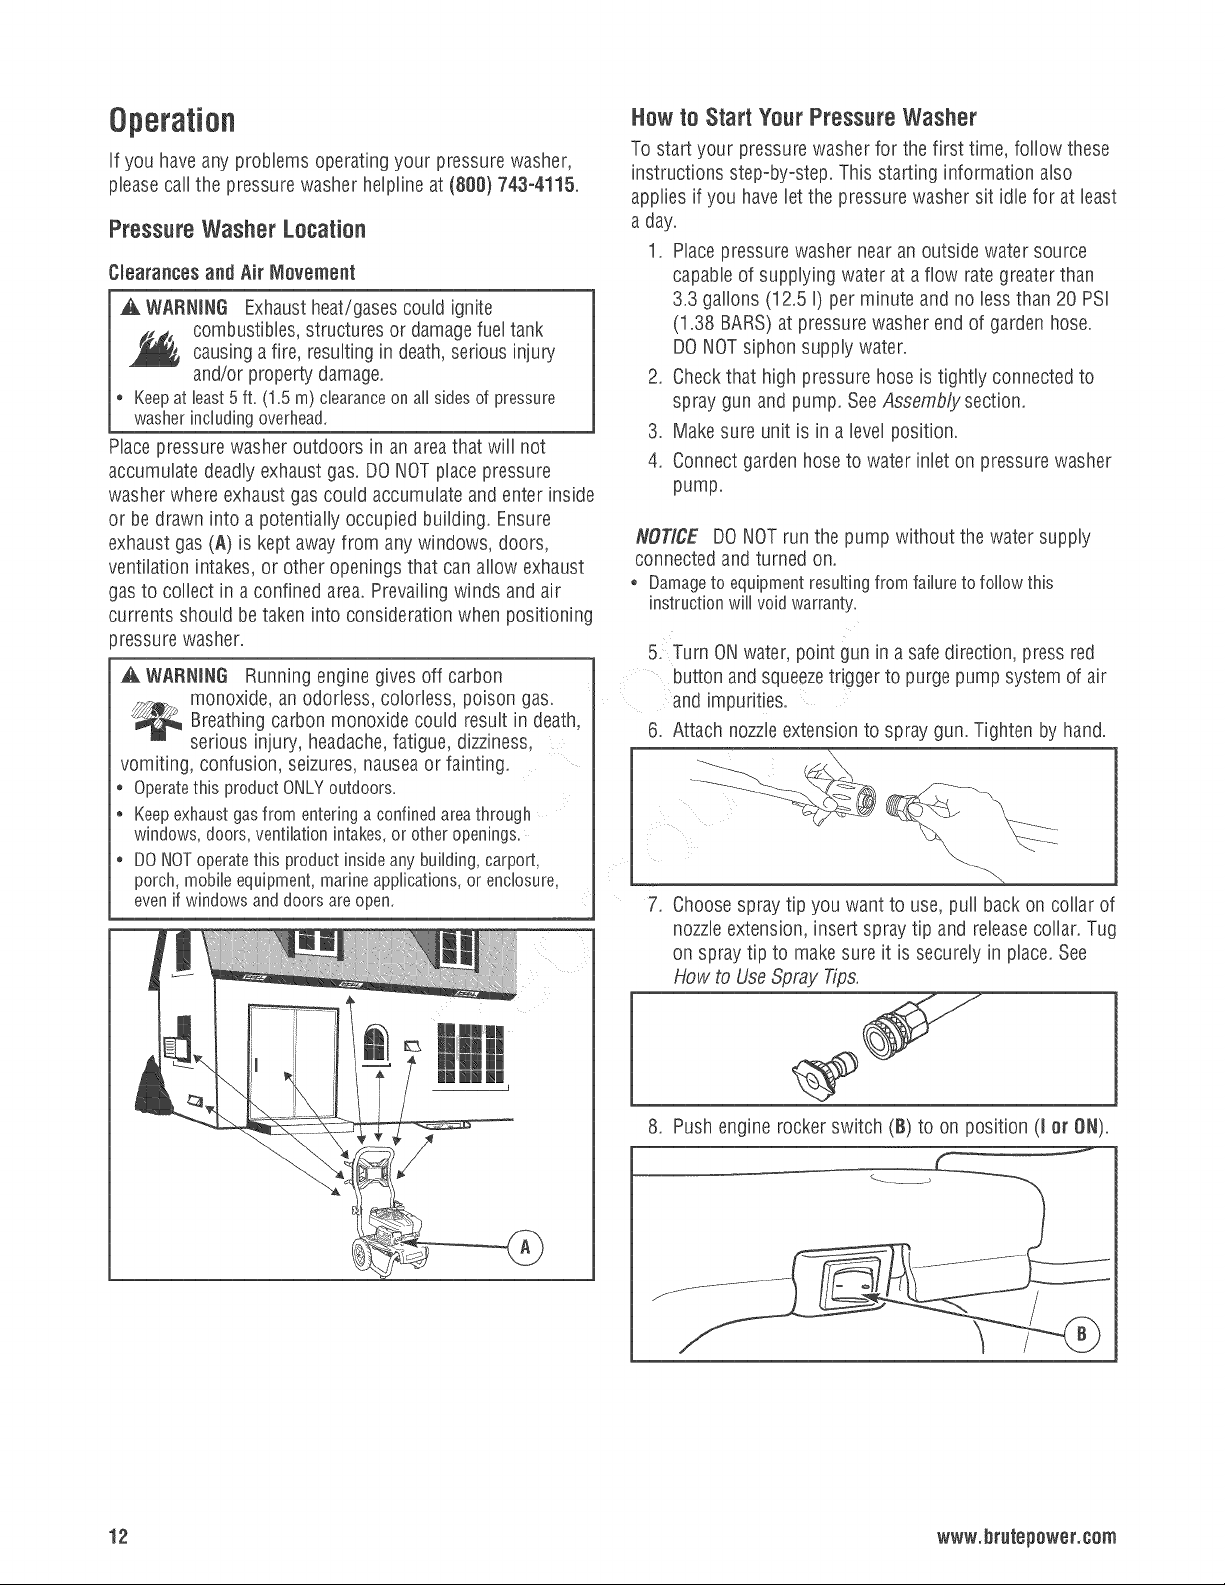
Pressure Washer Lecatian
Ciearanees and Air Mevement
_k WARNING Exhaustheat/gasescould ignite
combustibles, structuresor damagefueltank
causing afire, resultingin death,serious injury
and/or property damage.
, Keepat least5 ft. (1.5m) clearanceonaiIsidesof pressure
washerincludingoverhead.
Placepressure washer outdoors in an areathat will not
accumulate deadlyexhaust gas. DONOTplacepressure
washer where exhaustgas could accumulate and enter inside
or be drawn into a potentially occupied building. Ensure
exhaustgas (A) is kept awayfrom any windows, doors,
ventilation intakes, or other openingsthat can allow exhaust
gasto collect in aconfined area. Prevailingwinds and air
currents should be taken into considerationwhen positioning
_ressurewasher.
WARNING Running engine gives off carbon
monoxide, an odorless, colorless, poison gas.
Breathing carbon monoxide could result in death,
serious injury, headache, fatigue, dizziness
vomiting, confusion, seizures, nausea or fainting.
Operatethis product ONLYoutdoors.
Keepexhaustgas from entering a confined areathrough
windows, doors, ventibtion intakes, or other openings.
DO NOToperatethis product insideany building, carport.
porch, mobile equipment, marine applications, or enclosure=
evenif windows and doors are open.
Haw to Start Your Pressure Washer
To start your pressure washer for the first time, follow these
instructions step-by-step. This starting information also
applies if you havelet the pressurewasher sit idle for at least
a day.
1. Placepressure washer near an outside water source
capableof supplying water at a flow rate greaterthan
3.3 gallons (12.5 I) per minute and no lessthan 20 PSi
(1.38 BARS)at pressurewasher end of garden hose.
DONOTsiphon supply water.
2. Checkthat high pressurehoseis tightly connectedto
spray gun and pump. SeeAssembly section.
3. Makesure unit is in a level position.
4. Connectgarden hose to water inlet on pressure washer
pump.
NOTICE DONOTrunthe pump without the water supply
connectedand turned on.
Damageto equipmentresultingfromfailureto followthis
instructionwillvoidwarranty.
5. Turn ONwater, point gun in a safedirection, press red
button andsqueezetrigger to purge pump system of air
and impurities.
6. Attach nozzleextensionto spraygun. Tighten by hand.
Choosespraytip you want to use, pull back on collar of
nozzleextension,insert spray tip and releasecollar. Tug
on spray tip to makesure it is securely in place.See
How to Use@ray Tips.
8. Push engine rocker switch (B) to on position (Jor ON).
NOTICE Beforestarting the pressure washer, be sureyou
are wearing safetygoggles as described below.
10.Return starter grip handleslowly. DONOTlet rope"snap
back" against starter.
WARNING Riskof eye injury.
Spraycould splash back or propel objects
resulting in serious injury.
o Always wear indirect vented (chembaI spbsh) safety goggles
markedto comply with ANSI Z87.1 when using or in vicinity of
this equipment.
NEVERsubstitute safety gbsses or dry-condition goggles for
indirect vented safety goggles.
NOTICE This unit is equipped with a ReadyStart@engine.A
ReadyStart@enginemeansthere is no priming or choking
required.
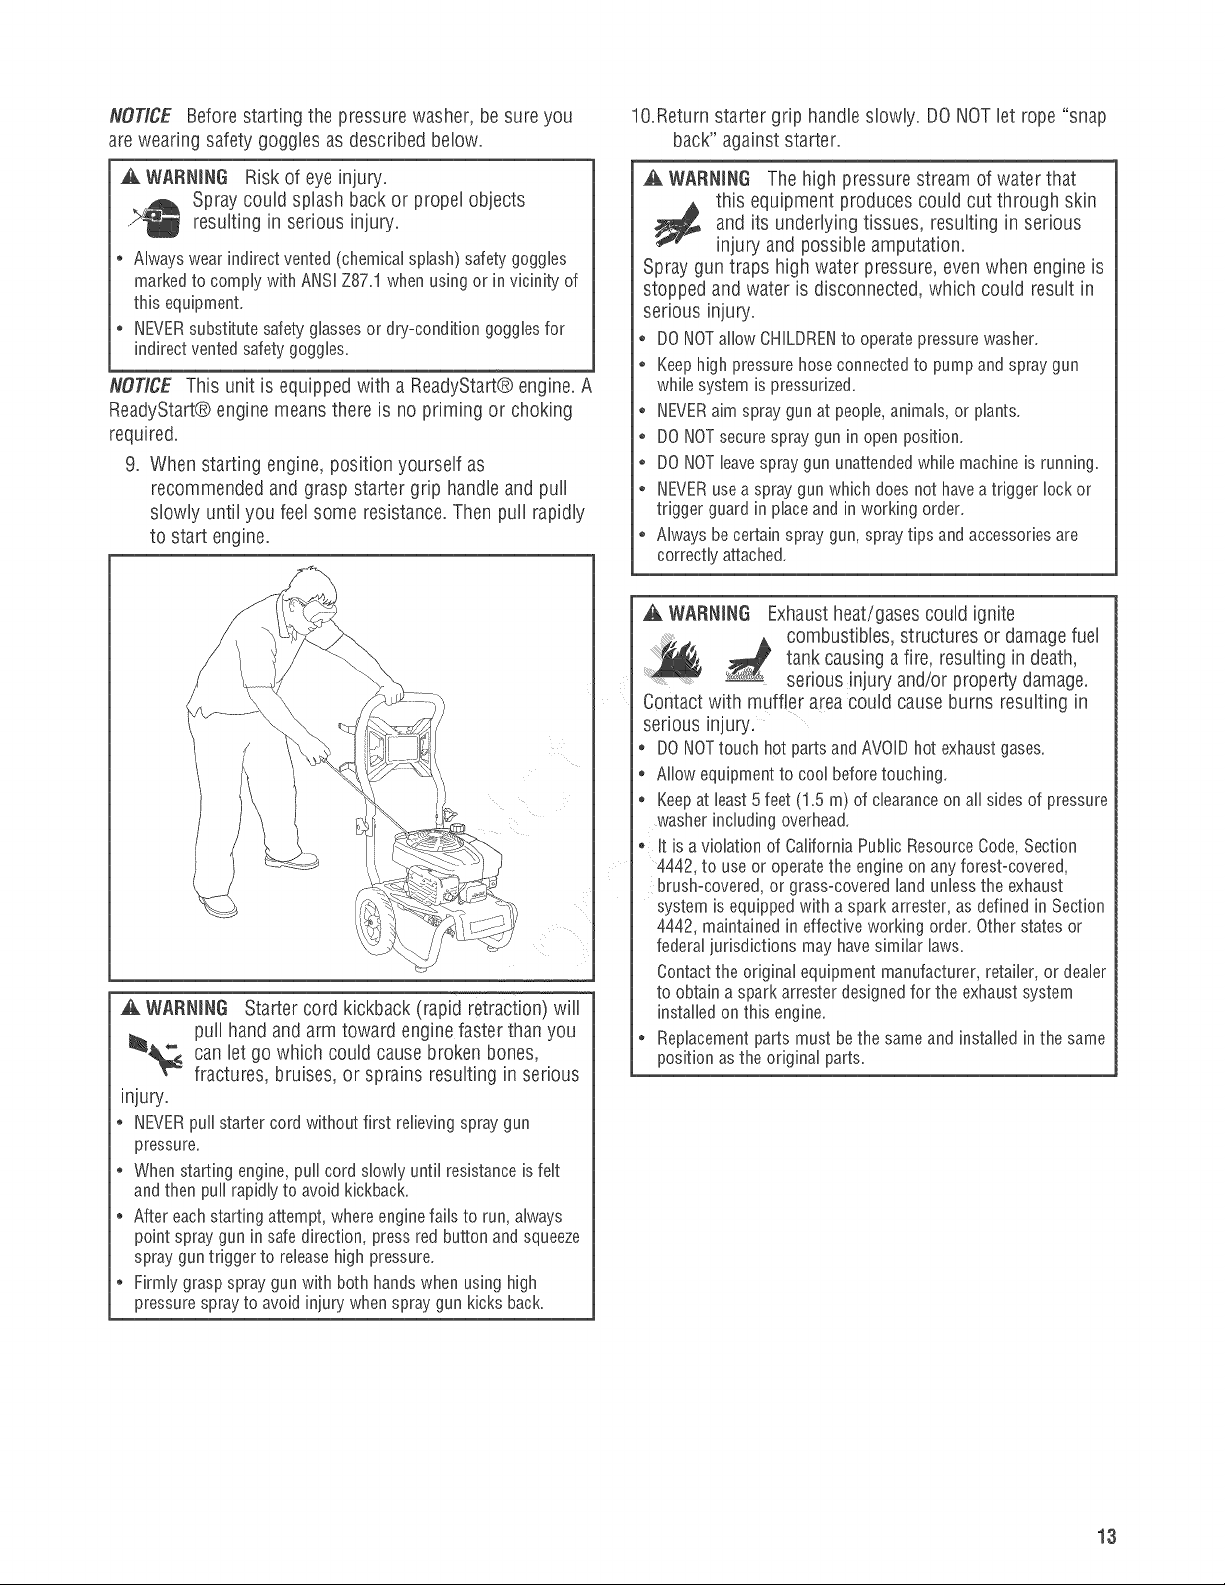
9. When starting engine, position yourself as
recommendedand grasp starter grip handb and puiI
slowly until you fed some resistance.Then puiI rapidly
to start engine.
A WARNING Starter cord kickback (rapid retraction will
pull hand and arm toward engine faster than you
_< can let go which could cause broken bones,
fractures, bruises, or sprains resulting in serious
injury.
NEVERpull starter cord without first relieving spraygun
pressure.
When starting engine, pull cord slowly until resistance isfelt
andthen pull rapidly to avoid kickback.
After each starting attempt, where enginefails to run, always
point spray gun in safe direction, pressred button andsqueeze
spray gun trigger to releasehigh pressure.
Firmly grasp spray gun with both hands when using high
pressure sprayto avoid injury when spraygun kicks back.
A WARNING The high pressure stream of waterthat
and its underlying tissues, resulting in serious
this equipment produces could cut through skin
injury andpossible amputation.
Spray gun traps high water pressure, evenwhen engine is
stopped and water is disconnected,which could result in
serious injury.
DONOTallowCHILDRENto operatepressurewasher.
Keephighpressurehoseconnectedto pumpandspraygun
whilesystemispressurized.
NEVERaimspraygunatpeople,animals,orplants.
DONOTsecuresprayguninopenposition.
DONOTleavespraygununattendedwhilemachineis running.
NEVERusea spraygunwhichdoesnothaveatriggerlockor
triggerguardinplaceandinworkingorder.
Alwaysbecertainspraygun,spraytipsandaccessoriesare
correctlyattached.
_, WARNING Exhaust heat/gases could ignite
combustibles, structures or damage fuel
tank causing a fire, resulting in death,
serious injury and/or property damage.
Contact with muffler a[ea could cause burns resulting in
serious inju%
DO NOTtouch hot parts and AVOIDhot exhaust gases.
Allow equipment to cool beforetouching.
Keepat least 5 feet (1.5 m) of clearanceon all sidesof pressure
washer including overhead.
It is aviolation of California PuNic Resource Code,Section
4442, to use or operate the engine on any forest-covered,
brush-covered, or grass-covered land unless the exhaust
system is equipped with a spark arrester, as defined in Section
4442, maintained in effective working order. Other statesor
federaljurisdictions may have similar laws.
Contactthe original equipment manufacturer, retailer, or dealer
to obtain aspark arrester designed for the exhaust system
installed on this engine.
Replacement parts must bethe same and installed in the same
position as the original parts.
13
Hew to Stop Your Pressure Washer
1. Releasespray gun trigger and let engineidle for two
minutes.
2. Push engine rockerswitch to off position (0 or OFF).
3. ALWAYSpoint gun in a safedirection andpress red
button and squeezespray gun trigger to release
retained high water pressure.
WARNING The high pressure stream of waterthat
and its underlying tissues, resulting in serious
this equipment produces could cut through skin
injury andpossible amputation.
Spray gun traps high water pressure, evenwhen engine is
stopped and water is disconnected,which could result in
serious injury.
, Keephighpressurehoseconnectedto pumpandspraygun
whilesystemispressurized.
ALWAYSpointspraygunin safedirection,pressredbutton
andsqueezesprayguntriggerto releasehighpressure,every
timeyoustopengine.
Hewte Use AccesseryTray
The unit is equipped with an accessorytray with placesto
store your spray gun, nozzleextension,high pressure hose
and quick connect spray tips.
1. Placenozzleextensionthrough hole on accessorytray,
as shown.
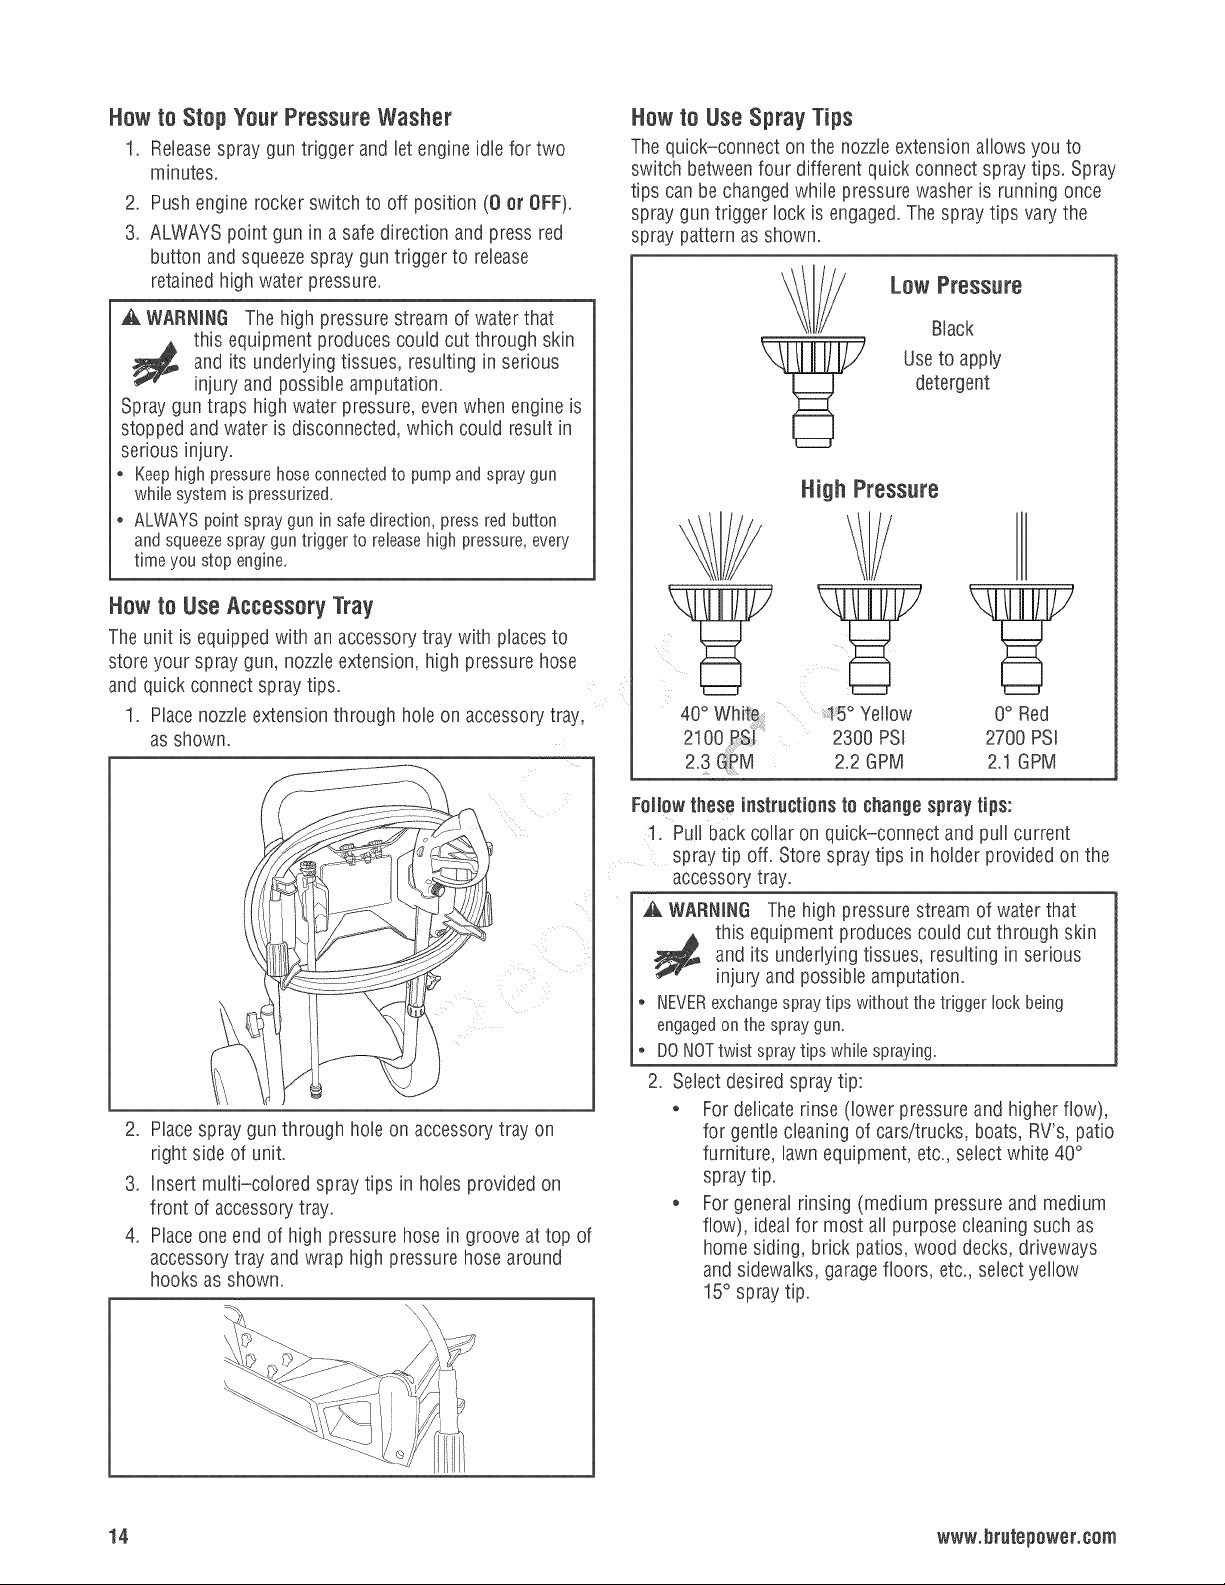
Hew te Use Spray Tips
Thequick-connect on the nozzleextensionallows you to
switch betweenfour different quick connect spray tips. Spray
tips can be changedwhile pressure washer is running once
spray gun trigger lock is engaged.Thespray tips vary the
spray pattern as shown.
Law Pressure
Black
Useto apply
detergent
High Pressure
V
q5 ° Yellow 0° Red
2300 PSI 2700 PSI
2.2 GPM 2.1 GPM
2. Placespray gun through hole on accessorytray on
right side of unit.
3. insert multi-colored spray tips in holesprovided on
front of accessorytray.
4. Placeone end of high pressure hose in groove at top of
accessorytray and wrap high pressure hosearound
hooks asshown.
Fallow these instructionsto changespray tips:
1. Pull back collar on quick-connect and puiI current
spray tip off. Store spray tips in holderprovided on the
accessorytray.
A WARNING The high pressure stream of waterthat
and its underlying tissues, resulting in serious
this equipment produces could cut through skin
injury and possibleamputation.
, NEVERexchangespraytips withoutthetrigger lock being
engagedon thespraygun.
* DONOTtwist spraytips while spraying,
2. Selectdesiredspray tip:
* For delicate rinse (lower pressure and higher flow),
for gentlecleaning of cars/trucks, boats, RV's, patio
furniture, lawn equipment, etc., selectwhite 40°
spray tip.
* For general rinsing (medium pressure and medium
flow), idealfor most all purpose cleaning such as
home siding, brick patios, wood decks, driveways
and sidewalks, garagefloors, etc., select yellow
15° spray tip.
14 www.hrutepawer.cam
o For maximum rinsing (higher pressure and lower
flow), for stubborn or hardto reach surfacesuch as
second story surfaces, paint removal,oil stains,
rust removal or other stubborn substances (tar,
gum, grease,wax, etc.), sebct red0° spraytip.
o To applydetergent, appibs project specific cbaners
to hdp breakdown stubborn dirt and grime on a
variety of surfaces, sebct Nack detergent spraytip.
.
Puffbackoncollar, insertnewspraytip and releasecollar.
Tugon spraytip to makesureit is securelyin place.
Usage Tips
o For most effective cleaning, keepspray tip from 8 to
24 inches awayfrom cleaning surface.
o if you getspray tip too close, especiallyusing a high
pressure spray tip, you may damagesurface being
cleaned.
o DONOTget closer than 6 incheswhen cleaningtires.
Cleaning and Applying Detergent
WARNING ChemicalBurn Hazard.
Chemicals could causeburns resultingin death,
serious injury, and/or property damage.
o DO NOTuse caustic liquid with pressure washer
o Use ONLY pressurewasher safe detergents/soaps, Followaii
manufacturers instructions,
4. Make sure blackdetergent spray tip is installed.
NOTICE Detergentcannot be @priedwith the high pressure
spray tips (White, Yellow or Red).
5. Makesure garden hose is connectedto water inlet.
Checkthat high pressure hoseis connectedto spray
gun and pump. Turn on water.
NOTICE You must attachall hosesbeforeyou start the
engine.
, Startingtheenginewithoutallthehosesconnectedandwithout
thewaterturnedONcoulddamagethepump.
* Damageto equipmentresultingfromfailuretofollowthis
instructionwillvoidwarranty.
6. Start enginefollowing instructions How to Start Your
Pressure Washer.
7. Apply detergentto a dry surface, starting at lower
portion of areato be washedand work upward, using
long, even,overlapping strokes.
8. Allow detergent to "soak in" for 3-5 minutes before
washing and rinsing. Reapplyas neededto prevent
surfacefrom drying. DONOTallow detergentto dry on
(prevents streaking).
NOTICE You must flush the detergent siphoning system
after eachuse by placingthe siphoning tube into a bucket of
cleanwater, then run the pressure washer in low pressure
for 1-2 minutes.
Teapply detergent, feiiew these steps:
1. Reviewuse of spray tips.
2. Preparedetergentsolution as required byjob
3. Hace end of detergent siphoning tube into detergent
container.
NOTICE Make sure the siphoning tube is fufly submerged in
detergent while applying detergent.
NOTICE Contactwith the hot muffler could damage
detergent siphoning tube.
, Wheninsertingthesiphonintoadetergentsolutionbottle,route
thetubesoasto keepitfrom inadvertentlycontactingthehot
muffler.
15
Pressure Washer Rinsing
ForRinsing:
1, Removeblack detergent spray tip from nozzle
extension.
2, Select and install desired high pressure spray tip
following instructions Now to UseSpray Tips,
3, Keepthe spray guna safedistance from the areayou
plan to spray.
WARNING Kickbackfrom spray gun could causeyou
to fall resulting in deathor serious injury.
* Operatepressurewasher from a stable surface.
* Beextremely careful if you must use the pressurewasher from
a ladder,scaffolding, or any other similar location.
Firmly grasp spray gun with both hands when using high
pressure sprayto avoid injury when spraygun kicks back.
4. Apply ahigh pressurespray to asmall area,then check
the surface for damage, if no damageis found, it is
okay to continuecleaning.
5. Start atthe top of the areato be rinsed, working down
with same overlapping strokes asyou usedfor washing
and applying detergent.
Cleaning Detergent Siphening Tube
if you usedthe detergent siphoning tube, you must flush it
with cleanwater before stopping the engine.
1. Placedetergent siphoning tube ina bucketfull of clean
water.
2. Removehigh pressure spray tip from nozzleextension.
3. Selectand install black detergent spray tip following
instructions Howto UseSpray Tips.
4. Flush for 1o2minutes.
5. Shut off enginefollowing instructions How to Stop
Pressure VVasherandturn off water supply.
6. ALWAYSpoint gun in a safe direction andpress red
button and squeezespray gun trigger to release
retained high water pressure.
A WARNIN6 The high pressure stream of water that
and its underlying tissues, resulting in serious
this equipment produces could cut through skin
injury and possibleamputation.
Spray gun traps high water pressure, evenwhen engine is
stopped and water is disconnected, which could result in
serious injury.
Keephighpressurehoseconnectedto pumpandspraygun
whilesystemispressurized.
o ALWAYSpointspraygunin safedirection,pressredbutton
andsqueezesprayguntriggerto releasehighpressure,every
timeyoustopengine,
Autemaiic Ceei Dewn System (Thermal Relief}
if you run the engineon your pressure washer for
3-5 minutes without pressingthe trigger on the spraygun,
circulating water in the pump can reachtemperatures above
125°F.The system engagesto cool the pump by discharging
the warm water onto the ground.

Maintenance
Maintenance Schedule
Follow the hourly or calendarintervals, whichever occurs
first. More frequent serviceis required when operating in
adverseconditions noted below.
o Changeengineoil
o Check/clean water inlet screen1
o Checkhigh pressurehose
o Checkdetergentsiphoning hose
o Checkspray gun and assembly for leaks
o Cleandebris
o Checkengineoil level
o Service air cleaner_
o Changeengineoff_
o Inspect muffler and spark arrestor
NOTICE Onceayear you should cleanor replacethe spark
plug, clean or replacethe air filter, and checkthe spray gun
and nozzleextension assembly for wear. A new spark plug
and cleanair filter assure proper fuel-air mixture andhelp
your enginerun betterand last longer.
Pump Oil
DONOTattempt any oil maintenanceonthis pump. The
pump is preolubricatedand sealedfrom the factory, requiring
no additional maintenancefor the life of the pump.
EmissionsControl
Maintenanee, replacement, or repair ef the emissions
control devices and systems may be performed by any
nenoroadengine repair establishment or individual.
However,to obtain "no charge" emissions control service,
the work must be performed by a factory authorized dealer.
Seethe Emissions Warranty.
Before EachUse
1, Checkengineoil level,
2, Cleandebris,
3. Checkwater inlet screen for damage.
4. Check
5. Check
6, Check
7, Rinseout gardenhose to flush out debris.
high pressure hosefor leaks,
detergentsiphoning tube for damage,
spray gun and nozzleextension assemblyfor
leaks
o Service spark plug
o Air cooling system_
1 Clean if clogged. Replace if perforated or torn.
z Service more often under dirty or dusty conditions.
General Recommendations
Regular maintenancewill improve the performance and
extendthe life of the pressurewasher. Seeany qualified
dealerfor service.
The pressurewasher's warranty does not cover items that
havebeen subjected to operator abuse or negligence.To
receivefull value from the warranty, the operator must
maintain the pressurewasher as instructed in this manual,
including proper storage as detailedin Winter Storage and
Long TermStorage.
HOTICE Should you havequestions about replacing
components on your pressure washer, pleasecall
(800) 743-4115 for assistance.
Someadjustments will needto be made periodically to
properly maintainyour pressure washer.
All serviceand adjustments should be made at bast once
eachseason.Follow the requirementsin the Maintenance
Schedulechart above.
PressureWasher i_aintenance
Clean Debris
Daily or beforeuse. cleanaccumulated debris from pressure
washer. Keeplinkage, spring and controls clean. Keeparea
around and behind muffler free from any combustible debris.
inspect cooling air slots and openings on the pressure
washer.These openings must be kept cleanand
unobstructed.
pressure washer parts should be kept clean to reducethe
risk of overheatingand ignition of accumulated debris.
o Use a damp cloth to wipe exteriorsurfaces clean.
HOTICE improper treatment of pressure washer could
damageit and shorten its life.
o DONOTinsertanyobjectsthroughcoolingslots,
o Use a soft bristle brush to loosen cakedon dirt, oil, etc.
o Use a vacuum cleanerto pick up loose dirt and debris.
Cheekand Clean Inlet Screen
Examinethe screen on the pump's water inlet. Cleanit ifthe
screen is dogged or replaceit if screen is damaged.
17
 Loading...