

Briggs & Stratton 020514-00 Owner’s Manual
Pressure
r
rator's
I
This pressure washer is rated in accordance to the Pressure Washer Manufacturers Association
(PWMA) standard PWI01 (Testing and Rating Performance of PressureWashers).
BRIGGS& STRATTONPOWERPRODUCTSGROUP,LLC
MILWAUKEE, WISCONSIN, U.S.A.
Manual No. 315996G3 Revision -
Thankyou for purchasing this quality-built Briggs & Stratton@ pressurewasher. We are pleasedthat you've placedyour
confidence inthe BRUTFMbrand. When operated and maintained accordingto the instructions in this manual,your Briggs &
Stratton pressurewasherwill provide many years of dependableservice.
This manual contains safety information to makeyou awareof the hazardsand risks associatedwith pressure washersand
how to avoid them. BecauseBriggs & Stratton does not necessarilyknow all the applications this pressure washercould be
usedfor, it is important that you readand understand these instructions thoroughly before attemptingto start or operatethis
equipment. Savethese original instructionsfar future reference.
This pressure washer requiresfinal assembly before use. Referto the Assemblysection of this manual for instructions on
final assemblyprocedures. Follow the instructions completely.
Where to Find Us
You never haveto look far to find Briggs & Stratton support and servicefor your pressure washer. Consult your Yellow Pages.
Thereare over 30,000 Briggs & Stratton authorized servicedealersworldwide who provide quality service.You canalso
contact Briggs & Stratton Customer Serviceby phone at (800) 743o4115,or on the Internet at BRIGGSandSTRATTON.COM.
Forengine relatedquestions, call American HondaMotor Company, inc. at (888) 426o7701or visit www.handa-engines.cam
for a dealerIocator.
Pressure Washer
Model Number
Revision
Serial Number
Date Purchased
L
Copyright © 2012. Briggs & Stratton PowerProducts Group, LLC
Milwaukee, Wl, USA.All rights reserved.
BRUTFMis a trademark
of Briggs & Stratton Power Products, LLC
Milwaukee, Wl, USA
2 www.brutepawer.cam
Table of Contents
Assembly ..................................... 7
Unpack PressureWasher....................................... 7
Attach Handleand Accessory Tray ............................... 7
Add Engine Oil and Fuel........................................ 8
Lubricate O-Rings ............................................ 8
Connect HoseandWater Supply to Pump.......................... 9
Operation .................................... 11
PressureWasher Location..................................... 11
How to Start Your PressureWasher ............................. 11
How to Stop Your PressureWasher ............................. 12
How to UseAccessory Tray.................................... 12
How to Use SprayTips ....................................... 13
Applying Detergent .......................................... 13
PressureWasher Rinsing ..................................... 14
CleaningDetergent Siphoning Tube.............................. 14
Automatic Cool Down System IThermal ReHefl..................... 14
Maintenance .................................. 1,5
PressureWasher Maintenance ................................ 15
Engine Maintenance.......................................... 17
After EachUse.............................................. 17
Winter Storage.............................................. 18
Long Term Storage .......................................... 18
Warranty ..................................... 20
PressureWasher OwnerWarranty............................... 20
Specifications ................................. 22
Product Specifications........................................ 22
Common ServiceParts ....................................... 22
Espafiol
OperatorSafety
Mmportant Safety Mnformation
Equipment Description
Read this ITlanuaJ carefuJJy and became familiar
with yourpressurewasher. Knowits applications,
its Jinlitatians,and any hazardsiflvaJved.
This pressurewasher operatesat a max of 2,600 PSi
(179.2 BARS)and a flow rateof up to 2.3 gallons per minute
(8.7 liters per minute). This high quality residential system
features 10" (25.4 cm) wheels,axial cam pump with
stainless steel pistons, automatic cool down system,
detergent siphoning system, nozzleextension with quick
connect fitting, a variety of spraytips, heavyduty 25' (7.6 m)
hose, and more.
Everyeffort has been madeto ensurethat information in this
manual is accurate and current. However,we reservethe
right to change,alter, or otherwise improve the product and
this document at any time without prior notice.
The EmissionControl System for this pressure washer is
warranted for standards setby the Environmental Protection
Agency andthe CaliforniaAir ResourcesBoard.
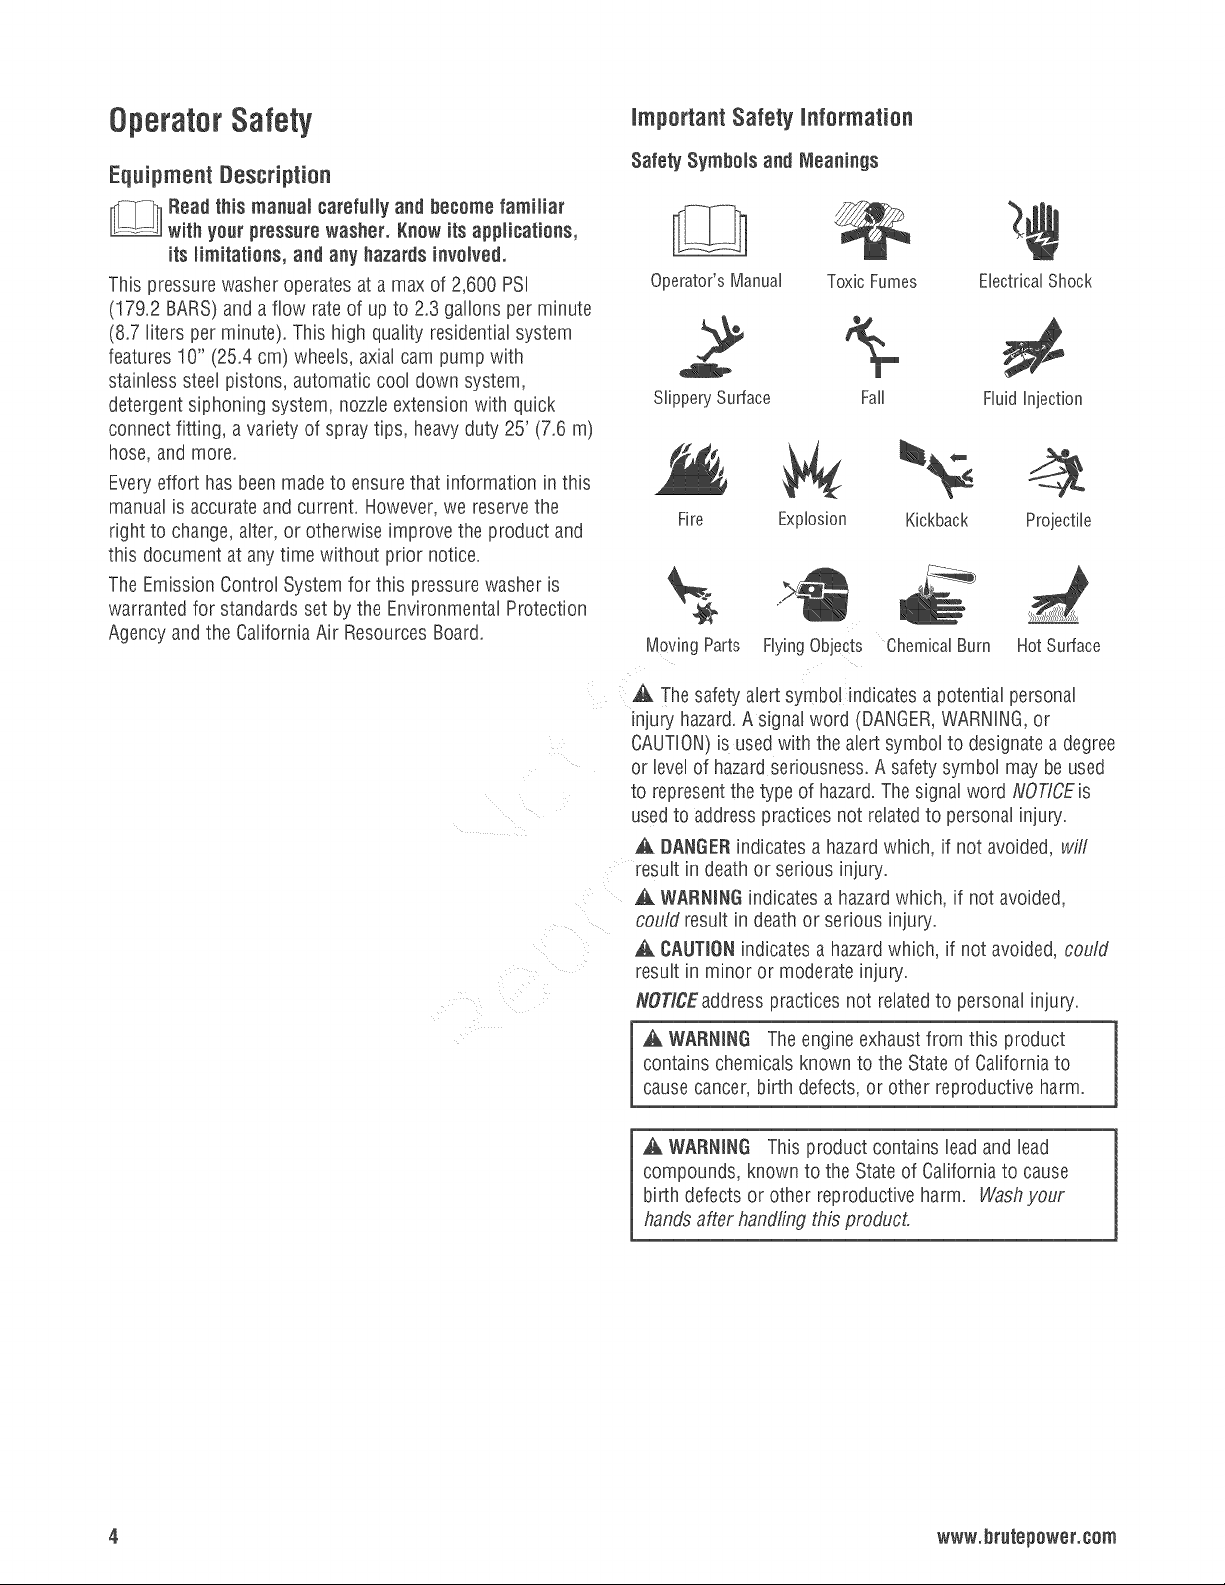
SafetySymbaisandMeanings
Operator'sManual
SlipperySurface
Fire Kickback Projectile
Moving Parts Flying Objects ChemicalBurn Hot Surface
A Thesafetyalert symbol indicates a potential personal
injury hazard.Asignal word (DANGER,WARNING,or
CAUTION)is usedwith the alert symbol to designatea degree
or levelof hazardseriousness. Asafety symbol may be used
to representthe type of hazard.Thesignal word NOT/CEis
usedto addresspractices not relatedto personalinjury.
A DANGERindicatesa hazardwhich, if not avoided, wiii
result in death or serious injury.
_]_WARNENGindicatesa hazardwhich, if not avoided,
couid result in death or serious injury.
A CAUTJ0Nindicates a hazardwhich, if not avoided, cou/d
result in minor or moderate injury.
NOTICEaddress practices not relatedto personal injury.
Toxic Fumes
Fall
Explosion
ElectricalShock
Fluid injection
A WARNING The engine exhaustfrom this product
contains chemicalsknown to the Stateof Californiato
cause cancer,birth defects, or other reproductive harm.
A WARNING This product contains leadand lead
compounds, known to the State of Californiato cause
birth defectsor other reproductive harm. V@shyour
hands afterhandling t,_£ product.
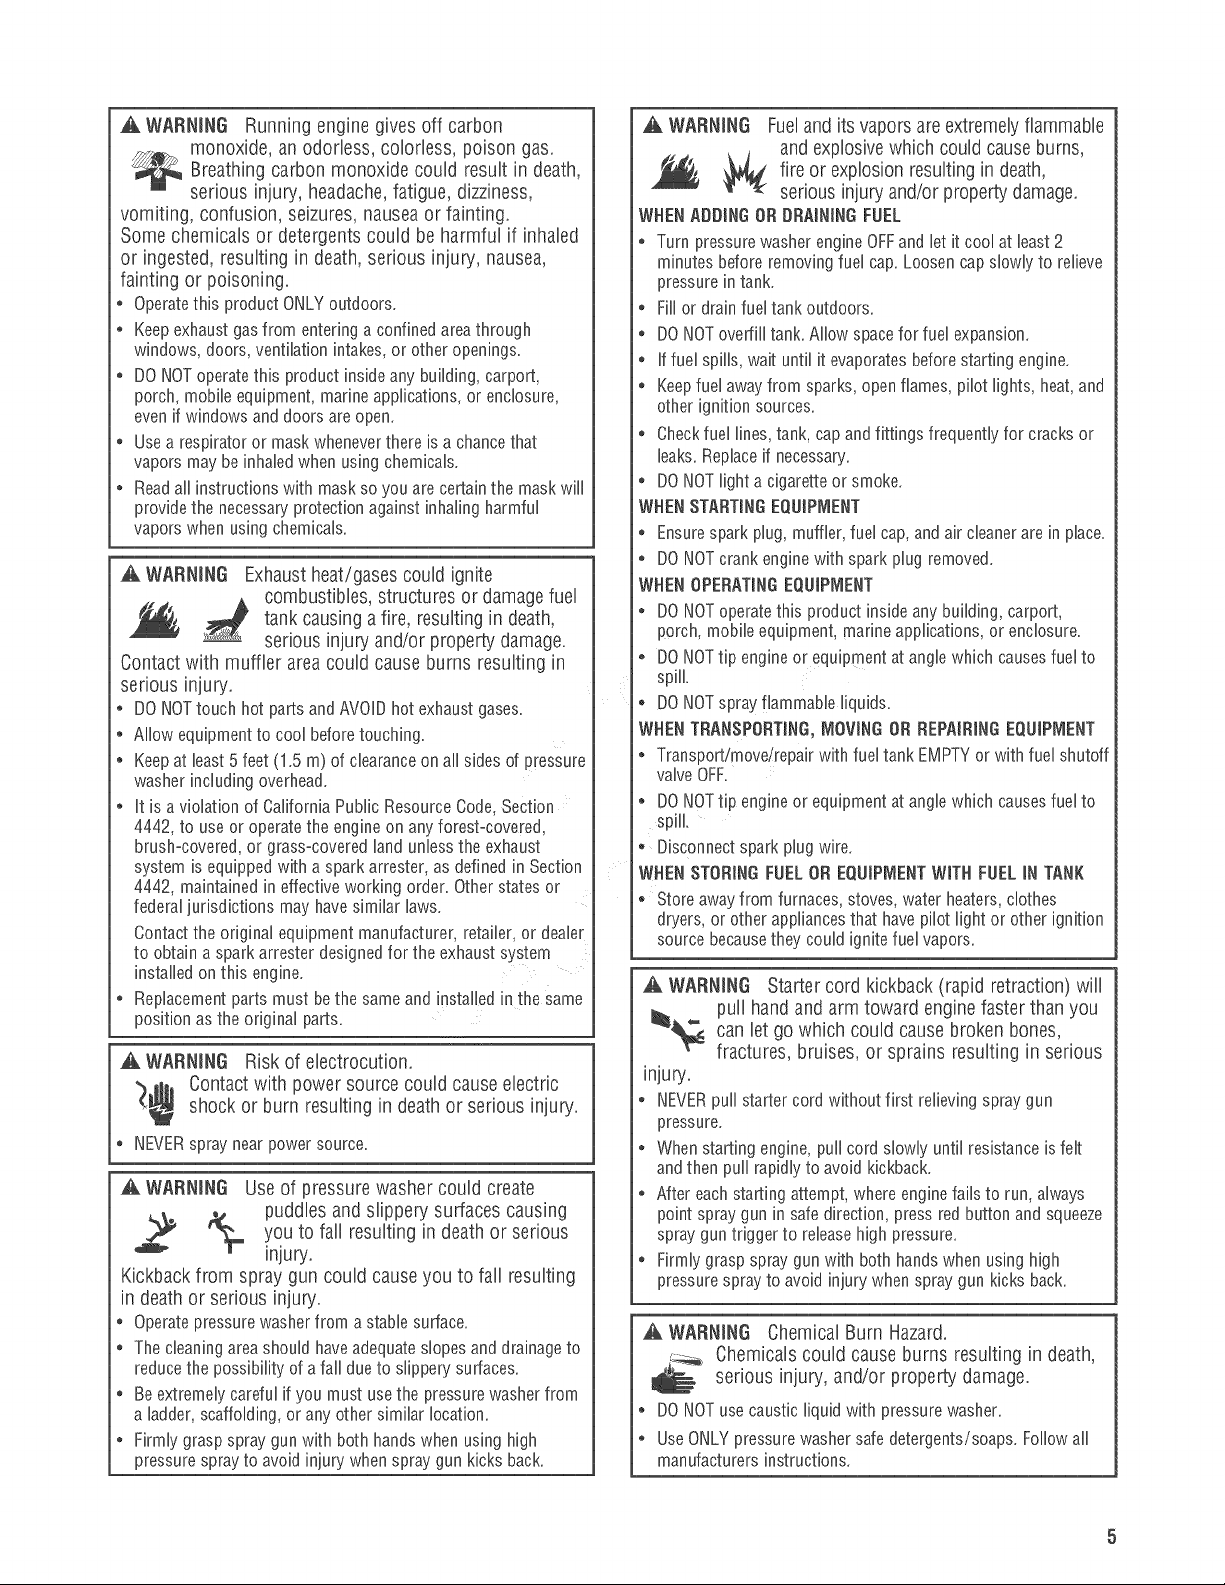
WARNING Running engine gives off carbon
monoxide, an odorless, colorless, poison gas.
Breathing carbon monoxide could result in death,
serious injury, headache, fatigue, dizziness,
vomiting, confusion, seizures, nausea or fainting.
Some chemicals or detergents could be harmful if inhaled
or ingested, resulting in death, serious injury, nausea,
fainting or poisoning.
* Operatethis product ONLYoutdoors.
* Keepexhaustgas from entering a confined areathrough
windows, doors, ventilation intakes, or other openings.
* DONOToperatethis product insideany building, carport,
porch, mobile equipment, marine applications, or enclosure,
evenif windows anddoors areopen.
* Usea respirator or maskwheneverthere is a chancethat
vapors may beinhaled when using chemicals.
* Readall instructions with mask so you arecertain the mask will
provide the necessaryprotection against inhaling harmful
vapors when using chemicals.
A WARNING Exhaust heat/gases could ignite
combustibles, structures or damage fuel
tank causing a fire, resulting in death,
serious injury and/or property damage.
Contact with muffler area could cause burns resulting in
serious injury.
, DO NOTtouch hot parts and AVOID hot exhaust gases.
* Allow equipment to cool beforetouching.
* Keepat least5 feet (1.5 m) of clearanceon all sidesof pressure
washer including overhead.
* It is aviolation of California Public Resource Code,Section
4442, to use or operate the engineon anyforest-covered,
brush-covered, or grass-covered land unlessthe exhaust
system is equipped with aspark arrester, as defined inSection
4442, maintained in effective working order. Other states or
federal jurisdictions may have similar laws.
Contactthe original equipment manufacturer, retailer, or dealer
to obtain a sparkarrester designed for the exhaust system
installed on this engine.
* Replacementparts must bethe same and installed inthe Same
position as the original parts.
A WARNING Riskof electrocution.
Contactwith power source could causeelectric
shock or burn resulting in death or serious injury.
,, NEVERspray near power source.
A WARNING Use of pressure washer could create
puddles and slippery surfaces causing
"t.. youto oso,tin0in so ioos
Injury.
Kickback from spray gun could cause you to fall resulting
in death or serious injury.
, Operatepressurewasher from a stablesurface.
* Thecleaning areashould haveadequateslopes and drainageto
reducethe possibility of a fall due to slippery surfaces.
* Beextremely careful if you must usethe pressurewasher from
a ladder,scaffolding, or any other similar location.
* Firmly grasp spray gunwith both hands when using high
pressure sprayto avoid injury when spray gun kicks back.
A WARNING Fuel and its vapors are extremely flammable
and explosive which could cause burns,
fire or explosion resulting in death,
serious injury and/or property damage.
WHENADDING ORDRNNING FUEL
. Turn pressurewasher engineOFFand let it cool at least 2
minutes before removingfuel cap. Loosen cap slowly to relieve
pressure in tank.
* Fillor drain fuel tank outdoors.
* DONOT overfill tank. Allow spacefor fuel expansion.
* If fuel spills, wait until it evaporatesbefore starting engine.
* Keepfuel awayfrom sparks, open flames, pilot lights, heat,and
other ignition sources.
* Checkfuel lines,tank, cap andfittings frequently for cracks or
leaks. Replaceif necessary.
* DONOT light a cigaretteor smoke.
WHENSTARTINGEQUIPMENT
* Ensurespark plug, muffler,fuel cap,and air cleanerare in place.
* DONOTcrank enginewith spark plugremoved.
WHENOPERATINGEQUIPMENT
* DONOToperatethis product inside any building, carport,
porch, mobile equipment, marine applications, or enclosure.
DONOTtip engine or equipment at anglewhich causes fuel to
spill.
, DONOTsprayflammabb liquids.
WHENTRANSPORTBNG,MOVING OR REPAIMNG EQUIPMENT
* Transportimovdrepair with fuel tank EMPTYor with fuel shutoff
valveOFF.
* DONOTtip engine or equipmentat anglewhich causes fuel to
spill.
o Disconnectspark plug wire.
WHENSTORINGFUELOR EQUIPMENTWITH FUEL iN TANK
Store awayfrom furnaces, stoves, water heaters,clothes
dryers, or otherappliancesthat havepilot light or other ignition
source becausethey could ignite fuel vapors.
,a, WARNING Starter cord kickback (rapid retraction) will
_, pull hand and arm toward engine faster than you
can let go which could cause broken bones,
fractures, bruises, or sprains resulting in serious
injury.
. NEVERpull starter cord without first relieving spraygun
pressure.
* When starting engine, pull cord slowly until resistance isfelt
andthen pull rapidly to avoid kickback.
* After eachstarting attempt, where enginefails to run, always
point spray gun in safedirection, press red button and squeeze
spray guntrigger to releasehigh pressure.
* Firmly grasp spray gun with both hands when using high
pressure sprayto avoid injury when spray gun kicks back.
,a, WARNING ChemicalBurn Hazard.
Chemicals could cause burns resulting in death,
serious injury, and/or property damage.
* DONOTuse caustic liquid with pressure washer.
* UseONLYpressurewasher safe detergents/soaps. Followall
manufacturers instructions.

WARNING The high pressure stream of water that
_, his equipment produces could cut through skin
Spray gun traps high water pressure, even when engine is
stopped and water is disconnected, which could result in
serious injury.
. if cut by fluid, call physicianimmediately. DONOTtreat as a
* DONOT allow CHILDRENto operate pressure washer.
* NEVERrepairhigh pressure hose.Replaceit.
* NEVERrepairleakingconnections with sealantof any kind.
* NEVERconnect high pressure hose to nozzleextension.
* Keephigh pressure hose connectedto pump and spraygun
* ALWAYS point spray gun in safedirection, press red button
* NEVERaim spray gun at people,animals, or plants.
* DONOTsecure spraygun in open position.
* DONOTleavespray gun unattendedwhile machine is running.
* NEVERusea spray gun which does not have a trigger lock or
* Always be certain spray gun, nozzlesand accessoriesare
and its underlying tissues, resulting in serious
injury and possible amputation.
simple cut.
Replaceo-ring or seal.
while system is pressurized.
andsqueezespray gun trigger to releasehigh pressure, every
time you stop engine.
trigger guardin placeand in working order.
correctly attached.
A WARNING Unintentionalsparking could causefire or
electric shock resulting n death or
serious injury.
WRENADJUSTINGOR MAKING REPAIRSTO YOURPRESSURE
WASHER
* Disconnectthe spark plug wire from the spark plugand place
the wire where it cannot contact spark plug_
WHENTESTINGFORENGINESPARK
Use approvedspark plug tester.
, DONOTcheckfor sparkwith spark plugremoved.
A WARNING Starter and other rotating parts could
resulting in serious injury.
entangle hands, hair, clothing, or accessories
NEVERoperatepressure washerwithout protective housing or
covers.
° DONOTwear looseclothing, jewelry or anything that could be
caught in the starter or other rotating parts.
° Tieup long hairand remove jewdry.
,a, WARNING Risk of eyeor bodily injury.
Spraycould splash back or propel
objects resulting in serious injury.
* Alwayswear indirect vented(chemicalsplash) safety goggles
markedto comply with ANSi Z8X1 when using or in vicinity of
this equipment.
* NEVERsubstitute safety glasses or dry-condition goggles for
indirect vented safety goggles.
* Alwayswear protectiveclothing such asa long-sleeved shirt,
long pantsand close-toed shoes.
* NEVERoperate pressure washerwhen barefootor wearing
sandalsor shorts.
A CAUTION Excessively high operating speeds could
result in minor injury and/or pressure washer damage.
Excessively low speeds impose a heavy Ioa&
, DO NOTtamper with governor spring, links or other parts to
increase enginespeed. Pressurewasher supplies correct rated
pressure and flow when running at governed speed.
* DONOTmodify pressure washer in any way.
NOTICE High pressurespraycould damagefragile items
including glass.....
DONOTpointspraygunatglasswhenusingred(0°)spraytip.
, NEVERaimspraygunatplants.
NOTICE mproper treatment of pressure washer could
damage it and shorten its life.
,, if you havequestions about intended use,ask dealeror contact
qualified service center.
* NEVERoperate units with brokenor missing parts, or without
protective housing or covers.
* DONOTby-pass any safety device on this machine.
* DONOTtamper with governed spee&
* DONOT operate pressurewasher above ratedpressure.
* DONOT modify pressurewasher in any way.
* Beforestarting pressure washer in cold weather,check all parts of
the equipment to be sure ice has not formed there.
* NEVERmove machine by pulling on hoses. Use handleprovided
on uniL
* Thisequipment is designedto be usedwith Briggs & Stratton
Power Products authorized parts ONLY.if equipment is used with
parts that DONOTcomply with minimum specifications, user
assumesall risks andliabilities.

Your pressure washer requires some assembly and is ready
for useafter it has beenproperly serviced with the
recommendedoil and fuek
if you have anyproblems with the assemblyof your pressure
washer, pleasecall the pressurewasher helpline at
(800) 743-4115. if calling for assistance, please havethe
model, revision, and serial number from the identification
label available,
Attach Handle and Accessory Tray
1, Placehandle(A) onto handle supports (B) connectedto
main unit, Makesure hobs (C) in handle align with
hobs (C) on handlesupports,
UnpackPressureWasher
1, Removethe parts bag, accessories, and inserts
included with pressure washer.
2, OpencaCLoncompletely by cutting each corner from
top to bottom,
3, Ensureyou have all included items prior to assembly,
items in the carton include:
o Main Unit
o Handle
o High Pressure Hose
o Spray Gun
o NozzleExtensionwith Quick ConnectFitting
o Plastic AccessoryTray
o Oil Bottle
o Parts Bag(which includesthe following):
o Operator's Manual
o Owner's RegistrationCard
o Bag of 4 Multi-Colored Quick ConnectSpray Tips
o Handle/AccessoryTray FasteningHardwareKit
(which includes):
o CarriageBolts (2)
o Plastic Knobs (2)
o TreeClips (4)
To prepareyourpressurewasher for operation, youwiii
need to performthese tasks:
1, Fill out and send in registration card,
2. Attach handle and accessory tray to main uniL
3, Add oil to engine crankcase,
4, Add fuel to fuel tank,
5. Connect high pressure hose to spray gun and pump,
6, Connect water supply to pump,
7, Attach nozzleextensionto spray gun,
8, Select/attachquick connect spray tip to nozzle
extension,
,
insert handlecarriage bolts (D) through hobs from
inside of unit and attacha plastic knob (E)from outside
of unit,Tighten by hand, By loosening both knobsto
the middle section of the attachment bolt, the upper
handle canfold forward to store fiat atopthe cold
engine,
/
NOTICE DONOTfold handle down while the engineis hot.
3. Place accessorytray (F) over hobs (G) on handle
(viewing from back of unit), Pushthe tree clips (H) into
the hobs until they sit fiat against the accessorytray,
//
,
insert supplied accessoriesin spacesprovided in
accessorytray. See How to UseAccessory Tray,
Add Engine Oil and Fuel
* Place pressure washer on a level surface.
NOTICE Any attemptto crank or start the engine before it
has beenproperlyfilled with the recommended oil will
result in equipment failure.
• Referto enginemanualfor oilandfuelfill information.
• Damagetoequipmentresultingfrom failuretofollowthis
instructionwillvoidwarranty.
* Referto engine operator's manualand follow oil and
fuel recommendations and instructions.
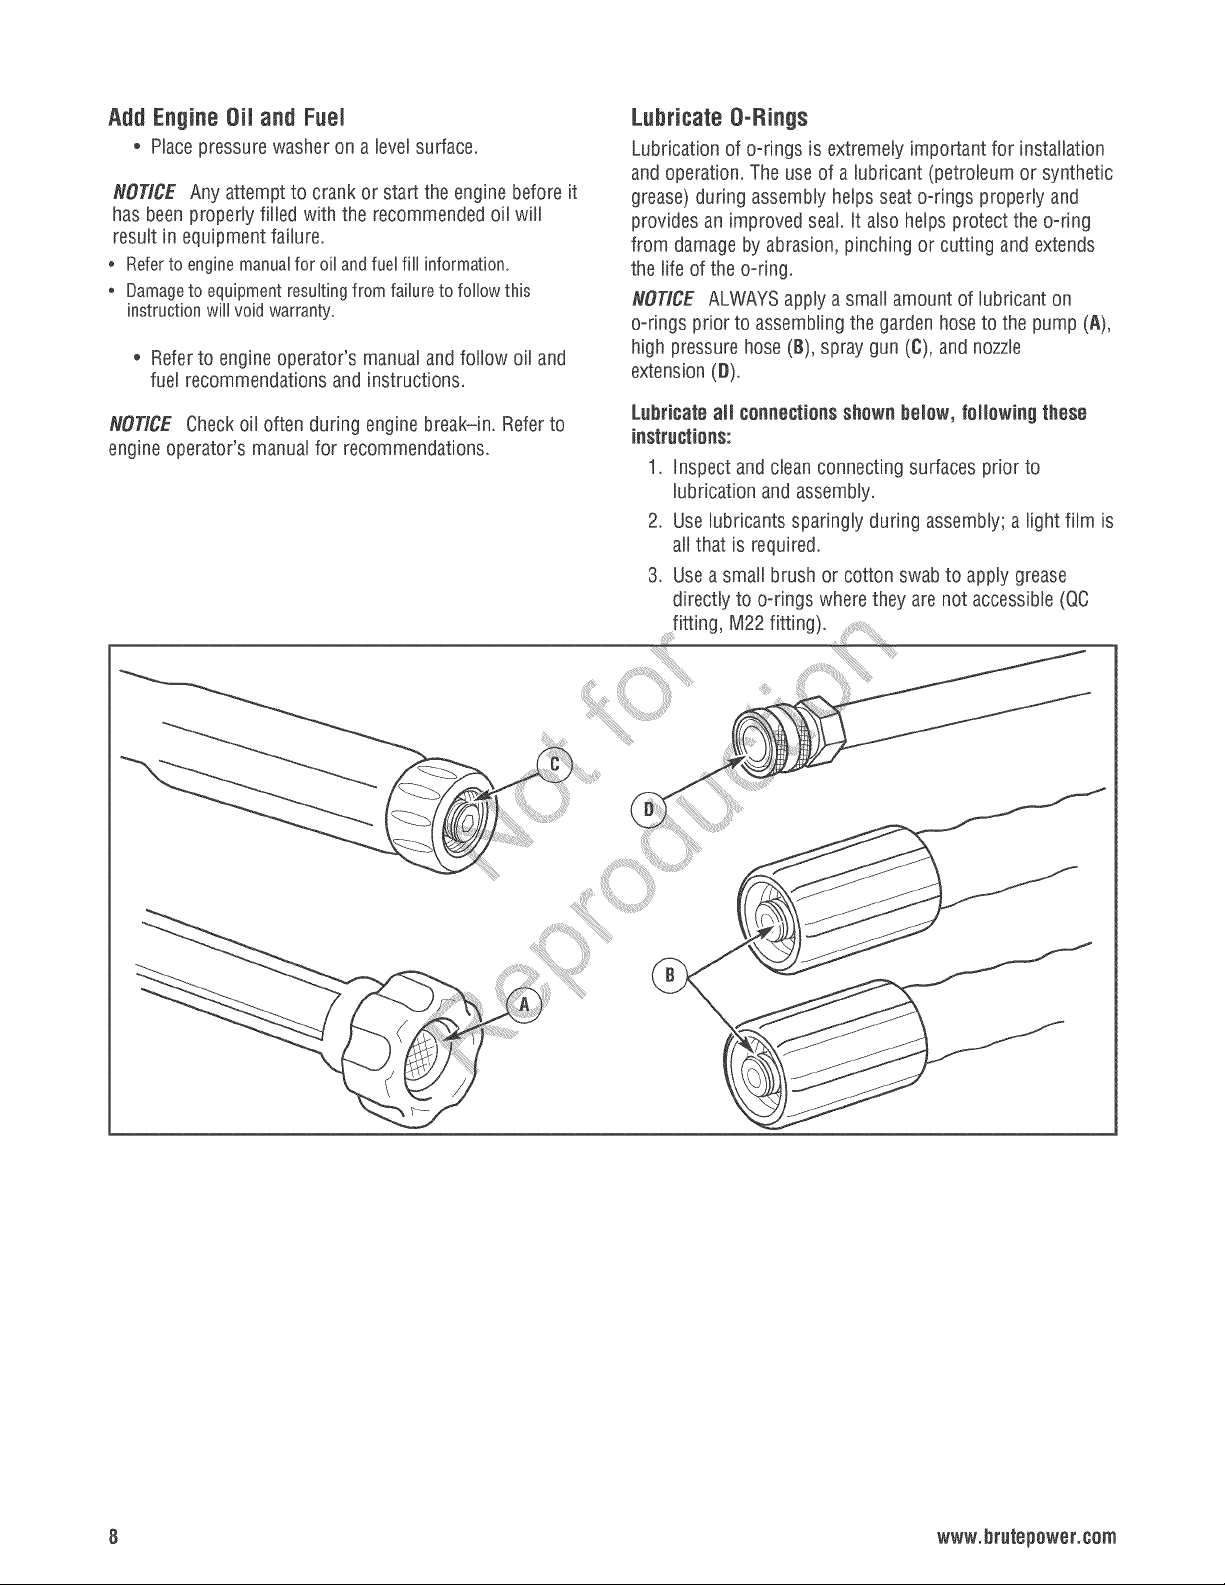
Lubricate O-Rings
Lubrication of o-rings is extremely important for installation
and operation. The useof a lubricant (petroleum or synthetic
grease)during assembly helpsseat o-rings properly and
provides an improved seal. it also helps protect the o-ring
from damageby abrasion,pinching or cutting and extends
the life of the o-ring.
NOTfCE ALWAYSapply a small amount of lubricant on
o-rings priorto assemblingthe garden hose to the pump (A),
high pressure hose (B), spraygun (C), and nozzle
extension(D).
NOTfCE Checkoil oftenduring engine break-in. Referto
engine operator's manualfor recommendations.
Lubricateall cennectiens shewnbelew, feiiewing these
instru;tions:
1. Inspect and clean connecting surfaces prior to
lubrication and assembly.
2. Use lubricants sparingly during assembly; a light film is
all that is required.
3. Use a small brush or cotton swabto apply grease
directly to o-rings wherethey are not accessible(QC
fitting, M22 fitting).
8 www.brutepewer.eem
Connect Hose and Water Supply to Pump
NOTICE DONOTrun the pump without the water supply
connectedand turned on.
, Damagetoequipmentresultingfrom failuretofollowthis
instructionwillvoidwarranty.
NOTICE Removeand discardthe shipping caps from the
pump's high pressure outlet and water inlet before attaching
hoses.
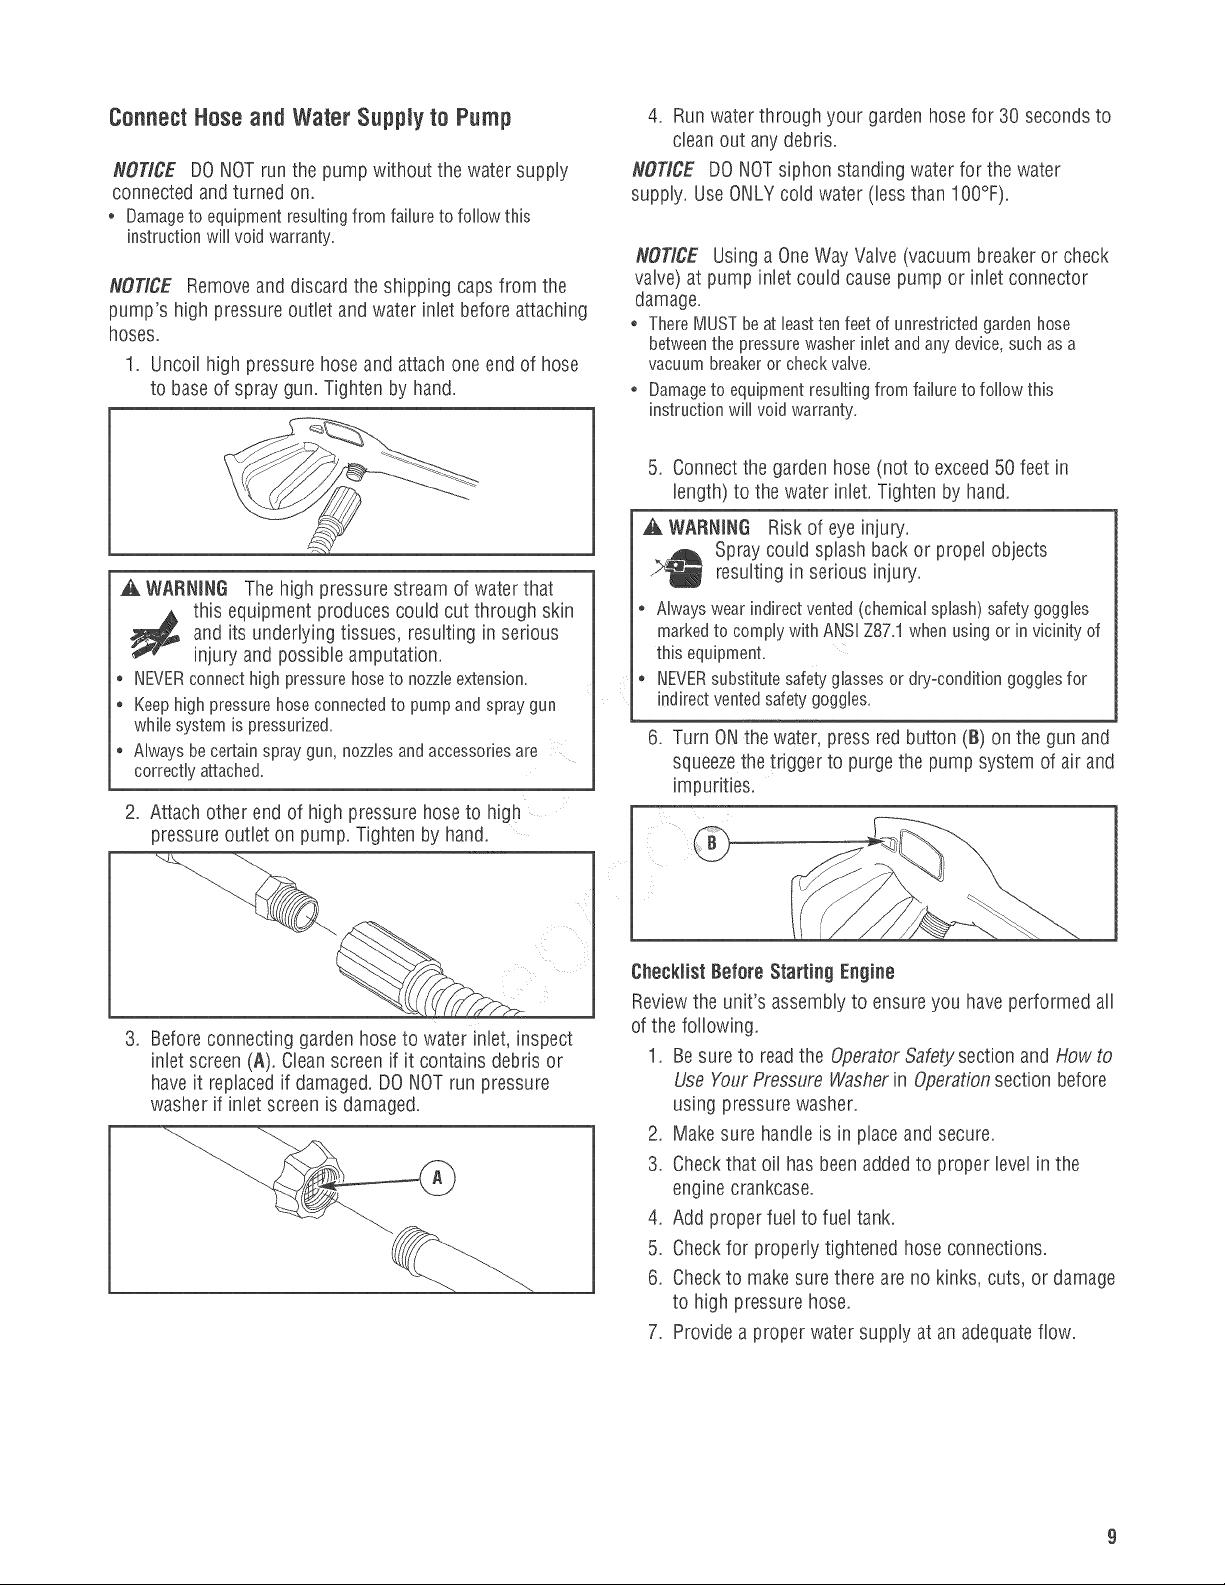
1. Uncoil high pressure hoseand attach one end of hose
to baseof spray gun. Tighten by hand.
WARNING The high pressure stream of waterthat
this equipment produces could cutthrough skin
and its underlying tissues, resulting in serious
injury and possible amputation.
NEVERconnecthighpressurehoseto nozzleextension.
Keephighpressurehoseconnectedto pumpandspraygun
whilesystemispressurized.
Alwaysbecertainspraygun,nozzlesandaccessoriesare .......
correctlyattached.
2. Attach other endof high pressure hoseto high
pressure outlet on pump. Tighten by hand.
4. Run water through your garden hosefor 30 secondsto
cleanout anydebris.
NOTICE DONOTsiphon standing water for the water
supply. UseONLYcold water (less than 100%).
NOTICE Using a OneWayValve (vacuum breakeror check
valve) at pump inlet could cause pump or inlet connector
damage.
ThereMUSTbeatleasttenfeetof unrestrictedgardenhose
betweenthe pressurewasherinletandanydevice,suchasa
vacuumbreakeror checkvalve.
* Damageto equipment resulting from failure to follow this
instruction will void warranty.
5. Connectthe garden hose (not to exceed50 feet in
length) to the water inlet. Tighten by hand.
A WARNING Riskof eyeinjury.
Spray could splash back or propel objects
resulting in serious injury.
* Alwayswear indirect vented(chemicalsplash) safety goggles
markedto comply with ANSi Z87.1 when using or in vicinity of
this equipment.
* NEVERsubstitute safety glasses or dry-condition goggles for
indirect vented safety goggles.
6. Turn ONthe water, press red button (B) onthe gun and
squeezethetrigger to purgethe pump system of air and
impurities.
,
Beforeconnecting garden hoseto water inlet, inspect
inlet screen(A). Cleanscreen if it contains debris or
haveit replacedif damaged.DONOTrun pressure
washer if inlet screenis damaged.
Checklist Befere Starting Engine
Reviewthe unit's assemblyto ensureyou haveperformed all
of the following.
1. Be sureto readthe OperatorSafetysection and Howto
Use Your Pressure Washerin Operationsection before
using pressurewasher.
2. Make sure handle is in placeand secure.
3. Checkthat oil hasbeen addedto proper levelin the
engine crankcase.
4. Add proper fuel to fuel tank.
5. Checkfor properly tightened hose connections.
6. Checkto make sure there are no kinks,cuts, or damage
to high pressure hose.
7. Provide aproper water supply at anadequateflow.

Featuresand Controts
Readthis Operatar's Manual and safety rules before operating yaur pressurewasher.
Comparethe illustrations with your pressure washer, to familiarizeyourself with the locations of various controls and
adjustments. Savethis manual for future reference.
A oSpray Tips -- Detergent,0°, 15° and 40°: for various
high pressure cleaning applications.
B o Nigh Pressare Outlet -- Connection for high pressure
hose.
Co 0il Fill/Dipstick -- Checkand addengine oil here.
D oWater Inlet -- Connectionfor garden hose.
E oPump-- Develops high pressure.
F oAutamatic Cad DawnSystem -- Cycleswater through
pump whenwater reaches125°-155°F (51°-68°C)_Warm
water will dischargefrom pump onto ground. This system
preventsinternal pump damage.
I_oDetergent Sipl_aningTube -- Useto siphon pressure
washer safe detergents into the low pressure stream.
N oAir Filter -- Protects engine by filtering dust and debris
out of intake air.
3 oRecall Starter -- Usedfor starling the engine manually.
1(oFuel Tank -- Fill tank with regular unleadedfuel. Always
leaveroom for fuel expansion.
IVloNazzie Extensian with Quick Canned -- Allows you to
switch betweenfour different spray tips.
N oSprayGun-- Controlsthe applicationof water onto
cleaningsurface with trigger device.Includestrigger IocL
P o High Pressure Nasa -- Connect one end to water pump
andthe other end to spray gun.
R oAccessaryTray -- Providesconvenient storage for
standard and optional accessories,such as brushes,
turbo wands,etc.
items Nat Shawn:
Identificatian Label(near rear of base plate}-- Provides
model and serial number of pressure washer. Pleasehave
these readily availableif calling for assistance.
Warning/0perating Instrudians Tag- identifies hazards
and proper procedure to sta@/stoppressure washer.
ifyouhaveanyproblemsoperatingyourpressurewasher,
pleasecallthepressurewasherhelplineat(800)743-4115.
Pressure Washer Lecatien
Ciearanees and Air Mevement
_k WARNING Exhaustheat/gasescould ignite
combustibles, structuresor damagefuel tank
causing afire, resultingin death,serious injury
and/or propertydamage.
, Keepat least5 ft. (1.5m) clearanceonall sidesof pressure
washerincludingoverhead.
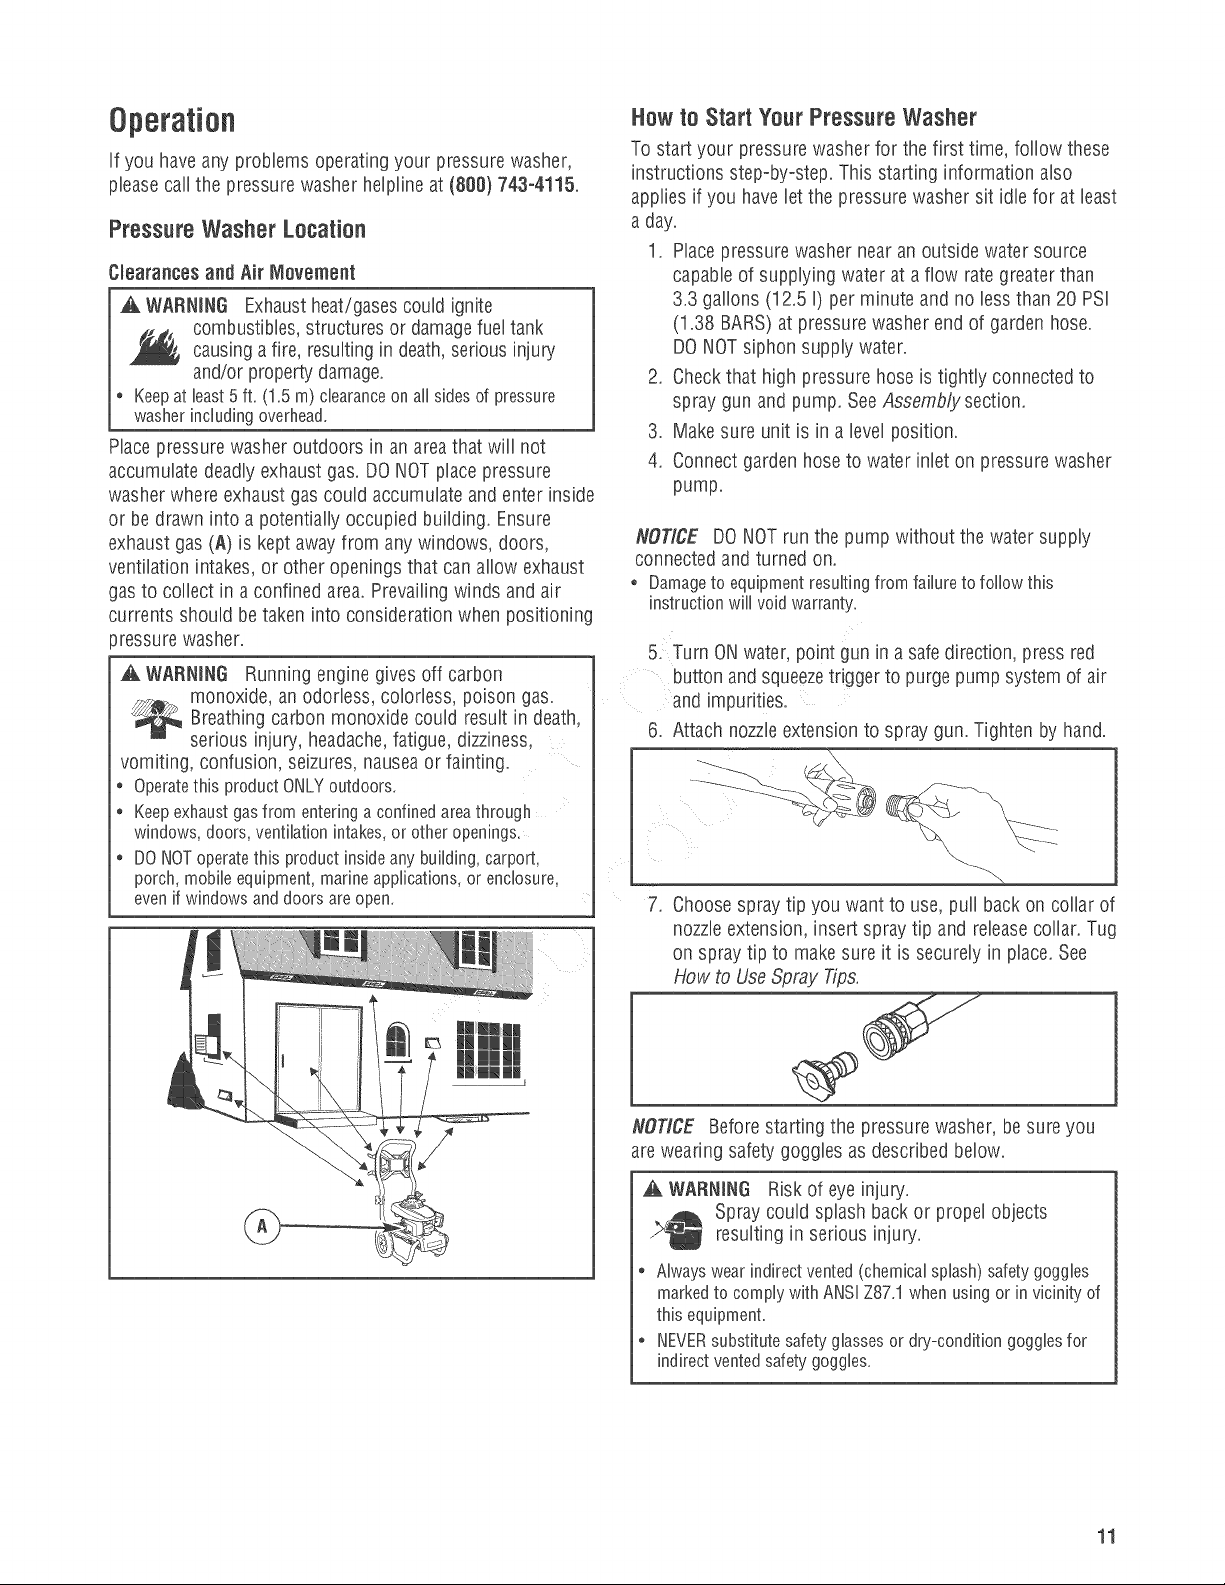
Placepressure washeroutdoors in an areathat will not
accumulate deadlyexhaustgas. DO NOTplacepressure
washer where exhaustgas could accumulateand enter inside
or be drawn into a potentially occupied building. Ensure
exhaustgas (A) is kept awayfrom any windows, doors,
ventilation intakes,or other openingsthat can allow exhaust
gasto collect in aconfined area. Prevailing winds and air
currents should be takeninto considerationwhen positioning
_ressurewasher.
WARNING Running engine gives off carbon
monoxide, an odorless, colorless, poison gas.
Breathing carbon monoxide could result in death,
serious injury, headache, fatigue, dizziness,
vomiting, confusion, seizures, nausea or fainting.
. Operatethis product ONLYoutdoors.
Keepexhaustgas from entering a confined areathrough
windows, doors, venfibfion intakes,or other openings,
DO NOToperatethis product insideany building, carport,
porch, mania equipment, marine applications, or enclosure=
evenif windows anddoors areopen.
Haw to Start Your Pressure Washer
To start your pressure washer for the first time, follow these
instructions step-by-step. This starting information also
applies if you haveletthe pressure washersit idle for at bast
a day.
1. Placepressurewasher near an outside water source
capableof supplying water at a flow rategreaterthan
3.3 gallons (12.5 I) per minute and no lessthan 20 PSi
(1.38 BARS)at pressurewasher end of garden hose.
DONOTsiphon supply water.
2. Checkthat high pressure hose is tightly connectedto
spray gun and pump. SeeAssembly section.
3. Make sure unit is in a level position.
4. Connect garden hoseto water inlet on pressure washer
pump.
NOTICE DONOTrun the pump without the water supply
connectedand turned on.
Damageto equipmentresultingfromfailuretofollowthis
instructionwillvoidwarranty.
5. Turn ONwater, point gunin a safedirection, press red
button andsqueezetrigger to purge pump system of air
and impurities,
6. Attach nozzleextensionto spray gun. Tighten by hand.
Choosespray tip you want to use, pull back on collar of
nozzleextension, insert spray tip and releasecollar. Tug
on spray tip to makesure it is securely in place. See
How to Use@ray Tips.
NOTICE Beforestarting the pressure washer, be sureyou
are wearing safety goggles asdescribed below.
_k WARNING Riskof eye injury.
Spray could splash back or propel objects
resulting in serious injury.
* Alwayswear indirect vented(chemicalsplash) safety goggles
markedto comply with ANSi Z8X1 when using or in vicinity of
this equipment.
NEVERsubstitute safety glasses or dry-condition goggles for
indirect vented safety goggles.
11
.
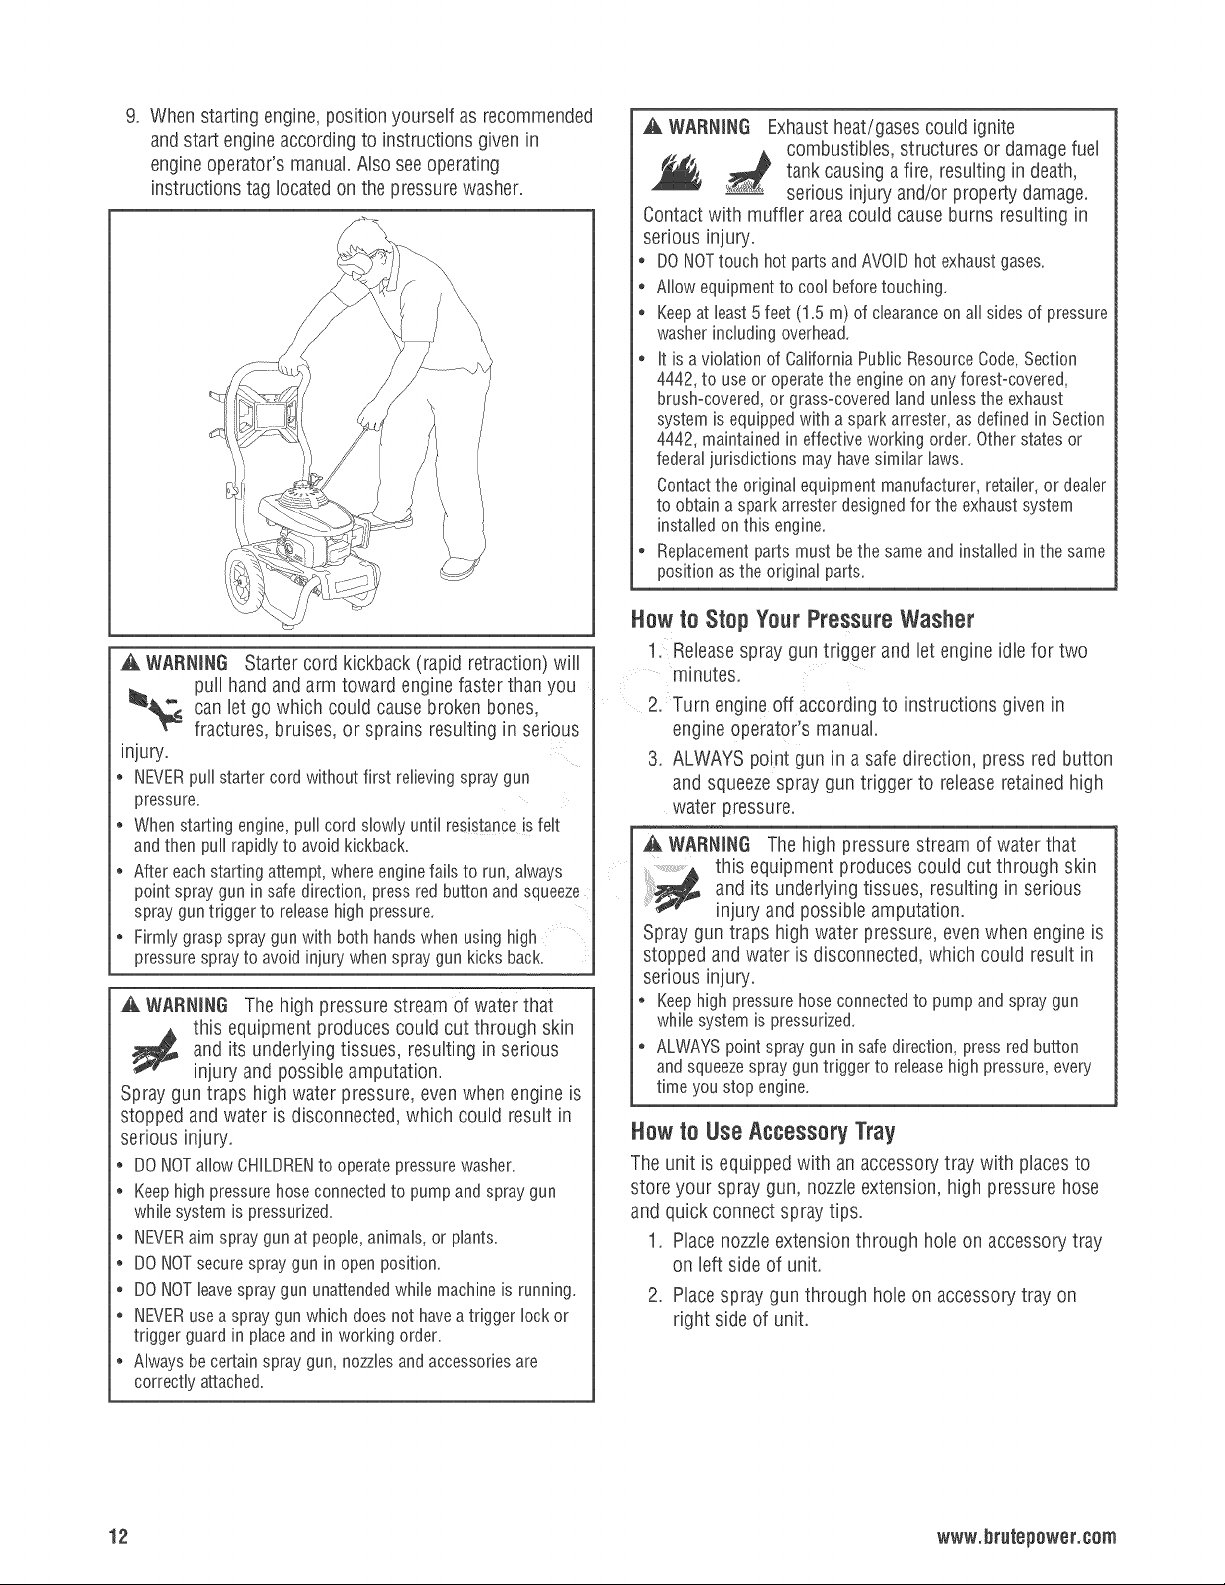
Whenstarting engine,positionyourself as recommended
and start engineaccordingto instructions givenin
engineoperator's manual.Also seeoperating
instructions tag locatedon the pressurewasher.
WARNING Starter cord kickback (rapid retraction) will
pull hand and arm toward engine faster than you
_a_ can let which could cause broken bones,
injury.
, NEVERpullstarter cord without first relieving spraygun
pressure,
When starting engine, pull cord slowly until resistanceiSfelt
andthen pull rapidly to avoid kickback,
After each starting attempt, where enginefails to run, always
point spray gun in safe direction, press red button andsqueeze
spray guntrigger to releasehigh pressure,
Firmly grasp spray gun with both hands when using high
pressure sprayto avoid injury when spray gun kicks back.
go
fractures, bruises, or sprains resulting in serious
,A WARNING The high pressure stream of waterthat
and its underlying tissues, resulting in serious
this equipment produces could cutthrough skin
injury and possible amputation.
Spraygun traps high water pressure, evenwhen engineis
stopped and water is disconnected, which could result in
serious injury.
DONOTallowCHILDRENtooperatepressurewasher.
Keephighpressurehoseconnectedto pumpandspraygun
whilesystemispressurized.
NEVERaimspraygunatpeople,animals,orplants.
DONOTsecurespraygun inopenposition.
DONOTleavespraygununattendedwhilemachineis running.
NEVERuseaspraygunwhichdoesnothaveatriggerlockor
triggerguardinplaceandin workingorder.
Alwaysbecertainspraygun,nozzlesandaccessoriesare
correctlyattached.
,a, WARNING Exhaust heat/gases could ignite
combustibles, structures or damage fuel
tank causing a fire, resulting in death,
serious injury and/or property damage.
Contact with muffler area could cause burns resulting in
serious injury.
DO NOTtouch hot parts andAVOIDhot exhaust gases.
Allow equipment to cool beforetouching.
Keepat least5 feet (1.5 m) of clearanceon ail sides of pressure
washer including overhead.
it is aviolation of California PuNic Resource Code,Section
4442, to use or operate the engine on any forest-covered,
brush-covered, or grass-covered land unless the exhaust
system is equipped with aspark attester, as defined inSection
4442, maintained in effective working order. Other states or
federaljurisdictions mayhave similar laws.
Contactthe original equipment manufacturer, retailer, or dealer
to obtain a spark attester designed for the exhaust system
installed on this engine.
Replacement parts must be the sameand installed in the same
position as the original parts.
Hew to Step Your Pressure Washer
1. Releasespray gun trigger and let engine idlefor two
minutes.
2. Turn engine off according to instructions given in
engine operator's manual.
3. ALWAYS point gun in a safe direction, press red button
and squeeze spray gun trigger to release retained high
water pressure.
,_, WARNING The highpressure stream of water that
and its underlying tissues, resulting in serious
this equipment produces could cut through skin
injury and possible amputation.
Spray guntraps high water pressure, evenwhen engineis
stopped and water is disconnected, which could result in
serious injury.
Keephighpressurehoseconnectedto pumpandspraygun
whilesystemispressurized.
ALWAYSpointspraygunin safedirection,pressredbutton
andsqueezesprayguntriggerto releasehighpressure,every
timeyoustopengine.
Hawte UseAccessory Tray
Theunit is equipped with an accessorytray with placesto
store your spray gun, nozzle extension, high pressure hose
and quick connect spray tips.
1. Place nozzle extension through hob on accessory tray
on left side of unit.
2. Placespraygun through hob on accessorytray on
right side of unit.
12 www.brutepewer.eem
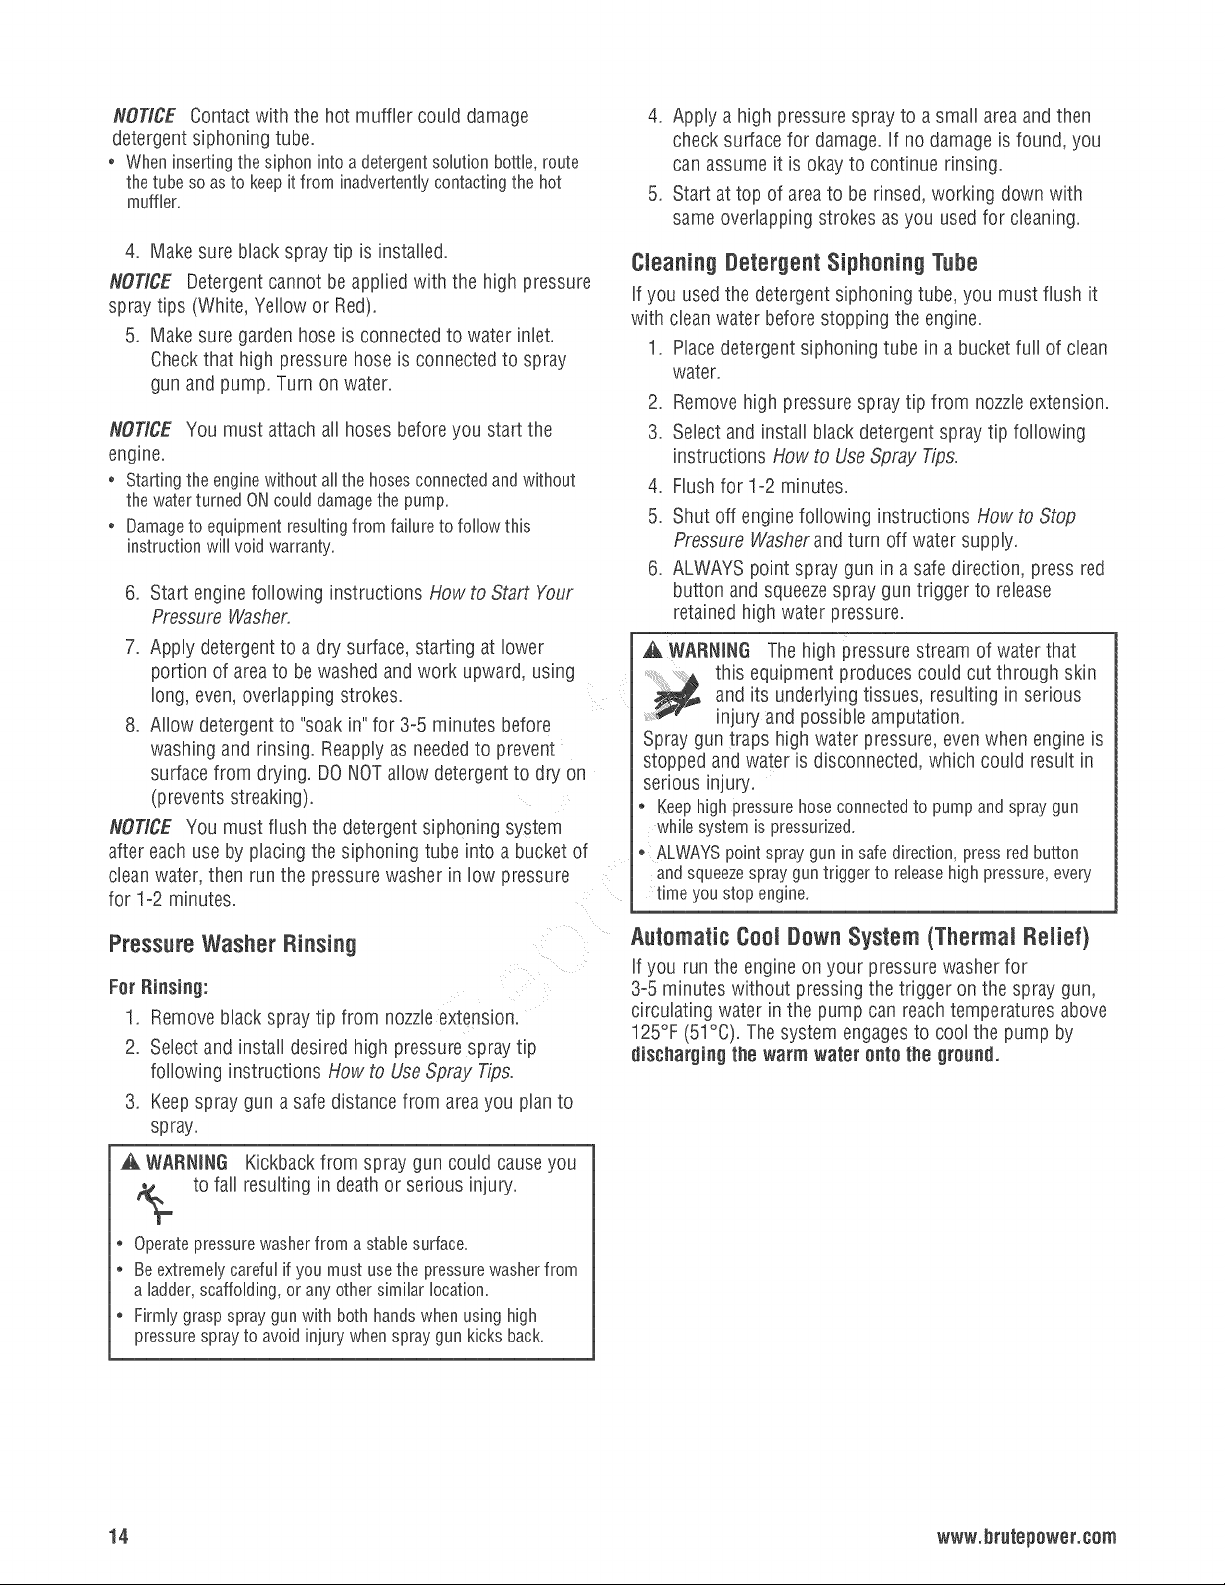
2. Select desiredspray tip:
Low Pressure
Black
Useto apply
detergent
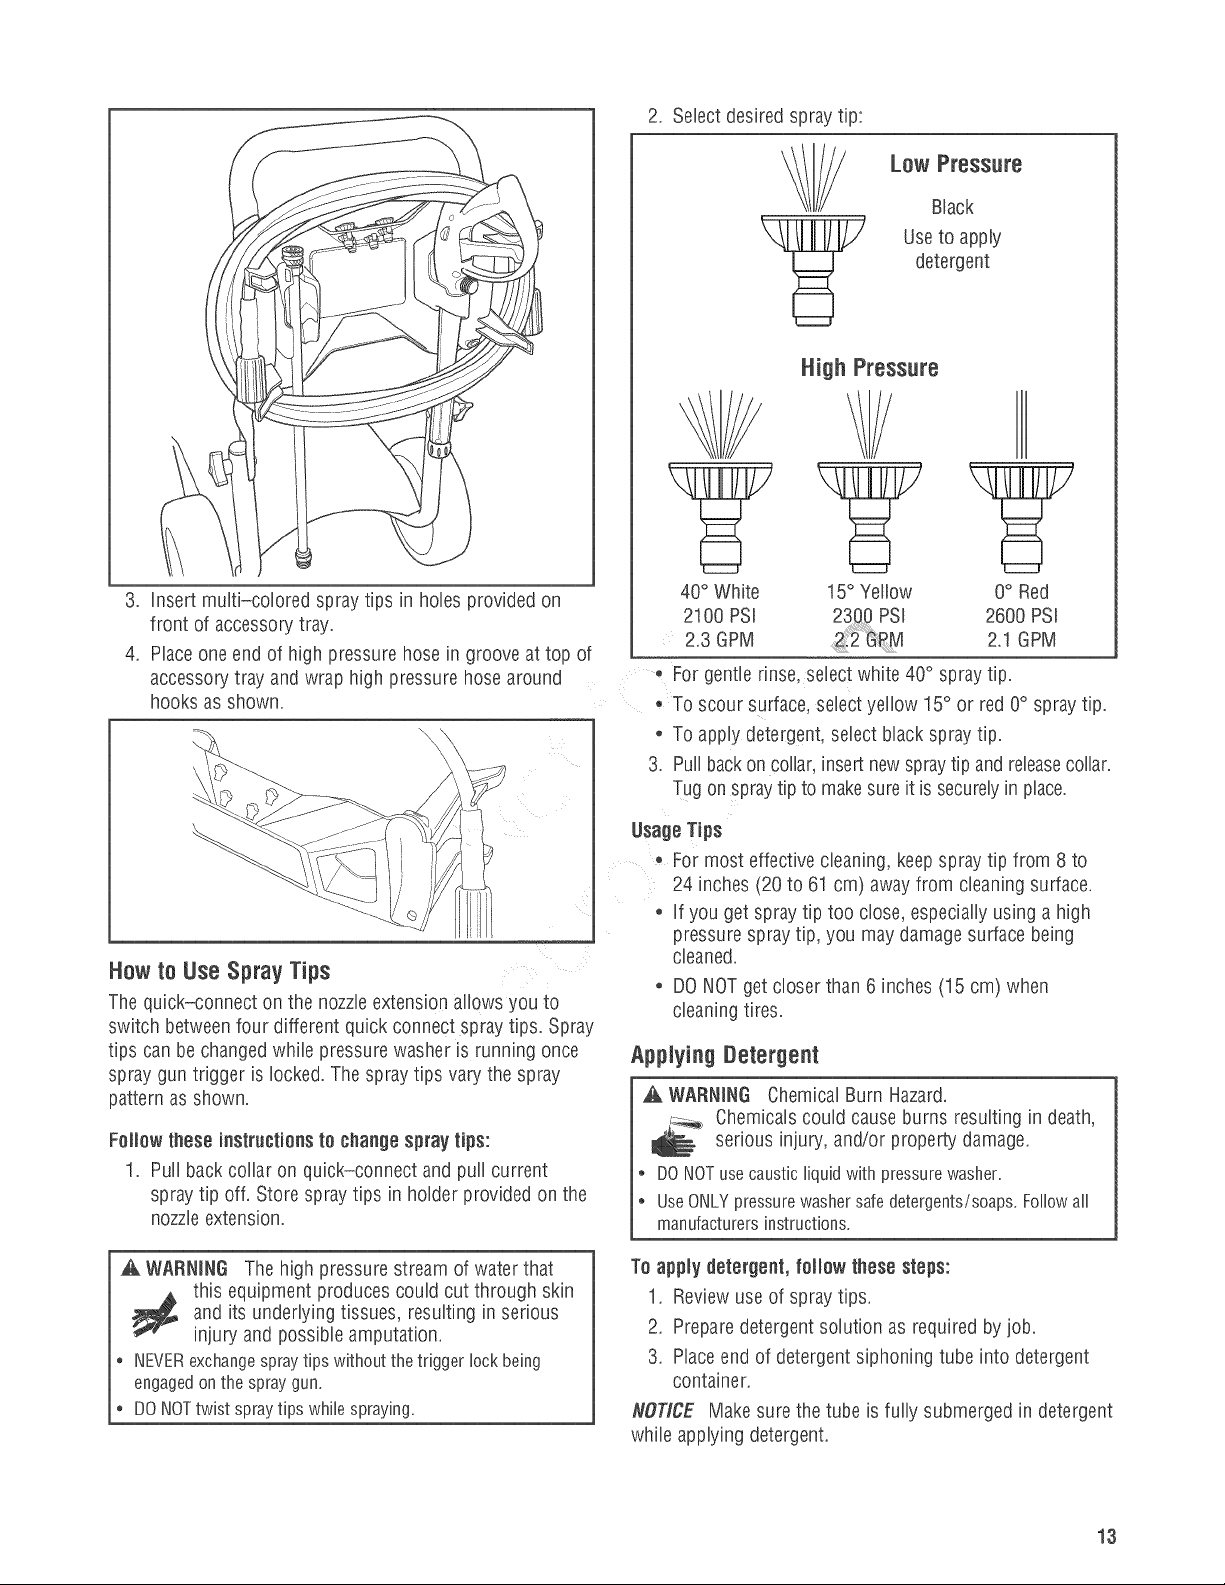
3. insert multi-colored spray tips in holesprovided on
front of accessorytray.
4. Place one end of high pressurehose in grooveat top of
accessorytray andwrap high pressure hosearound
hooks asshown.
How to Use Spray Tips
The quick-connect on the nozzleextension allows you to
switch betweenfour different quick connect spray tips. Spray
tips can be changedwhile pressurewasher is running once
spray gun trigger is locked.Thespray tips vary the spray
pattern as shown.
Fallow these instructionsto change spray tips:
1. Pull back collar on quick-connect and puff current
spray tip offi Store spray tips in holder provided on the
nozzleextension.
40° White
21O0PSI
2.3 GPM
° For gentle rinse,selectwhite 40° spray tip.
o To scour surface, select yellow 15° or red 0° spray tip.
o To applydetergent, select black spray tip.
3. Pul backon collar,insertnewspraytip and releasecollar.
Tugon spraytip to makesureit is securelyinplace.
Usage Tips
* For most effective cleaning, keepspray tip from 8 to
24 inches _20to 61 cm) awayfrom cleaning surface.
o if you get spraytip too close, especiallyusing a high
pressure spray tip, you may damagesurface being
cleaned.
o DONOTget closerthan 6 inches (15 cm) when
cleaningtires.
15° Yellow 0° Red
2600 PSI
2.1 GPM
Applying Detergent
A WARNING Chemical Burn Hazard.
Chemicals could cause burns resulting in death,
serious injury, and/or property damage.
* DONOTuse caustic liquid with pressure washer.
* UseONLYpressurewasher safe detergents/soaps. Followall
manufacturers instructions.
WARNING The high pressure stream of waterthat
and its underlying tissues, resulting in serious
this equipment produces could cutthrough skin
injury and possible amputation.
* NEVERexchangespraytipswithoutthetriggerlockbeing
engagedonthe spraygun.
* DONOTtwist spraytipswhilespraying.
Ta apply detergent, fallow these steps:
1. Reviewuse of spray tips.
2. Preparedetergent solution as requiredby job.
3. Placeendof detergentsiphoning tube into detergent
container.
NOTICE Make surethe tube is fully submerged in detergent
while applying detergent.
13
NOTICE Contact with the hot muffler could damage
detergent siphoning tube.
, When insertingthe siphon into adetergent solution bottle, route
the tube so as to keep it from inadvertently contacting the hot
muffler.
4. Make sure black spray tip is installed.
NOTICE Detergentcannot be appliedwith the high pressure
spray tips (White, Yellow or Red).
5. Make sure garden hose is connectedto water inlet.
Checkthat high pressure hose is connectedto spray
gun and pump. Turn on water.
NOTICE You must attach all hoses before you start the
engine.
Starting the engine without all the hoses connected and without
the waterturned ON could damage the pump.
Damageto equipment resulting from failure to follow this
instruction will void warranty.
6. Start enginefollowing instructions How to Start Your
Pressure Washer.
7. Apply detergentto a dry surface, starting at lower
portion of areato bewashed andwork upward, using
long, even,overlapping strokes.
8. Allow detergent to "soak in" for 3-5 minutes before
washing and rinsing. Reapplyas neededto prevent
surfacefrom drying. DO NOTallow detergentto dry on
(prevents streaking).
NOTICE You must flush the detergent siphoning system
after each use by placingthe siphoning tube into a bucket of
cleanwater, then run the pressurewasher n low pressure
for 1-2 minutes.
4. Apply a high pressure sprayto a small area andthen
checksurface for damage, if no damage is found, you
can assumeit is okayto continue rinsing.
5. Start attop of areato be rinsed,working down with
same overlapping strokes asyou used for cleaning.
Cleaning Detergent $iphening Tube
if you used the detergentsiphoning tube, you must flush it
with cleanwater before stopping the engine.
.
Placedetergent siphoning tube in a bucketfull of clean
water.
2.
Removehigh pressurespray tip from nozzleextension.
3.
Select and install black detergentspray tip following
instructions How to UseSpray Tips.
.
Flush for 1-2 minutes.
5.
Shut off enginefollowing instructions How to Stop
Pressure VVasherandturn off water supply.
.
ALWAYSpoint spray gun in a safe direction, press red
button and squeezespray gun trigger to release
retained highwater pressure.
A WARNING The highpressurestream of water that
this equipment produces could cut through skin
and its underlying tissues, resulting in serious
injury and possible amputation.
Spray guntraps high water pressure, evenwhen engineis
stopped and water is disconnected, which could result in
serious injury.
° Keephighpressurehoseconnectedto pumpandspraygun
whib systemis pressurized,
o ALWAYSpointspraygunin safedirection,pressredbutton
andsqueezesprayguntriggerto releasehighpressure,every
timeyoustopengine,
Pressure Washer Rinsing
Fer Rinsing:
1. Removeblackspray tip from nozzleextension.
2. Select and install desired high pressure spray tip
following instructions How to UseSpray Tips.
3. Keepspray gun asafe distance from areayou plan to
spray.
WARNING Kickbackfrom spray gun could causeyou
to fall resulting in deathor serious injury.
* Operatepressurewasher from a stable surface.
Beextremely careful if you must use the pressurewasherfrom
a ladder,scaffolding, or any other similar location.
Firmly grasp spray gun with both hands when using high
pressure sprayto avoid injury when spray gun kicks back.
Autematic CeetDewn System (Thermal Relief}
if you run the engineon your pressurewasher for
3-5 minutes without pressingthe trigger onthe spray gun,
cimulating water in the pump can reachtemperatures above
125°F (51°C).The system engagesto cool the pump by
discharging the warm water ente the ground.
 Loading...