

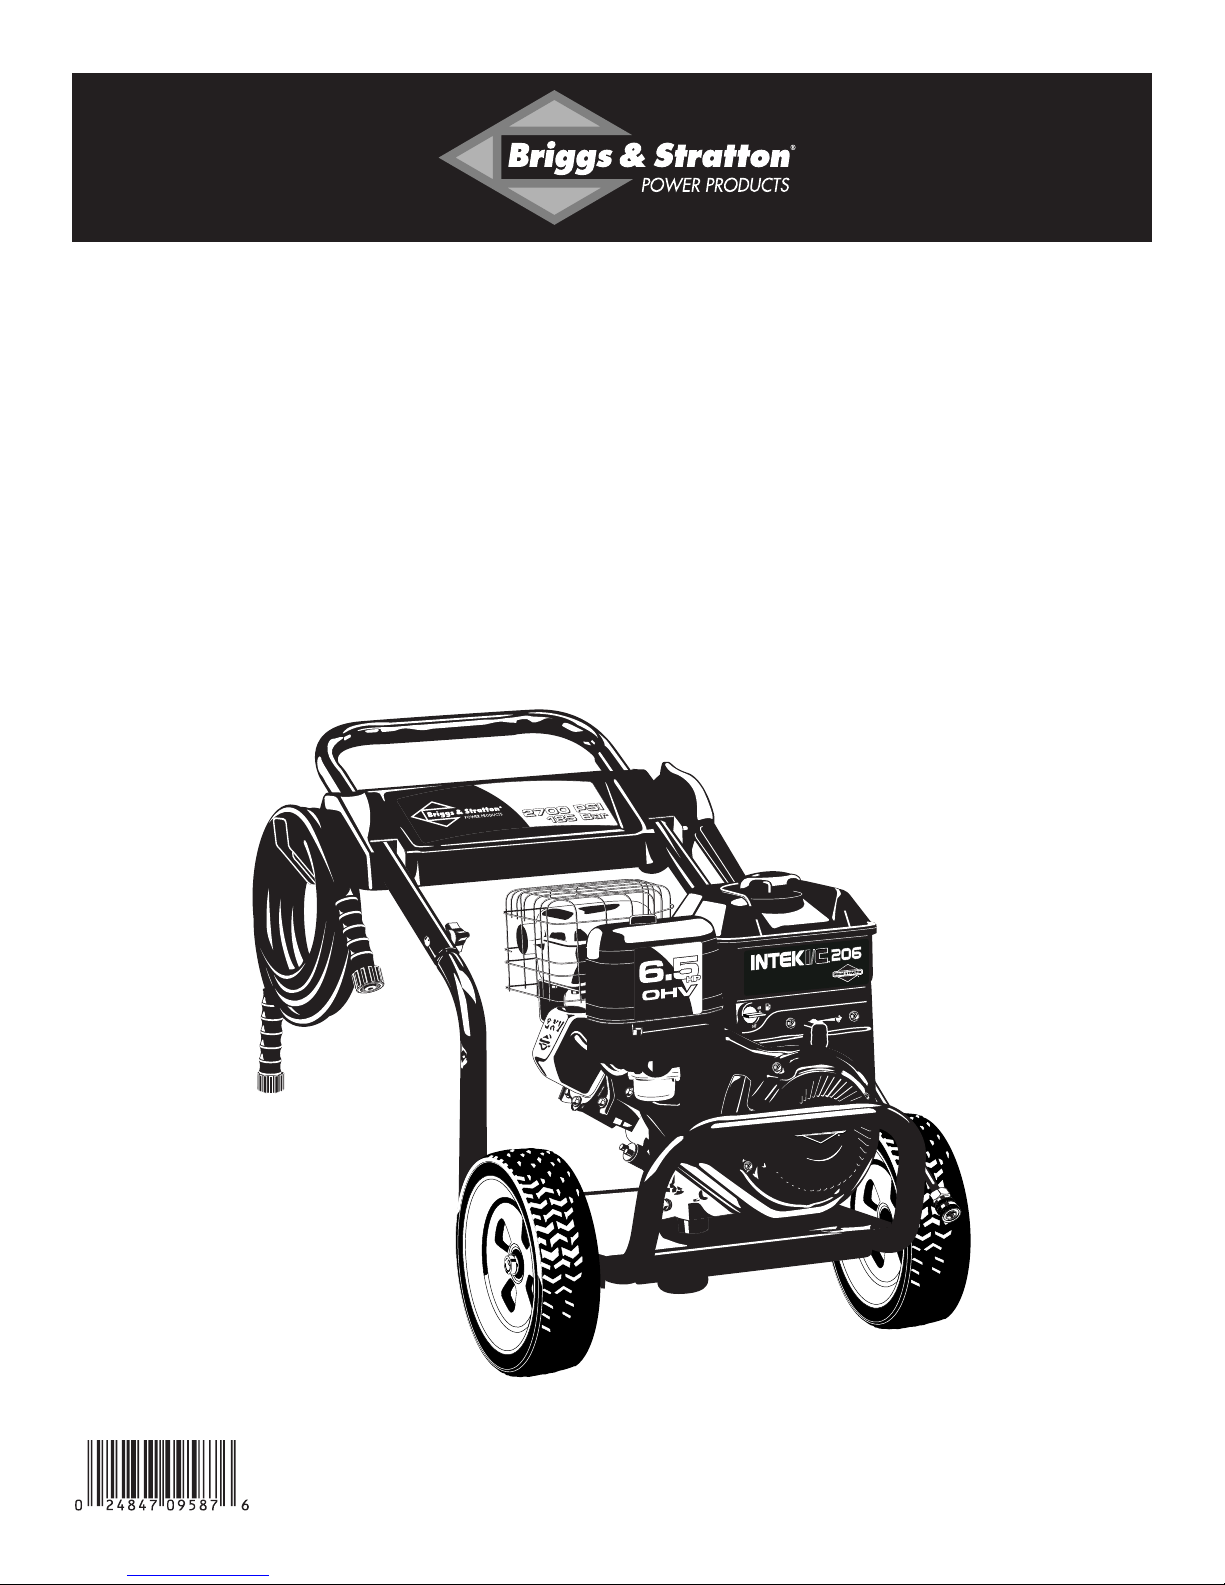
Briggs & Stratton 020224-0 Operator's Manual
Operator’s Manual / Manuel d'opérateur / Bedienungsanleitung /
Manual do Operador / Manual del Operario
Model No. 020224 (2700 PSI Pressure Washer) Manual No. 195259GS Revision 1 (11/04/2005)
2700 PSI
185 BAR
BRIGGS & STRATTON POWER PRODUCTS GROUP, LLC
JEFFERSON,WISCONSIN, U.S.A.
Briggs & Stratton Generac Generator Discount Parts Call 606-678-9623 or 606-561-4983
www.mymowerparts.com
BSPP 2700 PSI Pressure Washer
2
TABLE OF CONTENTS
Safety Rules. . . . . . . . . . . . . . . . . . . . . . . . . . . . . . . . . . . . 2-4
Know Your Pressure Washer. . . . . . . . . . . . . . . . . . . . . . . . 5
Assembly. . . . . . . . . . . . . . . . . . . . . . . . . . . . . . . . . . . . . . 6-8
Operation . . . . . . . . . . . . . . . . . . . . . . . . . . . . . . . . . . . . 9-12
Product Specifications . . . . . . . . . . . . . . . . . . . . . . . . . . . . 13
Maintenance . . . . . . . . . . . . . . . . . . . . . . . . . . . . . . . . . 13-15
Storage . . . . . . . . . . . . . . . . . . . . . . . . . . . . . . . . . . . . . . . . 15
Troubleshooting. . . . . . . . . . . . . . . . . . . . . . . . . . . . . . . . . 16
Notes . . . . . . . . . . . . . . . . . . . . . . . . . . . . . . . . . . . . . . 17-18
Warranty . . . . . . . . . . . . . . . . . . . . . . . . . . . . . . . . . . . . . . 19
EQUIPMENT
DESCRIPTION
Read this manual carefully and become
familiar with your pressure washer. Know its
applications, its limitations and any hazards
involved.
This manual contains information for a high pressure
washer that operates at 2,700 PSI at a flow rate of
2.5 gallons per minute.This powerful, high quality system
features large 10” wheels, a pump equipped with an
automatic cool down system, chemical injection system,
nozzle extension with quick connect nozzles, safety goggles,
heavy duty 25’ hose, and more.
Every effort has been made to ensure that information in
this manual is accurate and current. However, we reserve
the right to change, alter or otherwise improve the product
and this document at any time without prior notice.
SAFETY RULES
This is the safety alert symbol. It is used to
alert you to potential personal injury hazards.
Obey all safety messages that follow this
symbol to avoid possible injury or death.
The safety alert symbol ( ) is used with a signal word
(DANGER, CAUTION,WARNING), a pictorial and/or a
safety message to alert you to hazards. DANGER indicates
a hazard which, if not avoided, will result in death or serious
injury. WARNING indicates a hazard which, if not avoided,
could result in death or serious injury. CAUTION
indicates a hazard which, if not avoided, might result in
minor or moderate injury. CAUTION, when used
without the alert symbol, indicates a situation that could
result in equipment damage. Follow safety messages to
avoid or reduce the risk of injury or death.
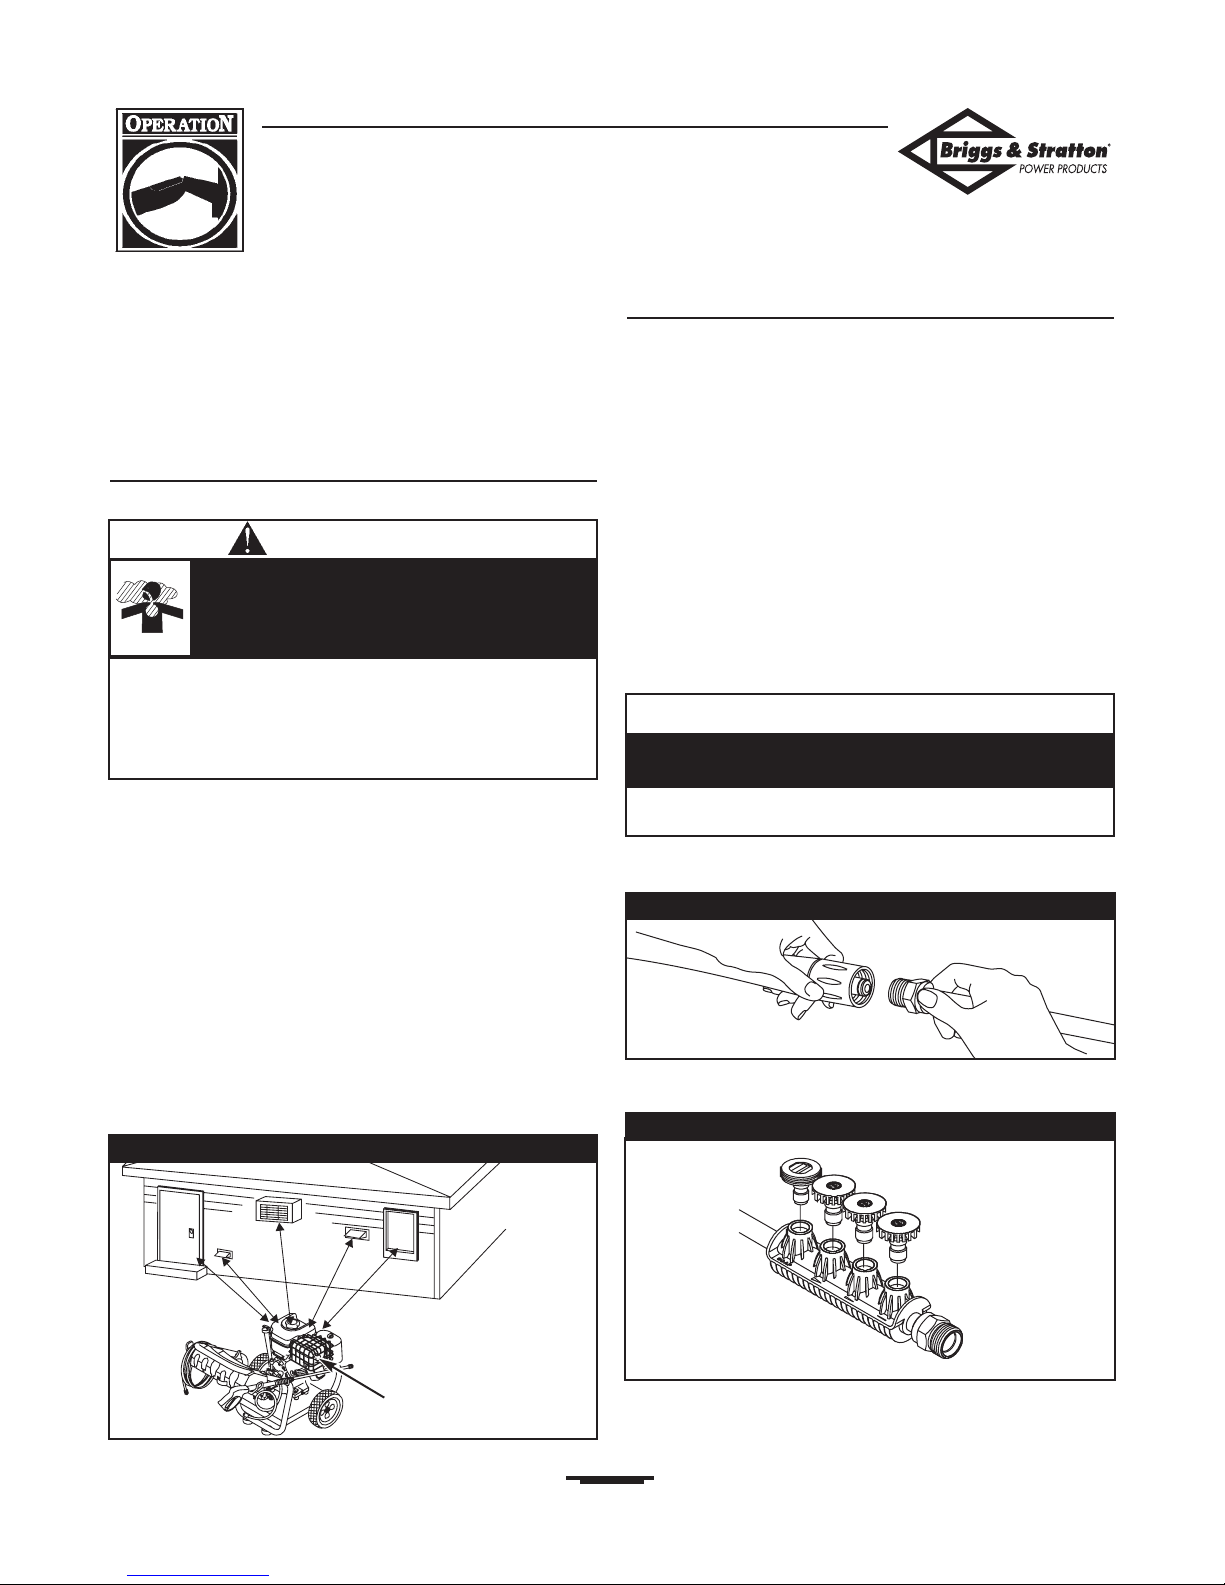
Warning Tag
A warning tag (Figure 1) is provided on your unit to inform
you of potential safety hazards. If the tag becomes damaged
or illegible, replace it by contacting your local Briggs &
Stratton dealer to obtain a new one.
The icons on the warning tag are shown and described in
detail later in the next section.
Hazard Symbols and Meanings
Fire
Explosion
Toxic Fumes
Hot Surface
Moving Parts
Electrical Shock
Slippery Surface
Fall
Kickback
Flying Objects
Fluid Injection
Figure 1 — Warning Label
Copyright © 2005 Briggs & Stratton Power Products
Group, LLC. All rights reserved. No part of this material
may be reproduced or transmitted in any form by any
means without the express written permission of Briggs &
Stratton Power Products Group, LLC.
Briggs & Stratton Generac Generator Discount Parts Call 606-678-9623 or 606-561-4983
www.mymowerparts.com
BSPP 2700 PSI Pressure Washer
3
• Keep water spray away from electric wiring or fatal electric
shock may result.
Spray contact with electrical wiring can result in
electrocution.
WARNING
• Operate pressure washer ONLY outdoors.
• Keep exhaust gas from entering a confined area through
windows, doors, ventilation intakes or other openings.
• DO NOT operate pressure washer inside any building or
enclosure.
• Use a respirator or mask whenever there is a chance that
vapors may be inhaled.
• Read all instructions with mask so you are certain the mask will
provide the necessary protection against inhaling harmful vapors.
Running engine gives off carbon monoxide, an
odorless, colorless, poison gas.
Breathing carbon monoxide will cause nausea,
fainting or death.
Some chemicals or detergents may be harmful if
inhaled or ingested, causing severe nausea,
fainting or poisoning.
WARNING
• Keep spray nozzle between 8 to 24 inches away from cleaning
surface.
• Operate this unit on a stable surface.
• The cleaning area should have adequate slopes and drainage to
reduce the possibility of a fall due to slippery surfaces.
• Be extremely careful if you must use the pressure washer from
a ladder, scaffolding or any other relatively unstable location.
• Firmly grasp spray gun with both hands when using high
pressure spray to avoid injury if gun kicks back.
Use of pressure washer can create puddles and
slippery surfaces.
High pressure spray could cause you to fall if
you are too close to the cleaning surface.
WARNING
• When starting engine, pull cord slowly until resistance is felt
and then pull rapidly to avoid kickback.
• If engine starts and fails to continue to run or if increased
resistance is felt during starting pull attempts, squeeze trigger
on spray gun.
Rapid retraction of starter cord (kickback) will
pull hand and arm toward engine faster than
you can let go.
Broken bones, fractures, bruises or sprains could
result.
WARNING
• NEVER aim spray gun at people, animals or plants.
• DO NOT allow CHILDREN to operate pressure washer.
• NEVER repair high pressure hose. Replace it.
• Keep high pressure hose connected to pump and spray gun
while system is pressurized.
• Squeeze trigger on spray gun to relieve trapped pressure,
every time you stop engine. Engage trigger lock on spray gun.
The high pressure stream of water that this
equipment produces can pierce skin and its
underlying tissues, leading to serious injury and
possible amputation.
Spray gun retains high pressure when pressure
washer is shut down, which can cause injury.
WARNING
WHEN ADDING FUEL
• Turn pressure washer OFF and let it cool at least 2 minutes
before removing fuel cap.
• Fill fuel tank outdoors.
• DO NOT overfill tank. Allow space for fuel expansion.
• Keep fuel away from sparks, open flames, pilot lights, heat, and
other ignition sources.
• DO NOT light a cigarette or smoke.
WHEN OPERATING EQUIPMENT
• DO NOT tip engine or equipment at angle which causes fuel
to spill.
• DO NOT spray flammable liquids.
WHEN TRANSPORTING OR REPAIRING EQUIPMENT
• Transport/repair with fuel tank EMPTY or with fuel shutoff
valve OFF.
• Secure pressure washer upright when transporting so that it
does not tip and spill fuel and oil.
WHEN STORING FUEL OR EQUIPMENT WITH FUEL
IN TANK
• Store away from furnaces, stoves, water heaters, clothes
dryers or other appliances that have pilot light or other
ignition source because they can ignite fuel vapors.
Fuel and its vapors are extremely flammable an
explosive.
Fire or explosion can cause severe burns or
death.
WARNING
Briggs & Stratton Generac Generator Discount Parts Call 606-678-9623 or 606-561-4983
www.mymowerparts.com
BSPP 2700 PSI Pressure Washer
4
• DO NOT tamper with governed speed.
• DO NOT operate pressure washer above rated pressure.
Excessively high or low operating speeds increase risk
of injury and damage to pressure washer.
CAUTION
WHEN ADJUSTING OR MAKING REPAIRS TO YOUR
PRESSURE WASHER
• Disconnect spark plug wire from spark plug and place wire
where it cannot contact spark plug.
Unintentional sparking can result in fire or
electric shock.
WARNING
• DO NOT point spray gun at glass when in jet spray mode.
• NEVER aim spray gun at plants.
High pressure spray may damage fragile items including
glass.
CAUTION
• DO NOT wear loose clothing, jewelry or anything that may
be caught in the starter or other rotating parts.
• Tie up long hair and remove jewelry.
Starter and other rotating parts can entangle
hands, hair, clothing, or accessories.
WARNING
• Always wear eye protection when using this equipment or in
vicinity of where equipment is in use.
High pressure spray can cause paint chips or
other particles to become airborne.
WARNING
• DO NOT secure spray gun in open position.
• DO NOT leave spray gun unattended while machine is
running.
• NEVER use a spray gun which does not have a trigger lock or
trigger guard in place and in working order.
• Always be certain spray gun,nozzles and accessories are
correctly attached.
A pressure washer produces a high pressure spray
which increases risk of injury and damage to unit.
CAUTION
• If you have questions about intended use, ask dealer or
contact Briggs & Stratton Power Products.
• NEVER operate units with broken or missing parts, or
without protective housing or covers.
• DO NOT by–pass any safety device on this machine.
• Before starting pressure washer in cold weather, check all
parts of the equipment to be sure ice has not formed there.
• NEVER move machine by pulling on high pressure hose. Use
handle provided on unit.
• Check fuel system for leaks or signs of deterioration, such as
chafed or spongy hose, loose or missing clamps,or damaged
tank or cap. Correct all defects before operating pressure
washer.
• This equipment is designed to be used with Briggs & Stratton
Power Products authorized parts ONLY. If equipment is used
with parts that DO NOT comply with minimum specifications,
user assumes all risks and liabilities.
Improper treatment of pressure washer can damage it
and shorten its life.
CAUTION
• DO NOT touch hot surfaces.
• Allow equipment to cool before touching.
• The pressure washer must be at least 5 feet from structures
having combustible walls and/or other combustible materials.
• Keep at least 3 feet of clearance on all sides of pressure
washer for adequate cooling, maintenance and servicing.
Running engines produce heat.Temperature of
muffler and nearby areas can reach or exceed
150°F (65°C).
Severe burns can occur on contact.
Combustible debris, such as leaves, grass, brush,
etc. can catch fire.
WARNING
Briggs & Stratton Generac Generator Discount Parts Call 606-678-9623 or 606-561-4983
www.mymowerparts.com
BSPP 2700 PSI Pressure Washer
5
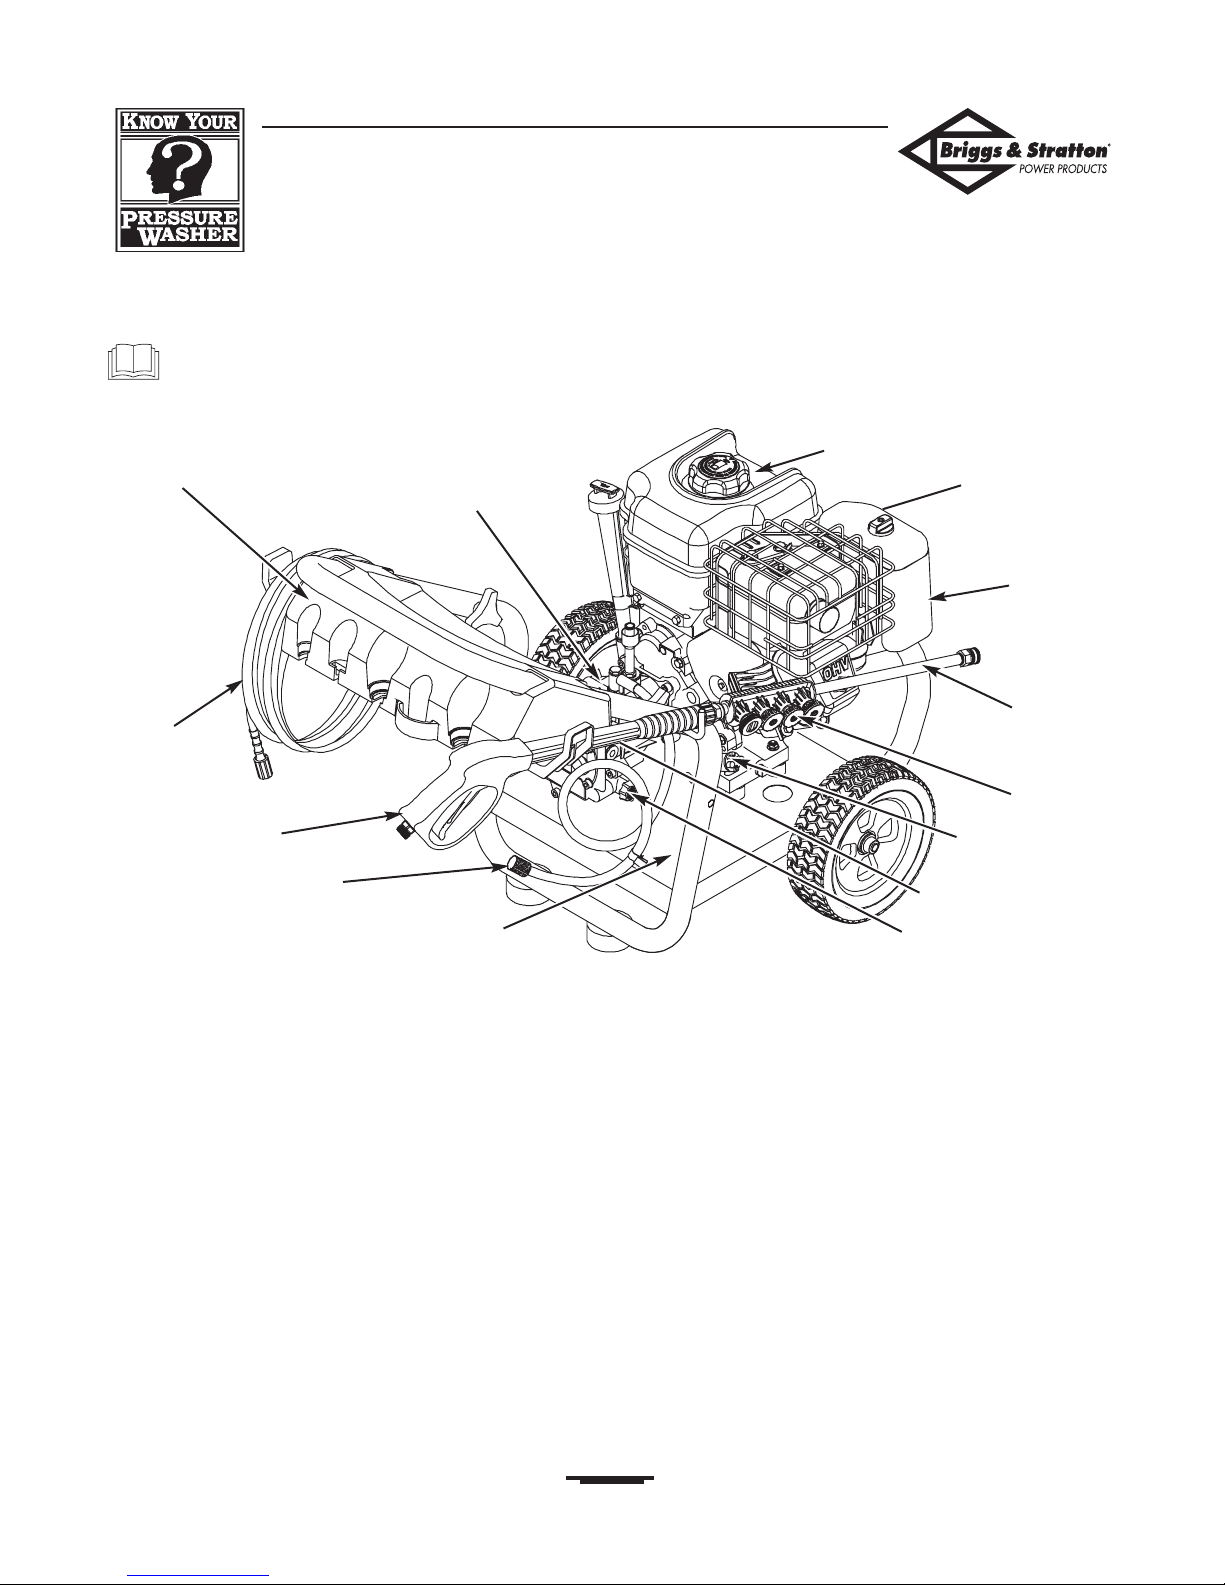
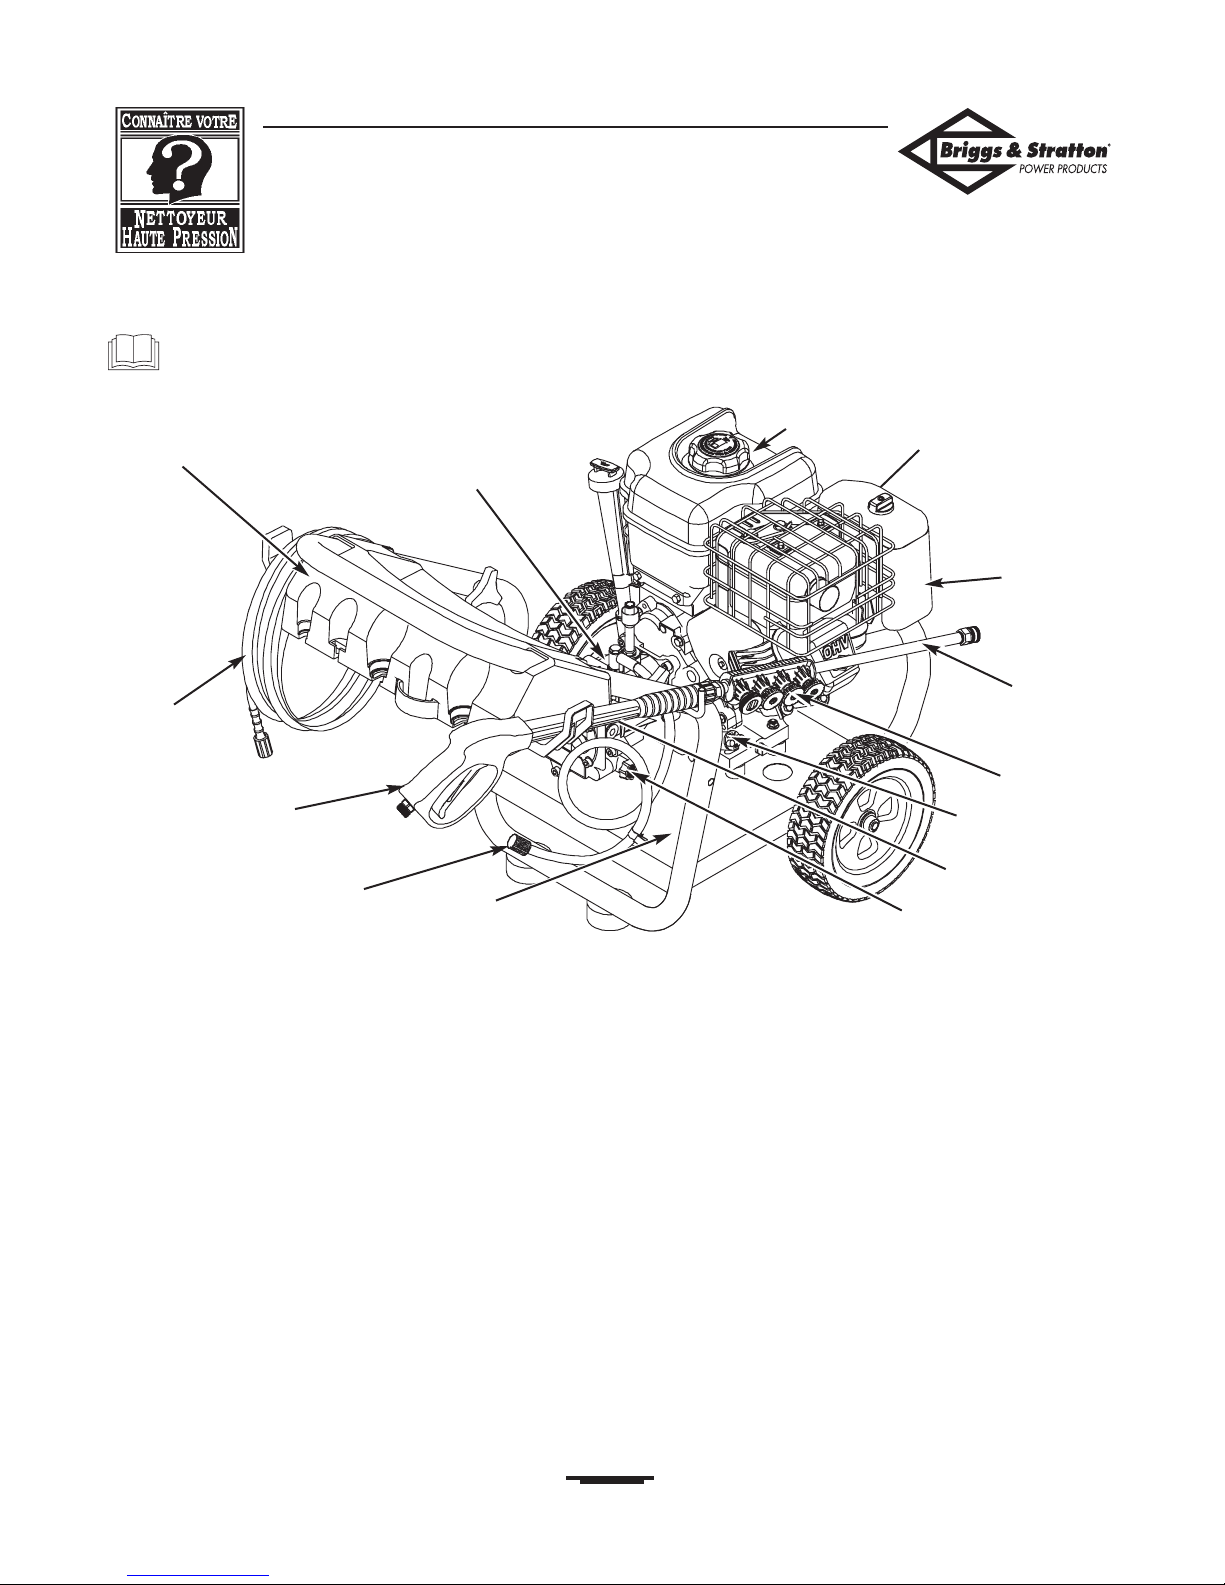
KNOW YOUR PRESSURE WASHER
Read this operator’s manual and safety rules before operating your pressure washer.
Compare the illustrations with your pressure washer to familiarize yourself with the locations of various controls
and adjustments. Save this manual for future reference.
Chemical Injection
Siphon/Filter
Spray Gun
Nozzle Extension
with Quick Connect
Throttle Lever
Choke Lever
Fuel Valve
Recoil Starter
(on front of engine)
Air Filter
Fuel Tank
Pump equipped
with Automatic
Cool Down System
Water Inlet
Oil Fill Cap
Spray Tips
High Pressure Outlet
Accessory Tray — Provides convenient storage for
standard and optional accessories, such as brushes, turbo
wands, ect.
Air Filter — Protects engine by filtering dust and debris out
of intake air.
Automatic Cool Down System — Cycles water through
pump when water reaches 125°-155°F. Warm water will
discharge from pump onto ground.This system prevents
internal pump damage.
Chemical Injection Siphon/Filter — Use to siphon
detergent or other pressure washer chemicals into the low
pressure stream.
Choke Lever — Prepares a cold engine for starting.
Data Tag — Provides model, revision and serial number of
pressure washer. Please have these readily available if calling
for assistance.
Fuel Tank — Fill tank with regular unleaded fuel.Always leave
room for fuel expansion.
Fuel Valve — Used to turn fuel on and off to engine.
High Pressure Hose — Connect one end to the water
pump and the other end to the spray gun.
High Pressure Outlet — To connect high pressure hose.
Nozzle Extension with Quick Connect — Allows you to
switch between four different spray tips.
Oil Fill Cap — Fill engine with oil here.
Pump — Develops high pressure.
Recoil Starter — Use for starting the engine manually.
Safety Goggles (not shown) — Always use the enclosed
goggles or other eye protection when running your
pressure washer.
Spray Gun — Controls the application of water onto
cleaning surface with trigger device. Includes safety latch.
Spray Tips — Chemical injection, 0°, 15°, and 40°: for various
high pressure cleaning applications.
Throttle Lever—Sets engine in starting mode for recoil
starter and stops a running engine.
Water Inlet — Connect garden hose here.
Accessory Tray
Data Tag
High Pressure
Hose
Briggs & Stratton Generac Generator Discount Parts Call 606-678-9623 or 606-561-4983
www.mymowerparts.com
BSPP 2700 PSI Pressure Washer
6
ASSEMBLY
IMPORTANT: Read entire operator’s manual before you
attempt to assemble or operate your new pressure washer.
Remove Pressure Washer From
Carton
• Remove the parts bag, accessories, and inserts included
with pressure washer.
• Slice two corners at the end of carton from top to
bottom so the panel can be folded down flat.
• Roll pressure washer out of carton.
Carton Contents
Items in the carton include:
• Main Unit
• Safety Goggles
• Handle
• Plastic Accessory Tray
• High Pressure Hose
• Spray Gun
• Nozzle Extension with Quick Connect Fitting
• Parts Bag (which includes the following):
• Operator’s Manual
• Engine Manual
• Maintenance Kit
• Hose Fittings
• Quick Connects
• Bag containing 4 multi–colored Quick Connect Spray
Tips
• Handle Fastening Hardware Kit (which includes):
• Carriage Bolt
• “L” Bolt
• Plastic Knobs (2)
• “J” Hook
• Chemical Hose Clip
• Self Tapping Screws (4)
If parts are missing or damaged, contact the local Briggs &
Stratton service center.
PREPARING PRESSURE
WASHER FOR USE
To prepare your pressure washer for operation,you
will need to perform these tasks:
1. Attach accessory tray to handle, then attach handle to
main unit.
2. Add oil to engine crankcase.
3. Add fuel to fuel tank.
4. Connect high pressure hose to spray gun and pump.
5. Connect water supply to pump.
6. Attach nozzle extension to spray gun.
7. Select/attach quick connect spray tip to nozzle
extension.
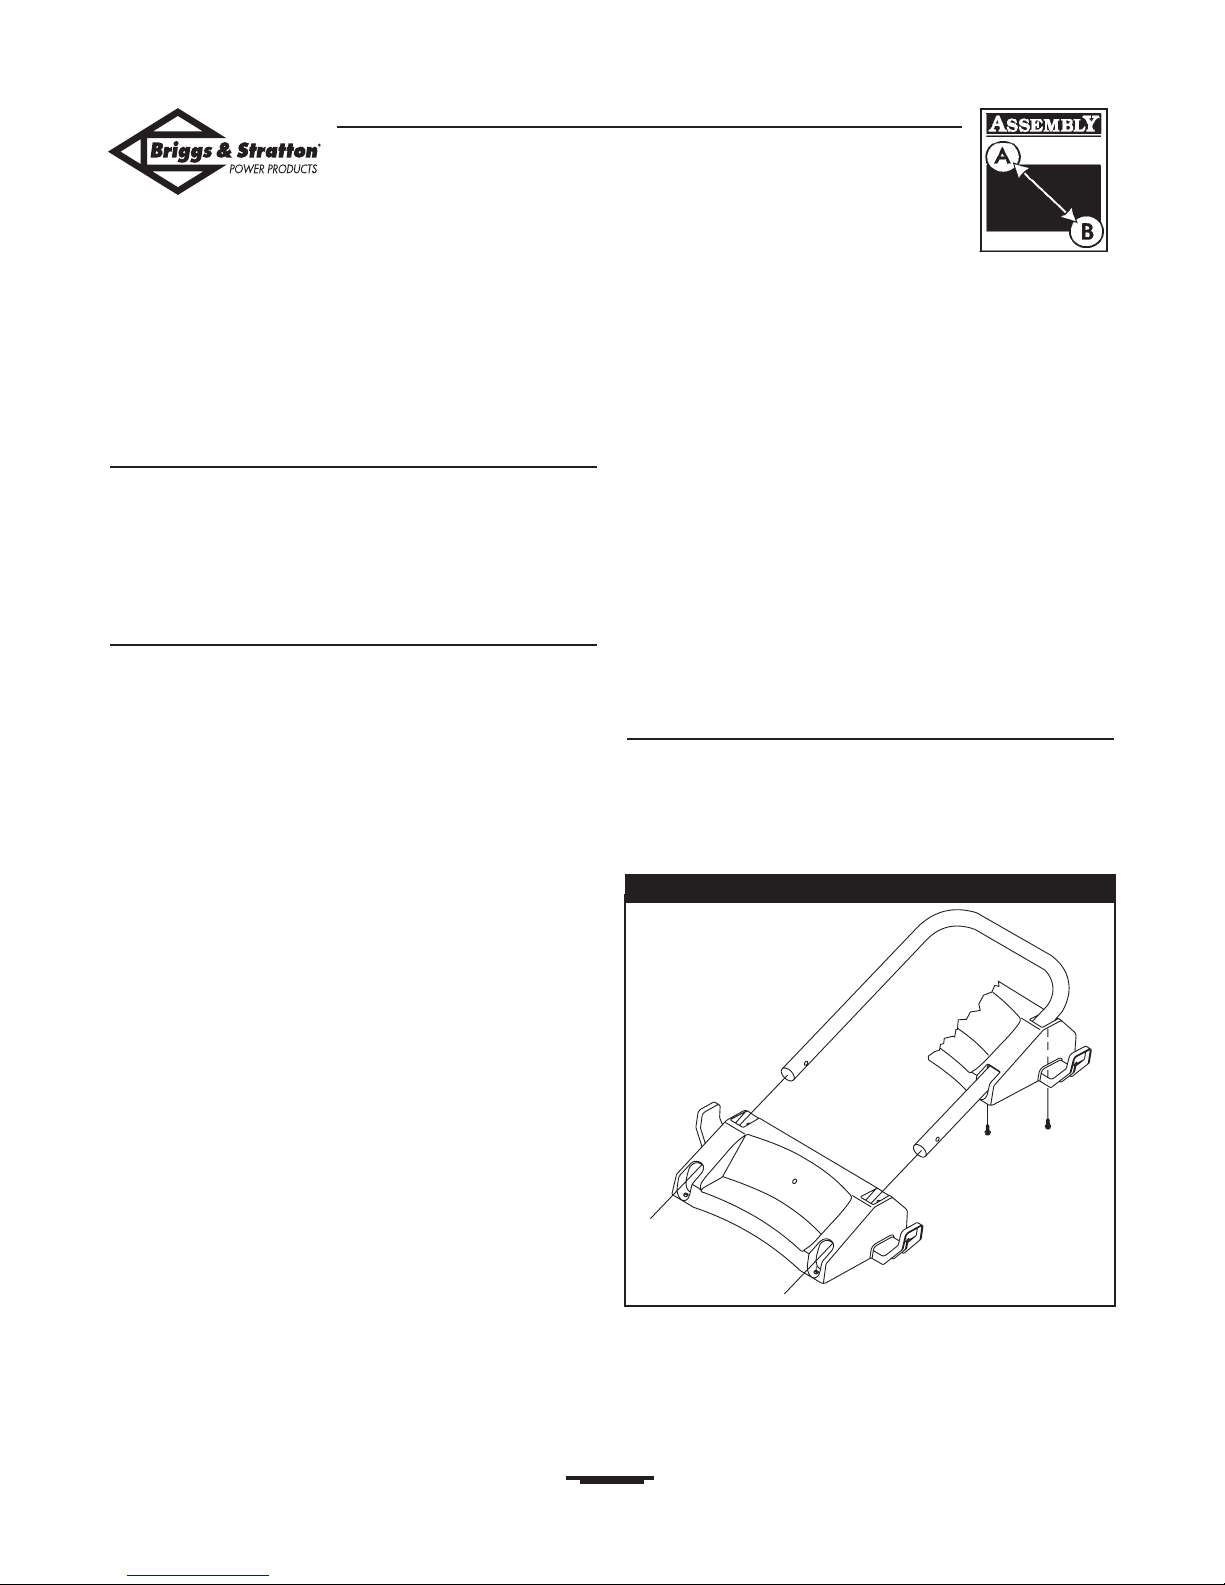
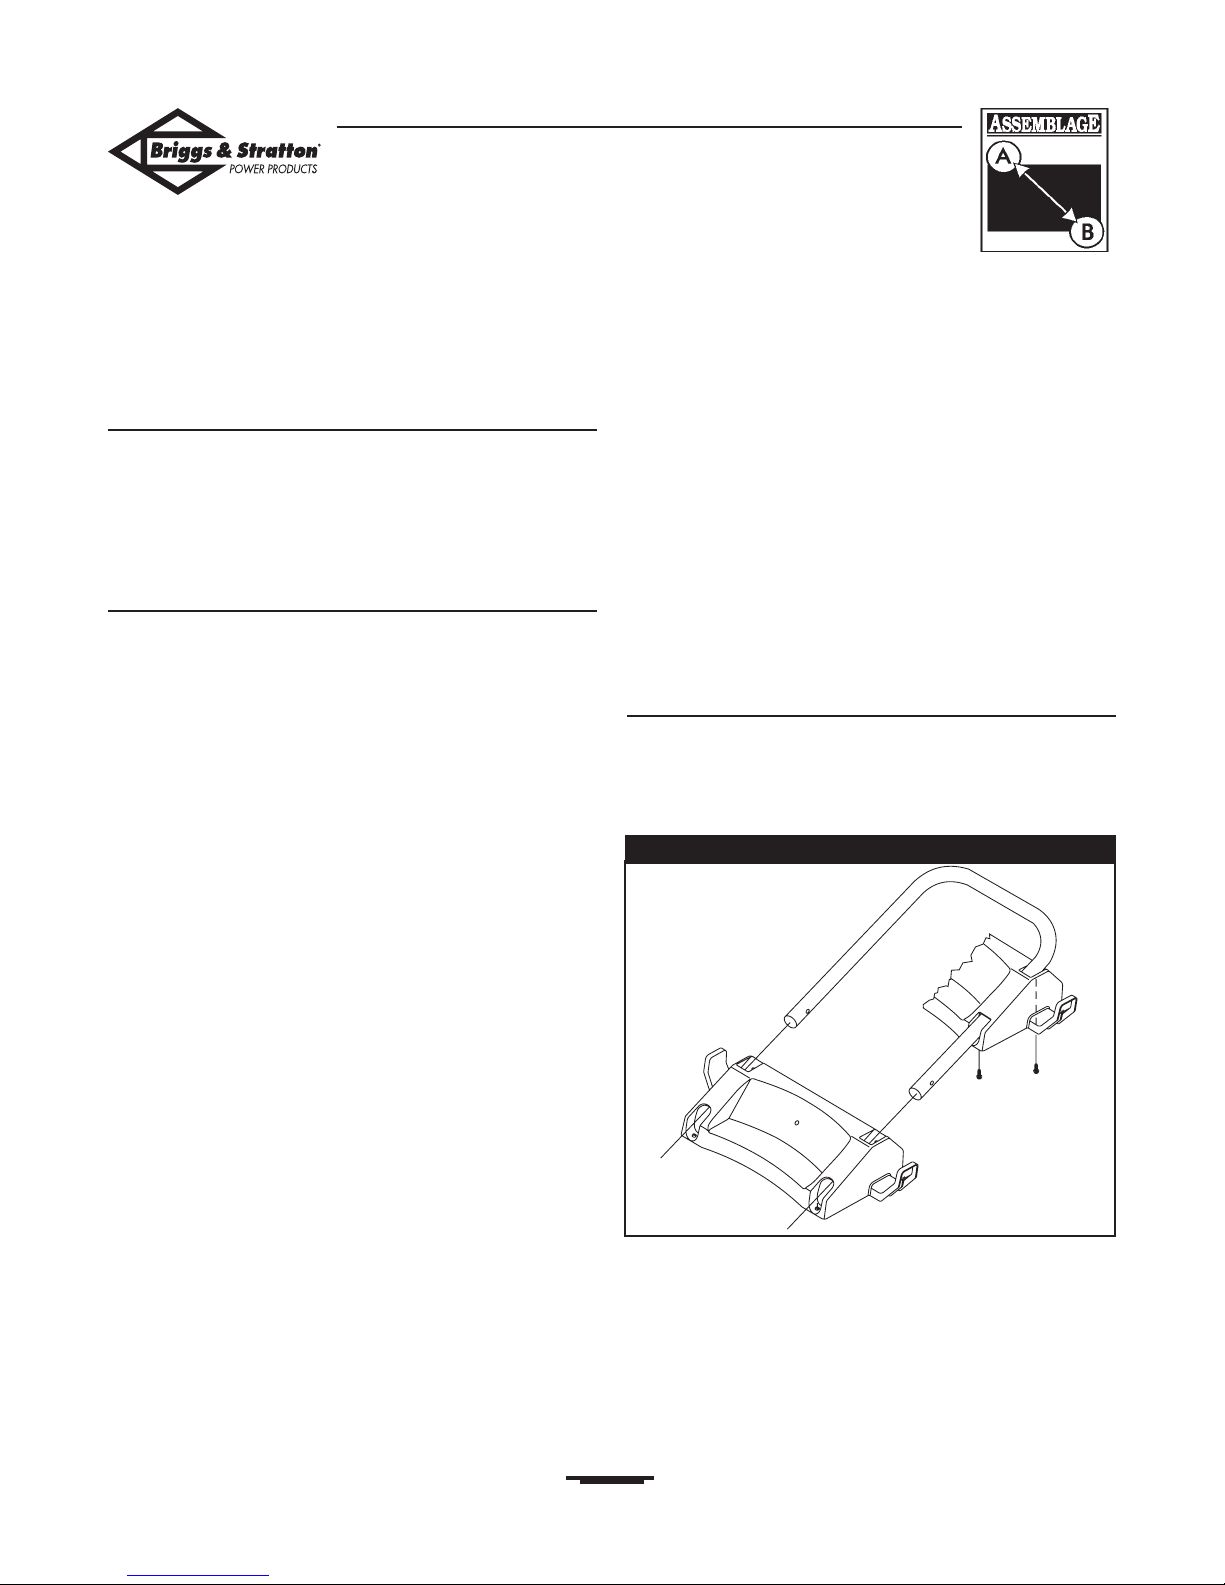
Attach Handle and Accessory Tray
NOTE:All assembly operations given in this section will
be described from the perspective of assembling the
pressure washer from the rear.
1. Slide plastic accessory tray onto handle and align holes
in accessory tray with holes on handle (Figure 2).
2. Secure tray to handle with self tapping screws using a
#2 phillips screwdriver. Ensure screws are tight but not
crushing the plastic accessory tray.
Figure 2 — Attach Accessory Tray
Briggs & Stratton Generac Generator Discount Parts Call 606-678-9623 or 606-561-4983
www.mymowerparts.com
BSPP 2700 PSI Pressure Washer
7
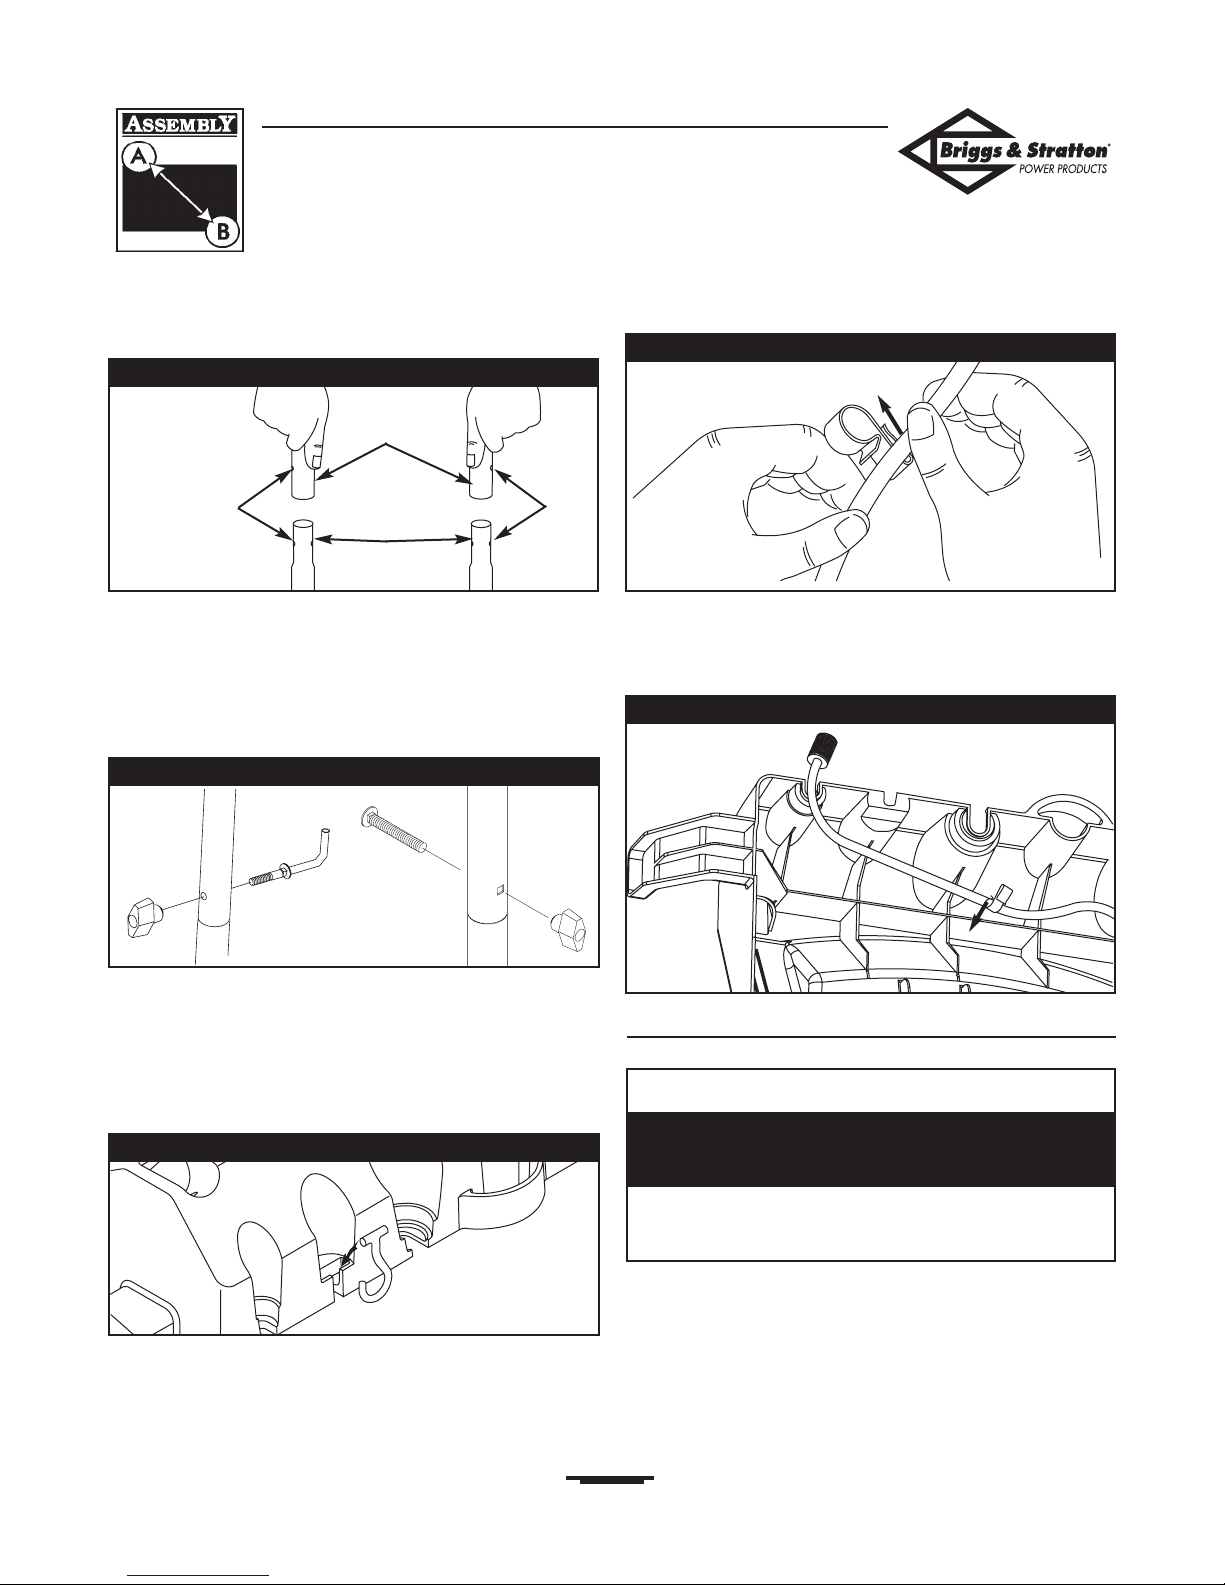
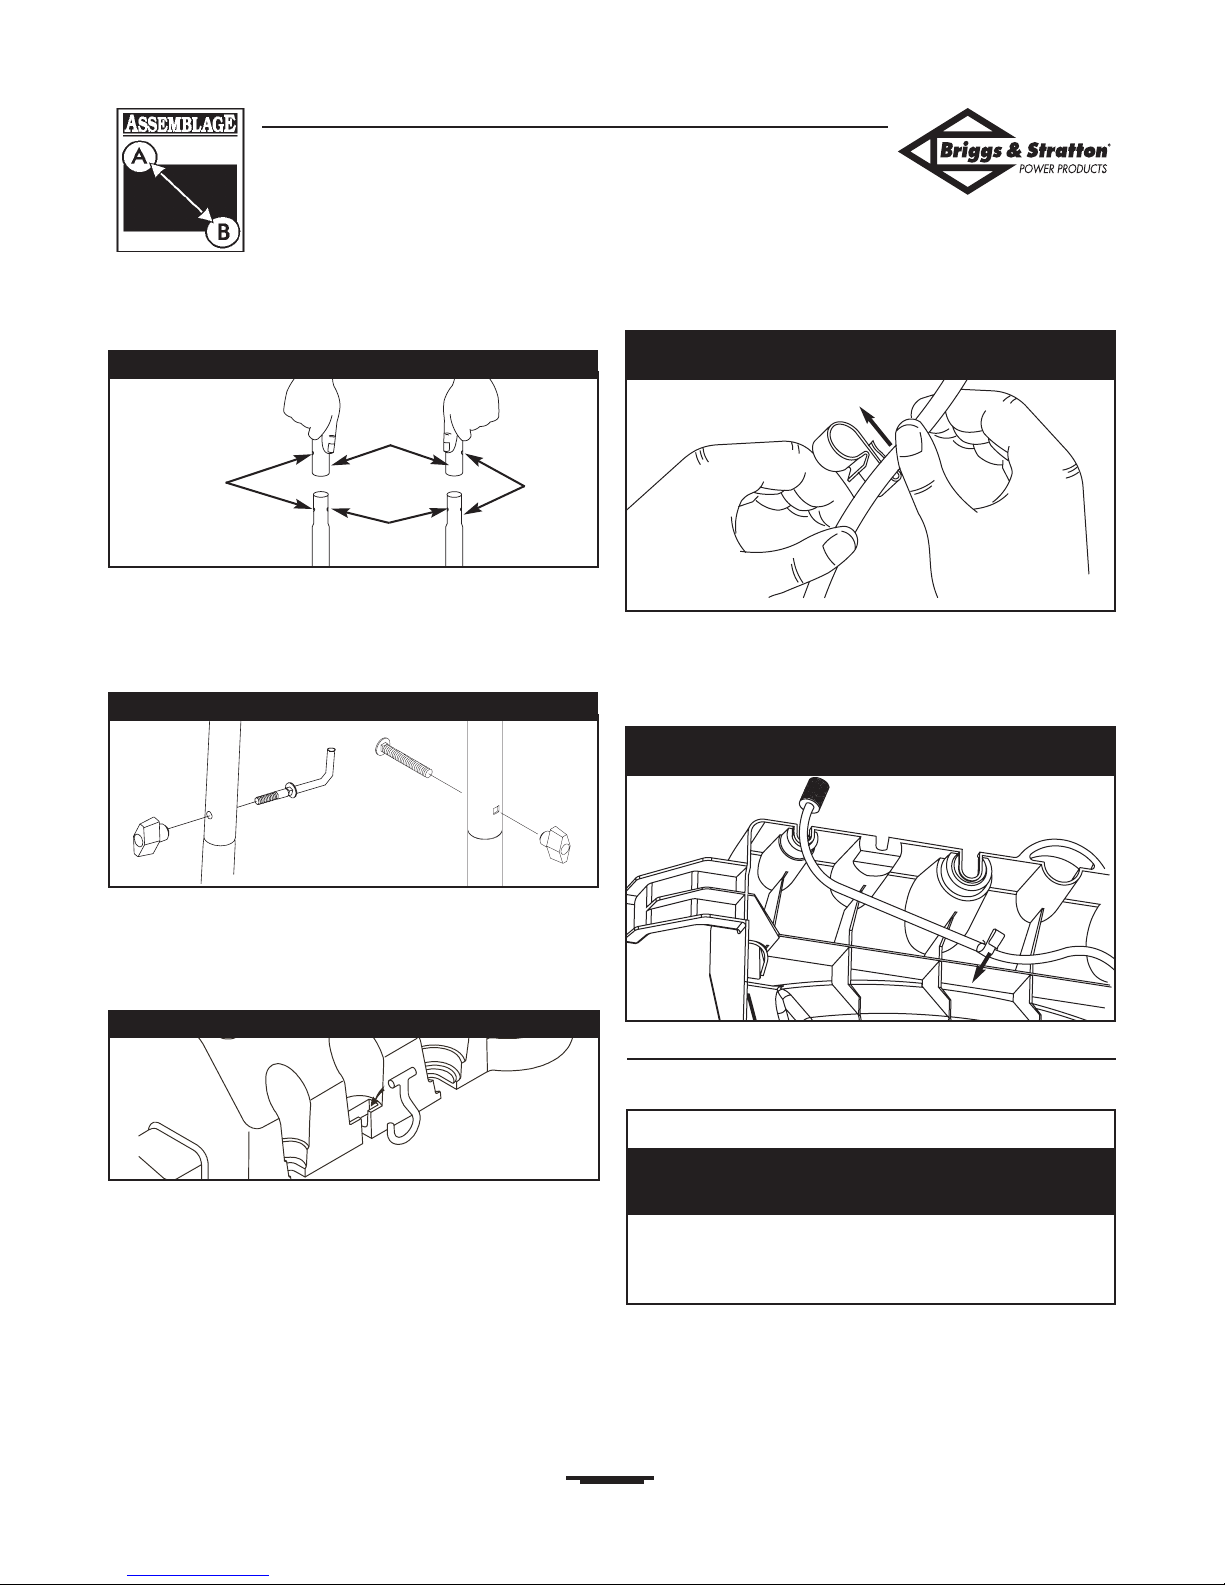
3. Place handle assembly onto handle supports connected
to main unit. Make sure holes in handle align with holes
on handle supports (Figure 3).
NOTE: It may be necessary to move the handle supports
from side to side in order to align the handle so it will slide
over the handle supports.
4. Insert “L” bolt through hole on right side of handle
(viewing from handle side of unit) and attach plastic
knob.Tighten knob by hand (Figure 4).
5. Insert carriage bolt through left side hole from outside
of unit and attach a plastic knob from inside of unit
(viewing unit from the handle side).Tighten by hand
(Figure 4).
6. Insert “J” hook into second from left slot in accessory
tray (Figure 5).
7. Pinch chemical hose and slide it into metal clip as
shown in Figure 6.
8. Tilt unit up by handle and attach metal clip to rib on
center underside of accessory tray (Figure 7). Slide
chemical hose through metal clip so that it is tight but
not kinked.
Add Engine Oil and Fuel
• Place pressure washer on a level surface.
• Refer to engine operator’s manual and follow oil and fuel
recommendations and instructions.
NOTE: Check oil often during engine break–in. Refer to
engine operator’s manual for recommendations.
CAUTION
• Refer to engine manual for oil and fuel fill information.
• Damage to equipment resulting from failure to follow this
instruction will void warranty.
Any attempt to crank or start the engine before it has
been properly filled with the recommended oil will result
in equipment failure.
Figure 5 — Install “J” Hook on Accessory Tray
Figure 6 — Slide Chemical Hose into Metal Clip
Figure 7 — Slide Metal Clip onto Accessory Tray Flange
Align Holes
Handle
Handle
Supports
Figure 3 — Attach Handle to Base
Figure 4 — Secure Handle
Briggs & Stratton Generac Generator Discount Parts Call 606-678-9623 or 606-561-4983
www.mymowerparts.com
BSPP 2700 PSI Pressure Washer
8
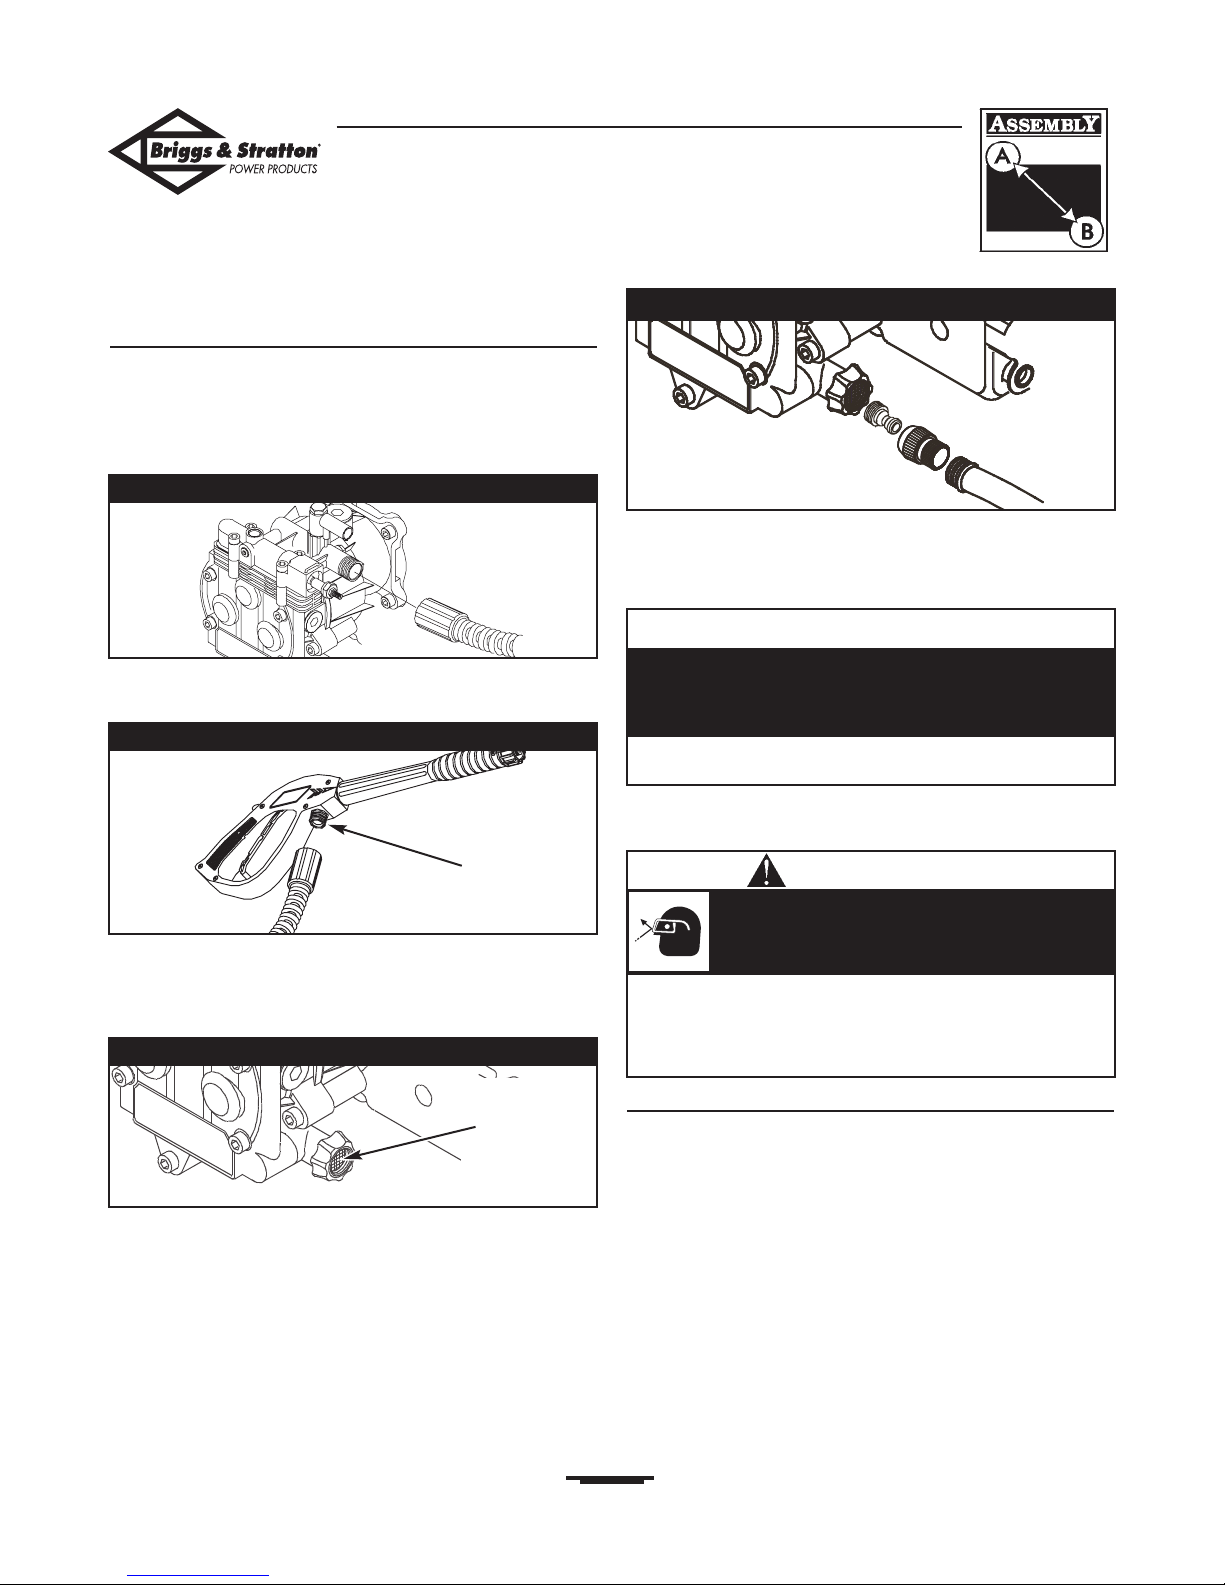
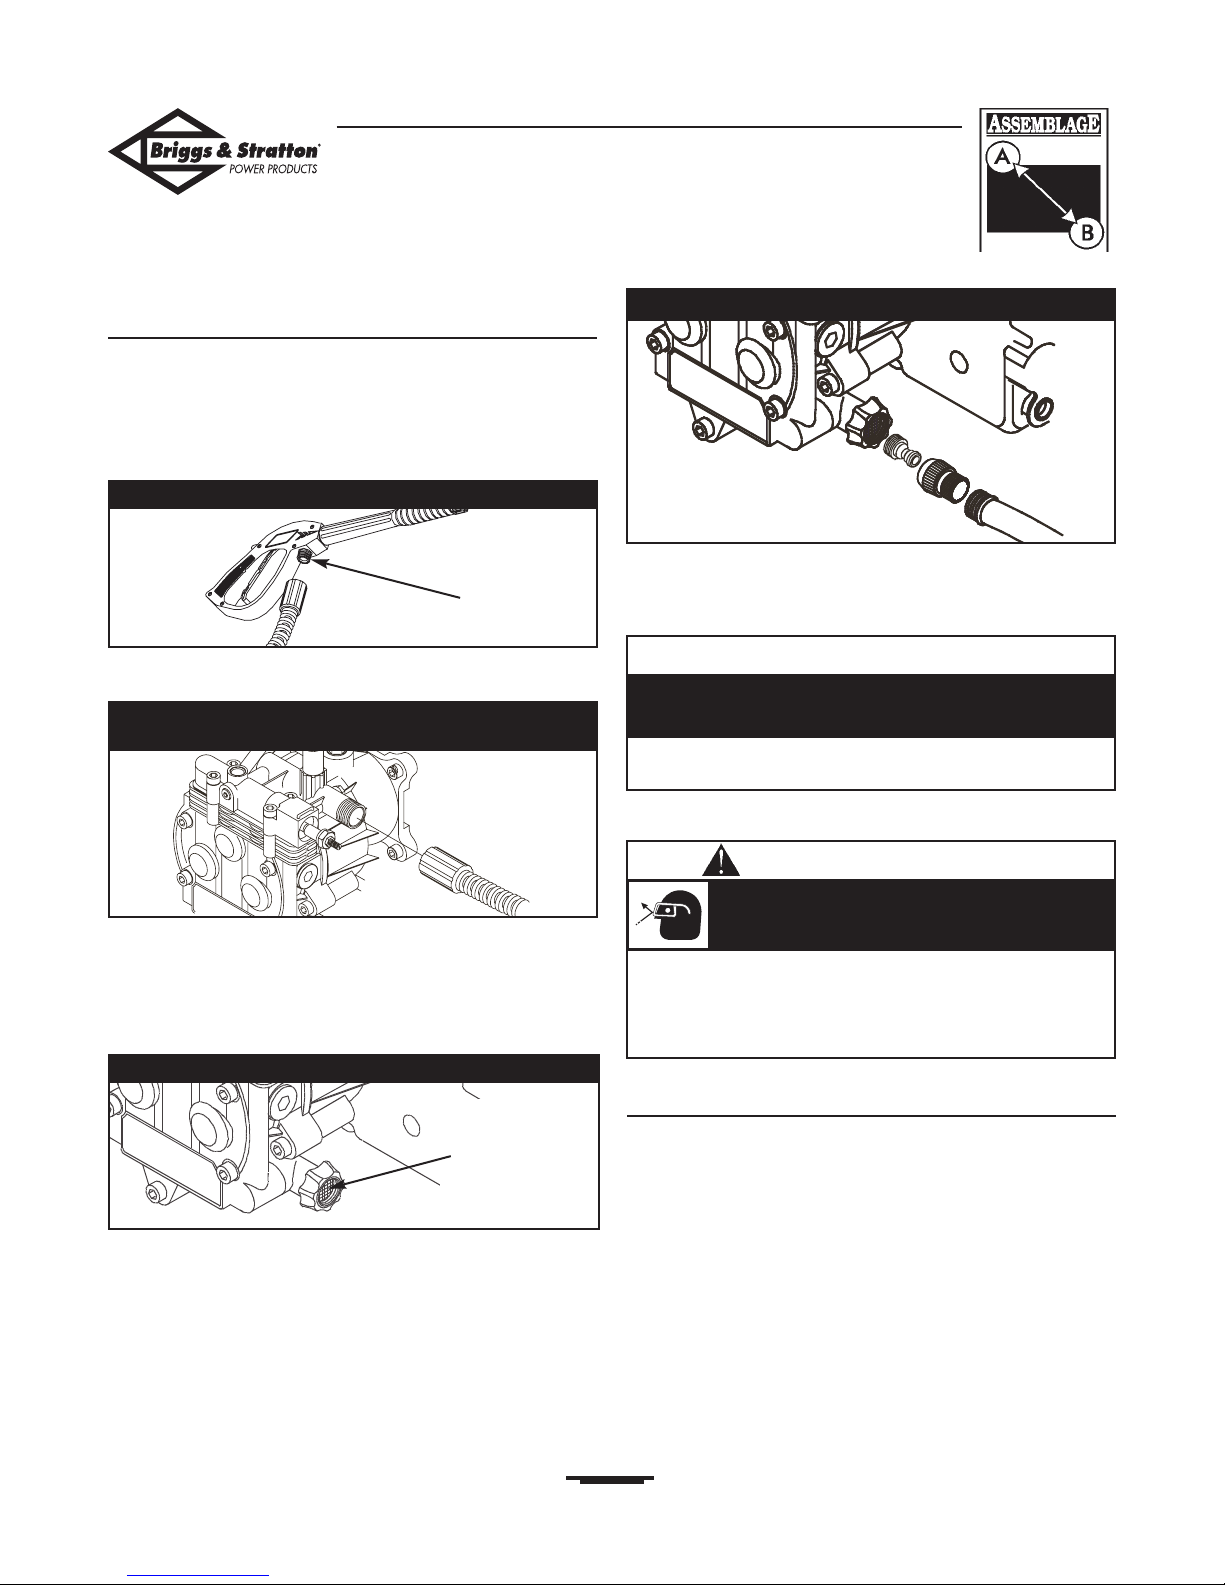
Connect Hose and Water Supply to
Pump
IMPORTANT: To avoid pump damage, you must assemble
the nozzle extension to the spray gun and attach all hoses
before you start the engine.
1. Attach one end of high pressure hose to high pressure
outlet on pump (Figure 8).Tighten by hand.
2. Attach other end of hose to base of spray gun
(Figure 9).Tighten by hand.
3. Before connecting garden hose to water inlet, inspect
inlet screen (Figure 10). Clean screen if it contains debris
or replace if damaged. DO NOT RUN PRESSURE
WASHER IF SCREEN IS DAMAGED.
4. Run water through garden hose for 30 seconds to clean
out any debris.
IMPORTANT: DO NOT siphon standing water for water
supply. Use ONLY cold water (less than 100°F).
5. Attach female quick connect to garden hose.Attach male
quick connect to water inlet on pump (Figure 11).
6. Connect garden hose (not to exceed 50 feet in length)
to water inlet (Figure 11). Pull back on collar of quick
connect, slide fitting onto pump and let go of collar. Pull
on hose to be sure of a tight connection.
7. Turn ON water and squeeze trigger on spray gun to
purge pump system of air and impurities.
Checklist Before Starting Engine
Review the unit’s assembly to confirm you have performed
all of the following:
1. Make sure handle is in place and secure.
2. Check that oil has been added to the proper level in
engine crankcase.
3. Add proper fuel to fuel tank.
4. Check for properly attached hose connections.
5. Check to make sure that there are no kinks, cuts, or
damage to high pressure hose.
6. Provide a proper water supply at an adequate flow.
7. Be sure to read “Safety Rules” and “How To Use Your
Pressure Washer” before using pressure washer.
• Always wear eye protection when using this equipment or in
vicinity of where equipment is in use.
• Before starting the pressure washer, be sure you are wearing
adequate eye protection.
High pressure spray can cause paint chips or
other particles to become airborne.
WARNING
CAUTION
• Damage to equipment resulting from failure to follow this
instruction will void warranty.
There MUST be at least ten feet of unrestricted garden
hose between the pressure washer inlet and any flow
shut off device, such as a ‘Y’ shut-off connector or other
convenience-type water shut-off valve.
Connect high
pressure hose
here
Figure 9 — Connect High Pressure Hose to Spray Gun
Figure 8 — Connect High Pressure Hose to Pump
Figure 10 — Connect Garden Hose to Water Inlet
Inspect inlet
screen, DO
NOT use if
damaged, clean
if dirty.
Figure 11 — Connect the Garden Hose to Water Inlet
Briggs & Stratton Generac Generator Discount Parts Call 606-678-9623 or 606-561-4983
www.mymowerparts.com
BSPP 2700 PSI Pressure Washer
9
HOW TO USE PRESSURE
WASHER
If you have any problems operating your pressure washer,
please contact the local Briggs & Stratton service center.
Pressure Washer Location
Pressure Washer Clearance
The pressure washer must be at least 5 ft. (152 cm) from
structures having combustible walls and/or other
combustible materials. Leave at least 3 ft. (92 cm) all around
pressure washer including overhead, for adequate cooling,
maintenance and servicing.
Place pressure washer in a well ventilated area, which will
allow for removal of deadly exhaust gas. DO NOT place
pressure washer where exhaust gas could accumulate and
enter inside or be drawn into a potentially occupied
building. Ensure exhaust gas is kept away from any
windows, doors, ventilation intakes or other openings that
can allow exhaust gas to collect in a confined area
(Figure 12). Prevailing winds and air currents should be
taken into consideration when positioning pressure washer.
How To Start Pressure Washer
To start your pressure washer for the first time, follow
these instructions step-by-step.This starting information
also applies if you have let the pressure washer sit idle for
at least a day.
1. Place pressure washer near an outside water source
capable of supplying water at a flow rate greater than
3.5 gallons per minute and no less than 20 PSI at
pressure washer end of garden hose.
2. Check that high pressure hose is tightly connected to
spray gun and to pump. See “Preparing Pressure
Washer for Use” for illustrations.
3. Make sure unit is in level position.
4. Connect garden hose to water inlet on pressure
washer pump. Turn ON the water.
5. Attach adjustable nozzle extension to spray gun
(Figure 13).Tighten by hand.
6. Place colored quick connect spray tips in slots on
holder that’s attached to nozzle extension (Figure 14).
7. Choose spray tip you want to use and insert it into
nozzle extension. See “How to Use Spray Tips”.
Figure 13 — Connect Nozzle Extension to Spray Gun
CAUTION
• Damage to equipment resulting from failure to follow this
instruction will void warranty.
DO NOT run the pump without the water supply
connected and turned on.
• Operate pressure washer ONLY outdoors.
• Keep exhaust gas from entering a confined area through
windows, doors, ventilation intakes or other openings.
• DO NOT operate pressure washer inside any building or
enclosure.
Running engine gives off carbon monoxide, an
odorless, colorless, poison gas.
Breathing carbon monoxide will cause nausea,
fainting or death.
WARNING
Figure 12 — Pressure Washer Clearance
Exhaust Port
Typical Pressure
Washer Shown
Figure 14 — Install Spray Tips in Holder
Briggs & Stratton Generac Generator Discount Parts Call 606-678-9623 or 606-561-4983
www.mymowerparts.com
8. Engage safety latch to spray gun trigger (Figure 15).
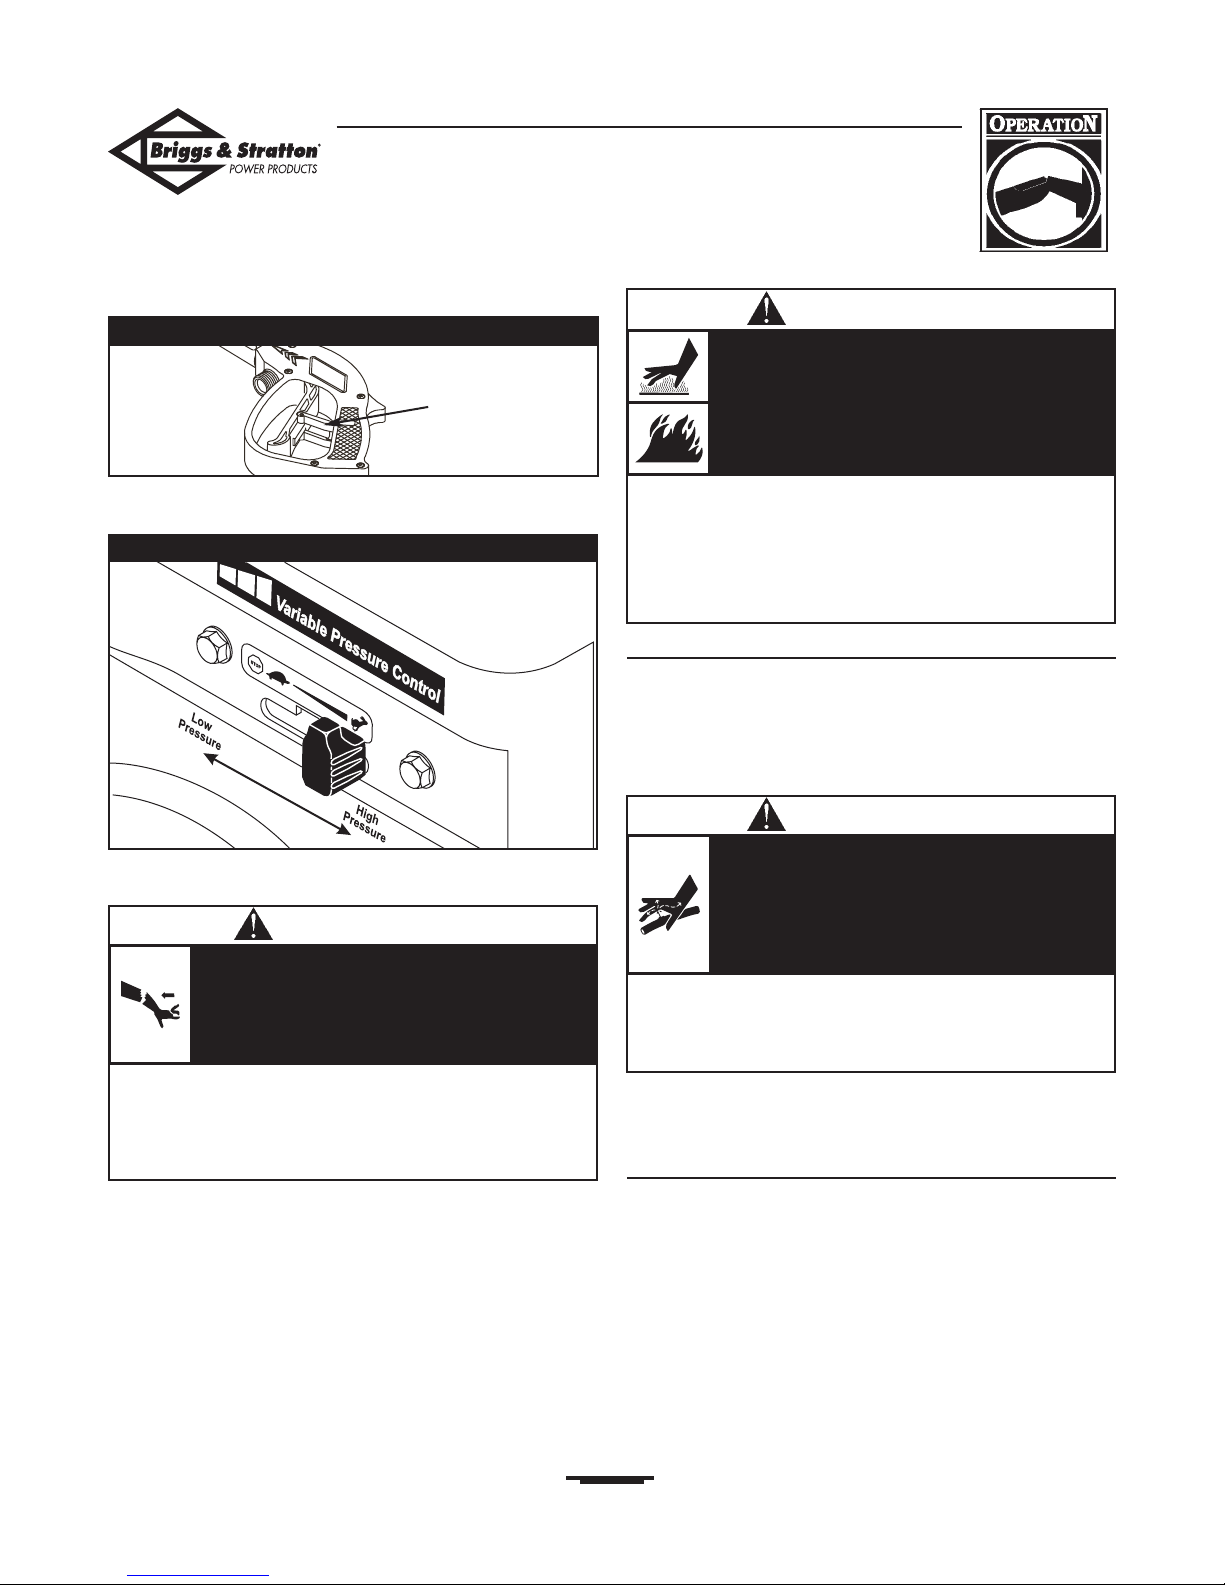
9. Move variable pressure control lever to “High”
position, shown on engine as a rabbit (Figure 16).
10. Start engine according to instructions given in engine
operator’s manual.
How To Stop Pressure Washer
• Move variable pressure control lever to “Stop” position.
• Turn engine off according to instructions given in the
engine operator’s manual.
• Squeeze trigger on the spray gun to relieve
pressure in the hose.
NOTE:A small amount of water will squirt out when
pressure is released.
How to Use Accessory Tray
The unit is equipped with an accessory tray with places to
store your nozzle extension , and slots to hold the cleaning
solution bottle and the detergent siphoning filter.There are
also two hooks at the ends of the handle to hold your
spray gun and high pressure hose.
NOTE:The extra holes in the tray are for storing a brush
and a turbo wand.The brush and turbo wand are NOT
included with your pressure washer.You can buy these
items as optional accessories.
BSPP 2700 PSI Pressure Washer
10
Figure 16 - Variable Pressure Control Lever
Safety Latch
Figure 15 — Spray Gun with Safety Latch Engaged
• When starting engine, pull cord slowly until resistance is felt
and then pull rapidly to avoid kickback.
• If engine starts and fails to continue to run or if increased
resistance is felt during starting pull attempts, squeeze trigger
on spray gun.
Rapid retraction of starter cord (kickback) will
pull hand and arm toward engine faster than
you can let go.
Broken bones, fractures, bruises or sprains could
result.
WARNING
• DO NOT touch hot surfaces.
• Allow equipment to cool before touching.
• The pressure washer must be at least 5 feet from structures
having combustible walls and/or other combustible materials.
• Keep at least 3 feet of clearance on all sides of pressure
washer for adequate cooling, maintenance and servicing.
Running engines produce heat.Temperature of
muffler and nearby areas can reach or exceed
150°F (65°C).
Severe burns can occur on contact.
Combustible debris, such as leaves, grass, brush,
etc. can catch fire.
WARNING
• Keep high pressure hose connected to pump and spray gun
while system is pressurized.
• Squeeze trigger on spray gun to relieve trapped pressure,
every time you stop engine. Engage trigger lock on spray gun.
The high pressure stream of water that this
equipment produces can pierce skin and its
underlying tissues, leading to serious injury and
possible amputation.
Spray gun retains high pressure when pressure
washer is shut down, which can cause injury.
WARNING
Briggs & Stratton Generac Generator Discount Parts Call 606-678-9623 or 606-561-4983
www.mymowerparts.com

BSPP 2700 PSI Pressure Washer
11
1. Place nozzle extension through hole on accessory tray,
as shown in Figure 17.
2. Hang chemical solution bottle on “J” hook and place
detergent siphoning filter in last slot on left (Figure 17).
3. Place spray gun on hook attached to accessory tray on
right side of unit (Figure 17).
4. Hang high pressure hose on hook attached to
accessory tray on left side of unit as shown on page 5.
How to Use Spray Tips
The quick–connect on the nozzle extension allows you to
switch between four different spray tips.The spray tips vary
the spray pattern as shown (Figure 18).
Follow these instructions to change spray tips:
1. Engage safety latch on spray gun.
2. Pull back collar on quick–connect and pull current
spray tip off. Store spray tips in space provided on
handles storage panel.
3. Select desired spray tip:
• For gentle rinse, select white 40° spray tip.
• To scour surface, select yellow 15° or red 0° spray
tip.
• To apply chemical, select black spray tip.
4. Pull back on collar,insert new spray tip and release collar.
Tug on spray tip to make sure it is securely in place.
5. For most effective cleaning, keep spray tip from 8 to
24 inches away from cleaning surface. If you get spray
tip too close, you may damage cleaning surface.
6. DO NOT get closer than 6 inches when cleaning tires.
Cleaning and Applying Chemical
IMPORTANT: Use soaps designed specifically for
pressure washers. Household detergents could damage
the pump.
To apply detergent follow these steps:
1. Review spray tip use.
2. Prepare detergent solution as required by
manufacturer.
Figure 17 — Typical Accessory Tray
• NEVER exchange spray tips without locking the safety latch
on the trigger.
A pressure washer produces a high pressure spray
which increases risk of injury and damage to unit.
CAUTION
40° White 15° Yellow 0° Red
Black
Use to apply
chemical
Figure 18 — Spray Tip Spray Patterns
Low Pressure
High Pressure
CAUTION
• Starting the engine without all the hoses connected and
without the water turned ON will damage the pump.
• Damage to equipment resulting from failure to follow this
instruction will void warranty.
You must attach all hoses before you start the engine.
Briggs & Stratton Generac Generator Discount Parts Call 606-678-9623 or 606-561-4983
www.mymowerparts.com
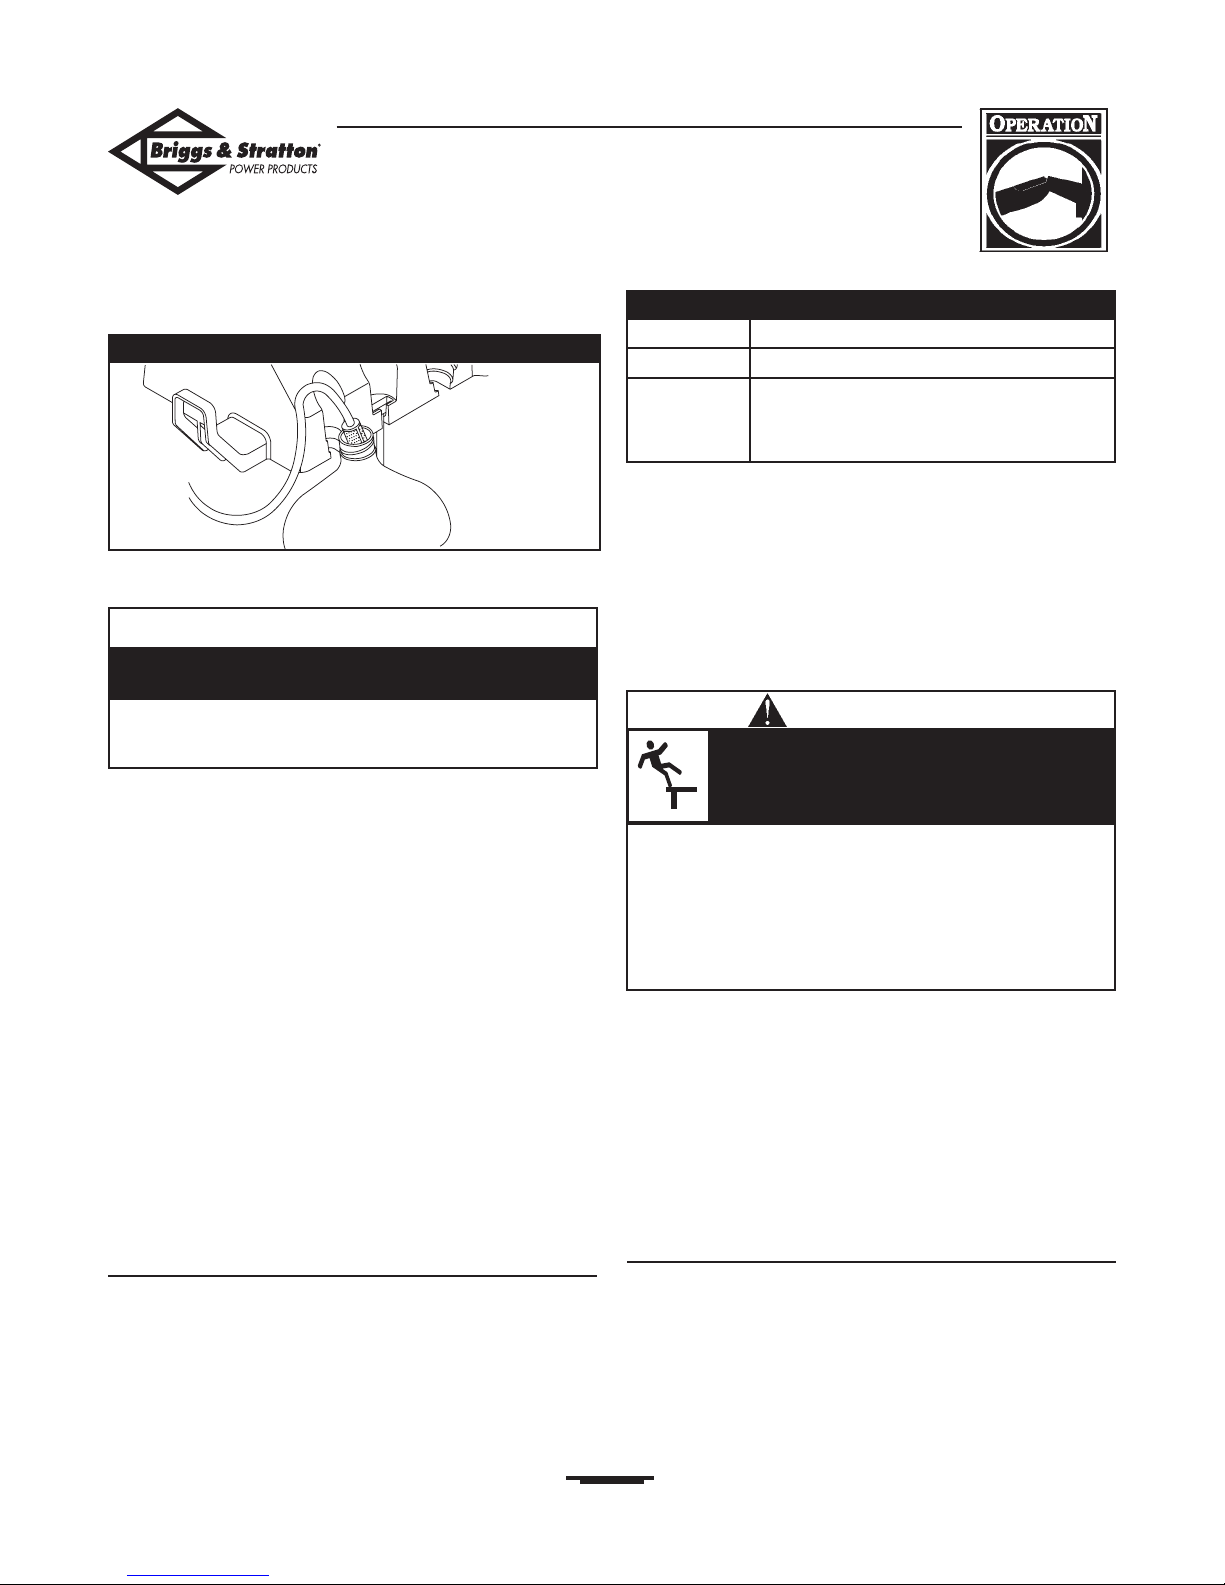
3. Hang detergent solution on “J” hook attached to
accessory tray, as shown in Figure 19.
4. Place small filter end of detergent siphoning tube into
detergent container.
5. Make sure black spray tip is installed.
NOTE: Detergent cannot be applied with the high
pressure spray tips (White, Green,Yellow, or Red).
6. Make sure garden hose is connected to water inlet.
Check that high pressure hose is connected to spray
gun and pump and start engine.
7. Apply detergent to a dry surface, starting at lower
portion of area to be washed and work upward, using
long, even, overlapping strokes.
8. Allow detergent to soak in between 3–5 minutes
before washing and rinsing. Reapply as needed to
prevent surface from drying. DO NOT allow detergent
to dry on (prevents streaking).
IMPORTANT: You must flush the chemical injection
system after each use by placing the filter into a bucket of
clean water, then run the pressure washer in low pressure
for 1-2 minutes.
Pressure Washer Rinsing
Wash and Rinse Surface
This pressure washer permits regulation of output water
pressure by varying the engine speed.The variable pressure
control lever found on the front of the engine may be set,
as shown in Figure 20:
After you have applied detergent, scour the surface
and rinse it clean as follows:
1. Apply safety latch to spray gun.
2. Remove black chemical nozzle from nozzle extension.
3. Select and install desired high pressure nozzle following
instructions “How to Use Spray Tips” on page 11.
4. Keep spray gun a safe distance from the area you plan
to spray.
5. Adjust spray pressure by sliding variable pressure control
lever left or right, as shown in Figure 16 on page 10.
6. Apply a high pressure spray to a small area and then
check the surface for damage. If no damage is found,
you can assume it is okay to continue rinsing.
7. Start at top of area to be rinsed, working down with
same overlapping strokes as you used for cleaning.
Automatic Cool Down System
(Thermal Relief)
If you run the engine on your pressure washer for
3-5 minutes without pressing the trigger on the spray gun,
circulating water in the pump can reach temperatures
above 125°F.The system engages to cool the pump by
discharging the warm water onto the ground.
BSPP 2700 PSI Pressure Washer
12
• Keep spray nozzle between 8 to 24 inches away from cleaning
surface.
• Operate this unit on a stable surface.
• Be extremely careful if you must use the pressure washer from
a ladder, scaffolding or any other relatively unstable location.
• Firmly grasp spray gun with both hands when using high
pressure spray to avoid injury if gun kicks back.
High pressure spray could cause you to fall if
you are too close to the cleaning surface.
WARNING
Figure 19 — Insert Filter into Container
CAUTION
• When inserting the filter into a detergent solution bottle,
route the tube so as to keep it from inadvertently contacting
the hot muffler.
Keep the chemical injection tube from coming in contact
with the hot muffler.
Pressure Low to High
Duty Light Medium Heavy
Application Auto Concrete Paint Removal
Boat Driveway Degreasing
Furniture Deck
Figure 20 - Variable Pressure Control
Briggs & Stratton Generac Generator Discount Parts Call 606-678-9623 or 606-561-4983
www.mymowerparts.com
BSPP 2700 PSI Pressure Washer
13
SPECIFICATIONS
Outlet Pressure . . . . . . . . . . . . . . . . . . . . . . . . . 2700 psi
Flow Rate . . . . . . . . . . . . . . 2.5 gallons per minute (gpm)
Detergent Use detergent approved for pressure washers
Water Supply Temperature . . . . Not to Exceed 100°F
Automatic Cool . . . . . . . . . . . . . Will cycle when water
Down System reaches 125°-155°F
Measured LwA . . . . . . . . . . . . . . . . . . . . . .104 dB(A)/pW
Guaranteed LwA . . . . . . . . . . . . . . . . . . .104 dB(A)/pW
Sound Pressure Level @ 7m . . . . . . . . . . . . . .79 dB(A)
Shipping Weight . . . . . . . . . . . . . . . . . . . . . . . . . . .84 lbs.
GENERAL MAINTENANCE
RECOMMENDATIONS
The pressure washer warranty does not cover items that
have been subjected to operator abuse or negligence.To
receive full value from the warranty, the operator must
maintain the pressure washer as instructed in this manual.
NOTE: Should you have questions about replacing
components on your BSPP pressure washer, please visit
our website at www.briggsandstratton.com.
• Some adjustments will need to be made periodically to
properly maintain your pressure washer.
• All maintenance in this manual and the engine operator’s
manual should be made at least once each season.
• Once a year you should check the spray gun and nozzle
extension assembly for wear.Also clean or replace the
spark plug and clean or replace the engine air filter. Please
refer to engine operator’s manual for more details.
Before Each Use
1. Check engine oil level.
2. Check water inlet screen for damage.
3. Check in-line filter for damage.
4. Check high pressure hose for leaks.
5. Check chemical injection hose and filter for damage.
6. Check spray gun and nozzle extension assembly for
leaks.
7. Rinse out garden hose to flush out debris.
PRESSURE WASHER
MAINTENANCE
Check and Clean Inlet Screen
Examine the screen on the water inlet. Clean it if the
screen is clogged or replace it if screen is damaged.
Check High Pressure Hose
The high pressure hose can develop leaks from wear,
kinking, or abuse. Inspect the hose each time before using
it. Check for cuts, leaks, abrasions or bulging of cover,
damage or movement of couplings. If any of these
conditions exist, replace the hose immediately.
Check Chemical Injection Hose
Examine the filter on the detergent tube and clean if
clogged.The tube should fit tightly on the barbed fitting.
Examine the tube for leaks or tears. Replace the filter or
tube if either is damaged.
Check Gun and Adjustable Nozzle
Extension
Examine the hose connection to the spray gun and make
sure it is secure.Test the trigger by pressing it and making
sure it “springs back” into place when you release it. Put
the safety latch in the ON position and test the trigger.You
should not be able to press the trigger.
• NEVER repair high pressure hose. Replace it.
• Replacement hose rating MUST exceed maximum pressure
rating of unit.
The high pressure stream of water that this
equipment produces can pierce skin and its
underlying tissues, leading to serious injury and
possible amputation.
WARNING
Briggs & Stratton Generac Generator Discount Parts Call 606-678-9623 or 606-561-4983
www.mymowerparts.com
BSPP 2700 PSI Pressure Washer
14
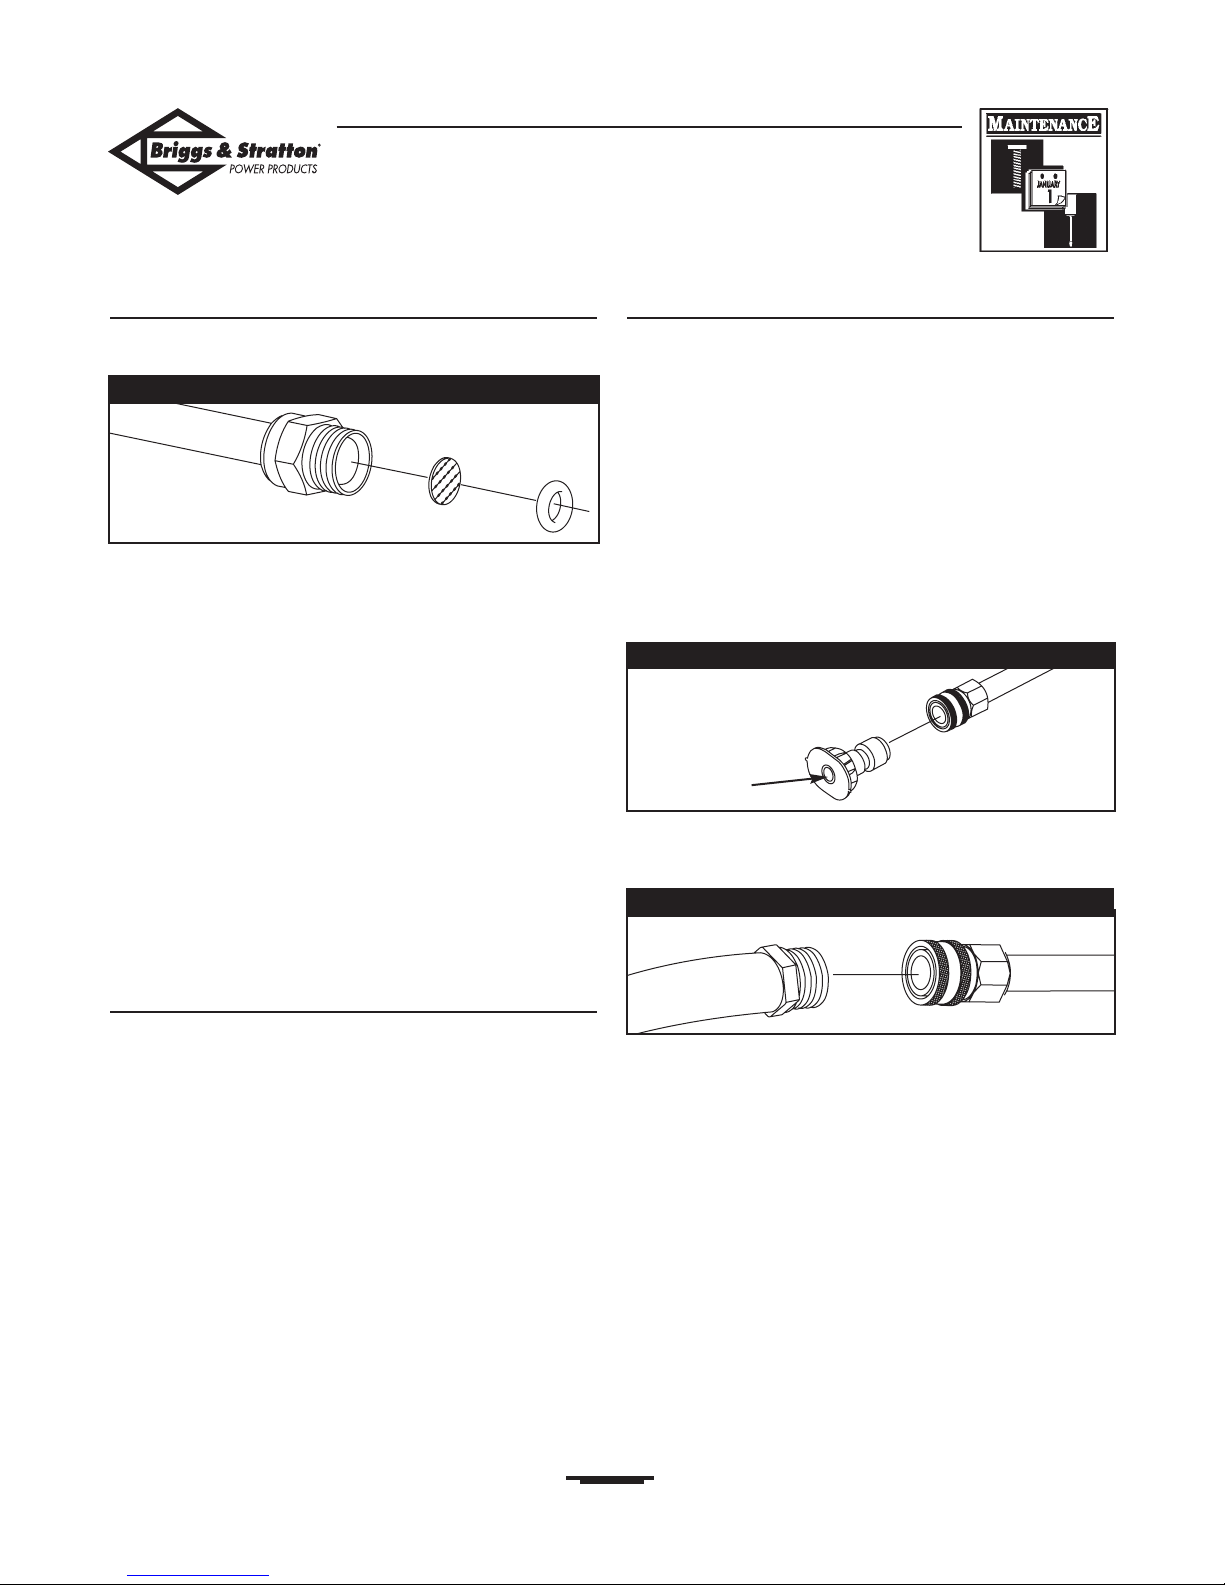
Check In-Line Filter
Refer to Figure 21 and service the in-line filter if it
becomes clogged, as follows:
1. Detach spray gun and nozzle extension from high
pressure hose. Detach nozzle extension from spray gun
and remove o-ring and screen from nozzle extension.
Flush screen, spray gun, and nozzle extension with clean
water to clear debris.
2. If screen is damaged, o-ring kit contains a replacement
in-line filter screen and o-ring. If undamaged, reuse
screen.
3. Place in-line filter screen into threaded end of nozzle
extension. Direction does not matter. Push screen in
with eraser end of pencil until it rests flat at bottom of
opening.Take care to not bend screen.
4. Place o-ring into threaded end of nozzle extension. Push
o-ring snugly against in-line filter screen.
5. Assemble nozzle extension to spray gun, as described
earlier in this manual.
Cleaning Chemical Injection Hose
If you used the chemical injection hose, you must flush it
with clean water before stopping the engine.
1. Place chemical injection siphon/filter in a bucket full of
clean water.
2. Attach black low pressure spray tip.
3. Flush for 1-2 minutes.
4. Shut off engine.
IMPORTANT: Simply shutting OFF engine will not
release pressure in the system. When the engine has
shut down, squeeze the trigger on the spray gun to
relieve the pressure in the hose.
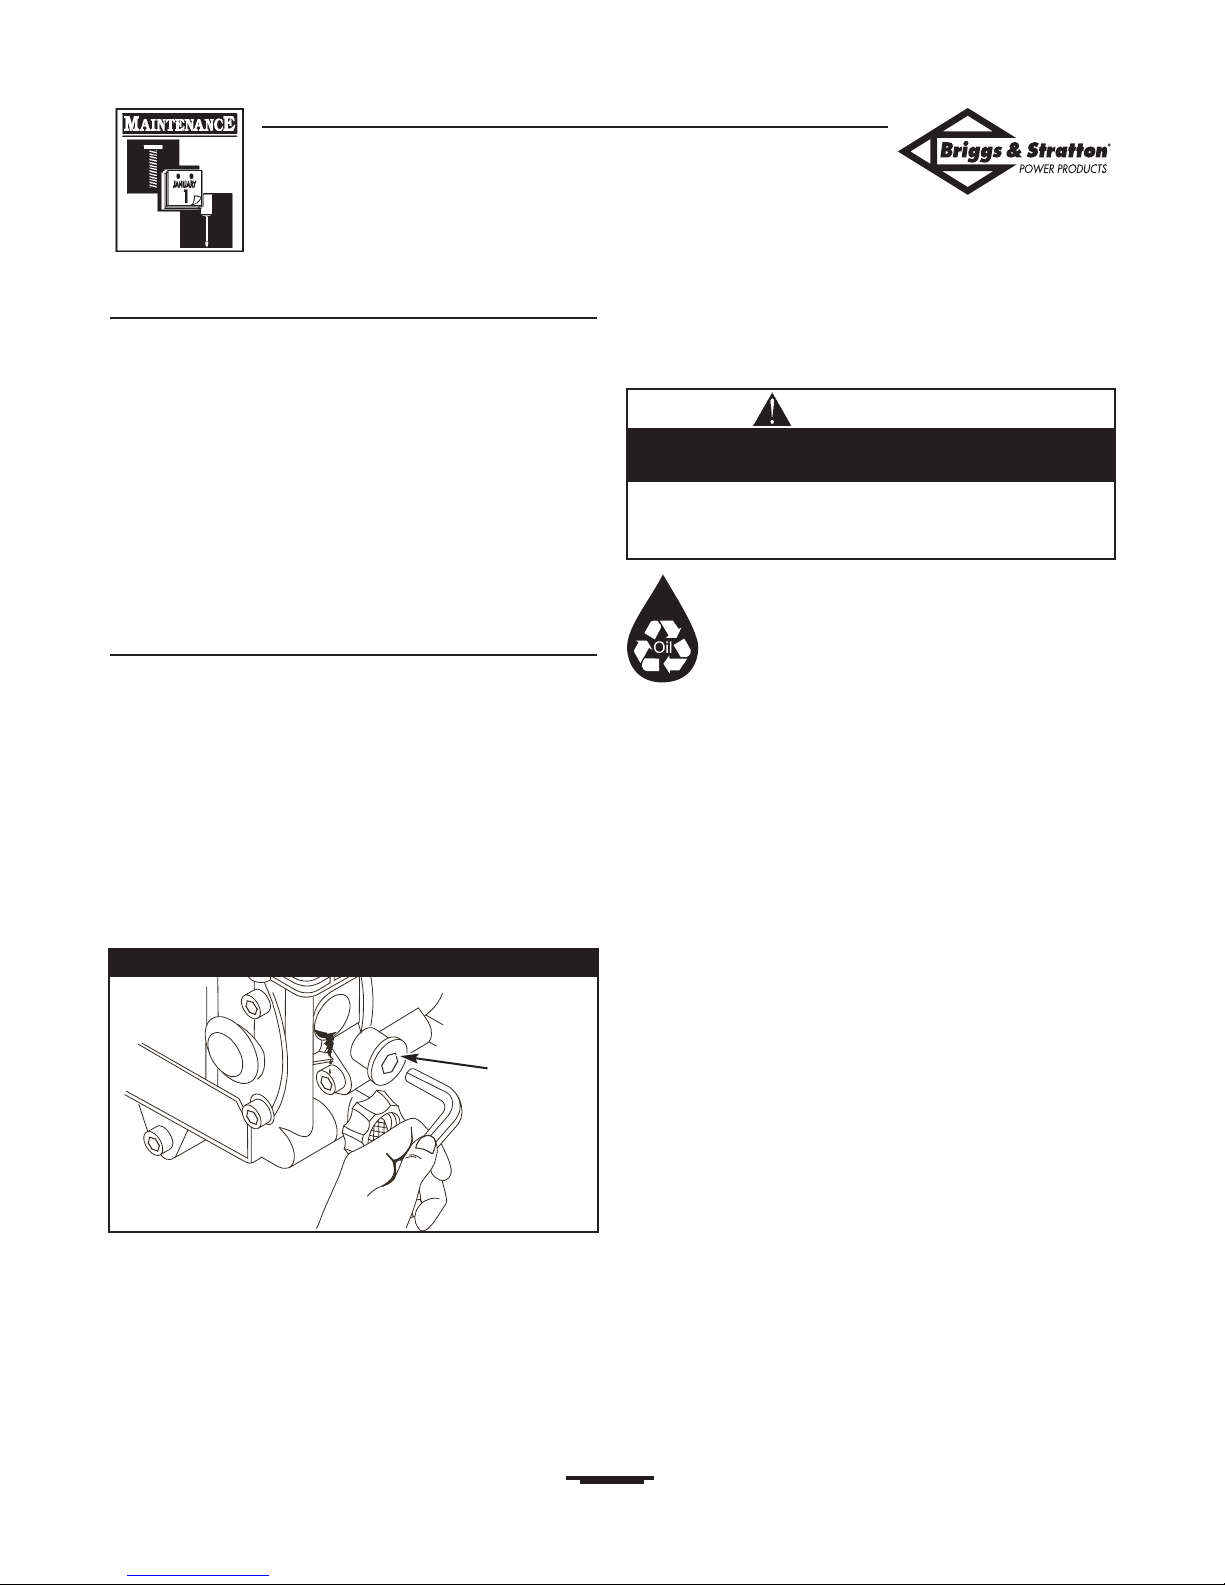
Nozzle Maintenance
A pulsing sensation felt while squeezing the spray gun
trigger may be caused by excessive pump pressure.The
principal cause of excessive pump pressure is a spray tip
clogged or restricted with foreign materials, such as dirt,
etc.To correct the problem, immediately clean the spray tip
following these instructions:
1. Shut off engine and turn off water supply.
2. Remove spray tip from end of nozzle extension.
3. Remove in-line filter from other end of nozzle
extension.
4. Use a small paper clip to free any foreign material
clogging or restricting spray tip (Figure 22).
5. Using a garden hose, remove additional debris by back
flushing water through nozzle extension (Figure 23).
Back flush between 30 to 60 seconds.
6. Reinstall spray tip and in-line filter into nozzle
extension.
7. Reconnect nozzle extension to spray gun.
8. Reconnect water supply, turn on water, and start
engine.
9. Test pressure washer by operating with each Quick
Connect spray tip.
Nozzle Extension
Filter Screen
O-ring
Figure 21 — Clean In-Line Filter
Use wire here
to remove
debris.
Figure 22 — Nozzle Maintenance
Figure 23 — Backflushing the Nozzle Extension
Briggs & Stratton Generac Generator Discount Parts Call 606-678-9623 or 606-561-4983
www.mymowerparts.com
BSPP 2700 PSI Pressure Washer
15
O–Ring Maintenance
Through the normal operation of your pressure washer,
o–rings are used to keep the connections of the hoses and
spray gun tight and leak–free.These o-rings may become
worn or damaged.
An O–Ring Maintenance Kit is provided with your pressure
washer which includes replacement o-rings, rubber washer
and water inlet filter. Refer to the instruction sheet
provided in the kit to service your unit’s o-rings. Note that
you will not use all of the parts in the kit.
To remove a worn or damaged o–ring; use a small flathead
screwdriver to get underneath the o-ring and pry it off.
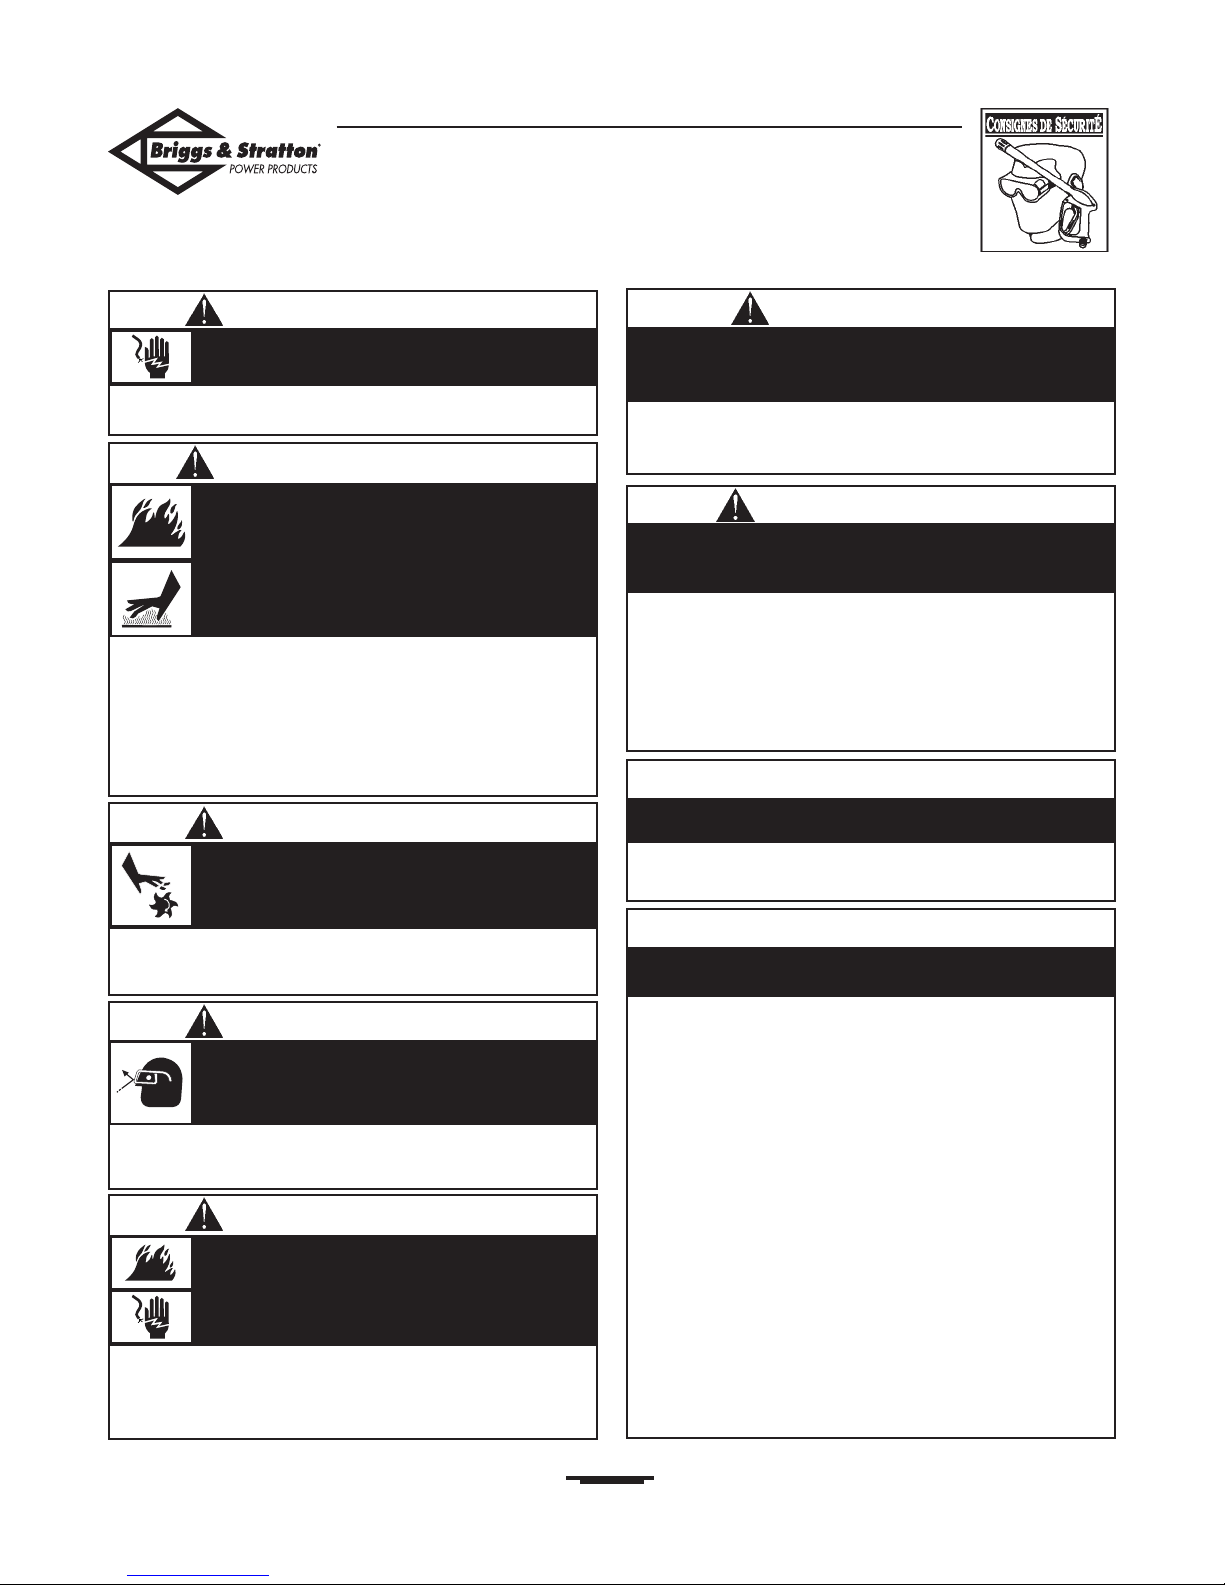
Pump Maintenance
Changing Pump Oil
Change oil every 50 hours or once yearly, whichever
occurs first.
NOTE:You must purchase a premeasured bottle of pump
oil, item number 190585GS, by contacting the nearest
authorized service center.
Change pump oil as follows:
1. Drain engine oil and fuel from pressure washer.
2. Use a 8mm allen wrench to remove black pump oil
cap between high pressure outlet and garden hose
inlet (Figure 24).
3. Tilt pressure washer to drain oil into an approved
container until it drips slowly from pump.
4. Tilt pressure washer in opposite direction and empty
premeasured pump oil bottle into same opening (a
small funnel may be helpful).
5. Install black pump oil cap and tighten firmly.
6. Set pressure washer in upright position.Add fuel and
engine oil.
ENGINE MAINTENANCE
See the engine operator’s manual for instructions on how
to properly maintain the engine.
KEEP OUT OF REACH OF CHILDREN. DON'T
POLLUTE. CONSERVE RESOURCES. RETURN
USED OIL TO COLLECTION CENTERS.
PREPARING THE UNIT
FOR STORAGE
Water should not remain in the unit for long periods of
time. Sediments or minerals can deposit on pump parts and
“freeze” pump action. If you do not plan to use the pressure
washer for more than 30 days, follow this procedure:
1. Flush detergent siphoning tube by placing the filter into
a pail of clean water while running pressure washer in
low pressure mode. Flush for one to two minutes.
2. Shut off the engine and let it cool, then remove all
hoses. Disconnect spark plug wire from spark plug.
3. Empty the pump of all pumped liquids by pulling the
recoil handle about 6 times.This should remove most
of the liquid in the pump.
4. Draw RV antifreeze (non-alcohol) into the pump by
pouring the solution into a 3-foot section of garden
hose connected to inlet adapter and pulling recoil
handle twice.
If available, use PumpSaver in place of RV antifreeze
and follow package instructions.
5. Store unit in a clean, dry area.
STORING THE ENGINE
See the engine operator’s manual for instructions on how
to properly prepare the engine for storage.
Oil Cap
Figure 24 - Changing Pump Oil
• Used motor oil has been shown to cause skin cancer in
certain laboratory animals.
• Thoroughly wash exposed areas with soap and water.
Avoid prolonged or repeated skin contact with used
motor oil.
CAUTION
Briggs & Stratton Generac Generator Discount Parts Call 606-678-9623 or 606-561-4983
www.mymowerparts.com

BSPP 2700 PSI Pressure Washer
16
TROUBLESHOOTING
Problem Cause Correction
Pump has following problems:
failure to produce pressure,
erratic pressure, chattering, loss
of pressure, low water volume.
1. Low pressure spray tip installed.
2. Water inlet is blocked.
3. Inadequate water supply.
4. Inlet hose is kinked or leaking.
5. Clogged inlet hose strainer.
6. Water supply is over 100°F.
7. High pressure hose is blocked or
leaks.
8. Gun leaks.
9. Spray tip is obstructed.
10. Pump is faulty.
1. Replace spray tip with high
pressure spray tip.
2. Clear inlet.
3. Provide adequate water flow.
4. Straighten inlet hose, patch leak.
5. Check and clean inlet hose
strainer.
6. Provide cooler water supply.
7. Clear blocks in outlet hose.
8. Replace gun.
9. Clean spray tip.
10. Contact Authorized service facility.
Detergent fails to mix with spray.
1. Detergent siphoning tube is not
submerged.
2. Chemical filter is clogged or
cracked.
3. Dirty in-line filter.
4. High pressure spray tip installed.
1. Insert detergent siphoning tube
into detergent.
2. Clean or replace filter/detergent
siphoning tube.
3. See "Check In-Line Filter".
4. Replace spray tip with low
pressure spray tip.
Engine shuts down during
operation.
Out of gasoline. Fill fuel tank.
Briggs & Stratton Generac Generator Discount Parts Call 606-678-9623 or 606-561-4983
www.mymowerparts.com

BSPP 2700 PSI Pressure Washer
17
NOTES
Briggs & Stratton Generac Generator Discount Parts Call 606-678-9623 or 606-561-4983
www.mymowerparts.com

BSPP 2700 PSI Pressure Washer
18
NOTES
Briggs & Stratton Generac Generator Discount Parts Call 606-678-9623 or 606-561-4983
www.mymowerparts.com

BRIGGS & STRATTON POWER PRODUCTS GROUP, LLC EQUIPMENT OWNER WARRANTY POLICY
LIMITED WARRANTY
Briggs & Stratton Power Products Group, LLC will repair or replace, free of charge, any part(s) of the equipment that is defective in material
or workmanship or both. Transportation charges on parts submitted for repair or replacement under this warranty must be borne by
purchaser. This warranty is effective for the time periods and subject to the conditions stated below. For warranty service, find the nearest
Authorized Service Dealer in our dealer locator map at www.briggspowerproducts.com.
THERE IS NO OTHER EXPRESS WARRANTY. IMPLIED WARRANTIES, INCLUDING THOSE OF MERCHANTABILITY AND FITNESS
FOR A PARTICULAR PURPOSE, ARE LIMITED TO ONE YEAR FROM PURCHASE, OR TO THE EXTENT PERMITTED BY LAW ANY
AND ALL IMPLIED WARRANTIES ARE EXCLUDED. LIABILITY FOR INCIDENTAL OR CONSEQUENTIAL DAMAGES ARE EXCLUDED
TO THE EXTENT EXCLUSION IS PERMITTED BY LAW. Some states or countries do not allow limitations on how long an implied warranty
lasts, and some states or countries do not allow the exclusion or limitation of incidental or consequential damages, so the above limitation
and exclusion may not apply to you. This warranty gives you specific legal rights and you may also have other rights which vary from state
to state or country to country.
OUR EQUIPMENT*
OUTBOARD
MOTOR
PRESSURE
WASHER
WATER PUMP
(Not available in the
USA)
PORTABLE
GENERATOR
WELDER
LLeessss tthhaann 1100 KKWW 1100 KKWW oorr ggrreeaatteerr
TTrraannssffeerr sswwiittcchh
2 years
none
1 year
90 days
1 year
90 days
2 years
1 year
2 years
none
3 years or
1500 hours
none
3 years
none
WARRANTY PERIOD**
HOME STANDBY GENERATOR SYSTEM
Consumer Use
Commercial Use
* The engine and starting batteries are warranted solely by the manufacturers of those products.
** 2 years for all consumer products in the European Union. Parts only on 2nd year for consumer use of Portable Generator and
Home Standby Generator System - Less than 10 KW, outside of European Union.
The warranty period begins on the date of purchase by the first retail consumer or commercial end user, and continues for the period of time
stated in the table above. “Consumer use" means personal residential household use by a retail consumer. “Commercial use" means all other
uses, including use for commercial, income producing or rental purposes. Once equipment has experienced commercial use, it shall thereafter
be considered as commercial use for purposes of this warranty. Equipment used for prime power in place of utility are not applicable to
this warranty. Electric powered pressure washers used for commercial purposes are not warranted.
NO WARRANTY REGISTRATION IS NECESSARY TO OBTAIN WARRANTY ON BRIGGS & STRATTON PRODUCTS. SAVE YOUR
PROOF OF PURCHASE RECEIPT. IF YOU DO NOT PROVIDE PROOF OF THE INITIAL PURCHASE DATE AT THE TIME WARRANTY
SERVICE IS REQUESTED, THE MANUFACTURING DATE OF THE PRODUCT WILL BE USED TO DETERMINE THE WARRANTY
PERIOD.
ABOUT YOUR WARRANTY
We welcome warranty repair and apologize to you for being inconvenienced. Any Authorized Service Dealer may perform warranty repairs. Most
warranty repairs are handled routinely, but sometimes requests for warranty service may not be appropriate. For example, warranty service would not
apply if equipment damage occurred because of misuse, lack of routine maintenance, shipping, handling, warehousing or improper installation.
Similarly, the warranty is void if the manufacturing date or the serial number on the equipment has been removed or the equipment has been altered
or modified. During the warranty period, the Authorized Service Dealer, at its option, will repair or replace any part that, upon examination, is found to
be defective under normal use and service. This warranty will not cover the following repairs and equipment:
• Normal Wear: Outdoor Power Equipment, like all mechanical devices, needs periodic parts and service to perform well. This warranty does not
cover repair when normal use has exhausted the life of a part or the equipment.
• Installation and Maintenance: This warranty does not apply to equipment or parts that have been subjected to improper or unauthorized
installation or alteration and modification, misuse, negligence, accident, overloading, overspeeding, improper maintenance, repair or storage so as,
in our judgment, to adversely affect its performance and reliability. This warranty also does not cover normal maintenance such as adjustments,
fuel system cleaning and obstruction (due to chemical, dirt, carbon, lime, etc.).
• Other Exclusions: This warranty excludes wear items such as quick couplers, oil gauges, belts, o-rings, filters, pump packing, etc., pumps that
have been run without water supplied or damage or malfunctions resulting from accidents, abuse, modifications, alterations, or improper servicing
or freezing or chemical deterioration. Accessory parts such as guns, hoses, wands and nozzles are excluded from the product warranty. This
warranty excludes failures due to acts of God and other force majeure events beyond the manufacturers control. Also excluded is used,
reconditioned, and demonstration equipment; equipment used for prime power in place of utility power and equipment used in life support
applications.
BRIGGS & STRATTON POWER PRODUCTS GROUP, LLC
JEFFERSON, WI, USA
Effective September 1, 2004 replaces all undated Warranties and all Warranties dated before September 1, 2004
Briggs & Stratton Generac Generator Discount Parts Call 606-678-9623 or 606-561-4983
www.mymowerparts.com

Nettoyeur Haute Pression 2700 PSI de BSPP
20
TABLE DES MATIÈRES
Consignes de sécurité . . . . . . . . . . . . . . . . . . . . . . . . . . . . . . . 20-22
Connaître Votre Nettoyeur Haute Pression . . . . . . . . . . . . . . . . 23
Assemblage . . . . . . . . . . . . . . . . . . . . . . . . . . . . . . . . . . . . . . . 24-26
Fonctionnement . . . . . . . . . . . . . . . . . . . . . . . . . . . . . . . . . . . 27-30
Caractéristiques . . . . . . . . . . . . . . . . . . . . . . . . . . . . . . . . . . . . . . 31
Maintenance. . . . . . . . . . . . . . . . . . . . . . . . . . . . . . . . . . . . . . . 31-33
Entreposage . . . . . . . . . . . . . . . . . . . . . . . . . . . . . . . . . . . . . . . . . 33
Diagnostic des problèmes . . . . . . . . . . . . . . . . . . . . . . . . . . . . . . 34
Garantie . . . . . . . . . . . . . . . . . . . . . . . . . . . . . . . . . . . . . . . . . . . . 35
DESCRIPTION DE L'ÉQUIPEMENT
L'utilisateur doit lire ce manuel soigneusement et
se familiariser avec le nettoyeur haute pression. Il
doit prendre connaissance de ses applications,de
ses limites et des risques inhérents à son utilisation.
Ce manuel contient les informations relatives à un nettoyeur
haute pression fonctionnant sous 185 bars (2 700 PSI) avec un
débit de 9,46 l/mn (2,5 gallons/mn). Ce système puissant de
grande qualité comporte de grosses roues de 25 cm (10 pouces),
une pompe dotée d'un système de refroidissement automatique,
un système d'injection de produit chimique, une rallonge de buse
à embouts à fixation rapide, des lunettes de sécurité, un tuyau
flexible de 7,60 m (25 pieds) et plus encore.
Tout a été fait pour s'assurer que les renseignements contenus
dans le présent guide soient exacts et à jour.Toutefois, le
fabriquant se réserve le droit de changer, de modifier ou encore
d'amélorer le système en tout temps et ce, sans préavis.
CONSIGNES DE SÉCURITÉ
Voici le symbole d'avertissement de sécurité. Ces
symboles attirent votre attention sur le risque de
blessure corporelle. Pour éviter toute blessure
mortelle ou non, observer toutes les consignes de
sécurité associées à ces symboles.
Le symbole d'alerte
() apparaît complété par un qualificatif
(DANGER,ATTENTION, AVERTISSEMENT), une image ou un
message de sécurité pour attirer l'attention sur les risques. Un
DANGER signale un risque qui - s'il n'est pas écarté - entraîne des
blessures graves ou la mort.Un AVERTISSEMENT signale un
risque qui - s'il n'est pas écarté - pourrait entraîner des blessures
graves ou la mort.La mention ATTENTION signale un risque qui
- s'il n'est pas écarté - pourrait entraîner des blessures légères ou
modérées. La mention ATTENTION,utilisée sans le symbole
d'alerte, signale une situation qui pourrait entraîner une
détérioration de l'équipement. Respectez scrupuleusement les
consignes de sécurité pour éliminer ou réduire les risques de
blessures ou dangers de mort.
Plaque d'avertissement
Une plaque d'avertissement (figure 25) figure sur l'appareil pour
signaler les risques pour la sécurité. Si cette plaque vient à être
endommagée ou illisible, la remplacer par une étiquette neuve
disponible auprès de votre représentant local Briggs & Stratton.
Les pictogrammes de la plaque d'avertissement sont explicités
plus bas dans cette section consacrée à la sécurité.
Pictogrammes des risques et signification
Incendie
Explosion
Vapeurs toxiques
Surface chaude
Pièces en mouvement
Risque de choc électrique
Surface glissante
Risque de chute
Risque de recul
Projection d'objets
Injection de fluide
Figure 25 — Plaque d'avertissement
Briggs & Stratton Generac Generator Discount Parts Call 606-678-9623 or 606-561-4983
www.mymowerparts.com
Nettoyeur Haute Pression 2700 PSI de BSPP
21
• Maintenir la buse de pulvérisation à une distance de 20 à
60 centimètres de la surface à nettoyer.
• Utiliser cet appareil sur une surface stable.
• La pente et le drainage de l'aire de nettoyage doivent être suffisants
pour réduire le risque de chute accru sur des surfaces glissantes.
• Agir avec une extrême prudence en cas d'utilisation du nettoyeur
haute pression sur une échelle, un échafaudage ou tout autre
emplacement relativement instable.
• Pour éviter tout risque de blessure en cas de recul du pistolet de
pulvérisation, le tenir fermement à deux mains lors de la pulvérisation
à haute pression.
L'utilisation du nettoyeur haute pression peut causer
l'apparition de flaques d'eau et rendre les surfaces
glissantes et dangereuses.
Le jet à haute pression peut également faire tomber
l'utilisateur s'il se tient trop près de la surface à
nettoyer.
AVERTISSEMENT
• Utiliser le nettoyeur EXCLUSIVEMENT en extérieur.
• Empêchez les gaz d'échappement de pénérer dans un lieu confiné par
les fenêtres, portes, entrées d'aération et d'autres ouvertures.
• NE FAITES PAS fonctionner le nettoyeur haute pression à l'intérieur
d'un bâtiment ou d'un lieu clos.
• S'il y a un risque d'inhalation de vapeurs, utiliser un appareil ou un
masque respiratoire.
• Lire soigneusement les instructions d'emploi du masque afin d'être certain
qu'il protège efficacement contre l'inhalation de vapeurs dangereuses.
En fonctionnement, le moteur dégage du monoxyde
de carbone, un gaz inodore, incolore et mortel.
Respirer du monoxyde de carbone peut provoquer
des nausées, l'évanouissement ou la mort.
Certains produits chimiques ou détergents peuvent
être dangereux et, s'ils sont inhalés ou ingérés,
provoquer des nausées importantes, des
évanouissements ou des empoisonnements.
AVERTISSEMENT
• Lors du démarrage du moteur,tirer lentement sur la corde jusqu'à
sentir une résistance, puis tirer rapidement afin d'éviter l'effet de recul.
• Si le moteur démarre et cale ou si une résistance accrue est ressentie
au cours des tentatives de démarrage, appuyer sur la détente du
pistolet de pulvérisation.
Le recul rapide du câble de démarreur peut tirer la
main et le bras en direction du moteur plus
rapidement que vous ne vous y attendez.
Ce peut être la cause de fêlures, fractures, contusions
ou foulures.
AVERTISSEMENT
METTRE DE L'ESSENCE
• ARRETER le nettoyeur haute pression et le laisser refroidir au moins
deux minutes avant d'ouvrir le bouchon d'essence.
• Faire le plein du réservoir à l’air libre.
• NE PAS trop remplir le réservoir. Laisser un espace suffisant pour
l’évaporation de l'essence.
• Manipuler l'essence à l'abri des étincelles, des flammes nues,des
veilleuses, de la chaleur ainsi que d'autres sources potentielles
d'inflammation.
• NE PAS allumer de cigarettes, ni fumer.
UTILISATION DE L'ÉQUIPEMENT
• NE JAMAIS incliner le moteur ni l'équipement au point que l'essence
se mette à couler.
• NE PAS vaporiser de liquides inflammables.
TRANSPORT ET RÉPARATION DE L'ÉQUIPEMENT
• VIDER le réservoir et FERMER le robinet d'essence pour transporter
et réparer l'équipement.
• Fixez le nettoyeur haute pression en position debout pendant le
transport pour qu'il ne bascule pas et ne répande pas d'essence et
d'huile.
ENTREPOSAGE D'ESSENCE OU D'UN ÉQUIPEMENT
DONT LE RÉSERVOIR CONTIENT DE L'ESSENCE.
• NE PAS entreposer à proximité de fours, poêles, chauffe-eau, sèche-linge
ou d'autres équipements susceptibles de comporter une veilleuse ou
une source potentielle d'inflammation des vapeurs d'essence.
L'essence sous forme liquide ou vapeur est
extrêmement inflammable et explosive.
Un incendie ou une explosion peuvent provoquer de
graves brûlures ou la mort.
AVERTISSEMENT
• NE JAMAIS diriger le jet vers des personnes, des animaux ou des
plantes.
• NE PAS laisser des ENFANTS manipuler le nettoyeur haute pression.
• NE JAMAIS tenter de réparer le flexible haute pression. Le remplacer
systématiquement.
• Ne jamais déconnecter le flexible haute pression de la pompe et du
pistolet de pulvérisation lorsque le système est sous pression.
• Pressez la détente du pistolet de pulvérisation pour libérer la pression
dans le tuyau chaque fois que vous arrêtez le moteur. Engagez le
verrou de la détente du pistolet de pulvérisation.
Le jet d'eau à haute pression produit par l'appareil est
capable d’entraîner des blessures graves.
Le pistolet de pulvérisation reste sous haute pression
lorsque le nettoyeur haute pression est arrêté,ce qui
peut provoquer des blessures.
AVERTISSEMENT
Briggs & Stratton Generac Generator Discount Parts Call 606-678-9623 or 606-561-4983
www.mymowerparts.com
Nettoyeur Haute Pression 2700 PSI de BSPP
22
• NE PAS toucher les surfaces chaudes.
• Laisser l'équipement refroidir avant d'y toucher.
• Il faut éloigner le nettoyeur haute pression d'au moins 1,5 m des
structures dont les murs sont inflammables et/ou d'autres matériaux
inflammables.
• Conservez un débattement d'au moins 1 m tout autour du nettoyeur
haute pression pour le refroidissement,l'entretien et les réparations.
Un moteur en marche dégage de la chaleur et des
gaz d'échappement brûlants. La température du
échappement et de certaines pièces voisines peut
atteindre ou dépasser 65 °C (150 °F).
Un incendie ou des blessures graves peuvent survenir.
Les débris inflammables, tels que feuilles, herbes,
broussailles, peuvent prendre feu.
AVERTISSEMENT
• NE PAS verrouiller le pistolet de pulvérisation en position ouverte.
• NE PAS laisser le pistolet de pulvérisation sans surveillance lorsque
l'appareil est en marche.
• Ne JAMAIS utiliser un pistolet de pulvérisation dont le verrou de
détente ou le pontet n'est pas installé et en ordre de marche.
• Toujours s'assurer que le pistolet de pulvérisation, les buses et les
accessoires sont bien fixés.
Les nettoyeurs haute pression produisent un jet à haute
pression qui accroît les risques de blessure et de dommage à
l'appareil.
ATTENTION
• En cas de questions à propos de l'utilisation conforme de cet appareil,
consulter le distributeur ou prendre contact avec Briggs & Stratton
Power Products.
• Ne JAMAIS utiliser un appareil dont des pièces sont cassées,
manquantes ou non munies de leur capot ou de leurs couvercles
protecteurs.
• NE neutraliser AUCUN dispositif de sécurité de cette machine.
• Par temps froid, avant de démarrer le nettoyeur à haute pression,
vérifier tous ses éléments pour vérifier l'absence de gel.
• Ne JAMAIS utiliser le flexible haute pression comme poignée pour
déplacer l'appareil.Toujours utiliser pour cela la poignée de l'appareil.
• Vérifier la présence de fuites ou de signes de détérioration du circuit
de carburant, comme un flexible usé ou spongieux, des brides de
serrage desserrées ou manquantes, ou un réservoir ou un bouchon
endommagé. Réparer toutes les défectuosités avant d'utiliser le
nettoyeur haute pression.
• Cet appareil est conçu pour être utilisé uniquement avec des pièces
Briggs & Stratton Power Products d'origine. Si l'équipement est utilisé
avec des pièces qui NE sont PAS conformes aux caractéristiques
minimales, tous les risques et responsabilités incomberont à
l'utilisateur.
Un traitement inadéquat du nettoyeur haute pression peut
l'endommager et réduire sa durée de vie utile.
ATTENTION
• NE PAS porter de vêtements amples, de bijoux ni d'autres effets qui
pourraient être happés par le démarreur ou les autres pièces en rotation.
• Retenir les cheveux longs en chignon et retirer les bijoux.
Prendre garde au fait que le démarreur et les pièces
en rotation peuvent happer les mains, les cheveux, les
vêtements ou des accessoires (colliers, lacets...).
AVERTISSEMENT
• Toujours porter une protection oculaire pendant l'utilisation de
l'équipement ou si vous vous trouvez à proximité d'un équipement en
fonctionnement.
Le jet à haute pression peut mettre en suspension
dans l'air des particules de peinture ou d'autres
matériaux.
AVERTISSEMENT
POUR RÉGLER OU RÉPARER LE NETTOYEUR
HAUTE PRESSION
• Débrancher le fil de bougie d'allumage et l'écarter de sorte qu'il ne
puisse toucher la bougie.
La production involontaire d'étincelles peut
provoquer un incendie ou une électrocution.
AVERTISSEMENT
• NE PAS modifier la vitesse régulée du moteur.
• NE PAS faire fonctionner le nettoyeur à une pression supérieure à la
pression nominale.
Une vitesse de fonctionnement du moteur trop élevée ou
trop faible augmente le risque d'occasionner des blessures ou
d'endommager le nettoyeur.
ATTENTION
• En mode haute pression, ne pas diriger le jet sur des vitres.
• NE JAMAIS diriger le jet sur des plantes.
Le jet à haute pression peut endommager les matériaux
fragiles, le verre par exemple.
ATTENTION
• NE JAMAIS pulvériser d'eau sur les circuits électriques sous peine
d'électrocution.
La pulvérisation d'eau sur les circuits électriques peut
entraîner une électrocution.
AVERTISSEMENT
Briggs & Stratton Generac Generator Discount Parts Call 606-678-9623 or 606-561-4983
www.mymowerparts.com
Nettoyeur Haute Pression 2700 PSI de BSPP
23
CONNAÎTRE VOTRE NETTOYEUR HAUTE PRESSION
Lisez ce manuel d'opérateur et ces règles de sécurité avant d'utiliser le nettoyeur haute pression.
Reportez-vous aux illustrations pour repérer l'emplacement des divers réglages et commandes de votre nettoyeur. Conservez ce
manuel pour pouvoir vous y référer ultérieurement.
Admission d'eau - Raccorder le tuyau d'arrosage à cet endroit.
Bouchon de remplissage d'huile - Orifice de remplissage de
l'huile du moteur.
Embouts de pulvérisation - Injection de produits chimiques,
0°, 15° et 40° : pour diverses applications de nettoyage sous haute
pression.
Filtre à air - Protège le moteur en filtrant la poussière et les
débris avant la prise d'air.
Flexible haute pression - Raccorder une des extrémités du
flexible à la pompe à eau et l'autre au pistolet de pulvérisation.
Lanceur - Sert à démarrer le moteur manuellement.
Levier d'étranglement - Prépare le moteur froid au démarrage
lorsqu'il est froid.
Lunettes de sécurité (non représentées) - Lors de
l'utilisation du nettoyeur haute pression, toujours utiliser les
lunettes de sécurité fournies ou une autre protection oculaire.
Manette de poussée - Cette manette place le moteur en mode
démarrage pour le lanceur et arrête le moteur lorsqu'il est en
marche.
Pistolet de pulvérisation - Un dispositif de détente permet de
contrôler le jet d'eau sur la surface à nettoyer. Le pistolet est
muni d'un verrou de sécurité de la détente.
Plaque d'identité - Indique le modèle, la révision et le numéro
de série du nettoyeur haute pression.Tenir ces renseignements à
disposition lors d'un appel pour assistance.
Pompe - Fournit la haute pression.
Porte-accessoires - Permet de ranger les accessoires standard
et en option, tels que brosses, turbo-lances, etc.
Rallonge de buse à raccord rapide - Permet de passer de l'un
à l'autre des quatre embouts de pulvérisation différents.
Réservoir de carburant - Remplir le réservoir avec du
carburant sans plomb normal. Ne jamais remplir complètement le
réservoir pour permettre la dilatation du carburant.
Robinet de carburant - Sert à ouvrir et à fermer l'arrivée du
carburant au moteur.
Siphon/Filtre d'injection de produits chimiques - Sert à
siphoner les détergents ou autres produits chimiques de
nettoyage sous pression dans le circuit basse pression.
Sortie haute pression - Sert au branchement du flexible haute
pression.
Système de refroidissement automatique - Fait circuler de
l'eau dans la pompe lorsque la température de l'eau atteint 51,6 à
68,3 ºC. L'eau chaude de la pompe est évacuée au sol. Ce
système prévient tout dommage interne à la pompe.
Siphon/Filtre d'injection
de produits chimiques
Pistolet de pulvérisation
Rallonge de buse à
raccord rapide
Levier d'étranglement
Manette de poussée
Lanceur
Robinet de carburant
(à l'avant du moteur)
Filtre à air
Réservoir
de carburant
Pompe équipée du système de
refroidissement automatique
Admission d'eau
Bouchon de
remplissage d'huile
Embouts de
pulvérisation
Sortie haute pression
Porte-accessoires
Plaque d'identité
Flexible haute
pression
Briggs & Stratton Generac Generator Discount Parts Call 606-678-9623 or 606-561-4983
www.mymowerparts.com
Nettoyeur Haute Pression 2700 PSI de BSPP
24
ASSEMBLAGE
IMPORTANT: Lire entièrement le manuel d'opérateur avant de
monter et d'utiliser l'appareil.
Deballer le nettoyeur haute pression de
son carton
• Sortir tous les accessoires et composants livrés avec le
nettoyeur haute pression.
• Couper le carton du haut en bas le long de deux arêtes
consécutives et rabattre au sol le côté ainsi libéré, retirer
ensuite tous les matériaux d'emballage.
• Sortir le nettoyeur du carton en le faisant rouler.
Contenu de la boîte
La boîte contient les éléments suivants :
• Unité principale
• Lunettes de sécurité
• Poignée
• Porte-accessoires en plastique
• Flexible haute pression
• Pistolet de pulvérisation
• Rallonge de buse à raccord rapide
• Sachet de pièces détachées (contenant les éléments suivants) :
• Manuel d'opérateur
• Manuel du moteur
• Kit d'entretien
• Raccords de tuyau
• Raccords rapides
• Sachet contenant 4 embouts de pulvérisation à raccord
rapide de différentes couleurs
• Kit de quincaillerie de fixation de la poignée (comprenant):
• Boulon
• Boutons en plastique (2)
• Crochet en "L"
• Crochet en "J"
• Attache du flexible pour produits chimiques
• Vis auto-taraudeuses (4)
Si des pièces manquent ou sont endommagées, contacter le
centre de réparation Briggs & Stratton le plus proche.
PRÉPARATION DU NETTOYEUR
HAUTE PRESSION AVANT
UTILISATION
Pour mettre le nettoyeur haute pression en état de
fonctionnement, les tâches suivantes doivent être effectuées:
1. Fixer le porte-accessoires à la poignée, puis fixer la poignée à
l'unité principale.
2. Faire le niveau d'huile.
3. Faire le plein d'essence.
4. Raccorder le flexible haute pression au pistolet et pompe.
5. Raccorder l'alimentation en eau à la pompe.
6. Monter la lance sur le pistolet.
7. Choisir et fixer l'embout de pulvérisation à raccord rapide à
la rallonge de buse.
Fixer la poignée et le porte-accessoires
REMARQUE: Toutes les opérations de montage décrites dans
cette section se rapportent à un montage par rapport à l'arrière
du nettoyeur haute pression.
1. Faire glisser le porte-accessoires en plastique sur la poignée et
aligner les trous du plateau avec ceux de la poignée (figure 26).
2. Fixer le plateau sur la poignée avec des vis auto-taraudeuses
à l'aide d'un tournevis cruciforme n° 2.Vérifier que les vis
sont serrées sans pour autant écraser le porte-accessoires
en plastique.
Figure 26 - Fixer le porte-accessoires
Briggs & Stratton Generac Generator Discount Parts Call 606-678-9623 or 606-561-4983
www.mymowerparts.com
3. Placer la poignée sur les supports déjà reliés à l'unité
principale.Vérifier que les trous de la poignée et des
supports sont alignés (figure 27).
REMARQUE: Il peut être nécessaire de déplacer les supports
d'un côté à l'autre.
4. Insérer le boulon en "L" dans le trou du côté gauche de la
poignée (en regardant depuis l'avant de l'appareil) et fixer le
bouton en plastique (figure 28).
5. Insérer le boulon dans le trou du côté droit de la poignée
(en regardant depuis l'avant de l'appareil) et fixer le bouton
en plastique (figure 28). Serrer le bouton à la main.
6. Insérer le crochet en "J" dans le porte-accessoires, dans la
deuxième fente en partant de la gauche (figure 29).
7. Pincer le flexible pour produits chimiques et le faire glisser
dans la fixation métallique comme indiqué sur la figure 30.
8. Incliner l'unité vers le haut par la poignée et fixer la fixation
métallique à la nervure située au centre de la face inférieur
du porte-accessoires (figure 31). Passer le flexible pour
produits chimiques dans la fixation métallique de telle sorte
qu'il soit maintenu sans être plié ni pincé.
Charger en huile moteur et en carburant
• Placer le nettoyeur haute pression sur une surface
horizontale.
• Consulter le manuel d'opérateur du moteur et suivre les
instructions et les recommandations relatives à l'huile et au
carburant.
REMARQUE: Toujours vérifier le niveau d’huile avant utilisation,
comme expliqué dans le manuel d'opérateur du moteur.
Nettoyeur Haute Pression 2700 PSI de BSPP
25
• Consulter le manuel d'opérateur du moteur au sujet de l'huile et du
carburant.
• La garantie sera annulée si l'équipement est endommagé par suite du
non-respect de cette instruction.
Toute tentative de démarrage du moteur sans qu'il ait été
rempli avec l'huile recommandée entraînera une panne de
l'équipement.
ATTENTION
Aligner
les trous
Poignée
Supports de
poignée
Figure 27 — Fixer la poignée sur la base
Figure 28 — Immobiliser la poignée
Figure 29 - Installer le crochet en "J" sur le porte-accessoires
Figure 30 — Faire glisser le flexible pour produits chimiques
dans la fixation métallique
Figure 31 — Faire glisser la fixation métallique sur la bride du
porte-accessoires
Briggs & Stratton Generac Generator Discount Parts Call 606-678-9623 or 606-561-4983
www.mymowerparts.com
Nettoyeur Haute Pression 2700 PSI de BSPP
26
Raccorder le flexible et l'alimentation en
eau à la pompe
IMPORTANT: Pour éviter d'endommager la pompe, il est
impératif de monter la rallonge de buse au pistolet de
pulvérisation et raccorder tous les flexibles avant de lancer le
moteur.
1. Dérouler le flexible haute pression et fixer une extrémité à
la base du pistolet (figure 32). Serrer à la main.
2. Fixer l'autre extrémité du flexible haute pression à la sortie
haute pression de la pompe (figure 33). Serrer à la main.
3. Avant de raccorder le tuyau d'arrosage à l'entrée d'eau du
nettoyeur, inspecter le tamis d'entrée (figure 34). Nettoyer le
tamis s'il contient des débris, le remplacer s'il est
endommagé. NE JAMAIS UTILISER UN NETTOYEUR
HAUTE PRESSION DONT LE TAMIS D'ENTRÉE EST
ENDOMMAGÉ.
4. Faire couler l'eau dans le tuyau d'arrosage pendant trente
secondes pour éliminer tous les débris en suspension.
Refermer l'eau.
IMPORTANT: NE PAS siphonner une eau stagnante pour
alimenter le nettoyeur. Utiliser EXCLUSIVEMENT de l'eau froide
(moins de 35 °C).
5. Fixer un raccord rapide femelle au tuyau d'arrosage. Fixer un
raccord rapide mâle à l'admission d'eau de la pompe (figure 35).
6. Brancher le tuyau d'arrosage (de moins de 15m) à l'orifice
d'admission d'eau (figure 35). Repousser le collier du raccord
rapide, emboîter le raccord sur la pompe et relâcher le collier.
Tirer sur le tuyau pour vérifier la solidité du branchement.
7. OUVRIR l'eau et appuyer sur la gâchette du pistolet pour
purger l'air et d'éventuels débris de la pompe.
Liste de vérifications avant le démarrage
du moteur
Inspecter le montage de l'appareil pour confirmer que les tâches
suivantes ont été accomplies:
1. S'assurer que la poignée est bien fixée sur le chariot.
2. Vérifier que le niveau d'huile du carter moteur est correct.
3. Vérifier que l'essence ajoutée dans le réservoir est d'un type
approprié.
4. Vérifier que les raccords du flexible haute pression sont
correctement serrés.Vérifier que le flexible haute pression est
exempt de pincements, de coupures ou de tout autre dommage.
5. Vérifier que l'alimentation en eau et son débit sont appropriés.
6. S'assurer que l'utilisateur a pris connaissance des "Consignes
de sécurité" et du paragraphe "Utilisation du nettoyeur haute
pression" avant d'utiliser l'appareil.
ATTENTION
• Les dommages causés au nettoyeur haute pression en raison du nonrespect de cette mise en garde ne sont pas couverts par la garantie.
Il FAUT laisser au moins 3 mètres de tuyau d'arrosage libre entre
l'entrée du nettoyeur haute pression et un dispositif d'arrêt,par
exemple un raccord d'arrêt en Y ou tout autre type de robinet.
• Toujours porter une protection oculaire pendant l'utilisation de
l'équipement ou si vous vous trouvez à proximité d'un équipement en
fonctionnement.
• Avant de démarrer le nettoyeur haute pression,l'utilisateur doit
s’équiper d’une protection oculaire adéquate.
Le jet à haute pression peut mettre en suspension
dans l'air des particules de peinture ou d'autres
matériaux.
AVERTISSEMENT
Connecter le
flexible haute
pression ici
Figure 32 — Raccorder le flexible haute pression au pistolet
Figure 33 — Connecter l'haut tuyau de pression pour
pomper
Inspecter le tamis
d'entrée. NE PAS
l'utiliser s'il est
endommagé, le
nettoyer s'il est sale.
Figure 34 — Inspecter le tamis d'entrée
Figure 35 — Connecter le tuyau d'arrosage d'admission d'eau
Briggs & Stratton Generac Generator Discount Parts Call 606-678-9623 or 606-561-4983
www.mymowerparts.com
 Loading...