

Briggs & Stratton 020206-0 Owner’s Manual

CleanShot TM ,
__lw POWERPRODUCTS
2050PSI
Owner's Manual/Manual del Propietario
Questions? Help isjust a moment away!
Preguntas? Laayudaes justaun momento lejos!
Call: Pressure Washer Helpline
Llame:Linea Directa del Lavador a Presi6n - 1-800-743-4115 M-F 8-5 CT
CleanShotTM isa trademark of Briggs& Stratton Power Products.
CleanShotTM es una marca registrada de Briggs& Stratton Power Products.
BRIGGS & STRATTON POWER PRODUCTS GROUP, LLC
IU!!!U!!U!!,,EFFERSO,,,,W,SCONS,,,,,U.S.A.
0 3 Model No.020206-0 (2050 PSIPressureWasher) Manual No. 194140GS Revision I (01/26/2004)
CleanShotTM 2050 PSIPressureWasher
TABLE OF CONTENTS
SafetyRules.................................... 2-4
Know Your PressureWasher........................ 5
Assembly...................................... 6-7
Operation .................................... 8- I0
Product Specifications ............................ I I
Maintenance................................. I I- 13
Storage........................................ 14
Troubleshooting ................................. 15
Replacement Parts ............................ 16-17
Notes ......................................... 18
Warranty ...................................... 19
EQUIPMENT
DESCRIPTION
_Read this manual carefully and become familiar
with your pressure washer.Know its
applications, its limitations and any hazards
involved.
This manual contains informationfor a pressure washer
that operates at 2,050 PSIat a flow rate of 2.0 gallonsper
minute.This high quality residential system features axial
cam pump with stainless steel pistons, automatic cool down
system,chemical injection system,adjustable spray nozzle,
turbo nozzle, utility brush with adapter,tool bag,safety
goggles,heavyduty 25' hose, and more.
Every effort hasbeen madeto ensure that information in
this manual is accurate and current. However, we reserve
the right to change,alter or otherwise improve the product
and this document at any time without prior notice.
In the State of California a spark arrester is required by lawI
(Section 4442 of the California PublicResourcesCode). I
Other states may havesimilar laws.Federal lawsapply on
federal lands.If you equip the muffler with asparkarrester,
it must be maintained in effective working order.
SAFETY RULES
This is the safety alert symbol. It is used to
alert you to potential personal injury hazards.
Obey all safety messages that follow this
symbol to avoid possible injury or death.
The safety alert symbol (_,) is used with asignalword
(DANGER, CAUTION,WARNING), a pictorial and/or a
safety messageto alert you to hazards.DAN('_I'R indicates
a hazard which, if not avoided,will result in death or serious
injury. WARNING indicatesa hazard which, if not avoided,
couldresult in death or serious injury. CAUTION
indicates a hazardwhich, if not avoided,might result in
minor or moderate injury. CAUTION, when used
without the alert symbol, indicates a situation that could
result in equipment damage.Follow safety messagesto
avoid or reduce the risk of injury or death.
WARNING I
The engine exhaust from this product contains I
chemicals known to the State of California to cause
cancer, b rth defects, or other reproduct ve harm.
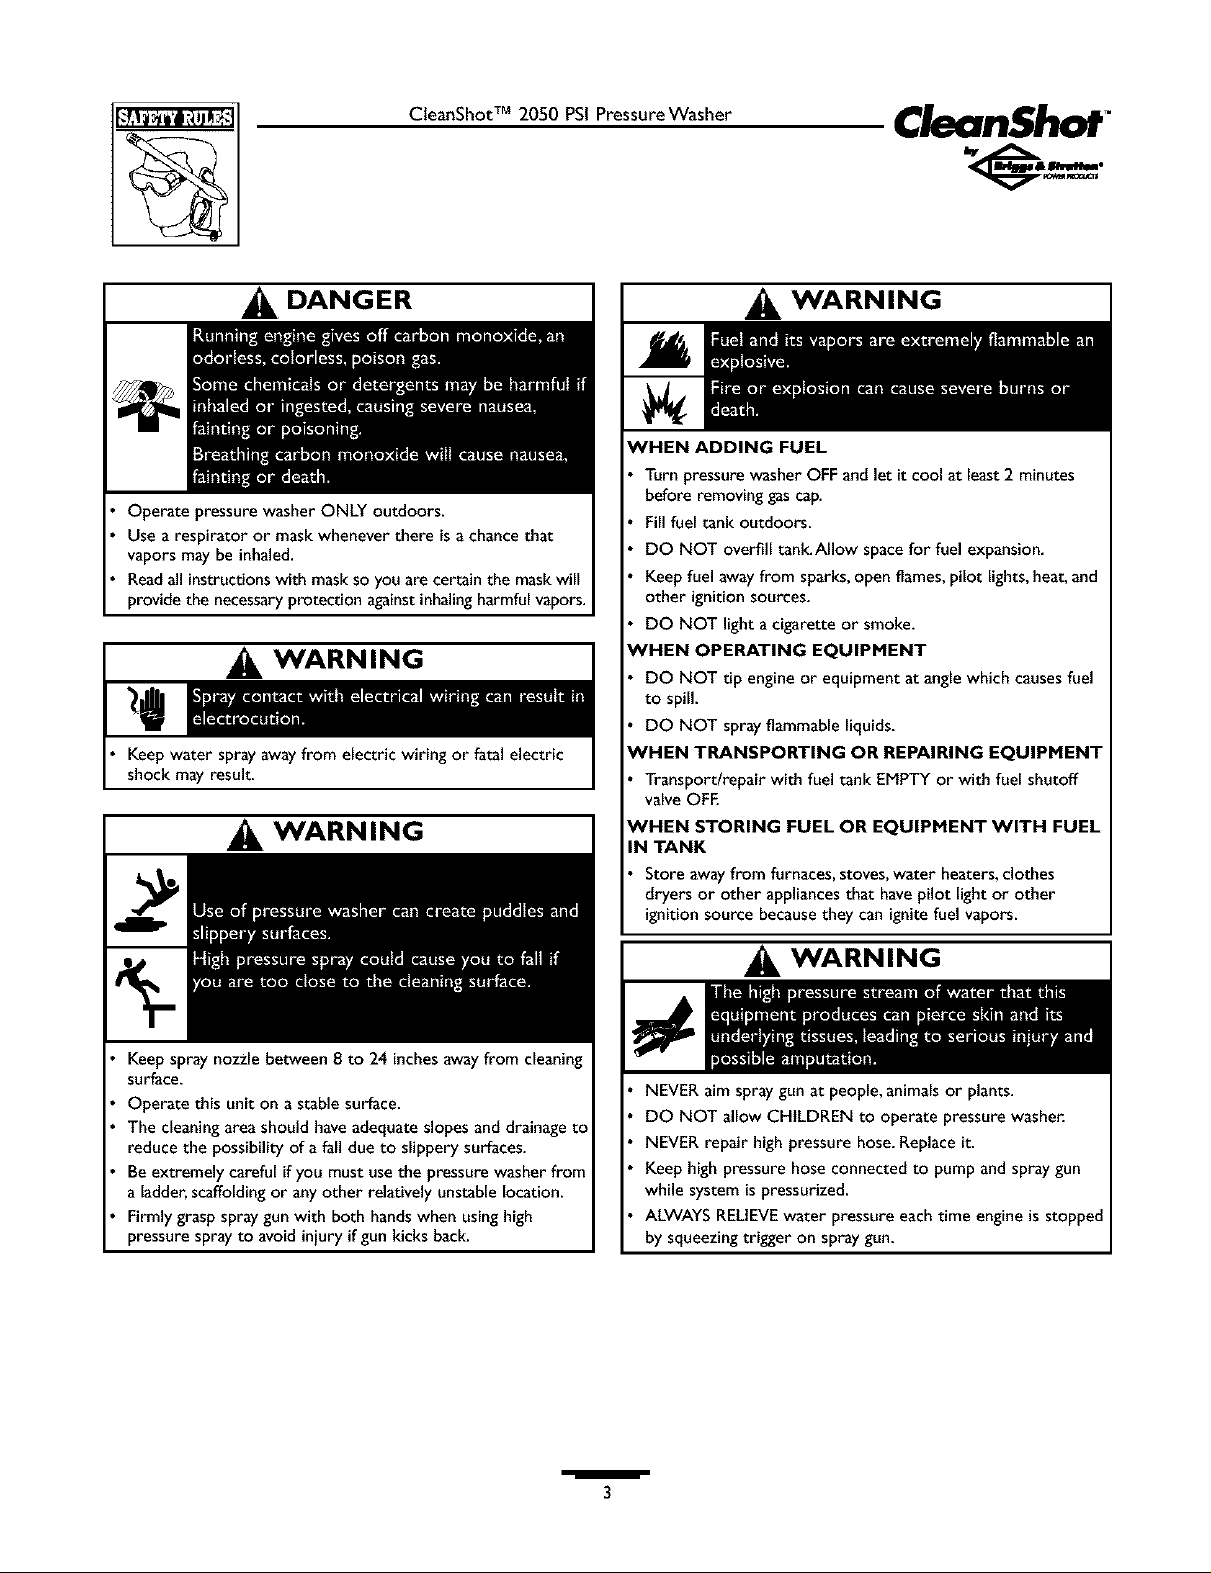
Hazard Symbols and Meanings
Toxic Fumes Electrical Shock
Slippery Surface Fall Fluid Injection
Fire Explosion Hot Surface
Moving Parts FlyingObjects Kickback
/
2
CleanShotTM 2050 PSIPressureWasher
CleanShor
DANGER
Operate pressure washer ONLY outdoors.
Use a respirator or mask whenever there is a chance that
vapors may be inhaled.
Readall instructionswith mask so you are certain the maskwill
provide the necessaryprotection againstinhalingharmful vapors.
WARNING
Keepwater spray awayfrom electric wiring or fatal electric
shock may result.
WARNING
WARNING
WHEN ADDING FUEL
Turn pressure washer OFF and let it cool at least 2 minutes
before removing gas cap.
Fill fuel tank outdoors.
DO NOT overfill tank.Allow space for fuel expansion.
Keep fuel away from sparks, open flames, pilot lights, heat, and
other ignition sources.
DO NOT light a cigarette or smoke.
¢VHEN OPERATING EQUIPMENT
DO NOT tip engine or equipment at angle which causes fuel
to spill.
DO NOT spray flammable liquids.
'HEN TRANSPORTING OR REPAIRING EQUIPMENT
Transport/repair with fuel tank EMPTY or with fuel shutoff
valve OFE
_HEN STORING FUEL OR EQUIPMENT WITH FUEL
IN TANK
Store away from furnaces, stoves, water heaters, clothes
dryers or other appliances that have pilot light or other
ignition source because they can ignite fuel vapors.
Keepspray nozzle between 8 to 24 inchesawayfrom cleaning
surface.
Operate this unit on a stable surface.
The cleaning area should have adequate slopes and drainage to
reduce the possibility of a fall due to slippery surfaces.
Beextremely careful ifyou must usethe pressure washer from
a ladder,scaffolding or anyother relatively unstable location.
Firmly grasp spraygunwith both hands when usinghigh
pressure sprayto avoid iniuryif gun kicks back.
/
WARNING
NEVER aim spray gun at people, animals or plants.
DO NOT allow CHILDREN to operate pressure washe_
NEVER repair high pressure hose.Replace it.
Keep high pressure hose connected to pump and spray gun
while system is pressurized.
ALWAYS RELIEVEwater pressure eachtime engine is stopped
by squeezing trigger on spray gun.
3
CleanShotTM 2050 PSIPressureWasher
WARNING
DO NOT touch hot surfaces.
Stay dear of exhaust gases.
Allow equipment to cool before touching.
WARNING
DO NOT wear loose clothing, jewelry or anything that may
be caught in the starter or other rotating parts.
Tie up long hair and remove jewelry.
WARNING
CAUTION
DO NOT tamper with governed speed.
DO NOT operate pressure washer above rated pressure.
CAUTION
DO NOT secure spray gun in open position.
DO NOT leavespray gun unattended while machine is
running.
NEVER use a spray gun which does not have a trigger lock or
trigger guard in place and in working orde_
Always be certain spraygun,nozzles and accessories are
correctly attached.
CAUTION
DO NOT point spray gun at glasswhen in iet spray mode.
NEVER aim spray gun at plants.
CAUTION
Always wear eye protection when using this equipment or in
vicinity of where equipment is in use.
WARNING
Disconnect spark plug wire from spark plug and place wire
where it cannot contact spark plug.
tf you have questions about intended use,askdealer or
contact Briggs& Stratton Power Products.
NEVER operate units with broken or missing parts, or
without protective housing or covers.
DO NOT by-pass any safety device on this machine.
Before starting pressure washer in cold weather, check all
parts of the equipment to be sure ice has not formed there.
NEVER move machine by pulling on highpressure hose.Use
handle provided on unit.
Check fuel system for leaksor signsof deterioration, such as
chafed or spongy hose, loose or missingclamps, or damaged
tank or cap.Correct all defects before operating pressure
washe_
This equipment is designed to be used with Briggs& Stratton
Power Products authorized parts ONLY. If equipment is used
with parts that DO NOT comply with minimum specifications,
user assumesall risks and liabilities.
/
4

CleanShotTM 2050 PSIPressureWasher
CleanShot
KNOWYOUR PRESSURE WASHER
Read this owner's manual and safety rules before operating your pressure washer.
Compare the illustrationswith your pressure washer to familiarize yourself with the locations of various controls and
adjustments. Savethis manualfor future reference.
Air Cleaner
Primer Bulb
FueiTank
\
Recoil Starter
High Pressure Outlet
& Water Inlet
Air Cleaner-- Dry type filter element limits the amount
of dirt and dust that gets in the engine.
Automatic Cool Down System -- Cycles water
through pump when water reaches 125°-155°F.Warm
water will discharge from pump onto ground.This
system prevents internal pump damage.
Fuel Tank- FIlltank with regular unleaded fuel.
High Pressure Hose (not shown) -- Connect one end
to water pump and the other end to spraygun.
High Pressure Outlet -- Connection for high pressure
hose.
I
Pump equipped with
Automatic Cool Down System
DataTag (not shown, near rear of base plate) -
Provides model and serial number of pressure washer.
Pleasehave these readily availableif calling for assistance.
Primer Bulb -- Preparesa cold enginefor starting.
Pump -- Devetops high water pressure.
Recoil Starter -- Used for starting the engine manually.
Spray Gun (not shown) -- Controls the application of
water onto cleaning surfacewith trigger device.Includes
safety latch.
Water Inlet -- Connection for garden hose.
5
CleanShot
CleanShotTM 2050 PSIPressureWasher
ASSEMBLY
IMPORTANT: Readentire owner's manualbefore you
attempt to assembleor operate your new pressure washer.
Remove Pressure Washer From
Carton
I. Removethe parts bag,accessories,and inserts included
with pressure washer.
2. Slicetwo corners at the end of carton from top to
bottom so the panel can be folded clown fiat.
3. Removepressure washer from carton.
Carton Contents
Items in the carton include:
Main Unit
High Pressure Hose
SprayGun
Nozzle Extension
Turbo Nozzle
Utility Brush with Adapter
Accessory Storage Bag
SafetyGoggles
Oil Bottle
Parts Bag(which includesthe following):
Owner's Manual
EngineManual
Owner's Registration Card
PREPARING PRESSURE
WASHER FOR USE
If you have anyproblems with the assemblyof your
pressure washer or if parts are missingor damaged,callthe
pressure washer helpline at 1-800-743-4115. If callingfor
assistance,pleasehave the model, revision, and serial
number from the data tag available.
To prepare your pressure washer for operation, you
will need to perform these tasks:
I. Fill out and sendin registration card.
2. Add oil to engine crankcase.
3. Add fuel to fuel tank.
4. Connect high pressure hose to spraygun and pump.
5. Connect water supply to pump.
6. Attach nozzle extension to spray gun.
Add Engine Oil and Fuel
• Placepressurewasher on a level surface.
CAUTION
• Refer to engine manualfor oil andfuel fill information.
• Damageto equipment resulting from failure to follow this
instructionwill void warranty.
• Refer to engine owner's manual and follow oil and fuel
recommendations and instructions.
NOTE: Check oil often during engine break-in. Refer to
engine owner's manual for recommendations.
/
6
CleanShotTM 2050 PSIPressureWasher
Connect Hose and Water Supply to
Pump
IHPORTANT: To avoid pump damage,you must assemble
the nozzle extension to the spray gun and attach atl hoses
before you start the engine.
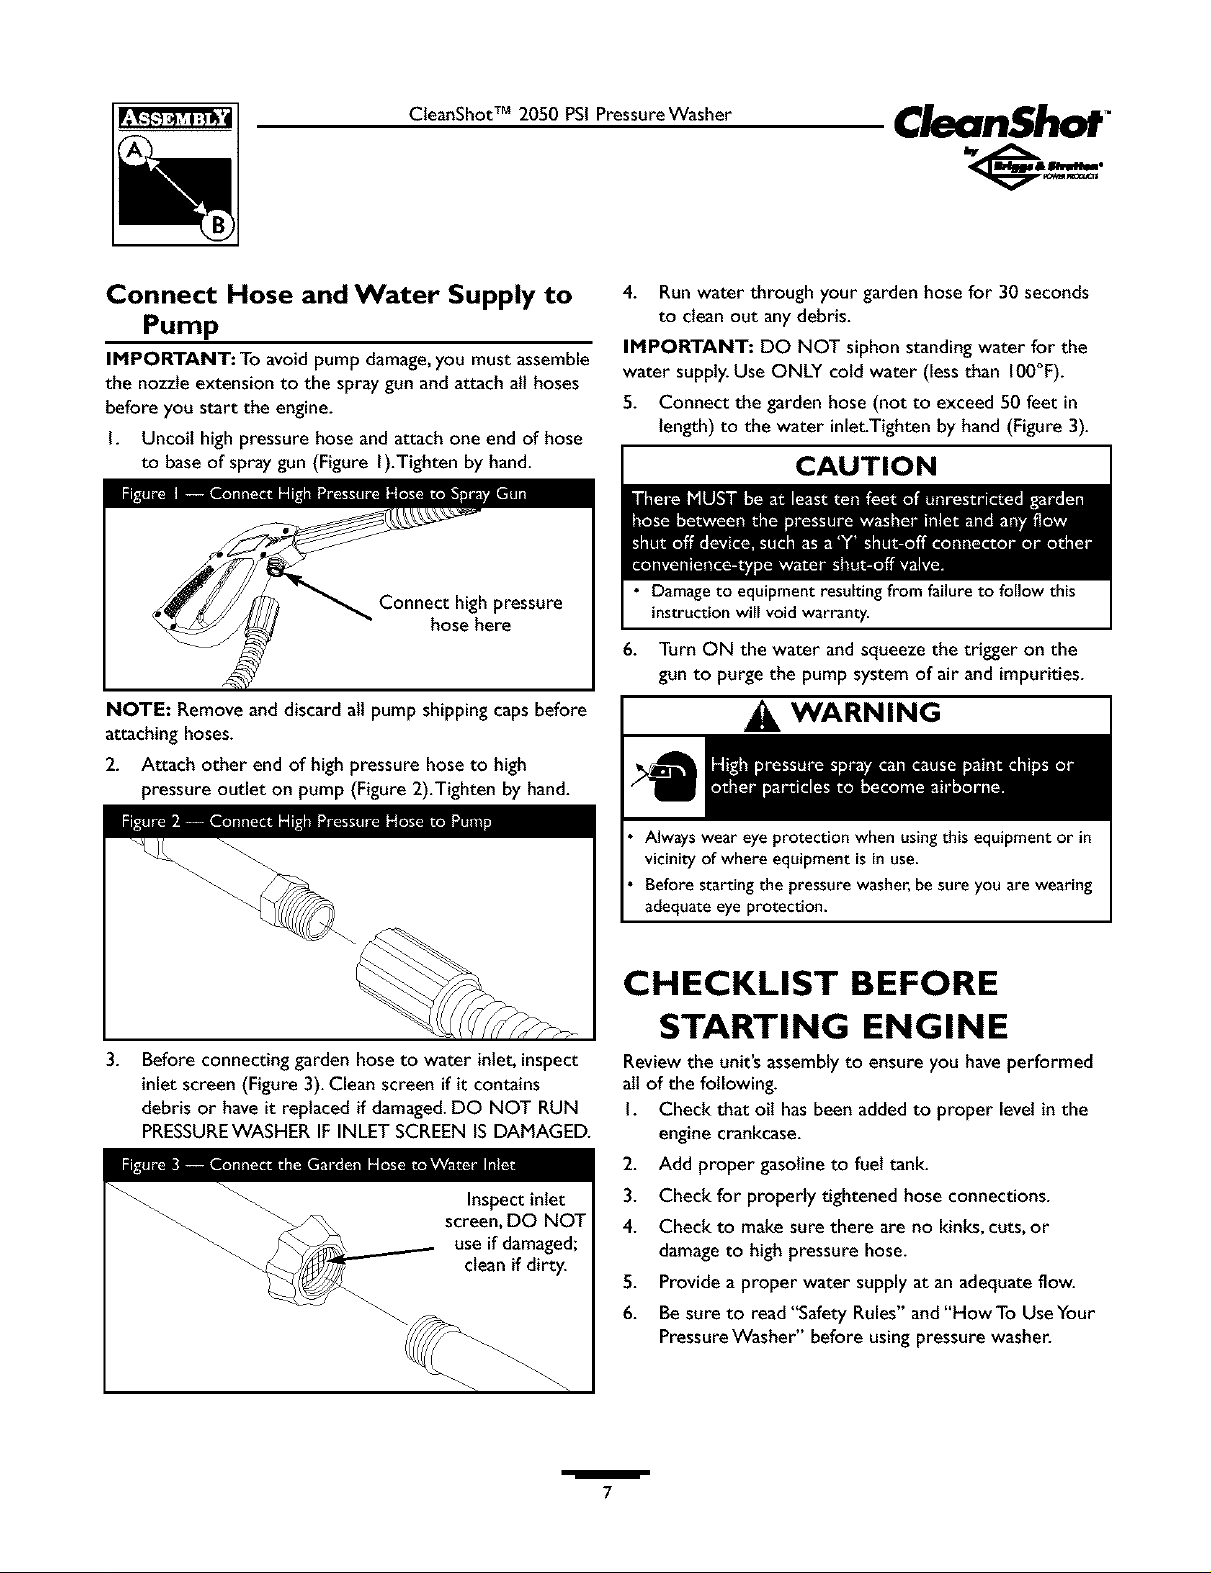
I. Uncoil high pressure hose and attach one end of hose
to baseof spray gun (Figure I).Tighten by hand.
Connect high pressure
hose here
NOTE: Remove and discard alt pump shippingcapsbefore
attaching hoses.
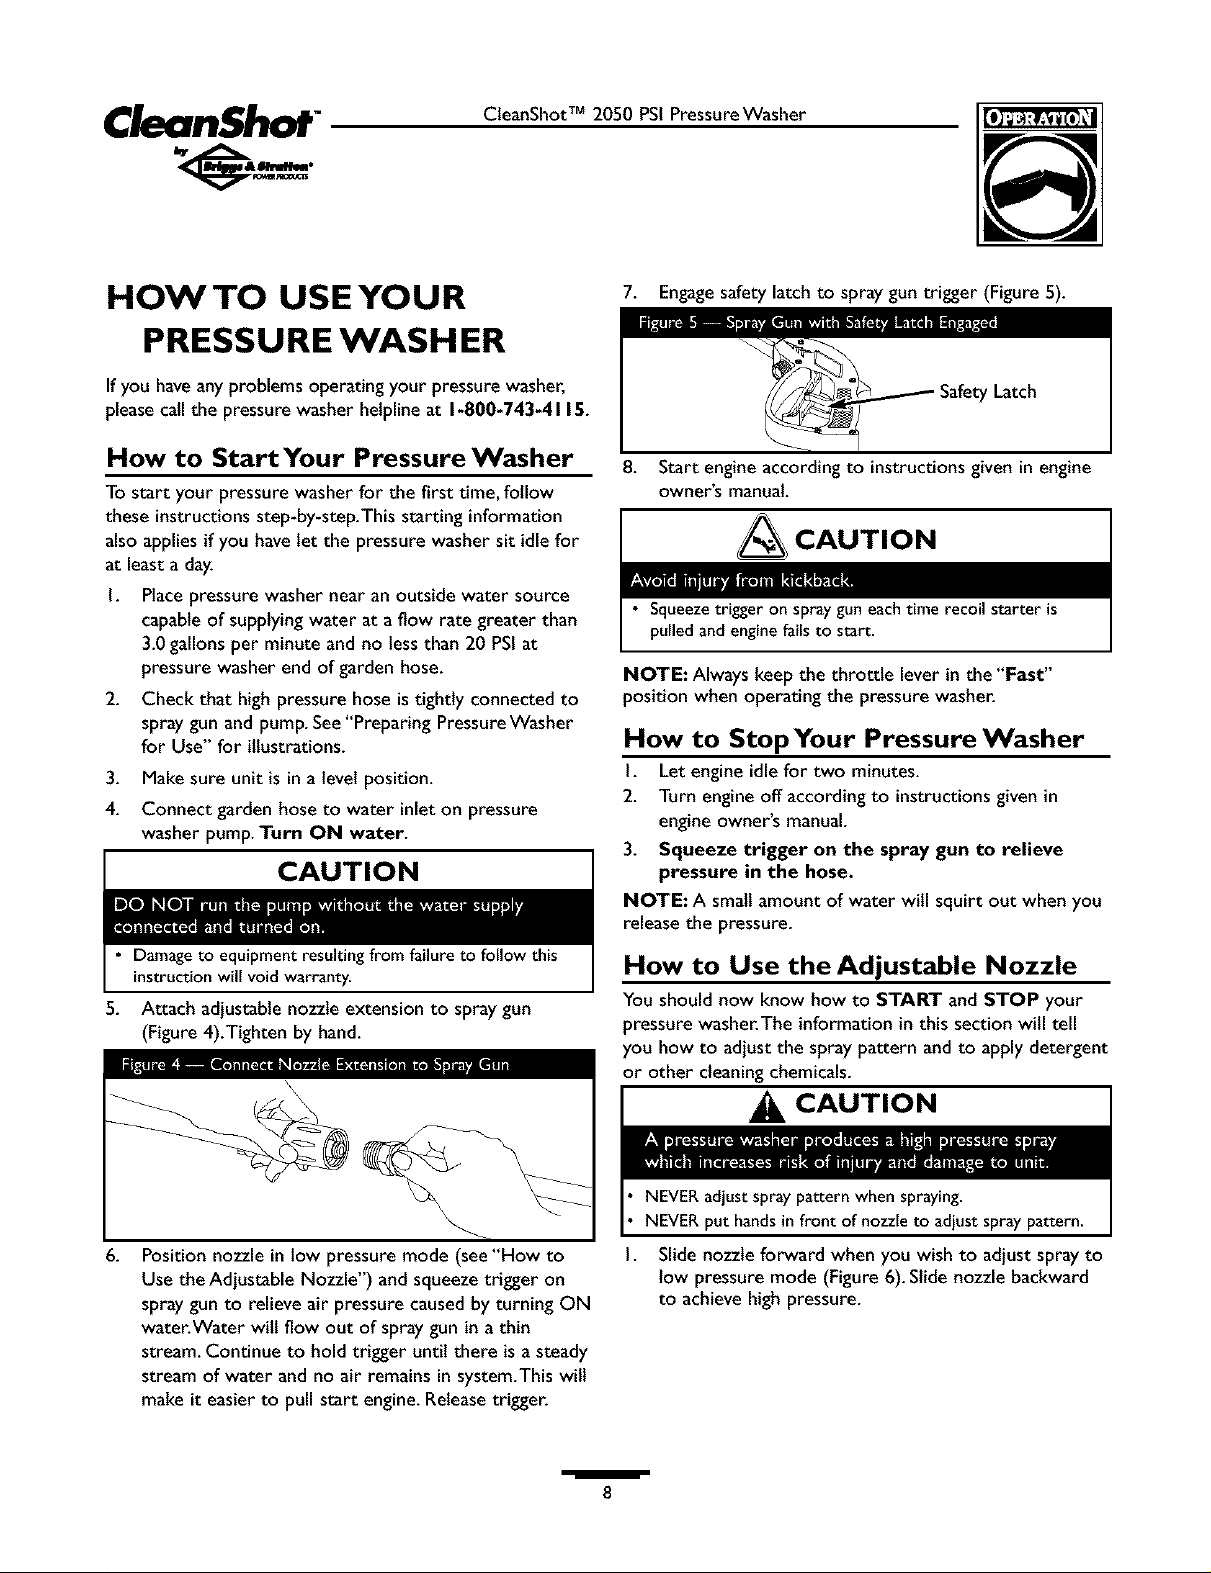
2. Attach other end of high pressure hoseto high
pressure outlet on pump (Figure 2).Tighten by hand.
4. Run water through your garden hose for 30 seconds
to cleanout any debris.
IMPORTANT: DO NOT siphon standing water for the
water supply.Use ONLY cold water (lessthan IO0°E).
5. Connect the garden hose (not to exceed 50 feet in
length)to the water inlet.Tightenby hand (Figure 3).
CAUTION
• Damage to equipment resulting from failure to follow this
instructionwill voidwarranty.
6. Turn ON the water and squeezethe trigger on the
gun to purge the pump system of air and impurities.
WARNING
Always wear eye protection when usingthis equipment or in
vicinity of where equipment isin use.
Before starting the pressure washer,be sure you are wearing
adequate eye protection.
.
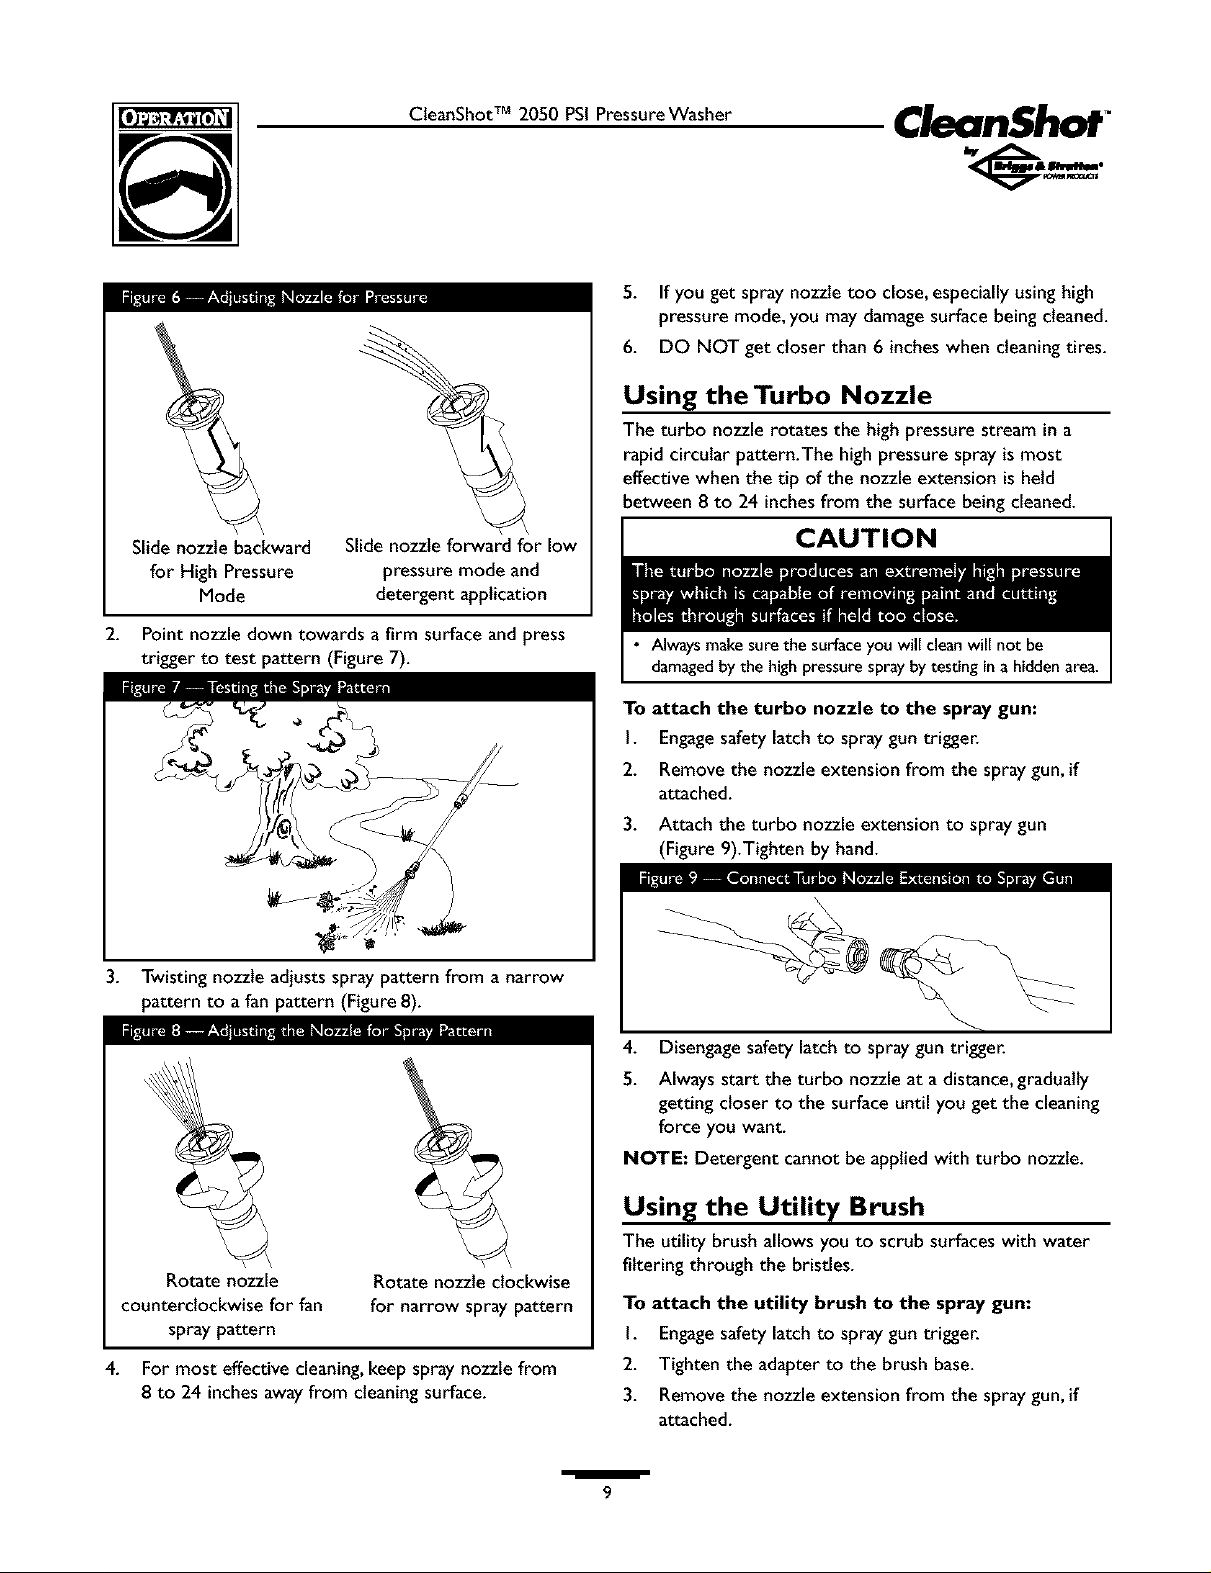
Before connectinggarden hose to water inlet,inspect
inlet screen (Figure 3). Clean screen if it contains
debris or have it replaced if damaged.DO NOT RUN
PRESSUREWASHERIF INLET SCREEN ISDAMAGED.
Inspectintet
screen,DONOT
useif damaged;
cleanif dirty.
CHECKLIST BEFORE
STARTING ENGINE
Review the unit's assemblyto ensure you haveperformed
altof the following.
I. Check that oit has been added to proper level in the
engine crankcase.
2. Add proper gasoline to fuel tank.
3. Check for properly tightened hose connections.
4. Check to make sure there are no kinks,cuts, or
damageto high pressure hose.
5. Provide a proper water supply at an adequateflow.
6. Be sure to read "Safety Rules" and"HowTo UseYour
PressureWasher" before usingpressure washer.
/
7
CleanShot
CleanShotTM 2050 PSIPressureWasher
HOW TO USE YOUR
PRESSURE WASH ER
If you haveany problems operating your pressurewasher,
pleasecall the pressurewasher helplineat 1-800-743-4115.
How to StartYour Pressure Washer
To start your pressure washer for the first time, follow
these instructions step-by-step.This starting information
also applies if you have let the pressure washer sit idlefor
at least a day.
I. Placepressure washer near an outside water source
capableof supplying water at a flow rate greater than
3.0gallons per minute and no lessthan 20 PSIat
pressure washer end of garden hose.
2. Check that high pressure hose is tightly connected to
spray gun and pump. See"PreparingPressureWasher
for Use" for illustrations.
3. Make sure unit is in a level position.
4. Connect garden hose to water inlet on pressure
washer pump. Turn ON water.
CAUTION
• Damage to equipment resulting from failure to follow this
instruction will void warranty.
5. Attach adjustable nozzle extension to spray gun
(Figure 4).Tighten by hand.
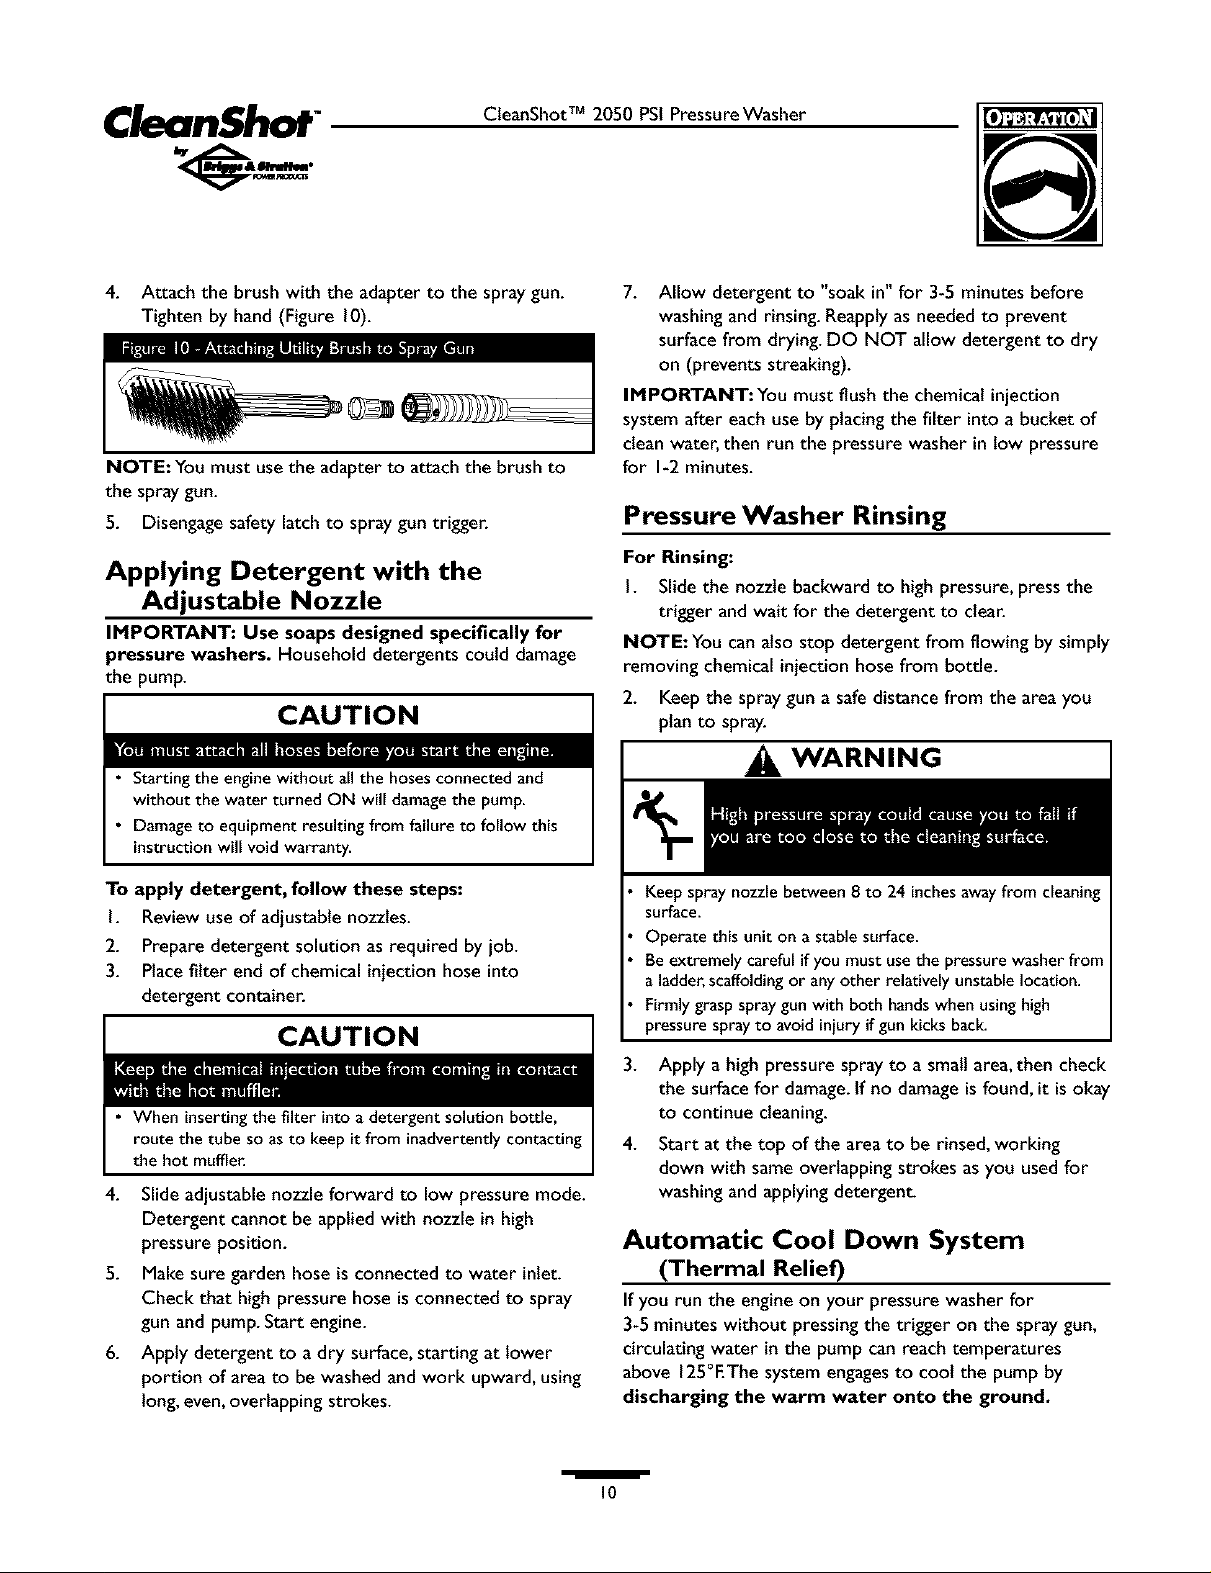
7. Engage safety latch to spray gun trigger (Figure 5).
SafetyLatch
8. Start engine according to instructions given in engine
owner's manual.
• Squeezetriggeron sprayguneachtime recoil starter is
pulledandenginefailsto start.
NOTE: Always keep the throttle lever in the "Fast"
position when operating the pressure washer.
How to StopYour Pressure Washer
I. Let engine idle for two minutes.
2. Turn engine off according to instructions given in
engine owner's manual.
3. Squeeze trigger on the spray gun to relieve
pressure in the hose.
NOTE: A small amount of water will squirt out when you
releasethe pressure.
How to Use the Adjustable Nozzle
You should now know how to START and STOP your
pressure washer.The information in this section will tell
you how to adjust the spray pattern andto apply detergent
or other cleaning chemicals.
6.
Position nozzle in low pressure mode (see"How to
Use the Adjustable Nozzle") and squeezetrigger on
spray gun to relieve air pressure caused by turning ON
water.Water will flow out of spray gun in a thin
stream. Continue to hold trigger until there is a steady
stream of water and no air remains in system.This wilt
make it easier to pull start engine.Releasetrigger.
CAUTION
NEVER adjust spray pattern when spraying.
NEVER put handsin front of nozzle to adiust spray pattern.
I.
Slide nozzle forward when you wish to adjust spray to
low pressure mode (Figure 6). Slide nozzle backward
to achieve high pressure.
I
8
CleanShotTM 2050 PSIPressureWasher
Slide nozzle backward
for High Pressure
Mode
2.
Point nozzle down towards a firm surface and press
trigger to test pattern (Figure 7).
Slide nozzle forward for low
pressure mode and
detergent application
CleanShot
5. If you get spray nozzle too close,especiallyusinghigh
pressure mode, you may damagesurfacebeing cleaned.
6. DO NOT get closer than 6 inches when cleaningtires.
Using the Turbo Nozzle
The turbo nozzle rotates the high pressure stream in a
rapid circular pattern.The high pressure spray is most
effective when the tip of the nozzle extension is held
between 8 to 24 inches from the surface being cleaned.
CAUTION
Always make sure the surface you will clean will not be
damaged by the high pressure spray by testing in a hidden area.
3. Twisting nozzle adjusts spray pattern from a narrow
pattern to a fan pattern (Figure 8).
Rotate nozzle
counterclockwise for fan
spray pattern
Rotate nozzle clockwise
for narrow spray pattern
4. For most effective cleaning,keep spray nozzle from
8 to 24 inchesawayfrom cleaning surface.
To attach the turbo nozzle to the spray gun:
I. Engagesafety latch to spraygun trigger.
2. Remove the nozzle extension from the spray gun, if
attached.
3. Attach the turbo nozzle extension to spray gun
(Figure 9).Tighten by hand.
\
4.
Disengagesafety latch to spray gun trigger.
5.
Always start the turbo nozzle at a distance,gradually
getting closer to the surface until you get the cleaning
force you want.
NOTE: Detergent cannot be applied with turbo nozzle.
Using the Utility Brush
The utility brush allows you to scrub surfaces with water
filtering through the bristles.
To attach the utility brush to the spray gun:
I. Engagesafety latch to spraygun trigger.
2. Tighten the adapter to the brush base.
3. Remove the nozzle extension from the spray gun, if
attached.
/
9
CleanShot
CleanShotTM 2050 PSIPressureWasher
4. Attach the brush with the adapter to the spray gun.
Tighten by hand (Figure 10).
NOTE:You must use the adapter to attach the brush to
the spray gun.
5. Disengagesafety latch to spray gun trigger.
Applying Detergent with the
Adjustable Nozzle
IMPORTANT: Use soaps designed specifically for
pressure washers. Household detergents could damage
the pump.
CAUTION
• Starting the engine without all the hoses connected and
without the water turned ON will damagethe pump.
• Damage to equipment resulting from failure to follow this
instruction will void warranty.
7. Allow detergent to "soak in"for 3-5 minutes before
washingand rinsing. Reapplyas needed to prevent
surface from drying. DO NOT allow detergent to dry
on (prevents streaking).
IMPORTANT:You must flush the chemical injection
system after eachuse by placingthe filter into a bucket of
cleanwater, then run the pressure washer in low pressure
for I-2 minutes.
Pressure Washer Rinsing
For Rinsing:
I. Slide the nozzle backward to high pressure, pressthe
trigger and wait for the detergent to clear.
NOTE:You can also stop detergent from flowingby simply
removing chemical injection hose from bottle.
2. Keep the spraygun a safe distancefrom the area you
plan to spray.
WARNING
To apply detergent, follow these steps:
I. Reviewuse of adjustable nozzles.
2. Preparedetergent solution asrequired by job.
3. Placefilter end of chemical injection hose into
detergent container.
CAUTION
• When inserting the filter into a detergent solution bottle,
route the tube so as to keep it from inadvertentlycontacting
the hot mufflen
4. Slide adjustable nozzle forward to lowpressure mode.
Detergent cannot be applied with nozzle in high
pressure position.
5. Makesure garden hose is connected to water inlet.
Check that high pressure hose is connected to spray
gun and pump. Start engine.
6. Apply detergent to a dry surface,starting at lower
portion of area to be washed and work upward, using
long,even,overlapping strokes.
/
Keepspray nozzle between 8 to 24 inchesawayfrom cleaning
surface.
Operate this unit on a stable surface.
Be extremely careful if you must usethe pressure washer from
a ladder,scaffolding or anyother relatively unstable location.
Firmlygrasp spraygun with both handswhen using high
pressure sprayto avoid iniuryif gun kicks bac!c
3. Apply a high pressure spray to a small area,then check
the surfacefor damage.If no damage isfound, it is okay
to continuecleaning.
4. Start at the top of the areato be rinsed,working
down with same overlapping strokes asyou usedfor
washingand applyingdetergent
Automatic Cool Down System
(Thermal Relief)
If you run the engine on your pressure washer for
3-5 minutes without pressingthe trigger on the spray gun,
circulating water in the pump can reachtemperatures
above 125°EThe system engagesto cool the pump by
discharging the warm water onto the ground.
10
SPECIFICATIONS
PRESSURE WASH ER
Outlet Pressure ..... 2050 psi
Flow Rate .......... 2.0 gallonsper minute (gpm)
Detergent .......... Use detergent approved for
pressure washers
Water Supply ...... Not to Exceed 100°F
Temperature
Automatic Cool .... Willcyclewhen water
Down System reaches 125°-155°F
ShippingWeight .... 48 Ibs.
GENERAL MAINTENANCE
RECOMMENDATIONS
The pressure washer warranty does not cover items that
have been subjected to operator abuse or negEgence.To
receive full value from the warranty, the operator must
maintain the pressure washer as instructed in this manual
• Some adjustments witl need to be made periodically to
properly maintain your pressure washer.
• All maintenance in this manual and the engine owner's
manual should be made at least once each season.
• Once a year you should clean or replace the spark plug,
clean or replace the air filter and check the spray gun
and adjustable nozzle extension assembly for wear.A
new spark plug and clean air filter assure proper fuel-air
mixture and help your engine run better and last longer.
Please refer to your engine owner's manual for more
details.
• If equipped with inflatabletires, keep the air pressure at
the value marked on the tire or within 15 and 40 psi.
Before Each Use
I. Check engine oil level.
2. Check water inlet screen for damage.
3. Check in-line filter for damage.
4. Check high pressure hose for leaks.
5. Check chemical injectionhose and filter for damage.
6. Check spray gun and adjustable nozzle extension
assemblyfor leaks.
7. Rinseout gardenhose to flush out debris.
MAINTENANCE
Check and Clean Inlet Screen
Examinethe screen on the water inlet.Clean it if the
screen isclogged or replace it ifscreen is damaged.
Check High Pressure Hose
The high pressure hose can develop leaksfrom wear,
kinking,or abuse.Inspect the hoseeach time before using
it. Check for cuts,leaks,abrasions or bulging of cover,
damageor movement of couplings. If anyof these
conditions exist, replacethe hose immediately.
WARNING
NEVER repair high pressure hose. Replace it.
Replacement hose rating MUST exceed maximum pressure
rating of unit.
Check Chemical Injection Hose
Examinethe filter on the detergent tube and clean if
clogged.The tube should fit tightly on the barbed fitting.
Examine the tube for leaks or tears. Replace the filter or
tube if either is damaged.
Check Gun and Adjustable Nozzle
Extension
Examinethe hose connection to the spray gun and make
sure it is secure.Test the trigger by pressingit and making
sure it "springs back" into place when you releaseit. Put
the safety latch in the ON position and test the trigger.You
should not be able to press the trigger.
Purge Pump of Air and
Contaminants
To remove air from the pump, follow these steps:
I. Set up pressure washer asdescribed in"Preparing
PressureWasher For Use". Connect water supply and
turn water on.
I
II
 Loading...