

Page 1

Not for
Reproduction
Electric Pressure Washer
OPERATOR’S MANUAL
This pressure washer is rated in accordance to the Pressure Washer Manufacturers Association (PWMA)
standard PW101-2010 (Testing and Rating Performance of Pressure Washers).
BRIGGS & STRATTON CORPORATION
MILWAUKEE, WISCONSIN, U.S.A.
Manual No. 80027050 Revision -
Page 2

Not for
Reproduction
Thank you for purchasing this quality-built Briggs & Stratton® electric pressure washer. We are pleased that you’ve
placed your confidence in the Briggs & Stratton brand. When operated and maintained according to the instructions in this
manual, your Briggs & Stratton electric pressure washer will provide many years of dependable service.
This manual contains safety information to make you aware of the hazards and risks associated with electric pressure
washers and how to avoid them. Because Briggs & Stratton does not necessarily know all the applications this electric
pressure washer could be used for, it is important that you read and understand these instructions thoroughly before
attempting to start or operate this equipment. Save these original instructions for future reference.
This electric pressure washer requires final assembly before use. Refer to the Assembly section of this manual for
instructions on final assembly procedures. Follow the instructions completely.
Where to Find Us
You never have to look far to find Briggs & Stratton support and service for your electric pressure washer. There are over
30,000 Briggs & Stratton authorized service dealers worldwide who provide quality service. You can also contact Briggs &
Stratton Customer Service by phone at (800) 743-4115, or on the Internet at BRIGGSandSTRATTON.COM.
Electric Pressure Washer
Model Number _____________________________
Revision __________________________________
Serial Number ______________________________
Date Purchased ___________________________
Register Your Product
To ensure prompt and complete warranty coverage, register your product online at www.onlineproductregistration.com.
Table of Contents
Operator Safety.............................. 3
Assembly................................... 6
Features and Controls ........................ 8
Operation................................... 9
Maintenance ...............................12
Storage ...................................13
Troubleshooting ............................14
Warranty ..................................15
Specifications ..............................16
Copyright © 2017. Briggs & Stratton Corporation
Milwaukee, WI, USA. All rights reserved.
2 BRIGGSandSTRATTON.COM
Page 3

Not for
Reproduction
Operator Safety
SAVE THESE INSTRUCTIONS
Equipment Description
WARNING Failure to read and follow the operator’s
manual and all operating instructions before
using could result in death or serious injury.
• Read this manual carefully and become familiar with
your electric pressure washer. Know its applications, its
limitations, and any hazards involved.
This electric pressure washer operates at a maximum of
2,200 PSI with yellow spray tip and a flow rate of up to 1.2
GPM (gallons per minute) with turbo spray tip.
Every effort has been made to ensure that the information
in this manual is accurate and current. However, we
reserve the right to change, alter, or otherwise improve the
product and this document at any time without prior notice.
This ISM device complies with Canadian ICES-001.
Ground Fault Circuit Interrupter Protection
This pressure washer is provided with a ground-fault
circuit-interrupter (GFCI) built into the plug of the power
supply cord. This device provides additional protection
from the risk of electric shock. Should replacement of
the plug or cord become necessary, use only identical
replacement parts that include GFCI protection.
Automatic Shut-Off
The electric pressure washer is equipped with a sensor
that will detect that water flow has stopped when releasing
or locking the spray gun trigger. The sensor will cause the
motor to shut off for as long as the spray gun trigger is
released or locked.
If the motor continues to run when the spray gun trigger is
released or locked, DO NOT USE THE MACHINE. Call the
electric pressure washer helpline at (800) 743-4115 for
assistance.
NOTICE The electric pressure washer is equipped with a
main power ON/OFF switch. The switch should always be
moved to the OFF position (0) when the electric pressure
washer is not being used to prevent possible damage.
Motor Overload
The electric motor in this electric pressure washer is
equipped with an overload protection device (thermostat).
This device will automatically shut off the motor if the motor
overheats or draws excessive current.
If the overload protection device is tripped, disconnect the
power supply by turning the master ON/OFF switch to the
OFF (0) position. Let unit cool for 30 minutes. Then turn
the master ON/OFF switch to the ON (I) position to resume
operation.
Important Safety Information
Please read and understand this entire manual before
attempting to assemble, operate or service the product.
Follow the maintenance instructions specified in this manual.
If you have any questions regarding the product, please call
customer service at (800) 743-4115, 8 a.m. - 5 p.m., CST,
Monday - Friday.
Safety Symbols and Meanings
Read Manual
Slippery Surface Fall
Projectile
The safety alert symbol indicates a potential personal
injury hazard. A signal word (DANGER, WARNING, or
CAUTION) is used with the alert symbol to designate a
degree or level of hazard seriousness. A safety symbol
may be used to represent the type of hazard. The signal
word NOTICE indicates information considered important,
but not hazard-related.
DANGER indicates a hazard which, if not avoided, will
result in death or serious injury.
WARNING indicates a hazard which, if not avoided,
could result in death or serious injury.
CAUTION indicates a hazard which, if not avoided,
could result in minor or moderate injury.
NOTICE indicates information considered important, but
not hazard-related.
Electrical Shock
Flying Objects
Fire
Fluid Injection
Chemical Burn
3
Page 4

Not for
Reproduction
WARNING Risk of electrocution. Use of an
extension cord could cause electric shock or
burn resulting in death or serious injury.
WARNING Risk of eye or bodily injury. Spray could
splash back, propel objects or cause
internal harm resulting in serious injury.
• DO NOT use an extension cord with this electric
pressure washer. Your home’s electrical circuit
receptacle or extension cord may not provide lifesaving
ground-fault circuit-interruption protection.
WARNING Risk of electrocution. Contacting both
power conductors, at the same time could
cause electric shock or burn resulting in death
or serious injury.
• Connect only to a properly grounded outlet. DO NOT
remove ground pin from plug.
• Inspect cord before each use, DO NOT use if cord is
damaged.
• The product is equipped with a ground fault circuit
interrupter (GFCI) built into the power cord plug. If
replacement of the plug or cord is required, use only
identical replacement parts.
• Keep all connections dry and off the ground.
• DO NOT touch plug with wet hands.
• DO NOT run cord through doorways, windows, holes in
ceilings, walls, or floors.
• DO NOT walk on cord.
• DO NOT drive over, drag or place objects over cord.
• DO NOT spray near power source.
WARNING Use of electric pressure washer could
create puddles and slippery surfaces.
Risk of kickback. Spray gun could
kickback causing you to fall resulting in
death or serious injury.
• Operate the electric pressure washer from a
stable surface.
• Do not overreach or stand on unstable support. Keep
good footing and balance at all times.
• The cleaning area should have adequate slopes
and drainage to reduce the possibility of a fall due to
slippery surfaces.
• Be extremely careful if you must use the electric
pressure washer from a ladder, scaffolding, or any
other similar location.
• Firmly grasp spray gun with both hands when using
power spray modes to avoid injury when spray gun
kicks back.
• Always wear indirect vented (chemical splash) safety
goggles marked to comply with ANSI Z87.1 when using
or in vicinity of this equipment. NEVER substitute safety
glasses or dry-condition goggles for indirect vented
safety goggles.
• Know how to stop the pressure washer and bleed
pressure quickly. Be thoroughly familiar with the
controls.
• DO NOT allow CHILDREN to operate the electric
pressure washer.
• Keep operating area clear of all persons.
• Inspect high pressure hose before each use. NEVER
repair high pressure hose; replace it.
• DO NOT repair leaking connections with sealant of any
kind; replace o-rings and gaskets.
• Keep hose connected to electric pressure washer and
spray gun while system is pressurized.
• ALWAYS point spray gun in safe direction while system
is pressurized and squeeze spray gun trigger to release
high pressure, every time you turn off the pressure
washer.
• DO NOT aim spray gun at people or animals.
• DO NOT
• DO NOT secure spray gun in open position.
• DO NOT leave spray gun unattended while the electric
pressure washer is in ON (I) position.
• DO NOT use a spray gun which does not have a trigger
lock or trigger guard in place and in working order.
• Always be certain spray gun and accessories are
correctly attached.
• Stay alert – watch what you are doing.
• DO NOT operate the product when fatigued or under
the influence of alcohol or drugs.
• Close supervision is necessary when this product is
used near children.
WARNING The high pressure stream of water that
Spray gun traps high water pressure, even when motor
is stopped and water is disconnected, which could result
in serious injury.
• NEVER aim spray gun at people, animals, or plants.
• ALWAYS point spray gun in safe direction, squeeze
spray gun trigger to release high pressure, every time
you turn off pressure washer.
drink from hose connected accessories.
this equipment produces could cut through skin
and its underlying tissues, resulting in serious
injury and possible amputation.
4 BRIGGSandSTRATTON.COM
Page 5

Not for
Reproduction
WARNING Risk of fire. Spraying flammable liquids
could result in death or serious injury.
• DO NOT spray flammable liquids.
WARNING Risk of fire. Overheated cord could result
in death or serious injury.
• Uncoil cord completely prior to use.
• DO NOT cover cord with any material.
WARNING Chemical Burn Hazard.
Chemicals could cause burns resulting
in death or serious injury.
• Always wear indirect vented (chemical splash) safety
goggles marked to comply with ANSI Z87.1 when using
chemicals.
• DO NOT substitute safety glasses or dry-condition
goggles for indirect vented safety goggles.
• DO NOT use caustic liquid with electric pressure
washer.
• Use ONLY pressure washer safe detergents/soaps.
Follow all manufacturers instructions.
WARNING This product contains lead and lead
compounds, known to the state of California to cause
birth defects or other reproductive harm. Wash your
hands after handling this product. Cancer and
Reproductive Harm - www.P65Warnings.ca.gov
NOTICE High pressure spray could damage fragile
items including glass.
• DO NOT point spray gun at glass when using turbo
spray tip.
• NEVER aim spray gun at plants.
NOTICE You must protect your unit from freezing
temperatures.
• Failure to do so will permanently damage your pump
and spray gun rendering your unit inoperable.
• Freeze damage is not covered under warranty.
NOTICE Improper treatment of electric pressure washer
could damage it and shorten its life.
• If you have questions about intended use, ask dealer or
contact authorized service center.
• DO NOT operate units with broken or missing parts, or
without protective housing or covers.
• DO NOT by-pass any safety device on the electric
pressure washer.
• DO NOT modify the electric pressure washer in any
way.
• Before starting the electric pressure washer in cold
weather, check all parts of the equipment to be sure ice
has not formed there.
• DO NOT move the electric pressure washer by pulling
on hoses. Move unit using the transport handle
supplied.
• Use ONLY branded accessories intended for use with
this product.
5
Page 6

Not for
Reproduction
Assembly
Read entire Operator’s Manual before you
attempt to assemble or operate your new
electric pressure washer.
Your electric pressure washer requires some assembly
but is quickly ready for use. If you have any problems with
the assembly of your electric pressure washer, please call
the electric pressure washer helpline at (800) 743-4115. If
calling for assistance, please have the model, revision, and
serial number from the identification label available.
Tools Needed
• Philips screwdriver #2
Unpack Electric Pressure Washer
1. Remove everything from carton.
2. Ensure you have all included items prior to assembly.
Items Included in the Carton
• Main unit
• Handle with accessory tray
• Spray gun
• High pressure hose
• Spray wand
• Quick Connect (QC) spray tips (3)
• Quick Connect (QC) foamer spray tip with detergent
bottle
• Handle support tubes (2)
• Screws (2)
• Operator’s Manual
Check all contents. If any parts are missing or damaged,
DO NOT use, call the electric pressure washer helpline at
(800) 743-4115.
Become familiar with each component before assembling
the electric pressure washer. Identify contents with the
illustration shown in Features and Controls.
Attach Handle and Support Tubes
1. Push and hold lock-pin buttons (A) on each side of
the handle. Slide handle (B) down into each handle
support tubes (C) until lock-pins buttons snap into the
holes.
2. Slide handle support tubes (C) into slots on both
sides of main unit. Align holes and insert screws (D).
Tighten with a #2 philips screwdriver.
D
C
D
Lubricate O-Rings
Lubrication of o-rings is extremely important for installation
and operation. The use of a lubricant (petroleum or
synthetic grease) during assembly helps seat o-rings
properly and provides an improved seal. It also helps
protect the o-ring from damage by abrasion, pinching or
cutting and extends the life of the o-ring.
NOTICE ALWAYS apply a small amount of lubricant on
o-rings prior to assembling the garden hose to the pump
(E), high pressure hose (F), spray gun (G), and spray
wand (H).
G
H
E
F
Lubricate all connections shown below, following
these instructions:
1. Inspect and clean connecting surfaces prior to
lubrication and assembly.
2. Use lubricants sparingly during assembly; a light film
is all that is required.
3. Use a small brush or cotton swab to apply grease
directly to o-rings where they are not accessible (QC
fitting, M22 fitting).
B
A
C
6 BRIGGSandSTRATTON.COM
Page 7

Not for
Reproduction
Connect Hose and Water Supply to Pump
NOTICE DO NOT run the pump without the water supply
connected and turned on.
• Damage to equipment resulting from failure to follow this
instruction will void warranty.
1. Uncoil high pressure hose (A) and attach black end of
hose to base of spray gun (B). Tighten by hand.
A
B
WARNING The high pressure stream of water that
this equipment produces could cut through skin
and its underlying tissues, resulting in serious
injury and possible amputation.
• NEVER connect high pressure hose to spray wand.
• Keep high pressure hose connected to pump and spray
gun while system is pressurized.
• Always be certain spray gun, nozzles and accessories
are correctly attached.
2. Attach red end of high pressure hose (A) to high
pressure outlet (C) on pump. Tighten by hand.
NOTICE Using a One Way Valve (vacuum breaker or
check valve) at pump inlet could cause pump or inlet
connector damage.
• There MUST be at least 10 ft. (3 m) of unrestricted
garden hose between the pressure washer inlet and any
device, such as a vacuum breaker or check valve.
• Damage to equipment resulting from failure to follow this
instruction will void warranty.
5. Connect the garden hose (D) (not to exceed 50 ft. (15
m) in length) to the water inlet (E). Tighten by hand.
WARNING Risk of eye injury.
Spray could splash back or propel objects
resulting in serious injury.
• Always wear indirect vented (chemical splash) safety
goggles marked to comply with ANSI Z87.1 when
using or in vicinity of this equipment.
• NEVER substitute safety glasses or dry-condition
goggles for indirect vented safety goggles.
6. Turn ON the water, press red button (G) on the gun
and squeeze the trigger to purge the pump system of
air and impurities.
G
C
A
3. Run water through your garden hose for 30 seconds
to clean out any debris.
NOTICE DO NOT siphon standing water for the water
supply. Use ONLY cold water (less than 100°F (38°C)).
4. Before connecting garden hose (D) to water inlet (E),
inspect inlet screen (F). Clean screen if it contains
debris or have it replaced if damaged. DO NOT run
pressure washer if inlet screen is damaged.
F
D
E
Checklist Before Starting Pump Motor
Review the unit’s assembly to ensure you have performed
all of the following.
1. Be sure to read Operator Safety and Operation before
using the electric pressure washer.
2. Check for properly tightened hose connections.
3. Check to make sure there are no kinks, cuts, or damage
to hoses.
4. Provide a proper water supply at an adequate flow.
5. Plug electrical power cord into a dedicated electrical circuit
rated for 120 Volts AC at 15 Amps that is properly installed
in accordance with all local codes and ordinances. Check
that circuit is not used to supply any other electrical needs.
7
Page 8

Not for
Reproduction
Features and Controls
Read the Operator’s Manual and safety rules before operating your electric pressure washer.
Compare the illustrations with your electric pressure washer to familiarize yourself with the locations of various
controls and adjustments. Save this original manual for future reference.
A
B
C
D
E
F
M
L
K
J
G
A - Spray Gun — Controls the application of water onto
cleaning surface with trigger device. Includes trigger lock.
B - Spray Tips — Yellow and white spray tips are for
various high pressure applications.
C - High Pressure Hose — Connect red end to high
pressure water outlet and black end to spray gun.
D -Warning Label — Identifies hazards to be avoided
when using your pressure washer.
E - Master ON/OFF Toggle Switch — Push top of switch
in (I) to turn pressure washer ON. Push bottom of switch
in (0) to turn pressure washer OFF.
F - Water Supply Inlet — Connect to water supply using a
50 ft. (15.24 m) maximum garden hose.
G - Electric Cord with GFCI — The electric pressure
washer and operator is protected by a ground fault
circuit interrupter (GFCI).
8 BRIGGSandSTRATTON.COM
H - Foamer Spray Tip with Detergent Bottle — Use to
apply pressure washer safe detergent to surfaces.
J - Identification Label (under housing)— Provides model
and serial number of pressure washer. Please have
these readily available if calling for assistance.
K - High Pressure Outlet — Connection for high pressure
hose.
L - Spray Wand — Allows you to switch between different
spray tips.
M -Turbo Spray Tip — Whirls a powerful pin-point jet of
water for intense cleaning.
H
Page 9

Not for
Reproduction
Operation
How to Start Your Electric Pressure Washer
Follow the instructions below in the order presented. If
you have any problems operating your electric pressure
washer, please call the electric pressure washer helpline at
(800) 743-4115.
WARNING Risk of eye injury. Spray could splash
back or propel objects resulting in serious
injury. Always wear indirect vented (chemical
splash) safety goggles marked to comply with
ANSI Z87.1 when using or in vicinity of this equipment.
NEVER substitute safety glasses or dry-condition
goggles for indirect vented safety goggles.
1. Place pressure washer near an outside water source
capable of supplying water at a flow rate greater than
3.0 gallons (11.4 l) per minute and no less than 20 PSI
(1.3 BAR) at pressure washer end of garden hose. DO
NOT siphon supply water.
2. Check that high pressure hose is tightly connected to
spray gun and pump. See Assembly section.
3. Make sure unit is in a level position.
4. Connect garden hose to water inlet on pressure
washer pump.
NOTICE DO NOT run the pump without the water supply
connected and turned on.
• Damage to equipment resulting from failure to follow this
instruction will void warranty.
5. Turn ON water, point gun in a safe direction, press red
button and squeeze trigger to purge pump system of air
and impurities.
6. Attach spray wand to spray gun. Tighten by hand.
WARNING Risk of electrocution. Use of an
extension cord could cause electric shock or
burn resulting in death or serious injury.
• DO NOT use an extension cord with this electric
pressure washer. Your home’s electrical circuit
receptacle or extension cord may not provide lifesaving
ground-fault circuit-interruption protection.
9. Plug electrical power cord into a dedicated electrical
circuit rated for 120 Volts AC at 15 Amps that is
properly installed in accordance with all local codes and
ordinances. Circuit is not to supply any other electrical
needs. The indicator light on the GFCI should be ON.
NOTICE The indicator light must be ON for the electric
pressure washer to operate.
WARNING Risk of electrocution. Non-operating
ground fault circuit interrupter (GFCI) could
result in death or bodily injury. If indicator light
does not stay ON after test and reset, do not
use GFCI.
10. Press TEST button (B). The indicator light (C) should
be OFF.
D
7. Choose spray tip you want to use, pull back on collar
of spray wand, insert spray tip and release collar. Tug
on spray tip to make sure it is securely in place. See
How to Use Spray Tips.
8. Push master ON/OFF switch (A) to OFF (0) position.
A
B
C
11. Press RESET button (D). The indicator light (C)
should be ON.
NOTICE DO NOT use the electric pressure washer if
above test fails.
12. Press the master ON/OFF switch (A) to the pressure
washer ON (I) position.
13. Point gun in a safe direction, press trigger lock button
and squeeze trigger.
The electric pressure washer motor will start and stop as
spray gun trigger is depressed and released.
The electric pressure washer is now ready for use.
Instructions for use of the supplied accessories are given
later in this section.
9
Page 10
Not for
Reproduction
How to Stop Your Electric Pressure Washer
Applying Detergent
The electric pressure washer motor runs only when the
trigger is engaged. To stop the electric pressure washer
and turn off the motor:
1. Release spray gun trigger.
2. Press the master ON/OFF switch to the OFF (0) position.
NOTICE Releasing the trigger will shut off the motor but
does not shut off electrical power to the unit.
3. Turn off water supply.
4. ALWAYS point spray gun in a safe direction, press
trigger lock button and squeeze trigger to relieve built
up pressure in the unit.
WARNING The high pressure stream of water that
this equipment produces could cut through skin
and its underlying tissues, resulting in serious
injury and possible amputation.
Spray gun traps high water pressure, even when motor
is stopped and water is disconnected, which could result
in serious injury.
• Keep high pressure hose connected to pump and
spray gun while system is pressurized.
• ALWAYS point spray gun in safe direction, squeeze
spray gun trigger to release high pressure, every time
you turn off pressure washer.
WARNING Chemical Burn Hazard.
Chemicals could cause burns resulting
in death or serious injury.
• Always wear indirect vented (chemical splash) safety
goggles marked to comply with ANSI Z87.1 when using
chemicals.
• DO NOT substitute safety glasses or dry-condition
goggles for indirect vented safety goggles.
• DO NOT use caustic liquid with electric pressure
washer.
• Use ONLY pressure washer safe detergents/soaps.
Follow all manufacturers instructions.
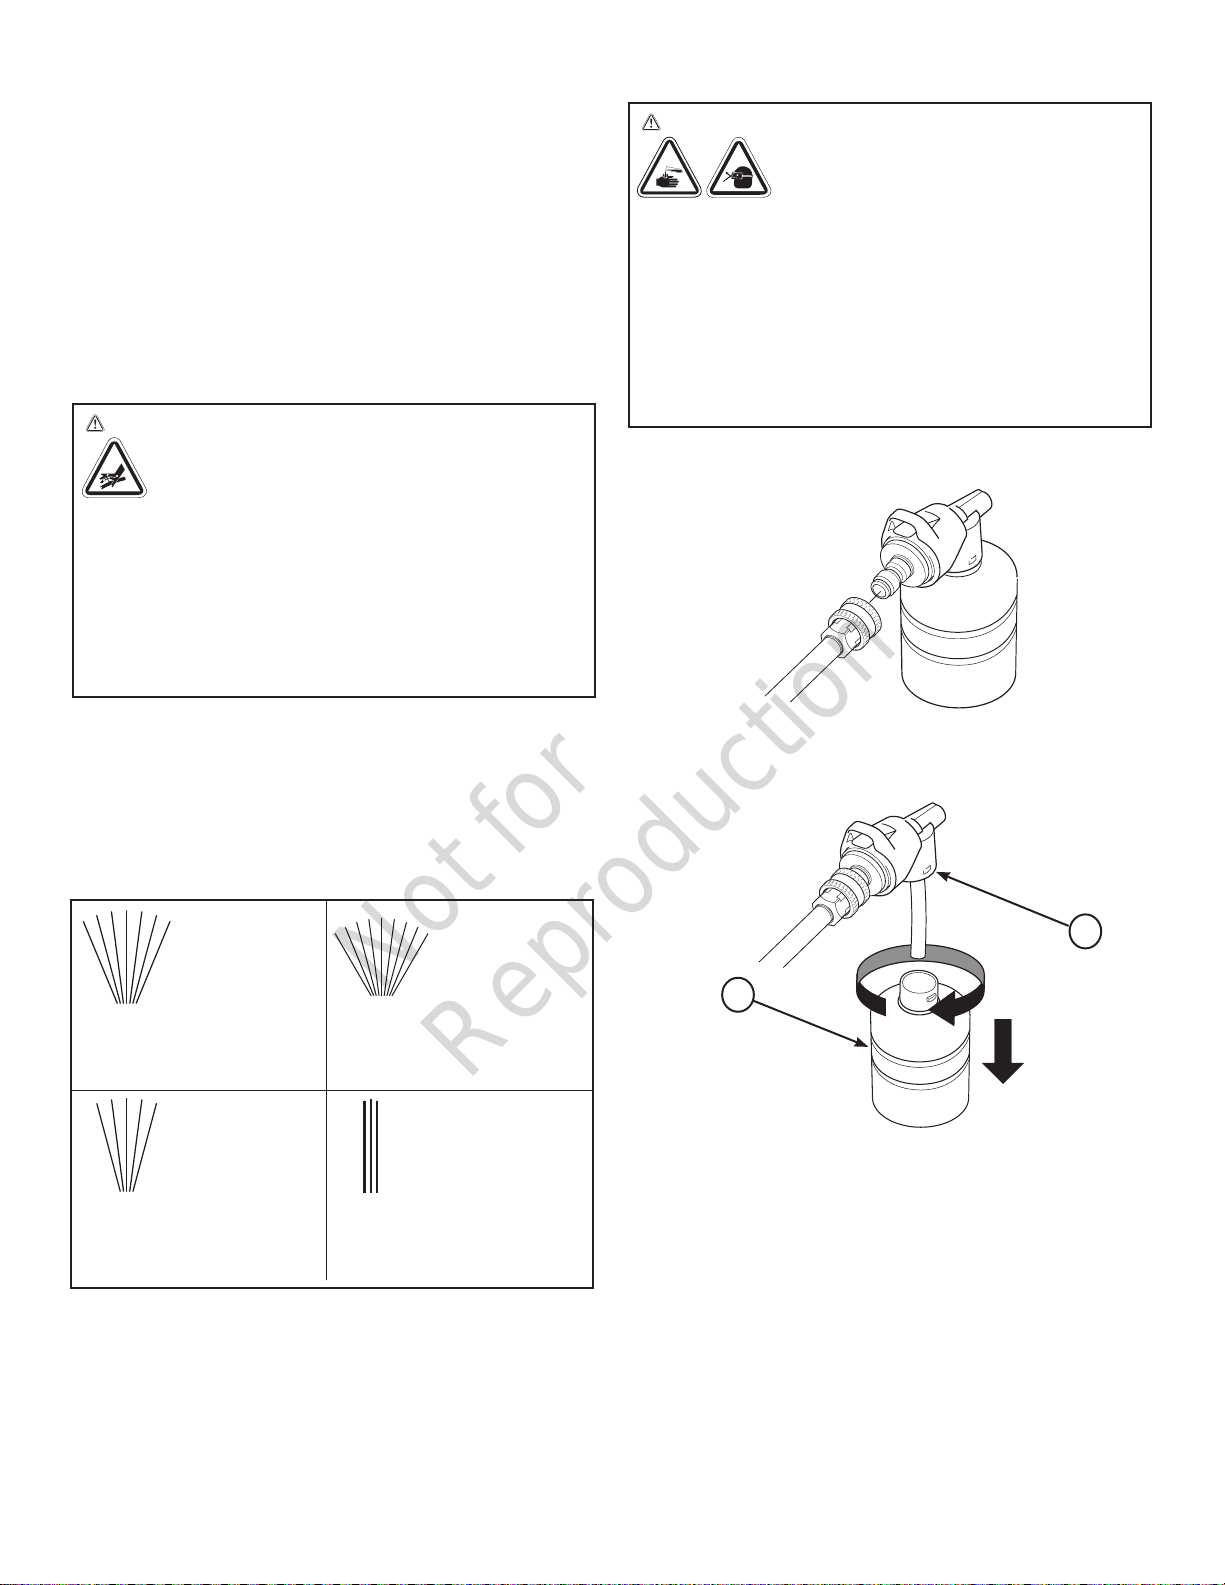
To apply detergent, follow these steps:
1. Install foamer spray tip with detergent bottle.
5. Disconnect GFCI plug from outlet.
How to Use Spray Tips
There are four spray tips supplied with the pressure
washer. The turbo spray tip whirls a powerful pin-point jet
of water for intense cleaning. The yellow and white spray
tips are for various high pressure applications. The foamer
spray tip is for general soap applications.
Low Pressure
Foamer
Use to apply
detergent
1.1 GPM (4.1 LPM)
General Rinse
Yellow, 15°
Siding / Patios
Decks /
Driveways / Garage Floors
2200 PSI (152 bar)
1.0 GPM (3.7 LPM)
Usage Tips
• For most effective cleaning, keep spray tip from 8 to
24 inches away from cleaning surface.
• If you get spray tip too close, especially using a high
pressure spray tip, you may damage surface being
cleaned.
• DO NOT get closer than 6 inches when cleaning tires.
1.2 GPM (4.5 LPM)
Delicate Rinse
White, 40°
Cars / Vans /
Trucks / Outdoor
Furniture
1300 PSI (90 bar)
Intense Cleaning
Turbo
Paint Removal /
Oil Stains / Rust
Removal
900 PSI (6 bar)
2. Prepare detergent solution as required by job.
3. Rotate detergent bottle (A) counter-clockwise and
remove from foamer spray tip (B).
B
A
4. Fill bottle with detergent solution.
5. Reinstall detergent bottle onto foamer spray tip and
turn clockwise until it clicks into place.
6. Make sure garden hose is connected to water inlet.
Check that high pressure hose is connected to spray
gun and high pressure outlet. Turn on water.
NOTICE You must attach all hoses before you start the
pressure washer.
10 BRIGGSandSTRATTON.COM
Page 11

Not for
Reproduction
7. Start the pressure washer as instructed in How to
Start Your Electric Pressure Washer.
8. Apply detergent to a dry surface, starting at lower
portion of area to be washed and work upward using
long, even, overlapping strokes.
9. Allow detergent to “soak in” for 3-5 minutes before
washing and rinsing. Reapply as needed to prevent
surface from drying. To prevent streaking, do not allow
detergent to dry on surface.
Electric Pressure Washer Rinsing
1. Remove foamer spray tip from wand.
2. Install white or yellow spray tip.
3. Keep spray gun a safe distance from area you plan to
spray.
WARNING Risk of kickback.
Spray gun could kickback causing you to fall
resulting in death or serious injury.
• Operate the electric pressure washer from a
stable surface.
• Be extremely careful if you must use the electric
pressure washer from a ladder, scaffolding, or any
other similar location.
• Firmly grasp spray gun with both hands when using
power spray modes to avoid injury when spray gun
kicks back.
How to Store Accessories
The unit is equipped with areas to store your high pressure
hose, spray gun, spray wand, and power cord. Coil power
cord on brackets on ends of main unit. Wrap high pressure
hose and store on hook on back of accessory tray. Store
spray gun in slots on left side of accessory tray. Snap
spray wand in slots on right side of accessory tray. Store
spray tips in holes on front of accessory tray. Identify all
accessories with the illustrations in Features and Controls.
4. Apply a high pressure spray to a small area and then
check surface for damage. If no damage is found, you
can assume it is okay to continue rinsing.
5. Start at top of area to be rinsed, working down with
same overlapping strokes as you used for cleaning.
Other Cleaning Tips
• NEVER leave the electric pressure washer unattended
while it is plugged into an electrical outlet and while
water is supplied to the equipment.
• If you have the spray tip too far away from the surface
being washed, the cleaning may not be as effective.
11
Page 12

Not for
Reproduction
Maintenance
General Recommendations
Regular maintenance will improve the performance and
extend the life of the electric pressure washer.
The electric pressure washer’s warranty does not cover
items that have been subjected to operator abuse or
negligence. To receive full value from the warranty, the
operator must maintain the electric pressure washer as
instructed in this manual, including proper storage.
NOTICE Should you have questions about replacing
components on your electric pressure washer, please call
(800) 743-4115 for assistance.
Check Spray Gun
Examine the hose connection to the spray gun and
make sure it is secure. Test the trigger (A) by pressing
the triggger lock button (B) and making sure the trigger
“springs back” into place when you release it. You should
not be able to press the trigger without pressing the trigger
lock button. Replace spray gun immediately if it fails any of
these tests.
B
A
Before Each Use
1. Clean debris.
2. Check water inlet screen for debris or damage.
3. Check high pressure hose for leaks.
4. Check spray gun operation.
Electric Pressure Washer Maintenance
Clean Debris
Daily or before use, clean accumulated debris from electric
pressure washer. Inspect cooling air slots and openings on
the front, rear and bottom of the electric pressure washer.
These openings must be kept clean and unobstructed.
The electric pressure washer parts should be kept clean to
reduce the risk of overheating and ignition of accumulated
debris.
• Use a damp cloth to wipe exterior surfaces clean.
NOTICE Improper treatment of the electric pressure
washer can damage it and/or shorten its life.
• DO NOT insert any objects through cooling slots.
Check and Clean Water Inlet Screen
Examine the screen on the unit’s water inlet. Clean it if the
screen is clogged or replace it if screen is damaged.
Check High Pressure Hose
The high pressure hose can develop leaks from wear,
kinking, or abuse. Inspect the hose each time before
using it. Check for cuts, leaks, abrasions or bulging of
cover, damage or movement of couplings. If any of these
conditions exist, replace the hose immediately.
Spray Tip Maintenance
Excessive pump pressure can cause a pulsing sensation
felt while squeezing the spray gun trigger. The principal
cause of excessive pump pressure is a spray tip clogged or
restricted with foreign materials such as dirt, etc. A clogged
spray tip could lead to pump cycling ON/OFF or not turning
on even when there is some flow.
1. Press the master ON/OFF switch to the OFF (0)
position. Remove power cord plug from electrical outlet.
2. Disconnect water supply at the electric pressure
washer.
3. ALWAYS point spray gun in a safe direction, press
trigger lock button and squeeze spray gun trigger to
release retained high water pressure.
WARNING The high pressure stream of water that
this equipment produces could cut through skin
and its underlying tissues, resulting in serious
injury and possible amputation.
Spray gun traps high water pressure, even when motor
is stopped and water is disconnected, which could result
in serious injury.
• Keep high pressure hose connected to pump and
spray gun while system is pressurized.
• ALWAYS point spray gun in safe direction, squeeze
spray gun trigger to release high pressure, every time
you turn off pressure washer.
WARNING The high pressure stream of water that
this equipment produces could cut through skin
and its underlying tissues, resulting in serious
injury and possible amputation.
• NEVER repair high pressure hose. Replace it.
• Replacement hose rating MUST equal or exceed
maximum pressure rating of unit.
12 BRIGGSandSTRATTON.COM
Page 13

Not for
Reproduction
4. Remove spray tip from end of spray wand.
5. Use a small paper clip to free any foreign material
clogging or restricting any of the spray tips.
6. Using a garden hose, remove additional debris by
back flushing water through spray wand. Back flush
between 30 to 60 seconds.
7. Reinstall spray tip into spray wand.
8. Reconnect spray wand to spray gun.
9. Make sure garden hose is connected to water inlet.
Check that high pressure hose is connected to spray
gun. Turn on water.
10. Plug power cord into electrical outlet and press the
master ON/OFF switch to the pressure washer ON (I)
position.
11. Test the electric pressure washer by operating with
each spray tip.
Pump and Motor Maintenance
The electric pressure washer does not require any
maintenance to the pump or motor. Both assemblies
are pre-lubricated and sealed, requiring no additional
lubrication ever.
10. Store spray gun and spray wand in slots on accessory
tray. Store spray tips in holes on accessory tray.
11. Store unit in a clean, dry area.
12. If storing for more than 30 days see Winter or Long
Term Storage.
Winter or Long Term Storage
Follow steps 1-10 in After Each Use.
NOTICE Water left in pump could freeze and permanently
damage pump. Freeze damage is not covered under
warranty.
Protecting the Pump
To protect the pump from damage caused by mineral
deposits or freezing, use PumpSaver, Model 6039, to treat
pump. This prevents freeze damage and lubricates plunger
and seals.
NOTICE PumpSaver is available as an optional
accessory. It is not included with the electric pressure
washer. Contact the nearest authorized service center to
purchase Pump Saver.
NOTICE You must protect your unit from freezing
temperatures.
• Failure to do so will permanently damage your pump
and spray gun rendering your product inoperable.
• Freeze damage is not covered under warranty.
To use PumpSaver, make sure the electric pressure
washer is turned off and inlet and outlet hoses are
disconnected. Read and follow all instructions and
warnings given on the PumpSaver container.
After Each Use
Water should not remain in the unit for long periods of time.
Sediments or minerals can deposit on pump parts and “freeze”
pump action. Follow these procedures after every use:
1. Flush detergent bottle (if used) by removing it from the
foamer spray tip and pouring out all remaining solution.
2. Rinse detergent bottle out with fresh clean water and
reinstall onto foamer spray tip.
3. Run the electric pressure washer with foamer spray
tip. Flush for one or two minutes.
4. Press the master ON/OFF switch to the OFF (0) position.
5. Turn off water supply, point gun in a safe direction,
press red button and squeeze trigger to relieve trapped
pressure, and let engine cool.
6. Disconnect hose from spray gun and high pressure
outlet on pump. Drain water from hose, spray gun,
and spray wand. Use a rag to wipe off the hose.
7. Drain water from pump by tipping unit to the side (water
inlet facing down) for two minutes. Tip to the other side
(high pressure outlet facing down) for an additional two
minutes.
8. Wrap high pressure and store on hook on back of
accessory tray.
9. Coil power cord on brackets.
Final Storage Procedures
1. Wrap high pressure and store on hook on back of
accessory tray.
2. Coil power cord on brackets.
3. Store spray gun and spray wand in slots on accessory
tray. Store spray tips in holes on accessory tray.
4. Store unit in a clean, dry area that is protected from
freezing temperatures.
5. Cover unit with a suitable protective cover that does
not retain moisture.
13
Page 14

Not for
Reproduction
Troubleshooting
Problem Cause Correction
Pump has following
problems: failure to produce
pressure, erratic pressure,
chattering, loss of pressure,
low water volume.
1. Water inlet is blocked.
2. Inadequate water supply.
3. Garden hose is kinked or leaking.
4. Clogged water inlet screen.
5. Water supply is over 100°F (38°C).
6. High pressure hose is blocked or
leaks.
7. Spray tip is obstructed.
1. Clear inlet.
2. Provide adequate water flow.
3. Straighten garden hose or replace if leaking.
4. Check and clean water inlet screen.
5. Provide cooler water supply.
6. Clear blocks in high pressure hose or
replace hose.
7. Clean spray tip.
Unit fails to start when spray
gun trigger is squeezed.
Detergent fails to mix with
spray.
Hose connections leaking.
1. Water supply is not turned on.
2. Unit is not turned on.
3. Garden hose is too long.
4. Fuse blown or circuit breaker tripped.
1. High pressure spray tip is installed. 1. Install foamer spray tip.
1. Garden hose loose to water inlet.
2. Loose high pressure hose
connections.
3. Damaged o-ring.
1. Turn on water supply.
2. Press the master ON/OFF switch to the
ON (I) position. Reset GFCI.
3. Use only 50 ft. (15.24 m) maximum
garden hose.
4. a.) Check fuse box for blown fuse and
replace as necessary or reset circuit
breaker. Do not use a fuse or circuit
breaker with a higher rating than that
specified for your particular branch
circuit.
b.) Disconnect other electrical
appliances and turn off lights in the
circuit or operate the pressure washer
on its own dedicated circuit.
c.) Run pressure washer with any spray
tip for 5 minutes. Motor break in may be
necessary.
1. Hand tighten garden hose to water
inlet.
2. Remove hose completely and reinstall
hand tight.
3. Replace o-ring.
For all other issues, see a Briggs & Stratton authorized dealer.
14 BRIGGSandSTRATTON.COM
Page 15

Not for
Reproduction
BRIGGS & STRATTON WARRANTY POLICY
Briggs & Stratton warrants that, during the warranty period specified below, it will repair or replace, free of charge, any part that is defective in material or workmanship
or both. Transportation charges on product submitted for repair or replacement under this warranty must be borne by purchaser. This warranty is effective for and
is subject to the time periods and conditions stated below. For warranty service, contact Briggs & Stratton Customer Service by phone at (800) 743-4115, or on the
internet at BRIGGSANDSTRATTON.COM.
There is no other express warranty. Implied warranties, including those of merchantability and fitness for a particular purpose, are limited to the
warranty period listed below, or to the extent permitted by law. Liability for incidental or consequential damages are excluded to the extent exclusion
is permitted by law. Some states or countries do not allow limitations on how long an implied warranty lasts, and some states or countries do not allow the exclusion
or limitation of incidental or consequential damages, so the above limitation and exclusion may not apply to you. This warranty gives you specific legal rights and you
may also have other rights which vary from state to state or country to country.**
** In Australia - Our goods come with guarantees that cannot be excluded under the Australian Consumer Law. You are entitled to a replacement or refund for a major
failure and for compensation for any other reasonably foreseeable loss or damage. You are also entitled to have the goods repaired or replaced if the goods fail to be
of acceptable quality and the failure does not amount to a major failure. For warranty service, find the nearest Authorized Service Dealer in our dealer locator map at
BRIGGSandSTRATTON.COM, or by calling 1300 274 447, or by emailing or writing to salesenquires@briggsandstratton.com.au, Briggs & Stratton Australia Pty Ltd, 1
Moorebank Avenue, NSW, Australia, 2170.
The warranty period begins on the date of purchase by the first retail or commercial consumer. “Consumer use” means personal residential household use by a retail
consumer. “Commercial use” means all other uses, including use for commercial, income producing or rental purposes. Once a product has experienced commercial
use, it shall thereafter be considered as a commercial use product for purposes of this warranty.
Save your proof of purchase receipt. If you do not provide proof of the initial purchase date at the time warranty service is requested, the manufacturing date of the
product will be used to determine the warranty period. Product registration is not required to obtain warranty service on Briggs & Stratton products.
LIMITED WARRANTY
WARRANTY PERIOD
Consumer Use Commercial Use
12 months None
ABOUT YOUR WARRANTY
Most warranty repairs are handled routinely, but sometimes requests for warranty service may not be appropriate. This warranty covers only defects in materials or
workmanship. It does not cover damage caused by improper use or abuse, improper maintenance or repair, normal wear and tear, or stale or unapproved fuel.
Improper Use and Abuse - The proper, intended use of this product is described in the Operator’s Manual. Using the product in a way not described in the Operator’s
Manual or using the product after it has been damaged will not be covered under this warranty. Warranty coverage will also not be provided if the serial number on the
product has been removed or the product has been altered or modified in any way, or if the product has evidence of abuse such as impact damage or water/chemical
corrosion damage.
Improper Maintenance or Repair - This product must be maintained according to the procedures and schedules provided in the Operator’s Manual, and serviced or
repaired using genuine Briggs & Stratton parts or equivalent. Damage caused by lack of maintenance or use of non-original parts is not covered by warranty.
Normal Wear and Tear - Like most mechanical devices, your unit is subject to wear even when properly maintained. This warranty does not cover repairs when normal
use has exhausted the life of a part or the equipment. Maintenance and wear items such as filters, belts, cutting blades, and brake pads (except engine brake pads) are
not covered by warranty due to wear characteristics alone, unless the cause is due to defects in material or workmanship.
Stale or Unapproved Fuel - In order to function correctly, this product requires fresh fuel that conforms to the criteria specified in the Operator’s Manual. Engine or
equipment damage caused by stale fuel or the use of unapproved fuels (such as E15 or E85 ethanol blends) is not covered by warranty.
Other Exclusions - This warranty excludes damage due to accident, abuse, modifications, alterations, improper servicing, freezing or chemical deterioration.
Attachments or accessories that were not originally packaged with the product are also excluded. There is no warranty coverage on equipment used for primary power in
place of utility power or on equipment used in life support applications. This warranty does not include used, reconditioned, second-hand, or demonstration equipment or
engines. This warranty also excludes failures due to acts of God and other force majeure events beyond the manufacturer’s control.
80018419_EN Rev A
15
Page 16

Not for
Reproduction
Electric Pressure Washer
Specifications
Max Pressure ...............2,200 PSI (152 BAR)* @ 1.0 GPM (3.8 liters/min)
Max Flow Rate .................1.2 GPM (4.5 liters/min)* @ 900 PSI (62 BAR)
Detergent Mix .................................... See MFR’s Instructions
Water Supply Temperature ........................41°F (5°C) - 100°F (38°C)
Motor ...................................................Induction Type
Rated Voltage .............................................120 Volts AC
Current..................................................... 14.5 Amps
This pressure washer is rated in accordance to the Pressure Washer Manufacturers Association (PWMA) standard
*
PW101-2010 (Testing and Rating Performance of Pressure Washers).
Briggs & Stratton Corporation
16 BRIGGSandSTRATTON.COM
Milwaukee, Wisconsin, 53201-0702 U.S.A.
P.O. Box 702
(800) 743-4115
Page 17

Not for
Reproduction
Hidrolavadora eléctrica
MANUAL DEL OPERARIO
Esta limpiadora a presión está clasificada conforme a la norma PW101-2010
(Comprobación y Clasificación de Rendimiento de Limpiadoras a Presión) de la
Asociación de Fabricantes de Limpiadoras a Presión (PWMA).
BRIGGS & STRATTON CORPORATION
MILWAUKEE, WISCONSIN, EE. UU.
Page 18

Not for
Reproduction
Gracias por comprar esta hidrolavadora eléctrica Briggs & Stratton® de alta calidad. Nos complace que haya depositado
su confianza en la marca Briggs & Stratton. Si la operación y el mantenimiento de su producto Briggs & Stratton se realiza
según las instrucciones de este manual, le proporcionará muchos años de servicio confiable.
Este manual contiene información de seguridad para alertarlo sobre los peligros y riesgos asociados con las
hidrolavadoras eléctricas, y para indicarle cómo evitarlos. Dado que Briggs & Stratton no conoce necesariamente todas
las aplicaciones para las cuales se podría utilizar esta hidrolavadora eléctrica, es importante que usted lea detalladamente
y entienda estas instrucciones antes de hacer arrancar o utilizar este equipo. Guarde estas instrucciones originales
para futuras consultas.
Esta hidrolavadora eléctrica requiere su montaje final antes de su uso. Consulte la sección Montaje de este manual
para conocer las instrucciones sobre los procedimientos de montaje final. Siga las instrucciones detalladamente.
Contacto
Nunca debe ir demasiado lejos para encontrar el soporte y el servicio de Briggs & Stratton para su hidrolavadora eléctrica.
Existen más de 30.000 distribuidores de servicio autorizado por Briggs & Stratton en todo el mundo, quienes suministran
servicio de calidad. También puede ponerse en contacto con Atención al Cliente de Briggs & Stratton por teléfono al (800)
743-4115 o en Internet en BRIGGSandSTRATTON.COM.
Hidrolavadora eléctrica
Número de modelo __________________________
Revisión __________________________________
Número de serie ____________________________
Fecha de compra __________________________
Registrar su producto
Para asegurar pronta y completa cobertura de la garantía, registre su producto en línea en
www.onlineproductregistration.com.
Índice
Seguridad del operador . . . . . . . . . . . . . . . . . . . . . . . 3
Montaje .................................... 6
Características y controles..................... 8
Operación .................................. 9
Mantenimiento .............................12
Almacenamiento............................ 14
Solución de problemas.......................15
Garantía...................................16
Especificaciones............................18
Copyright © 2017. Briggs & Stratton Corporation
Milwaukee, WI, USA. Reservados todos los derechos.
2 BRIGGSandSTRATTON.COM
Page 19

Not for
Reproduction
Seguridad del operador
CONSERVE ESTAS INSTRUCCIONES
Descripción del equipo
ADVERTENCIA No leer ni seguir las instrucciones del
manual del operador y todas las instrucciones de
funcionamiento antes de usar la unidad podría
ocasionar la muerte o lesiones graves.
• Lea este manual cuidadosamente y familiarícese con la
hidrolavadora eléctrica. Conozca sus aplicaciones, sus
limitaciones y los peligros involucrados.
Esta lavadora de presión eléctrica opera a un máximo
de 152 bar (2200 PSI) con una punta de pulverización
amarilla y a un caudal de hasta 4.5 LPM (litros) (1,2 GPM
(galones)) por minuto con una punta de pulverización
turbo.
Hemos hecho todo lo posible para asegurarnos de que la
información de este manual sea precisa y esté actualizada.
No obstante, nos reservamos el derecho a cambiar,
modificar o mejorar el producto y este documento en
cualquier momento y sin previo aviso.
Este dispositivo ISM cumple con la norma canadiense
ICES-001.
Circuitos protegidos con interruptores a tierra
Esta arandela de presión se proporciona con un circuito
protegido con interruptores a tierra (GFCI) integrado en
el enchufe del cable de alimentación. Este dispositivo
aporta una mayor protección frente al riesgo de descarga
eléctrica. En el caso de que sea necesario sustituir
el enchufe o el cable, utilice piezas de repuestos
exactamente idénticas que dispongan de protección GFCI.
Apagado automático
La hidrolavadora eléctrica está equipada con un sensor
que detectará si el flujo de agua se detuvo al activar o
bloquear el gatillo de la pistola pulverizadora. El sensor
hará que el motor se apague siempre que el gatillo de la
pistola pulverizadora se active o bloquee.
Si el motor continúa en funcionamiento cuando se activa o
bloquea el gatillo de la pistola pulverizadora, NO USE LA
MÁQUINA. Llame al teléfono de ayuda de la hidrolavadora
eléctrica: (800) 743-4115 para obtener asistencia.
AVISO La hidrolavadora eléctrica está equipada con
un interruptor de encendido/apagado de la alimentación
principal. El interruptor siempre debe estar en la posición
de apagado (0) cuando no se usa la hidrolavadora
eléctrica para evitar probables daños.
Sobrecarga del motor
El motor eléctrico de esta hidrolavadora eléctrica está
equipado con un dispositivo de protección por sobrecarga
(termostato). Este dispositivo apagará automáticamente el
motor si este se recalienta o utiliza corriente en exceso.
Si se activa el dispositivo de protección por sobrecarga,
desconecte la alimentación. Para ello, coloque el
interruptor principal de encendido/apagado en la posición
de apagado (0). Deje que la unidad se enfríe durante
30 minutos. Luego, coloque el interruptor principal de
encendido/apagado en la posición de encendido (I) para
continuar con el funcionamiento.
Información de seguridad importante
Lea y comprenda todo el manual antes de armar,
hacer funcionar o realizar operaciones de reparación/
mantenimiento en el producto. Siga las instrucciones de
mantenimiento especificadas en este manual. Si tiene
alguna pregunta relacionada con este producto, por favor,
póngase en contacto con el servicio de atención llamando
al cliente al (800) 743-4115, de lunes a viernes, de 8.00 a
17.00, CST.
Símbolos de seguridad y significados
Lea el manual
Superficie
resbaladiza
Proyectil
El símbolo de alerta de seguridad indica un posible
riesgo para su integridad física. Se utiliza una palabra de
señalización (PELIGRO, ADVERTENCIA o PRECAUCIÓN)
junto con el símbolo de alerta para designar un grado o
nivel de gravedad de riesgo. Se puede utilizar un símbolo
de seguridad para representar el tipo de riesgo. AVISO
indica una información considerada importante, pero no
relacionada con un peligro potencial.
PELIGRO indica un peligro que, si no se evita,
ocasionará la muerte o una lesión grave.
ADVERTENCIA indica un peligro que, si no se evita,
podría ocasionar la muerte o una lesión grave.
PRECAUCIÓN indica un peligro que, si no se evita,
podría ocasionar en lesión leve o moderada.
AVISO indica una información considerada importante, pero
no relacionada con un peligro potencial.
Descarga eléctrica
Caídas
Objetos
voladores
Fuego
Inyección
de fluidos
Quemadura
química
3
Page 20

Not for
Reproduction
ADVERTENCIA Riesgo de electrocución. El uso
de un cable de prolongación podría ocasionar
descarga eléctrica o quemaduras que pueden
provocar lesiones graves o la muerte.
• NO use un cable de prolongación con esta
hidrolavadora eléctrica. Es posible que el cable de
prolongación o el enchufe del circuito eléctrico de su
casa no proporcione la protección del interruptor de
circuito por fallos con conexión a tierra que resguarda
la vida de las personas.
ADVERTENCIA Riesgo de electrocución.
El contacto con ambos conductores de
alimentación al mismo tiempo podría ocasionar
descarga eléctrica o quemaduras que pueden
provocar lesiones graves o la muerte.
• Conectarla solo a un toma corriente con una buena
descarga a tierra. NO quite el terminal de tierra del enchufe.
• Inspeccione el cable antes de cada uso, NO lo utilice si
está dañado.
• El producto está equipado con un interruptor de circuito
por fallos con conexión a tierra (GFCI) montado en el
enchufe del cable de alimentación. Si es necesario
cambiar el enchufe o el cable, utilice solamente piezas
de repuesto idénticas.
• Mantenga todas las conexiones secas y alejadas del
suelo.
• NO toque el enchufe con las manos mojadas.
• NO pase el cable a través de puertas, ventanas,
agujeros en los techos, paredes o pisos.
• NO camine sobre el cable.
• NO conduzca sobre el cable ni arrastre o coloque
objetos sobre él.
• NO pulverice cerca de una fuente de alimentación.
ADVERTENCIA El uso de la hidrolavadora eléctrica
podría formar charcos y generar
superficies resbaladizas.
Riesgo de contragolpe. La pistola de
pulverización podría causar un contragolpe, con riesgo de
caída que podría provocar la muerte o lesiones graves.
• Opere la hidrolavadora eléctrica desde una superficie
estable.
• No se estire ni se pare sobre un apoyo inestable.
Mantenga una postura firme y un buen equilibrio en
todo momento.
• La zona de limpieza debe tener inclinaciones
adecuadas y sistema de drenaje para reducir la
posibilidad de caída debido a superficies resbaladizas.
• Sea extremadamente cuidadoso si debe usar la
hidrolavadora eléctrica desde una escalera, un
andamio u otro lugar similar.
• Sujete firmemente la pistola de pulverización con
ambas manos al utilizar modos de pulverización
eléctrica para evitar lesiones en caso de contragolpe de
la pistola.
ADVERTENCIA Riesgo de lesiones oculares o
corporales. La pulverización podría
salpicar, propulsar objetos o causar
daños internos, lo que puede provocar
lesiones graves.
• Siempre use gafas de seguridad con ventilación indirecta
(salpicaduras de productos químicos) identificadas en
cumplimiento de la norma ANSI Z87.1 cuando utilice
este equipo o esté cerca de él. NUNCA sustituya las
gafas de seguridad con ventilación indirecta con gafas de
seguridad o gafas de condición seca.
• Sepa cómo detener la hidrolavadora y descargar la
presión rápidamente. Familiarícese completamente con
los controles.
• NO permita que ningún NIÑO opere la hidrolavadora
eléctrica.
• Mantenga el área de operación libre de personas.
• Inspeccione la manguera de alta presión antes de
cada uso. NUNCA repare la manguera de alta presión;
reemplácela.
• NO repare las conexiones con fugas con sellador de
ningún tipo; reemplace las juntas tóricas y juntas.
• Mantenga la manguera conectada a la hidrolavadora
eléctrica y a la pistola de pulverización cuando el
sistema esté presurizado.
• SIEMPRE apunte con la pistola de pulverización
hacia una dirección segura mientras el sistema esté
presurizado y apriete el gatillo de la pistola para liberar
la alta presión, cada vez que apague la hidrolavadora.
• NO apunte la pistola de pulverización hacia personas o
animales.
• NO beba de los accesorios conectados a la manguera.
• NO fije la pistola de pulverización en la posición abierta.
• NO deje la pistola de pulverización desatendida
cuando la hidrolavadora eléctrica está en la posición de
encendido (I).
• NO utilice una pistola de pulverización que no tenga
un bloqueo o seguro de gatillo instalado y en buenas
condiciones.
• Asegúrese siempre de que la pistola de pulverización y
los accesorios estén conectados correctamente.
• Manténgase alerta, observe lo que está haciendo.
• NO haga funcionar el producto si está cansado o bajo
la influencia de alcohol o drogas.
• Se requiere supervisión minuciosa cuando este
producto se utiliza cerca de niños.
ADVERTENCIA El chorro de agua a alta presión que
este equipo produce podría atravesar la piel y
los tejidos subcutáneos, y provocar lesiones
graves y posible amputación.
La pistola de pulverización acumula agua a alta
presión, incluso con el motor detenido y el agua
desconectada, lo que puede provocar lesiones graves.
• NUNCA apunte la pistola de pulverización hacia
personas, animales o plantas.
• SIEMPRE apunte con la pistola de pulverización hacia
una dirección segura y apriete el gatillo de la pistola
para liberar la alta presión, cada vez que apague la
hidrolavadora.
4 BRIGGSandSTRATTON.COM
Page 21

Not for
Reproduction
ADVERTENCIA Riesgo de incendio. Pulverizar
líquidos inflamables podría causar la muerte o
lesiones graves.
• NO pulverice líquidos inflamables.
ADVERTENCIA Riesgo de incendio. Un cable
sobrecalentado podría provocar la muerte o
lesiones graves.
• Desenrolle el cable completamente antes de su uso.
• NO cubra el cable con ningún material.
ADVERTENCIA Este producto contiene plomo y
compuestos de plomo que, de acuerdo al estado de
California, pueden causar defectos de nacimiento u
otros problemas reproductivos. Lávese las manos
después de manipular este producto. Cáncer y
problemas reproductivos – www.P65Warnings.ca.gov
AVISO La pulverización a alta presión podría dañar
objetos frágiles, incluido el vidrio.
• NO apunte la pistola de pulverización hacia objetos de
vidrio cuando se utiliza el punta de rociado turbo.
• NUNCA apunte la pistola hacia plantas.
ADVERTENCIA Peligro de quemaduras químicas.
Los productos químicos podrían
ocasionar quemaduras que podrían
provocar la muerte o lesiones graves.
• Siempre use gafas de seguridad con ventilación
indirecta (salpicaduras de productos químicos)
identificadas en cumplimiento de la norma ANSI Z87.1
cuando utilice ese tipo de productos.
• NO sustituya las gafas de seguridad con ventilación
indirecta con gafas de seguridad o gafas de condición
seca.
• NO use líquido cáustico con la hidrolavadora eléctrica.
• Utilice SOLAMENTE detergentes o jabones de uso
seguro en hidrolavadoras. Siga todas las instrucciones
del fabricante.
AVISO Deberá proteger su unidad de las temperaturas
de congelación.
• Si no lo hace, dañará permanentemente la bomba y la
unidad no podrá funcionar.
• Los daños producidos por congelación no están
cubiertos por la garantía.
AVISO Un tratamiento inadecuado de la hidrolavadora
eléctrica podría dañarla y acortar su vida útil.
• En caso de dudas sobre su uso previsto, diríjase al
distribuidor o comuníquese con un centro de servicio
autorizado.
• NO opere unidades con piezas rotas o faltantes, o sin
sus carcasas o cubiertas de protección.
• NO eluda ningún dispositivo de seguridad en la
hidrolavadora eléctrica.
• NO modifique la hidrolavadora eléctrica de ninguna
manera.
• NO mueva la hidrolavadora eléctrica tirando de las
mangueras. Mueva la unidad utilizando la manija de
transporte suministrada.
• Utilice SOLO accesorios de marca destinados para su
uso con este producto.
5
Page 22

Not for
Reproduction
Montaje
Lea todo el manual del operador antes de
intentar armar o hacer funcionar su
hidrolavadora eléctrica nueva.
Deberá armar la hidrolavadora eléctrica, pero no tardará
mucho en poder tenerla lista para usarla. Si tiene problemas
con el ensamblado de la hidrolavadora eléctrica, por favor,
llame al número de teléfono de ayuda de la hidrolavadora
eléctrica (800) 743-4115. Si solicita asistencia, tenga a mano
el número de modelo, de revisión y de serie que puede ver
en la etiqueta de identificación.
Herramientas necesarias
• Destornillador Phillips, n.º 2
Desembale la hidrolavadora eléctrica
1. Saque todos los elementos de la caja.
2. Asegúrese de tener todos los elementos que se
incluyen antes de ensamblarla.
Artículos incluidos en la caja
• Unidad principal
• Manija con bandeja de accesorios
• Pistola de pulverizadora
• Manguera de alta presión
• Varilla de rociado
• Puntas de rociado de conexión rápida (3)
• Punta de rociado espumante de conexión rápida con
botella de detergente
• Tubos de soporte de la manija (2)
• Tornillos (2)
• Manual del operario
2. Deslice los tubos de soporte de la manija (C) en las
ranuras en ambos lados de la unidad principal. Alinee
los orificios e inserte los tornillos (D). Ajuste con un
destornillador Philips n.° 2.
D
C
D
Lubrique las juntas tóricas
La lubricación de las juntas tóricas es extremadamente
importante para la instalación y el funcionamiento. El uso
de un lubricante (grasa lubricante o sintética) durante
el montaje ayuda a que las juntas tóricas se asienten
correctamente y ofrece un mejor sellado. También ayuda
a evitar que la junta tórica resulte dañada por abrasión,
pellizcado o cortes, y aumenta la vida útil de la junta tórica.
AVISO SIEMPRE aplique una pequeña cantidad de
lubricante en las juntas tóricas antes de montar la manguera
de jardín a la bomba (E), manguera a alta presión (F), la
pistola rociadora (G), y el varilla de rociado (H).
G
H
Revise todo el contenido. Si falta alguna de las piezas o
alguna está dañada, NO los use, llame a la línea de ayuda
de la hidrolavadora eléctrica: (800) 743-4115.
Familiarícese con todos los componentes antes de armar
la hidrolavadora eléctrica. Identifique los contenidos con la
ilustración que se muestra en Características y controles.
Conecte la manija y los tubos de soporte
1. Mantenga presionados los botones de los pasadores
de seguro (A) a cada lado de la manija. Deslice la
manija (B) dentro de cada tubo de soporte (C) hasta
que los botones de los pasadores de seguro se
encajen en los orificios.
B
A
C
E
F
Lubrique todas las conexiones mostradas debajo.
Para ello, siga estas instrucciones:
1. Revise y limpie las superficies de conexión antes de
lubricar y armar.
2. Sea moderado en el uso de lubricantes durante el
armado. Solo necesita una pequeña lubricación.
3. Use un cepillo pequeño o un bastoncillo de algodón
para aplicar la grasa directamente a las juntas tóricas
en los lugares donde no son accesibles (adaptador
QC, adaptador M22).
6 BRIGGSandSTRATTON.COM
Page 23

Not for
Reproduction
Conecte la manguera y el suministro de
agua a la bomba
AVISO NO haga funcionar la bomba si no tiene el
suministro conectado y abierto.
• El daño a la limpiadora a presión, resultado de la desatención
a esta precaución, no será cubierto por la garantía.
1. Desenrolle la manguera de alta presión y conecte el
extremo negro la manguera de alta presión (A) a la
base de la pistola rociadora (B). Apriete con la mano.
A
B
ADVERTENCIA El chorro de agua a alta presión que
este equipo produce podría atravesar la piel y los
tejidos subcutáneos, que podrían provocar lesiones
graves y la posible amputación de un miembro.
• NUNCA conecte la manguera de alta presión al
prolongador de la boquilla.
• Mantenga conectada la manguera a la máquina o a la
pistola de rociado cuando el sistema esté presurizado.
• Asegúrese en todo momento de conectar
correctamente la pistola rociadora, las boquillas y los
accesorios.
2. Conecte el extremo rojo de la manguera de alta
presión (A) a la salida de alta presión (C) de la
bomba. Apriete a mano.
AVISO El uso de una válvula unidireccional (igualador
de presión o válvula de retención) en la entrada de
la bomba podría producir daños en la bomba o en el
conector de entrada.
• DEBE haber un mínimo de 3 metros (10 pies) de
manguera de riego libre entre la entrada de la limpiadora
a presión y cualquier dispositivo, como un igualador de
presión o una válvula de retención).
• El daño a la limpiadora a presión, resultado de la
desatención a esta precaución, no será cubierto por la
garantía.
5. Conecte la manguera de jardín (D) (no exceder 15
m (50 pies) en la longitud) a la entrada del agua (E).
Apriete con la mano.
ADVERTENCIA Riesgo de lesiones oculares.
El agua rociada podría salpicar o propulsar
objetos, lo que puede provocar lesiones graves.
• Cuando utilice este equipo o esté cerca de él, siempre
use gafas de seguridad con ventilación indirecta
(contra salpicaduras de productos químicos) marcadas
para cumplir con ANSI Z87.1.
• NUNCA se ponga gafas de seguridad ni gafas para
entornos secos como sustituto de las gafas de
seguridad con ventilación indirecta.
6. Abra el grifo, pulse el botón rojo (G) de la pistola
rociadora y apriete el gatillo para eliminar el aire y las
impurezas del sistema de bombeo.
G
C
A
3. Haga correr el agua a través de la manguera de
su jardín por 30 segundos para limpiar cualquier
escombro que se encuentre en ella. Corte el agua.
AVISO Hace no agua de parar de siphon para el
abastecimiento de agua. Use agua SOLO fría (menos que
38°C (100°F)).
4. Antes de que conecte la manguera de jardín (D) a
la entrada de agua (E), inspeccione el colador de
la entrada (F). Limpie el colador si tiene residuos
o solicite su remplazo si está dañado. NO haga
funcionar la máquina limpiadora a presión si el
colador de la entrada está dañado.
F
D
E
Lista de verificación previa al arranque del
motor de la bomba
Revise el montaje de la unidad para asegurarse de que
haya realizado todas las siguientes acciones.
1. Asegúrese de leer Seguridad del usuario y
Funcionamiento antes de usar la hidrolavadora
eléctrica.
2. Compruebe que las conexiones de manguera estén
correctamente apretadas.
3. Asegúrese de que las mangueras no tengan nudos, cortes
ni daños.
4. Coloque un suministro de agua adecuado con el flujo
correcto.
5. Enchufe el cable de alimentación eléctrica a un
circuito eléctrico dedicado para 120 V CA a 15 A que
haya sido instalado conforme a todos los códigos y
normativas locales. Compruebe que el circuito no se
use para ningún otro suministro eléctrico.
7
Page 24

Not for
Reproduction
Características y controles
Lea el manual del usuario y las reglas de seguridad antes de hacer funcionar su hidrolavadora eléctrica.
Compare las ilustraciones con la hidrolavadora eléctrica para familiarizarse con la ubicación de los distintos
controles y ajustes. Guarde este manual original para consultarlo en el futuro.
A
B
C
D
E
M
L
F
G
A - Pistola pulverizadora — Controla la aplicación de agua
sobre la superficie por limpiar con un gatillo. Incluye
traba de gatillo.
B - Puntas de rociado — La punta de rociado con
casquillo amarillo y blanca es para diversas
aplicaciones de alta presión.
C - Manguera a alta presión — Conecte un rojo extremo
a la salida de agua a alta presión y el extremo negro la
manguera de alta presión a la pistola pulverizadora.
D - Etiqueta de advertencia — Identifique los peligros que
deben evitarse cuando utiliza la hidrolavadora eléctrica.
E - Interruptor principal de encendido/apagado —
Presione el extremo superior del activador (I) para
encender la hidrolavadora eléctrica. Presione el botón
(0) del activador para apagar la limpiadora.
F - Entrada del suministro de agua — Conecte el
suministro de agua utilizando una manguera para jardín
de un máximo de 50 ft (15,24 m).
K
J
H
G - Cable eléctrico con GFCI — La hidrolavadora eléctrica
y el operador están protegidos por un interruptor de
circuito con fallos a tierra.
H - Punta de rociado espumante con botella de
detergente —Se usa para aplicar detergente apto para
uso en lavadoras a presión sobre supercies.
J - Etiqueta de identificación (debajo de la cubierta)
— Proporciona el modelo y el número de serie de la
hidrolavadora eléctrica. En caso de llamar y solicitar
ayuda, tenga la etiqueta cerca.
K - Salida de agua a alta presión — Conexión de la
manguera a alta presión.
L - Varilla de rociado — Le permite cambiar entre puntas
de rociado distintos.
M - Punta de rociado turbo — Hace girar un poderoso
chorro de agua de precisión para una limpieza profunda.
8 BRIGGSandSTRATTON.COM
Page 25

Not for
Reproduction
Funcionamiento
Cómo arrancar la hidrolavadora eléctrica
Siga las instrucciones que aparecen a continuación en el
orden en el que se muestran. Si tiene problemas con el
funcionamiento de la hidrolavadora eléctrica, por favor,
llame al número de teléfono de ayuda de la hidrolavadora
eléctrica (800) 743-4115.
ADVERTENCIA Riesgo de lesión ocular. El
pulverizador podría salpicar o empujar
objetos y esto podría causar lesiones graves.
Cuando utilice o esté cerca de este dispositivo,
colóquese gafas de seguridad con ventilación indirecta
(salpicadura química) que cumplan con la disposición
ANSI Z87.1. Jamás reemplace las gafas de seguridad o
las gafas para tareas secas por gafas de seguridad con
ventilación indirecta.
1. Coloque la máquina limpiadora a presión en un área
cercana a una suministro de agua exterior capaz de
abastecer agua a un volumen mayor de 11.4 litros
por minuto (3.0 galones por minuto) en no menos que
1.38 BARS (20 PSI) en el fin de arandela de presión
de la manga del jardín.
2. Revise que la manguera de alta presión se encuentre
conectada firmemente a la pistola de rociado y a la
bomba. Vea Montaje.
3. Asegúrese que la unidad esté nivelada.
4. Conecte la manguera de jardín a la entrada del agua.
Aprietela con la mano.
AVISO NO haga funcionar la bomba si no tiene el
suministro conectado y abierto.
• El daño a la limpiadora a presión, resultado de la
desatención a esta precaución, no será cubierto por la
garantía.
5. Abra el grifo, pulse el botón rojo de la pistola
rociadora y apriete el gatillo para eliminar el aire y las
impurezas del sistema de bombeo.
6. Conecte la varilla de rociado a la pistola rociadora.
Apriétela con las manos.
ADVERTENCIA Riesgo de electrocución. El uso de un
cable prolongador podría provocar electrocución y
quemaduras, y tener como resultado lesiones graves
o la muerte.
• NO utilice un cable prolongador con esta hidrolavadora
eléctrica. Es posible que la toma eléctrica residencial o el
cable prolongador no le brinde protección con interrupción
de circuito de fallo de conexión a tierra, crucial para la vida
de una persona.
9. Enchufe el cable de alimentación eléctrica a un
circuito eléctrico dedicado para 120 V CA a 15 A que
haya sido instalado conforme a todos los códigos y
normativas locales. El circuito no debe utilizarse para
ningún otro suministro eléctrico. La luz de indicación
en el GFCI debe estar ENCENDIDA.
AVISO La luz del indicador debe estar visible para que la
hidrolavadora eléctrica pueda funcionar.
ADVERTENCIA Riesgo de electrocución. Si no
se utiliza un interruptor con circuito de fallo de
conexión a tierra (GFCI), se podría producir daños
materiales, lesiones o incluso la muerte. Si el luz
del indicador no se mantiene encendido después de la
prueba y el rearme, no utilice al GFCI.
10. Presione el botón TEST (prueba) (B). Se debería
apagar la luz del indicador (C).
D
B
C
7. Seleccione la puntas de rocío de conexión rápida que
usted desee e insértela en el extremo de varilla de
rociado. Vea Como Usar las Puntas de Rocío.
8. Sitúe el interruptor principal de encendido/apagado
(A) en la posición de ON (I).
A
11. Presione el botón RESET (reiniciar) (D). Se debería
encender la luz del indicador (C).
AVISO NO use la hidrolavadora eléctrica si falla la prueba
mencionada anteriormente.
12. Presione el interruptor principal de encendido/
apagado de la hidrolavadora eléctrica y llévelo a la
posición de encendido (I).
13. Apunte la pistola hacia una dirección segura, presione
el botón de bloqueo del gatillo y apriete el gatillo.
El motor de la hidrolavadora eléctrica arrancará y se
detendrá mientras se presiona y se suelta el gatillo de
la pistola pulverizadora. Ahora la hidrolavadora eléctrica
está lista para ser usada. Más adelante, en esta sección,
encontrará las instrucciones de uso de los accesorios
provistos.
9
Page 26

Not for
Reproduction
Cómo detener la hidrolavadora eléctrica
El motor de la hidrolavadora eléctrica solo funciona cuando
está presionado el gatillo. Para detener la hidrolavadora
eléctrica y apagar el motor:
1. Suelte el gatillo de la pistola pulverizadora.
2. Presione el interruptor principal de encendido/
apagado y llévelo a la posición de apagado (0).
AVISO Al soltar el gatillo, se apagará el motor, pero no se
cortará el suministro de energía a la unidad.
3. Desconecte el suministro de agua.
4. SIEMPRE apunte la pistola pulverizadora hacia una
dirección segura y presione su gatillo para liberar la
presión acumulada en la unidad.
ADVERTENCIA El chorro de agua de alta presión
que produce esta unidad podría generar
cortes en la piel y tejidos subcutáneos, lo
cual provocaría lesiones graves o una posible
amputación.
La pistola pulverizadora contiene agua a alta presión
incluso cuando el motor está detenido y el suministro
de agua desconectado. Esto podría provocar lesiones
graves.
• Mientras el sistema esté presurizado, mantenga la
manguera de alta presión conectada a la bomba y a la
pistola pulverizadora.
• SIEMPRE apunte la pistola pulverizadora en una
dirección segura, apriete el gatillo de la pistola
para liberar la presión alta cada vez que apague la
hidrolavadora eléctrica.
5. Desconecte el enchufe de GFCI.
Consejos de uso
• Para realizar una limpieza muy efectiva, mantenga la
punta de rociado de 8 a 24 in (de 20 a 60 cm) alejada
de la superficie de limpieza.
• Si acerca demasiado la punta de rociado,
especialmente en el uso a alta presión, podría llegar a
dañar la superficie que está limpiando.
• Al limpiar neumáticos, no se acerque a más de 6 in
(15 cm).
Cómo aplicar detergente
ADVERTENCIA Peligro de quemaduras químicas.
Los productos químicos pueden causar
quemaduras que ocasionen la muerte o
heridas graves.
• Cuando utilice productos químicos, colóquese gafas
de seguridad con ventilación indirecta (salpicadura
química) que cumplan con la disposición ANSI Z87.1.
• NO reemplace las gafas de seguridad o las gafas para
tareas secas por gafas de seguridad con ventilación
indirecta.
• NO utilice líquido cáustico con la hidrolavadora
eléctrica.
• SOLO utilice detergentes/jabones seguros para la
hidrolavadora eléctrica. Siga todas las instrucciones
del fabricante.
Para aplicar detergente, siga estos pasos:
1. Instale la punta de rociado espumante con botella de
detergente.
Cómo usar las puntas de rociado
La hidrolavadora eléctrica se suministra con tres puntas de
rociado. La punta de rociado turbo hace girar un poderoso
chorro de agua de precisión para una limpieza profunda.
Las puntas de rociado amarilla y blanca se usan para
diversas aplicaciones de alta presión. La punta de rociado
espumante se usa para aplicar jabón en general.
Pulverizador
espumante de
baja presión
Use para aplicar
detergente
Enjuague
general
Amarillo, 15°
Revestimientos
/ Terrazas / Entradas de
vehículos / Pisos de garaje
2200 PSI (152 bar)
1.0 GPM (3.7 LPM)
Camiones / Muebles para
exteriores
1.1 GPM (4.1 LPM)
/ Retiro de óxido
1.2 GPM (4.5 LPM)
Enjuague
delicado
Blanco, 40°
Carros / Vans /
1300 PSI (90 bar)
Limpieza intensa
Turbo
Retiro de pintura /
Manchas de aceite
900 PSI (6 bar)
2. Prepare una solución de detergente adecuada para el
trabajo que realizará.
3. Gire la botella de detergente (A) en sentido contrario
a las agujas del reloj y retírela de la punta de rociado
espumante (B).
B
A
10 BRIGGSandSTRATTON.COM
Page 27

Not for
Reproduction
4. Llene la botella con la solución de detergente.
5. Vuelva a instalar la botella de detergente en la punta
de rociado espumante y gírela en el sentido de las
agujas del reloj hasta que escuche un clic.
6. Asegúrese de que la manguera para jardín esté
conectada a la entrada de agua. Verifique que la
manguera a alta presión esté conectada a la pistola
pulverizadora y a la bomba. Encienda el agua.
AVISO Debe conectar todas las mangueras antes de
arrancar la hidrolavadora eléctrica.
7. Arranque la hidrolavadora eléctrica según las
indicaciones de Cómo arrancar la hidrolavadora
eléctrica.
8. Aplique detergente a una superficie seca. Comience
en una parte inferior de la zona que limpiará y vaya
subiendo de forma amplia y pareja.
9. Deje que el detergente entre en “remojo” de 3 a 5 min
antes de lavar y enjuagar. Vuelva a aplicar, según sea
necesario, para evitar que la superficie se seque. Para
evitar que queden vetas, NO DEJE que el detergente
se seque en la superficie.
Enjuagar la hidrolavadora eléctrica
1. Quite la punta rociadora espumante de la varilla.
2. Instale la punta de rociado con casquillo blanca o amarillo.
3. Mantenga la pistola pulverizadora a una distancia
segura de la zona que va a limpiar.
Cómo almacenar los accesorios
La unidad está equipada con áreas para almacenar su
manguera de alta presión, pistola rociadora, varilla rociadora
y cable de alimentación. Enrolle el cable de alimentación en
los soportes en los extremos de la unidad principal. Enrolle
la manguera de alta presión y almacénela en el gancho
en la parte trasera de la bandeja de accesorios. Guarde
la pistola rociadora en las ranuras en el lado izquierdo
de la bandeja de accesorios. Coloque a presión la varilla
rociadora en las ranuras en el lado derecho de la bandeja
de accesorios. Guarde las puntas de rociado en los
agujeros en la parte delantera de la bandeja de accesorios.
Identifique todos los accesorios con las ilustraciones en la
sección Características y controles.
ADVERTENCIA Riesgo de rebote. La pistola
pulverizadora puede generar un rebote y esto
puede hacer que usted se caiga, lo cual podría
provocarle la muerte o lesiones graves.
• Utilice la hidrolavadora eléctrica desde una superficie
estable.
• Tenga mucho cuidado en caso de que deba utilizar
la hidrolavadora eléctrica parado sobre una escalera,
andamio o alguna ubicación similar.
• Agarre la pistola pulverizadora con ambas manos
cuando utilice los distintos modos de pulverización para
evitar lesiones cuando la pistola pulverizadora rebota.
4. Rocíe a alta presión en una zona pequeña y luego
compruebe que no haya daños en la superficie. Si no
encontró daños, puede continuar con el enjuague.
5. Comience en la parte superior de la zona por enjuagar
y baje con movimientos amplios y parejos, al igual
que cuando limpió.
Otros consejos de limpieza
• NUNCA descuide la hidrolavadora eléctrica mientras
está enchufada a una salida eléctrica y mientras se
está suministrando agua al equipo.
• Si la punta de rociado está muy lejos de la superficie
que está lavando, la limpieza puede no ser tan efectiva.
11
Page 28

Not for
Reproduction
Mantenimiento
Recomendaciones Generales
Realizar el mantenimiento con frecuencia mejorará el
rendimiento y ampliará la vida útil de la hidrolavadora
eléctrica.
La garantía en esta hidrolavadora eléctrica no cubre artículos
que hayan sido sometidos a abusos o negligencia por parte
del operador. Para sacar el máximo provecho de la garantía,
el operador debe cumplir con todas las especificaciones
aquí indicadas, entre ellas, el almacenamiento correcto de la
hidrolavadora eléctrica.
AVISO Si tiene preguntas sobre las piezas de repuesto
de la hidrolavadora eléctrica, por favor, llame al (800) 743-
4115 para obtener ayuda.
Antes de cada utilización
1. Limpie los desechos.
2. Verifique que la pantalla de entrada de agua no tenga
suciedad y no esté dañada.
3. Verifique que la manguera a alta presión no tenga
pérdidas.
4. Verifique el funcionamiento de la pistola pulverizadora.
Mantenimiento de la hidrolavadora eléctrica
Limpieza de desechos
A diario, o antes de usarla, limpie los desechos
acumulados en la hidrolavadora eléctrica. Revise las
ranuras y las entradas de aire de refrigeración adelante,
atrás y abajo de la hidrolavadora eléctrica. Estas
aberturas deben estar limpias y sin obstrucciones.
Las piezas de la hidrolavadora eléctrica deben mantenerse
limpias para reducir el riesgo de sobrecalentamiento e
incendio de desechos acumulados.
• Use un trapo húmedo para limpiar las superficies
exteriores.
AVISO Si maneja inadecuadamente la hidrolavadora
eléctrica, podría dañarla y acortar su vida útil.
• NO inserte objetos a través de las ranuras de
enfriamiento.
Revise y limpie el filtro de entrada de agua
Examine el filtro en la entrada de agua de la unidad.
Límpielo si está tapado o reemplácelo si está dañado.
Revisión de la manguera a alta presión
La manguera a alta presión puede tener pérdidas a causa del
desgaste, los nudos y el mal uso. Siempre revise la manguera
antes de usarla. Compruebe que no haya cortes, fugas,
abrasiones o bultos en la cubierta, y daños o movimientos de
acopladores. Si ocurre algo de lo mencionado anteriormente,
reemplace la manguera inmediatamente.
ADVERTENCIA El chorro de agua de alta presión
que produce esta unidad podría generar
cortes en la piel y tejidos subcutáneos, lo
cual provocaría lesiones graves o una posible
amputación.
• NUNCA repare la manguera a alta presión. Cámbiela.
• La potencia de la manguera reemplazada DEBE ser
igual o superior a la presión máxima de la unidad.
Revisión de la pistola pulverizadora
Revise la conexión de la manguera a la pistola
pulverizadora y asegúrese de que esté firme. Pruebe
el gatillo (A). Para ello, presione el botón de bloqueo
del gatillo (B) y asegúrese de que el gatillo vuelva a su
posición, como si fuera un resorte, al soltarlo. No debería
poder presionar el gatillo sin presionar antes el botón
de bloqueo del gatillo. Si estas pruebas fallan, cambie
inmediatamente la pistola pulverizadora.
B
A
Mantenimiento de la punta de rociado
Una presión excesiva en la bomba puede provocar una
sensación de pulsación al apretar el gatillo de la pistola
pulverizadora. El principal motivo de que haya presión
excesiva en la bomba es que la punta de rociado esté
tapada o limitada por materiales externos como la tierra.
Una punta de rociado tapada podría hacer que la bomba
se encienda y se apague, o que no se encienda, incluso
cuando haya algo de flujo.
1. Presione el interruptor principal de encendido/
apagado y llévelo a la posición de apagado (0). Quite
el enchufe del cable de alimentación de la salida
eléctrica.
2. Desconecte el suministro de agua de la hidrolavadora
eléctrica.
3. SIEMPRE apunte la pistola pulverizadora hacia una
dirección segura. Presione el botón de bloqueo del
gatillo y apriete el gatillo de la pistola pulverizadora
para liberar el agua a alta presión retenida.
ADVERTENCIA El chorro de agua de alta presión
que produce esta unidad podría generar cortes en
la piel y tejidos subcutáneos, lo cual provocaría
lesiones graves o una posible amputación.
La pistola pulverizadora contiene agua a alta presión
incluso cuando el motor está detenido y el suministro de
agua desconectado. Esto podría provocar lesiones graves.
• Mientras el sistema esté presurizado, mantenga la
manguera de alta presión conectada a la bomba y a la
pistola pulverizadora.
• SIEMPRE apunte la pistola pulverizadora en una dirección
segura, apriete el gatillo de la pistola para liberar la presión
alta cada vez que apague la hidrolavadora eléctrica.
4. Remueva la punta de rociado del extremo de la varilla
de rociado.
12 BRIGGSandSTRATTON.COM
Page 29

Not for
Reproduction
5. Utilice la herramienta de limpieza de la punta de rociado
que se proporciona o un clip para papel para eliminar el
material extraño que obstruya alguna de las puntas de
rociado.
6. Usando una manguera de jardín, remueva cualquier
desecho adicional, poniendo agua en la varilla de
plástico. Haga ésto de 30 a 60 segundos.
7. Instale de punta de rociado en la varilla de rociado.
8. Conecte de varilla de plástico a la pistola rociadora.
9. Asegúrese de que la manguera para jardín esté
conectada a la entrada de agua. Verifique que la
manguera a alta presión esté conectada a la pistola
pulverizadora y a la bomba. Encienda el agua.
10. Enchufe el cable de alimentación en una salida
eléctrica, presione el interruptor principal de encendido/
apagado y llévelo a la posición de encendido (I).
11. Haga funcionar la hidrolavadora eléctrica con cada
una de las puntas de rocío de conexiones rápidas que
viene con el hidrolavadora eléctrica.
Mantenimiento de la bomba y del motor
La bomba y el motor de la hidrolavadora eléctrica no requieren
mantenimiento. Ambos conjuntos están prelubricados y
sellados, y no es necesario volver a lubricarlos.
Después de cada utilización
El agua no debería permanecer durante mucho tiempo en la
unidad. Los sedimentos o los minerales pueden depositarse
en las piezas de la bomba y “congelar” su funcionamiento.
Después de cada uso, siga estos procedimientos:
1. Vacíe la botella de detergente (si está usada)
retirándola de la punta de rociado espumante y
volcando toda la solución restante.
2. Enjuague la botella de detergente con agua limpia y
fresca y vuelva a instalarla en la boquilla rociadora
espumante.
3. Ponga en funcionamiento la hidrolavadora eléctrica
con la punta de rociado espumante. Enjuague durante
uno o dos minutos.
4. Presione el interruptor principal de encendido/
apagado y llévelo a la posición de apagado (0).
5. Cierre la alimentación de agua, apunte con la pistola
rociadora hacia una dirección segura, pulse el botón
rojo y apriete el gatillo para descargar la presión. Deje
enfriar el motor.
6. Desconecte manga del fusil del rocío y salida alta de
presión en la bomba. Desagüe agua de la manga, del
pistola rociadora, y de la varilla de rociado. Use un
harapo para quitar la manga.
7. Vacíe el agua dentro de la bomba volteando la unidad
hacia adelante (con la entrada de agua hacia abajo)
por dos minutos. Incline hacia atrás (con la salida de
alta presión hacia abajo) por dos minutos más.
8. Enrolle la manguera de alta presión y almacénela
en el gancho en la parte trasera de la bandeja de
accesorios.
9. Enrolle el cable de alimentación en los soportes.
10. Guarde la pistola rociadora y la varilla rociadora en
las ranuras en la bandeja de accesorios. Guarde las
puntas de rociado en los agujeros en la bandeja de
accesorios.
11. Almacene la unidad en una área limpia y seca.
12. Si planea almacenar la unidad por más de 30 días, vea
la sección Almacenamiento en invierno durante largos
períodos.
13
Page 30

Not for
Reproduction
Almacenamiento en invierno o
durante largos períodos
Siga los pasos 1-10 en Después de cada utilización.
AVISO El agua que queda en la bomba podría congelarse y
dañar la bomba en forma permanente. Los daños producidos
por congelación no están cubiertos por la garantía.
Protección de la bomba
Para proteger la bomba de daños provocados por
depósitos de minerales o congelamiento, utilice la
PumpSaver, modelo 6039, para tratar la bomba. Esto evita
daños por congelamiento y lubrica el pistón y los cierres.
AVISO La PumpSaver está disponible como un
accesorio opcional. No viene incluida con la hidrolavadora
eléctrica. Para comprar la PumpSaver, póngase en
contacto con el centro de mantenimiento autorizado más
cercano.
AVISO Debe proteger la unidad de temperaturas
extremadamente bajas.
• Si no lo hace, le causará un daño permanente a la
bomba y pistola y la unidad quedará inservible.
• La garantía no cubre daños por congelamiento.
Procedimientos para el almacenamiento
final
1. Enrolle la manguera de alta presión y almacénela
en el gancho en la parte trasera de la bandeja de
accesorios.
2. Enrolle el cable de alimentación en los soportes.
3. Guarde la pistola rociadora y la varilla rociadora en
las ranuras en la bandeja de accesorios. Guarde las
puntas de rociado en los agujeros en la bandeja de
accesorios.
4. Guarde la unidad en un área limpia y seca que esté
protegida contra las bajas temperaturas.
5. Cubra la unidad con una manta protectora apropiada
que no retenga la humedad.
Para utilizar la PumpSaver, asegúrese de que la
hidrolavadora eléctrica esté apagada y que las mangueras
de entrada y salida estén desconectadas. Lea y siga todas
las instrucciones y advertencias que aparecen en la caja
de la PumpSaver.
14 BRIGGSandSTRATTON.COM
Page 31

Not for
Reproduction
Resolución de problemas
Problema Causa Solución
La bomba tiene los siguientes
problemas: no genera presión,
presión errática, vibración,
pérdida de presión, bajo
volumen de agua.
1. La entrada de agua está bloqueada.
2. Suministro de agua inadecuado.
3. La manguera para jardín está
enroscada o tiene pérdidas.
4. Revise la pantalla de entrada de
agua.
5. El suministro de agua supera los
100 °F (38 °C).
6. La manguera a alta presión está
obstruida o pierde.
7. La punta de rociado está tapada.
1. Libere la entrada.
2. Proporcione un flujo de agua adecuado.
3. Estire la manguera para jardín o
reemplácela si pierde.
4. Revise y limpie la pantalla de entrada
de agua.
5. Proporcione un suministro de agua
más fresca.
6. Libere las obstrucciones en la manguera
a alta presión o reemplace la manguera.
7. Limpie la punta de rociado.
La unidad no se enciende
cuando se aprieta el gatillo de
la pistola pulverizadora.
El detergente no se mezcla
con el pulverizador.
1. El suministro de agua no está
encendido.
2. La unidad no está encendida.
3. La manguera para jardín es
demasiado larga.
4. Fusible fundido o disyuntor
activado.
1. Está usando la puntas de rociado
de alta presión.
1. Encienda el suministro de agua.
2. Coloque el interruptor principal de
encendido/apagado en la posición de
encendido (I). Reinicie el GFCI.
3. Utilice una manguera para jardín de
50 ft (15,24 m) como máximo.
4. a.) Compruebe en el cuadro de
fusibles si hay algún fusible fundido
y reemplace según sea necesario o
restablezca el disyuntor. No utilice
un fusible o disyuntor de mayor
capacidad que la especificada para el
circuito derivado en particular.
b.) Desconecte los demás aparatos
eléctricos y apague las luces en
el circuito o haga funcionar la
hidrolavadora eléctrica en su propio
circuito dedicado.
c.) Ejecutar la hidrolavadora eléctrica
con la punta de rocío turbo durante 5
minutos. Es posible que sea necesario
aflojar el motor.
1. Instale la punta rociadora espumante.
Fugas en las conexiones de
las mangueras.
1. La manguera de jardín está floja
en la entrada de agua.
2. Las conexiones de la manguera
de alta presión están flojas.
3. La junta tórica está dañada.
1. Ajuste a mano la manguera de jardín a
la entrada de agua.
2. Retire la manguera por completo y
vuelva a instalarla ajustándola a mano.
3. Reemplazar la junta tórica.
Para cualquier otro problema, consulte con un concesionario autorizado de Briggs & Stratton.
15
Page 32

Not for
Reproduction
NORMAS DE GARANTÍA DE BRIGGS & STRATTON
Briggs & Stratton se compromete a que, durante el período de garantía especificado a continuación, reparará o sustituirá, de manera gratuita, cualquier pieza con
GARANTÍA LIMITADA
defectos de material o fabricación, o de ambos. El comprador deberá correr con los gastos de transporte del producto que envíe para reparación o reemplazo al
amparo de esta garantía. Esta garantía tiene vigencia y está sujeta a las condiciones que se establecen más adelante. Para servicio de garantía, contacto con
Atención al Cliente de Briggs & Stratton llamando al (800) 743-4115 o por Internet en BRIGGSandSTRATTON.COM..
No existe otra garantía expresa. Las garantías implícitas, inclusive aquellas de comerciabilidad y de idoneidad para un propósito en particular, se
limitan al período de garantía expresado abajo, o hasta los límites permitidos por la ley. La responsabilidad por daños fortuitos o indirectos está
excluida en tanto lo permita la ley. Algunos países o estados no permiten limitar la duración de una garantía implícita ni excluir o limitar los daños secundarios y
derivados. Por tanto, es posible que las limitaciones y exclusiones mencionadas no sean aplicables en su caso. Esta garantía le otorga derechos legales específicos,
y también podría tener otros que varían según el estado o el país.**
PERÍODO DE GARANTÍA
Uso particular Uso comercial
12 meses ninguno
** En Australia, nuestros productos están cubiertos por garantías ineludibles de acuerdo con la legislación sobre consumo de este país. Tiene derecho a un recambio
o devolución en caso de avería grave y a una compensación por las posibles pérdidas o daños razonables previsibles. Asimismo, si la vería no es grave, tiene derecho
a que se reparen o reemplacen los productos si no tienen una calidad aceptable. Para servicio de garantía, localice al distribuidor de servicio autorizado más cercano
con nuestro mapa en BRIGGSandSTRATTON.COM, llame al 1300 274 447, o bien, envíe un correo electrónico a salesenquires@briggsandstratton.com.au, o escriba a
Briggs & Stratton Australia Pty Ltd, 1 Moorebank Avenue, NSW, Australia, 2170.
El período de garantía comienza en la fecha de compra del primer consumidor o usuario comercial final. «Uso particular» significa uso doméstico residencial personal
por un consumidor minorista. «Uso comercial» significa los demás usos, lo que incluye el uso para propósitos comerciales, generar ingresos o alquiler. Una vez que el
producto se haya usado para fines comerciales, de ahí en adelante se considerará uso comercial a efectos de esta garantía.
Guarde el recibo comprobante de compra. Si no se proporciona una prueba de la fecha de compra inicial en el momento se solicitar servicio de garantía, se utilizará la
fecha de fabricación del producto para determinar el período de garantía. No es necesario el registro del producto para obtener el servicio de garantía de los productos
Briggs & Stratton.
ACERCA DE LA GARANTÍA
La mayor parte de las reparaciones bajo garantía se atienden de manera rutinaria, pero algunas veces las solicitudes de reparaciones bajo garantía podrían no ser
apropiadas Esta garantía SÓLO cubre defectos en materiales y mano de obra. No cubre los daños ocasionados por un uso incorrecto o un mal uso, un mantenimiento o
unas reparaciones inadecuadas, el desgaste y la rotura propios del uso, o bien el uso de un combustible en mal estado o no aprobado.
Uso no adecuado y mal uso: el uso correcto y para el que se ha diseñado este equipo se describe en el manual del usuario. Si el producto no se usa de la manera
que se describe en el manual del usuario o si el producto se usa después de que haya resultado dañado, quedará anulada la garantía. La garantía queda anulada si se
ha borrado el número de serie del producto o el producto ha sido modificado de alguna manera, o si el producto presenta indicios de haber sido usado incorrectamente,
por ejemplo, daños producidos por un impacto o daños producidos por corrosión química/agua.
Mantenimiento o reparaciones inadecuadas: el producto debe someterse a labores de mantenimiento de acuerdo con los procedimientos y plazos establecidos en
el manual del usuario, y para el mantenimiento y las reparaciones se deben utilizar piezas Briggs & Stratton originales o equivalentes. La garantía no cubre los daños
ocasionados por la falta de mantenimiento o el uso de piezas no originales.
Desgaste normal: al igual que otros dispositivos mecánicos, el producto está sujeto a desgaste incluso si se realiza un mantenimiento correcto. Esta garantía no cubrirá
la reparación cuando el uso normal haya agotado la vida útil de una pieza o del aparato. Los accesorios y elementos de mantenimiento como filtros, correas, hojas
cortantes y pastillas de freno (excepto las pastillas de freno de los motores) no están cubiertos por la garantía por sus propias características, a no ser que la causa sea
un defecto del material o de fabricación.
Combustible en mal estado o no aprobado: para que este producto funcione correctamente, se necesita combustible fresco que cumpla los criterios especificados
en el manual del usuario. Los daños al motor o al equipo causados por combustible en mal estado o por el uso de combustibles (como, por ejemplo, las mezclas de
etanol E15 o E85) no están cubiertos por la garantía.
Otras exclusiones: esta garantía excluye cualquier daño provocado por accidente, uso incorrecto, modificaciones, alteraciones, mantenimiento incorrecto, congelación
o deterioro producido por productos químicos. También excluye cualquier complemento o accesorio que no se incluyera en el paquete original del producto. No existe
ninguna cobertura de garantía para equipos que se usen para generar energía principal en lugar de energía de uso ni para equipos que se usen en aplicaciones de
soporte vital. Esta garantía no incluye equipos o motores usados, reacondicionados, de segunda mano o de demostración. Esta garantía excluye los fallos debidos a
hechos fortuitos y a otros acontecimientos de fuerza mayor que escapan al control del fabricante.
80018419_ES Rev A
16 BRIGGSandSTRATTON.COM
Page 33

Not for
Reproduction
17
Page 34

Not for
Reproduction
Hidrolavadora eléctrica
Especificaciones del producto
Presión máxima ....................2200 PSI (152 BAR)* @ 1,0 GPM (3,8 liters/min)
Caudal máxima.......................1,2 GPM (4,5 liters/min)* @ 900 PSI (62 BAR)
Mezcla de detergente................................Ver las instrucciones de MFR
Temperatura del suministro de agua ......................5°C (41°F) - 38°C (100°F)
Motor ................................................ De tipo universal (cepillo)
Rango de voltaje.....................................................120 VCA
Corriente .............................................................14,5 A
Esta limpiadora a presión está clasificada conforme a la norma PW101-2010 (Comprobación y Clasificación de Rendimiento de
*
Limpiadoras a Presión) de la Asociación de Fabricantes de Limpiadoras a Presión (PWMA).
Briggs & Stratton Corporation
18 BRIGGSandSTRATTON.COM
Milwaukee, Wisconsin, 53201-0702 EE. UU.
P.O. Box 702
(800) 743-4115
Page 35

Not for
Reproduction
Nettoyeur à haute
pression électrique
MANUEL D’UTILISATION
Ce nettoyeur à haute pression est évalué conformément à la norme PW101-
2010 (essai et évaluation de la performance des nettoyeurs à haute pression)
de l’Association des fabricants de nettoyeurs à haute pression (PWMA)
BRIGGS & STRATTON CORPORATION
MILWAUKEE, WISCONSIN, ÉTATS-UNIS
Page 36

Not for
Reproduction
Merci d’avoir acheté ce nettoyeur à haute pression électrique de qualité Briggs & Stratton®. Nous sommes heureux que
vous fassiez confiance à la marque Briggs & Stratton. Si vous respectez les instructions d’utilisation et d’entretien de ce
manuel, vous serez en mesure de profiter d’un service fiable de votre nettoyeur à haute pression électrique de Briggs &
Stratton durant de nombreuses années.
Ce manuel contient des renseignements sur la sécurité pour vous informer des dangers et des risques associés aux
nettoyeurs à haute pression électriques ainsi que de la façon de les éviter. Comme Briggs & Stratton ne connaît pas
nécessairement tous les contextes dans lesquels ce nettoyeur à haute pression électrique peut être utilisé, il est important
de lire et de bien comprendre ces instructions avant de tenter de démarrer ou d’utiliser cet équipement. Conserver ces
instructions d’origine pour vous y reporter dans le futur.
Ce nettoyeur à haute pression électrique exige un assemblage final avant utilisation. Consultez les directives sur
les procédures d’assemblage finales de la section Assemblage de ce manuel. Suivre complètement les directives.
Comment nous joindre
Vous n’aurez jamais à chercher bien loin pour trouver un centre de soutien et de service Briggs & Stratton pour votre
nettoyeur à haute pression électrique. Il y a plus de 30 000 concessionnaires agréés Briggs & Stratton qui fournissent des
services de qualité partout dans le monde. Vous pouvez aussi téléphoner au Service à la clientèle de Briggs & Stratton au
(800) 743-4115 ou communiquer avec ce service par Internet à l’adresse BRIGGSandSTRATTON.COM.
Nettoyeur à haute pression électrique
Numéro de modèle __________________________
Révision __________________________________
Numéro de série ____________________________
Date d’achat ______________________________
Enregistrer votre produit
Pour assurer que la garantie s’applique complètement et dans les meilleurs délais, enregistrer votre produit en ligne au
www.onlineproductregistration.com.
Table des matières
Sécurité de l’utilisateur ........................ 3
Assemblage ................................ 6
Caractéristiques et commandes ................ 8
Utilisation................................... 9
Entretien ..................................12
Entreposage ...............................13
Dépannage ................................14
Garantie...................................15
Fiche technique.............................18
Copyright © 2017. Briggs & Stratton Corporation
Milwaukee, WI, États-Unis. Tous droits réservés.
2 BRIGGSandSTRATTON.COM
Page 37

Not for
Reproduction
Sécurité de l’utilisateur
CONSERVEZ CES DIRECTIVES
Description de l’équipement
AVERTISSEMENT L’omission de lire et de se
conformer au manuel de l’utilisateur et à toutes
les directives d’utilisation avant d’utiliser le produit
peut entraîner la mort ou des blessures graves.
• Lisez ce manuel attentivement et familiarisez-vous avec
votre nettoyeur à haute pression électrique. Apprenez
ses applications, ses limitations ainsi que tous les
risques impliqués.
Ce nettoyeur à haute pression fonctionne à un maximum
de 152 bar (2 200 lb/po2) pour sur jaune et un débit
allant jusqu’à 4,5 l/min (1,2 gallon par minute) embout de
pulvérisation turbo.
Nous nous sommes efforcés de nous assurer que les
informations contenues dans ce manuel sont exactes et
actualisées. Toutefois, nous nous réservons le droit de
changer, de modifier ou même d’améliorer le produit et ce
document à tout moment sans préavis de notre part.
Cet appareil ISM satisfait à la norme canadienne ICES-001.
Protection par un disjoncteur de fuite de terre
Ce nettoyeur à haute pression électrique est pourvu d’un
disjoncteur de fuite de terre intégré à la fiche électrique du
cordon d’alimentation. Ce dispositif offre une protection
additionnelle contre les risques d’électrocution. Si un
remplacement de la fiche électrique ou du cordon est requis,
n’utilisez rien d’autre que des pièces de rechange identiques,
munies d’un disjoncteur de fuite de terre.
Arrêt automatique
Le nettoyeur à haute pression électrique est muni d’un
capteur qui détecte l’arrêt du jet d’eau lorsque la détente
du pistolet de pulvérisation est relâchée ou verrouillée.
Le capteur provoque l’arrêt du moteur du moment que
la détente du pistolet de pulvérisation est relâchée ou
verrouillée.
Si le moteur continue de tourner lorsque la détente du
pistolet de pulvérisation est relâchée ou verrouillée,
N’UTILISEZ PAS LA MACHINE. Veuillez téléphoner au
service de dépannage du nettoyeur à haute pression au
(800) 743-4115 pour obtenir de l’aide.
AVIS Le nettoyeur à haute pression électrique est pourvu
d’un interrupteur de mise en marche (ON/OFF). Afin de
prévenir tout dommage, l’interrupteur devrait toujours être
placé dans la positon OFF (0) lorsque le nettoyeur à haute
pression électrique n’est pas utilisé.
Surcharge du moteur
Le moteur électrique de ce nettoyeur à haute pression
électrique est muni d’un dispositif de protection
contre la surcharge (thermostat). Ce dispositif arrête
automatiquement le moteur s’il surchauffe ou prélève une
intensité de courant excessive.
Si le dispositif de protection contre la surcharge se
déclenche, coupez l’alimentation en plaçant l’interrupteur
d’alimentation principal ON/OFF à la position OFF (0).
Laissez l’appareil refroidir durant 30 minutes. Puis, placez
l’interrupteur d’alimentation principal ON/OFF à la position
ON (I) pour reprendre l’opération.
Informations importantes liées à la sécurité
Veuillez lire et vous assurer de comprendre le manuel
en entier avant de tenter d’assembler, d’utiliser ou de
faire l’entretien de l’appareil. Veuillez suivre les directives
d’entretien indiquées dans ce manuel. Si vous avez des
questions au sujet de l’appareil, veuillez appeler le Service
à la clientèle au (800) 743-4115, de 8 h à 17 h (HNC), du
lundi au vendredi.
Renseignements et symboles de sécurité
Lire le manuel
Surface glissante Chute
Le symbole d’alerte de sécurité indique un risque de
blessure corporelle possible. Un mot-indicateur (DANGER,
AVERTISSEMENT ou MISE EN GARDE) est utilisé avec
le symbole d’alerte pour indiquer la probabilité ou la
gravité du danger. Un symbole de danger peut être utilisé
pour représenter le type de danger. AVIS indique des
informations considérées importantes, mais non liées aux
dangers.
DANGER indique un danger qui, si non évité,
provoquera la mort ou des blessures graves.
AVERTISSEMENT indique un danger qui, si non évité,
pourrait provoquer la mort ou des blessures graves.
ATTENTION indique un danger qui, si non évité,
pourrait causer une blessure mineure ou modérée.
AVIS indique des informations considérées importantes,
mais non liées aux dangers.
Décharge électrique
Objets volantsProjectile Brûlure chimique
Incendie
Injection de liquide
3
Page 38

Not for
Reproduction
AVERTISSEMENT Risque d’électrocution.
L’utilisation d’une rallonge peut causer une
décharge électrique et des brûlures pouvant
entraîner la mort ou des blessures graves.
• N’utilisez PAS de rallonge avec ce nettoyeur à haute
pression électrique. Les prises du circuit électrique de
votre maison ou une rallonge peuvent ne pas fournir
une protection de coupure de circuit par une mise à la
terre qui peut sauver la vie.
AVERTISSEMENT Risque d’électrocution.
Le contact avec les deux conducteurs
d’alimentation simultanément peut provoquer
une décharge électrique ou une brûlure
entraînant des blessures graves voire la mort.
• Branchez uniquement dans une prise ayant une mise à
la terre adéquate. Ne retirez PAS la broche de la mise à
la terre de la fiche.
• Inspectez le cordon avant chaque utilisation, N’utilisez
PAS si le cordon est endommagé.
• Ce produit est muni d’un disjoncteur de fuite de terre
intégré dans la fiche du cordon d’alimentation. Si le
remplacement de la fiche ou du cordon est nécessaire,
veuillez utiliser des pièces de rechange identiques.
• Gardez tous les branchements secs et hors du sol.
• NE touchez PAS la fiche avec les mains mouillées.
• N’acheminez PAS le cordon d’alimentation par les
portes, les fenêtres, les trous dans les plafonds, les
murs ou les planchers.
• NE marchez PAS sur le cordon d’alimentation.
• NE conduisez pas, ne placez pas et ne tirez pas des
objets sur le cordon d’alimentation.
• NE vaporisez PAS près d’une source d’alimentation.
AVERTISSEMENT L’utilisation du nettoyeur à haute
pression électrique peut laisser des
flaques d’eau et rendre les surfaces
glissantes.
Risque d’effet de recul. Le pistolet de pulvérisation peut
créer un effet de recul susceptible de vous faire tomber
et d’entraîner des blessures graves ou la mort.
• Utilisez le nettoyeur à haute pression électrique à partir
d’une surface stable.
• Ne vous étirez pas et ne vous tenez pas debout sur une
surface instable. Gardez les pieds solidement appuyés
et en équilibre en tout temps.
• La surface de nettoyage devrait comporter une pente et
un drain adéquats pour diminuer les risques de chute
provoqués par des surfaces glissantes.
• Soyez très prudent si vous devez utiliser le nettoyeur à
haute pression électrique lorsque vous êtes dans une
échelle, un échafaudage ou un autre emplacement
similaire.
• Lorsque vous utilisez un jet à haute pression, saisissez
fermement le pistolet de pulvérisation avec les deux
mains afin d’éviter les risques de blessures entraînées
par les effets de recul.
AVERTISSEMENT Risque de lésion oculaire ou
corporelle. Le jet peut rejaillir sur vous,
propulser des objets ou causer des
blessures internes entraînant des
blessures graves.
• Portez toujours des lunettes de protection avec aération
indirecte (éclaboussures de produits chimiques)
conformes à la norme ANSI Z87.1 lorsque vous utilisez
ou que vous êtes à proximité de cet équipement. Ne
remplacez JAMAIS les lunettes de protection avec
aération indirecte par des lunettes de protection
ordinaires ou pour condition sèche.
• Apprenez à arrêter le nettoyeur à haute pression et
à libérer la pression rapidement. Maîtrisez bien les
commandes.
• NE laissez PAS les ENFANTS utiliser le nettoyeur à
haute pression électrique.
• Assurez-vous qu’il n’y a pas d’autre personne présente
dans la zone de travail.
• Inspectez le boyau à haute pression avant chaque
utilisation. NE réparez JAMAIS le boyau à haute
pression; remplacez-le.
• NE réparez PAS les raccords non étanches à l’aide
de scellant; remplacez les joints toriques et joints
d’étanchéité.
• Gardez toujours le boyau raccordé au nettoyeur à
haute pression électrique lorsque le système est sous
pression.
• Chaque fois que vous éteignez le nettoyeur à haute
pression électrique, dirigez TOUJOURS le pistolet
vers un endroit sécuritaire lorsque le système est
sous pression et appuyez sur la détente du pistolet de
pulvérisation pour en libérer la haute pression.
• NE dirigez PAS le pistolet vers des personnes ou des
animaux.
• NE buvez PAS
boyau.
• NE bloquez PAS le pistolet de pulvérisation dans la
position ouverte.
• NE laissez PAS le pistolet de pulvérisation sans
surveillance lorsque le nettoyeur à haute pression
électrique est en position de marche (I).
• N’utilisez PAS un pistolet de pulvérisation qui n’est pas
muni d’un verrou de la détente ou d’un pontet installé et
en ordre de marche.
• Assurez-vous toujours que le pistolet de pulvérisation et
les accessoires sont bien fixés.
• Soyez vigilant, regardez toujours ce que vous faites.
• NE faites PAS fonctionner l'appareil lorsque vous
êtes fatigué ou sous l’influence de l’alcool ou de
médicaments.
• Une supervision étroite est requise lorsque ce produit
est utilisé près des enfants.
à même les accessoires reliés au
4 BRIGGSandSTRATTON.COM
Page 39

Not for
Reproduction
AVERTISSEMENT Le jet d’eau à haute pression
produit par cet appareil pourrait couper la peau
et ses tissus sous-jacents, entraînant de graves
lésions et pouvant conduire à une amputation.
Le pistolet de pulvérisation emprisonne une pression
d’eau élevée, même lorsque le moteur est arrêté et que
l’arrivée d’eau est débranchée, ce qui peut entraîner des
blessures graves.
• NE dirigez JAMAIS le pistolet de pulvérisation en
direction des gens, des animaux ou des plantes.
• Dirigez TOUJOURS le pistolet de pulvérisation dans une
direction sécuritaire, serrez la gâchette du pistolet de
pulvérisation pour relâcher la haute pression à chaque
fois que vous arrêtez le nettoyeur à haute pression.
AVERTISSEMENT Risque d’incendie. La
vaporisation de liquides inflammables peut
provoquer des blessures graves, voire la mort.
• NE vaporisez PAS de liquides inflammables.
AVERTISSEMENT Risque d’incendie. La surchauffe
du cordon peut provoquer des blessures graves,
voire la mort.
AVERTISSEMENT Ce produit contient du plomb
et des composés de plomb, connus dans l’État de la
Californie pour causer des malformations congénitales
ou les dommages à l’appareil reproducteur. Nettoyezvous les mains après la manipulation de ce produit.
Cancer et effets nocifs sur la reproduction -
www.P65Warnings.ca.gov
AVIS Le jet à haute pression risque d’endommager les
articles fragiles, notamment le verre.
• NE dirigez PAS le pistolet de pulvérisation vers les
vitres lorsque la embout de pulvérisation turbo est
utilisée.
• NE dirigez JAMAIS le pistolet vers des plantes.
AVIS Vous devez protéger votre appareil contre le gel.
• Omettre de le protéger endommagera de façon
permanente votre pompe et rendra votre appareil
inopérant.
• Les dommages causés par le gel ne sont pas couverts
par la garantie.
• Déroulez le cordon en entier avant l’utilisation.
• Ne recouvrez PAS le cordon avec un matériel
quelconque.
AVERTISSEMENT Danger de brûlures chimiques.
Les produits chimiques peuvent causer
des brûlures risquant d’entraîner la mort
ou des blessures graves.
• Portez toujours des lunettes de protection avec aération
indirecte (éclaboussures de produits chimiques)
conformes à la norme ANSI Z87.1 lorsque vous utilisez
des produits chimiques.
• N’utilisez PAS de lunettes de sécurité ou de lunettes
de sécurité pour condition sèche au lieu de lunettes de
sécurité à aération indirecte.
• N’utilisez PAS de solution caustique avec le nettoyeur à
haute pression électrique.
• N’UTILISEZ QUE des détergents/savons qui ne risquent
pas d’endommager le nettoyeur à haute pression.
Suivez toutes les directives des fabricants.
AVIS Le traitement inadéquat du nettoyeur à haute
pression peut l’endommager et réduire sa durée de vie.
• Si vous avez des questions sur l’usage prévu,
demandez à votre concessionnaire ou prenez contact
avec le service de réparation agréé.
• N'opérez PAS un appareil dont les pièces sont
brisées ou manquantes, ni sans les protections ou les
revêtements.
• NE contournez PAS un dispositif de sécurité sur le
nettoyeur à haute pression électrique.
• N'altérez PAS d’aucune façon le nettoyeur à haute
pression.
• Avant de démarrer le nettoyeur à haute pression
électrique par temps froid, vérifiez toutes les pièces
d’équipement afin de vous assurer qu’aucune glace ne
s’est formée.
• NE déplacez PAS le nettoyeur à haute pression
électrique en tirant sur les tuyaux. Déplacez l’appareil
en utilisant la poignée de transport fournie.
• Utilisez UNIQUEMENT les accessoires de marque
conçus pour une utilisation avec ce produit.
5
Page 40

Not for
Reproduction
Assemblage
Lisez le manuel de l’opérateur en entier avant
de tenter d’assembler ou d’utiliser votre
nouveau nettoyeur à haute pression électrique.
Votre nettoyeur à haute pression électrique exige un peu
d’assemblage, mais il sera rapidement prêt à être utilisé.
Si vous avez des problèmes avec l’assemblage de votre
nettoyeur à haute pression électrique, veuillez appeler la
ligne d’assistance du nettoyeur à haute pression électrique
en composant le (800) 743-4115. Si vous appelez pour
obtenir de l’aide, veuillez avoir sous la main les numéros
de modèle, de révision et de série indiqués sur l’étiquette
d’identification.
Outils nécessaires
• Tournevis à tête cruciforme n˚2
Déballage du nettoyeur à haute pression
électrique
1. Enlevez tous les composants de la boîte d’expédition.
2. Assurez-vous d’avoir tous les articles inclus avant de
commencer l’assemblage.
Contenu de la boîte:
• Corps de l’appareil
• Manuel d’utilisation
• Poignée et plateau pour accessoires
• Pistolet de pulvérisation
• Boyau à haute pression
• Lance de pulvérisation
• Embouts de pulvérisation à raccord rapide (3)
• Embout de pulvérisation à mousse avec raccord
rapide et bouteille de détergent
• Tubes de support de poignée(2)
• Vis (2)
Vérifiez le contenu. Si une pièce est manquante ou
endommagée, NE l’utilisez PAS, téléphonez plutôt au
service de dépannage du nettoyeur à haute pression
au (800) 743-4115.
Familiarisez-vous avec chaque élément avant d’assembler
le nettoyeur à haute pression électrique. Identifiez les
pièces et les accessoires à partir de l’illustration montrée
dans la rubrique Fonctions et commandes.
Fixer la poignée et le support de tubes
1. Appuyer sur les boutons de goupille de verrouillage
(A) tout en les maintenant sur chaque côté de la
poignée. Faire glisser la poignée (B) vers les tubes de
support de chaque poignée (C) vers le bas jusqu’à ce
que les boutons de goupille de verrouillage se fixent
dans les trous.
B
2. Faire glisser les supports de poignée (C) vers le
bas dans les fentes à l’arrière de l’appareil. Aligner
les trous et insérez les vis (D). Serrer à l’aide d’un
tournevis cruciforme n° 2.
D
C
D
Lubrification des joints toriques
La lubrification des joints toriques est extrêmement
importante pour l’installation et le fonctionnement.
L’utilisation d’un produit lubrifiant (graisse de pétrole ou
graisse synthétique) pendant le montage aide les joints
toriques à s’emboîter correctement et fournit une meilleure
étanchéité. Elle permet aussi de protéger les joints
toriques contre les dommages provoqués par l’abrasion,
le pincement ou la coupure, et prolonge leur durée de vie.
AVIS TOUJOURS appliquer une petite quantité de
produit lubrifiant sur les joints toriques avant de monter
le tuyau d’arrosage sur la pompe (E), le tuyau pour haute
pression (F), le pistolet de pulvérisation (G) et la lance de
pulvérisation (H).
G
H
E
F
Lubrifiez tous les raccords indiqués ci-dessous en
suivant ces directives:
1. Inspectez et nettoyez les surfaces de connexion
avant la lubrification et l’assemblage.
2. Utilisez les lubrifiants en petite quantité pendant
l’assemblage; une couche légère suffit.
3. Utilisez une petite brosse ou un coton-tige pour
appliquer de la graisse directement sur les joints
toriques s’ils ne sont pas accessibles (raccord QC,
raccord M22).
A
C
6 BRIGGSandSTRATTON.COM
Page 41

Not for
Reproduction
Branchez le tuyau et l’alimentation en eau à la
pompe
AVIS NE faites PAS fonctionner la pompe sans avoir
connecté et ouvert l’alimentation en eau.
• La garantie sera annulée si l’appareil est endommagé
faute de suivre cette directive.
1. Déroulez le boyau à haute pression (A) et fixez le bout
noir du boyau à la base du pistolet de pulvérisation
(B). Serrez à la main.
A
B
AVERTISSEMENT Le jet d’eau haute pression
produit par cet appareil pourrait couper la peau et
ses tissus sous-jacents, entraînant de graves
lésions et pouvant conduire à une amputation.
• Ne raccordez JAMAIS le boyau à haute pression à une
lance de pulvérisation.
• Gardez le boyau à haute pression raccordé à la pompe
et au pistolet de pulvérisation lorsque le système est
sous pression.
• Assurez-vous toujours que le pistolet de pulvérisation,
les embouts et les accessoires sont bien fixés.
2. Fixez l’extrémité rouge du boyau à haute pression (A) à la
sortie haute pression (C) de la pompe. Serrez à la main.
AVIS L’utilisation d’un clapet anti-retour (reniflard
ou soupape de retenue) à la prise de la pompe peut
endommager la pompe ou le raccord d’admission d’eau.
• Il DOIT y avoir une longueur d’au moins trois mètres
(10 pi) de tuyau d’arrosage libre entre l’entrée du
nettoyeur à haute pression et tout dispositif, tel qu’un
reniflard ou une soupape de retenue.
• La garantie sera annulée si l’appareil est endommagé
faute de suivre cette directive.
5. Raccordez le tuyau d’arrosage (D) (longueur maximale
de 15 m/50 pi) à l’entrée d’eau (E). Serrez à la main.
AVERTISSEMENT Risque de lésion oculaire.
Le jet d’eau peut rejaillir ou propulser des objets
en entraînant de graves lésions.
• Portez toujours des lunettes de protection avec aération
indirecte (éclaboussures de produits chimiques)
conformes à la norme ANSI Z87.1 lorsque vous utilisez
ou que vous êtes à proximité de cet équipement.
• Ne remplacez JAMAIS les lunettes de protection
avec aération indirecte par des lunettes de protection
ordinaires ou pour condition sèche.
6. Ouvrez l’eau, appuyez sur le bouton rouge (G) du
pistolet puis sur la gâchette pour purger la pompe de
l’air et des impuretés qui s’y trouvent.
G
C
A
3. Faites circuler de l’eau dans le tuyau d’arrosage
pendant 30 secondes pour en déloger tous débris.
AVIS NE siphonnez PAS d’eau stagnante pour assurer
l’alimentation en eau. Utilisez UNIQUEMENT de l’eau
froide (moins de 38 °C/100 °F).
4. Avant de raccorder le tuyau d’arrosage (D) à l’entrée
d’eau (E), examinez la crépine d’admission (F).
Nettoyez la crépine si elle contient des débris ou
remplacez-la si elle est endommagée. NE mettez PAS
le nettoyeur à haute pression en marche si la crépine
d’admission est endommagée.
F
D
E
Liste de vérification avant de démarrer le
moteur de la pompe
Révisez l’assemblage de l’appareil pour vous assurer que
vous avez effectué toutes les étapes suivantes.
1. Assurez-vous de lire les sections Sécurité de l’utilisateur
et Utilisation avant d’utiliser le nettoyeur à haute
pression.
2. Vérifiez que les raccords de tuyau sont bien serrés.
3. Assurez-vous que les boyaux ne sont pas entortillés,
coupés ou endommagés.
4. Fournissez une bonne alimentation d’eau à un débit
adéquat.
5. Branchez le cordon d’alimentation électrique à un circuit
électrique distinct pouvant supporter des charges de
120 volts CA à 15 ampères installé conformément aux
règlements et aux ordonnances de sécurité locaux.
Assurez-vous que le circuit ne fournit aucun autre
appareil en électricité.
7
Page 42

Not for
Reproduction
Caractéristiques et commandes
Lisez ce manuel d’utilisation et les règles de sécurité avant d’utiliser votre nettoyeur à haute pression
électrique.
Comparez les illustrations à votre nettoyeur à haute pression électrique pour vous familiariser avec l’emplacement des
diverses commandes et réglages. Conservez ce manuel à des fins de consultation ultérieure.
A
B
C
D
E
M
L
F
G
A - Pistolet de pulvérisation — Un dispositif à gâchette qui
permet de contrôler le jet d’eau sur la surface à nettoyer.
Inclus le verrou de la gâchette.
B- Embouts de pulvérisation — Embout noir pour les
applications générales de savons. Embout blanc et jaune pour
les applications diverses à haute pression.
C- Boyau à haute pression — Raccordez l’extrémité rouge
du boyau à l’alimentation en eau et la noire au pistolet de
pulvérisation.
D- Étiquette d’avertissement — Identifie les risques à éviter
lors de l’utilisation de votre nettoyeur à haute pression.
E - Interrupteur principal à bascule de marche/arrêt —
Poussez la partie supérieure de l’interrupteur (I) pour mettre
en marche le nettoyeur à haute pression. Poussez la partie
inférieure de l’interrupteur (0) pour mettre en arrêt.
F - Admission d’eau — Branchez à l’alimentation en eau à l’aide
d’un boyau d’arrosage d’une longueur max. de 15,24 m (50 pi).
K
J
H
G - Cordon électrique avec disjoncteur de fuite de terre —
Le nettoyeur à haute pression électrique ainsi que l’opérateur
sont protégés par un disjoncteur de fuite à la terre (GFCI).
H - Embout de pulvérisation à mousse avec la bouteille de
détergent – Utiliser pour appliquer un détergent nettoyant
haute pression sur les surfaces en toute sécurité.
J - Étiquette d’identification (sous le boîtier) — Indique les
numéros de modèle et de série du nettoyeur à pression.
Veuillez avoir ces renseignements sous la main lorsque vous
appelez pour demander de l’aide.
K - Sortie haute pression — Raccord de boyau à haute
pression.
L - Lance de pulvérisation — Vous permet d’interchanger les
embouts de pulvérisation.
M - Embout de pulvérisation turbo — Fournit un jet d’eau
précis et puissant pour un nettoyage intensif.
8 BRIGGSandSTRATTON.COM
Page 43

Not for
Reproduction
Utilisation
Comment démarrer votre nettoyeur à haute
pression électrique
Suivez les directives ci-dessous dans l’ordre indiqué. Si
vous rencontrez des problèmes lors de l’utilisation de votre
nettoyeur à haute pression électrique, veuillez appeler
le service d’assistance des nettoyeurs à haute pression
électriques au (800) 743-4115.
1. Placez le nettoyeur à haute pression près d’une
source d’eau extérieure pouvant fournir un débit
supérieur à 11,4 litres (3,0 gallons) par minute et
d’au moins 20 psi (1,38 bar) à l’extrémité du tuyau
d’arrosage raccordée au nettoyeur à haute pression.
NE siphonnez PAS l’eau d’alimentation.
2. Vérifiez que le boyau à haute pression est raccordé
fermement au pistolet de pulvérisation et à la pompe.
Consultez la section Assemblage.
3. Assurez-vous que l’unité est à niveau.
4. Raccordez le tuyau d’arrosage à l’entrée d’eau de la
pompe du nettoyeur à haute pression.
AVIS NE faites PAS fonctionner la pompe sans avoir
connecté et ouvert l’alimentation en eau.
• La garantie sera annulée si l’appareil est endommagé
faute de suivre cette directive.
5. Ouvrez l’eau, dirigez le pistolet vers un endroit sécuritaire,
appuyez sur le bouton rouge puis sur la gâchette pour
purger la pompe de l’air et des impuretés qui s’y trouvent.
6. Fixez la lance de pulvérisation au pistolet de
pulvérisation. Serrez à la main.
AVERTISSEMENT Risque d’électrocution.
L’utilisation d’une rallonge peut causer une
décharge électrique et des brûlures pouvant
entraîner la mort ou des blessures graves.
• N’utilisez PAS de rallonge avec ce nettoyeur à haute
pression électrique. Les prises du circuit électrique de
votre maison ou une rallonge peuvent ne pas fournir une
protection de coupure de circuit par une mise à la terre
qui peut sauver la vie.
9. Branchez le cordon d’alimentation électrique à un
circuit électrique dédié pouvant supporter des charges
de 120 volts CA à 15 ampères installé conformément à
tous les règlements et ordonnances de sécurité locaux.
Le circuit ne doit fournir en électricité aucun autre
appareil ou dispositif. Le voyant du disjoncteur de fuite
de terre devrait être allumé.
AVIS Le voyant doit être allumé pour faire fonctionner le
nettoyeur à haute pression électrique.
AVERTISSEMENT Risque d’électrocution. Un
disjoncteur de fuite de terre non fonctionnel
peut provoquer des blessures corporelles ou la
mort. Si le voyant ne demeure pas allumé après
le test et la réinitialisation, n’utilisez pas le disjoncteur de
fuite de terre.
10. Appuyez sur le bouton « TEST » (B). Le voyant (C)
devrait être éteint (OFF).
7. Choisissez la embout de pulvérisation que vous
souhaitez utiliser, tirez sur le col de la lance de
pulvérisation, insérez la embout de pulvérisation et
relâchez le col. Tirez sur l’embout pour vous assurer
qu’il est bien en place. Consultez la section Comment
utiliser les embouts de pulvérisation.
8. Poussez l’interrupteur principal de marche/arrêt (A)
vers la position d’arrêt (0).
A
D
B
C
11. Appuyez sur le bouton « RESET » (D). Le voyant (C)
devrait être allumé (ON).
AVIS N’utilisez PAS le nettoyeur à haute pression
électrique si le test ci-dessus échoue.
12. Placez l’interrupteur principal de marche/arrêt (A) du
nettoyeur à haute pression à la position de marche (I).
13. Dirigez le pistolet vers un endroit sécuritaire, appuyez
sur le verrou de la détente puis sur la détente.
Le moteur du nettoyeur à haute pression électrique
démarre et s’arrête lorsque la détente du pistolet de
pulvérisation est enfoncée et relâchée.
Le nettoyeur à haute pression électrique est maintenant prêt
à être utilisé. Les directives d’utilisation des accessoires
fournis sont données plus loin dans cette section.
9
Page 44

Not for
Reproduction
Comment arrêter votre nettoyeur à haute
pression électrique
Le moteur du nettoyeur à haute pression électrique
fonctionne seulement lorsqu’on presse la détente. Pour
arrêter le nettoyeur à haute pression et éteindre le moteur :
1. Relâchez la détente du pistolet de pulvérisation.
2. Poussez l’interrupteur principal de marche/arrêt vers
la position d’arrêt (0).
AVIS Le fait de relâcher la détente arrête
automatiquement le moteur, mais cela ne coupe pas
l’alimentation électrique de l’appareil.
3. Fermez l’alimentation en eau.
4. Dirigez TOUJOURS le pistolet de pulvérisation
vers un endroit sécuritaire, appuyez sur le verrou
de détente puis sur la détente pour libérer la haute
pression de l’appareil.
AVERTISSEMENT Le jet d’eau à haute pression
produit par cet appareil pourrait couper la peau
et ses tissus sous-jacents, entraînant de graves
lésions et pouvant conduire à une amputation.
Le pistolet de pulvérisation emprisonne une pression
d’eau élevée, même lorsque le moteur est arrêté et que
l’arrivée d’eau est débranchée, ce qui peut entraîner des
blessures graves.
• Gardez le boyau à haute pression raccordé à la pompe
et au pistolet de pulvérisation lorsque le système est
sous pression.
• Dirigez TOUJOURS le pistolet de pulvérisation dans une
direction sécuritaire, serrez la gâchette du pistolet de
pulvérisation pour relâcher la haute pression à chaque
fois que vous arrêtez le nettoyeur à haute pression.
Conseils d’utilisation
• Pour un nettoyage plus efficace, maintenez la embout
de pulvérisation de 8 à 24 pouces (20,0 cm à 60,0 cm)
de la surface à nettoyer.
• Si vous tenez la embout de pulvérisation trop près,
en particulier s’il s’agit d’une embout de pulvérisation
à haute pression, vous risquez d’endommager la
surface à nettoyer.
• Ne vous approchez PAS à moins de 6 pouces (15 cm)
lors de nettoyage de pneus.
Application de détergent
AVERTISSEMENT Danger de brûlures chimiques.
Les produits chimiques peuvent causer
des brûlures risquant d’entraîner la mort
ou des blessures graves.
• Portez toujours des lunettes de protection avec aération
indirecte (éclaboussures de produits chimiques)
conformes à la norme ANSI Z87.1 lorsque vous utilisez
des produits chimiques.
• N’utilisez PAS de lunettes de sécurité ou de lunettes
de sécurité pour condition sèche au lieu de lunettes de
sécurité à aération indirecte.
• N’utilisez PAS une solution caustique avec le nettoyeur
à haute pression électrique.
• N’UTILISEZ QUE des détergents/savons qui ne risquent
pas d’endommager le nettoyeur à haute pression.
Suivez toutes les directives des fabricants.
Pour appliquer un détergent, suivez les étapes
ci-dessous:
1. Installez le embout de pulvérisation à mousse.
5. Débranchez la prise avec disjoncteur de fuite de terre
de la prise murale.
Comment utiliser les embouts de pulvérisation
Trois embouts de pulvérisation sont fournies avec le
nettoyeur à haute pression. La embout de pulvérisation
turbo fournit un jet d’eau précis et puissant pour un
nettoyage intensif. Les embouts de pulvérisation jaunes et
blancs servent aux applications diverses à haute pression.
Le embout de pulvérisation à mousse sert pour les
applications générales avec du savon.
Mousse à
basse pression
Utiliser pour
appliquer le
détergent
Rinçage
général
Jaune, 15 °
Revêtement
/ Terrasse / Allées /
Planchers de garage
2200 PSI (152 bar)
1.0 GPM (3.7 LPM)
Camions / Meubles d’extérieur
1.1 GPM (4.1 LPM)
d’huile/Élimination de la
poussière
1.2 GPM (4.5 LPM)
Rinçage délicat
Blanc, 40 °
Voitures /
Camionnettes /
1300 PSI (90 bar)
Nettoyage intense
Turbo
Élimination de la
peinture/Tâches
900 PSI (6 bar)
2. Préparez la solution de détergent nécessaire pour la
tâche à effectuer.
3. Tournez la bouteille de détergent (A) dans le sens
antihoraire et retirez-la du embout de pulvérisation à
mousse (B).
B
A
10 BRIGGSandSTRATTON.COM
Page 45

Not for
Reproduction
4. Remplissez la bouteille de la solution détergente.
5. Réinstallez la bouteille de détergent sur le embout
de pulvérisation à mousse et tournez-le dans le sens
antihoraire jusqu’à ce qu’il se fixe en place.
6. Assurez-vous que le tuyau d’arrosage est raccordé à
l’entrée d’eau. Vérifiez que le boyau à haute pression
est raccordé au pistolet de pulvérisation et à la sortie
haute pression de la pompe. Ouvrez l’eau.
AVIS Vous devez raccorder tous les boyaux avant de
démarrer le nettoyeur à haute pression.
7. Démarrez le nettoyeur à haute pression tel que décrit
à la rubrique Comment démarrer votre nettoyeur à
haute pression électrique.
8. Appliquez le détergent sur une surface sèche en
commençant par la partie inférieure à laver, puis
travaillez vers le haut en formant de longues bandes
uniformes qui se chevauchent.
9. Laissez le détergent pénétrer pendant au moins 3
à 5 minutes avant de laver et de rincer. Au besoin,
appliquez de nouveau afin d’empêcher la surface
de sécher. Pour empêcher la formation de stries, ne
permettez pas au détergent de sécher sur la surface.
Rinçage du nettoyeur à haute pression
électrique
1. Retirez le embout de pulvérisation à mousse pour
détergent de la lance.
2. Installez la embout de pulvérisation blanc ou jaune.
3. Maintenez le pistolet de pulvérisation à une distance
sécuritaire de la surface sur laquelle vous prévoyez de
pulvériser.
AVERTISSEMENT Risque d’effet de recul.
Le pistolet de pulvérisation peut créer un effet
de recul susceptible de vous faire tomber et
d’entraîner des blessures graves ou la mort.
• Utilisez le nettoyeur à haute pression électrique à partir
d’une surface stable.
• Soyez très prudent si vous devez utiliser le nettoyeur à
haute pression électrique lorsque vous êtes dans une
échelle, un échafaudage ou un autre emplacement
similaire.
• Lorsque vous utilisez un jet à haute pression, saisissez
fermement le pistolet de pulvérisation avec les deux
mains afin d’éviter les risques de blessures entraînées
par les effets de recul.
Comment ranger les accessoires
Cet appareil est équipé d’endroits pour stocker le boyau
à haute pression, le pistolet de pulvérisation, la lance de
pulvérisation et le cordon d’alimentation. Embobiner le
cordon d’alimentation sur les supports aux extrémités de
l’appareil principal. Enrouler le boyau à haute pression
et le ranger sur le crochet à l’arrière du plateau pour
accessoires. Ranger le pistolet dans les fentes sur le
côté gauche de plateau pour accessoires. Encliqueter
la lance de pulvérisation dans les fentes sur le côté
droit du plateau pour accessoires. Ranger les embouts
de pulvérisation dans les trous prévus sur le devant du
plateau pour accessoires. Identifier tous les accessoires à
partir de l’illustration montrée dans la rubrique Fonctions et
commandes.
4. Appliquez une pulvérisation haute pression à une
petite surface, puis vérifiez que celle-ci n’a pas été
endommagée. S’il n’y a aucun dommage, vous pouvez
considérer qu’il est acceptable de poursuivre le rinçage.
5. Commencez par la partie supérieure de la surface à
rincer, en vous dirigeant vers le bas en formant des
bandes qui se chevauchent, comme lors du nettoyage.
Autres conseils de nettoyage
• Ne laissez JAMAIS le nettoyeur à haute pression
électrique sans supervision alors qu’il est branché dans
une prise électrique et que l’eau est alimentée à l’appareil.
• Si vous avez la embout de pulvérisation trop éloignée de
la surface à laver, le nettoyage peut ne pas être efficace.
11
Page 46

Not for
Reproduction
Entretien
Recommandations générales
Un entretien régulier améliora la performance et prolongera
la durée de vie du nettoyeur à haute pression électrique.
La garantie sur ce nettoyeur à haute pression électrique
ne couvre pas les items assujettis à un abus ou une
négligence par l’opérateur. Pour recevoir la valeur en
entier de la garantie, l’opérateur doit maintenir le nettoyeur
à haute pression électrique selon les directives dans ce
manuel, y compris l’entreposage correct.
AVIS En cas de questions sur le remplacement des
composants du nettoyeur à haute pression, veuillez
appeler le 1 800 743-4115 pour toute assistance.
Avant chaque utilisation
1. Nettoyez les débris.
2. Vérifiez la crépine de l’entrée d’eau pour la présence
de débris ou de dommage.
3. Recherchez des fuites du boyau à haute pression.
4. Vérifiez le fonctionnement du pistolet de vaporisation.
Entretien du nettoyeur à haute pression
électrique
Nettoyez les débris
Nettoyez les débris accumulés sur le nettoyeur à haute
pression électrique tous les jours ou avant de l’utiliser.
Inspectez les fentes d’air de refroidissement et les
ouvertures aménagées sur l’avant, l’arrière et le dessous
du nettoyeur à haute pression. Ces orifices doivent rester
propres et libres de toute obstruction.
Les parties du nettoyeur à haute pression électrique
doivent être gardées propres afin de réduire le risque de
surchauffe et d’inflammation des débris accumulés.
• Utilisez un linge humide pour nettoyer les surfaces
extérieures.
AVIS Le traitement inadéquat du nettoyeur à haute pression
électrique peut l’endommager et réduire sa durée de vie.
• N’insérez AUCUN objet dans les fentes de
refroidissement.
Vérifiez et nettoyez la crépine d’admission d’eau
Examinez la crépine d’admission d’eau de la pompe.
Nettoyez-la si elle est obstruée ou remplacez-la si elle est
endommagée.
Vérification du boyau à haute pression
Le boyau à haute pression peut présenter des fuites suite à
l’usure, au pliage ou à l’abus. Inspectez le boyau à chaque fois
avant de l’utiliser. Recherchez la présence de coupures, de
fuites, d’abrasions, de gonflement de la gaine, de dommages
ou de mouvements dans les raccords. Si vous remarquez l'une
des ces conditions, remplacez le boyau immédiatement.
AVERTISSEMENT Le jet d’eau à haute pression
produit par cet appareil pourrait couper la peau
et ses tissus sous-jacents, entraînant de graves
lésions et pouvant conduire à une amputation.
• NE réparez JAMAIS le boyau à haute pression.
Remplacez-le.
• Le tuyau de remplacement DOIT résister à une pression
égale ou supérieure à la pression nominale de l’appareil.
Vérification du pistolet de pulvérisation
Examinez le raccord de boyau sur le pistolet de
vaporisation et vérifiez qu’il est bien serré. Faites l’essai
de la détente (A) en appuyant sur le verrou de détente (B)
et en vous assurant que la détente revient à sa position
initiale lorsque vous la relâchez. Vous ne devriez pas être
en mesure d’actionner la détente sans avoir appuyé sur le
verrou de détente. Remplacez immédiatement le pistolet
de pulvérisation si ces essais échouent.
B
A
Entretien de l’embout de pulvérisation
Une pression de la pompe trop élevée peut entraîner un
effet de pulsation lorsque vous appuyez sur la détente
du pistolet de pulvérisation. La raison principale d’une
pression de pompe trop élevée est l’obstruction complète
ou partielle de la embout de pulvérisation par un corps
étranger, comme des saletés, etc. Une embout de
pulvérisation obstruée peut entraîner un cycle marche/arrêt
de la pompe ou l’incapacité de se mettre en marche même
en présence d’un certain débit.
1. Poussez l’interrupteur principal de marche/arrêt
vers la position d’arrêt (0). Débranchez le cordon
d’alimentation de la prise murale.
2. Débranchez l’alimentation en eau sur le nettoyeur à
haute pression électrique.
3. Dirigez TOUJOURS le pistolet de vaporisation dans
une direction sécuritaire, appuyez sur le bouton de
verrouillage de la gâchette et serrez la gâchette
du pistolet de vaporisation pour relâcher la haute
AVERTISSEMENT Le jet d’eau à haute pression
produit par cet appareil pourrait couper la peau
et ses tissus sous-jacents, entraînant de graves
lésions et pouvant conduire à une amputation.
Le pistolet de pulvérisation emprisonne une pression
d’eau élevée, même lorsque le moteur est arrêté et que
l’arrivée d’eau est débranchée, ce qui peut entraîner des
blessures graves.
• Gardez le boyau à haute pression raccordé à la pompe
et au pistolet de pulvérisation lorsque le système est
sous pression.
• Dirigez TOUJOURS le pistolet de pulvérisation dans une
direction sécuritaire, serrez la gâchette du pistolet de
pulvérisation pour relâcher la haute pression à chaque
fois que vous arrêtez le nettoyeur à haute pression.
pression d’eau restante.
4. Retirez la embout de pulvérisation de la lance de
pulvérisation.
5. Utilisez un trombone pour dégager tout élément
pouvant obstruer les embouts de pulvérisation.
12 BRIGGSandSTRATTON.COM
Page 47

Not for
Reproduction
6. En utilisant un boyau d’arrosage, enlevez tout débris
restant en inversant la circulation de l’eau dans la
lance de pulvérisation. Faites circuler l’eau en sens
inverse pendant 30 à 60 secondes.
7. Réinstallez la embout de pulvérisation sur la lance de
pulvérisation.
8. Raccordez la lance de pulvérisation au pistolet de
vaporisation.
9. Assurez-vous que le tuyau d’arrosage est raccordé à
l’entrée d’eau. Vérifiez que le boyau à haute pression
est raccordé au pistolet de pulvérisation. Ouvrez l’eau.
10. Branchez le cordon d’alimentation dans une prise
électrique et poussez l’interrupteur principal de
marche/arrêt sur le nettoyeur à haute pression vers la
position de marche (I).
11. Faites l’essai du nettoyeur à haute pression électrique
en utilisant chacune des embouts de pulvérisation.
Entretien de la pompe et du moteur
La pompe et le moteur de ce nettoyeur à haute pression
électrique ne nécessitent aucun entretien. Les deux
assemblages sont pré-lubrifiés et scellés, ne nécessitant
jamais de lubrification supplémentaire.
Après chaque utilisation
L’eau ne devrait pas demeurer dans l’appareil pendant
de longues périodes. Des sédiments ou des minéraux
pourraient s’accumuler sur les pièces de la pompe et
bloquer son mouvement. Suivez ces procédures après
chaque utilisation :
1. Rincez la bouteille de détergent (si utilisée) en la
retirant du embout de pulvérisation à mousse et en
vidant toute la solution restante.
2. Rincez la bouteille de détergent avec de l’eau propre
et réinstallez-la sur le embout de pulvérisation à
mousse.
3. Faites fonctionner la laveuse à pression électrique
avec le embout de pulvérisation à mousse. Rincer
pendant une ou deux minutes.
4. Poussez l’interrupteur principal de marche/arrêt vers
la position d’arrêt (0).
5. Fermez l’alimentation en eau, dirigez le pistolet vers
un endroit sécuritaire et appuyez sur le bouton rouge
et la gâchette pour libérer la pression, puis laissez
refroidir le moteur.
6. Débranchez le boyau du pistolet de pulvérisation et
de la sortie haute pression sur la pompe. Videz l’eau
du tuyau, du pistolet de pulvérisation et de la lance de
pulvérisation. Essuyez le boyau avec un chiffon.
7. Videz l’eau de la pompe en basculant l’appareil sur
son côté avant (sortie d’eau vers le bas) pendant deux
minutes. Basculez l’appareil vers l’arrière (sortie de
haute pression vers le bas) pendant deux minutes
additionnelles.
8. Enrouler le boyau à haute pression et le ranger sur le
crochet à l’arrière du plateau pour accessoires.
9. Embobiner le cordon d’alimentation sur les supports.
10. Ranger le pistolet et la lance de pulvérisation dans
les fentes sur le plateau pour accessoires. Ranger les
embouts de pulvérisation dans les trous sur le plateau
pour accessoires.
11. Entreposez l’appareil dans un endroit propre et sec.
12. Si l’entreposage dure plus de 30 jours, reportez-vous
à la rubrique Remisage hivernal ou à long terme.
Remisage hivernal ou à long terme
Suivez les étapes 1 à 10 dans Après chaque utilisation.
AVIS L’eau restante dans la pompe pourrait geler et
endommager la pompe de manière permanente. Les
dommages causés par le gel ne sont pas couverts par la
garantie.
Protection de la pompe
Pour protéger la pompe des dommages causés par les
dépôts de minéraux ou le gel, utilisez le PumpSaver
(modèle 6039) pour traiter la pompe. Vous préviendrez
ainsi les dommages causés par le gel et lubrifierez le
plongeur et les joints.
AVIS PumpSaver est un accessoire disponible en option.
Il n’est pas fourni avec le nettoyeur à haute pression
électrique. Contactez le centre de service autorisé situé le
plus près de chez vous pour vous procurer PumpSaver.
AVIS Vous devez protéger votre appareil contre le gel.
• Faute de le protéger, la pompe et pistolet de
pulvérisation s’endommagera de façon permanente et
l’appareil sera inopérant.
• Les dommages causés par le gel ne sont pas
couverts par la garantie.
Pour utiliser PumpSaver, assurez-vous que le nettoyeur à
haute pression électrique est mis en arrêt et que les tuyaux
d’entrée et de sortie sont déconnectés. Veuillez lire et
suivre les directives et les avertissements mentionnés sur
le récipient de PumpSaver.
Procédures finales d’entreposage
1. Enrouler le boyau à haute pression et le ranger sur le
crochet à l’arrière du plateau pour accessoires.
2. Embobiner le cordon d’alimentation sur les supports.
3. Ranger le pistolet et la lance de pulvérisation dans
les fentes sur le plateau pour accessoires. Ranger les
embouts de pulvérisation dans les trous sur le plateau
pour accessoires.
4. Entreposez le nettoyeur dans un endroit propre et sec,
protégé du gel.
5. Recouvrez l’appareil avec une couverture protectrice
appropriée qui ne retient pas l’humidité.
13
Page 48

Not for
Reproduction
Dépannage
Problème Cause Correction
La pompe présente les
problèmes suivants : échec
à produire de la pression,
pression irrégulière,
cliquetis, perte de pression,
faible volume d’eau.
L’appareil ne démarre pas
lorsqu’on presse sur la
détente
Le détergent ne se
mélange pas avec l’eau de
pulvérisation.
Les raccords du tuyau
présentent des fuites.
1. L’entrée d’eau est bloquée.
2. L’alimentation en eau est insuffisante.
3. Le boyau d’arrosage est plié ou fissuré.
4. La crépine d’admission d’eau est
obstruée.
5. La température de l’alimentation en eau
est supérieure à 100 °F (38 °C).
6. Le tuyau à haute pression est obstrué ou
fissuré.
7. La embout de pulvérisation est obstruée
1. L’alimentation en eau n’est pas activée.
2. L’appareil n’est pas en marche.
3. Le boyau d’arrosage est trop long.
4. Fusible grillé, disjoncteur déclenché.
1. La embout de pulvérisation pour haute
pression est installée.
1. Le tuyau d’arrosage n’est pas étanche à
la prise d’eau.
2. Les raccords de tuyau à haute pression
ne sont pas étanches.
3. Les joints toriques sont endommagés.
1. Nettoyez l’arrivée d’eau.
2. Fournissez un débit d’eau adéquat.
3. Redressez le boyau d’arrosage ou
remplacez-le s’il présente des fuites.
4. Vérifiez et nettoyez la crépine d’admission
d’eau.
5. Fournissez une eau plus froide.
6. Dégagez tout blocage dans le tuyau à haute
pression ou remplacez-le.
7. Nettoyez la embout de pulvérisation.
1. Ouvrez l’alimentation en eau.
2. Poussez l’interrupteur principal de marche/
arrêt vers la position d’arrêt (I). Réinitialisez
le disjoncteur de fuite de terre.
3. Utilisez un boyau d’arrosage de 15,24 m
(50 pi) tout au plus.
a.) Vérifiez la boîte de fusibles à la
recherche d’un fusible grillé et remplacez-le
au besoin, ou réenclenchez le disjoncteur.
N'utilisez PAS un fusible ou un disjoncteur
avec une puissance nominale plus élevée
que ce qui est spécifié pour votre circuit de
dérivation en particulier.
b.) Débranchez les autres appareils
électriques et fermez les lumières dans le
circuit ou faites fonctionner le nettoyeur à
haute pression sur son propre circuit dédié.
c.) Faites fonctionner le nettoyeur à
pression avec une embout de pulvérisation
quelconque pendant 5 minutes. Il pourrait
s’avérer nécessaire d’ouvrir le moteur.
1. Installez le embout de pulvérisation à
mousse.
1. Connectez à la main le tuyau d’arrosage à
la prise d’eau.
2. Retirez le tuyau complètement et
rebranchez-le en le serrant bien à la main.
3. Remplacez le joint torique.
Pour tous les autres problèmes, contactez un concessionnaire Briggs & Stratton autorisé.
14 BRIGGSandSTRATTON.COM
Page 49

Not for
Reproduction
POLITIQUE DE GARANTIE DES BRIGGS & STRATTON
GARANTIE LIMITÉE
Briggs & Stratton garantit que, pendant la période de couverture de la garantie précisée ci-dessous, elle réparera ou remplacera, sans frais, toute pièce défectueuse
comportant un vice de matériau ou un défaut de fabrication ou les deux. En vertu de la présente garantie, les frais de transport du produit soumis pour réparation
ou remplacement sont à la charge de l’acheteur. La présente garantie sera en vigueur et soumise aux périodes et conditions stipulées ci-dessous. Pour obtenir
des services en vertu de la garantie, téléphoner au Service à la clientèle de Briggs & Stratton au (800) 743-4115 ou communiquer avec eux par Internet à l’adresse
BRIGGSandSTRATTON.COM.
Il n’existe aucune autre garantie expresse. Les garanties implicites, incluant les garanties de qualité marchande et d’adaptation à un usage particulier,
sont limitées à une période d’un an à partir de la date d’achat ou jusqu’à la limite permise par la loi. La responsabilité pour dommages accessoires ou
indirects est exclue dans la mesure où une telle exclusion est permise par la loi. Certains états/provinces ou pays n’autorisent aucune restriction sur la durée
d’une garantie implicite, et certains états/provinces ou pays n’autorisent pas l’exclusion ou la limitation des dommages consécutifs ou indirects. Par conséquent, les
restrictions et exclusions décrites ci-dessus pourraient ne pas s’appliquer dans votre cas. La présente garantie vous offre des droits juridiques spécifiques et il se peut
que vous ayez d’autres droits qui varient d’un état ou d’une province à l’autre, ou de pays à pays.**
PÉRIODE DE GARANTIE
Usage par un consommateur Usage à des fins commerciales
12 mois Aucune
** En Australie – Nos produits sont accompagnés de garanties qui ne peuvent être exclues en vertu de l’Australian Consumer Law. Vous avez droit à un remplacement
ou à un remboursement en cas de défaillance majeure et en compensation à toute perte ou tout dommage raisonnablement prévisible. Vous avez également droit à la
réparation ou au remplacement des produits si ceux-ci ne sont pas de qualité acceptable et que la défaillance n’équivaut pas à une défaillance majeure. Pour obtenir le
service sous garantie, recherchez le concessionnaire autorisé le plus proche sur notre carte des détaillants sur le site BRIGGSandSTRATTON.COM, ou appelez le
1300 274 447, ou encore envoyez un courriel à salesenquires@briggsandstratton.com.au, Briggs & Stratton Australia Pty Ltd, 1 Moorebank Avenue, NSW, Australie,
2170.
La période de garantie débute à la date d’achat par le premier acheteur au détail ou par le premier utilisateur commercial final. « Usage par un consommateur » signifie
une utilisation domestique personnelle dans une résidence, par l’acheteur au détail. « Usage à des fins commerciales » signifie toute autre utilisation, y compris à des
fins commerciales, générant des revenus, ou de location. Une fois que le produit a été utilisé dans un but commercial, il sera considéré comme d’utilisation commerciale
dans le cadre de cette garantie.
Veuillez garder le reçu de votre achat. Si vous ne pouvez pas fournir la preuve de l’achat au moment de faire une demande se rapportant à la garantie, la date de
fabrication du produit sera utilisée pour déterminer la période de garantie. L’enregistrement du produit n’est pas obligatoire pour obtenir un service de garantie pour les
produits Briggs & Stratton.
À PROPOS DE VOTRE GARANTIE
Le service de garantie n’est offert que par l’intermédiaire des Service à la clientèle de Briggs & Stratton. Cette garantie couvre uniquement les défauts de matériel et de
fabrication. Elle ne couvre pas des dommages causés par une mauvaise utilisation ou des abus, un mauvais entretien ou une réparation incorrecte, une usure normale
ou l’utilisation de carburant vicié ou non approuvé.
Mauvaise utilisation et abus – Une bonne utilisation, tel que prévu, du produit est décrite dans le manuel de l’opérateur. L’utilisation de la machine de façon autre
que celle décrite dans le manuel d’utilisation ou son utilisation après qu’elle a été endommagée annulera la garantie. Vous ne pourrez vous prévaloir de la garantie si
le numéro de série sur la machine a été supprimé ou si la machine a été modifiée d’une manière quelconque, ou si elle présente des preuves d’abus, tel que coups,
corrosion par l’eau ou des produits chimiques.
Mauvais entretien ou réparation – Cette machine doit être entretenue conformément aux procédures et aux intervalles indiqués dans le manuel de l’opérateur;
l’entretien et les réparations doivent être effectués avec des pièces d’origine Briggs & Stratton ou équivalentes. Les dommages causés par le manque d’entretien ou
l’utilisation de pièces n’étant pas d’origine ne sont pas couverts par la garantie.
Usure normale – Comme la plupart des équipements mécaniques, malgré un bon entretien, le vôtre est sujet à une usure. La présente garantie ne couvre pas les
réparations lorsque la durée de vie de la machine s’est achevée après une utilisation normale. Les articles d’entretien et d’usure, tels que filtres, courroies, lames et
plaquettes de frein (les plaquettes de frein moteur sont couvertes) ne sont pas couverts par la garantie, uniquement en raison de leur caractéristique d’usure, à moins
que la cause soit due à des vices du matériel ou de fabrication.
Carburant éventé ou non approuvé – Afin de fonctionner correctement, cette machine doit être alimentée avec un carburant propre conforme au critère précisé dans
le manuel de l’opérateur. Les dommages au moteur ou à l’équipement dus à un carburant éventé ou à l’utilisation de carburants non approuvés (comme les mélanges
d’éthanol E15 ou E85) ne sont pas couverts par la garantie.
Autres exclusions – Cette garantie exclut tout dommage dû à un accident, un abus, des modifications, des transformations, un entretien inapproprié, la détérioration
par le gel ou les produits chimiques. Les accessoires non emballés à l’origine avec le produit sont aussi exclus. La garantie ne couvre pas l’équipement utilisé comme
alimentation principale à la place de l’alimentation électrique de secteur ou pour les applications de maintien des fonctions vitales. Cette garantie ne concerne pas les
appareils ou les moteurs usagés, réusinés, de seconde main ou de démonstration. Cette garantie exclut toute défaillance due à une catastrophe naturelle ou à toute
autre force majeure hors du contrôle du fabricant.
80018419_FRCA Rév. A
15
Page 50

Not for
Reproduction
16 BRIGGSandSTRATTON.COM
Page 51

Not for
Reproduction
17
Page 52

Not for
Reproduction
Nettoyeur à haute pression électrique
Fiche technique
Pression maximum ..................152 bar (2 200 psi)* à 3,8 l/min (1,0 gpm)
Débit maximal ........................4,5 l/min (1,2 gpm)* à 62 bar (900 psi)
Mélange de détergent ................. Consultez les instructions du fabricant
Température de l’alimentation en eau ...............5°C (41°F) - 38°C (100°F)
Moteur ..................................................Type induction
Tension nominale ...........................................120 volts CA
Courant ..................................................14,5 ampères
Ce nettoyeur à haute pression est évalué conformément à la norme PW101-2010 (essai et évaluation de la performance des
*
nettoyeurs à haute pression) de l’Association des fabricants de nettoyeurs à haute pression (PWMA).
Briggs & Stratton Corporation
18 BRIGGSandSTRATTON.COM
Milwaukee, Wisconsin, 53201-0702 É.-U.
P.O. Box 702
(800) 743-4115
 Loading...