

Page 1
2
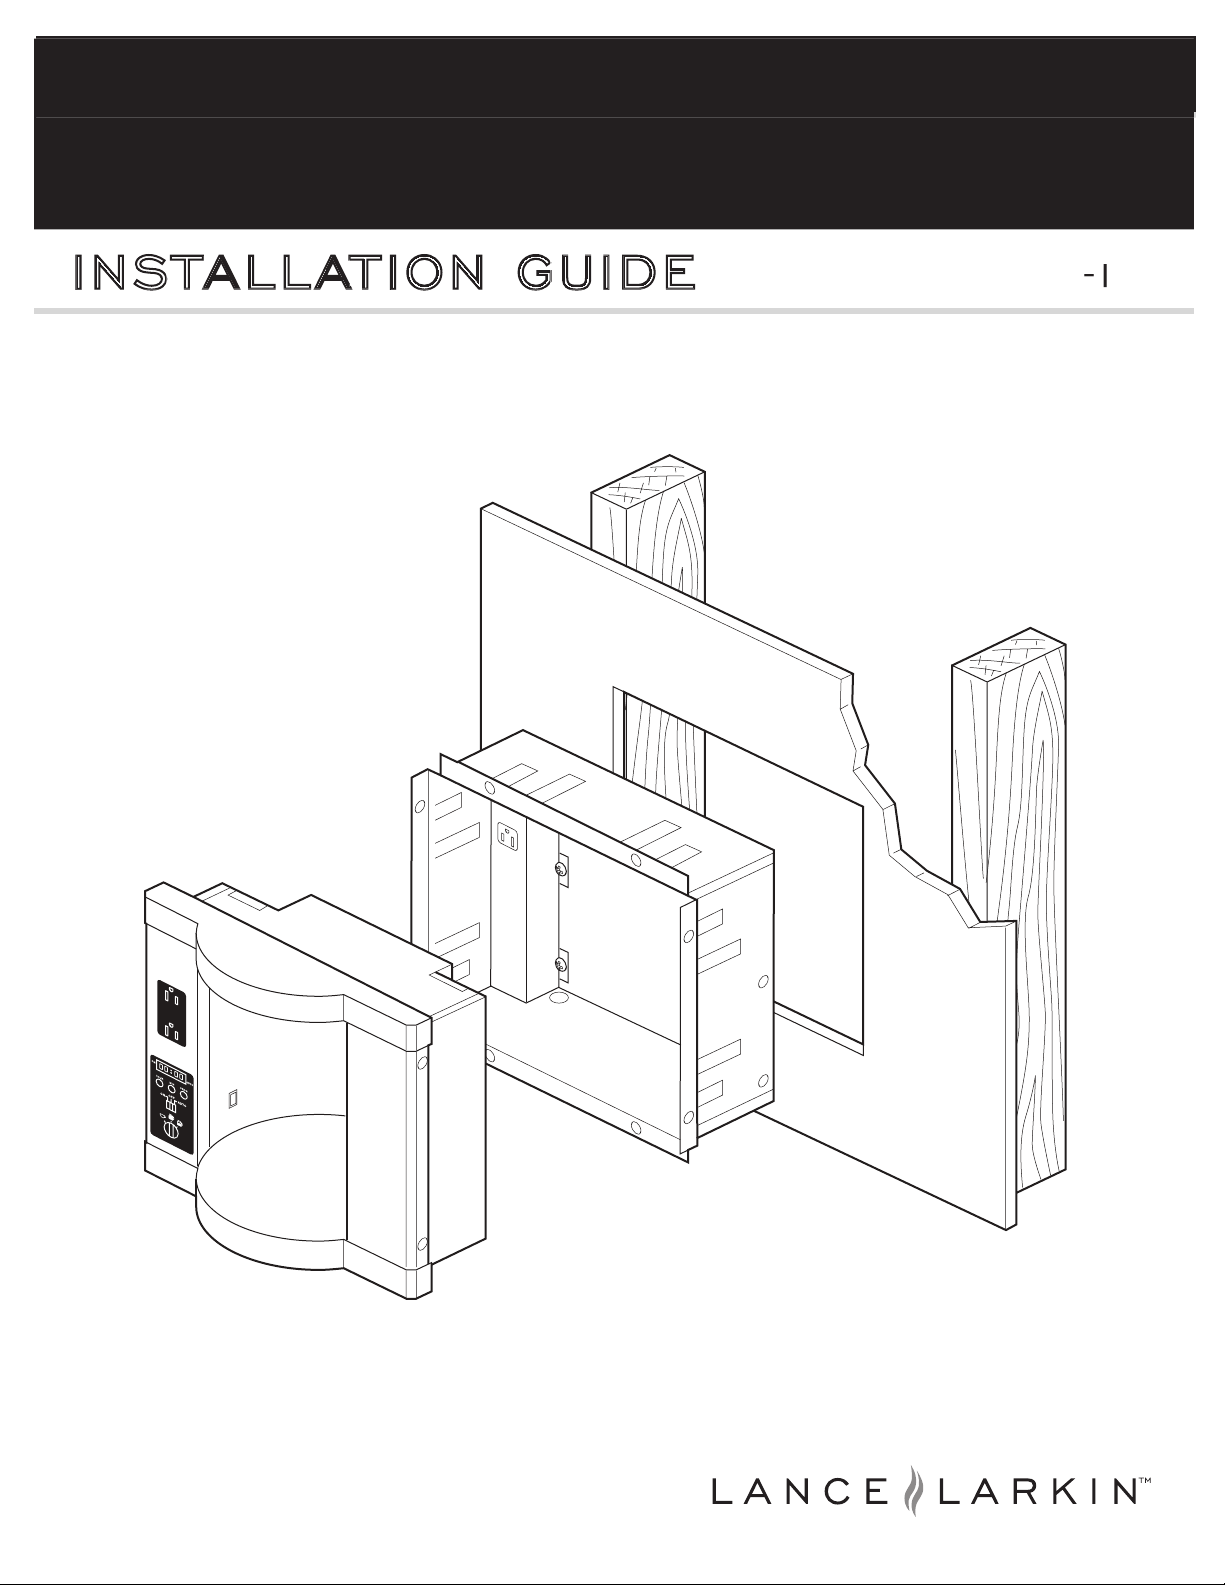
BREW EXPRESS
m
odel no.
by
™
Page 2
CONT EN TS
1. Getting Started
3. Hardware/Tools
3
4. Specifi cation and Requirements
5. Location (area of Installation)
5
8. Brewer Installation
8
3
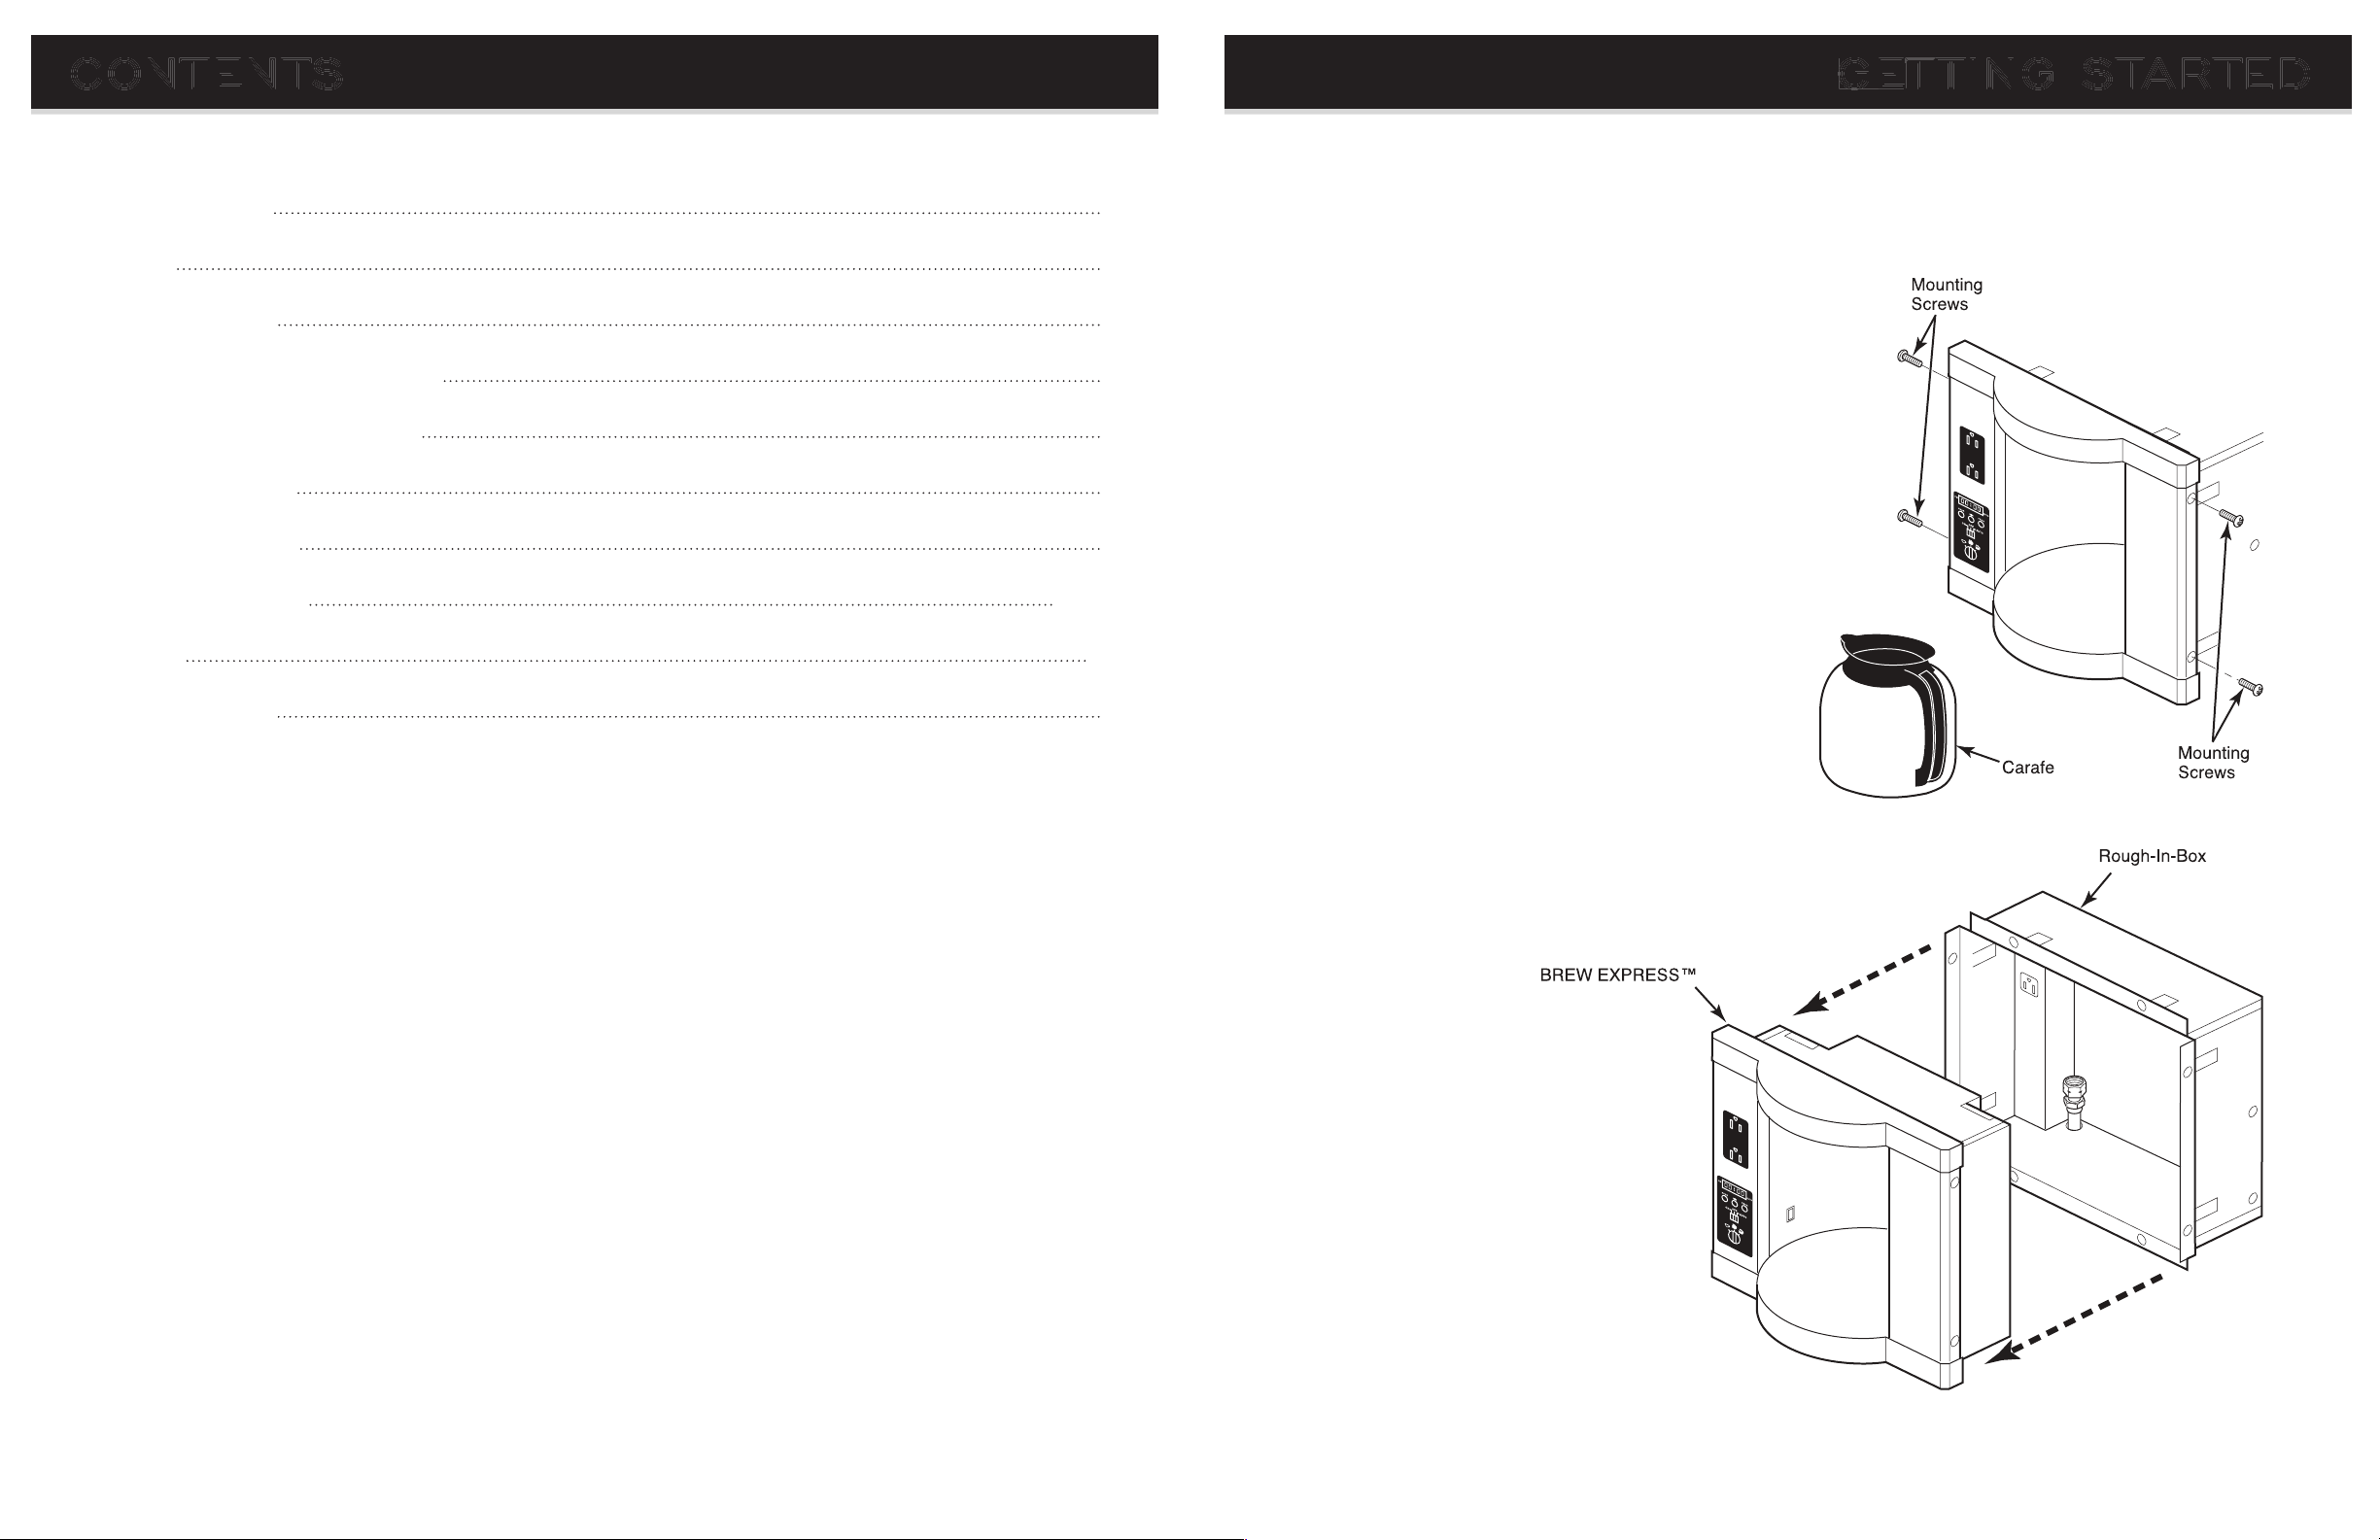
Carefully unpack BREW EXPRESS™ from gift box.
Remove carafe from brewing unit and set aside.
3.
Using a Philips screwdriver remove the four mounting
screws and gently separate the brewer from rough-in-box.
Please note that mounting screws may not be present
for removal.
4.
In the event it may be necessary to return BREW EXPRESS™
2
2
GET TING STARTED
Page 3
to a GFCI ground protected source.
This can be accomplished by:
Always turn off all power at main electrical panel before attempting to install BREW EXPRESS™.
Always turn off water supply at source when installing BREW EXPRESS™. Improper installation of water supply
could cause poor performance or leaks which may lead to dry rot and cause structure damage to building.
The BREW EXPRESS™ dispenses extremely hot water. Hot liquids may cause severe burns if it contacts skin.
for brewing hot water for beverages only, and may not be used in any other way.
Check distance between wall cavity studs to ensure BREW EXPRESS™ will fi t in desired location.
3
SAFETY HARD W ARE/TOOLS
(6) Sheet rock screws for mounting rough-in-box.
(3) Wire nuts
(1) Male Quick Connector (for connection between Coffee System Unit and Rough-in-Box).
(4) Mounting screws for mounting brewer in rough-in-box.
TOOLS AND PARTS REQUIRED
The following tools will be useful for installation:
Page 4
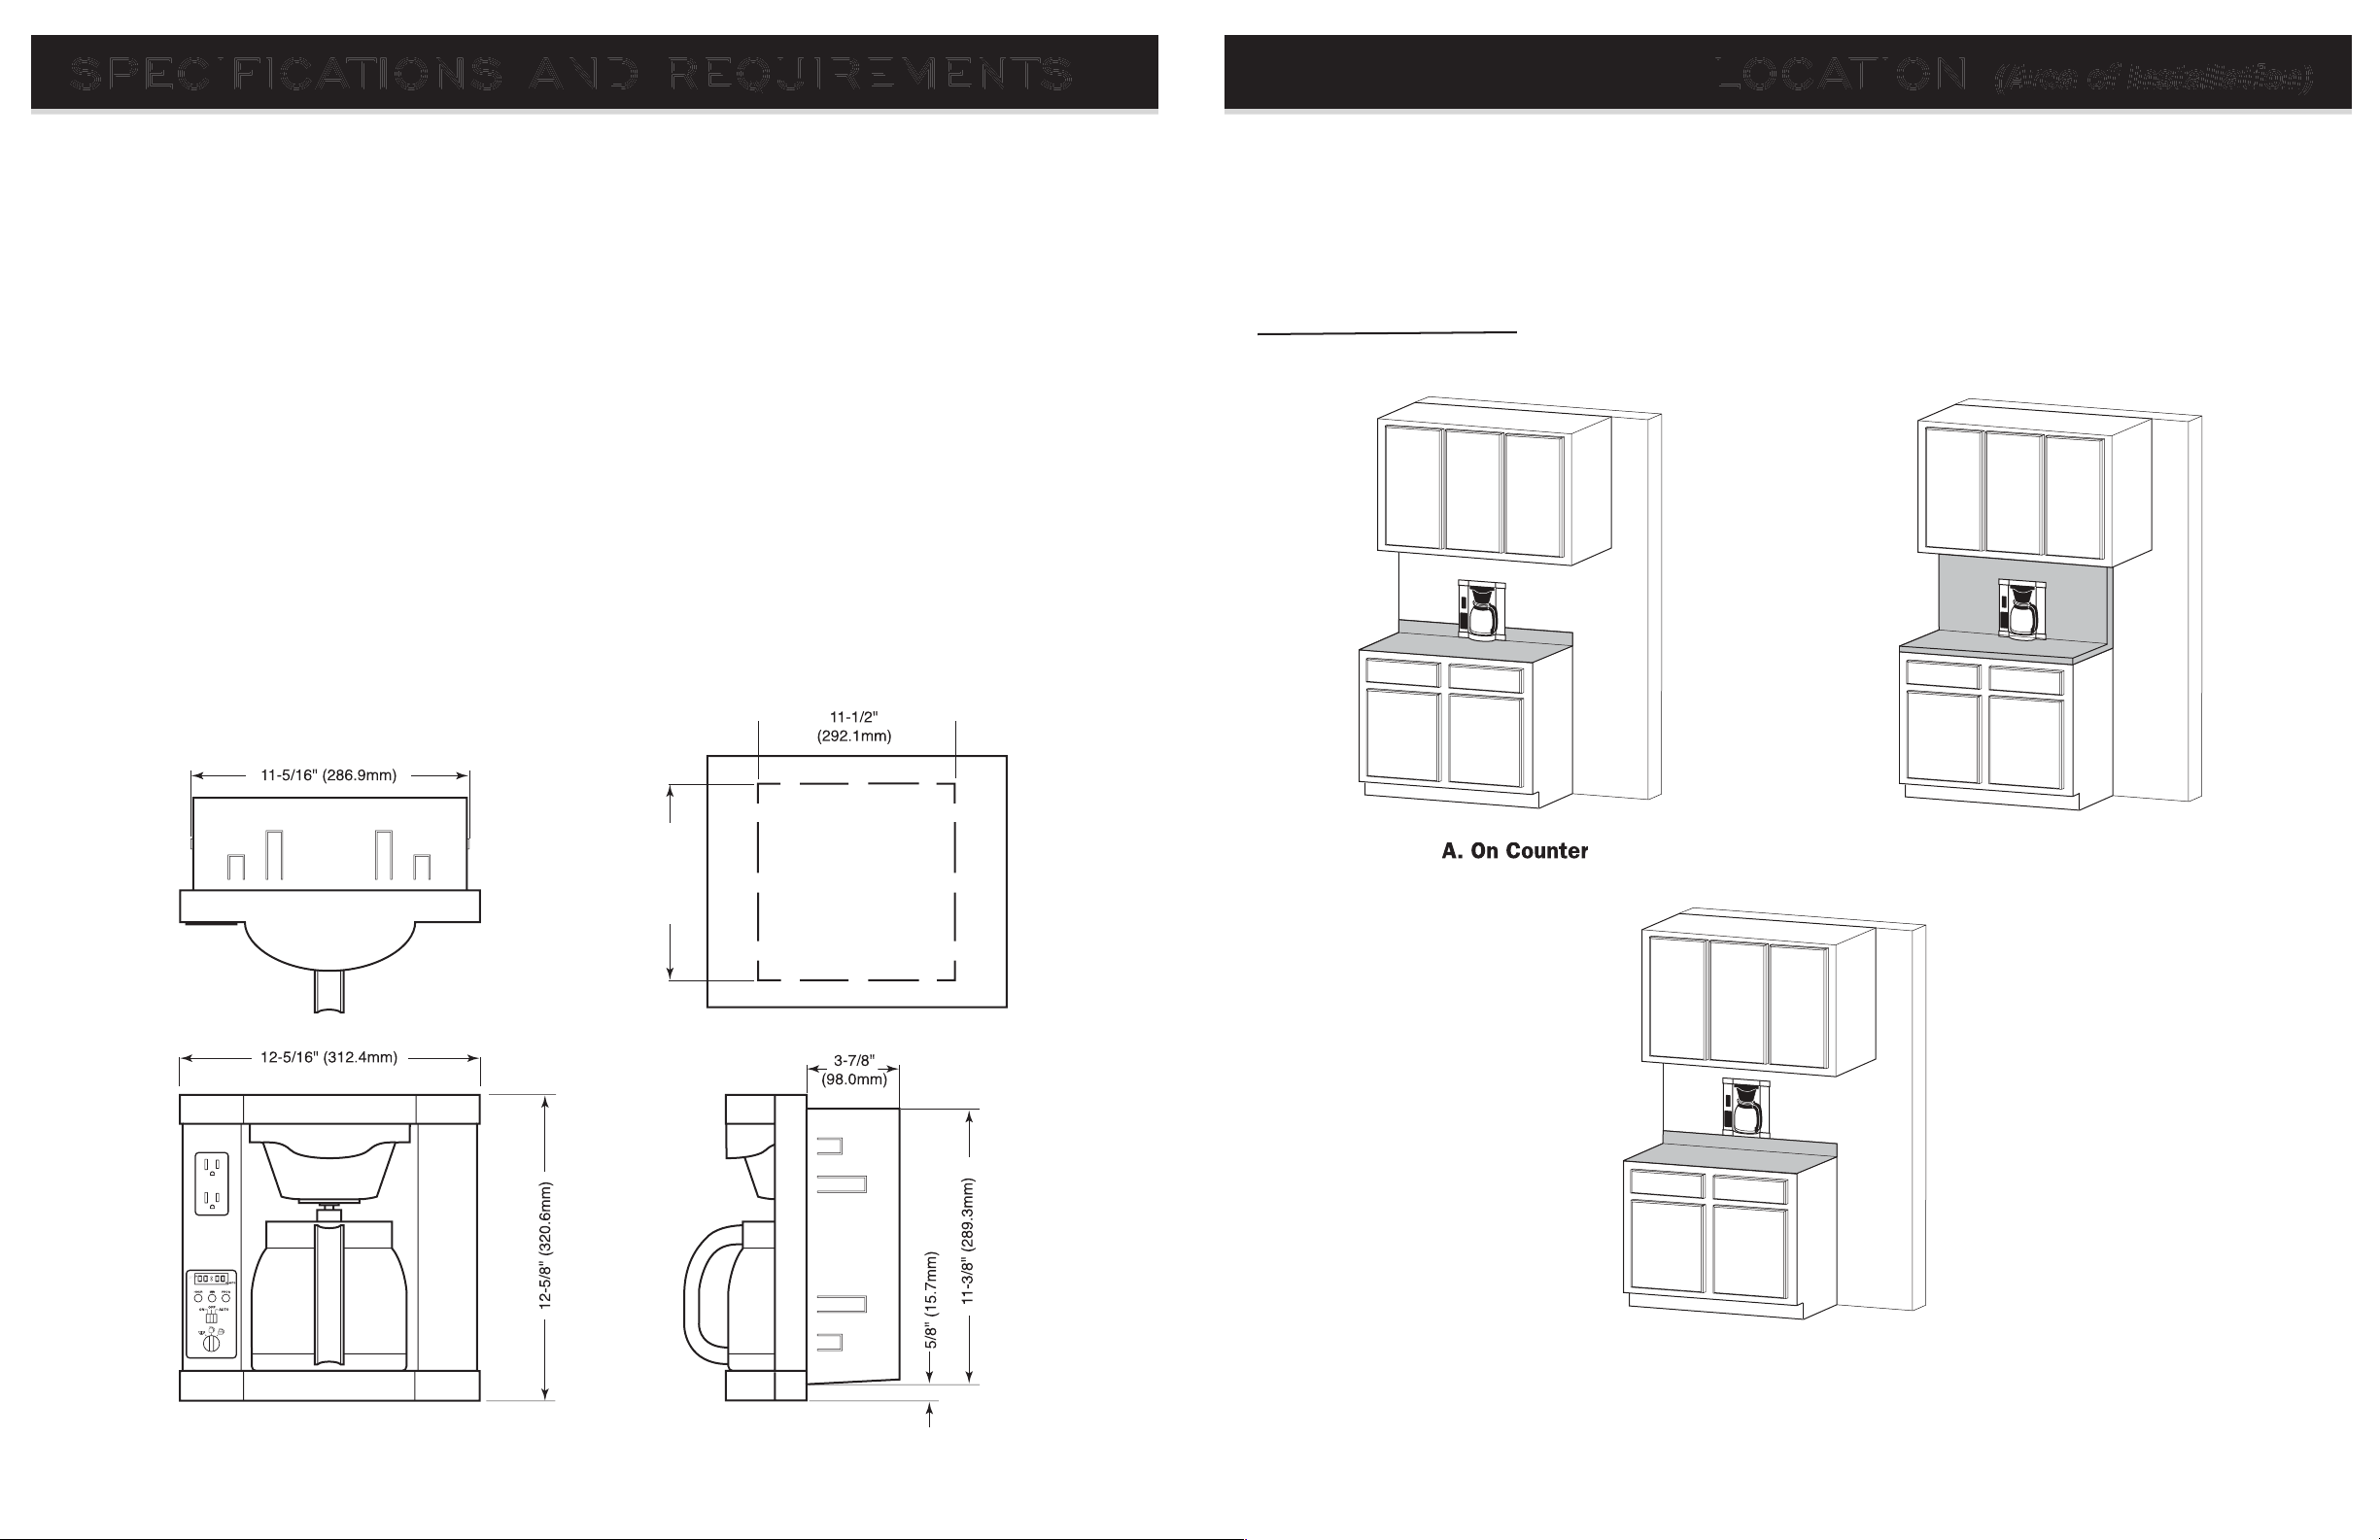
(Finished Unit with Rough-in-Box) approximately 12.5” x 12.5” (see below).
(Mounting Structure) approximately 11.5” x 11.5” x 4”.
3. Electrical Requirements
120VAC, 60HZ. (1400 watts).
4. Water Requirements
1/4” water supply line (copper or poly) minimum 30 psi to a maximum of
90 psi. Potable COLD water is required.
NOTE: If water is not available, an alternate water dispenser jug (5 gallons) can be used with the
optional pump accessory (not supplied). Contact dealer or Lance Larkin™.
The fi lter such as an ice maker type fi lter, can easily be installed at the source.
If water lines are not purged or clear of debris or a fi lter is NOT installed, foreign
particles (debris) in water may clog brewer system causing failure, and may
void all warranties.
5
SPECIFICATIONS AND R E QUIREMENTS LOCATION (Area of Installation)
AREA ON WALL
TO BE CUT
(USE TEMPLATE)
11-1/2"
(292.1mm)
The BREW EXPRESS™ can be installed in most places where power and water are supplied. If only power is available,
you may consider using water jug alternative. The most common locations are the kitchen and master bathroom.
Page 5
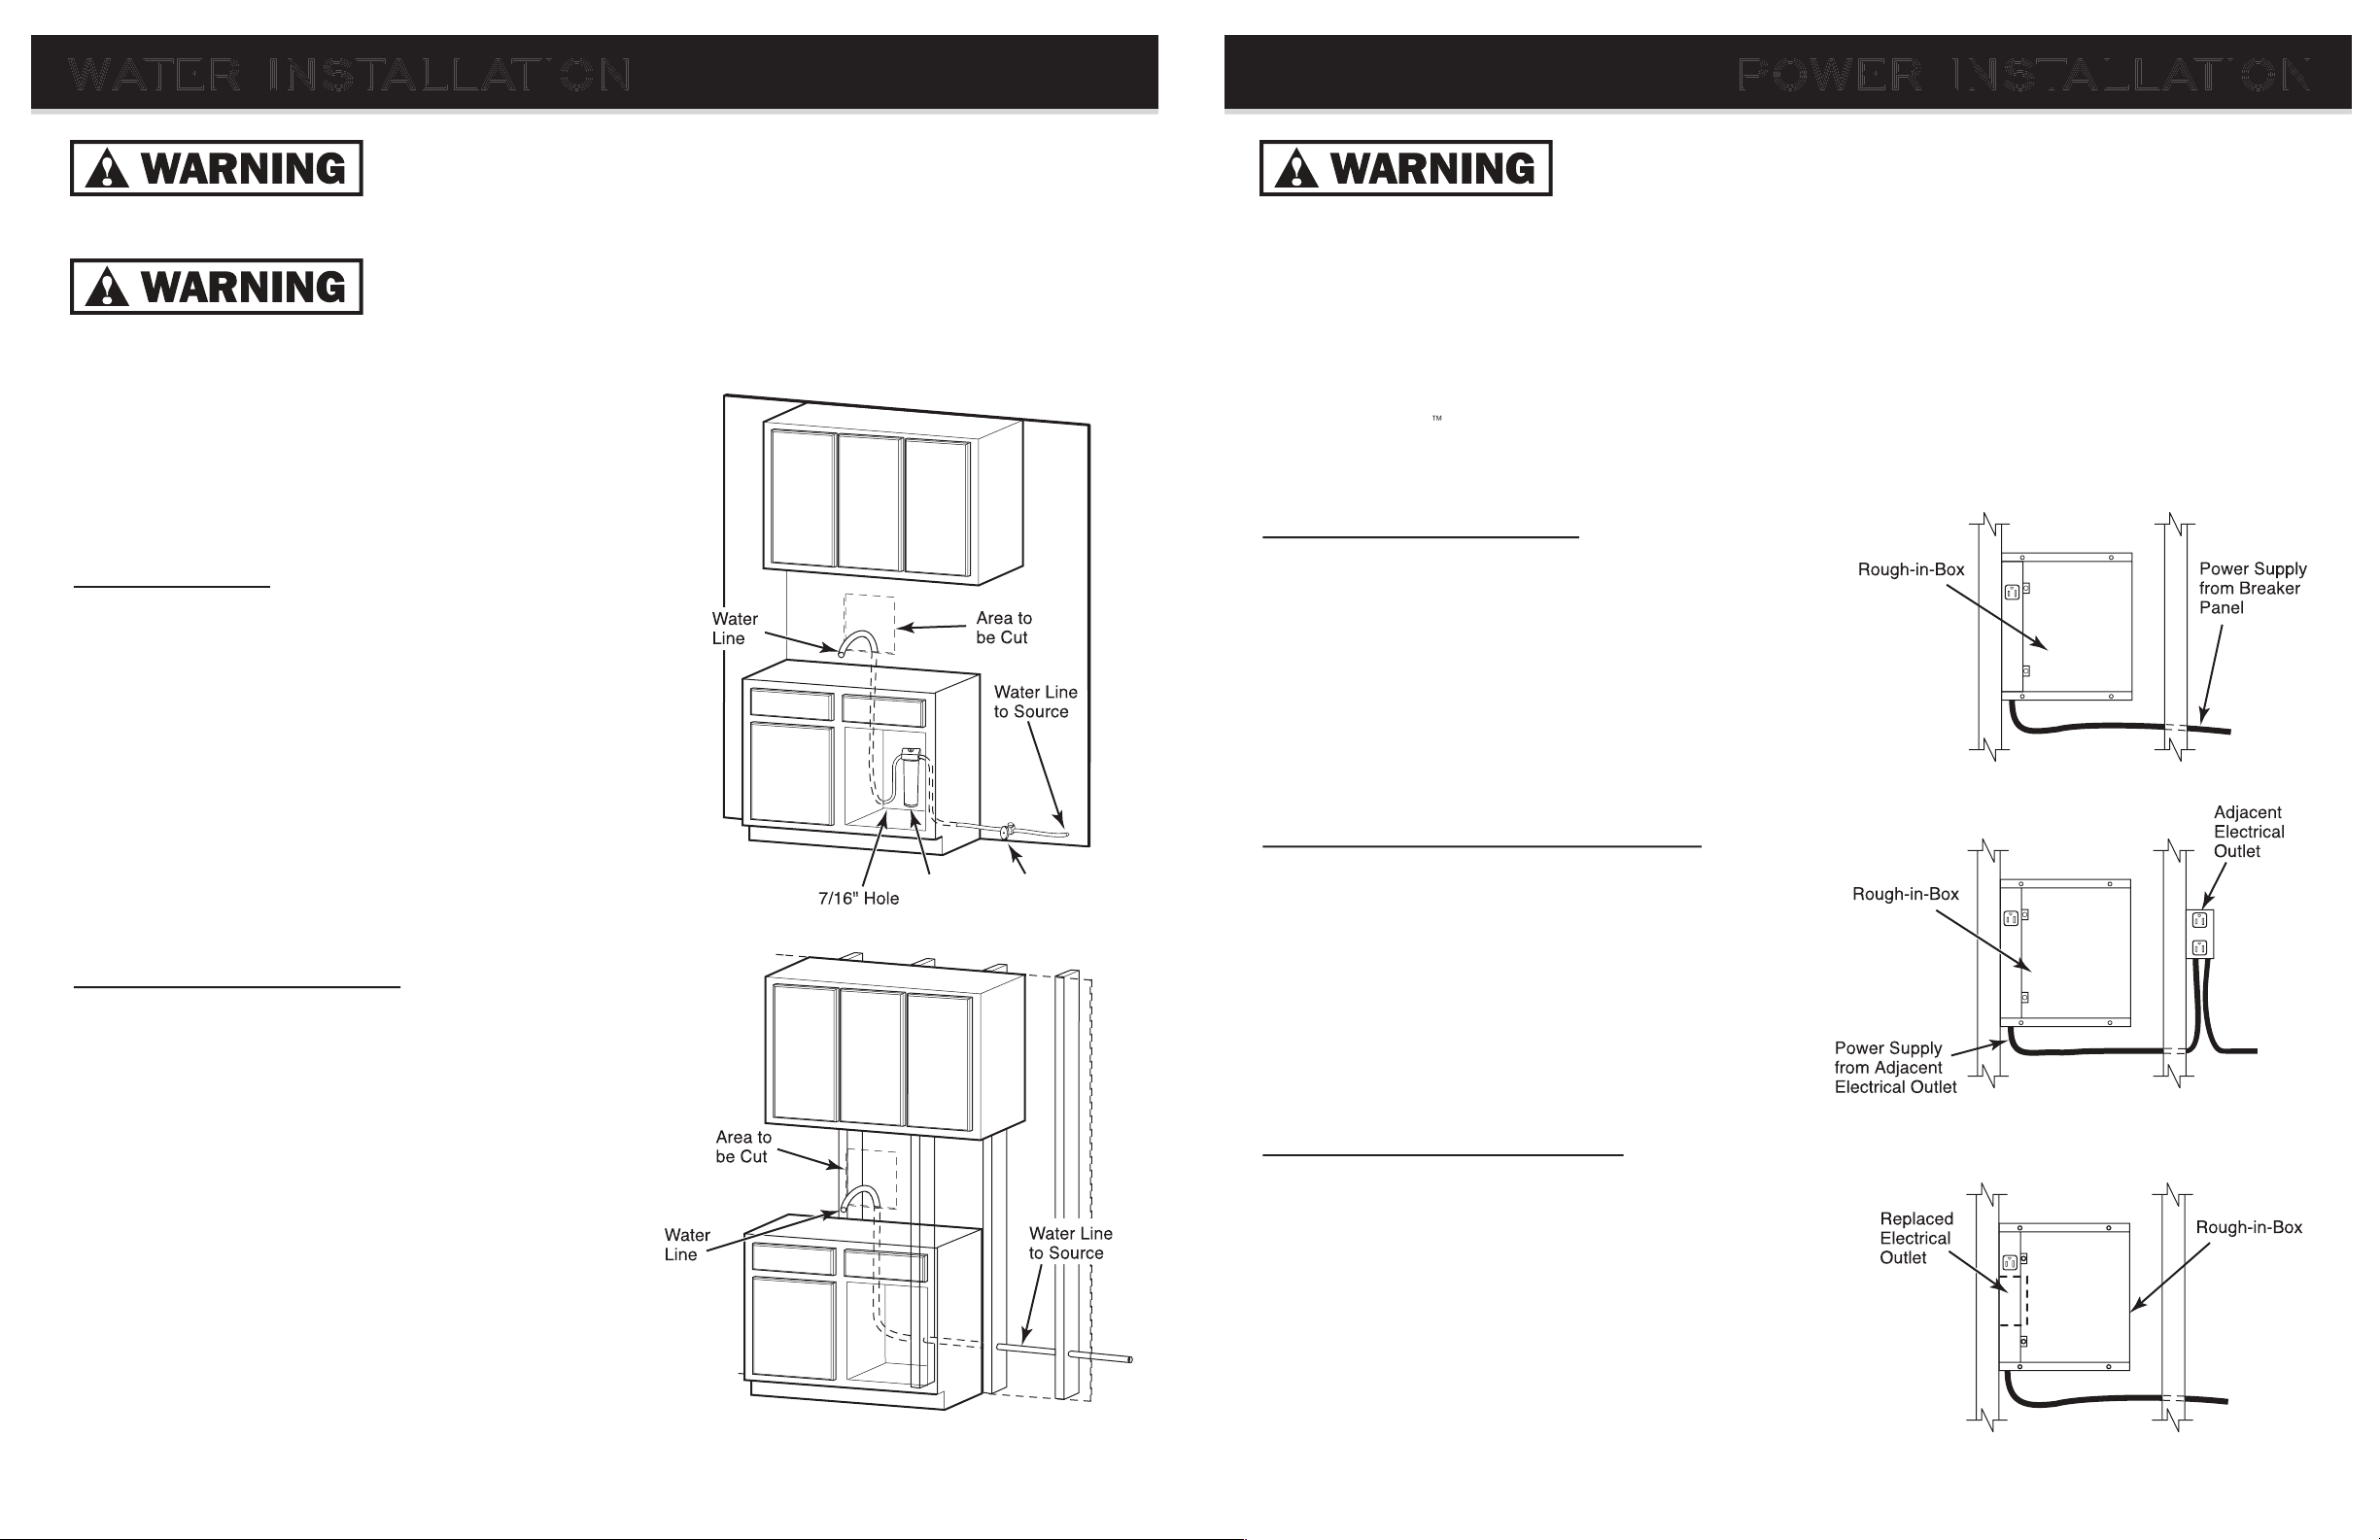
Always turn off water supply at source. It is strongly advised you consult a qualifi ed professional plumber when
attempting to install BREW EXPRESS™ in-the-wall COFFEE SYSTEM.
electrical wires. If in doubt Contact a qualifi ed professional. DO NOT ATTEMPT INSTALLATION.
A. EXISTING HOME
is to be installed where water can be plumbed by teeing off
water line from sink, refrigerator, ice maker or by simply using
the alternate water jug (not supplied). Drill a hole (7/16” dia)
at the lowest point in the cabinets and route water line through
hole behind cabinets and up wall cavity to the cut opening in
wall. Leave approximately 18” of excess water line at wall
opening for rough-in-box installation. Continue water line to
source. Splicing/coupling is not recommended. A continuous
line will be best to ensure no leaks.
is to be installed where water line can be plumbed by teeing off
water line from source sink, refrigerator or ice maker. Route
water line through studs and up wall cavity to area where wall
opening will be cut prior to sheet rock installation. Allow an
additional length of 18” at area where wall opening will be cut.
Using template provided mark the area to be cut AFTER sheet
rock is installed.
consult with cabinet maker and building contractor for exact
counter tops (tile laminate, granite, etc). For best results
cut hole and install unit AFTER cabinets are installed.
Always turn off power supply at main electrical panel before attempting any electrical installation. Local electrical
codes vary. All electrical installation must be done in accordance with local codes. Installation must be peformed
Wire the BREW EXPRESS to a GFCI protected circuit. Installation must be peformed by a Qualifi ed Electrican only,
or equivalent.
The BREW EXPRESS
can be installed in most places where power and water are supplied.
Wire unit to a GFI/GFCI circuit breaker.
WATER INSTALLATION POWER INSTALLATION
Shut off valve
Wa
ter
Filter
Page 6
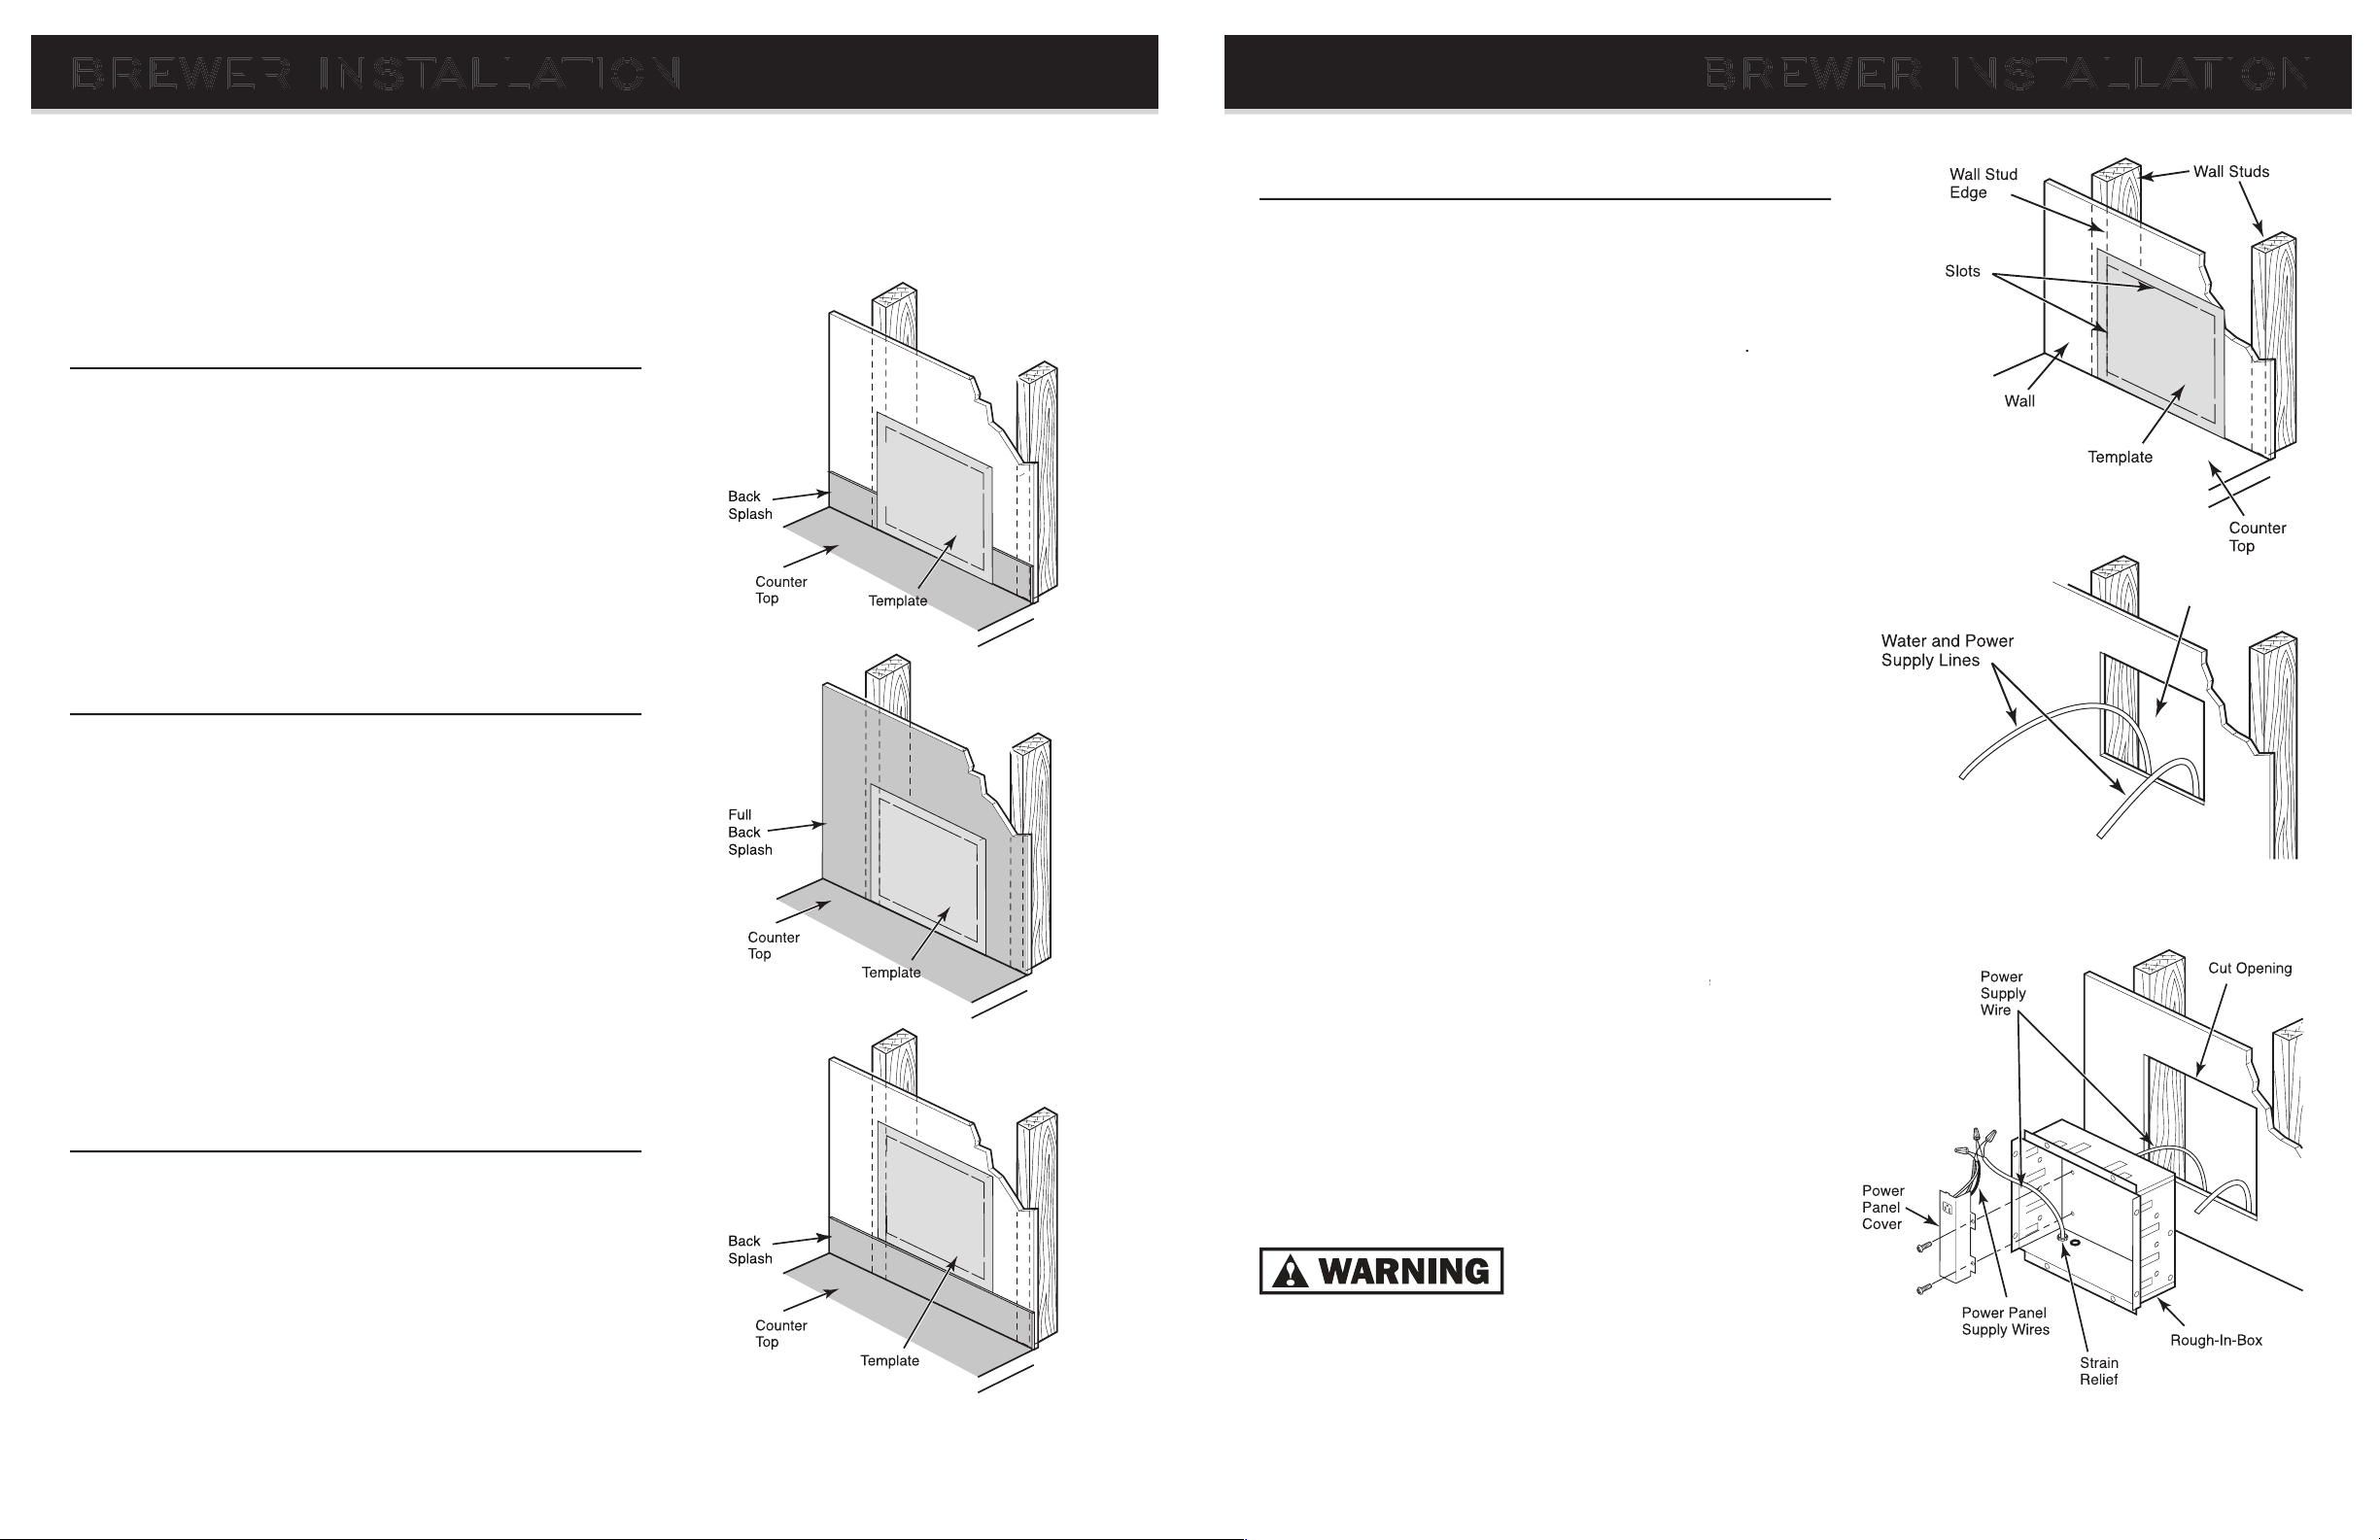
Locate
wall studs
within the desired location of
wall
Using the
template
provided, Place
template
on
wall
as
shown.
Slots
template
should be fl ush with left or right
side of
wall stud
edge. The
slots
in the
template
designate
the area to be cut. The bottom of
template
refl ects the
bottom of the unit.
See fi gure 1.
Use a utility knife to carefully cut inside the penciled
outline area. Start with the stud side and work outward.
DO NOT USE A SAW. Remove sheet rock piece exposing
wall cavity
water
and
lines from source
to this location.
See
8
BREWER INSTALLATION BREWER INSTALLATION
A. Installing BREW EXPRESS™ on Counter
It is best to install the unit so the bottom edge is just off the
counter top. In an existing home, this may require part of the
back splash to be removed. Use
template
determine the location to be cut out for rough-in-box.
Use
template
provided to determine the location to be cut
out for rough-in-box. Ensure fi t is correct by fi rst placing
rough-in-box in cut out hole. Remove rough-in-box. Finish
IMPORTANT:
DO NOT COMPLETE INSTALLATION OF
ROUGH-IN-BOX BEFORE BACK SPLASH.
If you prefer a continuous back splash, the unit can be installed
above the back splash. Use
template
provided to fi nd best fi t.
IMPORTANT:
WHEN INSTALLING THE UNIT ABOVE BACK
SPLASH, BE CERTAIN THERE IS SUFFICIENT ROOM BELOW
THE CABINETS.
3.
Place
from source
to cut opening as previously shown in
opening for installation of box.
cover.
Install
strain relief
(not
through
strain relief
(See
Supply Detail, page 10
to
supply wires
and secure with
wire
(See
Wiring Detail, page 10
green
wire to
green
wire,
to
and
white
to
white
See Figure 3.
All electrical wires and connections MUST be tucked
without any exposed wiring inside rough-in box. It is
advised you contact a qualifi ed electrician.
Page 7
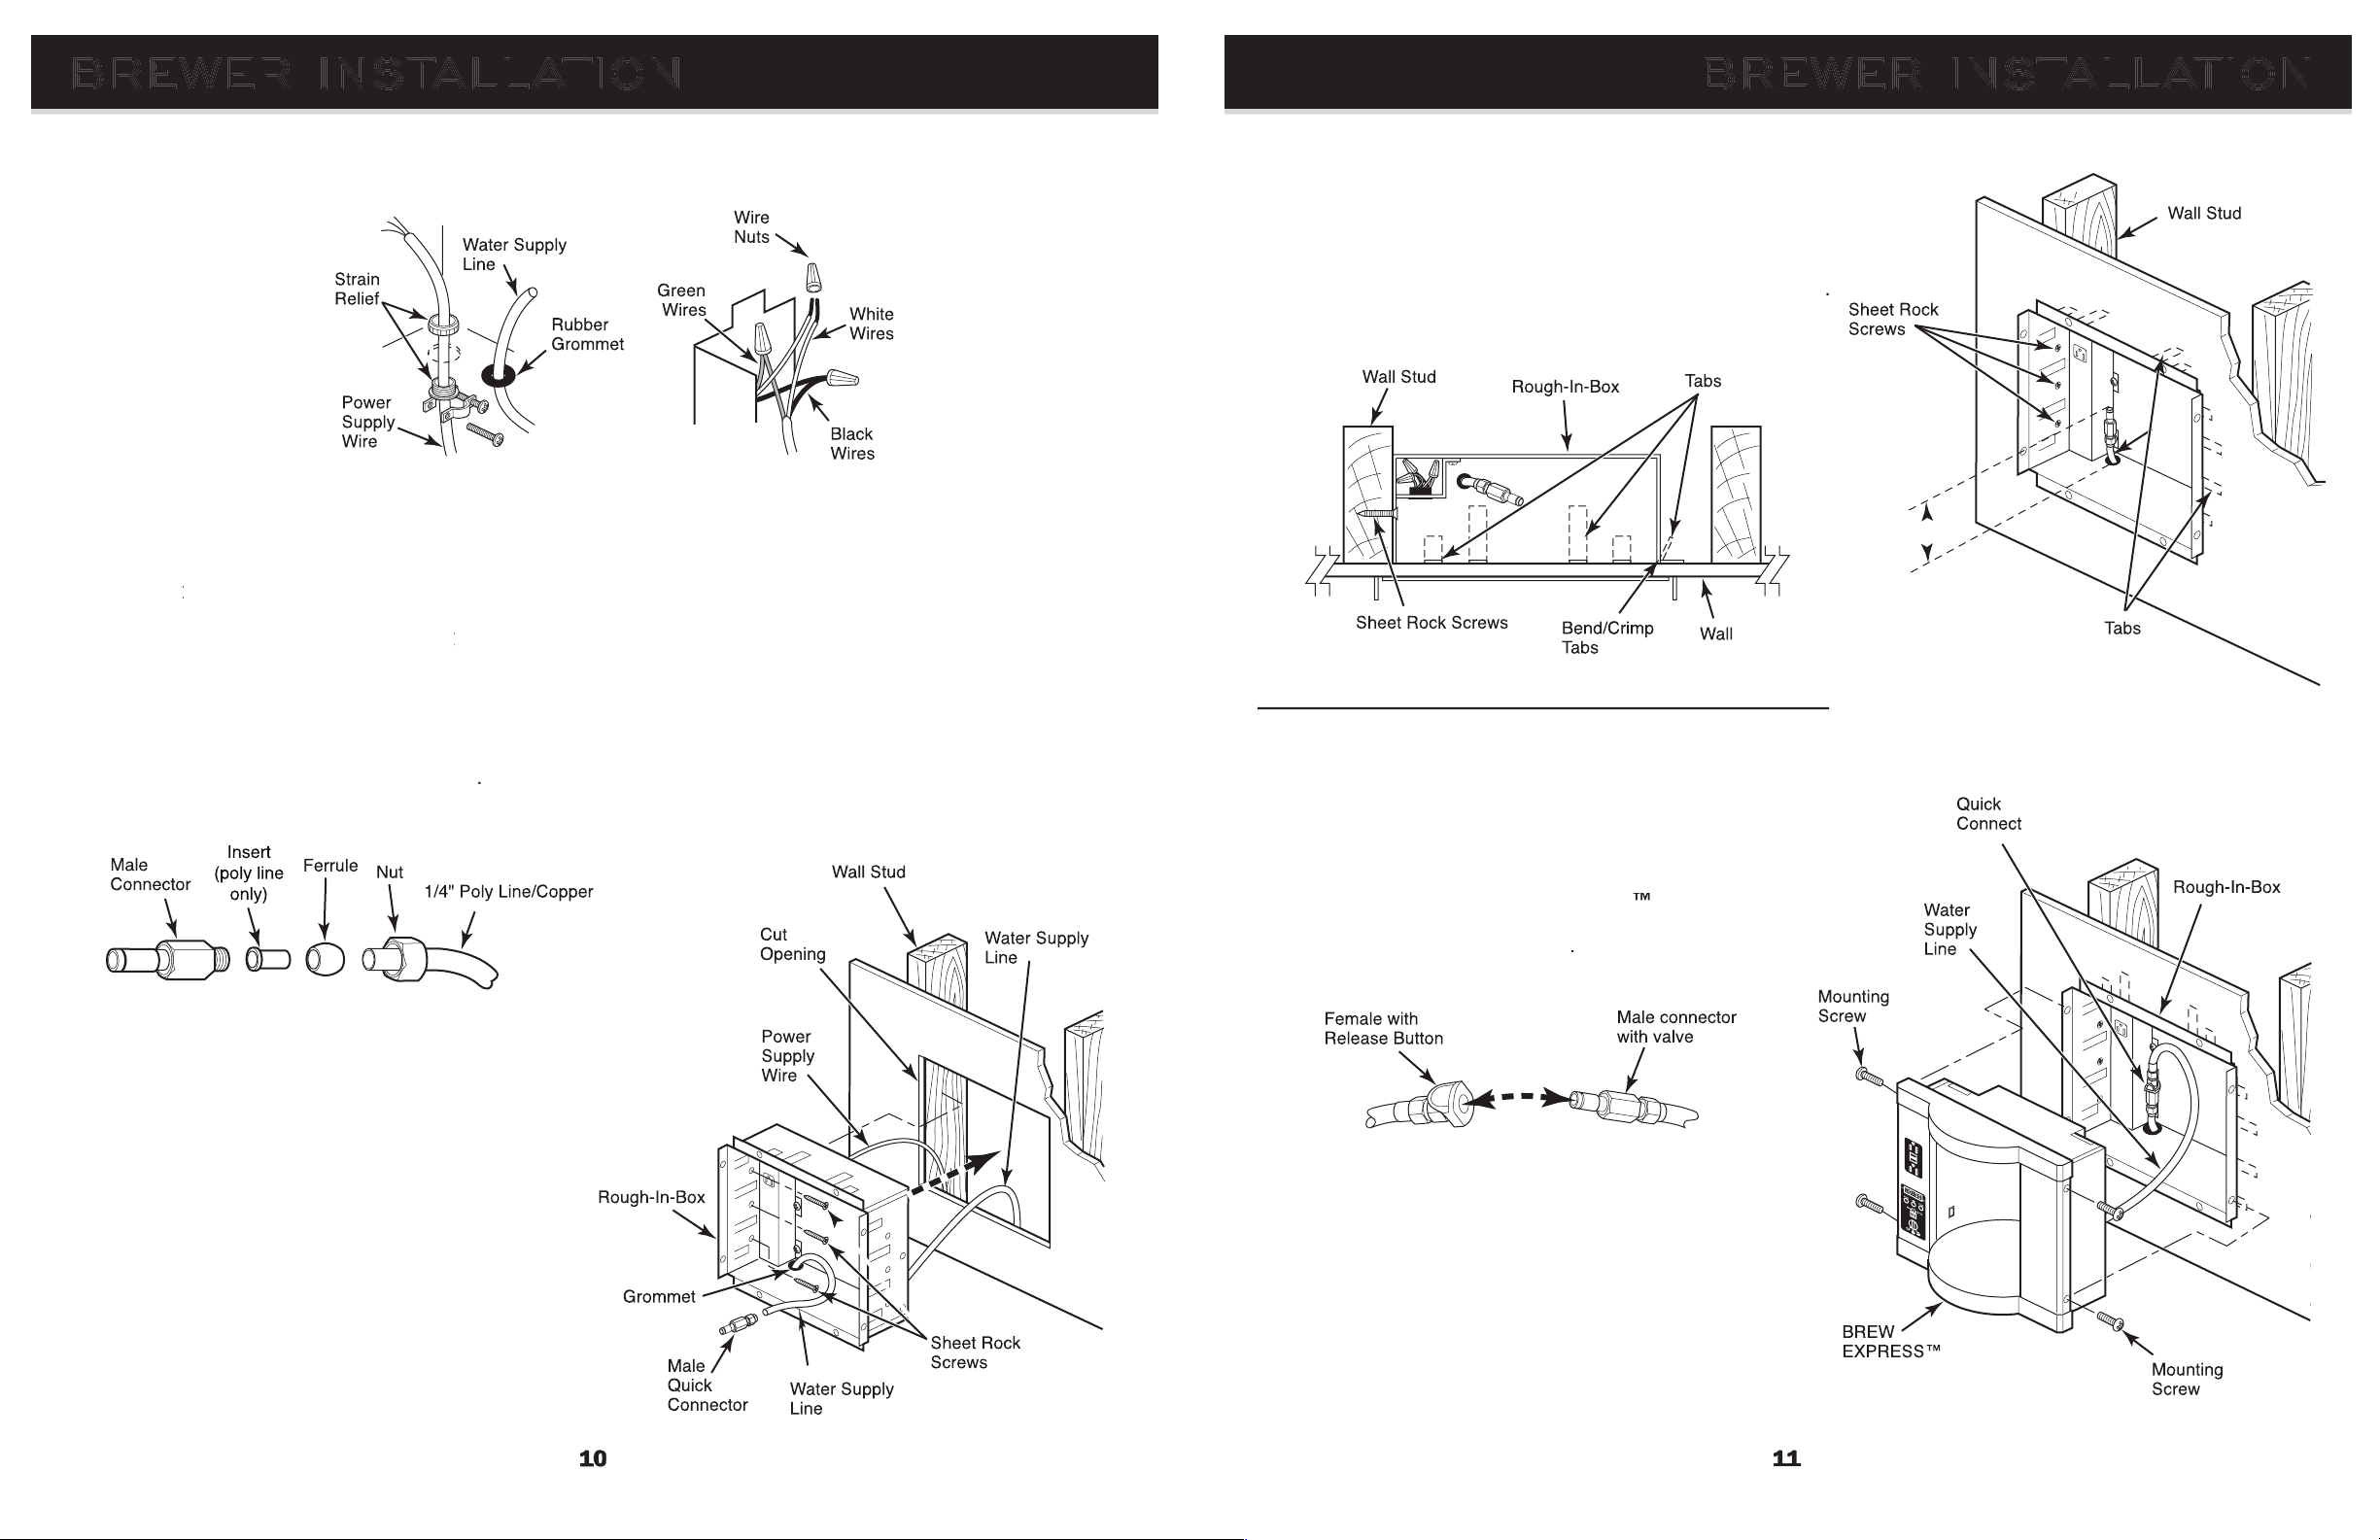
water supply line
from source (See page 6) to
cut
opening
as shown in
grommet
rough-in-box
(See
Supply Detail
cut opening
while gently pulling
water supply line
through
grommet
hole in
pulling
through excess (approx 18”). Secure
to wall stud
with
sheet rock screws
through line to clean any possible debris. Cut water line to length
(approx 3”) inside
and attach
(See
Water line to brewer must be fl ushed and a fi lter installed.
Should debris clog brewer system ALL WARRANTIES VOID.
BREWER INSTALLATION BREWER INSTALLATION
5.
After
sheet rock screws
are in place, gently bend appropriate
tabs (long or short depending on wall thickness such as tile
or granite) as shown on all other areas to fi nish securing
to
wall
tabs
fi rmly to
wall
grommet into wall cavity leaving top of connector a maximum of
3” above bottom of rough-in box. See
5
Quick connector is valved at rough-in-box so water can be
turned on prior to connection to coffee maker. Place unit on
directly in front of
quick
connector
to connect
water supply line
from
to
water supply line
from
(See
Quick Connect Detail
Snap connectors together fi rmly. Turn on water, check for leaks prior
to fi nal installation of
tighten connections or reinstall
quick connector
and check again. See
Be careful not to damage water supply lines. A fi rm fi t will
connect power from rough-in-box to the BREW EXPRESS™.
Use four mounting screws to secure BREW EXPRESS™
inside rough-in-box. Be careful not to damage counter top.
NOTE: Refer to OPERATION GUIDE for further instructions
before using BREW EXPRESS™.
3" max
Supply Detail
Wiring Detail
Page 8
TESTING TROUBLESHOOTING
A. Display is not illuminated
Ensure the power to the rough-in box is turned on (check circuit breaker).
Ensure brewer is fully pressed into the rough-in box.
Ensure the outlet inside the rough-in box is properly wired. Remove the brewer
and check outlet with volt meter. If power is on and no voltage is detected at the
outlet, wiring is incorrect. Turn off power. Remove power panel cover (two screws)
and check wire source connection.
Check wire connection at source.
If the BREW EXPRESS™ has not been used for 30 minutes or longer, it will PREHEAT
the water for 30 seconds. You may be waiting for the preheat cycle to end.
Ensure water has been turned on to the BREW EXPRESS™ (check valve at source).
Ensure the carafe or mug is centered under under the brew basket. BREW EXPRESS™
will not start if the detection sensor does not see a carafe or mug. The detection
then switch to a different type of container.
Ensure the water line is properly connected inside the rough-in box. Remove the four
mounting screws on the side and pull out brewer. Check for pinched or kinks in the water
supply line. The quick connector from the brewer must be pressed securely into quick
connector from from water source.
Ensure the water pressure is adequate. The BREW EXPRESS™ will not operate if water
pressure is under 30 PSI. LED display will fl ash EEEE if water pressure is too low.
Check the water fi lter (if present) at the supply. If fi lter is clogged replace fi lter.
If problem persist and there is no fi lter in the water line, then coffee system maybe
Testing
Turn on electrical power. Check to see if display panel is illuminated, The display panel is lit when electrical supply
has been properly connected. If the display panel is not lit, refer to the troubleshooting section of this manual.
Turn on water supply to BREW EXPRESS™. There should be no leaks in the water connections. If water is
leaking, pull the brewer from the wall, check connections and refer to the troubleshooting section of this manual
to make appropriate corrections. If water is leaking from inside the brewer, disconnect from the rough-in-box
and call for service.
Test the Brewer
Place empty brew basket in unit.
Place the empty carafe under brew basket.
3.
Set the adjustable cup selector to full carafe.
4.
Move the slide switch from OFF to ON.
5.
After 30 seconds water will begin fl owing and remain on for approximately 7 minutes.
A Beeper will sound 40 seconds after water stops fl owing.
Page 9

 Loading...