

Page 1
OPERATING MANUAL
Page 2

BREWART BY COOPERS
2
Welcome to the
perfect pour!
Congratulations on the purchase
of your BrewArt BrewFlo.
This manual covers the basic
setup and operation of your
BrewFlo. To discover the full
BrewArt experience head to
BREWART.COM
Did you know?
BREWART.COM/101 has lots
of great how-to videos, FAQs
and tips.
WARNING: Keep your BrewFlo
upright in a cool, dry position
out of direct sunlight and other
heat sources. Designed for
household use only.
WARNING: Keep plastic
bag out of reach of children.
NOTE: When not in use turn
o at the rear power switch.
Page 3
BREWFLO INSTRUCTIONS
3
Contents
Safety 4
Customer Service 5
BrewArt Customer Service 5
Product Specifications 5
In the box 5
Getting to know your
BrewArt BrewFlo 6
Control Panel with LCD Screen 8
Getting started 9
Assembly 9
Operation 10
1. Inserting a keg 10
2. Inserting the beer line 10
3. Connecting the lines 11
4. Powering up 11
5. Pouring a beer 12
Changing kegs 13
Mid keg 13
Empty keg 14
Cleaning 15
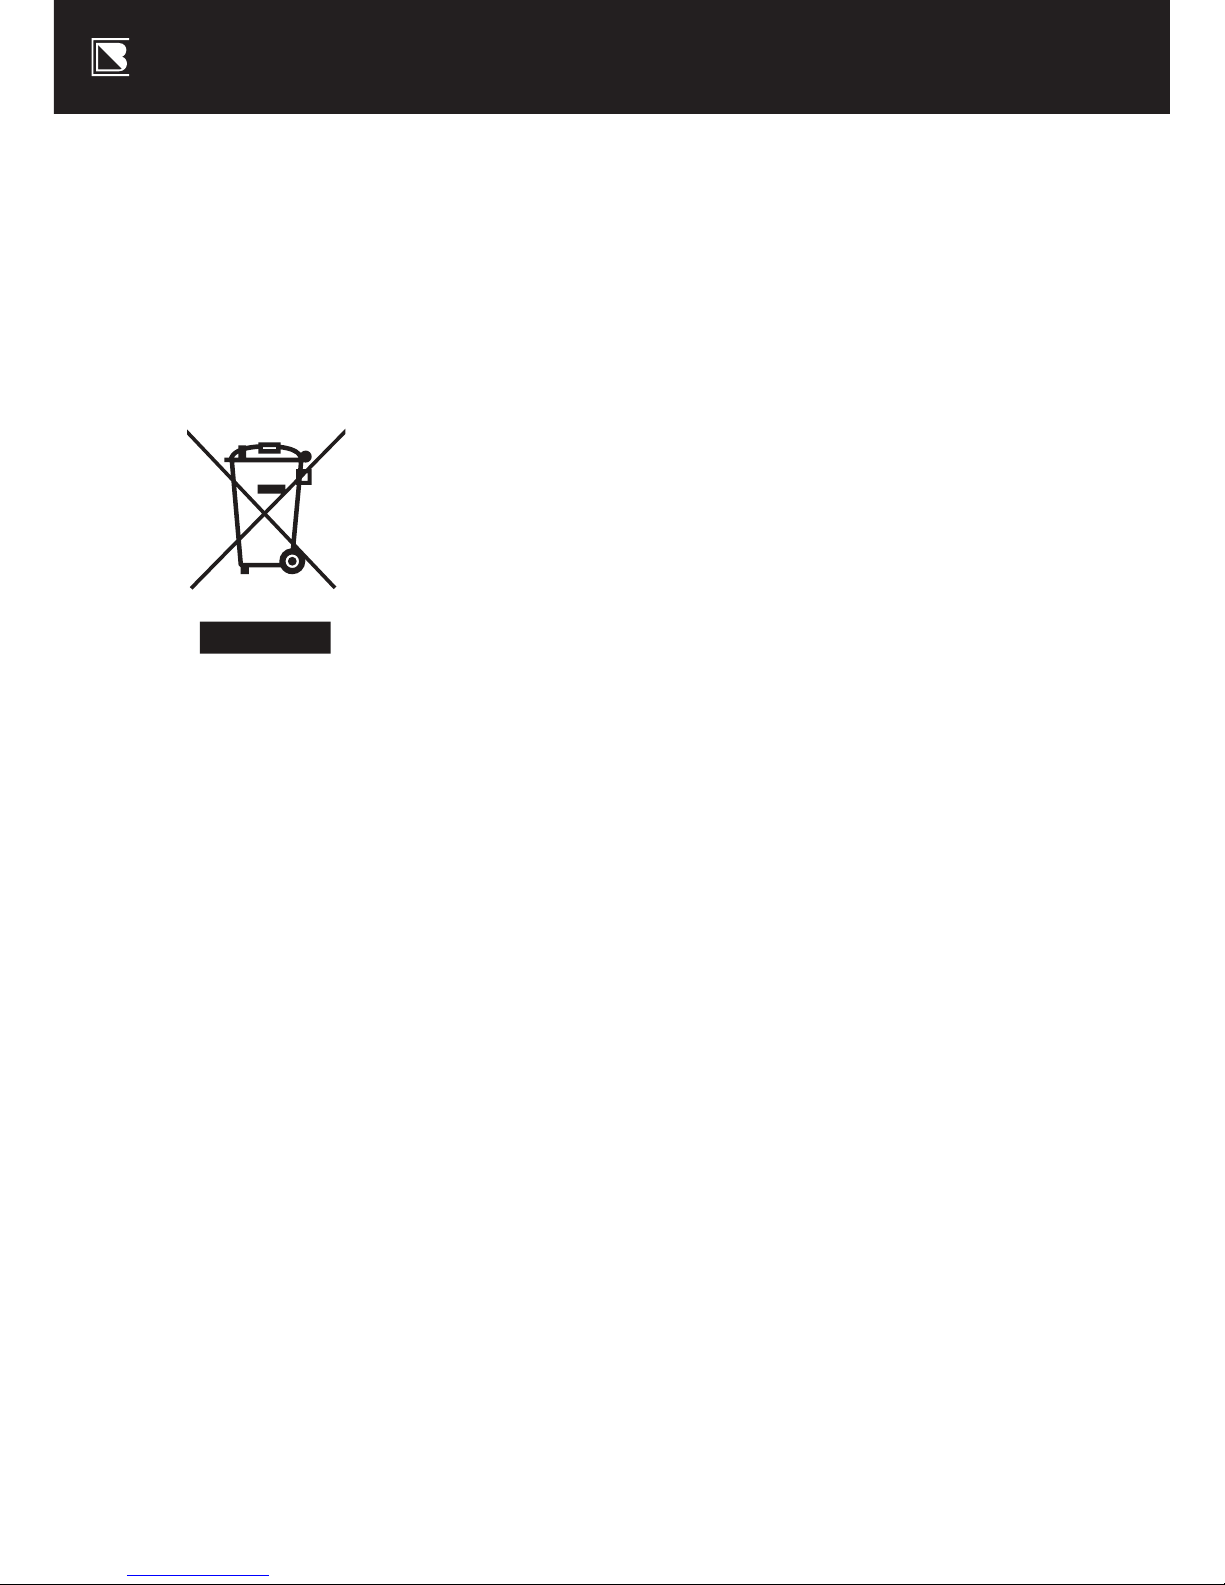
Power down 16
Condensation 16
Troubleshooting 16
Re-setting the keg level indicator 16
Error codes 17
Disposal 18
Correct Disposal of this product 18
Page 4

BREWART BY COOPERS
4
Safety
Your BrewArt BrewFlo has been designed and manufactured to
the highest safety specifications and all relevant Australian and
New Zealand Standards (AS/NZS 60335.2.24:2010 Inc A1,
AS/NZS 60335.1:2011 Inc A1-2).
To ensure a safe, successful and rewarding experience please read these instructions
fully prior to use, and if you have any queries, do not hesitate to contact BrewArt
support on 1300 240 242 or at [email protected]
To prevent injury:
k Read all instructions before use.
k Remove packaging and safely
discard packing material.
k Only li or transport your
BrewFlo when it is empty. Always
use safe liing techniques.
k Keep your BrewFlo upright in
a cool, dry position away from
direct sunlight and heat.
k When not in use, keep machine
turned o at the power point.
k Keep all vents clear.
k Do not disassemble your
BrewFlo for any reason.
k Only use genuine
BrewArt accessories.
k Only use your BrewFlo for
dispensing BrewArt Kegs.
k Keep your BrewFlo away
from children and pets.
k Do not store explosive
substances such as aerosol
cans with a flammable
propellant in your BrewFlo.
k If the power cord is damaged,
it must be replaced by the
manufacturer, its service agent
or similarly qualified persons
in order to avoid a hazard.
k The BrewFlo is intended for
household and domestic use only.
k The BrewFlo is not intended for
use by persons (including children)
with reduced physical, sensory
or mental capabilities, or lack
of experience and knowledge,
unless they are supervised or
given instruction concerning the
use of the BrewFlo by a person
responsible for their safety.
k Only use a so damp cloth to wipe
down external surfaces. Do not
use solvents or harsh chemicals.
A mild detergent may be used.
k Failure to keep your BrewFlo
upright may result in damage to
its compressor cooling system.
Page 5

BREWFLO INSTRUCTIONS
5
Customer Service
BrewArt Customer Service
Phone: 1300 240 242
Email: [email protected]
brewart.com
BrewArt is a registered trademark
of Coopers Brewery Ltd.
ABN 13 007 871 409
Coopers Brewery Ltd.
461 South Road,
Regency Park
South Australia 5010
Product Specifications
Model: BE641-AU
Class: I
Capacity: 5.0L
Voltage: 220-240V AC
Frequency: 50Hz
Power: 150W
Climate Type: SN/N/T/ST
Refrigerant: R134a (50g)
Vesicant: Cyclopentane (C
5 H10
)
Cooling Power: 150W
In the box
k BrewArt BrewFlo
k Drip tray
k Beer font with interchangeable
top, screws and plugs
k Air elbow connector
k Instruction manual
For the complete BrewArt System
including the full range of BrewPrints
and Accessories visit brewart.com
Page 6
BREWART BY COOPERS
6
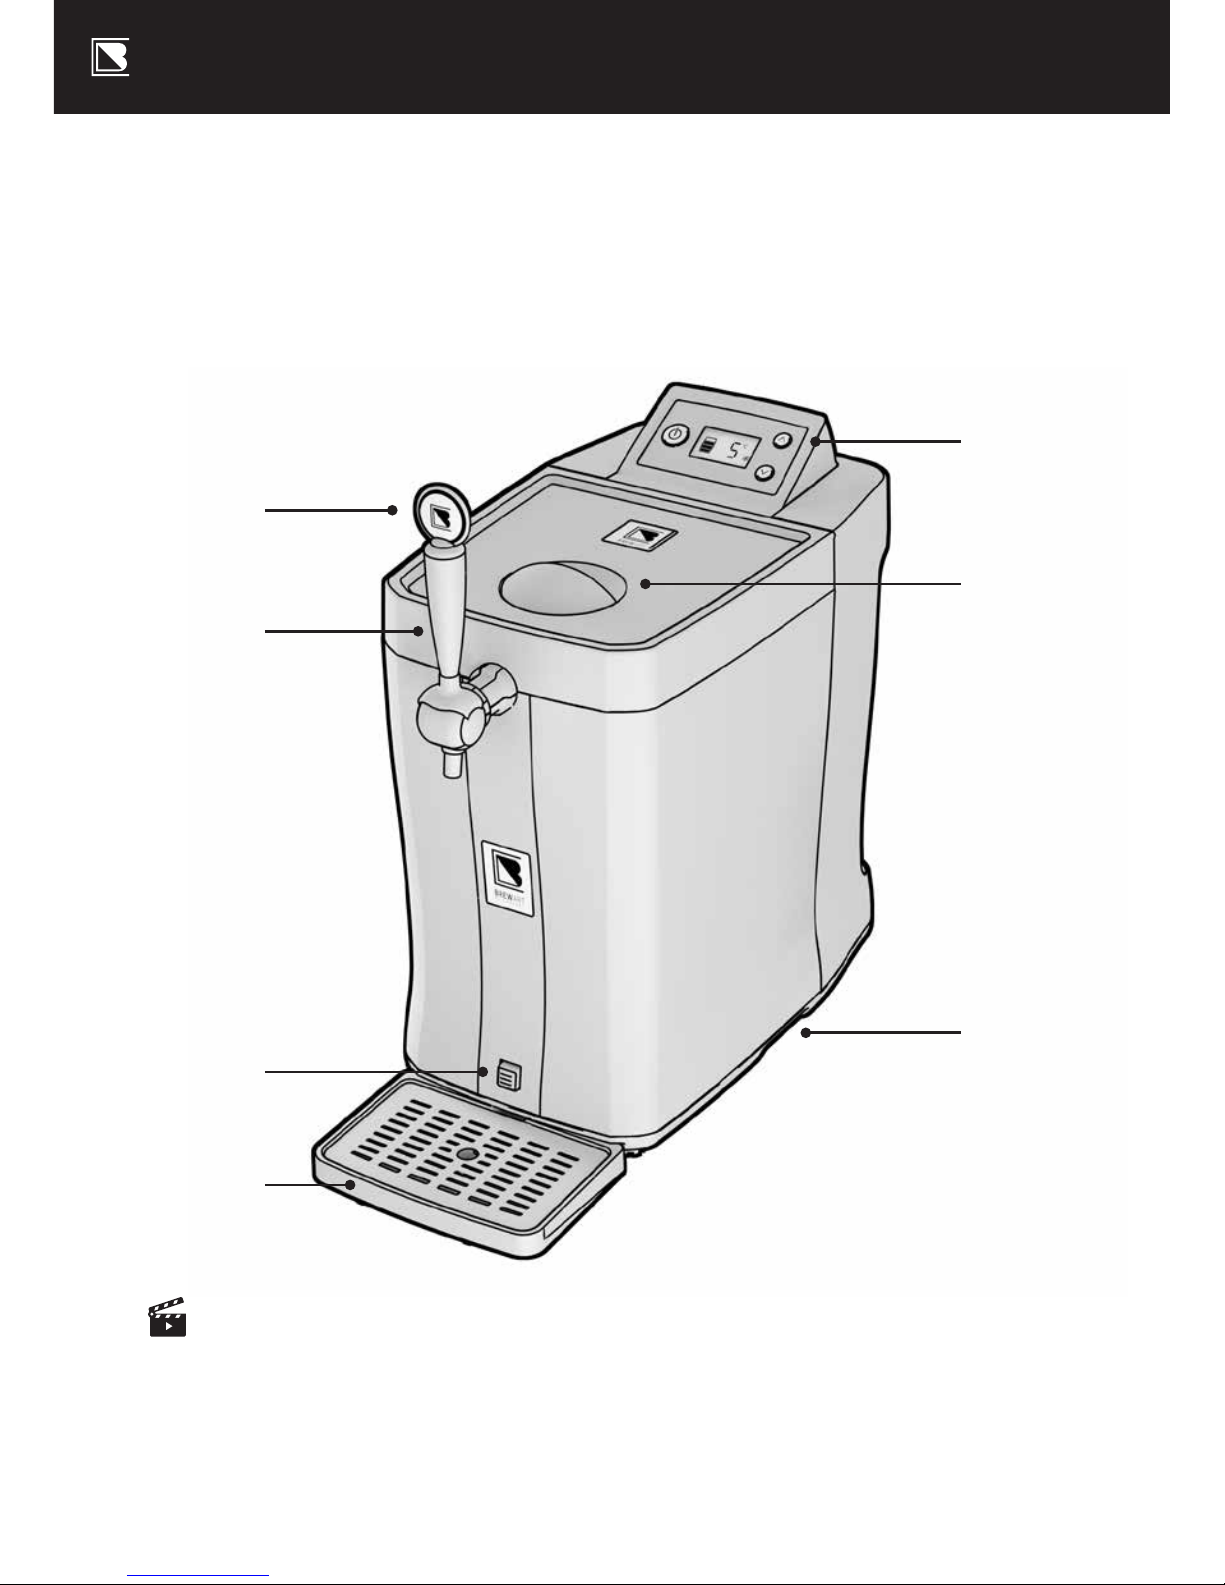
A
G
D
C
B
E
F
Getting to know your
BrewArt BrewFlo
Did you know?
Brewart.com/101 has lots of great
how-to videos, FAQs and tips.
Page 7
BREWFLO INSTRUCTIONS
7
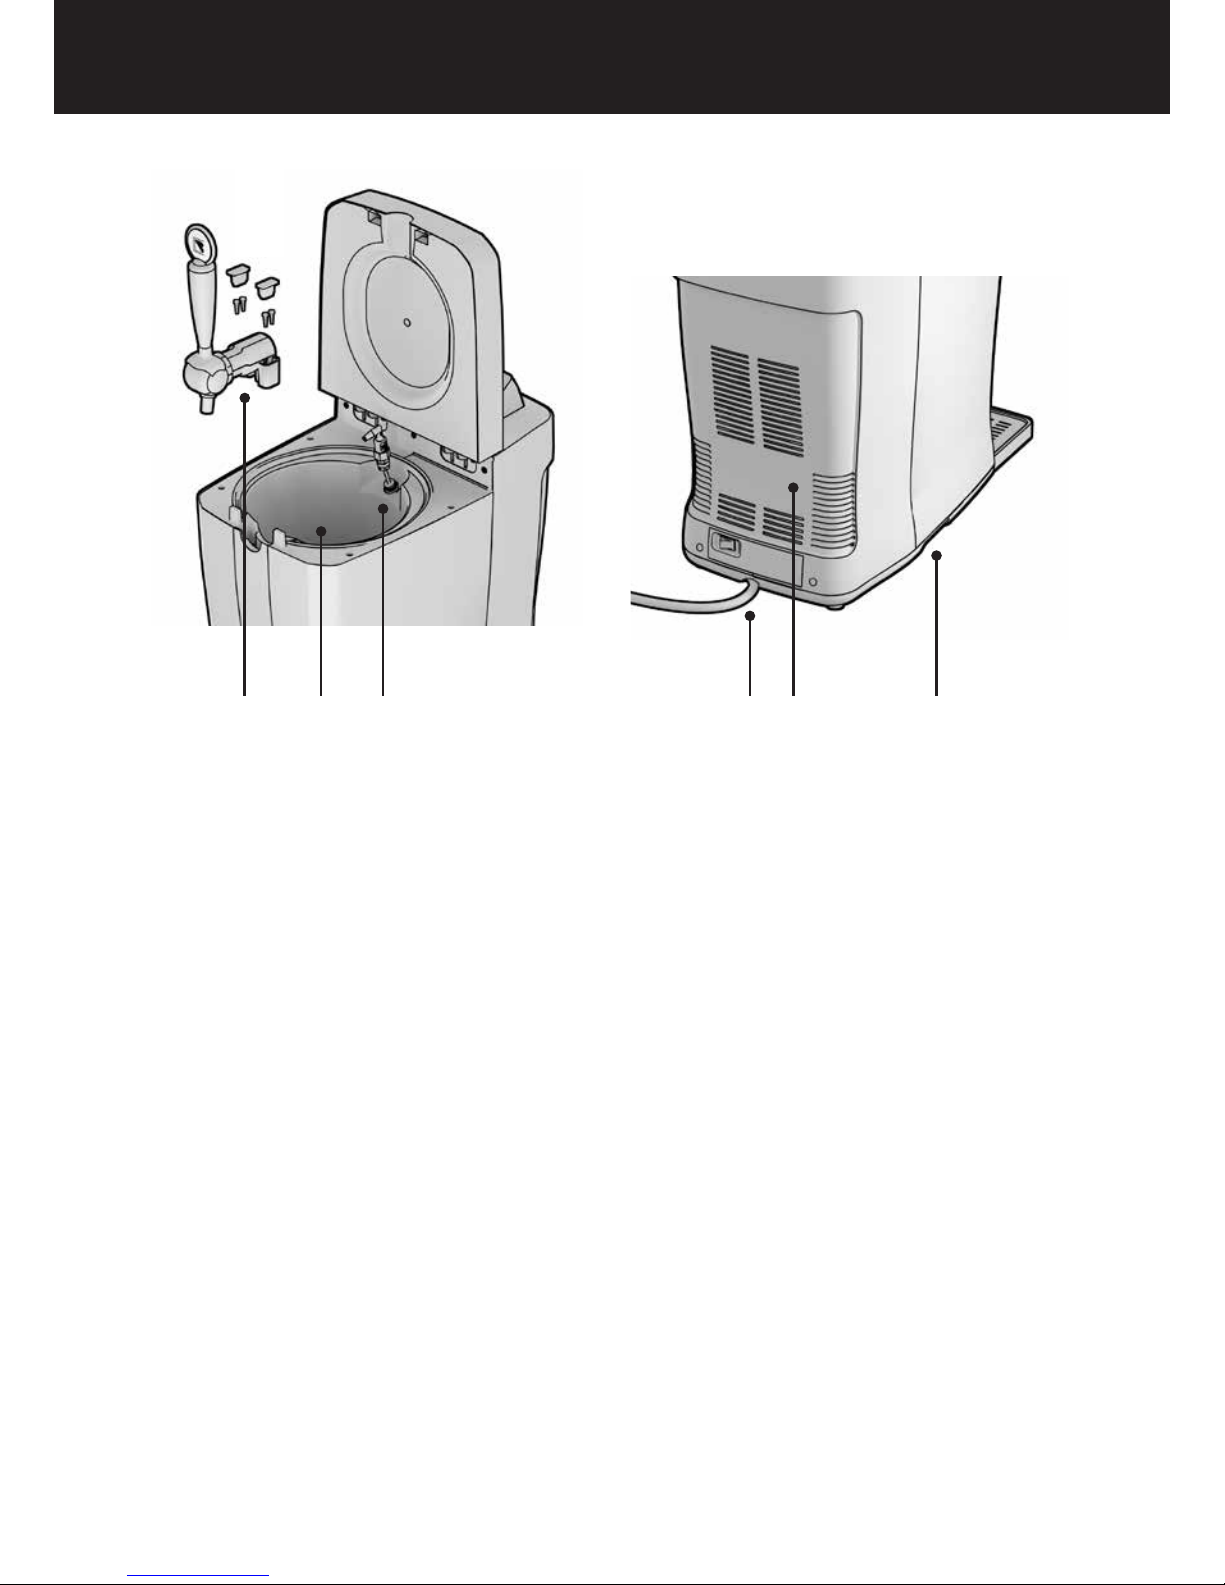
K L GH I J
A. Interchangeable Font Top:
Insert your own label for each brew
B. Beer Font:
To dispense beer
C. Control panel with LCD screen:
Control temperature and track
keg volume (see page 8)
D. Lid release handle:
Quick access to the keg chamber
Not for liing your BrewFlo
E. Drain plug:
Releases condensation build-up
from inside cooling chamber
F. Drip tray:
Catches drips from Beer Font
G. Carry handles:
Safe, easy moving and handling
H. Beer font screws (x4)
and plugs (x2):
Holds your beer font
securely in place
I. Internal cooling chamber:
Keeps your Keg at the
set temperature
J. Air line with elbow connector:
Pressurises the keg to
dispense beer
K. Power cord
L. Vents:
Keeps your BrewFlo compressor
cool. Do not block!
Page 8
BREWART BY COOPERS
8
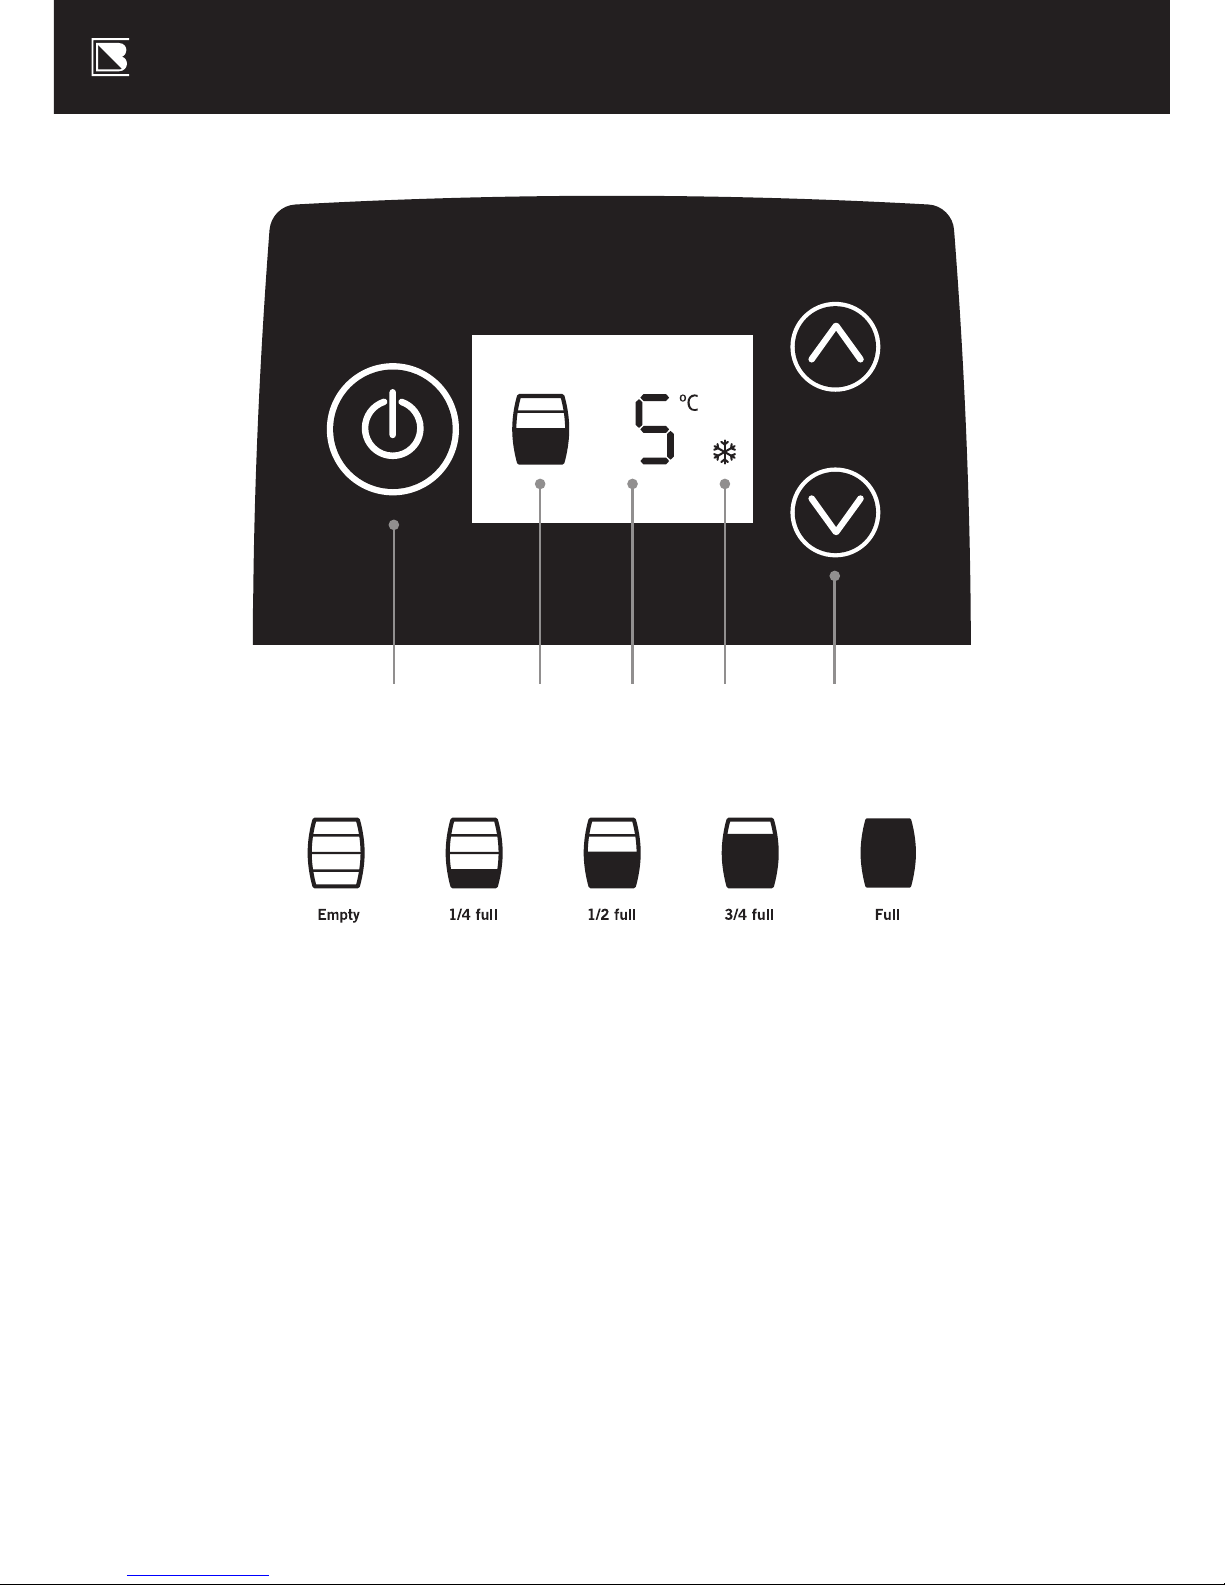
Control Panel with LCD Screen
M. On/Standby button:
Switches your BrewFlo between
ON and STANDBY mode
N. Beer level indicator:
Estimates the volume of
beer remaining in the keg,
to the nearest quarter
O. Target temperature:
Your Keg will be maintained
at this temperature
P. Cooling indicator:
Indicates the BrewFlo is cooling
Q. Temperature set buttons:
Use these buttons to set the Keg
target temperature. In standby
mode, these buttons can be used
to reset the Beer Level Indicator –
see Troubleshooting section.
M N O P Q
Page 9
10cm
BREWFLO INSTRUCTIONS
9
Getting started
k Record your warranty online by
visiting brewart.com/register
k BrewArt BeerDroid and BrewFlo
come with a 12 month Limited
Replacement Warranty.
k We recommend that you register
your hardware items for warranty.
k To view full Terms and Conditions
of Sale, including Limited
Replacement Warranty details
go to brewart.com/register
k Position your BrewFlo on a
clean flat surface in a dry area
away from direct sunlight
or other heat sources.
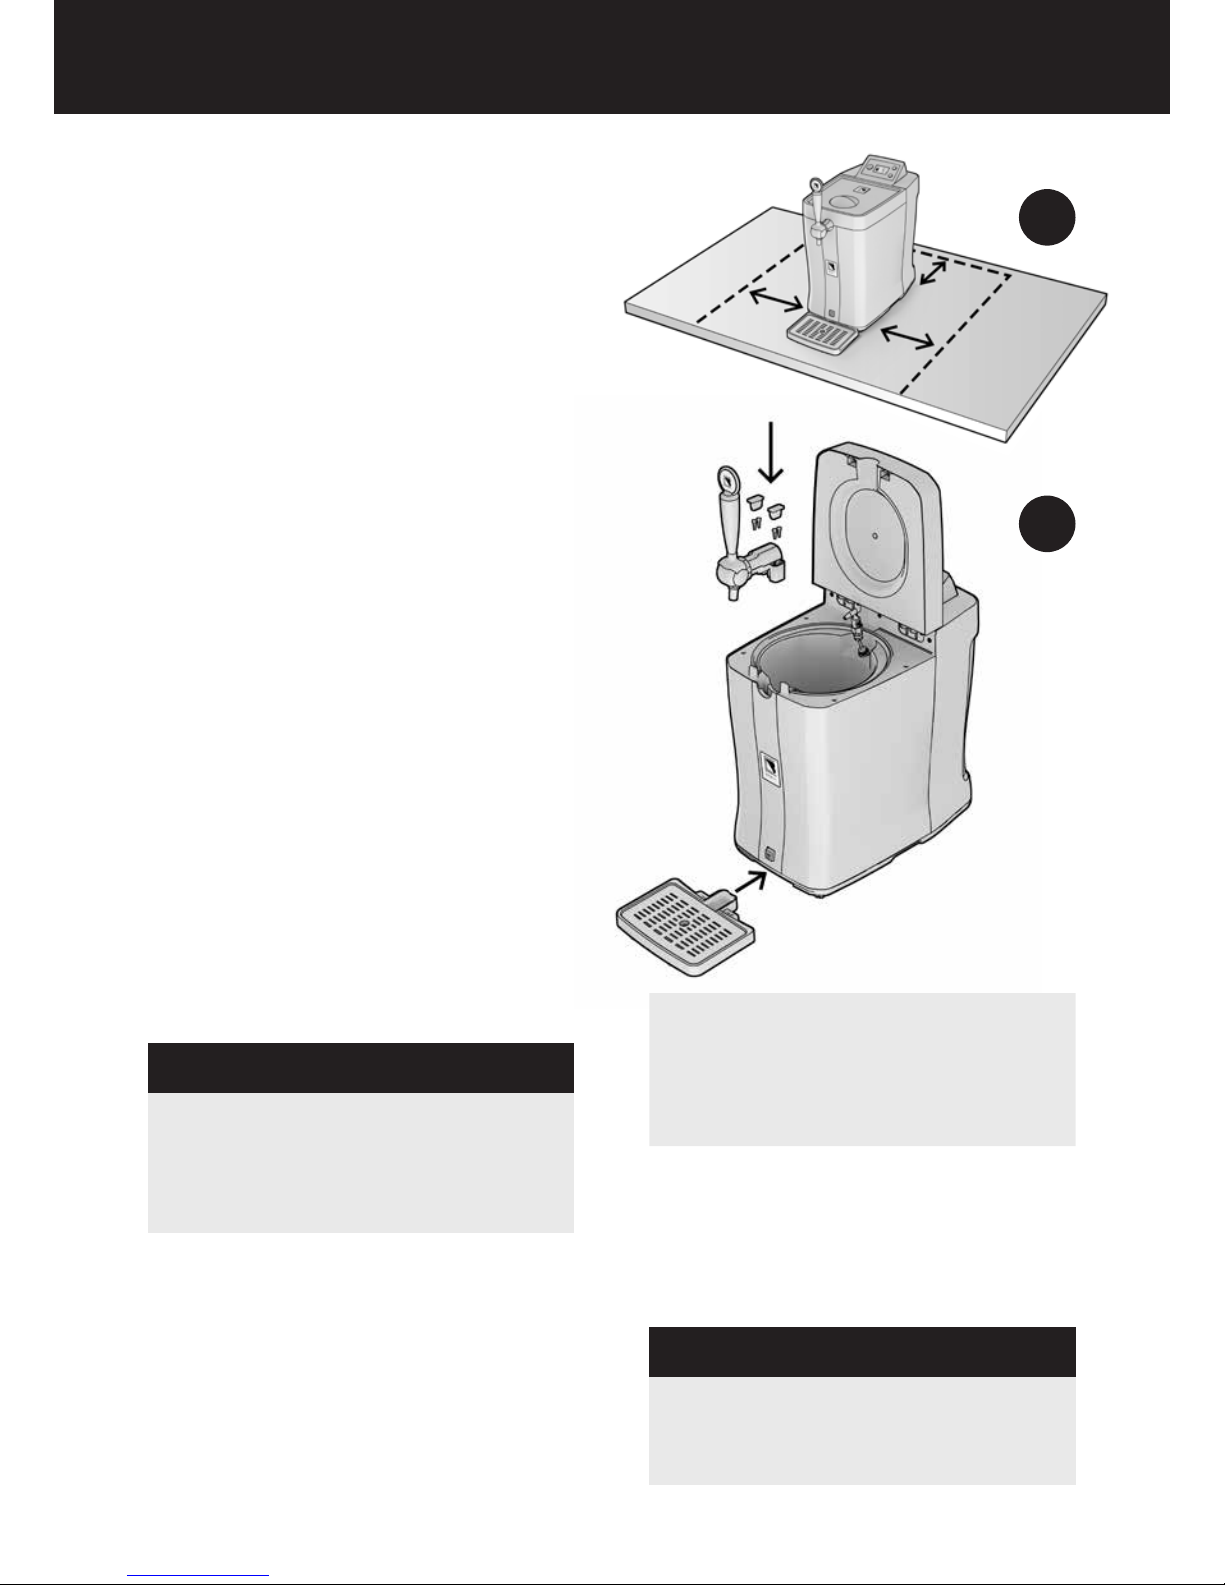
k Ensure all vents are free of
obstructions and your BrewFlo is
at least 10cm away from walls and
other objects – see Diagram A.
Assembly
WARNING
DO NOT tilt or lay BrewFlo on its
back or side as this can cause
damage to the compressor.
k Open your BrewFlo lid
k Fit the beer font into your BrewFlo
and, using the screws, secure
it in place – see Diagram B.
B
Note
Use a magnetic screwdriver to
make inserting screws easier.
k Insert plugs into the recesses
to either side of the font.
k Insert the drip tray by sliding it
into the base of your BrewFlo.
WARNING
Do not move your BrewArt
BrewFlo during operation.
A
Page 10
Note
Use only BrewArt 5 Litre kegs.
Your BrewFlo will chill a warm
keg in approximately 10 hours
so for immediate use we
suggest you pre-chill your
kegs in your refrigerator.
BREWART BY COOPERS
10
Operation
1. Inserting a keg
k Only use BrewArt kegs that
have fully completed their
secondary fermentation. If
unsure, visit brewart.com/101
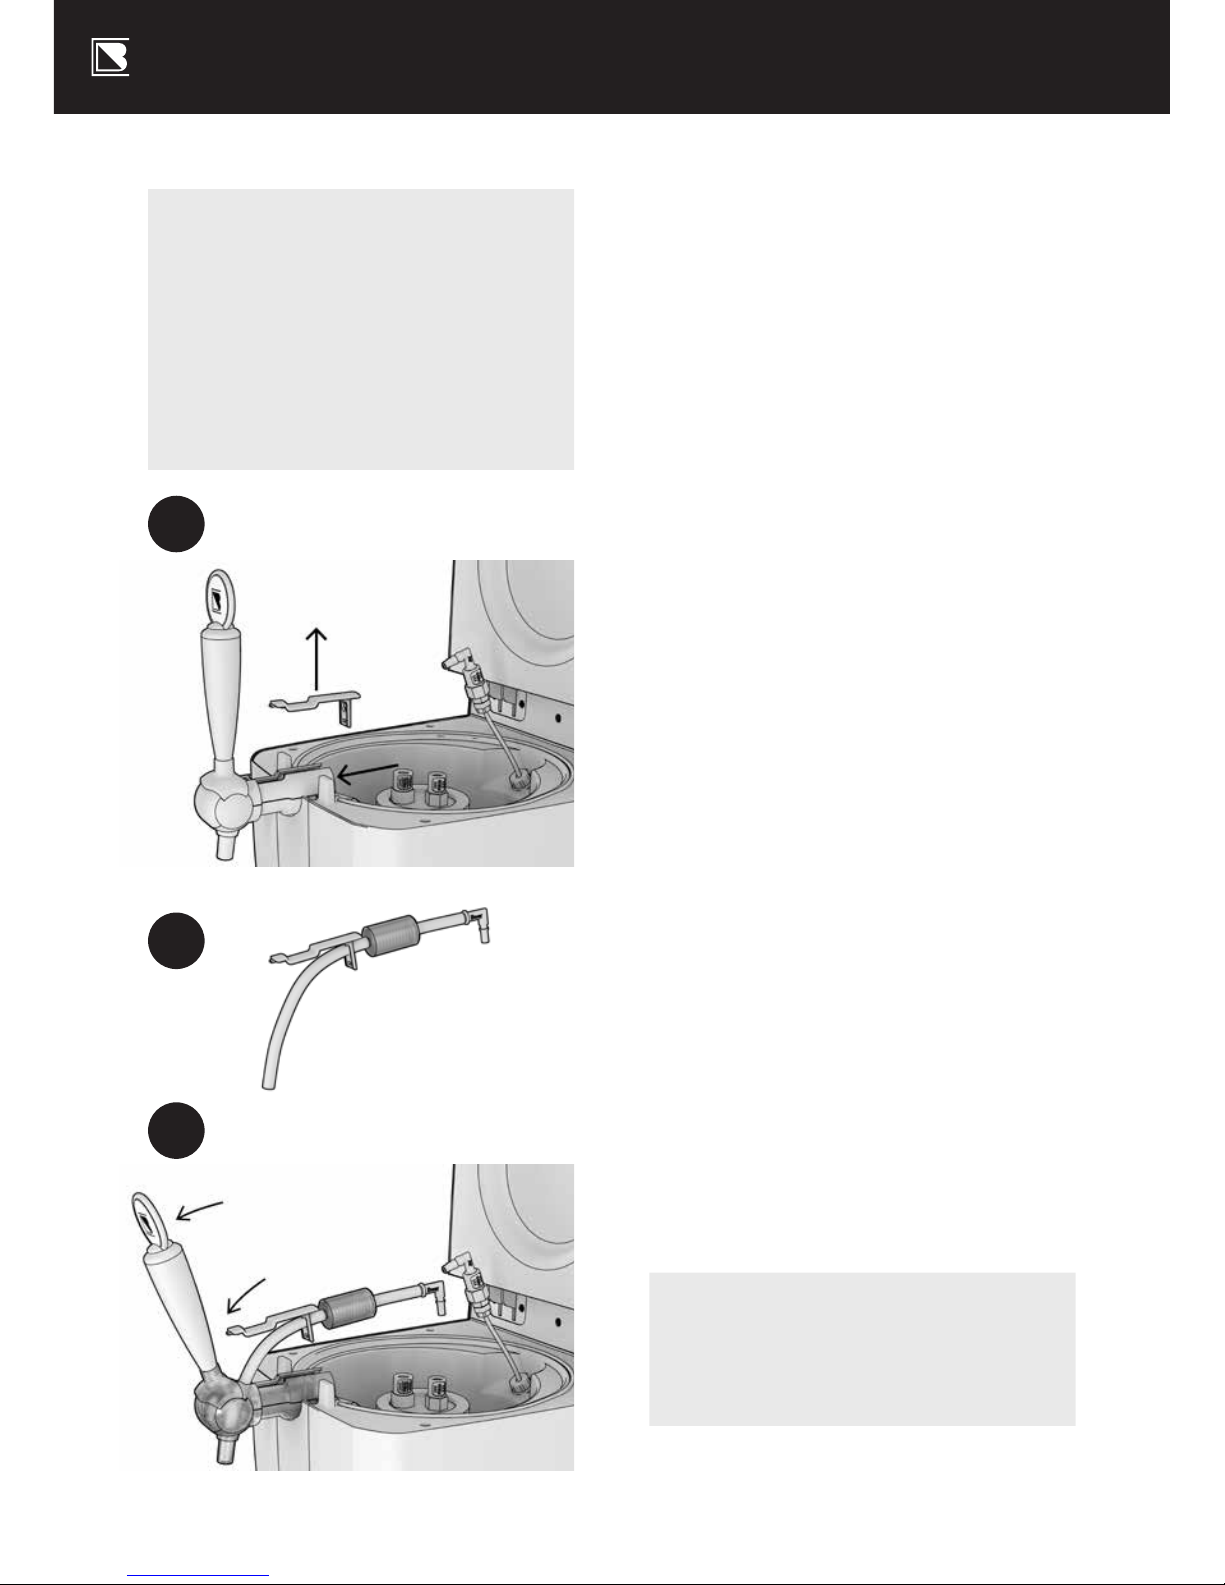
k Open the lid and insert
a BrewArt keg.
2. Inserting the beer line
k Release the beer line holder from
the font by pressing the release
button at the base of the font
connection – see Diagram C.
k Unclip the beer line holder
and feed the open end of the
beer line all of the way through
the hole – see Diagram D.
k Pull the font handle forward,
and then feed the open end of
the beer line into the font until
it stops (approximately 3cm) –
see Diagram E.
k Release the font handle.
k Fit the beer line and beer line
holder back into place.
Note
The beer line must be installed in the
Font before connecting it to a Keg.
C
D
E
Page 11
BREWFLO INSTRUCTIONS
11
3. Connecting the lines
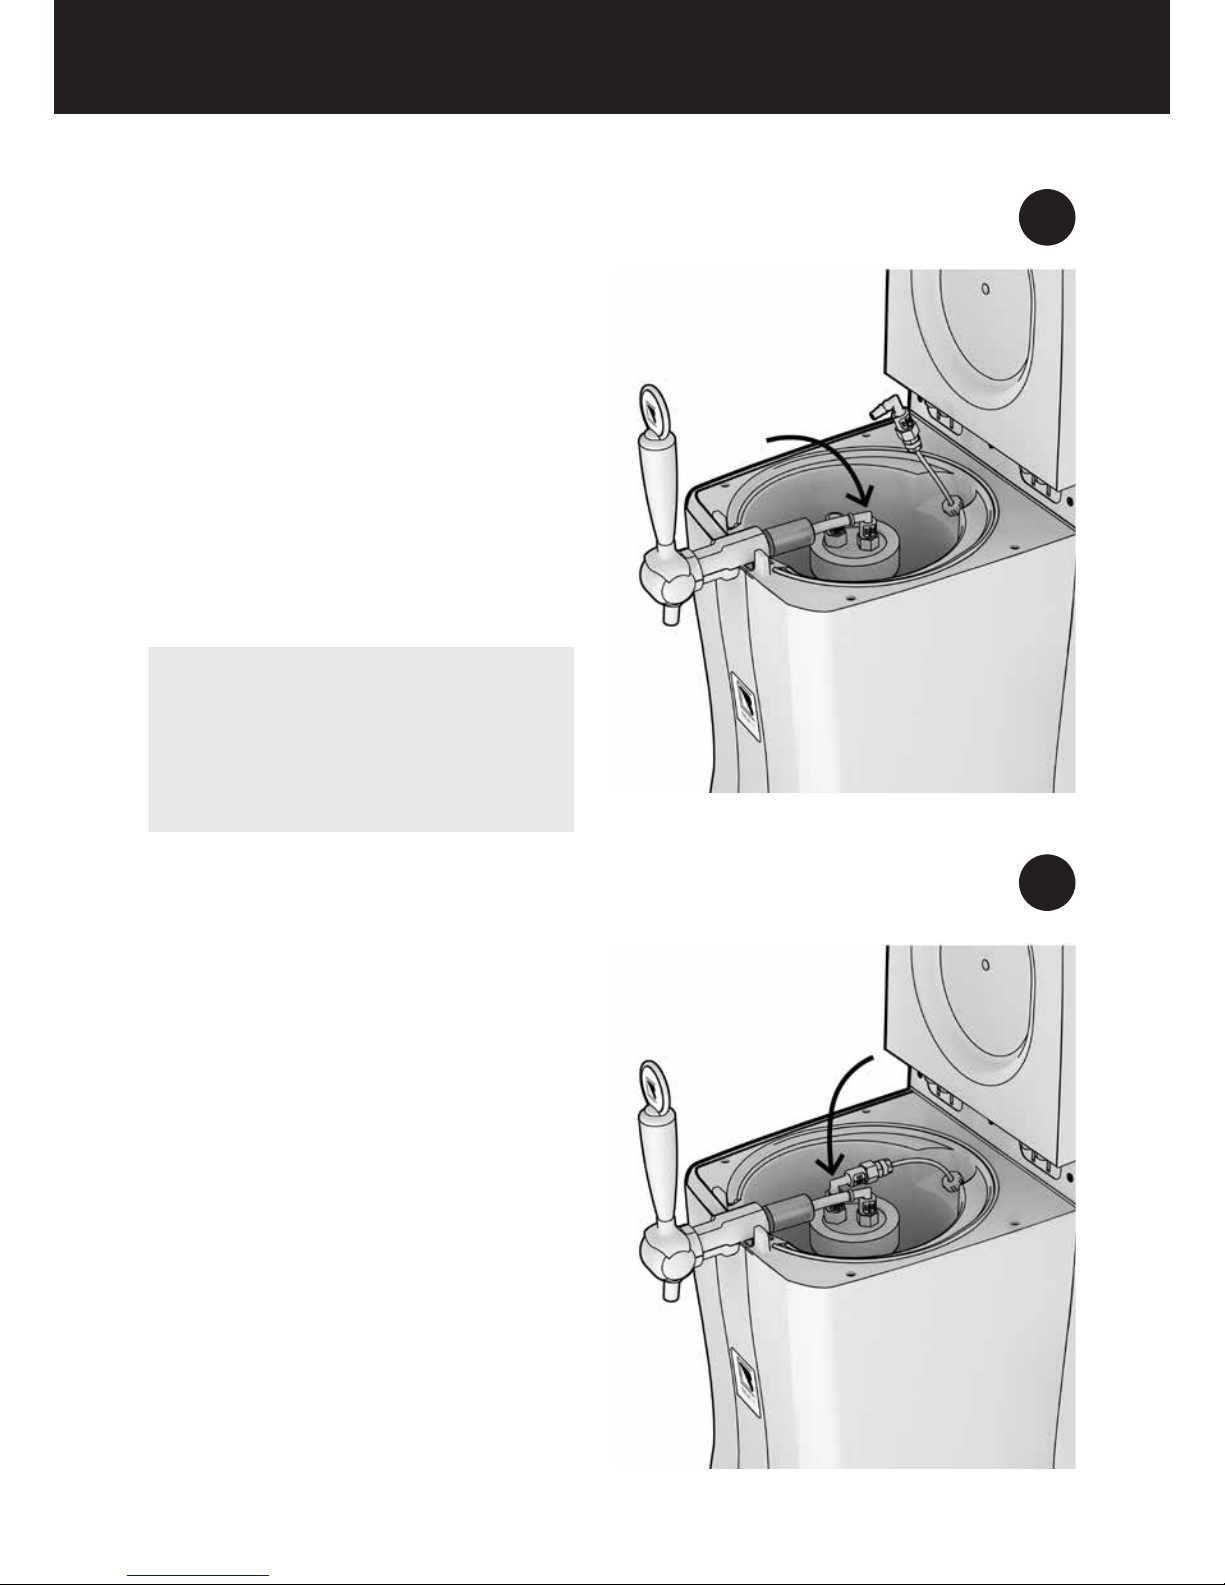
k Connect the beer line to the keg
by inserting its connector to
the orange keg valve. Press the
connector until it clicks into place,
ensure beer line is straight and
free of kinks – see Diagram F.
k Connect the air line to the keg by
inserting the connector to the black
keg valve. Press the connector until
it clicks into place – see Diagram G.
k Close the lid.
Note
It is best to wait until your keg is
chilled before connecting air and
beer lines.
4. Powering up
k Plug the power cord found
at the rear of your BrewFlo
into a power point and turn
on at the power point.
k Set power switch at the back
of your BrewFlo to ON.
k The display screen will light up
and momentarily display all
LCD screen content, the current
soware version will display, and
then it will enter standby mode.
k On the control panel press
the button to turn ON.
F
G
Page 12
BREWART BY COOPERS
12
5. Pouring a beer
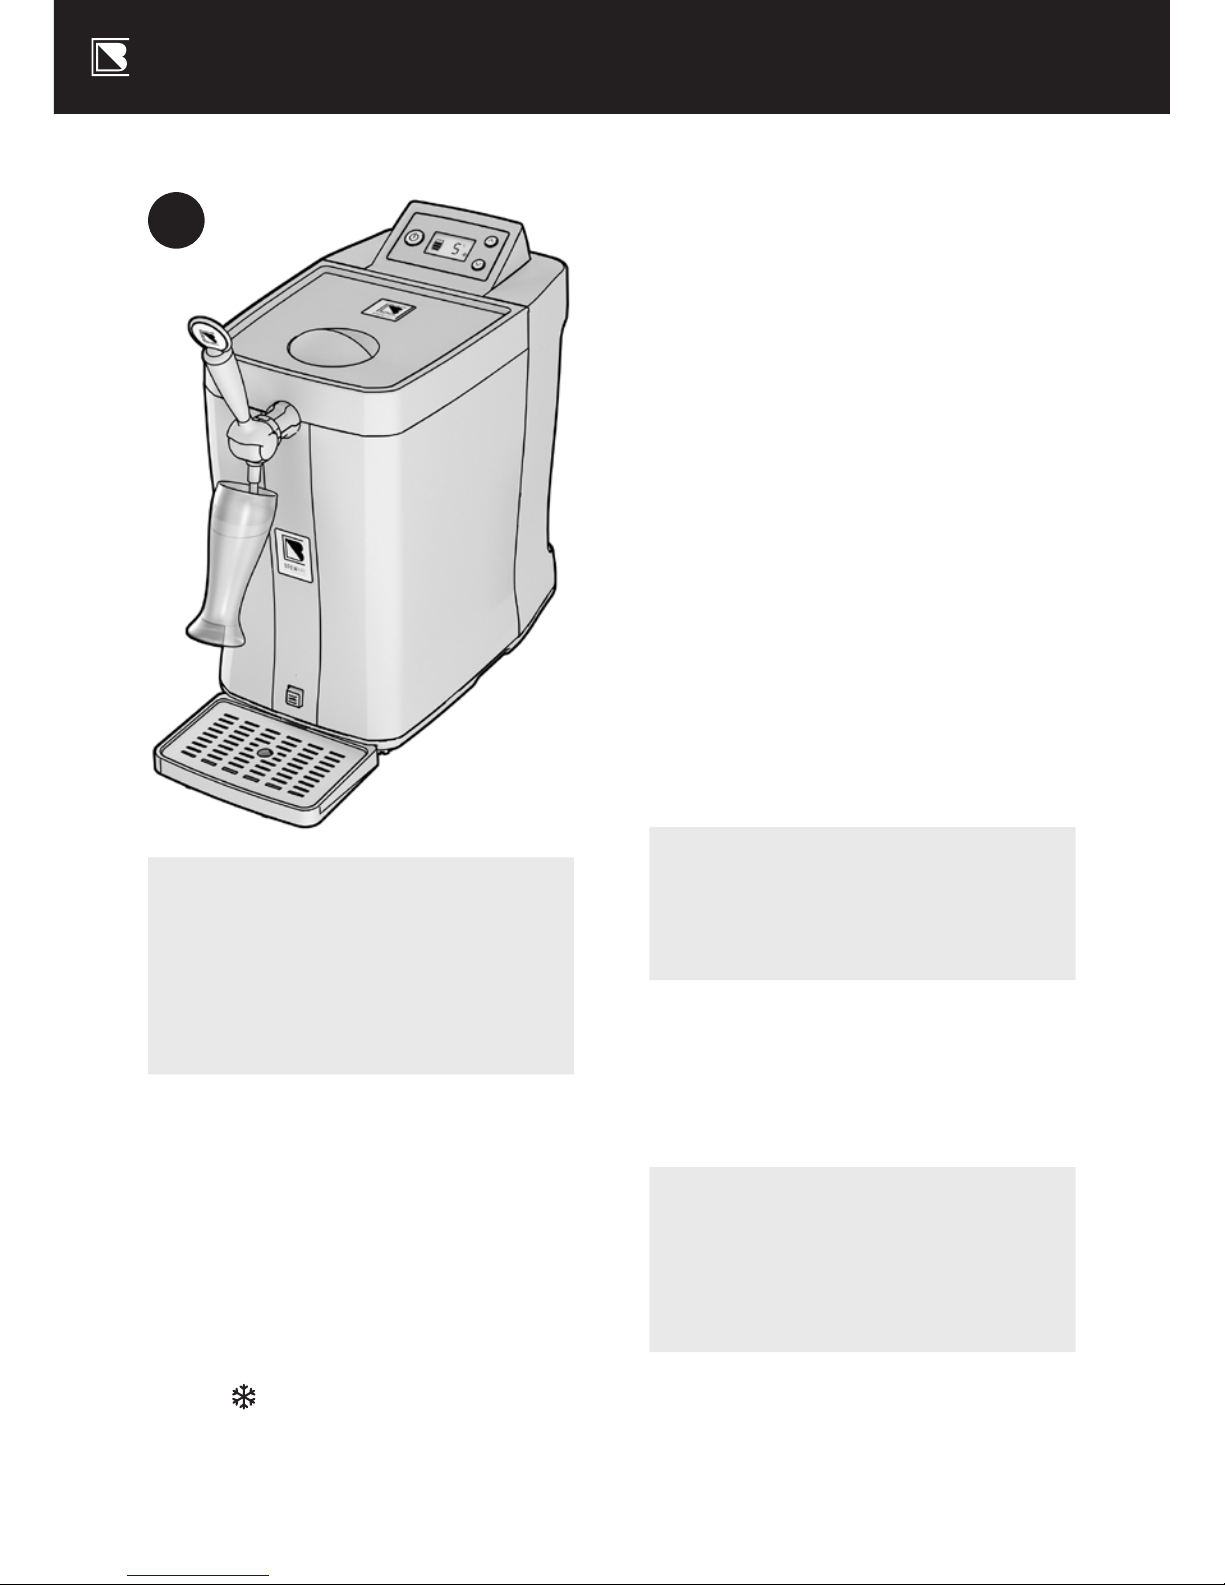
k When the beer is ready to pour,
place a clean glass on a slight
angle underneath the beer font
tap – see Diagram H – and
pull the font handle all the way
towards you in one smooth action.
Refer to brewart.com/101
k When a keg is first inserted there
will be additional foam in your first
pour. We recommend discarding
the first half a glass you pour.
k As it fills, straighten the glass
slowly until it is fully upright.
k When the beer head reaches
the rim of the glass, quickly
release the font handle to
return it to the o position.
Note
Do not immerse the font nozzle into
the beer or foam while pouring.
k The Beer Level Indicator on
the LCD screen will indicate
how much beer is le in the
keg. For shelf-life and expiry of
kegs, see brewart.com/101
Hint
The size of the head can be
controlled by adjusting the angle
and position of the glass.
H
Note
If your BrewFlo loses power
while in ON mode, it will
automatically return to ON
mode when power is restored.
k The beer level indicator should
display the approximate
beer level in the keg.
k The target temperature is displayed.
k Use the
and arrows to
change the target temperature
k The BrewFlo will adjust the
temperature accordingly.
The icon will appear on
the display screen to indicate
the BrewFlo is cooling.
Page 13
BREWFLO INSTRUCTIONS
13
Changing kegs
Mid keg
Note
You can remove a partially used
keg and replace it with another
keg at any time.
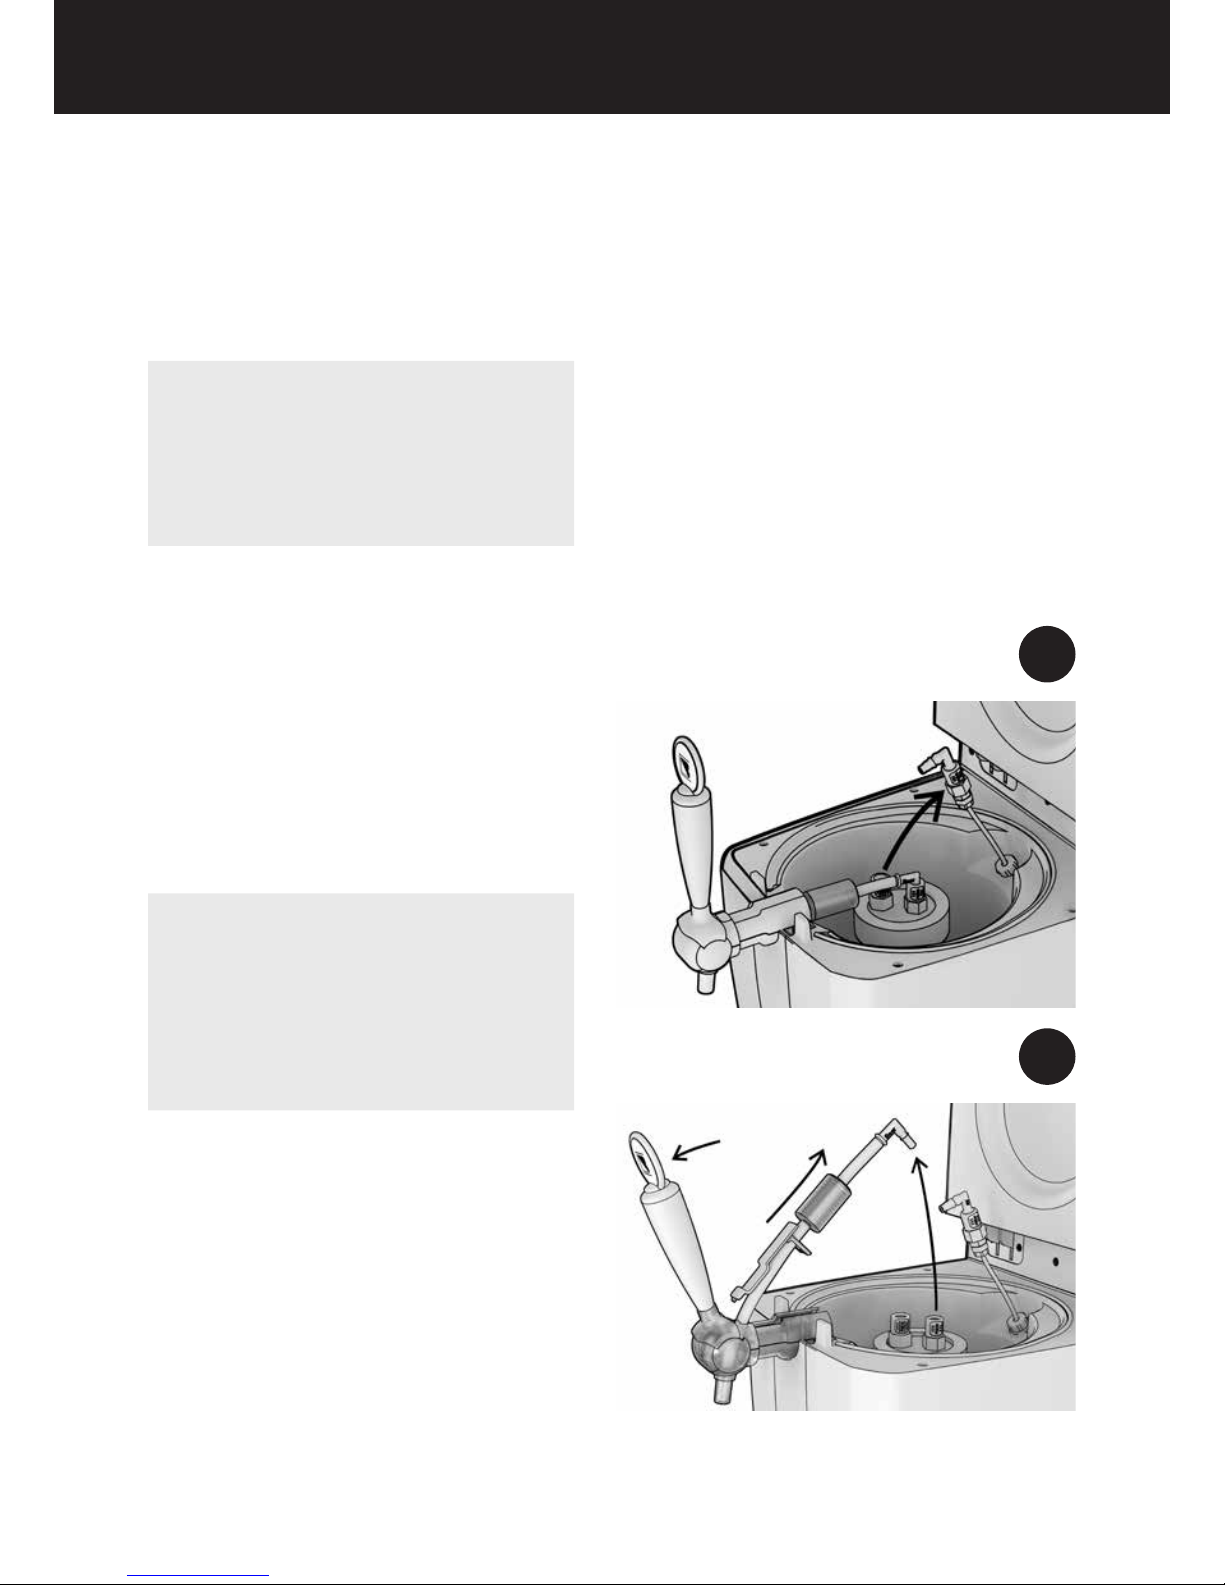
k Disconnect the air line by
pressing the white release button
on the airline keg valve. The
black elbow connector should
release – see Diagram I.
k Disconnect the beer line by
pressing the orange release
button on the Beer keg valve.
The connector should release.
Note
Place a cloth or paper towel around
the beer valve to catch the small
beer squirt when disconnecting
from the keg beer valve.
k Release the beer line holder
by pressing the button and
unclip it from the beer font.
k Raise the beer line and pull the
font handle forward to drain
any residual beer from the
beer line – see Diagram J.
k Pull the beer font handle
forward and pull the beer line
out from the beer font.
k Remove keg.
k Rinse any beer in the keg beer
valve with clean water.
k Replace keg. Refer to
Inserting a keg.
I
J
Page 14
BREWART BY COOPERS
14
Note
It is important to keep a partially
used keg pressurised to maintain
carbonation levels in your beer.
If you accidentally depressurise
the keg simply use the BrewFlo
to pressurise it again.
Empty keg
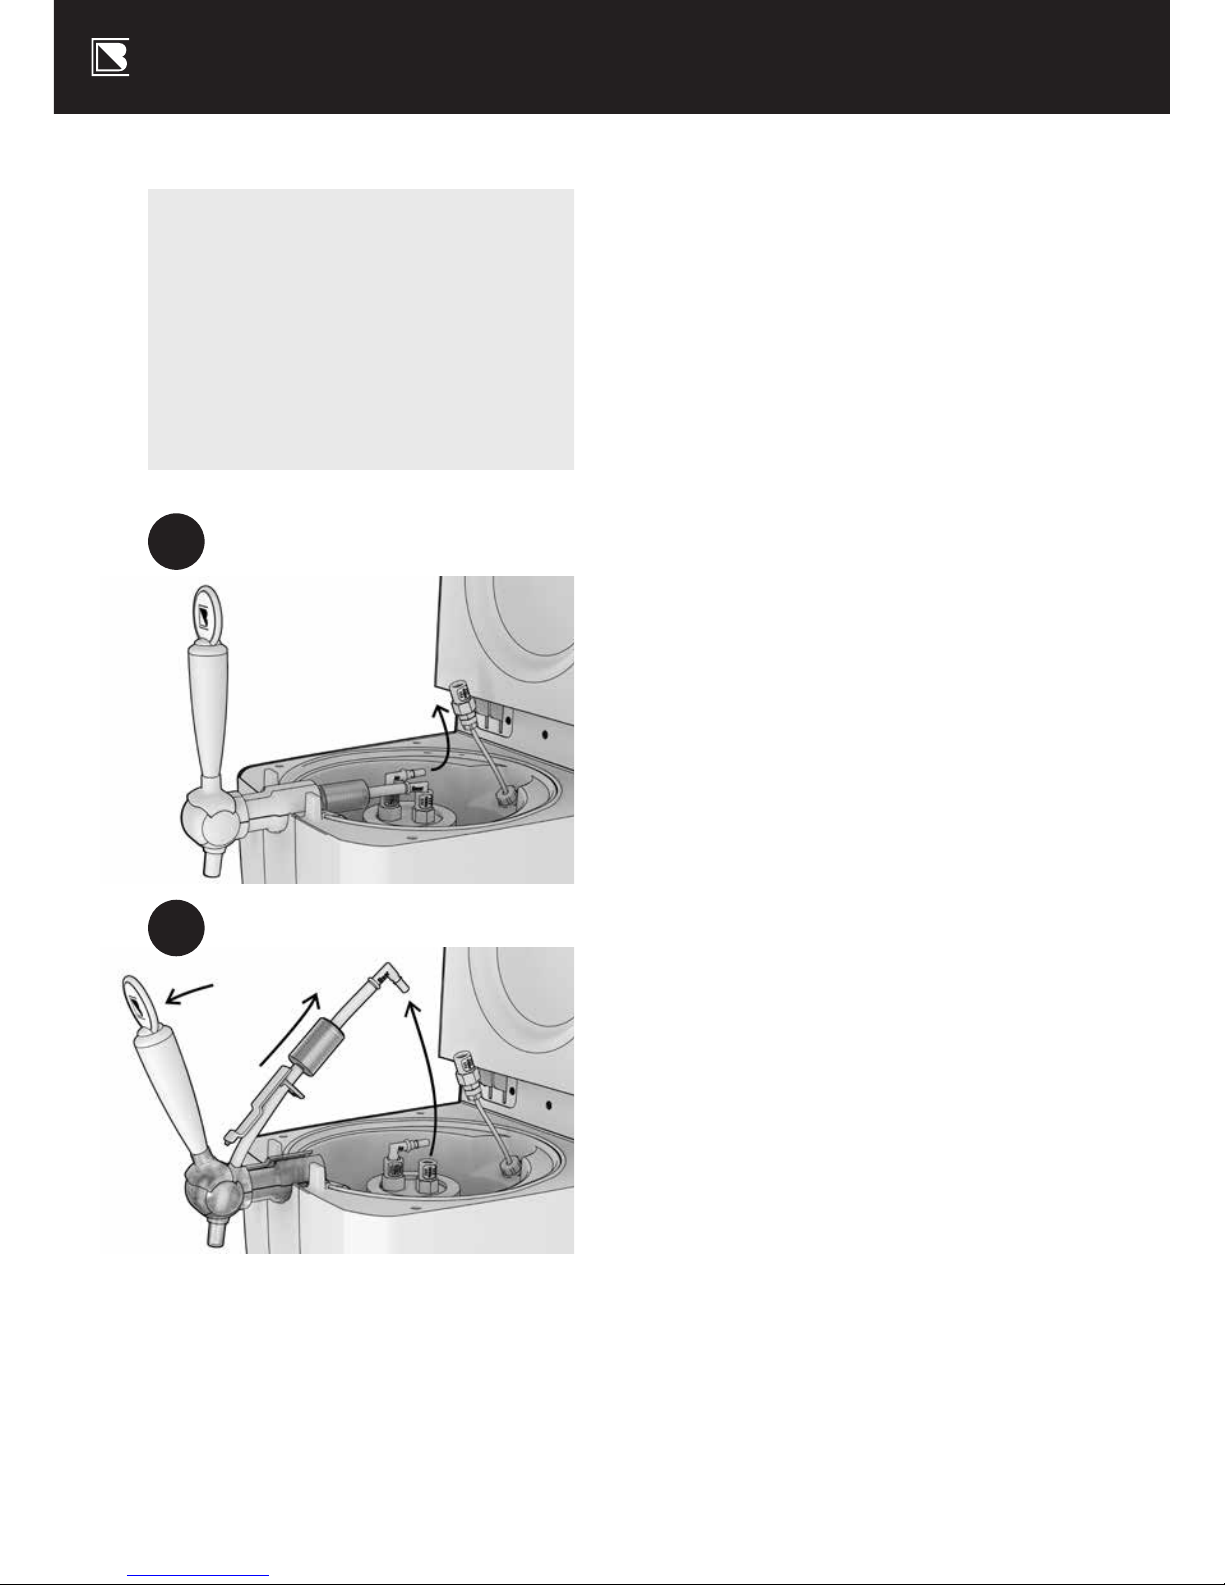
k To depressurise the keg, leave
the air line connecter in the keg.
Release the air line by pressing the
white release button, and pulling
the airline away from the black
connector – see Diagram K.
k Wait for air to completely
expel from the keg.
k Return the elbow connector
to the air line.
k Disconnect the beer line by pressing
the orange release button on the
Beer Line keg valve. The connector
should release from the keg.
k Release the beer line holder
by pressing the button and
unclip it from the beer font.
k Raise the beer line and pull the
font handle forward to drain
any residual beer from the
beer line – see Diagram L.
k Pull the beer font handle forward
and pull the beer line out from
the beer font and beer line holder
and safely dispose beer line.
k Remove keg.
k Unscrew the keg cap and
remove foil keg liner.
k Safely dispose of the foil
keg liner and beer line.
k Clean and rinse the Cap assembly
with clean water and allow to air dry
taking care not to lose small parts
when disassembling the valves.
K
L
Page 15

BREWFLO INSTRUCTIONS
15
Note
Remember to sanitise your
keg cap before each use.
Note
The same beer line can be
used with the new keg.
Once a beer line is used we
recommend that it be disposed of
and replaced with a new beer line
within three days of initial use if
not kept cool within the BrewFlo
or seven days if is kept cool.
For more FAQs and information
on beer lines and storing partially
used kegs, please go to
brewart.com/101
Cleaning
Clean your BrewFlo with a clean so
damp cloth, do not use solvents or
abrasive agents, if necessary you
may use a mild detergent.
Note
Cleaning up spills and splashes
as soon as they occur helps keep
your BrewFlo looking it's best.
During use, empty and rinse the
drip tray regularly.
When finished using the BrewFlo:
k Power o the unit at the rear switch.
k Remove the Keg and Beer Line.
k Rinse the inside of the beer
font spout with clean water.
k Drain any condensation and
spills from the inside of the unit
by pressing the drain button.
k Wipe the inside of the BeerFlo
with a so clean damp cloth.
k Empty the drip tray and
rinse it with clean water.
k Wipe the outside of the unit
with a so clean damp cloth.
k Keep empty Kegs clean and dry
and rinse and clean the Cap
assembly with clean water and
allow to air dry aer Keg is empty.
Page 16

BREWART BY COOPERS
16
Power down
k Turn your BrewFlo to standby
using the button on the control
panel, or if you are not going to
use it for an extended period turn
it o completely at the power
switch at the rear of your BrewFlo.
Condensation
k Aer extended use, the
cooling chamber may fill with
condensation. If this happens,
press the drain button at the
front of your BrewFlo until all the
condensed water drains into the
tray. Any remaining condensation
in the chamber can be removed by
wiping it with a clean so cloth.
k In humid locations condensation
may appear on the bench
underneath the BrewFlo. Wipe
any condensation from the
bench with a so cloth.
WARNING
DO NOT tilt or lay your BrewFlo
on its back or side as this may
damage the compressor.
Troubleshooting
Beer pouring flat or heady?
for these and many other
troubleshooting tips, FAQs
and instructional videos,
please visit brewart.com/101
Re-setting the keg
level indicator
1. If you notice that the keg gauge
is not displaying the correct
keg levels, you may need to
re-set the load monitor.
2. Plug the power cord in and switch
your BrewArt BrewFlo on.
3. Use the button to set your
BrewFlo to standby mode
(Power is on but LCD is o).
4. Place an empty keg plus the cap
and collar in your BrewFlo (no need
to connect air and beer lines).
5. Hold
and arrows
simultaneously for approximately 3
seconds, until your BrewFlo beeps.
6. The load monitor will be re-set
to empty, taking into account the
weight of the empty keg and cap.
Note
You don’t need to place a keg
liner in your BrewFlo as its
weight is negligible.
Page 17
BREWFLO INSTRUCTIONS
17
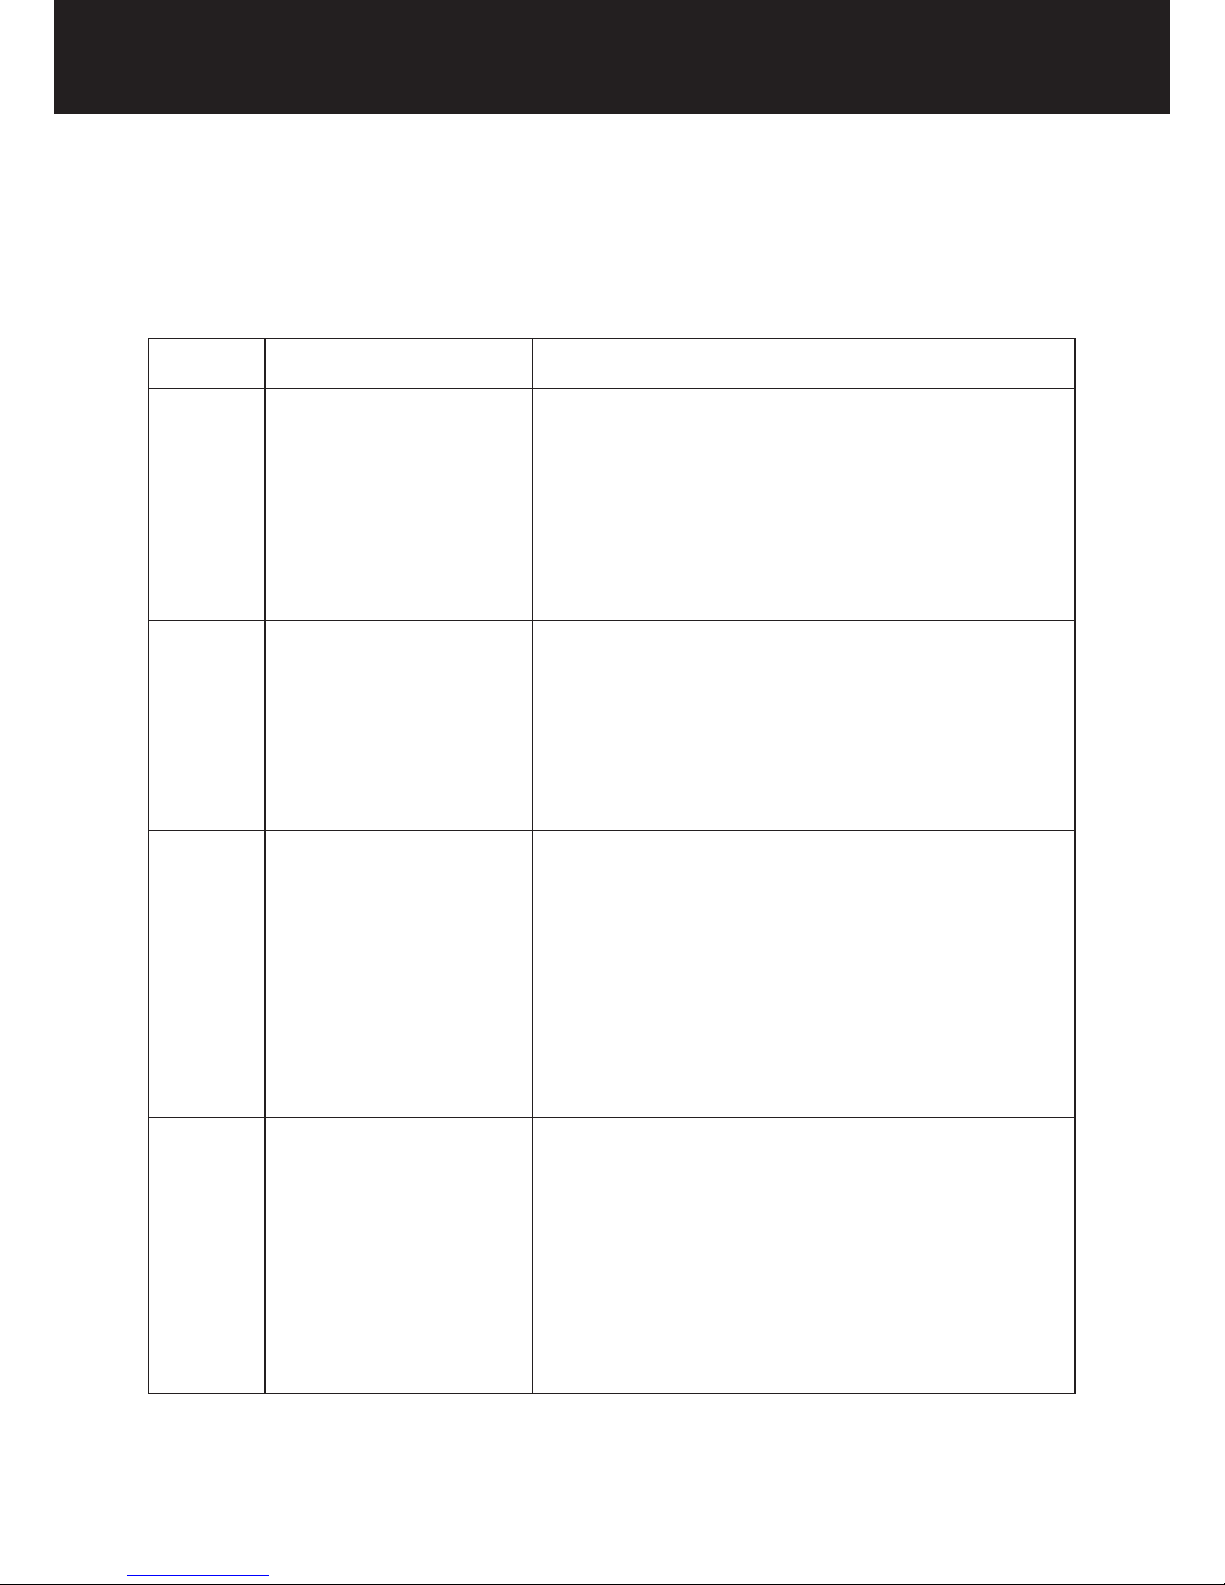
Error codes
Code Description User Action
E1 Load cell error.
The load cell
determines the
weight of the keg and
therefore the volume
of beer remaining.
Power o the unit at the wall for one minute
and try again, if the problem persists please
visit brewart.com/101 where you will find
FAQs and trouble shooting information.
If this does not help resolve your issue,
please contact customer service.
E2 Temperature
sensor error.
Power o the unit at the wall for one minute
and try again, if the problem persists please
visit brewart.com/101 where you will find
FAQs and trouble shooting information.
If this does not help resolve your issue,
please contact customer service.
E3 Air leak.
Keg failed to
pressurize within 10
minutes time limit.
Check the following:
k Connectors clicked together properly
k Keg collar is securely screwed down
Please visit brewart.com/101 where you will find
FAQs and trouble shooting information. If this
does not help resolve your issue, please contact
customer service.
E4 Pump overload.
An Air Pump
overload has been
detected, the air
pump has been
stopped for safety.
To reset this error press the front panel
button to put the unit in standby, clear error
and reset unit. Aer a few seconds press
again. If the problem persists, please
visit brewart.com/101 where you will find
FAQs and trouble shooting information.
If this does not help resolve your issue,
please contact customer service.
Page 18
BREWART BY COOPERS
18
Disposal
Correct Disposal
of this product
k This marking indicates that this
product should not be disposed
of with other household waste.
k To prevent harm to the
environment or human health from
uncontrolled waste disposal, please
recycle this product responsibly.
k Please contact your local municipal
authority or the retailer you
purchased the product from for
advice on your closest collection
depot that can recycle this product
in an environmentally responsible
and sustainable manner.
Page 19

BREWFLO INSTRUCTIONS
19
Notes
Page 20

© Coopers 2016 / AU – V1.1
BrewArt, BeerDroid and
BrewFlo are registered
trademarks of Coopers.
Due to continued product
improvement, the products
illustrated/photographed in
this brochure may vary slightly
from the actual product.
Updates to this manual
may be found at
brewart.com
 Loading...