

Breville wake cup vcf042 Instructions For Use Manual

*Cups pictured not included
®

2
Important Safety Instructions
READ CAREFULLY AND KEEP FOR FUTURE REFERENCE
This product can be used by children aged 8 years and above, and
persons who require supervision, provided:
• they are familiar with the hazards associated with the product,
and,
• they receive instruction by a competent person on how to
safely use the product.
Children must not play with the product. Cleaning and user
maintenance must not be done by children unless they are aged 8
or older and are supervised.
If the supply cord is damaged, it must be replaced by the
manufacturer,itsserviceagentorsimilarlyqualiedpersonsin
order to avoid a hazard.
This appliance is for household use only.
WARNING: The water tank cap must not be opened when the
appliance is being used. Always allow the appliance to completely
cool down before removing the water tank cap.

3
!This appliance generates heat during use. Adequate precaution must be taken to
prevent the risk of burns, scalds, res or other damage to persons or property caused
by touching the exterior whilst in use or during cooling.
!Never use this appliance for anything other than its intended use. This appliance is for
household use only. Do not use this appliance outdoors.
!Always ensure that hands are dry before handling the plug or switching on the
appliance.
!Always use the appliance on a stable, secure, dry and level surface.
!Always exercise caution when dispensing hot beverages.
!Always clean the appliance thoroughly by ushing the system with clean water.
!This appliance must not be placed on or near any potentially hot surfaces (such as a
gas or electric hob).
!Do not use the appliance if it has been dropped, if there are any visible signs of
damage or if it is leaking.
!Ensure the appliance is switched off and unplugged from the supply socket after use
and before cleaning.
!Always allow the appliance to cool before cleaning or storing.
!Never immerse any part of the appliance or power cord and plug in water or any
other liquid.
!Never let the power cord hang over the edge of a worktop, touch hot surfaces or
become knotted, trapped or pinched.
!Never leave the appliance unattended when in use.
!Never over ll the appliance.
!Never use the appliance without the drip tray or cover in place.
!Never ll the water tank with any liquid other than water. To prevent damage, never
use the appliance without water.

4
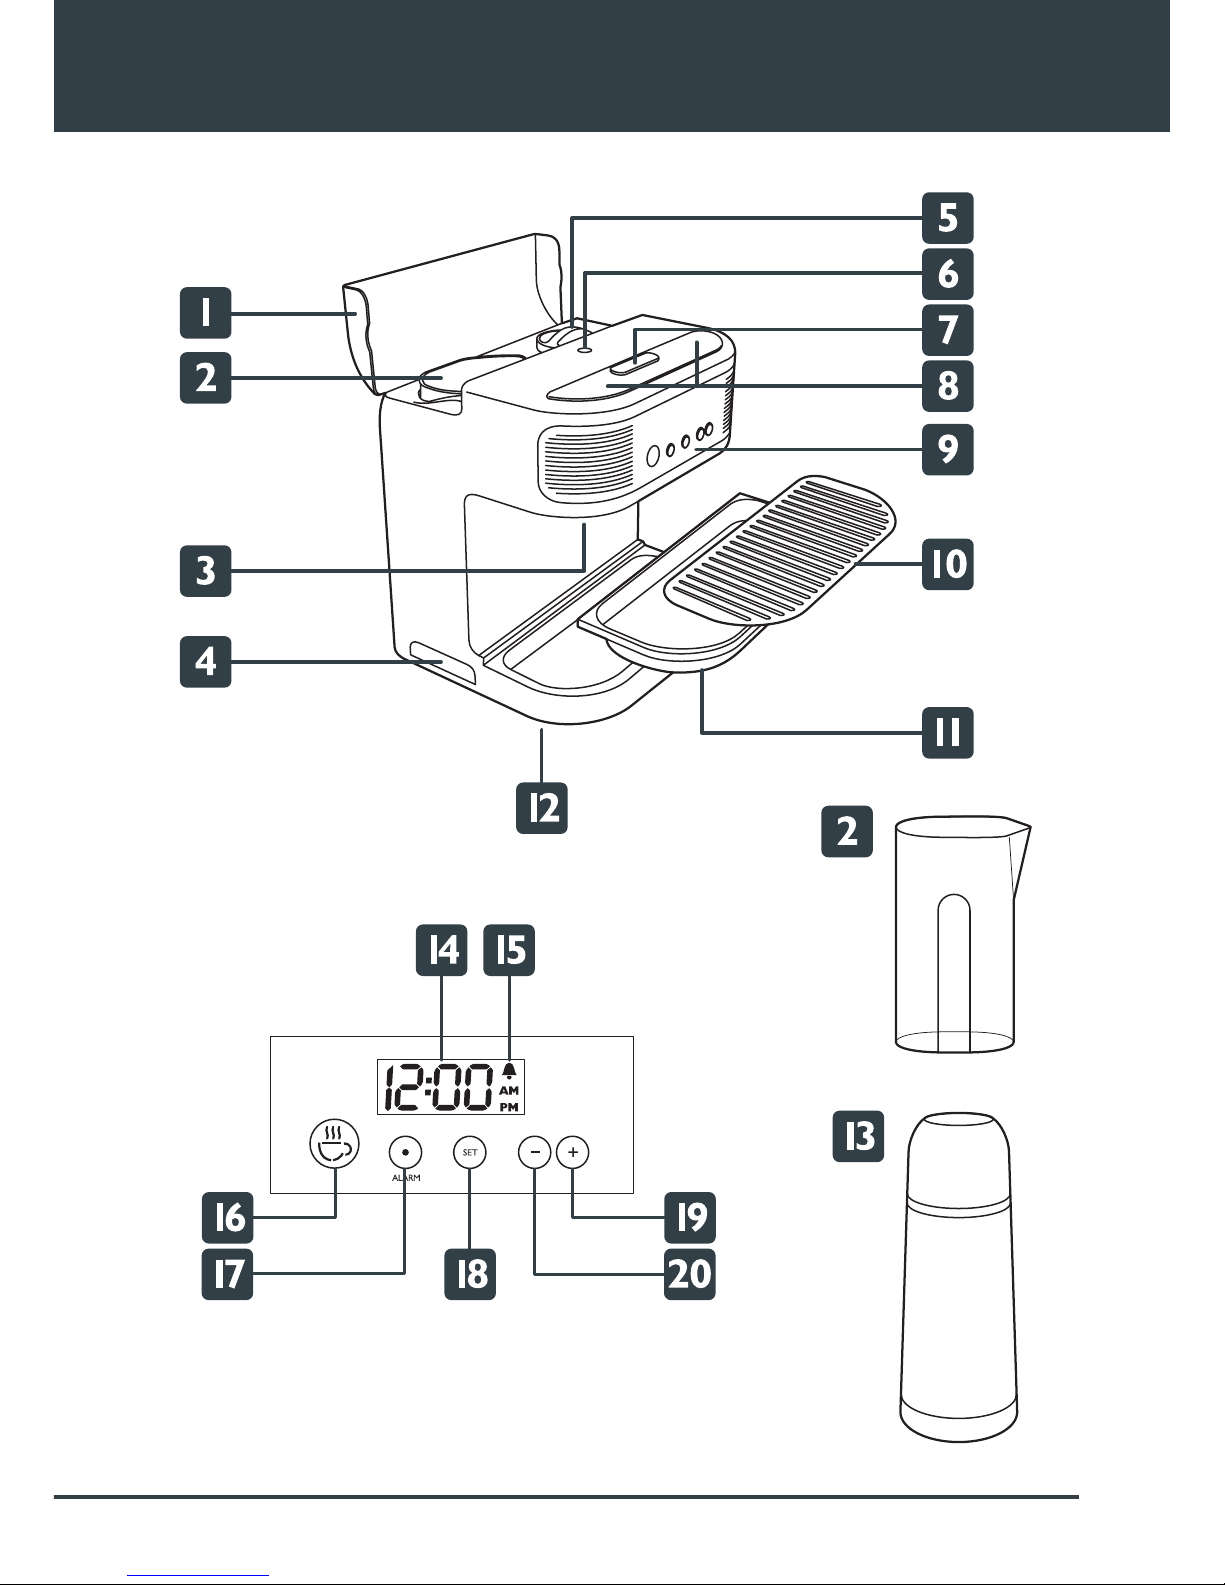
1. Rear cover
2. Water jug
3. Dispensing nozzles and dispensing lights
The dispensing lights come one when your Wake Cup is dispensing hot water.
4. Pull out tray
You can place dirty spoons and used tea bags, etc. in the pull out tray.
5. Water tank cap
The water tank cap must be retted before use.
6. Light sensor
Controls the display brightness by sensing the ambient light level.
7. Snooze/Lights button
Press for an extra 5 minutes before the alarm repeats. Also used to switch the lights
on or off at any time.
8. Gradual dawn wake up lights
The lights gradually increase their intensity to help you wake more naturally.
9. Control panel
10. Removable stainless steel drip tray cover
11. Removable drip tray
Catches drips and minor overows. No mess, just lift out and rinse it under the tap.
12. Clock back-up battery (underneath base)
The AA-size battery (not supplied) will back-up the clock in the event of power cuts
or if you need to unplug your Wake Cup for any reason.
13.Vacuumask
Allows you to keep your milk fresh and cool for use with your Wake Cup.
14. Display
15. Alarm icon
Lights up when setting the alarm time or when your Wake Cup is in alarm mode.
16. Dispense button
Puts your Wake Cup into alarm with dispense mode, immediate dispense mode or
cancels dispensing.
17. Alarm button
Used to enter alarm set mode and to cancel the alarm when it has started sounding.
18. Set button
Used during time and alarm programming.
19. Increase button
Used during alarm or time setting to increase values.
20. Decrease button
Used during alarm or time setting to decrease values.
Identifying the Parts
5

6
Before First Use
BeforeusingyourWakeCupforthersttime
Always position your Wake Cup in such a way that any splashing during the
dispensing cycle will not cause damage to the surrounding areas. Your Wake
Cup will become hot during use. Always use care when handling your Wake
Cup.
Remove your Wake Cup carefully from the box. Remove any packaging and promotional
material and position your Wake Cup on a dry, level, secure surface away from the edge.
Remove the water jug and wash it in warm soapy water. Rinse and dry thoroughly.
1. Remove the water jug and ll it with cold water to the 2 CUPS MAX mark.
2. Remove the water tank cap by giving it a quarter turn anticlockwise.
3. Carefully pour the water from the water jug into the water tank. Ret the water
tank cap by giving it a quarter turn clockwise. Make sure that the water tank
capiscorrectlyandsecurelytted. Connect your Wake Cup to a mains supply
socket. Your Wake Cup will sound two beeps. At this stage, it isn’t neccessary to set
the clock to the current time.
4. Place two suitable cups (not supplied) below the dispensing nozzles making sure
that each cup is positioned directly below a dispensing nozzle. Make sure that the
two cups are capable of holding all of the water used at step 1.
5. Press and hold the dispensing button until it turns red. Your Wake Cup will start to
boil the water.
6. When the water reaches boiling point, it will be dispensed into the cups below the
dispensing nozzles. Carefully discard this water.
Allow your Wake Cup to cool for a few minutes then repeat the above procedure once
more. This will remove any residues left over from the manufacturing process.
Wash your vacuum ask with warm soapy water and rinse thoroughly before use.
 Loading...