

Breville VFP009 User Manual
INTELLIGENT
FOOD PROCESSOR
BY

2
welcome to intelligent food processing
This food processor is a really easy to use product made for real people.
I’m passionate about simple, honest home cooked food. So I’ve developed a range of products to
help you to make great food—just like mum used to.
Packed with clever little features, my products take all the guesswork out of cooking.
This intelligent Food Processor will help you to release your inner chef and some of your spare
time! Enjoy!

3
what you can do with this machine
Successful home cooking is all about balancing speed with great results. Food processors are
ideal for producing great meals fast. My Intelligent Food Processor goes one step further, its
programmed buttons take all the guesswork out of food preparation.
My Intelligent Food Processor is versatile too. With its many accessories and blending attachment
you can do all this:
Blender Food processor
Crush ice Puree
Make milk shakes Make cakes, pastry and bread
Make baby food Slice vegetables
Make batters and pancakes Mash potatoes
Make frappes Make bread crumbs
Make great dips Grate cheese and vegetables
Make mayonnaise Juice citrus fruits
how to use these instructions
Each function and attachment of your Intelligent Food Processor is explained in its own section.
You can read each section on its own. For example, if you just want to know how you use the
whisk, just go to the ‘The whisk attachment’ section. Everything you need to know is there.
For your safety, please read the important safety instructions section on page 48 before operating
your Intelligent Food Processor.

4
contents
Welcome to intelligent food processing ............................................................................................ 2
What you can do with this machine ..................................................................................................3
Safety interlock system ..................................................................................................................... 5
Understanding all the parts ...............................................................................................................6
Accessories and attachments ............................................................................................................8
What the buttons do .......................................................................................................................10
Blending ........................................................................................................................................... 12
The chopping blade .........................................................................................................................14
The dough blade ..............................................................................................................................16
The whisk attachment ..................................................................................................................... 18
The slicing, shredding and grating blades ........................................................................................20
The citrus press ............................................................................................................................... 24
Care, cleaning and storage .............................................................................................................. 26
Recipes
Pea guacamole ................................................................................................................................. 28
Apple snow ......................................................................................................................................29
Clean and green chicken salad ........................................................................................................30
Mediterranean carrot rolls ..............................................................................................................32
Raspberry pavlova roulade .............................................................................................................. 34
Orange and almond cake................................................................................................................. 36
Ricotta griddle cakes with honeyed yogurt and berries ..................................................................38
Courgette and lemon pasta with parmesan ....................................................................................40
Banana pancakes with chocolate fudge sauce .................................................................................42
Hot chocolate souffles with raspberry sauce ..................................................................................44
Refrigerator biscuits.........................................................................................................................46
Important safety instructions ........................................................................................................... 48
Connection to the mains supply ...................................................................................................... 49
After sales service ............................................................................................................................50
Guarantee ........................................................................................................................................51

5
safety interlock system
If you tried to operate your food processor without say, the lid fitted, nothing would happen! This
is because, for your safety, your food processor has a safety interlock system making it impossible
for it to operate unless everything is correctly fitted together.
Detailed instructions on how to use your food processor and its attachments are given throughout
this booklet but briefly:
food processor
The processor bowl must first be fitted to the food processor body and locked in place.
After you have inserted the desired attachment, (chopping blade, whisk, etc.), the processor
bowl lid must be fitted onto the bowl and correctly locked in place.
When you are using the food processor, the safety cap must be fitted over the blender jug
drive take-off point. Remember, you can’t use the blender jug and food processor at the same
time.
blending
The processor bowl and processor bowl lid must be fitted to the processor body and locked
in place. It’s best not to have any attachment (chopping blade, whisk, etc.) fitted to the
processor drive shaft.
Remove the safety cap covering the blender drive shaft then fit and lock the blending jug.
The blender will not work unless the blending jug lid is correctly fitted and locked in place.
•
•
•
•
•
•

6
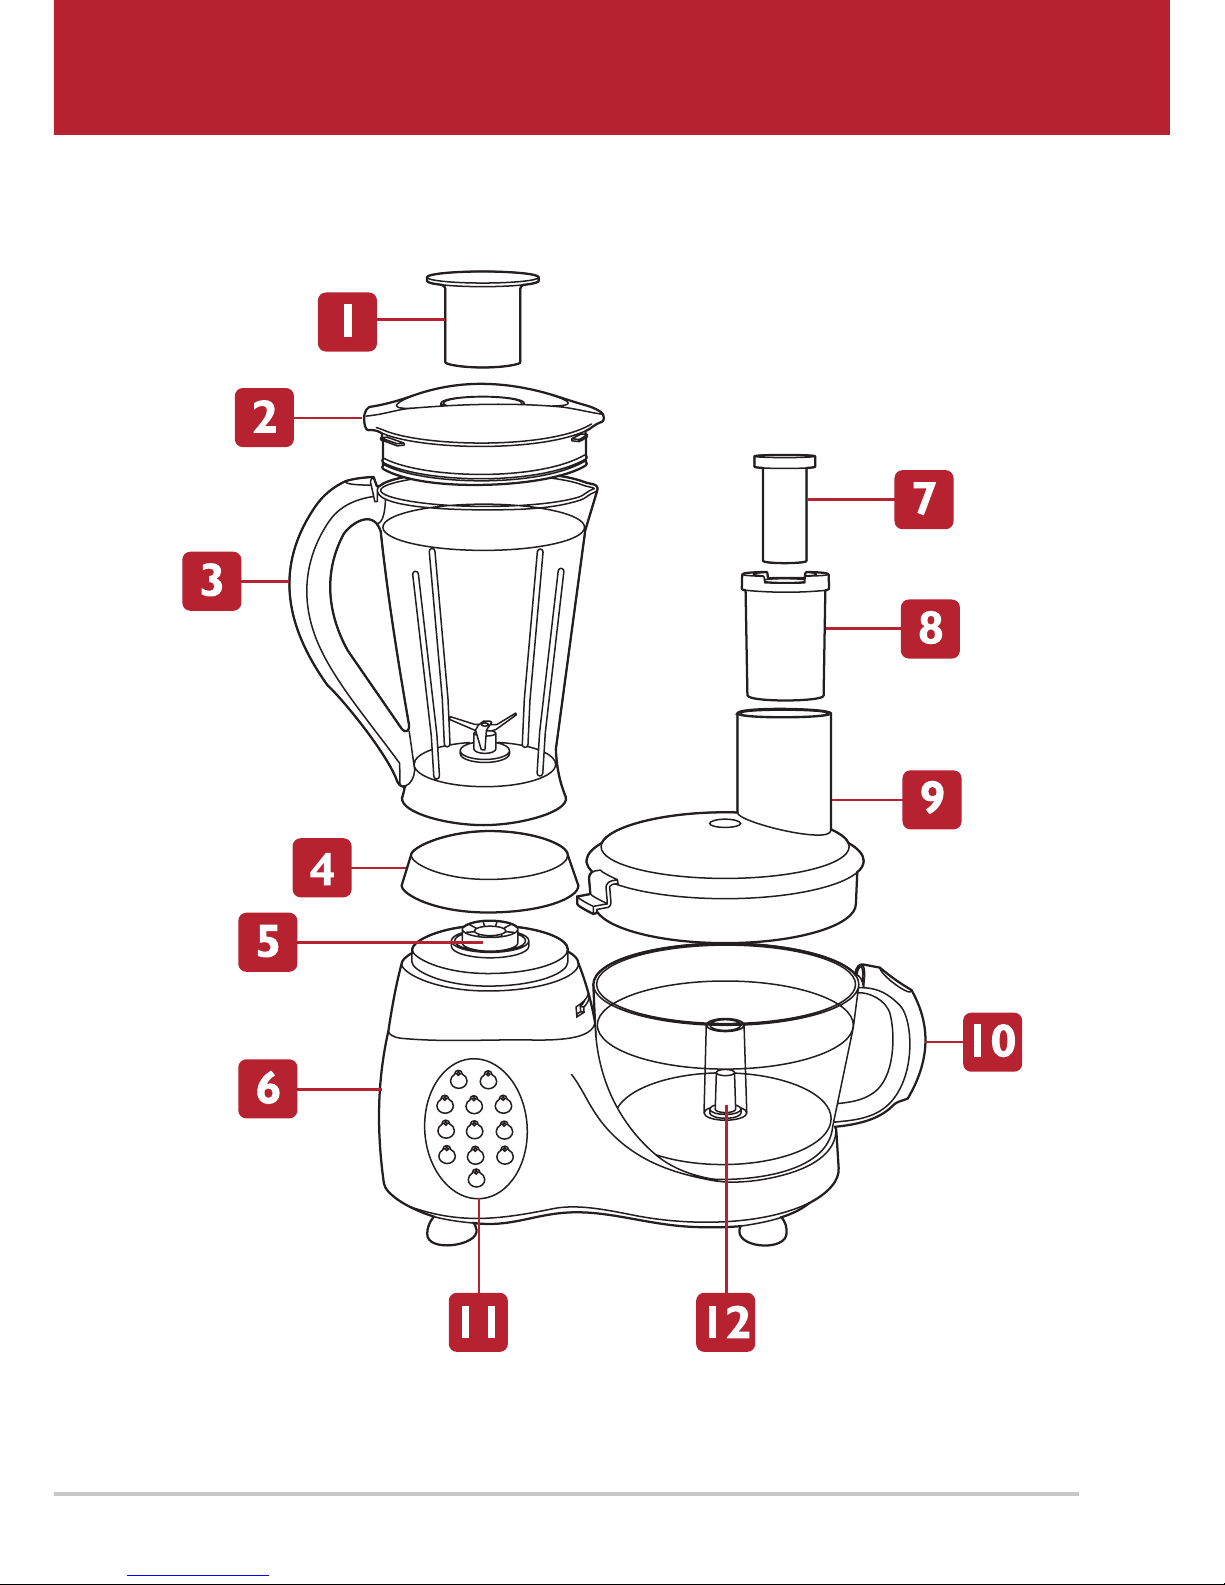
understanding all the parts
1 Stopper
Removable stopper allows you to safely add ingredients to the blender jug whilst it’s
operating. The stopper doubles as a handy 50ml measure. Dishwasher safe.
2 Blender jug lid
Locks into place to ensure spill-free blending. Easily removed for pouring. Dishwasher safe.
3 1.5 litre blender jug
The large capacity toughened plastic blender jug, features an easy grip handle and is marked
in both cup and millilitres (ml). The transparent jug allows you to observe the consistency of
the food during blending. Dishwasher safe.
4 Safety cap
The safety cap covers the blending jug drive shaft when the blender is not in use
5 Blender drive shaft
6 Food processor body
7 Small food pusher/measure
Allows smaller items of food such as spring onions, chives, etc. to be fed into the processor.
Doubles as a handy 100ml measure. Dishwasher safe.
8 Large food pusher
Allows you to safely push foods to be sliced, grated or shredded into the processor bowl.
Dishwasher safe.
9 Food processor bowl lid
The locking food processor bowl lid ensures safe operation. The extra wide feed tube allows
ingredients to be added during processing. Dishwasher safe.
10 1.5 Litre processor bowl
The large capacity toughened transparent plastic processor bowl allows you to observe the
progress of the food during processing. Dishwasher safe.
11 Control panel
Consists of 12 electronic touch buttons - 8 preset programs: BATTER, SMOOTHIE, PUREE,
MAYO, CITRUS PRESS, DOUGH/CAKE, SLICE/CHOP and WHISK. All preset programs
switch off automatically when the cycle is complete. 4 manual buttons: FAST, SLOW, STOP
and PULSE.
12 Drive shaft
7

8
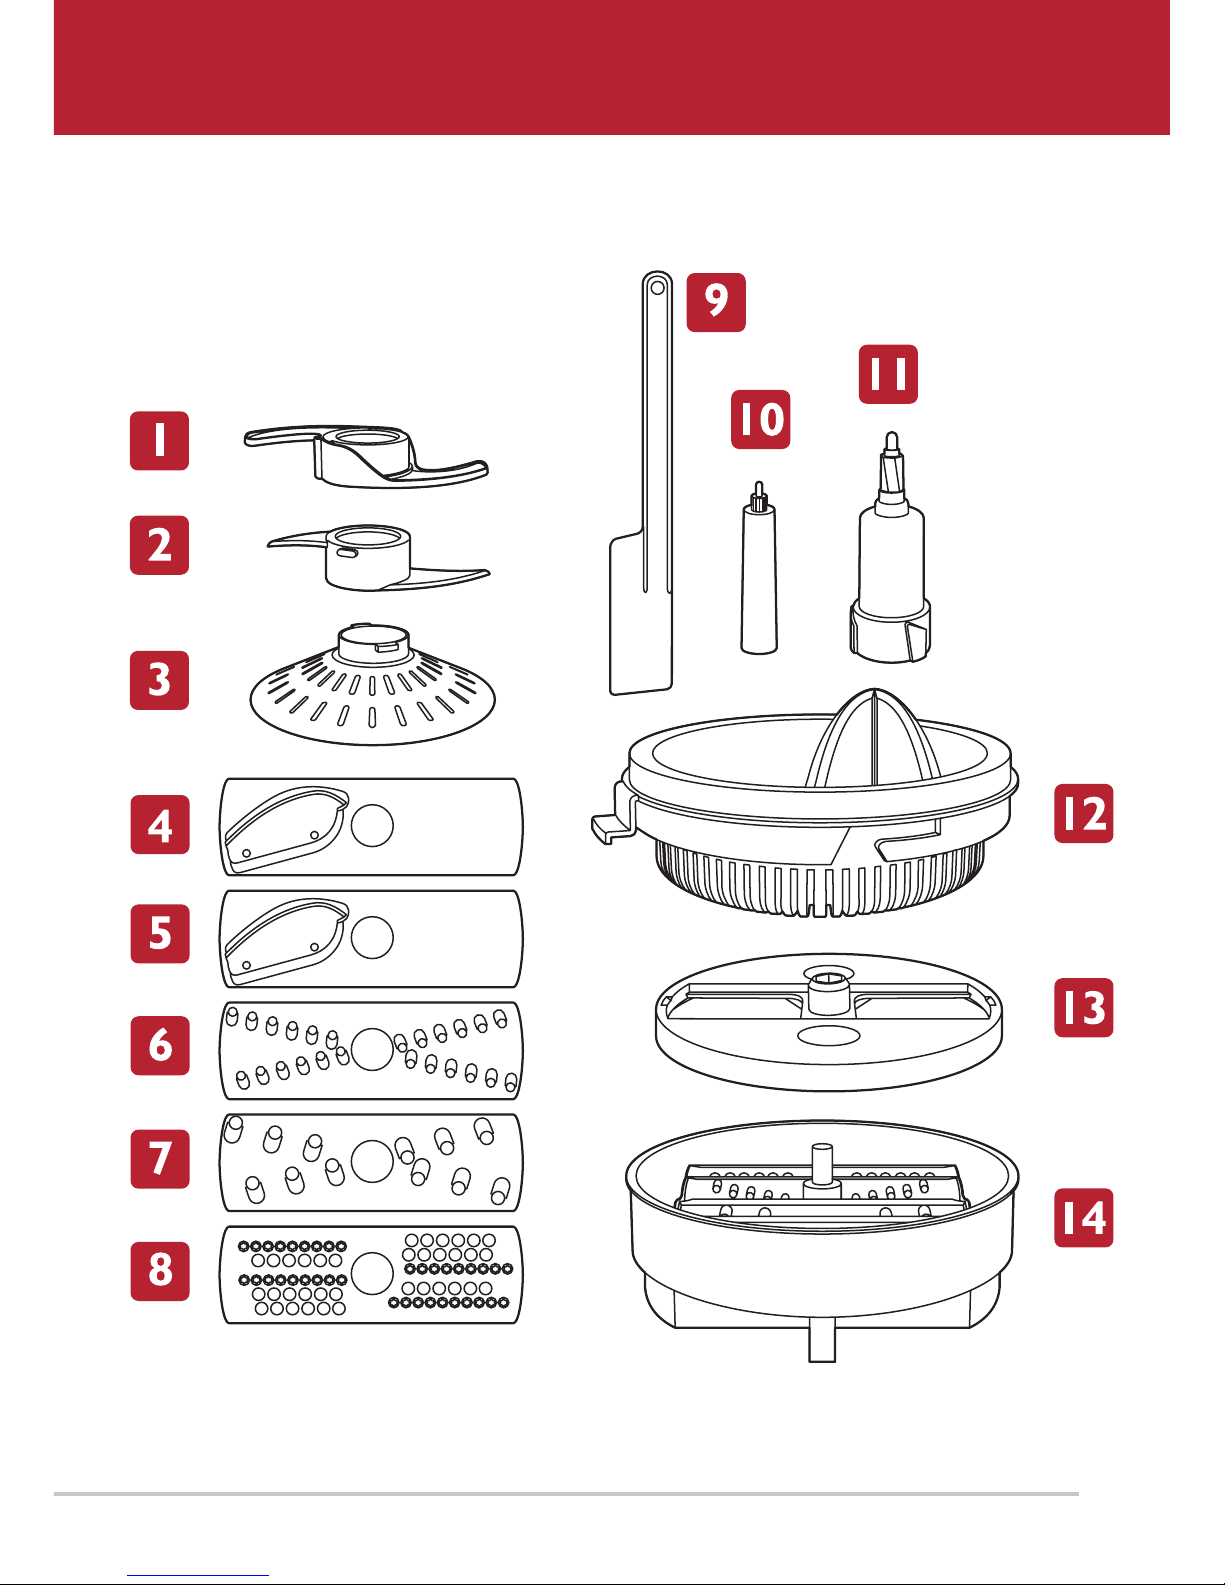
accessories and attachments
1 Chopping blade and chopping blade safety cover
Use for pureeing soft or cooked foods and chopping raw foods. Make dressings, mash
potatoes, make bread crumbs, chop herbs, etc.
2 Dough blade
Use for kneading dough, mixing dry ingredients, mixing light pastries, cakes and
batters.
3 Whisk
Use the whisk to whip egg whites, cream and light sauces.
4 Fine slicing blade
Produces approximately 2.5 mm thick slices of foodstuffs like carrots, cucumbers, tomatoes,
potatoes, onions, celery, etc.
5 Coarse slicing blade
Produces approximately 3.5 mm thick slices of foodstuffs like carrots, cucumbers, tomatoes,
potatoes, onions, celery, etc.
6 Fine shredding/grating blade
Use for finely shredding or grating foodstuffs such as cheese, carrots, cabbage, potatoes,
courgettes, etc.
7 Coarse shredding/slicing blade
Use for coarsely shredding or grating foodstuffs such as cheese, carrots, cabbage, potatoes,
courgettes, etc.
8 Rasping blade
Use for finely grating hard cheeses like parmesan or to grate coconut.
9 Spatula
10 Citrus press spindle
Used to power the citrus press.
11 Large spindle
Used in conjunction with the chopping blade, dough blade, whisk and slicing/shredding/
rasping blades.
12 Citrus press attachment
Use to juice citrus fruits such as lemons, limes, grapefruits, oranges, etc.
13 Blade holder
Used to hold the slicing/shredding/rasping blades during processing.
14 Blade storage container
Safely and neatly stores the slicing/shredding/rasping blades.
9

10
Button Suggested use
Blender/
Processor
Notes
1
BATTER
Savoury pancakes,
American style thick
pancakes, batter for
frying fish, tempura,
crepes
Blender Simply add your favourite batter ingredients to the blender
jug, press the Batter button and wait. Pancake batter works
best if it’s rested for about 10 minutes after you’ve made
it. Just give it a quick pulse in the blender for a few seconds
before using it.
2
SMOOTHIE
Smoothies (fruit and
yoghurt or fruit and
milk based drinks).
Fruit or vegetable
drinks
Blender Make drinks with a base of naturally soft or ripe fruits/
vegetables (strawberries, tomatoes, etc.) or foods that have
been softened through cooking. Don’t blend hard vegetables
such as carrots unless cooked first. Add liquid to achieve the
desired smoothie consistency. Always remove stones from
fruit or vegetables.
3
PUREE
Pureeing raw soft fruit
or vegetables, making
baby food, smoothing
soups, make pates,
guacamole, hummus.
Blender When pureeing, liquid is essential. Some fruits/vegetables are
high in water content and will need less or no additional water.
Add stock, yoghurt, milk or water a little at a time through the
pouring hole until the desired consistency is reached.
4
MAYO
Traditional and
flavoured mayonnaise
(pesto, garlic, spice).
Salad cream or
dressing
Blender For mayonnaise use ingredients at room temperature. If
your eggs are chilled you will end up with a runny sauce.
Slowly pouring oil into the mixture is fundamental to making
mayonnaise. Remove the stopper and pour oil through the
pouring hole.
5
CITRUS
PRESS
Juicing citrus fruits
such as oranges,
grapefruits, lemons
or limes
Processor Use this function to produce fresh juice. The pips and pith will
be strained out by the citrus press.
6
DOUGH/
CAKE
Kneading dough,
mixing dry
ingredients, mixing
light pastry
Processor For best results, stop the processor at intervals and use the
spatula to scrape any ingredients that are clinging to the sides
of the processor bowl back into the mixture. You can manually
increase or decrease the kneading speed while the program is
running using the Fast or Slow buttons.
7
SLICE/
CHOP
Slicing, chopping,
grating, shredding etc.
Processor Use the desired blade on foods such as carrots, cheese,
cucumber, tomatoes, potatoes, cabbage, etc.
8
WHISK
Whisking egg whites,
cream, sauces, etc.
Processor When whisking egg whites, ensure the processor bowl and
whisk is free from grease. Don’t over whisk the egg whites.
You can manually increase or decrease the whisking speed
while the program is running using the Fast or Slow buttons.
9
PULSE
Chopping nuts, herbs,
bread crumbs, biscuit
crumbs etc.
Both The Pulse button allows precise control of the duration and
speed of processing. Press and hold the Pulse button to start
processing, and release it to stop.
10
FAST, SLOW
Fast/Slow buttons Both These buttons allow you to manually adjust the processing
speed in 8 steps. Simply press the Fast or Slow button
repeatedly while the processor is running the change the
speed.
11
STOP
Stop button Both Press at any time to stop processing or blending.
what the buttons do

11
the magic of programmed buttons!
The programmed buttons take the guesswork out of food processing. All you need to do to get
great chef results is press a button!

12
blending
what it’s for
The blender of your food processor can be used to blend soups, make sauces, smoothies,
milkshakes, frappés, baby food, fruit, thin batters, in fact lots of things!
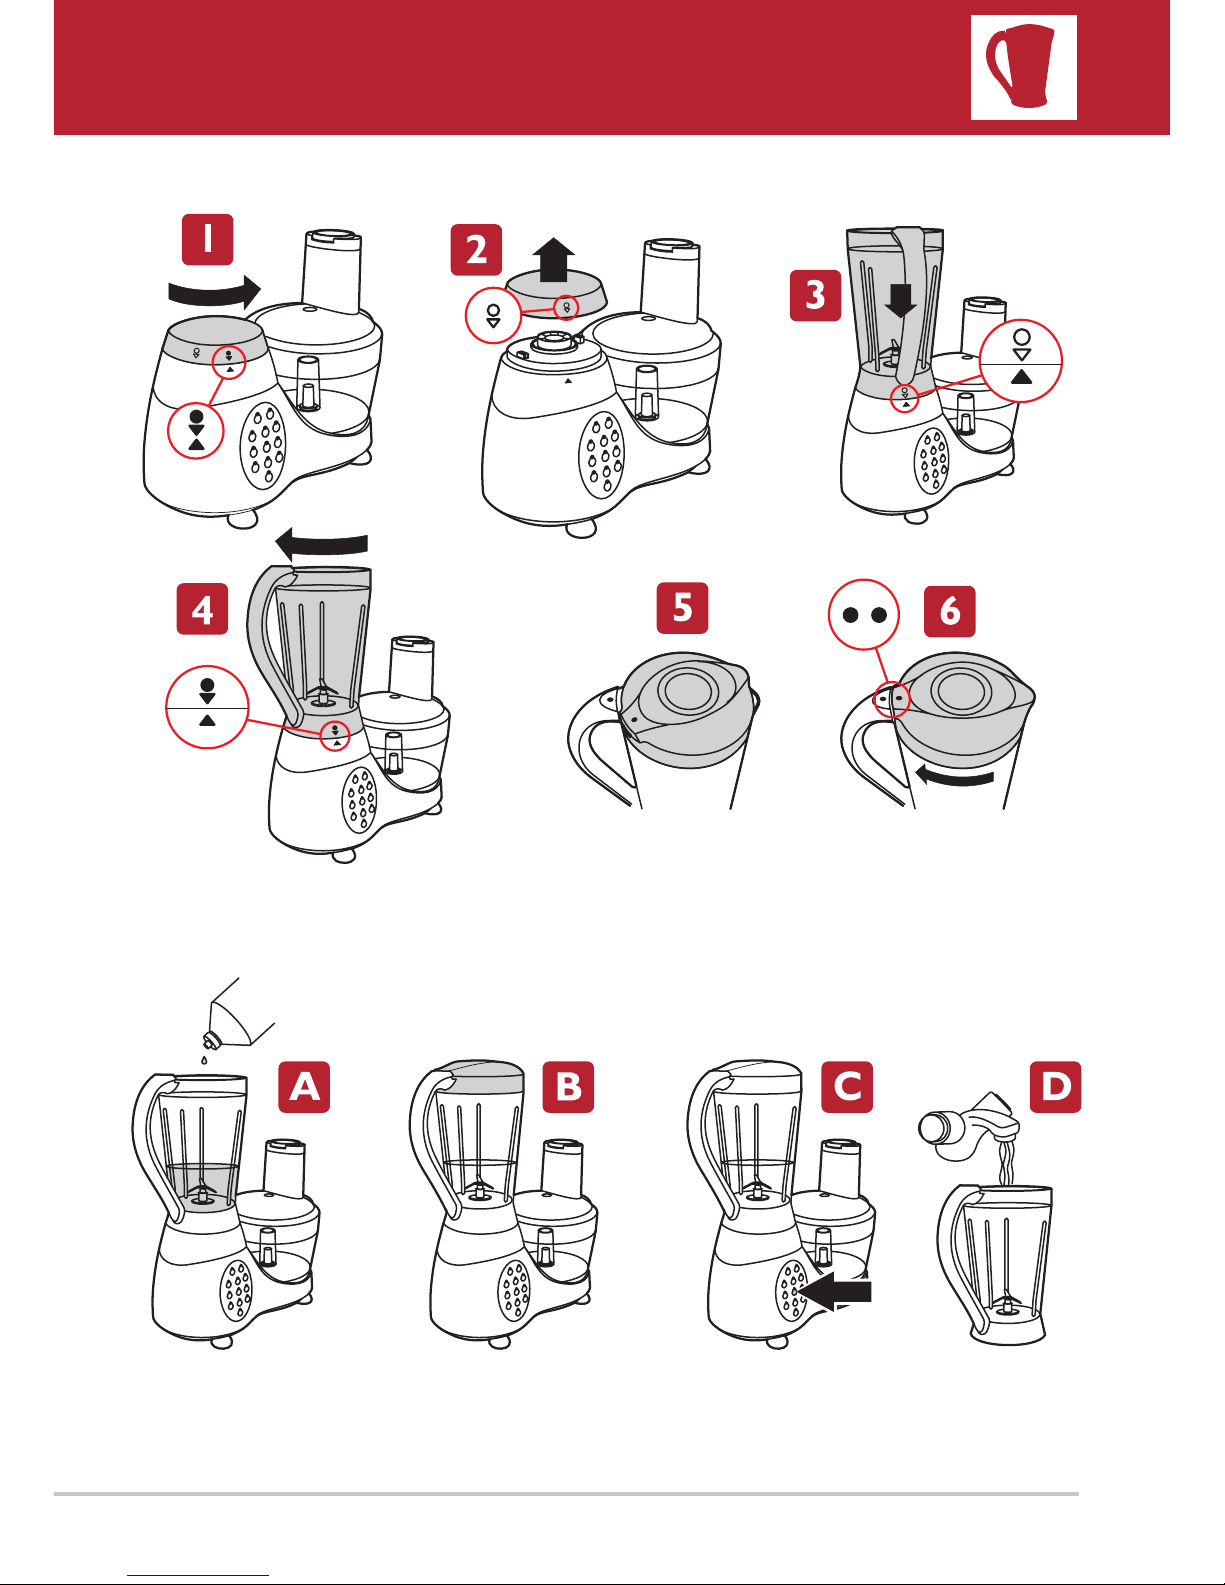
tting it
Rotate the safety cap anticlockwise until the symbol on the cap lines up with the arrow
on the base unit.
Remove the safety cap
Fit the blender jug to the base unit lining up the symbol on the base of the jug with the
arrow on the base unit.
Rotate the blender jug clockwise until the symbol lines up with the arrow.
Fit the lid and stopper onto the blending jug. Ensure that the lip of the blender lid is
positioned to the left of the spout on the blender jug as shown.
Rotate the lid clockwise until the dot on the handle and the dot on the lid are opposite each
other and the lid locks into place.
using it
For the blender to operate, the processor bowl and lid must be correctly fitted. It’s best not to
have any attachment (chopping blade, whisk, etc.) fitted to the processor drive shaft.
Add the ingredients to the blending jug, refit the lid and stopper and press one of the programmed
blending buttons (Batter, Smoothie, Puree or Mayo).
Further ingredients can be added by stopping the blender and removing the stopper or the lid.
Replace the stopper or lid before starting the blender again. Don’t overfill the blending jug. Cut
large pieces of food into 2.5cm (1”) cubes.
A red indicator light will illuminate above the chosen button when the blender is running. The
indicator will go out when the program finishes.
Don’t forget that some blending programs will cause your blender to operate at different speeds
during the cycle, or stop and start during use. This is completely normal.
cleaning it
It’s best to clean your blender as soon as you have finished using it. When you have emptied the
contents of the blending jug, refit it to the base unit and:
A Fill the blending jug a quarter full with warm water and add one drop of washing up liquid.
B Refit the lid and stopper onto the blending jug.
C Press the Pulse button for a few seconds.
D Remove the blender jug and rinse it out with clean running water.
E Dry the jug, lid and stopper with a soft cloth. Always make sure that the base of the blender
jug is completely dry before using it again.
Never use any harsh abrasive cleaning products to clean your blender jug or any other part of
your food processor.
1.
2.
3.
4.
5.
6.
13

14
the chopping blade
what it’s for
The chopping blade can be used to puree soft or cooked foods and chop/mince raw foods. You
can use it to make dressings, mash potatoes, make bread crumbs, chop herbs and mix/blend all
sorts of ingredients.
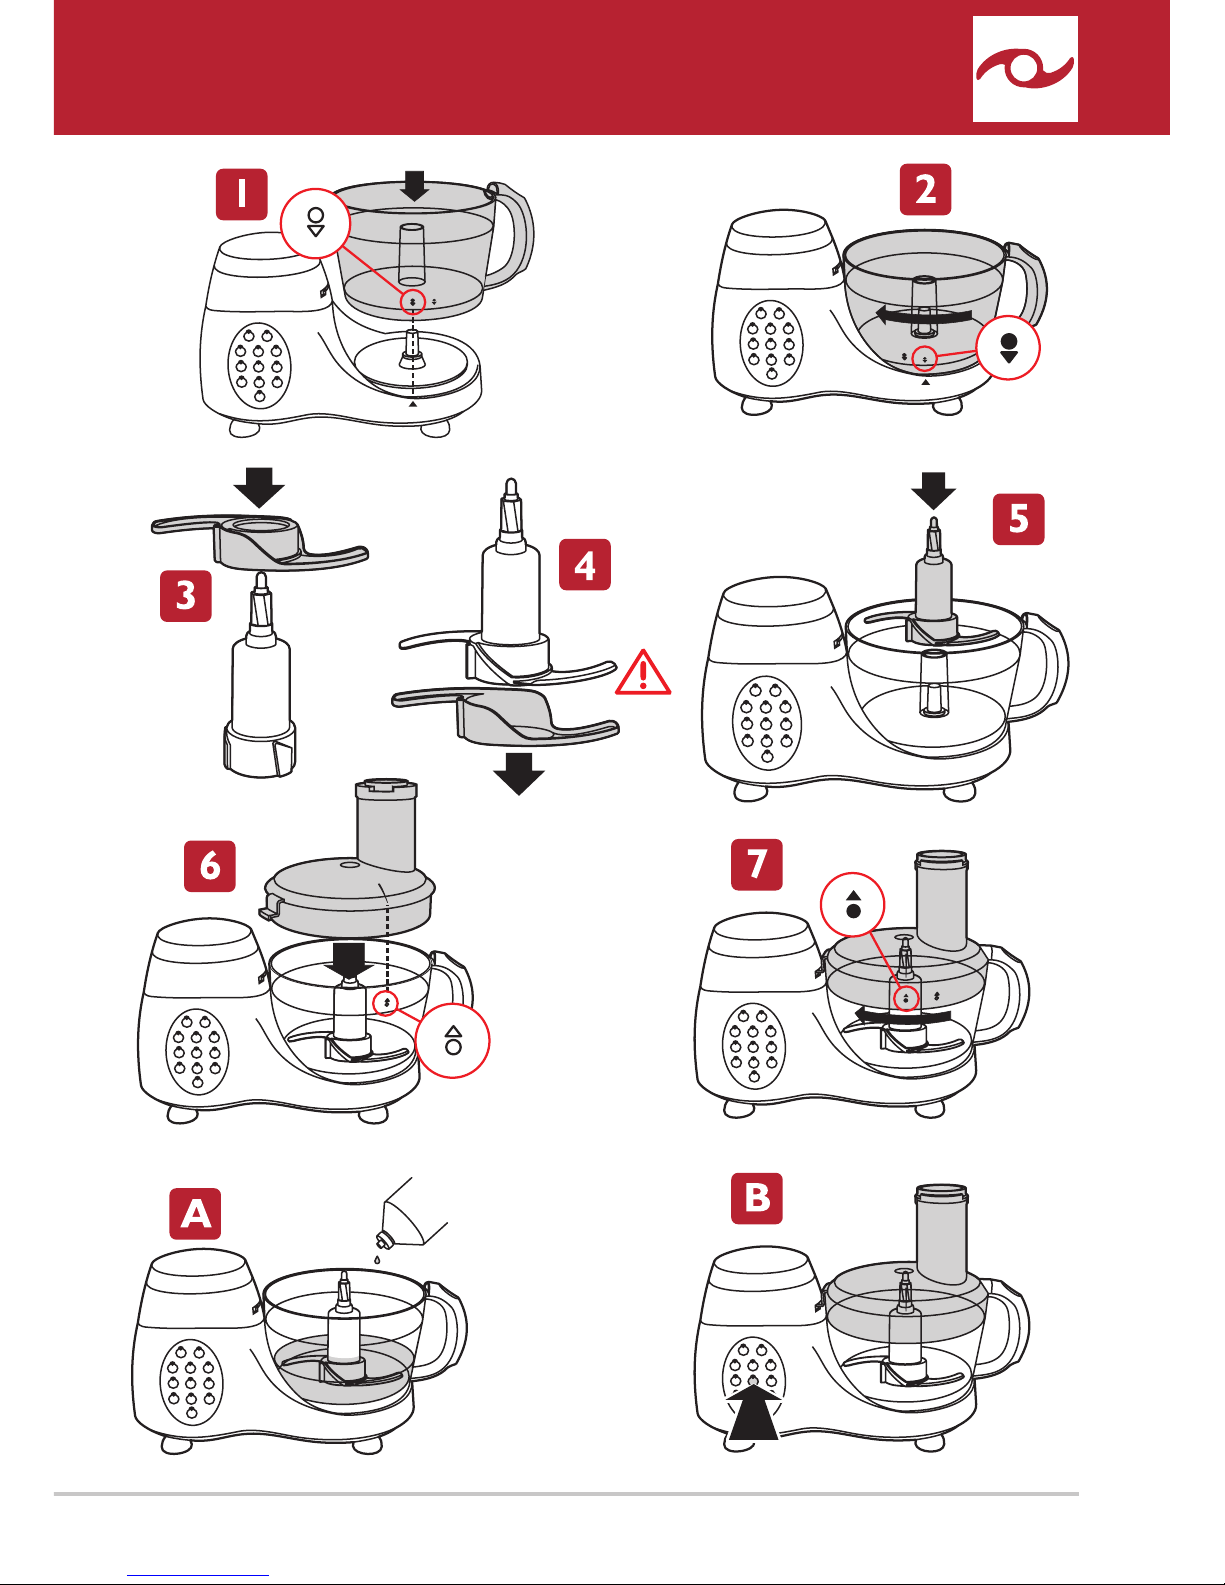
tting it
The chopping blade is very sharp! Take care when handling or cleaning it.
If the blender jug is fitted on the base unit, remove it and install the safety cap.
Lower the processor bowl over the drive shaft, ensuring the symbol on the bowl is aligned
with the symbol on the processor base.
Rotate the processor bowl clockwise until the symbol on the bowl is aligned with the
symbol on the processor base.
Fit the chopping blade with its safety cover onto the large spindle.
Carefully remove the chopping blade safety cover from the chopping blade. DO NOT
HANDLE THE BLADES.
Slide the chopping blade/large spindle assembly over the drive shaft in the processor bowl.
You may need to turn the blade/spindle assembly until it drops all the way down onto the
drive shaft.
Lower the bowl lid onto the processor bowl ensuring the symbol on the top rim of the
bowl is aligned with the line on the bowl lid.
Rotate the bowl lid clockwise until the line on the bowl lid is aligned with the symbol on the
top rim of the processor bowl.
using it
For the processor to operate, the processor bowl, lid and safety cap must be correctly fitted.
Add the ingredients to the processor bowl, refit the processor bowl lid and press the Slice/Chop
button. Alternatively, press the Pulse button in short bursts to have greater control over texture
and consistency.
More ingredients can be added during processing through the feed tube in the processor bowl
lid. Remove the food pusher, add the ingredients then replace the food pusher. Don’t overfill the
processor bowl.
cleaning it
It’s best to clean your processor as soon as you have finished using it. When you have emptied the
contents of the processor bowl, refit it to the base unit and:
A Fill the processor bowl a quarter full with warm water and add one drop of washing up liquid.
B Refit the processor lid and press the pulse button for a few seconds.
C Remove the bowl, lid and chopping blade assembly and rinse under clean running water.
D Dry the processor bowl, lid and chopping blade with a soft cloth. Carefully refit the chopping
blade safety cover over the blade.
Never use any harsh abrasive cleaning products to clean your processor bowl or any other part of
your food processor.
1.
2.
3.
4.
5.
6.
7.
15

16
the dough blade
what it’s for
The dough blade can be used to knead dough, mix dry ingredients and mix light pastry, cakes and
batters.
tting it
If the blender jug is fitted on the base unit, remove it and install the safety cap.
Lower the processor bowl over the drive shaft, ensuring the symbol on the bowl is aligned
with the symbol on the processor base.
Rotate the processor bowl clockwise until the symbol on the bowl is aligned with the
symbol on the processor base.
Fit the dough blade onto the large spindle.
Slide the dough blade/large spindle assembly over the drive shaft in the processor bowl. You
may need to turn the blade/spindle assembly until it drops all the way down onto the drive
shaft.
Lower the bowl lid onto the processor bowl ensuring the symbol on the top rim of the
bowl is aligned with the line on the bowl lid.
Rotate the bowl lid clockwise until the line on the bowl lid is aligned with the symbol on the
top rim of the processor bowl.
using it
For the processor to operate, the processor bowl, lid and safety cap must be correctly fitted.
Add the ingredients to the processor bowl, refit the processor bowl lid and press the Dough/Cake
button. Alternatively, press the Pulse button in short bursts to have greater control over texture
and consistency.
More ingredients can be added during processing through the feed tube in the processor bowl
lid. Remove the food pusher, add the ingredients then replace the food pusher. Don’t overfill the
processor bowl.
cleaning it
It’s best to clean your processor as soon as you have finished using it. When you have emptied the
contents of the processor bowl, refit it to the base unit and:
A Fill the processor bowl a quarter full with warm water and add one drop of washing up liquid.
B Refit the processor lid and press the pulse button for a few seconds.
C Remove the bowl, lid and dough blade assembly and rinse under clean running water.
D Dry the processor bowl, lid and dough blade with a soft cloth.
Never use any harsh abrasive cleaning products to clean your processor bowl or any other part of
your food processor.
1.
2.
3.
4.
5.
6.
 Loading...