

Breville VDF105 Instruction manual
®
®
Halo+
Health fryer

product safety
READ CAREFULLY AND KEEP FOR FUTURE REFERENCE
This appliance shall not be used by children from 0 year to
8 years. This appliance can be used by children aged from
8 years and above if they are continuously supervised. This
appliance can be used by people with reduced physical,
sensory or mental capabilities or lack of experience and
knowledge if they have been given supervision or instruction
concerning use of the appliance in a safe way and understand
the hazards involved.
Keep the product and its cord out of reach of children aged
less than 8 years. Cleaning and user maintenance must not be
done by children.
This product must be positioned on a stable surface with the
handles positioned to avoid the spillage of hot liquids.
Surfaces of the product are liable to get hot during use.
Never operate the product by means of an external timer or
separate remote-control system.
Never immerse any part of the appliance or power cord and
plug in water or any other liquid.
If the supply cord is damaged, it must be replaced by the
manufacturer, its service agent or similarly qualied persons
in order to avoid a hazard.
2
2

! Never use this appliance for anything other than its intended use. This appliance is for
household use only. Do not use this appliance outdoors.
! Always ensure that hands are dry before handling the plug or switching on the
appliance.
! Always use the appliance on a stable, secure, dry and level surface.
! Ensure the appliance is switched off and unplugged from the supply socket if it is
left unattended, when it is not in use or before cleaning. Never leave the appliance
unattended when it is in use.
! Always allow the appliance to fully cool down before cleaning or storing.
! Do not use the appliance if it has been dropped, if there are any visible signs of
damage or if it is leaking.
! Never let the power cord hang over the edge of a work top, touch hot surfaces or
become knotted, trapped or pinched.
! Do not touch the external surfaces of the appliance during use as they may become
very hot.
! Only use spares or accessories that are recommended by the manufacturer.
! When the appliance is in the tilted position, the lid will not stay open on its own.
Always return the appliance to the level position before opening the lid.
! Allow adequate space above and on all sides for air circulation.
! Do not allow the appliance to touch any ammable material during use (such as
curtains or wall coverings).
! Care is required when using the appliance on surfaces that may be damaged by heat.
The use of an insulated pad is recommended.
3

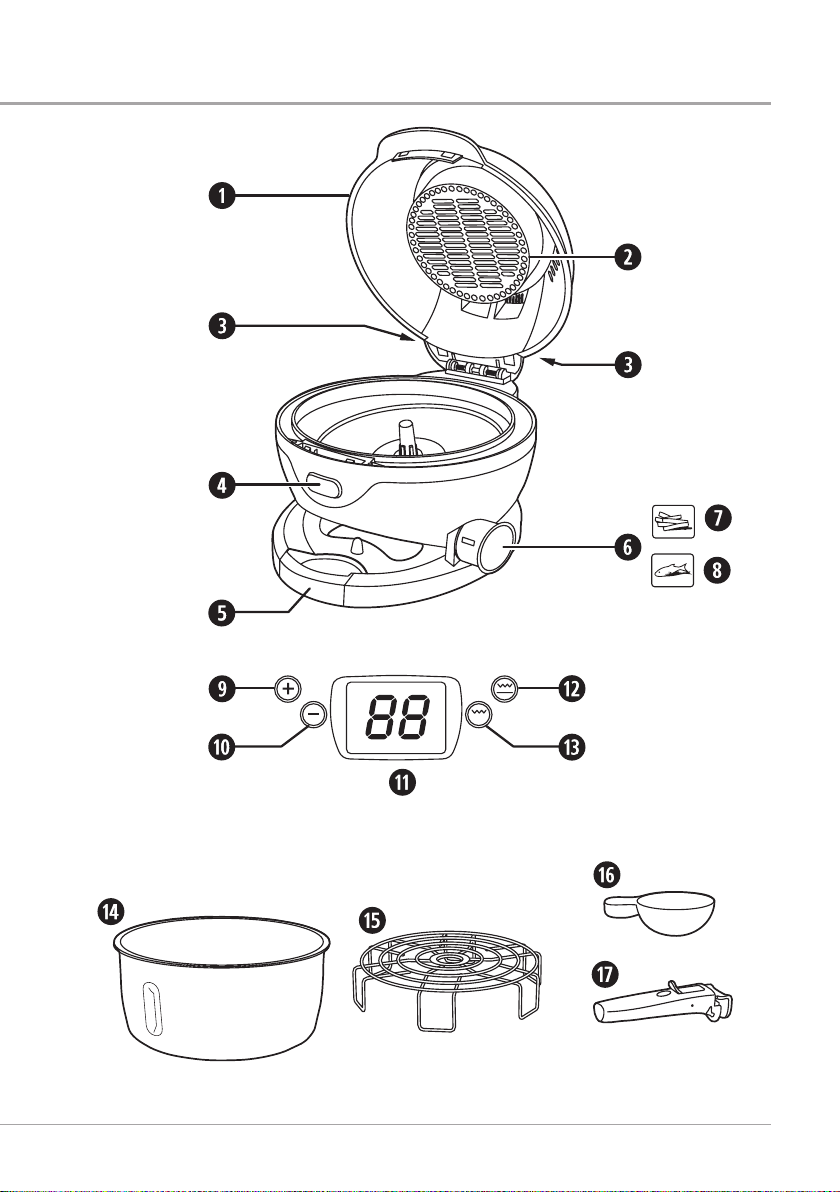
parts
1. Lid - removable for cleaning
2. Heater and fan assembly
3. Lid cleaning release button (one on each side)
4. Lid latch button
5. Removable condensation tray
6. Tilt mechanism lock and window
7. Icon for tilted position
8. Icon for level position
9. + (increase time) button
10. – (decrease time) button
11. Display
12. Dual heat mode button
13. Grill button
14. Non-stick inner bowl
15. Roasting rack
16. Oil measure
17. Detachable bowl handle
(approximately equal to 15ml)
4
Due to our policy of continuous improvement, the actual product may differ slightly from the one illustrated in these instructions.
5

before first use
Never immerse any part of the Halo+ Health Fryer body, power cord or plug in
water or any other liquid. Before assembling or disassembling your Halo+ Health
Fryer, ensure it is unplugged and all parts are cool.
Unpack the appliance and remove all packaging, promotional materials and stickers.
Remove all printed documents. Wash the inner bowl, measuring spoon, roasting rack,
drip tray and bowl handle in hot soapy water. Rinse then dry all of the parts. Wipe the
body and lid with a damp cloth only—see page 16 for cleaning instructions.
6
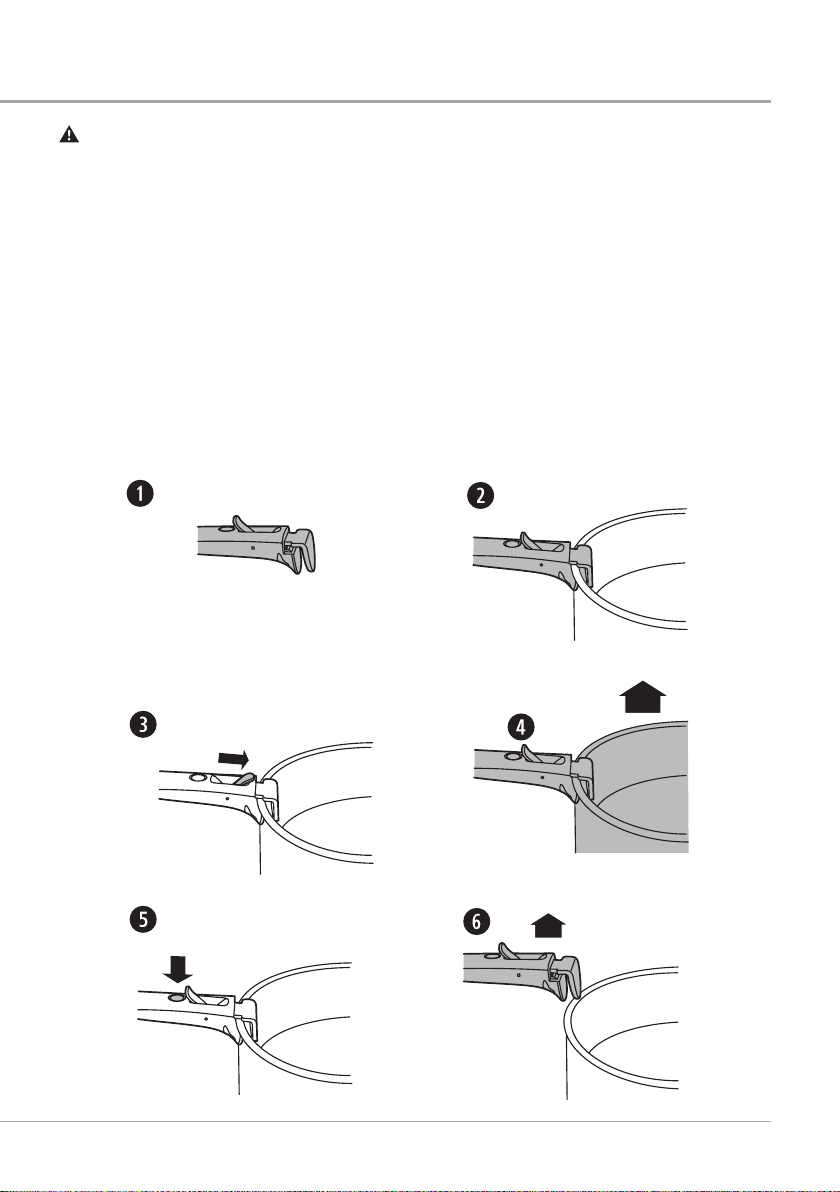
bowl handle
Only use the handle to remove the bowl after cooking has nished. Remember
the bowl will be very hot! Don’t set the bowl down on a surface that may be
damaged by heat.
After cooking, you can use the detachable bowl handle to remove the inner bowl and its
contents safely.
1. Make sure that the jaws of the handle are open. Press the button on the handle to
open the jaws if required.
2. Place the bowl handle over the lip of the inner bowl
3. Slide the lever forwards. The handle will grip the inner bowl. Let the lever return to its
rest position.
4. Lift the inner bowl out of the Halo+ Health Fryer body.
5. To release the bowl, press the button on the handle.
6. Lift the handle off the rim of the bowl.
7
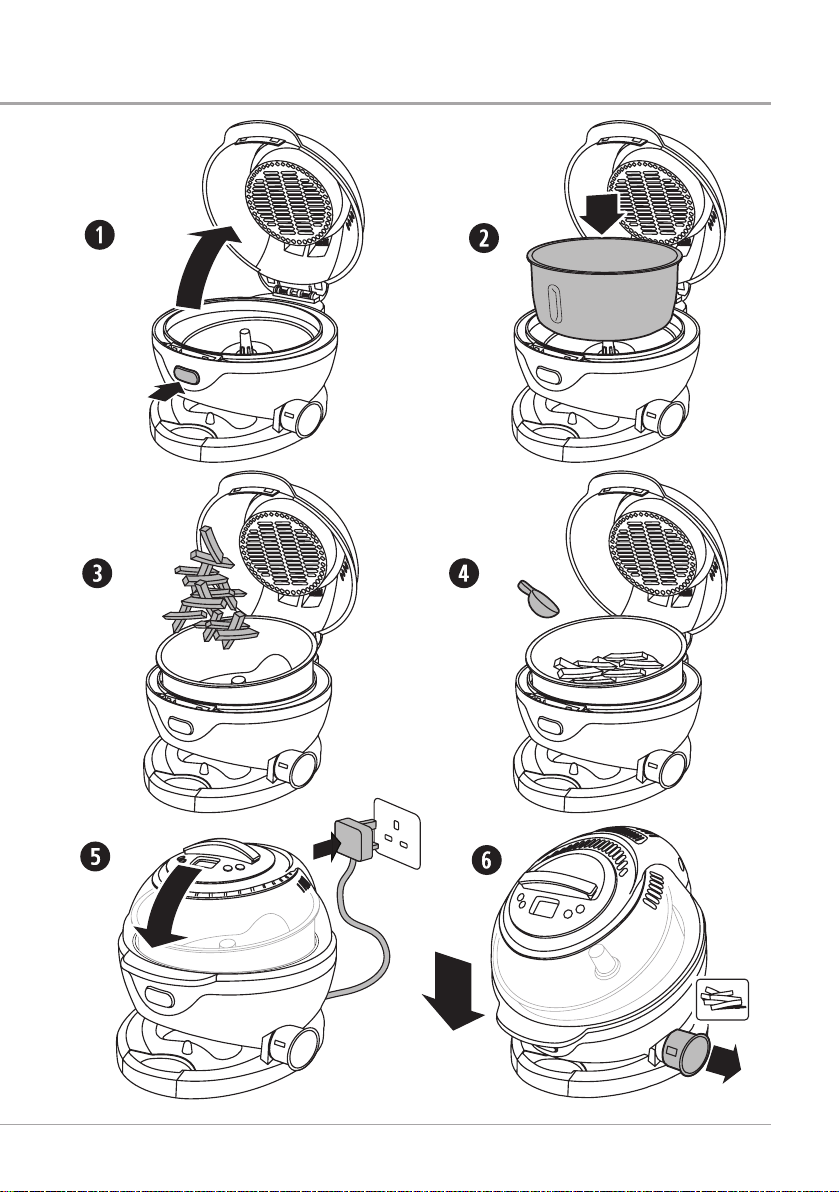
cooking chips
WARNING: When your Halo+ Health Fryer is in the tilted position, the lid will not
stay open on its own and may close unexpectedly. Always return the appliance to
the level position before opening the lid.
Your Halo+ Health Fryer can be used to cook fresh or frozen chips, however, for the
healthiest option, we suggest you try our perfect homemade chips on page 18.
1. Press the lid latch button and open the lid.
2. Fit the inner bowl over the central shaft.
3. Add the chips to the bowl. Distribute the chips evenly over the bottom of the bowl.
Don’t exceed 1.25kg of fresh chips or 1.0kg frozen chips.
4. Add the recommended quantity of oil to the chips using the cooking oil measure.
Spread the oil evenly over the chips. Please refer to our cooking popular, convenience
and frozen foods guide on page 14-15.
5. Close the lid and plug your Halo+ Health Fryer into a suitable mains supply and switch
the socket on. Your Halo+ Health Fryer will beep, the display will light up blue and
after a second or two will show
6. Use the + button to enter the desired cooking time in minutes. If you keep your nger
on the + button, the time will increase quickly. When you are near the desired time,
make single presses of the button. If you overshoot the desired time, use the – button
to adjust the time.
Next, pull the tilt mechanism lock outwards and tilt your Halo+ Health Fryer forwards.
Release the tilt lock to lock your Halo+ Health Fryer in the fully tilted position. When in
the correct position, the
7. Press the dual heat mode (
the heater will illuminate and the fan will start. The timer will start to count down in
minutes until 1 minute remains when it will count down in seconds.
8. When the cooking time has ended, your Halo+ Health Fryer will beep and the heater
will turn off.
Notes
The cooking time can be adjusted up or down during cooking using the + or – buttons.
During cooking, you may open the lid if required. First, set your Halo+ Health Fryer to the
level position then press the lid release button. Opening the lid will switch off the heater
and the fan, and the timer will stop counting down. To restart cooking, close the lid then
return your fryer to the tilted position. Cooking will resume when you close the lid and the
timer will continue to count down.
During cooking, the heater will switch on and off from time to time. This is normal and
allows your Halo+ Health Fryer to maintain an even cooking temperature.
You can cancel cooking at any time by pressing and holding either the dual heat mode
button or the grill mode button. Your Halo+ Health Fryer will beep, the display will
return to 00 and cooking will be cancelled.
00.
icon will show in the window of the tilt lock.
) button to start cooking. The display will turn orange,
8
9
other cooking methods
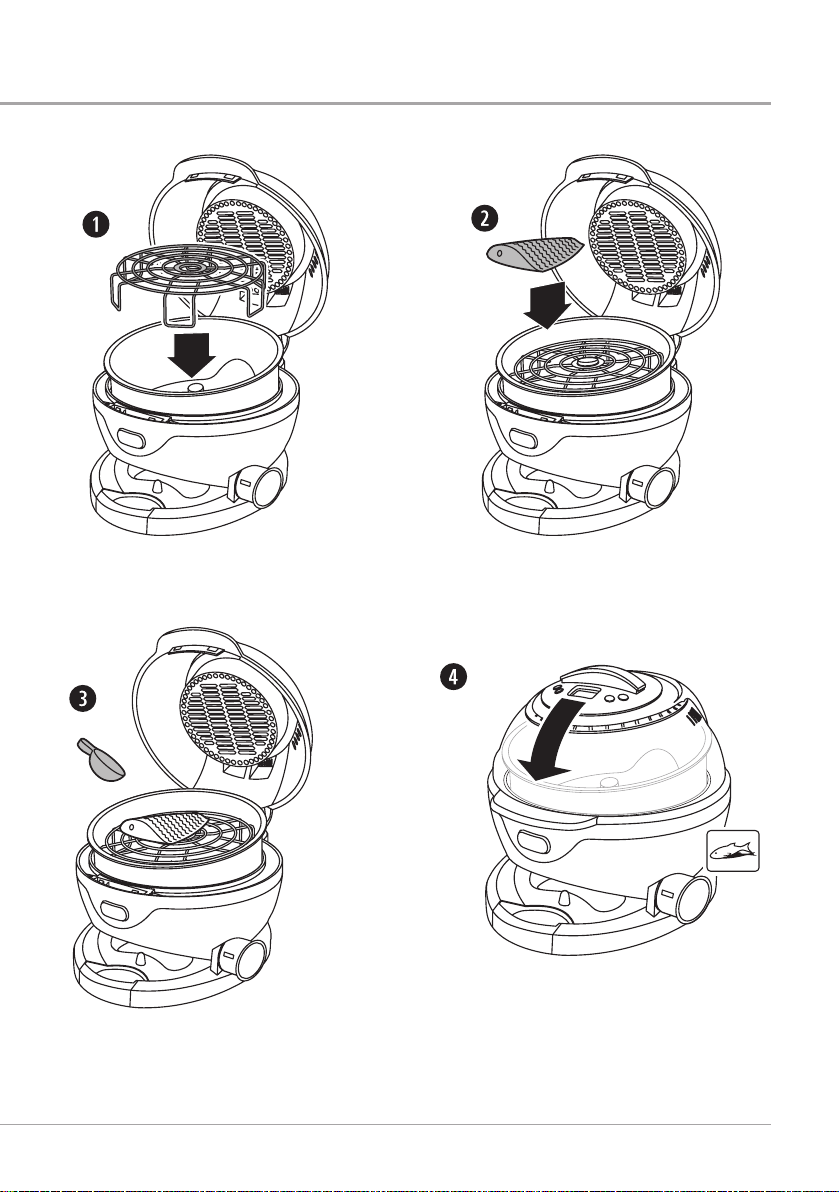
Grilling
Your Halo+ Health Fryer comes complete with a dishwasher safe rack suitable for grilling
and other types of cooking. Foods can also be cooked directly in the removable bowl.
Use whichever method gives you the best results.
1. Press the release button and open the lid. Place the rack into the inner bowl. For
best results lightly oil the rack before use.
2. Place the food on the rack (if you are using it). Select the cooking time, then the grill
function. The rack and food will rotate during cooking so make sure that the food
will not touch any part of the heater/fan assembly or other part of the lid when it is
closed.
3. If required, add oil evenly over the food.
4. Close the lid and plug your Halo+ Health Fryer into a suitable mains supply and
switch the socket on. Your Halo+ Health Fryer will beep, the display will light up blue
and after a second or two will show
5. Use the + button to enter the desired cooking time in minutes. If you keep your
nger on the + button, the time will increase quickly. When you are near the desired
time, make single presses of the button. If you overshoot the desired time, use the
– button to adjust the time.
When grilling, your Halo+ Health Fryer should be in the level position (the
show in the window of the tilt lock).
6. Press the grill mode
heater will illuminate and the fan will start. The timer will start to count down in
minutes until 1 minute remains when it will count down in seconds.
7. When the cooking time has ended, your Halo+ Health Fryer will beep and the heater
will turn off.
Notes
This product has been designed to cook foods in a healthier way. We do not recommend
that you use your Halo+ Health Fryer to cook foods which are very fatty e.g. chicken
portions (with the skin on), lamb chops, sausages or other fatty cuts of meat.
button to start cooking. The display will turn orange, the
00.
icon will
Dual Heat cooking mode without tilting
To tilt or not to tilt....
Your Halo+ Health Fryer can be used to cook the foods and recipes that you would
normally cook in a standard oven or saucepan. However, when your Halo+ Health Fryer
is tilted, the food inside is ‘tumbled’ which may damage fragile foods such as salmon,
jacket potatoes, fairy cakes, etc. You can use the dual heat mode cooking method
without setting your Halo+ Health Fryer into the fully tilted position. The recipes in these
instructions will give you more details on which method is best.
10
11
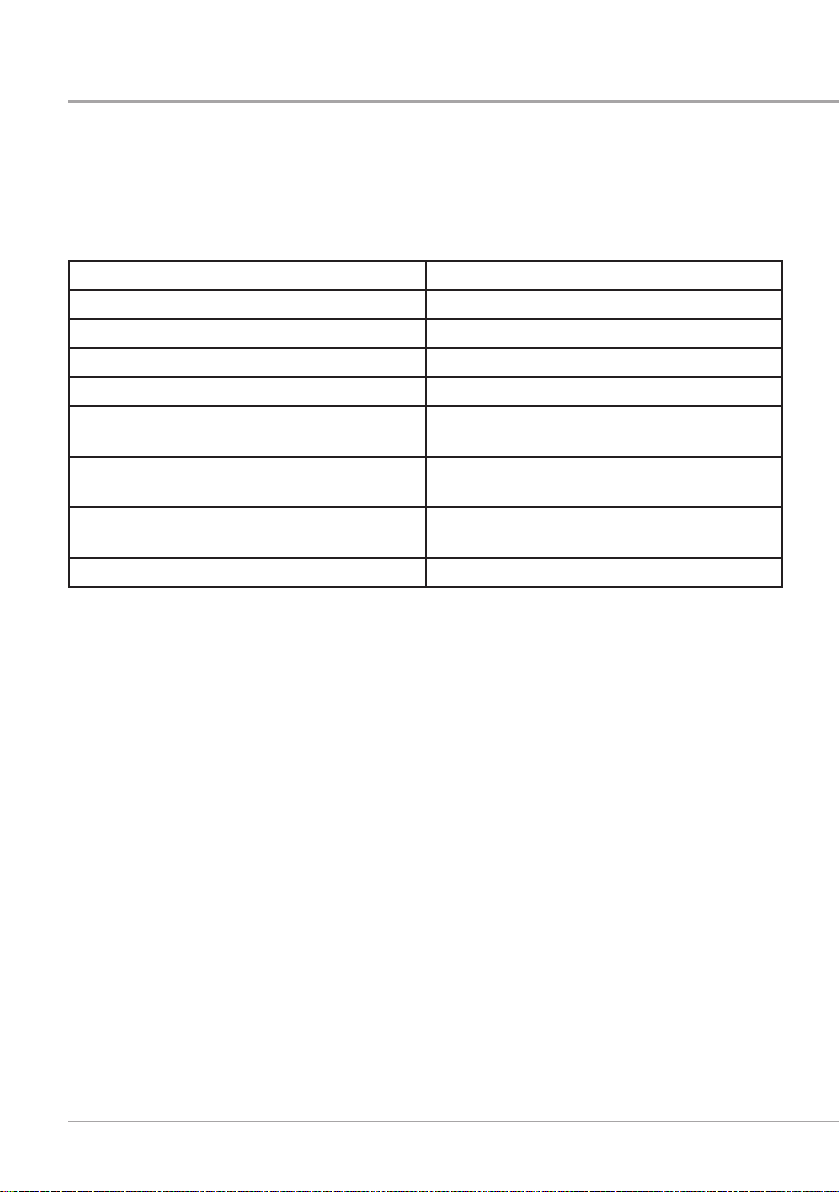
guide to oils and fats
Using your Halo+ Health Fryer to cook food will help you to reduce the amount of oil
needed in some recipes, which may benet your diet.
The table below lists some of the more widely available, popular oils. All of them can be
used in your Halo+ Health Fryer. However, for best results, we recommend Vegetable or
Rapeseed oil.
Oil Type Use
Vegetable oil Shallow, deep and stir frying.
Rapeseed oil (often called vegetable oil) Shallow, deep and stir frying.
Corn oil Shallow, deep and stir frying.
Sunower oil Shallow, deep and stir frying.
Olive oil Shallow and stir frying. Marinades,
dressings, drizzling.
Sesame oil Shallow, deep and stir frying. Marinades,
drizzling.
Peanut oil (often called ground nut oil) Shallow and stir frying. Dressings. Adds a
nutty avour.
Grape Seed oil Shallow, deep and stir frying.
• You can also use low calorie cooking spray in your Halo+ Health Fryer
• Always ensure that the ingredients are evenly coated with oil.
12
 Loading...