

Breville VBL060 Instruction Booklet
Complete Clean
soup maker
instruction booklet
selection of recipes included

product safety
READ CAREFULLY AND KEEP FOR FUTURE REFERENCE
This product can be used by children aged 8 years and above,
and persons who require supervision, provided:
• they are familiar with the hazards associated with the
product, and,
• they receive instruction by a competent person on how to
safely use the product.
Children must not play with the product. Cleaning and user
maintenance must not be done by children unless they are
aged 8 or older and are supervised.
Always disconnect the appliance from the mains supply socket
if it is left unattended and before assembling, disassembling or
cleaning.
If the supply cord is damaged, it must be replaced by the
manufacturer,itsserviceagentorsimilarlyqualiedpersonsin
order to avoid a hazard.
! Never use this appliance for anything other than its intended use. This appliance is for
household use only. Do not use this appliance outdoors.
! Always ensure that hands are dry before handling the plug or switching on the
appliance.
! Always use the appliance on a stable, secure, dry and level surface.
! This appliance must not be placed on or near any potentially hot surfaces (such as a
gas or electric hob).
! Never immerse the motor unit or power cord and plug in water or any other liquid.
! Never let the power cord hang over the edge of a work top, touch hot surfaces or
become knotted, trapped or pinched.
! Do not use the appliance if it has been dropped or if there are any visible signs of
damage.
! Never use any accessory or attachment not recommended by the manufacturer.
! Make sure that all attachments are securely and correctly tted before operating the
appliance.
! The blades and cutting accessories have very sharp edges. Take care when handling
or cleaning them.
! Allow moving parts to come to a stop before changing or cleaning accessories.
2

before using your soup maker
Ensure that the appliance is switched off and unplugged from the supply socket
if it is left unattended and before assembling, disassembling or cleaning.
The blades have very sharp edges. Take care when handling or cleaning them.
Never immerse the motor unit or power cord and plug in water or any other liquid.
Never use harsh, abrasive or caustic cleaners to clean this appliance.
1. Remove your soup maker carefully from the packaging. You may wish to store the
packaging for future use.
2. Check the contents:
• Motor unit
• Jug
• Lid
• Stopper/measure
• Collar
• Heating plate/blade assembly
• Seal
3. Wash all parts that will come into contact with food. Use warm soapy water then rinse
and dry thoroughly.
4. Using a mild detergent solution, wipe the motor unit with a damp cloth. Dry
thoroughly.
3

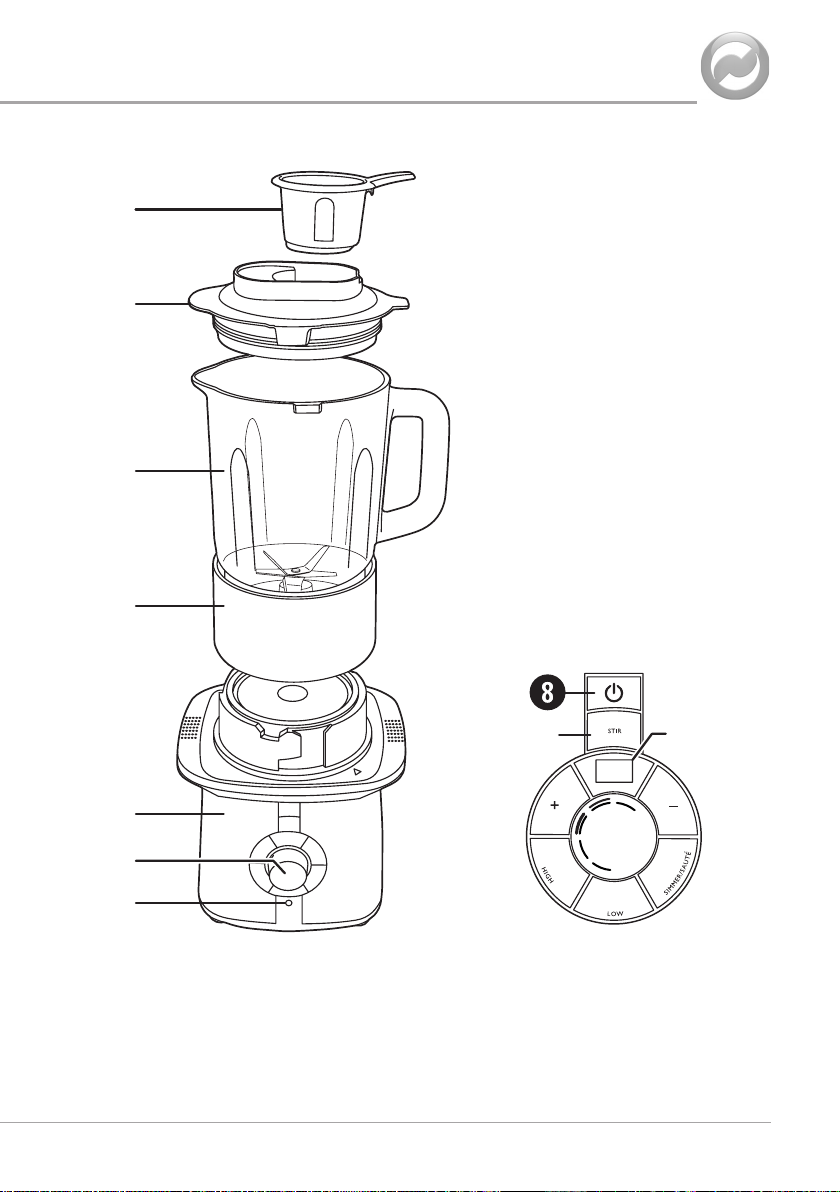
features
1 Stopper/measure
Allows ingredients to be added without removing the lid. Doubles as a convenient
measure.
2 Jug lid
3 Glass jug
4 Collar, heating plate/blade assembly and seal
5 Motor unit
6 Blending control
Four blending speeds and pulse function.
7 Status light
8 On/off button
9 STIR button
Press and hold to stir the soup or sauce during cooking. The stir button can be used
at any time.
10 Increase timer button
Increases the time in 1 minute increments. Hold to continuously increase the time.
You can use this button to increase the cooking time at any point in the cooking
cycle.
11 HIGH heat selector button
For quickly bringing soups and sauces to a rapid boil. Your soup maker will
automatically switch to the SIMMER/SAUTÉ setting after several minutes on HIGH.
12 LOW heat selector button
Reduced temperature setting for use once the soup has reached boiling point on the
HIGH setting.
13 SIMMER/SAUTÉ selector button
Used for sautéing, browning, frying and gently simmering soups and sauces. Use
this setting when adding cream or cheese towards the end of cooking.
14 Decrease timer button
Decreases the time in 1 minute increments. Hold to continuously decrease the time.
You can use this button to decrease the cooking time at any point in the cooking
cycle.
15 Display
The display allows you to set the cooking time and, during cooking, counts down in 1
minute increments.
4
q
w
e
r
h
0
4
g
P
f
t
y
u
a
s
o
88
1
2
3
d
Due to our policy of continuous improvement, the actual product may differ slightly from the one illustrated in these instructions.
5

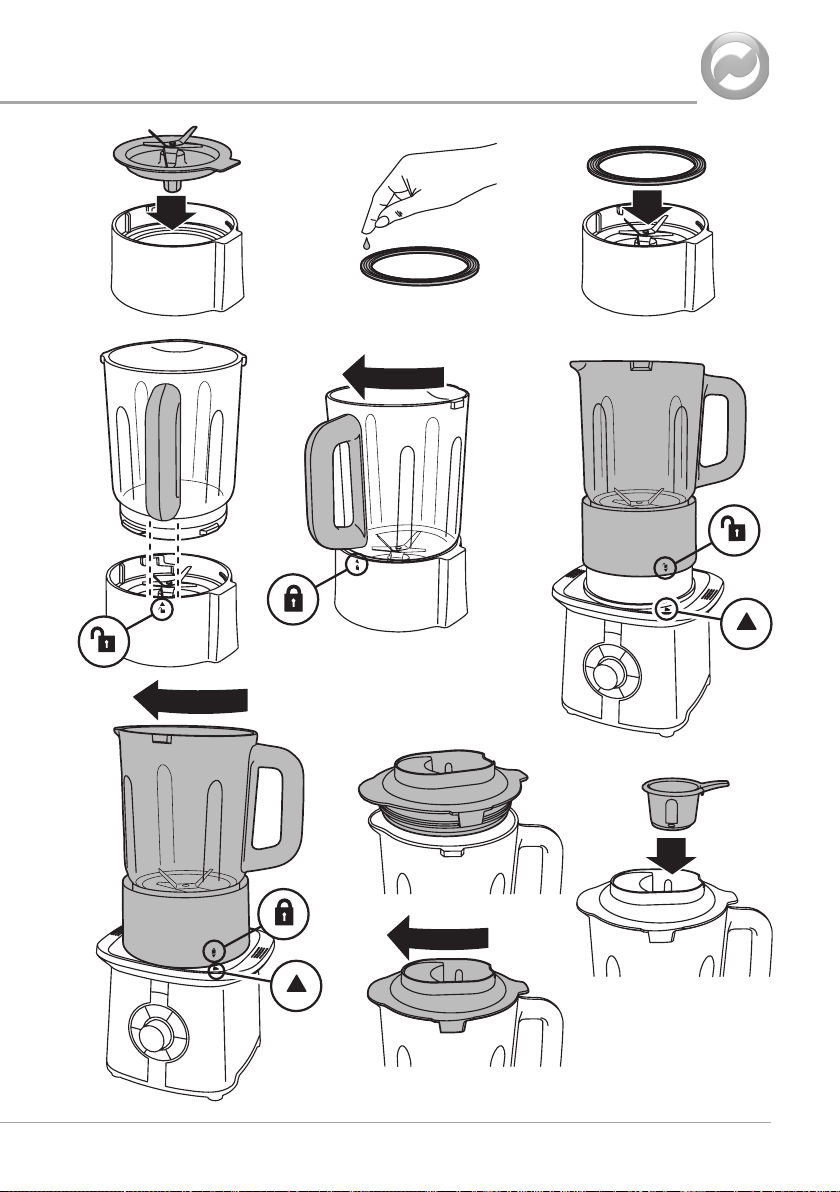
assembling your soup maker
Make sure the unit is switched off and unplugged from the mains supply socket
before assembly.
1. Place the heating plate/blade assembly into the collar A. Align the tab with the slot in
the collar before lowering the heating plate/blade assembly into the collar.
2. Moisten both sides of the seal. Use your nger and a few drops of water B. This will
make it easier to t and remove the jug from the collar.
3. Place the seal onto the heating plate/blade assembly C. Make sure that the seal is
completely at when in contact with the heating plate/blade assembly.
4. Fit the jug by lining up the jug handle with the upper unlocked ( ) icon on the collar
.
D
5. Rotate the jug handle to the left until it is lined up with the upper locked ( ) icon E.
6. Position the assembled jug and collar so that the lower unlocked ( ) icon on the
collar lines up with the triangle symbol ( ) on the motor unit F.
7. Rotate the jug until the lower locked ( ) icon on the collar lines up with the triangle
symbol ( ) on the motor unit G.
8. Fit the lid with the side locking tabs positioned as shown H.
9. Rotate the lid clockwise to lock it into place I. When correctly tted, the spout cover
on the lid will cover the spout on the jug.
10. Fit the stopper/measure into the opening in the lid J. Press it down until it clicks.
11. Your soup maker is now assembled and ready to use.
6
AB
TAB
C
D
G
EF
H
J
I
7

making soups and sauces
Make sure the unit is switched off and unplugged from the mains supply socket
before assembly.
Yoursoupmakermaysmokealittleandgiveoffanodourduringrstuse.Thisis
normal and will soon disappear.
Beware of steam escaping from around the area of the stopper/measure during
use.
Don’tllthejugabovethe1400mlmarking.
Neverplaceyourngersinsidethejugduringoperationorwhenadding
ingredients.
1. Prepare the ingredients for your recipe.
2. Assemble your soup maker on a at, stable, level surface.
3. Plug your soup maker in to a mains supply socket. Press the on/off button to select
standby mode. The display will show 88 and ash.
4. Set the cooking time. When the display stops ashing use the increase timer button
to set the desired cooking time in minutes. Each press of the button will increase
the time by one minute. You can hold the button down to increase the time more
rapidly. You can use the decrease timer button in the same way to decrease the time.
Note that the time can be altered at any stage during the cooking process using the
increase/decrease buttons.
5. Frying/sautéing. If the recipe requires you to fry or sauté ingredients (such as
onions or garlic), add a little oil to the heating plate. If using butter, add a little oil to
the butter to prevent it from burning. Press the SIMMER/SAUTÉ button and allow the
plate to heat up. Add the ingredients and cook as necessary. Press the STIR button
as required during cooking to mix the ingredients.
6. Cooking cycle. Add all of the remaining ingredients according to the recipe and
press the HIGH button. Your soup maker will quickly bring the ingredients to a
vigorous boil. The cooking cycle can then be amended by pressing the LOW or
SIMMER/SAUTÉ button. A built-in safety feature ensures that after several minutes
on the HIGH setting, your soup maker will automatically switch to the simmer/sauté
setting and the SIMMER/SAUTÉ button will light up. Press the STIR button at any
time during cooking to mix the ingredients. Don’t press and hold the STIR button for
longer than 10 seconds.
7. After the set time has elapsed and the cooking cycle has nished your soup maker
will beep six times and enter Keep Warm mode. The status light will change to white
to show that your soup maker is in the keep warm mode. The keep warm mode lasts
for 40 minutes after which your soup maker will switch to standby mode. To exit keep
warm mode, press the on/off button.
8

8. Blending cycle. WARNING:Thelidandstopper/measuremustbettedbefore
blending. You can only blend the soup once the timer has elapsed and the heating
cycle has nished. To end the heating cycle early, use the decrease timer button
to set the timer to 00. If your soup maker is in the keep warm mode, press the on/
off button to exit keep warm mode. Press the on/off button again to enter standby
mode then blend your soup or sauce by setting the blending control to the 1 or 2
position. You can also use the Pulse position. For your safety, settings 3 and 4 are
not available when processing ingredients over 70°C.
9. After blending, remove the jug from the base unit by rotating the jug until the
unlocked ( ) icon on the collar lines up with the triangle symbol ( ) on the base
unit. Lift the jug off the base unit. The jug, collar, heating plate and the heating
element in the base unit will be HOT—handle with care!
NOTES
When sautéing, pressing the STIR button can cause ingredients that are too chunky to
become jammed. If this happens, wait until the ingredients have softened before using
the STIR function again.
During cooking, the heater will switch on and off to maintain temperature. The bubbles
formed during cooking may increase and decrease when this happens.
For chunky soup, blend using the STIR button to pulse the ingredients until the desired
consistency has been obtained.
Ingredients can be added to the jug during cooking by removing the stopper/measure.
However, we do not recommend removing the stopper/measure when your soup maker
is on the HIGH setting. Always handle with care and beware of escaping steam from
this area during use.
9

blending
Make sure the unit is switched off and unplugged from the mains supply socket
before assembly.
Do not operate the blender continuously for more than one minute without giving it
a rest period of two minutes.
Neverplaceyourngersinsidethejugduringoperationorwhenadding
ingredients.
Your soup maker can also be used as you would use a regular blender to make
smoothies, milkshakes and much more!
1. Assemble your soup maker on a at, stable, level surface.
2. Add the ingredients to the blending jug A before tting the lid. Don’t overll the jug
(maximum quantity is 1750ml when blending cold ingredients).
3. Fit the lid and stopper onto the jug. Make sure that the spout cover on the lid aligns
with the spout on the jug B.
4. Plug your soup maker into a mains outlet C. Your soup maker will beep once and the
status light will light up orange and ash.
5. Press the on/off button D. The display will show 88 and ash.
6. When the display stops ashing use the blending control to process your ingredients
. To start blending, turn the blending control to 1. To blend at a higher speed, set
E
the speed control to 2, 3 or 4.
Alternatively, blend food using the pulse function. Twist the blending control
clockwise. Your blender will operate when the control is held in this position. Blend in
short bursts by twisting and releasing the blending control.
7. During processing, further ingredients can be added by removing the stopper in the
lid F. Ret the stopper after adding any ingredients.
10
 Loading...