


2
product safety
READ CAREFULLY AND KEEP FOR FUTURE REFERENCE
This product can be used by children aged 8 years and above, and persons
who require supervision, provided:
• they are familiar with the hazards associated with the product, and,
• they receive instruction by a competent person on how to safely use the
product.
Children must not play with the product. Cleaning and user maintenance
must not be done by children unless they are aged 8 or older and are
supervised.
Keep the appliance and its cord out of reach of children less than 8 years old.
Bread can burn therefore do not use the appliance near or below combustible
materials such as curtains. Never use the appliance below wall cupboards or
shelves.
Never operate the appliance by means of an external timer or separate
remote-control system.
Do not touch the metal parts of the appliance during use as they may become
very hot.
If the supply cord is damaged, it must be replaced by the manufacturer, its
serviceagentorsimilarlyqualiedpersonsinordertoavoidahazard.
! Never use this appliance for anything other than its intended use. This appliance is for
household use only. Do not use this appliance outdoors.
! Always ensure that hands are dry before handling the plug or switching on the appliance.
! Always use the appliance on a stable, secure, dry and level surface.
! This appliance must not be placed on or near any potentially hot surfaces (such as a gas
or electric hob).
! Do not use the appliance if it has been dropped or if there are any visible signs of
damage.
! Ensure the appliance is switched off and unplugged from the supply socket after use,
before tting or removing parts and before cleaning.
! Always allow the appliance to cool before cleaning or storing.
! Never immerse any part of the appliance or power cord and plug in water or any other
liquid.
! Never let the power cord hang over the edge of a worktop, touch hot surfaces or become
knotted, trapped or pinched.
! Never leave the appliance unattended when in use.
! This appliance generates heat during use. Adequate precaution must be taken to
prevent the risk of burns, scalds, res or other damage to persons or property caused
by touching the bread pan and other surfaces whilst in use or during cooling.
! Never leave the appliance unattended when in use.
! Do not restrict or cover the steam vents in the lid and sides of the appliance. Ensure
that there is adequate ventillation around the bread maker during operation.
! Do not touch moving parts.
! Do not use the appliance when it is empty as serious damage may result.

3
before first use
Do not immerse the bread maker or power cord and plug in water or any other
liquid.
Before using your breadmaker for the rst time, wash the inside of the bread pan and the
kneading paddles with hot, soapy water. Rinse and dry thoroughly.
Using a damp cloth or sponge, wipe the interior of the breadmaker, the inside of the lid
and the exterior of the breadmaker. Use only a mild detergent solution.
Wash the measuring spoon and measuring cup with hot, soapy water, then rinse and dry
them thoroughly.

4
features
1 Viewing window
Allows you to check on the progress of your bread during ccoking.
2 Bread pan handles
Cool touch bread pan handles make the bread pan easy and safe to t and remove.
3 Control buttons and LCD display
4 Body
5 Kneading/mixing paddle (x 2)
Twin kneading/mixing paddles for optimum performance.
6 Removable bread pan
7 Measuring cup
8 Measuring spoon
Measure for 1 tablespoon or 1 teaspoon
9 Hook
Sometimes the kneading/mixing paddles can become stuck in the bottom of the loaf
after baking. This hook can be used to remove them.

5
Due to our policy of continuous improvement, the actual product may differ slightly from the one illustrated in these instructions.
w
e
r
q
y
u
o
t
w

6
control panel and display
1 HOME MADE button
Allows you to program your own bread recipes.
2 MENU button
Selects one of the preset cooking programs.
3 + button
Allows you to increase times and temperatures when you are programming the
Home Made recipe feature. Also used in conjunction with the – button to set a delay
time period if you don’t want your breadmaker to start cooking immediately.
4 LCD display
This symbol shows the selected loaf size or crust colour
◄ ► These symbols show the current program stage
5 – button
Allows you to decrease times and temperatures when you are programming the
Home Made recipe feature. Also used in conjunction with the + button to set a delay
time period if you don’t want your breadmaker to start cooking immediately.
6 COLOUR button
Selects the crust colour Light, Medium or Dark.
7 LOAF button
Selects the loaf size.
8 START button
Used to stop or start your bread maker.

7
MEDIUM
LARGE
X LARGE
PREHEAT
TIMER
KNEAD
REST
LIGHT MEDIUM DARK
RISE
BAKE
WARM
END
MENU
TIMER
X LARGE
Selected crust colour
Selected program
Total cooking time remaining
Selected loaf size
MEDIUM
LARGE
PREHEAT
TIMER
KNEAD
REST
LIGHT MEDIUM DARK
RISE
BAKE
WARM
END
MENU
TIMER
Current program stage
HOME MADE
MENU
LOAF
COLOUR
START
q
w
e
r
t
y
u

8
START
This button is used for starting and stopping the selected program. To start a program,
press the START button once. A short beep will sound, the colon (:) in the time display
will ash and the program will start. All the other buttons on the control panel will be
deactivated except the START button when the program has begun.
To stop the program, press and hold the START button for approximately two seconds. A
beep will sound indicating that the program has been stopped.
MENU
This button is used to select the different programs. Each time it is pressed a short beep
will sound and the selected program will change. If you press and hold the button, the
menus will cycle through quickly.
1. White: This program is primarily used for breads that use white our, although some
recipes may include small quantities of whole wheat our.
2. White Fast Bake: As above but with a reduced cooking time. This program only
makes a large size loaf with a medium colour crust.
3. Whole-wheat: This program is used for recipes which contain signicant amounts of
whole wheat or rye our, oats or bran.
4. Whole-wheat Fast Bake: As above but with a reduced cooking time. This program
only makes a large size loaf with a medium colour crust.
5. Crusty White: This program makes a light crusty loaf in 3 sizes.
6. Sweet Bread: Suitable for sweet breads such as raisin, cinnamon, apricot, etc.
7. Gluten Free: This program should be used when making gluten free, and yeast free,
bread.
8. Cake: Make a variety of sweet and savoury home-made cakes with this program. You
can use this program to mix and bake cakes.
9. Dough: This program only makes the dough and will not bake the nal bread. This
dough setting is suitable for pizza bases, doughnuts, etc. Remove the dough to
shape it then bake it in a conventional oven (or, in the case of doughnuts, deep fry).
10. Pasta Dough: This program uses the mixing and kneading function of your bread
maker to make pasta dough for use in your own recipes.
11. Jam: Use this program to make sweet and savoury jams. The process is a simple
case of mixing and heating.
12. Extra Bake: This program provides an extra period (10 minutes) of baking. This
setting can only be used after a bread making program.
13. Home Made: This program allows you to congure each step in the baking cycle so
that you can create your own recipes.
control panel and display

9
COLOUR
The colour button allows you to select the colour of the loaf’s crust. Choose from LIGHT,
MEDIUM or DARK. The default crust colour is medium. The selected crust colour will be
indicated on the display.
LOAF
This button allows you to choose from a MEDIUM (900g), LARGE (1.2kg) or X LARGE
(1.4kg) loaf. Note that the total cooking time will vary depending on the size of loaf being
cooked. The default setting is X LARGE. The selected loaf size will by indicated on the
display.
+ and –
These buttons allow you to change times and temperatures when you are programming
the Home Made recipe feature. They also allow you to select a delay time period if you
don’t want your breadmaker to start cooking immediately.

10
Never exceed the maximum capacity of your bread maker (1.5kg). Place your
bread maker away from direct sunlight, draughts, or heating appliances and
radiators. These can adversely affect the operation of your bread maker and spoil
the results.
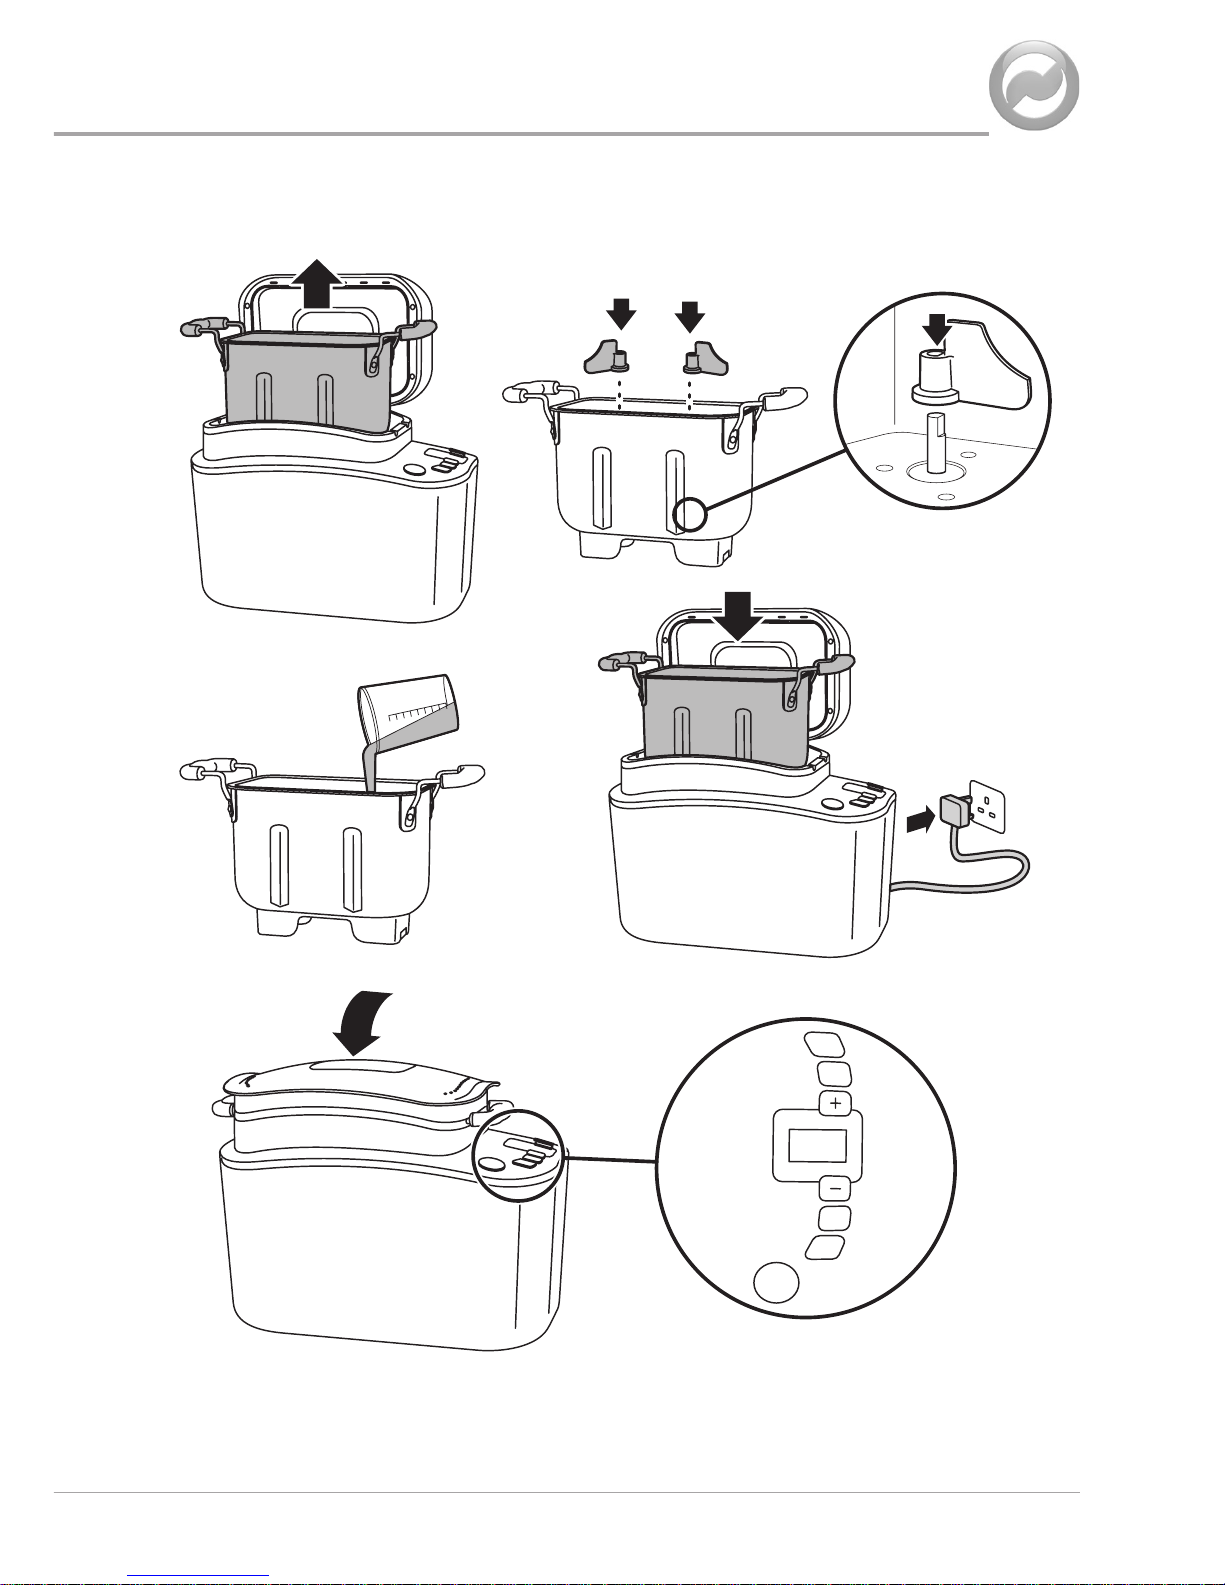
1. Lift the bread pan out of the bread maker using the handles.
2. Fit the kneading/mixing paddles onto the shaft in the bottom of the bread pan. Each
shaft has a attened side to grip the paddle when it is rotating. Align each paddle with
the at on the shaft and press it down.
3. Pour the liquid ingredients into the bread pan. Add the rest of the ingredients to the
bread pan in the order listed in the recipe. Weigh all of your ingredients accurately
because incorrect measures will produce poor results.
Do not let the yeast come into contact with the salt or water prior to mixing because
this will prevent the dough from rising properly (the water will activate the yeast
before the ingredients are properly mixed and kneaded).
When using the delay timer, make a small hollow in the mound of our and put the
dry yeast into the hollow.
4. Fit the bread pan into the bread maker and push it down to lock it into position. Close
the bread maker lid.
5. Plug your bread maker in to the mains supply socket. Your bread maker will beep
and select the default program (program 1).
6. Press the MENU button until the required program is selected. If the program
permits, select the loaf size and crust colour using the LOAF and COLOUR buttons.
7. Press the START button. Your bread maker will start to run the selected program.
To stop or cancel the program press the START button for approximately 2 seconds.
Your bread maker will beep and the program will be cancelled.
8. At the end of the baking cycle your bread maker will beep. Unplug your breadmaker
and, using oven gloves, lift the bread pan out of your bread maker.
9. Turn the bread out onto a wire rack and leave it to cool for at least 30 minutes.
10. Clean the bread pan and kneading/mixing paddle immediately after use—see
cleaning.
using your bread maker
11
HOME MADE
LOAF
COLOUR
START
MENU
q
w
e
r
t
y

12
using your bread maker
Using the delay timer
If you are using the breadmaker in hot or humid weather with a delay time
greater than 2 hours, there is a danger of the bread rising too quickly. To prevent
this, reduce the liquid by one or two tablespoons, increase the salt by ⅛ to ¼ of
a teaspoon and reduce the sugar by up to one half of the amount indicated in the
recipe.
Don’t use the delay timer for long delay periods if you are using ingredients that do
not keep well at room temperatures e.g. milk, eggs, cheese, etc.
Your bread maker has a built in timer that allows you to delay operation for up to 15
hours. The delay timer cannot be used on certain programs such as the Ultra Fast, Jam,
Bake, etc.
1. Prepare your bread maker and add the ingredients as previously described.
2. Make the required settings for program, loaf size and crust colour.
3. Set the timer. Use the + or – buttons until the required time is displayed.
For example, if the time is 8:30 p.m. and you want the bread to be ready at 7.00
a.m., you need to set the timer for a 10 hour 30 minute delay. Use the + or – buttons
until 10:30 appears on the display.
4. When the timer is set, press the START button. The display will start to count
down the time to completion and ◄ will appear next to TIMER on the display. The
breadmaker will automatically start mixing the ingredients at precisely the right
moment and your bread will be ready at the desired time. Once you have pressed
the START button you cannot alter the timer. If you forget to press the START button,
the timer will not work.
Keep warm function
The automatic keep warm function prevents the bread from getting soggy by keeping the
baked bread warm for up to one hour after the program has ended. The function stops
when the START button is pressed or the breadmaker is unplugged from the supply
socket.
Power failure function
If the power to your bread maker is interrupted, for example, by a temporary power cut,
your bread maker will keep the program in its memory for up to 8 minutes. If the power is
restored within 8 minutes, your bread maker will carry on the program where it left off.
 Loading...