

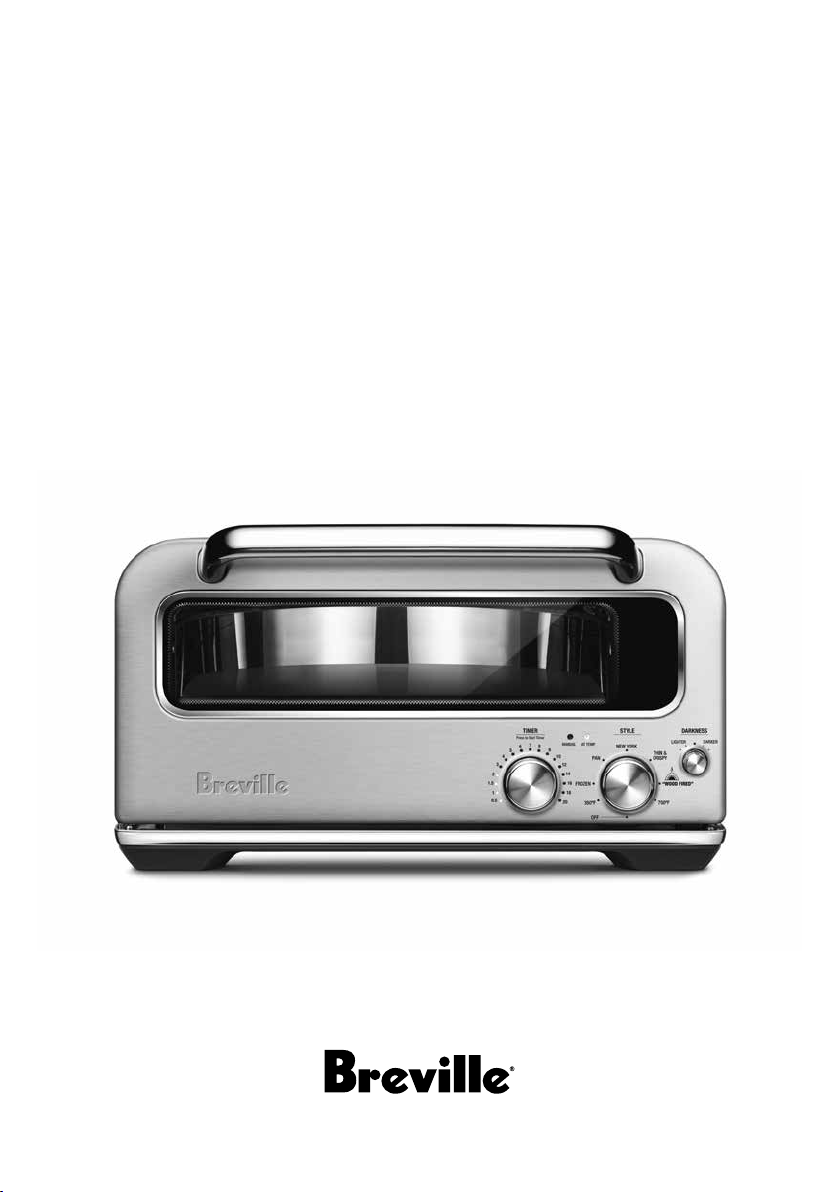
the Smart Oven
Instruction Book – BPZ800
™
Pizzaiolo

Contents
IMPORTANT
SAFEGUARDS
2 Breville recommends safety first
6 Components
8 Functions
13 Hints & Tips
15 Care & Cleaning
17 Troubleshooting
19 French
BREVILLE
RECOMMENDS
SAFETY FIRST
At Breville we are very safety
conscious. We design and
manufacture consumer
products with the safety of you,
our valued customer, foremost
in mind. In addition we ask
that you exercise a degree of
care when using any electrical
appliance and adhere to the
following precautions.
READ ALL INSTRUCTIONS
BEFORE USE AND SAVE
FOR FUTURE REFERENCE
When using electrical
appliances, basic safety
precautions should always
be followed including:
• Remove and safely discard
any packing materials and
promotional labels before
using the oven for the first time.
• To avoid choking hazard for
young children, remove and
safely dispose of the protective
cover fitted on the power plug.
• Do not use the appliance near
the edge of a countertop
or table. Ensure the surface
is stable, level, heat-resistant
and clean.
• Do not use on a cloth-covered
surface, near curtains or other
flammable materials.
• A fire may occur if the oven is
covered or touches flammable
materials, including curtains,
draperies, walls, and the like,
when in operation.
• Do not use the appliance on
(or close to) a hot gas or electric
burner, or where it could touch
a heated oven or surface.
2

• Do not let the power cord hang
over the edge of a table or
counter, touch hot surfaces or
become knotted.
• To avoid electric shock, do
not immerse the cord, plug or
motor base in water (or other
liquids).
• When operating the oven,
keep a minimum distance
of 4" (10cm) of space on both
sides of the appliance and
6" (15cm) above.
• Do not touch hot surfaces.
To avoid burns, use extreme
caution when removing the
included pizza pan or pizza
stone as they might be very hot.
• Do not lay cooking utensils,
roasting pans or dishes on the
glass door.
• Do not leave the door standing
open for extended periods
of time.
• Do not store any item on top
of the oven when in operation
except the dedicated optional
bamboo chopping board.
• Do not place cardboard, plastic,
paper, or other flammable
materials in the oven.
• Do not cover any part of the
oven with metal foil. This will
cause overheating of the oven.
• We recommend using the
dedicated BPZ800 pan with
the pizza oven, although other
cast iron/carbon steel pans that
fit are also suitable for usage.
• Do not use non-stick or coated
pans in the oven.
• Use caution when using
stainless steel pans as they may
discolor at high temperatures.
• Caution should be exercised
when removing the pan from
the oven. Pan should be placed
on a heat proof material.
• No lid should be used in the
oven on top of the pan.
• Oversized foods and metal
utensils must not be inserted
in the oven as they may create
fire or risk of electric shock.
• To avoid any direct contact
with the oven, the provided
pizza peel should be used
at all times when inserting
a pizza into the cavity, unless
cooking a pan pizza.
• The use of accessories and
attachments not recommended
or supplied with this oven may
cause injuries.
• Do not store any materials,
other than manufacturers
recommended accessories,
in this oven when not in use.
3

• This appliance is for household
use only. Do not use in any type
of moving vehicles.
Do not use the appliance
outdoors, or for anything other
than its intended use. Misuse
can cause injury.
• If the appliance is to be
cleaned, moved, assembled
or stored, always switch the
unit off and allow it to cool
completely, before unplugging
it from the power outlet.
• Do not clean with metal
scouring pads. Pieces can
break off the pad and touch
electrical parts, creating a risk
of electric shock.
• Close supervision is necessary
when the appliance is used by
or near children.
• Longer detachable powersupply cords or extension cords
are available and may be used
if care is exercised in their use.
• It is recommended to regularly
inspect the appliance and
power cord. Do not use the
appliance if there is damage to
the power cord or plug, or after
the appliance malfunctions or
has been damaged in any way.
Immediately stop use and call
Breville Consumer Support.
• We recommend operating
the oven on a dedicated
circuit separated from other
appliances. Consult a licensed
and qualified electrician if you
are unsure.
• Servicing should be performed
by an authorized service
representative.
WARNING
To prevent electric shock,
unplug before cleaning.
4

SHORT CORD
INSTRUCTIONS
Your Breville appliance is fitted
with a short power supply cord
to reduce personal injury or
property damage resulting from
pulling, tripping or becoming
entangled with a longer cord.
If an extension cord is used,
(1) the marked electrical rating
of the cord set or extension cord
should be at least as great as the
electrical rating of the appliance,
(2) the cord should be arranged
so that it will not drape over the
countertop or table-top where it
can be pulled on by children
or tripped over unintentionally
and (3) the extension cord
must include a 3-prong
grounding plug.
BREVILLE ASSIST® PLUG
Your Breville appliance comes
with a unique Breville Assist
Plug, conveniently designed
with a finger hole to ease
removal from the power outlet.
®
FOR HOUSEHOLD USE ONLY
SAVE THESE INSTRUCTIONS
5
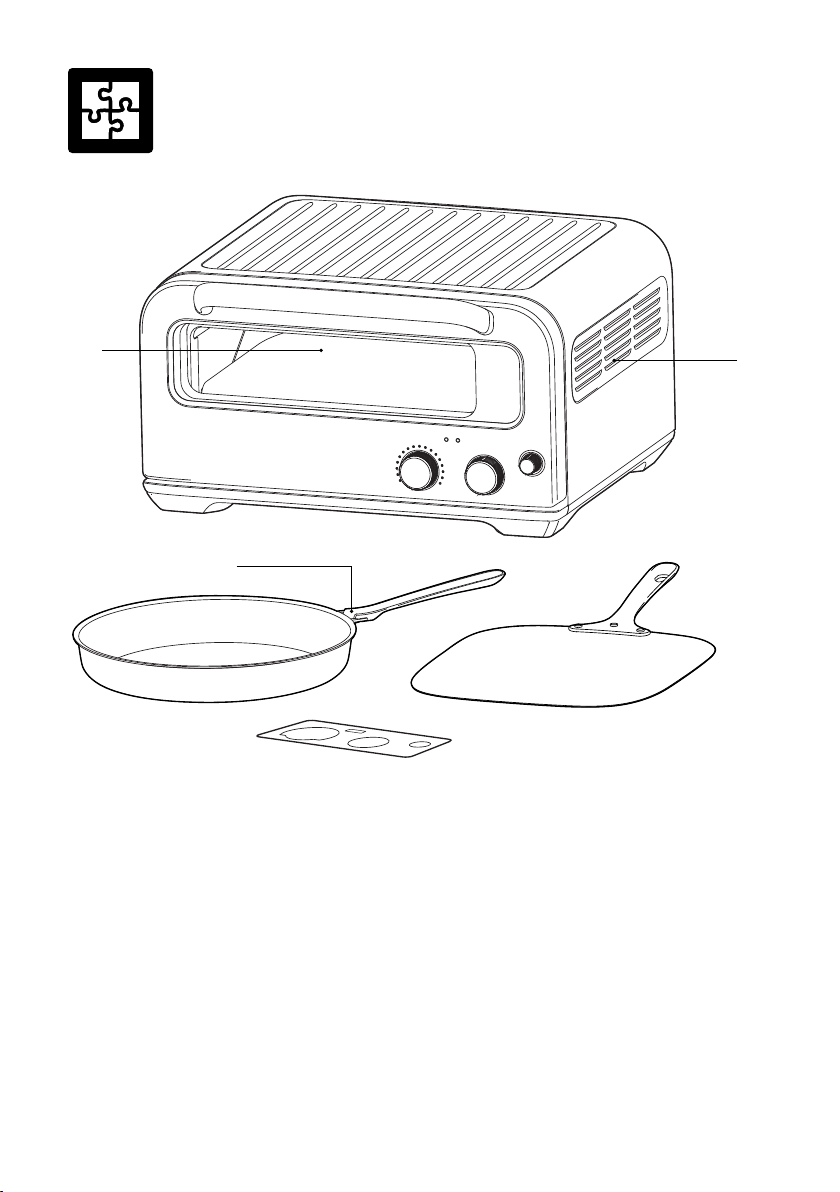
Components
A
C
D
E
B
A. Active Deck
The stone deck is designed to move
forward and down when you are opening
the door; this system makes loading and
unloading the pizza easy, while achieving
ultimate performance.
6
B. Ventilation Slots
C. Pizza Pan with removable handle
D. Pizza Peel
E. Manual Mode alternate interface magnet
BPZ800 CONCEPT
A
D E
B C
Press to Start Timer
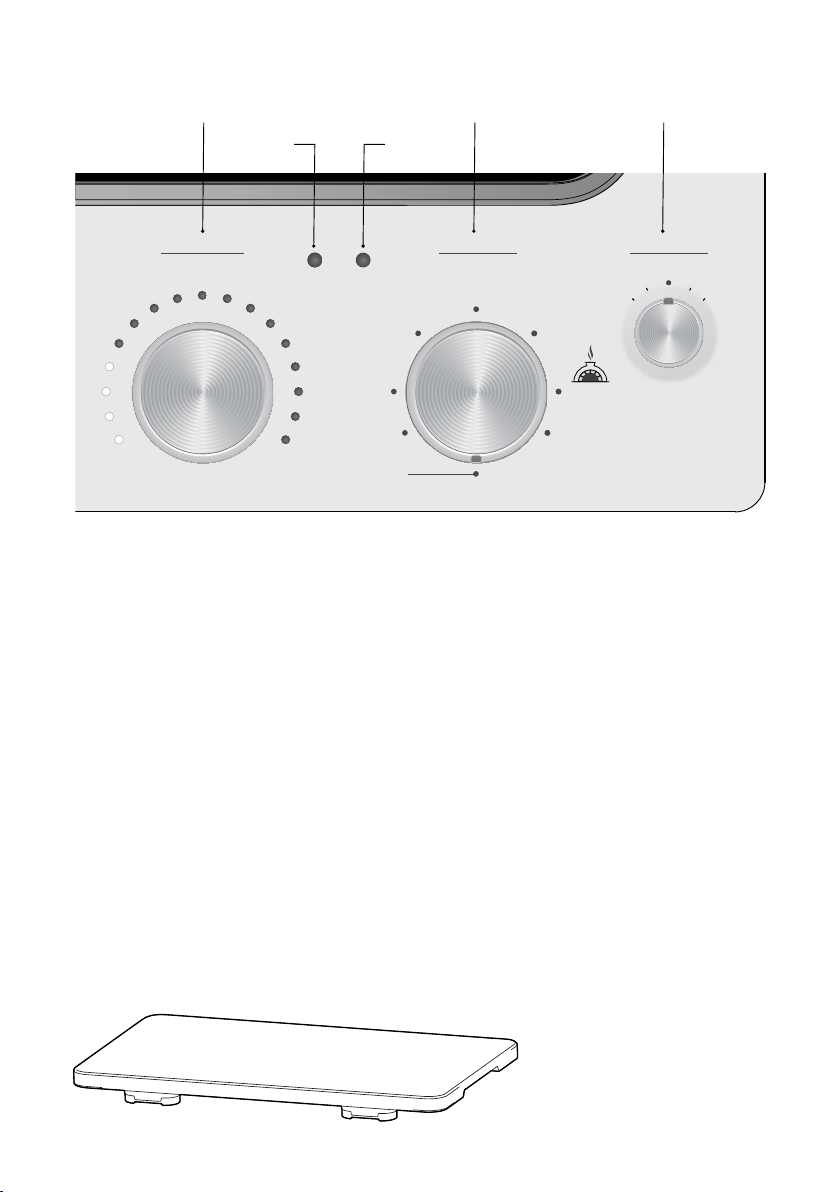
7
8
6
5
4
3
2
1.5
1
0.5
MANUAL
9
10
12
14
16
FROZEN
18
20
A. TIME dial
B. STYLE dial
C. DARKNESS dial
• The char/darkness on the top of
the pizza can be adjusted using the
DARKNESS dial.
• The dial allows you to increase or
decrease the temperature of the oven.
• Center position is default. Turn the dial
clockwise to increase the temperature
and counterclockwise to decrease it.
D. MANUAL MODE light
Indicates when you are in Manual Mode.
For further explanation, refer to the ‘Manual
Mode’ section on page 11.
AT TEMP
350ºF
NEW YORK
PAN
OFF
E. AT TEMP light
DARKNESSSTYLETIMER
DARKER
THIN &
CRISPY
“WOOD FIRED”
750ºF
LIGHTER
Light will flash during the initial preheating
of the oven(do not cook when flashing).
When the oven has reached the desired
temperature, the AT TEMP light will turn
on. If the AT TEMP light flashes, this means
that the oven has fallen outside the desired
temperature for cooking. Please wait until
the AT TEMP light turns on again to load
your pizza.
Bamboo Cutting Board
Accessory sold separately.
7
Functions
BEFORE FIRST USE
In order to remove any protective substances
on the heating elements, it is necessary to run
the oven empty for 20 minutes. Ensure the area
is well ventilated as the oven may emit vapors.
These vapors are safe and are not detrimental
to the performance of the oven.
1. Remove and safely discard any packing
material, promotional labels and tape
from the oven.
2. Remove the pizza stone from its packaging.
Gently wipe the top black surface of the
deck with a damp cloth. Dry thoroughly
and place the pizza stone in the oven cavity.
3. Wipe the interior of the oven with a soft,
damp sponge.
4. Place the oven on a flat, dry surface. Ensure
there is a minimum distance of 4" (10cm)
of space on both sides of the oven and
6" (15cm) above.
5. Unwind the power cord completely and
insert the power plug into a grounded
power outlet.
6. The oven alert will sound and the TIME
dial lights will illuminate and then turn off.
7. Turn the STYLE dial clockwise until the
indicator reaches the 750°F (400°C)
function.
8. Let the oven run for 20 minutes.
9. The oven is now ready to use.
10. Refer to seasoning the pan section on
page 15 for instructions for first use of pan.
OPERATING YOUR BREVILLE OVEN
Due to the extremely high temperatures being
achieved, please ensure to place the oven in
a well-ventilated area, as it will emit smoke
when cooking.
1. Insert the pizza stone into the pizza
oven cavity.
2. Turn the STYLE dial to the desired setting.
3. The TIME dial lights will illuminate with
the recommended time specific to the
setting. The time can be adjusted by turning
the time dial.
4. The AT TEMP light will flash to indicate
that the oven is preheating.
5. Allow the oven to preheat until the
AT TEMP light stops flashing, and stays
on. The preheating time can vary between
10–20 minutes depending on the selected
preset.
6. Use the pizza peel to place the pizza directly
on the pizza stone. Do not use the peel
when using the pizza pan.
7. Close the oven door. If using the pizza pan
be sure to remove the handle first.
8. Press the TIME dial to start the countdown
timer.
9. At the end of the cooking cycle, the oven
alert will sound and the TIME dial lights
will flash and then go out.
10. Remove your pizza and enjoy.
NOTE
Make sure the oven is preheated before placing
the pizza in the cavity. If cooking multiple
pizzas, wait until the AT TEMP light turns solid
on before loading your next pizza.
If cooking different types of pizza, it is advised
to start with the type that uses the lowest
temperature.
NOTE
For high temperature cooking functions,
we recommend you monitor and stay close
to the oven as your food can quickly become
overdone and eventually ignite.
See Troubleshooting for more information.
WARNING
After cooking, allow the oven to cool
completely before unplugging from the
wall. Fans will continue to run to cool
the sensitive electronics. These fans will
automatically turn off when the temperatures
8

are at an acceptable level.
FUNCTIONS
TIME
Timer to alert you when your pizza is ready.
The recommended time will illuminate
depending on the selected pizza style, but can
be adjusted before or during cooking to suit
your preference. Push dial to start timer. The
countdown cycle can be stopped at any time by
turning the dial down to zero.
PIZZA STYLE
750°F (400°C)
(Recommended time: 3 mins)
Extremely intense heat. Ideal for cooking
charred vegetables.
Note that the cooking time can vary depending
on the type of vegetable being cooked.
†
"WOOD FIRED"
(Recommended time: 2 mins)
Achieve authentic
Neapolitan pizza results
at home!
Extremely high heat.
Expect a cooked
but malleable crust
with distinct blisters and
charring (leopard spotting).
†
This product does not utilize any wood
or wood by-product. The term “Wood Fired”
refers to the specific heat performance
characteristics of this oven that replicate
that of a wood fired brick oven.
THIN & CRISPY
(Recommended time: 4–5 mins)
This dough is rolled out
thinly which gives the
pizza a crisp result. The
toppings should be right
to the edge and the sauce
can be spread to the very
outside of the pizza.
NEW YORK
(Recommended time: 7–8 mins)
The heat profile has been
designed to achieve the
iconic New York style pizza.
Toppings and crust should
be evenly browned and the
pizza should have a chewy
mouthfeel.
PAN
(Recommended time: 18 mins)
Amazing crunchy base,
fluffy dough and plenty
of toppings with sauce
almost to the edge.
The ultimate pizza
indulgence.
This setting requires the
use of the pan provided
with your pizza oven.
FROZEN
(Recommended time: 12–20 mins)
Great frozen pizza results.
350°F (175°C)
(Recommended time: 10 mins)
Perfect to reheat your pizza.
9

DARKNESS
If you prefer your pizza with a darker crust, this
can be achieved thanks to the DARKNESS dial
that allows you to adjust the temperature in
your pizza oven.
The center position is the default. Turn the dial
clockwise to increase the temperature
and counterclockwise to decrease it.
ELEMENT IQ
The Breville Pizzaiolo oven features
Element IQ
‰
‰
, a cooking technology that adjusts
what heating elements are on, and the power
of each of the heating elements to achieve the
optimum cooking performance.
Each of the oven’s functions is preset with our
recommended deck and top temperatures, that
are based on recipes and testing.
Depending on the recipe, amount of food and
your personal taste, these can be adjusted with
the use of the DARKNESS dial.
10

MANUAL MODE FUNCTION
Manual Mode is an alternative mode of operation that allows you to individually control deck and
top temperatures, and to select which heaters are in operation. This enables you to fully customize
how the oven functions.
For better use of the Manual Mode, the alternate interface magnet provided with the pizza oven
should be placed on the front of the interface to indicate what temperatures you have set and what
heaters you are using.
To set the oven to “Manual Mode”
1. Press and hold the TIME/DECK TEMP dial.
2. Turn the STYLE/TOP TEMP dial from OFF to 350°F.
3. Release the TIME/DECK TEMP dial.
4. The Manual Mode light will flash three times and then stay on.
When the Manual Mode is selected, the TOP CONTROL dial will allow you to choose the heat
configuration generated from the top element(s).
If cooking a Neapolitan style pizza which
requires higher heat on the crust to achieve
leopard spotting, or if cooking with delicate
ingredients, turn the TOP CONTROL dial
For other styles of pizza that require that
the toppings and the dough to be cooked
evenly, turn the TOP CONTROL dial to
select ‘EVEN HEAT’:
to select ‘CRUST ONLY’:
CRUST ONLY
TOP CONTROL
EVEN
HEAT
CRUST
ONLY
EVEN HEAT
TOP CONTROL
EVEN
HEAT
CRUST
ONLY
11
 Loading...