

Breville the Big Squeeze BJS700 Series Instruction Book

the Big
Squeez
e
™
Instruction Book - BJS700

2
Contents
2 Breville Recommends Safety
First
6 Components
7 Assembly
10 Operation
13 Care & Cleaning
17 Troubleshooting
20 French
BREVILLE
RECOMMEND
S SAFETY
FIRST
At Breville we are very safety
conscious. We design and
manufacture consumer
products with the safety of you,
our valued customer, foremost
in mind. In addition we ask
that you exercise a degree of
care when using any electrical
appliance and adhere to the
following precautions.
IMPORTANT
SAFEGUARD
S
READ ALL
INSTRUCTIONS
BEFORE USE AND
SAVE FOR FUTURE
REFERENCE
• Carefully read all
instructions before
operating the appliance
for the
first
time and
save for future
reference.
• Remove and safely
discard any packaging
materials and
promotiona l labels before
using the appliance for
the first
time.
• To eliminate a choking
hazard for young
children, remove and
safely discard the
protective cover fitted to
the pow er plug of th is
appliance.
• To protect against
electrical shock, do not

3
immer se the power
cord, power plug or
motor base in water or
any other liquid.

4
• Always use the
appliance on a dry, lev el
surface.
• Do not use the
appliance on a sink
drain board.
• Do not place the
appliance near
the
edge of a counter top
or table during
operation. Vibration
during operation may
ca use the appliance to
move.
• Do not place the
appliance on or near a
hot
ga s or electric burner, or
where it could touch any
other source of heat.
• Unwind the pow er
cord fully before use.
• Do not allow the
power cord to hang
ov er the
edge of a table or
counter, touch hot
surfaces or become
knotted.
• Always ensure the
appliance is completely
assembled before
connecting to the
power outlet and
operating. The
appliance will not turn
on unless properly
assembled. Follow the
instructions provided in
this book.
• Always avoid contact
with moving parts.
• Strictly follow the care
and cleaning instructions
described in this book.
• This appliance is for
household use only.
Do not use the
appliance for anything
other than its intended
purpose as
described in this book.
Do not use outdoors. Do
not use in moving
vehicles or boats.
• The use of attachments
not sol d or
recom mended by
Breville may cause fire,
electric shock or injury.

5
• Do not leave the
appliance unattended
when in use.

6
• Do not operate the juice
extractor without the pulp
and juice container
in place.
• Do not use the juice
extractor if the juicing
screw is dama ged.
• Do not push produ ce
into the feed chute with
your
fingers.
Always use
the food pusher
provided.
• Do not juice fruit
unless seeds, pits and
stones have been
removed.
• Always switch the
juice extractor off after
each use. Ensure the
motor stops
completely and
unplug the power cord
from the wall outlet
before attempting to
move
the appliance, before
cleaning,
disassembling,
assembling and when
storing the appliance.
• Do not operate the
machine longer than
20
seconds before inserting
ingredients.

7
IMPORTANT
SAFEGUARDS
FOR ALL
ELECTRICAL
APPLIANCES
• Fully unwind the
power cord before
use.
• Do not let the power
cord hang ov er the
edge of a counter top or
table, touch hot surfaces
or become knotted.
• To protect against
electric shock do not
immer se the power
cord, pow er plug or
appliance in water or
any ot her liquid.
• The appliance is not
intended for use by
persons (including
children) with
reduced
physica l, sensor y or
mental capabilities, or
lack of experience and
know ledge, unless they
have been given
supervision or instruction
concerning
use of the appliance by
a person responsible for
their safety.

8
• Children should be
supervised to ensure
that they do not play
with the appliance.
• It is recommended to
regularly inspect the
appliance. To avoid a
hazard do not use the
appliance if pow er
cord, power plug or
appliance becomes
damaged in any way.
Immediately stop and
ca ll Breville Consumer
Support
• Any maintenance
other than cl eaning,
visit www.Breville.com
or
ca ll Breville Consumer
Support.
• This appliance is
for household use
only.
• Do not use this
appliance for anything
other than
its intended use. Do
not use in moving
vehicles or boats. Do
not use outdoors.
Misuse may ca use
injury.
CALIFORNIA
PROPOSITION
65:
(Applicable to California
residents only).
Th is product contains
chemicals known to the
State of California to
ca use cancer, birth
defects or other
reproductive harm.

9
FOR HO USEHOLD USE
ONLY SAVE THESE
INSTRUCTIONS
10
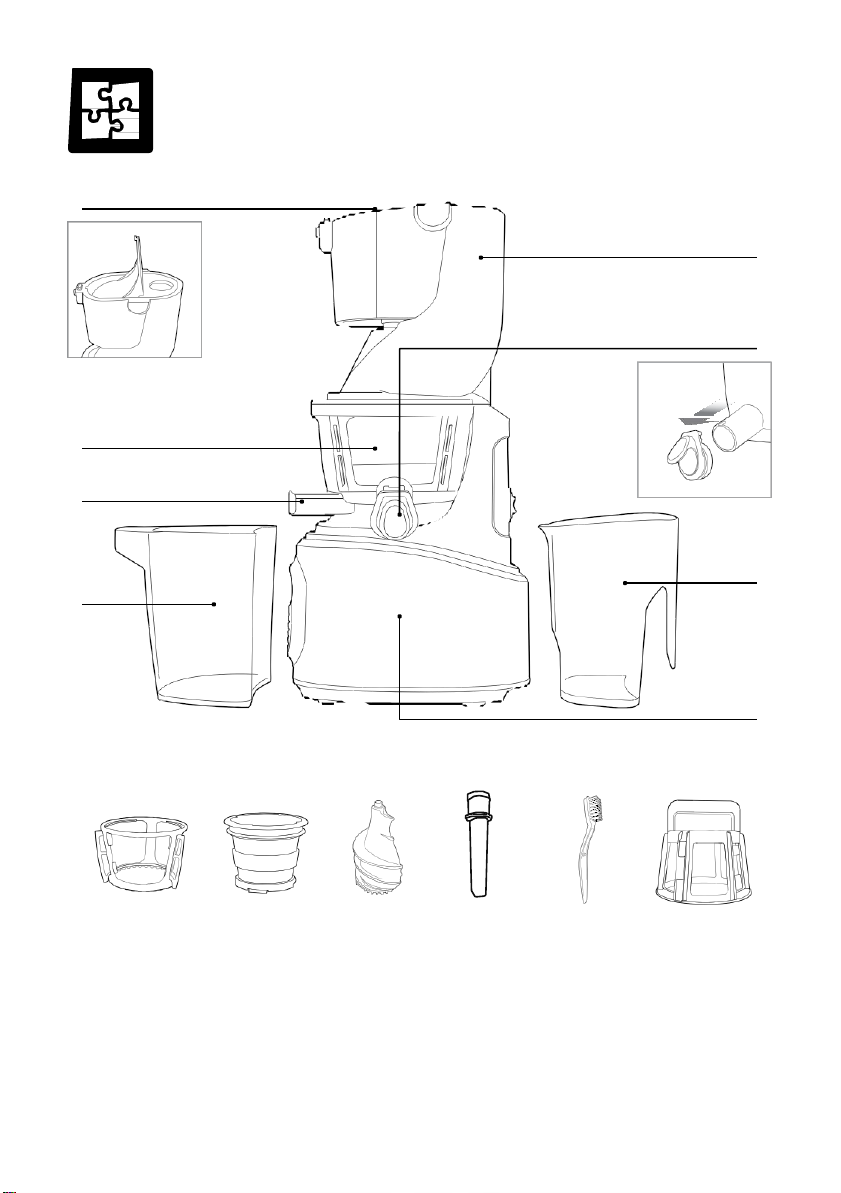
Components
A
Feeding
Basket
Feeding
Tube
E
F
Detachable
B
C
G
D
H
I J K L M N
A. Feeding Tube & Basket
For different sizes of produce.
B. Juicing Bowl
C. Pulp Spout
D. Pulp Cup
E. Drum Lid
F. Juice Spout with Detachable Smart Cap
G. Juice Jug
H. Motor Body
I. Rotation Wiper
J. Strainer
K. Juicing Screw
L. Pusher
M. Cleaning Brush
N. Cleaning Tool
11
Assembly
BEFORE FIRST USE
Before using your juicer for the
first
time,
remove any packaging material and
promotional labels. Ensure the pow er
sw itch is in the OF F position and the
power cord is unplugged.
Wash bow l and juicing tools in w arm
soapy w ater with a soft cloth. Rinse and
dry thoroughly.
When
first
using your appliance, you may
notice an odor coming from the motor. This
is normal and will dissipate with use.
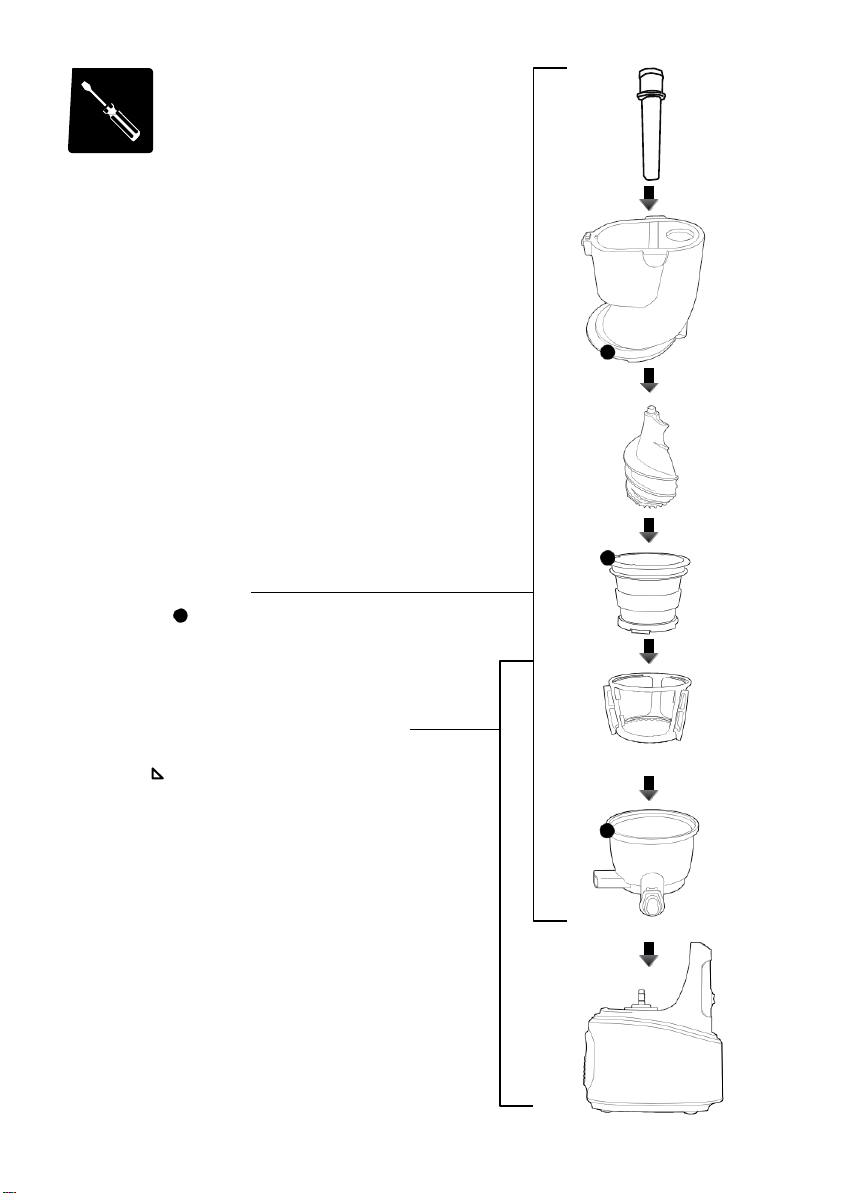
TOP SET ASSEMBLY
Align the dots on each part and assemble
in the order shown. Once assembled, turn
the drum lid clockwise to close.
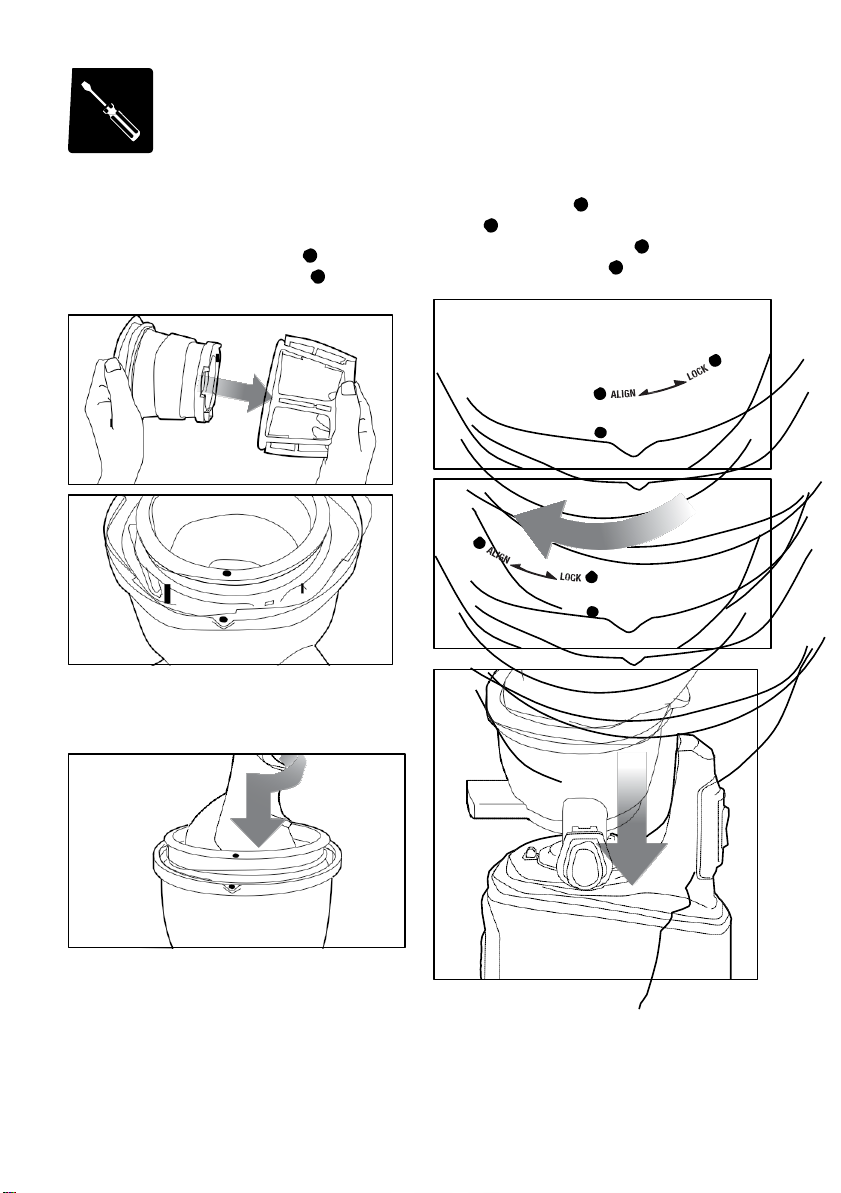
Place the top body assembly on the motor
body. Align the dow n arrow ▼ on the
drum
lid with the ALIGN mark on the motor body
and turn to the ▲ LOCK position.
12
Assembly
ASSEMBLY
1. Assemble the strainer into the
rotation wiper then place th is
assembly into the juicing bowl
ensuring the dot on the
strainer is aligned w ith the dot on the
juicing bowl.
3. Place the drum lid on to the juicing bow l
aligning the dot on the drum lid with the
dot on the juicing bowl. Turn clockwise
to close, aligning the dot on the drum lid
with the LOCK mark .
.
2. Place the juicing screw into the strainer.
Turn and press down on it until it clicks into
place.
The juicing screw needs to be locked
in place in order to close the drum lid.
13
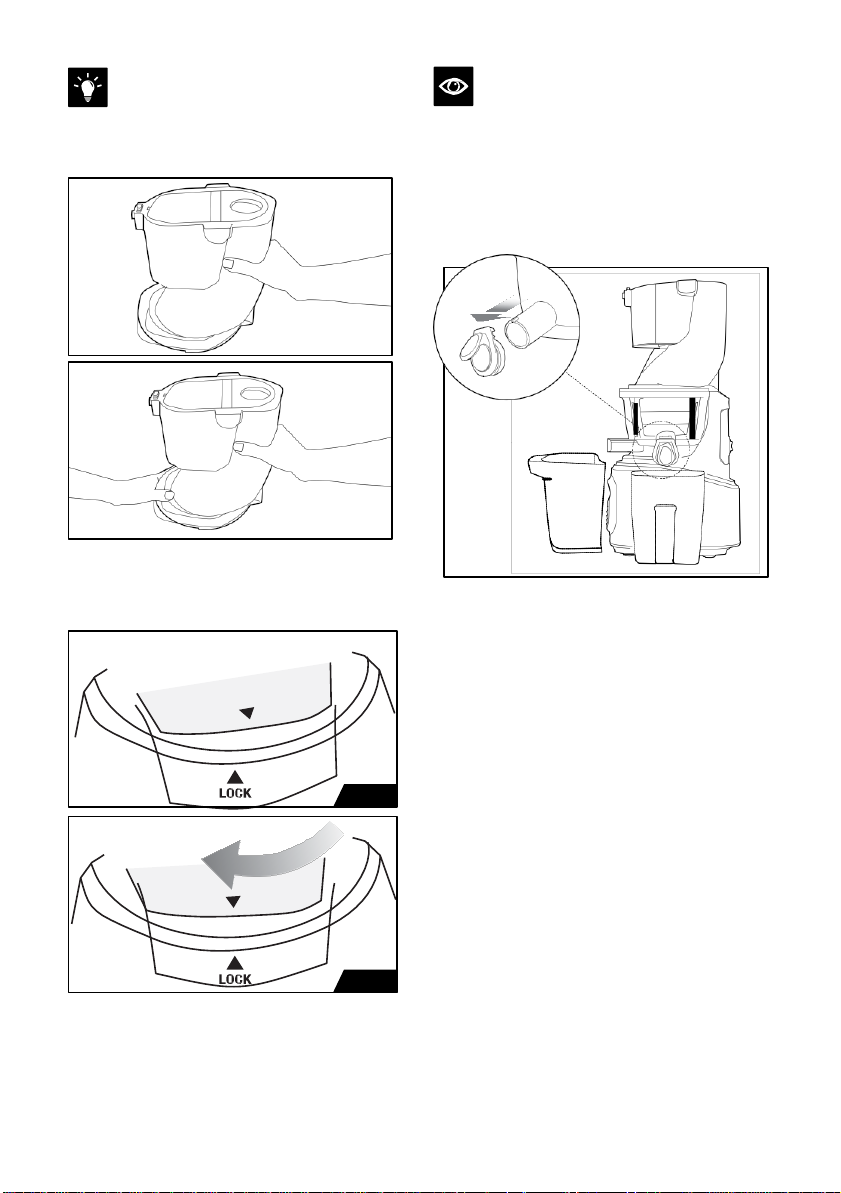
TIP
For easy assembly hold the drum lid by
grabbing the feeding tube and turn
clockwise as shown in the illustrations.
NOTE
The juicer w ill not operate if the down arrow
▼ on the drum lid is not completely aligned
with
the ▲ LOCK mark on the motor body.
5. Place the pulp cup under the pulp spout
and place the juice jug under the juice
spout as show n in the illustration.
Detachable
4. Lock mark on the top-set.
OPEN
LOCK

14
Operation
USING YOUR JUICER
1. After preparing the ingredients, plug
the power cord into a wall outlet.
Do not touch the pow er cord with wet
hands. It may cause electrical shock,
short- circuit, or fire.
2. Press the FORWARD button to
operate.
Forw ard - : Pulls down and
slowly masticates the ingredients.
Reverse = : Pushes the ingredients back
up to dislodge them. The REVERSE
button
only operates while holding down the
sw itch
3. Insert the prepared ingredients into the
feeding tube, one piece at a time. If large
quantity of ingredients are put into the
feeding tube, it can cause the juicer to
stop
Remove hard seeds, stones or pits in
fruits. When juicing frozen fruits,
completely thaw before juicing.
HARD VEGETABLES & LEAFY
GREENS
(E.G. CARROTS, BEETS, & SPINACH)
Insert into the feeding tube.
Tough and fibrous ingredients: Cut to 1/21 inches wide and 2 inches long.
Fibrous leafy vegetables (celery, kale, collard
greens, etc.): Cut the stems in pieces 2
inches long and bundle up the leafy part as
you insert them into the juicer.
SOFT FRUITS & VEGETABLES
(E.G. APPLES, ORANGES & TOMATOES)
Insert into the feeding basket.
Soft ingredients: Cut ingredients into 1-4
pieces. Insert the prepared ingredients into
the feeding basket and push dow n the
ingredient with the basket lid to extract.
NOTE
Citrus fruits need to be peeled.

15
SMART CAP
Detachable
Use the smart cap to make mixed juice,
block juice from dripping, or rinse betw een
different juices.
• Juicing w ith the smart cap closed creates
various mixed juice creations w ith
different fruits and vegetables, milk,
banana, beans and other ingredients.
• After juicing, close the smart cap to stop
juice from dripping, especially when
disassembling the juicing bow l off of the
base.
• When making different juices, quickly
rinse any left over ingredients by pouring
a glass
of w ater through the juicer with the smart
cap closed.
• Leave the smart cap open w hen juicing
ingredients that often create foam
during extraction. (e.g. apples, celery)
• Pay close attention w hen operating with
the smart cap closed. Juice may overflow
if the juice collected in the juicing bow l
exceeds capacity.
IF THE JUICER STOPS
DURING OPERATION:
If the ingredients become jammed in the
screw and the drum lid does not open, press
the OFF button ensuring that the juicer
comes to a complete stop.. Then press and
hold
the REVERSE button until the ingredients
become dislodged. Repeat REVERSE OFF - FORWARD as often as needed to
achieve the desired result. Let the juicer
stop completely before using the
REVERSE button to prevent malfunction.
OFF REV OFF FWD
If the juicer does not work after these
steps, disassemble and clean the parts
before operating the juicer again.
DISASSEMBLY
After juice and pulp have been
completely extracted, switch the unit
OFF.
If the remaining ingredients in the juicing bowl
have not been extracted completely, the drum
lid may not open easily. (After each
extraction, run the juicer for additional 30
seconds to let the juicer extract the remaining
pulp.)
When the drum lid is stuck, press the
REVERSE - OFF - FORWARD button in
the order, sw itching back and forth 2~3
times to dislodge. Then place your hands
on top of the drum lid and firmly press
down as you simultaneously turn the
drum lid counter clockwise to open.
Depending on the ingredients, pour water
down the feeding tube to rinse out the
interior of the juicing bow l and then try to
take off the drum lid.

16
Tips
1. Operating the juicer without ingredients
can cause damage to the screw.
2. Do not continuously operate the juicer for
more than 30 minutes. This can damage
the motor from overheating. After
continuous use, let the juicer rest for 30
minutes to cool down before starting
another session.
3. Do not put hand, utensil, tong, or other
objects into the feeding tube other than
the provided pusher.
4. During operation, do not put hand, utensil,
tong, spoon, spatula or other objects into
the juice spout of the juicing bowl. If
objects are put into the juice spout during
operation, such material/object can get
stuck and damage the juicer parts.
5. Do not reinsert the extracted pulp into
the juicer. This can cause the juicer to
stop or cause the drum lid not to open.
6. After juicing ingredients with small seeds
like grapes, thoroughly clean all the
crevices on the bottom of the juicing
screw.
Don’ts
DO NOT PUT THE FOLLOWING
INGREDIENTS INTO THE
JUICER
8
8
Hard seeds, pits or stones
Peach, nectarines, apricot , plum, mango,
etc.
Remove hard seeds from the ingredients
before juicing.
8
8
Hard or inedible skins
Pineapple, melon, mango, orange, etc.
Peel the skins from the ingredients before
juicing.
8
8
Frozen fruits or ice
Frozen straw berry, blueberry, raspberry,
etc.
Completely thaw frozen fruits before
juicing. Do not use ice.
8
8
Vegetable/ animal oil
Sesame seed, butter, margarine, etc.
Do not extract ingredients containing
vegetable or animal oil. This can reduce
performance and even damage the juicer.
8
8
Others
Coconut, sugarcane or whole grains.
Do not extract ingredients with no water
content.
 Loading...