

Page 1

INSTRUCTIONS FOR USE
AND RECIPE BOOK
Avance Skillet
Model TF10
Breville is a registered trademark of Breville Pty. Ltd.
ABN 98 000 092 928
© Copyright. Breville Pty. Ltd. 2004
Due to continual improvements in design or otherwise,
the product you purchase may differ slightly from
the one illustrated in this booklet.
Breville Customer Service Centre
Australian Customers
✉
Breville Customer Service Centre
Locked Bag 2000
Botany NSW 2019
AUSTRALIA
☎
Customer Service: 1300 139 798
Fax (02) 9384 9601
Email Customer Service askus@breville.com.au
New Zealand Customers
✉
Breville Customer Service Centre
Private Bag 94411
Greenmount
AUCKLAND, NEW ZEALAND
☎
Customer Service: 09 271 3980
Fax 0800 288 513
Email Customer Service askus@breville.com.au
www.breville.com.au
PRINTED ON
RECYCLED PAPER
Model TF10
Issue 1/04
Page 2

Page
Breville Recommends Safety First 4
Know your Breville Skillet 5
Operating your Breville Skillet 6
Care and Cleaning 7
Cooking Techniques 9
Recipes 11
Avance Skillet
CONTENTS
Congratulations
on the purchase of your new Breville Avance Skillet
2
Page 3
5
4
••
If using plastic utensils, do not leave
in cooking vessel when hot.
••
Never immerse cord and/or heat
probe in water or any other liquid.
••
Avoid using on metal surfaces
eg. sink, hotplate.
••
Always remove temperature control
probe before cleaning the appliance.
••
Extreme caution must be used when
the appliance is filled with hot oil or
other liquid. Do not move the appliance
during cooking and allow it to cool
before removing oil or other liquid.
••
Place skillet at least 200mm away from
walls and curtains.
••
Do not touch hot surfaces.
••
Do not leave the appliance unattended
when in use.
••
Always use the appliance on a dry,
level surface.
••
The appliance is not intended for use
by young children or infirm persons
without supervision.
••
Young children should be supervised
to ensure that they do not play with
the appliance.
••
Do not let the cord hang over the edge of
a table or counter, touch hot surfaces or
become knotted.
••
Do not place this appliance on or
near a hot gas or electric burner, or
where it could touch a heated oven.
••
This skillet must be used with the
Temperature Control Probe provided.
Do not use any other probe or connector.
••
Always switch appliance off, then switch
off at the power outlet, then unplug the
appliance when not in use, before
attempting to move appliance and before
cleaning or storing.
••
This appliance is for household use only.
Do not use this appliance for other than
its intended use. Do not use outdoors.
••
Regularly inspect the supply cord, plug
and actual appliance for any damage.
If found damaged in any way, immediately
cease use of the appliance and return the
entire appliance to the nearest authorised
Breville service centre for examination,
replacement or repair.
••
The installation of a residual current
device (safety switch) is recommended to
provide additional safety protection when
using electrical appliances. It is advisable
that a safety switch with a rated residual
operating current not exceeding 30mA be
installed in the electrical circuit supplying
the appliance. See your electrician for
professional advice.
BREVILLE RECOMMENDS SAFETY FIRST
We at Breville are very safety conscious. We design and manufacture consumer products with
the safety of you, our valued customer, foremost in mind. In addition we ask that you exercise a
degree of care when using any electrical appliance and adhere to the following precautions:
READ ALL INSTRUCTIONS BEFORE OPERATING
AND SAVE FOR FUTURE REFERENCE
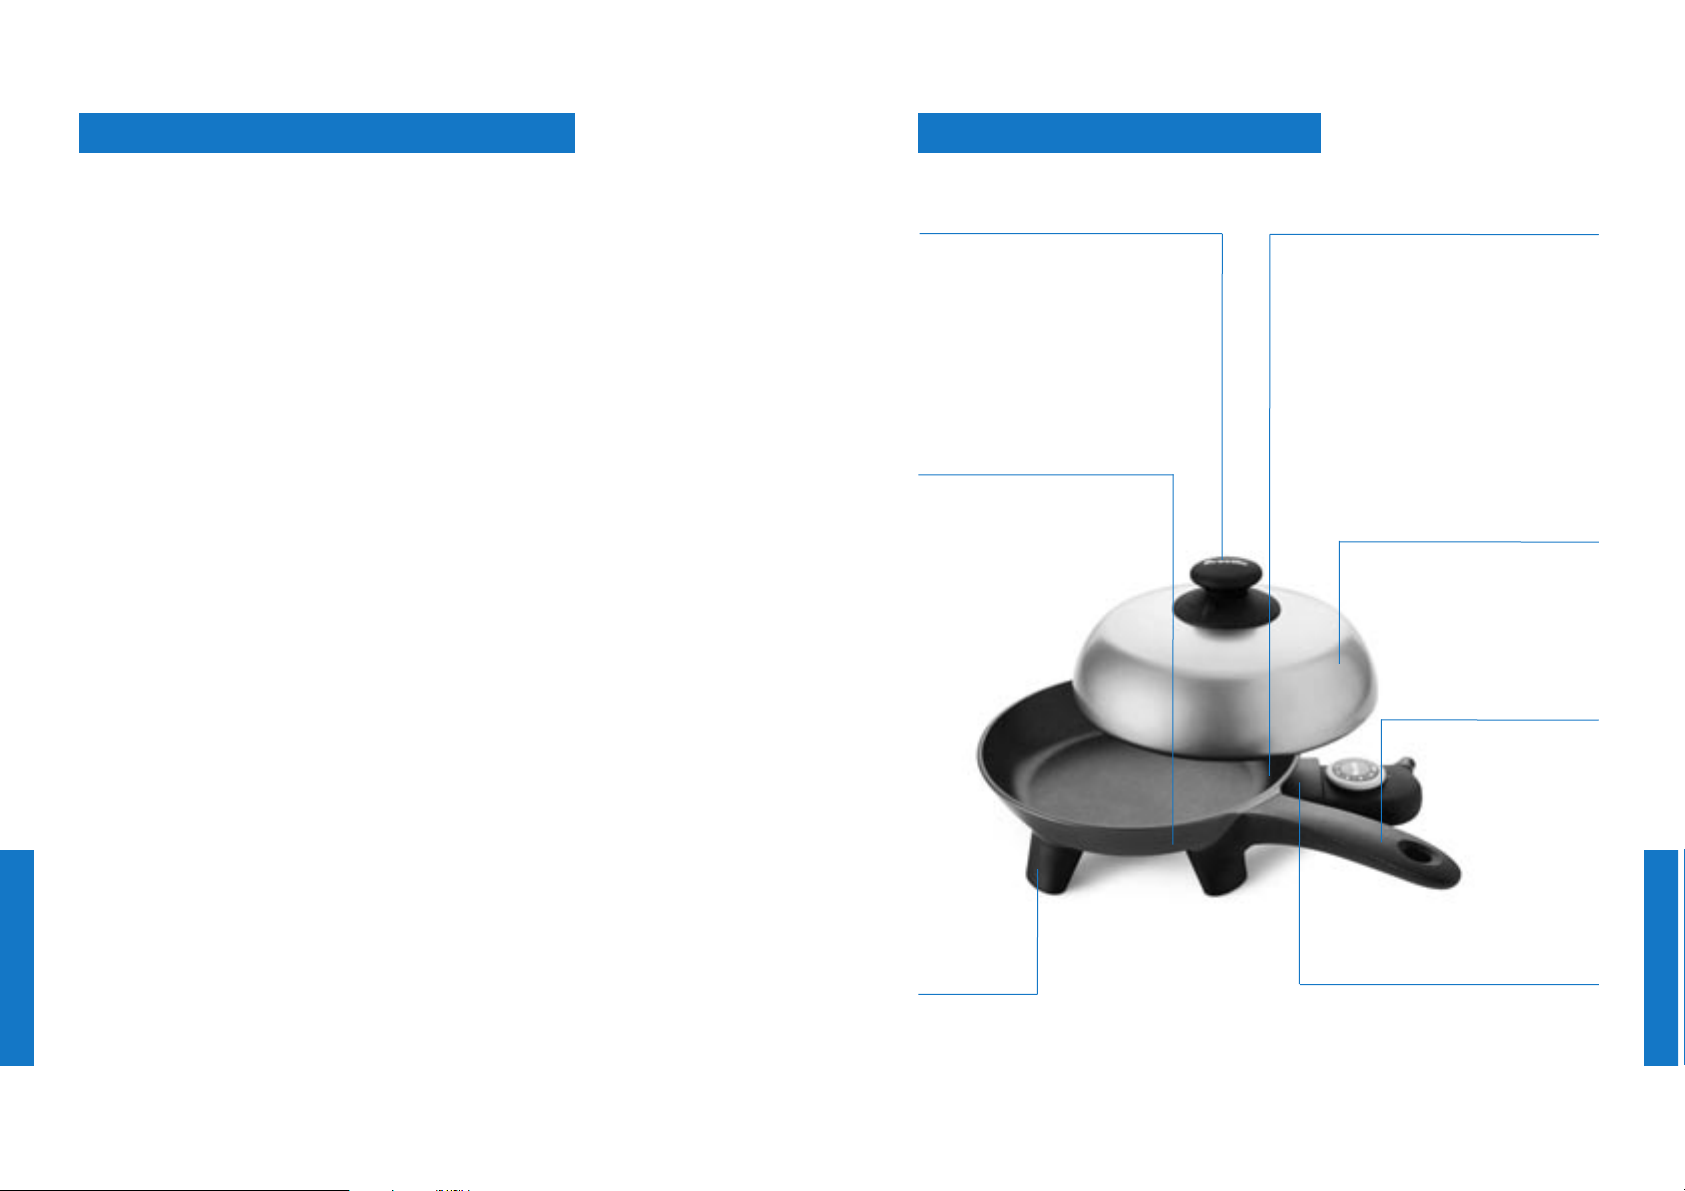
KNOW YOUR BREVILLE SKILLET
High Dome Metal Lid with Steam Vent
With the high dome lid in place, the
frypan can be used as a compact oven.
It allows you to bake, slow cook and roast
pieces of lamb, beef or chicken. The lid
also retains heat and moisture when
slow cooking foods such as curries.
Simply place the lid on the frypan and
adjust the steam vent while cooking.
Non-skid Feet
Cool touch integrated handle
Cool touch handle for safety
and ease of use
Removable Temperature Control Probe
The Temperature Probe is thermostatically
controlled providing accurate cooking
temperatures with 10 heat settings.
Quasar Rockcote Non-stick Cooking Surface
The high quality two coat non-stick cooking
surface on your frypan means food won’t
stick and less oil can be used when cooking.
It also means that cleaning your frypan is a
breeze. As with all non-stick surfaces only
plastic or wooden utensils should be used to
avoid scratching the surface. Regular high
heat cooking may discolour the non-stick
surface. This is normal and will not affect the
performance or life of the non-stick coating.
1100 watt element
The heavy die cast heating element
construction of the skillet allows
faster heating and is designed to
retain even heat and save energy.
Dishwasher Safe
The skillet element is fully sealed,
so the skillet vessel is dishwasher
safe and can be fully immersed in
water for easy cleaning.
Page 4

6
7
OPERATING YOUR BREVILLE SKILLET
BEFORE FIRST USE
It is recommended to remove any promotional
labels and wash your skillet and lid in hot
soapy water. Rinse and dry thoroughly. Do not
immerse the cord and/or temperature control
probe in water or any other liquid.
1. Insert the temperature control probe into
the probe socket on the appliance. Plug
into a 230/240v power outlet and switch
ON. Always insert the probe into the
appliance first, then plug into main
power outlet.
2. Turn the dial on the heat probe clockwise
to the desired setting. The heating ‘ON’
light will illuminate.
3. The red temperature control light will be
on until the Skillet reaches the desired
temperature. Once the temperature has
been reached, the red light will cycle 'on'
and 'off' during cooking to retain the
desired temperature.
4. When cooking is completed, turn the
dial clock-wise until it is aligned with
the ‘MIN’. Switch off at the power outlet
and unplug.
5. Leave the Temperature Probe connected
to the appliance until cool.
Before inserting the
Temperature Probe into the
Skillet socket, ensure the
interior of the socket is
fully dry. To do this, shake
out excess water then wipe
the interior of the socket
with a dry cloth.
This Skillet must be used
with the Temperature Probe
provided. Do not use any
other probe or connector.
••
Do not leave plastic cooking utensils
in contact with the hot skillet surface
while cooking.
••
Before cleaning, switch the frypan ‘OFF’
and unplug from the power outlet.
Remove the Temperature Probe from
the socket in the appliance.
TEMPERATURE PROBE
••
If cleaning is necessary, wipe over unit
with a slightly damp cloth.
Storage: Store the Temperature Probe
carefully. Do not knock or drop it as this can
damage the probe. If damage is suspected,
return the temperature probe to your nearest
Breville Service Centre for inspection.
Tip: For convenient storage of the
Temperature Probe, line the skillet bowl
with 2 sheets of kitchen paper and place the
probe on the kitchen paper. This will ensure
the probe and plug don’t scratch the nonstick surface.
QUASAR ROCKCOTE NON STICK
COOKING SURFACE
Your skillet features Quasar Rockote, a high
quality two coat non-stick coating, ideal for
low fat cooking.
Regardless of this fact, Breville recommends
that care is taken with the non-stick coating
particularly when using metal utensils.
Do not use sharp objects or cut food inside
the skillet. Breville will not be liable for
damage to the non-stick coating where
metal utensils have been used.
Cooking on a non-stick surface minimises
the need for oil, food does not stick and
cleaning is easier.
Any discolouration that may occur will only
detract from the appearance of the frypan
and will not affect the cooking performance.
When cleaning the non-stick coating, do
not use metal (or other abrasive) scourers.
Wash in hot soapy water. Remove stubborn
spots with a plastic washing pad or nylon
washing brush.
CARE AND CLEANING
Never immerse the
Temperature Probe or cord
in water or any other liquid.
Page 5

9
8
CARE AND CLEANING CONT’D
REMOVING DISCOLOURATION
OF THE NON-STICK SURFACE
Combine: 2 tablespoons bicarbonate of soda,
1/4
cup household bleach, 1 cup water.
Pour into the frypan, place lid on with the
vent closed, and simmer for 5-10 minutes.
Clean in a well-ventilated area and avoid
breathing in the vapours. Wash as directed
before re-use. In some instances this may
not remove all the staining.
HIGH DOME LID
Wash the lid in warm soapy water using a
soft sponge, rinse and dry thoroughly.
The metal lid is not dishwasher safe.
DISHWASHER SAFE
Your skillet vessel is dishwasher safe for easy
cleaning. The recessed heating element is
completely sealed so it is safe to immerse in
water. The metal lid is not dishwasher safe.
Before inserting the
Temperature Probe into the
frypan socket, ensure the
interior of the socket is
fully dry. To do this, shake
out excess water then wipe
the interior of the socket
with a dry cloth.
COOKING TECHNIQUES
SAUTEING
Recommended temperature probe setting
8 - 10. Used for sauteing onions, garlic,
spices, pastes, herbs, vegetables, meat
and seafood.
PAN FRYING
Recommended temperature probe setting
Searing meat – 10
Medium heat – 6 - 8.
Used for cooking meats, fish, seafood, eggs,
chicken or sausages.
••
Preheat skillet on high heat setting. When
heated add a small amount of oil, which
prevents the food from sticking.
The skillet’s non-stick cooking surface
allows you to reduce the amount of
oil when cooking.
••
Brush whole meat cuts eg steak, chicken
breast, fish fillets with small amount of
oil before pan frying rather than adding
oil directly to the pan.
••
When cooking meats, start on setting 10
to seal in juices. Reduce heat to setting
6 - 8 to cook the meat to well done.
ROASTING
Recommended temperature probe setting
Searing Roast - 8
Cooking Roast – 5 - 6
Meat and Poultry
The frypan is ideal for roasting meat and
poultry, as the meat retains the flavour
and juices.
••
Preheat the frypan on setting 8. Fattier
joints of meat require no oil. Use only a
small amount for less fatty joints.
••
Brown and seal the meat on all sides.
Position the lid.
••
After browning, turn the dial to setting
5 - 6, cooking the meat as desired.
••
Turn the meat during cooking.
••
Once the meat is cooked, set aside and
cover with foil, whilst the gravy is
prepared from the juice in the frypan.
Vegetables
••
Cut into even sized pieces.
••
Add to the frypan 40-65 minutes
before serving.
••
For crisper vegetables, remove the meat
and increase the heat for the last few
minutes of cooking.
Page 6

COOKING TECHNIQUES CONT’D
11
10
ROASTING TIMES
The following times are for dishes that are
well done. To suit your personal taste, these
times can be reduced.
Pork 30-40 minutes/500g after browning
Veal 30-40 minutes/500g after browning
Lamb/Beef 25-30 minutes/500g after browning
Chicken 30-35 minutes/500g after browning
TOASTING SANDWICHES
Recommended temperature probe setting
8 - 10.
Sandwiches can be easily toasted in the
skillet. Choose fillings which will hold
together and not spill out of the sandwich.
••
Preheat the skillet
••
Butter the pieces of bread well and
place the sandwich in the frypan with
the buttered sides on the outside
• Cook for approximately 3 - 4 minutes
on either side, depending on the depth
of toasting desired.
Temperature setting will
depend on filling.
RECIPES
BASIC OMELETTE
2 teaspoons oil or butter
2 eggs, beaten
1/3
cup milk
freshly ground black pepper
1. Place the ingredients into a bowl
and mix well.
2. Heat skillet on setting 6, add oil
or butter.
3. Pour the omelette mixture into skillet
and cook for 2-3 minutes, add filling
onto one half of the omelette and
carefully fold the other half over.
4. Cover with lid and cook for 2-3 minutes
or until the omelette has just set.
Suggested fillings:
Ham and Cheese
Spinach and Fetta
Tomato and Corn
Mushroom and Chives
Smoked Salmon and Cottage Cheese
FLUFFY SMOKED SALMON
SCRAMBLED EGGS
2 eggs
1/4
cup thickened cream
freshly ground black pepper
1 tablespoon butter
75g smoked salmon, thinly sliced
1 tablespoon finely snipped chives
1. Place eggs and cream into a mixing
bowl, mix together until light and
fluffy. Season with pepper.
2. Heat skillet on setting 6, add butter.
Pour eggs into hot pan, stir until mixture
has thickened slightly and the eggs are
almost set.
3. Stir through smoked salmon; cover with
lid until eggs are firm, light and fluffy.
4. Sprinkle with chives.
Serve on toasted muffins covered with
mascarpone cheese.
Page 7

RECIPES CONT’D
13
12
ZUCCHINI, FETTA AND
BASIL FRITTATA
1 teaspoon olive oil
2 eggs
1 medium zucchini, grated
1/4
cup fetta cheese, crumbled
1 tablespoon shredded basil
freshly ground black pepper
1. Place the eggs into a bowl and mix well,
mix in the remaining ingredients.
2. Heat skillet on setting 6, add oil.
3. Pour the frittata mixture into skillet and
cook for 6-7 minutes withthe lid on until
the frittata has set.
Serve with a rocket, pear and walnut salad.
PIKELETS
Makes 12
1 cup plain flour
2 teaspoons baking powder
1/4
tablespoon brown sugar
2 eggs, lightly beaten
1 tablespoon honey
1 cup milk
45g butter, melted
2 teaspoons butter (greasing)
1. Sift flour, baking powder and sugar into
a mixing bowl.
2. Mix the eggs, honey, milk and butter
together, gradually add them to the dry
ingredients, using a Breville hand mixer,
mix until a creamy consistency is formed
or ingredients are smooth.
3. Allow mixture to stand for 5 minutes.
4. Heat skillet on setting 6, add butter.
Place 3 level tablespoons of mixture
about 4 cm apart.
5. Cook until and bubbles appear in
pikelets, turn and cook until golden.
Continue with the remaining mixture.
Serve with cream and jam.
RECIPES CONT’D
CREPES
Makes 10 – 12
1
1/2
cups plain flour
1/4
teaspoon salt
1 teaspoon vanilla essence
3 eggs, lightly beaten
1
1/4
cups milk
2 tablespoons butter, melted
1 tablespoon oil (greasing)
1. Sift flour and salt into the glass
mixing bowl.
2 Combine essence, eggs, milk and
butter. Gradually add to the flour
mixing well until the batter is
smooth and free of lumps.
3. Heat skillet on setting 8, add oil.
4. Pour sufficient batter into skillet to
cover evenly, but not too thick.
5. Crepes cook quickly 1-2 minutes;
overcooking causes crepes to toughen.
6. Turn and cook until golden.
Serve with lemon juice and icing sugar.
PANCAKES
Makes approximately 8-10 pancakes
1 cup plain flour
1/4
teaspoon salt
1 egg
1
1/4
cups milk
2 tablespoons butter, softened
1. Combine the flour, salt, egg and milk in a
mixing bowl, mix until well combined
and smooth.
2. Heat skillet on setting 6, add butter.
Pour a small quantity of batter into
skillet to cover base of pan.
3. Cook until bubbles come to the surface
and break.
4. Carefully turn the pancake and cook until
golden brown.
5. Remove from skillet. Continue with
remaining batter.
Serve with maple syrup and ice cream.
Page 8

15
14
RECIPES CONT’D
GOURMET BEEF BURGERS
150g lean beef mince
1/2
onion, finely diced
1 egg, lightly beaten
1/2
cup fresh breadcrumbs
1 tablespoon chopped parsley
freshly ground black pepper
2 tablespoons oil
1/4
avocado sliced
2 slices Swiss cheese
2 thin slices spicy pancetta
2 Turkish bread rolls
1. Combine beef, onion, egg, breadcrumbs,
parsley and pepper. Shape into 2 patties,
refrigerate until required.
2. Heat skillet on setting 8, add oil.
3. Brown and cook patties on each side
until golden and mince is no longer
pink. Remove and drain on absorbent
paper. Top with sliced avocado and
sliced Swiss cheese.
4. Add the sliced pancetta to the skillet, cook
until crisp, place on each burger patty.
Serve on toasted Turkish rolls with salad leaves.
Hint: Patties are best made ahead of time
and chilled for several hours.
CRUMBED LAMB CUTLETS
4 lamb cutlets, trimmed
Salt & freshly ground black pepper
1/3
cup plain flour
2 eggs, lightly beaten
1 cup cornflake crumbs
2 tablespoons oil
1. Season cutlets with salt and pepper. Dip
cutlets into flour, then into the eggs and
then into the crumbs. Press the crumbs
on firmly to form a thick coating. Place
cutlets in a single layer onto a tray, cover
and refrigerate for 20 minutes.
2. Heat skillet on setting 6, add oil.
3. Cook cutlets on each side for 5 minutes
or until cooked to desired doneness.
Remove and drain on absorbent paper.
Serve immediately with mashed potatoes
and minted green peas.
RECIPES CONT’D
TOMATO AND BASIL BRUSCHETTA
2 slices light rye or French stick bread,
thickly sliced diagonally
1 clove garlic, cut in half
2 tablespoons olive oil
1/2
cup finely chopped deseeded tomato
1/2
cup finely chopped Spanish onion
1 tablespoon olive oil
1 tablespoon shredded basil
1 teaspoon light brown sugar
1. Rub both sides of bread with cut
surface of garlic.
2. Heat skillet on setting 6, add oil.
Cook bread until golden brown on
each side.
3. Combine tomato and onion.
4. Combine olive oil, basil and brown sugar,
mix well. Stir into tomato mixture.
5. Spoon tomato mixture evenly onto
toasted bread slices.
 Loading...