

Page 1
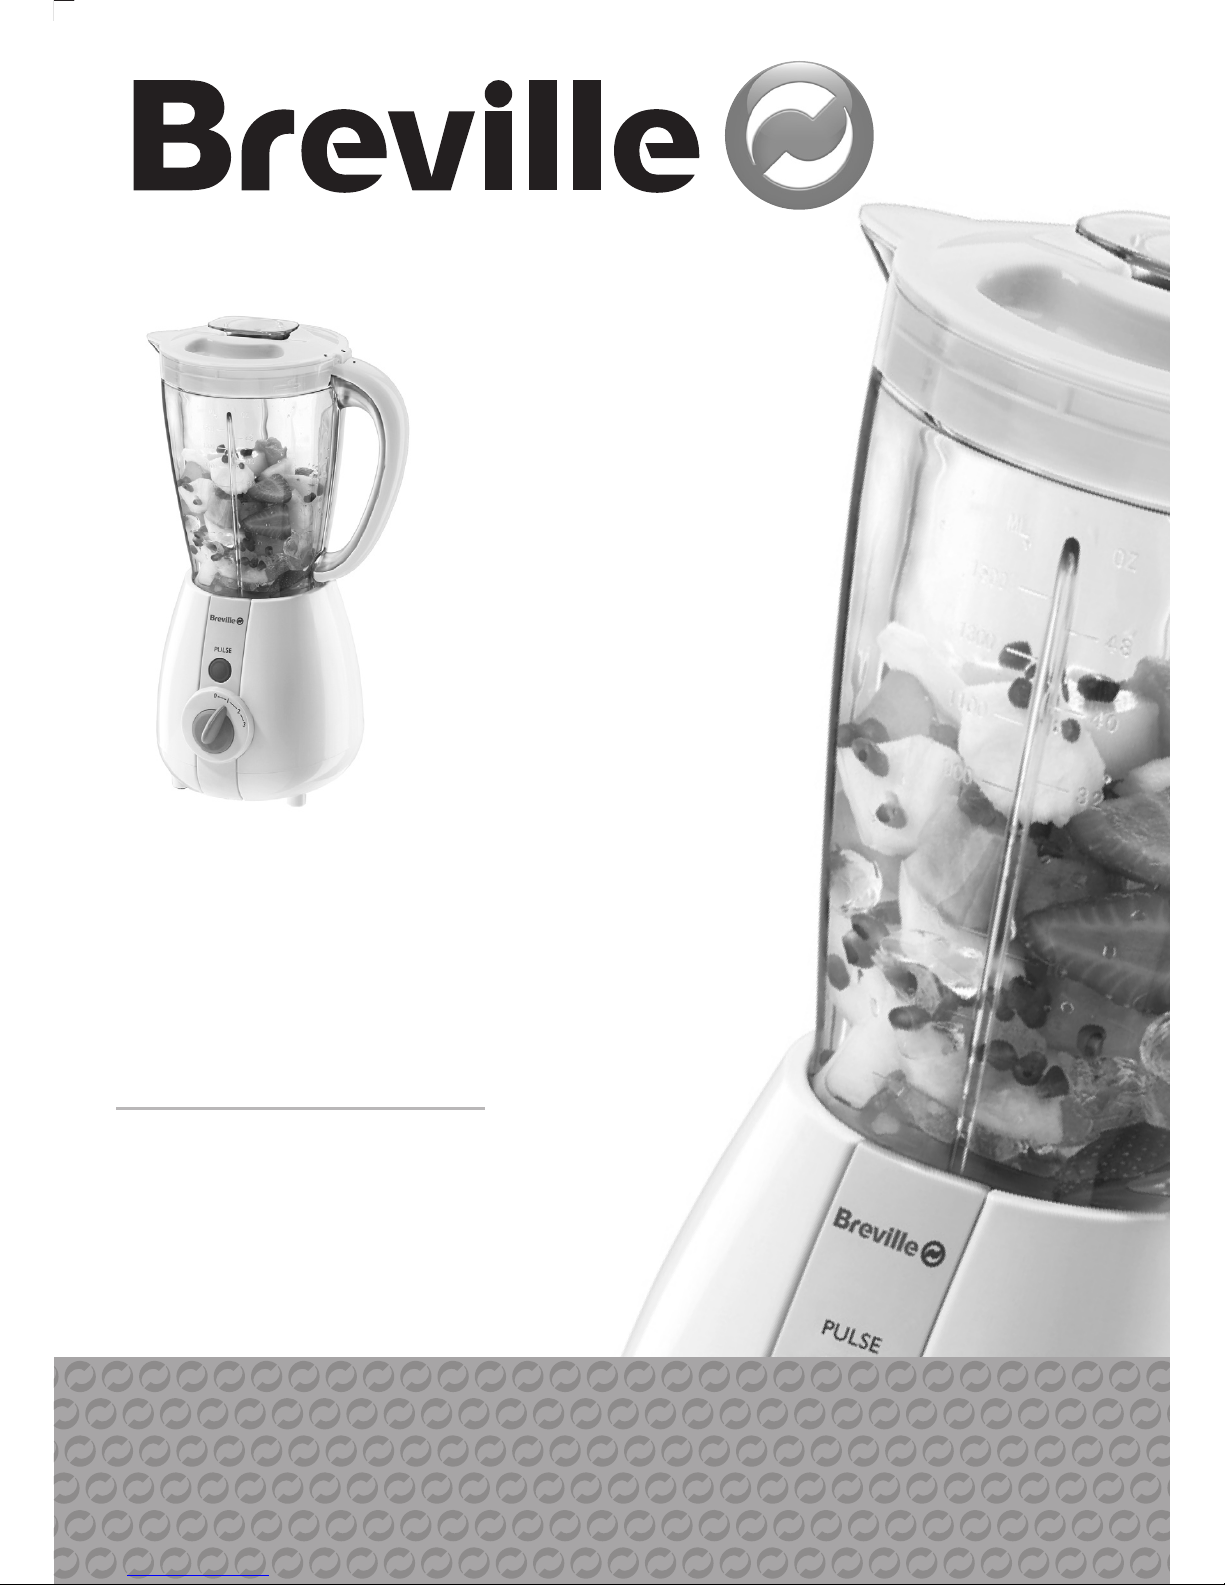
selection of recipes included
simplicity
500W blender
instruction booklet
®
Page 2

2
product safety
READ CAREFULLY AND KEEP FOR FUTURE REFERENCE
This product can be used by children aged 8 years and above,
and persons who require supervision, provided:
• they are familiar with the hazards associated with the
product, and,
• they receive instruction by a competent person on how to
safely use the product.
Children must not play with the product. Cleaning and user
maintenance must not be done by children unless they are
aged 8 or older and are supervised.
Always disconnect the appliance from the mains supply socket
if it is left unattended and before assembling, disassembling or
cleaning.
If the supply cord is damaged, it must be replaced by the
manufacturer,itsserviceagentorsimilarlyqualiedpersonsin
order to avoid a hazard.
! Never use this appliance for anything other than its intended use. This appliance is for
household use only. Do not use this appliance outdoors.
! Always ensure that hands are dry before handling the plug or switching on the
appliance.
! Always use the appliance on a stable, secure, dry and level surface.
! This appliance must not be placed on or near any potentially hot surfaces (such as a
gas or electric hob).
! Never immerse any part of the appliance or power cord and plug in water or any other
liquid.
! Never let the power cord hang over the edge of a work top, touch hot surfaces or
become knotted, trapped or pinched.
! Do not use the appliance if it has been dropped or if there are any visible signs of
damage.
! Never use any accessory or attachment not recommended by the manufacturer.
! Make sure that all attachments are securely and correctly tted before operating the
appliance.
! The blades and cutting accessories have very sharp edges. Take care when handling
or cleaning them.
! Allow moving parts to come to a stop before changing or cleaning accessories.
! Never process hot or boiling liquids. Allow them to cool before processing.
Page 3

3
• Motor unit
• Jug
• Lid
• Stopper
Ensure that the appliance is switched off and unplugged from the supply socket
if it is left unattended and before assembling, disassembling or cleaning.
The blades have very sharp edges. Take care when handling or cleaning them.
Never immerse any part of the motor unit or power cord and plug in water or any
other liquid.
Never use harsh, abrasive or caustic cleaners to clean this appliance.
1. Remove your blender carefully from the packaging. You may wish to store the
packaging for future use.
2. Check the contents:
3. Wash all parts that will come into contact with food. Use warm soapy water then rinse
and dry thoroughly.
4. Using a mild detergent solution, wipe the motor unit with a damp cloth. Dry
thoroughly.
before using your blender
Page 4

4
features
1 Stopper
Removable stopper allows you to add ingredients whilst continuing to blend
2 Jug lid
Removable lid. As a safety feature, your blender will not work unless the lid is tted.
3 Blending jug
4 Motor unit
5 Pulse button
The pulse button allows precise control of the duration and speed of blending. Press
and hold the pulse button to start processing, and release it to stop.
6 Speed control
Speed control with three speeds
Page 5

5
Due to our policy of continuous improvement, the actual product may differ slightly from the one illustrated in these instructions.
Page 6

6
assembling your blender
Make sure the unit is switched off and unplugged from the mains supply socket
before assembly.
Make sure that the speed control is set to the off (0) position before plugging your
blender in to the mains supply.
Place the motor unit on a at, dry and level surface.
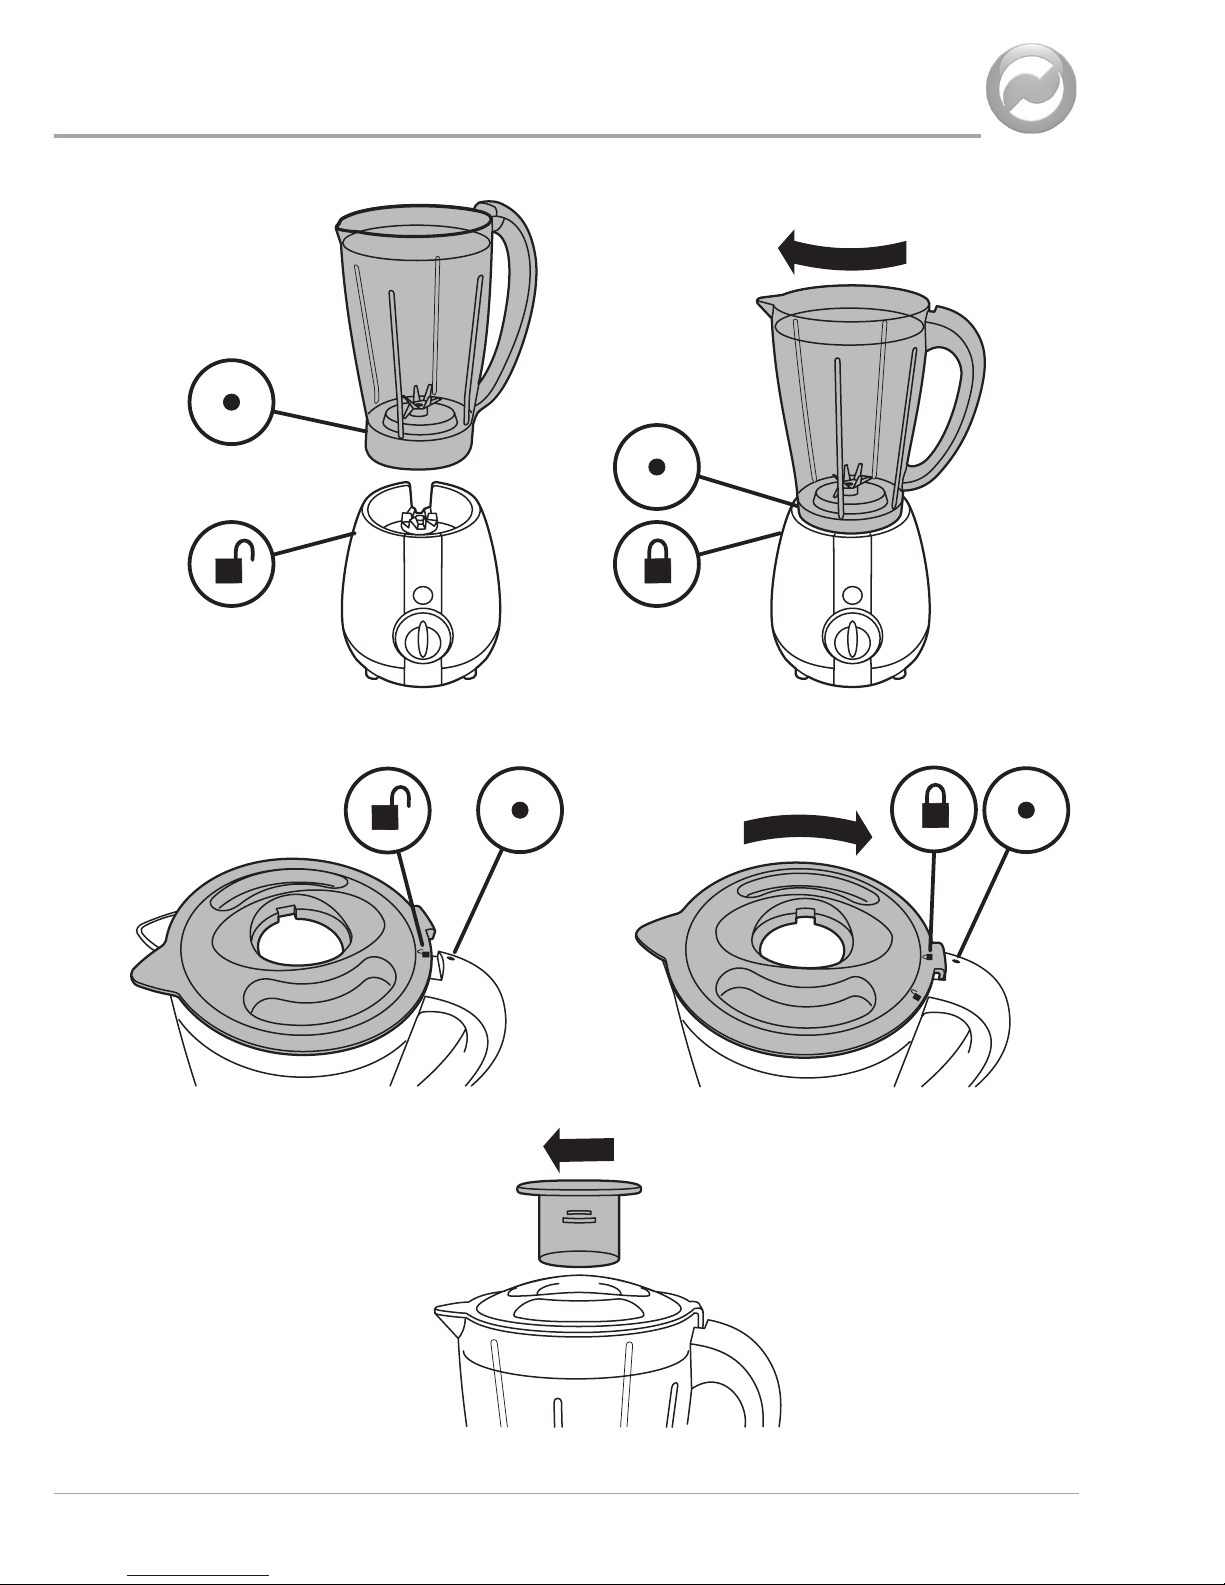
1. Line up the symbol on the lower part of the jug with the symbol on the motor
unit.
2. Twist the jug clockwise until the symbol on the jug is aligned with the symbol on
the motor unit. The jug will lock rmly in place. Your blender will not work unless the
jug is correctly locked in position.
3. Place the lid onto the jug with the symbol opposite the symbol on the jug
handle.
4. Rotate the lid clockwise until the symbol on the lid is aligned with the mark on
the jug handle. Your blender will not work unless the lid is correctly locked in position.
5. Fit the stopper into the hole in the lid and twist clockwise to lock it.
Page 7
7
q w
e r
t
Page 8

8
using your blender
Neverplaceyourngersoranyotherimplementinsidethejugduringoperation
or when adding ingredients.
Do not operate your blender continuously for more than one minute without giving
it a rest period of two minutes.
Never process boiling liquids.
1. Add the ingredients and t the lid. Make sure that the jug and lid are correctly tted
otherwise your blender will not operate. Don’t overll the jug.
2. Liquid ingredients and smaller ingredients can be added to the jug by removing the
stopper. Don’t overll the jug.
3. To start blending, set the speed control to 1. To blend at a higher speed, set the
speed control to 2 or 3. Alternatively, blend food using the pulse button. Set the
speed control to the off (0) position then blend in short bursts by pressing and
releasing the pulse button.
4. During processing, further ingredients can be added by twisting and removing the
stopper in the lid. Ret the stopper after adding any ingredients.
Using your blender to crush ice
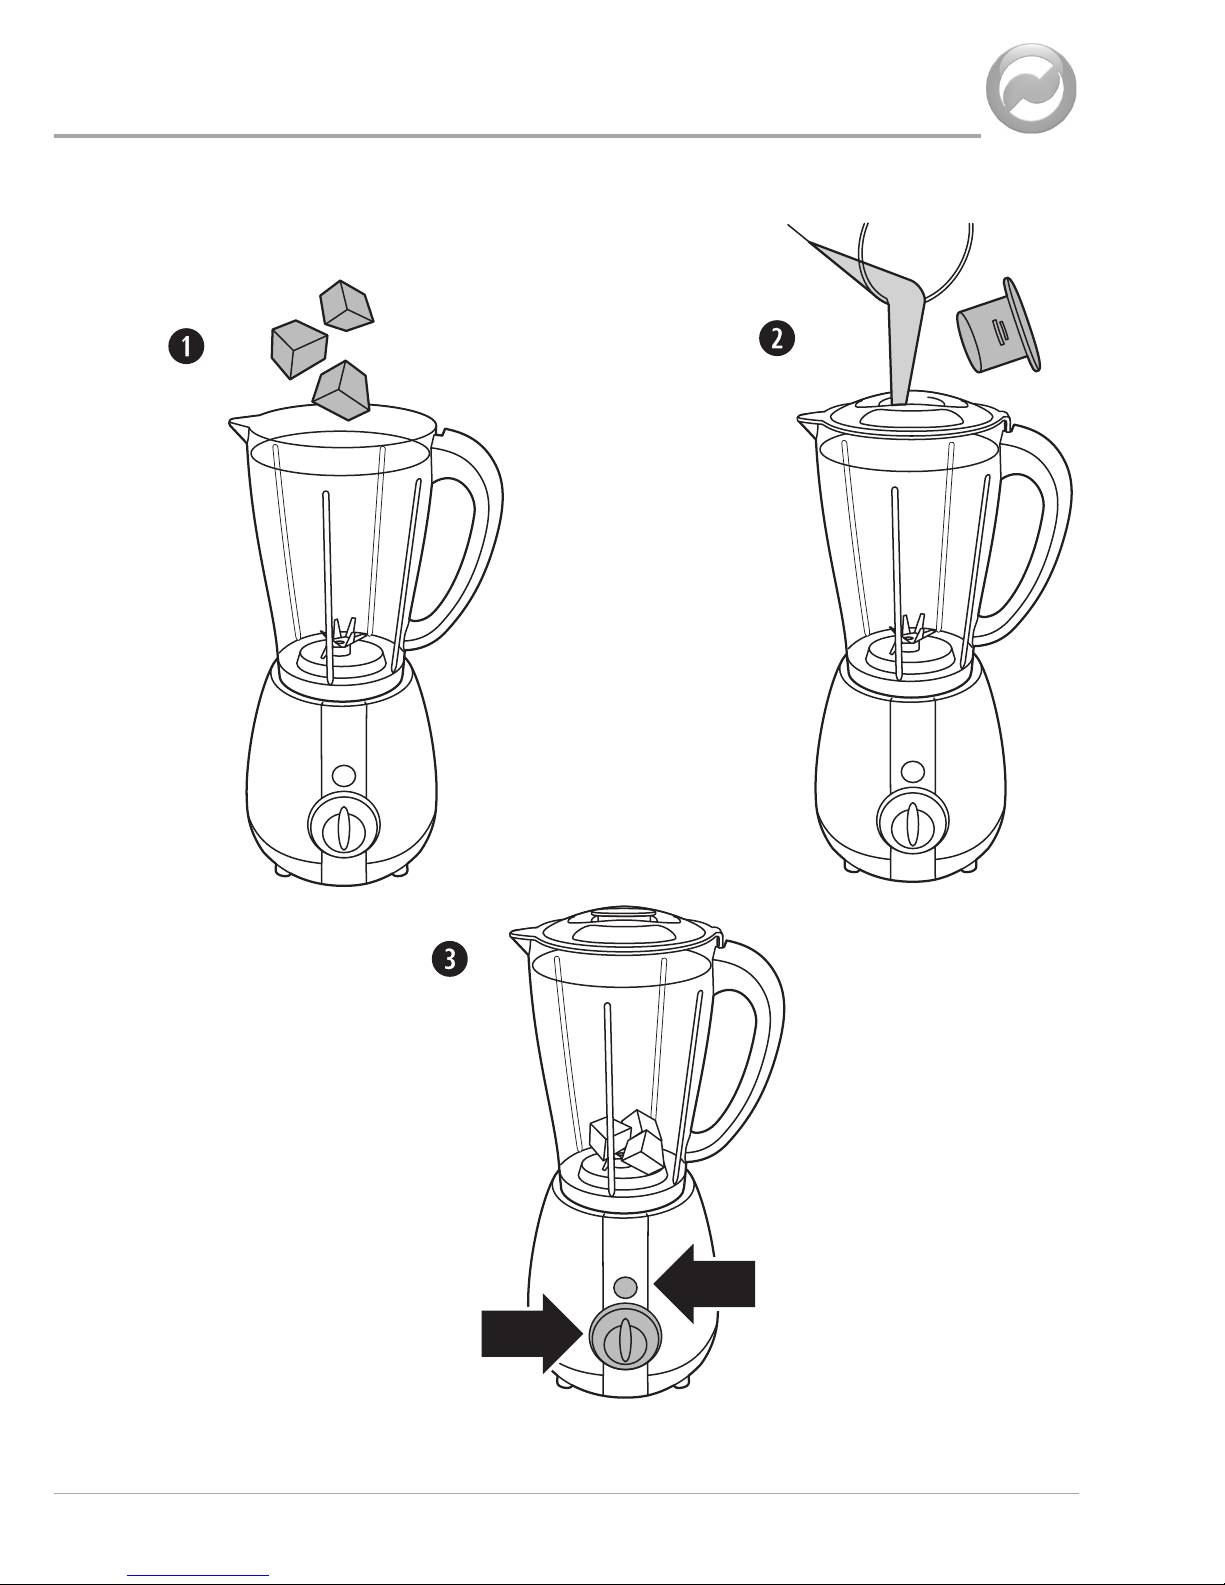
For best results defrost ice cubes slightly before crushing. To crush home made (small)
ice cubes ll the jug to 750ml (30 .oz) and add 200ml (7.oz) water. To crush shop
bought (large) ice cubes add 15 ice cubes to the blender jug and add 200ml (7 .oz) of
water.
• Place the ice cubes and water inside the jug.
• Fit the lid and stopper. Set the speed control to the off (0) position before plugging the
blender in to the mains supply socket.
• Blend in short bursts using the pulse button.
• If any large chunks of ice remain, gently shake the jug and pulse a few more times.
Page 9
9
Page 10

10
recipes
Fruity Fantasy Serves 2
• 180ml fresh orange juice
• 90ml pineapple juice
• 100g strawberries
• 1 slice honeydew melon
• 1 slice water melon
• 8 small ice cubes
1. Place all the ingredients into the blender and blend together on a low speed setting.
2. Divide the cocktail into two glasses and serve immediately.
Peachy Mango Smoothie Serves 2
• 3 ripe peaches
• 2 ripe mangos
• ½ lemon, juiced
• 150ml of white grape juice
• A hand full of ice cubes
1. Cut the mango in half and carefully remove the stones. Remove the mango esh and
chop into chunks.
2. Do the same to the peaches.
3. Add the mango, peach, white grape juice and lemon juice to the blender and then mix
on a low speed setting until smooth.
4. Pour the smoothie over ice and enjoy.
Page 11

11
Citrus Slush Serves 2-3
• 300ml fresh orange juice
• 30ml lemon and lime cordial
• 15ml caster sugar
• 15 large ice cubes* slightly defrosted
• Lime slices
* You can nd bags of ice cubes in all major supermarkets
1. Place the ice in the blender jug with a 1 tablespoon of water and crush using the
pulse setting.
2. Add the rest of the ingredients and mix together using the blender on a low/ medium
speed setting.
3. Spoon into glasses and garnish with lime slices.
Alternativeavours
Use different avoured cordial for varying taste sensations. For an adult treat, why not
add your favourite ‘tipple’.
Oreo Cookie Milkshake Serves 2
• 10 Oreo Cookies
• 5 scoops of good quality vanilla ice cream
• 200ml milk
• A good squeeze of chocolate syrup
1. Break up the Oreo Cookies into the blender and pulse until crumbled.
2. Open the lid and add the ice cream, milk and chocolate syrup.
3. Blend all the ingredients together on a high speed setting until combined.
4. Serve immediately.
Page 12

12
recipes
Tomato and Avocado Salsa
• 4 large ripe tomatoes
• 1 red chilli
• ½ teaspoon ground cumin
• ½ teaspoon ground coriander
• Juice of 1 lime
• 1 small red onion
• 2 medium-ripe avocados (halved, stoned)
• 2 tablespoons extra virgin olive oil
• 8 tablespoons of roughly of coriander leaves
• Salt and black pepper
1. Roughly chop the tomatoes, avocado and onion into big chunks and add to the
blender jug along with the other ingredients.
2. Chop with quick pulses until all the ingredients are combined.
Roasted Red Pepper and Tomato Soup Serves 4
• 3 red pepper, de-seeded and halved
• 1 onion, unpeeled and halved
• 4 large plum tomatoes
• 4 garlic cloves, unpeeled
• 350ml vegetable stock
• 15ml tomato puree
• Salt and pepper
1. Pre heat the oven to 200ºC/Gas mark 4.
2. Place the peppers (cut side down), onion, tomatoes and garlic on a baking tray.
3. Cook in the pre-heated oven for 30 minutes or until tender and well browned.
4. Leave the vegetables to cool for 10 minutes then peel them. Place the vegetables
and half the stock in the blender and blend on a low speed setting until smooth.
5. Place in a pan and add the remaining stock and tomato puree.
6. Bring to the boil.
7. Season to taste and serve.
Page 13

13
Tomato and Chickpea Soup Serves 4
• Olive Oil
• 2 carrots, chopped
• 1 leek, chopped
• 1 potato, peeled and chopped
• 2 cloves of garlic, nely chopped
• 1 tbsp of nely chopped rosemary
• 400ml of vegetable stock
• ½ a teaspoon of sugar
• 2 x 400g of chopped tomatoes
• 410g of chickpeas drained and rinsed
• 1 tablespoon of dried mixed Italian herbs
• Salt and pepper
1. Put the vegetables in a large saucepan with the garlic, rosemary, Italian herbs, stock
and sugar. Season with salt, pepper and stir.
2. Cover and cook gently for 25 minutes or until the vegetables are tender.
3. Add the tomatoes to the pan and cook for a further 10 minutes.
4. Allow the mixture to cool slightly and then transfer to the blender jug . Keep the pan
to one side for later. Blend together on a medium speed setting.
5. Once it is smooth, transfer back to the pan, add the chickpeas and heat through for
approximately 5 minutes, stirring occasionally and seasoning to taste.
6. Serve warm with toasted French bread and melted cheese.
Salmon Dip Serves 2
• 212g can of red salmon
• 55ml (2.oz) double cream
• 2 tablespoons white wine vinegar
• 2 tablespoons Greek yoghurt
• Juice ½ a lemon
• Salt and freshly ground black pepper
1. Place the salmon and the white wine vinegar in the blender jug and combine using a
low speed setting.
2. Add the rest of the ingredients and blend on a medium speed setting until smooth.
Page 14

14
recipes
French Style Dressing Makes approximately 400ml
• 60ml white wine vinegar
• 275ml sunower oil
• 2 cloves garlic, peeled
• 1 tablespoon of Dijon mustard
• 2 teaspoons dried mixed herbs
• 1 tablespoon caster sugar
• Salt and freshly ground black pepper
1. Place all of the ingredients in the blender jug and blend together on a high speed
setting.
2. Pour into a clean glass bottle or jam jar and store in the refrigerator until needed.
3. Shake before using.
Walnut Dressing Makes approximately 300ml
• 60ml Balsamic vinegar
• 90ml walnut oil
• 150ml olive oil
• 25g walnut pieces
• 1tsp caster sugar
• Salt and freshly ground black pepper
1. Place all the ingredients into the blender jug and blend on a high speed setting until
smooth.
2. Pour into a clean glass bottle or jam jar and store in the refrigerator until needed.
Shake before using.
Page 15

15
Hearty Hummus Makes approx. 400ml
Hummus is great served on its own with warm crusty bread, or as part of a Middle
Eastern feast served with Turkish atbreads or warmed pitta bread, tabouleh, Kalamata
olives or a refreshing salad. Delicious!
• 410g can of chick peas in salted water
• 2 cloves garlic, peeled
• 2 teaspoons of light tahini
• 2 tablespoon of Greek yogurt
• Juice of ½ lemon
• 60ml extra virgin olive oil
• 2 teaspoons of cumin powder
• Salt and freshly ground black pepper
To garnish
• Olive oil and cayenne pepper.
1. Drain the chick peas, reserving the liquid.
2. Place 75ml (5tbsp) of the reserved liquid along with the rest of the ingredients into the
blender jug and blend on a high speed setting.
3. The nished hummus should be smooth and creamy.
4. Transfer what you need to a serving dish, drizzle over a little more olive oil and
sprinkle with cayenne pepper. Pour the rest into an airtight container and refrigerate
until needed.
Page 16

16
cleaning and storage
Make sure the unit is switched off and unplugged from the mains supply socket
before cleaning.
The blending blades are very sharp, take extreme caution when washing the jug.
Do not immerse the motor base, mains lead or plug in water or any other liquid.
Do not clean any part of your blender in the dish washer.
Cleaning
• Wash the jug in warm, soapy water. Rinse and dry thoroughly. If necessary, use a
washing up brush to get rid of any stubborn food deposits which have stuck around
the blade. Alternatively, the jug can be washed in a dishwasher.
• Wash jug lid and stopper in warm, soapy water. Rinse and dry thoroughly.
• Using a damp cloth or sponge, wipe down the motor base and dry thoroughly. Make
sure you only use a mild detergent solution.
Quick cleaning method
1. Half ll the blender with warm water and a drop or two of detergent.
2. Press the pulse button for 10-20 seconds.
3. Remove the jug and rinse it under running water.
Storing
When storing the blender, assemble all parts and store in a safe, dry place, out of the
reach of children.
Page 17
17
connection to the mains supply
This appliance is tted with either a moulded or rewirable BS1363, 13 amp plug. The fuse
should be rated at 5 amps and be ASTA approved to BS1362.
If the fuse in a moulded plug needs to be changed, the fuse cover must be retted. The
appliance must not be used without the fuse cover tted.
If the plug is unsuitable, it should be dismantled and removed from the supply cord
and an appropriate plug tted as detailed below. If you remove the plug it must not be
connected to a 13 amp socket and the plug must be disposed of immediately.
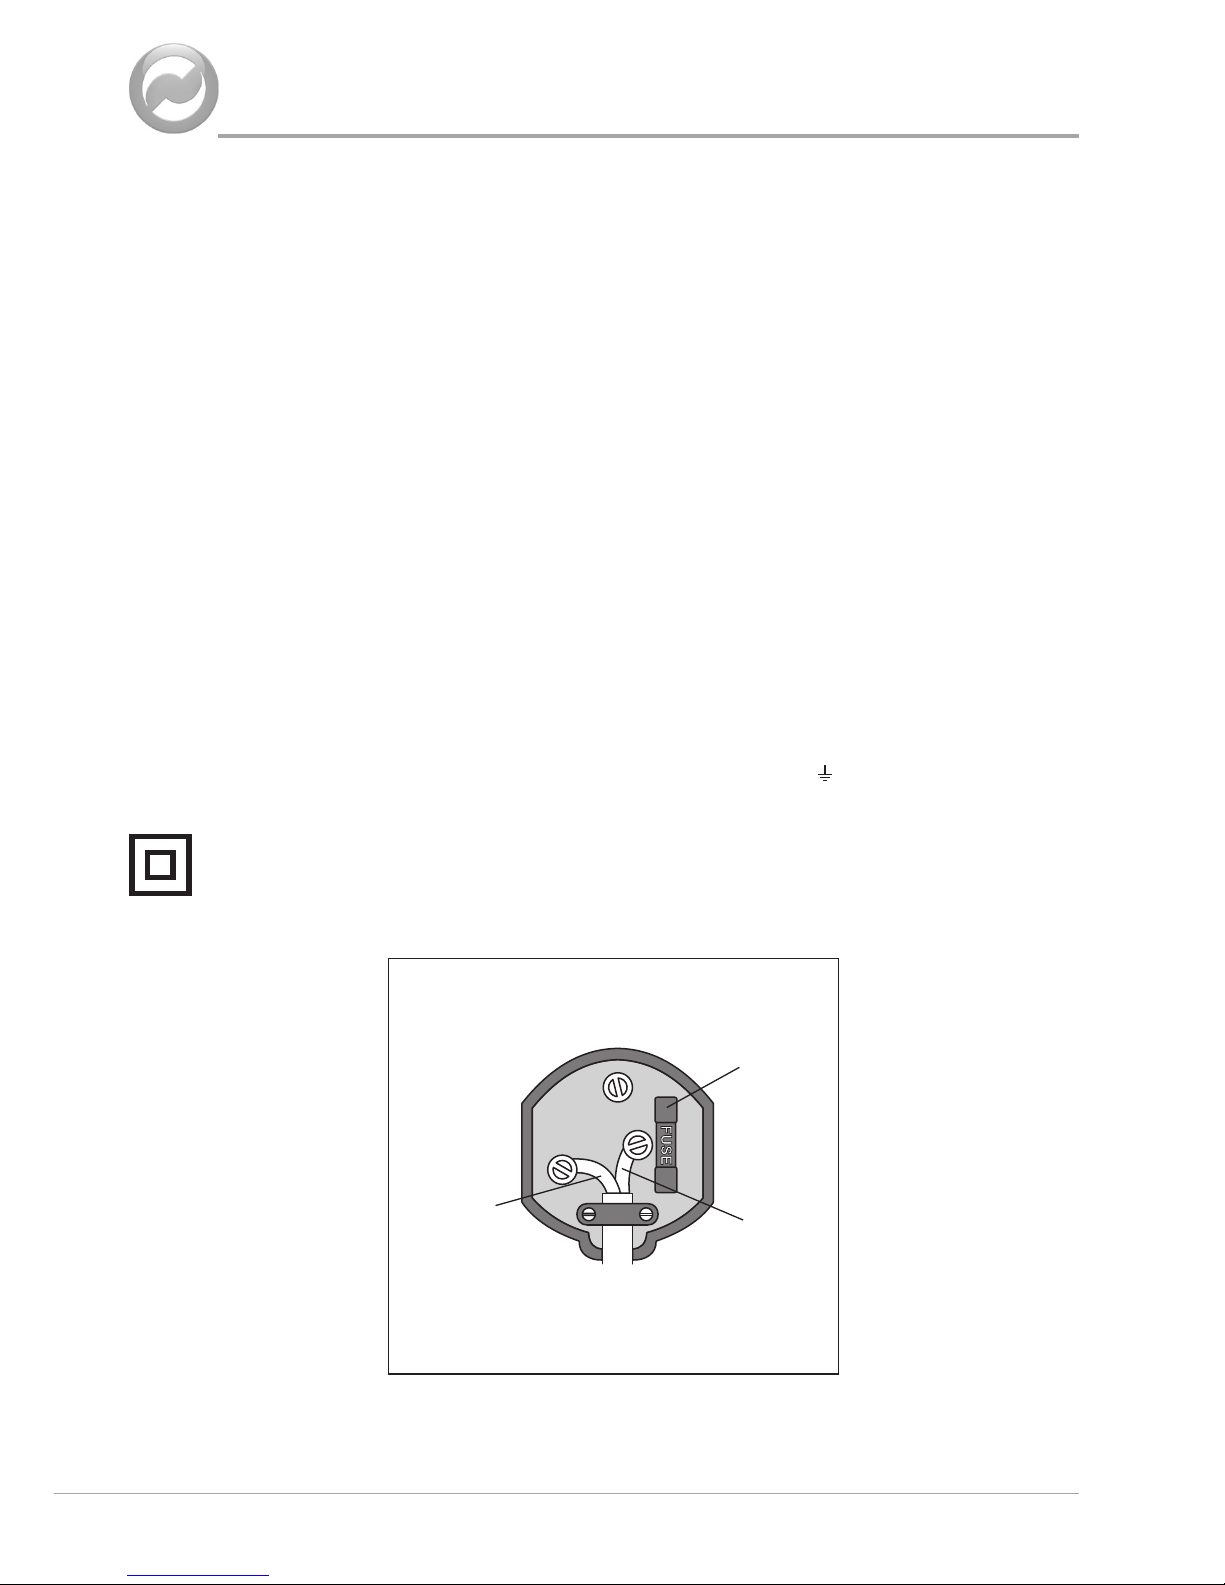
The wires of the mains lead are coloured in accordance with the following code:
BLUE – NEUTRAL BROWN – LIVE
The wire which is coloured Blue, must be connected to the terminal which is marked with
the letter N or coloured Black.
The wire which is coloured Brown, must be connected to the terminal which is marked
with the letter L or coloured Red.
If any other plug is used, a 5 amp fuse must be tted either in the plug or adaptor or at the
distribution board.
CAUTION: DO NOT CONNECT EITHER WIRE TO THE EARTH TERMINAL IN THE
PLUG WHICH IS MARKED E OR WITH THE EARTH SYMBOL ( ) OR COLOURED
GREEN OR GREEN AND YELLOW.
This symbol indicates that this unit is a Class II appliance and therefore an earth
connection is not required.
Plug should be BS1363/A approved
Fit a 5 Amp Fuse
Ensure that the outer sheath of the cable
is rmly held by the clamp
BROWN
(Live)
5 Amp Fuse
BLUE
(Neutral)
Page 18

18
after sales service
These appliances are built to the very highest of standards. There are no user serviceable
parts. Follow these steps if the unit fails to operate:
1. Check the instructions have been followed correctly.
2. Check that the fuse has not blown.
3. Check that the mains supply is functional.
If the appliance will still not operate, return the appliance to the place it was purchased for
a replacement. To return the appliance to the Customer Service Department, follow the
steps below:
1. Pack it carefully (preferably in the original carton). Ensure the unit is clean.
2. Enclose your name and address and quote the model number on all correspondence.
3. Give the reason why you are returning it.
4. If within the guarantee period, state when and where it was purchased and include
proof of purchase (e.g. till receipt).
5. Send it to our Customer Service Department at the address below:
Customer Service Department
Jarden Consumer Solutions (Europe) Limited
Middleton Road
Royton
Oldham
OL2 5LN, UK.
Telephone: 0161 621 6900 Fax: 0161 626 0391
e-mail: [email protected]
Page 19

19
guarantee
Please keep your receipt as this will be required for any claims under this guarantee.
This appliance is guaranteed for 1 year after your purchase as described in this
document.
During this guaranteed period, if in the unlikely event the appliance no longer functions
due to a design or manufacturing fault, please take it back to the place of purchase, with
your till receipt and a copy of this guarantee.
The rights and benets under this guarantee are additional to your statutory rights, which
are not affected by this guarantee. Only Jarden Consumer Solutions (Europe) Ltd. (“JCS
(Europe)”) has the right to change these terms.
JCS (Europe) undertakes within the guarantee period to repair or replace the appliance,
or any part of appliance found to be not working properly free of charge provided that:
• you promptly notify the place of purchase or JCS (Europe) of the problem; and
• the appliance has not been altered in any way or subjected to damage, misuse,
abuse, repair or alteration by a person other than a person authorised by JCS
(Europe).
Faults that occur through, improper use, damage, abuse, use with incorrect voltage, acts
of nature, events beyond the control of JCS (Europe), repair or alteration by a person
other than a person authorised by JCS (Europe) or failure to follow instructions for use
are not covered by this guarantee. Additionally, normal wear and tear, including, but not
limited to, minor discoloration and scratches are not covered by this guarantee.
The rights under this guarantee shall only apply to the original purchaser and shall not
extend to commercial or communal use.
If your appliance includes a country-specic guarantee or warranty insert please refer
to the terms and conditions of such guarantee or warranty in place of this guarantee or
contact your local authorized dealer for more information.
Waste electrical products should not be disposed of with Household waste. Please
recycle where facilities exist. E-mail us at enquiries [email protected] for further
recycling and WEEE information.
Jarden Consumer Solutions (Europe) Ltd.
Middleton Road
Royton
Oldham
OL2 5LN
UK
Page 20

93573-1VBL074_Iss_2 06/13
 Loading...