

Instructions for Use
PLEASE READ AND RETAIN FOR FUTURE REFERENCE
Combination Microwave
These instructions refer to the Breville Combination Microwave MW4
MW4.book Page 1 Tuesday, May 16, 2006 4:19 PM

2
CONTENTS
To Avoid Explosion and Sudden Boiling.......................... 4
Before First Use .................................................................. 5
Getting Started ..................................................................................... 5
In the Box ............................................................................................. 5
Preparation for Use .............................................................................. 5
Microwave Location ............................................................................. 5
Child Lock ............................................................................................ 5
Assembly ............................................................................. 6
Setting up your oven ............................................................................ 6
Overview .............................................................................. 7
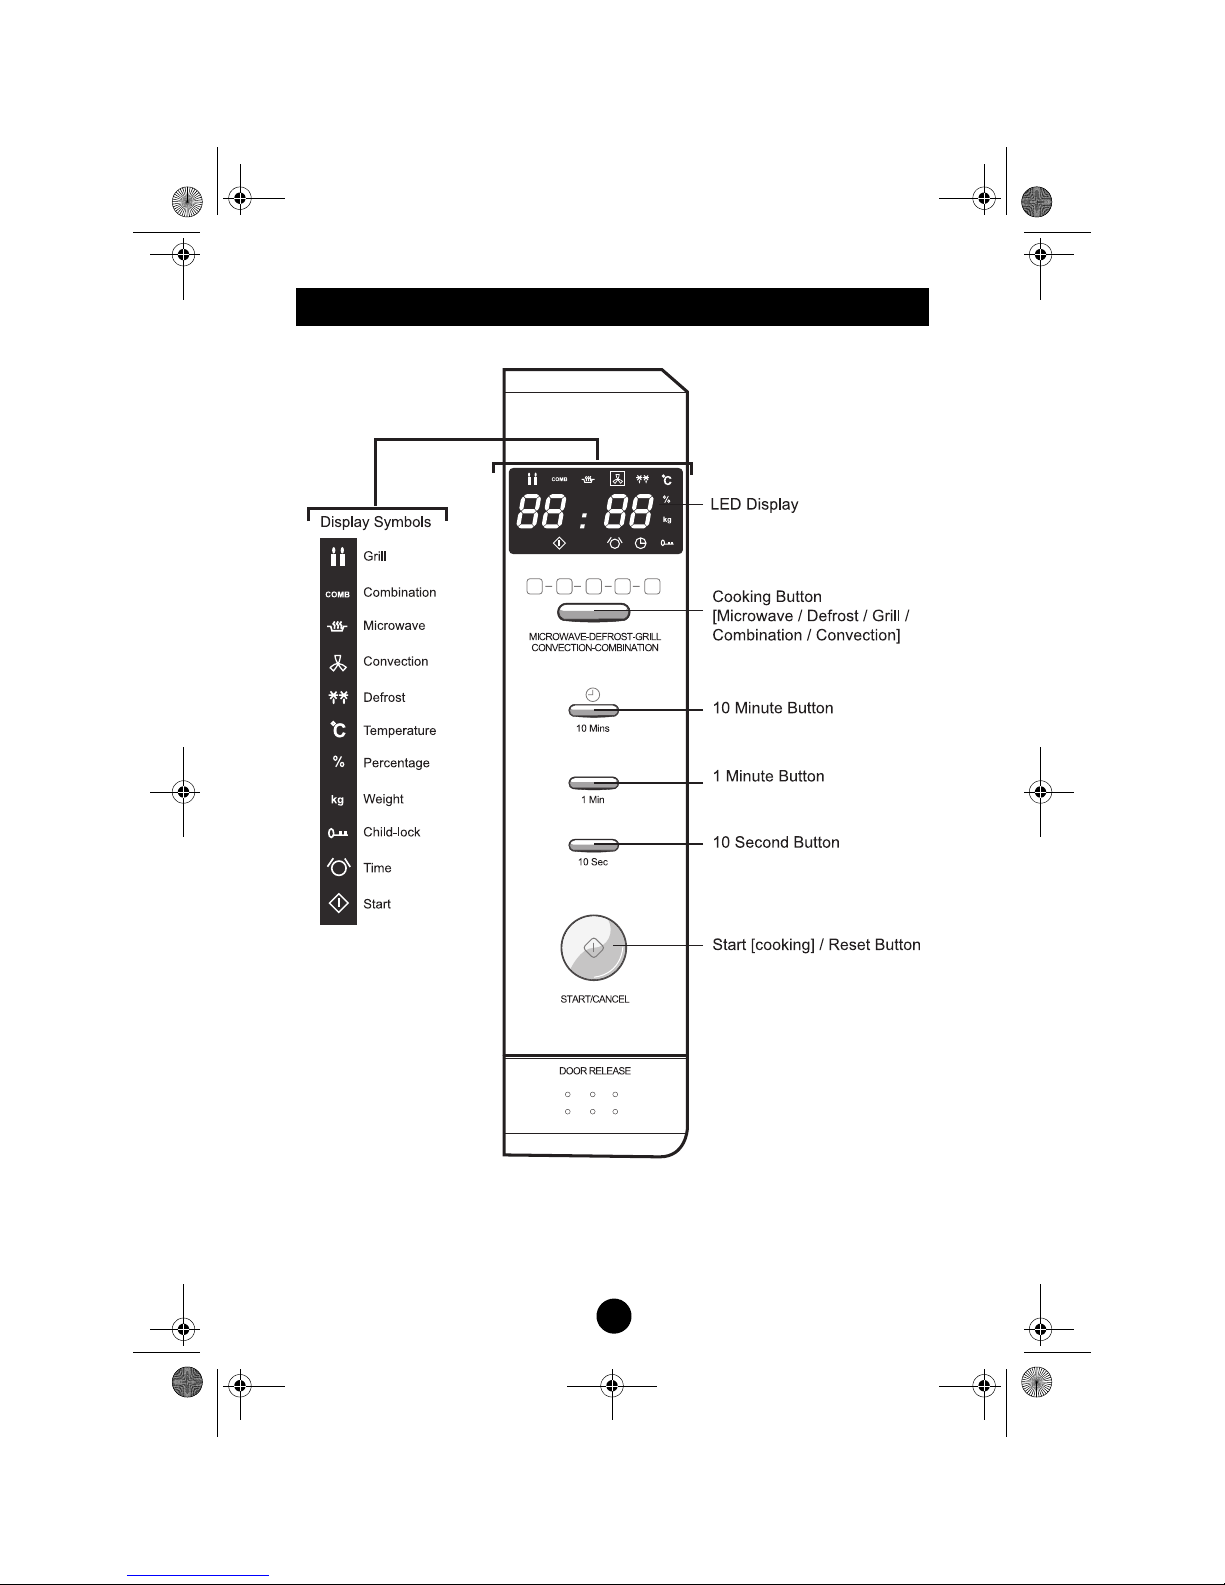
Control Panel....................................................................... 8
Cookware Guide.................................................................. 9
Operation ........................................................................... 10
Switching On the Microwave .............................................................. 10
Cooking Methods ............................................................................... 10
Microwave Cooking .......................................................... 11
Microwave Cooking Basics ................................................................ 11
Audible Tones .................................................................................... 11
Quick Start Microwave Cooking ......................................................... 12
Microwave Cooking ............................................................................ 12
Defrosting .......................................................................... 13
Auto Defrost ....................................................................................... 13
Microwave Defrost Principles ............................................................. 13
Grill Cooking ..................................................................... 14
Convection Cooking ......................................................... 15
Preheating and Convection Cooking .................................................. 15
Combination Cooking....................................................... 17
Convection + Microwave (C - 1) ......................................................... 17
Grill + Convection (C - 2) ................................................................... 17
Grill + Microwave (C - 3) .................................................................... 18
General Guidelines ........................................................... 19
Care and Cleaning ............................................................ 22
General .............................................................................................. 22
Interior ................................................................................................ 22
Exterior ............................................................................................... 22
Control panel ...................................................................................... 23
Removable items ............................................................................... 23
Maintenance ....................................................................................... 23
MW4.book Page 2 Tuesday, May 16, 2006 4:19 PM

3
CONTENTS
Recipe Book ...................................................................... 24
Stir Fried Vegetables .......................................................................... 24
Vegetable Chilli .................................................................................. 25
Stuffed Mushrooms ............................................................................ 26
Banana & Walnut Upside-Down Cake ............................................... 27
One Stage Basic White Sauce ........................................................... 28
Before Calling for Service ................................................ 29
Questions and Answers ................................................... 30
Connecting To The Mains Supply ................................... 31
After Sales Service ........................................................... 32
Important Safety Instructions .......................................... 33
Guarantee .......................................................................... 34
MW4.book Page 3 Tuesday, May 16, 2006 4:19 PM
4
TO AVOID EXPLOSION AND SUDDEN BOILING
WARNING! WHEN HEATING LIQUIDS, EG. SOUPS, SAUCES AND
BEVERAGES IN YOUR MICROWAVE OVEN, OVERHEATING THE
LIQUID BEYOND BOILING POINT CAN OCCUR WITHOUT EVIDENCE
OF BUBBLING.
THIS COULD RESULT IN A SUDDEN BOIL OVER THE LIQUID.
TO PREVENT THIS POSSIBILITY THE FOLLOWING STEPS SHOULD BE
TAKEN:
a. AVOID USING STRAIGHT SIDED CONTAINERS WITH NARROW
NECKS.
b DO NOT OVERHEAT
c STIR THE LIQUID BEFORE PLACING THE CONTAINER IN THE
OVEN AND AGAIN HALFWAY THROUGH THE HEATING TIME.
d AFTER HEATING, ALLOW TO STAND IN THE OVEN FOR A SHORT
TIME, STIR OR SHAKE THEM AGAIN CAREFULLY AND CHECK THE
TEMEPERATURE OF THEM BEFORE CONSUMPTION TO AVOID
BURNS (ESPECIALLY, CONTENTS OF FEEDING BOTTLES AND
BABY FOOD JARS.
1. Eggs
Never cook eggs in their shells. Steam will build up inside the shell during
cooking and the egg will explode.
If you want to cook or reheat eggs which have not been broken up by
scrambling or mixing, you must always pierce the yolks or these will also
explode. You should slice shelled hard boiled eggs before you reheat them
in your microwave oven.
2. Piercing
Always pierce food which has a skin or membrane, for example, potatoes,
tomatoes, apples, sausages etc. If you do not pierce them, steam will build
up inside and they may explode.
3. Lids
Always remove the lids of jars and containers and take away food containers,
before you cook using your microwave oven. If you do not, then steam and
pressure might build up inside and cause an explosion even after the
microwave cooking has stopped.
MW4.book Page 4 Tuesday, May 16, 2006 4:19 PM

5
BEFORE FIRST USE
Getting Started
Lift the microwave carefully from the box. Remove any packaging and
promotional material from inside and around the microwave. You may wish to
keep the packaging for future use.
In the Box
• Combination Microwave
•Glass Tray
• Turntable Ring
• Grilling Rack
Preparation for Use
• Remove all packing material and accessories including the protective
film on the cabinet surface. Do NOT remove the mica cover that is
screwed to the oven cavity to protect the magnetron.
• Inspect the microwave oven and mains lead for any damage. If any
damage is found, do not use the oven. Contact the dealer where the
product was purchased.
Microwave Location
• Locate the microwave oven on a horizontal surface strong enough to
support the microwave oven’s weight and away from heat and steam
sources.
• There must be air spaces of 20 cm above the oven, 10 cm at the back
and 5 cm either side to provide sufficient ventilation.
• Do not place anything on top of the oven or block any vents. Do not
remove the feet.
• Route the mains lead away from all hot and sharp surfaces. Do not
trap the lead under the microwave.
Child Lock
The child lock prevents the microwave from being used.
1. To activate the child lock, press and hold the 1 MINUTE and 10
Second buttons at the same time for 3 seconds. A ‘beep’ will sound and
the lock symbol will be shown in the display.
2. To deactivate the child lock, press and hold the 1 MINUTE and 10
Second buttons at the same time for 3 seconds. A ‘beep’ will sound and
the lock symbol will disappear from the display.
MW4.book Page 5 Tuesday, May 16, 2006 4:19 PM
6
ASSEMBLY
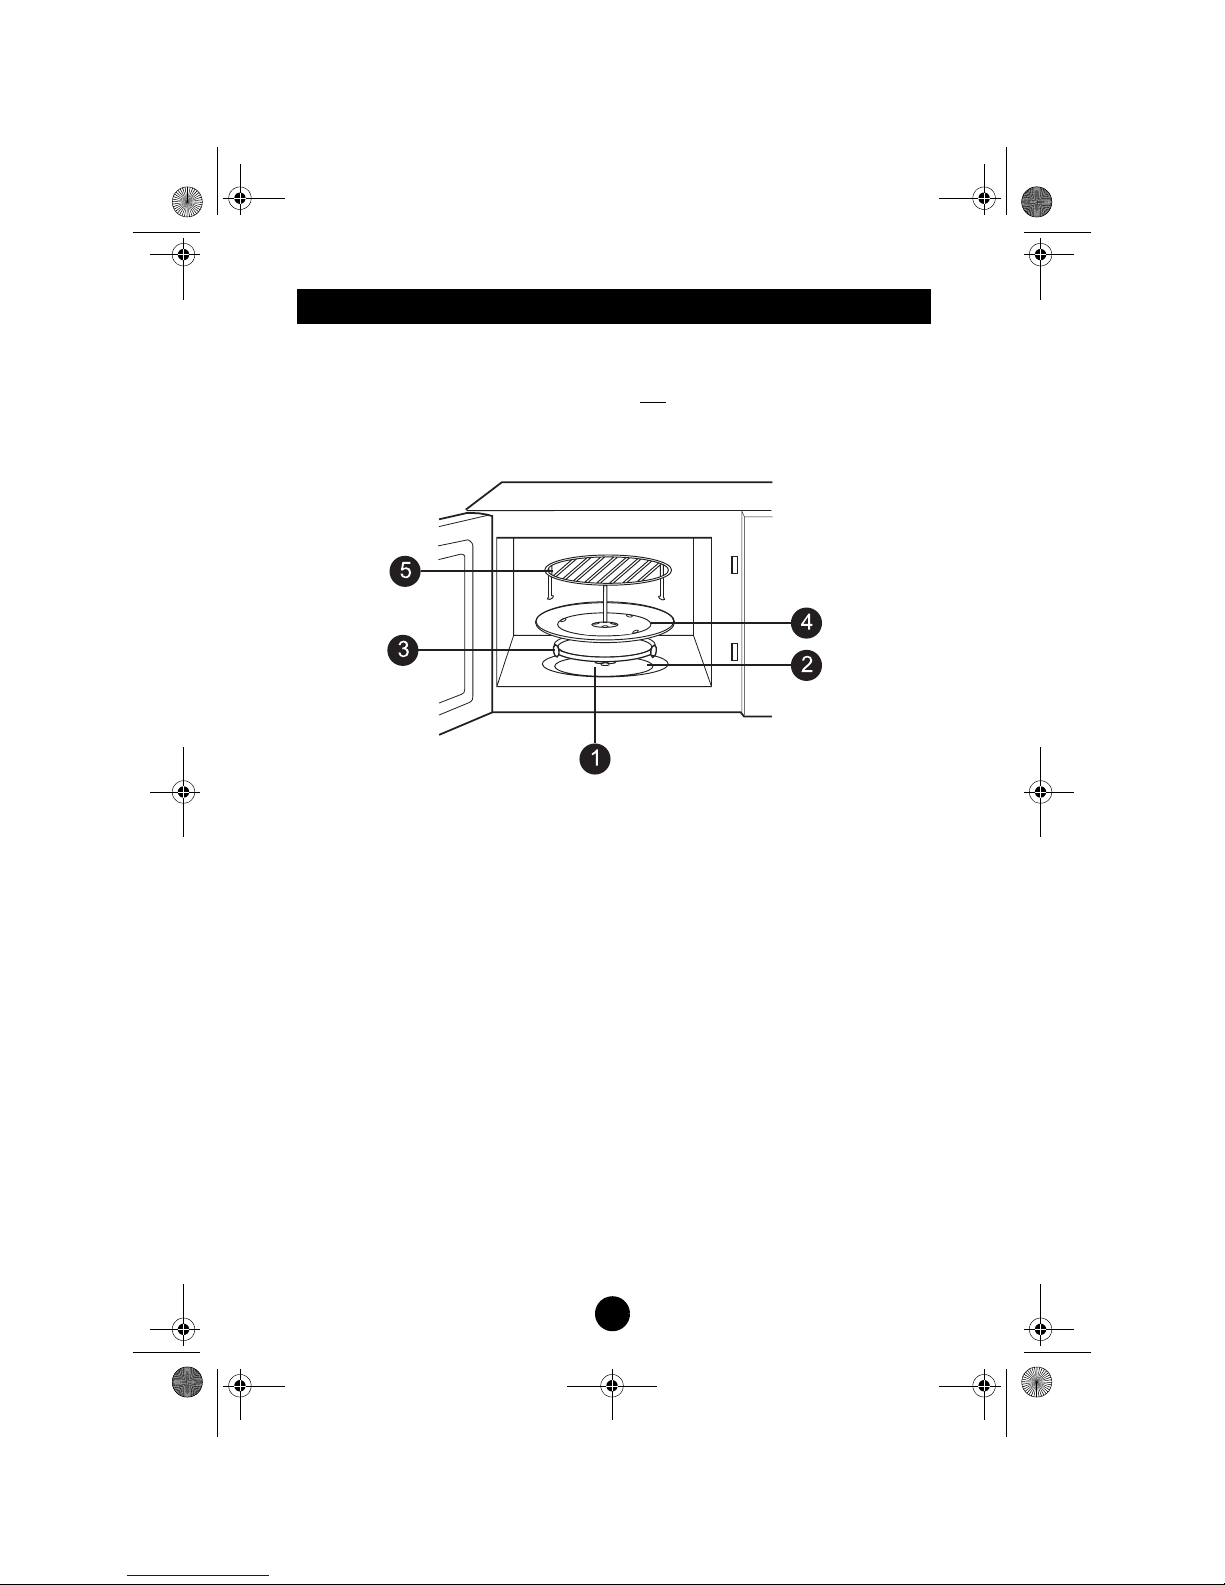
Setting up your oven
The oven with the turntable ring (3), glass tray (4), and grilling rack (5) can be
seen as shown below. The grilling rack is not
suitable for use when the oven
is used for microwave cooking.
Turntable
Place the turntable ring (3) in the recess (2) in the microwave floor. Place the
glass tray (4) on the turntable ring ensuring that the three central lugs on the
underside of the glass tray are facing down and mate with the similar locating
slots on the turntable shaft (1). Do not operate the microwave oven
without these items fitted.
MW4.book Page 6 Tuesday, May 16, 2006 4:19 PM
7
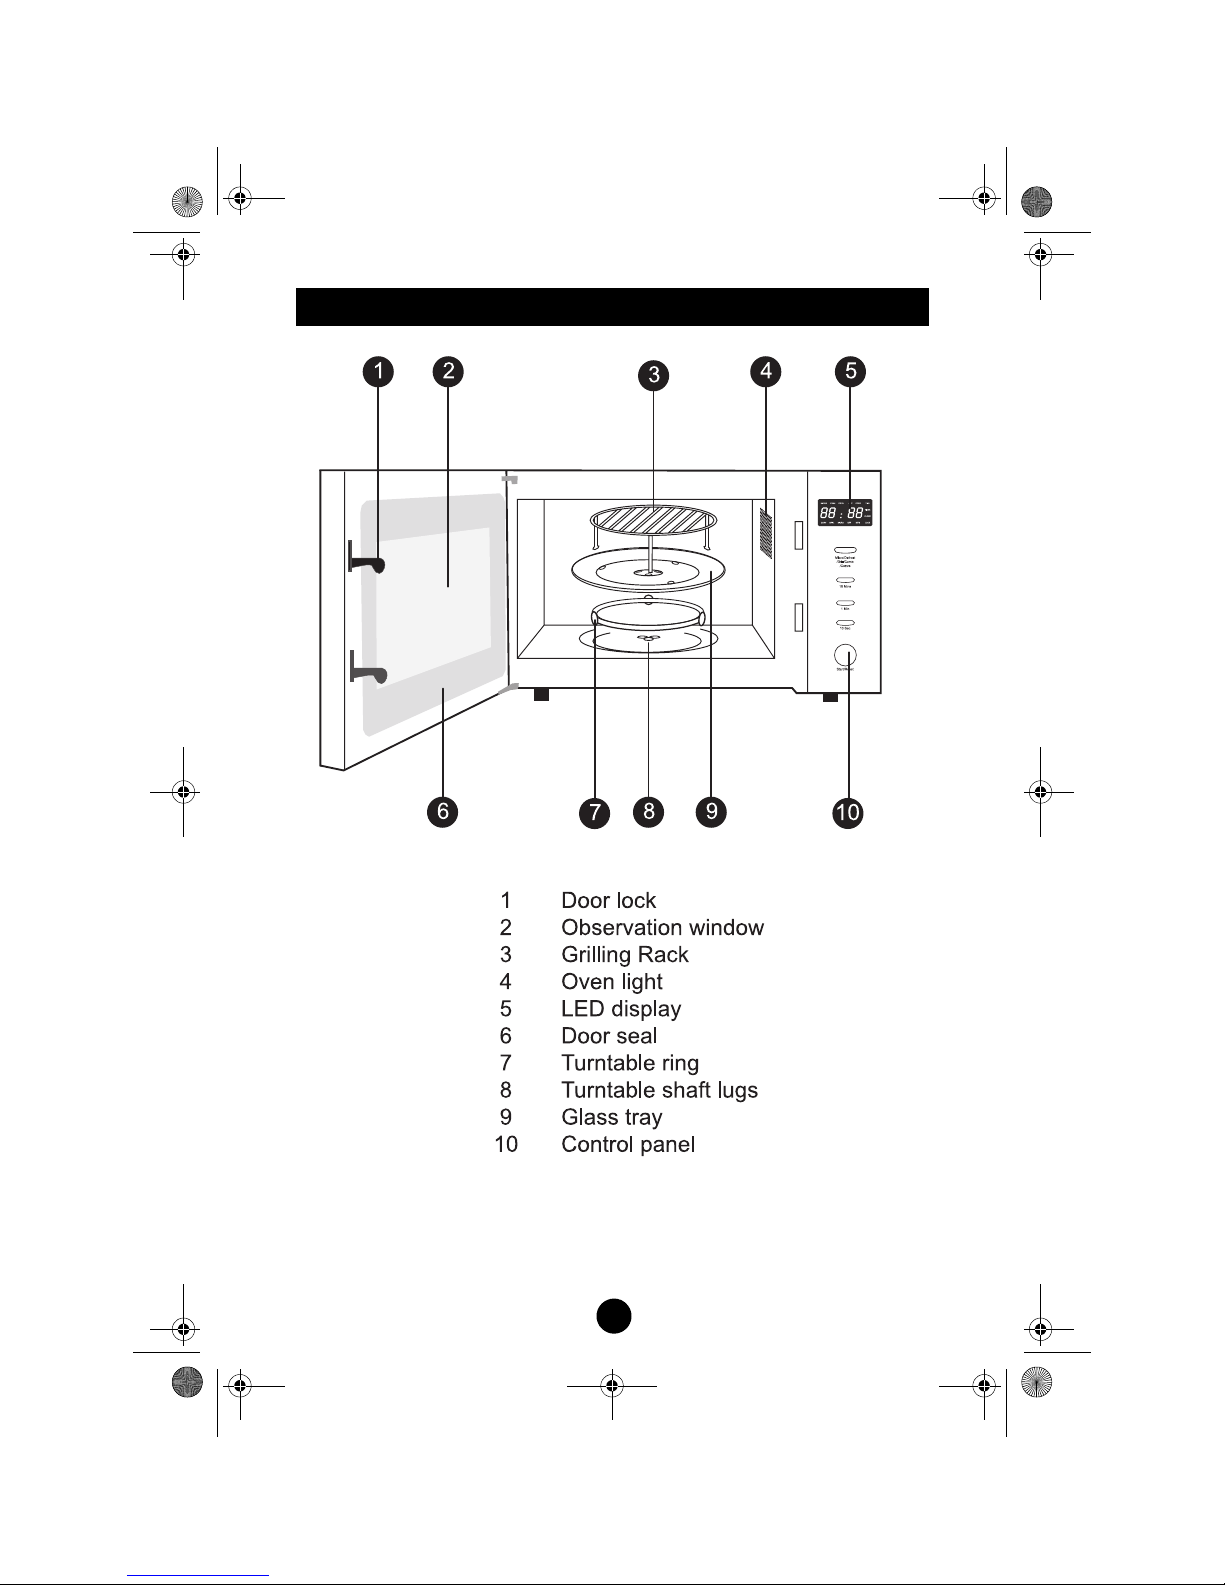
OVERVIEW
MW4.book Page 7 Tuesday, May 16, 2006 4:19 PM
8
CONTROL PANEL
MW4.book Page 8 Tuesday, May 16, 2006 4:19 PM
9
COOKWARE GUIDE
• Tightly closed containers could explode. Closed containers should be
opened and plastic pouches pierced before cooking.
• Transparent containers are best for use in microwave ovens as they
allow energy to pass easily through the container and heat the food.
• Microwaves cannot penetrate metal, therefore metal utensils or
dishes with metallic trim should not be used.
• Do not use recycled paper products as they may contain small metal
fragments which may cause sparks.
• For even cooking, round or oval dishes rather than square or oblong
ones are recommended.
• If you are unsure whether a utensil is suitable for use in the
microwave oven, carry out the following check:
1.Place the empty utensil in the oven and microwave on high for 30
seconds.
2.If the utensil becomes very hot, it is not suitable for use in the oven.
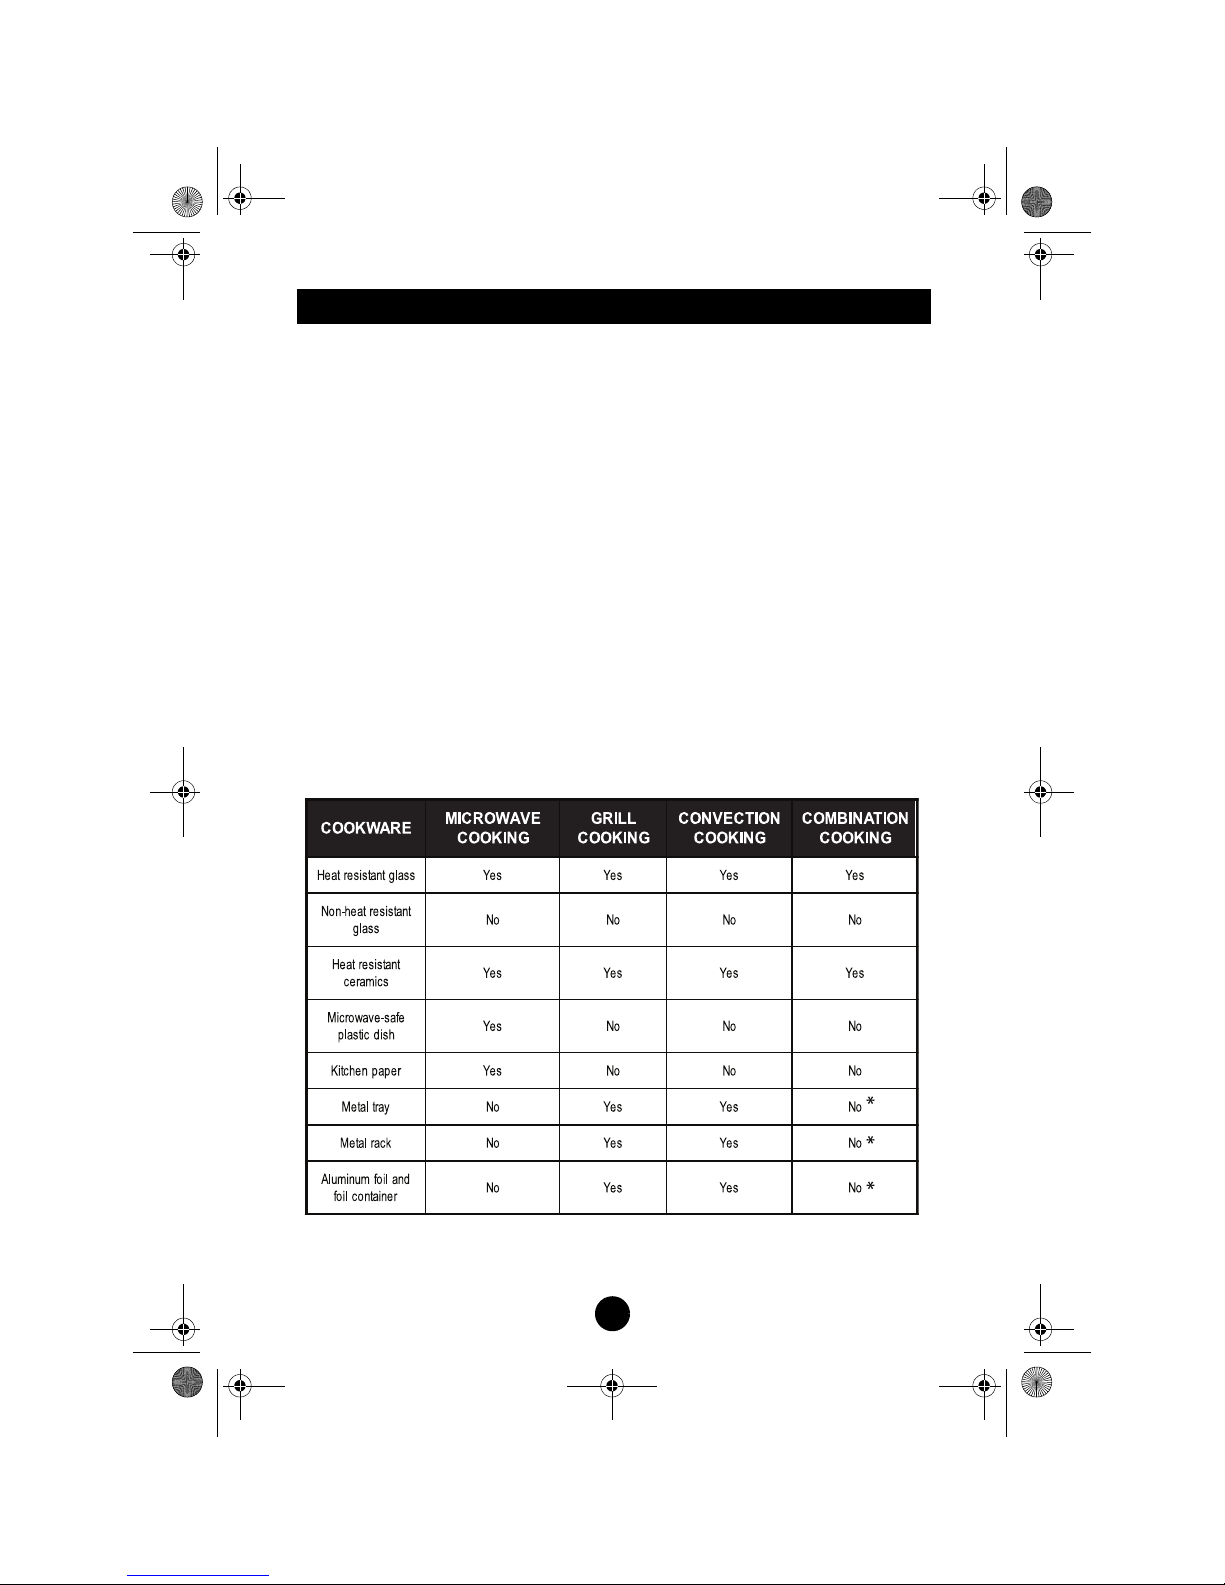
• The table below summarises the suitability of materials for microwave
cooking. If you are unsure check the utensil labelling or consult the
utensil manufacturer.
= cookware can be used in combination mode 2 (c-2), see “Grill +
Convection (C - 2)” on page 17.
*
MW4.book Page 9 Tuesday, May 16, 2006 4:19 PM

10
OPERATION
Switching On the Microwave
After positioning (see “Microwave Location” on page 5) and assembling (see
“Assembly” on page 6) the microwave, plug in and switch On at the mains
supply.
When you first plug the microwave in, a ‘beep’ will sound and the display will
show ‘0:00’.
Push the open door button. The door will open and the internal light will turn
on. Close the door and it will turn off.
Cooking Methods
Your appliance oven is able to cook as follows:
• Normal microwave cooking
• Grilling
• Convection cooking
• Microwave and grilling combination cooking
• Microwave and convection combination cooking
• Grilling and convection combination cooking
Microwave
When cooking with microwaves alone, you are able to set the power level
and the cooking time. There are five power levels that are specified as a
percentage of the maximum level and range from 100% to 10%. You can
set the cooking time to be up to 60 minutes.
Grilling
When cooking by means of grilling alone you are able to specify the
grilling time at full power. Grilling time can be set at up to 60 minutes.
Convection cooking
Convection cooking uses a fan to push hot air around the oven.
Convection cooking time can be set at up to 1 hour, 29 minutes and 50
seconds.
MW4.book Page 10 Tuesday, May 16, 2006 4:19 PM

11
MICROWAVE COOKING
Microwave Cooking Basics
Warning! The Grilling Rack must not be used in microwave cooking.
Do not cook directly on the glass tray. Place the food in a microwave proof
dish for example.
Arrange the food with the thickest areas to the outside of the dish. Cook for
the shortest indicated time but do not under-cook. Add extra time if required.
Severely over-cooked food can smoke and may ignite.
Cover food while cooking. The cover prevents spatter and helps the food to
cook more evenly.
Turn foods over during cooking to speed the cooking of products such as
hamburgers and chicken. Larger items, such as joints of meat must be turned
at least once.
Rearrange small items of food such as meatballs halfway through cooking.
Turn them over and move ones from the centre of the dish to the outside and
items from the top to the bottom of the dish.
Warning! Never operate the microwave when empty as this will cause
damage to the appliance.
Audible Tones
A single beep is sounded when a button on the Control panel is pressed.
The oven also emits beeps during operation to signify other events, such as
end of cooking, end of cooking phase, change in power setting etc.
MW4.book Page 11 Tuesday, May 16, 2006 4:19 PM

12
MICROWAVE COOKING CONTINUED...
Warning! Do not use the Grilling Rack when microwave cooking.
Warning! The microwave oven will be hot during and after cooking, take
care when removing food.
Quick Start Microwave Cooking
1. Place the food in a suitable container on the glass tray and shut the door.
2. Press the START/RESET button. The microwave symbol will be shown in
the display. The microwave will cook on full power (100%) for 1 minute.
3. Press the START/RESET button at any time to cancel cooking.
4. When cooking has finished, 5 ‘beeps’ will sound.
Microwave Cooking
To microwave cook, first set the cooking power and then the cooking time.
Alternatively, you can just set the cooking time and start cooking on full power
(100%).
Suppose you want to cook at 70% for 5 minutes.
1. Place the food in a suitable container on the glass tray and shut the door.
2. Repeatedly press the COOKING button (2 times) until P 70 is displayed.
The microwave and time symbols will be shown in the display.
The power can be set to 100%, 70%, 50%, 30% and 10%.
3. Press the 1 MINUTE button (5 times) until ‘5:00’ is displayed.
Note: Maximum cooking time for microwave cooking is 60:00 minutes.
4. Press the START/RESET button to start microwave cooking.
• Press the START/RESET button at any time to cancel cooking.
• To pause cooking, open the microwave oven door. The microwave
oven will automatically shut off but the programmed information will
be retained. Close the door and press the START/RESET button to
resume cooking. This is useful for checking or stirring dishes during
cooking.
5. When cooking has finished, 5 ‘beeps’ will sound.
MW4.book Page 12 Tuesday, May 16, 2006 4:19 PM

13
DEFROSTING
Warning! Do not use the Grilling Rack when defrosting.
Warning! The microwave oven will be hot during and after defrosting,
take care when removing food.
Auto Defrost
The auto defrost facility of your microwave enables you to defrost meat,
poultry and seafood by simply setting the weight of the food. The range of
weights that can be auto defrosted is between 0.1kg and 2.0kg.
Suppose you want to defrost 1.4kg of frozen food.
1. Press the COOKING button (6 times) until DEF appears in the display.
The microwave, defrost and time symbols will be shown in the display.
2. Press the 1 MINUTE button once. 1.0 (kg) will be shown in the display.
3. Press the 10 SECOND button repeatedly (4 times) until 1.4 (kg) appears
in the display.
4. Press the START/RESET button to start auto defrost.
Microwave Defrost Principles
• Always stop the oven periodically to remove or separate the portions
that are defrosted. If food is not defrosted at the end of the estimated
defrosting time, program the oven in 1 - minute increments until totally
defrosted.
• When using plastic containers from the freezer, defrost only long
enough to remove from plastic in order to place in a microwave-safe
dish.
• Food frozen in plastic bags or in their packaging may be placed
directly in the oven, as long as they have no metal parts (e.g. bands or
closure rivets).
• Certain foods, such as greens, vegetables and fish, do not have to be
completely defrosted before you begin cooking them.
• Stewed foods and meats and meat sources defrost better and quicker
if they are stirred from time to time.
• While defrosting, meat and fish lose their liquid content. It is
recommended that you defrost such items in a tray or bowl.
• It is advisable to separate individual pieces of meat and freeze them
separately. This will save valuable time when defrosting.
• Always allow defrosted items to stand after defrosting before cooking
them. Standing time should be at least as long as the defrost time.
MW4.book Page 13 Tuesday, May 16, 2006 4:19 PM

14
GRILL COOKING
Warning! The microwave oven will be hot during and after cooking, take
care when removing food.
When grill cooking, food is cooked using the grill element on the top side of
the microwave.
Suppose you want to program grill cooking for 12 minutes.
1. Press the COOKING button (7 times) until G - 1 appears in the display.
The grill and time symbols will be shown in the display.
2. Place the food in a suitable container on the glass tray, or on the grilling
rack with a collecting tray below.
3. Press the 10 MINUTE button once, and the 1 MINUTE button twice.
12.00 will appear in the display.
Note: Maximum cooking time for grill is 60:00 minutes.
4. Press the START/RESET button to start grill cooking.
5. Half way through grill cooking the microwave will automatically pause
and sound 2 ‘beeps’, indicating you to open the door and turn the food
over. This will ensure your food is cooked evenly. To restart cooking,
close the door and press the START/RESET button.
• If you do not want to turn the food over, grill cooking will re-start after a
1 minute pause.
MW4.book Page 14 Tuesday, May 16, 2006 4:19 PM

15
CONVECTION COOKING
Warning! The microwave oven will be hot during and after cooking, take
care when removing food.
During convection cooking, hot air is circulated throughout the oven cavity to
brown and make crisp foods quickly and evenly. Convection cooking allows
you to set the oven temperature and cooking duration.
Suppose you want to cook at 180°c for 1 hour and 20 minutes.
1. Press the COOKING button (11 times) until 180 (°c) appears in the
display. The convection, temperature, time and start symbols will be
shown in the display.
2. Place the food in a suitable container on the glass tray and shut the door.
3. Press the 10 MINUTE button (8 times) until 80:00 (1 hour, 20 minutes)
appears in the display.
Note: Maximum cooking time for grill is 89:50 minutes (1 hour, 29
minutes, 50 seconds).
4. Press the START/RESET button to start convection cooking.
Note: You can check the convection temperature during cooking by
pressing the COOKING button.
Preheating and Convection Cooking
Your microwave can be programmed to preheat to a desired temperature
before cooking your food.
Suppose you want to preheat to 180°c and then cook food 1 hour and 20
minutes.
1. Press the COOKING button (11 times) until 180 (°c) appears in the
display.
2. Press the START/RESET button to start preheating.
Note: The maximum preheating time is approximately 30 minutes.
3. When the desired oven temperature has been reached, the microwave
will sound 2 ‘beeps’.
4. Place the food in a suitable container on the glass tray and shut the door.
5. Press the 10 MINUTE button (8 times) until 80:00 (1 hour, 20 minutes)
appears in the display.
Note: Maximum cooking time for grill is 89:50 minutes (1 hour, 29
minutes, 50 seconds).
MW4.book Page 15 Tuesday, May 16, 2006 4:19 PM

16
CONVECTION COOKING CONTINUED...
6. Press the START/RESET button to start convection cooking.
Note: You can check the convection temperature setting during cooking
by pressing the COOKING button.
MW4.book Page 16 Tuesday, May 16, 2006 4:19 PM
17
COMBINATION COOKING
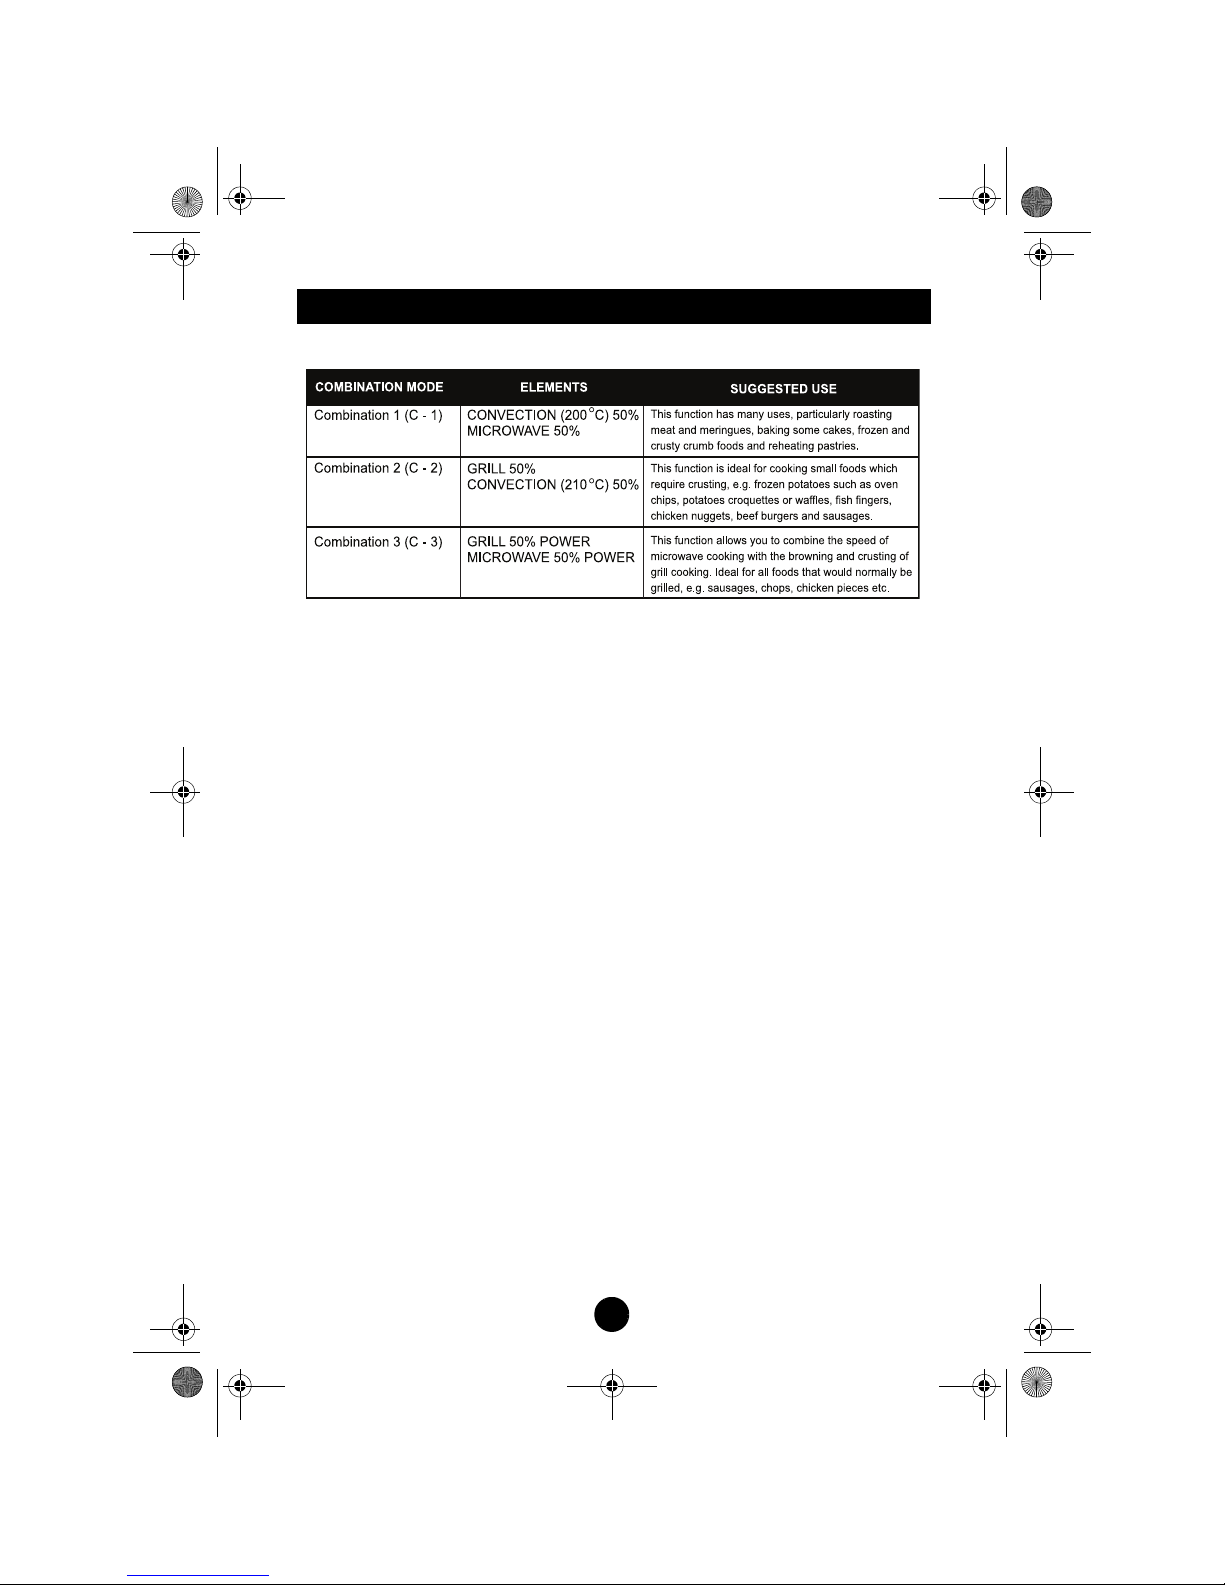
This microwave offer a choice of three methods of combination cooking;
Convection + Microwave (C - 1)
Warning! Do not use the Grilling Rack when convection + microwave
combination cooking.
1. Press the COOKING button (13 times) until C - 1 appears in the display.
The combination, convection, temperature and time symbols will be
shown in the display.
2. Place food in a suitable container on the glass tray and shut the door.
3. Use the 10 MINUTE, 1 MINUTE and 10 SECONDS buttons to set the
required cooking time.
Note: Maximum cooking time for combination cooking is 60 minutes.
4. Press the START/RESET button to start combination cooking.
Grill + Convection (C - 2)
1. Press COOKING button (14 times) until C - 2 appears in the display. The
grill, combination, convection, temperature and time symbols will be
shown in the display.
2. Place the food in a suitable container on the glass tray, or on the grilling
rack with a collecting tray below.
3. Use the 10 MINUTE, 1 MINUTE and 10 SECONDS buttons to set the
required cooking time.
Note: Maximum cooking time for combination cooking is 60 minutes
4. Press the START/RESET button to start combination cooking.
MW4.book Page 17 Tuesday, May 16, 2006 4:19 PM

18
COMBINATION COOKING CONTINUED...
Grill + Microwave (C - 3)
Warning! Do not use the Grilling Rack when grill + microwave combination
cooking.
1. Press the COOKING button (15 times) until C - 3 appears in the display.
The grill, combination, microwave, temperature and time symbols will be
shown in the display.
2. Place food in a suitable container on the glass tray and shut the door.
3. Use the 10 MINUTE, 1 MINUTE and 10 SECONDS buttons to set the
required cooking time.
Note: Maximum cooking time for combination cooking is 60 minutes
4. Press the START/RESET button to start combination cooking.
MW4.book Page 18 Tuesday, May 16, 2006 4:19 PM

19
GENERAL GUIDELINES
Since microwave cooking to some extent is different from traditional cooking,
the following general guidelines should be considered whenever you use
your microwave oven.
IF THE FOOD IS UNDERCOOKED
Check:
• You have selected the correct power level.
• The selected time is sufficient, the times given in the recipes are
approximate. They depend on initial temperature, weight and density
of the food etc.
• You are using the appropriate cookware.
IF THE FOOD IS OVERCOOKED, IE. DRIED OUT OR BURNT
Before you cook again, consider whether:
• The power level was too high.
• The set time was too long, the times in the recipes are approximate.
They depend on initial temperature, weight and density of the food.
POINTS TO REMEMBER WHEN DEFROSTING
• The shape of the package alters the defrosting time.
Shallow rectangular packets defrost more quickly than a deep block.
• When defrosting, it is better to under thaw the food slightly and allow
the process to finish during the standing time.
THE AMOUNT OF FOOD
The more food you want to prepare the longer it takes to cook. A rule of thumb
is that double amount of food requires almost double the time. If one potato
takes four minutes to cook, approximately seven minutes are required to
cook two potatoes.
STARTING TEMPERATURE OF FOOD.
The lower the temperature of the food which is being put into the microwave
oven, the longer time it takes. Food at room temperature will be reheated
more quickly than food at refrigerator temperature.
MW4.book Page 19 Tuesday, May 16, 2006 4:19 PM

20
GENERAL GUIDELINES
The more dense the food, the longer it takes to heat. ‘Very dense’ food like
meat takes longer time to reheat than lighter, more porous food like sponge
cakes.
SIZE AND SHAPES
Smaller pieces of food will cook more quickly than larger pieces and uniform
pieces of food cook more evenly than irregular shaped foods.
With unevenly shaped food, the thinner parts will cook faster than the thicker
areas. Place the thinner chicken wings and legs closer to the centre of the
dish.
STIRRING, TURNING OF FOODS
Stirring and turning of foods are techniques used in conventional and well as
in microwave cooking to distribute the heat quickly to the centre of the dish
and avoid over cooking at the outer edges of the food.
COVERING FOOD HELPS:
• To reduce spattering
• To shorten cooking times
• To retain food moisture
RELEASING PRESSURE IN FOODS
Several foods are tightly covered by a skin or membrane. These foods should
be pricked with a fork or cocktail stick to release the pressure and to prevent
bursting, as steam builds up within them during cooking. This applies to
potatoes, chicken livers, sausages, egg yolks and some fruits.
STANDING TIME
Always allow the food to stand for some time after using the oven. Standing
time after defrosting, cooking/reheating always improves the results since the
temperature will then be evenly distributed through out the food.
MW4.book Page 20 Tuesday, May 16, 2006 4:19 PM
21
GENERAL GUIDELINES
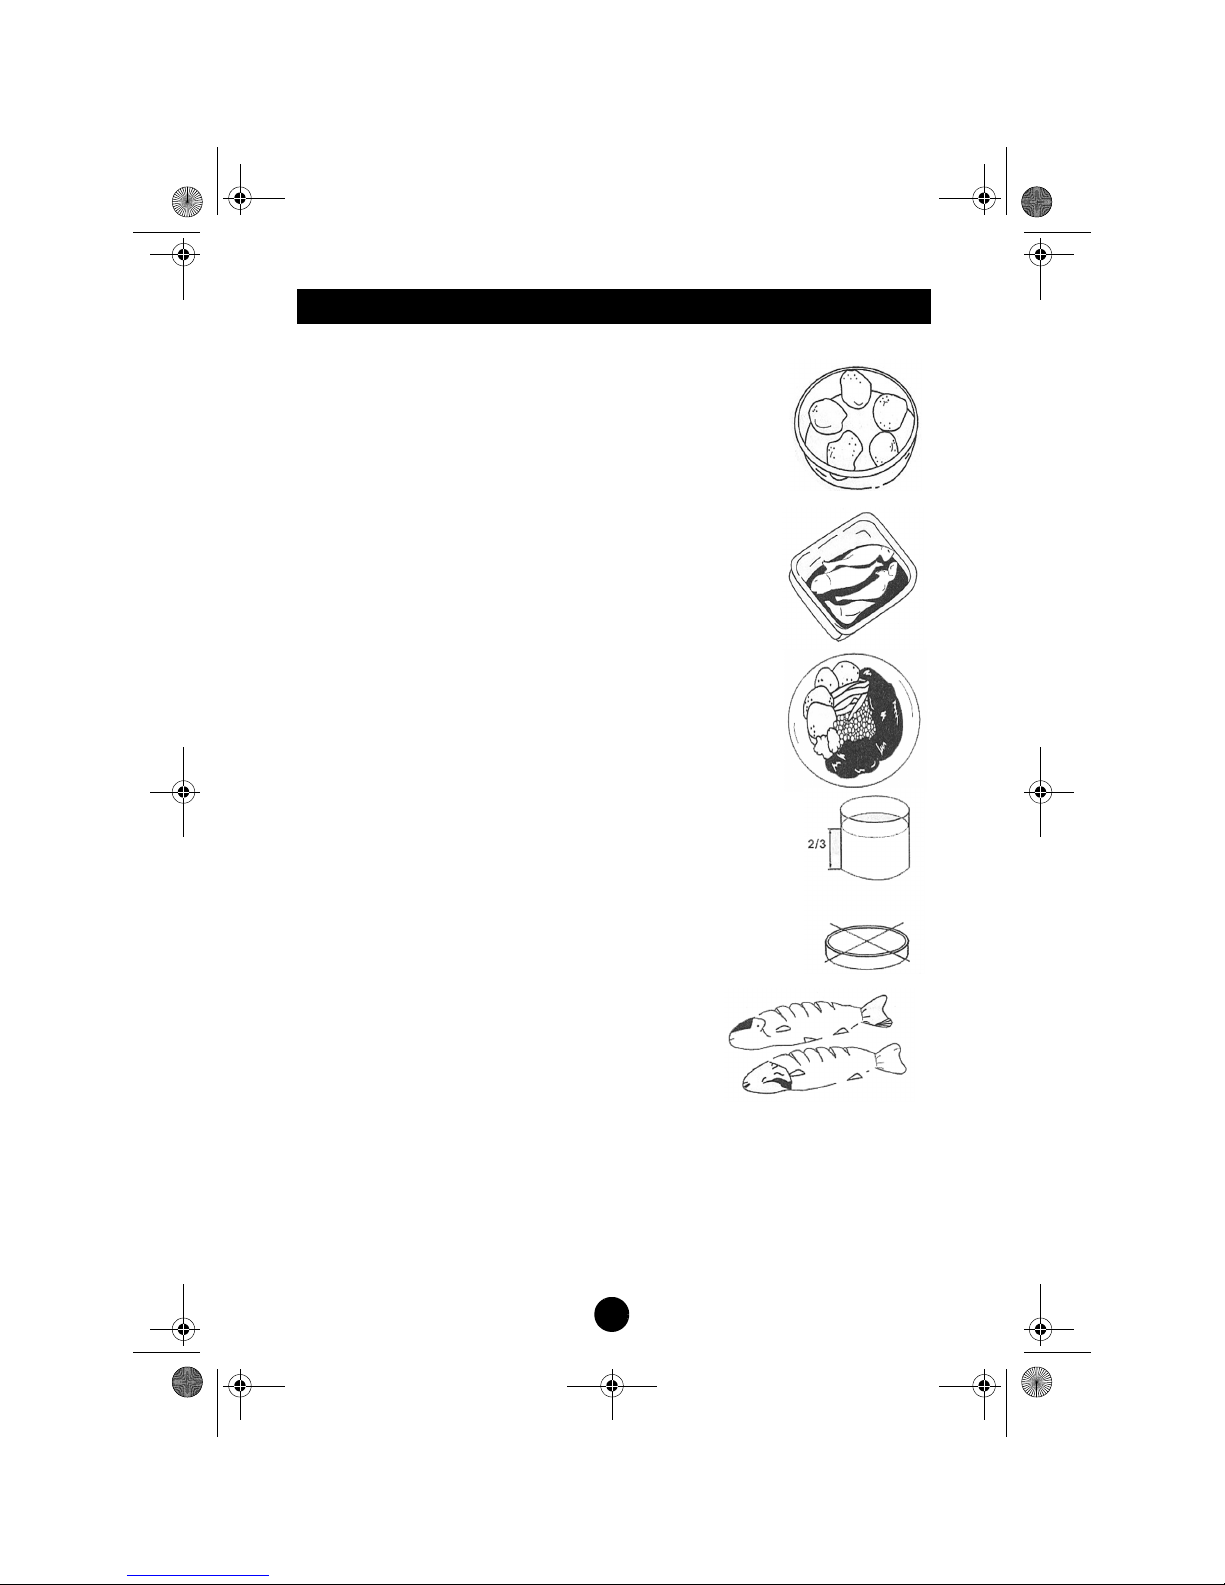
ARRANGING FOOD
This is done in several ways in microwave cooking to give
more even cooking results.
If you are cooking several items of the same food, such as
jacket potatoes, place them in a ring pattern for uniform
cooking (as shown opposite). When cooking foods of
uneven shapes or thickness, place the smaller or thinner
area of the food towards the centre of the dish where it will
be heated last.
Uneven foods such as fish should be arranged in the oven
with the tails to the centre.
If you are saving a meal in the refrigerator or ‘plating’ a
meal for reheating, arrange the thicker, denser foods to
the outside of the plate and the thinner or less dense foods
in the middle.
Place thin slices of meat on top of each other or interlace
them. Thicker slices such as meat loaf and sausages have
to be placed close to each other. Gravy or sauce should be
reheated in a separate container.
Choose a tall, narrow container rather than a low and wide
container. When reheating gravy, sauce or soup, do not fill
the container more than 2/3.
When you cook or reheat whole fish, score the skin
this prevents cracking.
MW4.book Page 21 Tuesday, May 16, 2006 4:19 PM

22
CARE AND CLEANING
Warning! Before carrying out any cleaning or maintenance work turn off
the microwave oven and remove the plug from the wall socket.
Warning! The door seal area must be kept clean at all times to eliminate
the possibility of microwaves escaping around a door seal that can be
distorted by trapped particles of food.
Warning! It is hazardous for anyone other than a competent person to
carry out any service or repair operation which involves the removal of a
cover which gives protection against exposure to microwave energy.
Warning! Do NOT use harsh abrasive cleaners or sharp metal scrapers
to clean the oven door class since they can scratch the surface, which
may result in shattering of the glass.
General
Most cleaning can be carried out with a damp cloth and mild detergent
solution, rinsed with a clean damp cloth and wiped dry.
Caution! Never use sprays or harsh cleaners, cleaning powders or
scouring or other abrasive pads.
Cleaning should be carried out on a weekly basis, more often if required.
Interior
• Excessive oil spatters on the inside top will be difficult to remove if left
longer. Wipe spatters inside the oven with a damp paper towel soon
after cooking, especially after cooking chicken or bacon.
• Clean the inside of the oven with a soft cloth damped with a mild
detergent solution to remove any food spatters.
• There are holes on the top, back, left and right sides of the oven.
Therefore, you must take care not to drop any waterdrops or spills
over the holes. Do not wipe the holed surfaces will a damp cloth or
detergent. Only use s soft, clean and dry cloth.
• If steam accumulates around the inside of the door, wipe it away with
a soft cloth.
Exterior
• The outside surface should be cleaned in the same way. Do not use a
wet cloth as this could cause water to seep into ventilation openings
and damage the operating parts.
MW4.book Page 22 Tuesday, May 16, 2006 4:19 PM

23
CARE AND CLEANING
• Wipe the observation window in the door both inside and outside with
the damp cloth.
• If steam accumulates around the outside of the door, wipe it away with
a soft cloth.
Control panel
If the Control panel becomes dirty, clean with a soft dry cloth. A slightly damp
cloth may be used for stubborn marks. Do not use sprays or harsh cleaners
as they may stain or dull the panel.
Removable items
Warning! Do not immerse the glass tray when hot into cold water to
prevent damages or breaks.
The grilling rack and glass tray may be removed for cleaning. Wash them in
warm soapy water or in a dishwasher. Be careful not to chip or scratch the
glass tray as this may cause it to break during use.
The turntable ring and oven floor should be cleaned regularly to allow the
glass tray to rotate easily and quietly. Wash the turntable ring in warm soapy
water or in a dishwasher.
Ensure that the items are replaced correctly (see “Assembly” on page 6).
Maintenance
The only electrical user replaceable items in this microwave oven is the mains
fuse in the plug (see “Connecting To The Mains Supply” on page 31).
For all repairs you are advised to contact your local approved service centre
for this equipment. Your supplier will be able to advise you in this matter.
MW4.book Page 23 Tuesday, May 16, 2006 4:19 PM

24
RECIPE BOOK
Stir Fried Vegetables
Serves 4
• 15ml (1tbsp) sunflower oil
• 30ml (2tbsp) soy sauce
• 15ml (1tbsp) sherry
• 2/3cm root ginger, peeled and finely grated
• 1 garlic clove, crushed
• 2 medium carrots, cut into thin strips
• 100g button mushrooms, chopped
• 50g beansprouts
• 100g (4oz) mange-tout
• 1 red pepper, seeded and thinly sliced
• 4 spring onions, chopped
• 100g (4oz) canned water chestnuts, sliced
• ¼ head of Chinese leaves, thinly sliced
1. Place the oil, soy sauce, sherry, ginger, garlic and carrots in a large bowl.
Mix thoroughly.
2. Cover and cook on 100% (HIGH) for 5 minutes, stirring once.
3. Add the button mushrooms, beansprouts, mange-tout, red pepper, spring
onions, water chestnuts and Chinese leaves. Mix thoroughly.
4. Cook on 100% (HIGH) for 6 minutes, until the vegetables are tender. Stir
twice during cooking.
These are ideally served with meat or fish.
MW4.book Page 24 Tuesday, May 16, 2006 4:19 PM

25
RECIPE BOOK
Vegetable Chilli
Serves 4-6
• 30ml (2tbsp) olive oil
• 175g onion, chopped
• 2 cloves garlic, crushed
• 75g tomato puree
• 225g carrot, chopped
• 1 red pepper, seeded and sliced
• 1 green pepper, seeded and sliced
• 150g baby sweetcorn, chopped
• 4 sticks celery, sliced
• 225g courgette, sliced
• 5ml (1tsp) ground cumin
• 10ml (2tsp) mild chilli powder
• 2.5ml (1/2tsp) cayenne pepper
• 400g canned, chopped tomatoes
• 225g canned haricot beans, drained
• 400g canned red kidney beans
• 300ml (1/2 pint) hot vegetable stock
• 15ml (1tbsp) cornflour blended with water
1. Place the oil, onion, garlic and tomato puree in a large bowl, heat on
100% for 2 minutes.
2. Add the carrots, peppers and sweetcorn and mix well. Cover and cook on
100% for 3 minutes.
3. Stir in the remaining ingredients (apart from the cornflour) and mix well.
4. Cook on 70% for 15 minutes, stir 3-4 times during cooking.
5. Add the blended cornflour, mix well and cook on 100% for 5 minutes.
MW4.book Page 25 Tuesday, May 16, 2006 4:19 PM

26
RECIPE BOOK
Stuffed Mushrooms
Serves 4
• 4 large flat mushrooms
• 15g (1/2oz) butter/margarine
• 1 clove garlic, crushed
• ½ green eating apple, finely chopped
• ½ red pepper, de-seeded and finely diced
• 15ml (1tbsp) chopped parsley
• 25g (1oz)wholemeal breadcrumbs
• 75g (3oz) brie, finely chopped
• salt and paprika pepper
• Lemon wedges to serve
1. Wash the mushrooms, remove the stalks carefully and chop them finely.
Arrange the mushrooms caps upturned on a plate.
2. Place the chopped stalks into a bowl together with the margarine and
crushed garlic. Heat on 100% for 2 minutes.
3. Add the apple, pepper, parsley, breadcrumbs and cheese. Season to
taste. Mix all ingredients well.
4. Fill the mushroom caps with the stuffing mixture. For a crisper/browner
topping heat on combination mode C-3 for 3-4 minutes, or until
thoroughly cooked.
5. Serve hot with lemon wedges and paprika pepper sprinkled over the top.
The cooking time may vary depending on the size and firmness of the
mushrooms.
MW4.book Page 26 Tuesday, May 16, 2006 4:19 PM

27
RECIPE BOOK
Banana & Walnut Upside-Down Cake
Serves 6-8
• 115g soft brown sugar
• 55g butter
• 3 ripe bananas
• 115g soft margarine
• 115g caster sugar
• 2 medium eggs
• 2 tbsp milk
• 115g self-raising flour
• 50g broken walnuts, roughly chopped
1. Put the brown sugar and butter into a bowl and cook on 100% for about 2
minutes, stirring once, until the butter is melted. Pour into a deep 23cm
flan dish and tip to coat the base.
2. Cut the bananas into thick slices and arrange on the caramel.
3. Put the margarine, caster sugar, eggs and milk into a bowl and sift flour
over. With a wooden spoon or electric mixer, beat until smooth and light.
Stir in the walnuts. Spoon the mixture over the bananas and level the
surface.
4. Cook on combination mode C-1 for 12 minutes or until the cake is well
risen, firm when lightly pressed and golden brown.
5. Leave to stand for at least 5 minutes. Slip a knife around the edge of the
cake to help transfer to a serving plate. Cut into wedges.
Best eaten warm with a scoop of vanilla ice cream or whipped cream.
MW4.book Page 27 Tuesday, May 16, 2006 4:19 PM

28
RECIPE BOOK
One Stage Basic White Sauce
Makes ½ pint (300ml)
• 25g butter or margarine
• 25g plain flour
• 300ml (½ pint) milk
1. Place all the ingredients into a jug or small bowl.
2. Heat on 100% for 3-4 minutes, or until the sauce has boiled and
thickened, stirring after every minute.
3. Season to taste.
Variations:
Add the following to the hot sauce with the seasoning
Cheese Sauce: 50g (2oz) grated cheddar cheese and a pinch of
mustard powder
Parsley Sauce: 30ml (2tbsp) fresh parsley, chopped
Onion Sauce: 1 cooked onion, finely chopped
Mushroom sauce: 75g (3oz) mushrooms, sliced and lightly cooked
Blue cheese Sauce: 50g (2oz) crumbled Stilton or other blue cheese
and 10ml(2tsp) lemon juice
MW4.book Page 28 Tuesday, May 16, 2006 4:19 PM

29
BEFORE CALLING FOR SERVICE
You can often correct operating problems yourself. If your microwave oven
fails to work properly, locate the operating problem in the chart below and try
the solutions marked for each problems.
If the microwave oven still does not work properly, contact the service centre.
Note: It is quite normal for steam to be emitted around the door during the
cooking cycle. The door is not intended to seal the oven cavity completely but
its special design contributes to the complete safety of the appliance.
Caution!
1. Do not attempt to operate the oven while empty as this will cause
damage.
2. As an exhaust is located in the rear of the oven, install the oven so as not
to block the outlet.
MW4.book Page 29 Tuesday, May 16, 2006 4:19 PM

30
QUESTIONS AND ANSWERS
Q1. When the microwave oven is plugged into a mains supply socket
for the first time, it does not work properly.
What’s wrong?
A1. The microcomputer used in the microwave oven may temporarily
become scrambled and fail to function as programmed. Unplug the
microwave oven from the supply socket and then plug it back in again.
The microcomputer will then reset for proper functioning.
Q2. Why is there noise coming from the turntable when the
microwave oven is turned on?
A2. The noise occurs when the turntable roller slips on the bottom of the
microwave oven. Frequent cleaning of these parts should eliminate or
reduce the noise.
Q3. Why is there noise coming from the microwave oven when the
power level is set low?
A3. When cooking with power other than 100% the microwave oven
automatically turns on and off to obtain lower power output. The clicking
noise can be heard when the microwave oven switches on and off. This is
normal.
Q4. Why is there steam coming out of the air exhaust vent?
A4. Steam is produced during cooking. The microwave oven has been
designed to vent this steam.
Q5. What is wrong when the microwave oven light will not glow?
A5. There may be several reasons why the microwave oven light will not
glow, such as the light bulb has burned out or the Start button has not
been pressed.
Q6. Why do eggs sometime pop?
A6. The egg yolk may pop because of steam build-up inside the
membrane. Before cooking, pierce the membrane with a toothpick. Never
microwave eggs in their shells as they may explode.
Q7. How are boil-overs avoided?
A7. Use a larger utensil than usual for cooking. If you open the microwave
oven door the food will stop boiling.
MW4.book Page 30 Tuesday, May 16, 2006 4:19 PM

31
CONNECTING TO THE MAINS SUPPLY
When using electrical appliances, basic safety precautions should
always be followed
.
If this appliance is fitted with a rewirable BS1363/A, 13 amp plug, the fuse
should be rated at 13 amps and be ASTA approved to BS1362. However, if
the plug is unsuitable, it should be dismantled and removed from the supply
cord and an appropriate plug fitted as detailed below.
If this appliance is fitted with a moulded BS1363/A 13 amp plug, the fuse
should be rated at 13 amps and be ASTA approved to BS1362. If the fuse
in a non-rewirable plug needs to be changed, the fuse cover must be
refitted. The appliance must not be used without the fuse cover fitted.
In the event of the plug being unsuitable, it should be changed and an
appropriate plug fitted as detailed below. If you remove the plug it must not
be connected to a 13 amp socket and the plug must be disposed of
immediately.
As the colours of the wires in the mains lead of this appliance may not
correspond with the coloured markings identifying the terminals in your plug,
proceed as follows:
The wires of the mains lead are coloured in accordance with the following
code: BLUE = NEUTRAL, BROWN = LIVE, GREEN/YELLOW - EARTH
The wire which is coloured BLUE must
be connected to the terminal in your plug
which is marked with the letter N or
coloured BLACK.
The wire which is coloured BROWN
must be connected to the terminal in your
plug which is marked with the letter L or
coloured RED.
The wire which is coloured GREEN and
YELLOW must be connected to the
terminal in your plug which is marked
with either the letter E or with the earth
symbol, .
If any other plug is used, a 13 amp fuse must be fitted either in the plug or
adaptor or at the distributor board.
WARNING! This appliance must be earthed.
Make sure that the outer sheath of the
cable is firmly held by the clamp
Connect
Blue to N
(neutral)
Connect
Live to L
(live)
Fit a BS1363/A approved plug
Fit a
13 amp
fuse
Connect
Green/Yellow
to E (earth)
MW4.book Page 31 Tuesday, May 16, 2006 4:19 PM

32
AFTER SALES SERVICE
These appliances are built to the very highest standards. There are no userserviceable parts. Follow these steps if the unit fails to operate:
1. Check that the instructions have been followed correctly.
2. Check that fuse has not blown.
3. Check mains supply is functional.
If the appliance will still not operate, return it to the place it was purchased
for a replacement. To return the appliance to Breville Customer Service
Department, follow the steps below:
1. Pack it carefully, preferably in the original carton.
2. Enclose your name and address and quote the product reference
number given on the front cover of this booklet.
3. Give the reason why you are returning it.
4. If within the guarantee period, state when and where it was purchased
and include proof of purchase (eg till receipt).
5. Send it to the address below:
Customer Service Department
Pulse Home Products Limited
Vine Mill, Middleton Road
Royton
Oldham, OL2 5LN, UK
Telephone: 0161 621 6900
Fax: 0161 626 0391
email: info@pulse-uk.co.uk
MW4.book Page 32 Tuesday, May 16, 2006 4:19 PM

33
IMPORTANT SAFETY INSTRUCTIONS
✔ Always ensure hands are dry
before handling the plug or
switching on the appliance.
✔ Always use the appliance on a
secure, dry level surface.
✔ Always ensure that the power cord
does not hang over the edge of the
work surface and is positioned
where it cannot cause a hazard.
✔ Always carry out regular checks of
the supply cord to ensure no
damage is evident. Should there
be any signs that the cord is
damaged in the slightest degree,
the entire appliance should be
returned to the Customer Service
Department.
✔ Always return the appliance after a
malfunction, or if it has been
damaged in any manner to the
Customer Service Department for
examination, repair or adjustment
as special purpose tools are
required.
✔ Always exercise caution when
operating your microwave oven.
✔ Always use this appliance only for
its intended use as described in
this manual.
✔ Always ensure that the appliance
is switched off before removing
from the base, when not in use, or
before cleaning.
✔ Always ensure that the air inlet
and outlet are kept clear and don’t
become blocked.
✘ Never use this appliance outdoors.
✘ Never use this appliance for
other than the intended use. This
appliance is for household use
only.
✘ Never immerse any part of the
appliance base, cable or plug in
water or any other liquid to
protect against electrical
hazards.
✘ Never use harsh, abrasive or
caustic cleaners to clean this
appliance.
✘ Never allow children to use this
appliance. Close supervision is
necessary when the appliance is
near children.
✘ Never leave the appliance
unattended when in use.
✘ Never let the cable hang over the
edge of the worktop, touch hot
surfaces or become knotted.
✘ Never place this appliance on or
near a hot gas or electric burner
or where it could touch a heated
oven or microwave oven.
✘ Never attempt to operate this
appliance with the door open.
✘ Never operate any appliance
with a damaged cable or plug or
after an appliance malfunction or
if it has been damaged in any
manner.
✘ Never use the oven when empty,
this could damage the oven.
✘ Never operate the oven without
the turntable tray in place. Be
sure it is properly sitting on the
rotating base.
MW4.book Page 33 Tuesday, May 16, 2006 4:19 PM

34
GUARANTEE
This guarantee is subject to the following provisions:
• This product is guaranteed for a period of 1 year from the date of
purchase against mechanical and electrical defects
• This guarantee is only valid if the appliance is used solely for
domestic purposes in accordance with the instructions provided, that
it is not connected to an unsuitable electricity supply, dismantled or
interfered with in any way or damaged through mis-use. Under this
guarantee we undertake to repair or replace free of charge any parts
found to be defective.
• Nothing in this guarantee or the instructions relating to the product
excludes, restricts or otherwise affects your statutory rights.
• In line with our policy of continuous development, we reserve the right
to change this product, packaging and documentation without notice.
This product is manufactured to comply with the radio interference
requirements of EEC Directive 93/68 EEC.
Vine Mill, Middleton Road, Royton, Oldham, OL2 5LN, UK
Breville is a registered trademark of Alba Plc.
© Pulse Home Products Limited
MW4.book Page 34 Tuesday, May 16, 2006 4:19 PM

35
MW4.book Page 35 Tuesday, May 16, 2006 4:19 PM

DBF-ISS2-FEB06-PDF
92431-2
Vine Mill, Middleton Road, Royton, Oldham, OL2 5LN, UK
Breville is a registered trademark of Alba Plc.
© Pulse Home Products Limited
MW4.book Page 36 Tuesday, May 16, 2006 4:19 PM
 Loading...