


the AirRounder
Instruction Book - LPH408
TM
Connect

Contents
2 Breville Recommends Safety First
8 Components
8 Remote Control Panel
9 Control Panel
9 Display Screen
10 Features
11 Assembly
12 Functions
17 Wi-Fi Connectivity
& Voice Assistants
20 Care, Cleaning & Storage
21 Replacing the Filter
22 Troubleshooting
BREVILLE
RECOMMENDS
SAFETY FIRST
At Breville we are very safety
conscious. We design and
manufacture consumer
products with the safety of you,
our valued customer, foremost
in mind. In addition, we ask
that you exercise a degree
of care and adhere to the
following precautions.
SPECIFICATIONS
Filter Life Approx. 3 months
Product Dimensions
(HxWxL mm)
For room size 15 to 25 m²
Noise level (Max) 60dBA
Power Consumption 1800W
Weight Approx. 4.4kg
OS Compatibility Android® 5.0 or later and
450 x 245 x 260
iOS 9.0 or later
IMPORTANT
SAFEGUARDS
READ ALL
INSTRUCTIONS BEFORE
USE AND SAVE FOR
FUTURE REFERENCE
• Carefully read all instructions
before operating the purifier
fan heater for the first time
and save for future reference.
• Always ensure the purifier fan
heater is properly assembled
before use. Follow the
instructions provide in this
instruction book.
• Remove and safely discard
any packaging material and
promotional labels before
using the purifier fan heater
for the first time.
2

• To eliminate a choking
hazard for young children,
remove and safely discard
the protective cover fitted
to the power plug of this
purifier fan heater.
• Avoid touching the purifier
fan heater body while it is on
as some parts of the purifier
fan heater are hot. When
moving the purifier fan
heater, switch OFF and let the
purifier fan heater cool down
before attempting to move it.
• When moving the purifier
fan heater, always carry the
purifier fan heater by the
base. Do not attempt to move
the purifier fan heater by
the power cord.
• Keep combustible materials
such as drapes and other
furnishings at least 1.7 meters
from the front, sides and rear
of the purifier fan heater.
• Extreme caution and
supervision are necessary
when this purifier fan heater
is used by or near children,
invalids or animals.
• Children should be
supervised to ensure that
they do not play with the
purifier fan heater.
• Do not use this purifier fan
heater in the immediate
surroundings of a bath, a
shower or a swimming pool.
Do not immerse or allow
liquids to be spilt on the
purifier fan heater.
• Do not use the purifier fan
heater to dry your laundry.
• This purifier fan heater has
hot and arcing or sparking
parts inside. Do not use in
areas where petrol, paints,
aerosols or other flammable
substances are used or stored.
• Do not allow materials
that have been in contact
with oil, petroleum-based
products or drying fluids
to come in contact with the
purifier fan heater.
• Do not operate the purifier
fan heater on an incline plane.
• Only use the purifier fan
heater on a horizontal and
stable surface.
• Do not leave the purifier fan
heater unattended. Always
switch the purifier fan heater
OFF at the controls and at the
power outlet then unplug the
purifier fan heater from the
power outlet when not in use.
• Do not operate purifier fan
heater whilst asleep.
3

• Do not operate the purifier
fan heater with a damaged
cord or plug, or if the
purifier fan heater has
been dropped or damaged
in any matter, return the
purifier fan heater to your
nearest Breville service
centre for examination,
electrical or mechanical
adjustment or repair.
• Do not operate the purifier
fan heater with the power
cord damaged, frayed or split,
wound around any part of
the purifier fan heater, or in
contact with heated surfaces
of the heater.
• Do not run the cord under
carpeting or cover the cord
with rugs, runner of the like.
Arrange the cord away from
traffic areas and where it will
not be tripped over.
• Do no locate the purifier fan
heater immediately below
socket outlet when in use.
• Do not use this purifier fan
heater with a programmer,
timer or any other device
that switches the purifier fan
heater on automatically since
a fire risk may exist if the
purifier fan heater is covered
or positioned incorrectly.
• This purifier fan heater is not
intended for use in wet or
moist locations.
• To disconnect the purifier
fan heater, switch the power
switch to OFF, then switch
off at the power outlet then
remove plug from the outlet.
• Do not insert or allow foreign
objects to pass through the
inlet or outlet openings.
This may cause an electric
shock, fire or damage the
purifier fan heater.
• To prevent a possible fire or
heat damage, allow ample
space around the purifier fan
heater (at least 1.7m at the
front, 0.5m at the rear, top
and sides) and do not totally
or partially block the air inlet
or outlets in any manner.
Check the openings from
time to time for accumulated
dust. Ensure long shag carpet
does not obstruct airflow
under the unit.
• Do not touch hot surfaces
or the front grill when
in operation or for some
time after, as these
surfaces may be hot.
• Switch the purifier fan heater
to OFF, then turn off at the
power outlet and unplug.
4

Allow the purifier fan heater
to cool down before cleaning
or storing.
• Do not operate the purifier
fan heater on a sink or
drain board.
• To avoid an electrical
overload, it is recommended
that no other appliances are
plugged into the same circuit
as your purifier fan heater
when it is in use.
• Do not move the purifier fan
heater when it is switched on.
• Do not use outdoors. This
purifier fan heater is not
intended for commercial use
such as construction sites.
• Use this purifier fan heater
only as described in this
instruction manual. Any
other use not recommended
by the manufacturer may
cause fire, electric shock or
injury and void all warranties.
• Regularly inspect the supply
cord, plug, control settings, air
inlets and outlets and main
housing for any damage.
If found damaged in any
way, immediately cease use
of the purifier fan heater
and return to Breville or an
authorized service agent for
inspection or repair.
• Do not unplug the purifier
fan heater by pulling on the
power cord. Always unplug
using the power plug.
• To disconnect the purifier
fan heater, switch the heater
to OFF, then switch off at the
power outlet and remove the
plug from the power outlet.
Allow the purifier fan heater
to cool down before cleaning
and storing.
• Keep the purifier fan heater
and filter clean. Follow
the cleaning instructions
provided in this book.
• To prevent a possible fire
or heat damage in heating
mode, do not operate the unit
remotely using the Breville
Home Connect™ app when
the unit is unattended.
IMPORTANT
SAFEGUARDS FOR
ALL ELECTRICAL
APPLIANCES
• Fully unwind the power cord
before use.
• Connect only to a 230V or
240V power outlet.
• Do not let the power cord
hang over the edge of a bench
or table, touch hot surfaces or
become knotted.
5

• To protect against electric
shock, do not immerse the
power cord, power plug
or appliance in water or
any other liquid or allow
moisture to come in contact
with the part, unless it is
recommended in the cleaning
instructions.
• The appliance is not
intended for use by persons
(including children) with
reduced physical, sensory
or mental capabilities, or
lack of experience and
knowledge, unless they have
been given supervision or
instruction concerning use
of the appliance by a person
responsible for their safety.
• Children should be
supervised to ensure that
they do not play with
the appliance.
• It is recommended to
regularly inspect the
appliance. To avoid a hazard,
do not use the appliance if
power cord, power plug or
appliance becomes damaged
in any way. Return the entire
appliance to the nearest
authorized Breville service
centre for examination and
/ or repair.
• Any maintenance other than
cleaning should be performed
at an authorised Breville
Service Centre
• This appliance is for
household use only. Do
not use this appliance for
anything other than its
intended use. Do not use in
moving vehicles or boats. Do
not use outdoors. Misuse may
cause injury.
• The installation of a residual
current device (safety switch)
is recommended to provide
additional safety protection
when using electrical
appliances. It is advisable that
a safety switch with a rated
residual operating current not
exceeding 30mA be installed
in the electrical circuit
supplying the appliance.
See your electrician for
professional advice.
• During electrical storms,
the appliance should be
disconnected from the power
source at the wall socked
to prevent any electrical
surges that may arise during
the storm and which may
inadvertently cause damage
to the appliance and its
electronic componentry.
6

• Always turn the appliance to
the OFF position, switch off at
the power outlet and unplug
at the power outlet when the
appliance is not in use.
• Before cleaning, always turn
the appliance to the OFF
position, switch off at the
power outlet, unplug at the
power outlet and remove the
power cord, if detachable,
from the appliance and allow
all parts to cool.
• Do not place this appliance
on or near a heat source, such
as hot plate, oven or heaters.
• Position the appliance at a
minimum distance of 1m
away from walls, curtains and
other heat or steam sensitive
materials and provide
adequate space above and on
all sides for air circulation.
FOR HOUSEHOLD USE ONLY SAVE
THESE INSTRUCTIONS
7
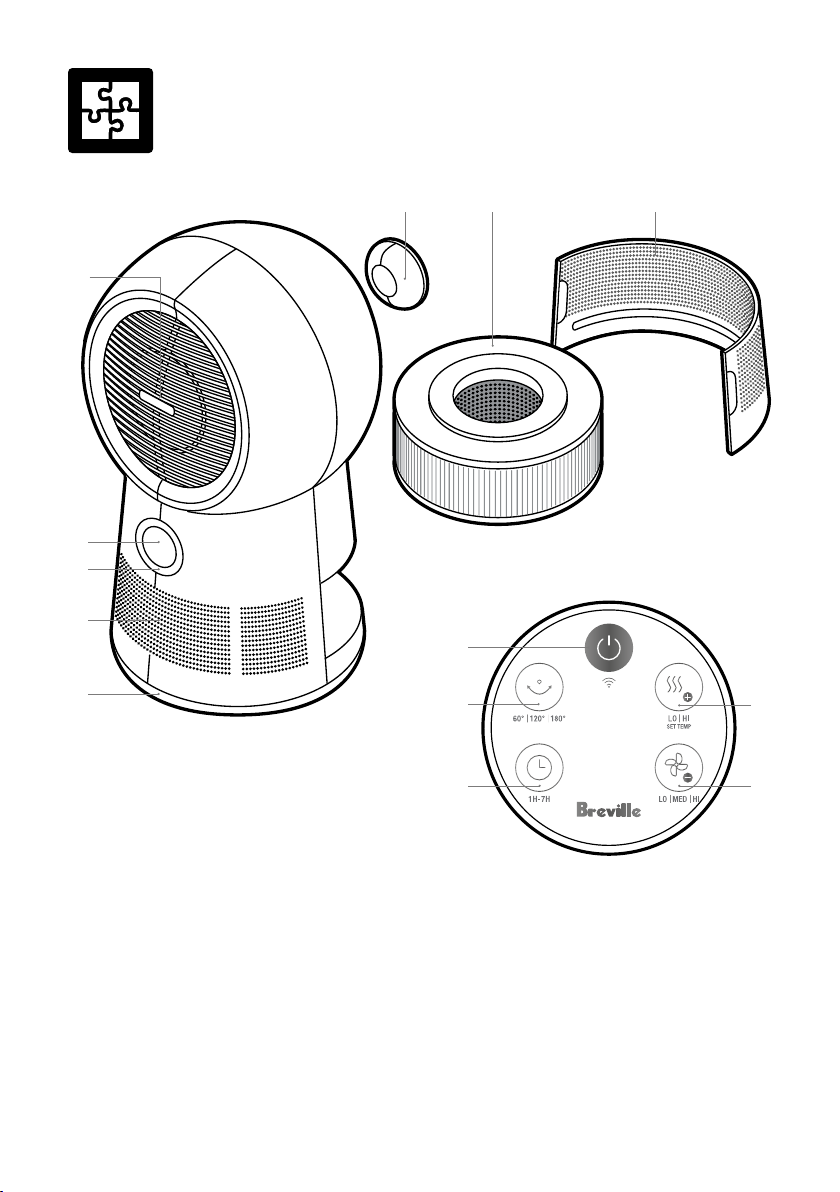
Components
F G H
A
B
C
D
A
E
A. Front Grille
B. LED Display
C. Control Panel
D. Front Vent (air inlet)
E. Oscillating Base
F. Remote Control
G. 3- Layer Filter
H. Removable Back Vent (rear cover)
NOT PICTURED
• Power Cord and Plug
• Remote Control Storage
• Non-Slip/Non-Marking Rubber Feet
8
B
C E
REMOTE CONTROL PANEL
A. Power ON/OFF & Wi-Fi button
B. Oscillation 60°C, 120°C & 180°C
C. Timer (up to 7 hours) button
D. Heating LOW/HIGH, Temp Increase
& Set Temp button
E. Cooling LOW/MEDIUM/HIGH &
Temp decrease button
D

Control Panel
OUTER CONTROL PANEL
A. Power ON/OFF &
Wi-Fi button
B. Timer (up to 7 hours) button
C. Oscillation 60°C, 120°C,
180°C & Filter Reset button
D. Cooling LOW/MEDIUM/
HIGH, temp decrease &
Child Lock button
E. Heating LOW/HIGH, temp
increase & Set Temp button
A
E
D
B
C
DISPLAY SCREEN
A. Wi-Fi
B. Timer (up to 7 hours)
C. Oscillation 60°C,
120°C, 180°C
D. Cooling LOW/
MEDIUM/HIGH
E. Heating LOW/HIGH
F. Child Lock
G. Ambient / Set
Temperature Display
H. Replace Filter
A
H
G
F
E
D
B
C
9

Features
WHAT IS THE AIRROUNDER™
CONNECT PURIFIER FAN HEATER?
The Breville AirRounder™ Connect purifier
fan heater features an air purifier, heater and
cooling fan in one.
The Purifier improves your indoor air quality
using 3 distinct levels of protection.
1. A Pre-Filter
Captures larger airborne particles such as
human hair, pet dander and dust particles.
2. A True HEPA Filter
Traps up to 99.97% of fine particles, allergens
and airborne contaminants down to
0.3 microns in size. These include bacteria,
viruses, mould spores, plant spores, and pollen.
3. An Activated Carbon Membrane
Along with assisting in the capture of dust,
smoke, pollen and other airborne allergens, the
activated carbon membrane helps to neutralise
odours in the home and to eliminate fumes
emitted by household products as well as
other volatile organic compounds (VOC’s) that
might be found in the air.
THERMOSECURE™ Protection
Your purifier fan heater is fitted with a safety
device that switches off the purifier fan heater
in the event of overheating. Should this purifier
fan heater stop working, turn off the purifier
fan heater and inspect the air inlet and outlet
for blockages. Wait until the purifier fan heater
is fully cooled for the protection system to reset
before attempting to restart the purifier fan
heater. If the purifier fan heater fails to operate
or the safety device switches off again, take the
purifier fan heater to an authorised Breville
Service Centre for examination or repair.
SAFETY FEATURES
Safety Tip-Over Cut-Out Switch
There is a tip-over switch inside the purifier
fan heater.
If the purifier fan heater is accidentally tipped
over, the purifier fan heater will stop operating.
Once placed back into the upright position,
press the power button to switch the purifier
fan heater on again.
10

Assembly
BEFORE FIRST USE
• Remove and safely discard any packaging
material or promotional labels attached to
your purifier fan heater and filter. Check for
any missing or damaged parts as per the
components list.
• Remove the filter from the purifier fan heater
(see REPLACING THE FILTER on page 19)
and take it out of the plastic bag. Then reinsert the filter into the purifier fan heater.
• Select a flat and level location for the purifier
fan heater
• For proper air flow, locate the unit at least
20cm from any wall or furniture.
• Ensure the air inlet and outlets are not
blocked before use.
• Ensure the filter has been fitted correctly as
per the instructions in this book.
• Plug the power plug into a 230V or 240V
power outlet and turn on the power outlet.
WARNING
Remove the filter packaging before first use.
IMPORTANT
When moving the purifier fan heater, always
lift the unit using two hands and set down
gently on a flat and level surface.
11
Functions
OPERATING YOUR PURIFIER
FAN HEATER
NOTE
The purifier automatically operates when
either Heating or Cooling is turned on. It is
recommended to use the Low Fan setting
to purify the surrounding area when a room
temperature adjustment is not required.
Place the purifier fan heater on a flat surface.
Insert the power plug into a 230V or 240V
power outlet and switch on at the outlet. When
switched on, a chime will sound to confirm the
unit is switched on and it is in standby mode.
1. Press the
remote control to turn the purifier fan heater
on. When switched on for the first time, the
purifier fan heater will start automatically
in heating mode, at high heat level and
25°C as the default set temperature will
illuminate on the LED display.
2. To turn the purifier fan heater off at any
time, press the
panel or remote control. When switched off,
a chime will sound to confirm the unit is
switched off and in standby mode.
3. To adjust how the purifier fan heater
operates, follow the directions below.
button on the control panel or
button on the control
NOTE
When the purifier fan heater is on and correctly
setup to the Wi-Fi network, Wi-Fi will attempt
to connect automatically. If a connection
has been made, the Wi-Fi symbol will flash
for 60 seconds, after 60 seconds, the Wi-Fi
symbol will illuminate on the LED display. If a
connection is not made, the Wi-Fi symbol will
stop illuminating. See Wi-Fi Connectivity in
this book for more details.
ROOM AMBIENT TEMPERATURE
To help maintain a comfortable environment,
your Breville Air Rounder™ Connect purifier
fan heater is fitted with a temperature sensor
that detects the room temperature (in °C)
which will display on the LED display screen.
The number displayed is only an indication of
the room temperature and will vary depending
on the location of the purifier fan heater
in the room.
NOTE
The room temperature display is an indicative
temperature only based on the temperature
sensor within the purifier fan heater.
Temperatures further away from the unit itself
may be different to this reading.
MEMORY
The purifier fan heater has a memory function
and will return to the last setting it was set to
when it was turned off. This will only occur if
the purifier fan heater is not unplugged and/or
switched off at the power point.
FUNCTIONS
Cooling + Purifying Mode
Your purifier fan heater has 3 cooling fan
settings: LOW, MEDIUM and HIGH. Use the
Low Fan setting to purify the surrounding
area when a room temperature adjustment is
not required.
1. To choose between these cooling fan
settings, press the
the control panel or
remote control, until the desired setting
illuminates on the LED display screen.
The LED display screen will display the
room ambient temperature and current
fan setting.
button found on
button found on the
12
2. To cancel a cooling setting, press the
button to stop operation. If the operation is
stopped, the unit will enter standby mode
and the LED display screen will be dimmed
and display the ambient room temperature.
NOTE
Choose the heat setting to determine to
determine how quickly purifier fan heater will
maintain the set temperature setting.
Heating + Purifying Mode
Your purifier fan heater has 2 heat settings
LOW and HIGH and allows you to set
your desired temperature with the default
temperature setting at 25°C.
1. To choose between these heat settings,
press the
panel or
control repeatedly, until the desired setting
illuminates on the LED display screen.
2. To cancel a heat setting, press the
button to stop operation. If the operation is
stopped, the unit will enter standby mode
and the LED display screen will illuminate
‘OFF’ whilst the unit is cooling down.
button found on the control
button found on the remote
WARNING
To avoid overheating, do not cover the heater.
Set Temp
Take control of your room temperature.
Everyone's comfort levels are different, so you
can set your own preferred temperature or even
heat the room before you go to bed.
1. To set the desired temperature, press and
hold the
panel or press and hold for 3 seconds the
button found on the remote-control.
2. To increase the temperature press
button repeatedly on the control panel or
button repeatedly on the remote control.
3. To decrease the temperature press
button repeatedly on the control panel or
on the remote control.
4. Once the temperature has been set, the
LED display screen will illuminate the
room ambient temperature. The purifier
fan heater will maintain the room ambient
temperature to the temperature setting
automatically.
button found on the control
NOTE
When the purifier fan heater is turned on from
standby, the memory function will start heating
based on the previously set temperature and
heating setting.
NOTE
When operating the purifier fan heater
remotely in heat mode, the purifier fan
heater will automatically switch off after 7hrs
by default.
NOTE
The purifier fan heater will stop heating and
purifying when the ambient temperature is
greater than the set temperature (e.g. >25˚C).
Ambient temperature will flash and
oscillation will stop.
The unit will start heating and purifying again
when the ambient temperature is less than the
set temperature (e.g. ambient temperature <
set temperature 25˚C). Ambient temperature
will stop flashing and oscillation will resume
at the same angle as previously set, only if the
oscillation button is touched on the control
panel or pressed on the remote control.
13

Night Mode
Your purifier fan heater is fitted with a lightsensitive sensor that will intelligently stop the
LED display screen from illuminating at night
when in a dark place.
The Night mode will automatically turn off all
lights on the LED display panel and operate in
the last setting.
Press any button on the control panel
or remote control to re-engage the LED
display panel.
TIMER
AUTO-OFF TIMER
The purifier fan heater comes with a
7-hour auto-off timer to turn off after a set
number of hours.
The purifier fan heater can be set in 1 hour
increments up to 7 hours. After the selected
number of hours have elapsed, the purifier fan
heater will switch to standby mode. If no timer
is set, the purifier fan heater will continuously
operate until it is manually switched off.
AUTO-OFF TIMER Example: Set the auto-off
timer to 3 hours, and the purifier fan heater
will stop operating after 3 hours. 1h and 2h will
illuminate on the LED display screen.
The auto-off timer can be set in any MODE.
To set the timer, press the
on the control panel or the remote control until
the desired number of hours displays on the
LED display screen. The time will display on
the LED display screen. The timer will start on
the selected mode, and will stop automatically
once the timer has expired.
The LED display screen will display the
remaining auto-off time.
button repeatedly
REMAINING TIME Example: Set the
auto-off timer to 3 hours, once 1 hour has
elapsed, the remaining time will be displayed
in a decremental way, whereby 2h will only
illuminate on the LED display screen, after
another hour has elapsed 1h will illuminate on
the LED display and so on and so forth until
the set time has completely elapsed.
To cancel the pre-set auto-off time, once the
timer is set, press the
the control panel or the remote control until
the number of hours no longer illuminates on
the LED display.
button repeatedly on
NOTE
The timer can be set on all modes and all
modes can be adjusted at any time once the
timer is set.
The purifier fan heater will switch to standby
mode once the set time has elapsed.
OSCILLATION
The purifier fan heater has horizontal
oscillation. The oscillation can be set
on all modes.
To activate oscillation, press the
repeatedly on the control panel or the remote
control to select between 60, 120 and 180
degrees, until the desired degree of oscillation
displays on the LED display screen. The
purifier fan heater will move left to right
continuously.
To stop and direct the orientation of your
purifier fan heater during oscillation, when the
airflow has reached your preferred position,
press the
panel or the remote control until 60, 120 or 180
degrees is no longer illuminating on the LED
display screen.
When the purifier fan heater is turned off,
the unit will stop oscillating and return to
centre position.
When turned on from standby, the purifier fan
heater will start oscillating at the same angle as
previously set. If no oscillation angle was set,
the unit will stay at the same position as it was
when it stopped.
button repeatedly on the control
button
14

CHILD LOCK
When the Child Lock is engaged, the buttons
on the control panel are locked from use.
1. To turn on, press and hold the
on the control panel or press and hold the
on the remote control until a beep sounds
and the child lock icon illuminates on the
LED display panel.
2. To cancel, repeat step 1 until the child lock
icon no longer illuminates on the LED
display panel.
button
FILTER RESET
• The REPLACE FILTER icon will illuminate on
the LED display panel indicating that the
filter needs to be replaced.
• Replace the filter according to the directions
found under Replacing the Filter in this book.
• Once the filter is replaced, press and hold
the
10 seconds to reset. The REPLACE FILTER
icon will no longer illuminate on the control
panel display.
• The built-in timer for the filter reset is
95 days.
button on the control panel for
NOTE
For best performance, the filter should be
cleaned at least monthly as per the instructions
found in the Care, Cleaning & Storage section
of this book.
To avoid misplacing your remote control, place
the remote control in the remote holder at the
back of the unit (Fig. 1).
Fig. 1
USING THE REMOTE CONTROL
The remote control includes 1 x CR2032
3V Lithium battery. This Lithium battery is
protected by an isolating slip. Before first
using the remote control, remove the battery
isolating slip by pulling the slip outwards away
from the remote control.
To check and/or to replace the battery, open
up the battery compartment at the back of the
remote by forming a good grip of the remote,
pushing the small arched groove to the right
and simultaneously pushing out the battery
compartment cover by pushing the rectangular
groove outwards. Insert the battery paying
attention to the polarity (+ and -) (Fig. 2).
REMOTE CONTROL
The purifier fan heater comes with a remote
control. This remote control features the same
controls as the control panel on the purifier fan
heater and can be used the same way.
The control panel has an additional control
not found on the remote control. The FILTER
RESET function can be set using the control
panel only. Refer to the FILTER RESET section
of this book for more details.
BACK OF REMOTE
Fig. 2
15

Reinsert the battery compartment into the
remote control ensuring that the + symbol
is facing downwards when inserted. Make
sure the battery compartment is correctly
secured (Fig 3).
360°
Fig. 3
NOTE
To use the remote control, it must be pointed at
the control panel and must be used within five
meters of the unit
WARNING
KEEP BATTERIES OUT OF REACH OF
CHILDREN
Swallowing may lead to serious injury in as
little as 2 hours or death, due to chemical burns
and potential perforation of the oesophagus.
If you suspect your child has swallowed
or inserted a button battery immediately
call the 24-hour Poisons Information
Centre on 13 11 26 for fast, expert advice.
Examine devices and make sure the battery
compartment is correctly secured, e.g. that
the screw or other mechanical fastener is
tightened. Do not use if compartment is not
secure. Dispose of used button batteries
immediately and safely. Flat batteries can
still be dangerous. Tell others about the risk
associated with button batteries and how to
keep their children safe.
16

Wi-Fi
Connectivity
The Breville AirRounder™ Connect purifier fan
heater can offer remote operation by using a
home Wi-Fi connection and the Breville Home
Connect™ app downloaded to a compatible
mobile phone. through the Google Play store
or Apple App store.
To go straight to the appropriate app store,
scan the QR code below.
For instructions on how to use the app, scan the
QR code below, refer to the Quick Start Guide
that can be found in the box or go to
tinyurl.com/HomeConnectQuickStart.
CONNECT YOUR PURIFIER FAN HEATER
TO WI-FI
1. Ensure the mobile device is connected to a
home Wi-Fi network.
2. The purifier fan heater can either be on
standby mode or turned on when setting up.
The symbol
panel. The purifier fan heater is now ready
to connect. The symbol stops flashing after
60 seconds but pairing remains possible.
3. Log into your Breville Home Connect™ app
account and stay on the “Home” page. To
add the purifier fan heater to the list. Touch
‘Add Device’ or the
top right-hand corner of the screen. Follow
the prompts in the app.
will flash fast on the display
symbol found in the
NOTE
The Breville Home Connect™ app is
compatible with mobile phones running
®
Android
or later.
5.0 or later and iOS devices 9.0
NOTE
To control the purifier fan heater using the app,
the purifier fan heater must be plugged in to an
active power outlet and turned on.
4. If the connection is successful, the purifier
fan heater will appear in the main page of
the app and the
purifier fan heater will illuminate.
5. If unsuccessful, press and hold the button
for 3 seconds until the symbol is flashing
slowly. Follow the prompts in the app to
connect in a different mode.
symbol light on the
17

Voice
Assistants
The Breville AirRounder™ Connect purifier fan heater comes with the added feature of voice
assistance, allowing you to control your purifier fan heater using your voice by linking your
Breville Home Connect™ app with Amazon Alexa and Google Home/Assistant.
To link your Breville Home Connect™ app account with either Amazon Alexa or Google Home/
Assistant, refer to the instructions on www.Breville.com or follow instructions found in the Breville
Home Connect™ app under Me > Third-Party Voice Services > View more ways to link.
NOTE
To control the purifier fan heater using the Amazon Alexa and Google Home/Assistant app, the
purifier fan heater must be plugged in to an active power outlet and turned on.
IMPORTANT NOTE
The recommended voice commands to operate the appliance's functions differ between Amazon
Alexa and Google Home/Assistant as listed below. Variations of these commands may also be
recognised, however, if a command fails, check against the recommended voice command.
VOICE CONTROL WITH AMAZON ALEXA
Before you can voice control your Breville AirRounder™ Connect with Amazon Alexa, you need to
link the Breville Home Connect™ account to the Amazon Alexa app as per the instructions.
Recommended Amazon Alexa Voice Commands for the Breville AirRounder™ Connect
Supported Settings Amazon Alexa Voice Commands
Power
Cooling Mode
Heating Level
Oscillation (Default 60 degrees)
Activate/Deactivate Child Lock
Set Temperature *
Ambient Temperature *
Turn ON DEVICENAME
Turn OFF DEVICENAME
Set DEVICENAME fan speed to Low/Mid/High
Set DEVICENAME to heater low/heater high
Turn Horizontal Swing ON on DEVICENAME
Turn Horizontal Swing OFF on DEVICENAME
Turn child lock ON on DEVICENAME
Turn child lock OFF on DEVICENAME
Set DEVICENAME to XX degrees
What is the temperature of DEVICENAME
NOTE
Currently, Amazon Alexa does not support the following settings:
• Oscillation mode (120 & 180 degree), timer, air quality, filter lifetime and reset filter.
VOICE CONTROL WITH GOOGLE HOME/ASSISTANT
18

Before you can voice control your Breville AirRounder™ Connect with Google Home/Assistant,
you need to link the Breville Home Connect™ account to the Google Home/Assistant app as per
the instructions.
Recommended Google Home/Assistant Voice Commands for the Breville AirRounder™ Connect
Supported Settings Google Home/Assistant Voice Commands
Power
Cooling Mode
Heating Level
Oscillation (Default 60 degrees)
Activate/Deactivate Child Lock
Set Temperature *
Ambient Temperature *
Turn ON DEVICENAME
Turn OFF DEVICENAME
Set fan speed to Low/Mid/High on DEVICENAME
Set DEVICENAME to heater low/heater high
Turn swing ON on DEVICENAME
Turn swing OFF on DEVICENAME
Turn child lock ON on DEVICENAME
Turn child lock OFF on DEVICENAME
Set DEVICENAME to XX degrees
What’s the temperature of DEVICENAME?
NOTE
Currently, Google Home/Assistant does not support the following settings:
• Oscillation mode (120 & 180 degree), timer, air quality, filter lifetime and reset filter.
TIPS for Amazon Alexa and Google Home/Assistant
• Configure your Amazon Alexa or Google Home/Assistant compatible devices with the
"Amazon Alexa" or “Google Home/Assistant” app if using, or simply download onto your
phone.
• Renaming your device - You will find your device listed as the Breville product name in your
Breville Home Connect™ smart home devices. Tap on it to rename your device for more
convenient voice commands, e.g. “Purifier Living Room” or give it a name, e.g. "Kenny".
• Training your voice assistant - Voice Match- Teach your assistant to recognise your voice. This
isn’t training it to understand English, but rather to recognise your voice as belonging to you.
You can do this by going to the Settings menu in the voice assistant app on your phone.
• Routines - Amazon Alexa and Google Home/Assistant allow you to combine multiple actions in
one voice command, to create a Routine, tap on the ‘Routines’ option via settings and follow the
steps.
• Ensure the primary language is set to English (United States) for all apps.
* Ensure measurement units in Amazon Alexa and Google Home/Assistant are set to Celsius.
19

Care, Cleaning
& Storage
The purifier fan heater and filter should be
cleaned at least once every month. Ensure
the purifier fan heater is switched off and
disconnected from the power outlet and allow
all parts to cool before cleaning or storing.
• Use a clean, dry cloth to clean all external
surfaces of the purifier fan heater.
NOTE
More frequent cleaning may be required
depending on environmental conditions.
BREVILLE RECOMMENDS
• Always ensure the purifier fan heater is
turned off, switched off at the power outlet
and unplugged and allow the unit to cool
before performing any cleaning or filter
replacement.
DO NOT stick any foreign objects or your
8
fingers inside the air inlet/outlet of this unit.
DO NOT use gasoline, benzine, thinner,
8
harsh cleaners, etc. on and/or in the unit
while cleaning as they will damage the unit.
NEVER use alcohol or other solvents
8
on this unit.
FILTER CARE & CLEANING
WARNING
The filter is not washable. Do not immerse
any part of the air purifier in water as it will
cause damage.
• The Pre-filter should be cleaned at least once
every month using a vacuum cleaner. Gently
vacuum using a hand-tool attachment such
as a brush or upholstery tool. Clean more
often if required (Fig 4).
Fig. 4
• Do not attempt to clean the carbon filter with
a vacuum as this can cause damage.
• Do not use any solutions, hard bristle
brushes or sharp objects to clean as this
can cause damage.
• Replace the filter as indicated using the
following instructions.
20

REPLACING THE FILTER
Your AirRounder™ Connect purifier fan heater
filter should be replaced in the time frames
indicated below. The filter life is approximately
3 months if used 24 hours daily, or 6 months if
used 12 hours daily.
• The filter life may vary to this timing
depending on environmental conditions.
• Remove all packaging from the replacement
filter and place the filter into the unit as
described below.
1. Remove the rear housing cover (Fig 5).
Fig. 5
3. Remove all packaging from the replacement
filter then place into the purifier fan heater
with pull tabs facing the opening (Fig 7).
Fig. 7
4. Ensure the filter is correctly fitted.
5. Replace the rear housing cover (Fig 8).
2. Remove the used filter using the pull tabs
on the filter (Fig 6).
Fig. 6
Fig. 8
Press and hold the button on the control
panel for 10 seconds to reset the filter. REPLACE
FILTER icon will no longer illuminate on the
LED display panel.
NOTE
There is no top or bottom on the filter. The
filter can be placed into the unit either way.
NOTE
If the filter is not in place or not fitted correctly,
the purifier fan heater will not operate.
21

REPLACEMENT FILTERS
Replacement filters must be purchased from
the Breville website^ or at participating
retail outlets.
See the table below for the replacement
product code to suit this Breville
Purifier Fan Heater.
Breville Purifier Fan
Heater Model No.
the AirRounder™
Connect
LPH408WHT
the AirRounder
Plus™ Connect
LPH708WHT
^Delivery charges may apply.
Filter Replacement
Product Code
LPH040WHT
LPH070WHT
Please contact Breville Customer Service
Centre for further support.
Only use the original Breville filter specially
intended for this appliance. Do not use any
other filters.
STORAGE
When not in use, store the purifier fan heater
upright in a cool, clean and dry location.
22

Troubleshooting
MINI TROUBLESHOOTING GUIDE
Before carrying out any of the following service checks, unplug the unit from the mains.
PROBLEM WHAT TO DO
Unit will not start
Insufficient air flow
Excessive noise
Not heating in the heating mode
Filter Indicator is still illuminated
after replacing the air filter
Breville Customer Service Centre (see back cover for contact details)
Check that the power plug is connected to a power outlet and the
•
outlet is turned on.
Check that purifier fan heater is assembled correctly.
•
Check that the filter is fitted correctly in place.
•
Make sure the filter is removed from the packaging.
•
Check that the filters are clean.
•
Check for any obstructions in the air inlet and/or outlet.
•
Check if the filter is clogged and ready for replacement.
•
Check that the rear housing cover is closed properly.
•
Check that the unit is on a level surface
•
Check for any obstructions in the air inlet and/or outlet.
•
Surface temperature of the heating plate rises, and the thermostat
•
has stopped working.
Reset the REPLACE FILTER indicator (see page 19).
•
23

BREVILLE HOME CONNECT™ APP TROUBLESHOOTING
PROBLEM WHAT TO DO
Why can’t I connect my purifier
fan heater to Wi-Fi network?
How do I change my
Wi-Fi network to a 2.4GHz
Wi-Fi network?
I already have another appliance
connected to the Breville Home
Connect™ app, but my purifier fan
heater won’t connect?
My purifier fan heater is offline
Check that your purifier is within range of the Wi-Fi router
•
During the setup process you must be on a secure
•
2.4GHz Wi-Fi network.
Make sure the Wi-Fi password you entered is correct.
•
Check that the filter is fitted correctly in place.
•
Unplug the purifier for 10 seconds and plug it back in.
•
Most dual-band routers support both 2.4Ghz and 5Ghz networks.
•
Select the Wi-Fi name that does not end in “-5G”
If your phone is attempting to connect to the 5Ghz network, try
•
“forgetting” or temporarily disabling the 5Ghz network.
If you are unsure, or if the 2.4Ghz and 5Ghz networks do not have
•
separate names, please contact your internet service provider.
Close and relaunch the Breville Home Connect™ app
•
Reset the Wi-Fi on the purifier fan heater by pressing and holding
•
the power button for 3 seconds when in standby mode. The Wi-Fi
indicator will rapidly blink and turn off.
Re-pair the purifier to the Breville Home Connect™ app by
•
following the instructions in this booklet
Make sure your router is connected to the internet and your
•
phone’s network connection is working properly.
Check that your purifier is within range of the Wi-Fi router
•
Delete the offline purifier fan heater for the Breville
•
Home Connect™ app. Swipe left (iOS) or tap and hold
(Android), and tap Delete.
Reset the purifier fan heater by pressing and holding the power
•
button for 15 seconds. The Wi-Fi indicator will rapidly blink
10 times and turn off.
Reconfigure your purifier fan heater with the Breville Home
•
Connect™ app.
NOTE: Power outages, internet outages, or changing Wi-Fi
•
routers may cause your air purifier to go offline.
If the problem is not listed, please contact Breville Customer Service Centre (see back cover for contact details)
24

TROUBLESHOOTING GUIDE FOR AMAZON ALEXA
AND GOOGLE HOME/ASSISTANT
PROBLEM WHAT TO DO
Why is Amazon Alexa or Google
Home/Assistant not responding
to my voice commands.
If the problem is not listed, please contact Breville Customer Service Centre (see back cover for contact details)
Check the internet connection.
•
Restart your device & mobile phone.
•
Restart your modem and router.
•
Make sure your Amazon Alexa or Google-enabled device or
•
mobile phone is in Wi-Fi range.
When you are giving a command to Amazon Alexa or Google
•
Home/Assistant make sure you are clear and there is no unwanted
noise in the background.
While the voice assistant is always on in the background, only
•
an activation phrase will allow for the voice assistant to start.
registering the commands being relayed. The activation phrase
depends on the application being used; For Amazon, use “Amazon
Alexa”, while “OK Google” is for Google Home/Assistant.
Ensure your voice is clear and distinct to allow the assistant to
•
accurately record and process the command.
Ask direct questions. Refer to the commands list for specific
•
commands.
25

Note
26

Note
27

Breville Customer Service Centre
Australian Customers
Phone: 1300 139 798
Web: www.breville.com
New Zealand Customers
0800 273 845
Phone:
Web: www.breville.com
Breville, the Breville logo, Master Every Moment, AirRounder, ThermoSecure and Breville Home Connect
Due to continued product improvement, the products illustrated/photographed in this booklet
are trademarks of Breville Pty. Ltd. A.B.N. 98 000 092 928.
All other brands may be trademarks of their respective owners.
Copyright Breville Pty. Ltd. 2021
may vary slightly from the actual product.
LPH408 ANZ E21
 Loading...