

Page 1

the Multi Cooker 9 in 1
Instruction Book - LMC600
LMC600_ANZ_IB_D19.indd 1 5/9/19 4:06 pm
Page 2

Contents
2 Breville Recommends Safety First
11 Components
13 Control Panel
14 Display Screen
15 Assembly
16 Functions
29 Recipes
31 Cooking Guide
35 Care, Cleaning & Storage
37 Troubleshooting Guide
38 Custom Program Table
BREVILLE
RECOMMENDS
SAFETY FIRST
At Breville we are very safety
conscious. We design and
manufacture consumer
products with the safety of you,
our valued customer, foremost
in mind. In addition, we ask
that you exercise a degree
of care and adhere to the
following precautions.
IMPORTANT
SAFEGUARDS
READ ALL
INSTRUCTIONS BEFORE
USE AND SAVE FOR
FUTURE REFERENCE
• Carefully read all instructions
before operating the Breville
multi cooker for the first time
and save for future reference.
• Remove and safely discard
any packaging material and
promotional labels before
using the multi cooker for
the first time.
• When unpacking the multi
cooker, check to see you
have received all the items
listed in the parts list before
discarding the packaging.
• To eliminate a choking
hazard for young children,
remove and safely discard
the protective cover fitted to
the power plug of this multi
cooker.
• Always ensure the multi
cooker removable parts and
accessories are cleaned, dried
and properly assembled
before use. Follow the
instructions provided in this
booklet.
• Always insert the connector
end of the power cord into
the multi cooker inlet before
inserting power plug into the
power outlet and switching
on the multi cooker. Ensure
the multi cooker inlet is
completely dry before
inserting the connector end
2
LMC600_ANZ_IB_D19.indd 2 5/9/19 4:06 pm
Page 3

of the power cord.
• Take care to avoid spillage on
the connector.
• To avoid an electrical overload,
it is recommended that no
other appliances are plugged
into the same circuit as the
multi cooker when it is in use.
• Avoid the use of extension
cords. Serious hot oil burns
may result from the multi
cooker being pulled off
a bench top.
• Do not allow the cord to hang
over the edge of a bench top
where it may be grabbed by
children or become
entangled by the user.
• The multi cooker is not
intended to be operated by
means of an external timer
or separate remote-control
system or any other device
that switches the multi cooker
on automatically.
• Always operate the multi
cooker on a stable and heat
resistant surface.
• Do not operate the multi
cooker on an incline plane.
• Do not place the multi cooker
near the edge of a bench or
table during operation.
Ensure that the surface is
level, clean and free of water,
flour and other substances.
Vibration during the kneading
cycles may cause the multi
cooker to move slightly.
• Do not operate the multi
cooker on a sink drain board.
• Do not place this multi cooker
on or near a hot gas or electric
burner, or where it could
touch a heated oven. Position
the appliance at a minimum
distance of 20cm away from
walls. This will help prevent the
possibility of discolouration
due to radiated heat.
• Do not place the multi cooker
directly on a heat-sensitive
bench top, such as a stone
bench top, when cooking.
This type of bench top is heat
sensitive to uneven heat and
may crack if heated locally.
To cook on a heat-sensitive
bench top, place a chopping
board or heat proof matt
underneath the multi cooker.
• Position the multi cooker so
that the steam vent is directed
away from you. Take extra care
when opening the lid to avoid
scalding from escaping steam.
• Do not touch or cover the
steam vents while the multi
cooker is in use.
• Never plug in or switch on the
multi cooker without having
the removable cooking bowl or
3
LMC600_ANZ_IB_D19.indd 3 5/9/19 4:06 pm
Page 4

bread pan placed inside the
multi cooker housing.
• Ensure the removable
cooking bowl or bread pan
is correctly positioned in the
multi cooker base before you
commence cooking.
• Do not exceed maximum fill
level marked on the cooking
bowl. Some foods or liquid
expand during cooking or
bread making, such as chips
in hot oil, diced vegetables,
bread. Over filling may
result in the overflow of hot
foodstuff or liquid from the
bowl or bread pan. It may
result in injury or damage the
multi cooker. Always follow
the maximum and minimum
quantities of liquid stated in
instructions and recipes.
• The lid and the outer surface
may get hot when the multi
cooker is operating.
• Do not touch hot surfaces.
Allow the multi cooker
to cool completely before
moving or cleaning any parts.
• Do not place anything on
top of the multi cooker when
assembled, when in use and
when stored.
• Extreme caution must be
used when the multi cooker
contains hot food, liquids
and/or oil. Improper use
may result in injury. When
operating this multi cooker,
ensure the lid is properly
assembled and locked into
position before use unless
stated otherwise.
• The glass viewing window
on the lid has been specially
treated to make it stronger,
more durable and safer than
ordinary glass, however, it
is not unbreakable. If struck
extremely hard, it may break
or weaken, and could at a
later time shatter into many
small pieces without
apparent cause.
• Do not move the multi
cooker while it is switched
on or in use.
• Before placing the removable
cooking bowl or bread pan
into the multi cooker
housing, ensure the base of
bowl, bread pan and the base
of the multi cooker are all
dry by wiping with a dry,
soft cloth.
• Only use the removable
cooking bowl and bread
pan supplied with the multi
cooker. Do not use any other
bowl or bread pan inside the
multi cooker housing.
• It is recommended to use
4
LMC600_ANZ_IB_D19.indd 4 5/9/19 4:06 pm
Page 5

only the accessories supplied
with this multi cooker.
• The use of any accessory
attachments not
recommended by Breville
may cause injuries.
• Do not use a damaged
cooking bowl or bread pan.
Replace before using.
• Do not place food or liquid
directly into the multi cooker
base. Only the removable
cooking bowl or bread pan
are designed to contain food
or liquid.
• Never operate the multi
cooker without food and
liquid in the removable
cooking bowl or bread pan.
• Do not leave the multi cooker
unattended when in use.
• Care should be taken when
handling the multi cooker
after cooking, ensuring that
the multi cooker body and
parts are not touched as these
may still be hot due
to residual heat.
• The temperature of
accessible surfaces will be
high when the multi cooker
is operating and for some
time after use.
• Do not place the removable
cooking bowl when hot on
any surface that may be
affected by heat.
• To prevent scratching the
non-stick surface of the
removable cooking bowl or
bread pan, do not use metal
utensils. Always use suitable
sized heat-proof plastic or
wooden utensils. If using
plastic utensils, do not leave
plastic utensils inside the
multi cooker cooking bowl
or bread pan whilst in use.
• Do not place removable
cooking bowl or bread pan
into or under cold water while
they are still hot.
• Do not use the removable
cooking bowl or bread pan for
food storage. The removable
cooking bowl or bread pan is
not suitable for storing food
in the freezer.
• Do not reheat food using
your removable cooking bowl
or bread pan.
• Do not use the removable
cooking bowl or bread pan
in a conventional oven or
microwave oven.
• Do not place the removable
5
LMC600_ANZ_IB_D19.indd 5 5/9/19 4:06 pm
Page 6

cooking bowl or bread pan
on a gas burner or electric
hotplate.
• Do not use harsh abrasives,
caustic cleaners or oven
cleaners when cleaning this
multi cooker.
• Do not attempt to operate the
multi cooker by any method
other than those described in
this booklet.
• Always return the multi
cooker to standby mode,
ensure the multi cooker has
cooled, and is turned off at
the power outlet and the cord
unplugged from the power
outlet before attempting to
move the multi cooker, when
not in use, if left unattended
and before disassembling,
cleaning or storing.
• Do not place the multi cooker
in direct sunlight. Colour
fading and discolouration
may occur when the multi
cooker is consistently
exposed to
UV light.
• Keep the multi cooker
clean. Follow the cleaning
instructions provided in
this book.
Special Safeguards
Information for Slow
Cooking Function
• When using a slow cooking
function (Lo, Med or Hi),
ensure the cooking bowl is
at least ½ to ¾ full of food or
liquid before switching on the
multi cooker.
Special Safeguards
Information for Steaming
Function
• Always ensure there is enough
liquid in the removable
cooking bowl when steaming.
At least 4 cups (1 litre) of liquid
is required when steaming.
Special Safeguards
Information for Deep Frying
Function
• Extreme caution must be used
when the deep fry function is
used. Never leave the multi
cooker unattended when using
the deep fry function.
• Never add any water or other
liquid to hot oil. Even a small
amount of water may cause the
oil to splatter and could cause
an injury.
• Ensure the removable cooking
bowl is completely dry and free
of water before adding any oil.
6
LMC600_ANZ_IB_D19.indd 6 5/9/19 4:06 pm
Page 7

• Do not fill oil and foodstuffs
exceeding the maximum
MAX 2
L
mark found on
the inside of the cooking
bowl. Hot oil may rise up
while deep frying and it will
generate a lot of heat and
steam during and after the
cooking process.
• Do not exceed the
maximum recommendation
of approximately 400g of
ingredients in the deep
fry basket.
• Extreme caution must
be used when the multi
cooker contains hot oil. Do
not move the multi cooker
during cooking. Allow the
multi cooker to cool before
removing oil.
CAUTION
Hot oil may rise up when
deep frying.
• Due to the high variability in
water content of ingredients,
always start with a small
volume of ingredients in
the deep fry basket and
closely monitor the change
in oil level to ensure the
oil does not overflow the
cooking bowl. Remove the
deep frying basket from
the cooking bowl if you see
the oil level rising rapidly
and reduce the volume of
ingredients in the basket.
• If oil overflows into the baking
chamber, switch the multi
cooker off at the power outlet,
remove the power plug from
the power outlet and remove
the connector end of the power
cord from the multi cooker
base.
• Allow the multi cooker and all
accessories to cool completely
before disassembling and
cleaning.
• Never remove the cooking
bowl while the oil is hot.
Special Safeguards
Information for Bread
Making Function
• Use oven mitts when removing
the hot bread pan and the
bread or jam from the pan.
• Take care when pouring jam
from the bread pan as the jam
will be extremely hot.
• Do not place any ingredients
directly into the baking
chamber. Place ingredients
into the bread pan only.
• The maximum quantities of
flour and raising agent that
may be used shall not exceed
7
LMC600_ANZ_IB_D19.indd 7 5/9/19 4:06 pm
Page 8

the quantities stated in the
recipes.
• Do not place fingers or hands
inside the multi cooker
during operation. Avoid
contact with moving parts.
• Wash only the interior of the
bread pan. Do not immerse
the bread pan in water. Doing
so may interfere with the free
movement of the drive shaft.
See Care, Cleaning & Storage
section of this book for more
details.
• Do not leave the lid standing
open for extended periods of
time when baking bread.
• Always ensure the kneading
blade is removed from the
base of the baked loaf or the
baked cake prior to slicing.
IMPORTANT
SAFEGUARDS FOR
ALL ELECTRICAL
APPLIANCES
• Fully unwind the power cord
before use.
• Connect only to a 230V or
240V power outlet.
• Do not let the power cord
hang over the edge of a bench
or table, touch hot surfaces or
become knotted.
• To protect against electric
shock, do not immerse the
power cord, power plug
or appliance in water or
any other liquid or allow
moisture to come in contact
with the part, unless it
is recommended in the
cleaning instructions.
• The appliance is not
intended for use by persons
(including children) with
reduced physical, sensory
or mental capabilities, or
lack of experience and
knowledge, unless they have
been given supervision or
instruction concerning use
of the appliance by a person
responsible for their safety.
• Children should be
supervised to ensure that
they do not play with the
appliance.
• It is recommended to
regularly inspect the
appliance. To avoid a hazard,
do not use the appliance if
power cord, power plug or
appliance becomes damaged
in any way. Return the entire
appliance to the nearest
authorized Breville service
8
LMC600_ANZ_IB_D19.indd 8 5/9/19 4:06 pm
Page 9

centre for examination and /
or repair.
• Any maintenance other
than cleaning should be
performed at an authorised
Breville Service Centre
• This appliance is for
household use only. Do
not use this appliance for
anything other than its
intended use. Do not use in
moving vehicles or boats.
Do not use outdoors. Misuse
may cause injury.
• The installation of a residual
current device (safety switch)
is recommended to provide
additional safety protection
when using electrical
appliances. It is advisable
that a safety switch with a
rated residual operating
current not exceeding
30mA be installed in the
electrical circuit supplying
the appliance. See your
electrician for professional
advice.
• During electrical storms,
the appliance should be
disconnected from the power
source at the wall socket
to prevent any electrical
surges that may arise during
the storm and which may
inadvertently cause damage
to the appliance and its
electronic componentry.
• Always turn the appliance
to the OFF position, switch
off at the power outlet and
unplug at the power outlet
when the appliance is not
in use.
• Before cleaning, always turn
the appliance to the OFF
position, switch off at the
power outlet, unplug at the
power outlet and remove the
power cord, if detachable,
from the appliance and allow
all parts to cool.
• Do not place this appliance
on or near a heat source, such
as hot plate, oven or heaters.
• Position the appliance at a
minimum distance of 20cm
away from walls, curtains and
other heat or steam sensitive
materials and provide
adequate space above and on
all sides for air circulation.
CAUTION
The lid and the outer surface
may get hot when the
9
LMC600_ANZ_IB_D19.indd 9 5/9/19 4:06 pm
Page 10

appliance is operating. The
temperature of accessible
surfaces may be high when
the appliance is operating.
WARNING
Never use the multi cooker if
oil overflows the cooking bowl
and leaks through the base
of the multi cooker onto the
benchtop. Turn the unit off at
the power point and contact
Breville Customer Service
Centre for examination and/
or repair.
WARNING
Steam vents are very hot
during operation.
FOR HOUSEHOLD USE ONLY
SAVE THESE INSTRUCTIONS
10
LMC600_ANZ_IB_D19.indd 10 5/9/19 4:06 pm
Page 11
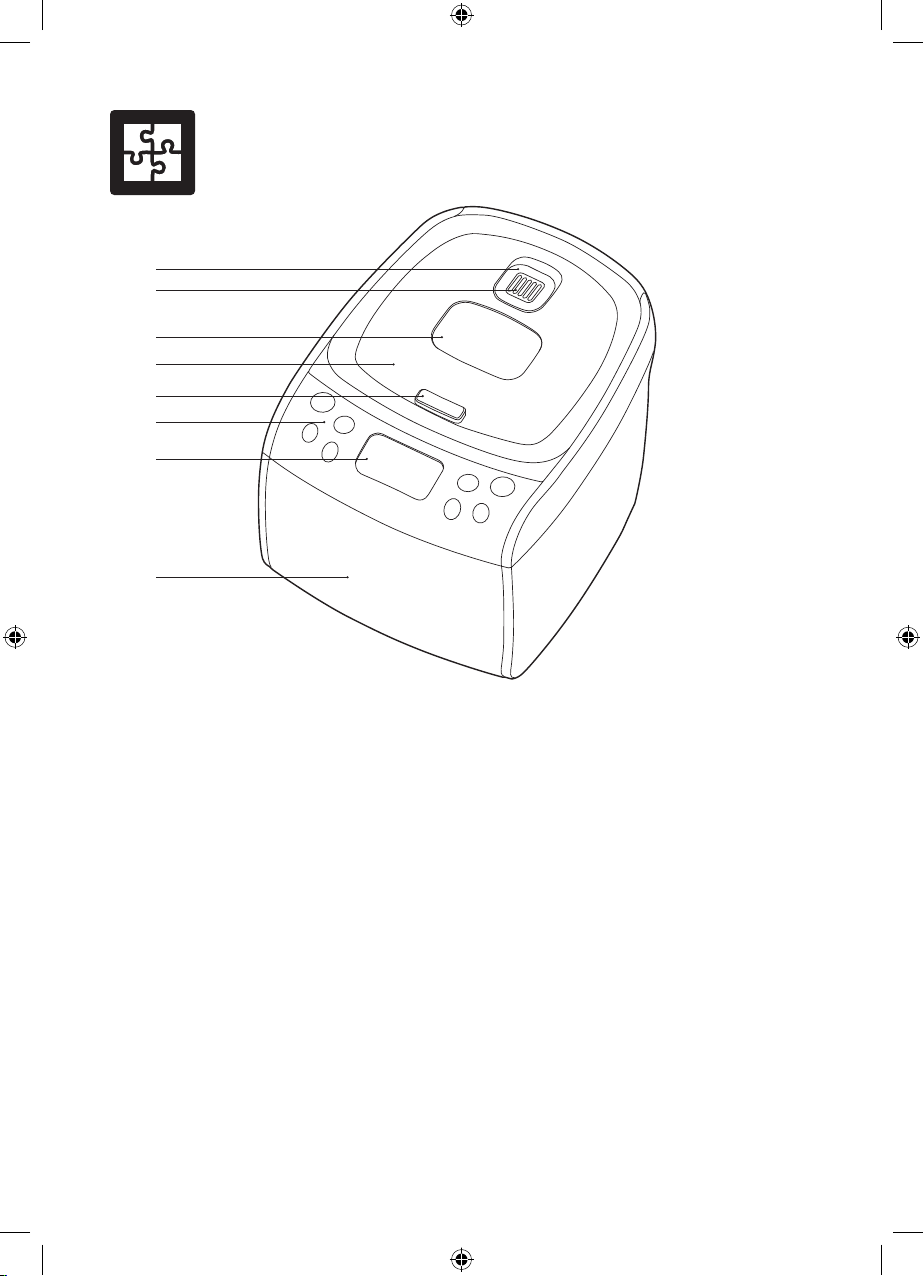
Components
H
G
F
E
D
C
B
A
A. Multi cooker body
B. Display screen
C. Control panel
D. Lid opening button
E. Lid
F. Viewing window
G. Steam release openings
H. Removable steam valve
I. Inner lid lock
J. Removable inner lid
K. Steaming tray
L. Tongs for removing the cooking bowl
M. Cheese strainer
N. Kneading blade
O. Measuring spoon
Q. Soup ladle
R. Rice serving spoon
S. Deep fry basket with removable handle
T. Cooking bowl
U. Bread pan
V. Bread measuring cup
W. Rice measuring scoop
Not Shown
Removable drip collector
Heating elements
Power cord
Temperature sensors
Power cord connector
Non-slip feet
P. Hook for removing the kneading blade
from bread loaves
11
LMC600_ANZ_IB_D19.indd 11 5/9/19 4:06 pm
Page 12
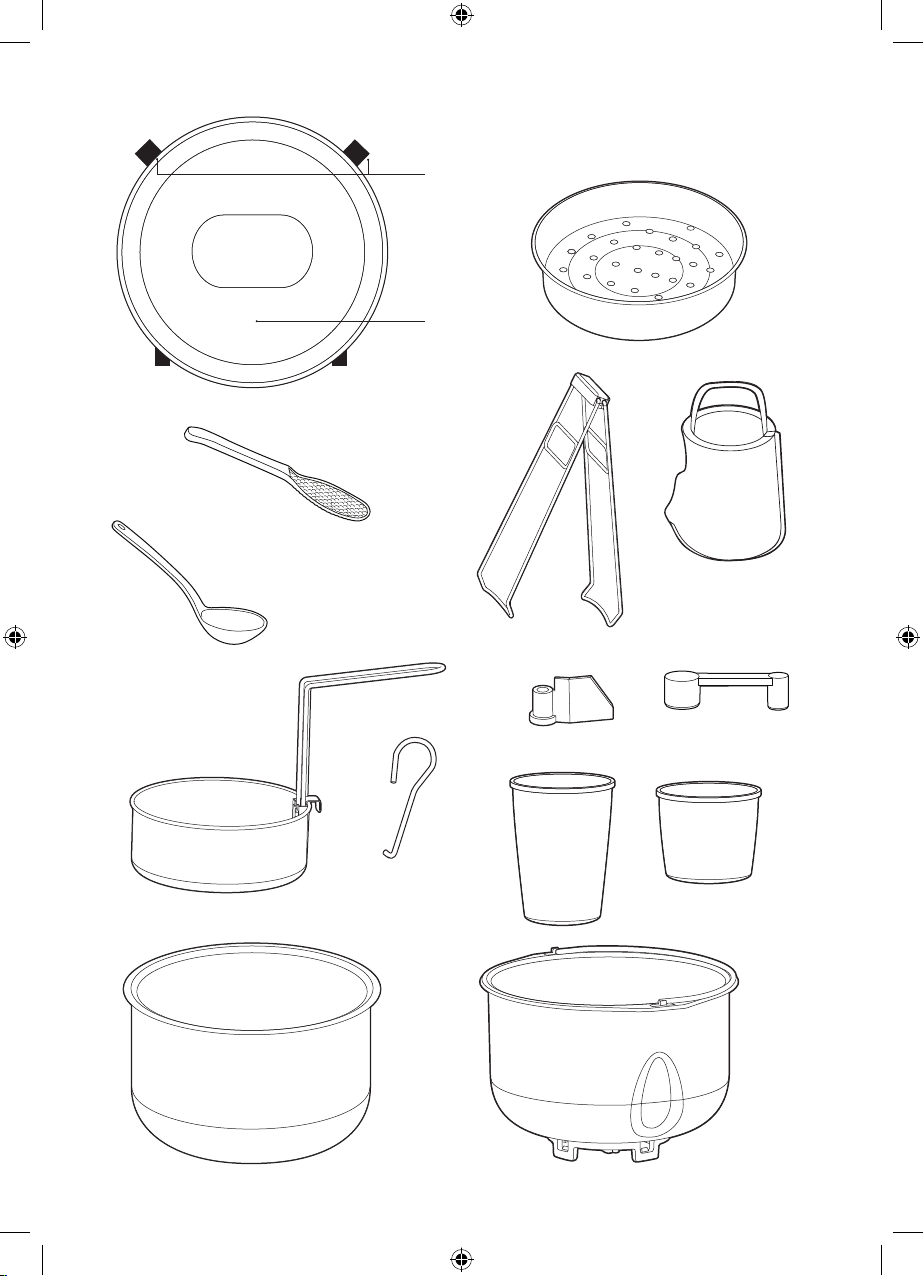
I
J
L
R
Q
K
M
12
N
P
V
S
U
T
O
W
LMC600_ANZ_IB_D19.indd 12 5/9/19 4:06 pm
Page 13

Control Panel
A CB D
CUSTOM
G
A. Custom Button
B. Cook Button
C. Bread Button
D. Start/Cancel Button
COOK
START
CANCEL
BREAD
SET
MENU
F E
E. Set Button
F. Menu Button
G. - & + Buttons
13
LMC600_ANZ_IB_D19.indd 13 5/9/19 4:06 pm
Page 14

Display Screen
AB
C D E
A. 6 Cooking Functions
B. Loaf Size & Crust Colour
C. 7 Bread & 6 Non-Bread Functions
D. Slow Cook (Lo, Med, Hi)
E. Deep Fry (Lo & Hi)
14
LMC600_ANZ_IB_D19.indd 14 5/9/19 4:06 pm
Delayed Start
Pre-heat
Knead
Rest
Proof
Bake
Keep Warm
Completed
Page 15

Assembly
BEFORE FIRST USE
Remove all promotional labels and any
packaging materials from the multi cooker.
Ensure that you have all parts and accessories
listed in the components list before discarding
the packaging.
Before using, it is recommended to refer to
the Cooking Guide section found in this book
for details on all settings for each individual
function.
NOTE
Do not place the multi cooker close to
objects that can be damaged by released
high temperature steam.
1. Place the multi cooker on a flat, heat resistant
surface and open the lid by pressing the lid
release button.
2. Remove the cooking bowl, inner lid and
all removable parts and accessories in
the components list and wash and dry
before assembly and each use. Follow the
instructions found in the Care, Cleaning &
Storage section in this book.
3. To assemble the deep fry basket, hold the
handle in one hand and squeeze the two
prongs on either side of the handle together.
Slide the handle into the wire bracket found
on the inside of the basket, before releasing to
lock into place.
4. To use a cooking function, place the cooking
bowl into the multi cooker. To make bread,
place the bread pan into the multi cooker.
Follow the cooking and bread baking
instructions found in this book.
5. Add all ingredients to the cooking bowl or
bread pan based on the chosen recipe.
6. Unless sautéing or deep frying, close the lid
until it clicks into place. Insert the connector
end of the power cord into the multi cooker
inlet at the back of the unit.
7. Insert the power plug into a 230–240V power
outlet and turn the outlet on.
8. The screen will light up displaying the
functions. The multi cooker is in standby,
ready for programming.
NOTE
When the bread pan is inserted into the multi
cooker, only functions that use the bread pan
will illuminate on the display screen.
IMPORTANT
• Ensure the multi cooker is clean and dry before
each use. Ensure the power cord connector is
dry before connecting to the multi cooker and
plugging into the power outlet.
• When using the multi cooker for the first time,
some foreign smells from the heating element
may occur. This is normal.
WARNING
• Always operate the multi cooker on a stable
and heat resistant surface.
• Do not place the cooker directly on a heat
sensitive bench top, such as a stone bench
top, when cooking. This type of bench top is
heat sensitive to uneven heat and may crack
if heated locally. To cook on a heat sensitive
bench top, place a chopping board
or heatproof mat underneath the cooker.
15
LMC600_ANZ_IB_D19.indd 15 5/9/19 4:06 pm
Page 16

Functions
YOUR BREVILLE MULTI COOKER
This multi cooker is a versatile cooker, with
multiple functions that can replace up to 9
appliances in your kitchen. The multi cooker
has both cooking and bread/baking functions.
IMPORTANT
• Do not use metal objects that can scratch the
non-stick coating of the cooking bowl or the
bread pan.
• To avoid burns, always be careful when
opening the lid, never lean over the steam
release opening, nor place any part of your body
above the cooking bowl or the bread
pan during operation.
• Do not leave the multi cooker unattended
when in use.
ABOUT YOUR MULTI COOKER
1. Place the cooking bowl or bread pan into the
multi cooker, depending on what function you
wish to use.
2. Press the COOK or BREAD button so the
appropriate functions will display.
3. Press the MENU button to cycle through the
functions. The function will flash to indicate the
selection.
4. Press the SET button to choose that function.
Only the selected function and the default time
or other optional selections on bread making,
will flash on the screen.
For example, when steam is selected:
5. The chosen function will continue to flash
until the SET button is pressed.
6. The display screen will dim if the control
panel is not touched after one minute. Touch
any button to return the screen to normal.
7. As a safety feature, the Deep Fry function
will turn off automatically if no buttons are
pressed after 30 minutes.
8. If a selection is not available on a chosen
function, the multi cooker will issue 3 quick
beeps as an alert.
9. If using the default time, press the START/
CANCEL button to commence. If START/
CANCEL is not pressed, the multi cooker
with revert to standby mode within 3 seconds.
10. The Function and the Time will remain
solid on the display screen during operation,
with only the ':' flashing to indicate the multi
cooker is in operation.
11. To change the default time, if available, press
the + and – until the desired time is flashing.
Press the START/CANCEL button to
commence with the chosen time. If START/
CANCEL is not pressed, the multi cooker
with revert to standby mode within 5 seconds.
12. Press and hold the START/CANCEL button
to cancel any function and return the multi
cooker to standby. All functions will again
illuminate on the display screen ready for
programming.
13. Preheating is available on the Sauté, Steam
and Deep Fry functions.
14. Keep Warm will activate automatically for up
to 4 hours on the SOUP/STEW, White Rice
(RICE/W), Brown Rice (RICE/B), RISOTTO
and SLOW COOK functions after the
cooking time elapses.
15. Keep warm for up to 1 hour will activate
automatically on Bread functions after
cooking time elapses.
16. Time can be adjusted on all Cook functions
except for White and Brown Rice.
16
LMC600_ANZ_IB_D19.indd 16 5/9/19 4:06 pm
Page 17

COOKING FUNCTIONS
The COOK functions on this multi cooker
include: Sauté, Steam, Soup/Stew, White Rice,
Brown Rice, Risotto, Deep Fry (Hi & Lo) and Slow
Cook (Hi, Med, Lo).
SAUTÉ
Sautéing seals in moisture, tenderises and
intensifies flavour. It is best used for browning
meat and caramelising vegetables prior to SLOW
COOK, RISOTTO and SOUP/STEW functions.
1. Place the cooking bowl into the multi cooker
and close the lid for faster preheating.
2. Press the COOK button.
3. Press the MENU button until the SAUTÉ
function flashes on the display screen and the
default cooking time is displayed.
4. To adjust the cooking time, press the SET
button once, and the cooking time will flash,
then adjust the cooking time using the + and buttons. Press SET to confirm.
5. Press the START/CANCEL button to start. The
SAUTÉ function will start preheating and the
PREHEATING icon will display.
6. When preheating is complete, the
PREHEATING icon will disappear. The time
on the screen will flash and the unit will beep
5 times.
7. Open the lid and add the ingredients. Do not
close the lid while sautéing. Press the START/
CANCEL button to start the function.
8. Sauté as required, stirring periodically. It may
be necessary to sauté in batches.
9. When the time has elapsed, the unit will beep 4
times and the
COMPLETED icon will display.
10. To cancel the function at any time during
operation, press and hold the START/
CANCEL button.
NOTE
Do not close the lid while sautéing ingredients.
The lid should only be closed for preheating.
STEAM
The STEAM function turns water in the cooking
bowl into steam to cook ingredients placed in the
steaming tray. Ideal for steaming dumplings, fish,
vegetables and puddings.
1. Place the cooking bowl into the multi cooker
and add a minimum of 1 litre of water to the
cooking bowl, then close the lid.
2. Press the COOK button.
3. Press the MENU button until the STEAM
function flashes on the display screen and the
default cooking time is displayed.
4. To adjust the cooking time, press the SET
button once, and the cooking time will flash,
then adjust the cooking time using the + and buttons. Press the SET button to confirm.
5. Press the START/CANCEL button to start.
The STEAM function will start preheating
and the
6. When preheating is complete, the
PREHEATING icon will disappear. The time
on the screen will flash and the unit will beep
5 times.
7. Open the lid and set the steaming tray
containing the ingredients on the top of the
cooking bowl, then close the lid.
8. Press the START/CANCEL button to start
the function.
9. When the time has elapsed, the unit will
beep 4 times and the
icon will display.
10. To cancel the function at any time during
operation, press and hold the START/
CANCEL button.
PREHEATING icon will display.
COMPLETED
17
LMC600_ANZ_IB_D19.indd 17 5/9/19 4:06 pm
Page 18

NOTE
• Monitor the water level and do not let the
removable cooking bowl boil dry during
steaming. Hot liquid can be added during the
steaming process.
7. Once the keep warm time elapses, the unit
will beep 4 times and the
icon will display.
8. To cancel the function at any time during
operation or before keep warm commences,
press and hold the START/CANCEL button.
COMPLETED
WARNING
• The steaming tray must only be used with the
steam function.
• Do not use metal steaming tray or trivet to
prevent damage to the non-stick coating.
• Do not touch hot surfaces. Allow the multi
cooker to cool completely before moving
or cleaning any parts. Use oven mitts and
carefully open the lid to avoid scalding from
escaping steam.
• Steam vents are very hot during operation.
SOUP/STEW
The SOUP/STEW function specifically cooks
liquid based foods by heating the liquid content
to a high temperature and maintain a simmer to
cook and soften the ingredients.
1. Place the cooking bowl into the multi cooker
and add ingredients to the cooking bowl, then
close the lid.
2. Press the COOK button.
3. Press the MENU button until the SOUP/
STEW function flashes on the display screen
and the default cooking time is displayed.
4. To adjust the cooking time, press the SET
button once and the cooking time will flash,
then adjust the cooking time using the + and buttons. Press the SET button to confirm.
5. Press the START/CANCEL button to start
the function.
6. When the time has elapsed, the unit will
beep 4 times. The
display and keep warm will operate for up to
4 hours.
KEEP WARM icon will
NOTE
Soup/Stew does not have preheat.
This multi cooker has 3 rice cooking functions:
White, Brown & Risotto.
WHITE AND BROWN RICE
1. Place the cooking bowl into the multi cooker
and add rice and water to the cooking bowl
as per the WHITE and BROWN RICE
COOKING GUIDE in this book, then close
the lid.
2. Press the COOK button.
3. Press the MENU button until the required
RICE/W or RICE/B function flashes on the
display screen. The screen will display 0:00.
4. Press the START/CANCEL button to start
the function.
5. During operation, the screen will display a
rotating loop.
NOTE
For white and brown rice, the cooking time is
determined by the cooking sensors. The finish
time will vary based on the type and amount of
rice and water used.
6. The multi cooker will beep 4 times once
the rice cooking is complete. The
WARM icon will display and keep warm will
operate for up to 4 hours.
7. Once the keep warm time elapses, the unit
will beep 4 times and the
icon will display.
KEEP
COMPLETED
18
LMC600_ANZ_IB_D19.indd 18 5/9/19 4:06 pm
Page 19

8. To cancel the function at any time during
operation or before keep warm commences,
press and hold the START/CANCEL button.
HINT
To make Quinoa, use the RICE/W function
at a quinoa to water ratio of 1 part quinoa to 2
parts water.
8. When the time has elapsed, the unit will beep
4 times. The
and keep warm will operate for up to 4 hours.
9. Once the keep warm time elapses, the unit will
beep 4 times and the
display.
10. To cancel the function at any time during
operation or before keep warm commences,
press and hold the START/CANCEL button.
KEEP WARM icon will display
COMPLETED icon will
NOTE
Refer to the Cooking Guide section of this
book for more information on rice cooking.
RISOTTO
Typically, risotto uses Italian short-grain rice
such as Arborio, Nano, Carnaroli and Baldo as
the higher starch in these varieties give risotto
its creamy consistency.
1. Use the SAUTÉ function as required by the
recipe prior to starting the risotto function.
2. Add remaining ingredients to the cooking
bowl and close the lid.
3. Press the COOK button.
4. Press the MENU button until the RISOTTO
function flashes on the display screen and the
default cooking time is displayed.
5. To adjust the cooking time, press the SET
button once, and the cooking time will flash,
then adjust the cooking time using the + and buttons. Press SET to confirm.
6. Press the START/CANCEL button to start
the function.
7. Stir once during the cooking process for the
best result.
WARNING
Open the lid carefully to avoid scalding from
escaping steam. Use oven mitts if required.
DEEP FRY
The DEEP FRY function has 2 heat temperature
settings; LO (Low) and HI (High). Choose the
heat setting appropriate to the food being cooked.
WARNING
• When using DEEP FRY, the multi cooker
will be damaged if heated without oil in the
cooking bowl.
• The amount of oil for deep frying must not be
below the minimum MIN 1 litre marking or
exceed the maximum MAX 2 litre marking
found on the inside of the cooking bowl.
• Do not exceed the maximum recommendation
of approximately 400g of ingredients in the
deep fry basket.
• To avoid overflow, lower the deep fry basket
slowly into the pre-heated oil. If you see the oil
level rising rapidly, remove the deep fry basket
from the cooking bowl and reduce the volume of
ingredients in the basket.
• Deep frying can cause injury if instructions are
not followed.
NOTE
Refer to the DEEP FRY GUIDE in the Cooking
Guide section of this book for deep fry setting
information.
1. Place the cooking bowl into the multi cooker
and add oil to the cooking bowl between the
1 litre and 2 litre levels marked on the inside
of the cooking bowl. Never exceed the 2 litre
marking.
19
LMC600_ANZ_IB_D19.indd 19 5/9/19 4:06 pm
Page 20

2. Close the lid for faster preheating.
3. Press the COOK button.
4. Press the MENU button until the required
DEEP FRY function flashes on the display
screen.
5. Press the SET button and HI (High) will flash.
6. Press + and - to choose between Deep Fry
LO (Low) or HI (High) temperature. The
chosen temperature selection will flash.
7. To adjust the cooking time, press the SET
button once, and the cooking time will flash,
then adjust the cooking time using the + and buttons. Press SET to confirm.
8. Press the START/CANCEL button to start the
function.
9. The Deep Fry function will start preheating
and the
PREHEATING icon will display.
10. When preheating is complete, the
PREHEATING icon will disappear. The time
on the screen will flash and the unit will beep
5 times.
11. Open the lid and using the handle attached to
the basket, lower the deep fry basket with food
to be cooked slowly into the oil to begin deep
frying. Do not close the lid while deep frying.
12. Press the START/CANCEL button to start
function.
13. When the time has elapsed, the unit will beep
4 times and the
COMPLETED icon will
display.
14. Use the handle of the deep fry basket to lift the
food out of the oil. The deep fry basket can be
hooked to the side of the cooking bowl to drain
before removing contents.
15. To cancel the function at any time during
operation, press and hold the START/
CANCEL button.
NOTE
• When deep frying, ensure water does not come
in to contact with hot oil as this will cause the oil
to bubble, splatter and spit.
• Use the handle locked correctly into position
on the basket to insert and remove the deep
fry basket from the hot oil. Follow instructions
provided in this book.
• Clean the multi cooker after each use when
using the DEEP FRY function. Remove all oil
residue from the interior of the cooking bowl
surround, inner lid and baking chamber after
each use. Refer to the Care, Cleaning & Storage
section in this booklet for more details.
SLOW COOK
This multi cooker has the option of using the
SLOW COOKER on LO (Low), MED (Medium)
& HI (High), depending on the meal and hours/
temperature level required.
HINT
Browning the meat prior to slow cooking is
recommended, but not necessary. Browning
seals in the moisture and intensifies the flavour,
resulting in tender meat perfect for slow
cooking. Use the SAUTÉ function to brown or
brown separately in a fry pan on a stove cook
top before transferring to the cooking bowl.
1. Place the cooking bowl into the multi cooker
and add ingredients to the cooking bowl, then
close the lid.
2. Press the COOK button.
3. Press the MENU button until the required
SLOW COOK (Low, Medium or High)
function flashes on the display screen.
4. To adjust the cooking time, press the SET
button once, and the cooking time will flash,
then adjust the cooking time using the + and buttons. Press the SET button to confirm.
5. Press the START/CANCEL button to start
the function.
6. When the time has elapsed, the unit will beep
4 times. The
and keep warm will operate for up to 4 hours.
7. Once the keep warm time elapses, the unit will
beep 4 times and the
will display.
8. To cancel the function at any time during
operation or before keep warm commences,
press and hold the START/CANCEL button.
When using the SLOW COOK function, refer
to the table below for the temperature level and
KEEP WARM icon will display
COMPLETED icon
20
LMC600_ANZ_IB_D19.indd 20 5/9/19 4:06 pm
Page 21

cooking times.
Temperature Level Default Time*
Low 8 hours
Medium 6 hours
High 4 hours
* Default Times are adjustable. See Cooking Guide for
more details.
Traditional
Cooking
Time
Slow Cooker
Time (Without Searing)
LOW MEDIUM HIGH
35–60
minutes
1–3 hours 8–10
Traditional
Cooking
Time
6–10
hours
5–7
hours
6–9
hours
hours
Slow Cooker
Time (With Searing)
3–5
hours
4–6
hours
LOW MEDIUM HIGH
35–60
minutes
1–3 hours 5–6
4–5
hours
hours
3–4
hours
4–5
hours
2–3
hours
3–4
hours
Refer to the SLOW COOKING GUIDE in the
Cooking Guide section of this book for setting
information.
CAUTION
• Extreme caution must be used when the
multi cooker contains hot food and liquids.
• The lid and the outer surface may get hot
when the multi cooker is operating. The
temperature of accessible surfaces may
be high when the appliance is operating.
• If the food was completely cooked before the
power went out, the food should remain safe for
up to two hours.
WARNING
High humidity, altitude, liquid and food
temperature, ingredients, ingredient size
and minor fluctuations may slightly affect
the cooking times in the multi cooker.
POWER INTERRUPTION PROTECTION
This multi cooker is equipped with a 7 minute
power interruption protection restart. If a power
outage occurs while in operation, or the power is
switched off accidentally, and power is restored
within 7 minutes, the multi cooker will restart,
continuing cooking from the time of the power
outage.
CUSTOM COOKING
This multi cooker has 10 Custom Cooking
Programs that can be programmed and stored
so you can save up to 10 of your favourite
recipes to use again and again.
Each CUSTOM program has (up to) 4 cooking
stages, consisting of 3 programmable steps:
• Step 1 – Single element or Dual element
• Step 2 – Temperature
• Step 3 – Time
Cooking
Stages 1 2 3 4
Step 1 ‘d’ or ‘C’ ‘d’ or ‘C’ ‘d’ or ‘C’ ‘d’ or ‘C’
Step 2 Temp +/- Temp +/- Temp +/- Temp +/-
Step 3 Time +/- Time +/- Time +/- Time +/-
Note:
d = Single element; Temperature range: 40–160°C
C = Dual element; Temperature range: 70–160°C
Time range = 0–4 Hours
NOTE
• If the power goes out when the multi cooker
is operating, finish cooking the ingredients
immediately by some other means such as on
a gas stove, on the outdoor grill or at a house
where the power is on.
21
LMC600_ANZ_IB_D19.indd 21 5/9/19 4:06 pm
Page 22

At Step 1, to select the SINGLE ELEMENT,
press the COOK button. The single element
operates the bottom element only and is
represented on the display as the letter ‘d’.
To select the dual element press the BREAD
button. The dual element operates the bottom
and side wrap around heating elements and
is represented on the display as the letter ‘C’.
Steps 2 and 3 then allow you to manually
adjust both the temperature and time.
3. Press the SET button to confirm the program
number and to move to Step 1; Element. The
screen will display ‘d1’.
4. In Step 1, if desired, press the BREAD button
to change the heating element from Single
(d1), to Dual (C1). Press the COOK button to
revert to single heating element.
5. Press the MENU button to go to Step 2;
Temperature. The default temperature of
100°C will display. To adjust the temperature,
press the + and - buttons.
Side wrap around
heating element
Bottom
heating element
To skip any of the 4 cooking stages, program the
time in Step 3 to read 0:00, and the multi cooker
will move to the next cooking stage.
For example, if you program the time for d1 at
0:20, then program d2 at 0:10, d3 at 0:15 and d4
at 0:00, the multi cooker will work through
Stage 1, 2, 3 and skip Stage 4.
NOTE
The heating elements ‘d’ and ‘C’ can be
adjusted in Step 1 of each of the 4 cooking
stages.
For example, you can program a single recipe
as d1, C2, C3, d4 meaning that in Stage 1 and
4, the single element with operate, and Stage 2
and 3, the dual elements will operate.
HINT
• It is recommended to have your recipe
available before you start programming.
• Record your saved custom recipes in the blank
table provided at the end of this book.
HOW TO SAVE CUSTOM RECIPES
1. Press the CUSTOM button and the unit will
display Program 1 (P01).
2. Press the + and - buttons until the preferred
custom program number is displayed on the
screen between P01 and P10.
NOTE
The number next to ‘d’ or ‘C’ represents the
cooking stage. For example, ‘C1’ represents
dual heating element ‘C’ on cooking Stage ‘1’.
NOTE
Press the MENU button to move through each
STEP. Do not press the SET button as it will
revert to the program setting.
6. Press the MENU button to go to Step 3; Time.
The default cooking time 0:00 will display.
To adjust the cooking time, press the + and –
buttons.
NOTE
Refer to the Custom Steps and Stages table on
page 20 for the custom time and temperature
ranges.
7. Press the MENU button to set. Cooking
Stage 1 is now complete, ready to program
Stage 2.
8. The screen will now display ‘d2’ to represent
cooking Stage 2. Repeat How To Save
Custom Recipes steps 4–7 to program
Stage 2–4, until all 4 Stages have been
programmed.
9. Once programming is complete, press the
SET button to save the recipe. Record the
recipe and program number for future use.
NOTE
To update a recipe program that has been saved,
select the program number and follow the steps
in How To Save Custom Recipes.
22
LMC600_ANZ_IB_D19.indd 22 5/9/19 4:06 pm
Page 23

HOW TO USE A SAVED RECIPE
1. Press the CUSTOM button and the unit will
display Program 1 (P01).
2. Press the + and - buttons until the saved
recipe program number is displayed.
3. Press the START/CANCEL button to start
the cooking process.
4. The unit will beep 4 times after each cooking
stage has completed.
5. To stop or cancel the function at any time
during operation, press and hold the START/
CANCEL button.
EXAMPLE RECIPE BELOW
CUSTOM Setting
Bolognese Sauce
Preparation Time:
Cooking Time: 2 hours 50 minutes
Serves: 6–8
Ingredients
1 tbsp. vegetable oil 3 tbsp. tomato paste
1 large onion, finely diced 1 cup red wine
3 cloves garlic, crushed 600g tinned diced tomatoes
500g beef mince 2 cups beef stock
3 small carrots, grated 1 tsp. mixed herbs
200g button mushrooms,
grated
1 small sweet potato, grated 1–2 tbsp. gravy powder
To Serve
700g Cooked spaghetti
50g Fresh parmesan
DIRECTIONS TO CUSTOM SAVE THE
RECIPE PROGRAM:
1. Press the CUSTOM button. Press the SET
button to confirm the program (the screen
will display P01).
Note: If P01 is already a saved recipe, press
+ and – to select a different program number.
2. Press the BREAD button to choose dual
cooking elements (the screen will display C1).
3. Press the MENU button and adjust the
temperature to 160°C by pressing the
+ and - buttons.
4. Press the MENU button and adjust the time
to 20 minutes, by pressing the + and - buttons.
20 minutes
Salt and pepper
5. Press the MENU button (the screen will display
d2).
6. Press the COOK button to choose only the
bottom heating element (the screen will display
d2).
7. Press the MENU button and adjust the
temperature to 100°C by pressing the + and buttons.
8. Press the MENU button and adjust the time to
30 minutes, by pressing the + and - buttons.
9. Press the MENU button (the screen will display
d3).
10. Press the BREAD button to choose both
cooking elements (the screen will display c3).
11. Press the MENU button and adjust the
temperature to 95°C by pressing the + and buttons.
12. Press the MENU button and adjust the time to
1 hour by pressing the + and - buttons.
13. Press the MENU button (the screen will display
d4).
14. Press the BREAD button to choose both
cooking elements (the screen will display C4)
15. Press the MENU button and adjust the
temperature to 90°C by pressing the
+ and - buttons.
16. Press the MENU button and adjust the time to
1 hour by pressing the + and - buttons.
17. Press the SET button to save the recipe as
Program 1 (P01).
RECIPE DIRECTIONS USING THE SAVED
RECIPE PROGRAM:
1. Place the cooking bowl into the multi cooker,
keeping the lid open.
2. Press the CUSTOM button to display P01.
3. Press the START/CANCEL button to begin
cooking.
4. Allow to heat for 2 minutes.
5. Add the oil to the removable cooking bowl.
6. Add the onion and garlic, stir continuously for
5 minutes.
7. Add the beef mince and keep stirring for
5 minutes.
8. Add the carrot, mushroom and sweet potato,
stirring continuously for 2 minutes.
9. Add the tomato paste and stir to combine then
deglaze with the red wine.
23
LMC600_ANZ_IB_D19.indd 23 5/9/19 4:06 pm
Page 24

10. Add the tinned tomatoes, beef stock and
mixed herbs. Season with salt and pepper.
11. Close the lid.
12. The unit will beep 4 times at the end of each
stage. At the end of stage 4, the unit will beep
4 times and then display the
icon.
13. Open the lid and stir through the gravy
powder to thicken slightly. Season if required.
14. Serve on top of the cooked spaghetti and
garnish with fresh parmesan.
COMPLETED
1. Place the bread pan on a dry, level surface.
2. If the kneading blade is required, align the
semi-circle on the top of the kneading blade
to the one on top of the drive shaft and slide
the blade down to the base of the bread pan.
BREAD FUNCTION
The BREAD function uses the bread baking pan.
When the bread pan is inserted into the multi
cooker, these functions will illuminate on the
display. Alternatively, press the BREAD button
to activate.
This multi cooker has 7 different options for
baking bread: White, Whole Wheat, French,
Sweet, Gluten Free, Rapid and Homemade.
Each of these settings require the use of the
kneading blade.
The BREAD BAKING function, except Gluten
Free and Rapid, also allow the choice of Loaf
Size (900g, 680g, 450g) and Crust Colour
(Dark, Med, Light).
This multi cooker also offers 6 options for using
the bread pan for non-bread functions: Cake,
Dough, Pasta Dough, Bake, Yoghurt and Jam.
NOTE
• Bake can be used on its own or to add
additional time to bread baking.
• The RAPID bread selection makes a loaf of
bread in less time. Selecting Rapid will bake a
bread loaf to a medium crust colour and reduce
the finishing time by about an hour.
• For best results when using the Rapid setting,
increase the yeast content in the bread recipe by
¼ teaspoon.
3. Place all the ingredients into the bread pan
in proper measurements and in correct order
as per the recipe being used, noting that
for bread making, the order of inclusion is
important to a successful loaf.
4. Use the handle to lift the pan and place into
the base of the multi cooker, aligning the legs
on the bottom of the pan with the notches in
the bottom of the multi cooker.
5. Twist the pan slightly clockwise to secure.
Pull up lightly on the handle and if the pan
does not come away, the bread pan is locked
in place.
6. Lower the handle, then close the lid.
7. The BREAD functions will illuminate on
the display screen ready for programming
or, alternatively, press the BREAD button.
NOTE
The bread pan must be properly locked in
place in the multi cooker to operate. If the
bread pan is not in the multi cooker, or not
locked in correctly, an “E04” message will
display, and the unit will not operate when
programming. Press the START/CANCEL
button or fit the bread pan correctly to cancel
the “E04” message.
24
LMC600_ANZ_IB_D19.indd 24 5/9/19 4:06 pm
Page 25

FOR WHITE, WHOLE WHEAT,
FRENCH, SWEET, GLUTEN FREE
AND RAPID BREAD FUNCTIONS
1. Press the MENU button until the preferred
function flashes on the display screen. The
default baking time, loaf size and crust colour
will display against each function.
2. To adjust the loaf size, crust colour and/or
start time, press the SET button once and the
3 loaf sizes and crust colours will display.
3. Use the + and - button to choose the desired
loaf size, then press the SET button to
confirm. The cooking time will adjust
automatically.
7. During bread baking, icons for the various
stages will display as they operate on the
display screen including: Preheating, Dough,
Pause, Dough Proofing, Baking.
IMPORTANT
For Gluten Free and Rapid, Steps 2–5 are not
available. Loaf size, crust colour and delayed
start are not operational on these functions.
8. When the time has elapsed, the unit will
beep 4 times. The
display and keep warm will operate for up to
1 hour.
9. Once the keep warm time elapses, the unit
will beep 4 times and the
icon will display.
10. To cancel the function at any time during
operation or before keep warm commences,
press and hold the START/CANCEL button.
KEEP WARM icon will
COMPLETED
4. Use the + and - button to choose the crust
colour, then press the SET button to confirm.
The cooking time will adjust automatically.
5. The DELAYED START icon will display.
Use the + and – to adjust the time up to
15 hours.
6. Press the START/CANCEL button to start
the function.
NOTE
• Do not press the SET button after changing
the delayed start time as that will return the
unit to the default settings.
• The time displayed for delayed start represents
the finishing time. For example, if you adjust
the White Bread default time 3:15 to 5:00, the
bread will be finished at the end of 5 hours.
The time can be delayed up to 15 hours.
NOTE
The automatic KEEP WARM setting is not
available on Rapid.
25
LMC600_ANZ_IB_D19.indd 25 5/9/19 4:06 pm
Page 26

HOMEMADE
The HOMEMADE bread function allows you
to manually change the bread baking times
at each step of the bread making process to
customise your own recipe.
The default time and temperature represent
the standard time and temperatures for a basic
4. Once programming is complete, press
the SET button to confirm.
5. Press the START/CANCEL button to
commence.
6. To cancel the function at any time during
operation or before keep warm commences,
press and hold the START/CANCEL button.
white, medium loaf size with dark crust colour
bread loaf, with shortened proofing time.
1. Press the MENU button until the Homemade
function flashes on the display screen.
2. Press the SET button to begin the
programming and to cycle through each step
of the baking process as detailed in the table
below.
3. To adjust the time/temperature, press
the + and - buttons. Press the MENU
button again to set the step and continue
NOTE
If any of Steps 1–7 are not required for the
recipe, the time for the step can be set to 0:00
and this function will not operate.
For example, if no PROOFING is required,
set the Proof time to 0:00 and the step will be
skipped. The temperature (Steps 8 & 9) must
be set for the function to work, however the
steps that are programmed with 0:00 will not
commence.
programming.
Sequence Steps Icon Default set times / Temps Time / Temp range
1 Pre-heat
2 Knead
3 Rest
4 Knead
5 Proof
0 minute 0–1 hour (60 minutes)
10 minutes 0–10 minutes
5 minutes 0–30 minutes
30 minutes 0–30 minutes
1 hour/60 minutes 0–4 hours
6 Bake
7 Keep warm
8 Proof temp
9 Bake temp
Total 2:45 hours
1 hour/60 minutes 0–4 hours
1 hour 0–1 hour (60 minutes)
30°C 20–50°C
125°C 70–160°C
26
LMC600_ANZ_IB_D19.indd 26 5/9/19 4:06 pm
Page 27

CAKE & BAKE
Both the CAKE and BAKE functions are
recommended for cake making, however,
the BAKE function does not require the
kneading blade, so it is ideal for cooking
prepared cake mix.
The BAKE function can also be used to add
some additional time to any BREAD function.
1. Press the MENU button until the desired
function flashes on the display screen.
2. Press the SET button to confirm. The
DELAYED START icon will display for the
BAKE function only. Use the + and - to adjust
the time between 10 minutes and 1 hour.
NOTE
• The CAKE function can be used when you
would like to mix and bake a cake. During
the first 5 minutes of operation, scape down
the sides of the bread pan with a rubber or
silicon spatula to ensure the ingredients are
thoroughly mixed.
• Delayed time is not available on the CAKE
function.
• If you press the SET button after changing
the delayed start time the unit will return to
the default settings.
3. Press the START/CANCEL button to start
the function.
4. When the time has elapsed, the unit will
beep 4 times. The
display and keep warm will operate for up to
1 hour for BAKE only.
KEEP WARM icon will
NOTE
Keep Warm is not available on the CAKE
function.
5. Once the keep warm time elapses, the unit
will beep 4 times and the
icon will display.
6. To cancel the function at any time during
operation or before keep warm commences,
press and hold the START/CANCEL button.
COMPLETED
DOUGH, PASTA DOUGH, YOGHURT
AND JAM
DOUGH & PASTA DOUGH
FUNCTIONS
The DOUGH and PASTA DOUGH functions
are ideal for making fresh bread, pizza and
pasta dough by mixing the ingredients
together. Once complete, the dough is ready
for hand shaping, rolling or placing through
a pasta extruder.
1. Press the MENU button until the desired
function flashes on the display screen.
2. Press SET to confirm. The
START icon will display. Use the + and -
to adjust the time up to 15 hours.
DELAYED
NOTE
• Delayed time is not available on the PASTA
DOUGH function.
• If you press the SET button after changing
the delayed start time the unit will return to
the default settings.
3. Press the START/CANCEL button to start
the function.
4. After the dough has been partially combined
in the multi cooker (at around 5 minutes),
open the lid and add 20ml of water to the
outer edges inside the bread pan. This will
help the dough pick up any dry pieces on the
outer edges of the bread pan.
27
LMC600_ANZ_IB_D19.indd 27 5/9/19 4:06 pm
Page 28

5. When the time has elapsed, the unit will
beep 4 times to indicate that the function
has finished and the
will display.
COMPLETED icon
NOTE
Add 20ml of water to the bread pan after
the ingredients have partially combined to
help dough form and reduce ingredients
being displaced. Non-combined ingredients
may get thrown from the bread pan into the
interior baking chamber of the multi cooker
during operation.
NOTE
Keep warm is not available for the DOUGH
and PASTA DOUGH functions.
NOTE
Clean the interior baking chamber after each
use when using the PASTA DOUGH function.
Remove any pasta dough debris from the
interior baking chamber after each use.
Refer to the Care, Cleaning & Storage section
in this booklet for instructions on cleaning the
interior baking chamber.
YOGHURT FUNCTION
The YOGHURT function works by heating
the yoghurt ingredients at a constant low
temperature for a long period of time.
1. Press the MENU button until the desired
function flashes on the display screen.
2. Press SET to confirm. Use the + and –
to adjust the time between 4–12 hours.
JAM FUNCTION
NOTE
The JAM function is ideal for making both
sweet and savoury jams from fresh fruits and
vegetables.
When using the JAM function, cut fresh fruit
and/or vegetables into 1cm pieces before adding
into the bread pan. Use no more than
2 cups of ingredients as the maximum amount
for the JAM function. Avoid high liquid fruits
and vegetables such as tomatoes.
1. Press the MENU button until the desired
function flashes on the display screen.
2. Press the START/CANCEL button to start
the function.
3. When the time elapses, the unit will beep
4 times. The
display and keep warm will operate for up
to 20 minutes.
4. Once the keep warm time elapses, the unit
will beep 4 times and the
icon will display.
5. To cancel the function at any time during
operation or before keep warm commences,
press and hold the START/CANCEL button.
6. Pour the hot jam into hot, sterilised jars
leaving 1cm at the top. Seal immediately.
The jam will continue to thicken on cooling.
KEEP WARM icon will
COMPLETED
3. Press the START/CANCEL button
to start the function.
4. When the time has elapsed, the unit
will beep 4 times.
5. To cancel the function at any time
during operation, press and hold the
START/CANCEL button.
28
LMC600_ANZ_IB_D19.indd 28 5/9/19 4:06 pm
Page 29

RECIPES
WHITE BREAD
INGREDIENTS 450g 680g 900g
Water 180ml 260ml 340ml
Oil 25ml 30ml 35ml
Salt 1 tsp. 1½ tsp. 2 tsp.
Sugar 1 tbsp. 1½ tbsp. 1¾ tbsp.
Bread Flour 300g 450g 590g
Bread Improver 1 tsp. 1½ tsp. 1¾ tsp.
Milk powder ½ tbsp. ¾ tbsp. 1 tbsp.
Dried yeast ¾ tsp. 1 tsp. 1¼ tsp.
Method
1. Place ingredients in the order listed. Wipe
any spills from outside of pan.
2. Insert the bread pan with kneading blade
into position in the baking chamber and
close the lid.
3. Press the BREAD button, then press the
MENU button until WHITE flashes on the
display screen.
4. Choose CRUST COLOUR and LOAF SIZE.
5. Choose the DELAYED START time if
applicable.
6. Press the START/CANCEL button to
commence cycle.
7. After cycle has completed, press the
START/CANCEL button to stop the
keep warm setting.
8. Using oven mitts, remove bread from
bread maker. Allow bread to rest in pan
for 5 minutes before turning out to cool
on a wire rack. Remove kneading blade
before slicing.
NOTE
Suitable settings for WHITE BREAD are
WHITE and LIGHT/MEDIUM/DARK colour.
FRENCH BREAD
INGREDIENTS 450g 680g 900g
Water 195ml 300ml 340ml
Oil 5ml 10ml 15ml
Salt 1 tsp. 1 ½ tsp. 2 tsp.
Sugar 1 tsp. 1 ½ tsp. 2 tsp.
Bread Flour 325g 500g 590g
Bread Improver ½ tsp. ¾ tsp. 1 tsp.
Dried yeast ¾ tsp. 1¼ tsp. 1½ tsp.
Method
1. Place ingredients in the order listed.
Wipe any spills from outside of pan.
2. Insert the bread pan with kneading blade
into position in the baking chamber and
close the lid.
3. Press the BREAD button, then press the
MENU button until FRENCH flashes on the
display screen.
4. Choose CRUST COLOUR and
LOAF SIZE.
5. Choose the DELAYED START
time if applicable.
6. Press the START/CANCEL button
to commence cycle.
7. After cycle has completed, press
the START/CANCEL button to stop
the keep warm setting.
8. Using oven mitts, remove bread from
bread maker. Allow bread to rest in pan for
5 minutes before turning out to cool on a wire
rack. Remove kneading blade before slicing.
NOTE
Suitable settings for FRENCH BREAD are
FRENCH and LIGHT/MEDIUM/DARK colour.
29
LMC600_ANZ_IB_D19.indd 29 5/9/19 4:06 pm
Page 30

NATURAL YOGHURT
INGREDIENTS
Full cream milk 1 litre
Natural Yoghurt L cup
Full cream milk powder 50g
Method
1. Sterilise all equipment used in making
yoghurt.
2. Mix all ingredients together. Wipe any spills
from outside of pan.
3. Insert the bread pan, without the kneading
blade, into position in the baking chamber
and close the lid.
4. Press the BREAD button, then press the
MENU button until YOGHURT flashes
on the display screen.
5. Press the START/CANCEL button to
commence cycle.
6. After cycle has completed, press the
START/CANCEL button to stop the
keep warm setting.
7. Refrigerate when complete.
30
LMC600_ANZ_IB_D19.indd 30 5/9/19 4:06 pm
Page 31

COOKING
GUIDE
COOKING Specifications
Function Cooking
Sauté 180°C 15 minutes 0:01–1:00 N/A Yes
Steam 100°C 15 minutes 0:05–2:00 N/A Yes
Soup/Stew 98–99°C 30 minutes 0:05–8:00 4 hours No
Rice/W 100°C N/A N/A 4 hours No
Rice/B 100°C N/A N/A 4 hours No
Risotto 100°C 20 minutes 0:05–2:00 4 hours No
Deep Fry Low 170°C 15 minutes 0:01–1:00 N/A Yes
Deep Fry High 190°C 15 minutes 0:01–1:00 N /A Yes
Slow Cook Low 98°C 8 hours 4:00–12:00 4 hours N/A
Slow Cook
Medium
Slow Cook
High
Temperature
98°C 6 hours 2:00–10:00 4 hours N/A
98°C 4 hours 2:00–08:00 4 hours N/A
BAKING Specifications
Type Crust Baking
White Light 120°C 450g 0M 3:10 2:33 Yes 15:00
Medium 125°C 450g 3:15 2:38 1 hour 15:00
Dark 135°C 450g 3:15 2:38 1 hour 15:00
Whole
Wheat
Light 120°C 450g
Medium 130°C 450g 3:20 2:38 1 hour 15:00
Dark 140°C 450g 3:25 2:43 1 hour 15:00
Temperature
Default Time Cooking Time
Size Preheat Total Extras Keep Warm Delay Time
680g 3:15 2:28 1 hour 15:00
900g 3:15 2:28 1 hour 15:00
680g 3:18 2:31 1 hour 15:00
900g 3:20 2:33 1 hour 15:00
680g 3:18 2:31 1 hour 15:00
900g 3:20 2:33 1 hour 15:00
680g 3:20 2:28 1 hour 15:00
900g 3:25 2:33 1 hour 15:00
680g 3:25 2:33 1 hou r 15:00
900g 3:30 2:38 1 hour 15:00
680g 3:30 2:38 1 hour 15:00
900g 3:35 2:43 1 hour 15:00
Range
10
minutes
Keep Warm Preheat
3:15 2:33 1 hour 15:00
31
LMC600_ANZ_IB_D19.indd 31 5/9/19 4:06 pm
Page 32

Type Crust Baking
French Light 120°C 450g 0M 3:45 No 1 hour 15:00
Medium 130°C 450g 3:50 No 1 hour 15:00
Dark 140°C 450g 3:55 No 1 hour 15:00
Sweet Light 115°C 450g 0M 3:13 2:41 1 hour 15:00
Medium 120°C 450g 3:15 2:43 1 hour 15:00
Dark 130°C 450g 3:15 2:43 1 hour 15:00
Gluten Free No 125°C No
Rapid No 135°C No 0M 1:55 No No No
Temperature
Size Preheat Total Extras Keep Warm Delay Time
680g 3:50 No 1 hour 15:00
900g 3:55 No 1 hour 15:00
680g 3:55 No 1 hou r 15:00
900g 4:00 No 1 hour 15:00
680g 4:00 No 1 hour 15:00
900g 4:05 No 1 hour 15:00
680g 3:18 2:36 1 hour 15:00
900g 3:20 2:38 1 hour 15:00
680g 3:20 2:38 1 hour 15:00
900g 3:25 2:43 1 hour 15:00
680g 3:20 2:38 1 hour 15:00
900g 3:25 2:43 1 hour 15:00
10
2:35 2:08 1 hour No
minutes
Cake No 120°C No 0M 1:05 No No No
Dough No No No 0M 1:30 1:08 No 15:00
Pasta Dough No No No 0M 0:14 No No No
Bake No 130°C No 0M 0:30 No 1 hour No
Yoghurt No 38°C No 0M 8:00 No No No
Jam No 120°C No 0M 1:00 No
Home Made No 125°C No 0M 2:45 No 1 hour No
70–160°C 0–1 hour 0–1 hour
20
minutes
No
32
LMC600_ANZ_IB_D19.indd 32 5/9/19 4:06 pm
Page 33

COOKING
GUIDE
WHITE & BROWN RICE COOKING GUIDE
Cups Uncooked
White Rice
2 2 4 25–35 minutes
4 4 8 30–35 minutes
6 6 12 30–40 minutes
8 8 16 35–40 minutes
10 10 20 40–45 minutes
Cups Cold Tap Water Cups Cooked Rice
(Approx)
Cooking Time on White Function
(Approx)
Cups Uncooked
Brown Rice
2 3 4 40–50 minutes
4 6 9 45–55 minutes
6 9 15 50–60 minutes
8 12 20 60–70 minutes
• Use the rice measuring scoop (included) to measure the rice.
• For white and brown rice, the cooking time is determined by the cooking sensors. The finish time will vary based on the type and
amount of rice and water used.
Cups Cold Tap Water Cups Cooked Rice
(Approx)
Cooking Time on Brown Function
(Approx)
THE SLOW COOK GUIDE
Food Low Medium High
Chicken 7–9 hours 5–7 hours 5–7 hours
Beef 8–10 hours 6–8 hours 4–5 hours
Pork 8–10 hours 6–8 hours 4–5 hours
GENERAL SLOW COOKING TIMES
Setting Cooking Times
Low 8 hours
Medium 6 hours
High 4 hours
Traditional Cooking Time Slow Cooker Time (Without Searing)
Low Medium High
35–60 minutes 6–10 hours 5–7 hours 3–5 hours
1–3 hours 8–10 hours 6–9 hours 4–6 hours
33
LMC600_ANZ_IB_D19.indd 33 5/9/19 4:06 pm
Page 34

THE DEEP FRY GUIDE
Food Low/High Time (Minutes)
Spring rolls/Samosas (frozen) High 3–5 minutes
Meat balls (frozen) Low 4–6 minutes
Fries (thick cut frozen) High 4–6 minutes
Fries (thin cut frozen) High 4–6 minutes
Fries (fresh) Low 10–12 minutes
Donuts Low 2–4 minutes
Battered fish (fresh) High 3–5 minutes
Battered fish (frozen) High 3–4 minutes
Calamari rings (frozen) High 3–4 minutes
Hash browns (frozen) Low 4–6 minutes
Chicken wings (frozen) Low 8–10 minutes
Wedges (frozen) High 5–7 minutes
Chicken nuggets (frozen) High 4–5 minutes
• Times may vary depending on the mix of food and sizes used. This is a general guide.
• Do not exceed the maximum recommendation of approximately 400g.
CAUTION
Hot oil may rise up when deep frying.
Due to the high variability in water content of ingredients, always start with a small volume of
ingredients in the deep fry basket and closely monitor the change in oil level to ensure the oil does
not overflow the cooking bowl. Remove the deep fry basket from the cooking bowl if you see the oil
level rising rapidly and reduce the volume of ingredients in the basket.
If oil overflows the cooking bowl during deep frying, remove the deep fry basket and turn the multi
cooker off at the power point then allow to cool before removing the cooking bowl.
Never remove the cooking bowl while the oil is hot.
34
LMC600_ANZ_IB_D19.indd 34 5/9/19 4:06 pm
Page 35

Care, Cleaning
& Storage
Before cleaning, ensure the multi cooker is
returned to standby mode by pressing and
holding the START/CANCEL button, then
switch the multi cooker off at the power outlet.
Remove the power plug from the power outlet
and remove the connector end of the power
cord from the multi cooker base. Allow the multi
cooker and all accessories to cool completely
before disassembling and cleaning.
CLEANING THE MULTI COOKER
EXTERNAL BODY AND INNER BAKING
CHAMBER
1. Wipe the outer body and the display screen
with a damp cloth or a soft, damp sponge and
then dry thoroughly. Do not clean with a dry
cloth or abrasive cleaners as this may scratch
the surface. A non-abrasive liquid cleanser or
mild spray solution may be used to avoid
build-up of stains. Apply the cleanser to the
sponge, not the multi cooker surface, before
cleaning.
2. Use extreme caution when cleaning the
interior baking chamber and the heating
elements. Ensure the multi cooker is
completely cool before cleaning.
3. Ensure the heating plate and heating elements
are clear of debris before use. If over-spills
such as oil, flour, nuts, raisins etc. occur in the
interior baking chamber, carefully remove
using a soft, damp cloth.
4. Clean the multi cooker interior baking
chamber, heating plate and heating element
with a damp cloth, then wipe dry. Alternatively,
if any over-spills occur and fall into the multi
cooker cavity which are hard to clean, use a
brush with soft to medium bristles to brush
away the spills from the heating element or
heating plate on the base. If necessary, carefully
tip the unit upside down and give a gentle
shake to remove loose debris.
5. Let all surfaces dry thoroughly before use.
WARNING
• Do not immerse the multi cooker housing,
power cord or power plug in water or any other
liquid as this may cause electrocution. Take
extra care when cleaning and not to allow
water or cleaning fluids to seep under the
buttons or LCD screen on the control panel.
• Do not use chemicals, steel wool, metal
scouring pad or abrasive cleaners to clean the
outside of the multi cooker housing, cooking
bowl or bread pan as these can damage the
housing or the coating of the cooking bowl,
bread pan or kneading blade.
• To prevent damage to the multi cooker,
do not use alkaline cleaning agents when
cleaning. Use a soft cloth and mild detergent.
• When moving the multi cooker, allow the
unit to fully cool down and carry the unit via
the base.
• Once cooking is complete, always clean the
interior baking chamber after each use to
remove any foodstuffs or residue.
NOTE
Exposure to cooking oils and cleaning
chemicals may cause colour fading and
discolouration to the multi cooker. If the multi
cooker is exposed to oils or chemicals, turn
off and unplug the appliance and use a damp
cloth to clean the surface of the multi cooker.
Dry thoroughly before use.
CLEANING ALL PARTS AND
ACCESSORIES
1. Remove the inner lid from the multi cooker.
Press outwards on the two grooved clips at
the same time, which will release the top
half of the inner lid. Once the inner lid flips
forward, lift out and away.
2. Wash the inner lid in warm soapy water with
mild household detergent. Rinse and dry
thoroughly. Clip the inner lid back into place
by inserting the bottom part of the inner lid
into the grooves on the outer lid, push the
upper part of the inner lid until the clips click
into place. Ensure inner lid is in place before
storage or use. Do not wash in a dishwasher.
35
LMC600_ANZ_IB_D19.indd 35 5/9/19 4:06 pm
Page 36

3. Remove the drip collector from the back of the
multi cooker and empty any residual water, oil
or other liquids.
4. Remove the steam valve from the lid by pulling
up and away.
5. Wash all removable parts and accessories
in warm soapy water with mild household
detergent. Rinse and dry thoroughly and
replace all removable parts before storage or
use.
6. Only the cooking bowl and deep fry basket can
be cleaned in the dishwasher, if required.
7. Place the clean and dry cooking bowl into the
multi cooker for storage.
8. To clean the bread pan, it is recommended to
half fill with warm soapy water and allow to
stand for 10–20 minutes prior to cleaning. Do
not immerse the outside of the bread pan in
water. Remove any residue with a damp cloth.
Rinse and then dry thoroughly before storing
or use.
9. Remove the kneading blade and rinse the
interior. Ensure there is no baked-on residue
in any of the blade crevice, including the
D shaped hole. If there is, soak the kneading
blade in warm soapy water. Use a wooden
toothpick, thin wooden skewer or plastic
cleaning brush to remove any bread residue
from the blade crevice. Do not use an abrasive
cleanser or metal scouring pad as these will
scratch the non-stick coating. Rinse and then
dry thoroughly before storing or use.
IMPORTANT
• Do not immerse the outside of the bread pan
in water as this may interfere with the free
movement of the wing-nut and drive shaft.
Wash only the interior of the bread pan.
• Some discolouration may appear on and inside
the bread pan over time. This is a natural effect
caused by moisture and steam and will not
affect the bread in any way.
• The inside of the bread pan and kneading blade
are coated with a high-quality non-stick coating.
As with any non-stick coated surface, do not
use abrasive cleansers, metal scouring pads or
metal utensils to clean these items as they may
damage the finish.
• Never wash the bread pan or kneading blade in
the dishwasher.
WARNING
The removable cooking bowl and deep fry
basket are dishwasher safe. Breville does not
recommend that any other parts of your multi
cooker are washed in a dishwasher as harsh
detergents and hot water temperatures may
stain or distort the bread pan and/or other
accessories.
STORAGE
1. Ensure the multi cooker is returned to
standby by pressing and holding the
STOP/CANCEL button on the control
panel. Switch the multi cooker off at the
power outlet and then unplug power cord
from the power outlet. Disconnect the power
cord from the multi cooker.
2. Ensure the multi cooker and all accessories
are completely cool before cleaning. With all
parts clean and dry and the removable bowl
inside the multi cooker, place the bread pan
and kneading blade inside the cooking bowl.
3. Stack the accessories and the removable
power cord on top of each other to fit inside
the bread pan in the multi cooker.
4. Ensure the lid is closed.
5. Store the multi cooker in an upright position.
NOTE
Do not store anything on the top of the
multi cooker.
36
LMC600_ANZ_IB_D19.indd 36 5/9/19 4:06 pm
Page 37

Troubleshooting Guide
Before carrying out any of the following service
checks, unplug the unit from the mains.
PROBLEM POSSIBLE CAUSES WHAT TO DO
Icon <E00> appears on the
display screen, followed by
repeated beeps.
Icon <E01> appears on the
display screen, followed by
repeated beeps.
Icon <E02> appears on the
display screen, followed by
repeated beeps.
Icon <E03> appears on the
display screen, followed by
repeated beeps.
Icon <E04> appears on the
display screen, followed by
repeated beeps.
The ambient temperature
is too low.
The unit has not cooled down
after previous baking cycle
and its interior will still be warm.
There is a problem with the circuit. Switch the unit off and contact the
There is a problem with the circuit. Switch the unit off and contact the
The bread pan hasn't been placed
inside the unit or incorrect
placement of the bread pan.
Use the unit at room temperature.
Unplug the unit, take out the
bread pan or removable cooking
bowl and let the unit cool down
to room temperature before
using again.
Breville Customer Service Centre.
Breville Customer Service Centre.
When making bread, make sure
to use the bread pan and it is
correctly positioned in the multi
cooker base.
37
LMC600_ANZ_IB_D19.indd 37 5/9/19 4:06 pm
Page 38

Custom Program Table
Custom
Recipe Cooking
Program
Number
Example Spaghetti Bolognese
P01
P02
P03
Stage
1
2
3
4
1
2
3
4
1
2
3
4
1
2
3
4
d or C Temperature°C Time
(0–4 hours)
d
= Bottom element; Temp : 40–160°C
C = Dual element; Temp: 70–160°C
C1
d2
C3
C4
160°C 20 minutes
100°C 30 minutes
95°C 1 hour
90°C 1 hour
P04
P05
1
2
3
4
1
2
3
4
38
LMC600_ANZ_IB_D19.indd 38 5/9/19 4:06 pm
Page 39

Custom
Program
Number
P06
Recipe Cooking
Stage
1
2
3
4
d or C Temperature°C Time
(0–4 hours)
d
= Bottom element; Temp : 40–160°C
C = Dual element; Temp: 70–160°C
P07
P08
P09
P10
1
2
3
4
1
2
3
4
1
2
3
4
1
2
3
4
39
LMC600_ANZ_IB_D19.indd 39 5/9/19 4:06 pm
Page 40

Breville Customer Service Centre
Australian Customers
Phone: 1300 139 798
Web: www.breville.com
New Zealand Customers
0800 273 845
Phone:
Web: www.breville.com
Breville, the Breville logo, Master Every Moment and the Multi cooker
are registered trademarks of Breville Pty. Ltd. A.B.N. 98 000 092 928.
Due to continued product improvement, the products illustrated/photographed in this booklet
LMC600_ANZ_IB_D19.indd 40 5/9/19 4:06 pm
Copyright Breville Pty. Ltd. 2019.
may vary slightly from the actual product.
LMC600 ANZ D19
 Loading...