

Breville ControlFreak Instruction Book
the C ontr ol ˚Freak
™
Instruction Book - CMC850

Contents
The Kit 3
Cookware Compatibility 4
Cookware Usage 5
The Interface 6
Control Dial Operation 7
Switching On 8
Start Cooking 9
Cancel Cooking 10
Screen Lock 11
Pan Temperature Control 12
Intensity 13
Timer 14
Timer Options 15–17
Create 18–21
Edit Custom Cooking Program 22
Delete Custom Cooking Program 23
Thermometer Function 24–27
Probe Control Function 28–31
Settings 32–35
Care and Cleaning 36
Save/Copy Function 37–39
Software Update 40–41
Software Update Fail/Error 42
Notification Screens 43
Warning & Error Commands 44
Consumer Support 45
Diagnosis 45

3
The Kit
Probe
Pan Sensor
Probe
Holder/
Pot Clip
Probe Jack USB Drive
Carry Bag
Accessories
Box
NOTE
Only use induction compatible cookware.
4
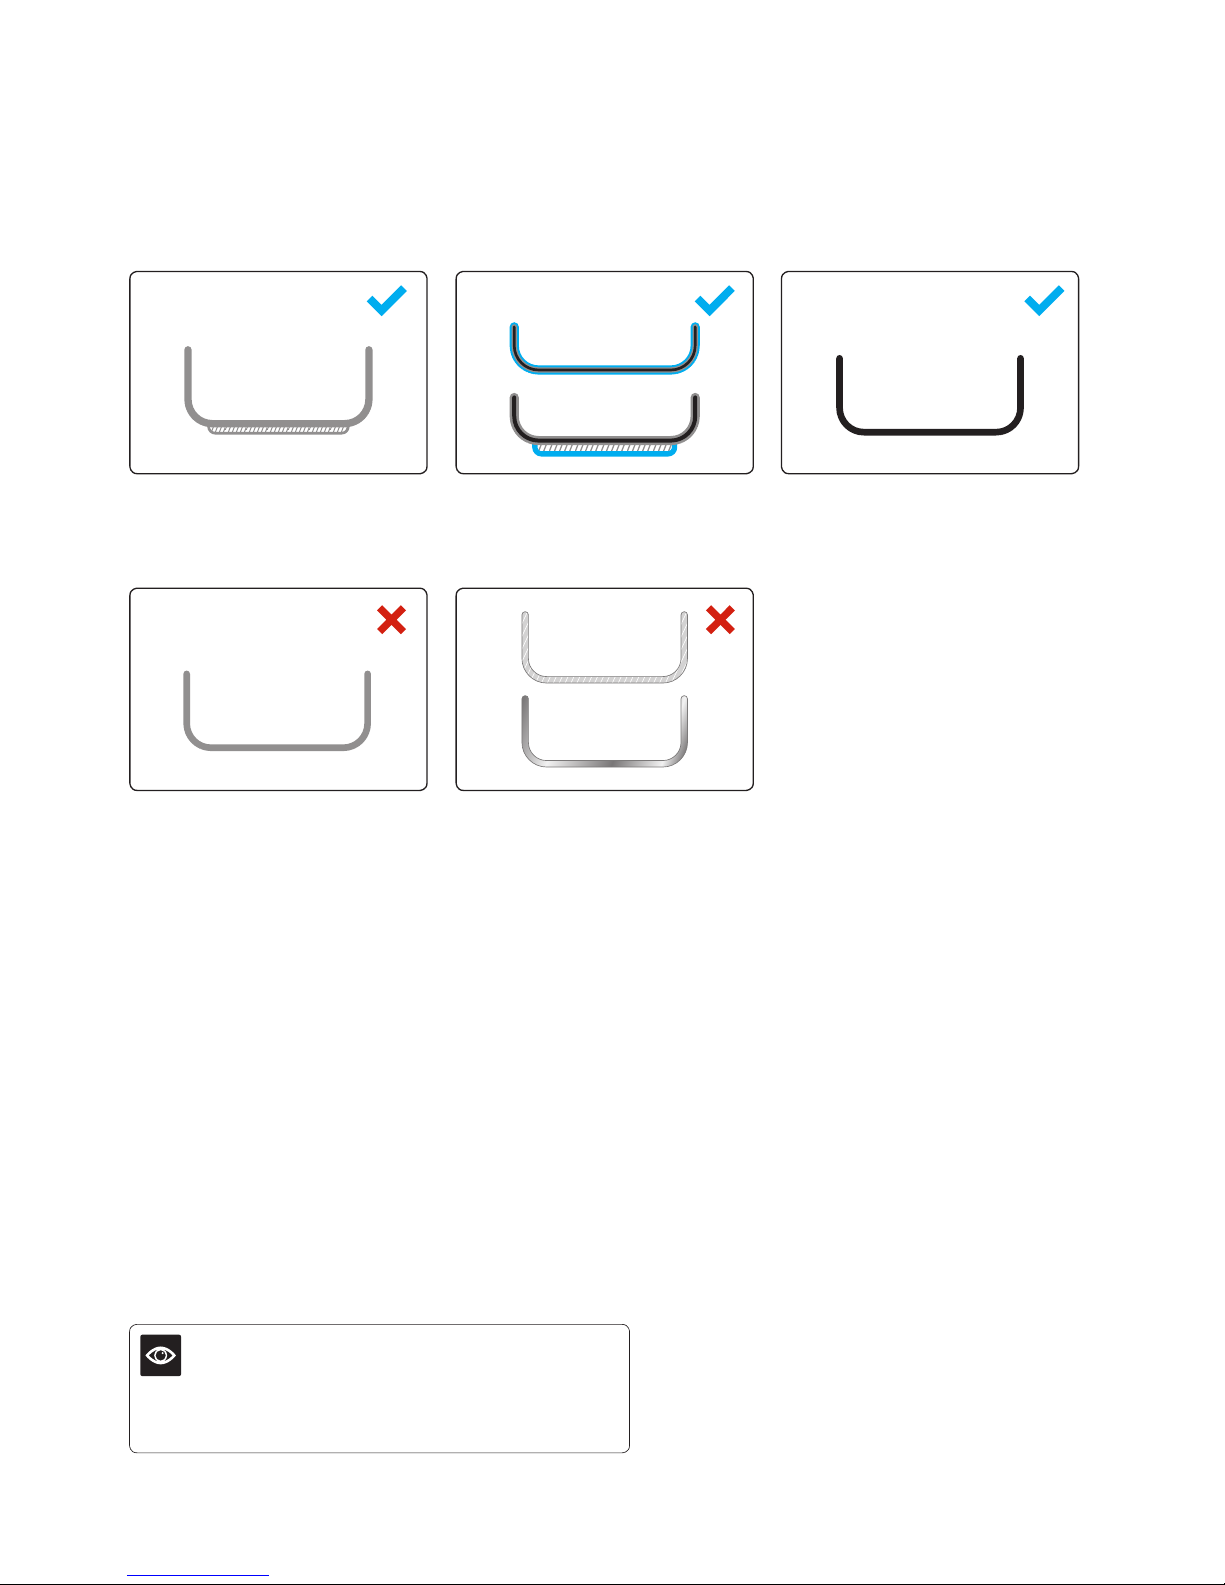
Stainless steel with base.
Stainless steel clad with
aluminium or copper/with base.
Aluminum, copper.
Cast iron.
Stainless steel single layer no base
(can distort easily).
Cookware Compatibility
TIP
If a magnet attracts firmly to the base of your cookware,
it is suitable with the cooker.

5
10"/26cm
4.5"/12cm
Cookware must touch the sensor
for correct temperature control.
Cookware smaller than
4.5"/12cm may not work
(material dependent).
Cookware must have
smooth clean bottom.
Do not use cookware with
concave or convex base.
Sensor will not work.
For most even heating,
max base ≤ 10"/30cm.
Cookware Usage
Best performance operation.
6
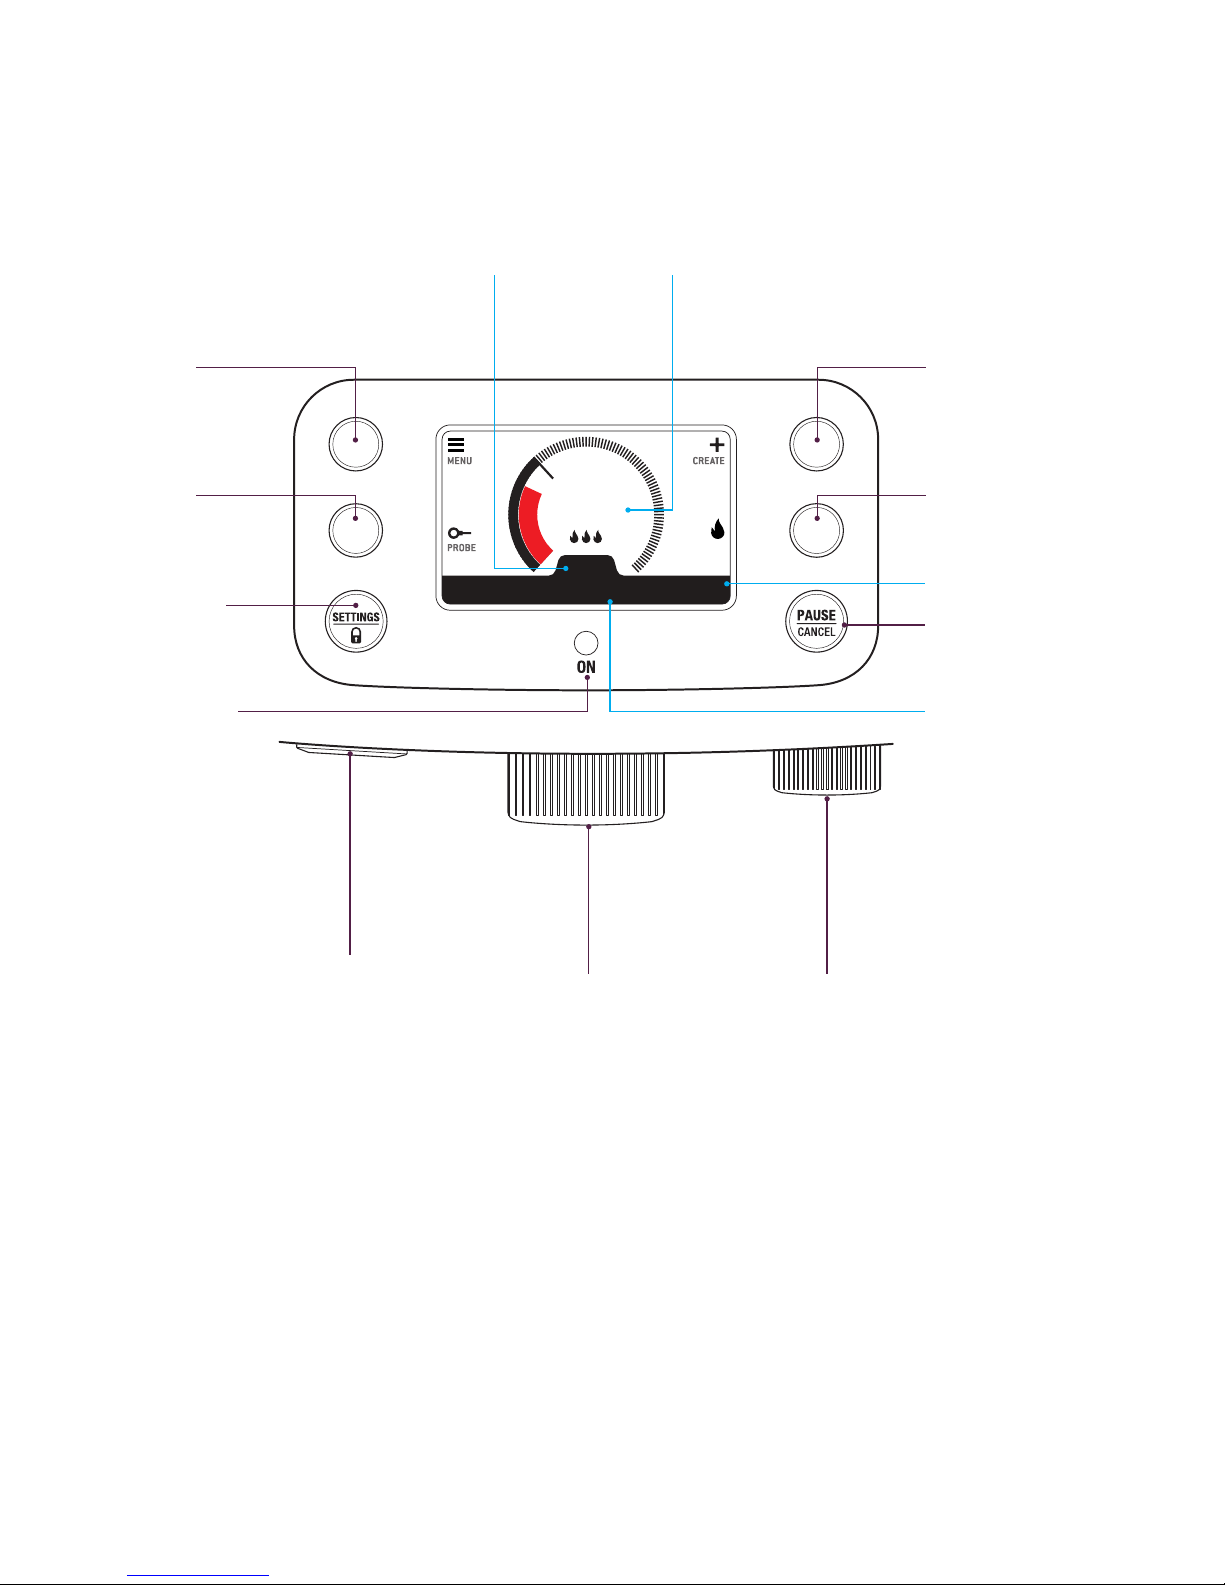
The Interface
FAST
02:00
Simmer
212
180
Set
Temperature
Power
Button
Current
Temperature
Create
Create & save
custom cooking
programs.
Menu
Your created
cooking programs
are saved here.
Probe
Thermometer
& probe control
functions.
Command Bar
Displays current
operation.
Operating
Light
Intensity
Control speed to the
set temperature.
Control Dial
Temperature function
& menu navigation.
Timer Dial
Control time
functions.
Timer Display
Pause/Cancel
Settings/
Lock

7
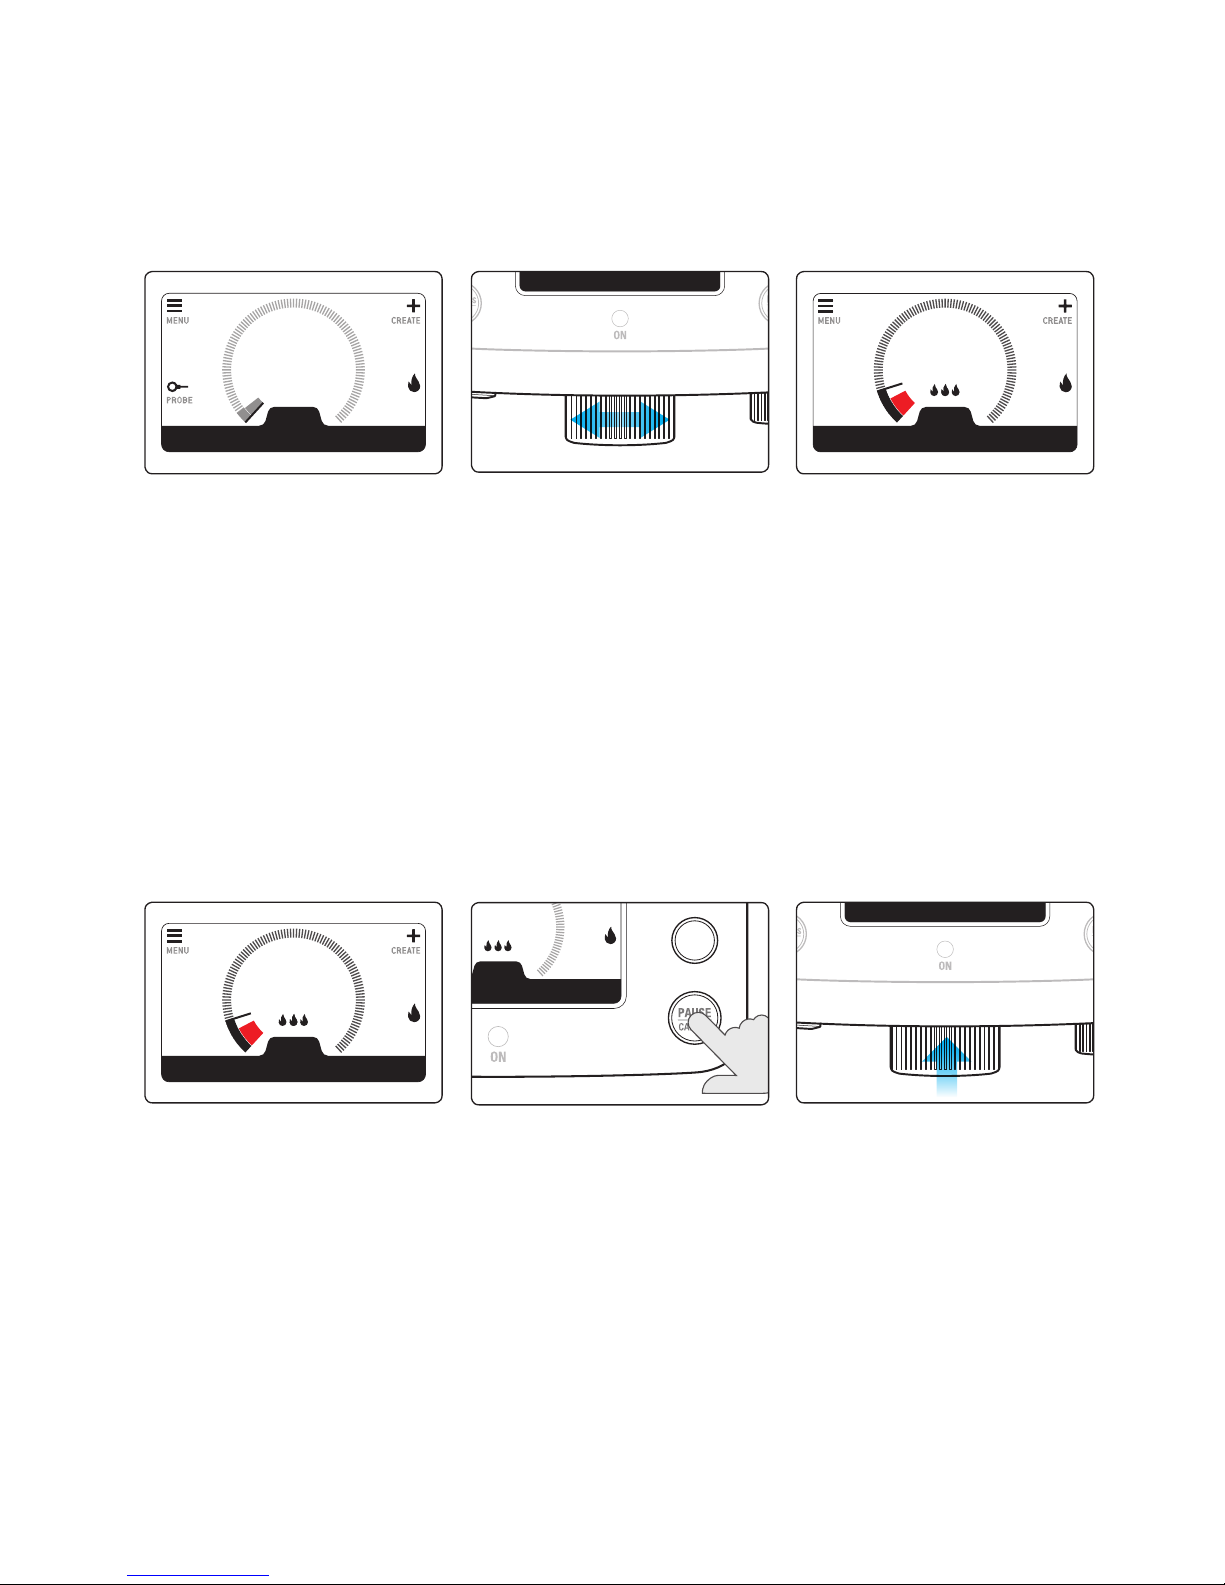
Control Dial Operation
Use control dial to navigate menus and to select and confirm cooking options.
Rotate Control Dial to select
temperature and scroll through
menu selections.
Rotate Timer Dial to
scroll through time functions.
Press Control Dial to confirm
menu selection.
Press Control Dial to confirm
Start.
Press Timer Dial to
confirm time selection.
INTENSITY
Set Pan Temp
°F
80
DEL
EDIT
EXIT
START
Menu
Caramelize
Chicken
320°F
120°F

88
INTENSITY
Set Pan Temp
°F
80
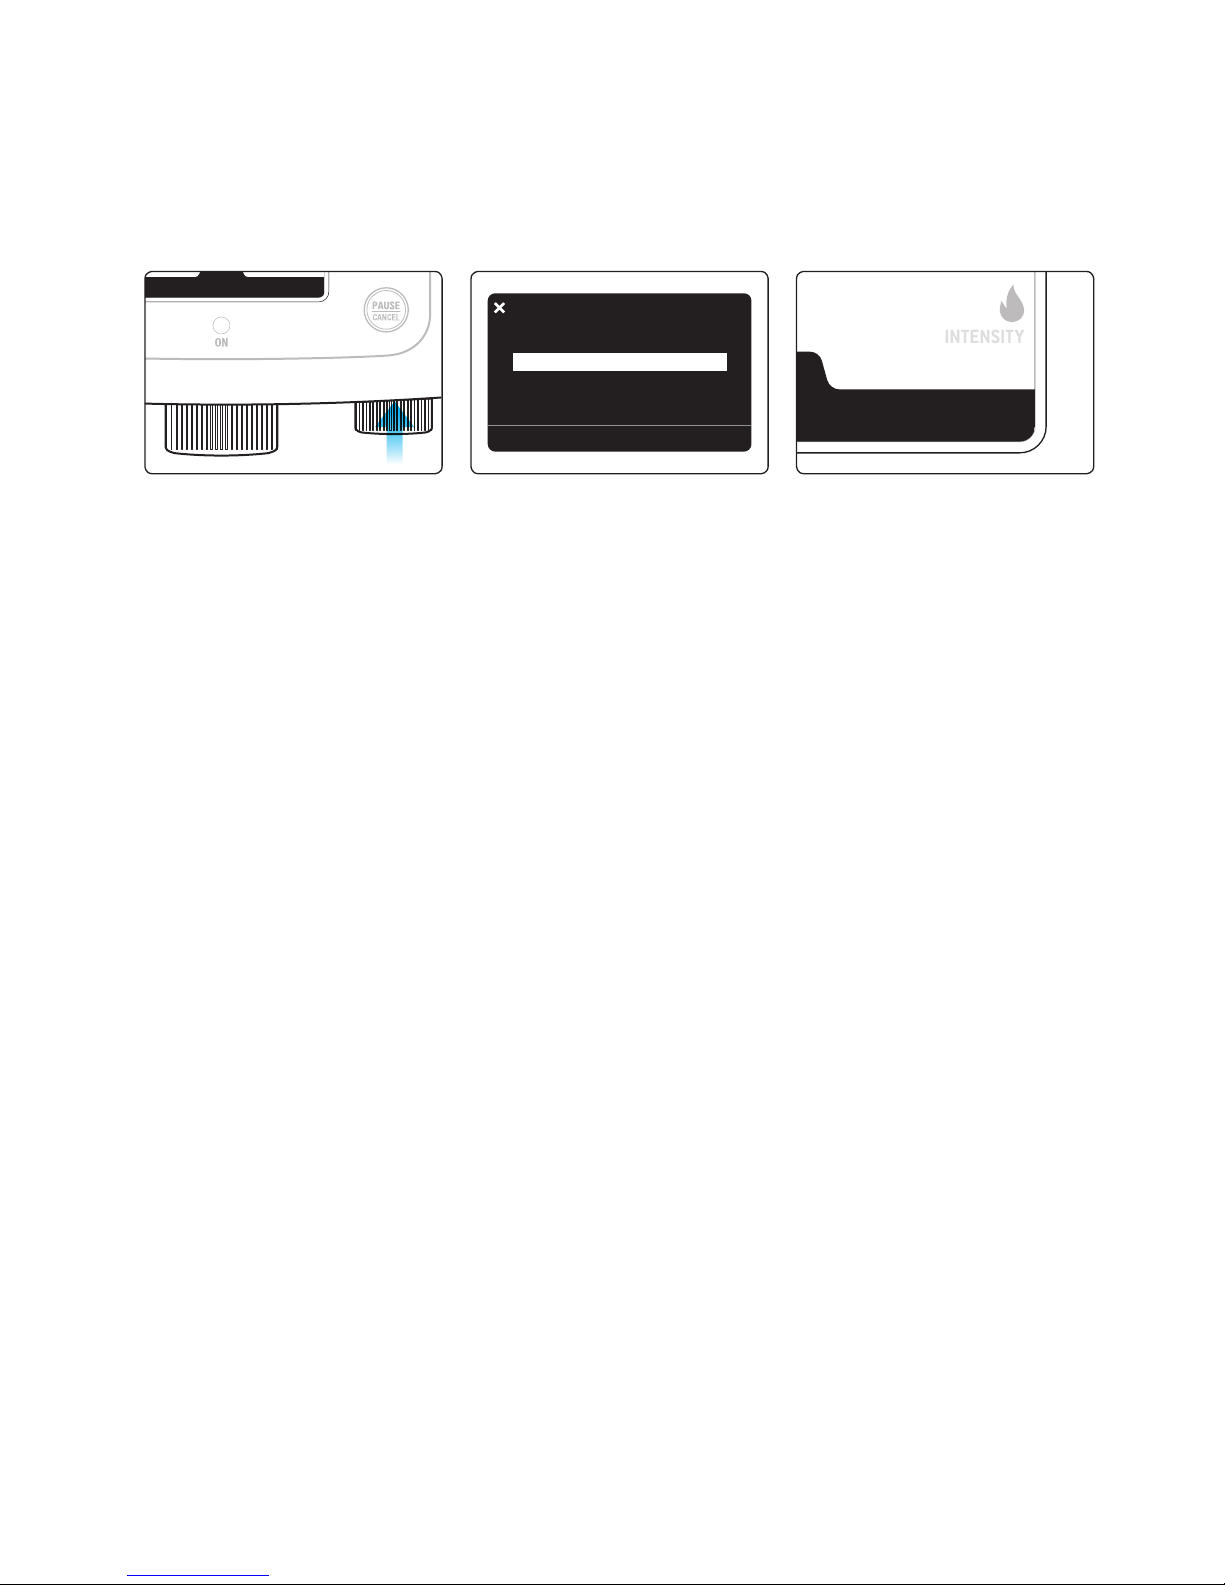
Plug in the power cord to
power outlet.
Power on. Standby screen.
Switching On
99
FAST
Low
110
95
INTENSITY
Set Pan Temp
°F
80
INTENSITY
Set Pan Temp
°F
80
1. Standby screen.
2. Turn control dial to set
temperature.
3. To resume, press control dial.
3. Cooktop heating to the
set temperature.
FAST
Low
110
95
2. Press "PAUSE | CANCEL"
to pause.
1. Cooktop active.
Start Cooking
Pause/Resume Cooking
It is possible to pause cooking. No heat will be applied during pause.
Resume will continue previous settings.
FAST
110
95
INTENSITY
Set Pan Temp
°F
80

10
INTENSITY
°F
95
FAST
Low
110
95
1. Cooktop active. 2. Press "PAUSE". 3. Press "PAUSE" again to cancel
to standby screen.
Cancel Cooking
FAST
110
95

1111
Screen Lock
Press & Hold the Settings/Lock
button to Lock and Unlock screen.
EXIT
SELECT
Settings
Screen Lock
Time and Date
ºC/º
F
Sounds
1. Press "Settings | ".
2. Select "Screen Lock".
3. Screen lock active.
4. To deactivate, press and
hold for 3 seconds.
Screen Lock
You can lock your screen by making all buttons and dials inactive.
Cooking continues as set.
INTENSITY
INTENSITY

12
Pan Temperature Control
Med High
356
140
Heating to set temperature.
FAST
356
122
At temperature.
FAST
356
356
Cooling to set temperature.
FAST
356
374
INTENSITY
Set Pan Temp
Fº
30
Pan Temperature
Set Temperature
INTENSITY
Set Pan Temp
°F
80

13
FAST
212
180
Fast (Default).
MEDIUM
Medium.
SLOW
Slow.
Intensity
Heat intensity can be varied to control the heating speed to the set temperature.
It can be adjusted while cooking.
Adjust intensity while cooking to control simmer.
You can vary the intensity to suit the pan size and load.
NOTE
• The size of pan and the amount of food in the pan will affect the heating speed.
• To avoid overshoot, use SLOW.
• To slow heat-up, use MEDIUM.
• For rapid heat up, use FAST.
Slow.
Small Pan - Slow.
Medium.
Medium Pan - Medium.
Fast.
Large Pan - Fast.

14
EXIT
OK
Timer Options
Cancel Timer
INTENSITY
02:00
INTENSITY
02:00
INTENSITY
02:00
INTENSITY
01:59
Timer
There is a multifunctional timer installed on your product.
It can be set to count up or count down. There are also multiple timer end options.
1. Set Timer. 2. 00:05 sec – 72:00 hours.
9. Press control dial to confirm.
INTENSITY
02:00
5. Add time.
3. Timer begins.
4. Reduce time.
INTENSITY
00:00
Time ended
60
INTENSITY
02:00
8. To cancel timer,
press timer dial.
6. Timer ended, alarm sound.
7. To stop alarm, press control
dial or timer dial.
15
INTENSITY
00:01
INTENSITY
02:00
EXIT
OK
Timer Options
Start Count Down Timer
Start Count Up Timer
1. Press timer dial. 2. Select and confirm Start Count
Up Timer.
3. Count up begins.
Timer Count Up
 Loading...