

Page 1
the Fresh Keeper
Instruction Booklet
™
BVP700
Page 2

CONGRATULATIONS
on the purchase of your new
Breville Fresh Keeper
™
Page 3

CONTENTS
4 Breville recommends safety first
6 Know your Breville Fresh Keeper™
8 Operating your
Breville Fresh Keeper™
15 Care & Cleaning
3
Page 4

BREVILLE RECOMMENDS SAFETY FIRST
At Breville we are very safety conscious. We design and manufacture consumer products with
the safety of you, our valued customer, foremost in mind. In addition we ask that you exercise
a degree of care when using any electrical appliance and adhere to the following precautions.
IMPORTANT SAFEGUARDS
TM
READ ALL INSTRUCTIONS
BEFORE USE AND SAVE FOR
FUTURE REFERENCE
• Carefully read all instructions before
operating and save for future reference.
• Remove and safely discard any
packaging material and promotional
labels before using the Fresh Keeper
for the first time.
• Do not place the Fresh Keeper
the edge of a bench or table during
operation.
• Ensure the surface is level, clean and
free of water, flour, etc.
TM
• Clean the Fresh Keeper
black foam
press pad, white liquid catch tray
regularly. Also ensure these parts are
cleaned immediately after handling raw
meat, poultry or fish.
• To protect against electric shock do not
immerse the Fresh Keeper
TM
in water or
any other liquid.
• Do not place this appliance on or near
a hot gas or electric burner, or where it
could touch a heated oven.
• Do not reuse the Fresh Keeper
after using with raw meat, fish or poultry
or after the Fresh Keeper
TM
bag has been
heated, ie. microwave or simmer.
TM
• Handle the Fresh Keeper
with care.
• Do not pull or carry the Fresh Keeper
by the cord.
• Before plugging in or using the
appliance, ensure that your hands are
dry.
TM
near
TM
bags
TM
TM
• Keep the Fresh Keeper
from babies and children to eliminate a
choking and suffocation hazard.
• Do not put too many foods inside
the Fresh Keeper
enough space in the open end of the
Fresh Keeper
TM
bag to be properly placed
into the Fresh Keeper
• Do not vacuum pack objects with sharp
edges like fish bones and hard shells.
Sharp pointed objects may pierce and
tear the Fresh Keeper
• Do not attempt to operate the Fresh
Keeper
TM
by any method other than
those described in this Instruction
booklet.
• Do not leave the Fresh Keeper
unattended when in use.
• Keep the appliance clean. Follow the
cleaning instructions provided in this
Instruction book.
bags away
TM
Bag. Always allow
TM
sealing chamber.
TM
bag.
TM
4
Page 5

BREVILLE RECOMMENDS SAFETY FIRST
IMPORTANT SAFEGUARDS FOR
ALL ELECTRICAL APPLIANCES
• Fully unwind the power cord before use.
• Connect only to 230V/240V power
outlet.
• Do not let the power cord hang over
the edge of a bench or table, touch hot
surfaces or become knotted.
• To protect against electric shock, do
not immerse the power cord, power
plug or appliance in water or any other
liquid, unless it is recommended in the
cleaning instructions.
• The appliance is not intended for use
by persons (including children) with
reduced physical, sensory or mental
capabilities, or lack of experience and
knowledge, unless they have been given
supervision or instruction concerning
use of the appliance, by a person
responsible for their safety.
• Children should be supervised to ensure
that they do not play with the appliance.
• It is recommended to inspect the
appliance regularly. Do not use the
appliance if the power supply cord,
plug, connector or appliance becomes
damaged in anyway. Return the entire
appliance to the nearest authorised
Breville Service Centre for examination
and/or repair.
• Any maintenance other than cleaning
should be performed at an authorised
Breville Service Centre.
• This appliance is for household use only.
Do not use this appliance for other than
its intended use. Do not use in moving
vehicles or boats. Do not use outdoors.
Misuse may cause injury.
• The installation of a residual current
device (safety switch) is recommended
to provide additional safety protection
when using electrical appliances. It
is advisable that a safety switch with
a rated residual operating current
not exceeding 30mA be installed in
the electrical circuit supplying the
appliance. See your electrician for
professional advice
• Always turn the appliance OFF at the
power outlet and unplug at the power
outlet when the appliance is not in use.
• Before cleaning, always turn the
appliance OFF, switch off at the power
outlet, unplug at the power outlet and
remove the power cord, if detachable,
from the appliance and allow all parts
to cool.
• Do not place this appliance on or near
a heat source, such as hot plate, oven or
heaters.
• Position the appliance at a minimum
distance of 20cm away from walls,
curtains and other heat or steam
sensitive materials and provide adequate
space above and on all sides for air
circulation.
SAVE THESE
INSTRUCTIONS
5
5
Page 6

KNOW
your Breville Fresh Keeper™
Page 7
KNOW YOUR BREVILLE FRESH KEEPER™
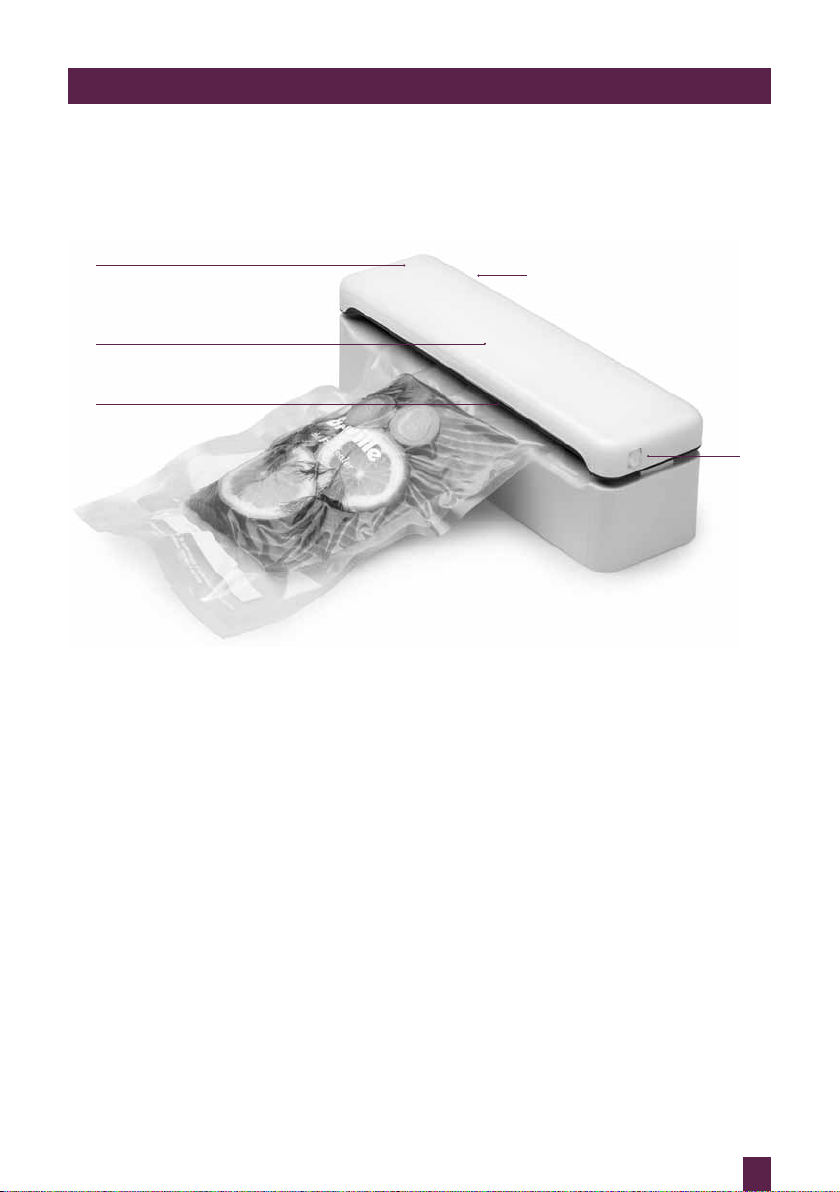
A
B
C
A. Lid designed
So pressure can be applied at any point
on the lid.
B. LED indicator light
White indicates ready, blue indicates
machine is under vacuum and red
indicates that the vacuum sealer is
sealing.
C. Sealing strip
Heat seals bags and rolls.
D. LOCKING/RELEASE button
Releases the lid.
E. Power button
On and off.
E
D
Accessories (Not Shown)
4 x pre cut bags
1 x 20cm x 7m roll
Pre cut bags and rolls
Available separately.
Removable drip tray
Catches any liquid or food that may have
been removed during the vacuum process.
Easy-clean.
7
Page 8

OPERATING
Your Breville Fresh Keeper™
Page 9
PAGE HEADER.....OPERATING YOUR BREVILLE FRESH KEEPER™
BEFORE FIRST USE
Before using your vacuum sealer for the first
time, remove any packaging material and
promotional labels. Ensure the appliance
is switched off at the power outlet and
the power cord is unplugged. Wash the
removable drip tray in warm, soapy water
with a soft cloth. Rinse and dry thoroughly.
Wipe the vacuum sealer unit with a soft
damp cloth. Do not place parts in the
dishwasher.
3. Using a vacuum sealer 20cm bag,
USING YOUR
BREVILLE FRESH KEEPER™
4. Place the end of the bag across the
VACUUM SEALING WITH BAGS
1. Place the vacuum sealer on a flat dry
surface. Plug the power plug into a
230/240V power outlet and press the
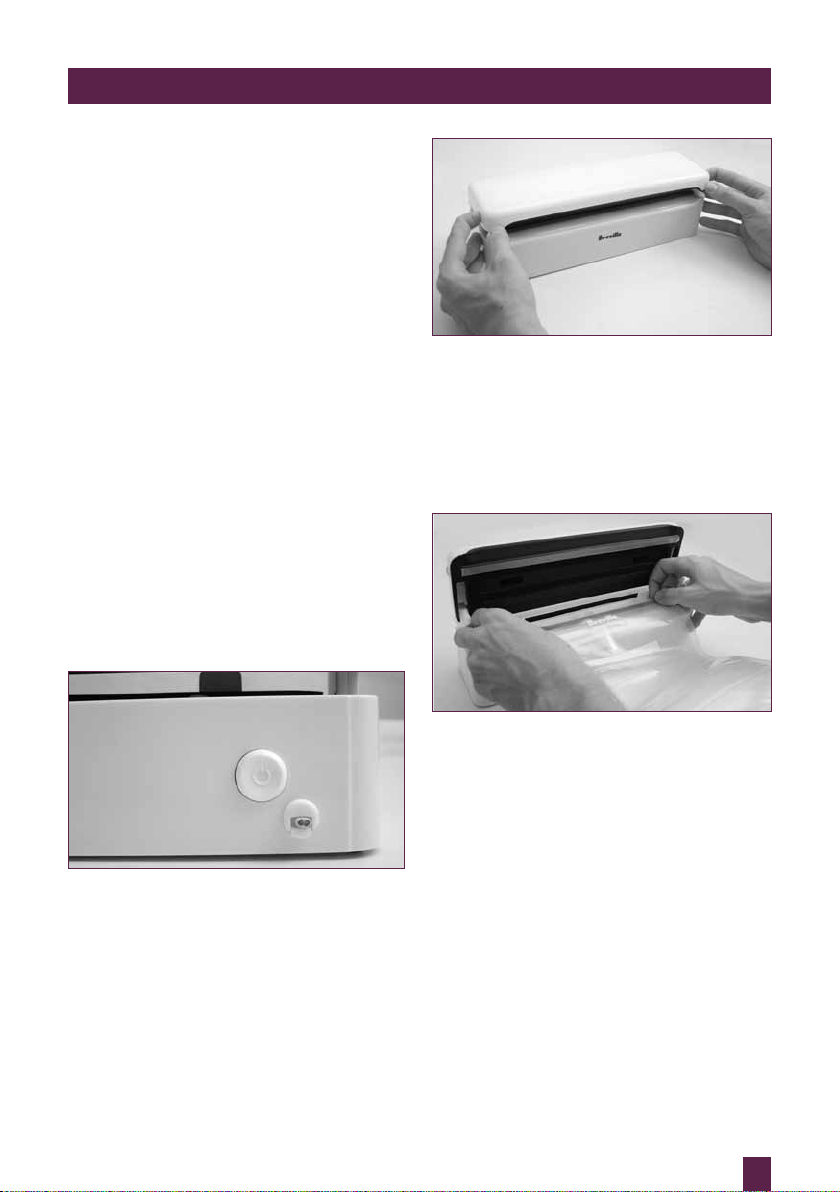
power button on the back of the vacuum
sealer to turn the unit on. The LED light
will be white to indicate that the unit is
on and ready.
place the item inside that needs to be
vacuumed.
sealing strip and up to the 2 white tabs
in the drip tray.
2. Press the release buttons on both sides
of the vacuum sealer to open the lid.
The lid should open to a 90 degree
angle. Ensure that the drip tray is placed
correctly in position.
Close the lid, press and hold pressure on
the middle of the lid to start the vacuum
sealing. The LED light should turn blue
to indicate that the vacuum sealer is
under vacuum.
The LED light will turn red to indicate
that it is sealing. When red light starts
to flash this is an indication the vacuum
sealer is finished vacuuming and sealing.
To remove bag press the 2 release
buttons on either side of the fresh keeper
and remove bag.
9
Page 10
PAGE HEADER.....
OPERATING YOUR BREVILLE FRESH KEEPER™
VACUUM SEALING WITH ROLLS
1. Place the vacuum sealer on a flat dry
surface. Plug the power plug into a
230/240V power outlet and press the
power button on the back of the vacuum
sealer to turn the unit on. The LED light
will be white to indicate that the unit is
on and ready.
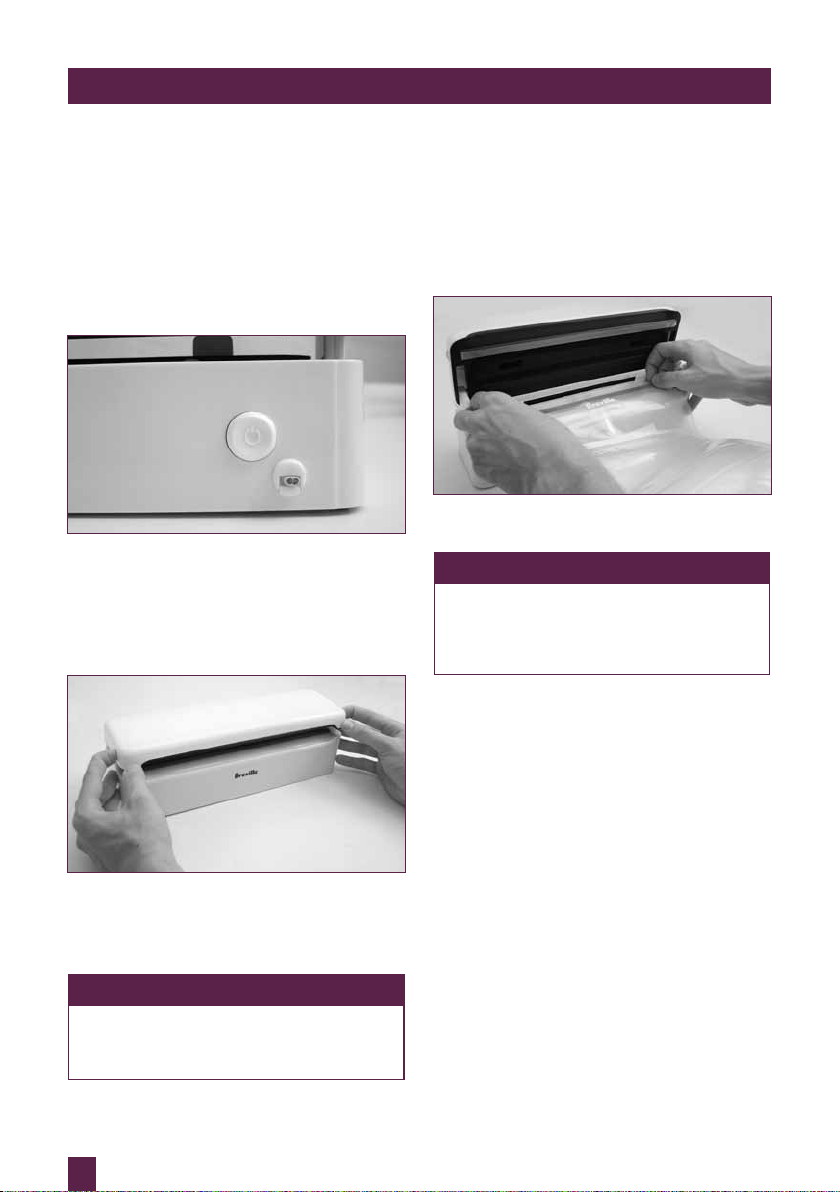
2. Press the release buttons on both sides
of the vacuum sealer to open the lid.
The lid should open to a 90 degree
angle. Ensure that the drip tray is placed
correctly in position.
3. Using the vacuum sealer 20cm roll, cut
enough bag material from the roll to fit
the item in that needs to be vacuumed.
NOTE
If using rolls you will require about
10cm more than the item as this extra
part will form the seal.
4. If using a roll note that one end will
need to be sealed prior to placing item
in the bag. Simply place the end of the
cut roll over the heat sealing area but not
into the drip tray. Close the lid, press and
hold pressure on it to start the sealing
process.
NOTE
The LED indicator light will go blue
first, the vacuum sealer will start to seal
after about 5 – 10 seconds and the light
will turn red.
Once the red light starts to flash this
will indicate that the seal is complete
and you can remove the bag from the
vacuum sealer and place items that need
to be sealed into the bag.
5. Place the food item in the bag. Place
the end of the bag across the sealing
strip and up to the 2 white tabs in the
drip tray. Close the lid, press and hold
pressure on the middle of the lid to
start the vacuum sealing. The LED light
should turn blue to indicate that the
vacuum sealer is under vacuum.
The LED light will turn red to indicate
that it is sealing. When red light starts
to flash this is an indication the vacuum
sealer is finished vacuuming and sealing.
You can release your hand and remove
the bag from the vacuum sealer.
10
Page 11

PAGE HEADER.....
OPERATING YOUR BREVILLE FRESH KEEPER™
SEALING BASICS
Vacuum sealing is an easy and convenient
way to help preserve the freshness of your
food.
Vacuum sealing is not intended to replace
refrigeration or freezing.
Food that normally requires refrigeration
(below 4 degree) or freezing (below -17
degree) even when vacuum sealed should
still be refrigerated or frozen. Vacuum
sealing will help retain your food’s flavour,
colour and texture. It may not stop the
growth of certain kinds of bacteria and
yeast fermentation. Vacuum sealing is not a
substitute for heat preserving or canning.
NOTE
Vacuum seal can not restore or revive
food that is past its prime.
Do not serve or consume food that has an
odour, texture or appearance of food that has
gone bad.
Freezing
Vacuum sealing helps prevent freezer burn
by removing the air in the bag. There are
other ways to further extend the life of food
in your freezer.
Placement (storage)
The back of a freezer has a more constant
temperature than other areas near the door
of a freezer. Delicate foods which may thaw
easily should be kept at the back of the
freezer.
Thawing food
For the best results, thaw frozen foods in
a refrigerator. Never thaw raw meats, fish,
dairy or poultry at room temperature.
Thawing by microwave may affect the
texture of foods. If thawing by microwave,
begin cooking process immediately after
thawing, to prevent bacteria growth.
Microwaving and Simmering
The vacuum sealer bags and rolls are
microwave and simmer safe. To microwave,
cut the bag on one corner so that the steam
can escape and place directly into the
microwave. To simmer, place bag into the
saucepan of simmering water with the top of
the bag out of the water for easy removal.
NOTE
Once bags or rolls are used in the
microwave or cooked in a pot, they
should not be re-used.
Soups and Sauces
To vacuum seal soups and sauces, pour
liquid in bag and leave at least 5cm of space
at the top of the bag. Do not vacuum seal at
this point. Place filled bag up right in the
freezer and allow liquid to freeze. Remove
frozen bag and then proceed to vacuum seal
it.
NOTE
If you only require small amounts
of stock or other liquids, you can
pre-freeze in ice cube trays and use
as much or as little as you wish. Try
vacuum sealing ice cubes in advance to
save time and freezer burn.
Fruit
For best results many fruits can be frozen
before vacuum sealing. Wash and dry the
fruit. Then spread on a tray or baking sheet.
Place the cooking sheet in the freezer
for about 2 hours, then transfer fruit to a
vacuum sealer bag and vacuum seal.
11
Page 12
PAGE HEADER.....
OPERATING YOUR BREVILLE FRESH KEEPER™
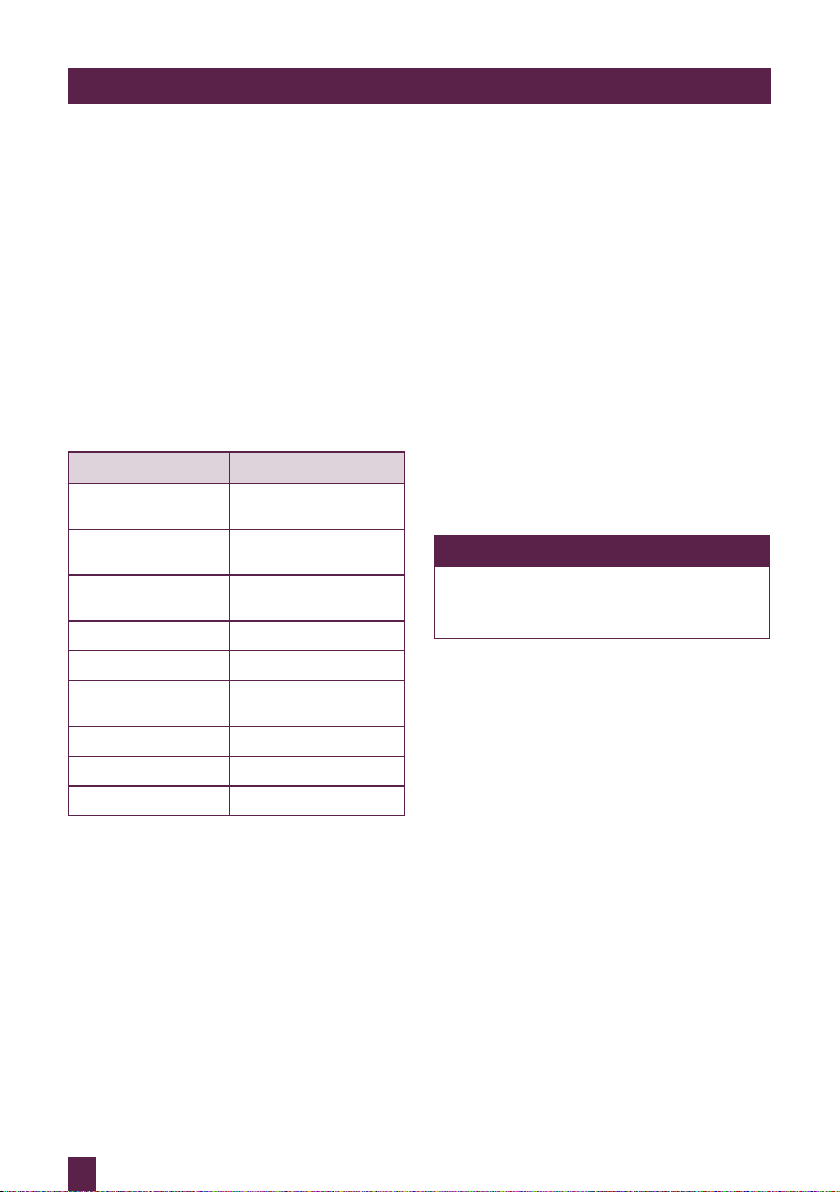
Vegetables
Frozen vegetables sometimes turn black
if they are not blanched before freezing.
To blanch vegetables, fill 1 litre pot with
water and bring to the boil. Also fill a large
bowl with ice water and have a colander or
strainer on hand. Add vegetables to boiling
water and cook for the times suggested.
Vegetables should retain a vibrant colour
and remain crisp and ‘under cooked’.
Remove from boiling water and plunge into
ice water until completely chilled. Drain
as necessary, dry, and transfer to a bag for
vacuum sealing.
FOOD BLANCHING TIME
Broccoli florets –
trimmed
Carrots – depend
on size
Cauliflower florets –
trimmed
Corn on the cob 3-4 minutes
Green beans 1-2 minutes
Leafy greens such as
spinach
Peas (shelled) 1-2 minutes
Sugar snap peas 1-2 minutes
Zucchini – sliced 1-2 minutes
1-2 minutes
Start checking at 3
minutes
1-2 minutes
30 seconds
Cruciferous vegetables
Because of gases they omit over time,
cruciferous vegetables should be kept in the
freezer rather than refrigerator after vacuum
sealing. These vegetables include broccoli,
cabbage, brussel sprouts, cauliflower,
kale,and turnips.
Mushrooms
Mushrooms need to breathe and should
never be sealed in plastic. The best way
to store mushrooms is to place them in
a brown paper bag and keep them in the
refrigerator.
Meat, fish & poultry
For best results, wash poultry and whole
clean fish and gently pat dry with a clean
paper towel.
Beef, veal, lamb, pork and fish fillets should
be patted dry with a clean paper towel.
This extra step saves you time when you are
ready to cook and also helps to maintain
good moisture levels and shape. For best
results, pre-freeze prior to vacuum sealing
for 1-2 hours to retain the moisture and
shape of the meat.
If vacuuming without freezing first, you
should also insert a paper towel into the
bag and over each side of the meat before
vacuum sealing to absorb excess moisture
and juices.
NOTE
Vacuum sealing may cause meat to
darken. This is due to the removal of
oxygen and does not indicate spoilage.
Ground Coffee & other powdery foods
Due to small particle like nature of ground
coffee, it may be necessary to wrap a paper
towel around the coffee being vacuum
sealed, or place the coffee in a bag or the
original packaging prior to vacuum sealing.
Non edible items
The vacuum sealer sealing can be used to
help preserve non edible items:
Camping, travelling & emergency
equipment.
Stays dry and takes up less room when it is
vacuum sealed – bandages, matches, clothes,
maps, passport, batteries, torches, film, flares
etc.
Silver
Helps prevent tarnishing. To avoid
puncturing the vacuum sealer bags, place a
paper towel or soft material over silver prior
to vacuum sealing.
12
Page 13

PAGE HEADER.....
OPERATING YOUR BREVILLE FRESH KEEPER™
Resealing heat sealed bags
We only recommend using Vacuum sealer
bags for vacuum sealing, however you
are able to reseal bags that have been
commercially heat sealed such as chips, nuts
and biscuits.
Trim the bag in a straight line, wipe away
any greasy reside or crumbs that may inhibit
the seal. Place the bag over the sealing area
but not into the drip tray and seal.
Plastic bags such as zip lock bags or plastic
wrap cannot be sealed.
13
Page 14
PAGE HEADER.....
OPERATING YOUR BREVILLE FRESH KEEPER™
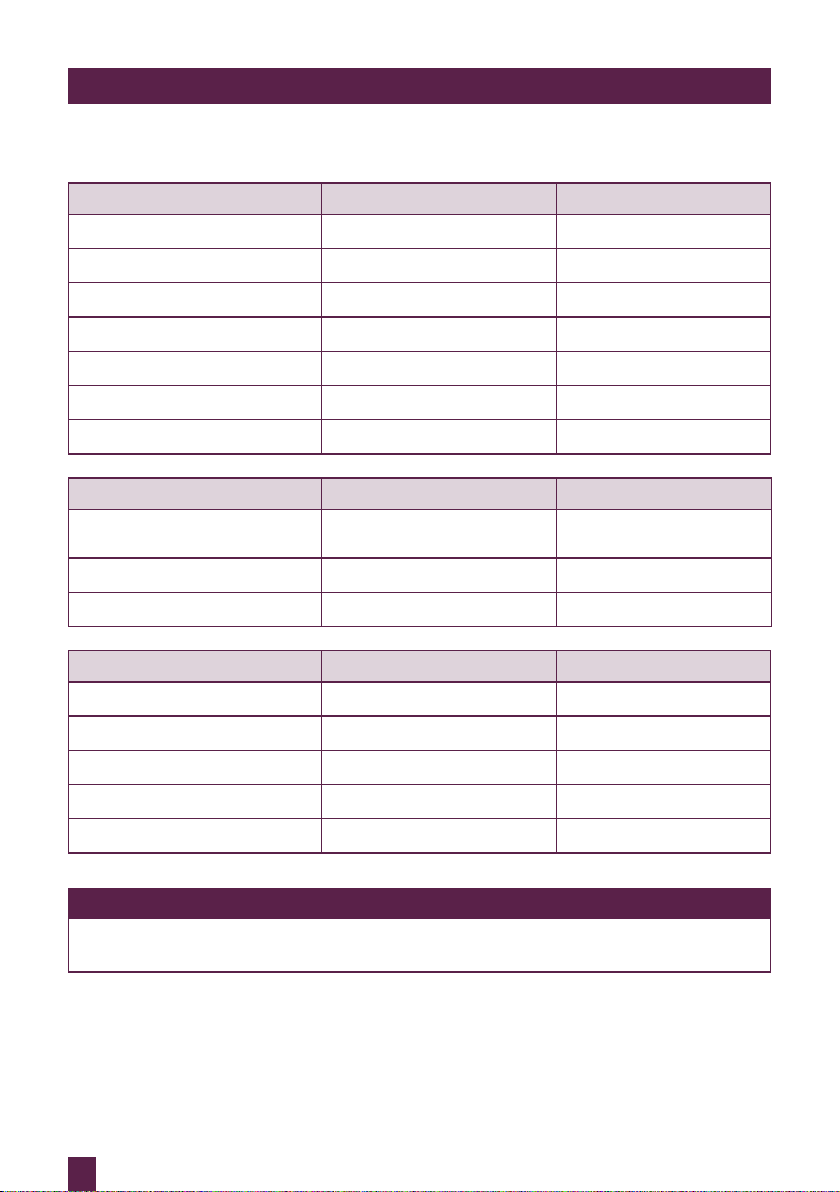
FOOD PRESERVATION CHART
FREEZER STANDARD SHELF LIFE VACUUM SHELF LIFE
Large cuts of beef, pork or lamb 6 months
Minced meat 4 months
Poultry 6 months
Fish 4 months
Cooked meals (stews, soups) 3-6 months
Vegetables 6 months
Berries 1-2 months
FRIDGE STANDARD SHELF LIFE VACUUM SHELF LIFE
Semi hard cheeses (cheddar,
swiss)
Hard cheeses (parmesan) 1-2 weeks
Avocado, cut 1-2 days
1-2 weeks
2-3 years
1 year
2-3 years
1 year
1-2 years
1-2 years
6-8 months
4-8 months
4-8 months
5-6 days
PANTRY STANDARD SHELF LIFE VACUUM SHELF LIFE
Nuts 6 months
Rice 6 months
Flour 6 months
Sugar
Coffee beans
6 months
6 months
2 years
2 years
1 - 2 years
1 - 2 years
1 year
NOTE
Chart above is to be used as a guide only. The storage life will depend on the original
quality of the food and whether a correct seal has been made..
14
Page 15

CARE & CLEANING
your Breville Fresh Keeper™
Page 16

PAGE HEADER.....
CARE & CLEANING
It is important to ensure that all parts
of your Fresh Keeper™ sealing system
is cleaned on a regular basis to avoid
the formation of bacteria and yeast
fermentation.
Follow the care and cleaning guidelines
below:
CLEANING THE FRESH KEEPER™
SEALING SYSTEM
1. Before disassembling and cleaning,
ensure the power is unplugged from the
power outlet.
2. To clean the appliance, simply wipe
down with a clean, damp cloth and dry
thoroughly.
NOTE
The appliance should not be submerged
in water or placed in the dishwasher.
Do not place any parts in the
dishwasher. Do not place any parts in
the dishwasher.. Abrasives or harsh
detergents should not be used to clean
the appliance.
CLEANING THE FRESH KEEPER™
BAGS
1. To wash bags for reuse, turn inside out
and wash them with warm, soapy water
and a sponge. Do not wash bags in the
dishwasher as extensive exposure to heat
may soften the bag material so that it
cannot be reused again. Ensure bags are
dried thoroughly before re-use.
NOTE
To avoid sickness, do not reuse bags
after they have contained greasy
foods, raw meat, poultry or chicken
or have been used for microwaving or
simmering.
STORING THE FRESH KEEPER™
SEALING SYSTEM
1. Store the vacuum sealer on the bench
top, cupboard or drawer.
2. Do not place anything on top of the
appliance as it could damage the
mechanism.
CLEANING THE FRESH KEEPER™
REMOVABLE TRAY
1. The drip tray can be removed from the
vacuum sealer. It can be cleaned in warm
soapy water with a soft cloth. Rinse and
dry thoroughly.
2. Once completely dried re-insert the drip
tray into the vacuum sealer
16
Page 17

NOTES
17
Page 18

NOTES
18
Page 19

NOTES
19
Page 20

Breville Customer Service Centre
Australian Customers
Mail: PO Box 22
Botany NSW 2019
AUSTRALIA
Phone: 1300 139 798
Fax: (02) 9384 9601
Customer Service:
Email:
www.breville.com.au
Breville is a registered trademark of Breville Pty. Ltd. A.B.N. 98 000 092 928.
Due to continued product improvement, the products illustrated/photographed
in this brochure may vary slightly from the actual product.
Copyright Breville Pty. Ltd. 2010.
New Zealand Customers
Mail: Private Bag 94411
Botany Manukau 2163
Auckland NEW ZEALAND
Phone:
0800 273 845
Fax: 0800 288 513
Customer Service:
Email:
BVP700 Issue - A12
 Loading...