

Bretford lap18eulba User Manual
LAP18EULBA
LAP18EULFR
NOTEBOOK CART ASSEMBLY
WITH TIMER
Assembly Instructions for:
INTERIOR E-UNIT
REPOSITIONING / REPLACEMENT
AND
TIMER REPLACEMENT
Parts List
Qty. Part No. Description
1 LAP18EULBA Cart Assembly, e-units at back
LAP18EULFR Cart Assembly, e-units at front
LAP18EULBA
NO TV/MONITOR TO BE
USED ON TOP OF CART
Tools Required
Philips screwdriver
The socket-outlet to be installed near the equipment and to be easliy accessible.
Do not load each electrical unit with more than 12 A and do not load any
recepticle with more than 12 A.
MAXIMUM WEIGHT OF ACCESSORIES
ON TOP OF CART: 25 LBS.
NOTE:
UNPLUG CART (TIMER) POWER CORD FROM POWER
SOURCE BEFORE STARTING
CAUTION: RISK OF ELECTRICAL SHOCK.
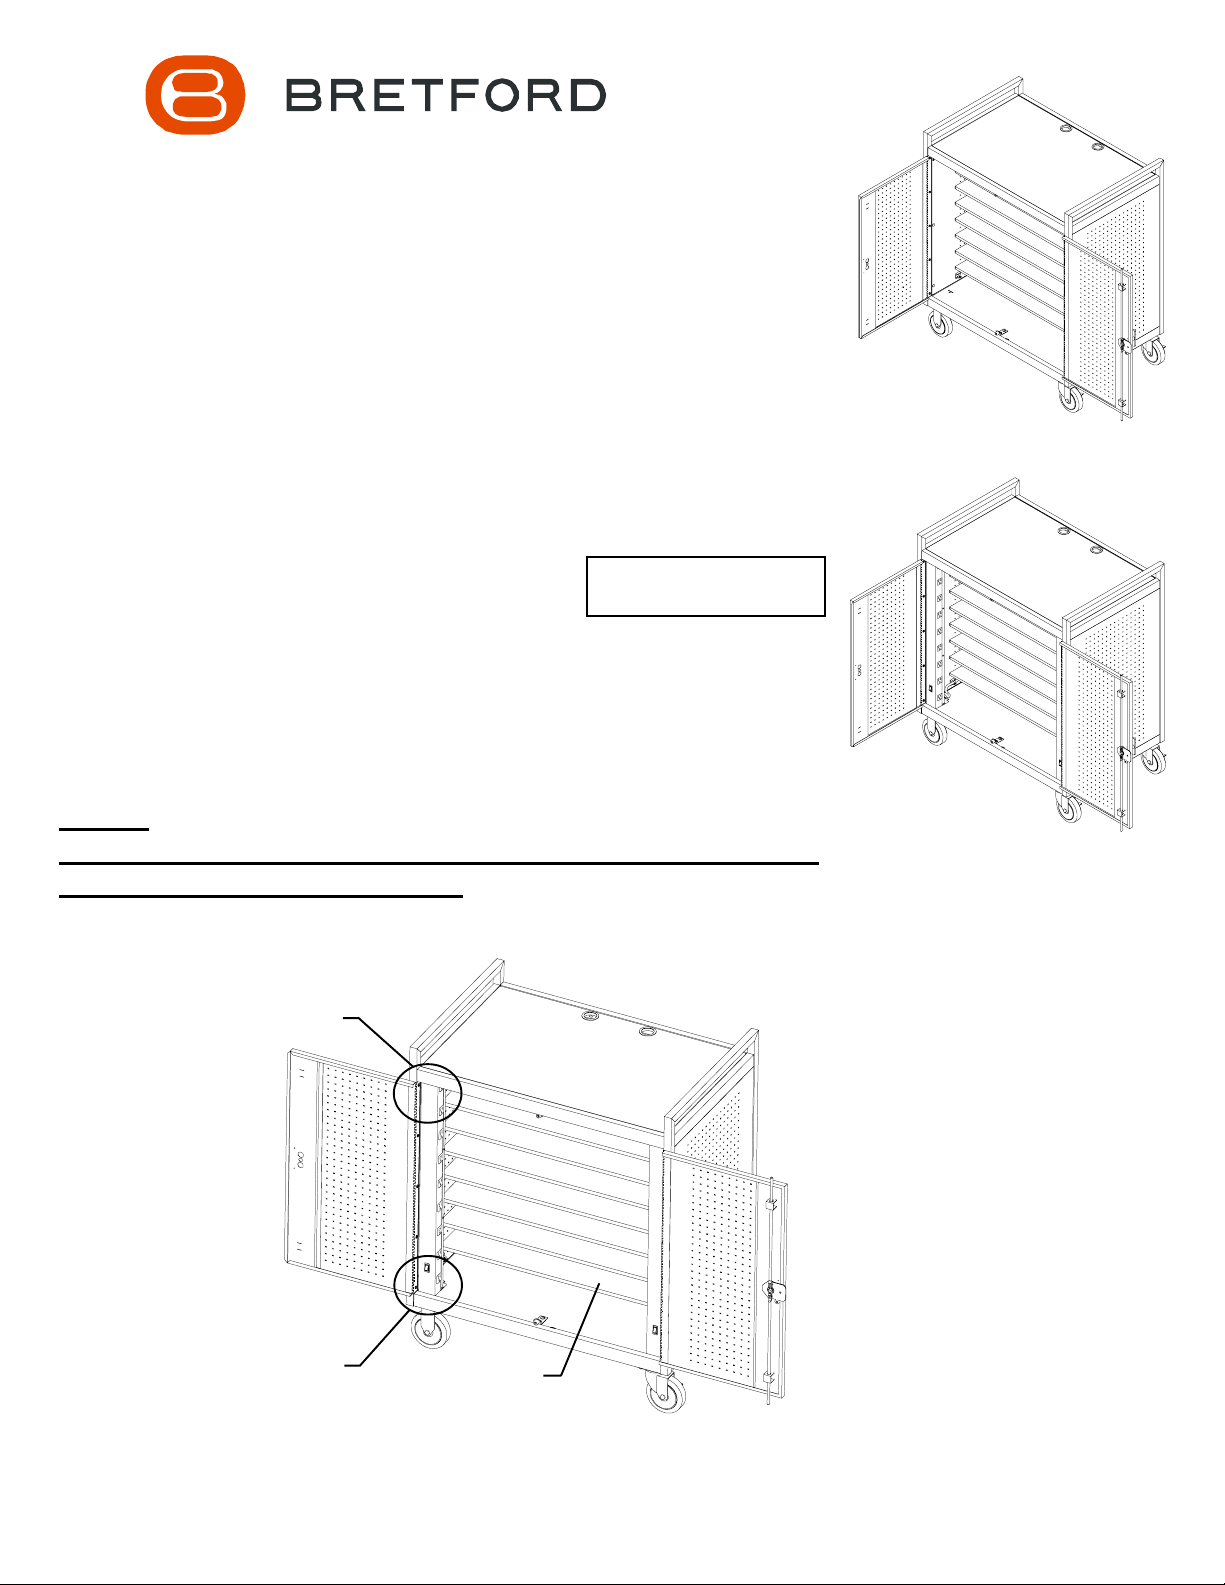
E-UNIT REPOSITIONING:
'FRONT TO REAR'
SEE DETAIL 'B'
DO NOT PLUG INTO ANOTHER RELOCATABLE
POWER TAP.
LAP18EULFR
SEE DETAIL 'A'
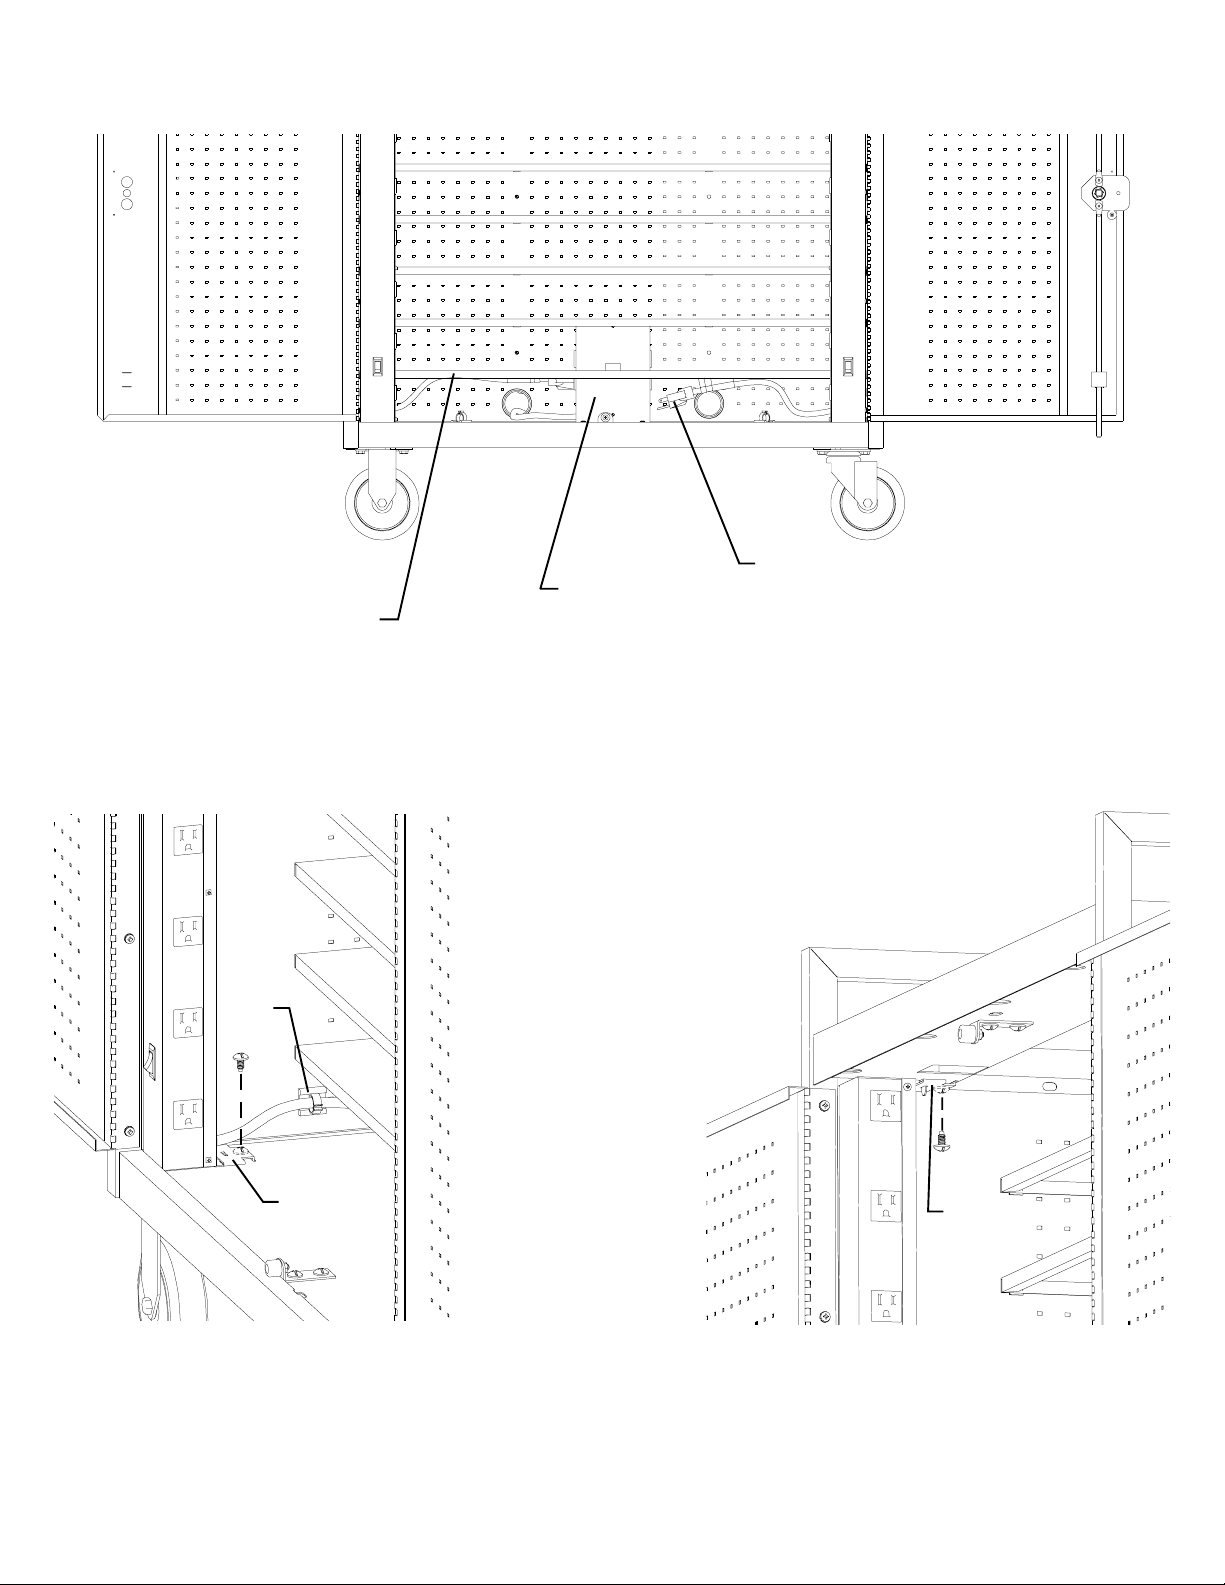
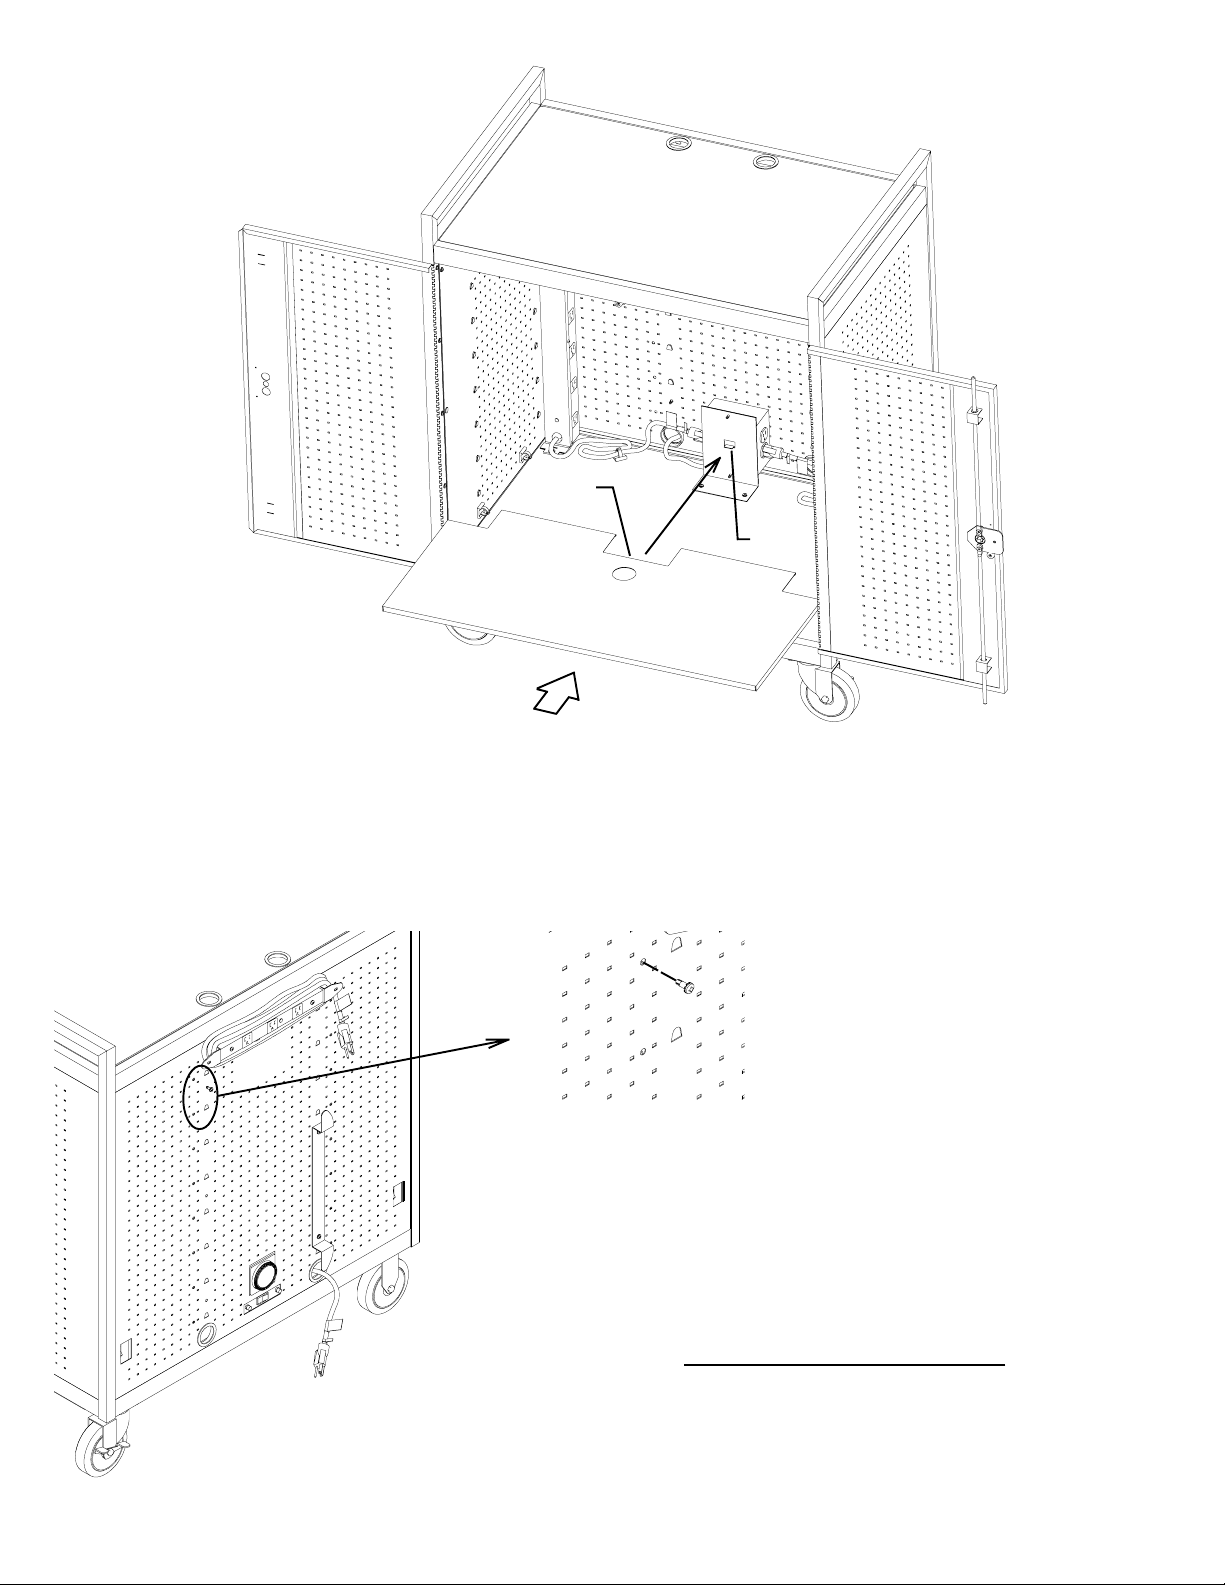
Open both front doors of cart to access E-Units. From underneath the bottom shelf, carefully unplug the power
cords of the E-Units from the timer assembly (see Front View) and unclip the power cords from the side panel
clips. Loosen the screw holding the E-Unit bracket assembly and remove all 4 bracket assemblies (see DETAILS
'A' and 'B').
bottom shelf
Step 1
bottom shelf
clip
timer assembly
Front View
E-Unit power
cord
bracket
assembly
DETAIL 'A' DETAIL 'B'
bracket
assembly

front-left
front-right
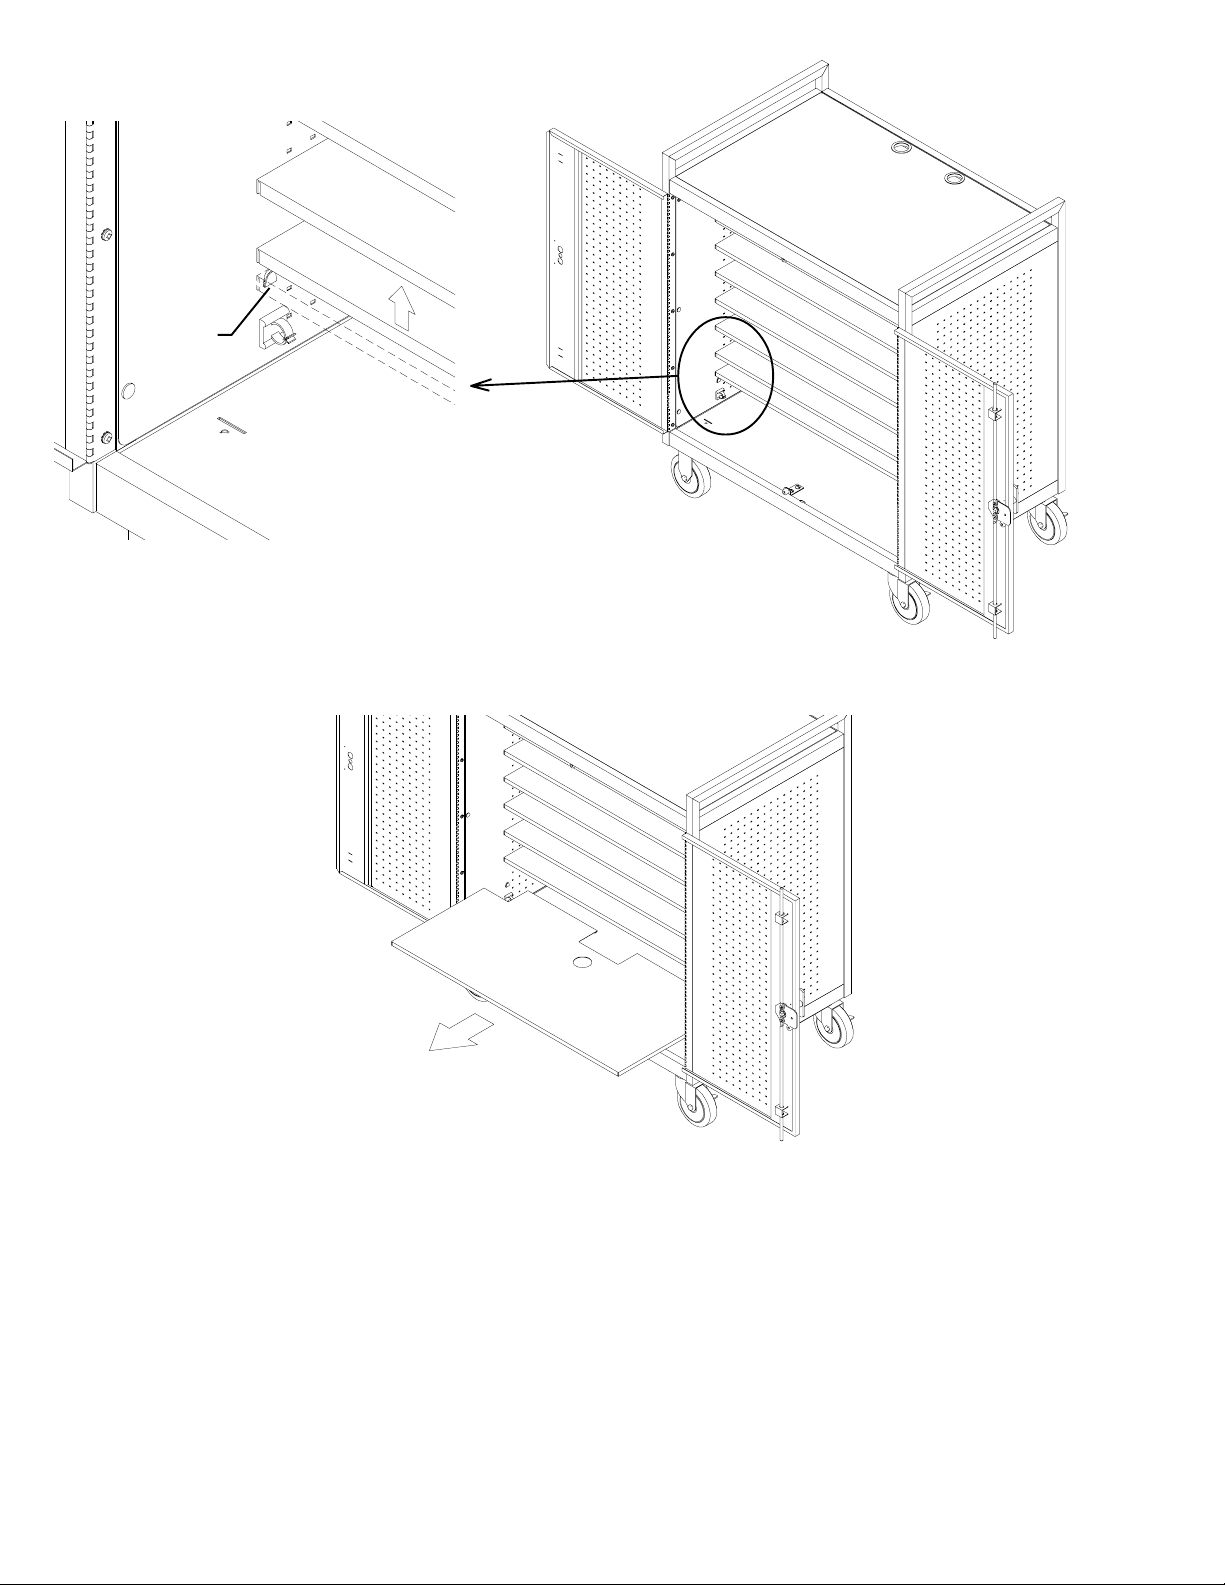
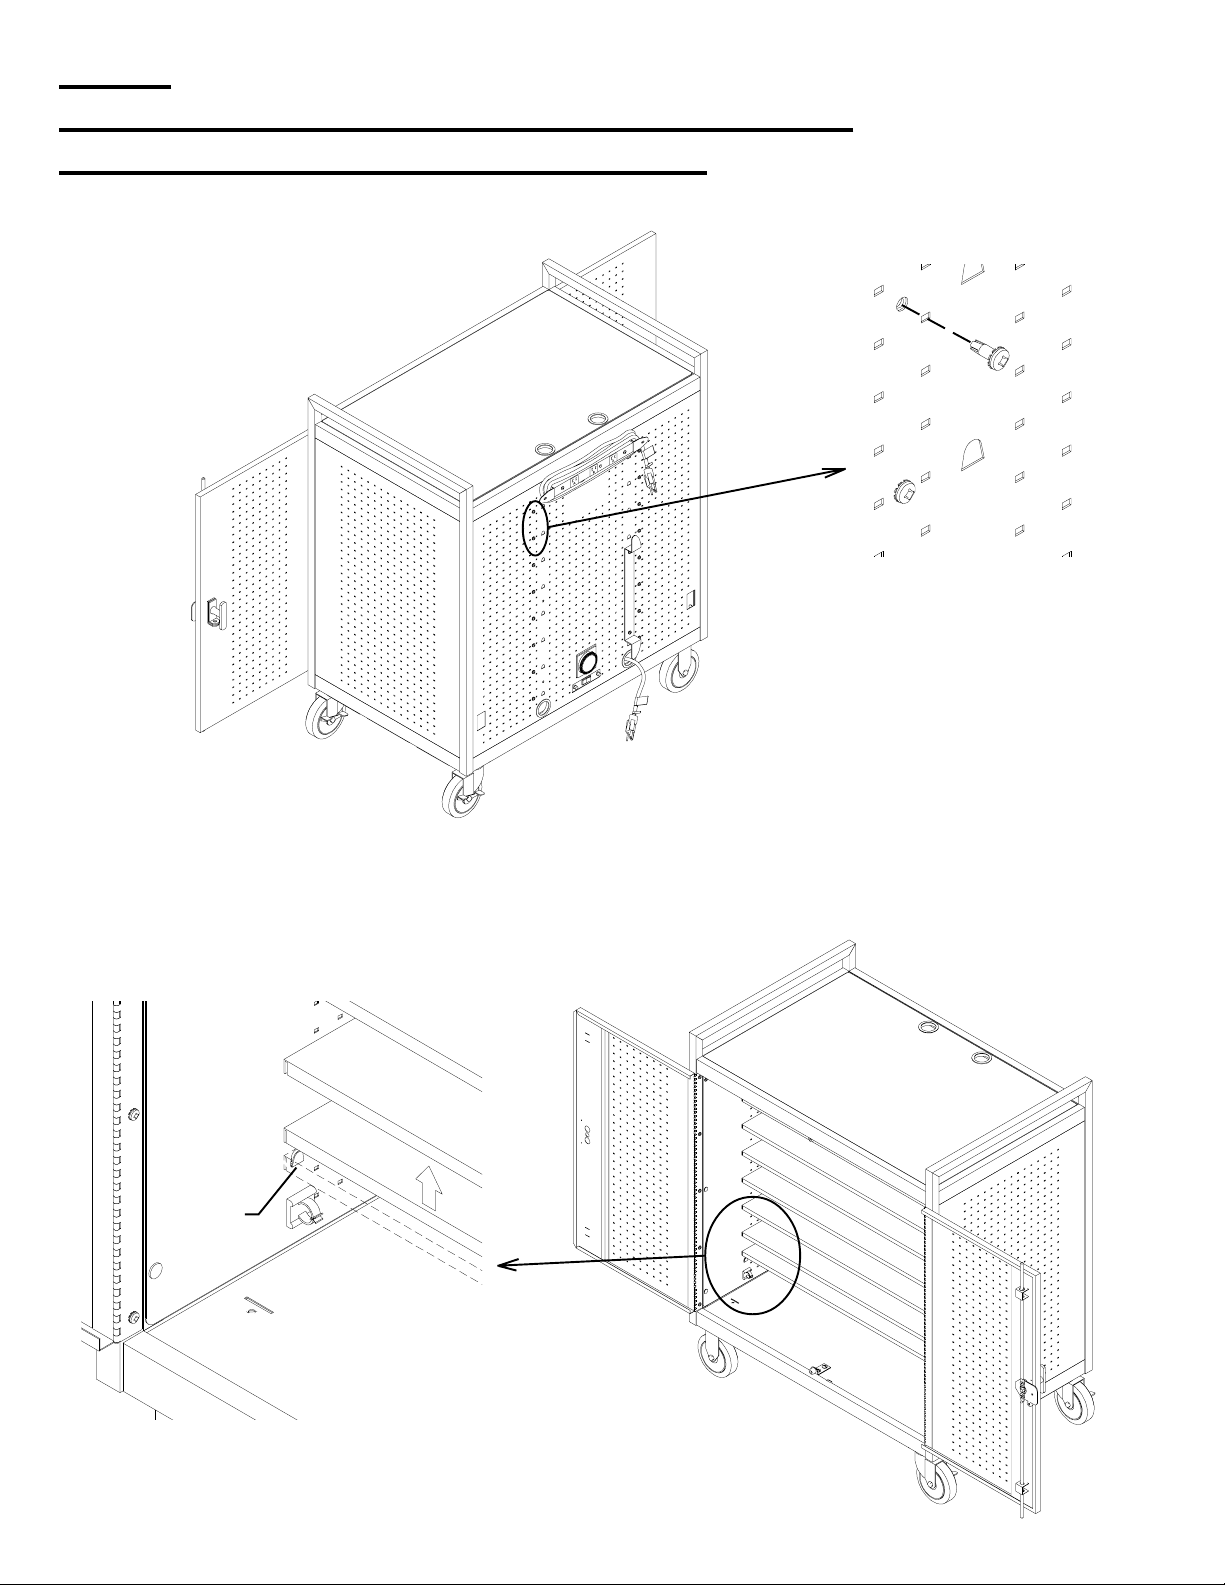
Step 2
Remove front-left E-Unit by griping the top and tilt it side ways until it clears the underside of the cart interior
shelf channel and set it aside.
Remove front-right E-Unit by griping the top and tilt it side ways until it clears the underside of the cart interior
shelf channel and set it aside.
DETAIL 'C'
Step 3
Remove 16 screws (2 per shelf) from rear panel that secure the 8 interior shelves (see DETAIL 'C').
mounting
tab
DETAIL 'D'
Step 4
Remove each interior shelf by carefully pushing upward (to release shelf from mounting tabs) shown in Detail 'D',
then carefully sliding out. Set each shelf aside.
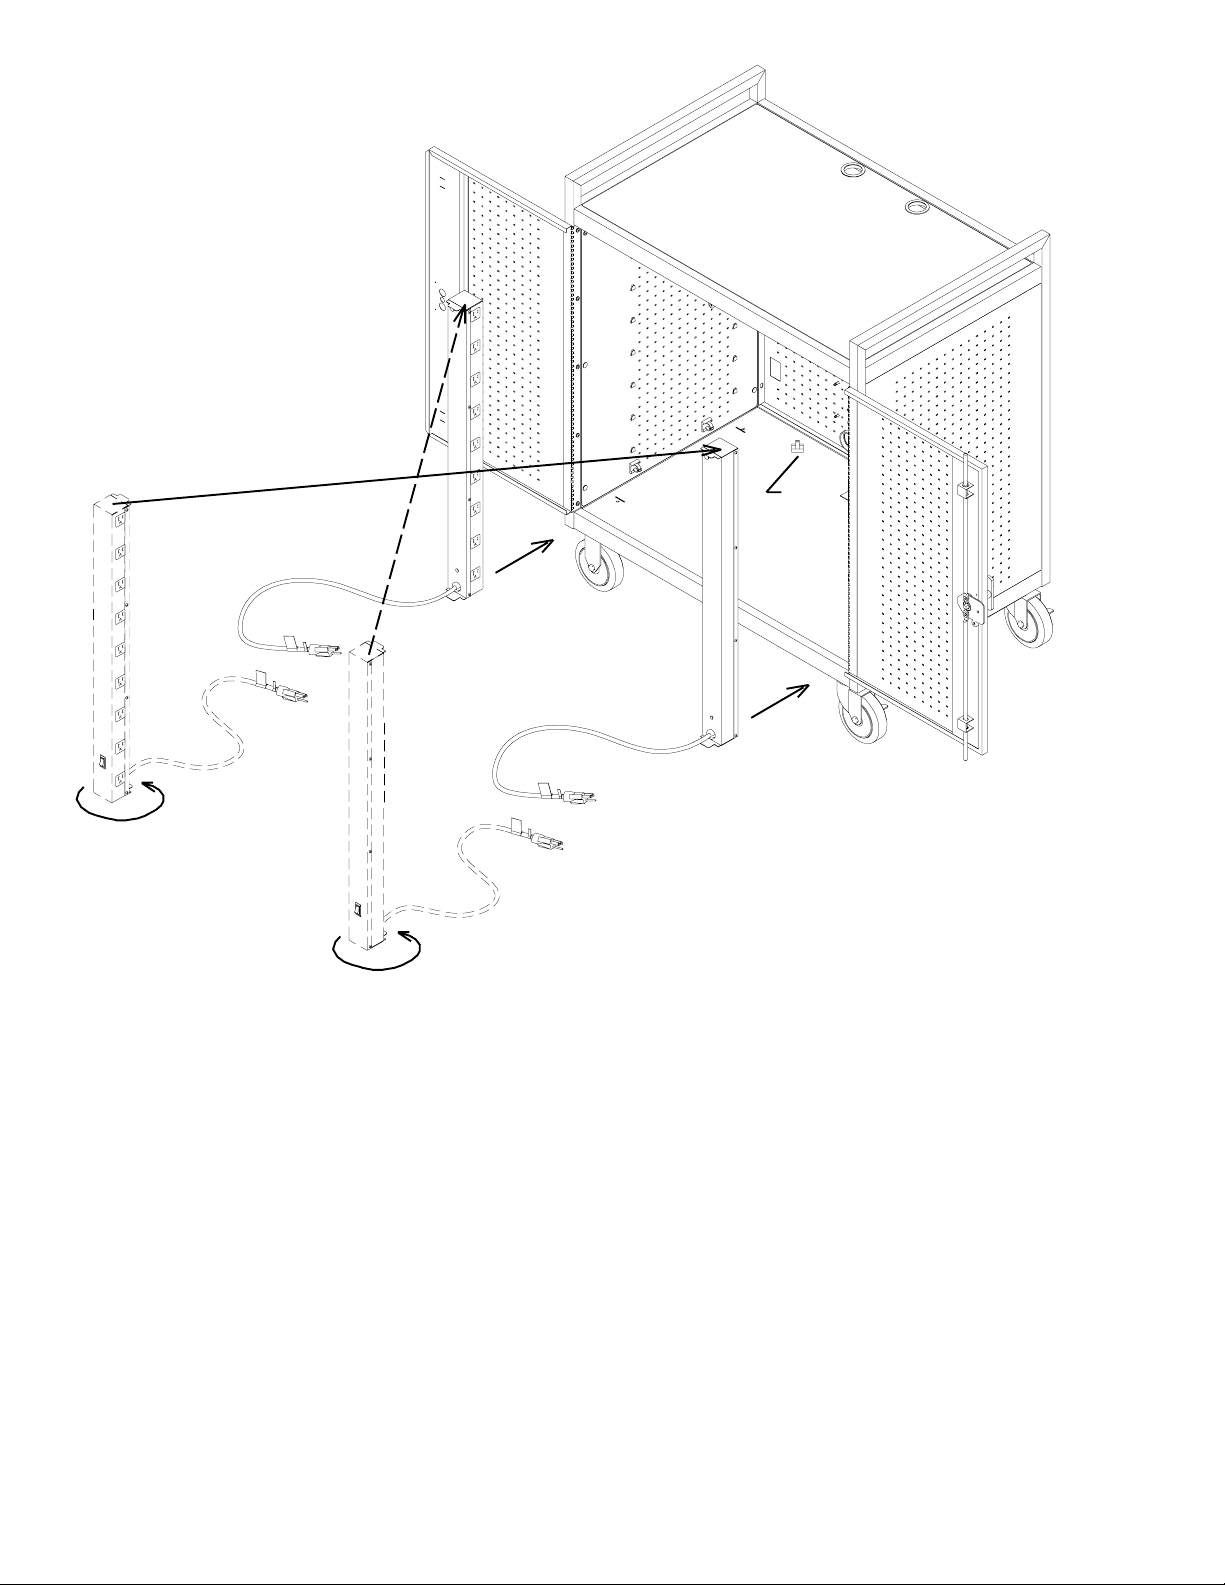
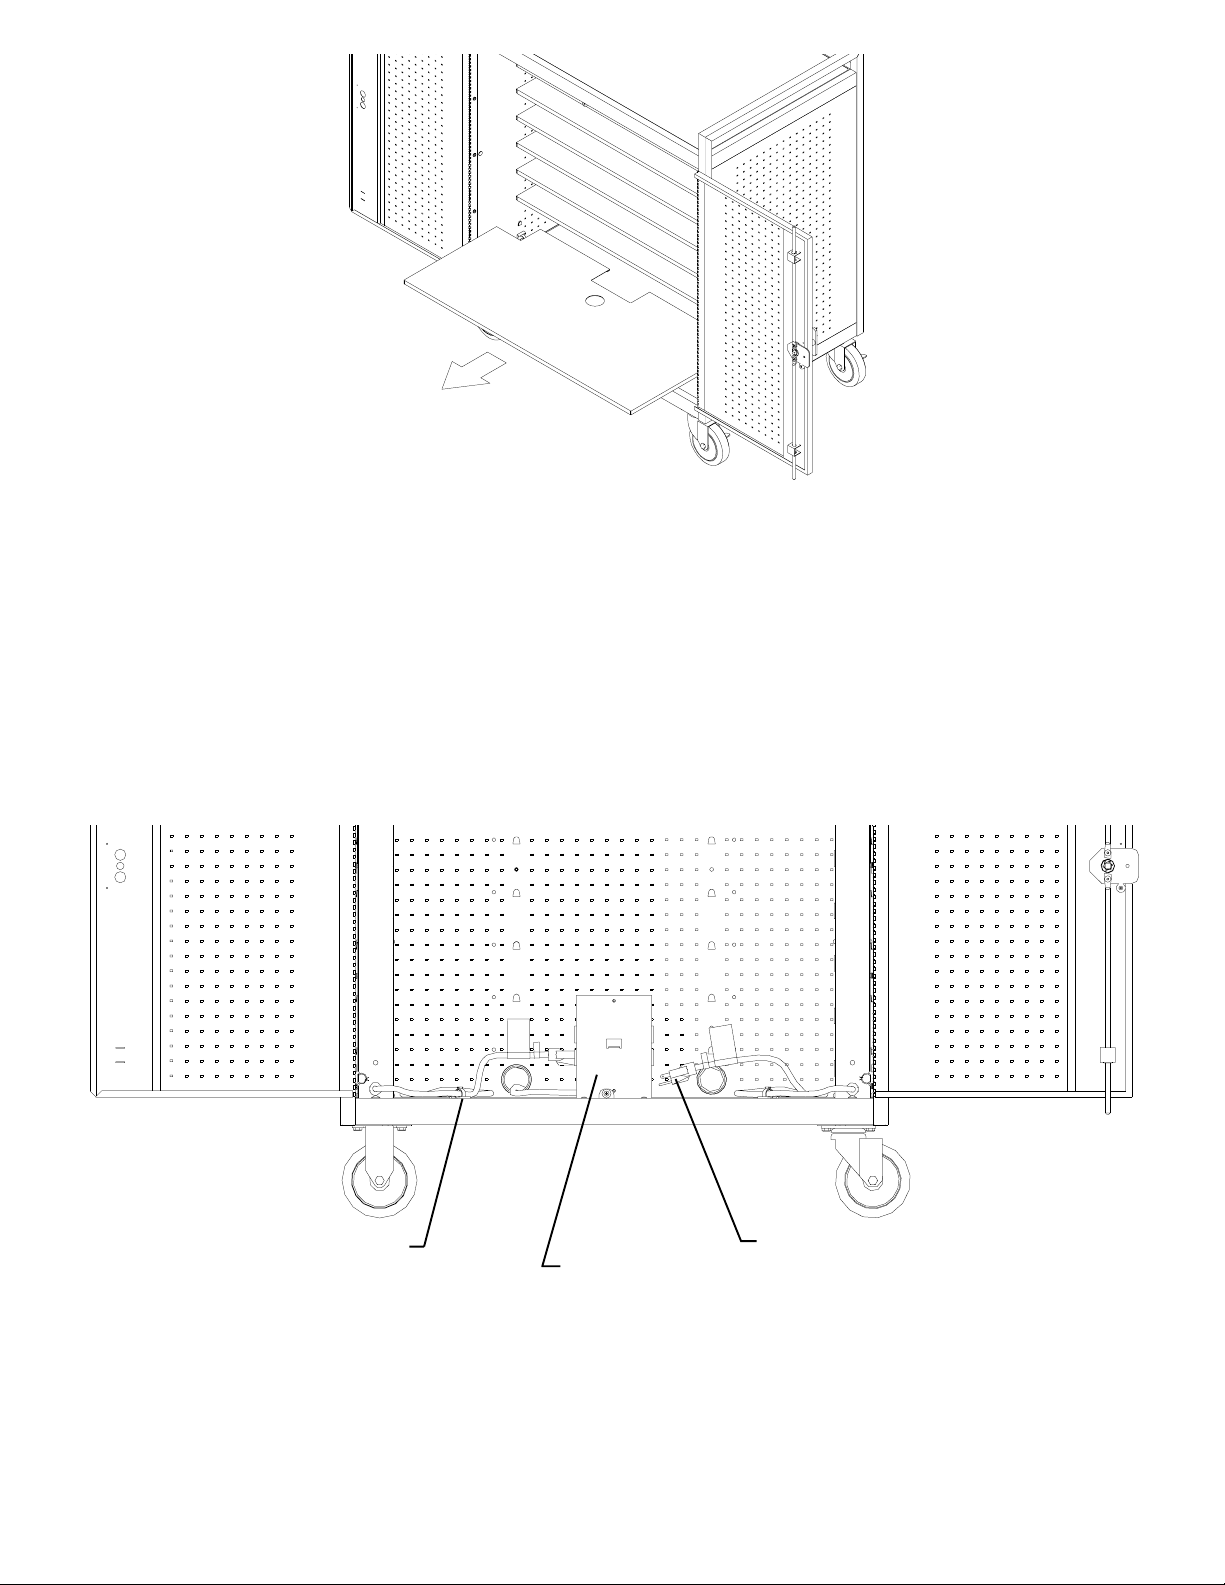
Step 5
Reinstall the E-Units (set aside from being removed from the front) as follows:
clip
1. Rotate the E-Unit 180 degrees (from original position).
2. Cross over to opposite corner of cart.
3. Tilt in and set bottom in back corner.
4. Grip the top and tilt to the upright position.
When repositioned correctly, the E-Unit outlets face the interior and power switch should be visible from rear
panel cutout.
Reinstall the E-Unit bracket assemblies (make sure that the top flange of the E-unit is aligned with the slot in the
bracket assembly) and tighten screws securely.
Plug in the E-Units power cords into the bottom outlets of the timer assembly.
(Note that the 'A', 'B' designation of the cords are now opposite the timer 'A, 'B' designation set at the factory.
This will not affect the operation of your cart.)
Press each E-Unit power cord into the single wire clip located at the rear/bottom of the cart only.
Fold the power cords into a 's' pattern, flat on the bottom surface.
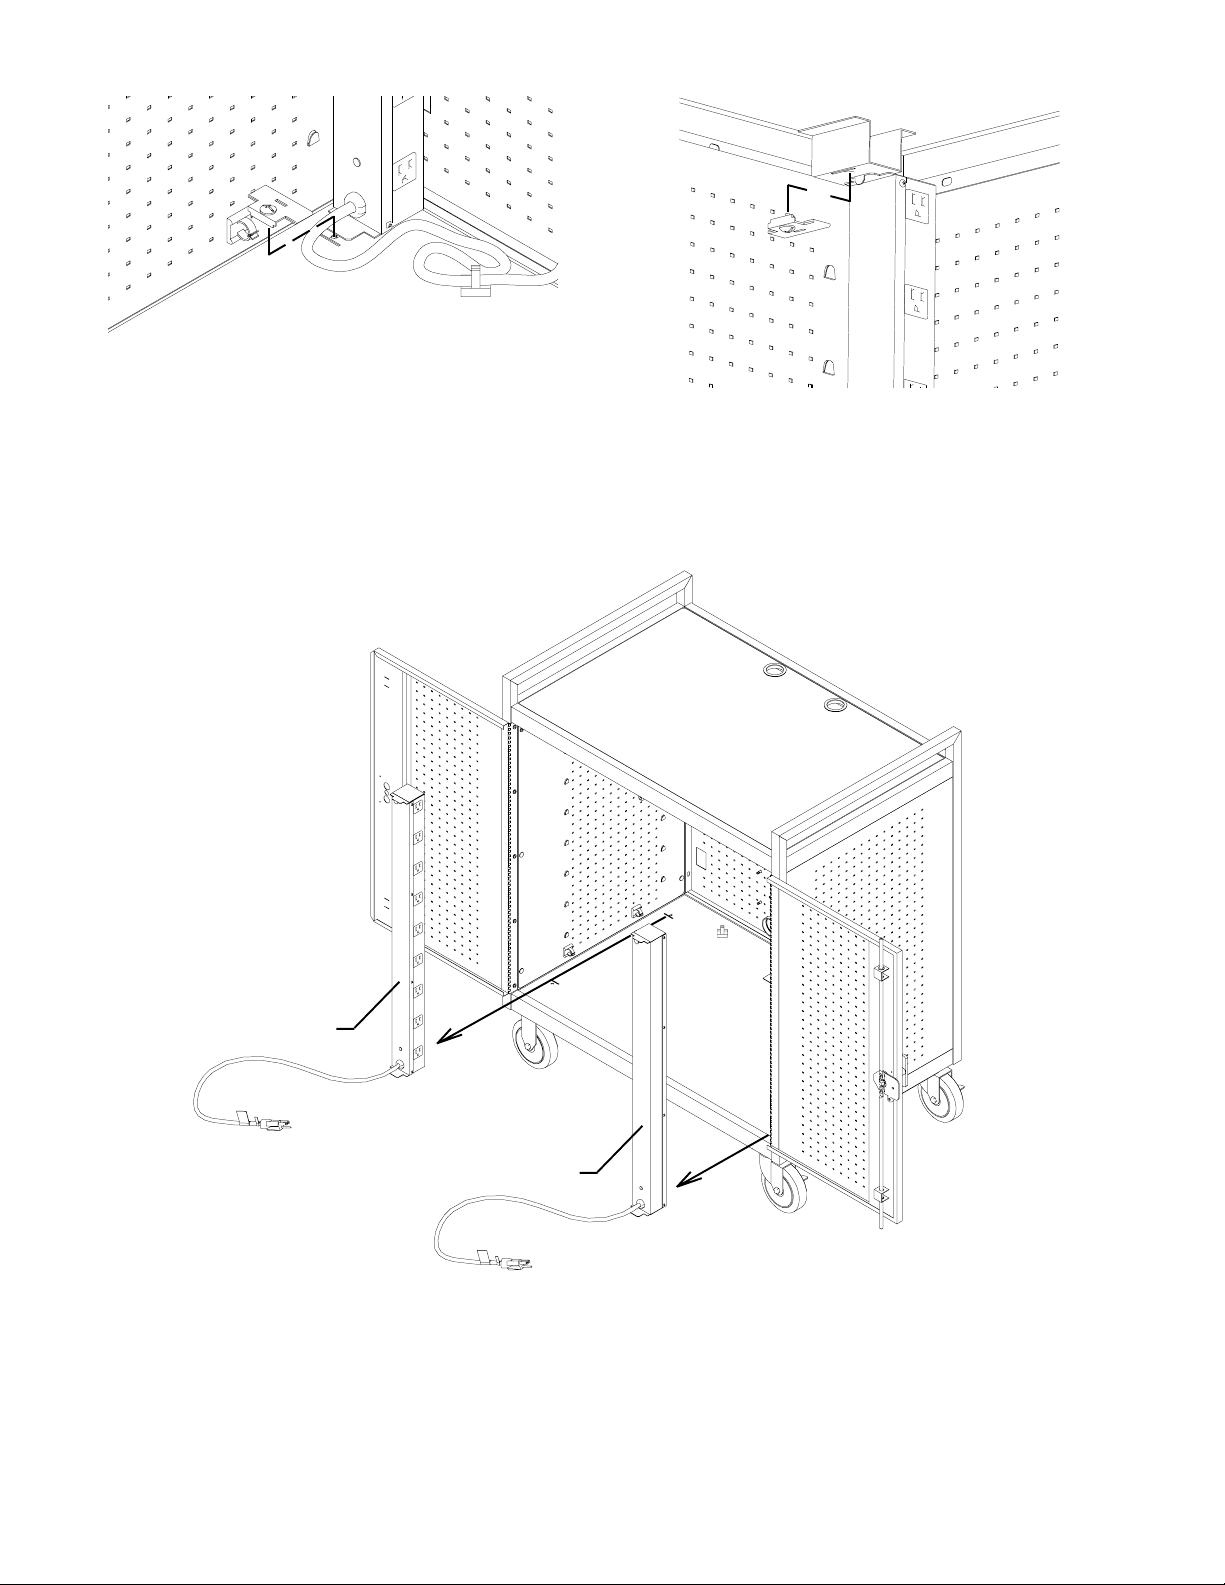
Reinstall the 8 interior shelves as follows:
1. Carefully slide in the shelf with notch at the bottom position (the notch will rest on the bracket tab).
(Make sure that the shelf flanges are ALL seated into the mounting tabs.)
2. Slide in all remaining shelves into position as the bottom shelf.
notch
tab
Step 6
DETAIL 'E'
Step 7
Reinstall 16 screws to rear panel that will secure the 8 interior shelves
(see DETAIL 'E). DO NOT OVER TIGHTEN SCREWS.
Installation is now complete and ready for use.
NOTE:
UNPLUG CART (TIMER) POWER CORD FROM
POWER SOURCE BEFORE STARTING
E-UNIT REPOSITIONING:
'REAR TO FRONT'
DETAIL 'A'
Step 1
Remove 16 screws (2 per shelf) from rear panel that secure the 8 interior shelves (see DETAIL 'A').
mounting
tab
DETAIL 'B'
Step 2
With both doors open, remove each interior shelf by carefully pushing upward (to release shelf from mounting
tabs) shown in Detail 'B', then carefully sliding out. Set each shelf aside.
clip
timer assembly
Front View
Carefully unplug the power cords of the E-Units from the timer assembly (see Front View) and unclip the power
cords from the clips at the rear of cart. Loosen the screw holding the E-Unit bracket assembly and remove all 4
bracket assemblies (see DETAILS 'D' and 'E').
E-Unit power
cord
DETAIL 'D' DETAIL 'E'
rear-left
rear-right
Step 3
Remove rear-left E-Unit by griping the top and tilt it side ways until it clears the underside of the cart interior
shelf bracket and set it aside.
Remove rear-right E-Unit by griping the top and tilt it side ways until it clears the underside of the cart interior
shelf bracket and set it aside.

Reinstall the 8 interior shelves as follows:
1. Carefully slide in the shelf with notch at the bottom position (the notch will rest on the bracket tab).
(Make sure that the shelf flanges are ALL seated into the mounting tabs.)
2. Slide in all remaining shelves into position as the bottom shelf.
notch
tab
Step 4
DETAIL 'F
Step 5
Reinstall 16 screws to rear panel that will secure the 8 interior shelves
(see DETAIL 'F'). DO NOT OVER TIGHTEN SCREWS.
 Loading...