

Bretford 35XTC17, 35XTC14, 35XTC18, 35XTC26 Assembly Instructions Manual

35XTC17 35XTC14
35XTC18 35XTC26
Adjustable Work Center with
CPU Holder and Casters
(30" DEPTH ONLY)
Assembly Instructions
35XTC17 36" wide one grommet hole 35XTC18 48" wide two grommet holes
35XTC14 42" wide one grommet hole
Parts List
Qty. Part No. Description
1 SA2339 Table Top (36")
SA2340 Table Top (42")
SA2341 Table Top (48")
SA2342 Table Top (72")
2 022-2036 Leg Assembly - Lower
1 022-1589 Leg Assembly - Upper Right
1 022-1590 Leg Assembly - Upper Left
1 010-2321 Modesty Panel (36")
010-3080 Modesty Panel (42")
010-2324 Modesty Panel (48")
010-2706 Modesty Panel (72")
1 010-2322 Cord Bin (36")
010-3081 Cord Bin (42")
010-2325 Cord Bin (48")
010-3075 Cord Bin (72")
2 010-3344 CPU Side Holder-w/hole
(1 required on 35XTC14,
35XTC17 & 35XTC18)
010-4981 CPU Holder w/Hole for MT Models
2 010-3343 CPU Side Holder-w/slot
(1 required on 35XTC14,
35XTC17 & 35XTC18)
010-4980 CPU Holder w/Slot for MT Models
Hardware List
Qty. Ref. Part No. Description
12 AA 030-0402 #10-32 x 5/8" Combo Screw
12 BB 030-0240 Washer, External Tooth
4 CC 030-0396 3/8-16 x 1/2" Set Screw
4 DD 030-0325 1/4-20 x 1/2" Combo Screw
6 EE 030-0168 #8 x 1/2" Wood Screw
2 FF 030-0433 #10-32 x 1/2" Knurled Knob Screw
2 HH 030-0465 Retaining Washer - Nylon
2 JJ1 015-0002 4" Caster without Lock
2 JJ2 015-0003 4" Caster with Lock
8 KK 030-0305 Washer, Flat (6 required on 35XTC14,
35XTC17 & 35XTC18)
8 LL 030-0453 #12 x 3/4" Phillips Truss Head Screw
(4 reqiured on 35XTC14, 35XTC17 &
35XTC18)
2 MM 030-0272 1/4-20 x 1/2" Carriage Bolt (1 reqiured
on 35XTC14, 35XTC17 & 35XTC18)
2 NN 030-0306 Washer, Flat (1 reqiured on 35XTC14,
35XTC17 & 35XTC18)
2 PP 030-0256 1/4-20 Flanged Nut (1 required on
35XTC14, 35XTC17 & 35XTC18)
1 030-0397 Allen Wrench
Tools Required
Phillips Screwdriver
Rubber Mallet
Allen Wrench (provided)
7/16" Open/Box End Wrench
Electric Drill
1/8" Dia. Drill Bit
35XTC26 72" wide,
two grommet holes,
two CPU holders
modesty panel
mounting holes
AA
BB
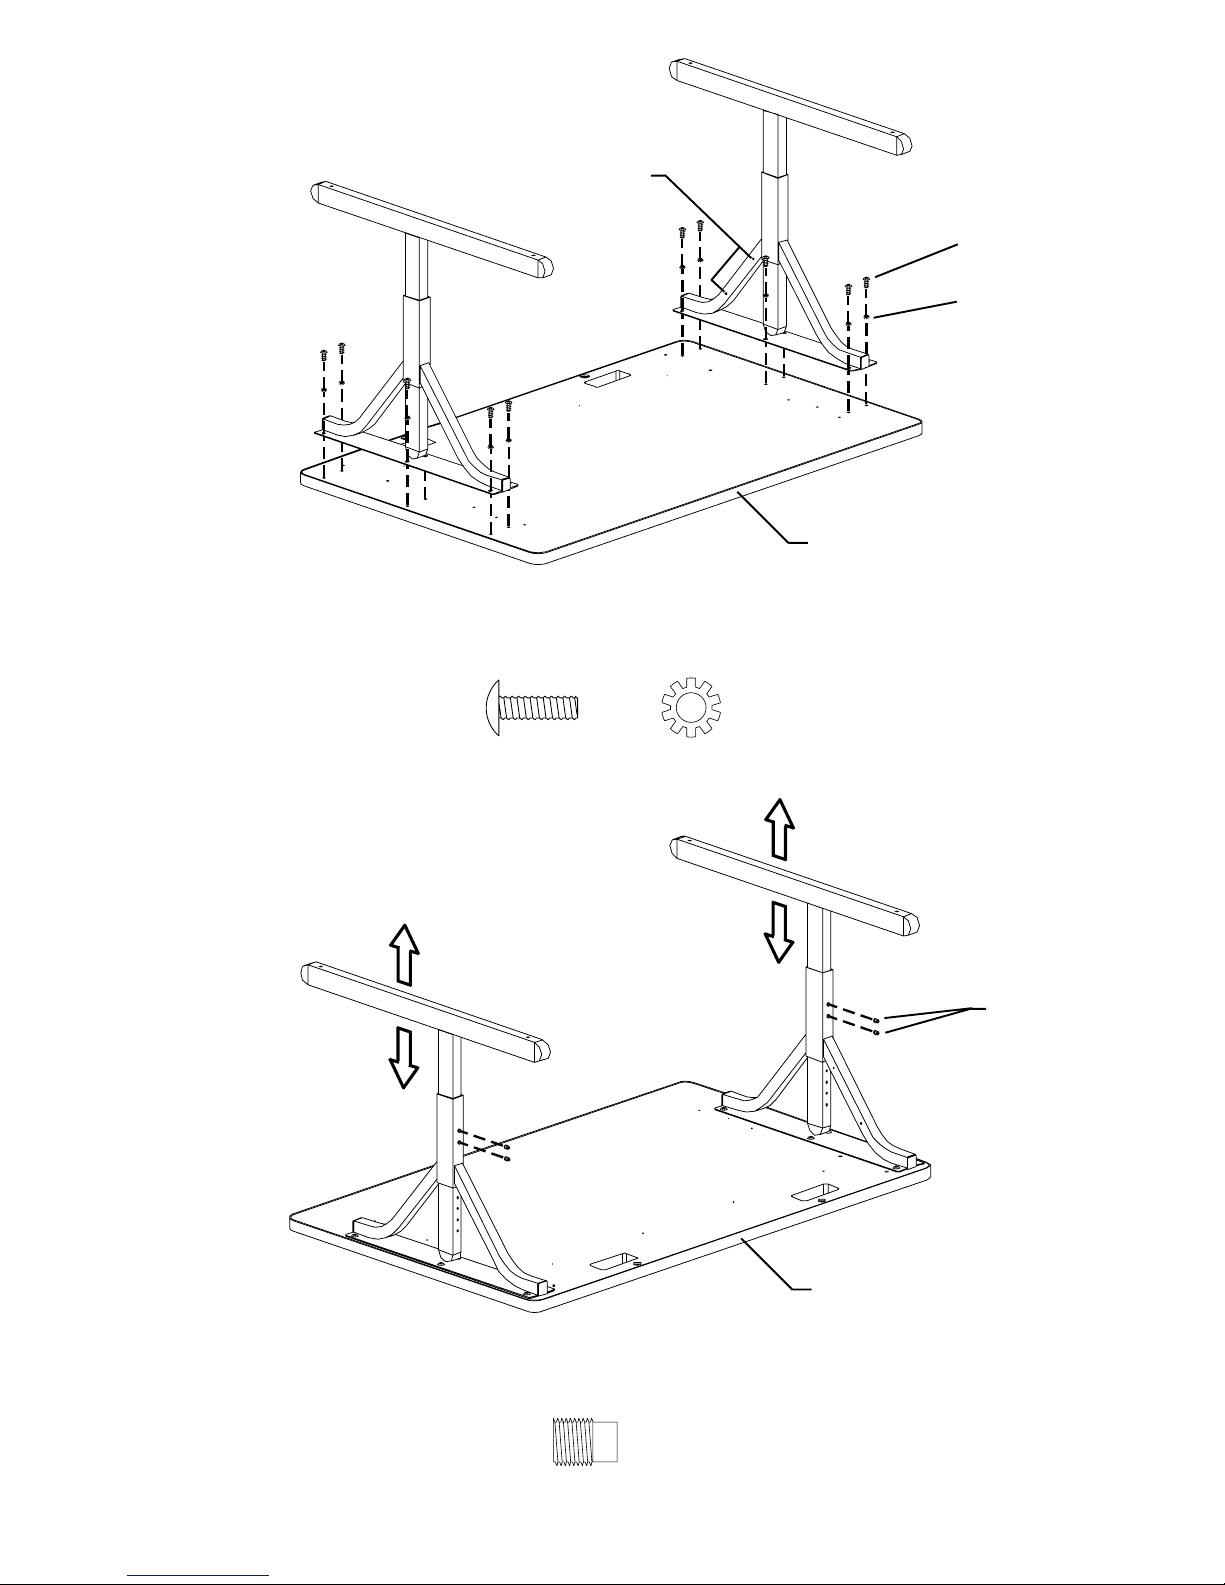
FRONT
Step 1
Lay the table top on a carpeted surface with holes facing up. Position the legs onto the table top with
the modesty panel mounting holes facing inward as shown. Loosely attach legs with screws (AA) and
washers (BB).
AA BB
CC
REAR
Set desired height of legs and insert set screws (CC) into legs and tighten with allen wrench provided.
Step 2
CC
 Loading...