

Page 1

Temeo TBT
Art. No. 7007700CM3000
GB
INSTRUCTION MANUAL
Page 2
A
Fig. 1
C
Page 3
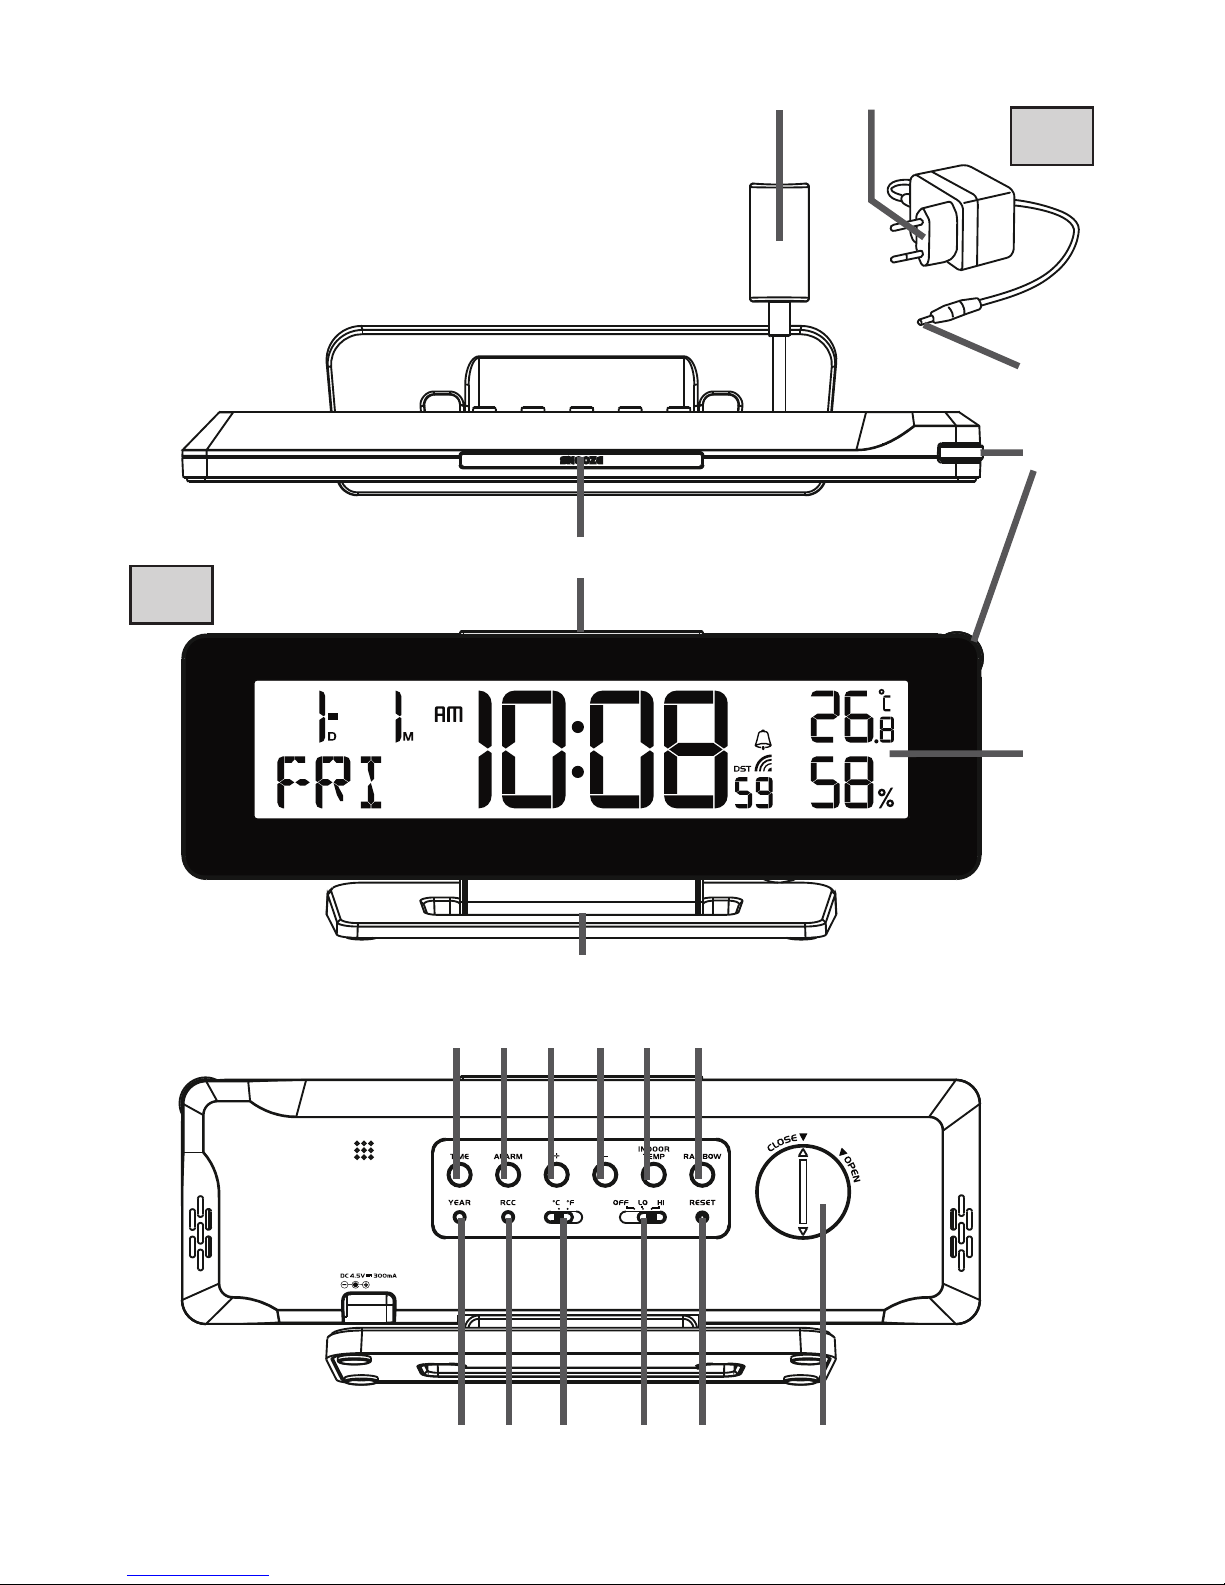
Fig. 2
8
14 15 16 17 18 19
9 10 11 12 13
1 2
3
4
A
B
6
7
5
Page 4
About this Instruction Manual
These operating instructions are to be considered a
component of the device. Please read the safety
instructions and the operating instructions carefully before
use. Keep these instructions for renewed use at a later
date. When the device is sold or given to someone else, the
instruction manual must be provided to the new owner/user
of the product.
This product is intended only for private use. It was developed
as an electronic medium for the use of multimedia services.
General Warnings
RISK OF CHOKING!
Keep packaging material, like plastic bags and rubber
bands, out of the reach of children, as these materials pose
a choking hazard.
RISK OF ELECTRIC SHOCK!
This device contains electronic components that operate
via a power source (batteries). Children should only use
the device under adult supervision. Only use the device as
described in the manual; otherwise, you run the risk of an
electric shock.
RISK OF CHEMICAL BURN!!
Leaking battery acid can lead to chemical burns. Avoid contact
of battery acid with skin, eyes and mucous membranes. In
the event of contact, rinse the affected region immediately
with a plenty of water and seek medical attention.
RISK OF FIRE/EXPLOSION!
Use only the recommended batteries. Do not short-circuit
Page 5

the device or batteries, or throw them into a fire. Excessive
heat or improper handling could trigger a short-circuit, a fire
or an explosion.
NOTE!
Do not disassemble the device. In the event of a defect,
please contact your dealer. The dealer will contact the
Service Centre and can send the device in to be repaired,
if necessary.
Do not immerse the unit in water.
Do not subject the unit to excessive force, shock, dust,
extreme temperature or high humidity, which may result in
malfunction, shorter electronic life span, damaged batteries
and distorted parts.
Use only the recommended batteries. Always replace weak
or empty batteries with a new, complete set of batteries at
full capacity. Do not use batteries from different brands or
with different capacities. Remove the batteries from the unit
if it has not been used for a long time.
The manufacturer is not liable for damage related to
improperly installed batteries!
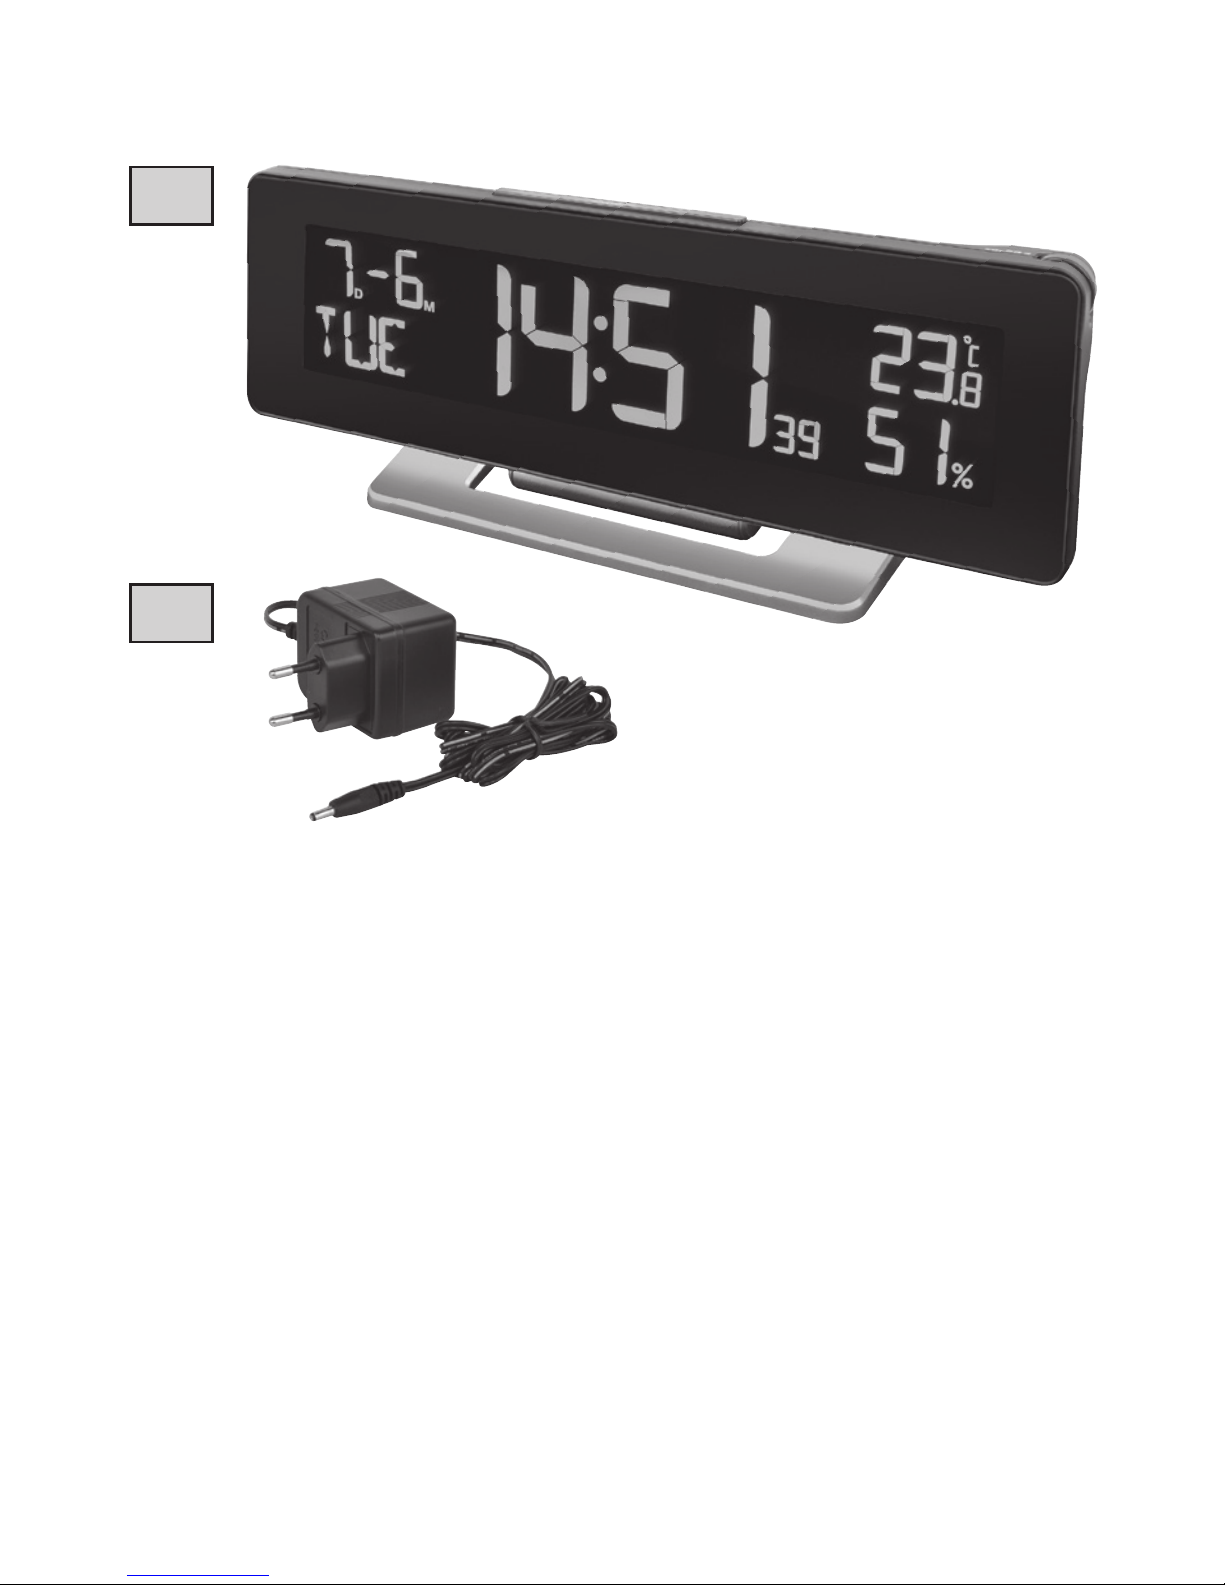
SCOPE OF DELIVERY (Fig. 1)
Main unit (A), power plug (B), instruction manual
Required batteries (not included with purchase):
1 pc. button cell (3V, CR2032 type)
PARTS OVERVIEW
1. DC jack
2. Power adapter
Page 6

3. Power cable with coaxial/barrel connector
4. Function wheel colour selection
5. SNOOZE button
6. LCD
7. Stand
8. TIME button
9. ALARM button
10. + button
11. – button
12. INDOOR TEMP button
13. RAINBOW button
14. YEAR button
15. RCC button
16. °C/°F button
17. OFF/LO/HI slide switch
18. RESET knob
19. Battery compartment
POWER SUPPLY
1.
Put the DC power plug (Fig. 1, 3) in the DC jack (Fig. 1, 1).
2. Push the RESET knob to initialize the automatic time
signal and remote sensor signal seanning.
3. Open the battery compartment covering carefully with a
coin (turn to arrow direction OPEN).
4. Insert 1 button cell (Typ CR2032, 3V) according to the
polarity marked in the battery compartment.
5. Close the battery compartment.
RECEPTION OF RADIO CONTROLLED TIME SIGNAL
The time and date are radio-controlled. The current time
Page 7

and date are automatically synchronized with the time signal
transmitted from Europe. When used for the first time (after
inserting the batteries or pressing [ RESET ] button), the
clock will start to receive the RC signal in 5 minutes with the
signal strength indicator flashing.
SIGNAL STRENGTH INDICATOR
The signal indicator displays signal strength in 4 levels. Wave
segment flashing means time signals are being received.
The signal quality could be classified into four types:
Symbol
Signal
strength
no
signal
weak
signal
acceptable
signal
excellent
signal
NOTE!
1. Everyday the unit will automatically search for the time
signal at 2:00am , 8:00am, 2:00pm and 8:00pm.
2. Always place the unit away from interfering sources such
as TV set, computer, etc.
3. Avoid placing the unit on or next to metal plate.
4. Closed area such as airport, basement, tower block or
factory is not recommended.
5. Do not start reception on a moving article such as
vehicle or train.
MANUAL TIME SETTING
1. In normal time mode, press and hold [ TIME ] button for 2
seconds to enter the 12- or 24-hour mode setting.
2. Press [ + ] or [ – ] button to set the desired value.
3. Press [ TIME ] button again. Hours digit flashes. Press [ +
] or [ – ] button to change its value.
Page 8

4. Repeat the above operation to set the time in this order:
12-/24-hour mode > Minutes > Seconds > Date display
mode > Month > Day > Time deviation > Language >
Automatic daylight saving time.
5. Press [ TIME ] button to save and exit the setting or let it
exit automatically 30 seconds later without pressing any
button.
ALARM TIME SETTING
1. In normal time mode, press [ ALARM ] button to select
the AL.
2. In AL mode, press and hold [ ALARM ] button for 2
seconds until alarm hour digit flashes.
3. Press [ + ] or [ – ] button to change the value.
4. Repeat the above operations to set time in this order:
Hour > Minute
5. Press [ ALARM ] button to save and exit the setting, or
let it exit automatically 30 seconds later without pressing
any button.
NOTE!
1. The alarm will sound automatically when the alarm time
icon
is displayed.
ACTIVATING THE ALARM
1. Set the alarm time as described in the previous chapter.
2. Press the [ ALARM ] button to switch into alarm mode AL.
2. Press the [ ALARM ] button to activate alarm time AL. The
symbol
will be displayed on the LCD.
3.
Press the [ ALARM ] button again to disable the alarm
time.
Page 9

SNOOZE FUNCTION
1. If no button is pressed during the alarm period, the
alarm will turn off automatically.Alarm beeping lasts for
2 minutes.
2. Press [ SNOOZE ] button to stop the current alarm and
enter snooze. Alarm icon will be flashing continuously.
The alarm will sound again in 5 minutes. Snooze can be
operated continuously in 24 hours.
3. Press [ ALARM ] button to turn off alarm function.
DISPLAY COLOR CHANGE
1. Press [ RAINBOW ] button and the function wheel
subsequently to activate the automatic color change.
Display changes continuously between 256 colors.
2. Press [ RAINBOW ] button again to disable color
change function. Press [ RAINBOW ] button several
times to select a color from the following and display it
permanently:
white > red > orange > yellow > green > light-blue > deep
blue > purple
3. Press [ RAINBOW ] button again to disable color change
function. Turn the function wheel to pass through the
whole colour spectrum. The selected colour is displayed
permanentely.
4. Press the [ INDOOR TEMP ] button to change the display
colour in dependence to the temperature change. Display
colour will change with each temeprature change.
LOW BATTERY INDICATOR
If the low battery indicator appears in the outdoor
temperature window (Fig. 7), it indicates that the battery
Page 10

power of the remote sensor is not high enough. Insert 2
new AA size batteries.
TECHNICAL DATA
Temperature
measurement range:
-5° C to 50° C (23° F to 122° F)
Measuring accuracy: 0,1° C/F (above -10° C/14° F);
1° C/F (below -10° C/14° F)
Time signal: DCF
Power supply:
4.5V, 300 mA via power plug (and 3V Lithium
button cell CR2032 as a low energy power supply)
CLEANING AND MAINTENANCE
Before cleaning the device, disconnect it from the power
supply (remove plug and remove batteries)!
Only use a dry cloth to clean the exterior of the device. To
avoid damaging the electronics, do not use any cleaning
fluid.
Protect the device from dust and moisture. The batteries
should be removed from the unit if it has not been used for
a long time.
DISPOSAL
Dispose of the packaging materials properly,
according to their type, such as paper or cardboard.
Contact your local waste-disposal service or environmental
authority for information on the proper disposal.
Do not dispose of electronic devices in the household
garbage!
Page 11

As per Directive 2002/96/EC of the European Parliament
on waste electrical and electronic equipment and its
adaptation into German law, used electronic devices must
be collected separately and recycled in an environmentally
friendly manner.
In accordance with the regulations concerning
batteries and rechargeable batteries, disposing of
them in the normal household waste is explicitly forbidden.
Please make sure to dispose of your used batteries as
required by law — at a local collection point or in the retail
market. Disposal in domestic waste violates the Battery
Directive.
Batteries that contain toxins are marked with a sign and a
chemical symbol. "Cd" = cadmium, "Hg" = mercury, "Pb"
= lead.
EC DECLARATION OF CONFORMITY
Bresser GmbH has issued a "Declaration of
Conformity" in accordance with applicable
guidelines and corresponding standards. This can be
viewed any time upon request
Page 12

Bresser GmbH
Gutenbergstr. 2 · DE-46414 Rhede
Germany
www.bresser.de · service@bresser.de
Errors and technical changes reserved.
Manual_7007700000000_Temeo_TBT_en_BRESSER_v1216
 Loading...