

Page 1

WIFI 3D Printer
Art. No. 2010200
WARNING!
Quickstart Guide
1. Do not remove the housing of the nozzle!
2. Hot surface! Do not touch the heating nozzle in operation!
3. Danger! Moving parts in printer may cause injury.
Do not wear gloves or other sources of entanglement in
operation!
Page 2

UNPACKING
1. Open the box and remove both top foam
sheets.
3. The bottom PE foam should contain: a spool
of PLA filament, a spool holder, a solid glue, an
USB cable, a filament guide tube and an
accessory bag.
2. Take the printer out of the box.
4. Remove the bubble wrap.
5. Remove the top PE foam piece, which
contains one power cable, one USB Stick,
the Quickstart guide and the After Sales Service
Card.
6. Remove the three buckles which are in
the circled area showed in the picture.
03
Page 3
Power Switch
7. Tear off tape and the stretch wrap of front door.
Squeeze top lid slightly from both sides to the middle
so as to take top lid successfully.
Remove the stretch wrap of top lid.
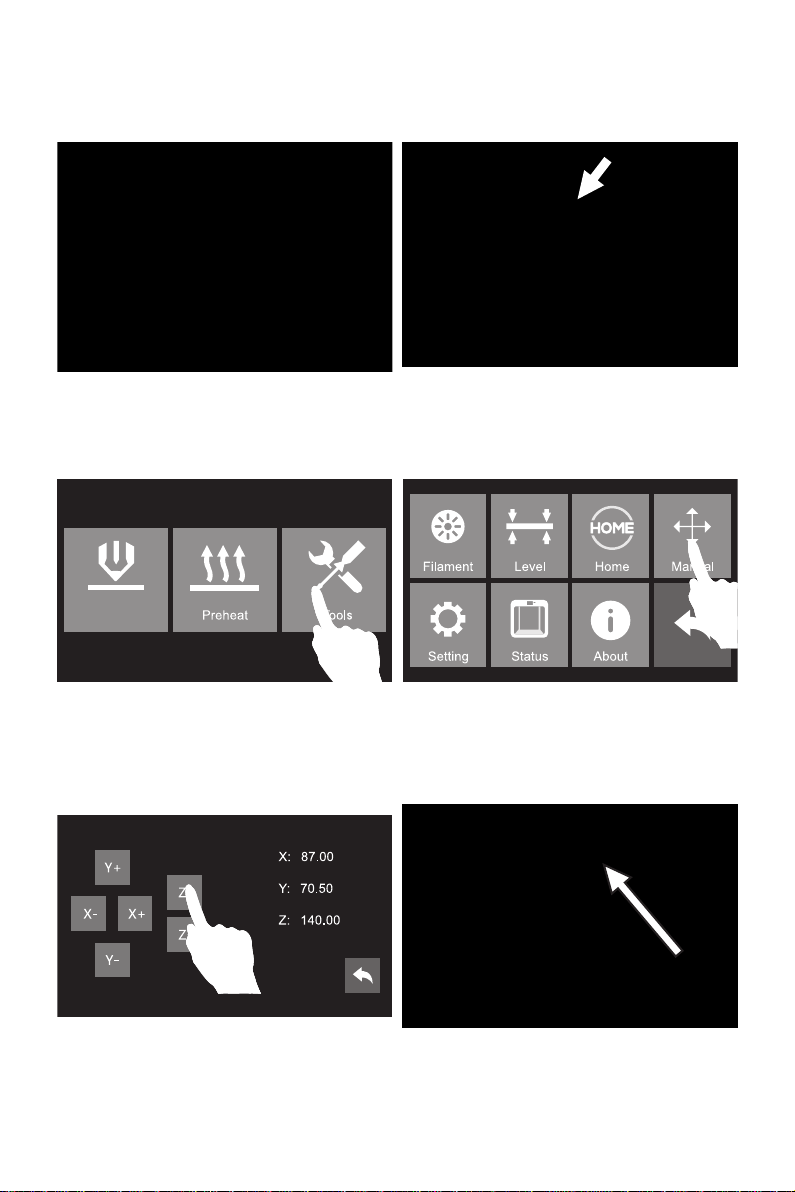
Build
9. T ap [Tools].
8. Take out power cable and plug the power cable into
the input on the back and turn on the power switch.
10. T ap [Manual].
Tear off
the stretch
wrap!
11. Tap [Z-] to partially elevate the build plate.
Tap touch screen button on the right side of touch screen,
go back to home screen.
12. Remove both bottom foam pieces.
Tear off the stretch wrap.
04
Page 4
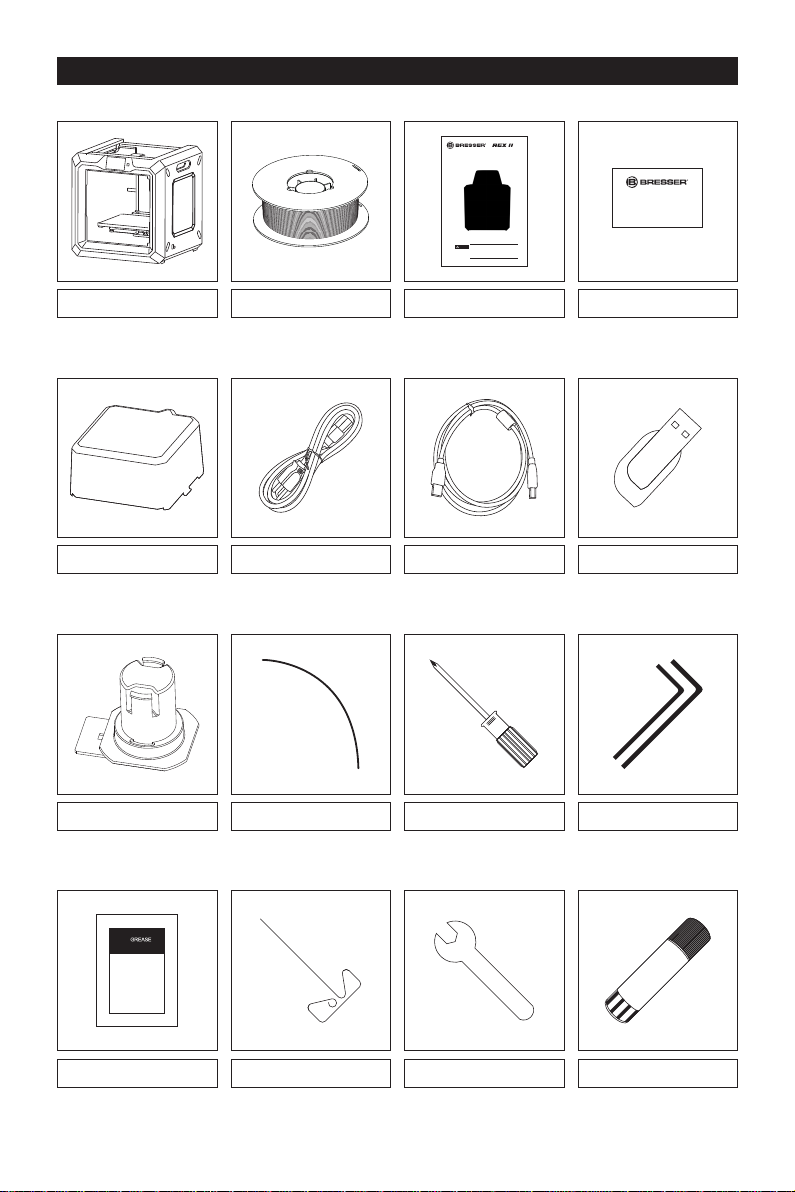
PRINTER KIT CONTENTS
WIFI 3D Printer
Art. No. 2010200
Warranty & Service
Quickstart Guide
1. Do not remove the housing of the nozzle!
WARNING!
2. Hot surface! Do not touch the heating nozzle in operation!
3. Danger! Moving parts in printer may cause injury.
Do not wear gloves or other sources of entanglement in
operation!
3D Printer Filament spool Quickstart guide Warranty & Service Card
Lid Power cable USB cable USB stick
Spool holder Filament guide tube Screwdriver Allen wrench
Grease Unclogging pin tool Wrench Solid glue
05
Page 5
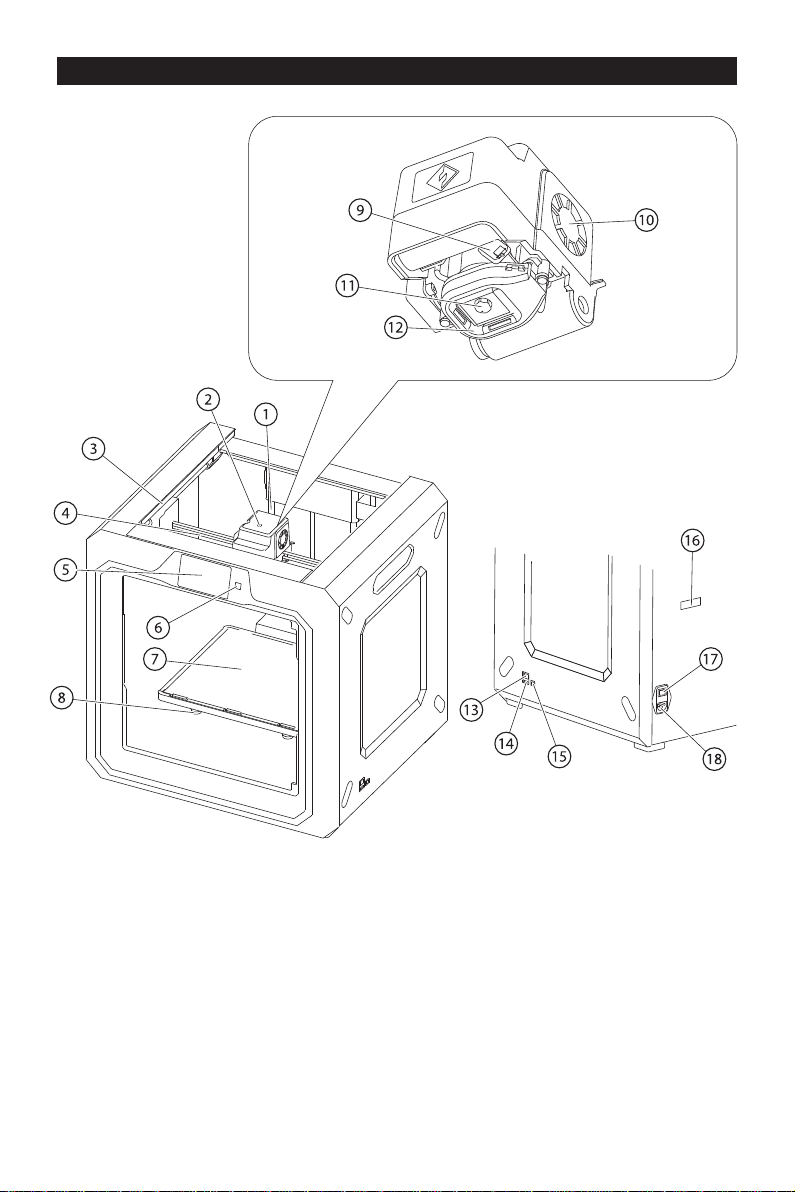
GETTING TO KNOW THE PRINTER
17. Power Switch 18. Power Input
3. Y-Axis Guide Rod 4. X-Axis Guide Rod1. Z-Axis Guide Rod 2. Filament Intake
7. Build Plate 8. Nut5. T ouch Screen 6. Touch Screen Button
11. Nozzle 12. Turbo Fan Baffle9. Servo 10. Turbo Fan
15. USB Cable Input 16. Spool Holder Slot13. Network Interface 14. USB Stick Input
06
Page 6

GETTING TO KNOW THE PRINTER
3. Air-Filter 4. Y-Axis Guide Rod1. Z-Axis Guide Rod 2. Filament Intake
7. Touch Screen Button 8. Build Plate5. X-Axis Guide Rod 6. Touch Screen
(Inside the printer)
17. USB Cable Input 18. Spool Holder Slot 19. Power Switch 20. Power Input
11. Servo 12. Turbo Fan9. Nut 10. Camera
15. Network Interface 16. USB Stick Input13. Nozzle 14. Turbo Fan Baffle
07
Page 7

HARDWARE ASSEMBLY
1. Locate the spool holder. Install the spool holder
into the left quadrangular opening on the back
3. Squeeze the spool holder top and mount the filament
spool to the holder.
Press here
Filament intake
2. Turn down the spool holder to make the holder
bottom cleave to the printer back.
4. Secure the filament guide tube with R-shaped buckles
and thread the filament through the tube. The filament spool
must be oriented correctly [see above] and should feed
filament from bottom to top.
5. After filament goes through guide tube, press spring
presser on the left side of extruder, and insert filament
vertically into filament intake.
6. After inserting into filament intake, insert guide tube
into extruder filament intake to fix.
08
Page 8

LEVELING THE BUILD PLATE
HOW TO CHANGE THE LANGUAGE
0201
Tools
0403
Before leveling, let's learn the function of nuts.
HOW TO USE THE NUTS
Build plate goes up
Rotate the nuts clockwise
Raise the build plate to reduce the distance
between the nozzle and build plate.
Build
1. T ap [Tools].
Build plate goes down
Rotate the nuts anticlockwise
Lower the build plate to increase the distance
between the nozzle and build plate.
2. T ap [Level].
09
Page 9

Screw the three nuts under the platform
counterclockwise until they are tight,
then tap the [OK] button.
3. Please wait while the extruder and platform finish initial movements. Screw three nuts under the
platform anticlockwise, then tap [OK] button.
Attention! Three nuts may be tightened up before going out, please skip this step if you find three nuts
have been tightened up, and continue to following steps
4. After tapping [OK] button, the extruder will
move towards the first point and the plate will
move up and down to verify the distance
between nozzle and plate.
6. Then tap the [Verify] button to check whether
the distance is appropriate.
5. If the distance between the nozzle and plate
is too large, rotate the three nuts underneath
the platform clockwise for the same rounds
until you hear a steady beep.
Congratulations
Tap the [OK] button to move to
the next leveling point.
7. If the distance is appropriate, tap [ok] to next step.
If the distance still not appropriate, please follow the
prompts on the touch screen to adjust till you see [ok].
10
Page 10

8. After first leveling point completed, start the other two leveling points.
Attention! When starting the second and the third leveling points, just need to adjust one
corresponding nut under extruder.
Distance Too Big
Turn the corresponding nut under
the platform clockwise until
you hear the beep.
Distance Too Small
Turn the corresponding nut under
the platform anticlockwise until
you hear the beep.
9. Follow the prompts on the touch screen to adjust the corresponding nut till you hear a steady
beep.
Congratulations
Tap the [OK] button to move to
the next leveling point.
10. If the distance is appropriate, tap [ok] to next step.
If the distance still not appropriate, please follow
the prompts on the touch screen to adjust till you
see [ok].
11. Start the third leveling point according to the method
of the second leveling point.
After leveling completed, tap return arrow to go back
to home screen.
Leveling completed!
Finish
11
Page 11

LOADING FILAMENT
1. T ap [Tools]. 2. T ap [Filament].
3. Tap [Load], extruder starts to heat.
Loading started, push filament vertically
into extruder and press [Done] when you see
filament come out of the extruder
Done
4. Once heated, filament will be drawn through the extruder. Continue extruding until the extruder
provides a steady flow of filament. Tap touch screen button, go back to home screen.
Attention! If extruder can not load filament for a long time, please check if you have inserted filament
into the bottom of extruder.
12
Page 12

SUGGESTIONS
1. Ensure that the build plate has been leveled before
printing.
2. Ensure that the filament has been loaded in an
appropriate approach.
3. Load the filament for a while to extrude all the
melted filament you printed last time out of the
extruder.
4. Please clean extruder before printing.
5. Do not leave the printer unattended during
operation.
FIRST PRINT
1. Please insert the USB stick into USB slot on the right
side of the printer. Tap [Build].
Flashprint
Quick Start Guide
Test Files
User Guide
2. Tap [USB Stick].
4. T ap [40mm_Box-PLA.gx].
PLA
6. The printer starts to heat and it prints automatically
after heating is completed.
3. Tap [Test Files].
PLA
5. T ap [Build].
13
Page 13

UNLOADING FILAMENT
Please follow steps below if you need to unload filament in
daily use.
1. Pull filament guide tube out of filament intake, leave
2. T ap [Tools].
filament 10cm to pull filament easily.
Load Unload
3. T ap [Filament]. 4. T ap [Unload].
Unload started, press down on the
spring lever and withdraw filament
Extruder
Press here
Push filament down through
for 3 seconds
Extruder
Done
5. When heating to target temparture, press spring presser
and push filament down through for 3 seconds, until you
see steady filament coming out of the nozzle.
14
Page 14

Withdraw
Press here
6. Then pull out vertically quickly and release spring presser.
Tap [Done], go back. Tap return arrow to go back to home screen.
filament
CHANGING THE NOZZLE
NOTE! Changing the nozzle requires a certain level of technical knowledge and experience in using this
device. If necessary, have the work carried out by a specialist.
The manufacturer assumes no liability for damage caused by incorrectly executed work!
We have provided detailed video instructions for changing the nozzle on the product page at
www.bresser.de/P2010200.
15
Page 15

Errors and technical changes reserved.
Quickstart_2010200_3D-Printer-REX-II_en_BRESSER_v052020a
Bresser GmbH
Gutenbergstr. 2 · DE-46414 Rhede
Germany
www.bresser.de · service@bresser.de
Page 16

More information, updates or software
Visit our website using the following QR codes or web links to find additional information,
available updates or software for this product or related accessories:
3D printer Accessories
www.bresser.de/P2010200
www.bresser.de/P2080210000000
After Sales Support / Service
We offer an individual service for this product beyond the purchase. If you have any
problems with the product, our support team will be happy to assist you.
For a smooth process, please keep the following information handy for possible
inquiries:
• Warranty/Service card
• Article number and Product description
• Date of purchase and dealer
Contact details:
e-Mail:
Internet:
Phone*:
Service hours:
Monday to Friday (except national public holidays)
* free hotline throughout Europe
service.3d@bresser.de (preferred communication)
www.bresser.de/c/en/service
00 800 – 63 43 7000
9:00 a.m. to 3:00 p.m. CET
Warranty
Please refer to the separate warranty & service card for any warranty information.
02
 Loading...