

Bresser Outdoor Set Operating Instructions Manual
DE
Bedienungsanleitung
GB
Operating Instructions
FR
Mode d’emploi
NL
Handleiding
IT
Istruzioni per l’uso
ES
Instrucciones de uso
PT
Manual de utilização
CZ
Návod k použití
Art. No. 88-30000
Outdoor Set
DE
Bedienungsanleitung .................................................4
GB
Operating Instructions .............................................10
FR
Mode d’emploi ..........................................................16
NL
Handleiding ...............................................................22
IT
Istruzioni per l’uso ....................................................28
ES
Instrucciones de uso ...............................................34
PT
Manual de utilização ................................................40
CZ
Návod k použití .........................................................46

O
A
O
B
O
C
O
D
O
E
(A)

GEFAHR für Ihr Kind!
Schauen Sie mit diesem Ge-
rät niemals direkt in die Sonne
oder in die Nähe der Sonne. Es besteht ERBLINDUNGSGEFAHR!
Kinder sollten das Gerät nur unter
Aufsicht benutzen. Verpackungsmaterialien (Plastiktüten, Gummibänder,
etc.) von Kindern fernhalten! Es besteht ERSTICKUNGSGEFAHR!
Dieses Gerät beinhaltet Elektronikteile, die über eine Stromquelle (Netzteil und/oder Batterien) betrieben
werden. Lassen Sie Kinder beim
Umgang mit dem Gerät nie unbeaufsichtigt! Die Nutzung darf nur wie in
der Anleitung beschrieben erfolgen,
andernfalls besteht GEFAHR eines
STROMSCHLAGS!
Batterien gehören nicht in Kinderhände! Achten Sie beim Einlegen der
Batterie auf die richtige Polung. Ausgelaufene oder beschädigte Batteri-
en verursachen Verätzungen, wenn
Sie mit der Haut in Berührung kommen. Benutzen Sie gegebenenfalls
geeignete Schutzhandschuhe.
BRAND-/EXPLOSIONSGEFAHR!
Setzen Sie das Gerät – spezi-
ell die Linsen – keiner direkten
Sonneneinstrahlung aus! Durch die
Lichtbündelung könnten Brände verursacht werden.
Setzen Sie das Gerät keinen hohen
Temperaturen aus. Benutzen Sie nur
das mitgelieferte Netzteil oder die
empfohlenen Batterien. Gerät und
Batterien nicht kurzschließen oder
ins Feuer werfen! Durch übermäßige
Hitze und unsachgemäße Handhabung können Kurzschlüsse, Brände
und sogar Explosionen ausgelöst
werden!
GEFAHR von Sachschäden!
Bauen Sie das Gerät nicht
auseinander! Wenden Sie
sich im Falle eines Defekts bitte an
Ihren Fachhändler. Er nimmt mit dem
Service-Center Kontakt auf und kann
das Gerät ggf. zwecks Reparatur einschicken.
HINWEISE zur Reinigung
Trennen Sie das Gerät
vor der Reinigung von der
Stromquelle (Netzstecker
ziehen oder Batterien entfernen)!
Reinigen Sie die Linsen (Okulare
und/oder Objektive) nur mit einem
weichen und fusselfreien Tuch (z. B.
Microfaser). Das Tuch nicht zu stark
aufdrücken, um ein Verkratzen der
Linsen zu vermeiden.
Zur Entfernung stärkerer Schmutzreste befeuchten Sie das Putztuch
mit einer Brillen-Reinigungsfl üssigkeit
und wischen Sie damit die Linsen mit
wenig Druck ab.
4
Schützen Sie das Gerät vor Staub
und Feuchtigkeit! Bewahren Sie es
in der mitgelieferten Tasche oder
Transportverpackung auf. Batterien
sollten aus dem Gerät entfernt werden, wenn es längere Zeit nicht benutzt wird.
SCHUTZ der Privatsphäre!
Das Fernglas ist für den
Privatgebrauch gedacht.
Achten Sie die Privatsphäre
Ihrer Mitmenschen – schauen Sie mit diesem Gerät zum Beispiel
nicht in Wohnungen!
ENTSORGUNG
Entsorgen Sie die Verpa-
ckungsmaterialien sortenrein.
Informationen zur ordnungsgemäßen
Entsorgung erhalten Sie beim kommunalen Entsorgungsdienstleister
oder Umweltamt.
Werfen Sie Elektrogeräte nicht
in den Hausmüll!
Gemäß der Europäischen
Richtlinie 2002/96/EG über Elektro- und Elektronik-Altgeräte und deren Umsetzung in nationales Recht
müssen verbrauchte Elektrogeräte
getrennt gesammelt und einer umweltgerechten Wiederverwertung
zugeführt werden.
Entladene Altbatterien und Akkus
müssen vom Verbraucher in Batteriesammelgefäßen entsorgt werden.
Informationen zur Entsorgung alter
Geräte oder Batterien, die nach dem
01.06.2006 produziert wurden, erfahren Sie beim kommunalen Entsorgungsdienstleister oder Umweltamt.
5
EG-Konformitätserklärung
Die Bresser GmbH, ansässig
in 46414 Rhede/Westf., Gutenbergstr. 2, Germany, erklärt für
dieses Produkt die Übereinstimmung
mit nachfolgend aufgeführten EGRichtlinien:
EN 61000-6-3:2007
EN 55015:2006
EN 61547/A1:2000
Produktbeschreibung:
Outdoorset
Typ / Bezeichnung:
LED lamps (Head Light)
Rhede, 11.03.2008
Bresser GmbH
Helmut Ebbert
Geschäftsführer
DE
6
Diese Dinge enthält dein
Outdoor-Set:
A Fernglas 4x30
B LED-Lampe mit Stirnband
C Mini-Kompass
D Aluminium-Trinkfl asche
E Nylon-Transporttasche
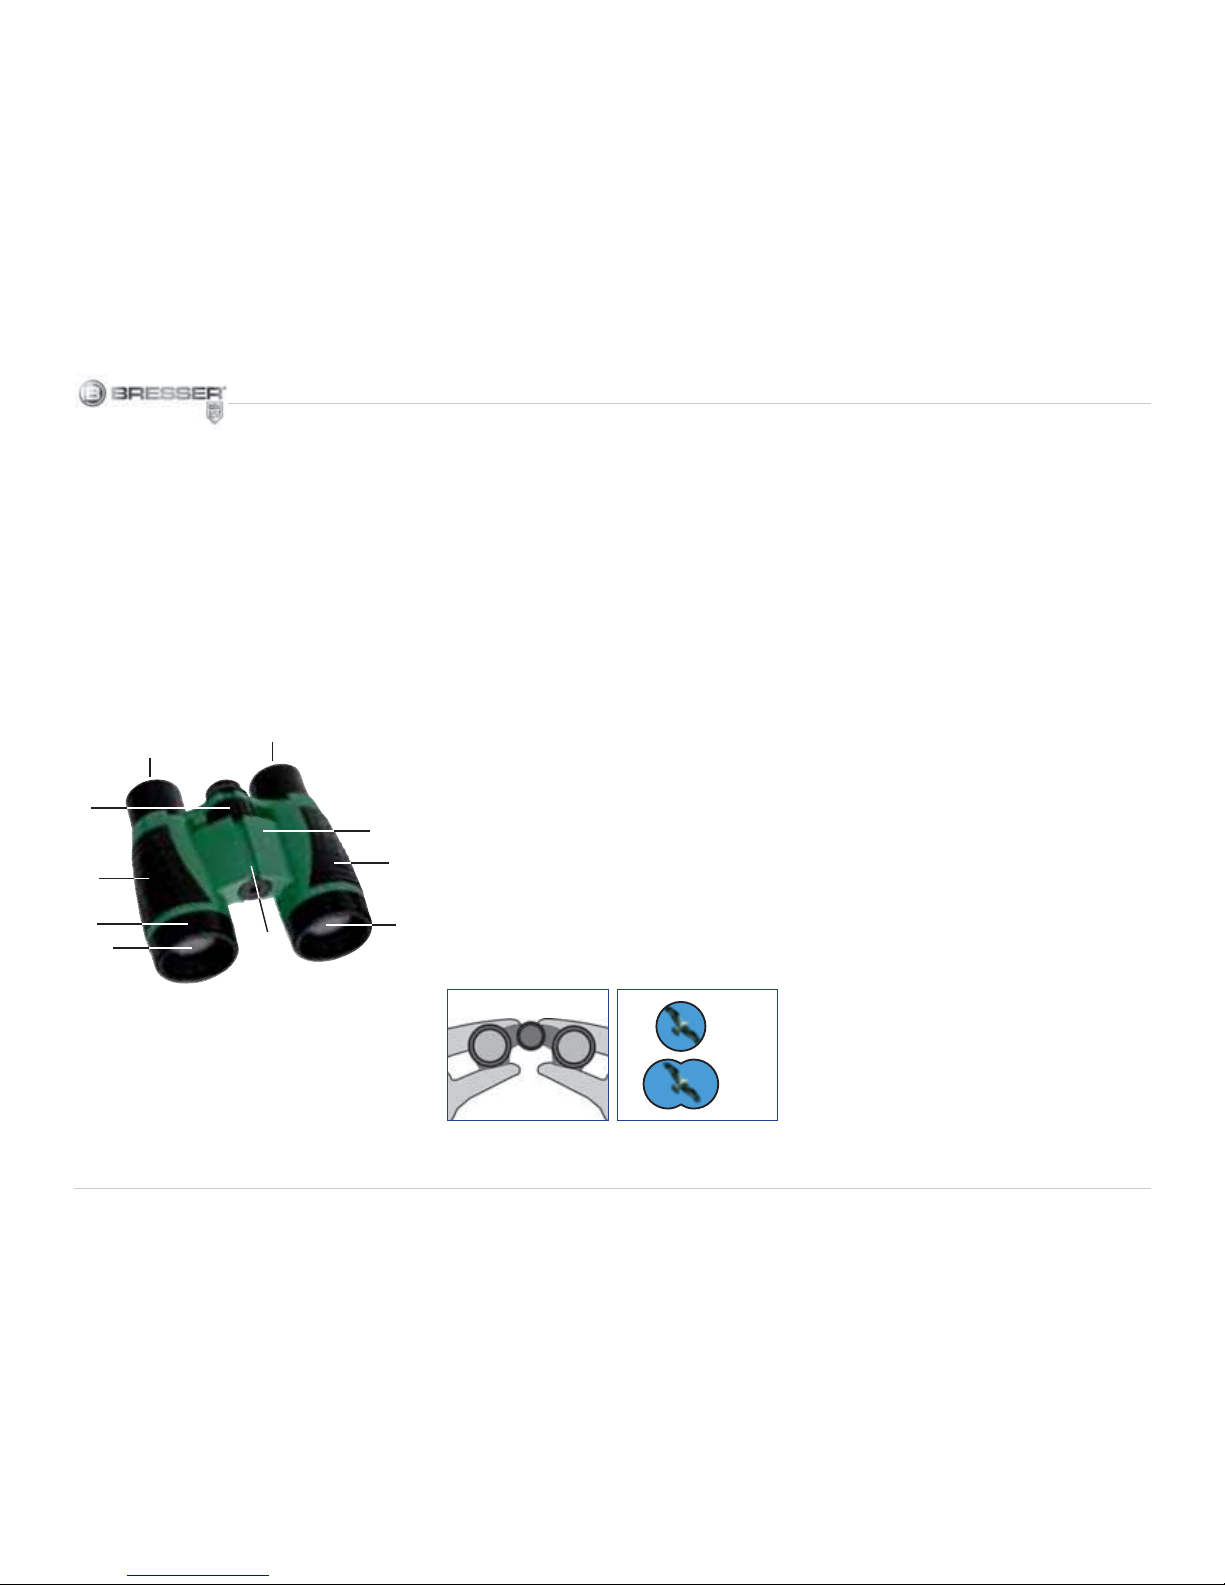
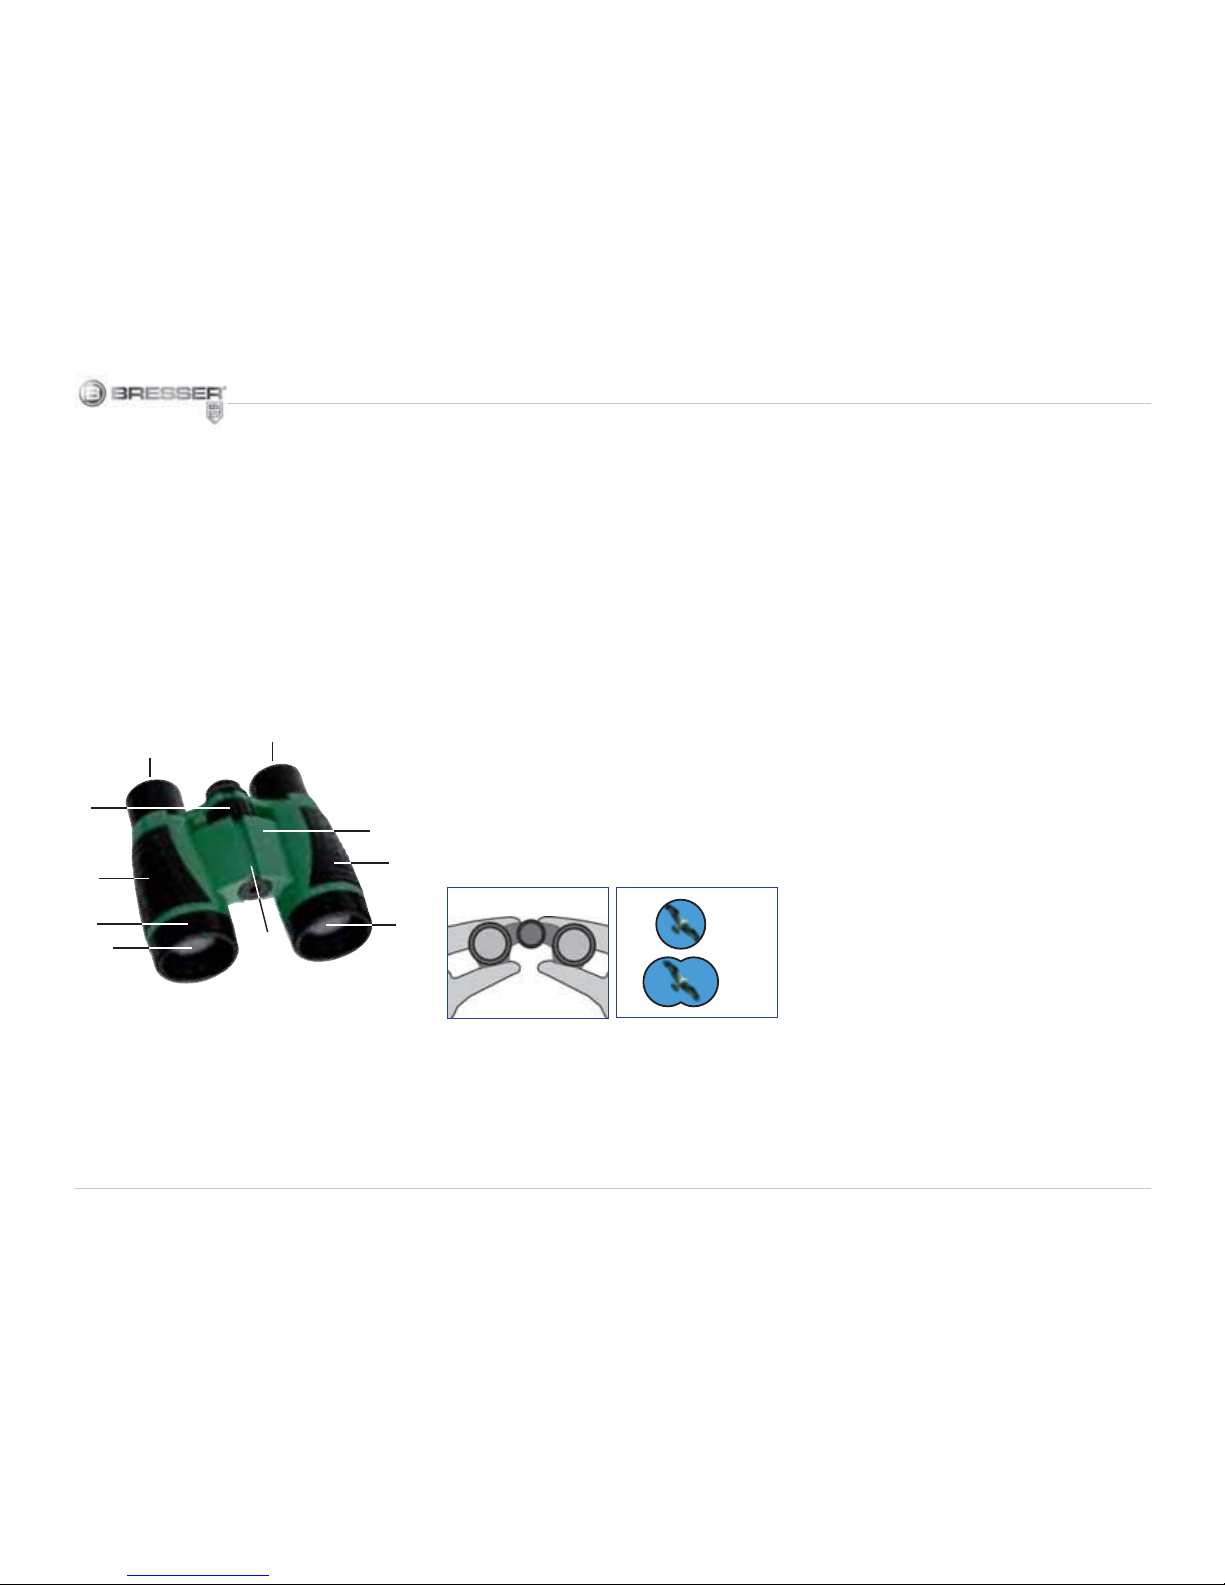
Fernglas 4x30
Die Einzelteile deines Fernglases:
1 Scharfstellknopf (Mitteltrieb)
2 Einblick-Linse (Okularlinse)
3 Fernglasstutzen (Tubus)
4 Fernglasachse zum Knicken
5 Ausblick-Linse (Objektivlinse)
6 Fernglasbrücke
7 Gummiarmierte Grifffl ächen
Dein Weg zu einem scharfen Bild
Der Augenabstand
Der Abstand zwischen den beiden Augen ist bei jedem Kind anders. Deshalb muss der richtige Augenabstand
bei deinem Fernglas zuerst für dich
eingestellt werden.
Nimm dazu das Fernglas in beide
Hände (wie du es in Abb. C siehst)
und halte es vor die Augen. Jetzt
musst du es um die Fernglasachse so
einknicken, dass du beim Durchblicken nur einen Bildkreis sehen kannst
(siehe Abb. D).
Die Scharfeinstellung
Suche dir einen Gegenstand, der
mehr als 10 Meter von dir entfernt ist.
Damit du ein scharfes Bild von diesem
Gegenstand bekommst, blickst du zuerst mit beiden Augen durch die Einblick-Linsen (2). Dann drehst du mit
einem Finger an dem Scharfstellknopf
(1) bis du das Bild, das du siehst, klar
und ganz deutlich aussieht.
Jetzt kann dein Abenteuer beginnen ...
Viel Spaß beim Beobachten!
(D)
✔
✘
(C)
(B)
b
d
E
c
F
F
c
H
G
H
7
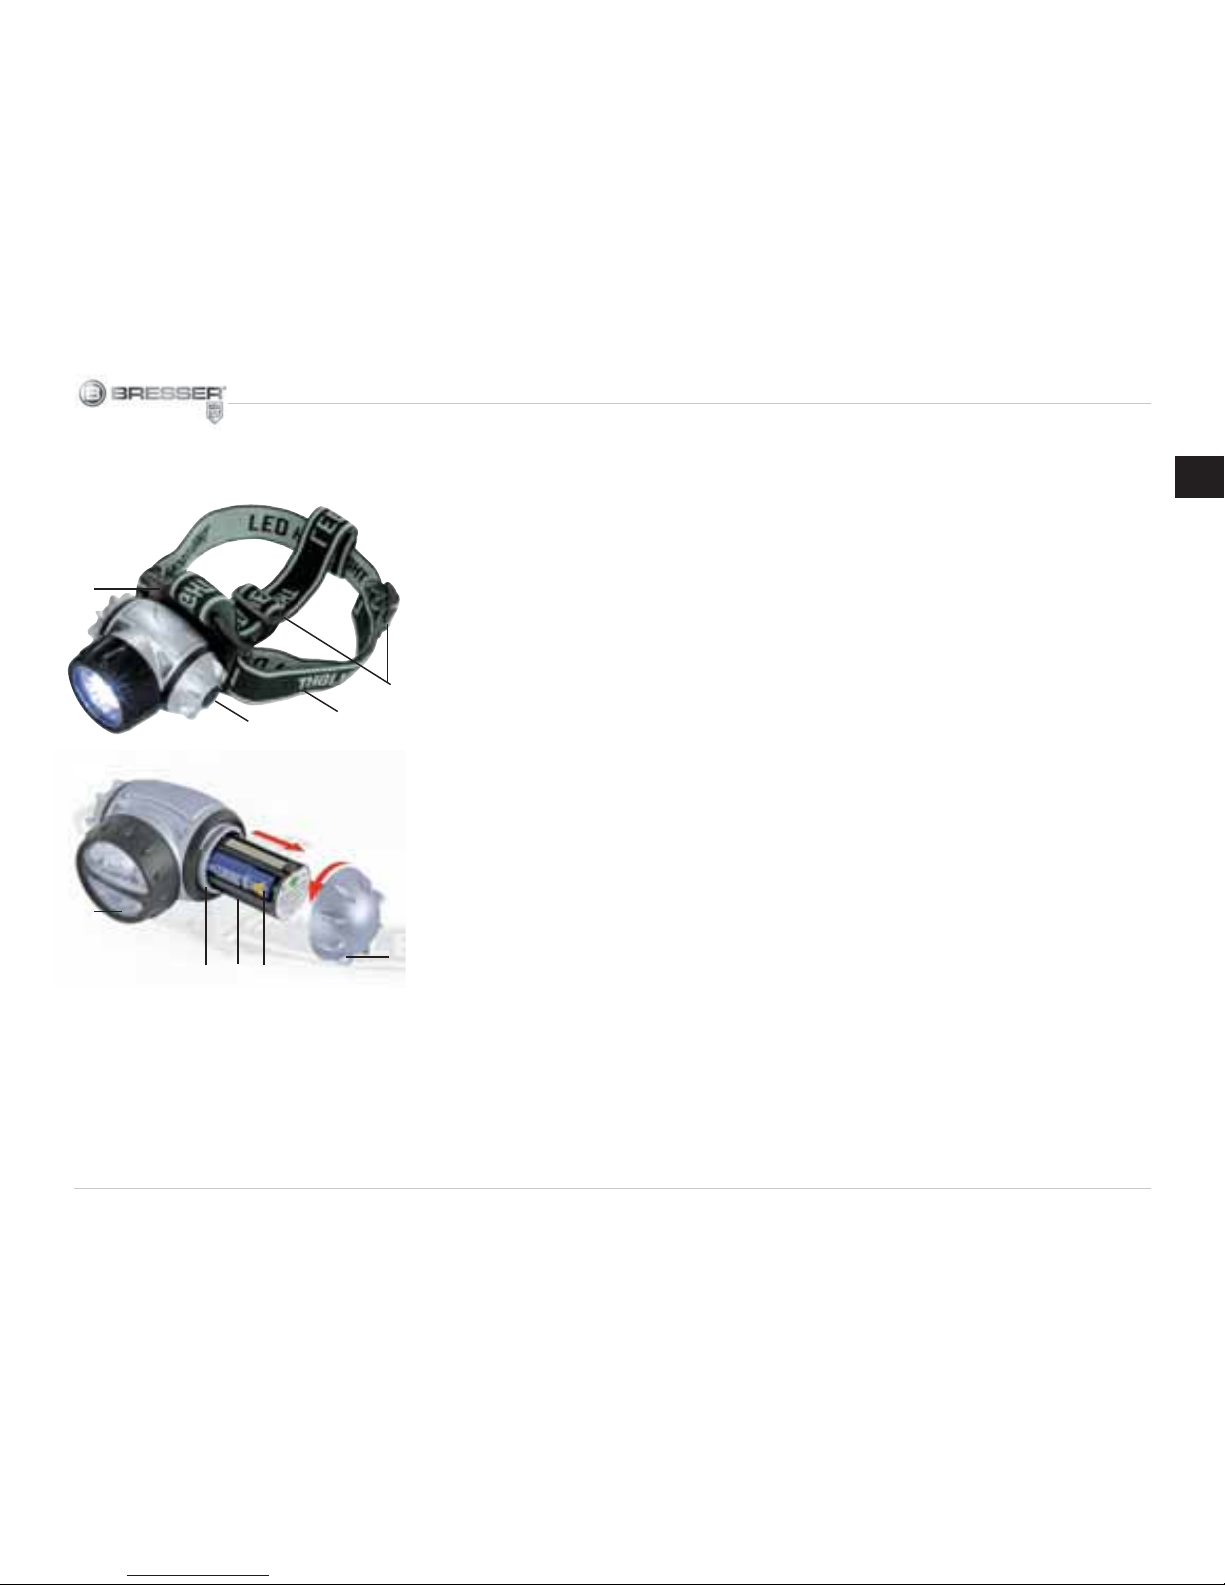
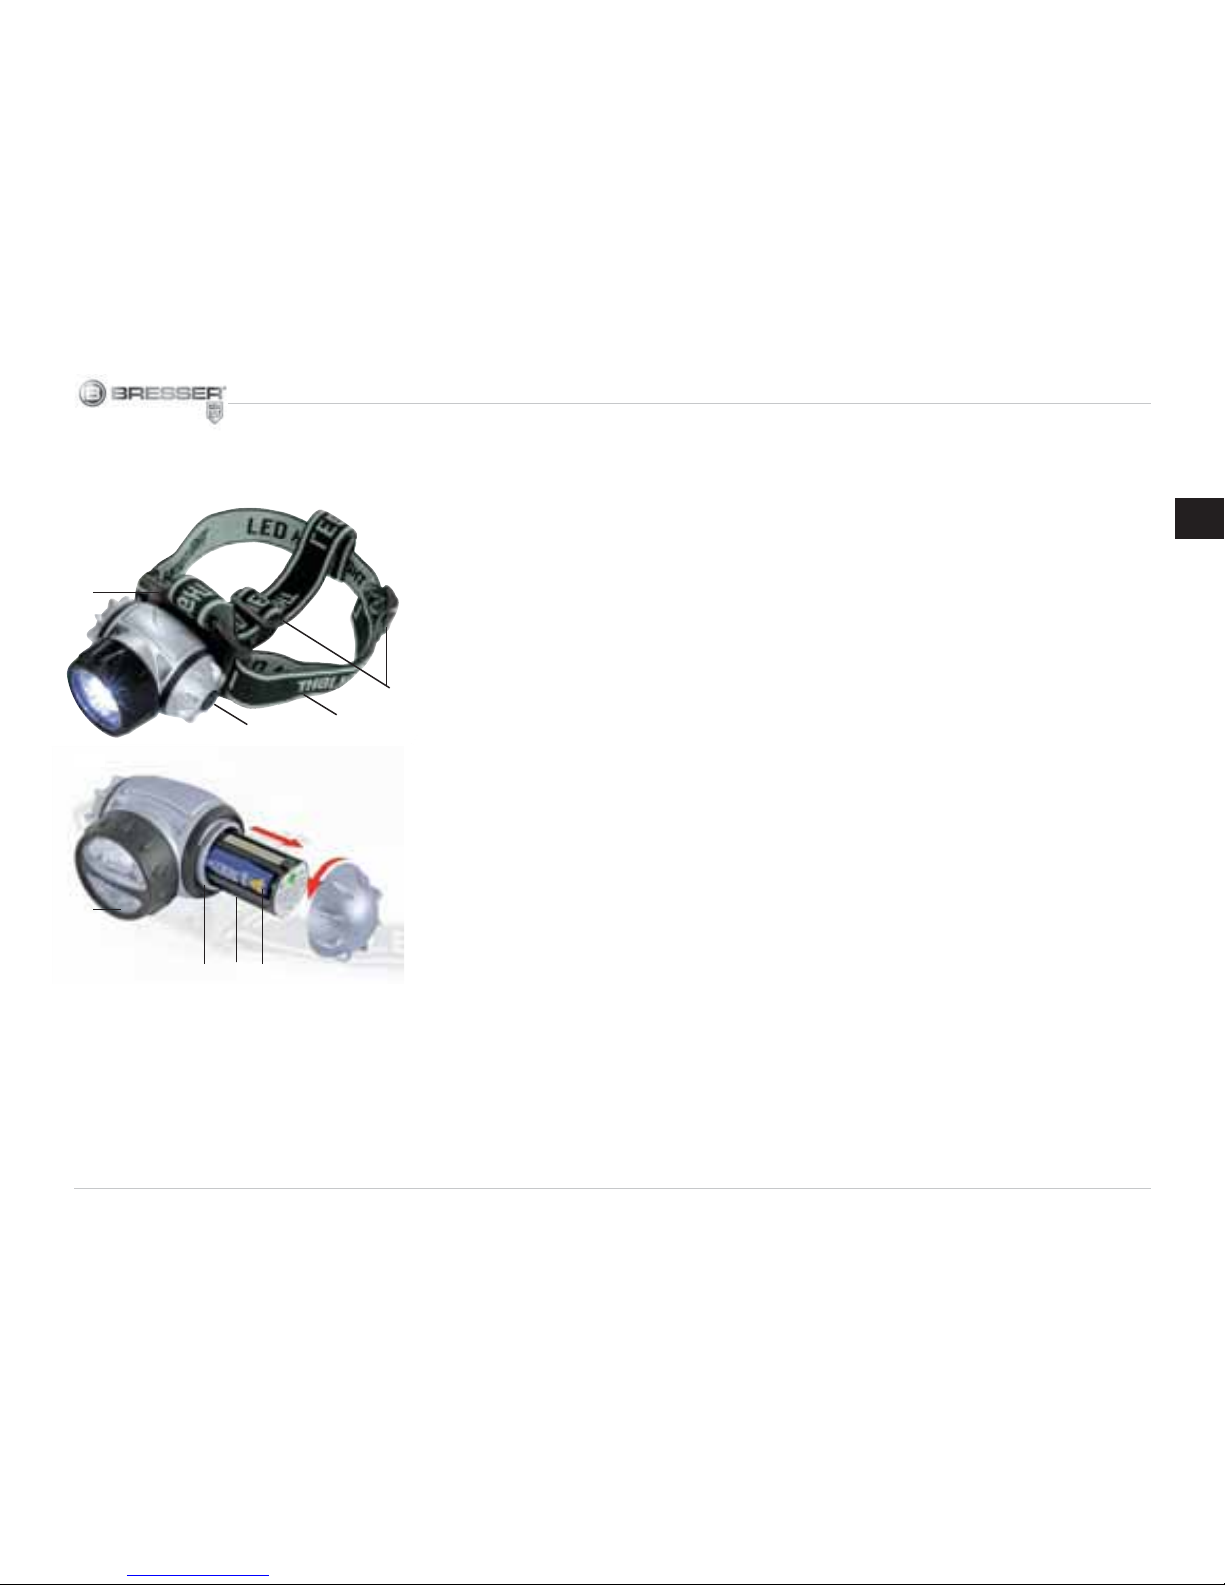
LED-Lampe mit Stirnband
Das sind die Einzelteile deiner
LED-Lampe mit Stirnband:
8 LED-Lampen
9 Ein-/Aus-Schalter
10 Stirnband
11 Ösen zum Verstellen der Strin-
bandlänge
12 Scharnier zum Verstellen der
Lampe
13 Batteriefachverschluss
14 Batteriefach
15 Batteriehalterung
16 Batterien
Was du wissen musst
Deine Stirnlampe hat eine starke
LED-Beleuchtung (8). Weil du sie mit
dem Stirnband auf deinen Kopf setzen kannst, hast du deine Hände frei.
So kannst du all die anderen Dinge
benutzen, ohne dabei im Dunkeln
stehen zu müssen. Eine tolle Sache, wenn du mit deinen Eltern eine
abendliche Wanderung unternimmst.
LED-Lampe aufsetzen und Stirnbandlänge anpassen
Der Kopf eines Kindes ist immer unterschiedlich groß. Deshalb musst du
die Länge der Stirnbänder für deine
Kopfgröße anpassen. Setze das
Stirnband (10) auf. Dann kannst du
die Länge des Bandes verändern, indem du es durch die Ösen (11) nach
vorn oder nach hinten schiebst.
Das Licht ein- und ausschalten
Um das Licht deiner Taschenlampe
einzuschalten, drückst du auf den
Ein-/Aus-Schalter (9). Dabei kannst
du die Stärke des Lichts so verändern:
1x drücken = 1 LED leuchtet
2x drücken = 3 LEDs leuchten
3x drücken = 7 LEDs leuchten
Wenn du dann zum vierten Mal auf
den Ein-/Aus-Schalter drückst, schaltest du damit das Licht wieder aus.
Die Batterien wechseln
Wenn das Licht schwächer wird oder
gar nicht mehr leuchtet, musst du
die Batterien (16) wechseln. Drehe
dazu entgegen dem Uhrzeigersinn
den Batteriefachverschluss (13) vom
Gehäuse ab. Neige das Batteriefach
DE
J
1)
1!
1@
I
1#
1$ 1% 1^
(F)
(G)

8
(14) ein wenig nach vorn, damit die
Batteriehalterung (15) mit den Batterien heraus rutscht. Setze 3 neue
Batterien vom Typ LR03 (AAA Micro)
in die Halterung ein. Achte darauf,
dass du die Batterien so einlegst,
wie es auf dem Etikett angegeben
ist. Auf der Halterung ist ein roter
Pfeil angebracht. Schiebe die Halterung in Richtung des roten Pfeils
in das Batteriefach zurück. Dabei
muss der andere schwarze Pfeil auf
dem Etikett in die entgegengesetzte
Richtung des Scharniers (12) zeigen.
Wenn du das geschafft hast, kannst
du den Batteriefachverschluss wieder festschrauben.
Hinweis:
Batterien für deine Stirnlampe kannst
du in fast jedem Kaufhaus oder Elektrofachgeschäft kaufen.
Lichtwinkel verändern
Deine LED-Stirnlampe ist an einer
Halterung mit einem Scharnier (12)
befestigt. Wenn du die Lampe aufgesetzt hast, kannst du sie in mehreren Stufen nach unten oder oben
bewegen. Damit veränderst du den
Lichtwinkel.
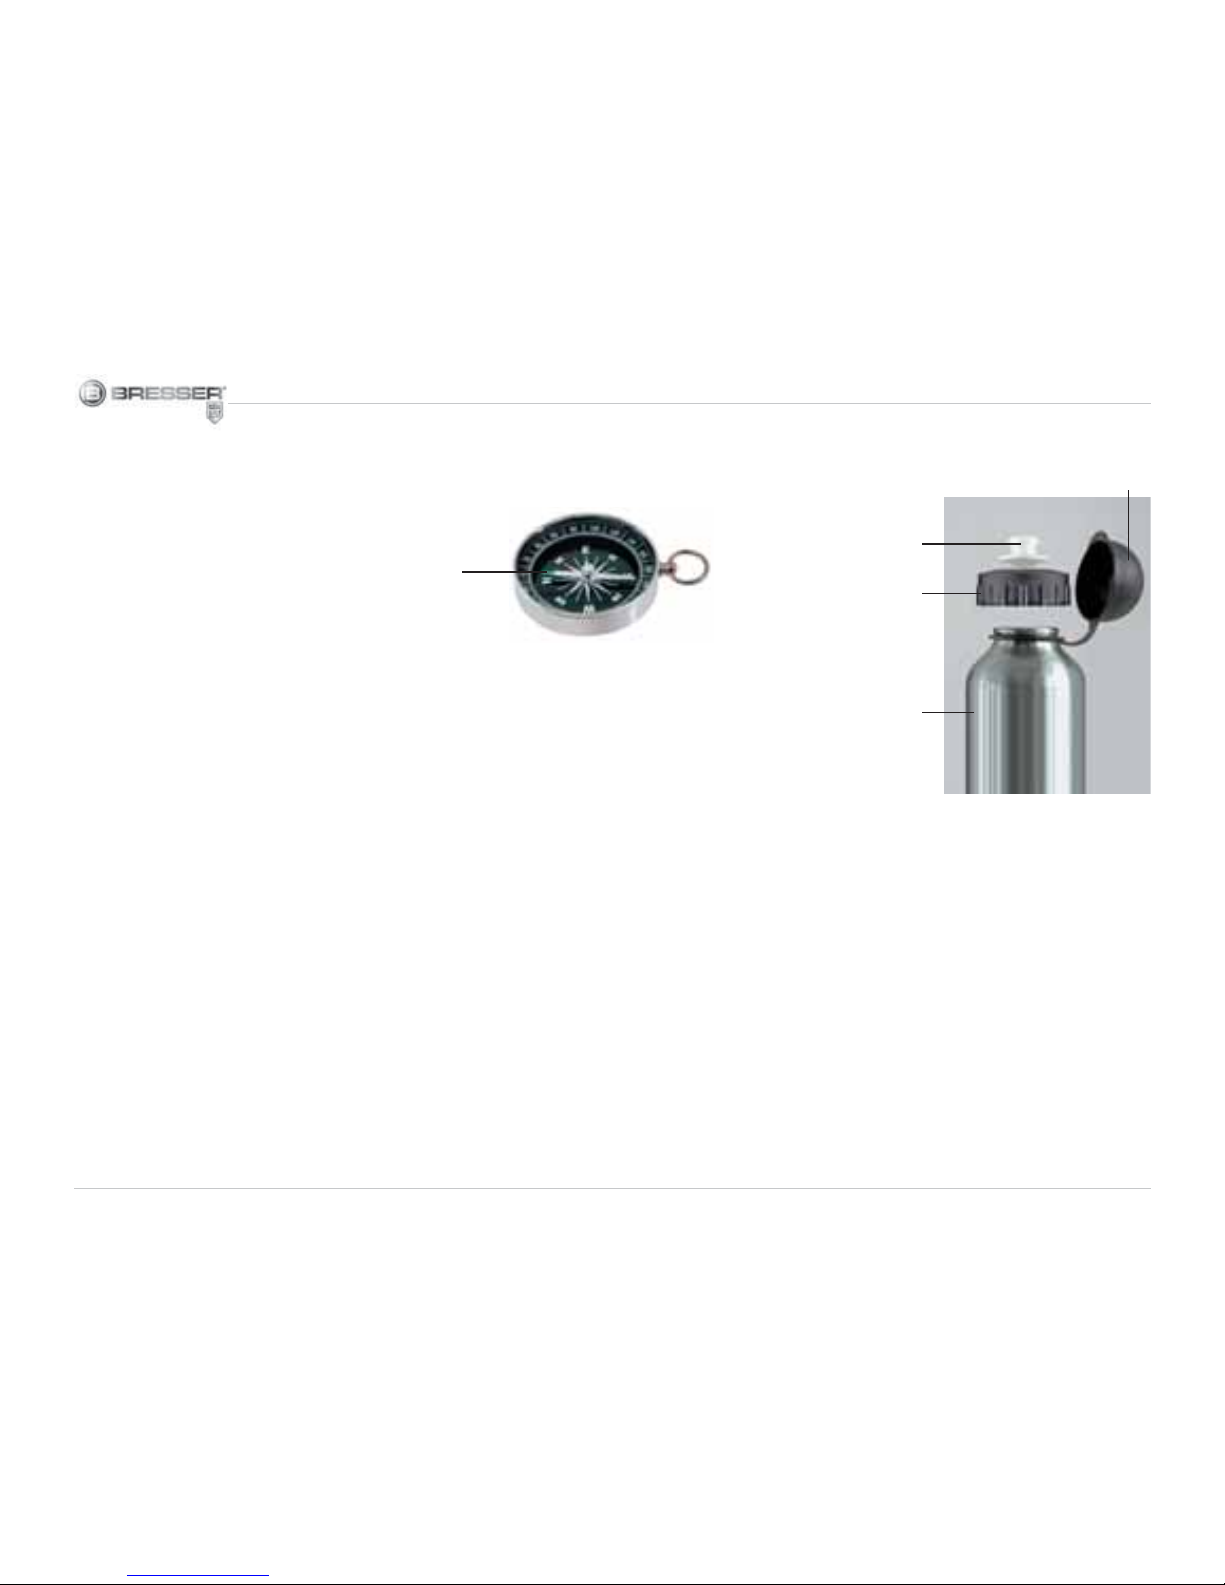
Mini-Kompass
So kannst du deinen Kompass
benutzen
Die markierte Spitze der Kompassnadel (17) zeigt immer nach Norden.
Das ist der Nordpfeil. Drehe den
Kompass so, dass das ‚N‘ (= Norden)
auf dem Ziffernblatt des Kompass in
die gleiche Richtung zeigt wie die
markierte Kompassspitze. Wenn du
nach Norden gehen willst, brauchst
du nur diese Richtung wählen.
Davon ausgehend kannst du auch
alle anderen Richtungen ansteuern.
Wenn du zum Beispiel nach Süden
(= S) gehen willst, läufst du genau
entgegen dem Nordpfeil. Möchtest
du in Richtung Osten (= O) gehen,
bewegst du dich vom Nordpfeil aus
gesehen nach rechts. Nach Westen
(= W) läufst du, wenn du vom Nordpfeil aus gesehen nach links gehst.
1&
(H)
9
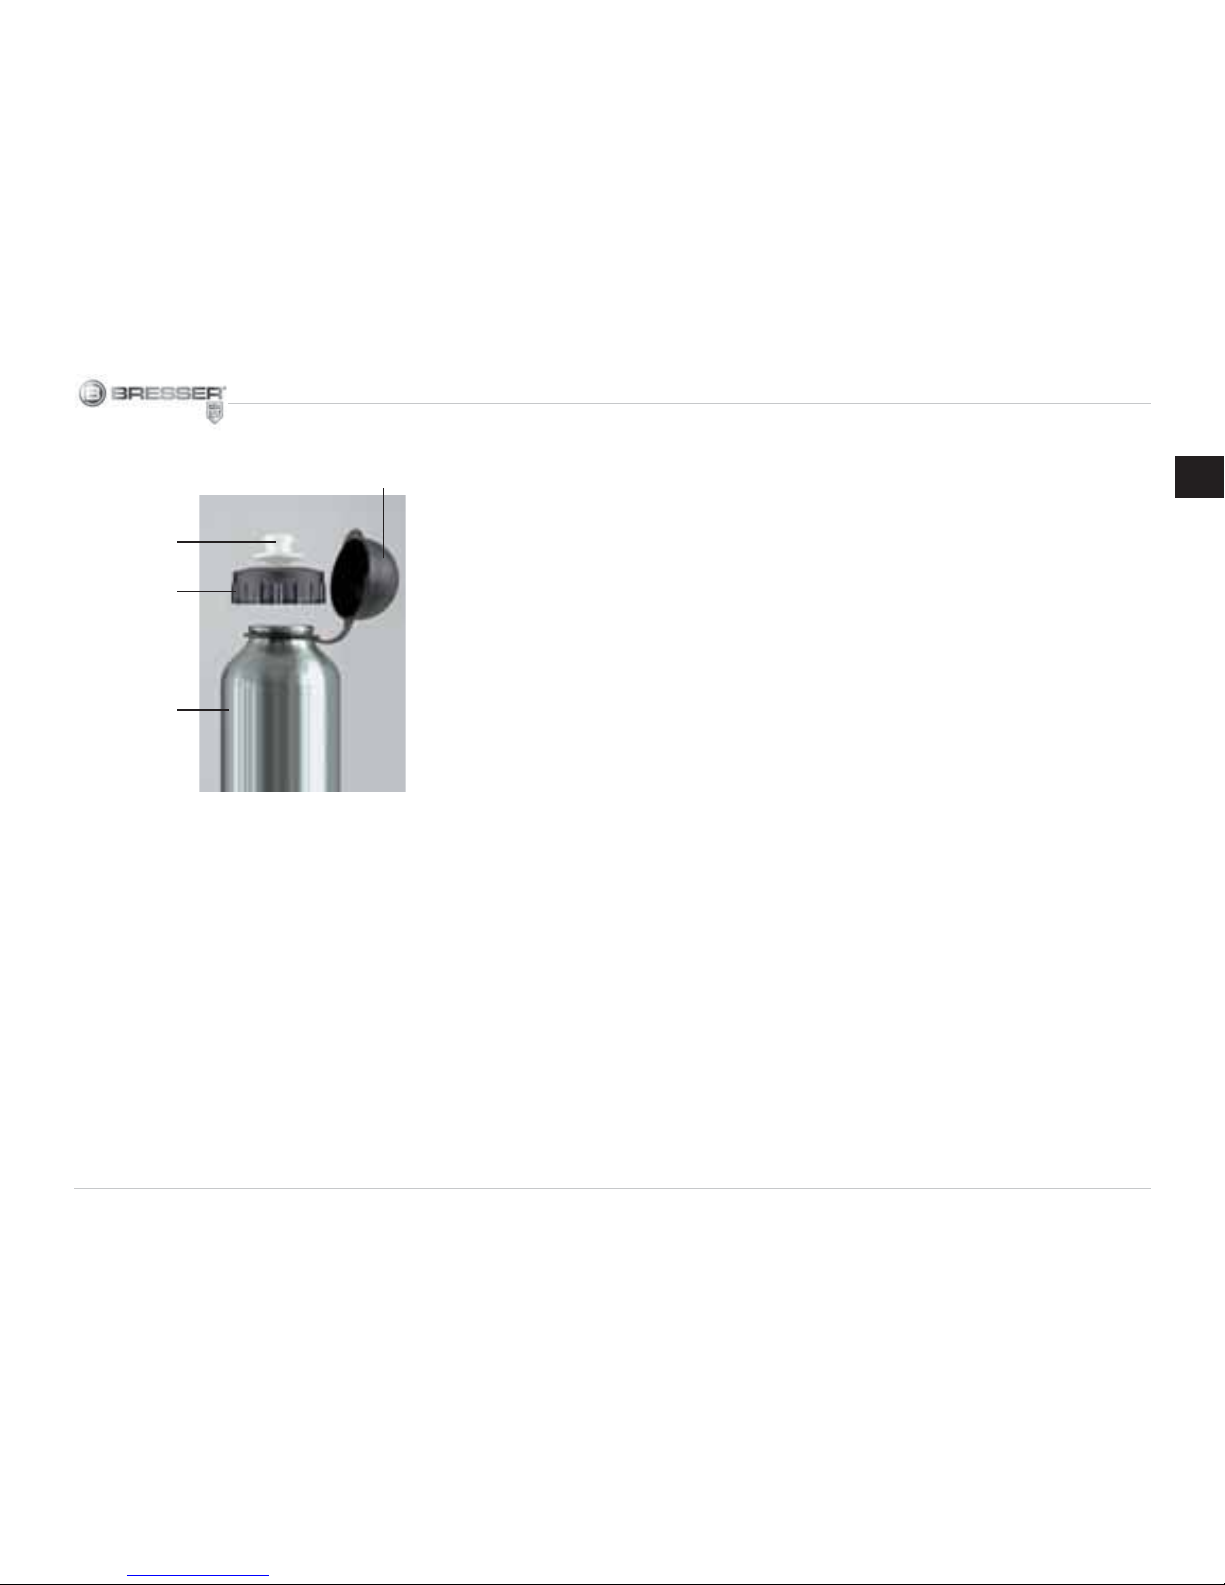
Trinkfl asche
Das sind die Einzelteile deiner
Trinkfl asche:
18 Schutzdeckel
19 Spender
20 Flaschenverschluss
21 Trinkfl asche
Was du wissen musst
Deine Trinkfl asche (21) besteht aus
doppelwandigem Aluminium. Dadurch kann sie sowohl Kälte als auch
Wärme für eine gewisse Zeit halten.
DE
1*
1(
2)
2!
Deshalb bleiben Getränke im Sommer kühl und im Winter warm.
Bevor du die Trinkfl asche zum ersten
Mal befüllst, spüle alle Teile in lauwarmem Wasser mit etwas Spülmittel.
Danach spülst du die Teile mit klarem
Wasser nochmals gut ab!
So kannst du deine Trinkfl asche
benutzen
Schraube zuerst den Flaschenverschluss (20) ab. Fülle dann dein
Getränk in die Flasche, aber nicht
ganz bis zum Flaschenhals. Schraube dann den Verschluss wieder auf.
Achte darauf, dass der Spender (19)
geschlossen, d.h. nach unten gedrückt, ist. So kann beim Transportieren der Flasche keine Flüssigkeit
auslaufen. Klappe auch den Schutzdeckel (18) über den Spender, damit
kein Schmutz daran gelangen kann.
Wenn du auf deinen Wanderungen
etwas trinken möchtest, musst du
(I)
zuerst den Schutzdeckel aufklappen.
Dann ziehst du den Spender nach
oben und nimmst ihn in den Mund.
Wenn du nun die Flasche etwas
schräg hältst, läuft die Flüssigkeit direkt in deinen Mund. Mmmh, lecker!
Vorsicht!
Fülle niemals heiße Getränke in deine Flasche! Du könntest dir beim
Trinken leicht den Mund verbrennen.
10
RISK to your child!
Never look through this device
directly at or near the sun. There
is a risk of BLINDING YOURSELF!
Children should only use this device
under supervision. Keep packaging
materials (plastic bags, rubber bands,
etc.) away from children. There is a
risk of SUFFOCATION.
This device contains electronic components that are powered by either a
mains connection or batteries. Never
leave a child unsupervised with this
device. The device should only be
used as per these instructions otherwise there is a serious RISK of ELECTRICAL SHOCK.
Batteries should be kept out of children’s reach. When inserting batteries please ensure the polarity is correct. Leaking or damaged batteries
can cause injury if they come into
contact with the skin. If you need to
handle such batteries please wear
suitable safety gloves.
DANGER of fi re and explosion!
Never subject the device - es-
pecially the lenses - to direct
sunlight. Light ray concentration can
cause fi res and/or burns.
Do not expose the device to high temperatures. Use only the mains adapter supplied or those battery types
recommended. Never short circuit
the device or batteries or throw into
a fi re. Exposure to high temperatures
or misuse of the device can lead to
short circuits, fi re or even explosion!
RISK of material damage!
Never take the device apart.
Please consult your dealer if
there are any defects. The dealer will
contact our service centre and send
the device in for repair if needed.
TIPS on cleaning
Remove the device from
it’s energy source before
cleaning (remove plug from
socket / remove batteries).
Clean the eyepieces and/or lenses
only with a soft, lint-free cloth, (e.g.
microfi bre cloth). To avoid scratching
the lenses, use only gentle pressure
with the cleaning cloth.
Dampen the cleaning cloth with a
spectacle cleaning fl uid and use it on
very dirty lenses.
Protect the device from dust and
moisture. Store the device in the bag
supplied or in its original packaging.
Batteries should be removed from
the device if it is not going to be used
for a long period of time.
11
RESPECT privacy!
This device is meant for private use. Respect others‘
privacy – do not use the device to look into other people‘s homes,
for example.
DISPOSAL
Dispose of the packaging
material/s as legally required.
Consult the local authority on the matter if necessary.
Do not dispose of electrical
equipment in your ordinary
refuse. The European guideline
2002/96/EU on Electronic and Electrical Equipment Waste and relevant
laws applying to it require such used
equipment to be separately collected
and recycled in an environment-friendly manner.
Empty batteries and accumulators
must be disposed of separately. Information on disposing of all such equip-
EEC conformity explanation
Bresser GmbH, resident in
46414 Rhede/Westf.,
Gutenbergstr. 2, Germany, explains
the agreement with in the following
specifi ed EEC guidelines for this
product:
EN 61000-6-3:2007
EN 55015:2006
EN 61547/A1:2000
Product description:
Outdoorset
Model /Description:
LED lamps (Head Light)
Rhede, 11.03.2008
Bresser GmbH
Helmut Ebbert
Managing director
GB
ment made after 01 June 2006 can be
obtained from your local authority.
12
Your Outdoor Set includes the
following things:
A Binoculars 4x30
B LED lamp with headband
C Mini compass
D Aluminum water bottle
E Nylon carrying case
Binocular 4x30
The individual components of
your binoculars:
1 Focus knob (center focus system)
2 Eyepieces
3 Binocular tubes
4 Folding binocular axis
5 Objective lenses
6 Binocular bridge
7 Rubber sheathed grips
How to get a sharp image
The distance between the eyes
Eye spacing is different in every
child. It‘s therefore essential this be
correctly set for you.
Take the binoculars in both hands as
in illustration C and hold them to your
eyes. Fold them so that you see a single circle when looking though them
with both eyes (see illustration D).
The focus
Look for an object that is more than
10 meters away from you. In order to
get a sharp picture of this object, fi rst
take a look through the eyepieces
with both eyes (2). Then use your fi nger to turn the focus knob (1) until the
picture becomes completely clear.
Now your adventure can begin.
Have fun!
(D)
✔
✘
(C)
(B)
b
d
E
c
F
F
c
H
G
H
13
GB
LED lamp with headband
Here are the individual parts of
your LED lamp with headband:
8 LED lights
9 On/off switch
10 Headband
11 Eyelets for the adjustment of the
headband length
12 Hinge for the adjustment of the
lamp
13 Battery compartment closure
14 Battery compartment
15 Battery holder
16 Batteries
What you need to know
Your headlamp has a strong LED light
(8). Since you place it on your forehead with the headband, you hands
will be free. In this way, you can use
other things without having to stand
around in the dark. This is really great
when you are going on an evening
walk with your parents.
Putting on the LED lamp and
adjusting the headband length.
The head of every child is a different
size. Therefore, you have to adjust the
headband length to your head. Place
the headband (10) on your head. You
can adjust the length of the band by
moving the eyelets (11) towards the
front or towards the bank.
Turning the light on and off
In order to turn on the light, simply
press the on/off switch (9). You can
adjust the strength of the light in this
way:
Press 1x = 1 LED lights up
Press 2x = 3 LEDs light up
Press 3x = 7 LEDs light up
If you push the on/off button for a
forth time, you will turn off the light
again.
Changing the batteries
If the light gets weaker or doesn’t
light up any more, you will have to
change the batteries (16). To do so,
simply remove the battery compartment closure (13) by unscrewing
it clockwise from the fl ashlight. Tilt
the battery compartment (14) a little
towards the front, so that the battery
holder (15) with the batteries slides
J
1)
1!
1@
I
1#
1$ 1% 1^
(F)
(G)
14
out. Place 3 new type LR03 (AAA
micro) batteries in the holder. Make
sure that you put the batteries in correctly, as shown on the label. A red
arrow is displayed on the holder.
Push the holder back into the battery
compartment in the direction of this
arrow. The other, black arrow on the
label must be in the opposite direction of the hinge (12). When you’ve
done this correctly, you can close the
battery compartment again.
Note:
You can buy new batteries for your
head lamp at any department or electronics store.
Adjusting the angle of the light
You LED head lamp is fi xed to a hinge
(12). When you have put the lamp on,
you can adjust it in various levels, up
or down. In this way, you can change
the angle of the light.
Mini compass
Here‘s how to use your compass.
The marked tip of the compass needle (17) always points to the north.
This is the north point. Turn the
compass, so that “N” (=north) on the
face of the compass is pointing in the
same direction as the marked compass point. If you want to go north,
you only have to select this direction.
You can also head in all other directions. If you want to go south (=S), for
example, go in the opposite direction
of the north point. If you want to go
east (=E), go to the right of the north
point. If you go to the left of the north
point, you’re heading west (=W).
Water bottle
Here are the individual
components of your water bottle:
18 Protective cover
19 Dispenser
20 Bottle cap
21 Water bottle
What you need to know
Your water bottle (21) is made of
double-walled aluminum. In this way,
it can keep things cold or warm for a
certain period of time. Drinks remain
1&
1*
1(
2)
2!
(H)
(I)
15
GB
cold in the summer and warm in the
winter.
Before you fi ll your water bottle for
the fi rst time, clean all the parts in
lukewarm water with some soap. After, give the parts a good rinsing with
clean water!
Here‘s how to use your water
bottle.
First unscrew the bottle cap (20).
Pour your drink in the bottle, but
not all the way up to the neck of
the bottle. Screw the cap back on.
Make sure that the dispenser (19) is
closed, i.e. it’s in the lower position.
This way, no liquid will leak out during
transport. As well, close the protective cover (18) over the dispenser, so
that no dirt can get in there.
When you want to talk a drink while
walking, you fi rst must open the
protective cover. Then pull the dispenser upwards and place it in your
mouth. When tilt the bottle a bit, the
liquid will run directly into your mouth.
Mmmmm, refreshing!
Caution!
Never put hot drinks in your bottle!
You could easily burn your mouth
while drinking.
16
DANGER pour votre enfant !
Avec cet appareil, ne regardez
jamais directement vers le soleil ou à proximité du soleil. DANGER
DE DEVENIR AVEUGLE !
Les enfants ne devraient utiliser l’appareil que sous surveillance. Gardez
hors de leur portée les matériaux
d’emballage (sachets en plastique,
élastiques etc.) ! DANGER D’ÉTOUFFEMENT !
Cet appareil contient des pièces
électroniques fonctionnant à l‘aide
d’une source de courant (bloc secteur et/ou piles). Ne laissez jamais
vos enfants sans surveillance utiliser
cet appareil ! L’appareil doit impérativement être utilisé selon les instructions du mode d’emploi : DANGER
de CHOC ÉLECTRIQUE !
Les piles doivent être tenues hors de
la portée des enfants ! Faites attention à la polarité lorsque vous insérez
les piles. Les piles qui ont fui ou qui
sont endommagées peuvent provoquer des brûlures lorsqu’elles entrent
en contact avec votre peau. Enfi lez
des gants de protection adaptés le
cas échéant.
DANGER D’INCENDIE/
EXPLOSION !
Ne laissez jamais l’appareil – et
surtout les lentilles – exposé
directement aux rayons du soleil !
L’effet de loupe pourrait provoquer
des incendies.
N’exposez pas l’appareil à de fortes
températures. Utilisez uniquement le
bloc secteur inclus à la livraison ou
bien les piles recommandées. Ne
court-circuitez pas l’appareil avec les
piles et ne les jetez pas dans le feu !
Une chaleur excessive ou un mauvais maniement peut provoquer des
courts-circuits, des incendies voire
des explosions !
DANGER de dommage sur le
matériel !
Ne démontez jamais l’appareil !
En cas d’endommagement,
adressez-vous à votre revendeur. Il
prendra contact avec le centre de
service et pourra, le cas échéant,
envoyer l’appareil au service de réparations.
REMARQUES concernant le
nettoyage
Avant de procéder au nettoyage de l’appareil, sépa-
rez-le de la source de courant (retirez le bloc secteur de la prise
ou retirez les piles) !
Les lentilles (oculaires et/ou objectifs) ne doivent être nettoyé qu’avec
un chiffon doux et ne peluchant pas
(p. ex. microfi bres). Le chiffon doit
être passé sans trop le presser sur
la surface, afi n d’éviter de rayer les
lentilles.
 Loading...