

Page 1
Bedienungsanleitung
Operating instructions
Instrucciones de uso
EN
Art.No. 96-83002
ES
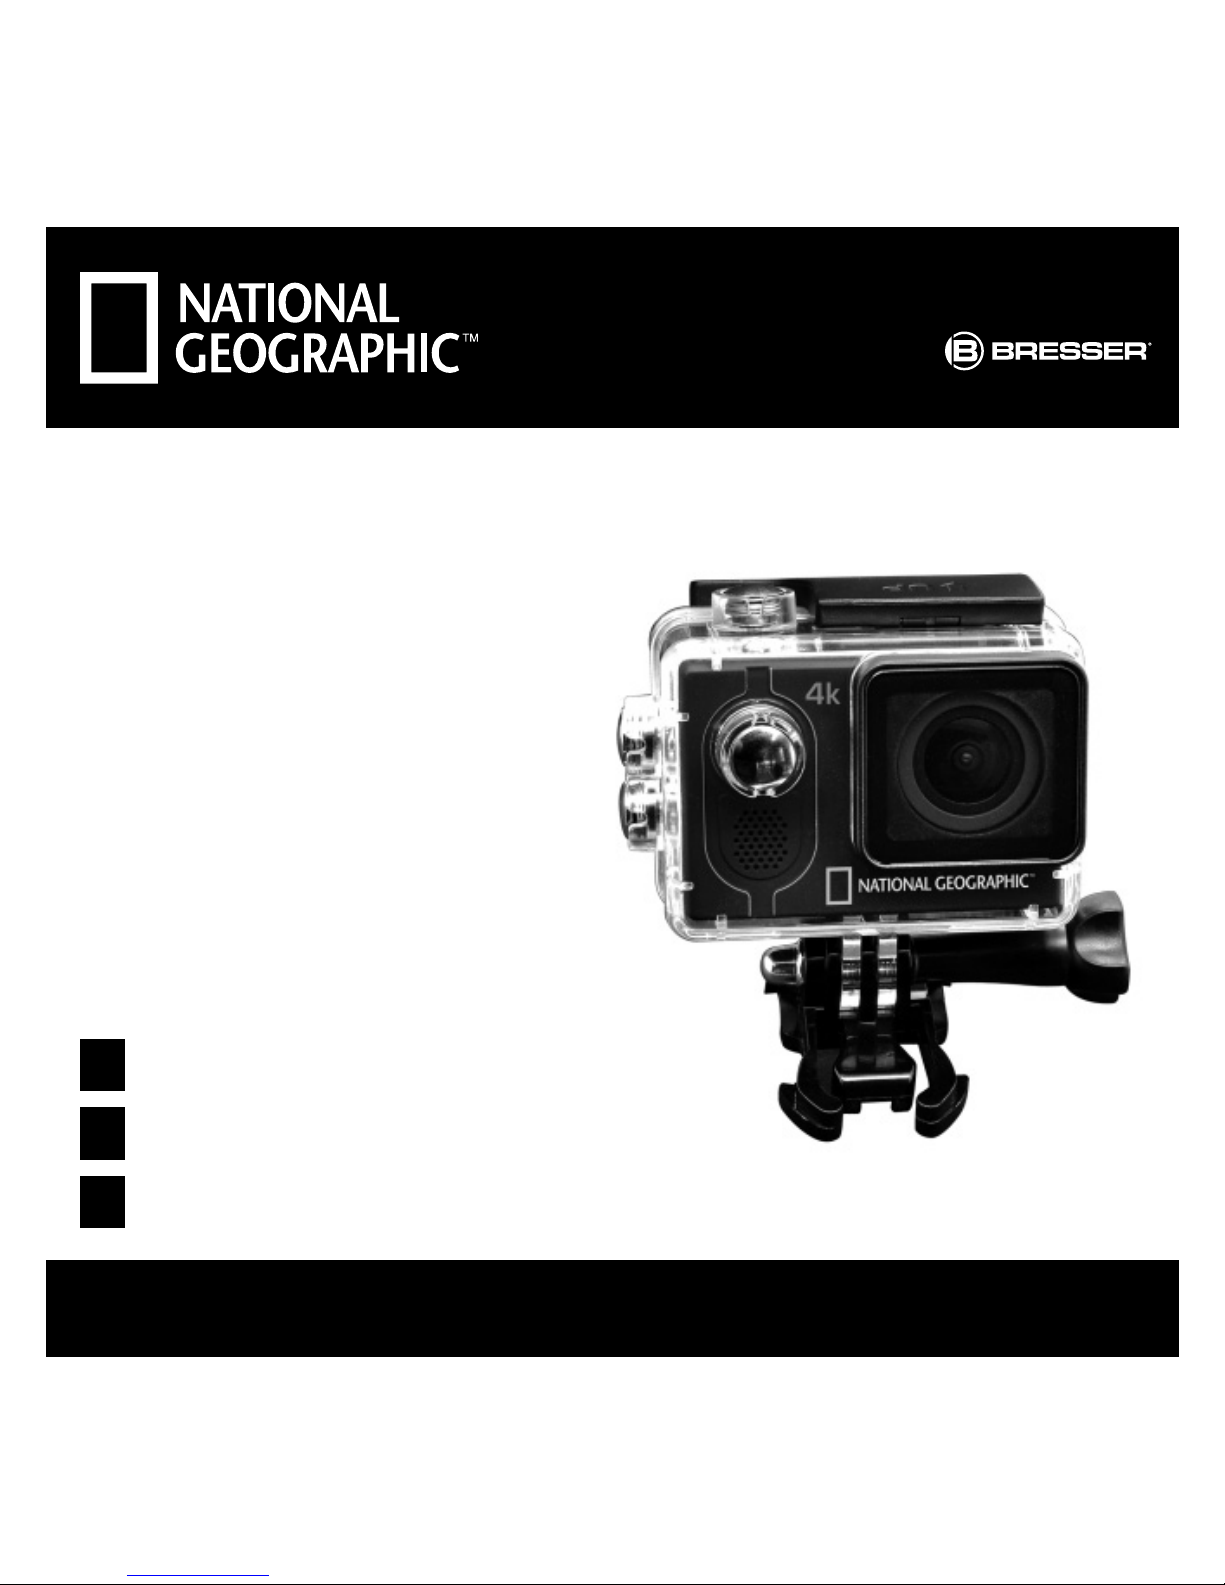
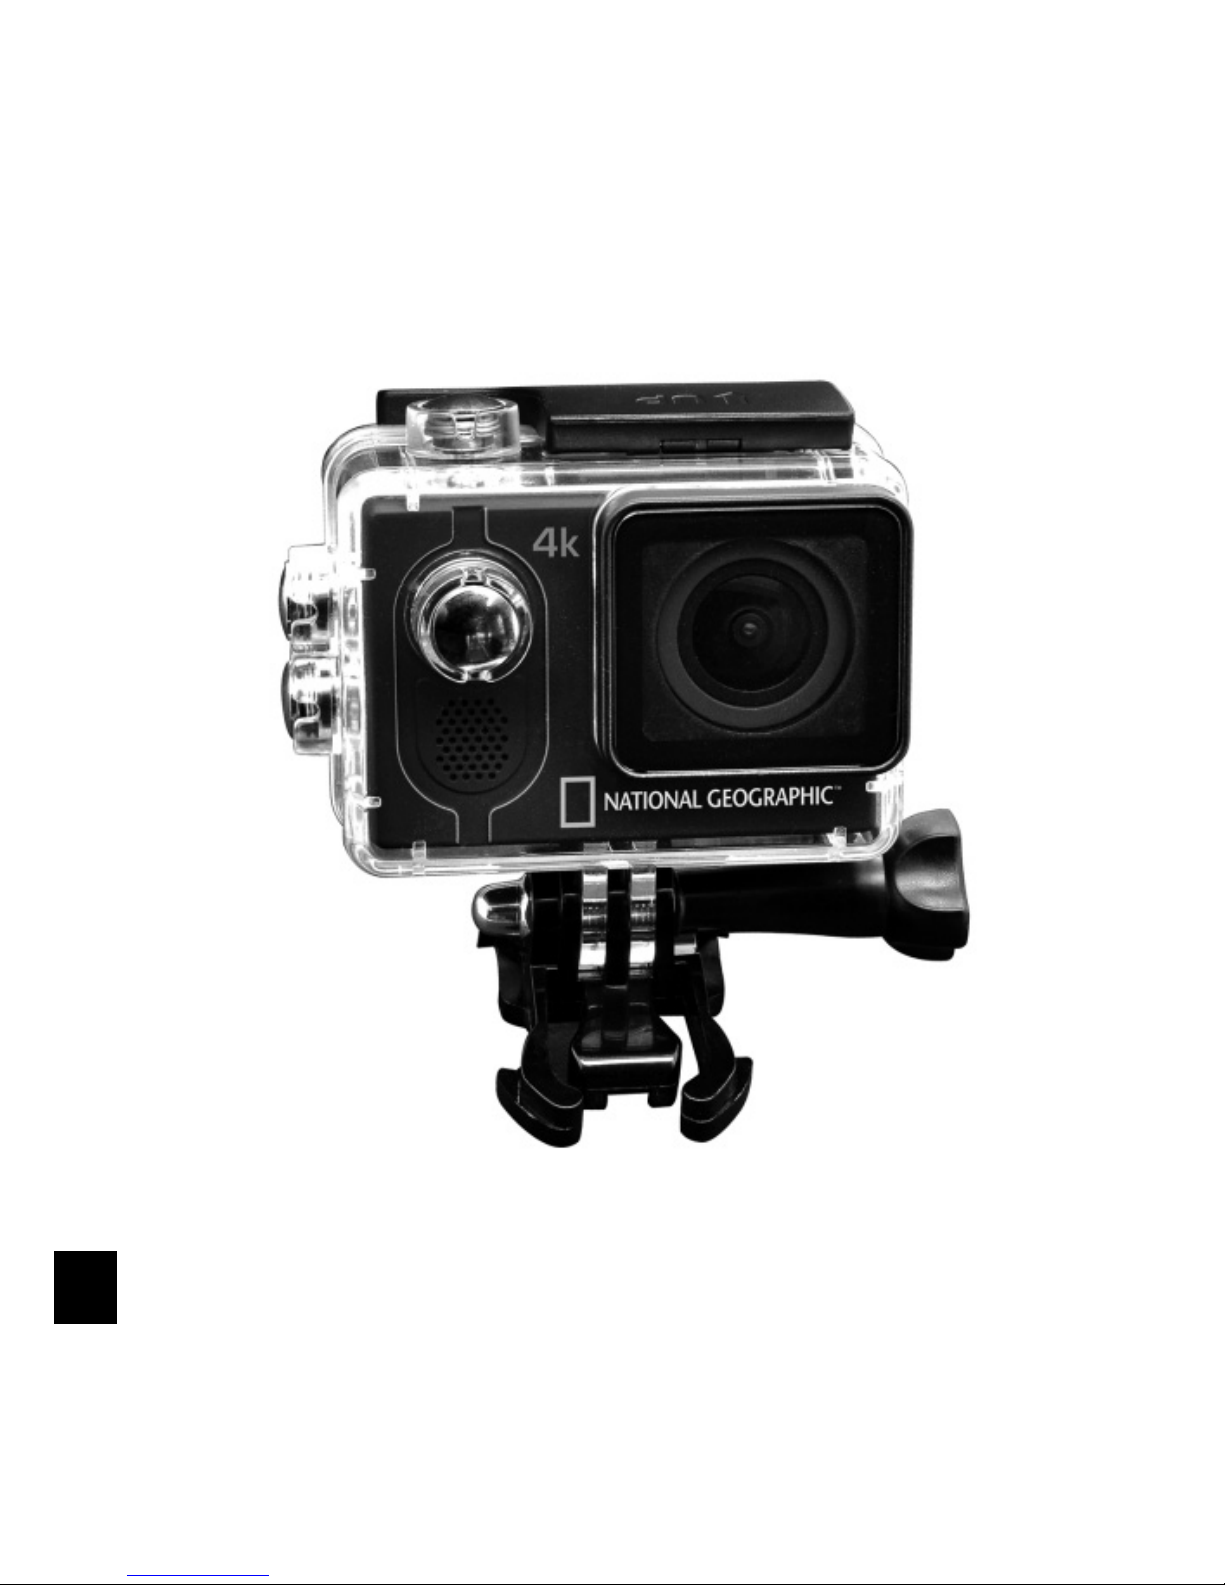
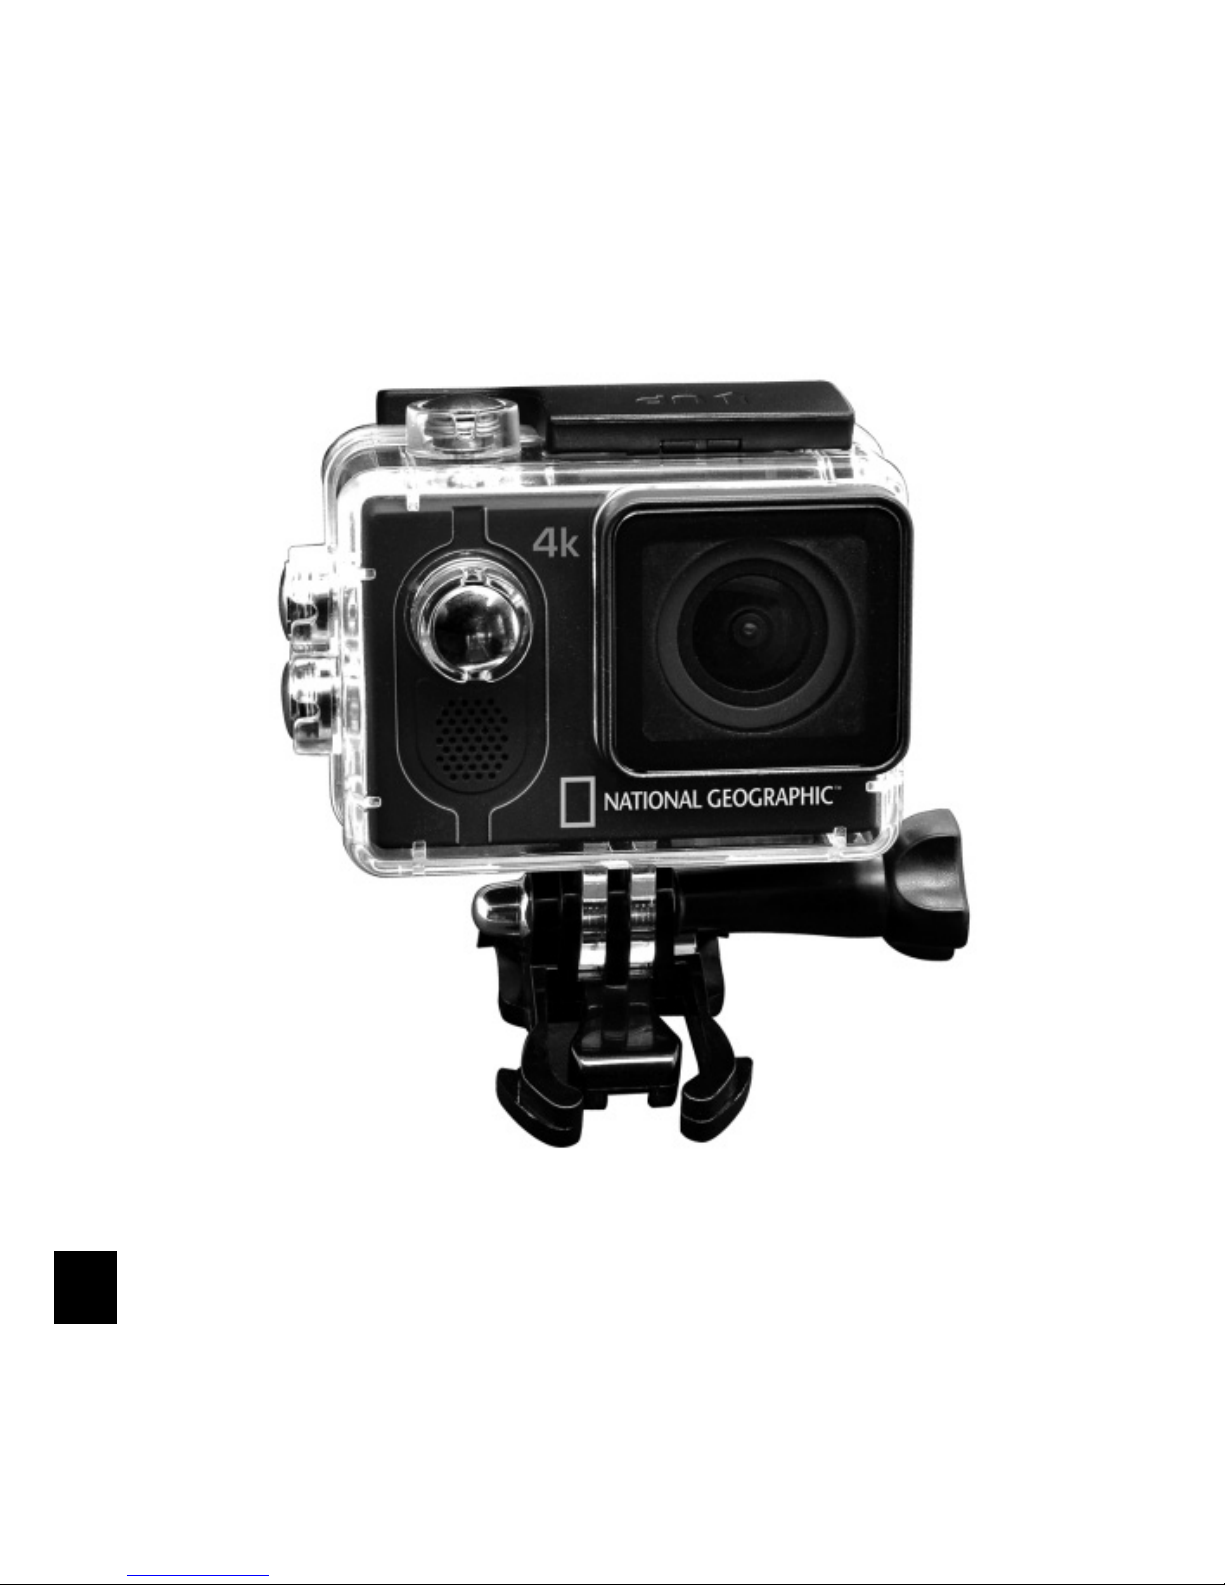
MOTION PRO
Action Camera
16 MP / Wi-Fi
4K Ultra HD
DE
Page 2
DE
Besuchen Sie unsere Website über den folgenden QR Code oder Weblink um
weitere Informationen zu diesem Produkt oder die verfügbaren Übersetzungen dieser
Anleitung zu fi nden.
EN
Visit our website via the following QR Code or web link to fi nd further information
on this product or the available translations of these instructions.
FR
Si vous souhaitez obtenir plus d’informations concernant ce produit ou recher-
cher ce mode d’emploi en d’autres langues, rendez-vous sur notre site Internet en
utilisant le code QR ou le lien correspondant.
NL
Bezoek onze internetpagina via de volgende QR-code of weblink, voor meer in-
formatie over dit product of de beschikbare vertalingen van deze gebruiksaanwijzing.
IT
Desidera ricevere informazioni esaustive su questo prodotto in una lingua
specifi ca? Venga a visitare il nostro sito Web al seguente link (codice QR Code) per
conoscere le versioni disponibili.
DK
Ønsker du en udførlig vejledning til dette produkt på et bestemt sprog? Så besøg
vores website ved hjælp af følgende link (QR-kode) for tilgængelige versioner.
PL
Odwiedź naszą stronę internetową, korzystając z kodu QR lub za pośrednictwem
linka sieciowego, aby poszukać więcej informacji na temat tego produktu lub
dostępnych wersji językowych niniejszej instrukcji obsługi.
RU
Посетите нашу страницу в сети Интернет, используя QR-код или Web-ссылку,
для получения дополнительной информации по данному устройству или для
поиска доступных языковых версий данного руководства по эксплуатации.
www.bresser.de/9683002
Page 3
DE
Allgemeine Informationen
Lesen Sie vor der Benutzung des Geräts aufmerksam die
Sicherheitshinweise und die Bedienungsanleitung. Bewahren Sie diese
Bedienungsanleitung für die erneute Verwendung zu einem späteren Zeitpunkt
auf. Bei Verkauf oder Weitergabe des Gerätes ist die Bedienungsanleitung an jeden
nachfolgenden Besitzer/Benutzer des Produkts weiterzugeben.
Verwendungszweck
Dieses Produkt dient ausschließlich der privaten Nutzung. Es wurde entwickelt als
elektronisches Medium zur Nutzung multimedialer Dienste.
Allgemeine Warnhinweise
• ERSTICKUNGSGEFAHR — Verpackungsmaterialien (Plastiktüten, Gummibänder,
etc.) von Kindern fernhalten! Dieses Produkt beinhaltet Kleinteile, die von Kindern
verschluckt werden können! Es besteht ERSTICKUNGSGEFAHR!
• Ausgelaufene Batteriesäure kann zu Verätzungen führen! Vermeiden Sie den
Kontakt von Batteriesäure mit Haut, Augen und Schleimhäuten. Spülen Sie bei
Kontakt mit der Säure die betroffenen Stellen sofort mit reichlich klarem Wasser
und suchen Sie einen Arzt auf.
• GEFAHR EINES STROMSCHLAGS — Strom- und Verbindungskabel sowie
Verlängerungen und Anschlussstücke niemals knicken, quetschen oder zerren.
Schützen sie Kabel vor scharfen Kanten und Hitze. Überprüfen Sie das Gerät, die
Kabel und Anschlüsse vor Inbetriebnahme auf Beschädigungen. Beschädigtes
Gerät oder ein Gerät mit beschädigten stromführenden Teilen niemals in Betrieb
nehmen! Beschädigte Teile müssen umgehend von einem autorisierten ServiceBetrieb ausgetauscht werden.
Page 4
• GEFAHR von Sachschäden! — Bauen Sie das Gerät nicht auseinander! Wenden
Sie sich im Falle eines Defekts an Ihren Fachhändler. Er nimmt mit dem ServiceCenter Kontakt auf und kann das Gerät ggf. zwecks Reparatur einschicken.
• Benutzen Sie nur das mitgelieferte Netzteil. Gerät nicht kurzschließen oder ins
Feuer werfen! Durch übermäßige Hitze und unsachgemäße Handhabung können
Kurzschlüsse, Brände und sogar Explosionen ausgelöst werden!
• Unterbrechen Sie niemals eine bestehende Datenverbindung zum Computer bevor
Sie alle Daten übertragen haben. Durch eine Unterbrechung kann es zu Datenverlusten kommen, für die der Hersteller keine Haftung übernimmt!
HINWEISE zur Reinigung
• Schalten Sie die Kamera aus.
• Reinigen Sie die Linsen (Okulare und/oder Objektive) nur mit einem weichen und
fusselfreien Tuch (z. B. Microfaser). Das Tuch nicht zu stark aufdrücken, um ein
Verkratzen der Linsen zu vermeiden.
• Reinigen Sie das Gerät nur äußerlich mit einem trockenen Tuch. Benutzen Sie
keine Reinigungsflüssigkeit, um Schäden an der Elektronik zu vermeiden.
• Reinigen Sie die Schutzhülle nach jedem Gebrauch mit klarem, sauberem Wasser
und trocknen Sie es gründlich.
EG-Konformitätserklärung
Eine „Konformitätserklärung“ in Übereinstimmung mit den anwendbaren
Richtlinien und entsprechenden Normen ist von der Bresser GmbH erstellt
worden. Diese kann auf Anfrage jederzeit eingesehen werden.
Page 5
DE
ENTSORGUNG
Entsorgen Sie die Verpackungsmaterialien sortenrein. Informationen zur
ordnungsgemäßen Entsorgung erhalten Sie beim kommunalen Entsorgungsdienstleister oder Umweltamt.
Werfen Sie Elektrogeräte nicht in den Hausmüll!
Gemäß der Europäischen Richtlinie 2002/96/EG über Elektro- und Elektronik-Altgeräte und deren Umsetzung in nationales Recht müssen verbrauchte
Elektrogeräte getrennt gesammelt und einer umweltgerechten Wiederverwertung zugeführt werden.
Entladene Altbatterien und Akkus müssen vom Verbraucher in Batteriesammelgefäßen
entsorgt werden. Informationen zur Entsorgung alter Geräte oder Batterien, die nach
dem 01.06.2006 produziert wurden, erfahren Sie beim kommunalen Entsorgungsdienstleister oder Umweltamt.
Der integrierte Akku darf nur zur Entsorgung entnommen werden! Durch das
Öffnen der Gehäuseschale kann das Gerät zerstört werden.
Entladen Sie den Akku vor der Entsorgung komplett. Drehen Sie alle Schrauben am
Gehäuse heraus und öffnen Sie die Gehäuseschale. Trennen Sie die Anschlüsse vom
Akku und nehmen Sie den Akku heraus. Kleben Sie offene Kontakte ab und verpacken Sie den Akku so, dass er sich nicht in der Verpackung bewegt.
Page 6
d E
F G
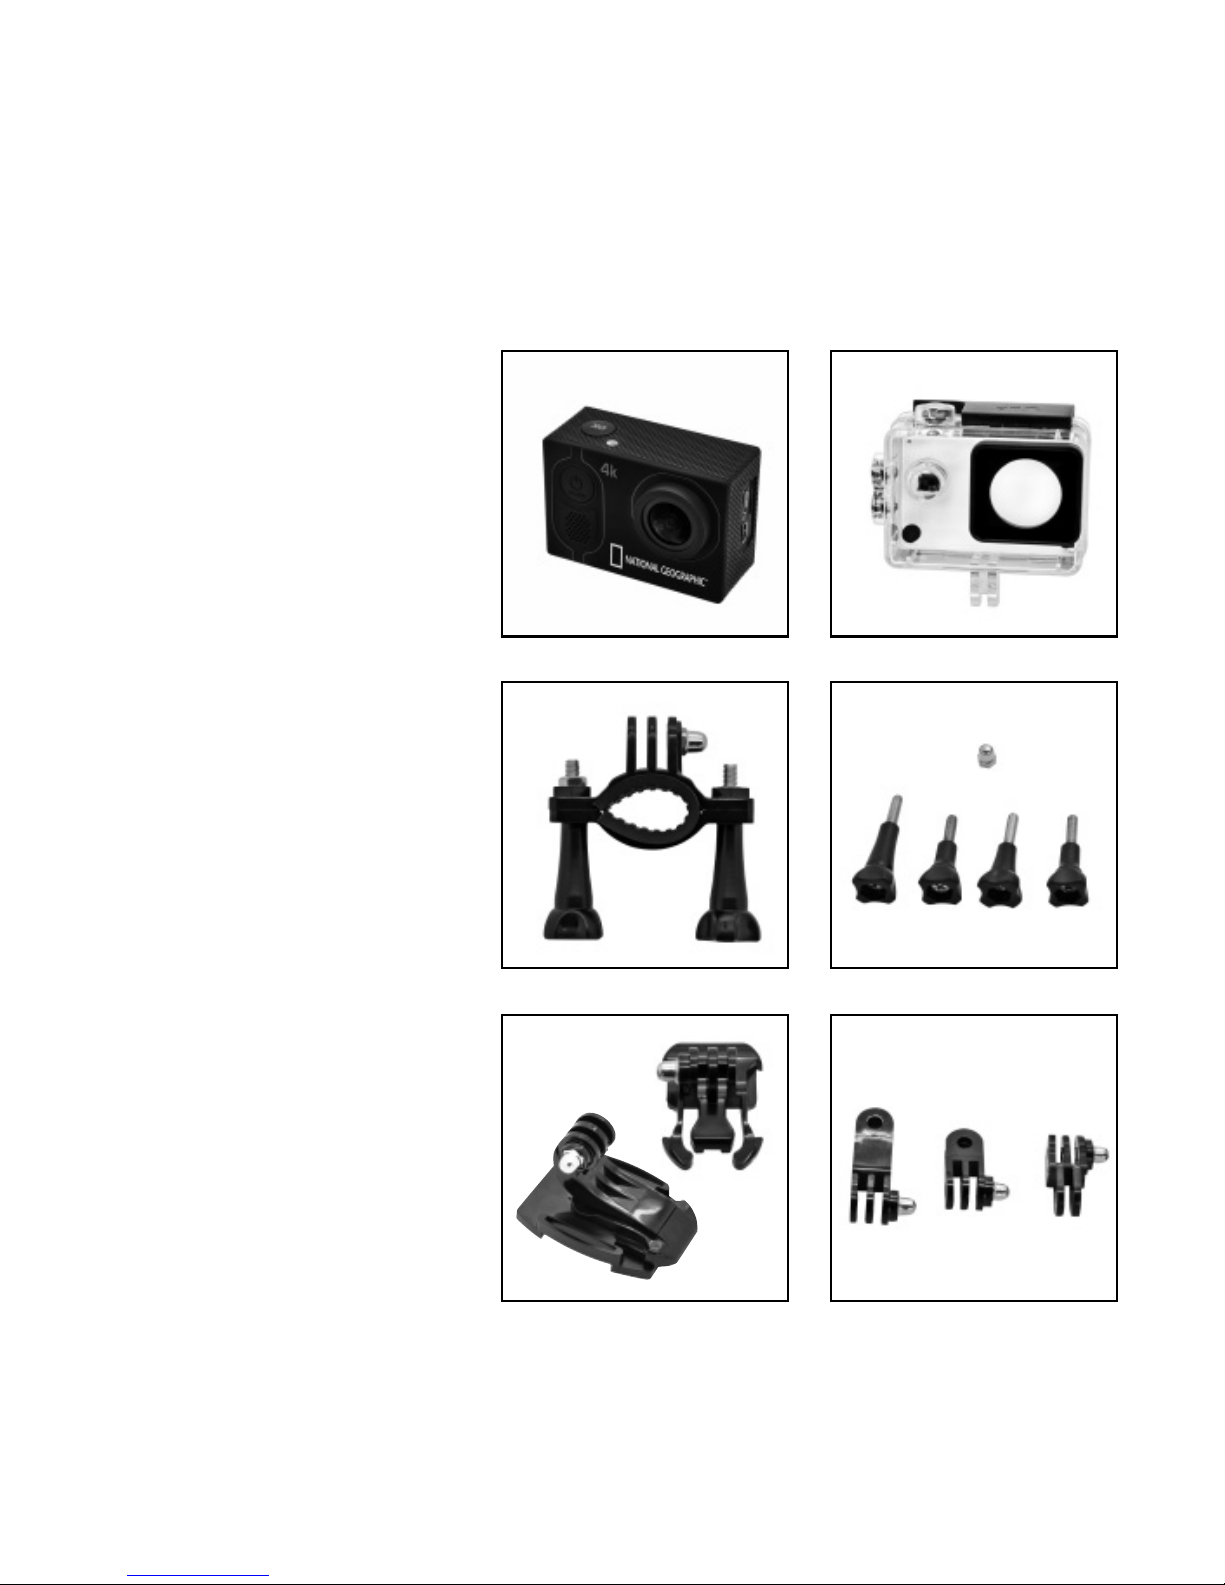
Lieferumfang
b
Kamera
c
Wasserdichtes Gehäuse
d
Fahrradhalterung
E Flügelschrauben und
Hutmutter
F Basis-Verbindungsstücke
G
Multifunktions Verbindungsstücke
2x 90° (a+b) und
1x gerade (c)
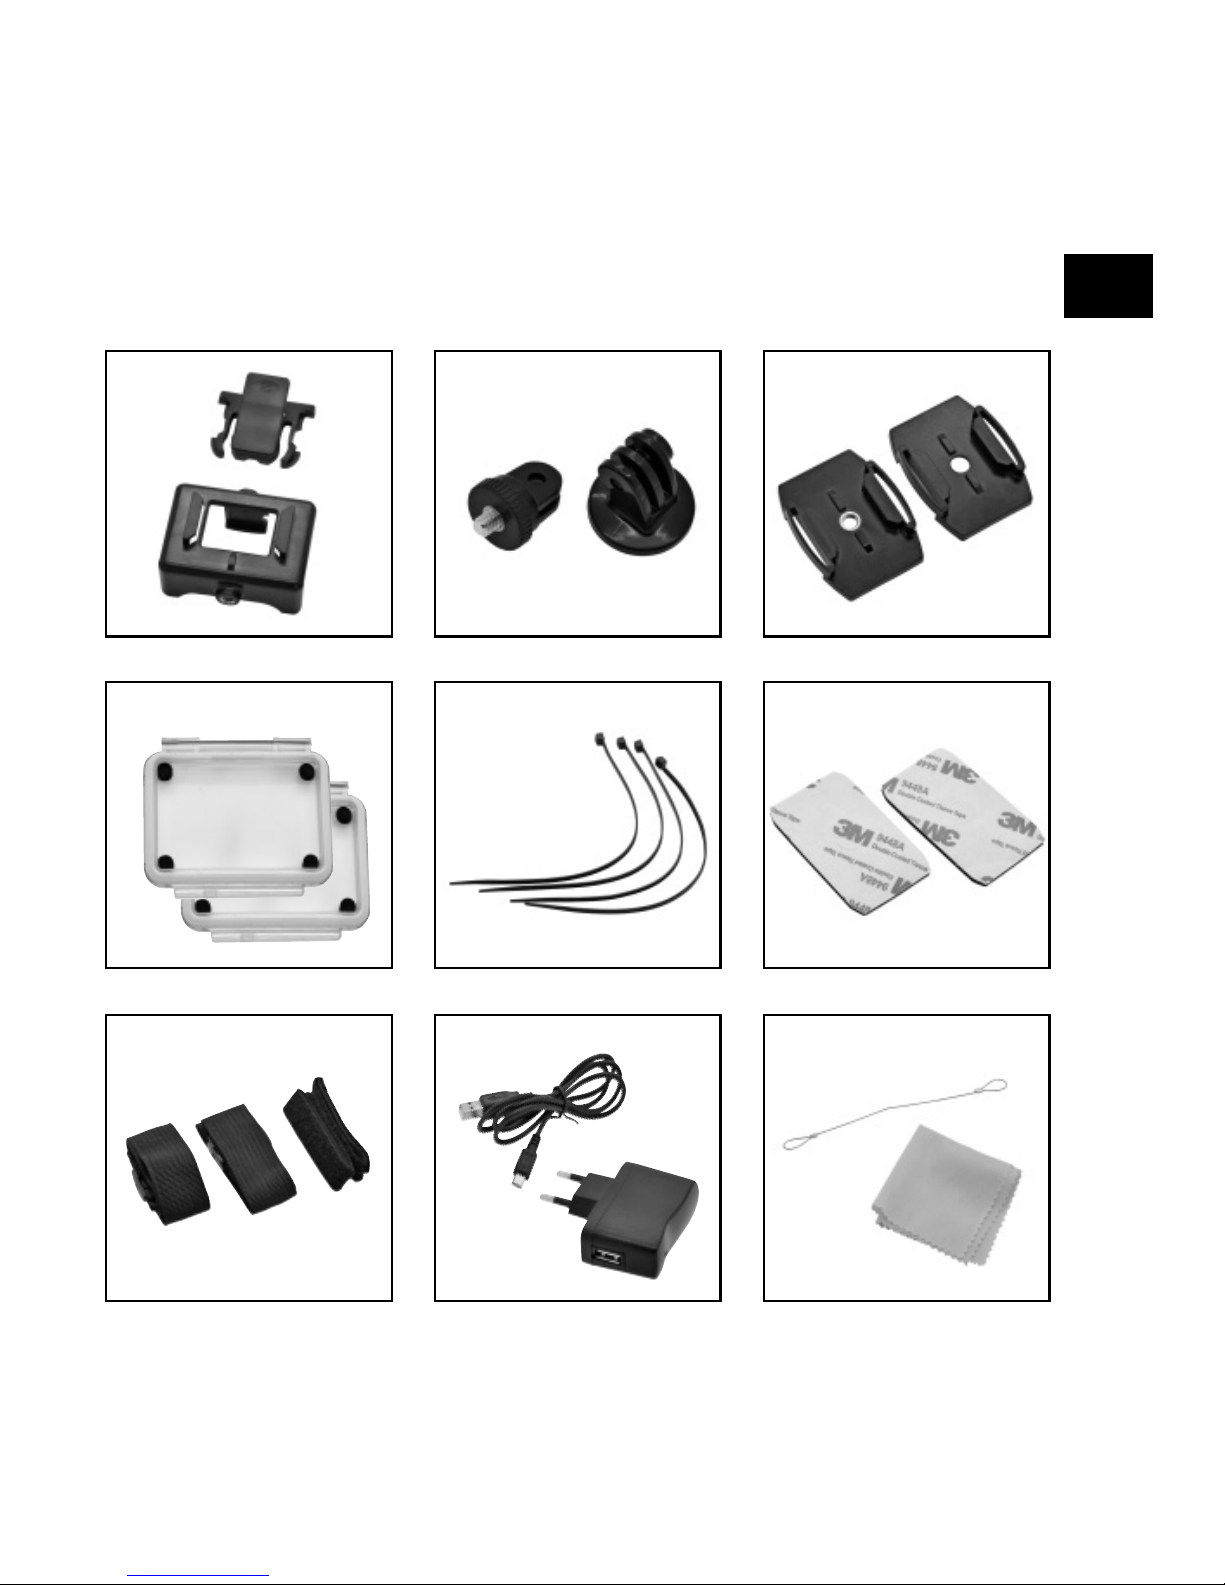
H
Kameragehäuse und
Gürtelhalterung
I
1/4” Stativadapter
(male/female)
J
Basis-Halterungen für
flache oder gebogene
Oberflächen
1)
Gehäuseklappen
1!
Kabelbinder
1@
Doppelseitige Klebepads
für die Basis-Halterungen
1#
Riemen
1$
USB Kabel
und Netzteil
1%
Sicherungsdraht
und Putztuch
(a) (b) (c)
b c
Page 7
DE
H I
1) 1!
1#
J
1@
1$ 1%
Page 8
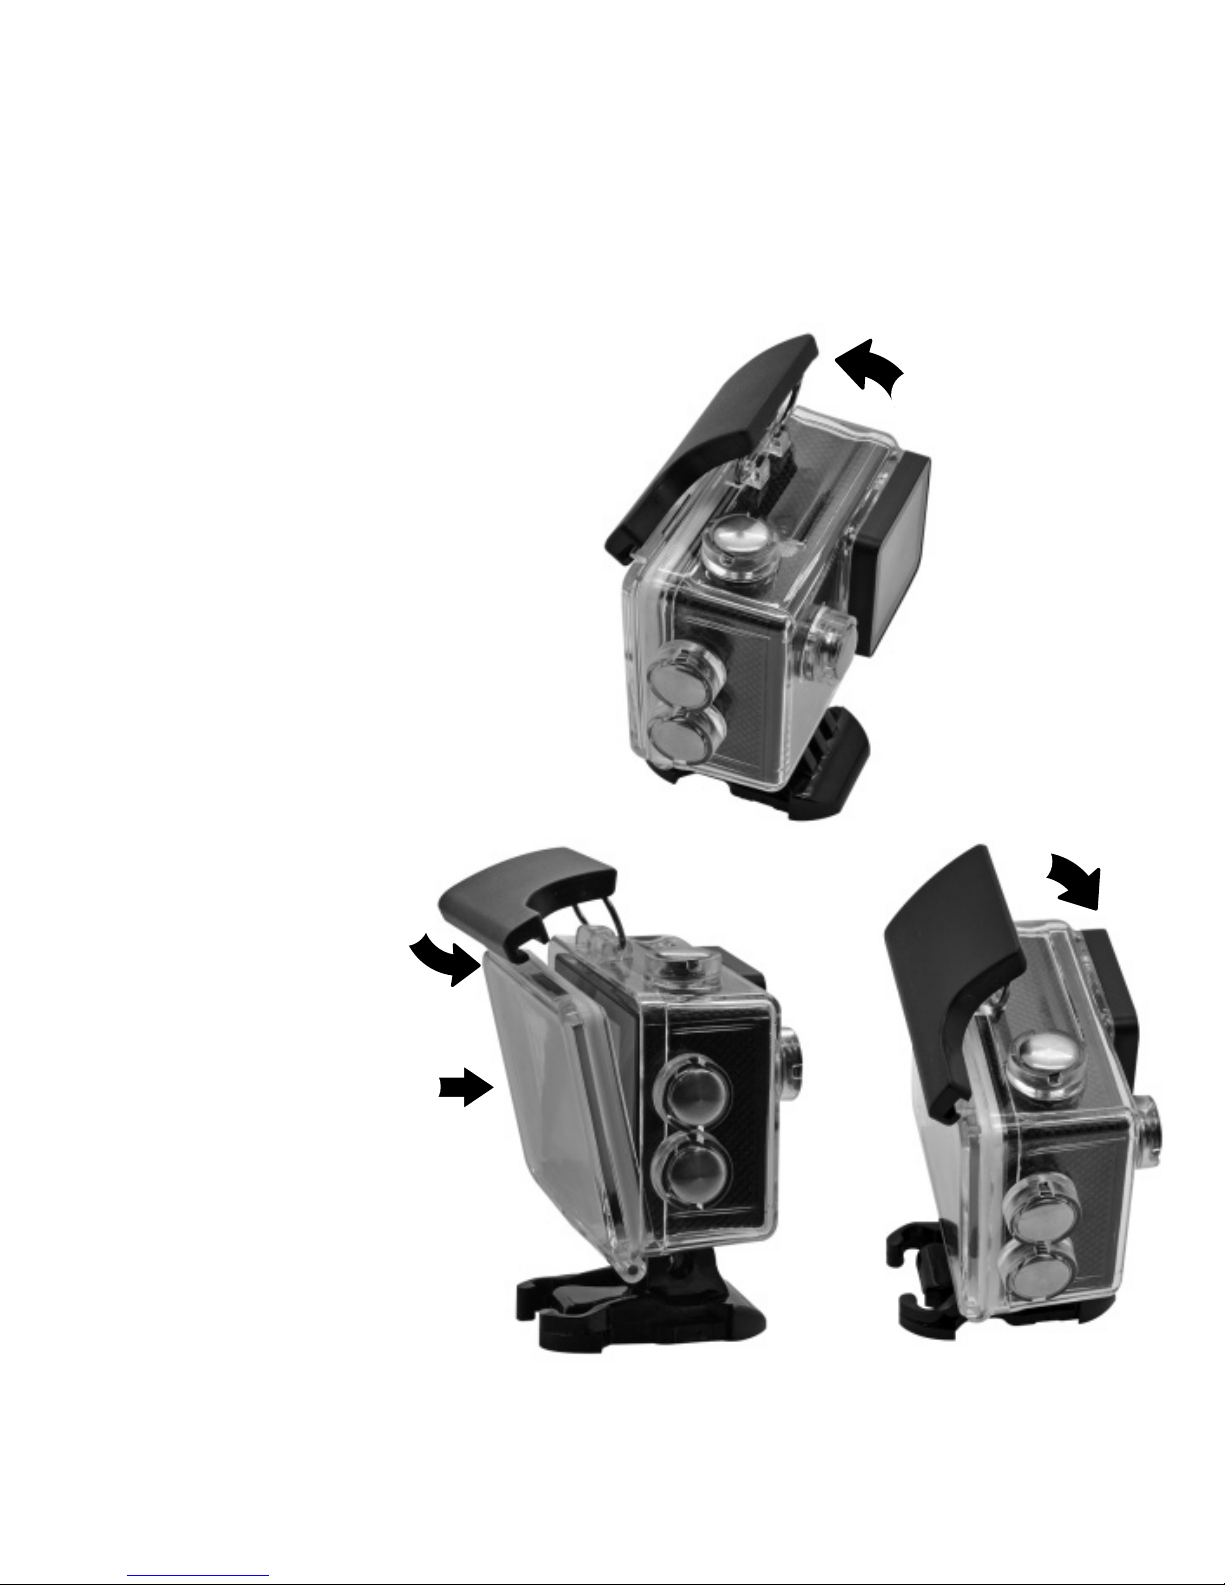
So öffnen und schließen Sie das wasserdichte Gehäuse
Gehäuse öffnen:
Drücken Sie die Klemme
nach oben um das
Gehäuse zu öffnen (1).
Gehäuse schließen:
Drücken Sie die
Klappe an das
Gehäuse (1), und
lassen sie die
Klemme am Gelenk
einrasten (2).
Nun die Klemme
nach unten drücken
(3) um zu schließen.
C
B
B
D
Page 9
DE
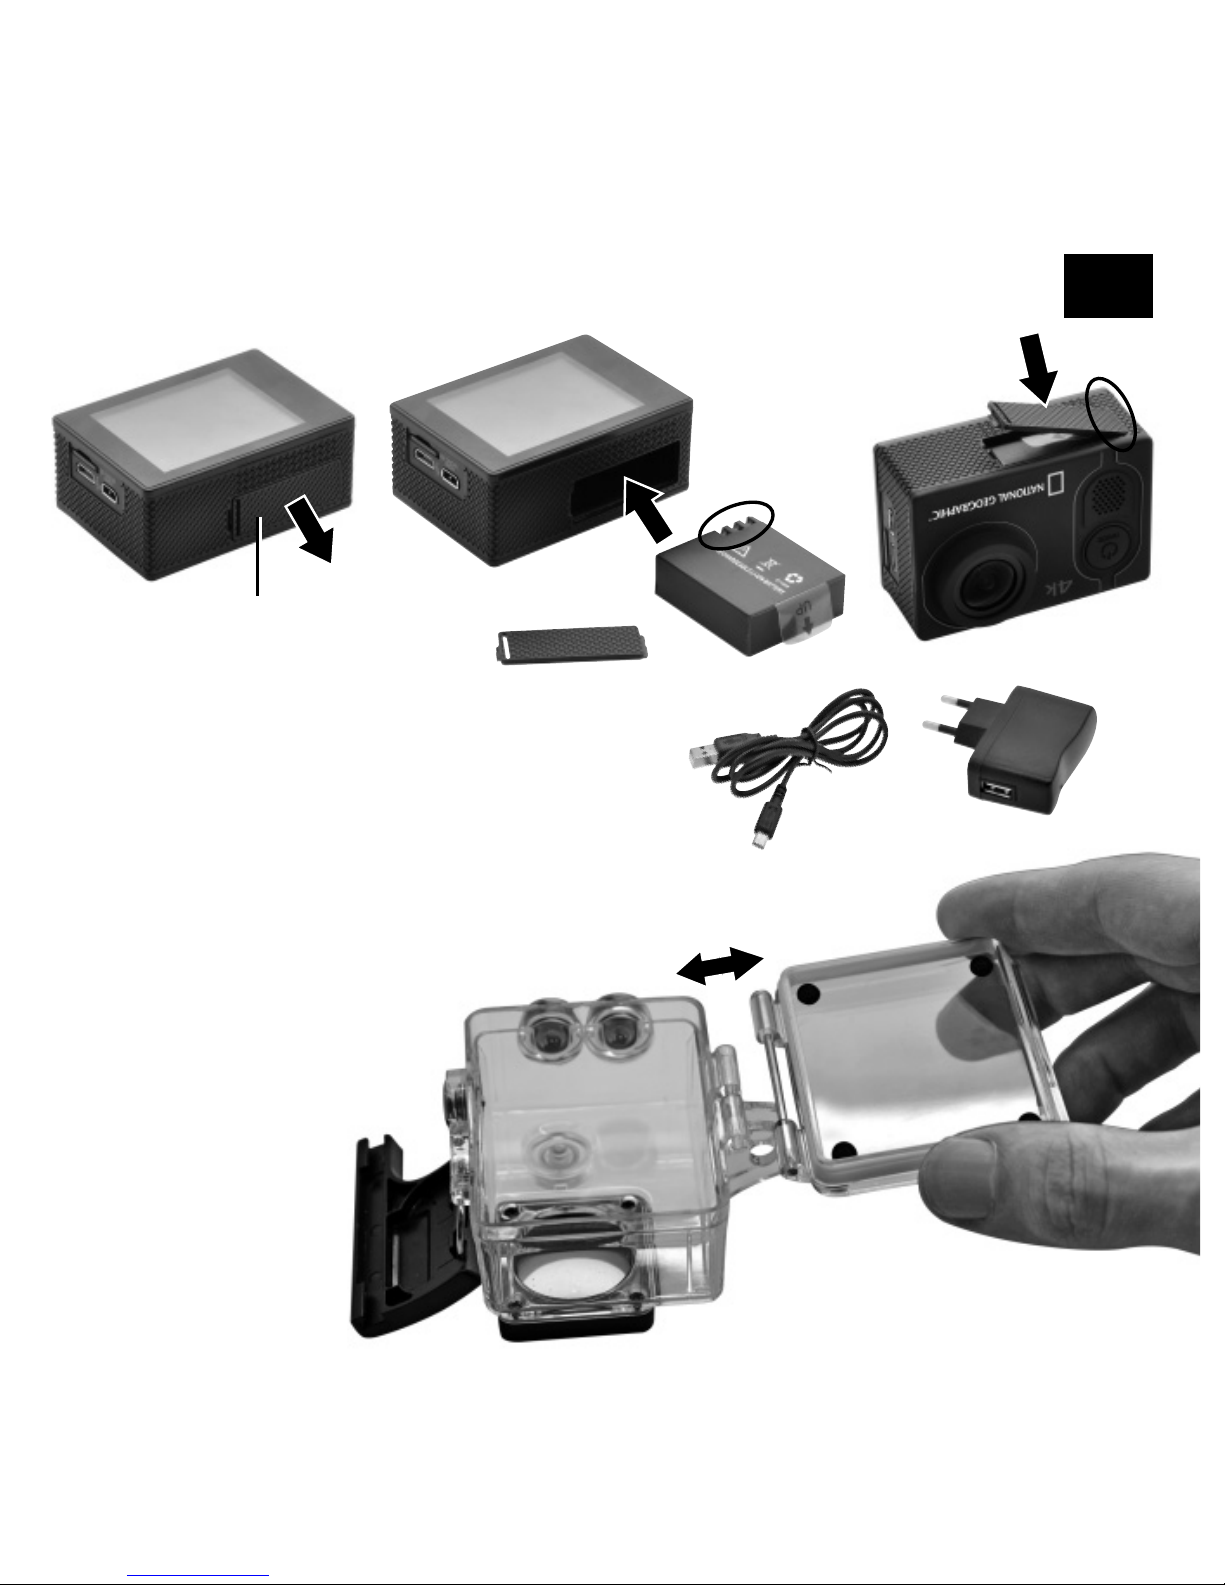
Akku wechseln
Gehäuseklappe wechseln
Ziehen Sie die alte
Gehäuseklappe ab.
Legen Sie die neue
Gehäuseklappe am
Scharnier an und
drücken Sie bis die
Klappe einrastet.
Der Akku kann mit dem beiliegenden Netzteil
oder über das USB Kabel am Computer
aufgeladen werden.
Batteriefachabdeckung
Page 10
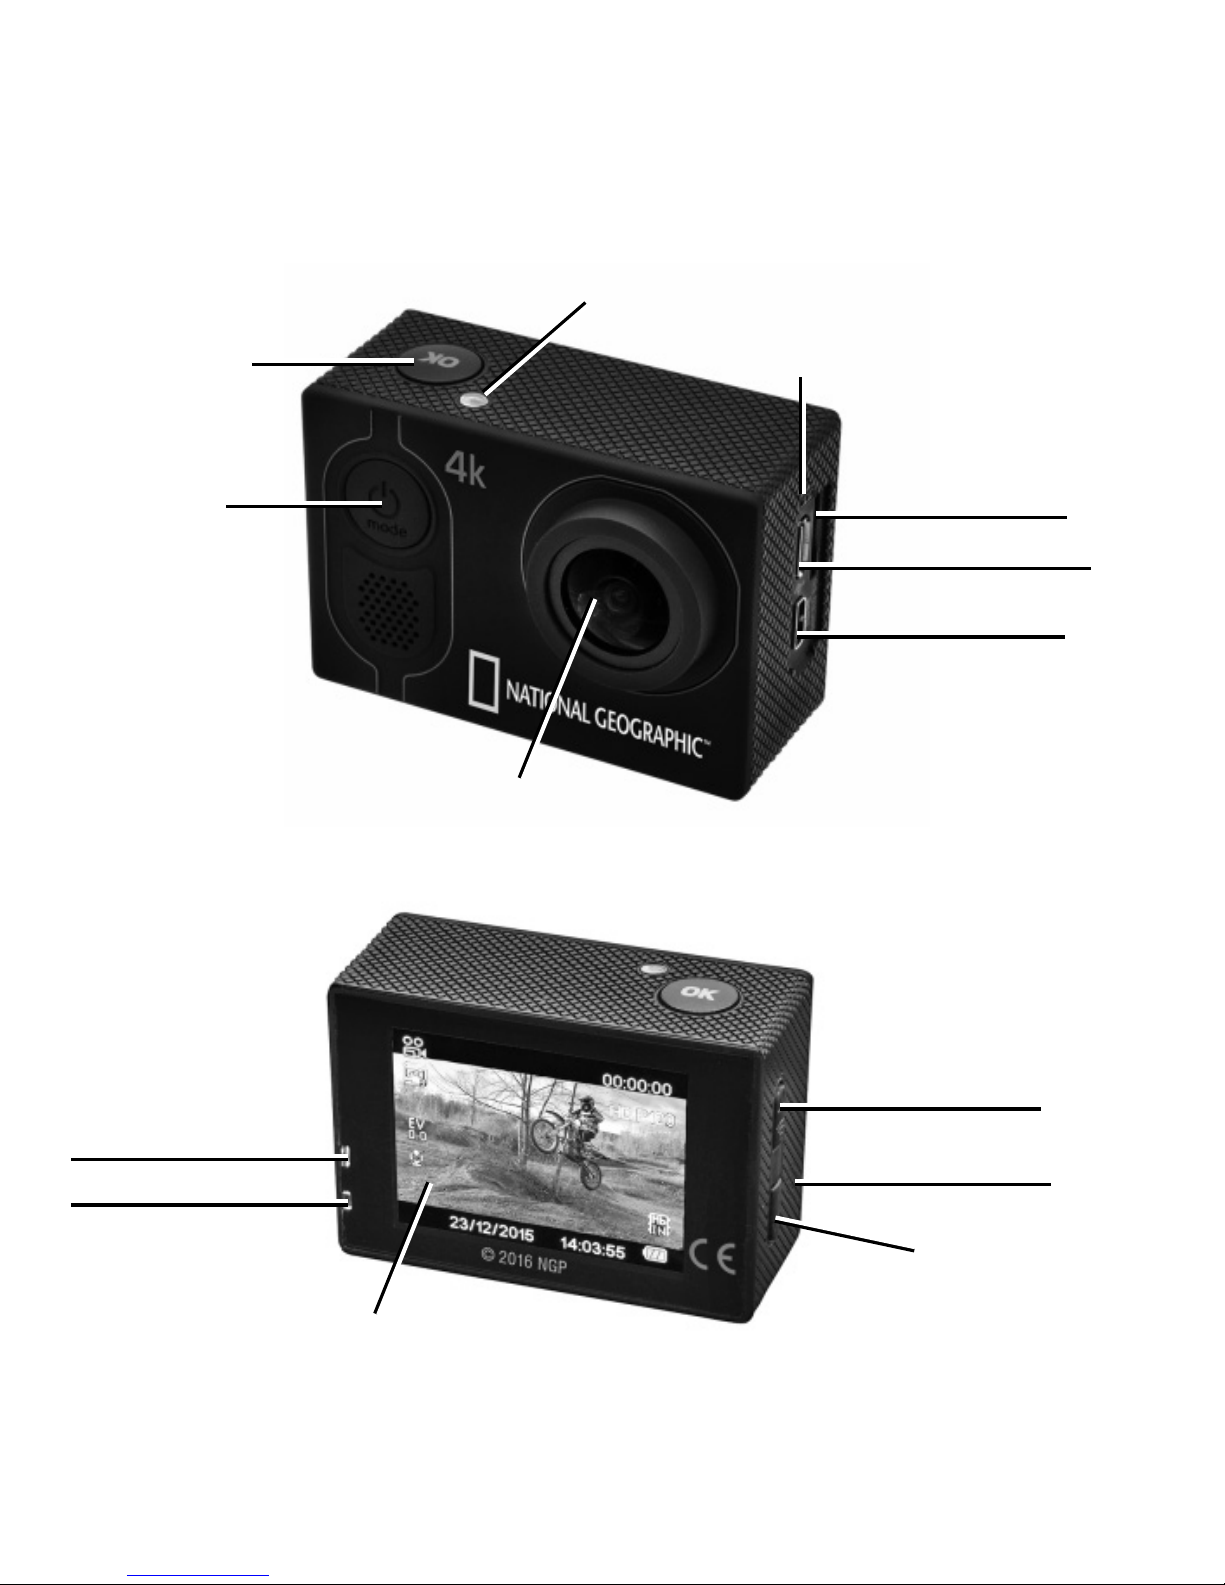
HOCH
& Wi-Fi Taste
Lautsprecher
TFT Bildschirm
RUNTER
Funktionen
Indikator
EIN/AUS Schalter
& MODUS
Mikrofon
Linse
Betriebsanzeige
Ladeanzeige
Micro SD/TF Port
Micro USB 2.0 Port
Micro HDMI
OK
Page 11
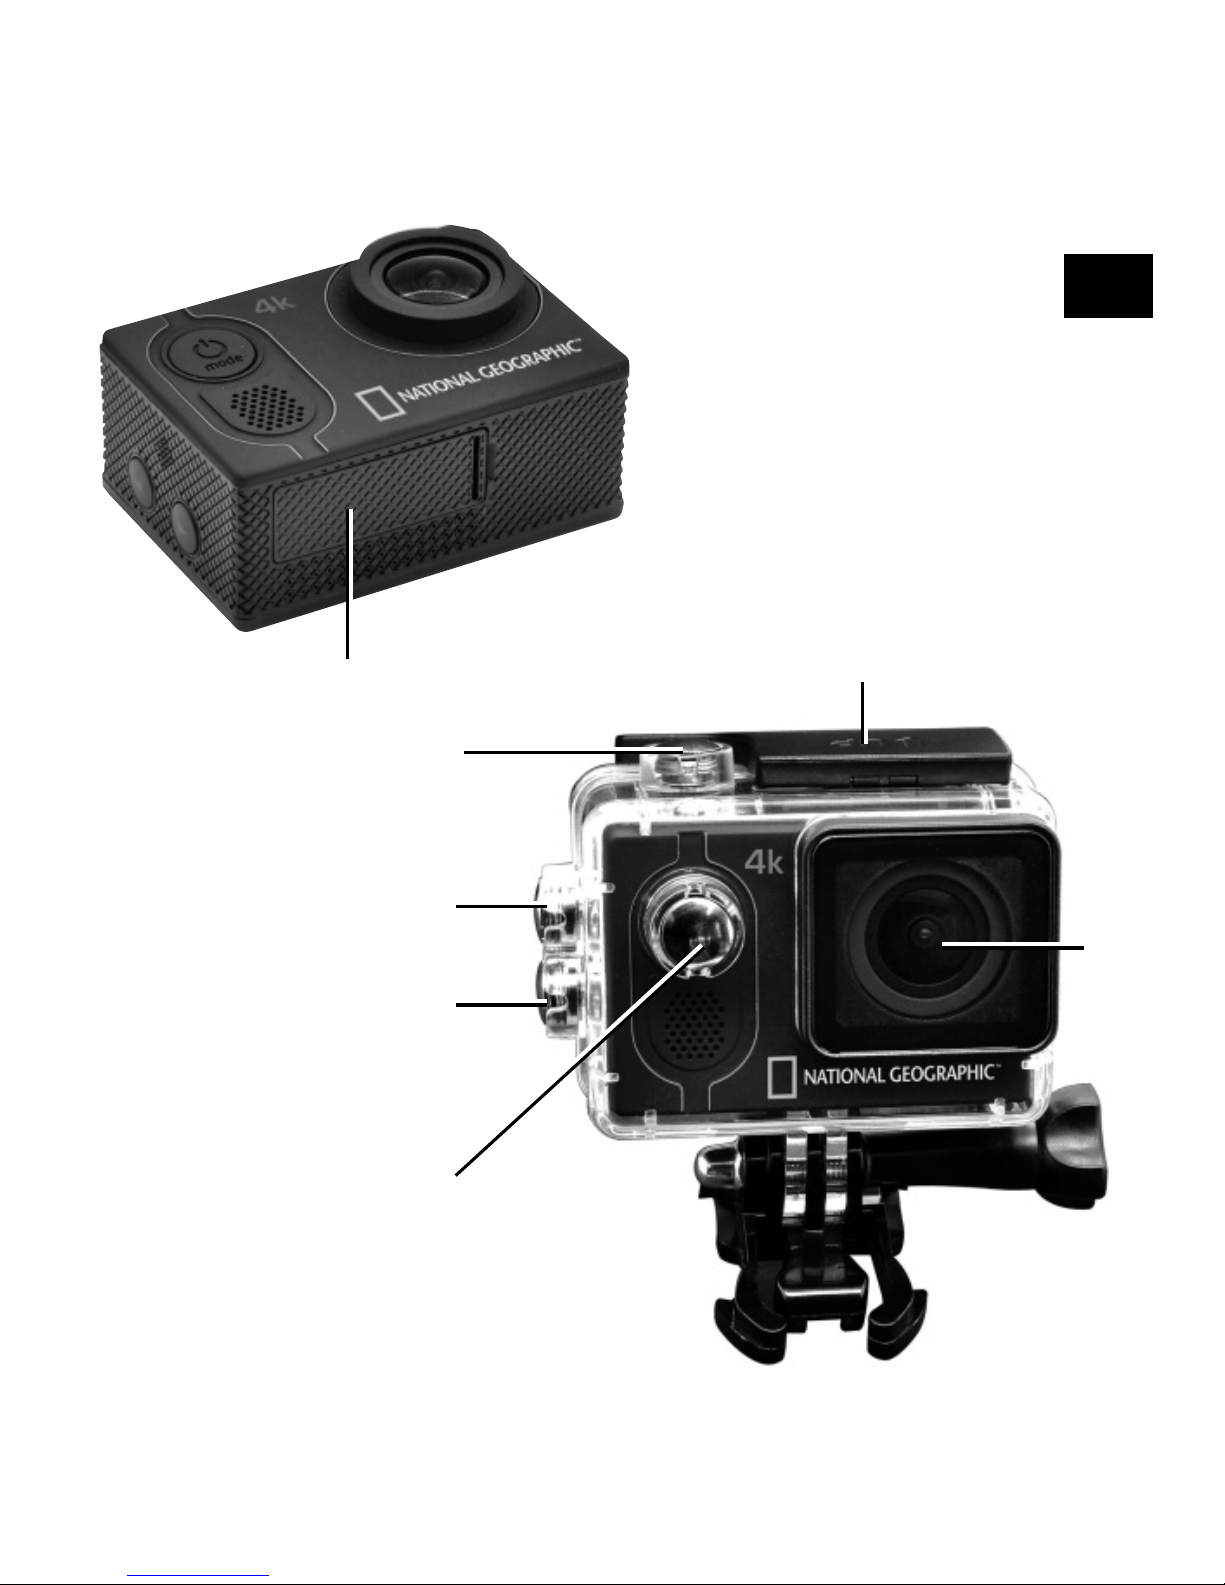
DE
Klemme um das
Wasserdichte Gehäuse
zu öffnen
HOCH
& Wi-Fi Taste
RUNTER
Linse
EIN/AUS Schalter
& MODUS
Batteriefachabdeckung
OK
Page 12
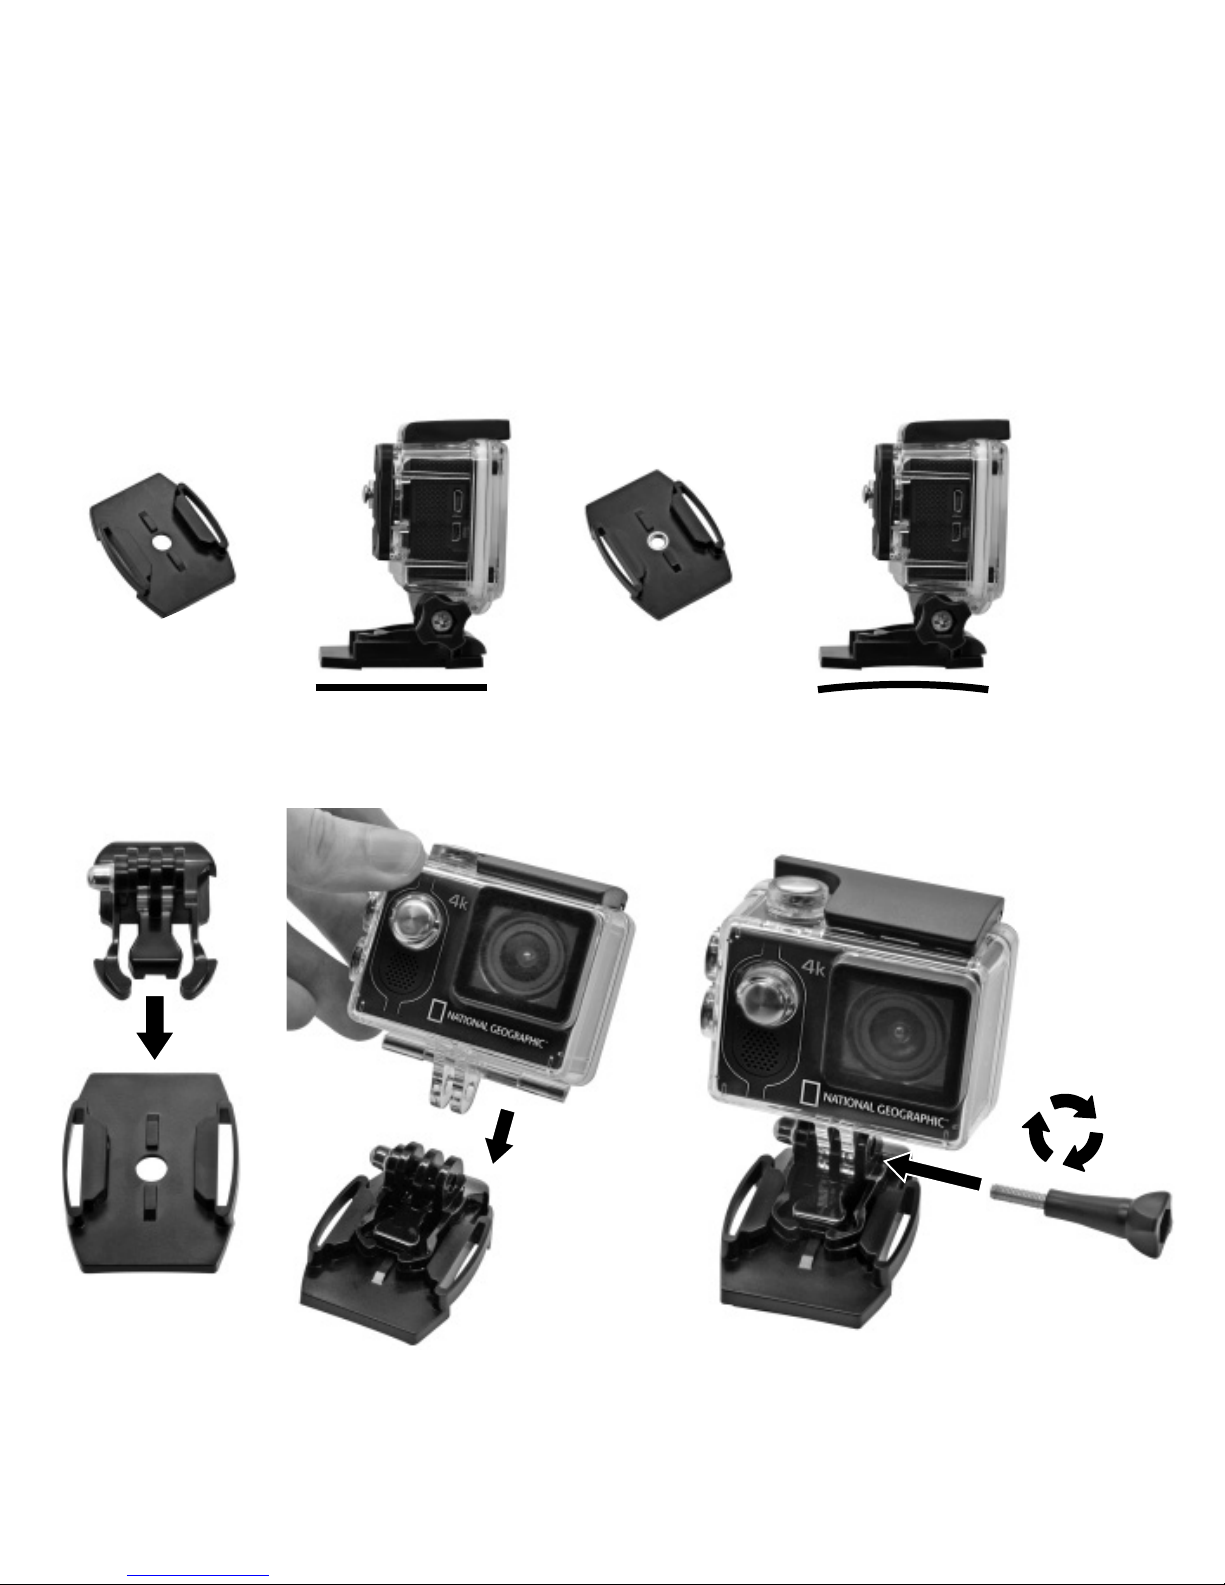
Kamerabefestigung
=
Befestigung an flachen oder gebogenen Oberflächen:
Wählen Sie, je nach Oberfläche, die flache oder gebogene Basis-Halterung aus.
=
Befestigung an flacher Basis-Halterung:
Page 13
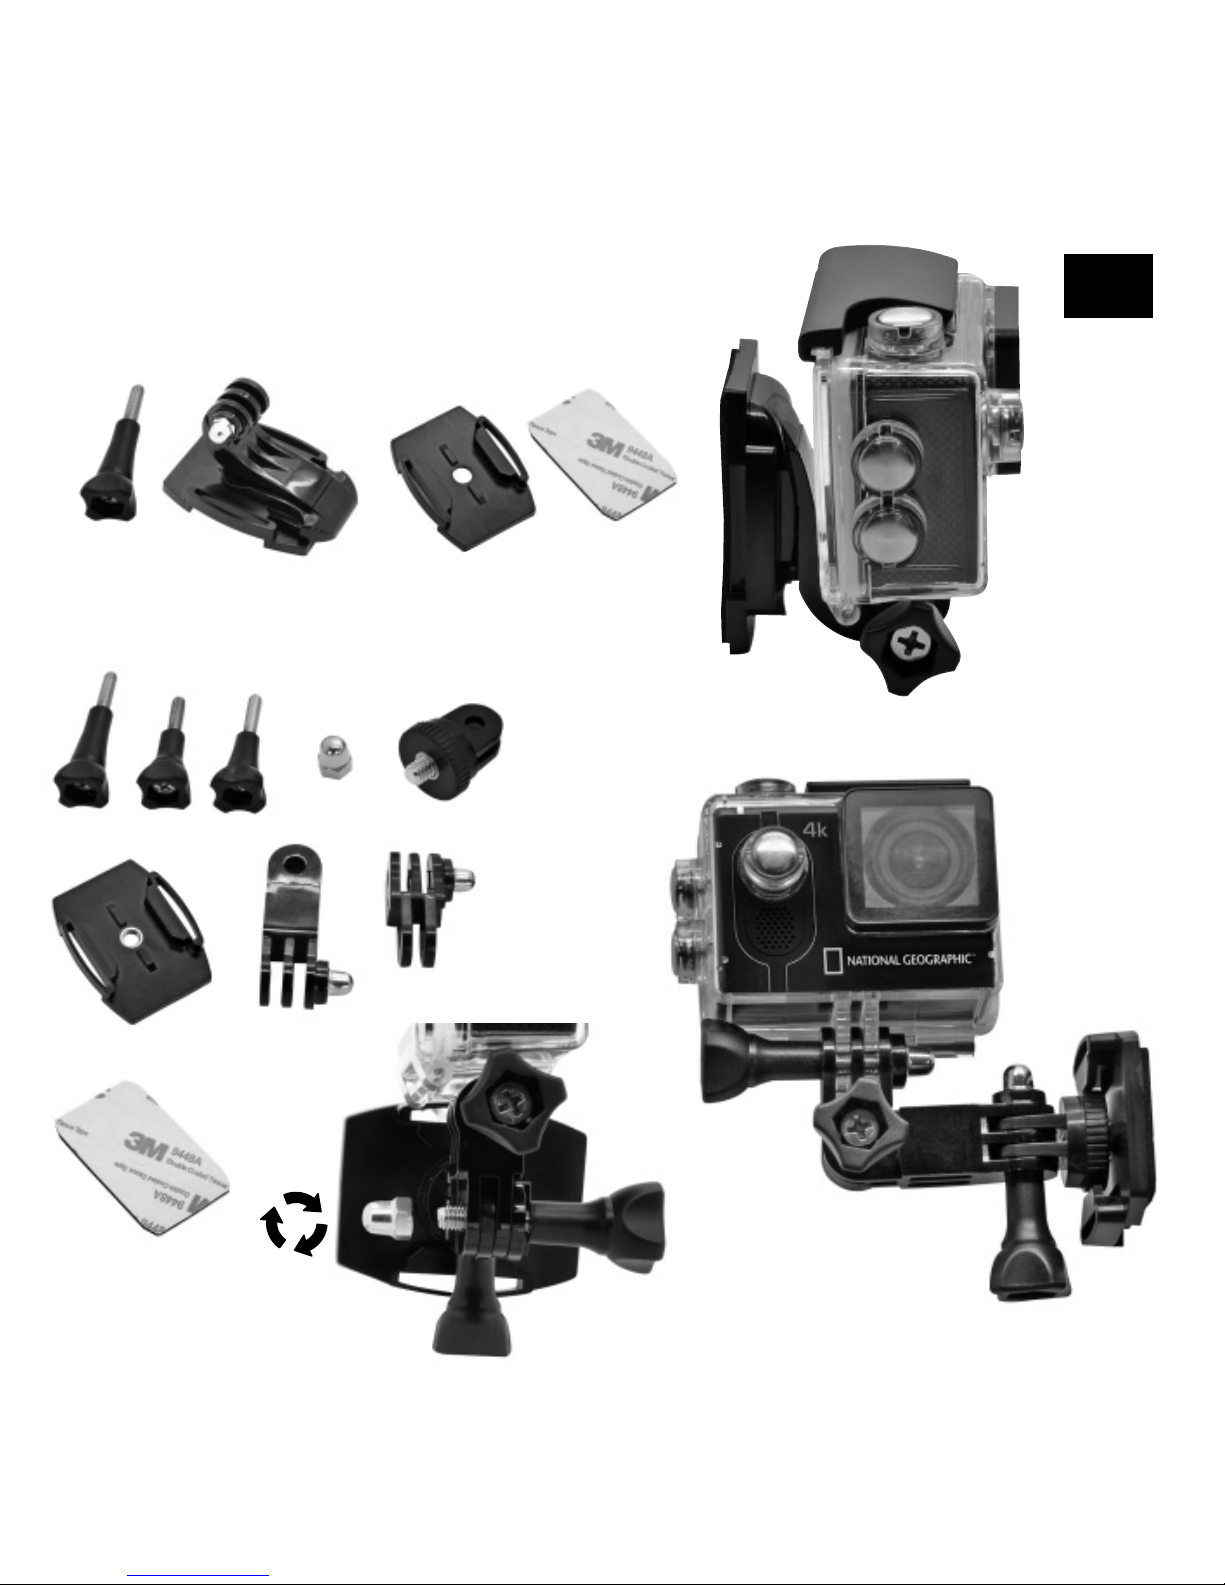
DE
Vertikale Befestigung:
Seitliche Befestigung:
Page 14
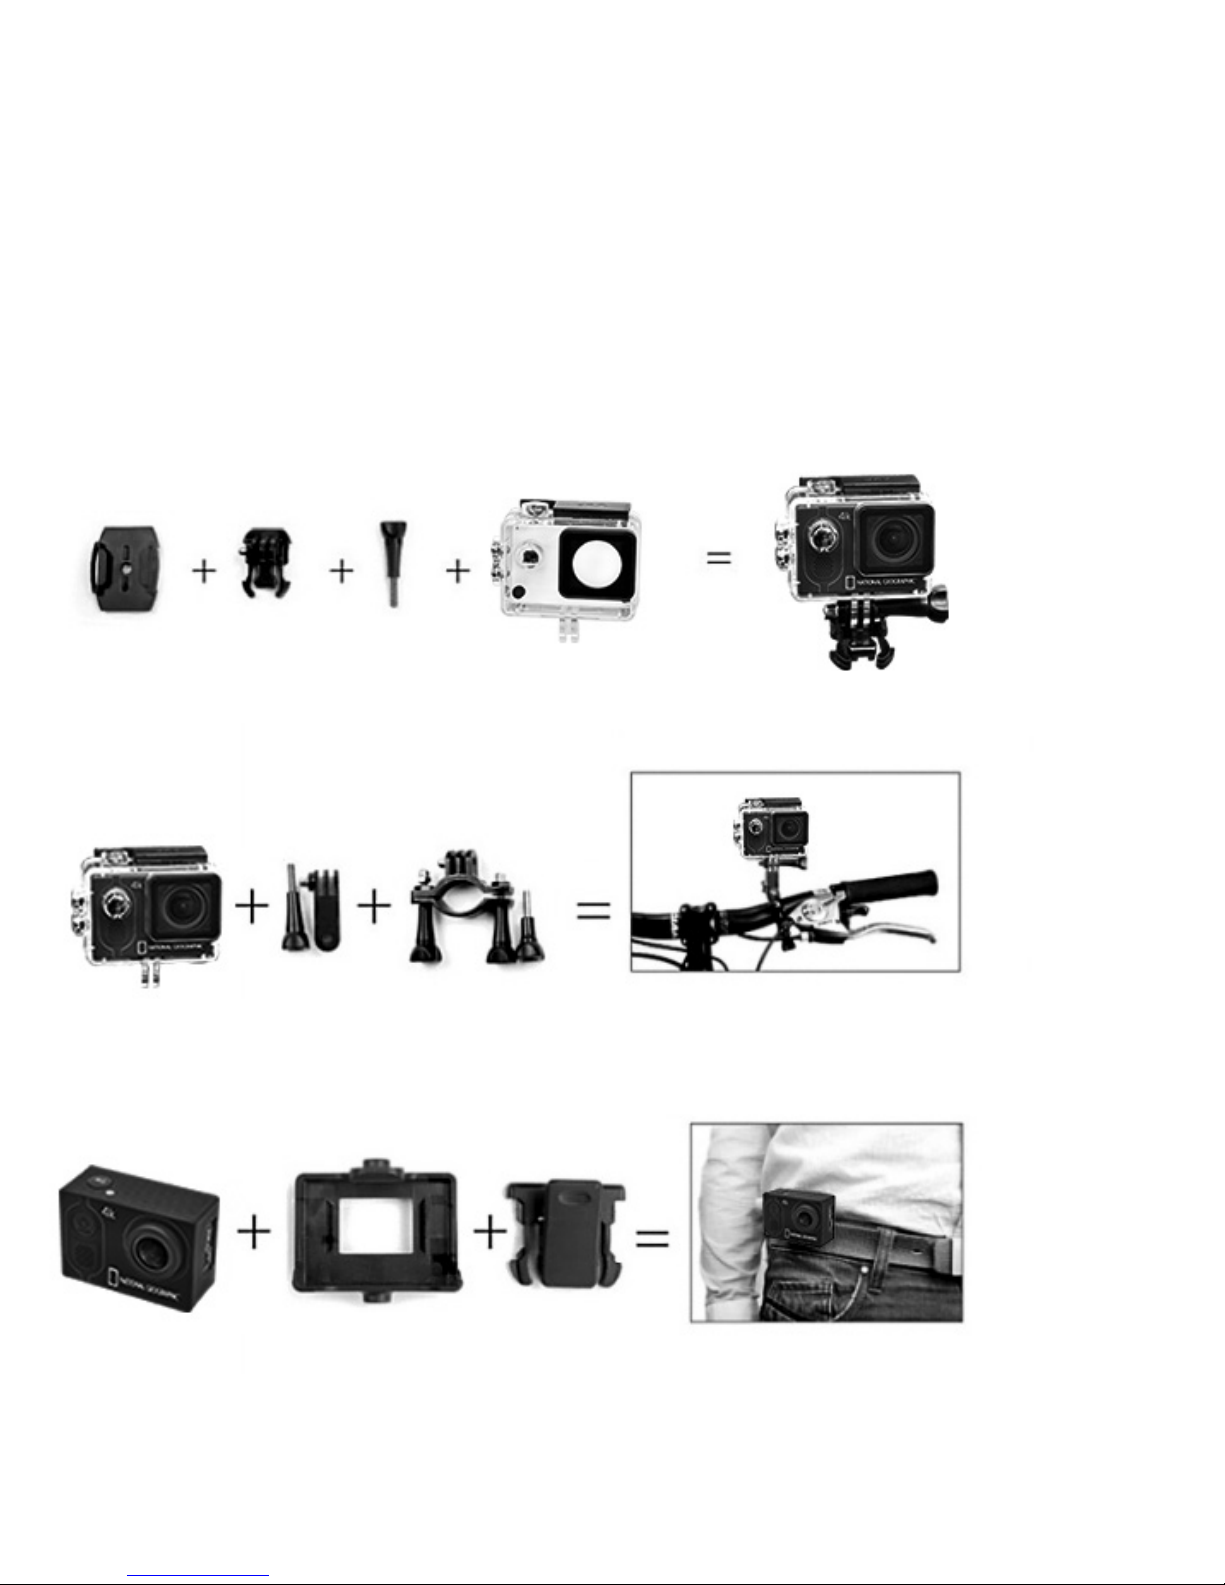
Montierungen - Beispiele:
E
D
b
/
c
EG
a
Basis-Montierung:
Das Basis-Verbindungsstück (5) in die Basis-Halterung (9) einrasten lassen.
Nutzen Sie je nach Oberfläche die flache oder gebogene Halterung.
Jetzt das Wasserdichte Gehäuse (2) mit Hilfe einer Flügelschraube (4) befestigen.
Fahrradhalterung:
Das Gehäuse mit Kamera (1/2) am Verbindungsstück 6a befestigen.
Die Fahrradhalterung (3) an 6a befestigen und danach am Lenker anbringen.
Hierzu die Flügelschrauben (4) festziehen.
hb
Gürtelhalterung:
Die Kamera (1) in das Gehäuse stecken und dann den Clip für die Gürtelhalterung
am Gehäuse einrasten lassen. Mit dem Clip am Gürtel befestigen.
E
c
FJ
Page 15
DE
1@
b
J
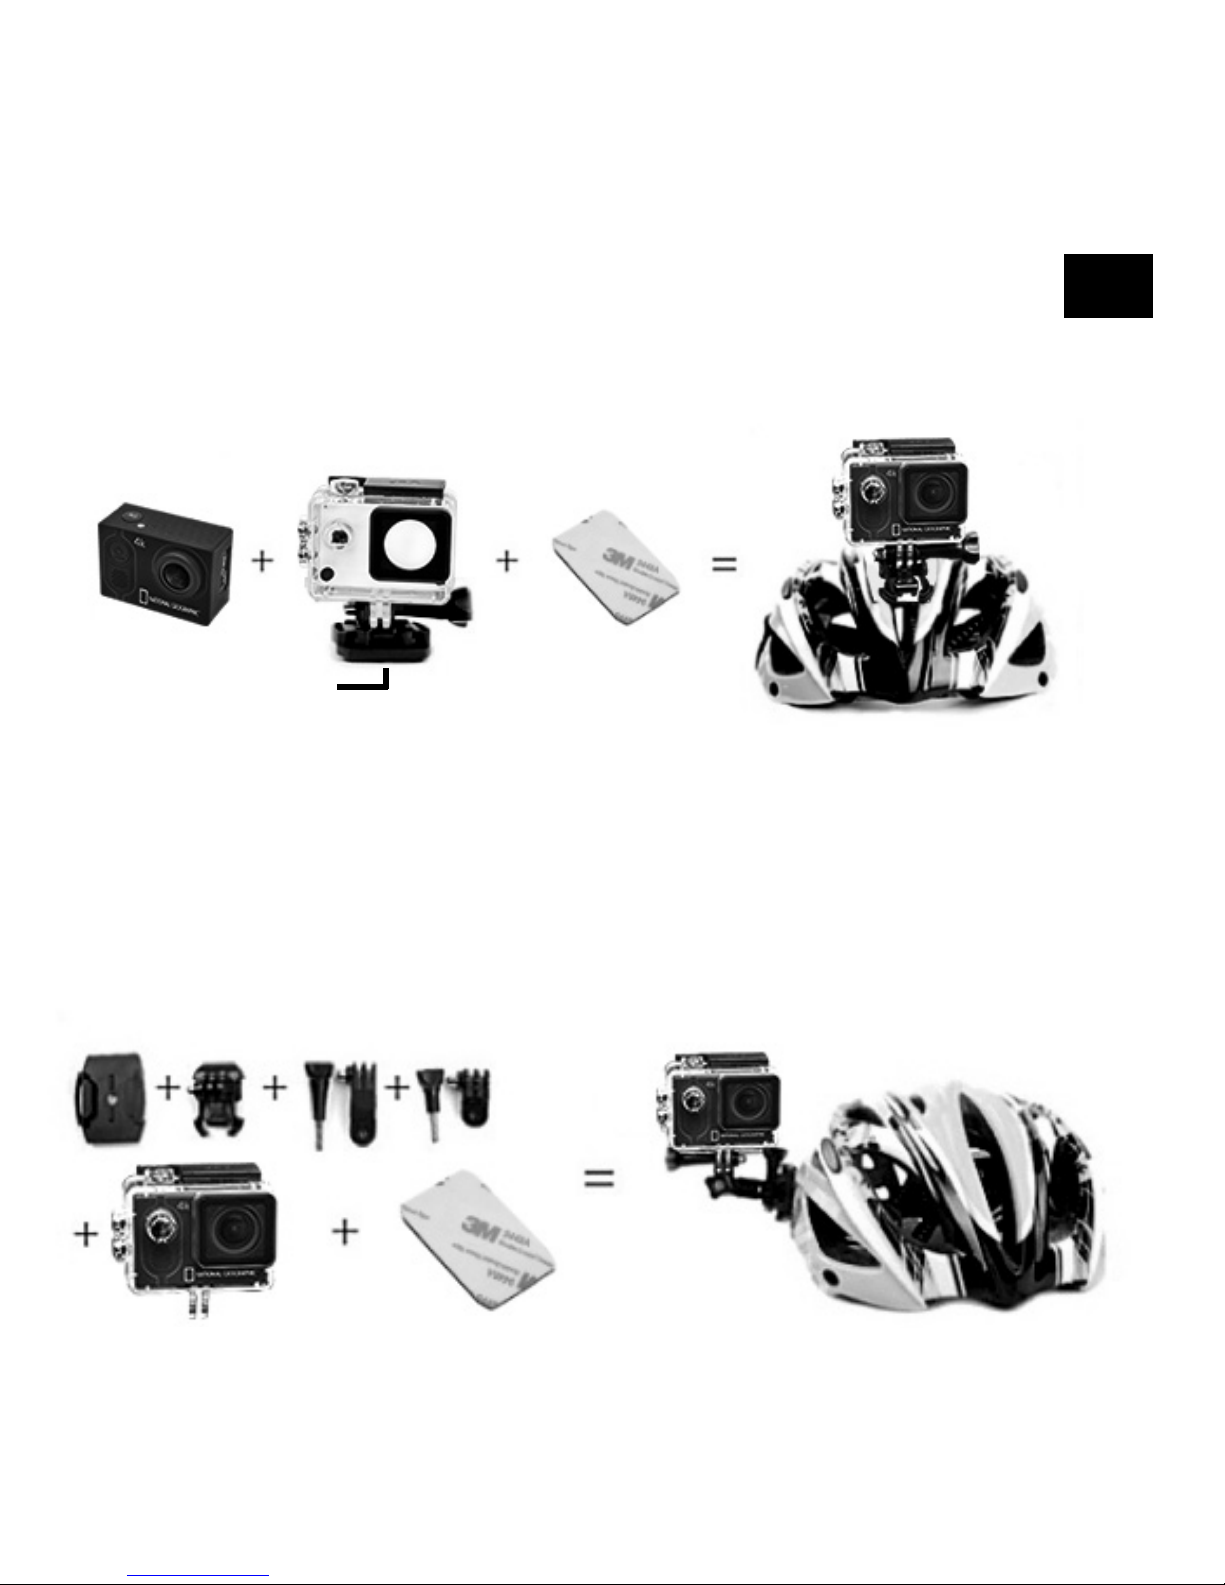
Helm-Montierung (Vertikale Befestigung):
An der Basis-Halterung (9) ein Klebepad (12) auftragen und am Helm befestigen.
Helm-Montierung (Seitliche Befestigung):
Verbindungsstück 6a am Verbindungsstück 6b befestigen und dann die Basis-Halterung
(9/5) am Verbindungsstück 6a montieren. Als letztes das Gehäuse mit Kamera an
6b befestigen. An der Basis-Halterung (9) ein Klebepad (12) auftragen und am Helm
befestigen.
E
F
JG
a
EG
b
1@
Page 16

Produkteigenschaften
• Mit dem Wasserdichten Gehäuse filmen Sie faszinierende Wassersport Ereignisse:
Wasserdicht bis zu 30 Meter.
• TFT-Bildschirm, der Ihre faszinierenden Videos direkt am Gerät anzeigt.
• Wiederaufladbarer Akku der einfach zu ersetzen ist um die Laufzeit ihrer Kamera zu
verlängern.
• Video-Aufnahme über Akku oder während des Ladevorgangs über Netzteil möglich.
• 12 Megapixel (HD) Weitwinkel-Objektiv.
• HDMI HD-Ausgang.
• Unterstützt Micro SD/TF-Speicherkarten bis maximal 32 GB.
Betrieb
1. Micro SD-Speicherkarte* einsetzen
Hinweis: Nutzen Sie bitte nur Micro SD-Speicherkarten von namhaften Herstellern für die
beste Leistung und formatieren Sie die Speicherkarte vor dem Gebrauch auf Ihrem Computer. Eine einwandfreie Funktion kann mit No-Name Speicherkarten nicht garantiert werden.
2. Akku einsetzen oder entfernen
A. Die Sperre lösen und die Batteriefachabdeckung öffnen.
B. Akku in korrekter Richtung einsetzen.
C. Akku entfernen: Batteriefachabdeckung öffnen und den Akku entfernen.
3. Akku aufladen
A. Der Akku kann mit dem beiliegenden Netzteil oder über das USB Kabel am Computer
aufgeladen werden.
B. Die Kamera kann während des Ladevorgangs Videos aufnehmen.
C. Die Kamera kann auch in ausgeschaltetem Zustand aufgeladen werden.
*Micro SD-Speicherkarte nicht enthalten
Page 17
DE
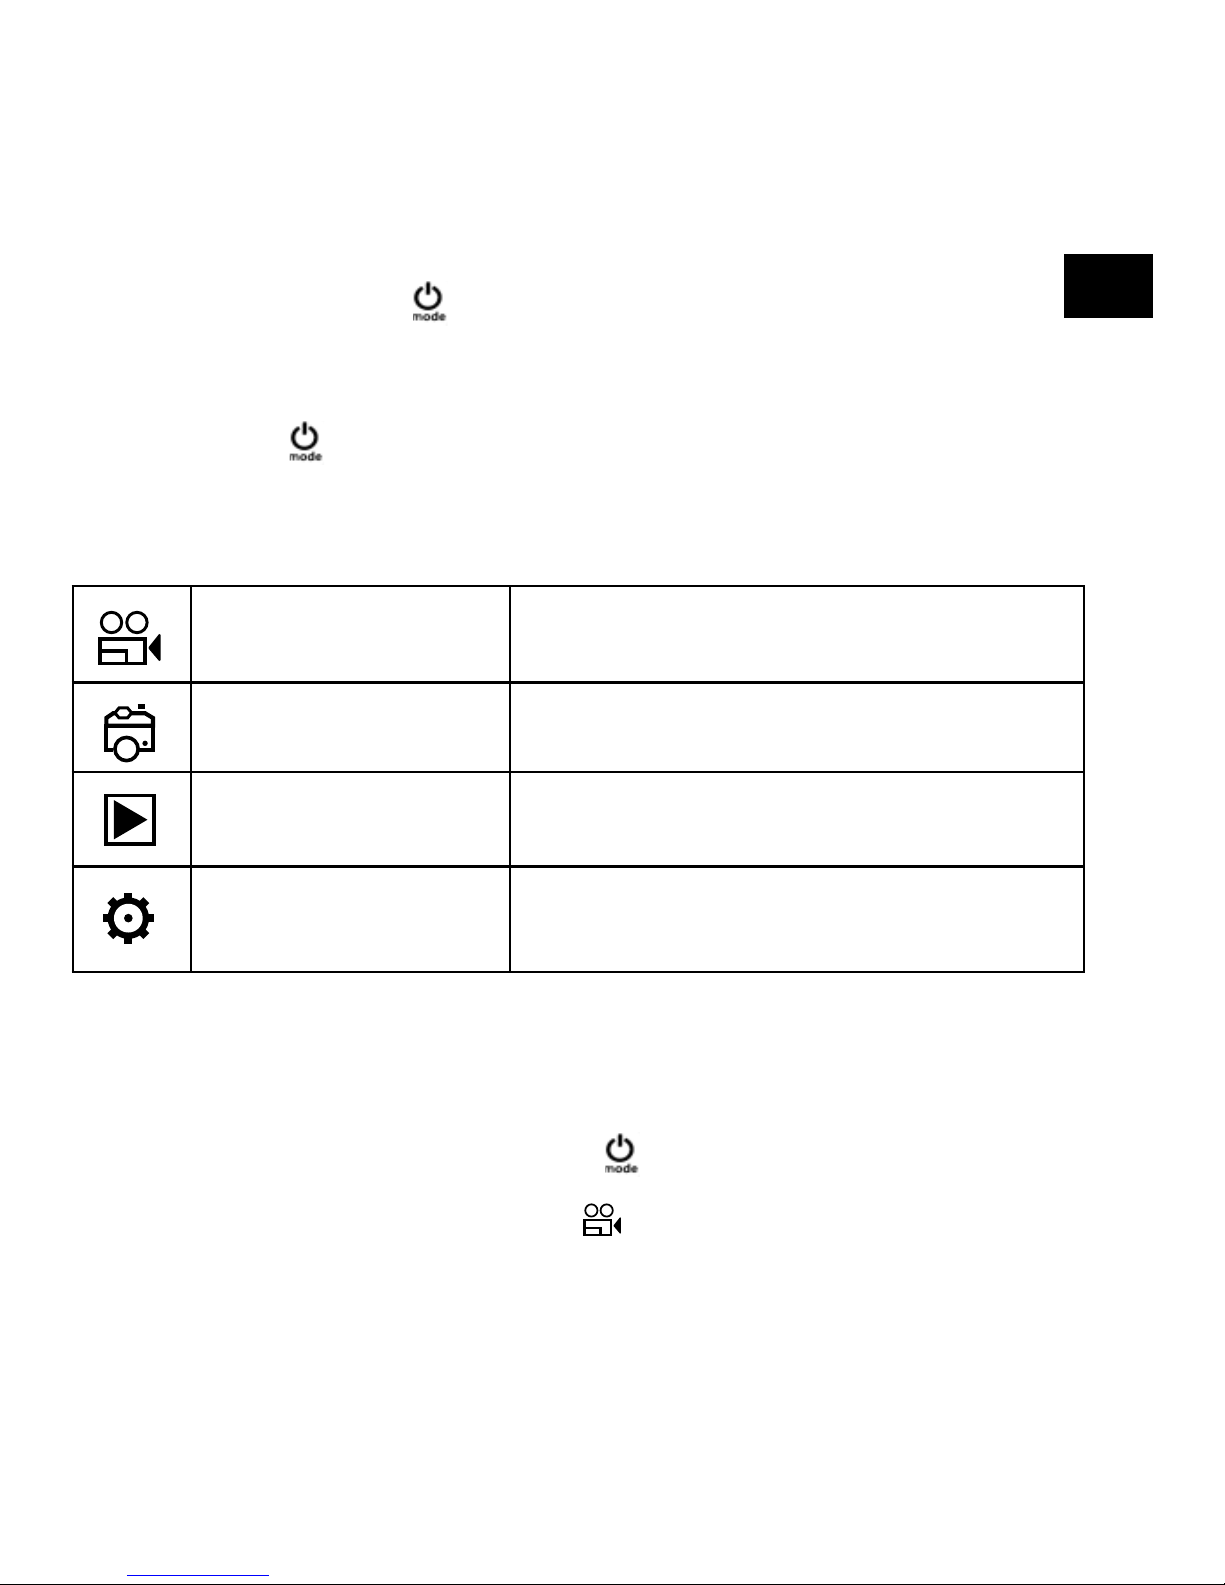
4. Kamera ein- und ausschalten
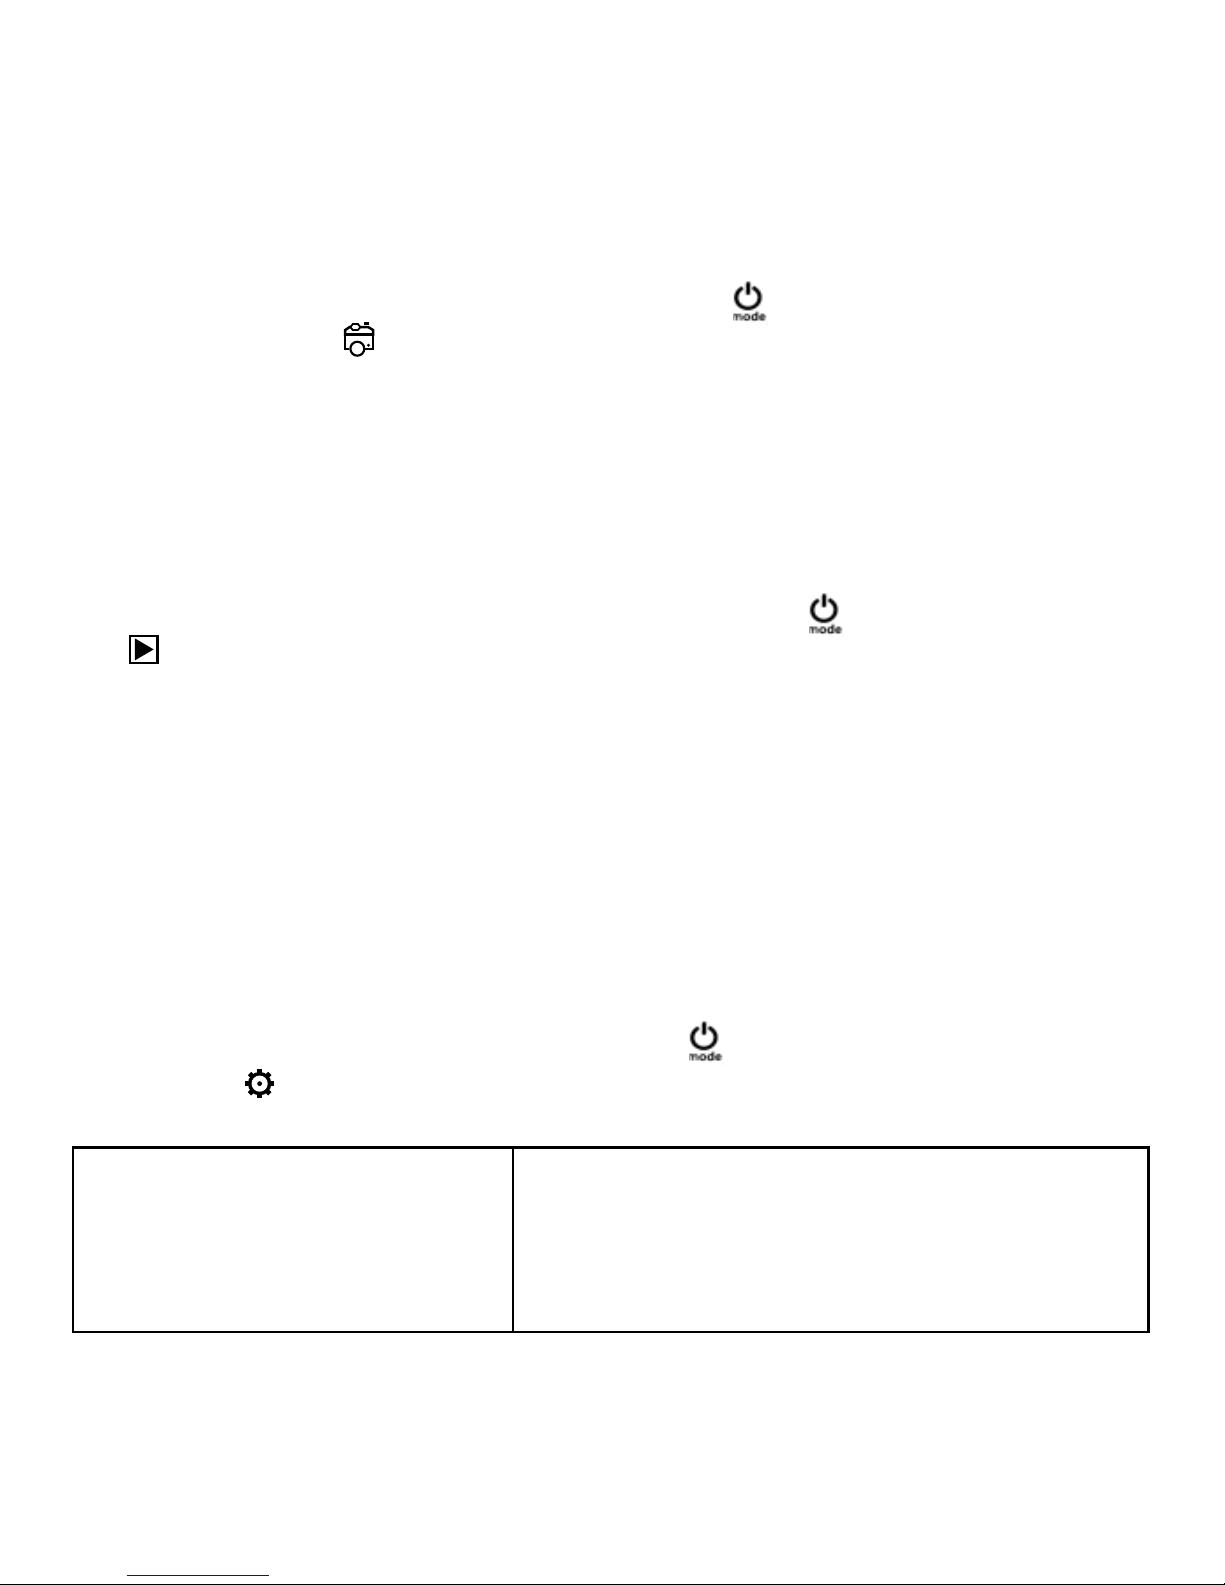
Drücken und halten Sie die [
] Taste für 3 bis 5 Sekunden, um die Kamera
ein- oder auszuschalten.
5 Moduswechsel
Drücken Sie die [
] Taste wiederholt, um durch die verschiedenen Kamera-Modi
zu schalten.
Kamera-Modi
Beschreibung
Video-Aufnahmemodus Video aufnehmen
Foto-Aufnahmemodus Einzelbild, Selbstauslöser, Serienbilder
Wiedergabemodus
Wiedergabe über den TFT-Bildschirm oder
am TV über HDMI Kabel.
Einstellungen Alle Kameraeinstellungen vornehmen
6. Videos aufnehmen und Einstellungen vornehmen
6.1. Videos aufnehmen
Schalten Sie die Kamera ein, indem Sie die [
] Taste drücken. Sie starten im VideoAufnahme-Modus.
In der linken oberen Ecke wird das Symbol
angezeigt.
Legen Sie eine SD-Speicherkarte ein und starten Sie die Aufnahme durch drücken
von “OK”. Drücken Sie “OK” erneut um die Aufnahme zu stoppen.
Page 18
6.2. Fotos aufnehmen
Wechseln Sie in den Foto-Aufnahmemodus, indem Sie [
] drücken. In der linken oberen
Ecke wird das Symbol angezeigt. Drücken Sie “OK”, um Fotos aufzunehmen.
6.3. Speichern & Wiedergabe
Wenn Sie mit der Aufnahme fertig sind können Sie zur Wiedergabe die Videos per USB
Kabel auf Ihren Computer übertragen. Sie können außerdem die Micro SD-Speicherkarte
entfernen und auf die Daten über ein Kartenlesegerät zugreifen.
7. Playback-Modus (Wiedergabe)
Um in den Wiedergabe-Modus zu gelangen, drücken Sie die [
] Taste mehrmals, bis Sie
das Symbol sehen. Verwenden Sie die HOCH / RUNTER Tasten um durch Ihre Videos
und Fotos zu schalten.
8. Wi-Fi Modus/ Kamera App
Installieren Sie zuerst eine Action-Camera App auf Ihrem Smartphone. Suchen Sie im App
Store nach z.B. „FinalCam“. Drücken Sie jetzt die „UP / Wi-Fi button“ um Wi-Fi auf der
Kamera zu aktivieren. Verbinden Sie jetzt die Kamera mit ihrem Smartphone (Suchen Sie
ein Netzwerk mit dem Namen „4K Sports DV“ oder ähnlich. Benutzen Sie das Passwort
„12345678“. Starten Sie jetzt die Action-Kamera App ihrer Wahl.
Einstellungen
Um zu den Einstellungen zu gelangen drücken Sie [ ] so oft bis das Symbol für die
Einstellungen erscheint. Drücken sie jetzt “OK” um das Menü zu öffnen.
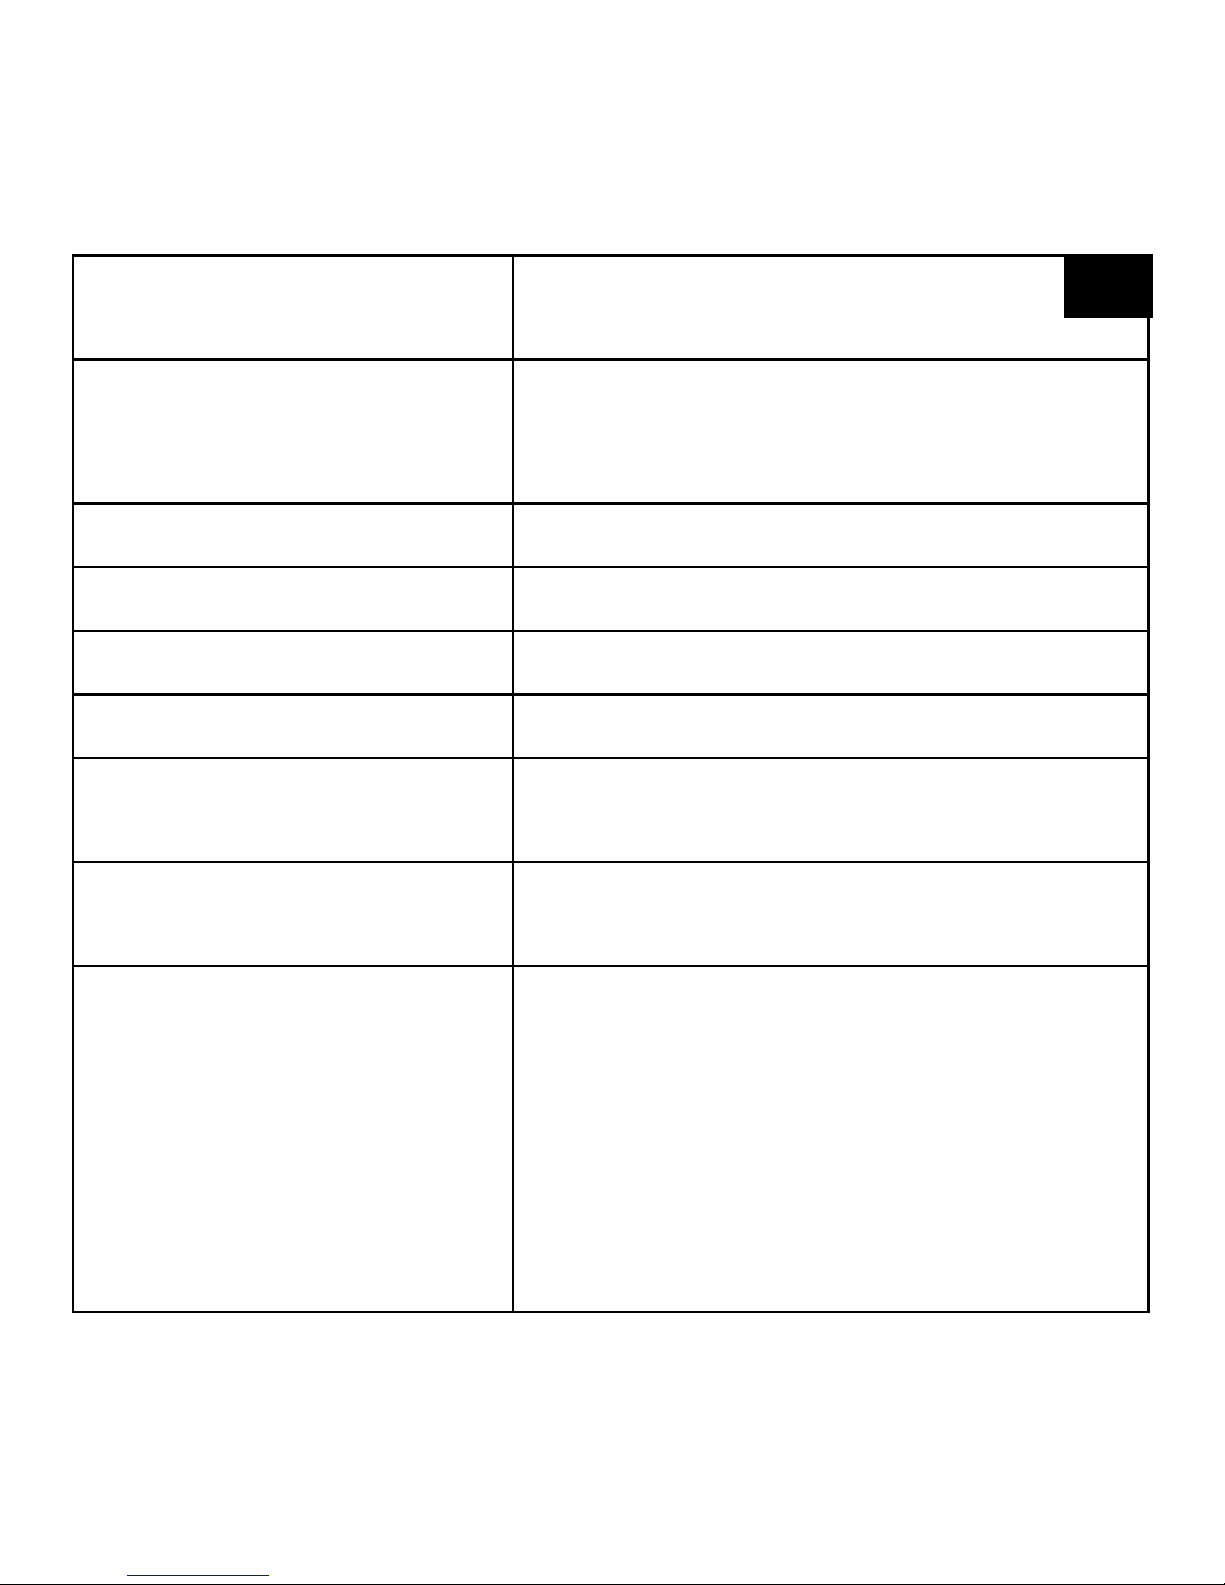
Aufl ösung (Videoaufl ösung) 4K (24fps), 2K (30fps), 1080p (60fps),
1080p (30fps), 720p (120fps), 720p
(60fps), 720p (30fps), WVGA (30fps),
VGA (24fps), VGA (30fps), QVGA (30fps)
Page 19
DE
Loop-Aufname
(Aufnahme-Schleife)
Aus / 3 Minuten / 5 Minuten /
10 Minuten
Zeitraffer Aus / 1 Sekunde / 2 Sekunden /
5 Sekunden / 10 Sekunden /
30 Sekunden / 1 Minute
HDR Aus / An
Rekordaudio (Tonaufname) Aus / An
Slow Motion (Zeitlupe) Aus / 720p (120fps) / VGA (24fps)
Datumsanzeige Aus / An
Movement Detection
(Bewegungserfassung)
Aus / An
Gyro RSC (GyroskopSensor)
Aus / An
Aufl ösung (Bildaufl ösung) 16 MP - 4608x3456,
14 MP - 4320x3240,
12 MP - 4032x3024,
10 MP - 3648x2736,
8 MP - 3264x2448,
5 MP - 2592x1944,
3 MP - 2048x1536,
VGA - 640x480
Page 20
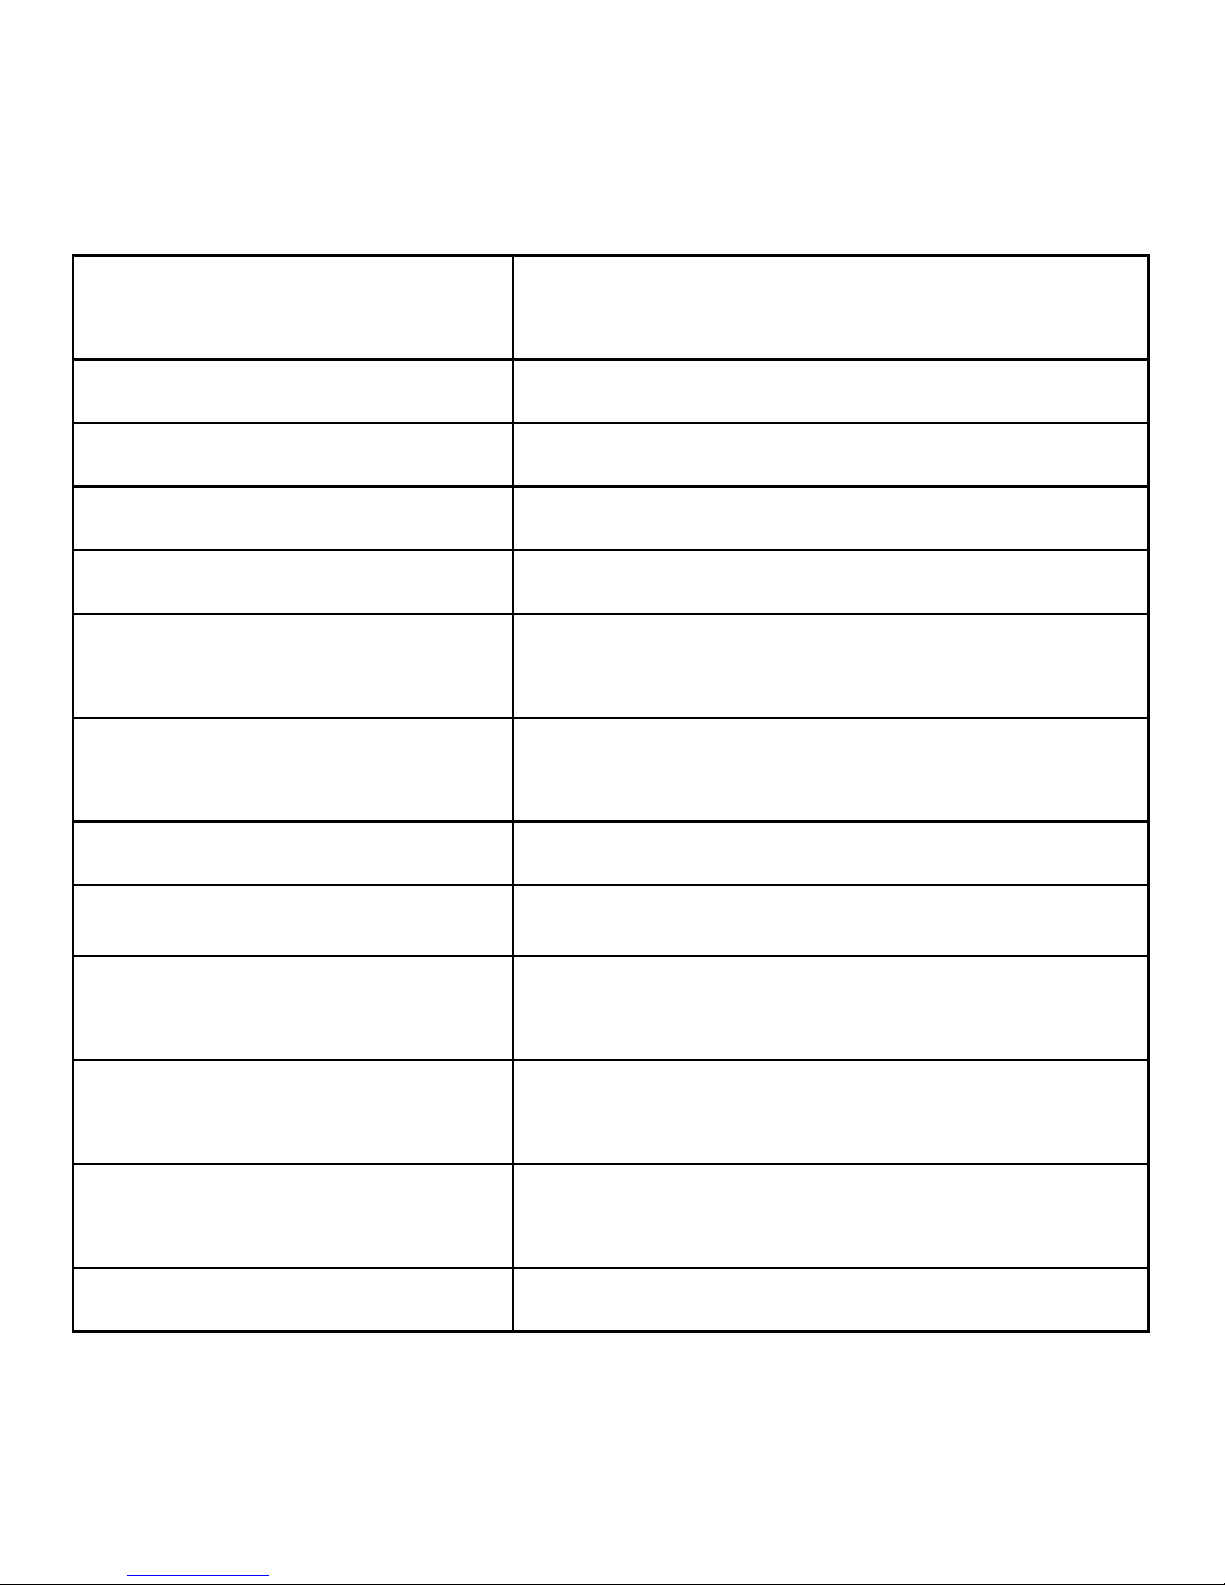
Fortsetzen (Burst mode) Aus / 3 Fortsetzen / 5 Fortsetzen /
10 Fortsetzen
Aufname-modus Single / Timer 2s / 5s / 10s / 20s
Qualität Fein / Normal / Sparsam
Schärfe Stark / Normal / Weich
Stabilisierung Aus / An
Belichtung +2/3, +1/3, +0.0, -1/3, -2/3, -1.0, -4/3,
-5/3, -2.0
Weissbalance
(Weißabgleich)
Auto / Sonning / Wolkig / Kunstlicht /
Neonlicht
Farbe Farbe / Schwarz & weiß / Sepia
ISO Auto / 100 / 200 / 400
Löschen Löschungen z.Z. (Aktuelle löschen) / Alle
löschen
Schutz Eins schützen / Eins öffnen
Alle schützen / Alle öffnen
Datum/Uhrzeit Aktuelles Datum und Uhrzeit einstellen
(Bestätigen mit „Mode“)
Auto Aus 5 Minuten / 10 Minuten
Page 21
DE
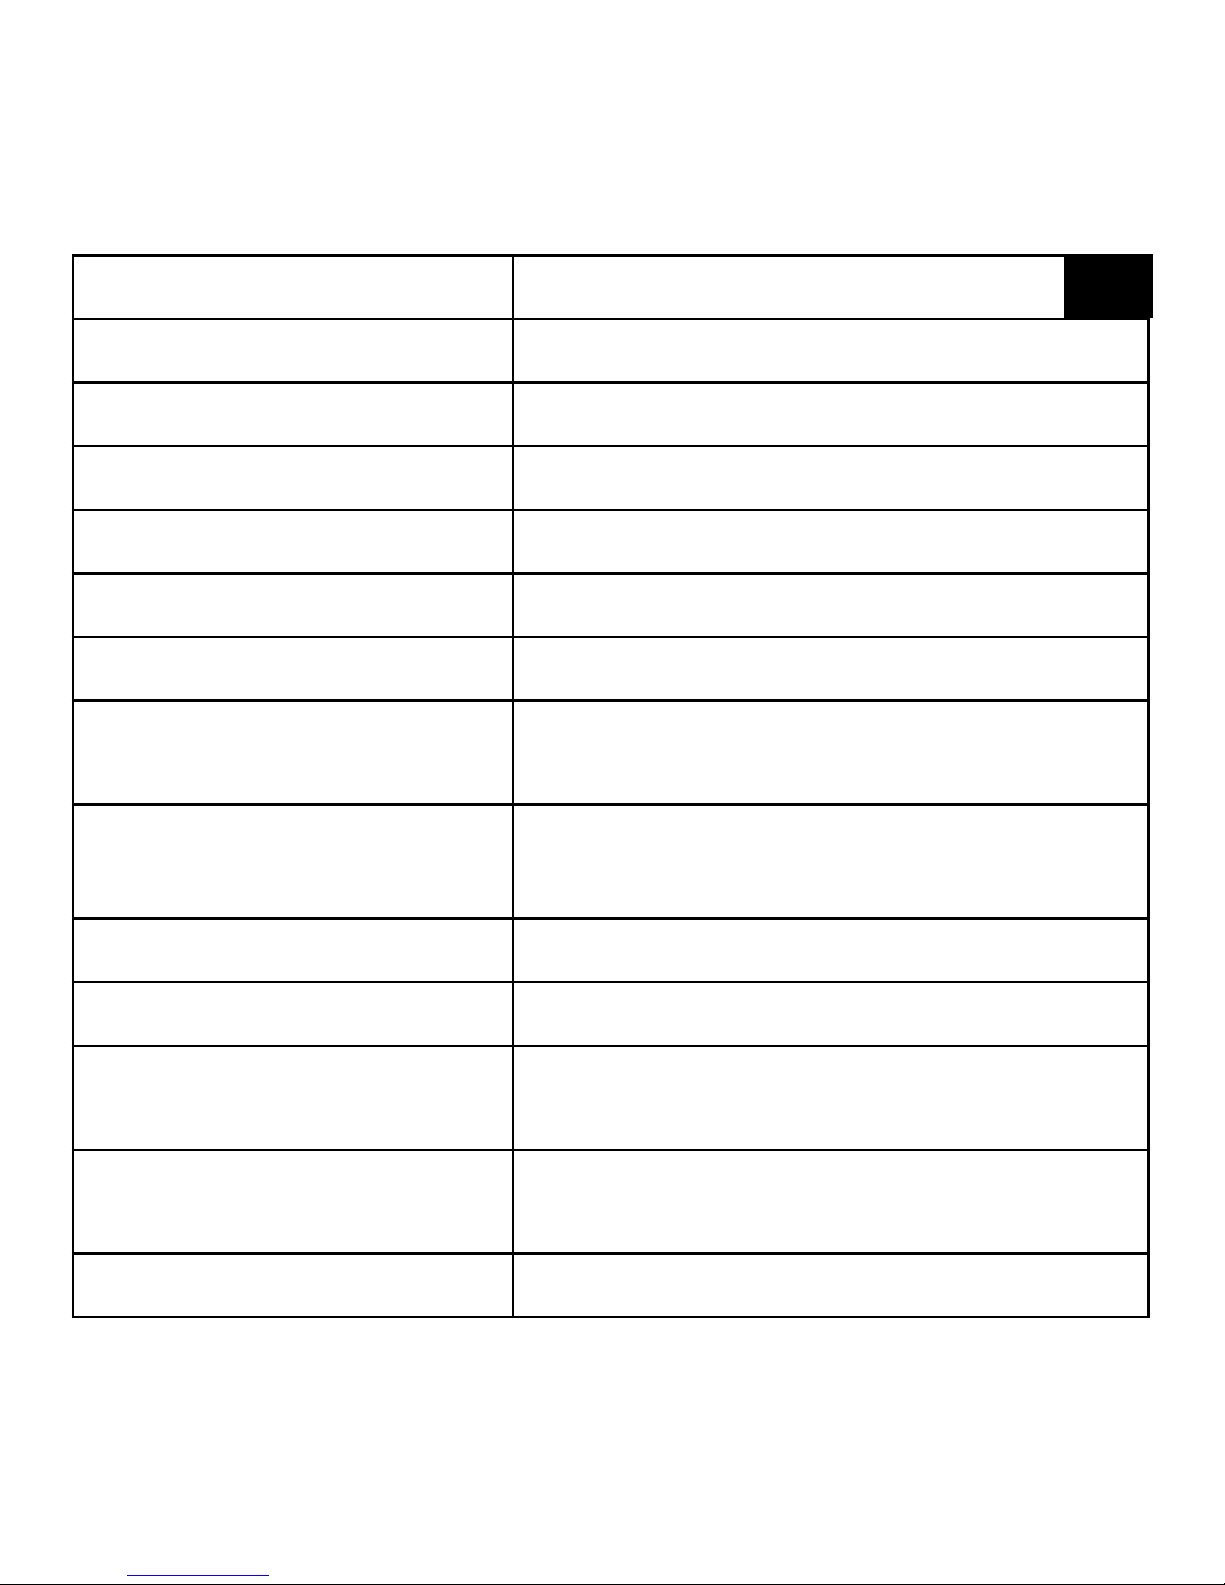
Akustisches Signal Aus / An
Sprache OSD Menüsprache auswählen
Frequenz 50 Hz / 60 Hz
TV-Modus NTSC / PAL
TV out Aus / An
Screensavers Aus / 30s / 1 Min / 3 Min / 5 Min
Car Mode (KFZ Modus) Aus / An
Field of view (Sichtfeld) Wide (Weit) / Medium (Mittel) / Narrow
(Eng)
Fisheye adjust (FischeyeEinstellung)
Aus / An
Aqua mode (Wassermodus) Aus / An
WiFi Aus / An
WiFi SSID WiFi Name festlegen
(Standard: 4K Sports DV)
WiFi Password WiFi Password festlegen
(Standard: 12345678)
Kennzeichen Einstellung Mit „Mode“ Taste festlegen
Page 22
Format (Formatieren) Interner Speicher -> Alle Daten im Internen
Speicher löschen, SD Karte -> Alle Daten
auf der Micro SD-Karte löschen
Standard Einstellungen Alle Einstellungen zurücksetzen
Version Aktuelle Firmware Version anzeigen
Technische Daten
TFT Display 2 inch (5.08 cm) Bildschirm
Lens 170° Weitwinkel
Wasserdichtes Gehäuse Wasserdicht bis 30 Meter
Sprachen Deutsch, English, Español, Français,
Italiano, Português, русский, Chinese,
Japanese
Bild-Aufl ösung 16 MP (4608×3456), 14 MP (4320×3240)
12 MP (4032x3024), 10 MP (3648x2736),
8 MP (3264x2448), 5 MP (2592x1944),
3 MP (2048x1536), VGA (640x480)
Video-Aufl ösung 4k (3840x2160) (24 fps),
2k (2560x1440) (30 fps),
1920x1080 (60 fps),
1280x720 (60 fps)
Page 23

DE
Videoformat MOV
Videocodec H.264
Speicher Micro SD-Speicherkarte (bis 32 GB)
(nicht enhalten)
Aufnahme-Modus Einzelbild / Selbstauslöser (2s/5s/10s) /
Serienaufnahme
Frequenz 50Hz/60Hz
USB Anschluss USB 2.0
Stromquelle 3.7 V
Akku-Kapazität 1050 mAh
Energieableitung 1050 mAh @ 3.7 V
Aufnahmezeit ca. 70 Minuten (bei 1080p)
Ladezeit ca. 3 Stunden
Betriebssystem (OS) Window XP / Vista / Win 7 / Mac OS X
Maße 59.3x41.1x24.6 mm
Gewicht 60 g
Hinweis: Technische Daten können sich durch Aufrüstung oder Aktualisierung ändern.
Bitte beachten Sie das eigentliche Produkt als Standard.
Page 24

Garantie und Garantiezeitverlängerung
Die Garantiezeit beträgt 2 Jahre und beginnt am Tag des Kaufs. Bitte bewahren Sie
die Rechnung auf. Sie können die Garantiezeit auf 5 Jahre verlängern, wenn Sie sich
auf www.bresser.de/garantie registrieren und den kurzen Fragebogen ausfüllen. Zur
Inanspruchnahme der 5-Jahre-Garantie müssen Sie die Registrierung innerhalb von
3 Monaten nach dem Kauf (es gilt das Datum des Kaufbelegs) durchführen. Danach
erlischt der Anspruch auf die verlängerte Garantie.
Sollten Sie Probleme mit Ihrem Gerät haben, wenden Sie sich bitte an unseren Service. Bitte senden Sie uns keine Artikel ohne vorherige telefonische Rücksprache. Viele Probleme lassen sich bereits am Telefon erledigen. Sollte das Problem nach Ablauf
der Garantie auftreten, oder nicht von der Garantie gedeckt sein, so erhalten Sie von
uns kostenfrei einen Kostenvoranschlag über die Reparaturkosten.
Service Hotline: +49 (0) 2872 - 80 74-210
Page 25

DE
Wichtig bei Rücksendungen:
Um Transportschäden zu vermeiden achten Sie bitte darauf, dass das Gerät
sorgfältig verpackt in der Original-Verpackung zurückgegeben wird. Bitte den
Kassenbon (oder eine Kopie) sowie die Fehlerbeschreibung beifügen. Ihre gesetzlichen Rechte werden durch diese Garantie nicht eingeschränkt.
Ihr Fachhändler: .............................. Art. Nr.: ..........................................
Fehlerbeschreibung: .......................................................................................
....................................................................................................................
....................................................................................................................
....................................................................................................................
Name: ...........................................
Straße: ...........................................
PLZ/Ort: ........................................
Telefon: ..........................................
Kaufdatum: .....................................
Unterschrift:....................................
Page 26
Operating instructions
EN
Page 27
EN
About this Instruction Manual
Please read the safety instructions and the operating instructions
carefully before use. Keep these instructions for renewed use at a later
date. When the device is sold or given to someone else, the instruction manual
must be provided to the new owner/user of the product.
Intended Use
This product is intended only for private use. It was developed as an electronic
medium for the use of multimedia services.
General Warnings
• Risk of choking — Keep packaging material, like plastic bags and rubber bands,
out of the reach of children, as these materials pose a choking hazard. This product
contains small parts that could be swallowed by children.
• Leaking battery acid can lead to chemical burns. Avoid contact of battery acid with
skin, eyes and mucous membranes. In the event of contact, rinse the affected
region immediately with a plenty of water and seek medical attention.
• Risk of electric shock — Never bend, pinch or pull the power and connecting
cables, extensions and adapters. Protect the cables from sharp edges and heat.
Before operating, check the device, cables and connections for damage. Never
use a damaged unit or a unit with damaged power cables. Damaged parts must be
exchanged immediately by an authorised service centre.
• Risk of property damage! — Do not disassemble the device. In the event of a
defect, please contact your dealer. The dealer will contact the Service Centre and
can send the device in to be repaired, if necessary.
Page 28
• Do not expose the device to high temperatures. Use only the supplied power
adapter. Do not short-circuit the device or throw them into a fi re. Excessive heat or
improper handling could trigger a short-circuit, a fi re or an explosion.
• Do not interrupt an on-going data connection to a computer before all data has
been transferred. This could lead to data loss for which the manufacturer is not
liable.
Notes on cleaning
• Turn off the camera
•
Clean the eyepieces and/or lenses only with a soft, lint-free cloth, (e.g. microfibre
cloth). To avoid scratching the lenses, use only gentle pressure with the cleaning cloth.
• Only use a dry cloth to clean the exterior of the device. To avoid damaging the
electronics, do not use any cleaning fluid.
• Clean the protective case after each use with clear, clean water and dry it thoroughly.
EC Declaration of Conformity
Bresser GmbH has issued a Declaration of Conformity‘ in accordance with
applicable guidelines and corresponding standards. This can be viewed any
time upon request.
Page 29
EN
Disposal
Dispose of the packaging materials properly, according to their type,
such as paper or cardboard. Contact your local waste-disposal service
or environmental authority for information on the proper disposal.
Do not dispose of electronic devices in the household garbage!
As per the Directive 2002/96/EC of the European Parliament on waste
electrical and electronic equipment and its adaptation into German law, used
electronic devices must be collected separately and recycled in an environmentally friendly manner. Empty, old batteries must be disposed of at battery collection points by the consumer. You can find out more information about the disposal of
devices or batteries produced after 6 January 2006 from your local waste-disposal
service or environmental authority.
The integrated battery must only be removed for disposal. Opening the device
housing can damage the unit.
Drain the battery completely before disposal. Remove all the screws in the housing
and open the device housing. Remove the connections to the battery and remove
it. Cover the open contacts with tape and package the battery in such a way that it
cannot shift in the packaging.
Page 30
d E
F G
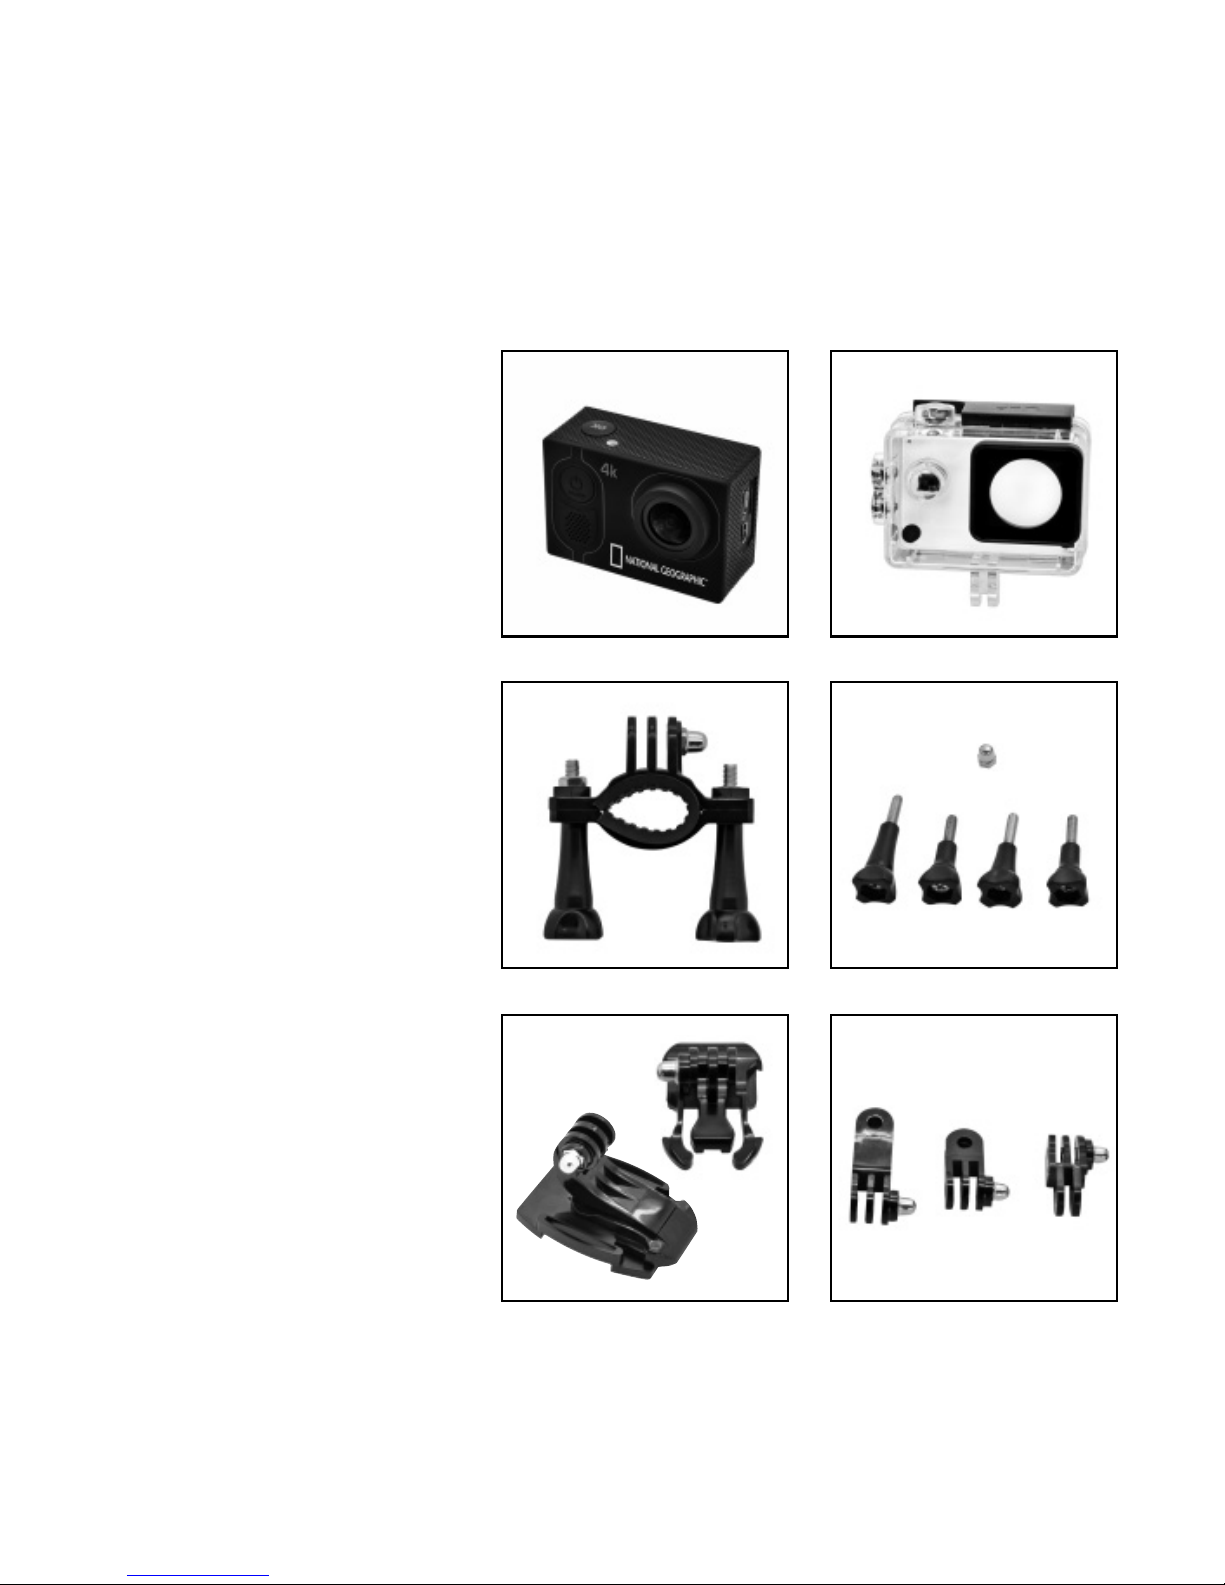
Scope of delivery
b
Camera
c
Waterproof case
d
Bicycle mount
E Thumb knobs and cap nut
F Base mounts
G
Multifunction mounts
2x 90° (a+b) and
1x straight (c)
H
Camera housing and
belt clip
I
1/4” Tripod adapter
(male/female)
J
Base for flat and curved
surface
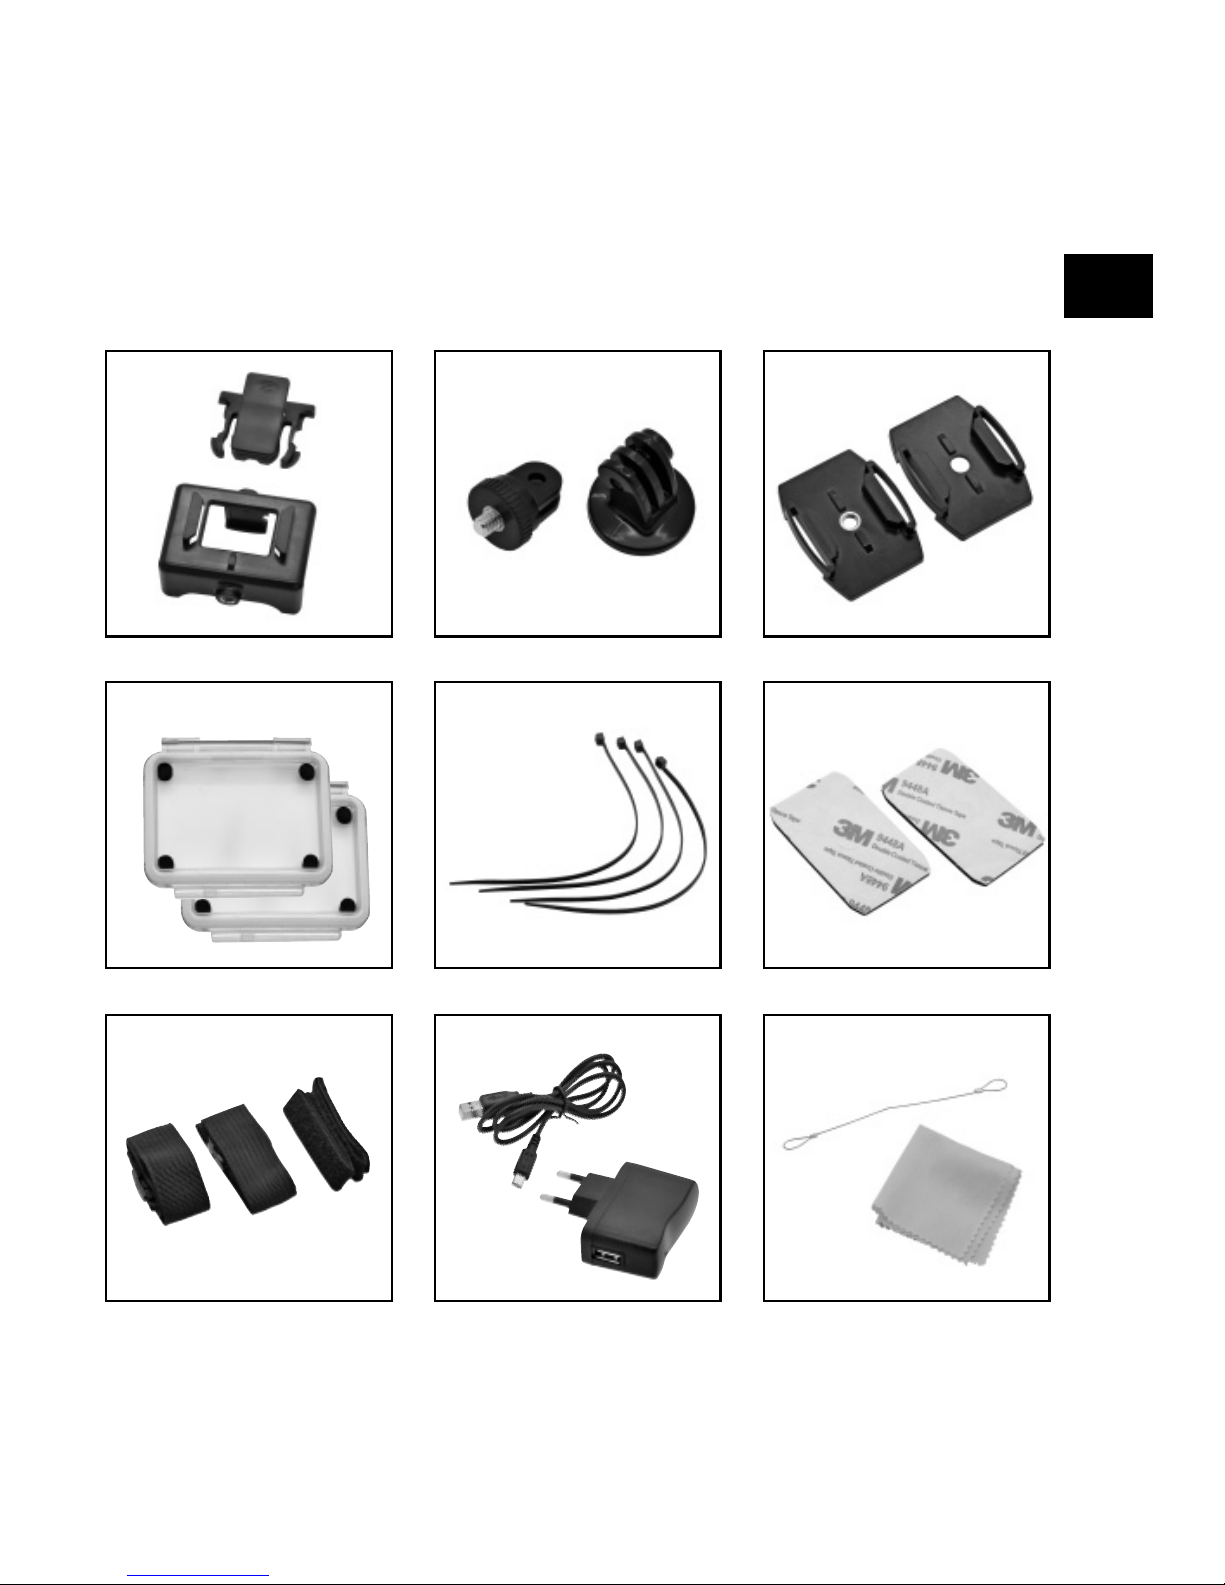
1)
Case doors
1!
Cable ties
1@
Double sided sticker
for base mounts
1#
Straps
1$
USB cable
and AC adapter
1%
Wire rope
and cleaning cloth
(a) (b) (c)
b c
Page 31
EN
H I
1!
J
1@
1$
1)
1# 1%
Page 32
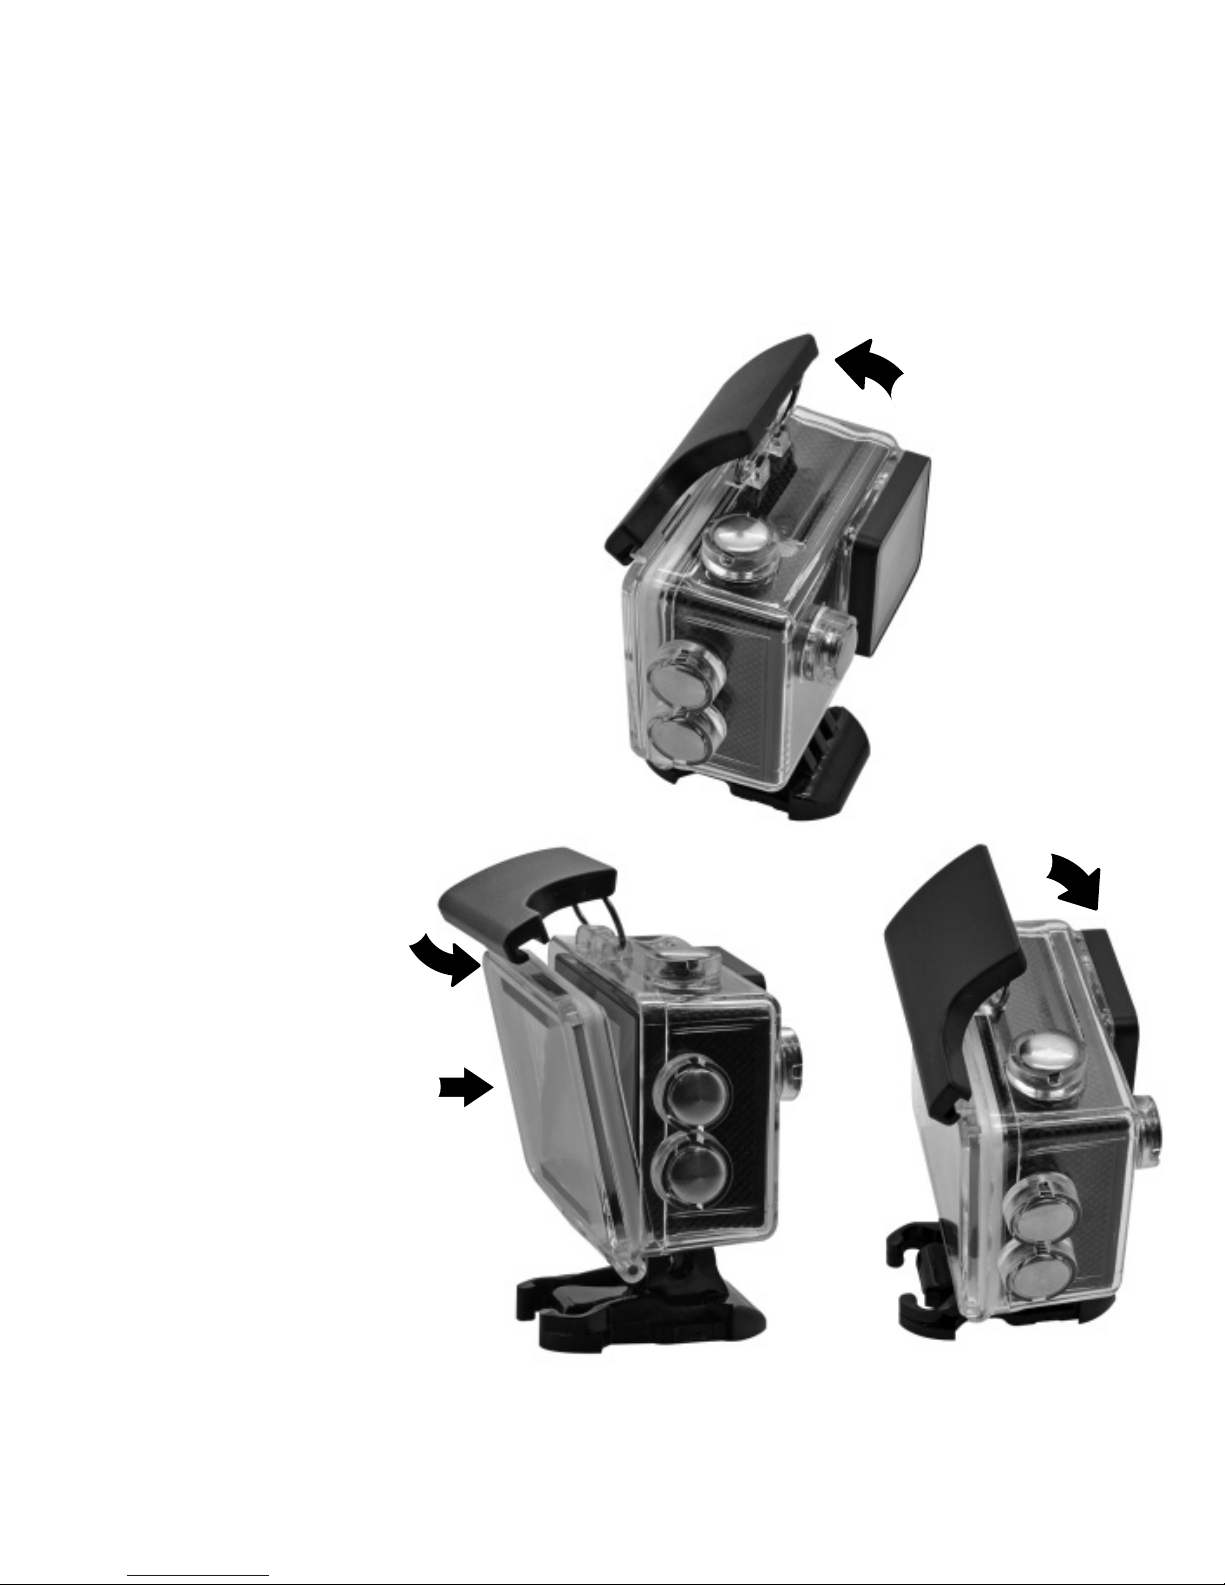
How to open and close the waterproof case
How to open:
Press the clamp upward,
to open the housing (1).
How to close:
Press the case door
all the way down (1)
and then snap the
clamp to the hinge
(2).
Now, simply press
the clamp down (3)
to close.
C
B
B
D
Page 33
EN
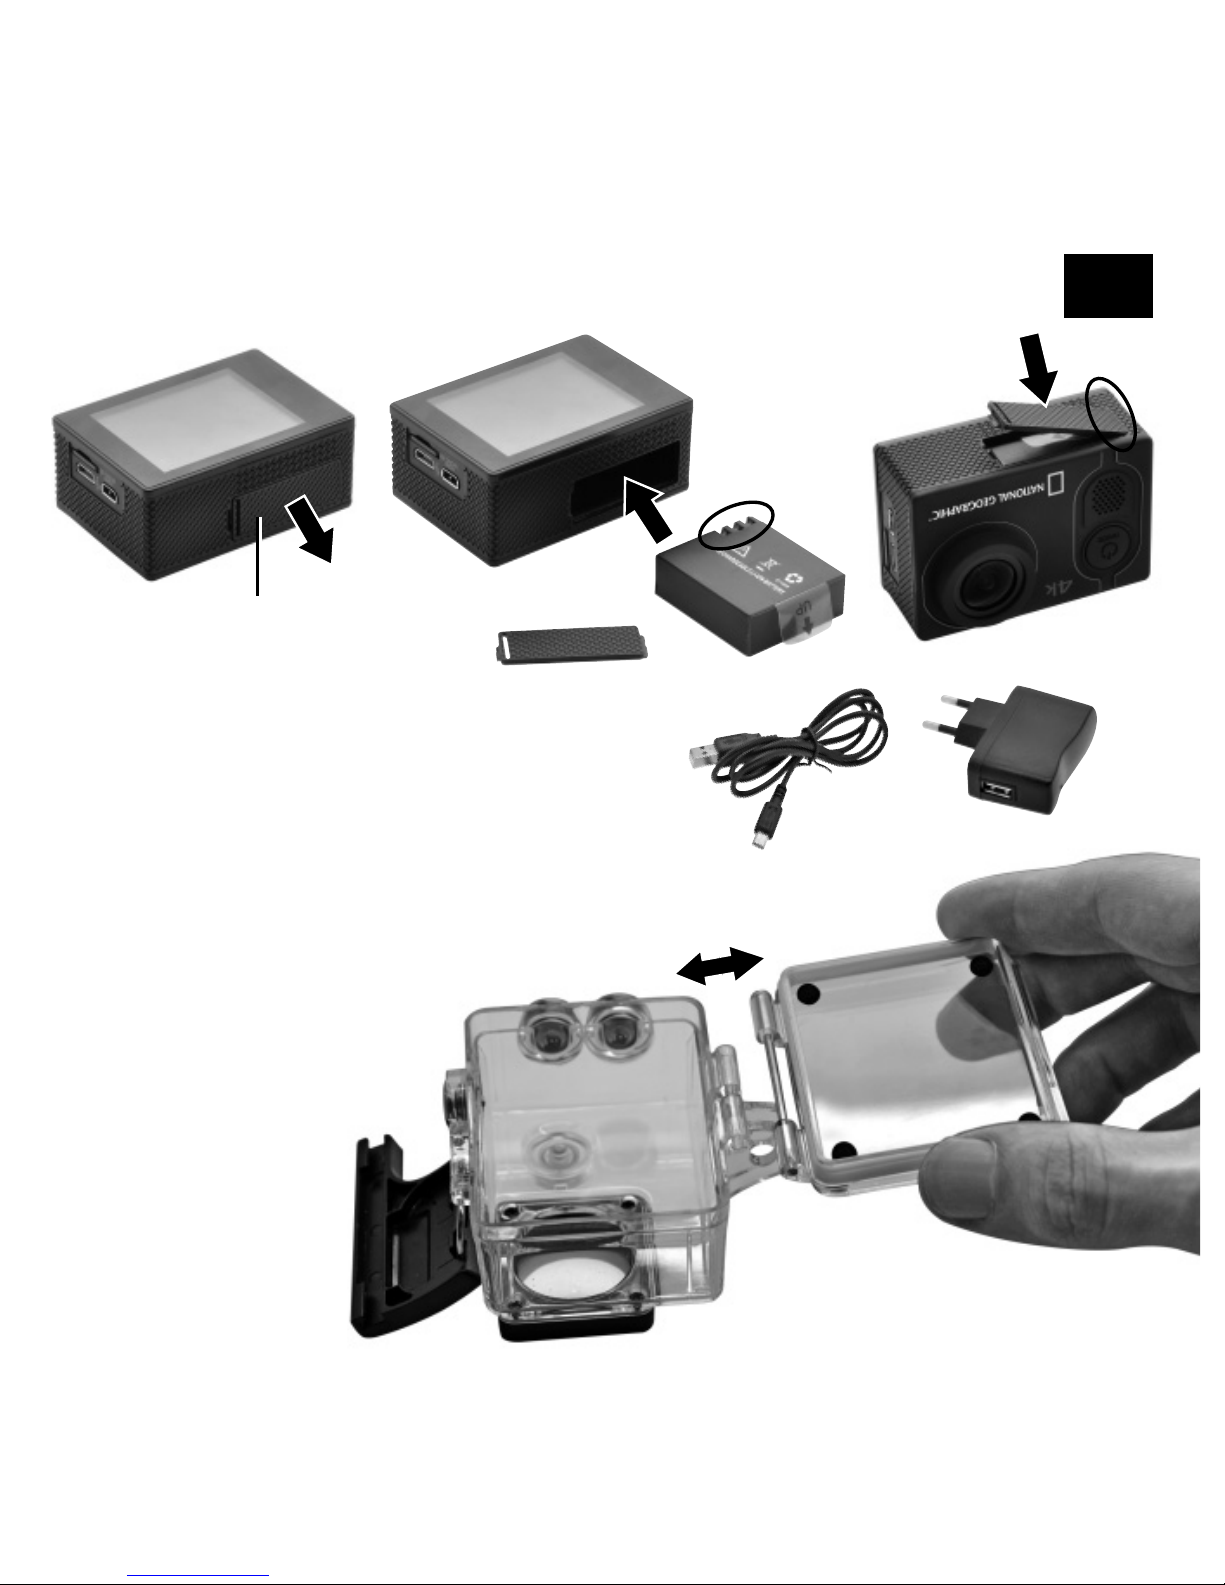
How to replace the battery
Pull off the case
door. Align the new
case door with the
hinge and press
down until it clicks
into place.
Charge with the included power adapter or via
a computer using the usb cable.
Battery cover
How to swap the case door
Page 34
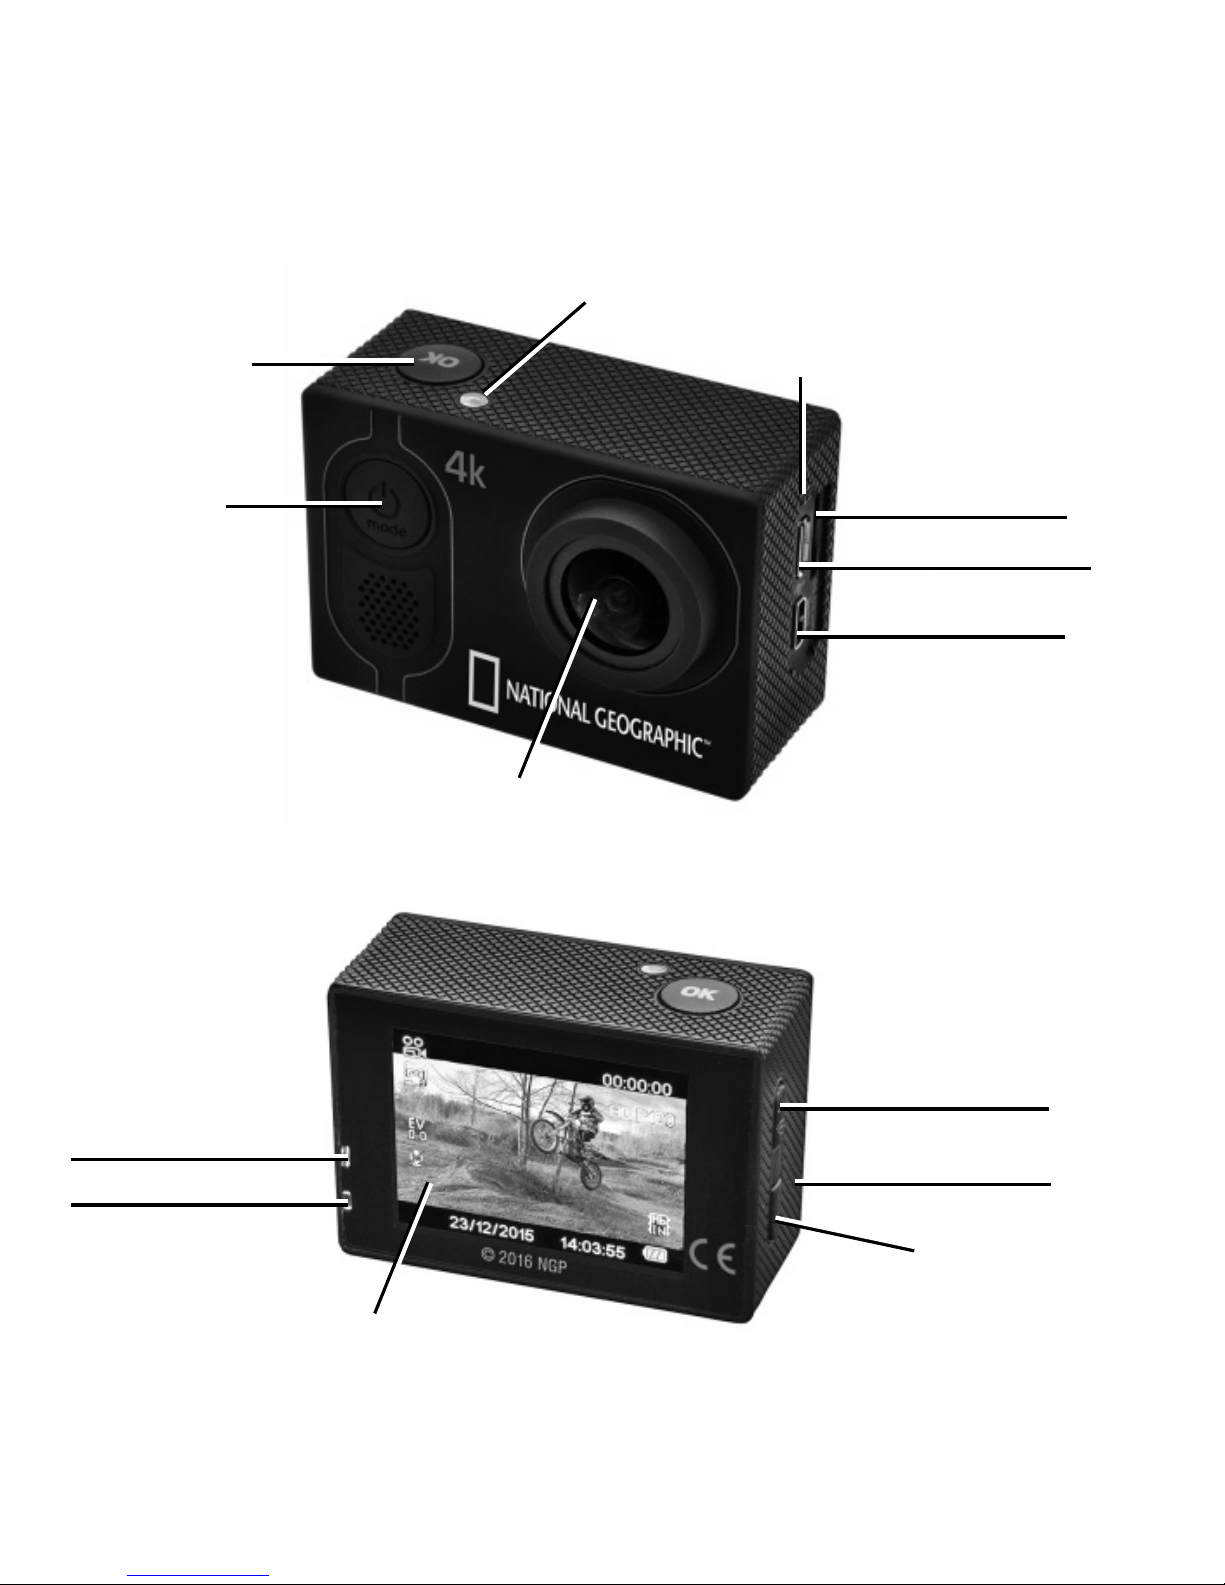
Functions
UP
& Wi-Fi button
Speaker
TFT Screen
DOWN
OK
Indicator
ON/OFF button
& MODE
Microphone
Micro SD/TF Port
Micro USB 2.0 Port
Micro HDMI
Lens
Operation indicator
Charging indicator
Page 35
EN
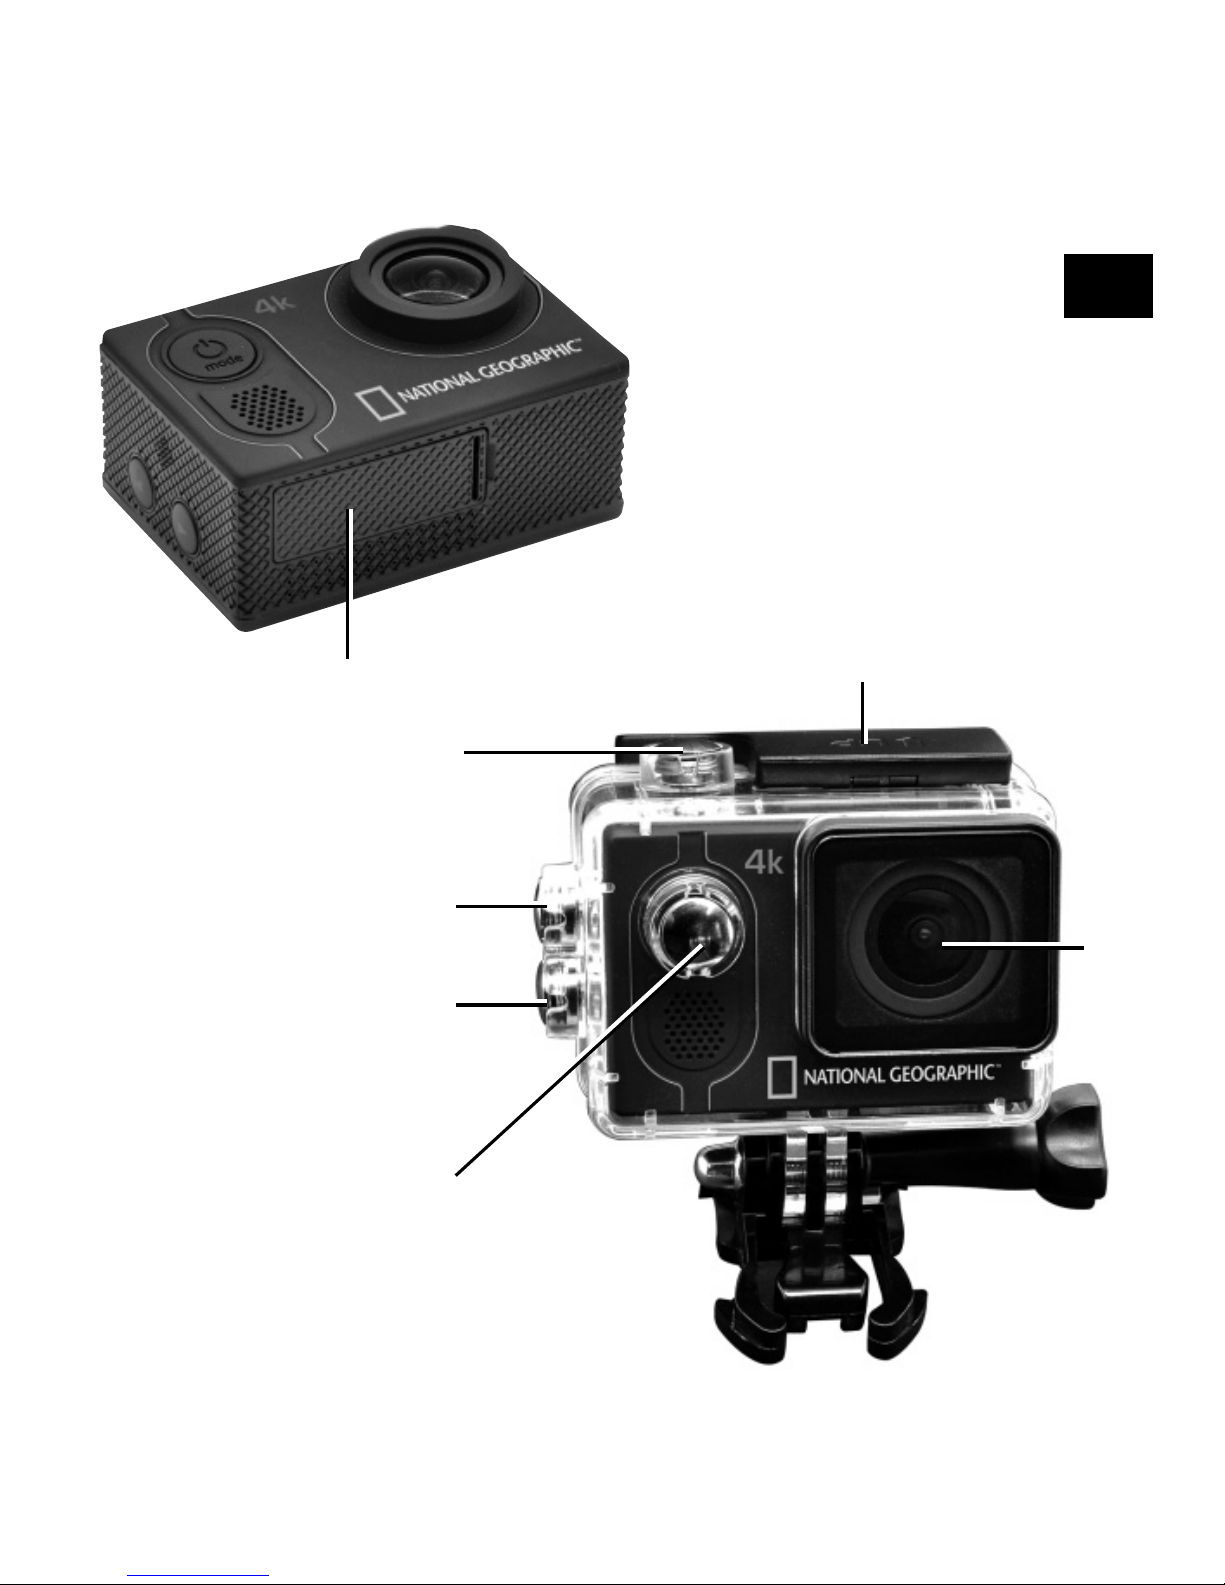
Battery cover
OK
Clamp to open the
Waterproof case
UP
& Wi-Fi button
DOWN
Lens
ON/OFF button
& MODE
Page 36
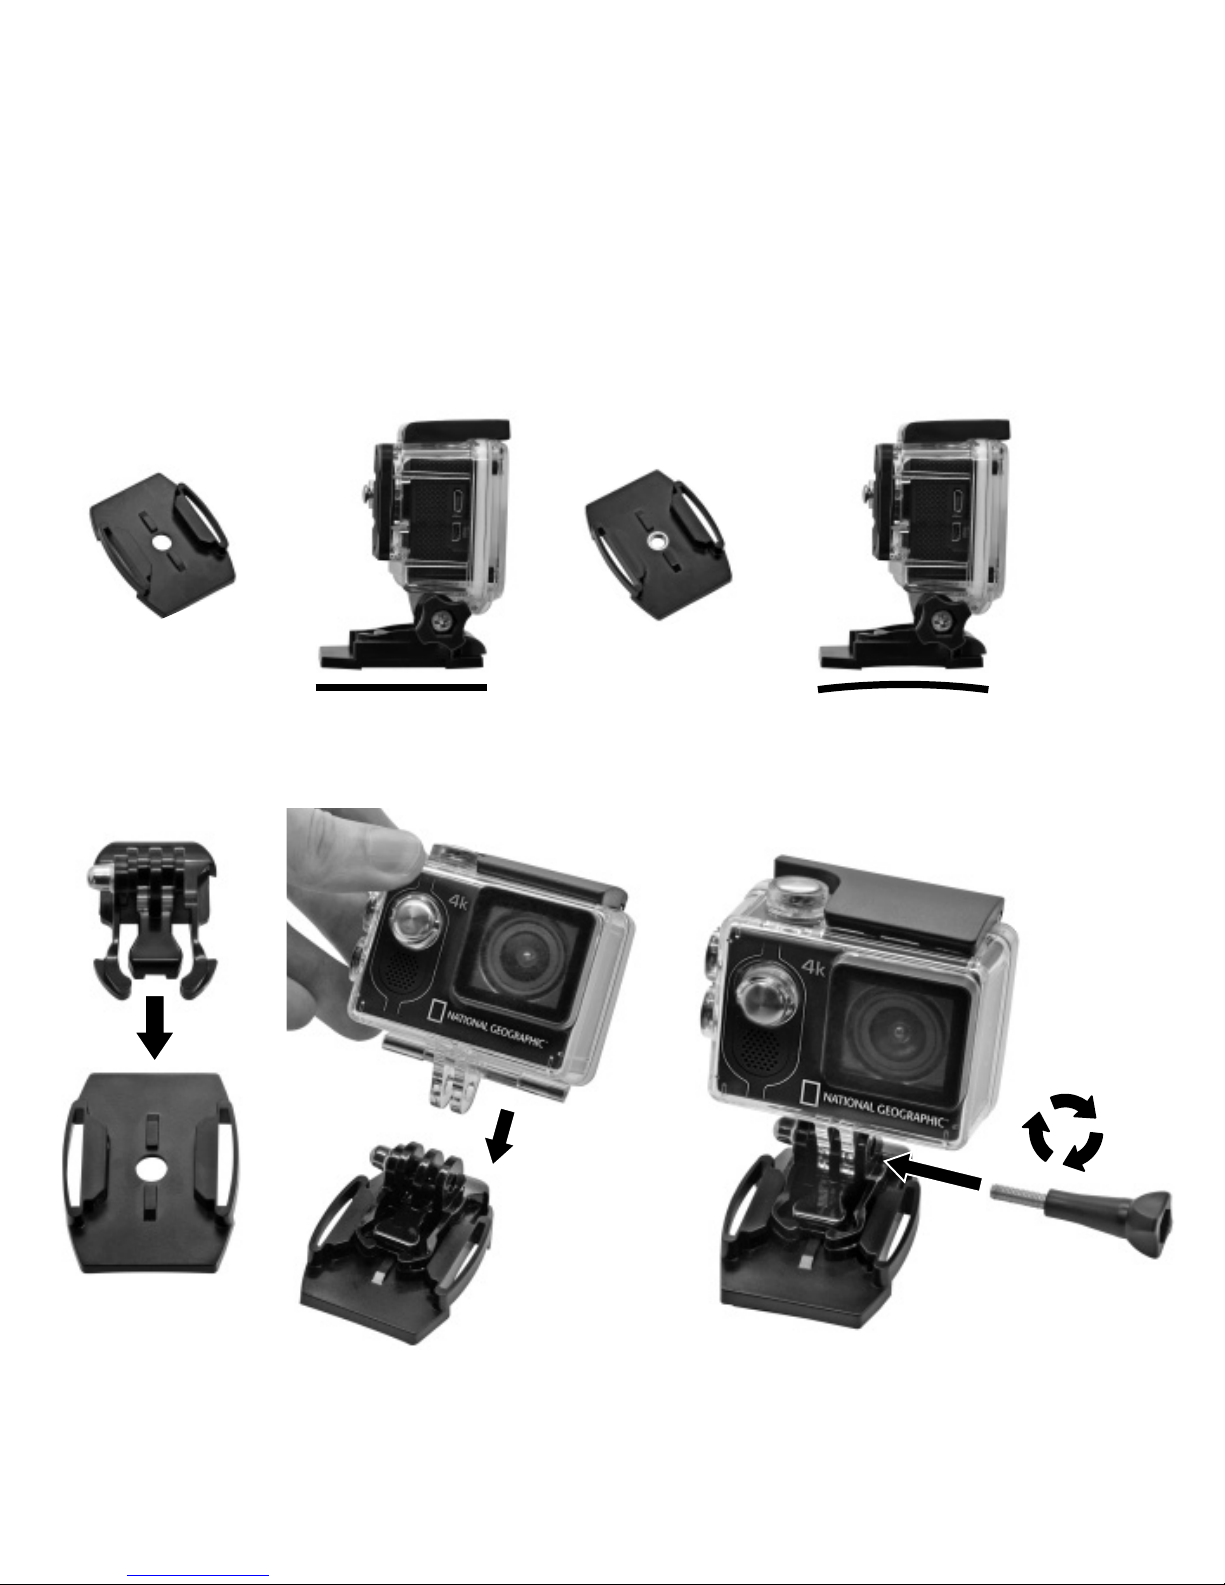
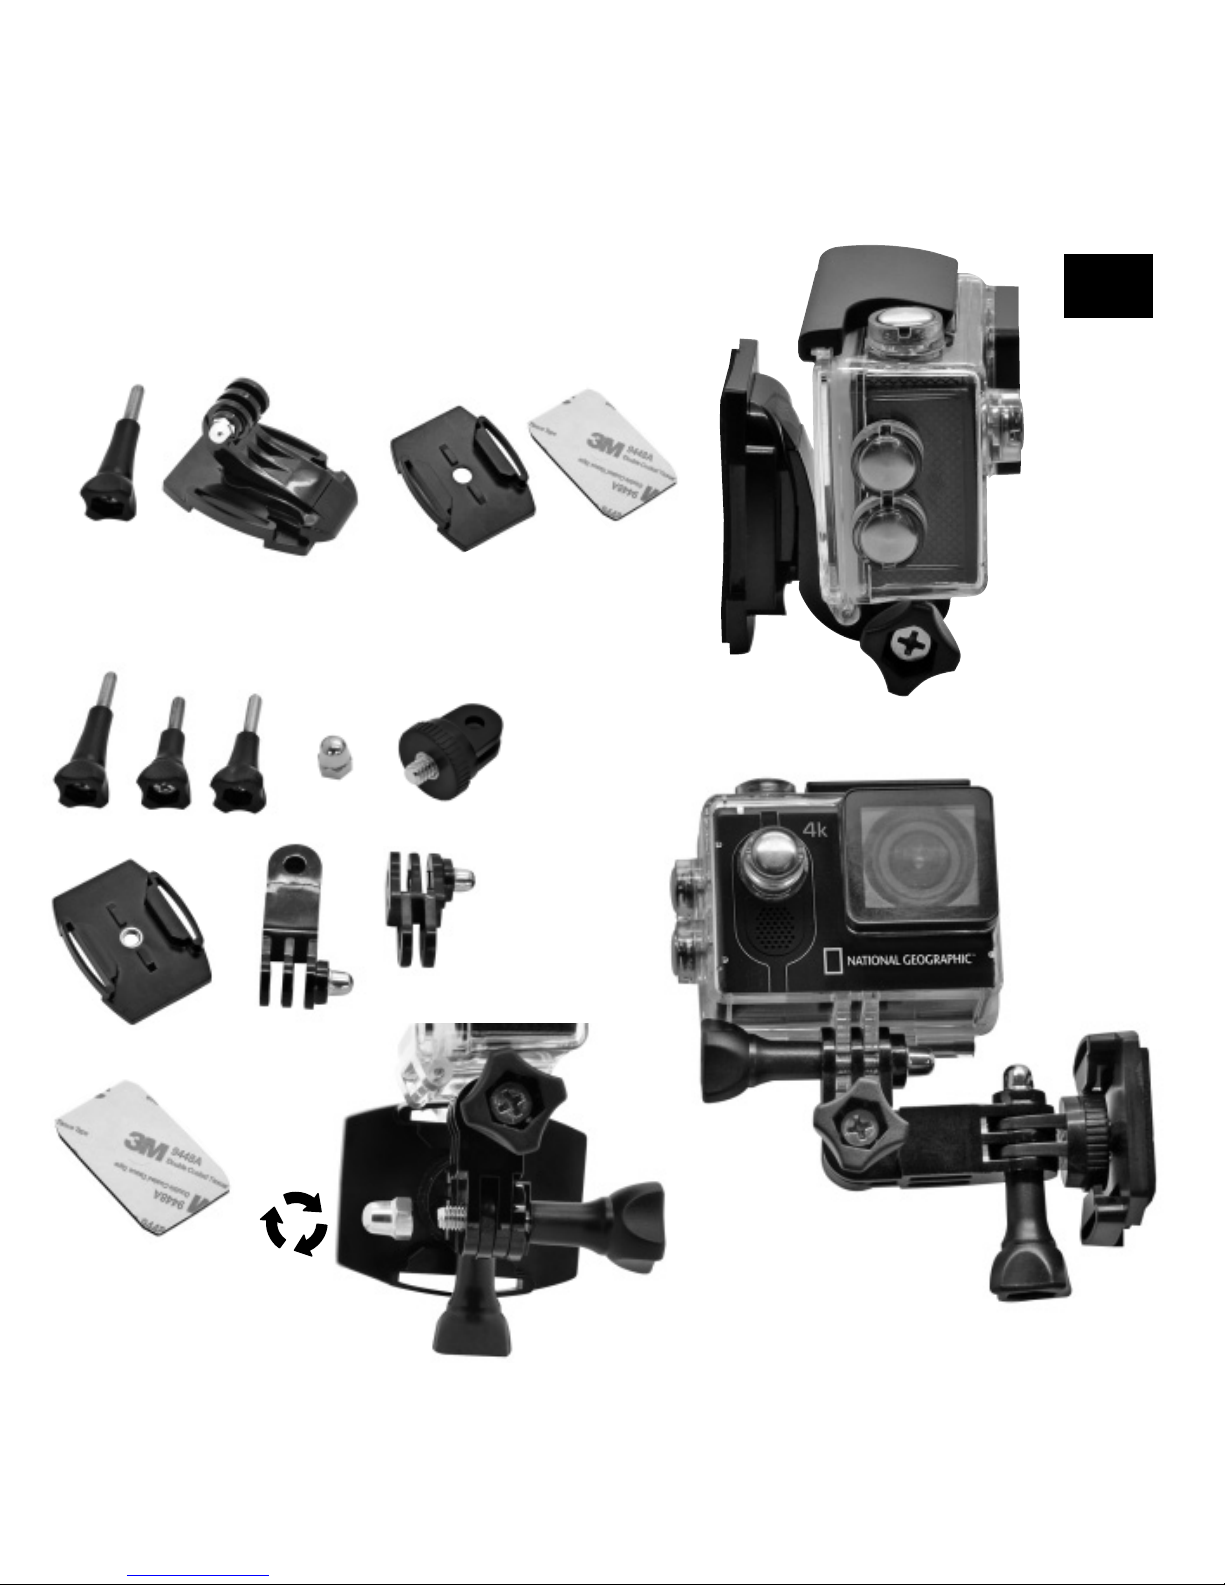
Mount your camera
=
Flat surface or curved surface mount:
Choose the flat or curved base depending on the surface.
=
Mount on flat base:
Page 37
EN
Vertical mount:
Side mount:
Page 38
E
D
b
/
c
EG
a
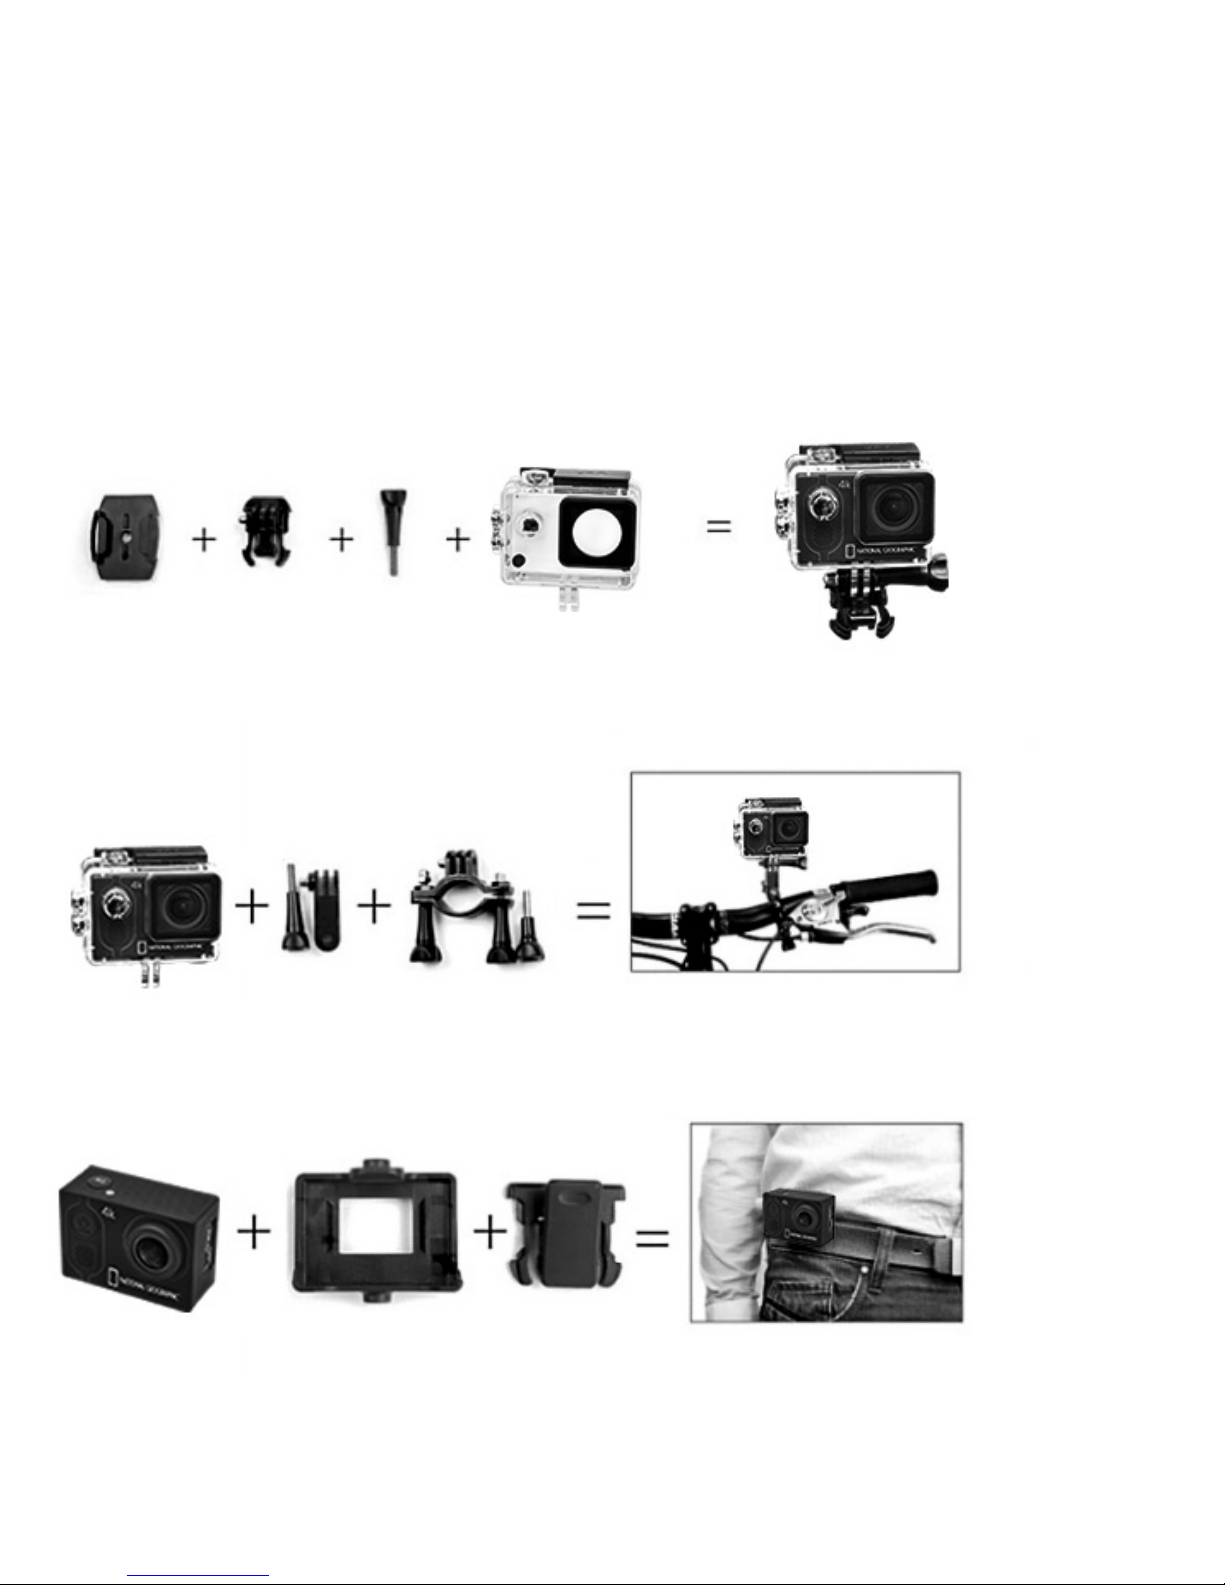
Mount examples:
Base-Mount:
Snap the base mount (5) into the base (9). Use the flat or curved base, depending on
the surface. Now use the thumb knobs (4) to mount the waterproof case (2).
Bicycle mount:
Attach the waterproof case with camera (1/2) on the multifunction mount 6a.
Now secure the bicycle mount (3) to multifunction mount 6a and then attach
to the handlebars. Tighten the thumb knobs (4) firmly.
hb
Belt mount:
Place the camera (1) in the housing and then snap the clip for the belt holder to the
housing. Fix the clip to the belt.
E
c
FJ
Page 39
EN
1@
b
J
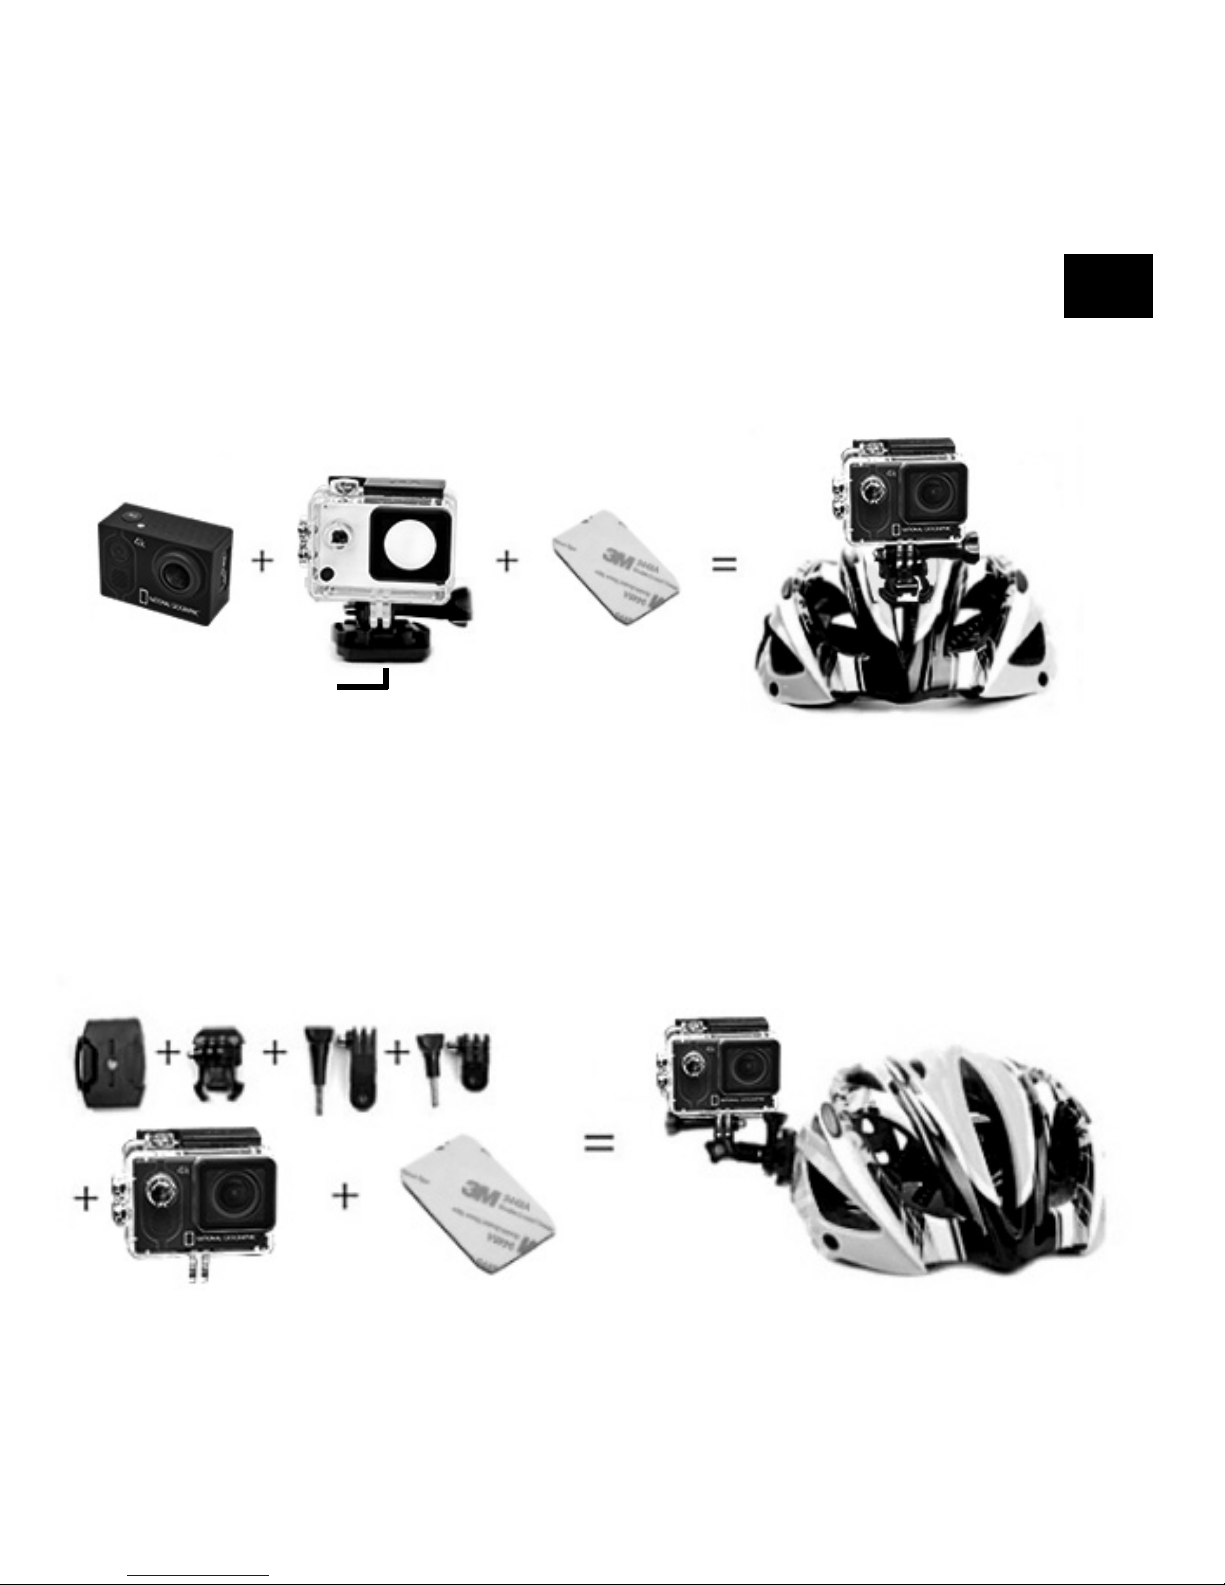
Helmet-Mount (Vertical mount):
Apply the double sided sticker (12) at the base (9) and attach the base mounted
camera to the helmet.
Helmet-Mount (Side mount):
Attach the multifunction mount 6a on the multifunction mount 6b and then mount the
base (9/5) to multifunction mount 6a. Finally mount the waterproof case with camera to
6b. Apply the double sided sticker (12) at the base (9) and attach to the helmet.
E
F
JG
a
EG
b
1@
Page 40

Product features
• A water-resistant casing that allows you to film fascinating water sports:
Water-resistant up to 30 metres under water.
• High definition screen that displays and replays fascinating videos recorded.
• Rechargeable battery that is easy to replace and prolongs your camera’s service life.
• Video recording while charging.
• Video recording with battery.
• 16 mega pixel (HD) wide-angle lens.
• HDMI HD output.
• Supports Micro SD/TF Memory cards* up to 32 GB maximum.
Operating
1. Inserting Micro SD card*
Note: For best performance, please choose a branded Micro SD card and format it on
your computer before use. Unbranded cards are not guaranteed to work flawlessly.
2. Installing or removing the battery
A. Press on the battery cover to open it.
B. Correctly install the battery into the camera.
C. Remove Battery: Simply open battery cover to take the battery out.
3. Charging
A. Charging can be done with the power adapter or by connecting the action camera to
a computer via the usb cable.
B. The action camera can record video while charging
C. Charging of the action camera can be done even when it’s powered off.
*Micro SD card not included
Page 41
EN
4. Turning camera on and off
Press and hold the [
] button for 3 to 5 seconds to turn the camera on or off.
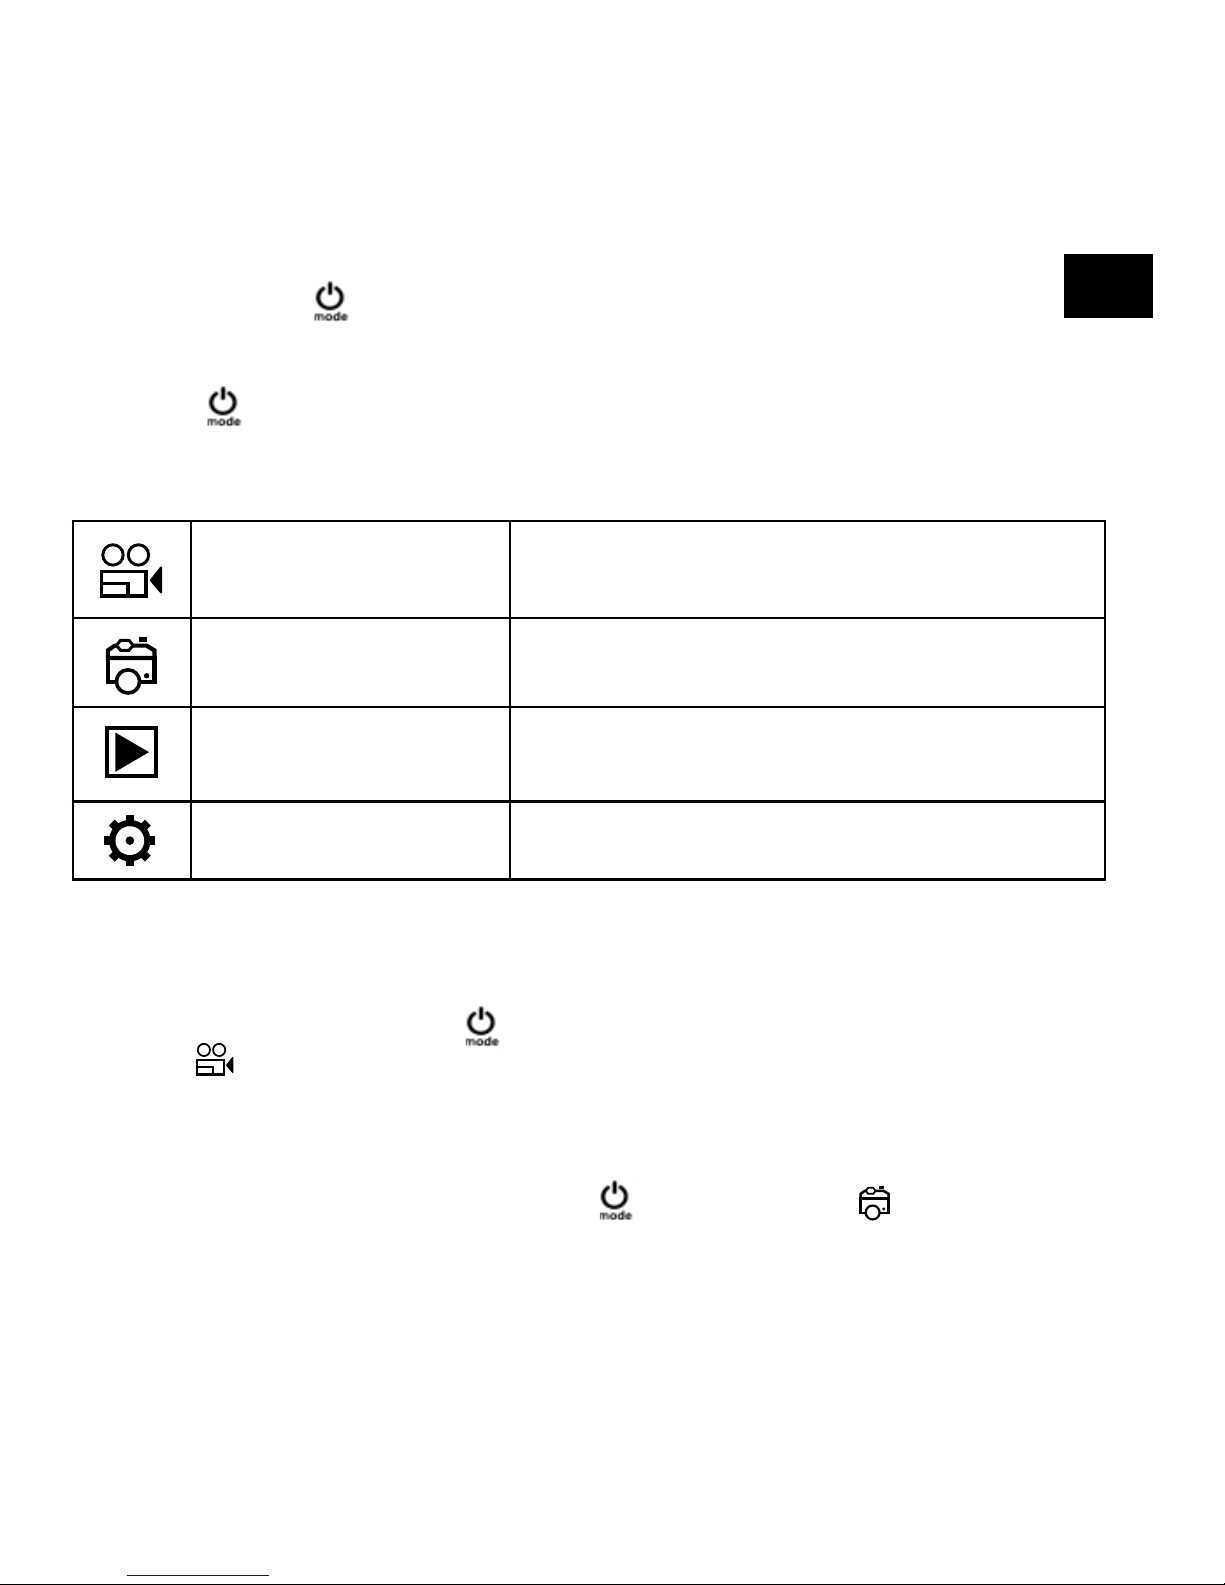
5. Mode Switching
Press the [
] button repeatedly to cycle through the camera modes.
Camera mode
Description
Video recording mode Video recording
Photo shooting mode Single Photo, Photo timer, Burst Mode
Play back mode
Play back content on the TFT display or on a
TV via HDMI cable.
Setup Adjust all camera settings
6. How to record videos and configure recording setting
6.1. Video Recording
Turn the camera on by pressing [
]. You will start with the video recording mode. There
will be an icon in the upper left corner. Insert a SD card and start recording by pressing “OK”. Press “OK” again if you want to stop the recording.
6.2. Photo shooting & Settings
Switch to photo shooting mode by pressing [
]. There will be an icon in the upper left
corner. Press ”OK“ to take photos.
Page 42
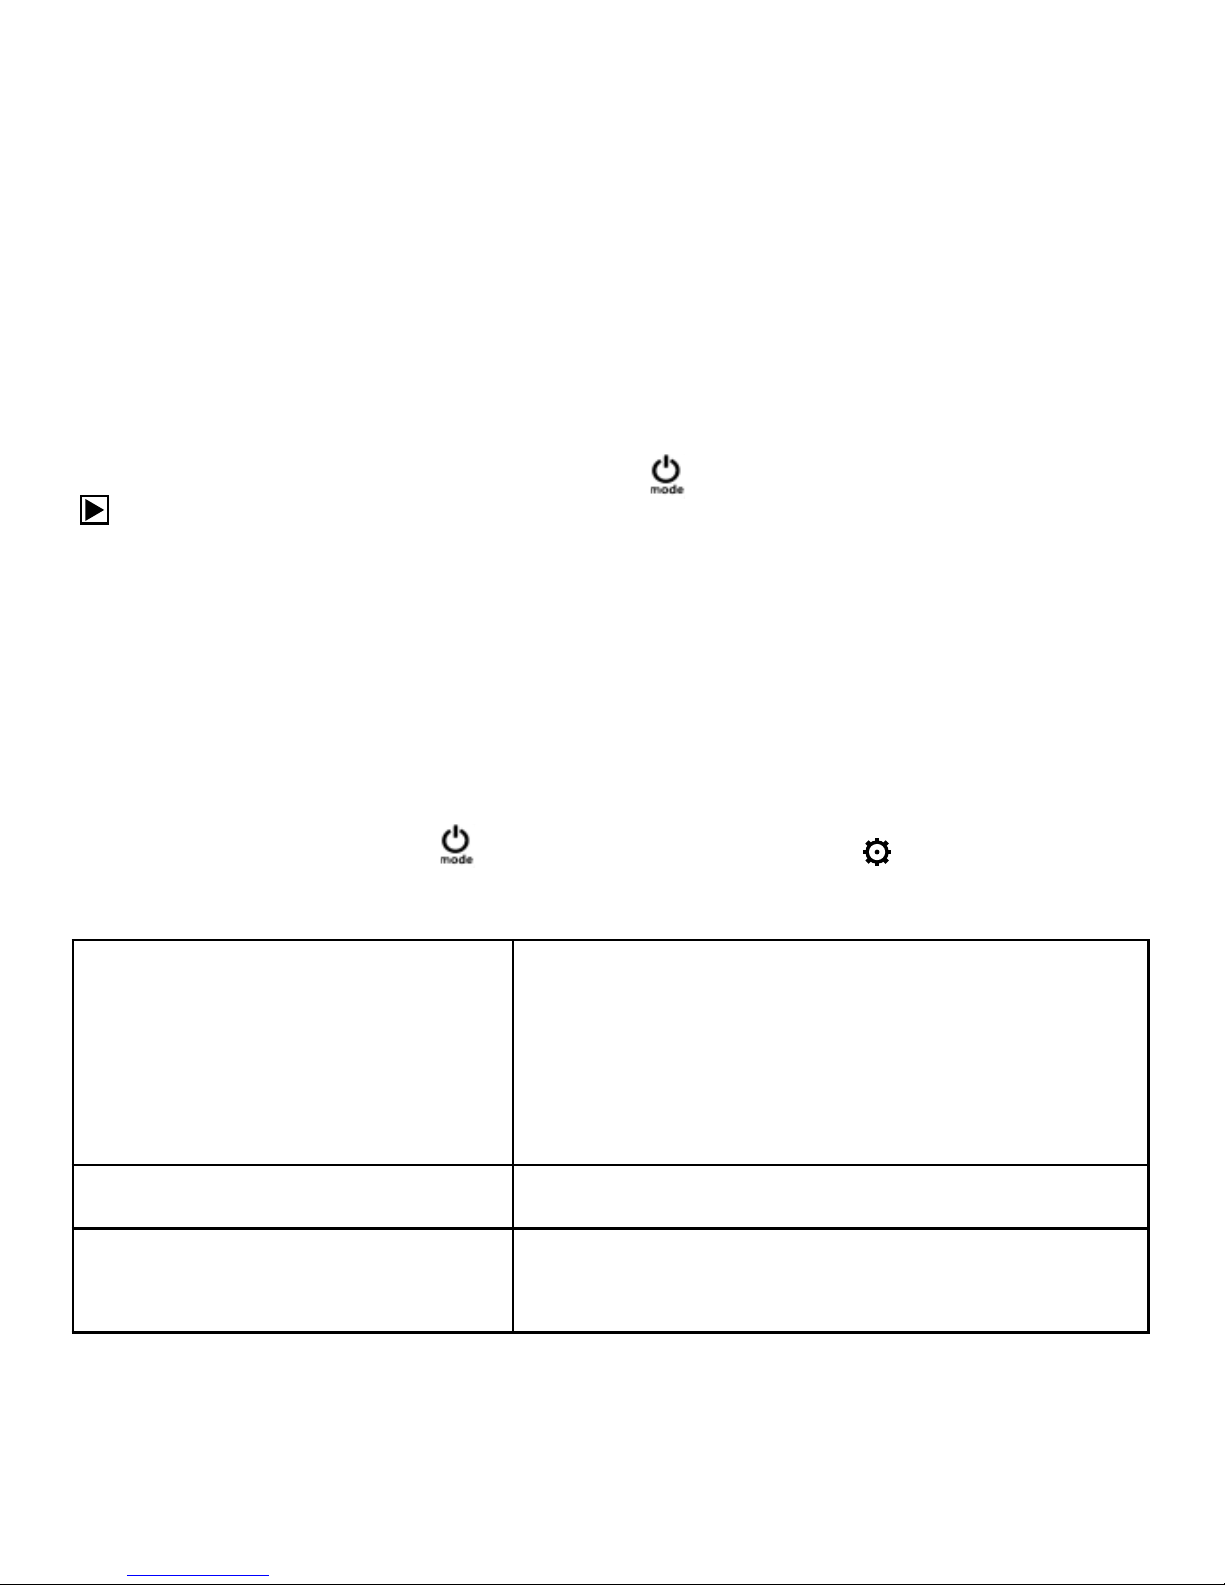
6.3. File Storage & Play back
After you are done recording use a USB cable to export the videos onto a computer for
play back. You can also take the Micro SD card out and access the image data with a card
reader.
7. Playback-mode
To enter or leave the Playback mode, press the [
] button repeatedly until you see the
icon. Use the UP / DOWN buttons to cycle through your videos and photos.
8. Wi-Fi Mode/ Camera App
First download a Action Camera Smartphone App like the free „FinalCam“. Press the „UP /
Wi-Fi button“ to turn on Wi-Fi. Connect to the camera (look for a Network called e.g. „4K
Sports DV“) with your Wi-Fi device using the password: „12345678“. Now start the Action
Camera app of your choice.
Settings
To access the settings, press [ ] several times until you see the icon for the settings.
Now press “OK” to open the menu.
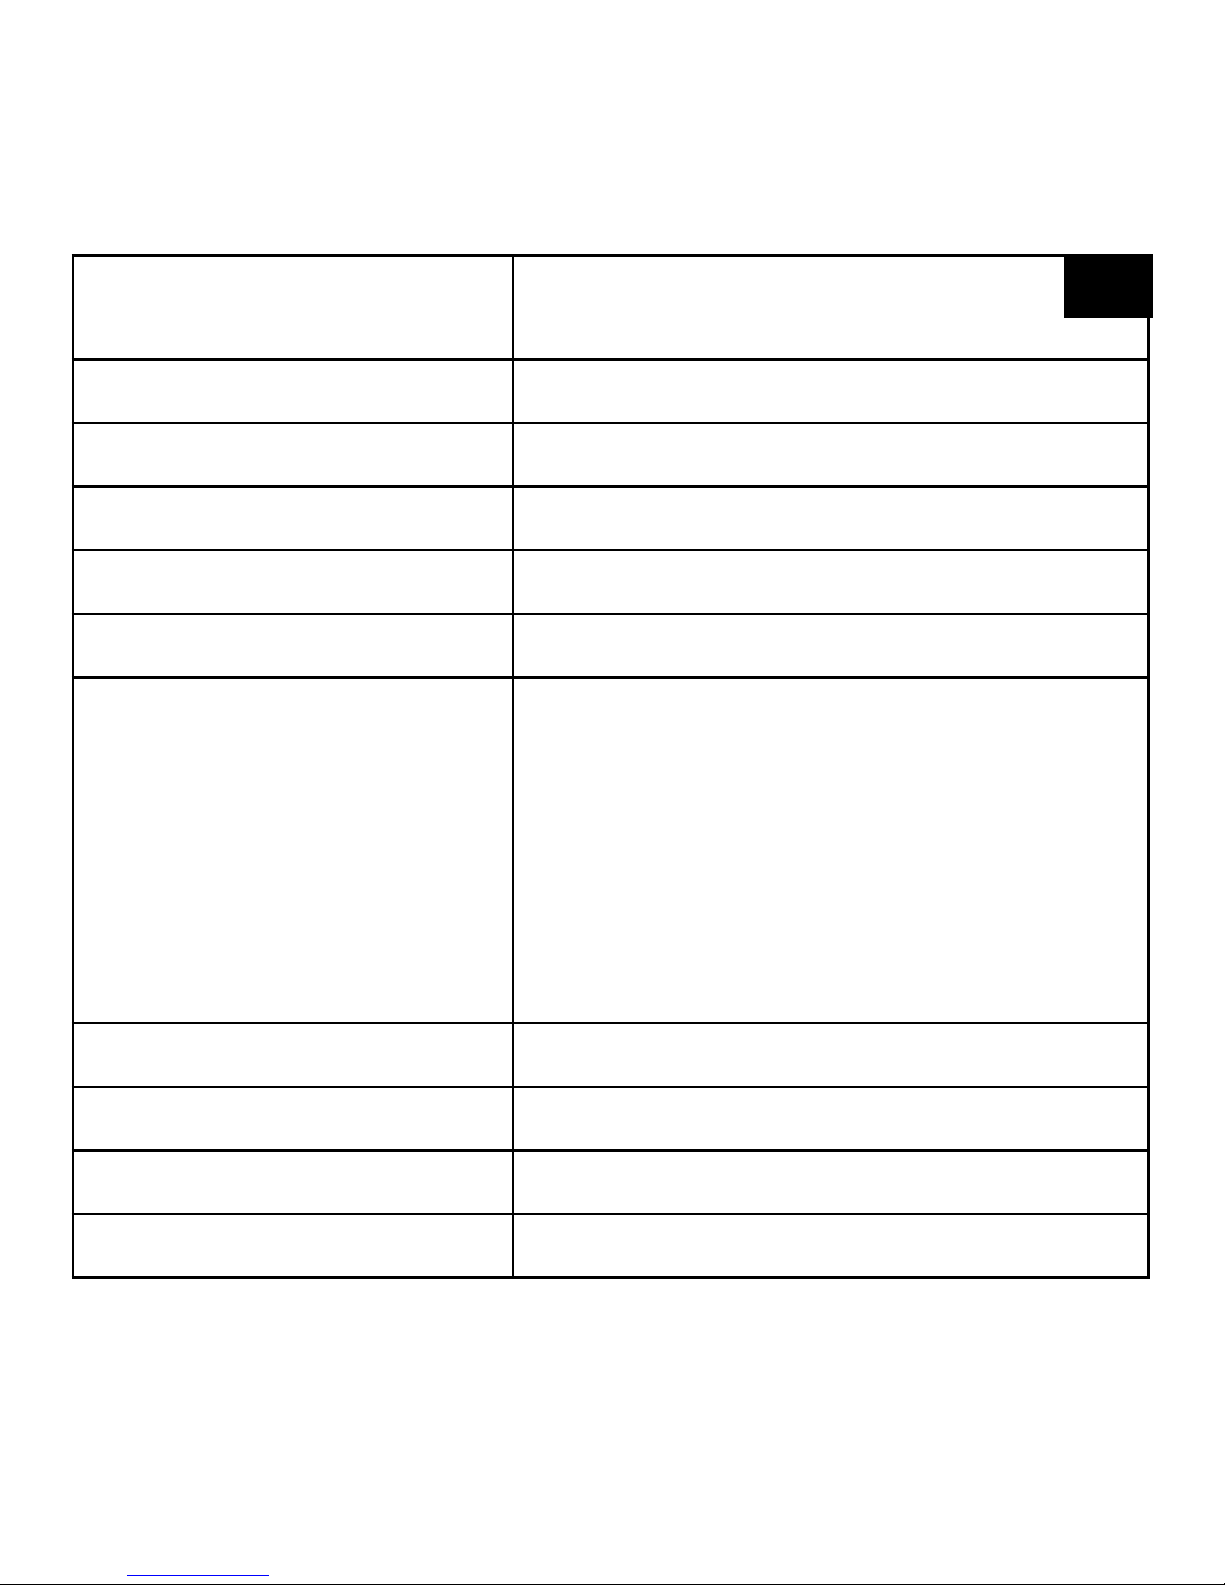
Resolution 4K (24fps), 2K (30fps), 1080p (60fps)
1080p (30fps), 720p (120fps)
720p (60fps), 720p (30fps)
WVGA (30fps), VGA (24fps)
VGA (30fps), QVGA (30fps)
Loop recording Off / 3 Minutes / 5 Minutes / 10 Minutes
Time-lapse Record Off / 1 Second / 2 Seconds / 5 Seconds
/ 10 Seconds / 30 Seconds / 1 Minute
Page 43
EN
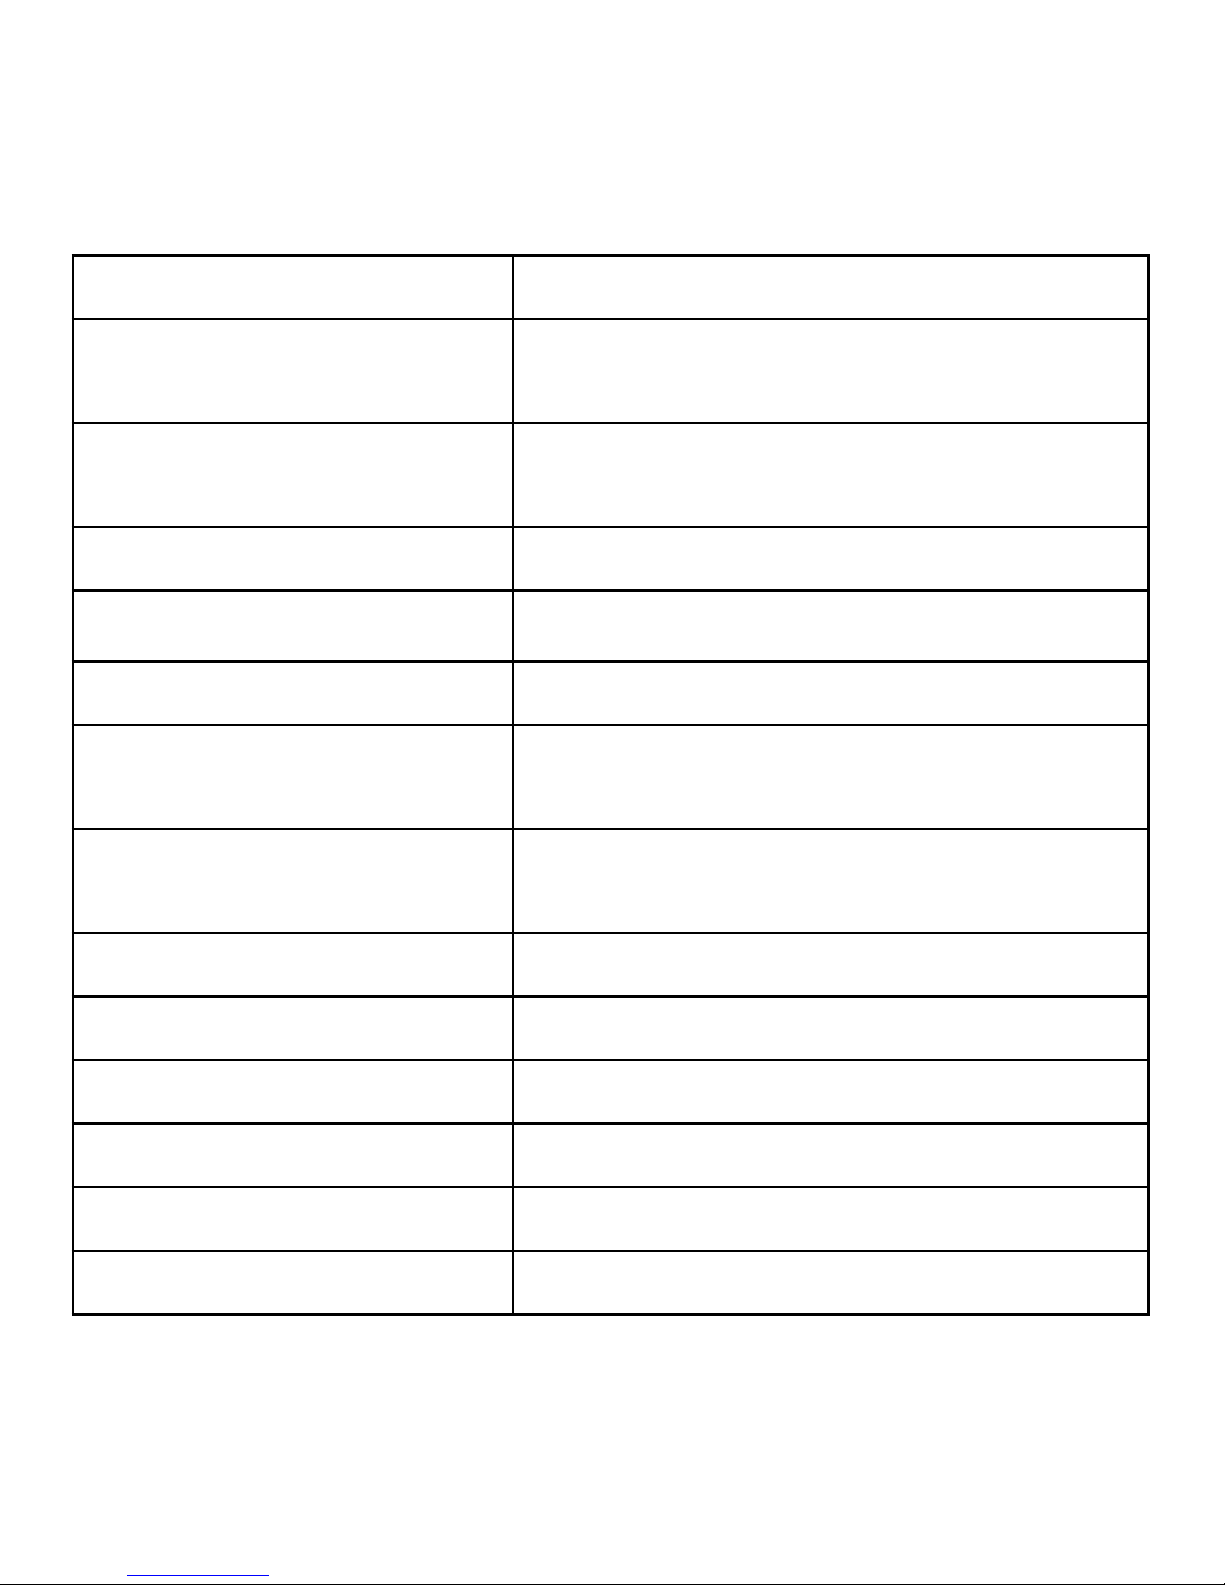
HDR Off / On
Record Audio Off / On
Slow Motion Off / /720p (120fps) / VGA (24fps)
Date Stamp Off / On
Motion Detection Off / On
Gyro RSC Off / On
Image Size / Resolution 16 MP - 4608x3456
14 MP - 4320x3240
12 MP - 4032x3024
10 MP - 3648x2736
8 MP - 3264x2448
5 MP - 2592x1944
3 MP - 2048x1536
VGA - 640x480
Sequence (Burst mode) Off / 3 Seq. / 5 Seq. / 10 Seq.
Capture Mode Single / 2s Timer / 5s / 10s / 20s
Quality Fine / Normal / Economy
Sharpness Strong / Normal / Soft
Page 44
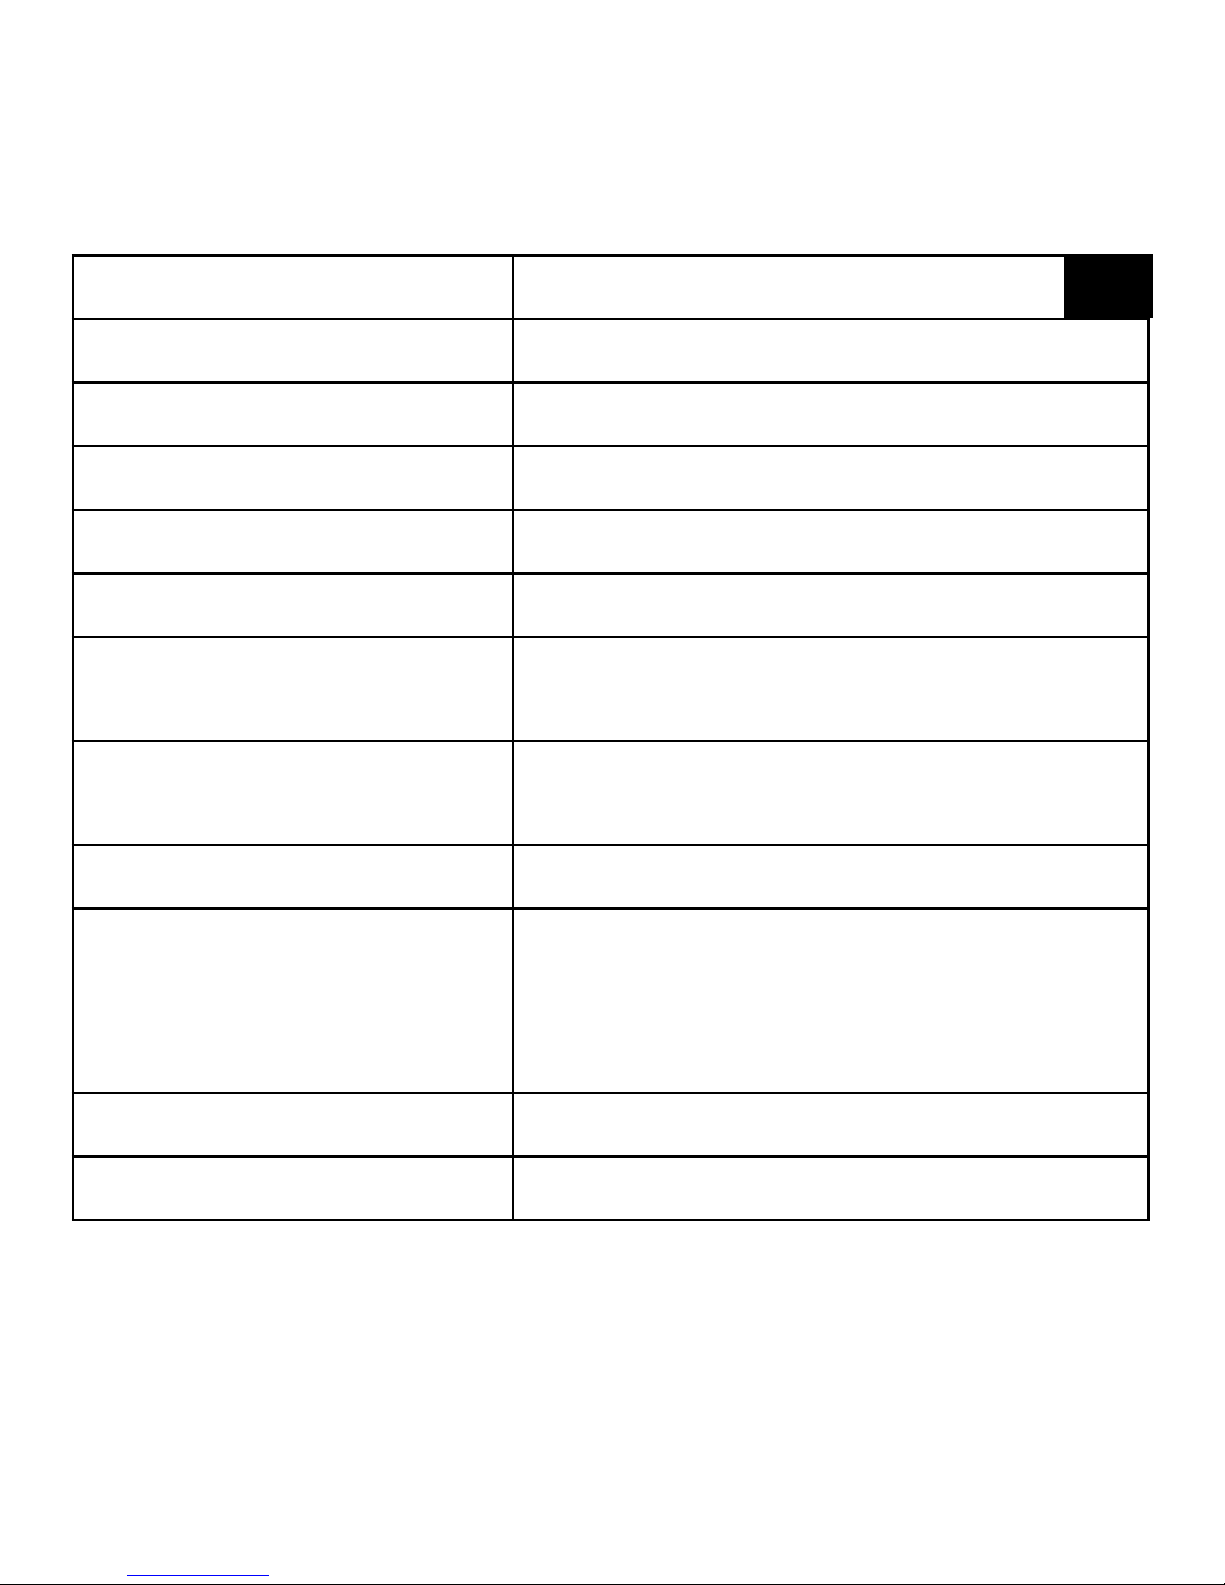
Anti-Shaking Off / On
Exposure +2/3 / +1/3 / +0.0 / -1/3 / -2/3
-1.0 / -4/3 / -5/3 / -2.0
White Balance Auto / Daylight / Cloudy / Tungsten /
Fluorescent
Color Color / Black & White / Sepia
ISO Auto / 100 / 200 / 400
Delete Delete Current / Delete All
Protect Lock Current / Unlock Current
Lock All / Unlock All
Date/Time Set current date and time
(Confi rm with „Mode“ button)
Auto Power Off 5 Minutes / 10 Minutes
Beep Sound Off / On
Language Choose OSD language
Frequency 50 Hz / 60 Hz
TV Mode NTSC / PAL
TV out Off / On
Page 45
EN
Screensavers Off / 30s / 1 Min / 3 Min / 5 Min
Car Mode Off / On
Field of view Wide / Medium / Narrow
Fisheye adjust Off / On
Aqua mode Off / On
WiFi Off / On
WiFi SSID Set WiFi Name
(Default: 4K Sports DV)
WiFi Password Set WiFi Password
(Default: 12345678)
Plate number setting Set with „MODE“ Button
Format Internal Memory >> All data on the internal
memory will be deleted
SD Card >> All data on the sd card will be
deleted
Default Setting Reset system to default settings
Version View current fi rmware version
Page 46
Technical Data
TFT Display 2 inch (5.08 cm) display
Lens 170° wide angle
Waterproof case Waterproof up to 30 m
Language options Deutsch, English, Español, Français,
Italiano, Português, русский, Chinese,
Japanese
Resolution of photos 16 MP (4608×3456), 14 MP (4320×3240)
12 MP (4032x3024), 10 MP (3648x2736),
8 MP (3264x2448), 5 MP (2592x1944),
3 MP (2048x1536), VGA (640x480)
Resolution of videos 4k (3840x2160) (24 fps),
2k (2560x1440) (30 fps),
1920x1080 (60 fps),
1280x720 (60 fps)
Video format MOV
Compressed format of
videos
H.264
Storage Micro SD card up to 32 GB
(not included)
Page 47
EN
Shooting mode Single shot / Self-timer (2s/5s/10s) /
Continuous Shooting
Frequency of optical source 50Hz/60Hz
USB interface USB 2.0
Power source interface 3.7 V
Battery capacity 1050 mAh
Power dissipation 1050 mAh @ 3.7 V
Recording time About 70 minutes (at 1080p)
Charging time About 3 hours
Operating systems (OS) Window XP / Vista / Win 7 / Mac OS X
Dimensions 59.3x41.1x24.6 mm
Weight 60 g
Note: Specifications could be subject to change due to upgrading or updating.
Please regard the actual product as the standard.
Page 48

Warranty and warranty term extension
The warranty term is two years from the date of purchase. Please keep your proof of
purchase. Register at www.bresser.de/warranty and fi ll out a brief questionnaire to
get your warranty term extended to fi ve years. Registration must be completed within
three months of purchase (date of receipt) to validate the warranty. If you register
thereafter, the warranty term will not be extended.
If you have problems with your device, please contact our customer service fi rst.
Do not send any products without consulting us fi rst by telephone. Many problems
with your device can be solved over the phone. If the problem cannot be resolved
by phone, we will take care of transporting your device to be repaired. If the problem
occurred after the warranty ended or it is not covered by our warranty terms, you will
receive an estimate of repair costs, free of charge.
Service Hotline: +49 (0) 2872 - 80 74-210
Page 49

EN
Important for any returns:
Please make sure to return the device carefully packed in the original packaging
in order to prevent damage during transport. Also, please enclose your receipt
for the device (or a copy) and a description of the defect. This warranty does not
imply any restriction of your statutory rights.
Your dealer: .................................... Art. No.: .........................................
Description of problem: ...................................................................................
....................................................................................................................
....................................................................................................................
....................................................................................................................
Name: ...........................................
Street: ...........................................
City/Postcode: ................................
Telephone: .....................................
Date of purchase: ............................
Signature: ......................................
Page 50
Instrucciones de uso
ES
Page 51
ES
Sobre este manual
Antes de utilizar el aparato, lea detenidamente las indicaciones de
seguridad y el manual de instrucciones. Guarde el presente manual de
instrucciones por si necesita volver a utilizarlo más tarde. En caso de venta o
entrega a terceros del aparato, se debe entregar el manual de instrucciones al
siguiente propietario/usuario del producto.
Uso previsto
Este producto sirve exclusivamente para el uso privado. Se ha desarrollado como
medio electrónico de uso de servicios multimedia.
Advertencias de carácter general
• ¡Existe PELIGRO DE ASFIXIA! Mantener los materiales de embalaje (bolsas de
plástico, bandas de goma) alejadas del alcance de los niños. Este producto contiene piezas pequeñas que un niño podría tragarse. Hay RIESGO DE AXFISIA.
• Si se derrama el ácido de las pilas, este puede provocar abrasiones Evite el
contacto del ácido de las baterías con la piel, los ojos y las mucosas. En caso de
contacto con el ácido, enjuague inmediatamente las zonas afectadas con agua
limpia abundante y visite a un médico.
• ¡PELIGRO DE DESCARGA ELÉCTRICA! NNo doblar, aplastar, estirar ni pasar
por encima de cables de alimentación o conexión ni de alargadores o piezas de
empalme. Proteja los cables de los bordes afi lados y el calor excesivo. Antes de
poner en funcionamiento, compruebe si presentan desperfectos el aparato, los cables y las conexiones. ¡No poner nunca en funcionamiento un aparato defectuoso
o un aparato cuyas piezas conductoras de corriente presenten desperfectos! Es
necesario recambiar sin demora las piezas defectuosas a través de una empresa
de servicio técnico autorizada.
Page 52
• ¡PELIGRO de daños materiales! No desmonte el aparato. En caso de que exista
algún defecto, le rogamos que se ponga en contacto con su distribuidor autorizado. Este se pondrá en contacto con el centro de servicio técnico y, dado el caso,
podrá enviarle el aparato para su reparación.
• ¡No cortocircuitar ni arrojar al fuego el aparato! El calor excesivo y el manejo inadecuado pueden provocar cortocircuitos, incendios e incluso explosiones.
• No interrumpa jamás una conexión de datos con el ordenador antes de que todos
los datos se hayan transmitido. La interrupción puede provocar pérdidas de datos
de las que el fabricante no se hace responsable.
NOTAS sobre la limpieza
• Apague la cámara.
•
Limpie las lentes (oculares y/o objetivos) exclusivamente con un paño suave y sin
hilachas (p. ej. de microfibras). No presione el paño con demasiada fuerza para
evitar arañazos en las lentes.
• Limpie solamente el exterior del aparato con un paño seco. No utilice productos de
limpieza para evitar daños en el sistema electrónico.
• Limpie la carcasa de protección después de su uso con agua limpia y clara y séquela.
Declaración de conformidad de la Unión Europea (CE)
Bresser GmbH ha emitido una “Declaración de conformidad” de acuerdo
con las directrices y normas correspondientes. Dicha declaración se puede
consultar en cualquier momento, previa petición.
Page 53
ES
ELIMINACIÓN
Elimine los materiales de embalaje separados por tipos. Obtendrá
información sobre la eliminación reglamentaria en los proveedores de
servicios de eliminación municipales o en la agencia de protección
medioambiental.
¡No elimine los electrodomésticos junto con la basura doméstica!
Conforme a la directiva europea 2002/96/UE sobre aparatos eléctricos y
electrónicos usados y a su aplicación en la legislación nacional, los aparatos
eléctricos usados se deben recoger por separado y conducir a un reciclaje
que no perjudique al medio ambiente. Las pilas y baterías descargadas deben ser
llevadas por los consumidores a recipientes de recogida para su eliminación. En los
proveedores de servicios de eliminación municipales o en la agencia de protección
medioambiental podrá obtener información sobre la eliminación de aparatos o pilas
usados fabricados después del 01-06-2006.
La batería integrada solo se puede extraer para su eliminación. La apertura de
la tapa de la carcasa puede provocar la destrucción del aparato.
Descargue completamente la batería antes de eliminarla. Desenrosque todos los
tornillos de la carcasa y abra la tapa de la misma. Desconecte las conexiones de la
batería y extráigala. Proteja los contactos descubiertos y empaquete la batería de tal
modo que no se mueva dentro de su embalaje.
Page 54
b c
d E
F G
(a) (b) (c)
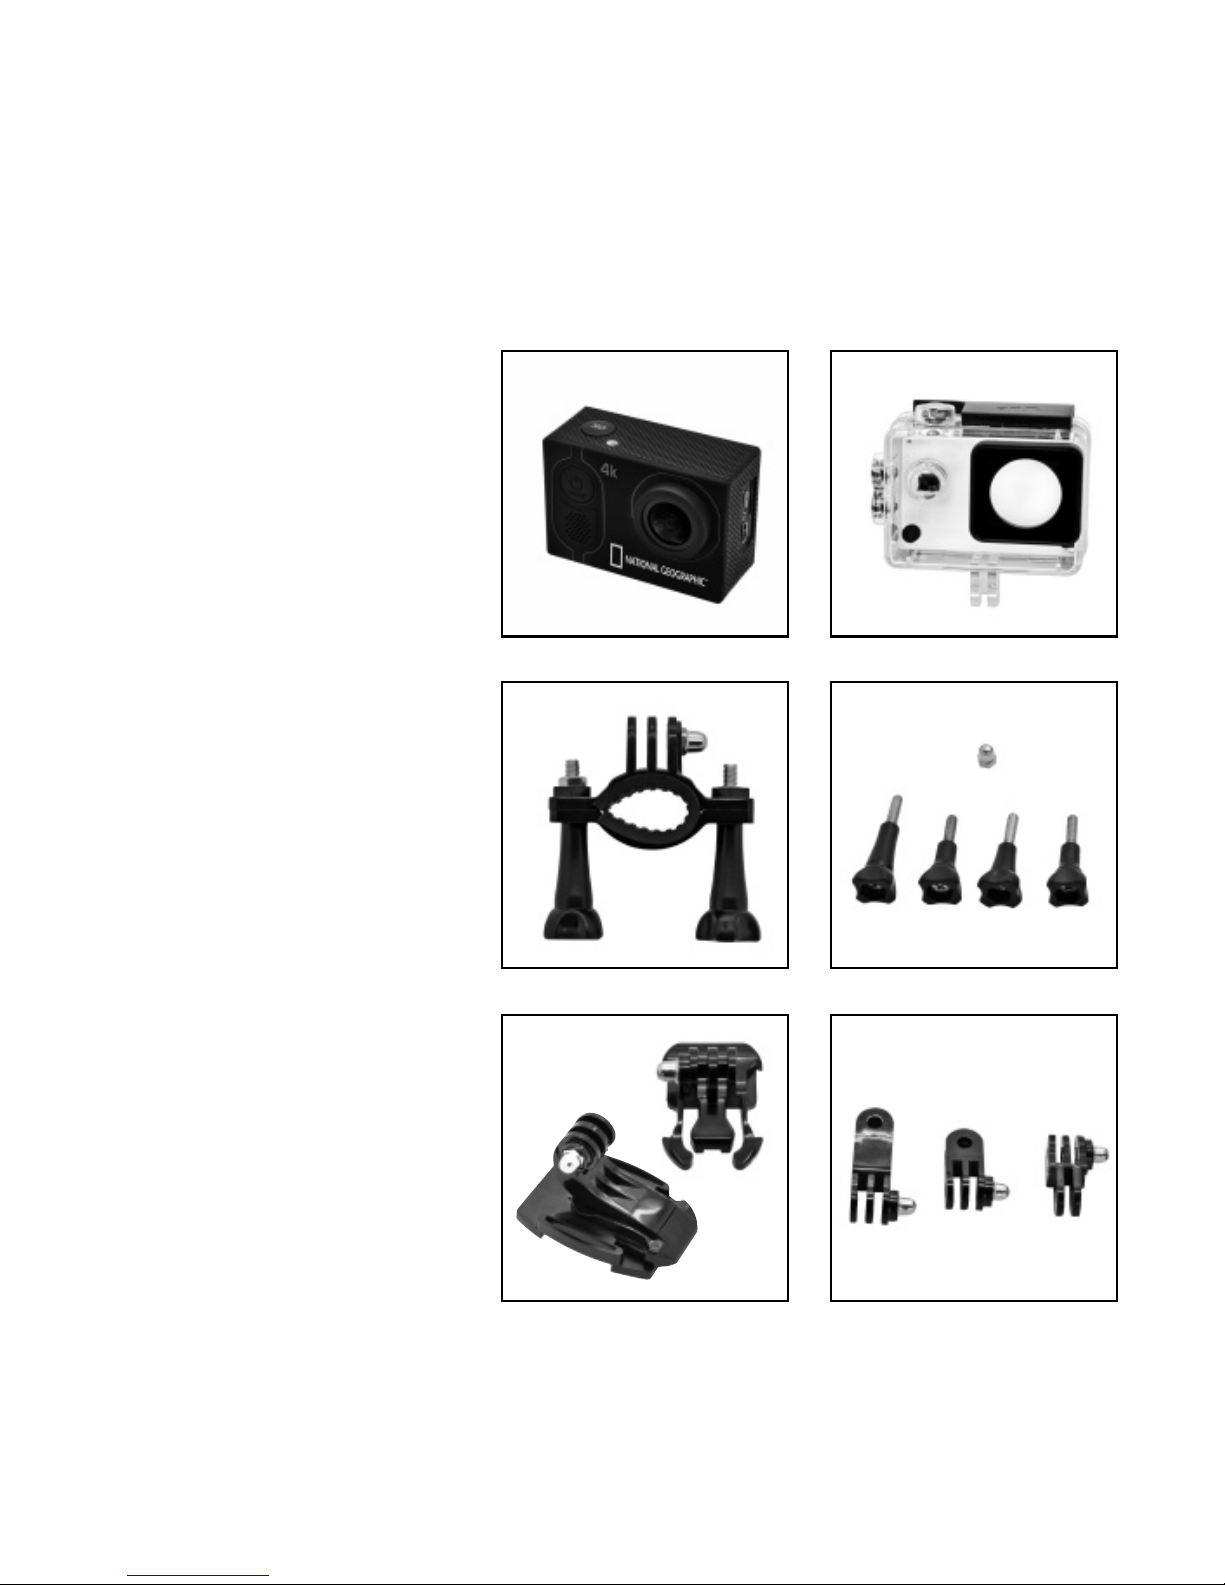
Volumen de suministro
b
Cámara
c
Carcasa sumergible
d
Soporte de bicicleta
E Tornillos y tuercas para
la fijación del soporte
F Base de la montura
G
Montura multifunción
2x 90° (a+b) y
1x recta (c)
H
Carcasa de la cámara
y clip para el cinturón
I
Adaptador de trípode de
1/4” (macho/hembra)
J
Base para superficies
planas y curvadas
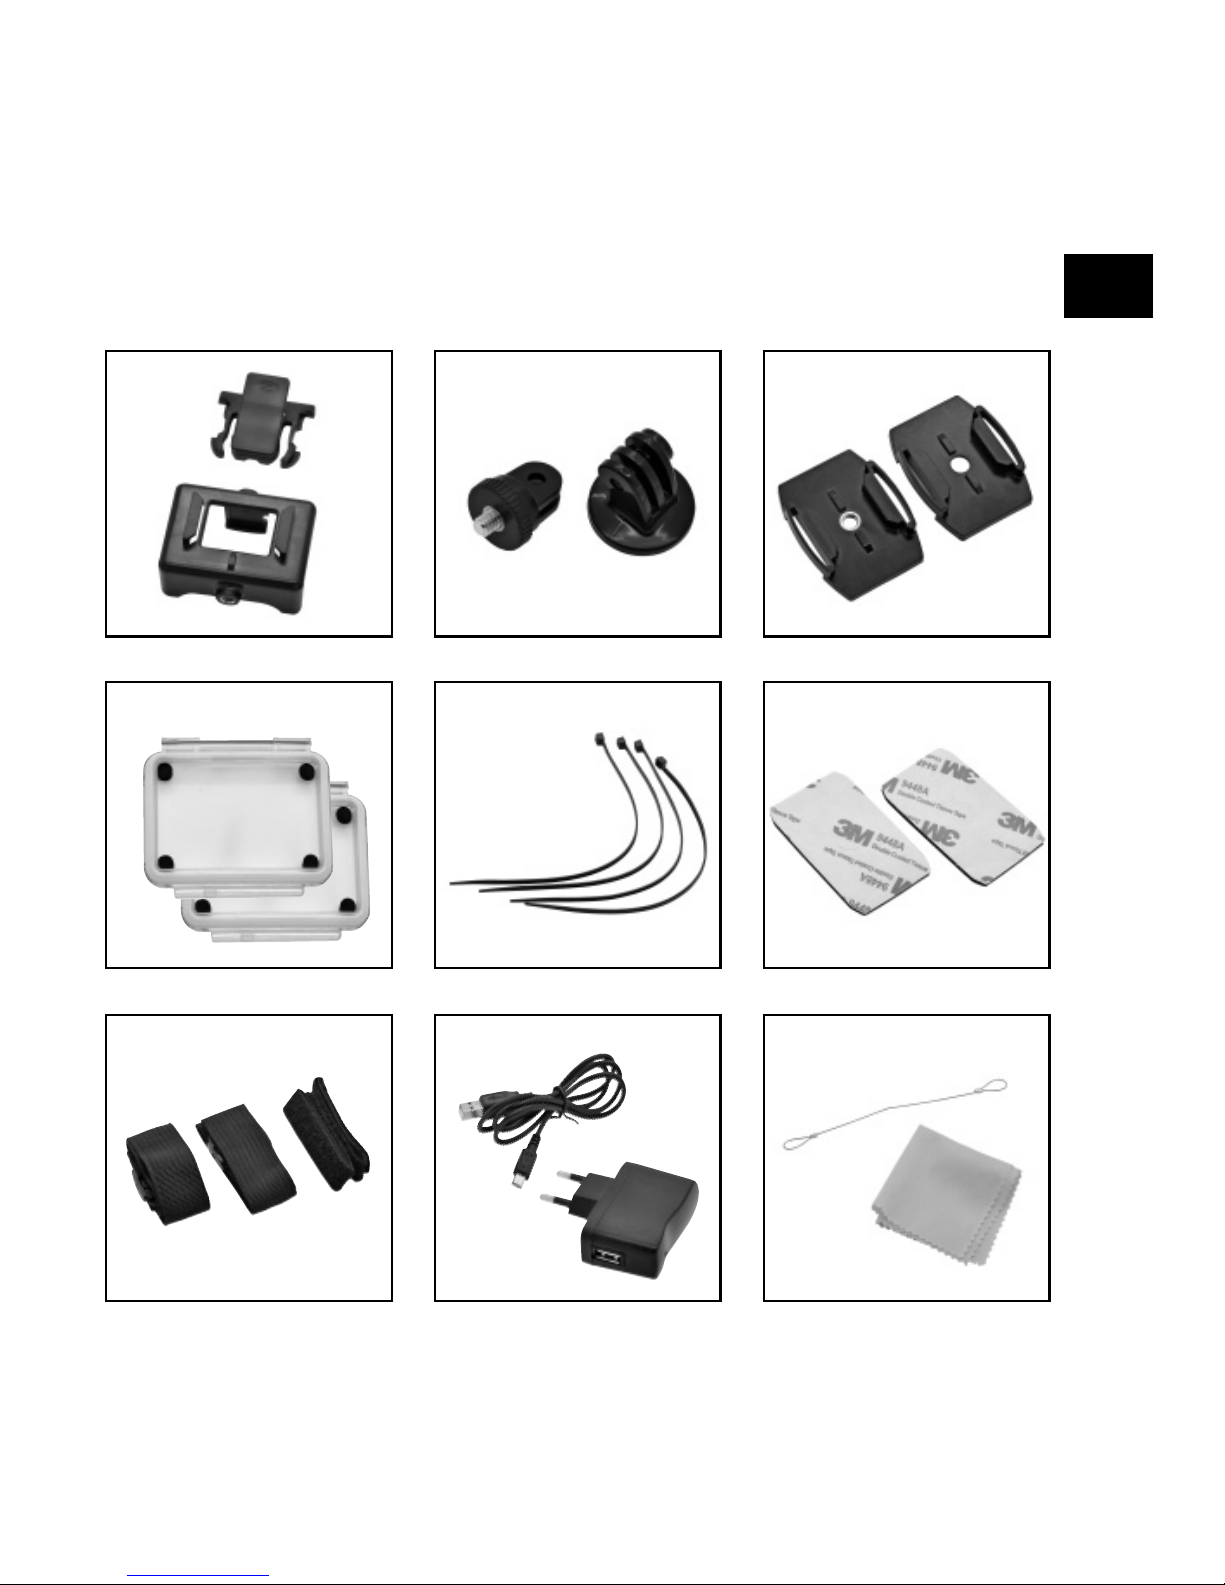
1)
Puertas traseras
1!
Bridas
1@
Pegatinas 3M para la
base de la montura
1#
Correas
1$
Cable USB y Fuente
de alimentación
1%
Alambre y paño
de limpieza
Page 55
ES
H I
1!
J
1@
1$
1)
1# 1%
Page 56
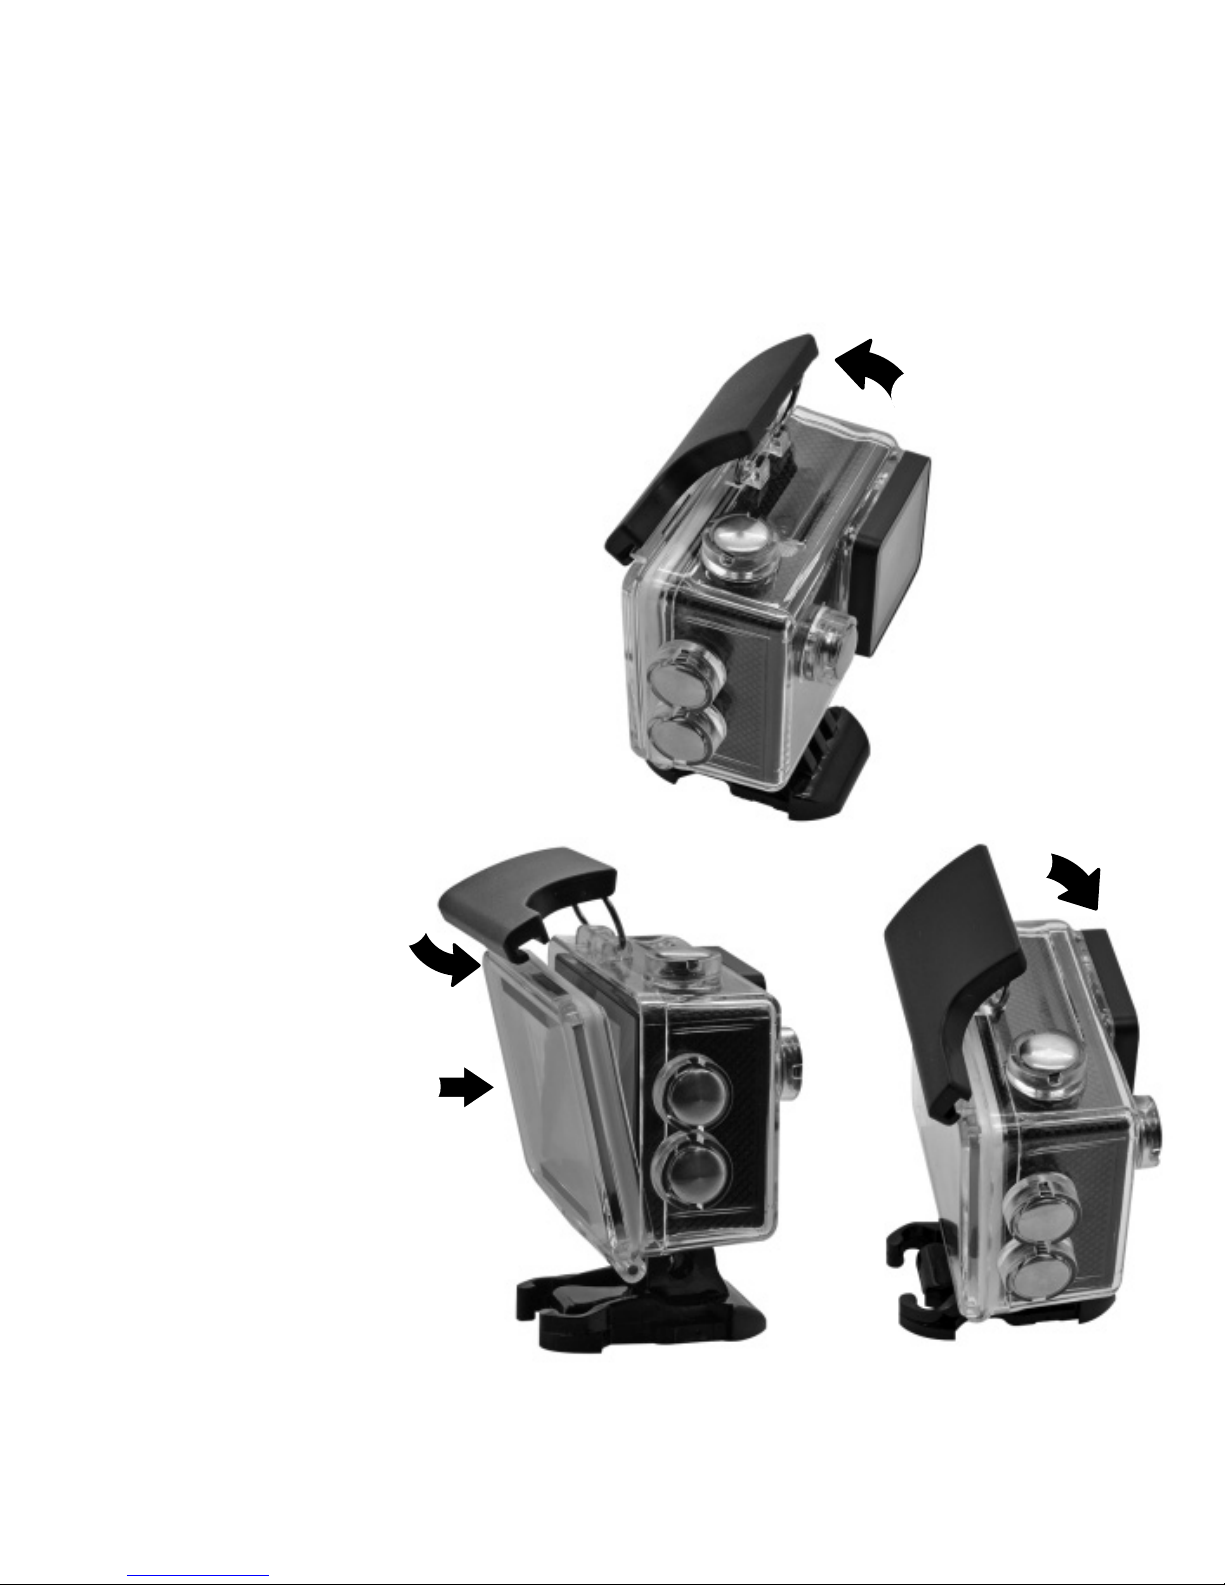
Como abrir y cerrar la carcasa sumergible
Como abrirla:
Presione la pinza hacia arriba,
para abrir la carcasa (1).
Como cerrarla:
Presione la puerta
trasera hacia abajo
(1) y luego encaje la
abrazadera en la
bisagra (2).
Ahora, simplemente
presione la abrazadera
hacia abajo (3) para
cerrar.
C
B
B
D
Page 57
ES
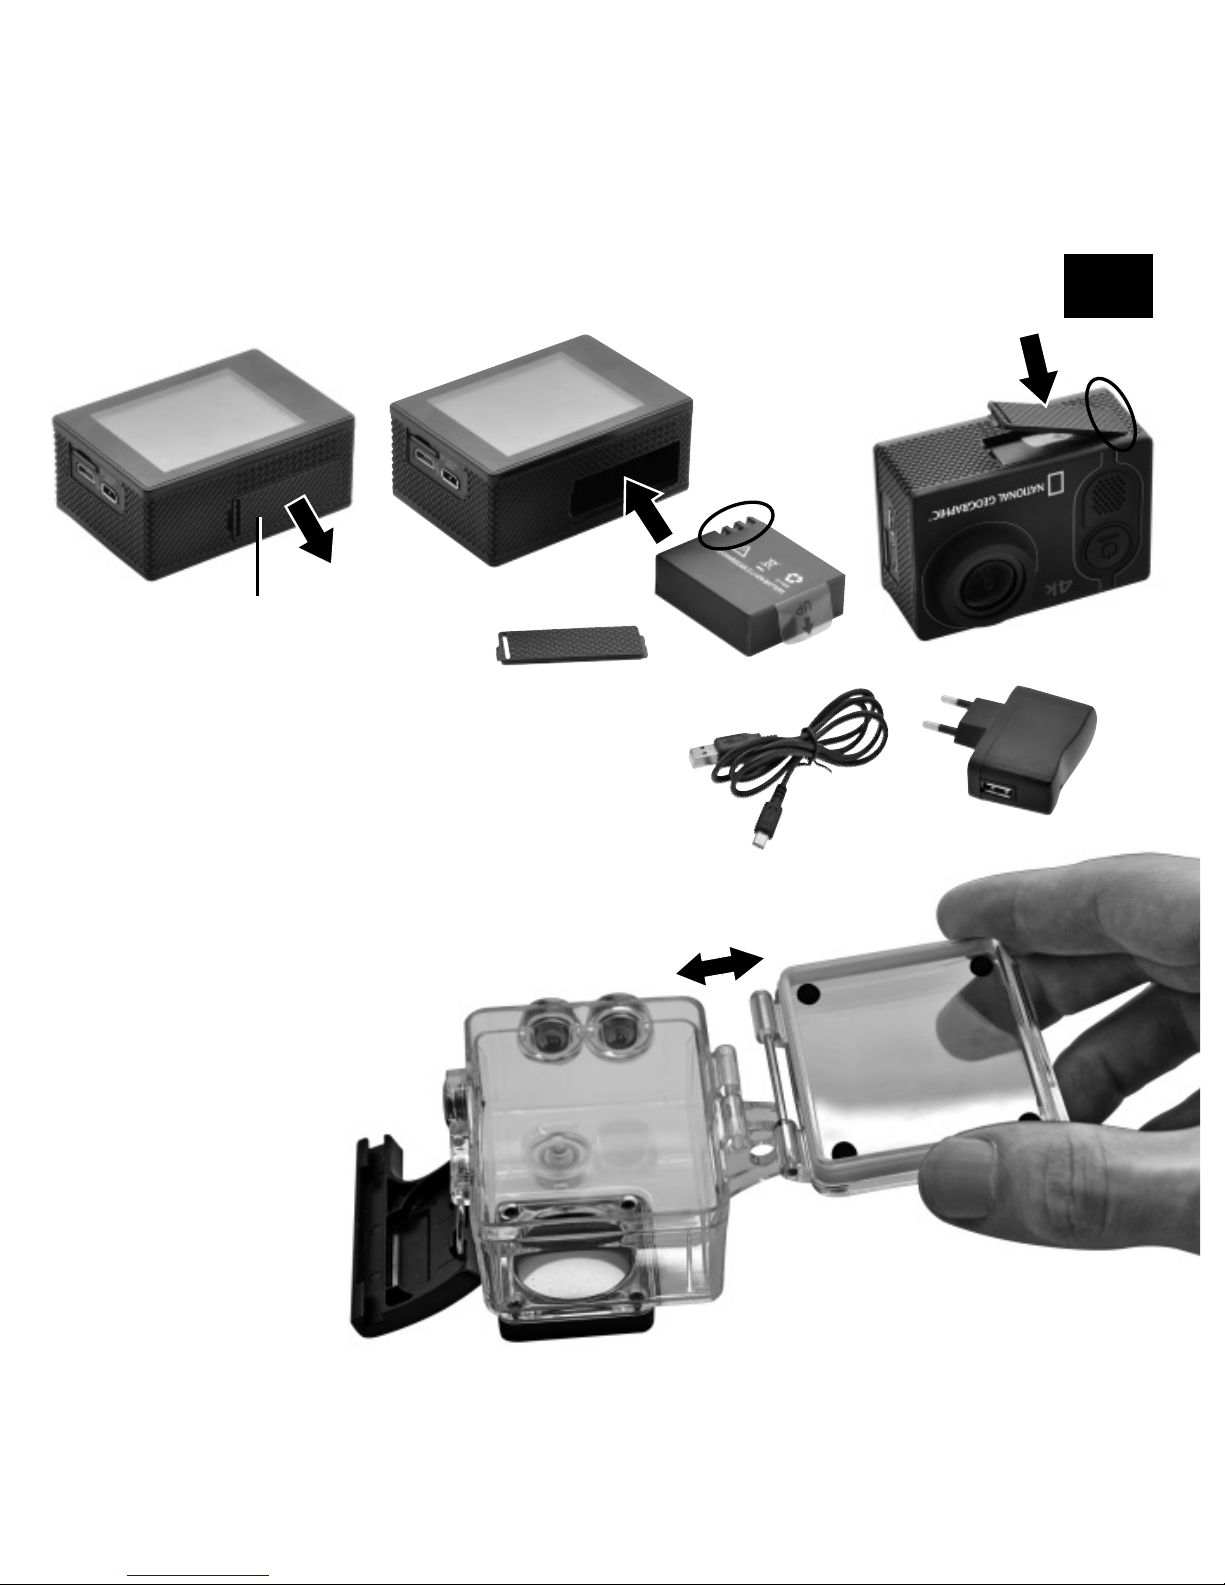
Como cambiar la batería
Sacar la tapa
trasera. Alinee la
nueva tapa trasera
con la bisagra y
presione hacia
abajo hasta que
encaje en su lugar.
Cargar con la Fuente de alimentación incluida
o a través del ordenador usando el cable USB.
Tapa de la batería
Como cambiar la tapa trasera
Page 58
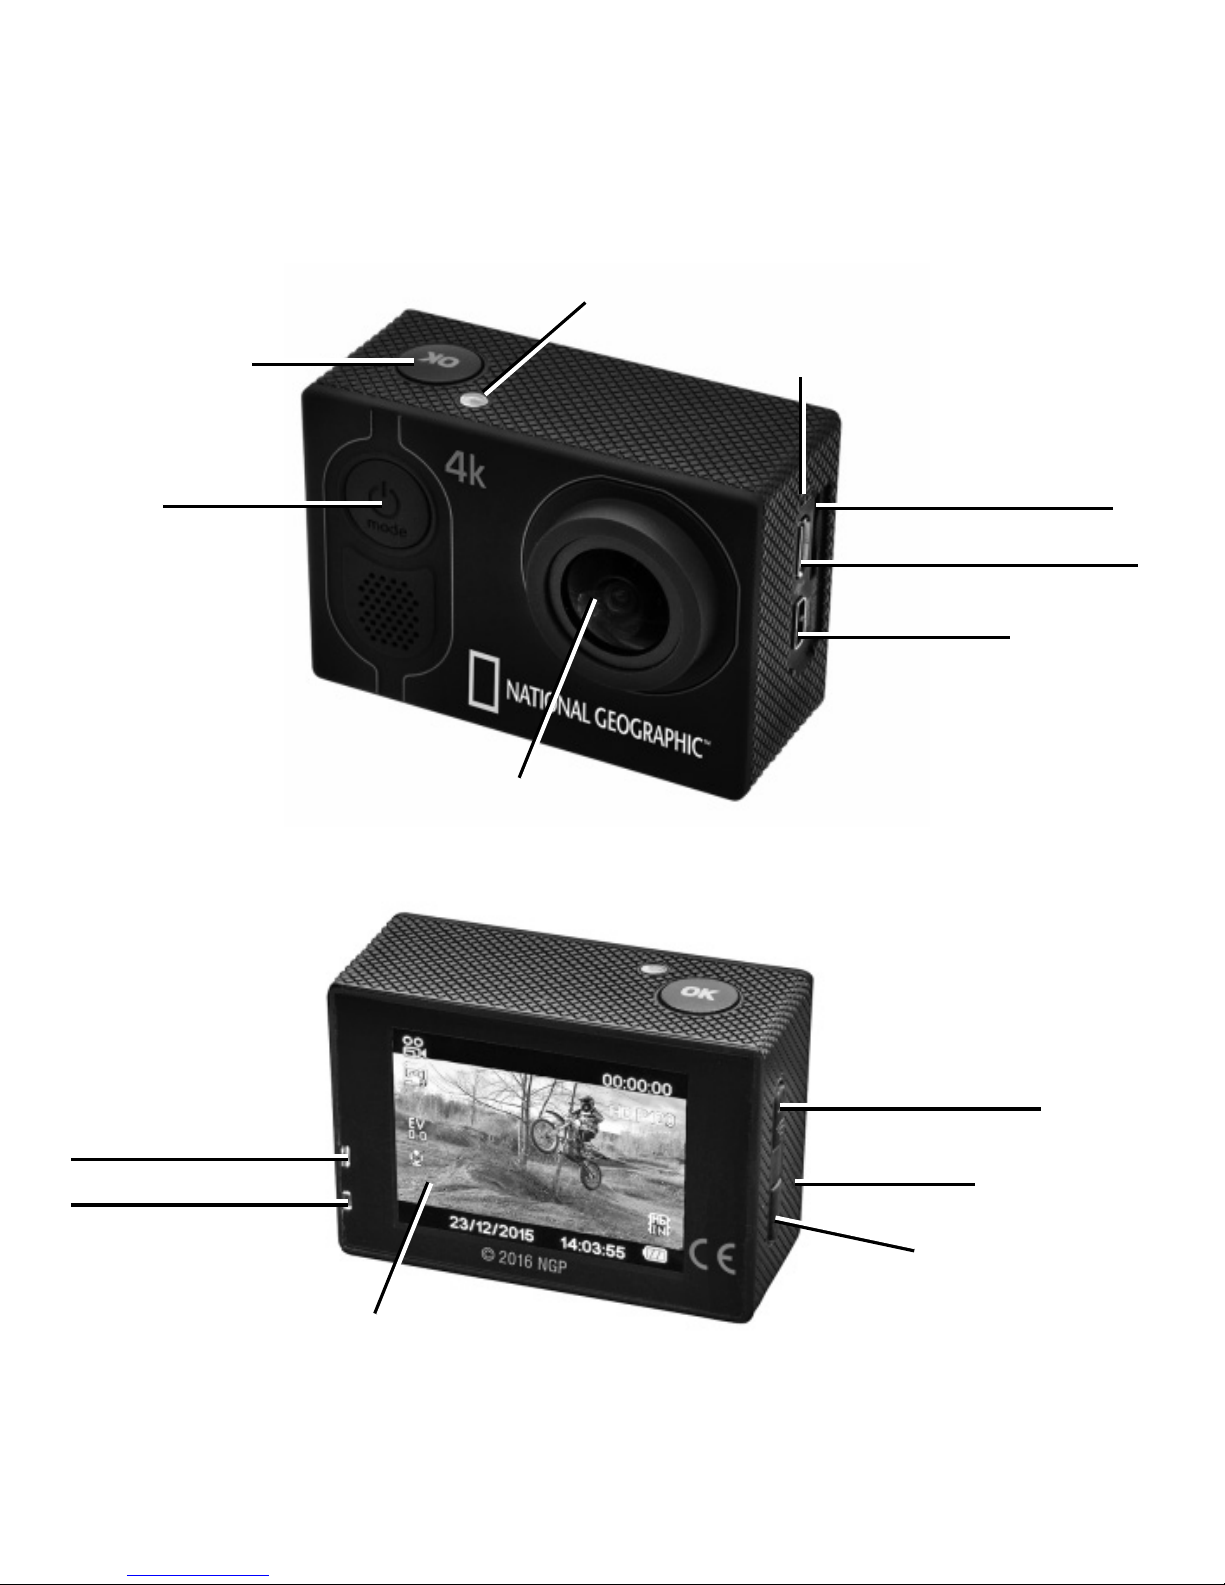
Funciones
ARRIBA
& Botón Wi-Fi
Altavoz
Pantalla TFT
ABAJO
OK
Indicador
Interruptor ON/OFF
& MODE
Micrófono
Lente
Indicador de
funcionamiento
Indicador de carga
Ranura de
tarjeta Micro SD/TF*
Puerto Micro USB 2.0
Micro HDMI
Page 59
ES
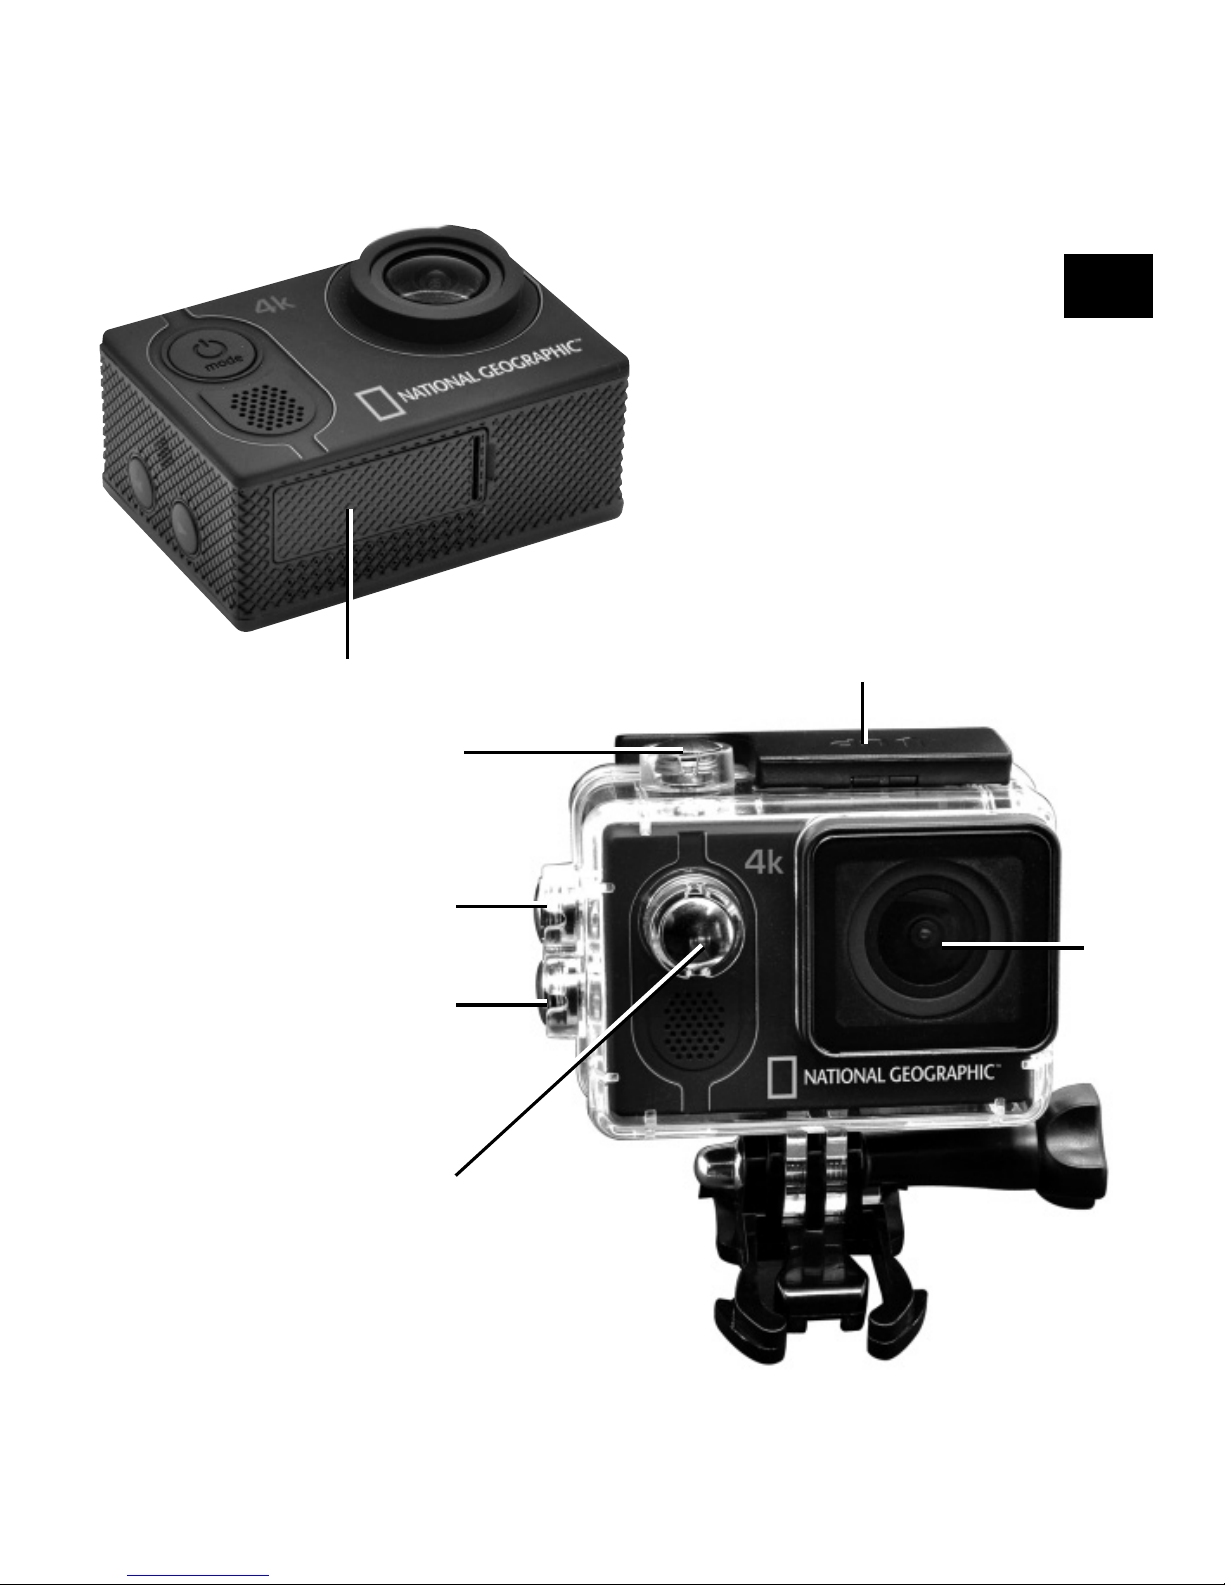
Tapa de la batería
OK
Interruptor para abrir
la carcasa sumergible
ARRIBA
& Botón Wi-Fi
ABAJO
Lente
Interruptor ON/OFF
& MODE
Page 60
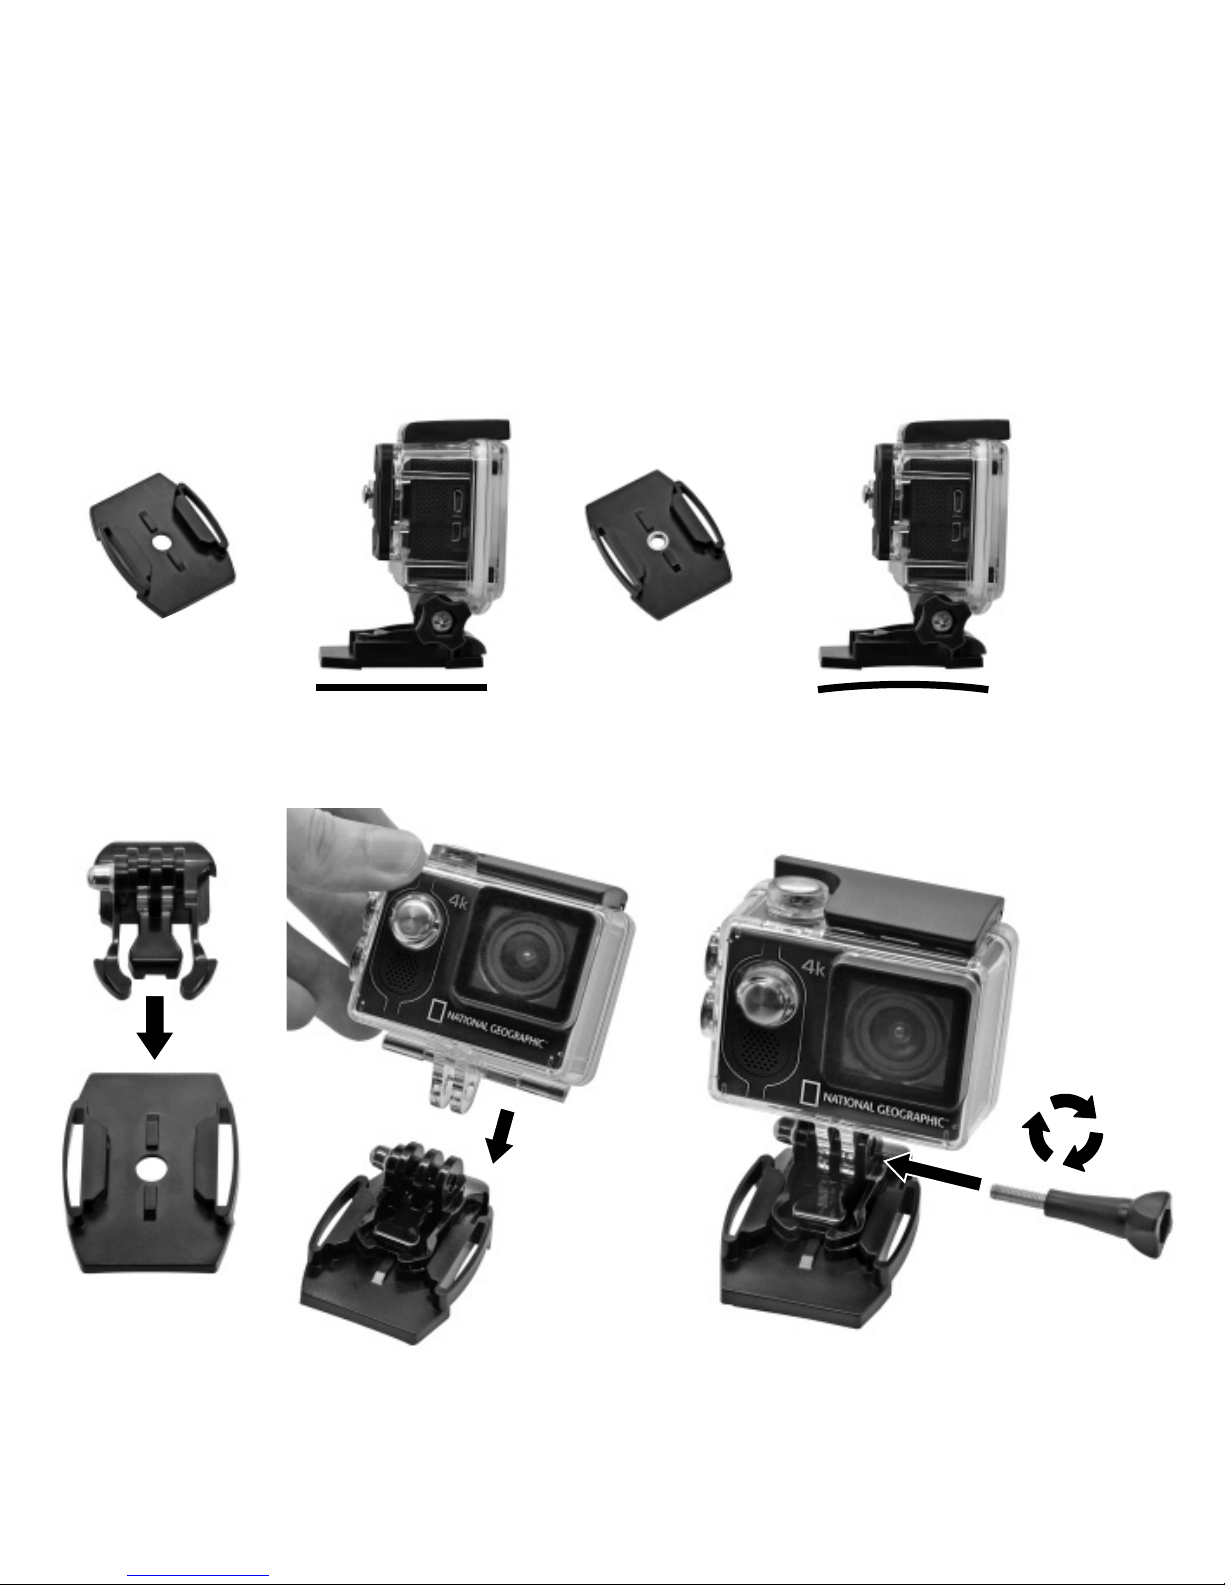
Montaje de la cámara
=
Montaje en una superficie plana o curva:
Elija la base plana o curva dependiendo de la superficie.
=
Instalación en una base plana:
Page 61
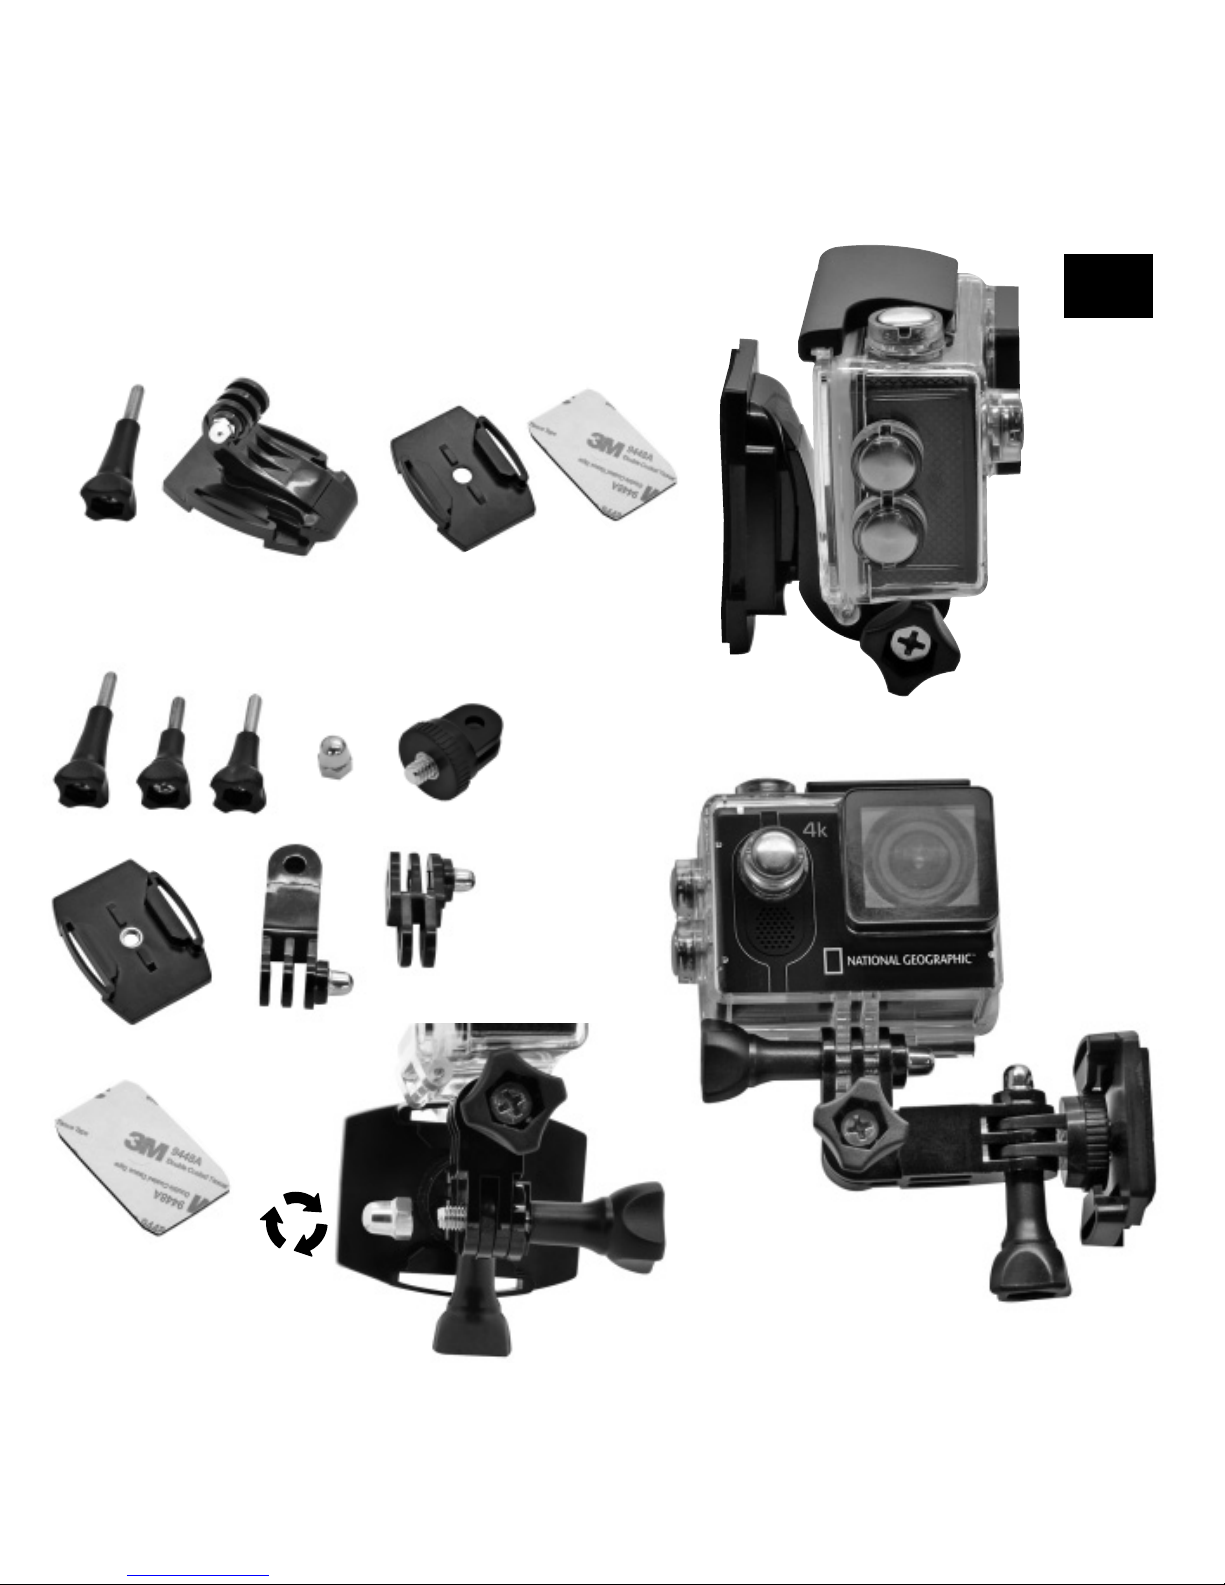
ES
Montaje vertical:
Montaje lateral:
Page 62
E
D
b
/
c
EG
a
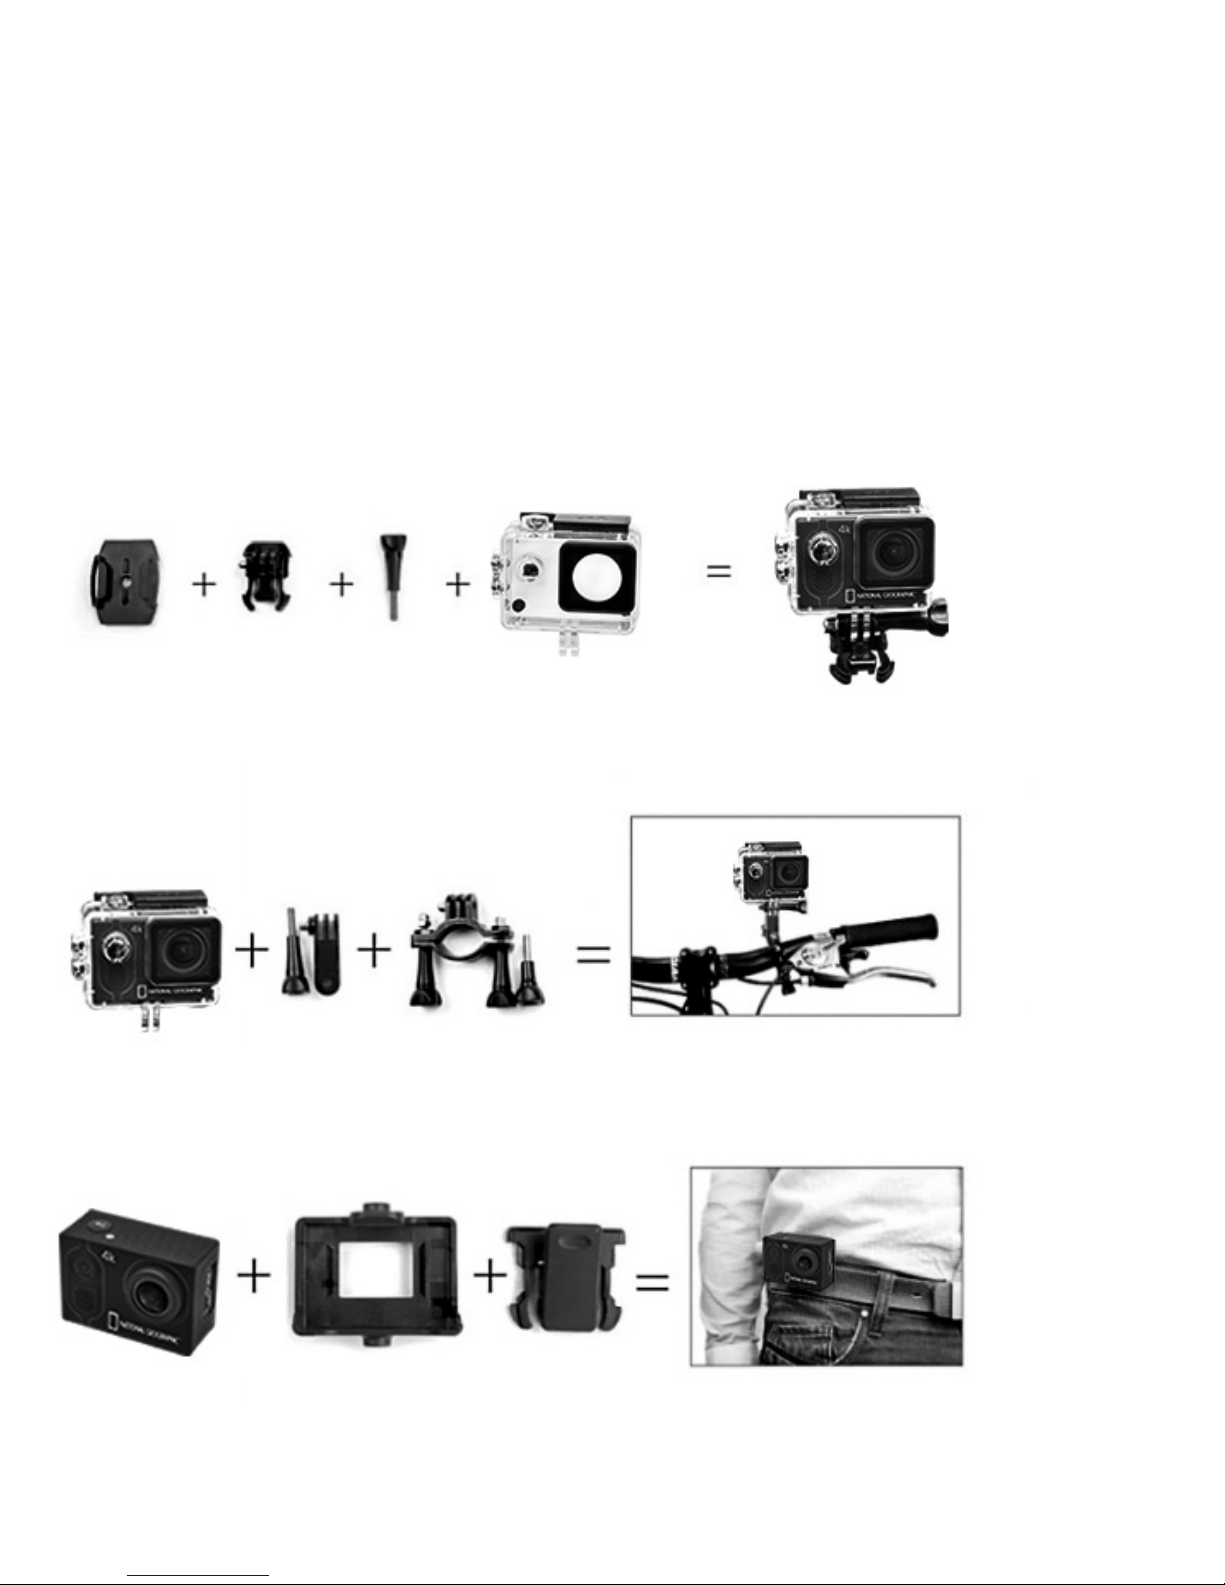
Ejemplos de montaje:
Montaje de la base:
Ajustar la montura de la base (5) en la base (9). Utilice la base plana o la curva,
dependiendo de la superficie. Ahora utilice los tornillo (4) para montarla junto la
carcasa impermeable (2).
Montaje para bicicleta:
Fije la carcasa impermeable con la cámara (1/2) en la montura multifunción 6a.
Ahora fije la montura de bicicleta (3) a la montura multifunción 6a y luego fíjela al manillar.
Apriete firmemente los tornillos (4).
hb
Montaje para el cinturón:
Coloque la cámara (1) en la carcasa y luego conecte el clip para el cinturón a la
carcasa. Fije el clip al cinturón.
E
c
FJ
Page 63
ES
1@
b
J
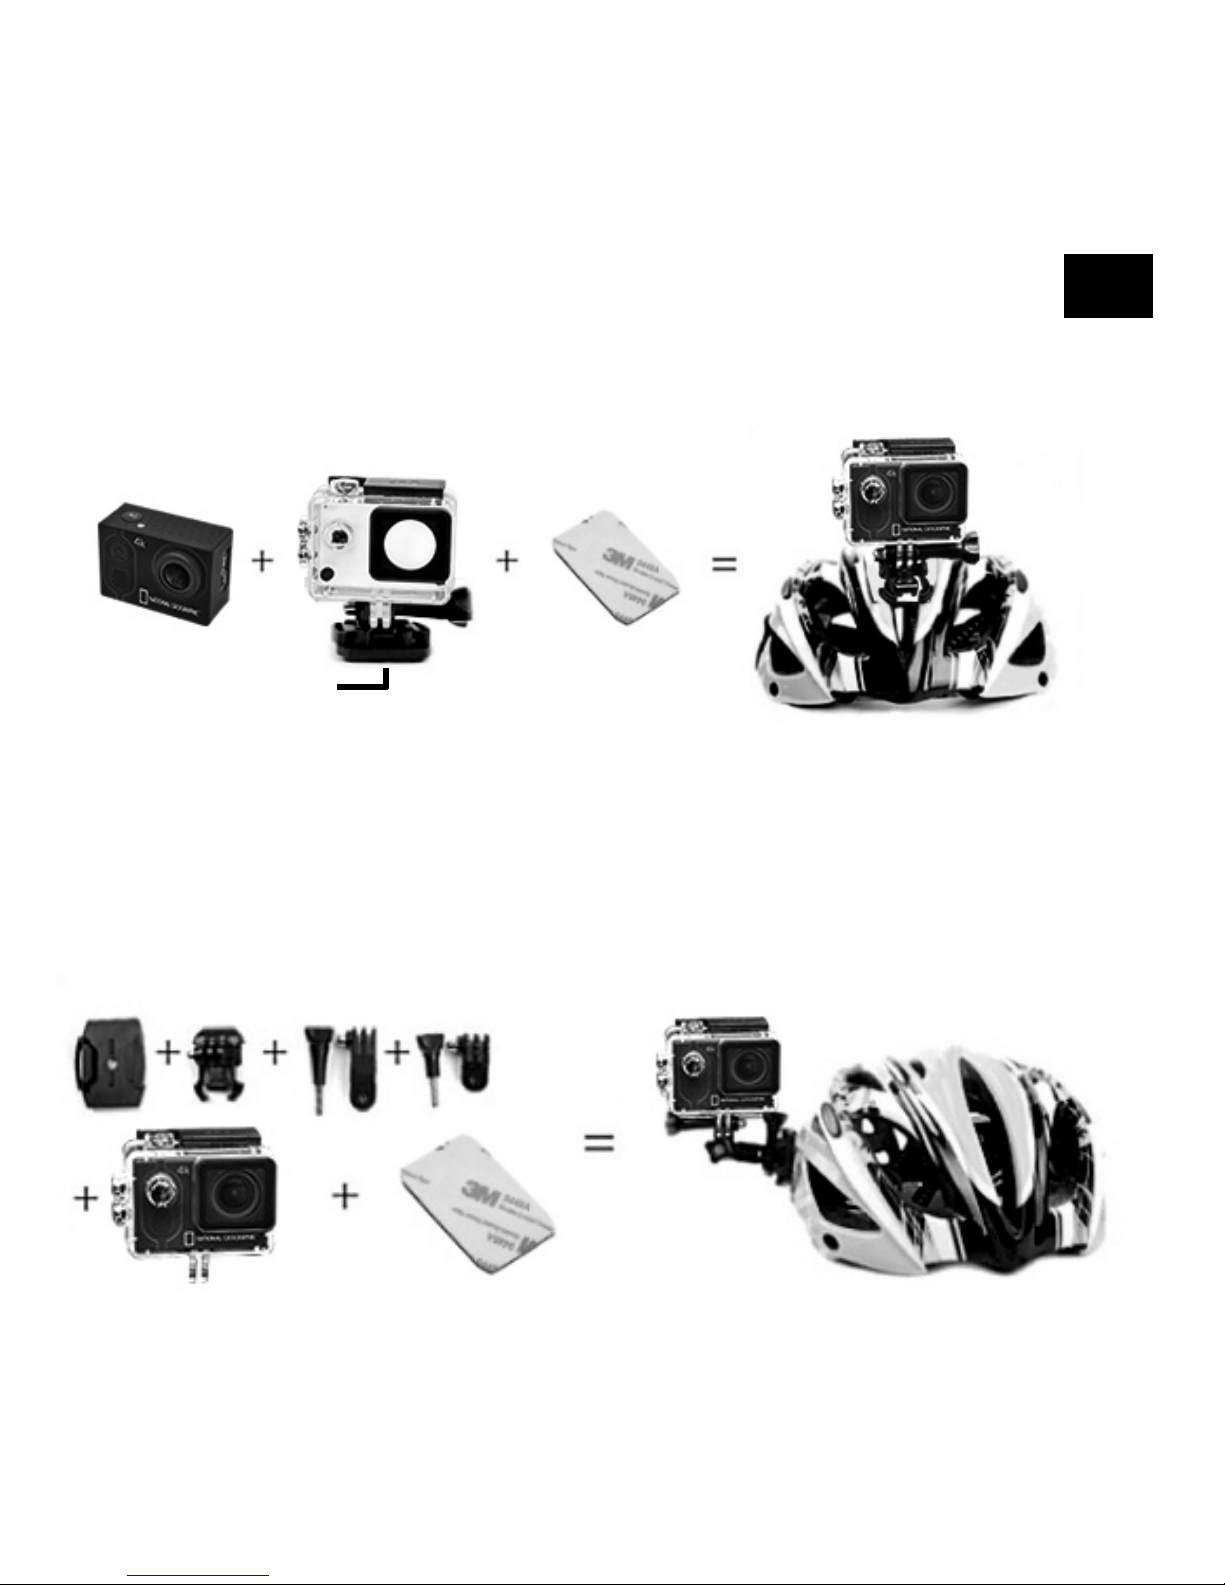
Montaje para el casco (Montaje vertical):
Ponga la etiqueta adhesiva 3M (12) en la base (9) y coloque la base de la
montura en el casco.
Montaje para el casco (Montaje lateral):
Coloque la montura multifunción 6a en la montura multifunción 6b y luego monte la base
(9/5) en la montura multifunción 6a. Finalmente coloque la carcasa impermeable con la
cámara en el 6b. Ponga la etiqueta adhesiva 3M (12) en la base (9) y colóquela en el casco.
E
F
JG
a
EG
b
1@
Page 64

Características del producto
• Una carcasa resistente al agua que le permite filmar fascinantes deportes acuáticos:
Resistente al agua hasta una profundidad de 30 metros.
• Pantalla de alta definición que muestra y reproduce los fascinantes videos grabados.
• Batería desmontable que es fácil de reemplazar y prolonga la vida útil de su cámara.
• Grabación de video usando la batería o grabación de video mientras está cargando.
• 12 mega pixel (HD) lente de gran angular.
• Salida HDMI HD.
• Soporta tarjetas de memoria Micro SD/TF* hasta un máximo de 32 GB.
Funcionamiento
1. Inserte la tarjeta Micro SD*
Nota: Para un mejor rendimiento, elija la marca de tarjetas Micro SD y formatéela en su
equipo antes de usarla. No está garantizado el perfecto funcionamiento de tarjetas de
otras marcas.
2. Instalar o quitar la batería
A. Presione la tapa de la batería para abrirla.
B. Instale correctamente la batería en la cámara.
C. Quitar la batería: simplemente abra la tapa de la batería para sacar la batería.
3. Carga
A. Puede cargarse con la fuente de alimentación o conectando la cámara al ordenador
a través de cable usb.
B. La cámara puede grabar videos mientras está cargando.
C. Se puede cargar la cámara incluso cuando está apagada.
* Tarjeta Micro SD no incluida
Page 65
ES
4. Encender y apagar la cámara
Presione y mantenga presionado el botón [
] entre 3 y 5 segundos para
encender o apagar la cámara.
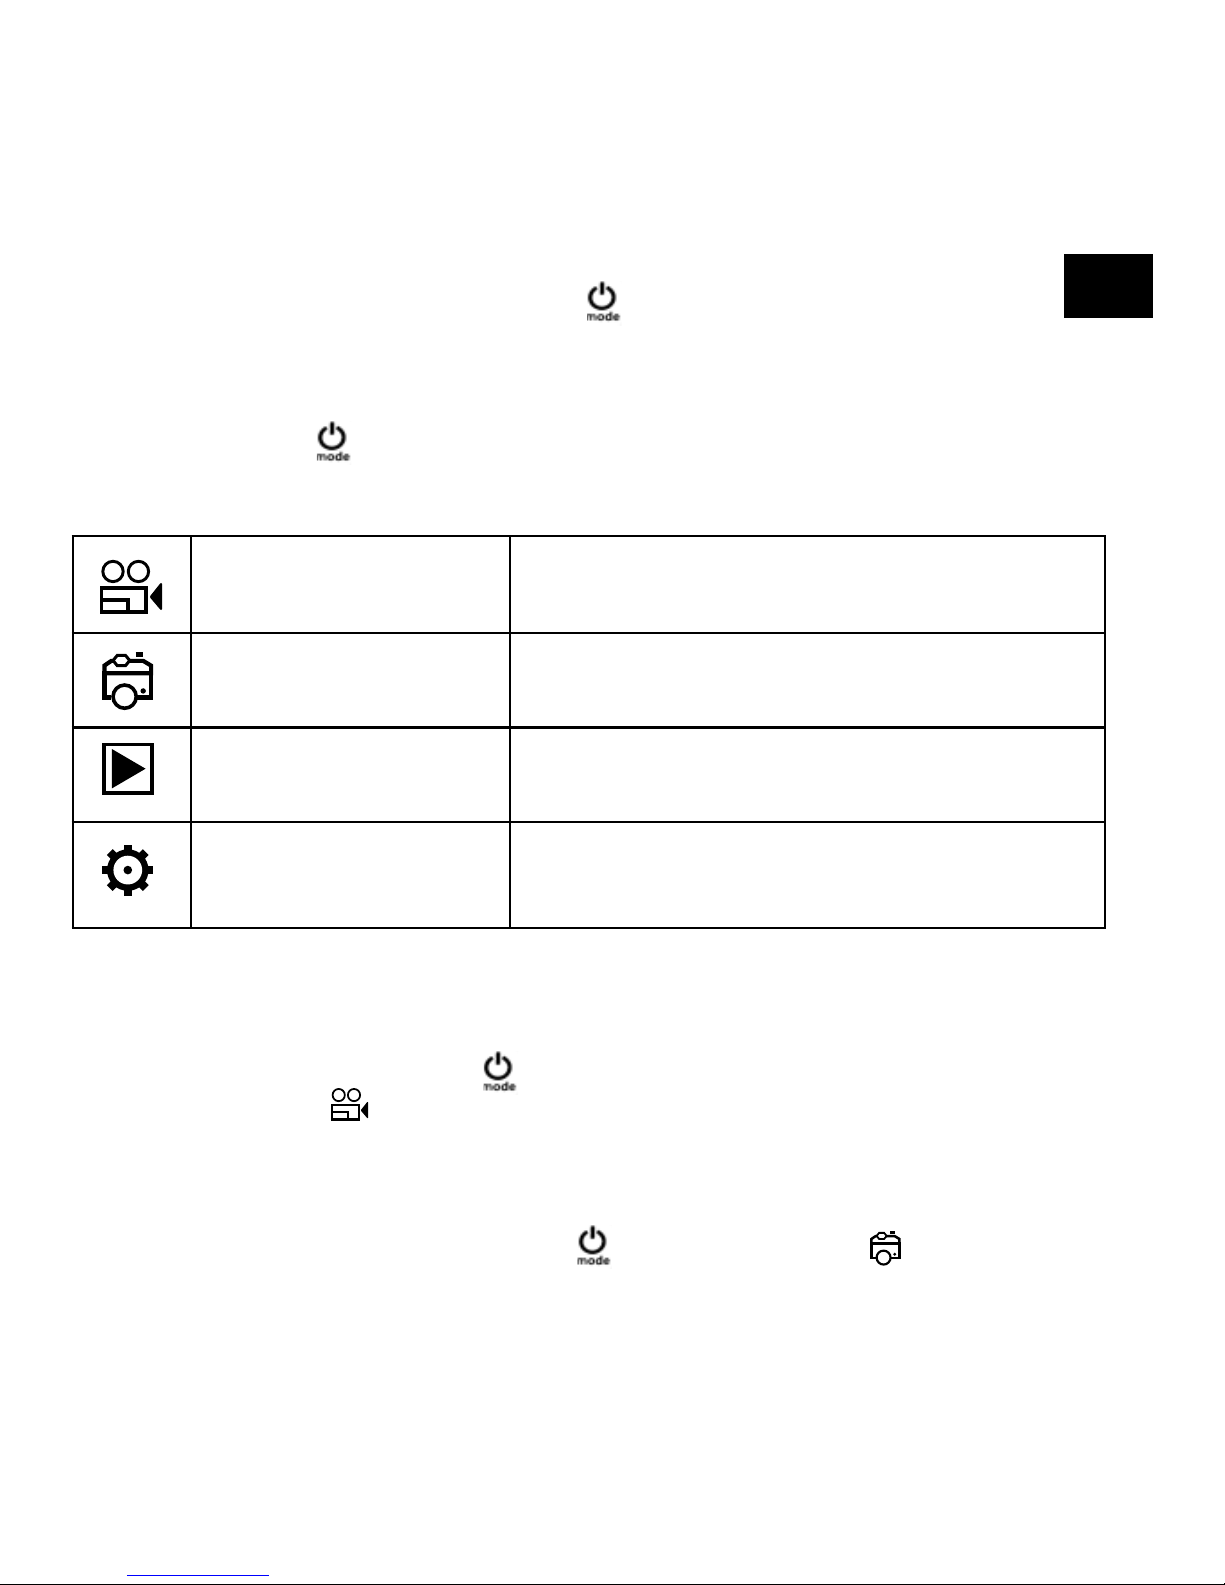
5.1 Cambio de modo
Presiones el botón [
] varias veces para recorrer los modos de la cámara.
Modo de Cámara
Descripción
Modo de grabación
de video
Grabacción vídeo
Modo de fotografía
Disparo individual, Temporizador, Ráfaga
(Burst mode
Modo de reproducción
Reproduzca el contenido en la pantalla TFT o
en un televisor mediante un cable HDMI.
Ajustes Ajuste de la configuración de la cámara
6. Como grabar videos y configurar los ajustes de grabación
6.1. Grabación de video
Encienda la cámara presionando [
]. Comience con el modo de grabación de video.
Se mostrará el icono en la parte superior izquierda. Inserte la tarjeta SD y empiece a
grabar presionando “OK”. Presione otra vez “OK” si quiere para la grabación.
6.2. Fotografías & Ajustes
Cambie el modo de disparo presionando [
]. Aparecerá el icono en la esquina
superior izquierda. Presione ”OK” para tomar las fotos.
Page 66
6.3. Almacenamiento de archivo & Reproducción
Después de que haya terminado la grabación utilice un cable USB para exportar los vídeos
a un ordenador y reproducirlos. También puede usar la tarjeta Micro SD y acceder a las
imágenes con un lector de tarjetas.
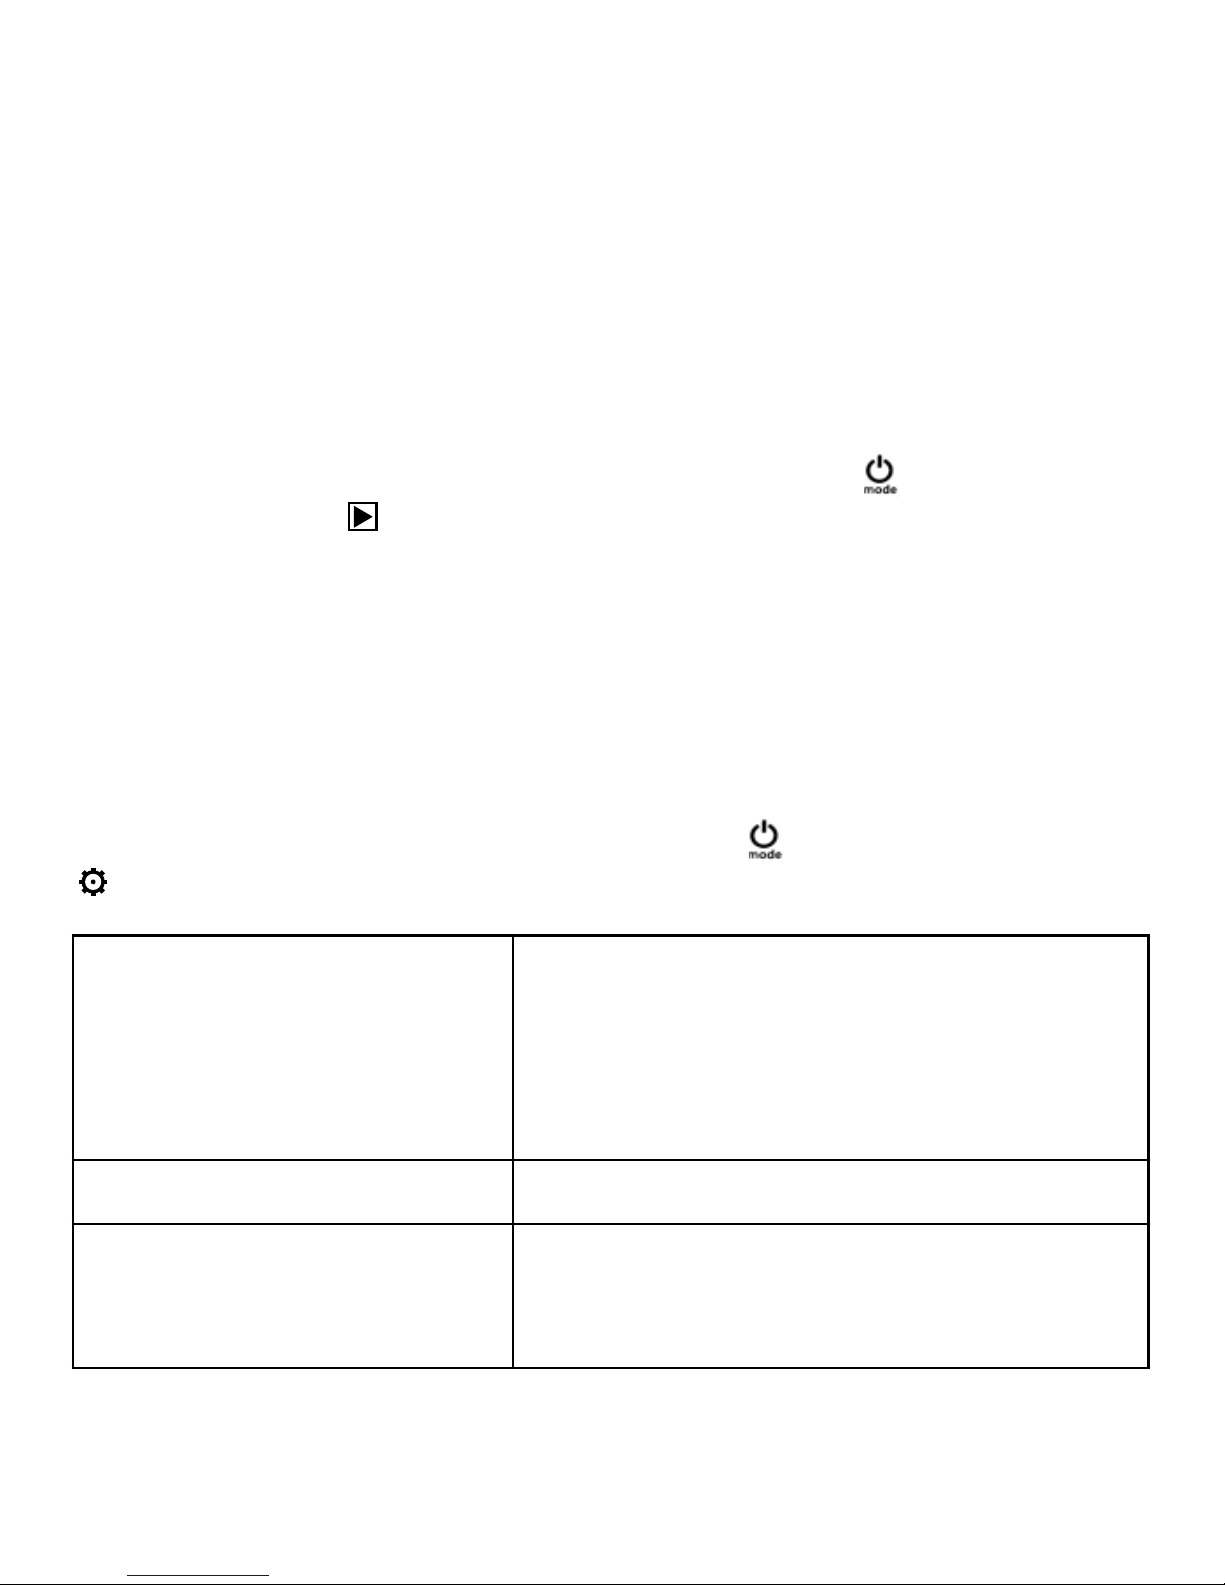
7. Modo Reproducción
Para entrar o salir del modo de Reproducción, presionar el botón [
] varias veces hasta
que aparezca el icono . Use los botones UP / DOWN para ver sus fotos y vídeos.
8. Modo Wi-Fi/ App Cámara
Primero descargue una App gratuita para cámaras deportivas , por ejemplo „iCam“. Presionar el botón „UP / Wi-Fi button“ para conectar el Wi-Fi. Conectar la cámara (Buscar red
llamada p.e. „4K Sports DV“) con su dispositivo WIFI usando la contraseña: „12345678“.
Ahora comenzar con la App elegida para su cámara deportiva.
Modo de configuración
Para acceder a la configuración, presionar varias veces [ ] hasta que puedas ver el icono
para los ajustes. Ahora presiona “OK” para abrir el menu.
Resolución 4K (24fps), 2K (30fps), 1080p (60fps),
1080p (30fps), 720p (120fps),
720p (60fps), 720p (30fps),
WVGA (30fps), VGA (24fps),
VGA (30fps), QVGA (30fps)
Grabación continua Apagado / 3 Min / 5 Min / 10 Min
Lapso de tiempo Apagado / 1 Seg. / 2 Segundos /
5 Segundos / 10 Segundos /
30 Segundos / 1 Min
Page 67
ES
HDR Apagado / Encendido
Audio de registro Apagado / Encendido
Slow Motion (Camara lenta) Apagado / 720p (120fps) / VGA (24fps)
Impresión Fecha Apagado / Encendido
Detección de movimiento Apagado / Encendido
Gyro RSC Apagado / Encendido
Tam. Imág. 16 MP - 4608x3456,
14 MP - 4320x3240,
12 MP - 4032x3024,
10 MP - 3648x2736,
8 MP - 3264x2448,
5 MP - 2592x1944,
3 MP - 2048x1536,
VGA - 640x480
continuo (Burst mode) Apagado / 3 continuo / 5 continuo /
10 continuo
Modo grabación único / 2s contador de tiempo / 5s /
10s / 20s
Calidad Alta / Normal / Económ.
Defi nición Alta / Normal / Encendido
Page 68
Estabilización Apagado / Encendido
Exposición +2/3, +1/3, +0.0, -1/3, -2/3, -1.0, -4/3,
-5/3, -2.0
Balance Blanco Auto / Sol / Nubes / Tungsteno / Fluoro
Color Farbe / B/N / Sepia
ISO Auto / 100 / 200 / 400
Borrar Suprime el actual / Borrar todo
Proteger Trabe el actual / Abra el actual / Blog.
Todo / Desblog. Todo
Fecha/Hora Confi gurar fecha y hora actuales (confi rmar
con el botón "MODE")
Desconexión Automática 5 Min / 10 Min
Sonido Bip Apagado / Encendido
Idioma Elección de idioma OSD
Frecuencia 50 Hz / 60 Hz
Modo de la TV NTSC / PAL
TV out Apagado / Encendido
Page 69
ES
Screensavers Apagado / 30 Seg. / 1 Min / 3 Min
5 Min
Car Mode Apagado / Encendido
Field of view Wide / Medium / Narrow
Fisheye adjust Apagado / Encendido
Aqua mode Apagado / Encendido
WiFi Apagado / Encendido
WiFi SSID Set WiFi Name (Standard: 4K Sports DV)
WiFi Password Set WiFi Password (Standard: 12345678)
ajuste del número de placa Set con el botón "Mode"
Formato Memoria Interna -> Todos los datos de
la Memoria Interna se borrarán, Tarjeta
SD -> Todos los datos de la tarjeta SD se
borrarán
Confi guración por defecto Resetee el sistema para volver a los ajun-
tes predeterminados
Versión Ver la versión actual del fi rmware
Page 70
Datos técnicos
Pantalla TFT Pantalla de 2 pulgadas (5.08 cm)
Lente 170° gran angular
Carcasa sumergible Sumergible hasta 30 m
Opciones de idioma Deutsch, English, Español, Français,
Italiano, Português, русский, Chinese,
Japanese
Resolución de las fotos 16 MP (4608×3456), 14 MP (4320×3240)
12 MP (4032x3024), 10 MP (3648x2736),
8 MP (3264x2448), 5 MP (2592x1944),
3 MP (2048x1536), VGA (640x480)
Resolución de los videos 4k (3840x2160) (24 fps),
2k (2560x1440) (30 fps),
1920x1080 (60 fps),
1280x720 (60 fps)
Formato de video MOV
Formato de compresión de
videos
H.264
Almacenaje Tarjeta Micro SD hasta 32 GB
(no incluida)
Page 71
ES
Modo de disparo Single shot / Self-timer (2s/5s/10s) /
Disparo continuo
Frecuencia 50Hz/60Hz
Interfaz USB USB 2.0
Fuente de alimentación 3.7 V
Capacidad de la batería 1050 mAh
Disipación de potencia 1050 mAh @ 3.7 V
Tiempo de grabación About 70 minutes (at 1080p)
Tiempo de carga About 3 hours
Sistema Operativo (OS) Window XP / Vista / Win 7 / Mac OS X
Dimensiones 59.3x41.1x24.6 mm
Peso 60 g
Nota: las especificaciones podrán ser objeto de modificación debido a mejoras o
actualizaciones. Por favor, considere el producto actual como la forma estándar.
Page 72

Garantía y prolongación del período de garantía
El período de garantía asciende a 2 años a partir del día de la compra. Por favor,
conserve el ticket de compra como justifi cante. Para poder disfrutar de un período de
garantía prolongado voluntariamente a 5 años, sólo tiene que registrarse en Internet
y rellenar un breve cuestionario.
Puede realizar el registro en www.bresser.de/warranty. Para hacer uso de la
garantía es necesario realizar este registro dentro del plazo de 3 meses después
de la compra (para ello se utiliza como referencia el justifi cante de compra). Si la
inscripción se realiza con posterioridad a dicha fecha, esto supone la pérdida de su
derecho a la prolongación de la garantía.
Si tiene problemas con el producto, póngase en contacto con nuestro servicio al
cliente primero - por favor no envíe ningún producto sin consulta previa por teléfono.
Muchos problemas se pueden resolver por teléfono. Si el problema se produjo
después de que el periodo de garantía ha terminado, o no está cubierto por los
términos de nuestra garantía, recibirá una presupuesto por nuestra parte de forma
gratuita del coste de reparación.
Servicio al cliente: +49 (0) 2872 - 80 74-210
Page 73

ES
Importante para cualquier devolución:
Asegúrese de devolver el producto cuidadosamente empaquetado en el embalaje original para evitar daños durante el transporte. Por favor adjuntar el recibo
de caja (o una copia) y una descripción del defecto. Esta garantía no implica
ninguna restricción de sus derechos legales.
Su tienda especializada: ................... Art. No.: .........................................
Descripción del error: .....................................................................................
....................................................................................................................
....................................................................................................................
....................................................................................................................
Nombre: ........................................
Calle: .............................................
Código postal/Ciudad: .....................
Teléfono: ........................................
Fecha de compra: ...........................
Firma: ............................................
Page 74

Page 75

Page 76

ANL9683002MSP0316NG
Bresser GmbH
Gutenbergstr. 2
DE-46414 Rhede
www.bresser.de · [email protected]
© 2016 National Geographic Partners LLC.
All rights reserved. NATIONAL GEOGRAPHIC and
Yellow Border Design are trademarks of the
National Geographic Society, used under license.
Irrtümer und technische Änderungen vorbehalten.
Errors and technical changes reserved.
Visit our website: www.nationalgeographic.com
 Loading...