

Page 1
40x-640x Mikroskop / Microscope
Art. No. 88-51300
DE
Bedienungsanleitung
GB
Operating Instructions
FR
Mode d’emploi
NL
Handleiding
IT
Istruzioni per l’uso
ES
Instrucciones de uso
RU
Руководство по эксплуатации
CZ
Návod k obsluze
Page 2

DE
Bedienungsanleitung .................................................4
GB
Operating Instructions .............................................10
FR
Mode d’emploi ..........................................................16
NL
Handleiding .............................................................. 22
IT
Istruzioni per l’uso ................................................... 28
ES
Instrucciones de uso ................................................34
RU
Руководство по эксплуатации ............................. 40
CZ
Návod k obsluze ...................................................... 45
Garantie & Service / Warranty & Service / Garantie et Service / Garantie et Service
Garantie & Service / Garanzia e assistenza / Garantía y servicio / Záruka & servis
Гарантия и обслуживание
....................................................... 50-51
Page 3
C
B
D
E
1#
F
1@
1$
J
G
1)
3x AA
I
1!
F
H
1@
1%
1^
Page 4

Allgemeine Warnhinweise
• ERSTICKUNGSGEFAHR!
Dieses Produkt beinhaltet Kleinteile, die von Kindern verschluckt
werden können! Es besteht ERSTICKUNGSGEFAHR!
• GEFAHR eines STROMSCHLAGS! Dieses Gerät beinhaltet
Elektronikteile, die über eine Stromquelle (Batterien) betrieben
werden. Lassen Sie Kinder beim Umgang mit dem Gerät nie
unbeaufsichtigt! Die Nutzung darf nur, wie in der Anleitung
beschrieben, erfolgen, andernfalls besteht GEFAHR eines
STROMSCHLAGS!
• BRAND-/EXPLOSIONSGEFAHR!
Setzen Sie das Gerät keinen hohen Temperaturen aus. Benutzen
Sie nur die empfohlenen Batterien. Gerät und Batterien nicht
kurzschließen oder ins Feuer werfen! Durch übermäßige Hitze und
unsachgemäße Handhabung können Kurzschlüsse, Brände und
sogar Explosionen ausgelöst werden!
• VERÄTZUNGSGEFAHR!
Batterien gehören nicht in Kinderhände! Achten Sie beim Einlegen
der Batterie auf die richtige Polung. Ausgelaufene oder beschädigte
Batterien verursachen Verätzungen, wenn Sie mit der Haut in
Berührung kommen. Benutzen Sie gegebenenfalls geeignete
Schutzhandschuhe.
• Bauen Sie das Gerät nicht auseinander! Wenden Sie sich im Falle
eines Defekts an Ihren Fachhändler. Er nimmt mit dem ServiceCenter Kontakt auf und kann das Gerät ggf. zwecks Reparatur
einschicken.
4
• Für die Arbeit mit diesem Gerät werden häufig scharfkantige und spitze
Hilfsmittel eingesetzt. Bewahren Sie deshalb dieses Gerät sowie alle
Zubehörteile und Hilfsmittel an einem für Kinder unzugänglichen Ort
auf. Es besteht VERLETZUNGSGEFAHR!
Teileübersicht
1. Okular
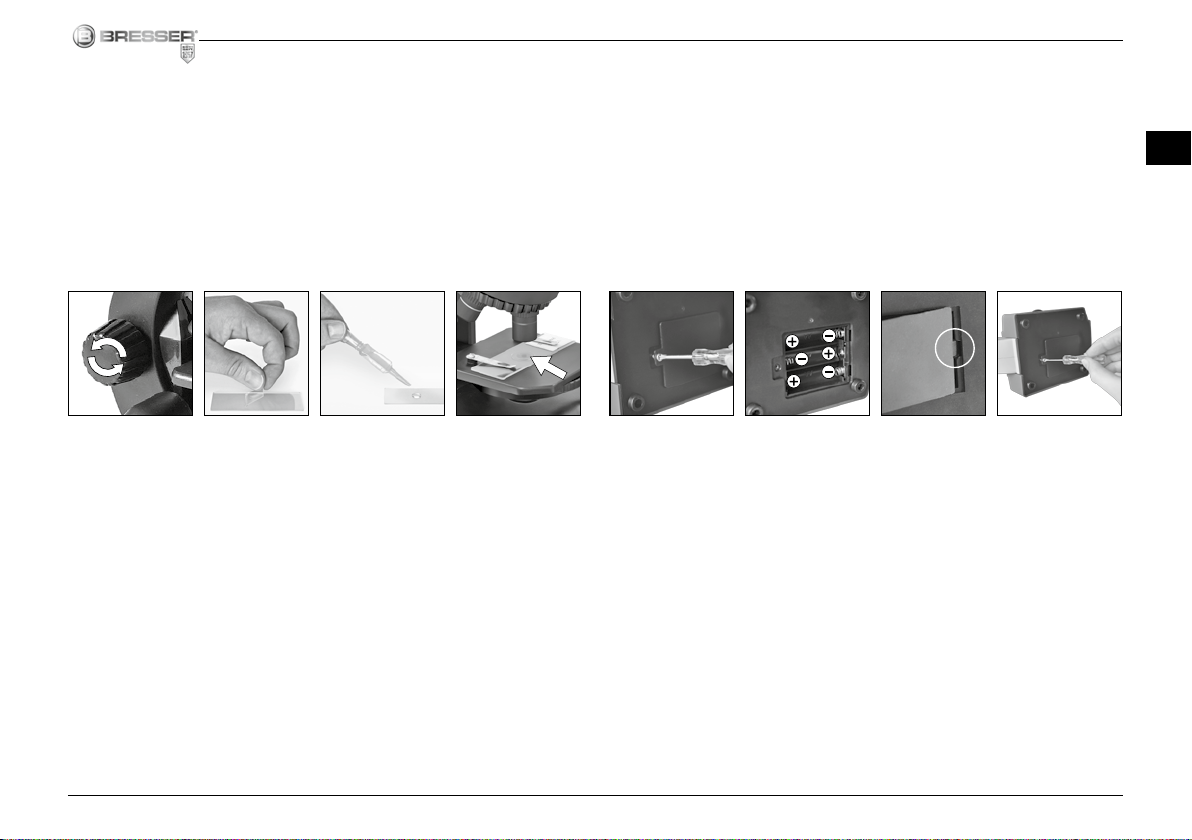
2. Scharfeinstellungsrad
3. Revolverkopf mit Objektiven
4. Objekttisch
5. Ein-/Aus-Schalter (Beleuchtung)
6. Elektrische Beleuchtung
7. Fuß mit Batteriefach
8. Batteriefach (3x AA)
9. Deckgläser
10. Dauerpräparate
11. Sammelbehälter
12. Mikroskop-Besteck
13. Blendenrad
14. Messbecher
15. Brutanlage
16. MicroCut
1. Was ist ein Mikroskop?
Das Mikroskop besteht aus zwei Linsen-Systemen: Dem Okular und
dem Objektiv. Wir stellen uns, damit es einfacher zu verstehen ist, diese
Systeme als je eine Linse vor. In Wirklichkeit bestehen aber sowohl das
Okular (1) als auch die Objektive im Revolver (3) aus mehreren Linsen.
Page 5
Die untere Linse (Objektiv) vergrößert das Präparat und es entsteht
dabei eine vergrößerte Abbildung dieses Präparates. Dieses Bild, welches man nicht sieht, wird von der zweiten Linse (Okular, 1) nochmals
vergrößert und dann siehst du das „Mikroskop-Bild“.
Die Bildschärfe wird durch langsames Drehen am Scharfeinstellungsrad (2) eingestellt. Nun kannst du eine höhere Vergrößerung auswählen, indem du den Objektiv-Revolver drehst und auf ein anderes Objektiv einstellst.
DE
2. Aufbau und Standort
Bevor du beginnst, wählst du einen geeigneten Standort zum Mikroskopieren aus. Zum einen ist es wichtig, dass genügend Licht da ist,
zum anderen empfiehlt es sich, das Mikroskop auf eine stabile Unterlage zu stellen, da sich auf einem wackeligen Untergrund keine zufrieden stellenden Ergebnisse erzielen lassen.
3. Normale Beobachtung
Für die normale Beobachtung stellst du das Mikroskop an einen hellen Platz (Fenster, Tischlampe). Das Scharfeinstellungsrad (2) wird bis
zum oberen Anschlag gedreht und der Objektiv-Revolver (3) wird auf
die kleinste Vergrößerung eingestellt.
Schalte nun die Beleuchtung
über den Schalter am Mikroskopfuß ein. Zur Beleuchtung findest du
weitere Tipps im nächsten Abschnitt. Jetzt schiebst du ein Dauerpräparat unter die Klemmen auf dem Objekttisch (4), genau unter das Objektiv. Wenn du nun durch das Okular (1) blickst, siehst du das vergrößerte Präparat. Es ist vielleicht ein noch etwas verschwommenes Bild.
Bei veränderter Vergrößerung muss die Bildschärfe neu eingestellt
werden und je höher die Vergrößerung, desto mehr Licht wird für eine
gute Bildausleuchtung benötigt.
Das Blendenrad (13) unterhalb des Mikroskoptisches (4) hilft dir bei
der Betrachtung sehr heller oder klarsichtiger Präparate. Drehe dazu
am Blendenrad (13) bis der beste Kontrast erreicht ist.
4. Betrachtung (Elektrische Beleuchtung)
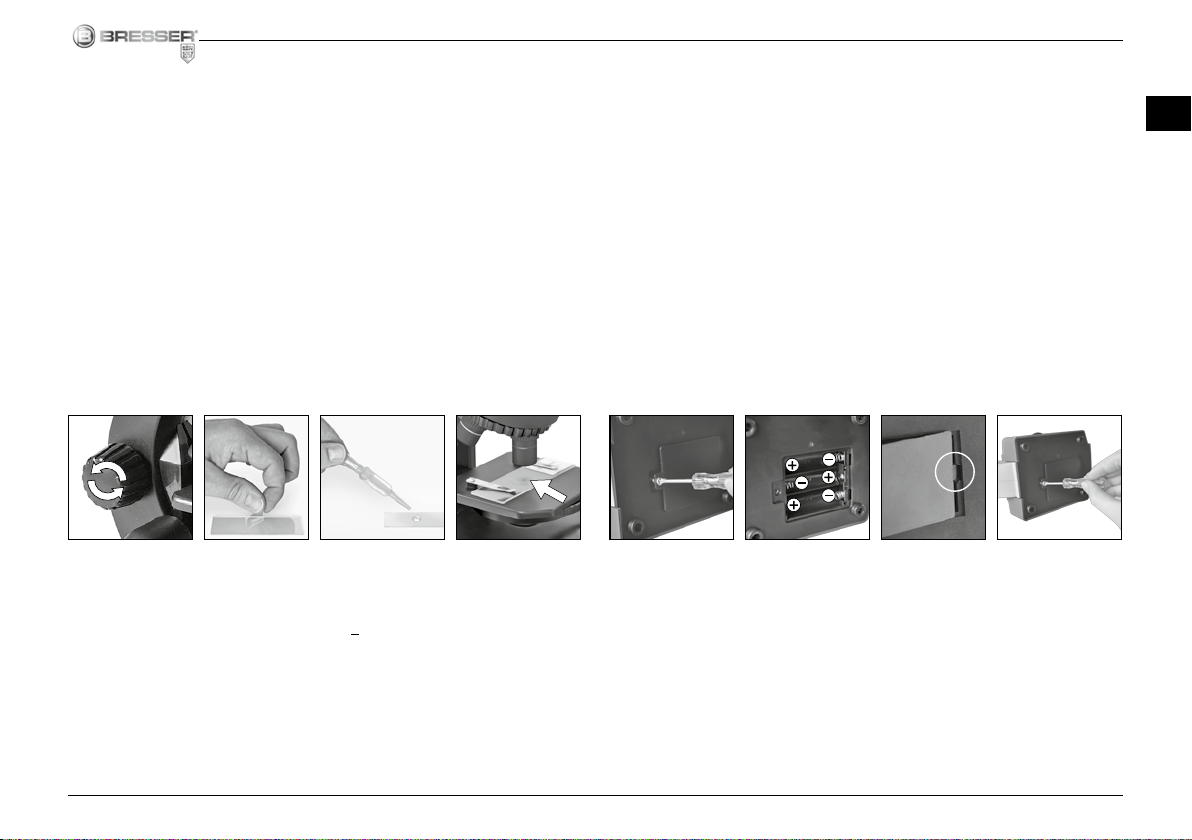
Zur Beobachtung mit der elektrischen Beleuchtung (6) benötigst du 3
AA Batterien mit 1,5 V, die im Batteriefach (8) am Mikroskop-Fuß (7)
eingesetzt werden. Das Batteriefach wird mit Hilfe von einem Kreuzschraubenzieher geöffnet. Achte beim einlegen der Batterien auf die
richtige Polarität (+/- Angabe). Der Batteriefachdeckel muss nun zuerst rechts in die kleine Öffnung gesteckt werden damit der Deckel
genau passt. Jetzt kannst du die Schraube anziehen. Die Beleuchtung
wird eingeschaltet, indem du den Schalter am Mikroskopfuß betätigst.
Jetzt kannst du auf die gleiche Weise wie unter Punkt 3 (Normale Beobachtung) beschrieben eine Beobachtung vornehmen.
5
Page 6
TIPP: Je höher die eingestellte Vergrößerung, desto mehr Licht wird
für eine gute Bildausleuchtung benötigt. Beginne deshalb deine Experimente immer mit einer kleinen Vergrößerung.
5. Beobachtungsobjekt –
Beschaffenheit und Präparierung
5.1. Beschaffenheit des Beobachtungsobjekts
Mit diesem Gerät, einem Durchlichtmikroskop, können durchsichtige
beobachtet werden. Das Bild des jeweiligen Beobachtungsobjektes
wird über das Licht “transportiert”. Daher entscheidet die richtige Beleuchtung, ob du etwas sehen kannst oder nicht!
Bei durchsichtigen (transparenten) Objekten (z.B. Einzeller) scheint
das Licht von unten durch die Öffnung im Mikroskoptisch und dann
durch das Beobachtungsobjekt. Der Weg des Lichts führt weiter durch
Objektiv und Okular, wo wiederum die Vergrößerung erfolgt und gelangt schließlich ins Auge. Dies bezeichnet man als Durchlichtmikroskopie.Viele Kleinlebewesen des Wassers, Pflanzenteile und feinste
tierische Bestandteile sind von Natur aus transparent, andere müssen
erst noch entsprechend präpariert werden. Sei es, dass sie mittels
einer Vorbehandlung oder Durchdringung mit geeigneten Stoffen (Medien) durchsichtig gemacht werden oder dadurch, dass sie in feinste
Scheibchen geschnitten (Handschnitt, Microcutschnitt) und dann untersuchen werden. Mit diesen Methoden soll dich der nachfolgende
Teil vertraut machen.
5.2. Herstellen dünner Präparatschnitte
Wie bereits vorher ausgeführt, sind von einem Objekt möglichst dünne Scheiben herzustellen. Um zu besten Ergebnissen zu kommen,
benötigst du etwas Wachs oder Paraffin. Nehme z.B. eine Kerze. Das
Wachs wird in einen Topf gegeben und über der Kerze erwärmt.
GEFAHR!
Sei äußerst vorsichtig im Umgang mit heißem Wachs, es
besteht Verbrennungsgefahr!
Das Objekt wird nun mehrere Male in das flüssige Wachs getaucht.
Lass das Wachs am Objekt hart werden. Mit einem MicroCut oder
Messer/Skalpell werden jetzt feinste Schnitte von dem mit Wachs umhüllten Objekt abgeschnitten.
GEFAHR!
Sei äußerst vorsichtig im Umgang mit Messern/
Skalpellen oder dem MicroCut! Durch ihre scharfkantigen
Oberflächen besteht ein erhöhtes Verletzungsrisiko!
Diese Schnitte werden auf einen Glasobjektträger gelegt und mit einem Deckglas abgedeckt.
5.3. Herstellen eines eigenen Präparats
Lege das zu beobachtende Objekt auf einen Glasobjektträger und gib
mit einer Pipette (12) einen Tropfen destilliertes Wasser auf das Objekt.
6
Page 7

Setze ein Deckglas senkrecht am Rand des Wassertropfens an, so
dass das Wasser entlang der Deckglaskante verläuft. Lege das Deckglas nun langsam über dem Wassertropfen ab.
6. Experimente
Wenn du dich bereits mit dem Mikroskop vertraut gemacht hast,
kannst du die nachfolgenden Experimente durchführen und die Ergebnisse unter deinem Mikroskop beobachten.
6.1. Wie züchtet man Salzwassergarnelen?
Zubehör (aus deinem Mikrokop-Set):
1. Garneleneier,
2. See-Salz,
3. Bruttank,
4. Hefe.
Der Lebenskreislauf der Salzwasser-Garnele
Die Salzwasser-Garnele oder „Artemia salina“, wie sie von den Wissenschaftlern genannt wird, durchläuft einen ungewöhnlichen und
interessanten Lebenskreislauf. Die von den Weibchen produzierten
Eier werden ausgebrütet, ohne jemals von einer männlichen Garnele
befruchtet worden zu sein. Die Garnelen, die aus diesen Eiern ausgebrütet werden, sind alle Weibchen.
Unter ungewöhnlichen Umständen, z. B. wenn der Sumpf austrocknet, können den Eiern männliche Garnelen entschlüpfen. Diese
Männchen befruchten die Eier der Weibchen und aus der Paarung
entstehen besondere Eier. Diese Eier, sogenannte „Winter-Eier“, haben eine dicke Schale, die das Ei schützt. Die Winter-Eier sind sehr
widerstandsfähig und bleiben sogar lebensfähig, wenn der Sumpf
oder der See austrocknet und dadurch der Tod der ganzen GarnelenBevölkerung verursacht wird. Sie können 5-10 Jahre in einem „schlafenden“ Zustand verharren. Die Eier brüten aus, wenn die richtigen
Umweltbedingungen wieder hergestellt sind. Solche Eier findest Du in
Deinem Mikroskop-Set.
Das Ausbrüten der Salzwasser-Garnele
Um die Garnele auszubrüten, ist es zuerst notwendig, eine SalzLösung herzustellen, die den Lebensbedingungen der Garnele entspricht. Fülle dazu einen halben Liter Regen- oder Leitungswasser in
ein Gefäß. Dieses Wasser lässt Du ca. 30 Stunden stehen. Da das
Wasser im Laufe der Zeit verdunstet, ist es ratsam, ein zweites Gefäß ebenfalls mit Wasser zu füllen und 36 Stunden stehen zu lassen.
Nachdem das Wasser diese Zeit „abgestanden“ hat, schüttest Du die
Hälfte des beigefügten See-Salzes in das Gefäß und rührst so lange,
bis sich das Salz ganz aufgelöst hat. Nun gibst Du einige Eier in das
Gefäß und deckst es mit einer Platte ab. Stelle das Glas an einen hellen Platz, aber vermeide es, den Behälter direktem Sonnenlicht auszusetzen. Da Dir ein Bruttank zur Verfügung steht, kannst Du auch die
Salzlösung mit einigen Eiern in jede der vier Zellen des Tanks geben.
Die Temperatur sollte ca. 25° C betragen.
Bei dieser Temperatur schlüpft die Garnele nach ungefähr 2-3 Tagen
aus. Falls während dieser Zeit das Wasser in dem Gefäß verdunstet,
füllst Du Wasser aus dem zweiten Gefäß nach.
DE
7
Page 8
Die Salzwasser-Garnele unter dem Mikroskop
Das Tier, das aus dem Ei schlüpft, ist bekannt unter dem Namen „Nauplius-Larve“. Mit Hilfe der Pipette kannst Du einige dieser Larven auf
einen Glas-Objektträger legen und beobachten.
Die Larve wird sich durch das Salzwasser mit Hilfe ihrer haarähnlichen
Auswüchse bewegen. Entnehme jeden Tag einige Larven aus dem
Gefäß und beobachte sie unter dem Mikroskop. Falls Du die Larven
in einem Bruttank gezogen hast, nimm einfach die obere Kappe des
Tanks ab und setze den Tank auf den Objekttisch.
Abhängig von der Raumtemperatur wird die Larve innerhalb von 6-10
Wochen ausgereift sein. Bald wirst Du eine ganze Generation von
Salzwasser-Garnelen gezüchtet haben, die sich immer wieder vermehrt.
Das Füttern Deiner Salzwasser-Garnelen
Um die Salzwasser-Garnelen am Leben zu erhalten, müssen sie natürlich von Zeit zu Zeit gefüttert werden. Dies muss sorgfältig geschehen, da eine Überfütterung bewirkt, dass das Wasser fault und unsere
Garnelen-Bevölkerung vergiftet wird. Die Fütterung erfolgt am besten
mit trockener Hefe in Pulverform. Ein wenig von dieser Hefe jeden
zweiten Tag genügt. Wenn das Wasser in den Kästchen des Bruttanks
oder in Deinem Behälter dunkel wird, ist das ein Zeichen, dass es
fault. Nimm die Garnelen dann sofort aus dem Wasser und setze sie in
eine frische Salz-Lösung.
8
Achtung!
Die Garneleneier und die Garnelen sind nicht zum Verzehr geeignet!
6.2. Textilfasern
Objekte und Zubehör:
1. Fäden von verschiedenen Textilien: Baumwolle, Leine, Wolle, Seide, Kunstseide, Nylon usw.
2. zwei Nadeln
Jeder Faden wird auf einen Glasobjektträger gelegt und mit Hilfe zweier Nadeln aufgefasert. Die Fäden werden angefeuchtet und mit einem
Deckglas abgedeckt. Das Mikroskop wird auf eine niedrige Vergrößerung eingestellt. Baumwollfasern sind pflanzlichen Ursprungs und
sehen unter dem Mikroskop wie ein flaches, gedrehtes Band aus. Die
Fasern sind an den Kanten dicker und runder als in der Mitte. Baumwollfasern sind im Grunde lange, zusammengefallene Röhrchen.
Leinenfasern sind auch pflanzlichen Ursprungs, sie sind rund und
verlaufen in gerader Richtung. Die Fasern glänzen wie Seide und weisen zahllose Schwellungen am Faserrohr auf. Seide ist tierischen Ursprungs und besteht im Gegensatz zu hohlen pflanzlichen Fasern aus
massiven Fasern von kleinerem Durchmesser. Jede Faser ist glatt und
ebenmäßig und hat das Aussehen eines kleinen Glasstabes. Wollfasern sind auch tierischen Ursprungs, die Oberfläche besteht aus sich
überlappenden Hülsen, die gebrochen und wellig erscheinen. Wenn
es möglich ist, vergleiche Wollfasern von verschiedenen Webereien.
Beachte dabei das unterschiedliche Aussehen der Fasern. Experten
können daraus das Ursprungsland der Wolle bestimmen. Kunstseide
Page 9
ist, wie bereits der Name sagt, durch einen langen chemischen Prozess künstlich hergestellt worden. Alle Fasern zeigen harte, dunkle
Linien auf der glatten, glänzendenen Oberfläche. Die Fasern kräuseln
sich nach dem Trocknen im gleichen Zustand. Beobachte die Gemeinsamkeiten und Unterschiede.
Hinweise zur Reinigung
• Trennen Sie das Gerät vor der Reinigung von der Stromquelle
(Batterien entfernen)!
• Reinigen Sie das Gerät nur äußerlich mit einem trockenen Tuch.
Benutzen Sie keine Reinigungsflüssigkeit, um Schäden an der
Elektronik zu vermeiden.
• Schützen Sie das Gerät vor Staub und Feuchtigkeit!
• Entfernen Sie Batterien aus dem Gerät, wenn es längere Zeit nicht
benutzt wird!
EG-Konformitätserklärung
Eine „Konformitätserklärung“ in Übereinstimmung mit den an-
wendbaren Richtlinien und entsprechenden Normen ist von
der Bresser GmbH erstellt worden. Diese kann auf Anfrage jederzeit
eingesehen werden.
Entsorgung
Entsorgen Sie die Verpackungsmaterialien sortenrein. Beachten
Sie bitte bei der Entsorgung des Geräts die aktuellen gesetzlichen Bestimmungen. Informationen zur fachgerechten Entsorgung
erhalten Sie bei den kommunalen Entsorgungsdienstleistern oder dem
Umweltamt.
Werfen Sie Elektrogeräte nicht in den Hausmüll!
Gemäß der Europäischen Richtlinie 2002/96/EG über Elekt-
ro- und Elektronik-Altgeräte und deren Umsetzung in nationales
Recht müssen verbrauchte Elektrogeräte getrennt gesammelt und einer umweltgerechten Wiederverwertung zugeführt werden. Entladene
Altbatterien und Akkus müssen vom Verbraucher in Batteriesammelgefäßen entsorgt werden. Informationen zur Entsorgung alter Geräte
oder Batterien, die nach dem 01.06.2006 produziert wurden, erfahren Sie beim kommunalen Entsorgungsdienstleister oder Umweltamt.
Batterien und Akkus dürfen nicht im Hausmüll entsorgt werden,
sondern Sie sind zur Rückgabe gebrauchter Batterien und Akkus
gesetzlich verpflichtet. Sie können die Batterien nach Gebrauch entweder in unserer Verkaufsstelle oder in unmittelbarer Nähe (z.B. im
Handel oder in kommunalen Sammelstellen) unentgeltlich zurückgeben.
Batterien und Akkus sind mit einer durchgekreuzten Mülltonne sowie
dem chemischen Symbol des Schadstoffes bezeichnet.
1
Batterie enthält Cadmium
2
Cd¹ Hg² Pb³
Batterie enthält Quecksilber
3
Batterie enthält Blei
DE
9
Page 10

General Warnings
• Choking hazard — This product contains small parts that could be
swallowed by children. This poses a choking hazard.
• Risk of electric shock — This device contains electronic
components that operate via a power source (batteries). Only use
the device as described in the manual, otherwise you run the risk of
an electric shock.
• Risk of fire/explosion — Do not expose the device to high
temperatures. Use only the recommended batteries. Do not shortcircuit the device or batteries, or throw them into a fire. Excessive
heat or improper handling could trigger a short-circuit, a fire or an
explosion.
• Risk of chemical burn — Make sure you insert the batteries correctly.
Empty or damaged batteries could cause burns if they come into
contact with the skin. If necessary, wear adequate gloves for protection.
• Do not disassemble the device. In the event of a defect, please
contact your dealer. The dealer will contact the Service Centre and
can send the device in to be repaired, if necessary.
• Tools with sharp edges are often used when working with this
device. Because there is a risk of injury from such tools, store this
device and all tools and accessories in a location that is out of the
reach of children.
Parts overview
1. Eyepiece
2. Focus knob
3. Objective turret
4. Stage
5. On/off switch ( illumination)
6. Electronic light source
7. Base with battery compartment
8. Battery compartment (3x AA)
9. Cover plates
10. Prepared slides
11. Reservoir
12. Microscope instruments
13. Wheel with pinhole apertures
14. Measuring cup
15. Hatchery
16. MicroCut
1. What is a microscope?
A microscope contains two lens systems: the eyepiece and the objective. We’re presenting these systems as one lens each so that the
concept is easier to understand. In reality, however, the eyepiece (1)
and the objective in the turret (3) are made up of multiple lenses.
The lower lens (objective) produces a magnified image of the prepared specimen. The picture, which you can’t see, is magnified once
more by the second lens (eyepiece, 1), which you can see as the
‘microscope picture’.
10
Page 11
2. Assembly and location
Before you start, choose an ideal location for using your microscope.
It’s important that you choose a spot with enough light for normal
observation. Furthermore, it is recommended that you place the microscope on a stable surface, because a shaky surface will not lead
to satisfactory results.
When you do so, note that the sharpness of the picture must be
adjusted again for the higher magnification. Also, the higher the
magnification, the more light you will need for good illumination of the
picture. The wheel with pinhole apertures (13) below the microscope
stage (4) will help you in viewing very bright or clear-sighted preparations. Turn the wheel (13) till the best contrast is achieved.
GB
3. Normal observation
For normal observation, place the microscope in a bright location
(near a window or desk lamp, for example).
Turn the focus knob (2) to the upper stop, and set the objective turret
(3) to the lowest magnification.
Now, turn on the light using the switch on the microscope base. You’ll
find further tips about the light source in the next section. Now, place
a prepared slide under the clips on the stage (4), directly under the
objective (1). When you take a look through the eyepiece, you can see
the magnified specimen. At this point, you still might see a slightly fuzzy
picture. Adjust the image sharpness by slowly turning the focus knob
(2). You can now select a higher magnification by turning the objective
turret and selecting a different objective.
4. Observation (electronic light source)
For observation with the electronic light source (6) you need to insert
3 AA batteries 1.5 V, in the battery compartment (8) on the base of
the microscope (7). The battery compartment is opened using a Phillips screwdriver. Insert the batteries with the correct polarity (+/- indication). Put the battery cover first into the small opening so that the
lid fits perfectly. Now you can tighten the screw.
The lighting is switched on when you turn the switch on the microscope base.
Now you can observe in the same way as described in the previous
section.
TIP: The higher the magnification you use the more light is required
for a good illumination of the picture. Therefore, always start your
experiments with a low magnification.
11
Page 12
5. Condition and prepare viewed objects
5.1. Condition
This microscope features transmitted light, so that transparent specimens can be examined.
If opaque specimens are being examined, the light from below goes
through the specimen, lens and eyepiece to the eye and is magnified
en route (direct light principle).
Some small water organisms, plant parts and animal components are
transparent by nature, but many others require pretreatment — that is,
you need to make a thinnest possible slice of the object by hand cutting or using a microtome, and then examine this sample.
DANGER!
Be extremely careful when using the MicroCut, knife or
scalpel. These instruments are very sharp and pose a
risk of injury.
Place the slices on a glass slide and cover them with another slide
before attempting to view them with the microscope.
5.3. Creation of your own preparation
Put the object to be observed on a glass slide and cover the object
with a drop of distilled water using the pipette (12).
5.2. Creation of thin preparation cuts
Specimens should be sliced as thin as possible. A little wax or paraffin
is needed to achieve the best results. Put the wax into a heat-safe bowl
and heat it over a flame until the wax is melted. You can use a candle
flame to melt the wax.
DANGER!
Be exremely carfeful when dealing with hot wax, as there
is a danger of being burned.
Then, dip the specimen several times in the liquid wax. Allow the wax
that encases the specimen to harden. Use a MicroCut or other small
knife or scalpel to make very thin slices of the object in its wax casing.
12
Set a cover glass (available at a well-stocked hobby shop) perpendicular to the edge of the water drop, so that the water runs along the edge
of the cover glass. Now lower now the cover glass slowly over the
water drop.
6. Experiments
Now that you’re familiar with your microscope’s functions and how to
prepare slides, you can complete the following experiments and observe the results under your microscope.
6.1. How do You Raise Brine Shrimp?
Accessories (from your microscope set):
1. Shrimp eggs
2. Sea salt,
3. Hatchery,
4. Yeast.
Page 13
The Life Cycle of Brine Shrimp
Brine shrimp, or “Artemia salina,” as they are called by scientists, have
an unusual and interesting life cycle. The eggs produced by the female
are hatched without ever being fertilized by a male shrimp. The shrimp
that hatch from these eggs are all females. In unusual circumstances,
e.g. when the marsh dries up, the male shrimp can hatch. These males
fertilize the eggs of the females and from this mating, special eggs come
about. These eggs, so-called “winter eggs,” have a thick shell, which protects them. The winter eggs are very resistant and capable of survival if
the marsh or lake dries out, killing off the entire shrimp population. They
can persist for 5-10 years in a “sleep” status. The eggs hatch when the
proper environmental conditions are reproduced. These are the type of
eggs you have in your microscope set.
The Incubation of the Brine Shrimp
In order to incubate the shrimp, you first need to create a salt solution
that corresponds to the living conditions of the shrimp. For this, put a
half liter of rain or tap water in a container. Let the water sit for approx.
30 hours. Since the water evaporates over time, it is advisable to fill a
second container with water and let it sit for 36 hours. After the water has
sat stagnant for this period of time, add half of the included sea salt to the
container and stir it until all of the salt is dissolved. Now, put a few eggs in
the container and cover it with a dish. Place the glass container in a bright
location, but don’t put it in direct sunlight. Since you have a hatchery, you
cal also add the salt solution along with a few eggs to each of the four
compartments of the tank. The temperature should be around 25º. At this
temperature, the shrimps will hatch in about 2-3 days. If the water in the
glass evaporates, add some water from the second container.
The Brine Shrimp under the Microscope
The animal that hatches from the egg is known by the name “nauplius
larva.” With the help of a pipette, you can place a few of these larvae
on a glass slide and observe them.
The larvae will move around in the salt water by using their hair-like
appendages.
Take a few larvae from the container each day and observe them under the microscope. In case you’ve hatched the larvae in a hatchery,
simply take off the cover of the tank and place the tank on the stage.
Depending on the room temperature, the larvae will be mature in 6-10
weeks. Soon, you will have had raised a whole generation of brine
shrimp, which will constantly grow in numbers.
Feeding your Brine Shrimp
In order to keep the brine shrimp alive, they must be fed from time to
time, of course. This must be done carefully, since overfeeding can
make the water become foul and poison our shrimp population. The
feeding is done with dry yeast in powdered form. A little bit of this yeast
every second day is enough. If the water in the compartments of the
hatchery or your container turns dark, that is a sign that it is gone bad.
Take the shrimp out of the water right away and place them in a fresh
salt solution.
Warning!
The shrimp eggs and the shrimp are not meant
to be eaten!
GB
13
Page 14

6.2. Textile fibres
Objects and accessories:
1. Threads of different textiles: Cotton, linen, wool, silk, Celanese, ny-
lon and any others you can find.
2. Two needles:
Put each thread on a glass slide and fray each with the help of the
two needles. Put a drop of water over each thread with the pipette
and cover each with a cover glass. Adjust the microscope to a low
magnification. Cotton fibres are of plant origin and look, under the microscope, like a flat, twisted band. The fibres are thicker and rounder
at the edges than in the centre. Cotton fibres consist primarily of long,
collapsed tubes. Linen fibres are also of plant origin; they are round
and run in straight lines. The fibres shine like silk and exhibit numerous swellings along the shaft of the fibre. Silk is of animal origin and
consists of solid fibres of smaller diameter than the hollow vegetable
fibres. Each silk fibre is smooth and even and has the appearance of
a small glass rod. Wool fibres are also of animal origin; the surface
consists of overlapping scales, which appear broken and wavy. If possible, compare wool fibres from different weaving mills, and note the
differences in the appearance of the fibres. Experts can determine the
country of origin of wool based on its appearance under a microscope.
Celanese is artificially manufactured by a long chemical process. All
Celanese fibres show hard, dark lines on a smooth, shining surface.
The fibres crinkle in the same way after drying. Observe the similarities
and differences between the different fibres.
14
Notes on Cleaning
• Before cleaning the device, disconnect it from the power supply by
removing the batteries.
• Only use a dry cloth to clean the exterior of the device. To avoid
damaging the electronics, do not use any cleaning fluid.
• Protect the device from dust and moisture.
• The batteries should be removed from the unit if it has not been used
for a long time.
EC Declaration of Conformity
Bresser GmbH has issued a ‘Declaration of Conformity’ in
accordance with applicable guidelines and corresponding
standards. This can be viewed any time upon request.
Disposal
Dispose of the packaging materials properly, according to their
type, such as paper or cardboard. Contact your local waste-disposal service or environmental authority for information on the proper
disposal.
Do not dispose of electronic devices in the household garbage!
As per Directive 2002/96/EC of the European Parliament on
waste electrical and electronic equipment and its adaptation into
German law, used electronic devices must be collected separately and
recycled in an environmentally friendly manner. Empty, old batteries
must be disposed of at battery collection points by the consumer. You
can find out more information about the disposal of devices or batteries
produced after 6 January 2006 from your local waste-disposal service
or environmental authority.
Page 15

In accordance with the regulations concerning batteries and re-
chargeable batteries, disposing of them in the normal household
waste is explicitly forbidden. Please make sure to dispose of your used
batteries as required by law — at a local collection point or in the retail
market. Disposal in domestic waste violates the Battery Directive.
Batteries that contain toxins are marked with a sign and a chemical
symbol.
1
battery contains cadmium
2
Cd¹ Hg² Pb³
battery contains mercury
3
battery contains lead
GB
15
Page 16

Consignes générales de sécurité
• RISQUE D’ETOUFFEMENT! Ce produit contient des petites
pièces, qui pourraient être avalées par des enfants. Il y a un RISQUE
D’ETOUFFEMENT.
•
RISQUE D’ELECTROCUTION ! Cet appareil contient des pièces
électroniques raccordées à une source d’alimentation électrique
(batteries). L’utilisation de l’appareil doit se faire exclusivement comme
décrit dans ce manuel, faute de quoi un RISQUE d’ELECTROCUTION
peut exister !
• RISQUE D’EXPLOSION / D’INCENDIE ! Ne pas exposer l’appareil à
des températures trop élevées. N’utilisez que les batteries conseillées.
L’appareil et les batteries ne doivent pas être court-circuitées ou jeter
dans le feu ! Toute surchauffe ou manipulation inappropriée peut
déclencher courts-circuits, incendies voire conduire à des explosions!
• RISQUE DE BLESSURE ! En équipant l’appareil des batteries, il
convient de veiller à ce que la polarité des batteries soit correcte.
Les batteries endommagées ou ayant coulées causent des brûlures
par acide, lorsque les acides qu’elles contiennent entrent en contact
direct avec la peau. Le cas échéant, il convient d’utiliser des gants
de protection adaptés.
• Ne pas démonter l’appareil ! En cas de défaut, veuillez vous adresser
à votre revendeur spécialisé. Celui-ci prendra contact avec le service
client pour, éventuellement, envoyer l’appareil en réparation.
• L’utilisation de cet appareil exige souvent l’utilisation d’accessoires
tranchants et/ou pointus. Ainsi, il convient de conserver l’appareil et
ses accessoires et produits à un endroit se trouvant hors de la portée
des enfants. RISQUES DE BLESSURES !
16
Vue d’ensemble des pièces
1. Oculaire
2. Molette de mise au point
3. Tourelle porte-objectifs
4. Platine avec pinces
5. Interrupteur marche/arrêt (Eclairage)
6. Eclairage électrique
7. Base avec compartiment de la batterie
8. Compartiment à piles (3x AA)
9. Lamelles
10. Lames porte-objet
11. Récipient
12. Ustensiles pour microscope
13. Roue avec des ouvertures sténopés
14. Tasses de mesure
15. Installation d‘accouvage
16. MicroCut
1. Qu’est ce qu’un microscope ?
Le microscope est composé de deux lots de lentilles : l’oculaire et
l’objectif. Pour simplifier, nous allons considérer que chaque lot n’a
qu’une seule lentille. En vérité, l’oculaire (1), tout comme les objectifs
sur la tourelle (3), sont des groupes de lentilles. La lentille inférieure
(objectif) grossit l’objet et permet d’obtenir une reproduction agrandie
de celui-ci. Cette image, qui n’est pas encore visible, est à nouveau
grossie par la seconde lentille (oculaire 1) et apparaît alors comme
«image microscopique».
Page 17

2. Montage et mise en place
Avant de commencer, cherche une place adaptée pour ton microscope. D’une part, il est important que cet endroit soit bien éclairé.
De plus, je te conseille de poser le microscope sur un emplacement
stable étant donné qu’il est impossible d’obtenir un bon résultat sur
une base qui bouge.
3. Observation normale
Pour une observation normale, tu dois poser ton microscope sur un
emplacement bien éclairé (près d’une fenêtre ou d’une lampe). La molette de mise au point (2) doit être vissée jusqu’à sa butée supérieure
et le porte-objectifs réglé sur le plus petit grossissement.
Maintenant, allumer la lumière en utilisant l’interrupteur sur la base
du microscope. En ce qui concerne la lampe, tu trouveras d’autres
conseils dans le chapitre suivant. Glisse maintenant une lamelle
porte-objet sous la pince sur la platine (4) exactement au-dessous de
l’objectif. Lorsque tu regardes à travers l’oculaire (1), tu vois ton échantillon grossi. L’image est éventuellement encore floue. Le réglage de la
netteté se fait en tournant doucement la molette de mise au point (2).
Maintenant, tu peux choisir un grossissement plus important en tournant le porte-objectifs et en choisissant ainsi un autre objectif.
Après le changement du grossissement, tu dois à nouveau faire une
mise au point et, plus le grossissement est important, plus le besoin
en lumière est important pour obtenir un bon éclairage de l’échantillon.
La roue avec des ouvertures sténopé (13) en dessous de la platine
du microscope (4) vous aidera à visualiser préparations très vives ou
clairvoyants. Tournez la roue (13) jusqu’à ce que le meilleur contraste
soit obtenu.
4. Observation (Eclairage électrique)
Pour l‘observation de la source de lumière électronique (6), vous devez insérer trois piles AA 1.5V, dans le compartiment de la batterie (8)
sur la base du microscope (7). Le compartiment des piles est ouvert à
l‘aide d‘un tournevis cruciforme. Insérez les piles avec la polarité (+/d‘indication). Mettez le couvercle de la batterie en premier dans la petite ouverture pour que le couvercle s’adapte parfaitement. Maintenant,
vous pouvez serrer la vis.
L‘éclairage s’allume lorsque vous allumez l‘interrupteur sur la base du
microscope. Maintenant, vous pouvez observer dans la même manière que décrit dans la section précédente.
FR
17
Page 18

Conseil : plus le grossissement est important, plus le besoin en lumière est important pour obtenir un bon éclairage de l’échantillon.
Commence donc toujours tes expériences avec le plus petit grossissement.
5. Objet de l‘observation – Qualité et préparation
5.1. Qualité de l‘objet de l‘observation
Avec ce microscope, un dit microscrope à éclairage par transmission,
vous pouvez observer des objets transparents. Pour les objets transparents la lumière arrive par le bas sur l‘objet sur la platine porte-échantillon, est agrandie par les lentilles de l‘objectif et de l‘oculaire et atteint
ensuite notre oeil (principe de la lumière transmise).
DANGER !
Soyez extrêmement prudent lorsque vous utilisez de la
cire chaude, il ya un risque de brûlure.
L‘objet sera plongé maintenant plusieurs fois dans la cire liquide. Laissez durcir la cire. Avec un microcut ou un couteau/scalpel des coupes
les plus fines sont coupées maintenant de l‘objet enrobé de cire.
DANGER !
Soyez très prudent en manipulant les couteaux/scalpels
ou le MicroCut ! Les surfaces tranchantes de ces outils
présentent un risque accru de blessures par coupure !
l Beaucoup de microorganismes de l‘eau, des parties de plantes et
des composants animales les plus fins ont naturellement une structure
transparente, d‘autres doivent être préparés à cette fin. Soit nous les
préparons à la transparence à travers un prétraitement ou la pénétration avec des matériaux adéquats (mediums) soit en découpant des
tranches les plus fines d‘elles (sectionnement manuel, microcut) et
que nous les examinons ensuite. Avec de telles méthodes nous nous
préparons à la partie suivante.
5.2. Fabrication de tranches de préparation fines
Comme déjà expliqué préalablement il faut produire des coupes de
l‘objet le plus mince possible. Afin d‘obtenir les meilleurs résultats, il
nous faut un peu de cire ou de paraffine. Prenez p. ex. une bougie
simplement. Posez la cire dans une casserolle et chauffez-la au-dessus d‘une flamme.
18
Ces coupes sont posées sur une lame porte-objet en verre et couvert
avec un couvre-objet.
5.3. Fabrication de sa propre préparation
Positionnez l‘objet à observer sur un porte-objet en verre ajoutez,
avec une pipette (12), une goutte d‘eau distillée sur l‘objet.
Posez maintenant une lamelle couvre-objet (disponible dans chaque
magasin de bricolage un tant soit peu fourni) verticalement au bord
de la goutte d‘eau de façon à ce que l‘eau s‘écoule le long du bord
de la lamelle couvre-objet. Baisser maintenant lentement la lamelle
couvre-objet au-dessus de la goutte d‘eau.
Page 19

6. Expériences
Si vous êtes déjà un habitué du microscope vous pouvez réaliser les
expériences suivantes et observer les résultats sous votre microscope.
6.1. Comment faire un élevage de crevettes des marais salants?
Accessoires (contenus dans ton set du microscope) :
1. Oeufs de crevette,
2. Sel de mer,
3. Couveuse,
4. Levure.
Le cycle de reproduction des crevettes des marais salants
La crevette des marais salants, ou la « artemia salina », comme l’appellent les scientifiques, parcourt un cycle de reproduction très insolite et intéressant. Les œufs pondus par les femelles éclosent sans
être fertilisés par une crevette mâle. Les crevettes naissant de ces
œufs sont toutes des femelles. Dans des conditions spéciales et insolites, par exemple lorsque le marais est asséché, il peut naître des
crevettes mâles de ces œufs. Ces mâles fertilisent alors les œufs des
femelles. Des œufs particuliers sont le résultat de cet accouplement.
Ils sont appelés « œufs d’hiver » et ont une coquille épaisse qui les
protège. Les œufs d’hiver sont très résistants et restent même en vie
lorsque le marais ou le lac s’assèche et ainsi détruit ainsi toute la population des crevettes. Ils peuvent survivre durant 5 à 10 ans dans un
état de « sommeil ». Les œufs éclosent lorsque les conditions de vie
sont redevenues bonnes. Tu trouveras des tels œufs dans le set de
ton microscope.
Faire éclore les crevettes des marais salants
Pour faire éclore les crevettes des marais salants, il est nécessaire
de préparer une solution salée correspondant aux conditions de vie
des crevettes. Remplis un récipient en verre d’un demi-litre d’eau de
pluie ou du robinet. Laisse l’eau se reposer durant environ 30 heures.
Etant donné que l’eau s’évapore dans le temps, il est recommandé de
remplir un second récipient avec de l’eau et de le stocker pendant 36
heures. Après que l’eau se sera « reposée » durant cette période, tu
verses la moitié du sel de mer joint au set dans le récipient et remues
le liquide jusqu’à ce qu’il soit entièrement délayé. Mets quelques œufs
dans le récipient et couvre-le d’un couvercle. Place le récipient sur
un emplacement lumineux et évite l’exposition directe aux rayons du
soleil. Etant donné que tu as aussi une couveuse dans ton set, tu peux
aussi remplir les quatre cellules avec la solution d’eau salée et y ajouter
quelques œufs. La température doit se situer autour de 25°C.
Dans ces conditions, les œufs de crevettes éclosent après 2 ou 3
jours. Si durant cette période, tu remarques que l’eau s’évapore dans
le récipient, fais le complément avec l’eau du second récipient.
Les crevettes des marais salants sous le microscope
L’animal qui naît de l’œuf est connu sous le nom de larve nauplius. A
l’aide de la pipette, tu peux déposer quelques larves sur une lame et
les observer sous le microscope.
Les larves se déplacent dans l’eau salée à l’aide de membres ressemblant à des poils. Prends chaque jour quelques larves du récipient
et observe-les sous le microscope. Si tu as élevé des larves dans la
couveuse, ouvre le couvercle d’une des coupelles et positionne-la sur
la platine.
FR
19
Page 20

La croissance des larves dépend de la température ambiante. Elles
atteignent leur maturité après 6 à 10 semaines. Bientôt, tu auras élevé
une génération complète de crevettes des marais salants qui se reproduira à nouveau.
La nourriture de tes crevettes des marais salants
Pour garder les crevettes des marais salants en vie, tu dois les nourrir
de temps en temps. Cela doit être fait avec soin, car si trop de nourriture se trouve dans l’eau, elle commence à pourrir et empoisonne
ensuite ton peuple de crevettes. Au mieux, tu nourris avec de la levure
sèche en poudre. Il suffit de donner un peu de levure tous les deux
jours. Si l’eau des coupelles de ta couveuse et de ton récipient se
noircit, c’est un signe qu’elle commence à pourrir. Sors tout de suite
les crevettes de l’eau et mets-les dans la nouvelle solution d’eau salée.
Attention !
Les œufs de crevettes et les crevettes ne sont pas comestibles !
6.2. Fibres textile
Objets et accessoires:
1. Fils de textiles différents: Coton, lin, laine, soie, rayonne, Nylon etc.
2. Deux aiguilles
Posez chacun des fils sur un porte-objet en verre et effilochez les avec
les deux aiguilles. Humidifiez les fils et couvrez les avec une lamelle
couvre-objets. Sélectionnez un grossissement peu élevé du microscope. Les fibres de coton sont d‘origine végétale et sous le microscope elles ont l‘aspect d‘un ruban plat, tourné. Les fibres sont plus
épaisses et rondes sur les côtés qu‘au milieu. Les fibres de coton sont,
au fond, de tubes capillaires longs, effondrés. Les fibres de lin sont
d‘origine végétale également, elles sont rondes et se déroulent en une
direction droite. Les fibres brillent comme de la soie et présentent de
nombreux renflements au niveau du tube fibreux. La soie est d‘origine
animale et consiste en des fibres -massives d‘un diamètre moindre
contrairement aux fibres végétales creuses. Chaque fibre est lisse et
égale et a l‘apparence d‘un petit bâtonnet en verre. Les fibres de laine
sont d‘origine animale aussi, la surface est constituée de peaux se chevauchant qui paraissent cassées et ondulées. Si possible comparez
des fibres de laine de différentes tisseranderies. Observez, ce faisant,
l‘apparence différente des fibres. Des experts peuvent déterminer ainsi
le pays d‘origine de la laine. La rayonne (ou soie artificielle) est, comme
son nom l‘indique, produite artificiellement à travers un long processus
chimique. Toutes les présentent des lignes dures et sombres sur la
surface lisse et brillante. Les fibres se crêpent après le séchage dans le
même état. Observez les points communs et les différences.
REMARQUE concernant le nettoyage
• Avant de nettoyer l’appareil, veuillez le couper de son alimentation
électrique (batteries) !
• Ne nettoyez l’appareil que de l’extérieur en utilisant un chiffon
sec. Ne pas utiliser de liquides de nettoyage, afin d’éviter
d’endommager les parties électroniques.
• Protégez l’appareil de la poussière et de l’humidité !
• Les batteries doivent être retirées de l’appareil lorsque celui-ci est
destiné à ne pas être utilisé un certain temps.
20
Page 21

Déclaration de conformité CE
Bresser GmbH a émis une « déclaration de conformité » con-
formément aux lignes directrices applicables et aux normes
correspondantes. Celle-ci peut être consultée à tout moment sur demande.
ELIMINATION
Eliminez l’emballage en triant les matériaux. Pour plus d’informa-
tions concernant les règles applicables en matière d’élimination de
ce type des produits, veuillez vous adresser aux services communaux
en charge de la gestion des déchets ou de l’environnement.
Ne jamais éliminer les appareils électriques avec les ordures mé-
nagères !
Conformément à la directive européenne 2002/96/CE sur les
appareils électriques et électroniques et ses transpositions aux plans
nationaux, les appareils électriques usés doivent être collectés séparément et être recyclés dans le respect des réglementations en vigueur
en matière de protection de l’environnement. Les batteries déchargées
et les accumulateurs usés doivent être apportés par leurs utilisateurs
dans les points de collecte prévus à cet effet. Pour plus d’informations
concernant les règles applicables en matière d’élimination des batteries produites après la date du 01.06.2006, veuillez vous adresser aux
services communaux en charge de la gestion des déchets ou de l’environnement.
En conformité avec les règlements concernant les piles et les
piles rechargeables, jeter ces produits avec les déchets ménagers normaux est strictement interdit. Veuillez à bien déposer vos piles
usagées dans des lieux prévus à cet effet par la Loi, comme un point
de collecte locale ou dans un magasin de détail (une élimination de
ces produits avec les déchets domestiques constituerait une violation
des directives sur les piles et batteries).
Les piles qui contiennent des toxines sont marquées avec un signe et
un symbole chimique.
1
pile contenant du cadmium
2
pile contenant du mercure
Cd¹ Hg² Pb³
3
pile contenant du plomb
FR
21
Page 22

Algemene waarschuwingen
• VERSTIKKINGSGEVAAR! Dit product bevat kleine onderdelen
die door kinderen kunnen worden ingeslikt! Er bestaat
VERSTIKKINGSGEVAAR!
• GEVAAR VOOR ELEKTRISCHE SCHOK! Dit toestel bevat
elektronische onderdelen die door een elektriciteitsbron (batterijen)
worden gevoed. Het toestel mag alleen gebruikt worden zoals in de
handleiding wordt beschreven, anders bestaat er GEVAAR op een
STROOMSTOOT!
• BRAND-/EXPLOSIEGEVAAR! Stel het apparaat niet bloot aan hoge
temperaturen. Gebruik uitsluitend de aanbevolen batterijen. Sluit het
apparaat en de batterijen niet kort en gooi deze niet in het vuur!
Te hoge temperaturen en ondeskundig gebruik kunnen leiden tot
kortsluitingen, branden en zelfs explosies!
• GEVAAR VOOR INBRANDEND ZUUR! Let bij het plaatsen van
de batterijen op de juiste richting van de polen. Lekkende of
beschadigde batterijen veroorzaken irritaties wanneer deze met
de huid in aanraking komen. Gebruik in dat geval alleen hiervoor
goedgekeurde beschermingshandschoenen.
• Neem het toestel niet uit elkaar! Neem bij defecten a.u.b. contact op
met de verkoper. Deze zal contact opnemen met een servicecenter
en kan het toestel indien nodig voor reparatie terugsturen.
• Tijdens het gebruik van dit toestel worden regelmatig scherpe
hulpmiddelen gebruikt. Bewaar dit toestel en alle toebehoren en
hulpmiddelen dus op een voor kinderen ontoegankelijke plaats. Er
bestaat GEVAAR VOOR VERWONDINGEN!
Onderdelen lijst
1. Oculair
2. Scherpteregeling
3. Revolverkop met objectieven
4. Objecttafel
5. Aan-/Uit-schakelaar (Verlichting)
6. Elektrische verlichting
7. Voet met batterijvak
8. Batterijvak (3x AA)
9. Dekglaasjes
10. Preparaten voor meermalig gebruik
11. Container
12. Microscoopbestek
13. Instelwieltje
14. Maatbekers
15. Broedinstallatie
16. MicroCut
1. Wat is een microscoop?
De microscoop bestaat uit twee lenssystemen: het oculair en het
objectief. Om het gemakkelijker te maken, stellen wij ons deze systemen elk als één lens voor. In werkelijkheid bestaan echter zowel het
oculair (1) als de objectieven in de revolver (3) uit meerdere lenzen.
De onderste lens (het objectief) vergroot het preparaat en er ontstaat
een vergrote afbeelding van het preparaat. Dit beeld, dat je niet ziet,
wordt door de tweede lens (het oculair, (1) nog eens vergroot en dan
zie je het „microscoop-beeld“.
22
Page 23

2. Waar en hoe zet je de microscoop neer?
Voordat je begint, kies je een geschikte plaats uit, om met de microscoop te kunnen werken. Aan de ene kant is het belangrijk dat er
voldoende licht is. Verder adviseer ik, de microscoop op een stabiele
ondergrond neer te zetten, omdat je op een wiebelende ondergrond
geen goede resultaten kunt krijgen.
Als je de vergrotingsfactor verandert, moet je ook de scherpte opnieuw instellen, en hoe hoger de vergroting, hoe meer licht er nodig
is om de afbeelding goed te kunnen bekijken.
Het instelwieltje (13) onder de microscooptafel (4) helpt bij het bekijken van zeer felle of doorzichtige preparaten. Draai daarvoor aan het
instelwieltje (13) tot het beste contrast bereikt is.
NL
3. Normale observatie
Voor de normale observatie zet je de microscoop op een goed verlichte plaats (raam, bureaulamp).
Draai de scherpteregeling (2) tot aan de bovenste aanslag en stel de
objectiefrevolver (3) op de kleinste vergroting in.
Doe nu de lamp aan met de schakelaar op de voet van de microscoop. Nu schuif je een duurzaam preparaat onder de klemmen
op de objecttafel (4), precies onder het objectief. Wanneer je door
het oculair (1) kijkt, zie je nu het uitvergrote preparaat. Het beeld zal
eerst nog wazig zijn. De scherpte stel je in, door langzaam aan de
scherpteregeling te draaien. Nu kun je een hogere vergroting kiezen,
doordat je aan de objectiefrevolver draait en een ander objectief voor
het oculair haalt.
4. Observatie (Elektrische verlichting)
Om dingen te bekijken met het elektrische licht (6) heb je 3 AA batterijen van 1,5 V nodig, die in het batterijvak (8) in de voet van de
microscoop (7) worden geplaatst. Het batterijvak dient met een kruiskopschroevendraaier geopend te worden. Let bij het plaatsen van de
batterijen op de juiste polariteit (+/- ). Het deksel van het batterijvak
moet nu eerst rechts in de kleine opening gezet worden zodat het
deksel precies past. Nu kun je het schroefje aandraaien.
De verlichting wordt ingeschakeld met behulp van de schakelaar op
de voet van de microscoop.
TIP: Hoe hoger de vergroting die je gebruikt, hoe meer licht nodig is
voor een goede belichting van de foto. Daarom altijd uw experimenten beginnen met een lage vergroting.
23
Page 24

5. Te observeren object – Aard en preparatie
5.1. Eigenschappen van het te observeren object
Met deze microscoop, een zogenaamde doorlichtmicroscoop, kunnen
doorzichtige objecten bekeken worden. Bij doorzichtige voorwerpen
(transparante) valt het licht van beneden door het voorwerp op de objecttafel, wordt door de objectief- en oculairlenzen vergroot en geraakt
dan in ons oog (doorlichtprincipe). Veel kleine waterdiertjes, plantendelen en delicate onderdelen van dieren zijn al van nature transparant,
andere objecten moeten echter eerst worden geprepapeerd. Dit kan
door ze voor te behandelen of te doordrenken met hiervoor geschikte
middelen (media), waardoor ze doorzichtig worden of door ze in plakjes te snijden (met de hand of met de microcut) en deze plakjes dan
te onderzoeken. In het volgende gedeelte worden deze methoden uit
de doeken gedaan.
5.2. Het vervaardigen van dunne preparaat-doorsnedes
Zoals al gezegd, moeten zo dun mogelijke schijven van een object
klaargemaakt worden. Om tot de beste resultaten te komen, heeft U
een beetje was of paraffine nodig. Neem daarvoor gewoon een kaars
bvb. De was wordt in een pan gegeven en op een vlam verwarmd.
GEVAAR!
Wees bijzonder voorzichtig bij het hanteren van messen/
scalpels of de MicroCut! De zeer scherpe snijvlakken
kunnen gemakkelijk letsel veroorzaken!
Deze schijven worden op een glazen objectdrager gelegd en met een
dekglas bedekt.
5.3. Zelf een preparaat maken
Leg het te bekijken voorwerp op een objectglas en doe er met een
pipet een druppel (12) gedestilleerd water op.
Plaats het dekglaasje (in elke goed gesorteerde hobby-winkel verkrijgbaar) loodrecht op de rand van de waterdruppel, zodat het water zich
langs de rand van het dekglas verdeelt. Laat het dekglaasje nu langzaam boven de waterdruppel zakken.
6. Experimenten
Als u al vertrouwd bent met de microscoop, kunt u de volgende experimenten uitvoeren en de resultaten onder uw microscoop bekijken.
GEVAAR!
Wees uiterst voorzichtig bij het gebruik van hete wax, is
er een risico van brandwonden.
Het object wordt nu meermaals in de vloeibare was ondergedompeld.
Laat de was dan hard worden. Met een microcut of een mes/scalpel worden nu de fijnste schijven, van het met was omhulde object, afgesneden.
24
6.1. Zoutwatergarnalen kweken
Accessoires (uit je microscoopset):
1. Garnaleneieren,
2. Zeezout,
3. Broedtank,
4. Gist.
Page 25

De levenscyclus van de zoutwatergarnaal
De zoutwatergarnaal of „Artemia salina“, zoals de wetenschap hemt
noemt, doorloopt een buitengewone en interessante levenscyclus. De
door de vrouwtjes geproduceerde eieren worden uitgebroed, zonder
door een mannelijke garnaal te zijn bevrucht. De garnalen die uit deze
eieren komen, zijn allemaal vrouwelijk. Onder bijzondere omstandigheden echter, als het moeras uitdroogt bijv., kunnen er ook mannelijke
garnalen uit de eieren kruipen. Deze mannetjes bevruchten de eieren
van de vrouwtjes en hieruit ontstaan speciale eieren. Deze eieren, zogenaamde „winter-eieren“, hebben een dikke schaal, die het ei beschermt. De wintereieren zijn erg sterk en blijven zelfs levensvatbaar
als het moeras of het meer uitgedroogd is en alle garnalen erin sterven. Ze kunnen 5-10 jaar in een „slapende“ toestand blijven. De eieren komen uit, als de omstandigheden hiervoor weer goed zijn. Zo’n
eieren vind je in je microscoopset.
Uitbroeden van de zoutwatergarnaaltjes
Om de garnalen uit te broeden moet er eerst een zoute oplossing worden gemaakt, die overeenkomt met de leefomstandigheden van de
garnaal. Doe hiervoor een halve liter regen- of leidingwater in een kom
of kan. Laat dit water ca. 30 uur staan. Omdat het water mettertijd verdampt, adviseer ik nog een tweede kom of kan ook met water te vullen
en 36 uur lang te laten staan. Nadat het water deze tijd heeft gestaan,
schenk je de helft van het zeezout van de set in de kom of kan en roert
net zolang tot het zout helemaal is opgelost. Doe nu een paar eieren in
de kom of kan en dek dit af met een vlakke plaat of plankje. Zet het glas
op een plaats met veel licht, maar zonder direct zonlicht. Je kunt ook
gebruikmaken van de broedtank en de zoutoplossing met een paar
eieren in de vier kamers van de tank doen. Zorg dat de temperatuur
zo’n 25° C bedraagt.
Bij deze temperatuur komen de garnalen na een dag of 2-3 uit.
Als het water in de tank verdampt, vul je het bij met het water uit de
tweede kom of kan.
NL
De zoutwatergarnaal onder de microscoop
Het dier dat uit het ei komt, staat bekend onder de naam „Nauplius-larve”. Met behulp van de pipet leg je een paar larven op een objectglas
en bekijkt ze. De larve zal met zijn haarachtige uitsteeksels door het
zout water zwemmen. Neem elke dag een paar larven uit de kom of
kan, of uit de broedtank, en bekijk ze onder de microscoop. Als je de
larven in een broedtank hebt gekweekt, kun je ook de bovenste kap
van de tank halen en de tank op de objecttafel zetten.
Al naar gelang de kamertemperatuur zullen de larven na 6-10 weken
zijn uitgegroeid. Binnenkort heb je een hele generatie zoutwatergarnalen, die zich steeds weer vermenigvuldigt.
De zoutwatergarnaaltjes voeren
Om de zoutwatergarnalen in leven te houden, moeten ze natuurlijk van
tijd tot tijd worden gevoerd. Dit moet zorgvuldig gebeuren, omdat teveel voer ervoor zorgt dat er rotting gaat optreden in het water en de
garnaaltjes vergiftigd raken. Het beste voer bestaat uit droge gistkorreltjes. Om de andere dag een paar korreltjes is voldoende. Als het water in de kamers van je broedtank of in de kan troebel wordt, betekent
dit dat er rottingsprocessen in zijn opgetreden. Haal de garnalen dan
direct uit het water en zet ze in een verse zoutoplossing.
25
Page 26

GEVAAR! Let op!
De garnaleneieren en de garnalen zijn niet geschikt voor
consumptie!
6.2. Textielvezels
Voorwerpen en accessoires:
1. Draden van verschillende textielsoorten: katoen, linnen, wol, zijde,
kunstzijde, nylon enz.
2. twee naalden
Elke draad wordt op een objectglaasje gelegd en met behulp van de
twee naalden uit elkaar gerafeld. De draden worden bevochtigd en met
een dekglaasje afgedekt. De microscoop wordt op een lage vergroting
ingesteld. Katoenvezels zijn van plantaardige oorsprong en zien er onder de microscoop uit als een platte, gedraaide band. De vezels zijn aan
de zijkanten dikker en ronder dan in het midden. Katoenvezels zijn in
feite lange, ineengezakte buisjes. Linnenvezels zijn ook van plantaardige
oorsprong en zijn rond en recht. De vezels glanzen als zijde en vertonen
talrijke verdikkingen langs de vezelbuis. Zijde is van dierlijke oorsprong
en bestaat uit massieve vezels met een kleinere diameter dan de holle
plantaardige vezels. Elke vezel is glad en gelijkmatig gevormd en ziet
eruit als een glazen staafje. Wolvezels zijn ook van dierlijke oorsprong,
het oppervlak bestaat uit elkaar overlappende hulzen die er gebroken
en gegolfd uitzien. Mocht dit mogelijk zijn, vergelijk dan wolvezels van
verschillende weverijen. Let daarbij op het verschil in uiterlijk tussen de
vezels. Experts kunnen aan de hand van deze kenmerken het land van
oorsprong van de wol bepalen. Kunstzijde wordt, zoals de naam al zegt,
kunstmatig vervaardigd door middel van een lang chemisch procédé.
26
Alle vezels vertonen harde, donkere lijnen op het gladde, glanzende oppervlak. De vezels krullen na het drogen in dezelfde toestand op. Observeer de overeenkomsten en verschillen.
TIPS voor reiniging
• Koppel het toestel los van de stroomvoorziening (batterijen
verwijderen) voordat u het reinigt!
• Reinig het toestel alleen uitwendig met een droge doek. Gebruik geen
vloeistoffen, om schade aan de elektronica te vermeiden.
• Bescherm het toestel tegen stof en vocht!
• Verwijder de batterijen uit het toestel wanneer deze langere tijd niet
gebruikt wordt.
EG-conformiteitsverklaring
Een “conformiteitsverklaring” in overeenstemming met de van
toepassing zijnde richtlijnen en overeenkomstige normen is
door Bresser GmbH afgegeven. Deze kan elk moment op aanvraag worden ingezien.
AFVAL
Scheid het verpakkingsmateriaal voordat u het weggooit. Informatie over het correct scheiden en weggooien van afval kunt u bij uw
gemeentelijke milieudienst inwinnen.
Gooi elektronische apparaten niet bij het huisvuil!
Volgens de Europese richtlijn 2002/96/EG over elektrische en
elektronische apparaten en de toepassing hiervan in nationale
wetten moeten afgedankte elektrische apparaten gescheiden worden
Page 27

ingezameld en op milieuvriendelijke wijze worden afgevoerd.
Lege batterijen en accu’s moeten door de gebruiker in een batterijenverzamelbak worden weggegooid. Informatie over het weggooien van oude
apparaten en batterijen, die na 01-06-2006 zijn geproduceerd, kunt u
bij uw gemeentelijke milieudienst inwinnen.
Batterijen en accu’s mogen niet worden weggegooid in de vuilnis-
bak. U bent wettelijk verplicht om gebruikte batterijen in te leveren.
U kunt de gebruikte batterijen in onze winkel of in de onmiddellijke omgeving, bijv. bij gemeentelijke Inzamelpunten gratis inleveren.
Batterijen en accu’s zijn gemarkeerd met een doorgestreepte vuilnisbak
en het chemische symbool van de verontreinigingende stoffen.
1
batterij bevat cadmium
2
Cd¹ Hg² Pb³
batterij bevat kwik
3
accu bevat lood
NL
27
Page 28

Avvertenze di sicurezza generali
• PERICOLO DI SOFFOCAMENTO! Il prodotto contiene piccoli
particolari che potrebbero venire ingoiati dai bambini! PERICOLO DI
SOFFOCAMENTO!
• RISCHIO DI FOLGORAZIONE! Questo apparecchio contiene
componenti elettronici azionati da una sorgente di corrente (batterie).
L’utilizzo deve avvenire soltanto conformemente a quanto descritto
nella guida, in caso contrario esiste il PERICOLO di SCOSSA
ELETTRICA!
• PERICOLO DI INCENDIO/ESPLOSIONE! Non esporre
l’apparecchio a temperature elevate. Utilizzare esclusivamente
le batterie consigliate. Non cortocircuitare o buttare nel fuoco
l‘apparecchio e le batterie! Un surriscaldamento oppure un utilizzo
non conforme può provocare cortocircuiti, incendi e persino
esplosioni!
• RISCHIO DI CORROSIONE! Per inserire le batterie rispettare
la polarità indicata. Le batterie scariche o danneggiate possono
causare irritazioni se vengono a contatto con la pelle. Se necessario
indossare un paio di guanti di protezione adatto.
•
Non smontare l’apparecchio! In caso di guasto, rivolgersi al proprio
rivenditore specializzato. Egli provvederà a contattare il centro di
assistenza e se necessario a spedire l’apparecchio in riparazione.
•
Per l’utilizzo di questo apparecchio vengono spesso utilizzati strumenti
appuntiti e affilati. Pertanto, conservare l’apparecchio e tutti gli accessori
e strumenti fuori dalla portata dei bambini. PERICOLO DI LESIONE!
Sommario
1. Oculare
2. Ghiera della messa a fuoco
3. Torretta portaobiettivi con obiettivi
4. Tavolino portaoggetti
5. Interruttore acceso/spento (Illuminazione)
6. Illuminazioni elettrica
7. Piede con vano batterie
8. Vano batterie (3x AA)
9. Coprivetrini
10. Vetrini preparati
11. Recipiente di raccolta
12. Set di attrezzi da microscopia
13. Rotella del diaframma
14. Misurini
15. Schiuditoio
16. MicroCut
1. Che cos’è un microscopio?
Il microscopio consiste in due sistemi di lenti: l’oculare e l’obiettivo. Per
semplificare la spiegazione supponiamo che entrambi questi sistemi
siano costituiti da una lente sola. In realtà tanto l’oculare (1) quanto gli
obiettivi (2) nella torretta portaobiettivi (3) sono costituiti da più lenti.
La lente inferiore (obiettivo) ingrandisce il preparato e si genera così
un’immagine ingrandita del preparato. Questa immagine, che in realtà
non si vede, viene ulteriormente ingrandita da una seconda lente (oculare, 1). Questa è quindi l’immagine che vedi al microscopio.
28
Page 29

2. Struttura e ubicazione
Prima di cominciare, scegli una posizione adatta per effettuare le tue
osservazioni al microscopio.
Da una parte, è importante che ci sia luce a sufficienza. Inoltre ti consigliamo di posizionare il microscopio su un piano di appoggio stabile
perché altrimenti eventuali movimenti oscillatori potrebbero compromettere i risultati dell’osservazione.
3. Osservazione normale
tamente la ghiera (2). Ora puoi scegliere un ingrandimento maggiore,
girando la torretta portaobiettivi e utilizzando un altro obiettivo. Ricorda
però che quando modifichi l’ingrandimento devi regolare nuovamente
la messa a fuoco e che quanto maggiore è l’ingrandimento, tanta più
luce è necessaria per ottenere un‘immagine ben illuminata. La rotella del
diaframma (13) sotto il tavolino del microscopio (4) facilita l’osservazione
di preparati molto chiari o trasparenti. Girare la rotella del diaframma (13)
fino ad ottenere il miglior livello di contrasto.
4. Osservazione (Illuminazione elettrica)
IT
Per effettuare una normale osservazione posiziona il microscopio in
un posto luminoso (vicino ad una finestra o ad una lampada da tavolo). Gira verso l’alto la ghiera di regolazione della messa a fuoco (2)
fino all’arresto e regola la torretta portaobiettivi (3) sull’ingrandimento
minore.
Accendere la luce dall’interruttore previsto sul piede del microscopio. Su
questo argomento troverai ulteriori suggerimenti al capitolo successivo.
Spingi un vetrino preparato sotto le clip del tavolino portaoggetti (4) e
posizionalo esattamente sotto l’obiettivo. Guardando attraverso l’oculare (1), vedrai il preparato ingrandito. L’immagine potrebbe non essere
ancora sufficientemente nitida. Per regolare la messa a fuoco gira len-
Per eseguire l’osservazione con l’ausilio della luce elettrica (6), inserire
3 batterie AA da 1,5 V nel vano batterie (8) nel piede del microscopio
(7). Il vano batterie si apre con l’ausilio di un cacciavite a croce. Durante l’inserimento delle batterie, verificarne la corretta polarità (segno
+/-). Il coperchio del vano batterie deve essere prima inserito a destra
nella piccola apertura e adattato con precisione. A questo punto si può
serrare la vite. La luce si accende dall’interruttore previsto sul piede del
microscopio.
SUGGERIMENTO: Quanto maggiore è l’ingrandimento impostato,
tanta più luce è necessaria affinché l’immagine sia ben illuminata. Inizia
quindi sempre i tuoi esperimenti con un ingrandimento basso.
29
Page 30

5. Oggetto delle osservazioni –
Natura e preparazione
5.1. Natura dell’oggetto da osservare
Con il presente microscopio, un microscopio cosiddetto “a luce trasmessa”, è possibile osservare oggetti trasparenti. Nel caso di oggetti
trasparenti la luce arriva da sotto attraversando l‘oggetto sul tavolino
portaoggetti, viene ingrandita dalle lenti dell’obiettivo e dell’oculare e
raggiunge infine l’occhio (principio della luce trasmessa).
Molti piccoli esseri viventi acquatici, parti di piante e le parti animali
più minute hanno per natura questa caratteristica della trasparenza,
mentre altri oggetti devono essere preparati in modo opportuno e cioè
rendendoli trasparenti per mezzo di un pretrattamento o con la penetrazione di sostanze adatte (mezzi) o tagliandoli a fettine sottilissime
(taglio manuale o con microcut). Questi metodi verranno più diffusamente descritti nel capitolo che segue.
5.2. Preparazione di fettine sottili
Come già illustrato in precedenza, un oggetto deve essere preparato
tagliandolo in fettine che siano il più possibile sottili. Per raggiungere
i migliori risultati è necessario usare della cera o della paraffina. Per
esempio la cera di una candela. Mettere la cera in un pentolino e scaldarla su una fiamma.
PERICOLO!
Fare molta attenzione quando si utilizza la cera a caldo,
vi è il rischio di ustioni.
Immergere l’oggetto ripetutamente nella cera liquida. Aspettare fino a
quando la cera non si sarà indurita. Con un microtomo o un coltello/
bisturi tagliare ora l’oggetto avvolto nella cera in fettine sottilissime.
PERICOLO!
Prestare la massima attenzione nel manipolare
lame/scalpelli o il MicroCut! Le loro superfici affilate
comportano un notevole rischio di lesione!
Le fettine saranno poi messe su un vetrino portaoggetti e coperte con
un coprivetrino.
5.3. Preparazione di un preparato
Mettere l’oggetto da osservare su un vetrino portaoggetti e con una
pipetta aggiungere una goccia di acqua distillata sull’oggetto.
Mettere un coprivetrino (in vendita in qualsiasi negozio di hobbistica
ben fornito) perpendicolarmente rispetto al bordo della goccia, in
modo tale che l’acqua si espanda lungo il bordo del corpivetrino.
Abbassare il corpivetrino lentamente sulla goccia d’acqua.
6. Esperimenti
Dopo preso confidenza con il microscopio si possono condurre i seguenti esperimenti ed osservarne i risultati al microscopio.
30
Page 31

6.1. Come si allevano le artemie saline
Accessori (contenuti nel kit in dotazione con il microscopio):
1. uova di gamberetto,
2. sale marino,
3. schiuditoio,
4. lievito.
Il ciclo vitale dell’artemia salina
L’artemia salina, come gli scienziati denominano questa specie di gamberetti, attraversa delle fasi di sviluppo insolite ed interessanti nel corso della sua vita. Le uova della femmina si schiudono senza essere mai
state fecondate dal maschio. I gamberetti che nascono da queste uova
sono tutte femmine. In condizioni particolari, per esempio quando la
palude va in secca, dalle uova possono uscire gamberetti maschi. I
maschi fecondano le uova delle femmine e dall’accoppiamento hanno origine uova particolari. Le uova fecondate, dette “uova d’inverno”,
hanno un guscio spesso che protegge l’uovo. Le uova d’inverno sono
particolarmente resistenti e si mantengono in vita anche quando la palude o il mare va in secca, fenomeno che determina la morte dell’intera colonia di gamberetti. Le uova possono “dormire” anche per 5-10
anni e schiudersi solo quando le condizioni ambientali ideali per la vita
dell’artemia vengono ripristinate. Le uova presenti nel kit sono uova di
inverno.
La schiusa delle uova di artemia salina
Affinché le uova di artemia si schiudano è necessario preparare una
soluzione salina che corrisponda alle condizioni vitali dei gamberetti.
Riempi un recipiente con mezzo litro di acqua piovana o del rubinetto.
Lascia riposare l’acqua così preparata per circa 30 ore. Dato che nel
corso del tempo l’acqua evapora si consiglia di riempire anche un altro
recipiente con acqua preparata allo stesso modo e di lasciarla riposare per 36 ore. Trascorso questo periodo di “riposo” versa la metà
del sale marino in dotazione nel recipiente e mescola finché il sale
non si sarà completamente sciolto. Metti alcune uova nel recipiente e
coprilo con un pannello. Metti il recipiente in un luogo luminoso, ma
evita di esporlo direttamente alla luce del sole. Poiché nella dotazione
del microscopio è compreso anche uno schiuditoio puoi mettere della
soluzione salina e alcune uova in ciascuno dei quattro scomparti. La
temperatura dovrebbe essere intorno ai 25°C.
A questa temperatura le uova si schiudono dopo circa 2-3 giorni.
Se durante tale periodo l’acqua nel recipiente evapora, aggiungi acqua
dal secondo recipiente preparato.
L’artemia salina al microscopio
La larva che esce dall’uovo è conosciuta con il nome di “nauplio”. Aiutandoti con una pipetta preleva alcune di queste larve e mettile su un
vetrino portaoggetti per osservarle.
Le larve si muovono nella soluzione salina con l’aiuto delle loro estremità simili a peli. Ogni giorno preleva alcune larve dal recipiente e osservarle al microscopio. Se hai allevato le larve nello schiuditoio rimuovi
semplicemente il coperchio superiore e metti lo schiuditoio direttamente sul tavolino portaoggetti.
A seconda della temperatura ambientale le larve diventano adulte nel
giro di 6-10 settimane. In tal modo avrai allevato una colonia di artemia
salina che continuerà a riprodursi.
IT
31
Page 32

L’alimentazione dell’artemia salina
Affinché le artemie sopravvivano,di tanto in tanto le devi nutrire. Bisogna procedere con molta cura perché un eccesso di cibo potrebbe far
imputridire l’acqua e avvelenare la colonia di gamberetti. L’alimentazione ideale è costituita da lievito secco in polvere. È sufficiente dare una
piccola quantità di lievito ogni due giorni. Se l’acqua nello schiuditoio
o nel recipiente diventa scura è indice che sta imputridendo. Rimuovi
quindi immediatamente i gamberetti dall’acqua e mettili in una soluzione salina nuova.
Attenzione!
Le uova e i gamberetti non sono commestibili!
6.2. Fibre tessili
Oggetti e accessori:
1. fili di diversi tessuti: cotone, lino, lana,seta, sintetico, nilon, etc.
2. due aghi
Disporre ciascun filo su un diverso vetrino portaoggetti e sfibrarlo con
l’aiuto degli aghi. I fili vengono inumiditi e coperti con un coprivetrino. Il microscopio viene regolato su un valore di ingrandimento basso.
Le fibre del cotone sono di origine vegetale e al microscopio hanno
l’aspetto di un nastro piatto e ritorto. Le fibre sono più spesse e più
tondeggianti ai lati che non al centro. Le fibre di cotone sono in fondo dei lunghi tubicini afflosciati. Anche le fibre di lino sono di origine
naturale, sono tondeggianti e lineari. Le fibre luccicano come la seta
e presentano numerosi rigonfiamenti sul tubicino della fibra. La seta è
32
di orgine animale ed è costituita da fibre robuste e di piccolo diametro
in confronto alle fibre cave vegetali. Ogni fibra presenta una superficie liscia ed omogenea e sembra un filo d’erba. Anche le fibre della
lana sono di origine animale e la loro superficie è composta da involucri sovrapposti, dall’apparenza sconnessa e ondulata. Se possibile,
confrontare le fibre della lana di diversi fabbriche tessili: si possono
osservare differenze nell’aspetto delle fibre. In base ad esse gli esperti
riescono a stabilire il paese d’origine della lana. La seta sintetica, come
indica il nome stesso, è prodotta in modo artificiale attraverso un lungo
processo chimico. Tutte le fibre mostrano delle linee dure e scure lungo la superficie liscia e lucida. Una volta asciutte le fibre si increspano
in modo uniforme. Osservi i tratti comuni e le differenze.
NOTE per la pulizia
• Prima di procedere con la pulizia, staccare l’apparecchio dalla
sorgente di corrente (rimuovere le batterie)!
• Pulire l’apparecchio soltanto con un panno asciutto. Non utilizzare
liquidi detergenti per evitare danni ai componenti elettronici.
• Proteggere l’apparecchio dalla polvere e dall’umidità!
• Togliere le batterie dall’apparecchio nel caso non venga utilizzato
per un periodo prolungato!
Dichiarazione di conformità CE
Bresser GmbH ha redatto una “dichiarazione di conformità”
in linea con le disposizioni applicabili e le rispettive norme. Su
richiesta, è visionabile in qualsiasi momento.
Page 33

SMALTIMENTO
Smaltire i materiali di imballaggio in maniera differenziata. Le informazioni su uno smaltimento conforme sono disponibili presso
il servizio di smaltimento comunale o l’Agenzia per l’ambiente locale.
Non smaltire gli apparecchi elettronici con i rifiuti domestici!
Secondo la Direttiva Europea 2002/96/CE riguardante gli ap-
parecchi elettrici ed elettronici usati e la sua applicazione nel diritto nazionale, gli apparecchi elettronici usati devono essere raccolti
in maniera differenziata e destinati al riciclaggio ecologico. Le batterie
e gli accumulatori scarichi devono essere smaltiti dall’utilizzatore negli
appositi contenitori di raccolta. Le informazioni degli apparecchi o delle batterie usate prodotte dopo il 01.06.2006 sono disponibili presso
il servizio di smaltimento o l’Agenzia per l’ambiente locale.
Le batterie normali e ricaricabili devono essere correttamente
smaltiti come sta previsto dalla legge. È possibile tornare batterie
inutilizzati presso il punto di vendita o cedere in centri di raccolta organizzati dai comuni per la raccolta gratuitamente.
Le batterie normali e ricaricabili sono contrassegnati con il simbolo
corrispondente disposte per lo smaltimento e il simbolo chimico della
sostanza inquinante.
1
Batteria contiene cadmio
2
Cd¹ Hg² Pb³
Batteria contiene mercurio
3
Batteria contiene piombo
IT
33
Page 34

Advertencias de carácter general
• RIESGO DE AXFISIA Este producto contiene piezas pequeñas que
un niño podría tragarse. Hay RIESGO DE AXFISIA.
• ¡PELIGRO DE DESCARGA ELÉCTRICA! Este aparato contiene
componentes electrónicos que funcionan mediante una fuente de
electricidad (pilas). No deje nunca que los niños utilicen el aparato sin
supervisión. El uso se deberá realizar de la forma descrita en el manual; de lo contrario, existe PELIGRO de DESCARGA ELÉCTRICA.
•
¡PELIGRO DE INCENDIO/EXPLOSIÓN! No exponga el aparato a
altas temperaturas. Utilice exclusivamente las pilas recomendadas.
¡No cortocircuitar ni arrojar al fuego el aparato o las pilas! El calor
excesivo y el manejo inadecuado pueden provocar cortocircuitos,
incendios e incluso explosiones.
• ¡PELIGRO DE ABRASIÓN! No dejar las pilas al alcance de los niños.
Al colocar las pilas, preste atención a la polaridad. Las pilas descargadas o dañadas producen causticaciones al entrar en contacto con la
piel. Dado el caso, utilice guantes protectores adecuados.
•
No desmonte el aparato. En caso de que exista algún defecto, le
rogamos que se ponga en contacto con su distribuidor autorizado.
Este se pondrá en contacto con el centro de servicio técnico y, dado
el caso, podrá enviarle el aparato para su reparación.
• ¡PELIGRO de lesiones corporales! Para trabajar con este apa-
rato se emplean con frecuencia instrumentos auxiliares afilados y
punzantes. Por ello, guarde este aparato y todos los accesorios e
instrumentos auxiliares en un lugar fuera del alcance de los niños.
¡Existe PELIGRO DE LESIONES!
Resumen
1. Ocular
2. Tornillo micrométrico
3. Cabeza revólver con objetivos
4. Platina
5. Interruptor de encendido/apagado (Iluminación)
6. Iluminación eléctrica
7. Base con compartimento de pilas
8. Compartimento de las pilas (3x AA)
9. Cubiertas de cristal
10. Preparaciones permanentes
11. Recipiente colector
12. Instrumental de microscopio
13. Rueda de transmisión de luz
14. Tazas de medición
15. Instalación para la incubación
16. MicroCut
1. ¿Qué es un microscopio?
El microscopio se compone de dos sistemas de lentes: el ocular y el
objetivo. Para que sea más fácil de entender, nos representamos estos
sistemas como si cada uno fuera una lente. Sin embargo, tanto el ocular
(1) como los objetivos que hay en el revólver (3) se componen de varias
lentes. La lente inferior (objetivo) aumenta la preparación, de modo que
se genera una representación aumentada de dicha preparación. Esta
imagen, que no se ve, vuelve a ser aumentada por la segunda lente
(ocular, 1), y es entonces cuando ves la «imagen de microscopio».
34
Page 35

2. Montaje y lugar de observación
Antes de empezar debes elegir un lugar apropiado para practicar
observaciones con tu microscopio. Por una parte, es importante que
haya luz suficiente. Además te recomiendo que coloques el microscopio sobre una base estable, ya que si el soporte se tambalea no se
pueden obtener resultados visuales satisfactorios.
3. Observación normal
Al hacerlo, ten en cuenta que al modificar el aumento también es necesario ajustar de nuevo la nitidez de imagen, y cuanto mayor sea el
aumento, más luz se necesitará para que la imagen esté bien iluminada.
La rueda de transmisión de luz (13) debajo de la platina del microscopio (4) le ayudará con la visualización de preparaciones muy brillantes
o claras. Gire la rueda (13) hasta que se logre el mejor contraste.
4. Observación (Iluminación eléctrica)
ES
Para la observación normal, debes colocar el microscopio en un
lugar donde haya claridad (junto una ventana o un flexo). Gira el tornillo micrométrico (2) hasta el tope superior y ajusta el revólver con
objetivos (3) al aumento más pequeño.
Ahora, encienda la luz usando el interruptor en la base del microscopio. Encontrarás más consejos sobre la lámpara en el siguiente
apartado. Ahora debes introducir una preparación permanente bajo
las pinzas que hay sobre la platina (4), justo debajo del objetivo. Si
miras ahora por el ocular (1), podrás ver la preparación aumentada.
Quizá veas la imagen algo difusa todavía. Puedes ajustar la nitidez de
imagen girando lentamente el tornillo micrométrico (2). Ahora puedes
seleccionar un aumento mayor girando el revólver con objetivos y ajustando un objetivo distinto.
Para la observación con la fuente de luz electrónica (6) necesita insertar 3 AA pilas de 1.5V, en el compartimento de las pilas (8) en la
base del microscopio (7). El compartimento de las pilas se abre usando un destornillado Phillips. Inserte las pilas con la polaridad correcta
(+/- indicación). Coloque primero la tapa de las pilas en la pequeña
abertura para que la tapa encaje perfectamente. Ahora puede apretar
el tornillo.
La iluminación se enciende cuando se enciende el interruptor de la
base del microscopio. Ahora puede observar del mismo modo descrito en la sección anterior.
CONSEJO: Cuanto mayor sea el aumento ajustado, mayor cantidad
de luz se necesitará para que la imagen tenga una buena iluminación.
35
Page 36

Por tanto, comienza tus experimentos siempre con un aumento pequeño.
5. Objeto de observación – Adecuación y preparación
5.1. Adecuación del objeto de observación
contemplarse objetos transparentes. En caso de materia transparente, la luz cae en la platina a través del propio objeto. Gracias a las
lentes tanto del objetivo, como del ocular, éste se aumenta y llega así
a nuestro ojo (Principio de la luz transmitida).
Muchos microorganismos del agua, así como diversos componentes
de plantas y animales de diminuto son transparentes por naturaleza,
mientras que otros deben prepararse según corresponda antes de
observarlos. En el apartado siguiente le explicaremos cuáles son los
métodos que debe seguir en cada caso, independientemente de si los
convierte en transparentes mediante un pretratamiento o la inyección
de sustancias (fluidos) adecuados o de si se decide recortar láminas
extremadamente finas de los mismos (manual o con un microcut) para
observarlas a continuación.
5.2. Creación de segmentos delgados de cultivo
Tal como hemos descrito anteriormente, de preferencia se han de preparar los objetos en capas finas. Para conseguir mejores resultados
necesitaremos un poco de cera o parafina. Coja, por ejemplo una
vela. Se deja caer la cera en un recipiente y posteriormente se calienta
con una llama.
¡PELIGRO!
Tenga mucho cuidado cuando se utiliza la cera caliente,
se corre el riesgo de quemaduras!
Se sumerge el objeto varias veces en la cera líquida. Deje que ésta se
solidifique. Corte trozos muy finos del objeto que está ahora envuelto
en cera con un microcut o un cuchillo / escalpelo.
¡PELIGRO!
¡Tenga especial cuidado a la hora de manejar cuchillos/
escalpelos o el MicroCut! ¡Existe un elevado riesgo de
lesiones a causa de sus superficies afiladas!
Coloque estos trozos en un portaobjetos de vidrio y tápelos con un
cubreobjetos.
5.3. Elaboración de un cultivo propio
continuación, utilice una pipeta para verter una gota de agua destilada
sobre dicho objeto.
Coloque un cubreobjetos (de venta en cualquier establecimiento especializado que esté bien surtido) en sentido perpendicular al borde
de la gota de agua, de modo que ésta transcurra a lo largo del borde del cubreobjetos. Ahora baje lentamente el cubre objetos sobre la
gota de agua.
36
Page 37

6. Experimentos
Una vez que se haya familiarizado con el microscopio podrá realizar
los siguientes experimentos y obtener los siguientes resultados con
su microscopio.
6.1. ¿Cómo se crían gambas en agua salada?
Accesorios (de tu set de microscopio):
1. huevos de gamba,
2. sal marina,
3. recipiente de incubación,
4. levadura.
El ciclo vital de las gambas de agua salada
Las gambas de agua salada, también llamadas «Artemia salina» por
los científicos, atraviesan un ciclo vital muy particular y de gran interés.
Los huevos producidos por las hembras se incuban sin necesidad de
haber sido fecundados nunca por las gambas macho. Las gambas que
salen de estos huevos son todas ellas hembras. Bajo circunstancias
poco habituales, por ejemplo cuando el pantano se seca, es posible
que salgan de los huevos gambas macho. Estos machos fecundan los
huevos de las hembras, y de este apareamiento surgen huevos especiales. Dichos huevos, conocidos como «huevos de invierno», presentan una cáscara gruesa que los protege. Los huevos de invierno son
muy resistentes y se mantienen con vida incluso cuando el pantano o
el lago se secan y se provoca así la muerte de toda la población de
gambas. Pueden perdurar entre 5 y 10 años en este estado «durmiente» o de hibernación. Los huevos se incuban cuando vuelven a darse
en el entorno las circunstancias propicias. Éstos son los huevos que
puedes encontrar en tu set de microscopio.
La incubación de las gambas de agua salada
Para incubar las gambas, en primer lugar es necesario elaborar una
solución de sal que se corresponda con las condiciones vitales de las
mismas. Para ello tienes que llenar un recipiente con medio litro de
agua corriente o de lluvia. Después debes dejar reposar dicha agua
aproximadamente 30 horas. Dado que el agua se evapora con el paso
del tiempo, se recomienda llenar con agua un segundo recipiente del
mismo modo y dejarla reposar durante 36 horas. Una vez que el agua
ha «reposado» durante este tiempo, debes echar la mitad de la sal
marina suministrada en el recipiente y revolverlo hasta que se haya
disuelto por completo. Ahora echas algunos huevos en el recipiente
y lo cubres con un plato. Coloca el tarro en un sito donde haya claridad, pero evita exponer el recipiente a la luz directa del sol. Dado
que dispones de un recipiente de incubación, también puedes echar
la solución salina junto con algunos huevos en cada uno de los cuatro
compartimentos del mismo. La temperatura debe ascender a 25 ºC.
A esta temperatura, la gamba sale del huevo aproximadamente tras
2 o 3 días. Si durante este tiempo se evapora el agua del recipiente,
puedes añadirle agua del segundo recipiente.
La gamba de agua salada bajo el microscopio
El animal que sale del huevo se conoce con el nombre de «larva de
Nauplius». Con la ayuda de la pipeta puedes colocar algunas de estas
larvas en un cristal portaobjetos y observarlas.
La larva se mueve por el agua salada ayudándose de sus protuberancias en forma de pelo. Toma cada día algunas larvas del recipiente
y obsérvalas con el microscopio. Si has introducido las larvas en un
recipiente de incubación, sólo tienes que levantar la tapa superior del
ES
37
Page 38

recipiente y colocarlo sobre la platina. Dependiendo de la temperatura
ambiente, la larva se habrá desarrollado en el plazo de 6 a 10 semanas. Pronto habrás criado toda una generación de gambas de agua
salada, cuyo número irá aumentando cada vez más.
Cómo alimentar a tus gambas de agua salada
Naturalmente, para mantener con vida a las gambas de agua salada,
es necesario echarles alimento de vez en cuando. Esto debe hacerse
con cuidado, ya que una sobrealimentación conlleva como consecuencia que el agua se deteriore y nuestra población de gambas se
envenenaría. Lo mejor es alimentarlas con levadura seca en polvo. Es
suficiente un poco de esta levadura cada dos días. Cuando el agua
que hay en el compartimento del recipiente de incubación o en tu
recipiente se ponga oscura, se trata de un signo de que se está deteriorando. Extrae entonces inmediatamente las gambas del agua e
introdúcelas en una solución salina fresca.
¡Cuidado!
¡Los huevos de gamba y las gambas no son aptas para
su consumo!
6.2. Fibras textiles
Objetos y accesorios:
1. Hilos de diversos tejidos: algodón, lino, lana, seda, rayón, nylon, etc.
2. Dos agujas
Coloque cada hilo en un portaobjetos de vidrio y únalos con ayuda de las dos agujas. Humedezca los hilos y cúbralos con un
38
cubreobjetos. Ajuste el microscopio a un aumento bajo. Las fibras de algodón son de origen vegetal y aparecen debajo del
microscopio como una banda plana y retorcida. Las fibras son más
gruesas y redondas en los bordes que en el centro. Las fibras de
algodón parecen tubitos largos y contraídos. Por su parte, las fibras de
lino son también de origen vegetal, son redondas y transcurren en línea
recta. Las fibras brillan como la seda y muestran numerosos abultamientos en el filamento de la fibra. La seda es de origen animal y consta de
una cantidad masiva de fibras de pequeño diámetro, lo que las diferencia de las fibras vegetales huecas. Cada fibra es lisa y homogénea y
tiene el aspecto de un pequeño bastoncito de vidrio. Las fibras de lana
son de origen animal y la superficie consta de cápsulas solapadas que
aparecen discontinuas y onduladas. Si es posible, compare las fibras
de algodón de diversos tejidos y observe el diferente aspecto que éstas
presentan. Los expertos pueden deducir a partir de este hecho el país de
origen del tejido. El rayón tiene un origen sintético y se fabrica mediante
un largo proceso químico. Todas las líneas muestran líneas duras y oscuras sobre una superficie lisa y brillante. Las fibras se rizan después de
secarse en el mismo estado. Observe las similitudes y las diferencias.
INSTRUCCIONES de limpieza
• Antes de limpiar el aparato, desconéctelo de la fuente de electricidad
(quite las pilas).
• Limpie solamente el exterior del aparato con un paño seco. No utilice
productos de limpieza para evitar daños en el sistema electrónico.
• ¡Proteja el aparato del polvo y la humedad!
• Se deben retirar las pilas del aparato si no se va a usar durante un
periodo prolongado.
Page 39

Declaración de conformidad
Bresser GmbH ha emitido una “Declaración de conformidad”
de acuerdo con las directrices y normas correspondientes.
Esto se puede ver en cualquier momento, previa petición.
ELIMINACIÓN
Elimine los materiales de embalaje separados por tipos. Obten-
drá información sobre la eliminación reglamentaria en los
proveedores de servicios de eliminación municipales o en la agencia
de protección medioambiental.
¡No elimine los electrodomésticos junto con la basura domésti-
ca! Conforme a la directiva europea 2002/96/UE sobre apara-
tos eléctricos y electrónicos usados y a su aplicación en la legislación nacional, los aparatos eléctricos usados se deben recoger por
separado y conducir a un reciclaje que no perjudique al medio ambiente. Las pilas y baterías descargadas deben ser llevadas por los consumidores a recipientes de recogida para su eliminación. En los
proveedores de servicios de eliminación municipales o en la agencia
de protección medioambiental podrá obtener información sobre la
eliminación de aparatos o pilas usados fabricados después del 01-06-
2006.
De acuerdo con la normativa en materia de pilas y baterías recar-
gables, está explicitamente prohibido depositarlas en la basura
normal. Por favor, preste atención a lo que la normativa obliga cuando
usted quiera deshacerse de estos productos - sobre puntos de recogida municipal o en el mercado minorista (disposición sobre violación
de la Directiva en materia de los residuos domésticos- pilas y baterías-). Las pilas y baterías que contienen productos tóxicos están
marcados con un signo y un símbolo químico.
1
pila que contiene cadmio
2
Cd¹ Hg² Pb³
pila que contiene mercurio
3
pila que contiene plomo
ES
39
Page 40

Общие предупреждения
• ОПАСНОСТЬ УДУШЕНИЯ! Данное устройство содержит мелкие
детали, которые дети могут проглотить. Существует опасность
УДУШЕНИЯ!
• ОПАСНОСТЬ ПОРАЖЕНИЯ ЭЛЕКТРОТОКОМ!
Данное устройство содержит электронные компоненты,
приводимые в действие от источника тока (батарейки).
Устройство следует использовать только так, как указано в
инструкции, иначе есть серьезный риск получить УДАР ТОКОМ.
• ОПАСНОСТЬ ПОЖАРА / ВЗРЫВА! Не допускайте нагревания
устройства до высокой температуры. Используйте только
рекомендованные батарейки. Не закорачивайте устройство и
батарейки, не бросайте их в огонь! Перегрев и неправильное
обращение могут стать причиной короткого замыкания, пожара
и даже взрыва!
• ОПАСНОСТЬ ПОЛУЧЕНИЯ ОЖОГА! Исключите доступ детей
к батарейкам! При установке/замене батареек соблюдайте
полярность. Вытекшие или поврежденные батарейки вызывают
раздражения при контакте с кожей. В случае необходимости
надевайте подходящие защитные перчатки.
• Никогда не разбирайте устройство. При возникновении
неисправностей обратитесь к дилеру. Он свяжется с нашим
сервисным центром и при необходимости отправит устройство в
ремонт.
• При пользовании данным устройством может потребоваться
применение инструментов с острыми краями. Храните
устройство, принадлежности и инструменты в недоступном для
детей месте. Существует риск получить ТРАВМУ!
Детали микроскопа
1. Окуляр
2. Ручка фокусировки
3. Револьверное устройство
4. Предметный столик
5. Выключатель подсветки
6. Подсветка
7. Основание с батарейным отсеком
8. Батарейный отсек (3x AA)
9. Покровные стекла
10. Готовые микропрепараты
11. Флаконы
12. Инструменты для работы с препаратами
13. Диск с диафрагмами
14. Измерение чашки
15. Коробочка для разведения артемии
16. Микротом
1. Что такое микроскоп?
Микроскоп – это оптическая система, состоящая, в свою очередь,
из двух оптических систем (окуляр и объектив). Для простоты
понимания можно представить, что и окуляр, и объектив состоят
из одной линзы, но на самом деле в каждой из этих деталей несколько линз.
Объектив в револьверном устройстве (3) увеличивает изображение микропрепарата, а затем полученное изображение увеличивается еще раз в окуляре (1). Следовательно, наблюдая микропрепарат в окуляр, вы видите дважды увеличенное изображение
этого микропрепарата.
40
Page 41

2. Сборка и установка
Прежде чем приступить к наблюдениям, выберите подходящее
место для микроскопа. С одной стороны, в комнате должно быть
достаточно света для обычных наблюдений. С другой — не стоит
забывать, что микроскоп должен стоять на устойчивой и ровной
поверхности. Пожалуй, лучшим местом для размещения микроскопа будет стол у окна со шторами.
3. Обычные наблюдения
резкости изображения, и вам придется настроить фокус повторно.
Также не забывайте, что на большем увеличении потребуется
больше света для освещения микропрепарата.
Диск с диафрагмами (13), расположенный под предметным столиком (4), поможет вам наблюдать очень яркие или прозрачные
препараты. Поворачивайте диск (13), пока не добьетесь наилучшей контрастности.
4. Подсветка
RU
Поставьте микроскоп в хорошо освещенное место, например у
окна или рядом с настольной лампой. Выберите объектив (3) с
наименьшим увеличением и поворачивайте ручки фокусировки
(2) до тех пор, пока оптическая трубка не будет на максимальном
расстоянии от предметного столика.
Включите подсветку (6) с помощью переключателя на основании
микроскопа. Положите готовый микропрепарат на предметный
столик (4), прямо под объектив. Закрепите микропрепарат зажимами. Если вы посмотрите в окуляр, то должны увидеть там
увеличенное изображение микропрепарата. Если изображение
нечеткое, резкость можно легко настроить, плавно поворачивая
ручки фокусировки (2). Теперь вы можете выбрать объектив с
большим увеличением и рассмотреть микропрепарат в деталях.
Обратите внимание на то, что смена объектива приведет к потере
Для наблюдений с подсветкой (6) вставьте 3 батарейки AA 1,5 В
в батарейный отсек (8), расположенный в основании микроскопа
(7). Батарейный отсек можно открыть с помощью крестовой отвертки. При установке батареек соблюдайте полярность (обозначена знаками +/- ). Затем поставьте крышку батарейного отсека
на место, сначала вдвинув выступ крышки в маленький паз, и
закрутите винт.
Подсветка включается при помощи переключателя, расположенного на основании микроскопа. Теперь можно приступать к наблюдениям (процесс наблюдений подробно описан в предыдущем
разделе).
41
Page 42

Примечание: Чем выше увеличение оптической системы, тем
больше света требуется для равномерного освещения микропрепарата. Всегда старайтесь начинать наблюдения с меньшего
увеличения.
ВНИМАНИЕ!
Будьте предельно осторожны, производя эту операцию:
старайтесь не порезаться о скальпель или микротом!
5. Изучаемый объект – условия и подготовка
5.1. Условия
Данный микроскоп позволяет изучать прозрачные объекты. При
изучении прозрачных объектов свет проходит сквозь препарат, и
изображение увеличивается, пройдя через оптическую систему
микроскопа (так называемый «метод проходящего света»).
Многие водные организмы, части растений и мельчайшие части
животных прозрачны от природы; другим же требуется предварительная подготовка — необходимо сделать тончайший срез образца (с помощью микротома или скальпеля), а затем уже изучать
полученный препарат.
5.2. Подготовка микропрепарата
Как сказано ранее, необходимо сделать тончайший срез объекта.
Для этого вам потребуется немного воска или парафина (можете
взять обыкновенную свечу): небольшое количество воска растапливается в ванночке, после чего препарат несколько раз окунается в получившуюся жидкость.
Когда воск затвердеет, воспользуйтесь микротомом или острым
скальпелем, чтобы сделать тонкий продольный срез объекта в
восковой оболочке.
42
Поместите изготовленный срез на предметное стекло и накройте
его покровным стеклом.
5.3. Создание микропрепарата
Положите подготовленный объект на предметное стекло и при помощи пипетки нанесите на объект несколько капель дистиллированной воды.
Возьмите покровное стекло и поставьте его вертикально на предметное стекло, на край капли воды. Аккуратно опустите покровное
стекло поверх капли.
6. Эксперименты
Узнав принципы работы с микропрепаратами, попробуйте провести следующие исследования:
6.1. Артемия
Вам понадобится:
1. Флакон с артемией
2. Морская соль
3. Инкубатор
4. Дрожжи
Цикл жизни артемии
Артемия – это маленький рачок, проживающий в морской воде, с
необычным и крайне интересным циклом жизни. Рачки вылупля-
Page 43

ются из яиц, даже если самец не осеменил кладку. Все вылупившиеся рачки – самки. В особо тяжелых условиях (например, при
высыхании среды обитания) из яиц вылупляются самцы, которые
оплодотворяют отложенные яйца. В результате оплодотворения
яйца переходят в состояние диапаузы. Эмбрион, защищенный
плотной яйцевой оболочкой, может пережить высыхание водоема
и экстремальные температуры на протяжении нескольких лет. Как
только условия, пригодные для жизнедеятельности рачков, восстанавливаются, из яиц вылупляются рачки и колония восстанавливается. Во флаконе находятся яйца артемии в состоянии диапаузы.
Разведение артемии
Прежде всего необходимо создать соляной раствор, пригодный
для жизни артемии. Возьмите пол-литра дождевой воды или воды
из-под крана и налейте в подходящий контейнер. Оставьте его на
тридцать часов. Так как вода испаряется с течением времени, подготовьте аналогичный контейнер с водой и оставьте его на тридцать
шесть часов. Через тридцать часов высыпьте в первый контейнер
половину флакона с морской солью и тщательно размешайте. Вылейте часть воды в инкубатор для артемии и добавьте немного яиц
из флакона. Закройте инкубатор крышкой и поставьте его в хорошо
освещенное место (не под прямые солнечные лучи). Температура
воды должна быть в районе 25 °С. При такой температуре рачки
вылупятся через два-три дня. Испарившуюся воду восполняйте из
заготовленного заранее контейнера.
Артемия под микроскопом
Из яиц вылупляются так называемые науплиусы, которых мы и будем изучать. При помощи пипетки наберите небольшое количество
воды с рачками из инкубатора и подготовьте препарат. Под микроскопом видно, что рачки передвигаются при помощи многочис-
ленных конечностей, похожих на волосы. Повторяйте наблюдения
каждый день и делайте снимки рачков при помощи встроенной камеры. При желании можно поставить под микроскопом и сам инкубатор, предварительно сняв с него крышку. Во взрослых рачков
науплиусы превратятся через шесть-десять недель, в зависимости
от температуры окружающей среды. Через некоторое время у вас
появится собственная колония рачков и фотоальбом их жизненного цикла.
Кормление артемии
Рачков необходимо кормить, чтобы колония продолжала жить. Для
этого можно воспользоваться сухими дрожжами, поставляемыми
в комплекте с микроскопом. Кормите рачков через день и старайтесь не насыпать слишком много, так как это может привести к
отравлению воды и гибели колонии. Если вода начнет темнеть –
это значит, что она испортилась. Немедленно пересадите рачков в
свежий соленый раствор и слейте старую воду.
Внимание!
артемия не пригодна для употребления в пищу!
6.2. Нити
Вам потребуется:
1. Нити разных тканей: хлопок, лен, шерсть, шелк, нейлон и т. п.;
2. Две иглы.
Положите каждую нить на стекло, размочальте их при помощи игл,
затем смочите и накройте покровным стеклом. Получившиеся препараты исследуйте на малом увеличении. Хлопок — растительный
материал — выглядит под микроскопом как плоское, скрученное
RU
43
Page 44

волокно. Волокна, похожие на длинные трубки, толще на концах
и сужаются к середине. Лен — еще один пример растительного
материала: волокна круглые, блестящие, вытянутые по прямой и с
узкими канальцами в середине. Шелк — материал животного происхождения, состоит из плотных волокон (не полых, в отличие от
растительных волокон), которые меньше в диаметре, чем волокна,
например, льна. Каждая ниточка гладкая, похожая на стеклянную
палочку. Шерсть также животного происхождения, поверхность
волокон чешуйчатая. По возможности сравните нити шерсти разных производителей и обратите внимание на их различия. Настоящие эксперты по строению волокон могут определить страну происхождения шерсти. Можете продолжить изучение других волокон
самостоятельно, обращая внимание на их сходства и различия.
СОВЕТЫ по уходу
• Перед чисткой отключите устройство от источника питания
(выньте батарейки)!
• Протирайте поверхности устройства сухой салфеткой. Не
используйте чистящую жидкость, она может повредить
электронные компоненты.
• Берегите устройство от пыли и влаги.
• Если устройство не будет использоваться в течение длительного
времени, выньте из него батарейки!
Сертификат соответствия ЕС
Сертификат соответствия был составлен с учетом действующих правил и соответствующих норм компанией Bresser
GmbH. Его можно просмотреть по запросу в любое время.
УТИЛИЗАЦИЯ
Утилизируйте упаковку как предписано законом. При необходимости проконсультируйтесь с местными властями.
Не выбрасывайте электронные детали в обычный мусорный
контейнер. Европейская директива по утилизации электрон-
ного и электрического оборудования 2002/96/EU и соответствующие ей законы требуют отдельного сбора и переработки подобных устройств.
Использованные элементы питания следует утилизировать отдельно. Подробную информацию об утилизации электроники можно
получить у местных властей.
Элементы питания не являются бытовыми отходами, поэтому
в соответствии с законодательными требованиями их необходимо сдавать в пункты приема использованных элементов питания. Вы можете бесплатно сдать использованные элементы питания в нашем магазине или рядом с вами (например, в торговых
точках или в пунктах приема).
На элементах питания изображен перечеркнутый контейнер, а также указано содержащееся ядовитое вещество.
1
Элемент питания содержит кадмий
2
Cd¹ Hg² Pb³
Элемент питания содержит ртуть
3
Элемент питания содержит свинец
44
Page 45

Všeobecné výstražné pokyny
• NEBEZPEČÍ UDUŠENÍ!
Tento výrobek obsahuje malé díly, které by děti mohly spolknout!
Hrozí NEBEZPEČÍ UDUŠENÍ!
• NEBEZPEČÍ ÚRAZU ELEKTRICKÝM PROUDEM! Tento přístroj
obsahuje elektronické součásti, které jsou provozovány pomocí
zdroje proudu (baterie). Neponechávejte děti při manipulaci s
přístrojem nikdy bez dozoru! Přístroj se smí používat pouze tak,
jak je popsáno v návodu, v opačném případě hrozí NEBEZPEČÍ
ZASAŽENÍ ELEKTRICKÝM PROUDEM!
• NEBEZPEČÍ POŽÁRU/VÝBUCHU!
Zařízení nevystavujte vysokým teplotám. Používejte pouze
doporučené baterie. Zařízení ani baterie nezkratujte a neodhazujte
do ohně! Nadměrné horko a nevhodná manipulace mohou způsobit
zkrat, požár nebo dokonce výbuch!
• NEBEZPEČÍ POLEPTÁNÍ!
Baterie nepatří do rukou dětí! Při vkládání baterie dbejte na správnou
polaritu. Vybité nebo poškozené baterie způsobují poleptání, pokud
se dostanou do styku s pokožkou. Používejte popřípadě ochranné
rukavice.
• Přístroj nerozebírejte! Obraťte se v případě závady na vašeho
odborného prodejce. Prodejce se spojí se servisním střediskem a
může přístroj příp. zaslat do servisního střediska za účelem opravy.
• Pro práci s tímto přístrojem se často používají ostrohranné a špičaté
pomocné prostředky. Ukládejte proto tento přístroj a také všechny
části příslušenství a pomocné prostředky na místě nepřístupném pro
děti. Hrozí NEBEZPEČÍ ZRANĚNÍ!
Přehled součástí
1. Okulár
2. Kolečko zaostření
3. Revolverová hlava s objektivy
4. Předmětový stolek
5. Zapínač/vypínač (osvětlení)
6. Elektrické osvětlení
7. Podstavec se schránkou na baterie
8. Schránka na baterie (3x AA)
9. Krycí sklíčka
10. Trvalé preparáty
11. Sběrná nádoba
12. Souprava pro mikroskopování
13. Kolečko clony
14. Odměrný pohárek
15. Zařízení líhně
16. MicroCut
1. Co to je mikroskop?
Mikroskop se skládá ze dvou systémů čoček: okuláru a objektivu. Aby
to bylo snadno pochopitelné, představíme si každý z těchto systémů
jako jedinou čočku. Ve skutečnosti se však okulár (1) i objektivy v revolveru (3) skládají z několika čoček.
Spodní čočka (objektiv) zvětšuje preparát, čímž vzniká zvětšený obraz
tohoto preparátu. Tento obraz, který nevidíme, je druhou čočkou (okulár, 1) ještě jednou zvětšen. Potom vidíš „obraz mikroskopu“.
CZ
45
Page 46

2. Instalace a umístění
Než začneš, zvol si pro mikroskopování vhodné stanoviště. Důležité
je jednak to, abys měl/a zajištěn dostatečný přísun světla, dále
doporučujeme, abys mikroskop umístil/a na stabilní podložku, neboť
na nerovném povrchu nelze docílit uspokojivých výsledků.
3. Běžné pozorování
Pro běžné pozorování umísti mikroskop na světlé místo (u okna, stolní
lampy). Nastavováním ostrosti (2) otáčej až do horní zarážky, čímž se
revolver objektivu (3) nastaví na nejmenší zvětšení (zobrazení: 50x100x). Nyní zapni vypínačem na podstavci mikroskopu osvětlení.
Ohledně osvětlení najdeš další tipy v následující části. Nyní se podívej
okulárem a zrcátko (5) nastav tak, abys získal/a rovnoměrný světelný
okruh. Případně použij lampu. K použití lampy nalezneš další tipy v
dalším oddíle. Nyní zasuň svůj trvalý preparát pod svorky na stůl na objekty (4), přesně pod objektiv. Pokud se nyní podíváš okulárem, uvidíš
zvětšeninu preparátu. Možná to bude ještě trochu nejasný obrázek.
Ostrost obrazu se nastavuje pomalým otáčením nastavování ostrosti
(2). Nyní můžeš zvolit vyšší zvětšení otáčením revolveru objektivu a nastavením na jiný objektiv.
Při změně zvětšení se musí znovu upravit ostrost obrazu. Čím větší je
zvětšení, tím více světla je zapotřebí pro dobré prosvětlení obrazu.
46
4. Pozorování (Elektrické osvětlení)
Pro pozorování s elektrickým osvětlením (6) potřebuješ 3 baterie o velikosti AA a napětí 1,5 V, které se vkládají do schránky na baterie (8)
na podstavci mikroskopu (7). Schránka na baterie se otvírá křížovým
šroubovákem. Při vkládání baterií dej pozor na správnou polaritu (údaj
+/-). Nyní se musí víčko schránky baterií nejprve zastrčit doprava do
malého otvoru tak, aby víčko přesně sedělo. Nyní můžeš utáhnout
šroub. Osvětlení se zapne spínačem na podstavci mikroskopu. Nyní
můžeš začít s pozorováním stejně, jako je popsáno v bodě 3.
TIP: Čím vyšší je nastavené zvětšení, tím více světla je zapotřebí pro dobré prosvětlení obrazu. S pokusy proto začínej vždy při malém zvětšení.
5. Objekt pozorování –
Povaha objektu a preparování
5.1. Povaha objektu pozorování
S tímto mikroskopem, tzv. mikroskopem pro dopadající/procházející
světlo, můžete pozorovat průhledné i neprůhledné preparáty. Jestliže
tímto mikroskopem pozorujeme neprůhledné objekty, například malé
živočichy, části rostlin, tkaniny, minerály a pod., světlo dopadá na pozorovaný objekt, odráží se od něj a zvětšené pomocí objektivu a okuláru dopadá do oka (princip dopadajícího světla, nastavení přepínače:
„I“). V případě průhledných (transparentních) objektů dopadá světlo
Page 47

na pozorovací stolík s preparátem zdola a obraz objektu po zvětšení
objektivem a okulárem dopadá do našeho oka (princip procházejícího
světla, poloha přepínače: „II“). Mnoho malých živých organismů žijících
ve vodě, částí rostlin a těch nejjemnějších částí živočichů je takto
průsvitných již ze své povahy, ostatní je
třeba nejprve odpovídajícím způsobem vypreparovat. To je možno provést tak, že je zprůhledníme během přípravného zpracování nebo tím,
že je ponecháme proniknout vhodnou látkou (médiem), nebo tak, že
odřežeme velmi tenké plátky (ručně nebo tzv. mikrotomy) a ty pak budeme zkoumat. Tyto postupy blížeji vysvětlíme v následující části.
5.2. Vytvoření tenčích řezů preparátů
Jak jsme uvedli, z objektu je zapotřebí připravit co nejtenčí řezy.
Nejlepších výsledků dosáhnete, jestliže použijete trochu vosku nebo parafínu. Použijte například běžnou svíčku. Vložte vosk do hrnce a zahřejte
nad plamenem. Objekt nyní opakovaně namočte do tekutého vosku.
NEBEZPEČÍ!
Buď nanejvýš opatrný při zacházení s voskem, hrozí
nebezpečí popálení!
Vosk nechejte ztvrdnout. Pomocí MicroCut případně pomocí nože/
skalpelu (opatrně!!!) nyní z objektu obaleného ve vosku nařezejte
tenké řezy.
NEBEZPEČÍ!
Buď nanejvýš opatrný při zacházení s noži/skalpely nebo
MicroCutem! Hrozí zvýšené nebezpečí poranění od jejich
ostrých hran!
Tyto řezy položte na podložní sklíčko a zakryjte krycím sklíčkem.
5.3. Vytváření vlastního preparátu
Položte objekt, který chcete pozorovat, na podložní sklíčko a pomocí
kapátka k němu přidejte kapku destilované vody.
CZ
Položte krycí sklíčko (obdržíte v každém dobře zásobovaném obchodu
s pomůckami pro hobby) vertikálně na hranu ke kapce vody tak, aby
voda procházela podél hrany krycího sklíčka. Nyní opatrně pokládejte
krycí sklíčko na kapku vody.
6. Experimenty
Pokud jste se již blíže seznámili s mikroskopem, můžete provádět tyto
experimenty a výsledky pak sledovat pod mikroskopem.
6.1. Jak se pěstují žábronožky solné?
Příslušenství:
1. vajíčka garnátů,
2. mořská sůl,
3. aparatura na líhnutí vajíček,
4. kvasnice
47
Page 48

Životní cyklus mořského garnátu
Mořský garnát, u vědců znám pod názvem „Artimia Salina“, má
neobyčejný a zajímavý životný cyklus. Vajíčka produkovaná samičkami
se vylíhnou, aniž by byla oplodněna samci garnátů. Garnáti vylíhnutí
z těchto vajíček jsou všechno samičky. Za mimořádných okolností,
např. když vyschne močál, se mohou z vajíček vylíhnout samečci. Tito
samečci oplodní vajíčka samiček a z tohoto páření vzniknou neobyčejná
vajíčka. Tato vajíčka, takzvaná „zimní vajíčka“, mají hrubou skořápku,
která vajíčko chrání. Zimní vajíčka jsou velmi odolná a zůstávají živá, i
když močál nebo jezero vyschne a tím zabije celou populaci garnátů a
zůstávají v „spícím” stavu i po dobu 5 -10 let. Vajíčka se vylíhnou, když
se v jejich okolí obnoví příznivé životní podmínky. Vajíčka, která jsou
součástí soupravy, jsou „zimní vajíčka“.
Líhnutí mořského garnátu
Pro vylíhnutí garnátu je zapotřebí připravit roztok soli, odpovídající
životnímu prostředí garnátu. Do nádoby nalejte půl litru dešťové nebo
vodovodní vody. Tuto vodu nechejte asi 30 hodin odstát. Pokud se
voda během této doby odpařuje, doporučujeme naplnit vodou i druhou
nádobu a nechat ji 36 hodin odstát. Do odstáté vody nasypte polovinu
dodaného množství mořské soli a míchejte tak dlouho, dokud se sůl
úplně nerozpustí. Nyní nalejte trochu připravené mořské vody do aparatury na líhnutí garnátů. Do aparatury vložte jedno vajíčko a zavřete
víčko. Líheň postavte na světlé místo, ale ne na přímé sluneční světlo.
Mořský garnát pod mikroskopem
Živočich, který se z vajíčka vylíhne, je znám pod označením „larva nauplius“. Pomocí pipety vložte několik těchto larev na podložní sklíčko a
pozorujte je. Larva se v mořské vodě pohybuje pomocí brv. Každý den
vyberte z nádoby několik larev a pozorujte je pod mikroskopem. Pokud
budete denně larvy pozorovat pomocí mikrookuláru a obrázky uložíte,
získáte obrazovou dokumentaci o životním cyklu mořského garnátu.
Můžete dokonce sundat víčko z líhně a položit ji celou přímo na pozorovací stolík. V závislosti na teplotě okolí bude larva dospělá v průběhu
6 -10 týdnů. Brzy budete mít vypěstovanou celou generaci mořských
garnátů, kteří se stále rozmnožují.
Krmení mořských garnátů
Abyste udrželi mořské garnáty při životě, musíte je čas od času krmit.
Při krmení buďte opatrní, protože překrmování vyvolává ve vodě hnilobný proces a naše kolonie garnátů bude otrávena. Na krmení je nejlepší
suché droždí v práškové formě. Každé dva dny dejte garnátům trochu
těchto kvasnic. Když voda v líhni ztmavne, je to známkou hnilobného procesu. Potom garnáty vyberte ihned z vody a přemístěte je do
čerstvého roztoku mořské vody.
Výstraha!
Vajíčka garnátů ani samotné garnáty nejsou vhodné k
jídlu!
Teplota by měla být přibližně 25° C. Při této teplotě se garnát vylíhne
asi po 2-3 dnech. Jestliže se během této doby voda v líhni odpaří,
doplňte ji vodou z druhé nádoby.
48
Page 49

6.2. Textilní vlákna
Objekty a příslušenství:
1. vlákna různých textilií: bavlna, len, vlna, hedvábí, umělé hedvábí,
nylon atd.
2. dvě jehly
Každé vláno se položí na preparační sklíčko a trochu se pomoci dvou
jehel roztřepí. Vlákna se navlhčí a přikryjí se krycím sklíčkem. Mikroskop se nastaví na malé zvětšení. Vlákna bavlny jsou rostlinného původu
a pod mikroskopem vypadají jako ploché točené proužky. Vlákna jsou
na hranách silnější a kulatější, než je tomu uprostřed. Vlákna bavlny v
podstatě vypadají jako dlouhé splasklé hadičky. Vlákna lnu jsou rovněž
rostlinného původu, jsou kulaté a rovné. Vlákna se lesknou jako hedvábí
a na trubkovitém vlákně vykazují četná zduření. Hedvábí je živočišného
původu a narozdíl od dutých rostlinných vláken sestává z masivních
vláken menšího průměru. Každé vlákno je hladké a rovnoměrné a vypadá jako malá skleněná tyčinka. Vlákna vlny jsou rovněž živočišného
původu, povrch se skládá ze vzájemně překrývajících se dutinek, které
vypadají jako zlomené a jsou zvlněné. Pokud je to možné, porovnejte
vlákna vlny z různých tkalcovských dílen. Přitom si všimněte různého
vzhledu vláken. Odborníci jsou pak schopni na základě toho určit zemi
původu vlny. Umělá bavlna, jak již sám název naznačuje, se uměle vyrábí během dlouhého chemického postupu. Všechna vlákna mají tvrdé
tmavé čáry na plochém a lesklém povrchu. Vlákna se po vysušení vlny
vlní. Všimněte si společných a rozdílných rysů.
POKYNY pro čištění
• Před prováděním čištění odpojte přístroj od zdroje proudu (vyjměte
baterie)!
• Čištění provádějte pouze zvnějšku přístroje suchou tkaninou.
Nepoužívejte čisticí kapalinu, aby nedošlo k poškození elektroniky.
• Chraňte přístroj před prachem a vlhkostí!
• Pokud se přístroj delší dobu nepoužívá, je třeba baterie vyjmout z
přístroje.
ES Prohlášení o shodě
„Prohlášení o shodě“ v souladu s použitelnými směrnicemi a
odpovídajícími normami zhotovila společnost Bresser GmbH.
Na vyžádání jej lze kdykoliv předložit k nahlédnutí.
LIKVIDACE
Balicí materiál zlikvidujte podle druhu. Informace týkající se řádné
likvidace získáte u komunální organizace služeb pro likvidaci a
nebo na úřadě pro životní prostředí.
Nevyhazujte elektrické přístroje do domovního odpadu!
Podle evropské směrnice 2002/96/EG o starých elektrických
a elektronických přístrojích a její realizace v národním právu se
musí opotřebené elektropřístroje ukládat samostatně a musí se předat
k recyklaci odpovídající ustanovením pro ochranu životního prostředí.
CZ
Baterie a akumulátory nevyhazujte do domovního odpadu! Podle
zákonných ustanovení je odevzdejte na sběrné místo použitých
49
Page 50

baterií a akumulátorů. Baterie po použití můžete bezplatně odevzdat
buď na našem prodejním místě, nebo na sběrném místě ve Vaší
bezprostřední blízkosti (např. prodejny či komunální sběrné dvory).
Baterie a akumulátory jsou označeny přeškrtnutým symbolem popelnice a chemickou značkou škodlivé látky („Cd“ znamená kadmium,
„Hg“ rtuť a „Pb“ olovo).
1
Baterie obsahuje kadmium
2
Cd¹ Hg² Pb³
Baterie obsahuje rtuť
3
Baterie obsahuje olovo
Garantie & Service
DE
Die reguläre Garantiezeit beträgt 2 Jahre und beginnt am Tag des
Kaufs. Um von einer verlängerten, freiwilligen Garantiezeit wie auf dem
Geschenkkarton angegeben zu profitieren, ist eine Registrierung auf
unserer Website erforderlich.
Die vollständigen Garantiebedingungen sowie Informationen zu
Garantiezeitverlängerung und Serviceleistungen können Sie unter
www.bresser.de/garantiebedingungen einsehen.
Warranty & Service
GB
The regular guarantee period is 2 years and begins on the day of
purchase. To benefit from an extended voluntary guarantee period as
stated on the gift box, registration on our website is required.
You can consult the full guarantee terms as well as information
on extending the guarantee period and details of our services at
www.bresser.de/warranty_terms.
Garantie et Service
FR
La durée normale de la garantie est de 2 ans à compter du jour de
l’achat. Afin de pouvoir profiter d’une prolongation facultative de la
garantie, comme il est indiqué sur le carton d’emballage, vous devez
vous enregistrer sur notre site Internet.
Vous pouvez consulter l’intégralité des conditions de garantie ainsi que
les informations concernant la prolongation de la garantie et les prestations de service sur www.bresser.de/warranty_terms.
50
Page 51

Garantie & Service
NL
Гарантия и обслуживание
RU
De reguliere garantieperiode bedraagt 2 jaar en begint op de dag van
aankoop. Om gebruik te maken van een verlengde vrijwillige garantieperiode zoals aangegeven op de geschenkverpakking is aangegeven
dient het product op onze website geregistreerd te worden.
De volledige garantievoorwaarden en informatie over de verlenging van de garantieperiode en servicediensten kunt u bekijken op
www.bresser.de/warranty_terms.
Garanzia e assistenza
IT
La durata regolare della garanzia è di 2 anni e decorre dalla data
dell‘acquisto. Per godere di un‘estensione volontaria della garanzia
come descritto sulla confezione regalo, è necessario registrarsi nel
nostro sito Web.
Le condizioni complete di garanzia e le informazioni sull‘estensione di
garanzia e i servizi di assistenza sono visibili al sito:
www.bresser.de/warranty_terms.
Garantía y servicio
ES
El período regular de garantía es dos anos iniciándose en el día de
la compra. Para beneficiarse de un período de garantía más largo
y voluntario tal y como se indica en la caja de regalo es necesario
registrarse en nuestra página web.
Las condiciones de garantía completas así como informaciones relativas
a la ampliación de la garantía y los servicios pueden encontrarse en
www.bresser.de/warranty_terms.
Стандартный гарантийный срок составляет 2 года, начиная со дня
покупки. Чтобы воспользоваться расширенной гарантией, необходимо
зарегистрироваться на нашем сайте.
Подробные условия гарантии, информацию о расширенной гарантии
и о наших сервисных центрах можно получить на нашем сайте
www.bresser.de/warranty_terms.
Záruka & servis
CZ
Ádná záruční doba činí 2 roky a začíná v den zakoupení. Abyste mohli
využít prodlouženou, dobrovolnou záruční dobu, která je uvedena
napčíklad na dárkovém obalu, je nutná registrace na našich webových
stránkách.
Úplné záruční podmínky a informace o možnosti prodloužení a o
servisních službách naleznete na stránkách:
www.bresser.de/warranty_terms
GARANTIE/WARRANTY
51
Page 52

Irrtümer und technische Änderungen vorbehalten. · Errors and technical changes reserved. · Sous réserve d’erreurs et de modifications techniques.
Vergissingen en technische veranderingen voorbehouden. · Con riserva di errori e modifiche tecniche. · Queda reservada la posibilidad de incluir
modificaciones o de que el texto contenga errores. · Ошибки и технические изменения защищены · Omyly a technické změny vyhrazeny.
ANL8851300MSP0616BRESSER
Bresser GmbH
Gutenbergstr. 2
DE-46414 Rhede
Germany
www.bresser-junior.de
 Loading...