

Page 1
BRESSER Science ETD-101
Auflichtmikroskop mit Zoom
BRESSER Science ETD-101
Zoom Stereo Microscope
BRESSER Science ETD-101
Loupe binoculaire zoom
Art.-No. 5806100
Bedienungsanleitung
Instruction Manual
Mode d’emploi
Page 2
VORSICHT!
Für die Arbeit mit diesem Gerät werden häufig scharfkantige und spitze Hilfsmittel eingesetzt. Bewahren Sie deshalb dieses Gerät sowie alle Zubehörteile und Hilfsmittel an einem für Kinder unzugänglichen Ort auf. Lassen Sie Kinder nur unter Aufsicht mit
dem Gerät arbeiten!
Verpackungsmaterial (Plastiktüten, Gummibänder etc.) von Kindern fernhalten!
Werfen Sie Elektrogeräte nicht in den Hausmüll!
Gemäß der Europäischen Richtlinie 2002/96/EG über Elektro- und Elektronik-Altgeräte und Umsetzung in nationales
Recht müssen verbrauchte Elektrowerkzeuge getrennt gesammelt und einer umweltgerechten Wiederverwertung zugeführt werden. Entladene Altbatterien und Akkus müssen vom Verbraucher in Batteriesammelgefäßen entsorgt werden. Informationen zur
Entsorgung alter Geräte oder Batterien erhalten Sie beim kommunalen Entsorgungsdienstleister oder Umweltamt.
CAUTION!
To work with this microscope, sharp and pointed aids are being used. Please take care that this microscope and its accessories are stored at a place out of reach of children. Let children only work with this microscope under an adult’s supervision! Keep
packing material (plastic bags etc.) away from children!
Do not dispose of electric equipment together with household waste material!
In observance of European Directive 2002/96/EC on waste electrical and electronic equipment (WEEE) and its implementation in accordance with national law, electric equipment that have reached the end of its life must be collected separately and returned to an environmentally compatible recycling facility. Discharged batteries and damaged rechargeable batteries
must be disposed of at special battery collection points. Information is available from your local disposal agent or local
authority regarding the disposal of devices or batteries manufactured after the 01.06.2006.
ATTENTION!
Avec cet instrument, on utilise souvent des accessoires à angles vifs et pointus. Pour cette raison, stockez-le ainsi que tous
les accessoires à un endroit inaccessible aux enfants. Ne laissez travailler les enfants avec cet instrument uniquement sous la
surveillance d’un adulte! Eloignez l’emballage (sacs en plastique, élastiques, etc.) des enfants!
Ne pas jeter les appareils électriques dans les ordures ménagères!
Conformément à la directive européenne 2002/96/EG relative aux déchets d’équipements électriques ou électroniques
(DEEE), et à sa transposition dans la législation nationale, les appareils électriques doivent etre collectés à part et etre soumis
à un recyclage respectueux de l’environnement.
Les piles déchargées et les accumulateurs hors d’usage doivent être apportés dans des appareils de collecte spéciaux. Pour
plus d’informations concernant l’élimination des appareils usagés ou de vieilles piles, veuillez vous adresser auprès du service
responsable de l’élimination de déchets ou au service de l'environnement de votre commune.
Produit après le 1.6.2006
DE
GB
2
FR
Page 3

3
Inhaltsverzeichnis
I. Komponenten ....................................................................................................................................................................5
II. Technische Daten und -Qualifikationen ............................................................................................................................5
III. Physikalische Daten ..........................................................................................................................................................5
IV. Betrieb ...............................................................................................................................................................................6
V. Lampenwechsel .................................................................................................................................................................6
VI. Wartung .............................................................................................................................................................................6
VII. Konformitätserklärung ........................................................................................................................................................6
VIII. Garantie ..............................................................................................................................................................................7
Table of Contents
I. Components ......................................................................................................................................................................8
II. Features and Technologic Specifications ........................................................................................................................ 8
III. Main Specifications .......................................................................................................................................................... 8
IV. Operation ...........................................................................................................................................................................9
V. Exchange of the Lamp ......................................................................................................................................................9
VI. Maintenance ......................................................................................................................................................................9
VII. EEC Conformity Explanation .............................................................................................................................................9
VIII. Warranty............................................................................................................................................................................10
Table des matières
I. Composants ....................................................................................................................................................................11
II. Caractéristiques techniques ...........................................................................................................................................11
III. Caractéristiques principales ...........................................................................................................................................11
IV. Opération .........................................................................................................................................................................12
V. Remplacement de la lampe ............................................................................................................................................12
VI. Entretien ..........................................................................................................................................................................12
VII. Conformité CE .................................................................................................................................................................12
VIII. Garantie ...........................................................................................................................................................................13
Page 4
1# 1@
i H
BC
D
E
F G
j
1)
1!
2!
1$
1^1& 1% 1( 2)
1*
4
Page 5
5
Das „BRESSER Science ETD-101“ ist ein Stereomikroskop, das
in der Lage ist, Mikroobjekte über einen kontinuierlichen Vergrößerungsbereich mit aufrechten und seitenrichtigen Stereobildern zu zeigen. Es liefert ein klares, kontrastreiches WeitfeldBild und gestattet einen weiten Arbeitsabstand. Man kann das
Mikroskop für Untersuchungen auf den Gebieten der Medizin
und Gesundheitspflege, der Land- und Forstwirtschaft ebenso
einsetzen wie in Einrichtungen der öffentlichen Sicherheit (z. B.
in der Kriminalistik), in Schulen und wissenschaftlichen Forschungsinstituten. Es eignet sich ferner zur Prüfung, zur Montage und zur Reparatur kleiner elektronischer oder feinmechanischer Ersatzteile.
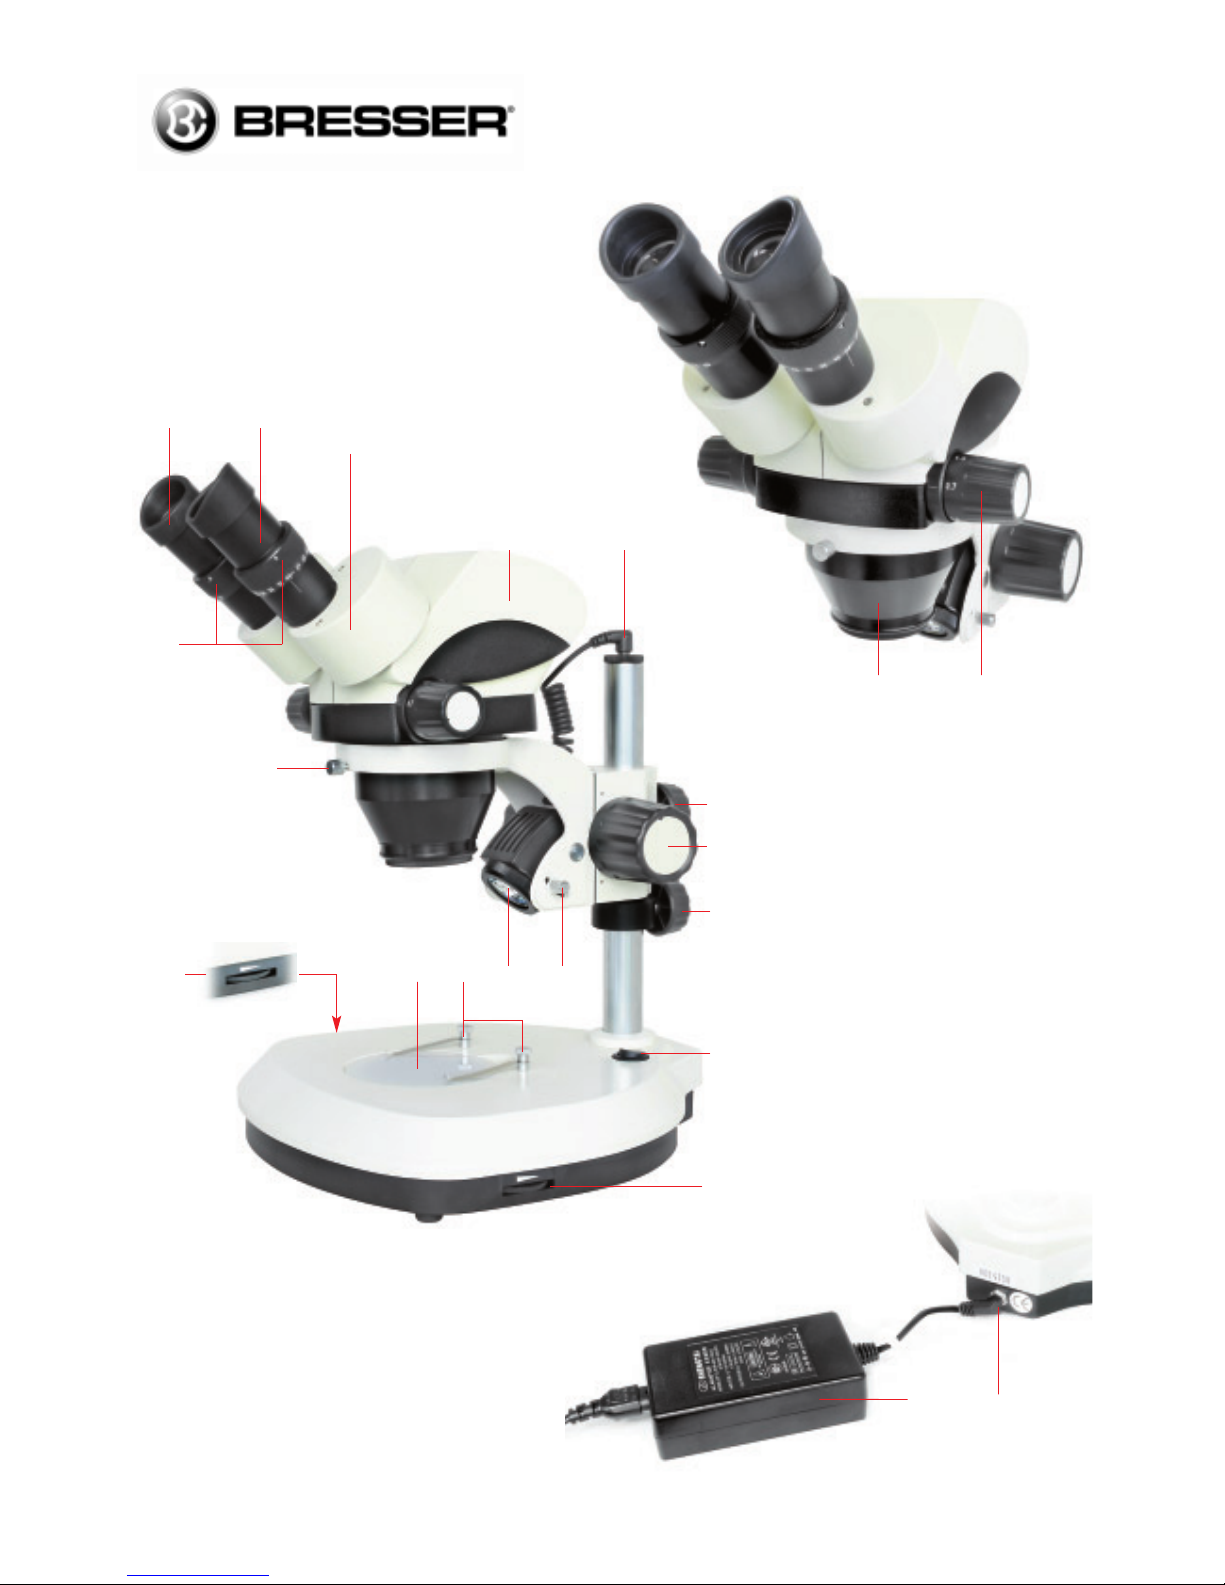
I. KOMPONENTEN
B
Augenmuschel
C
Okular
D
Dioptrieeinstellring
E
Okularstutzen
F
Mikroskopkopf
g
Stecker für Auflichtbeleuchtung
h
Zoom-Knopf
i
Objektivschaft
j
Feststellknopf
1)
Fokussiertrieb
1!
Auflage
1@
Netzteilstecker und Stromanschluss
1#
Netzteil
1$
Auflicht-Helligkeitsregler
1%
Objekt-Halteklammer
1^
Objektplatte / Objekttisch
1&
Durchlicht-Helligkeitsregler
1*
Tubus-Befestigungsschraube
1(
Lampenabdeckung für Auflicht-Beleuchtung
2)
Stellschraube für Auflicht-Einfallswinkel
2!
Ein/Aus-Schalter (Hauptschalter)
II. TECHNISCHE DATEN UND -QUALIFIKATIONEN
1. Objektiv mit Zoom-Vergrößerungsbereich 0,7x - 4,5x.
2. Okular mit deutlich wiedergegebenem Weitfeld;
Sehfeldgröße Ø = 20 mm.
3. Die beiden Okularstutzen sind 45° geneigt, der binokulare
Mikroskopkopf ist 360° drehbar.
4. Einstellbereich des Augenabstands: 53 mm - 75 mm.
5. Einstellbereich der Sehstärkenkorrektur („Dioptrieeinstellung“) an den Okularstutzen: –5 dpt - +5 dpt.
6. Das Instrument ist fungizid vorbehandelt, um seine Lebensdauer zu verlängern.
7. Das Strom-Netzteil befindet sich außerhalb des Mikroskops.
8. Die Wahl der Beleuchtungsart und die Helligkeitsregelung
sind sehr einfach. Es gibt drei Beleuchtungsarten:
Durchlicht-, Auflicht- und kombinierte Beleuchtung.
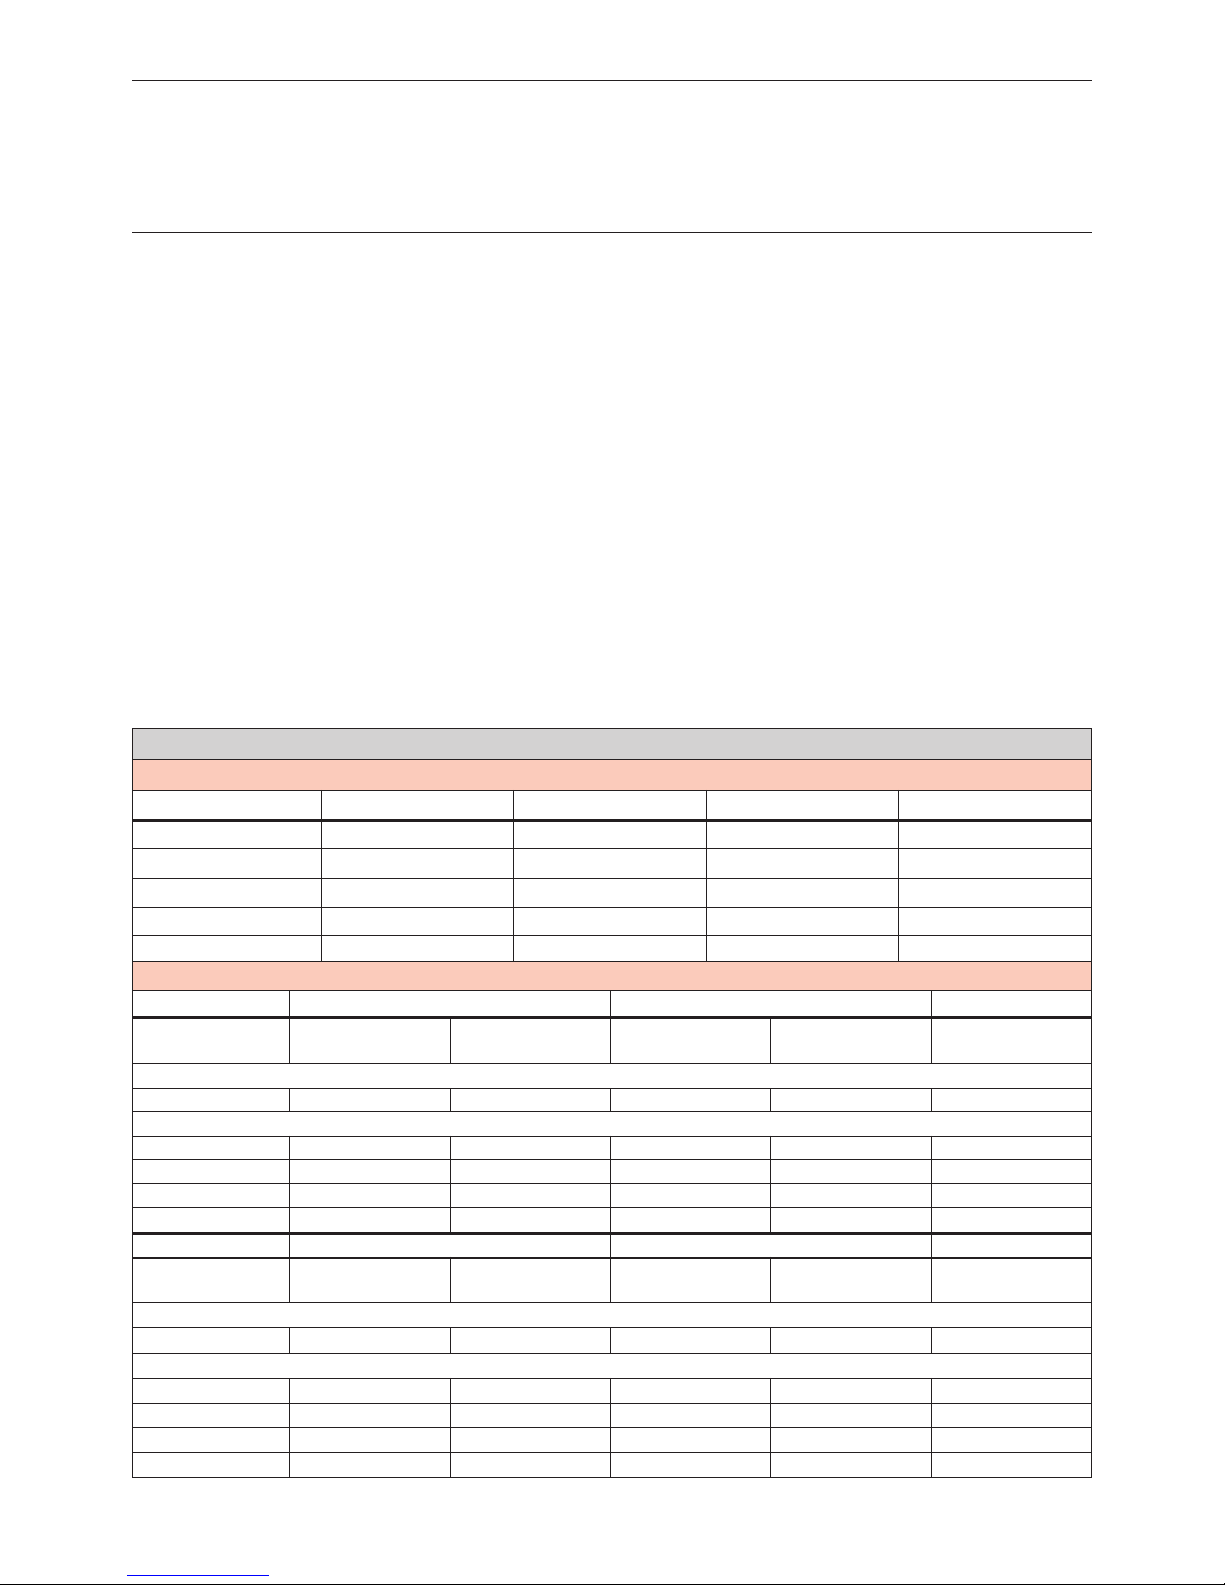
III. PHYSIKALISCHE DATEN
Angaben zu den Okularen
Weitere Angaben zu den Okularen und Objektiven
Okulartyp Vergrößerung Sehfeld Ø / mm Brennweite ƒ / mm Bemerkungen
Weitfeld-Okular (WF) 10x 20 25
Plan-Okular 15x 15 16,7 optional erhältlich
Plan-Okular 20x 12 12,5 optional erhältlich
Plan-Okular 25x 9 10 optional erhältlich
Messokular 10x 18 25 optional erhältlich
Okular: WF10x Plan 15x
Gesamt-
vergrößerung
Sehfeldbereich
Ø / mm
Gesamt-
vergrößerung
Sehfeldbereich
Ø / mm
Arbeitsabstand
WD /mm
Standardobjektiv:
7x - 45x 28,6 - 4,4 10,5x - 67,5x 21,4 - 3,3 90
Vorsatzlinse (optional erhältlich):
0,5x 3,5x - 22,5x 57,2 - 8,9 5,3x - 33,75x 42,9 - 6,7 137
0,75x 5,3x - 33,8x 38,1 - 5,9 7,9x - 50,6x 28,6 - 4,4 103
1,5x 10,5x - 67,5x 19 - 2,96 15,8x - 101,3x 14,3 - 2,2 48
2x 14x - 90x 14,3 - 2,2 21x - 135x 10,7 - 1,7 29
Okular: Plan 20x Plan 25x
Gesamt-
vergrößerung
Sehfeldbereich
Ø / mm
Gesamt-
vergrößerung
Sehfeldbereich
Ø / mm
Arbeitsabstand
WD / mm
Standardobjektiv:
14x - 90x 17,1 - 2,6 17,5x - 105x 12,9 - 2,1 90
Vorsatzlinse (optional erhältlich):
0,5x 7x - 45x 34,3 - 5,3 8,8x - 56,3x 25,7 - 4 137
0,75x 10,5x - 67,5x 22,9 - 3,6 13,1x - 84,4x 17,1 - 2,7 103
1,5x 21x - 135x 11,4 - 1,8 26,3x - 168,8x 8,6 - 1,3 48
2x 28x - 180x 8,6 - 1,3 35x - 225x 6,4 - 1 29
Page 6

6
IV. BETRIEB
1. Stecken Sie den Mikroskop-Netzteilstecker (12) in den
Stromanschluss des Mikroskops und schließen Sie das
Netzteil (13) an eine Netzsteckdose 230 V an.
2. Wenn Sie das „BRESSER Science ETD-101“ mit DurchlichtBeleuchtung betreiben wollen, stellen Sie zunächst den
Schalter (21) auf ”I“. Mit dem Einstellrad (17) wird die individuelle Helligkeit eingestellt. Legen Sie die weiße Kunststoffplatte (16) in den Objekttisch ein. Wenn Sie das Mikroskop
im Auflicht-Modus betreiben wollen, stecken Sie den
Stecker des Auflichtkabels (6) in den Anschluss am Stativkopf und stellen den Schalter (21) auf „I“. Die gewünschte
Helligkeit wird eingestellt (14). Der Einfallswinkel des Auflichtes kann mit der Justierschraube (20) nachjustiert werden um
eine optimale Ausleuchtung des Betrachtungsobjekts zu gewährleisten.
3. Zur Änderung der Beobachtungsposition lösen Sie die Tubus-Befestigungsschraube (18). Nun können Sie den Mikroskopkopf seitlich in die gewünschte Position drehen. Anschließend die Schraube (18) wieder festziehen.
4. Mit dem Dioptrieausgleich können Sie das Mikroskop auf ihre Sehbedürfnisse einstellen. Stellen Sie die Dioptrieeinstellringe (3) auf "0" und den Zoom (7) auf 4,5x. Schauen Sie mit
Ihrem linken Auge durch das linke Okular und drehen Sie den
Fokussiertrieb (10), um das Bild des Objekts scharf zu stellen. Danach schauen Sie mit Ihrem rechten Auge durch das
rechte Okular und und drehen den rechten Dioptrieeinstellring (3) so weit, bis das Bild des Ojektes ebenfalls scharf ist.
5. Drehen Sie den Zoom (7) von 4,5x auf 0,7x. Wenn das Bild
in dieser Position nicht scharf ist, sollten Sie wiederum durch
das linke und das rechte Okular, wie in Punkt 4 beschrieben,
schauen und die jeweilige Sehstärkekorrektur (am Dioptrieeinstellring (3)) vornehmen, um das Bild scharf zu stellen.
Drehen Sie den Zoom (7) wieder auf 4,5x. Falls das Bild jetzt
nicht scharf ist, stellen Sie es mit Hilfe des Fokussiertriebs
(10) scharf. Gemäß der obigen Einstellung können Sie ein
kontinuierlich scharfes Bild mit Zoom-Vergrößerungen von
0,7x bis 4,5x erhalten.
6. Betrachten Sie das Bild mit beiden Augen. Stellen Sie den
Augenabstand mit den beiden Okularstutzen (4) ein, so dass
beide Sehfelder visuell einen scharfrandiges, rundes Bild erzeugen.
7. Der Objektivschaft besitzt ein Feingewinde mit 49 mm Ø zur
optionalen Montage von Vorsatzlinsen oder Filtern. Damit
läßt sich das Einsatzspektrum des Mikroskops individuell erweitern.
8. Die äußere Einkerbung am Objektivring dient zur Befestigung
einer optionalen Ringbeleuchtung.
V. LAMPENWECHSEL
1. Schalten Sie das Gerät am Schalter (21) aus. Ziehen Sie
den Netzstecker des Netzteils aus der Steckdose und den
Mikroskop-Netzteilstecker (12) aus dem Stromanschluss.
2a. Für Auflicht-Beleuchtung: Ziehen Sie nun den Stecker (6)
für die Auflicht-Beleuchtung heraus. Schrauben Sie die
Lampenabdeckung (19) ab, ziehen Sie die defekte Lampe
heraus und installieren Sie eine neue Lampe ohne den Lampenkolben direkt zu berühren. Danach schrauben Sie die
Lampenabdeckung wieder an und stellen die Steckerverbindung wieder her. .
2b. Für Durchlicht-Beleuchtung: Entfernen Sie die Objektplat-
te (16) und ziehen Sie die defekte Lampe heraus. Installieren Sie danach eine neue Lampe ohne den Lampenkolben
direkt zu berühren und montieren Sie wiederum die Objektplatte.
2c. Optionale Ringbeleuchtung: Lösen Sie die Halteschraube
der Ringbeleuchtung, entnehmen Sie die defekte Beleuchtung und installieren Sie eine neue. Dann ziehen Sie die Halteschraube wieder fest.
VI. WARTUNG
1. Linsenreinigung: Wischen Sie die Linsen mit einem Linsenputztuch oder weichem Stoff ab, das bzw. den Sie in etwas
Alkohol (z.B. Isopropanol) getaucht haben.
2. Reinigung der lackierten Geräteteile: Der Staub auf den lakkierten Geräteteilen kann mit Gaze entfernt werden. Bei Fettflecken wird die Verwendung von Gaze, die leicht mit Waschbenzin getränkt wurde, empfohlen. Verwenden Sie keine organischen Lösemittel wie Alkohol, Ether oder Verdünner
usw., um lackierte Geräteteile oder Kunststoffkomponenten
zu reinigen.
3. Das Mikroskop ist ein Präzisionsinstrument. Sie sollten es
nicht demontieren. Unsachgemäße Demontage beeinträchtigt den hohen Gebrauchswert des Mikroskops. Außerdem
erlischt die Garantie.
4. Decken Sie das Mikroskop mit der Staubschutzhülle (aus
Polymethylmethacrylat oder Polyethylen) ab und stellen Sie
es an einen trockenen und schimmelfreien Platz. Wir empfehlen die Lagerung aller Okulare in einem geschlossenen
Behälter mit Trockenmittel.
VII. KONFORMITÄTSERKLÄRUNG
Die Meade Instruments Europe GmbH & Co. KG, ansässig in
46414 Rhede/Westf., Gutenbergstr. 2, Germany, erklärt für dieses Produkt die Übereinstimmung mit nachfolgend aufgeführten EG-Richtlinien:
EN 61326: 1997
EN 61000-3-2
Produktbeschreibung: Auflichtmikroskop
Typ / Bezeichnung: BRESSER Science ETD-101
Rhede, 02.06.2008
Meade Instruments Europe GmbH & Co. KG
Helmut Ebbert
Geschäftsführer
Page 7

7
VIII: GARANTIE
Die Garantiezeit beträgt 2 Jahre und beginnt am Tag des Kaufs.
Bitte bewahren Sie den Kassenbon als Nachweis für den Kauf
auf. Während der Garantiezeit werden defekte Geräte von Ihrem Fachhändler vor Ort angenommen und ggf. eingeschickt.
Sie erhalten dann ein neues oder repariertes Gerät kostenlos
zurück. Nach Ablauf der Garantiezeit haben Sie ebenfalls die
Möglichkeit, ein defektes Gerät zwecks Reparatur zurückzugeben.
Nach Ablauf der Garantiezeit anfallende Reparaturen sind jedoch kostenpflichtig.
Wichtig:
Achten Sie darauf, dass das Gerät sorgfältig verpackt in der
Original-Verpackung zurückgegeben wird, um Transportschäden zu vermeiden! Bitte den Kassenbon (oder Kopie) beilegen.
Ihre gesetzlichen Rechte werden durch diese Garantie nicht
eingeschränkt.
Ihr Fachhändler:
Name:
_ _ _ _ _ _ _ _ _ _ _ _ _ _ _ _ _ _ _ _ _ _ _ _ _ _ _ _ _ _ _
PLZ / Ort:
_ _ _ _ _ _ _ _ _ _ _ _ _ _ _ _ _ _ _ _ _ _ _ _ _ _ _ _ _
Straße:
_ _ _ _ _ _ _ _ _ _ _ _ _ _ _ _ _ _ _ _ _ _ _ _ _ _ _ _ _ _
Telefon:
_ _ _ _ _ _ _ _ _ _ _ _ _ _ _ _ _ _ _ _ _ _ _ _ _ _ _ _ _ _
Kaufdatum:
_ _ _ _ _ _ _ _ _ _ _ _ _ _ _ _ _ _ _ _ _ _ _ _ _ _ _ _
Unterschrift:
_ _ _ _ _ _ _ _ _ _ _ _ _ _ _ _ _ _ _ _ _ _ _ _ _ _ _
Page 8

8
The “BRESSER Science ETD-101” is a stereomicroscope,
which can magnify microobjects continually and show stereo
up-right images. It provides a clear high-contrast image, wide
field and long working distance. It can be used for observation studies in medical and health, farming and forestry, as well
as in public security departments, schools and scientific re-
search institutes, and it is also used for inspection, assembling
and repair of tiny spare parts in electronics and precision machine industries.
I. COMPONENTS
B
Eyepiece shade
C
Eyepiece
D
Diopter ring
E
Eyepiece tube
F
Microscope head
g
Incident illumination power supply plug
h
Zoom knob
i
Objective hood
j
Holding knob
1)
Focus adjustment knob
1!
Backstop
1@
Power supply plug and socket
1#
Mains adaptor
1$
Incident light brightness adjustment knob
1%
Specimen clip
1^
Stage / Object plate
1&
Transmitted light brightness adjustment knob
1*
Holding screw of tube
1(
Lamp cover of incident illumination
2)
Incident light angle adjustment screw
2!
Power switch
II. FEATURES AND TECHNOLOGIC SPECIFICATIONS
1. Objective’s range of zoom magnification: 0.7x - 4.5x.
2. Eyepiece’s field is wide and clear. Field size: Ø = 20 mm.
3. The binocular eyepiece tubes are inclined 45° and can be
rotated 360°.
4. Adjustment range of interpupillar distance:
53 mm - 75mm.
5. Diopter adjustment range at the eyepiece tubes:
–5 dpt - +5 dpt.
6. Anti-mildew device is installed to extend the lifetime of the
instrument.
7.
The current mains adaptor is out of the base of instrument.
8. The modes of illumination selection and brightness adjusting are very easy. There are three modes: transmitted
light, reflected (incident) light and mixed light illumination.
.
III. MAIN SPECIFICATIONS
Parameters of eyepieces
Different specifications and parameters of eyepieces and objectives
Eyepiece type Magnification Field of view Ø / mm Focal length ƒ / mm Remarks
Wide field eyepiece (WF)
10x 20 25
Plan eyepiece 15x 15 16.7 optional
Plan eyepiece 20x 12 12.5 optional
Plan eyepiece 25x 9 10 optional
Dividing eyepiece 10x 18 25 optional
Eyepiece: WF10x Plano 15x
Total
magnification
Range of field
Ø / mm
Total
magnification
Range of field
Ø / mm
Working distance
WD /mm
Mainframe:
7x - 45x 28.6 - 4.4 10.5x - 67.5x 21.4 - 3.3 90
Accessorial objective (optional parts):
0.5x 3.5x - 22.5x 57.2 - 8.9 5.3x - 33.75x 42.9 - 6.7 137
0.75x 5.3x - 33.8x 38.1 - 5.9 7.9x - 50.6x 28.6 - 4.4 103
1.5x 10.5x - 67.5x 19 - 2.96 15.8x - 101.3x 14.3 - 2.2 48
2x 14x - 90x 14.3 - 2.2 21x - 135x 10.7 - 1.7 29
Eyepiece: Plano 20x Plano 25x
Total
magnification
Range of field
Ø / mm
Total
magnification
Range of field
Ø / mm
Working distance
WD /mm
Mainframe:
14x - 90x 17.1 - 2.6 17.5x - 105x 12.9 - 2.1 90
Accessorial objective (optional parts):
0.5x 7x - 45x 34.3 - 5.3 8.8x - 56.3x 25.7 - 4 137
0.75x 10.5x - 67.5x 22.9 - 3.6 13.1x - 84.4x 17.1 - 2.7 103
1.5x 21x - 135x 11.4 - 1.8 26.3x - 168.8x 8.6 - 1.3 48
2x 28x - 180x 8.6 - 1.3 35x - 225x 6.4 - 1 29
Page 9

9
IV. OPERATION
1. Plug in the power plugs.
2. When you use the “BRESSER Science ETD-101” with transmitted illumination, you should turn on the power switch (21)
at first, then turn on the transmitted light brightness adjusting
knob (17), which means the transmitted light working. Then
put the plastic object plate (16) on the base, and take down
the organic glass plate (16).
When you use it with incident illumination, you should plug
the incident illumination power plug (6) and turn on the
power switch (21) as well as the incident light brightness adjusting knob (14), which means the incident light working.
Then adjust the angle and brightness of the incident light illumination to satisfy your needs.
When you use it with mixed illumination, you should turn on
both light brightness adjusting knobs and adjust their brightness to obtain satisfactory mixed illumination.
3. If you want to change the position of observation, you can
loose the holding screw of tube (18). Then turn the binocular or trinocular head in any angle which you need, then
tighten the screw (18) again.
4. Turn both diopter rings (3) to "0" and the zoom knob (7) to
4.5x. Observe through the right tube with your right eye and
turn the focus adjustment knob (10) to make the image of
the specimen clear. Then observe through the left tube with
your left eye and adjust its diopter, not adjusting the focus
adjustment knob (10) again, to make the image of specimen
clear.
5. Turn the zoom knob (7) from 4.5x to 0.7x. If the image isn't
clear, you should observe through the left and the right eyepiece tube with respective eye and adjust the respective diopter ring (3) to make the image clear. Then turn the
zoom knob (7) to 4.5x again. If the image isn't clear, you
should adjust the focus adjustment knob (10) to make the
image clear. According to the adjustment above, you can obtain a clear and continuous image from 4.5x to 0.7x.
6. Observe the image with both eyes. Adjust the interpupillary
distance of the eyepiece tubes (4) until the both fields of view
can be superpositioned.
7. If you need an accessorial objective, you can turn it into the
objective hood (8).
8. If you need the annular illumination, you can connect it to
the objective hood (8) with a holding screw.
V. EXCHANGE OF THE LAMP
1. Turn off the power switch (21). Plug out the mains adaptor
(13) and the power supply plug (12).
2a. Incident illumination: Unplug the power supply plug (6).
Loosen off the lamp cover (19), pull out the bad lamp and
then install a new lamp. Tighten the lamp cover again and
plug in (6).
2b. Transmitted illumination: Remove the object plate (16) and
pull out the bad lamp. Then install a new lamp and mount
the plate again.
2c. Annular illumination: Loose the annular illumination holding
screw, take off the bad illumination and install a new.
Tighten the holding screw again.
VI. MAINTENANCE
1. Sweep the lens: Sweep the lens by lens tissue or soft fabric
immersed with alcohol (e.g. isopropanol).
2. Clean the painted parts: The dust on the painted parts can
be removed by gauze. For the grease spots, the gauze
immersed slightly with aviation gasoline is recommended. Do
not use organic solvents such as alcohol, ether or other
thinner etc. for cleaning the painted parts or plastic components.
3. Avoid disassembling the microscope: Because of being a
precise instrument, do not disassemble the microscope casually. That may cause serious damage to its performance.
4. Being not used: Cover the microscope with the dust cover
(made of polymethylmethacrylate or polyethylene) and
place it there, where it is dry and mouldless. We suggest the
storage of all objectives and eyepieces in a closed
container with drying agent.
VII. EEC CONFORMITY EXPLANATION
Meade Instruments Europe GmbH & Co. KG, resident in
46414 Rhede/Westf., Gutenbergstr. 2, Germany, explains the
agreement with in the following specified EEC guidelines for
this product:
EN 61326: 1997
EN 61000-3-2
Product description: Zoom Stereo Microscope
Model: BRESSER Science ETD-101
Rhede, July 20, 2007
Meade Instruments Europe GmbH & Co. KG
Helmut Ebbert
Managing director
Page 10

10
VIII. WARRANTY
The period of warranty is 2 years, beginning on the day of
purchase. Please keep the cash receipt as evidence of purchase. Devices which become defective during the warranty
period can be returned to the dealer where the device was
bought. The repaired device or a new one will then be returned to you. In the case of defects which occur after the end
of the warranty period, the devices can also be returned. However, repairs which become necessary after the end of the
warranty period will be subject to a service fee.
Important:
Make sure to return the device carefully packed in the original packaging in order to prevent transport damage. Please
also enclose the cash receipt (or a copy). This warranty does
not imply any restriction of your statutory rights.
Your dealer:
Name: _ _ _ _ _ _ _ _ _ _ _ _ _ _ _ _ _ _ _ _ _ _ _ _ _ _ _ _ _ _ _
Postcode / City:_ _ _ _ _ _ _ _ _ _ _ _ _ _ _ _ _ _ _ _ _ _ _ _ _ _
Street: _ _ _ _ _ _ _ _ _ _ _ _ _ _ _ _ _ _ _ _ _ _ _ _ _ _ _ _ _ _ _
Telephone: _ _ _ _ _ _ _ _ _ _ _ _ _ _ _ _ _ _ _ _ _ _ _ _ _ _ _ _ _
Date of purchase: _ _ _ _ _ _ _ _ _ _ _ _ _ _ _ _ _ _ _ _ _ _ _ _ _
Signature: _ _ _ _ _ _ _ _ _ _ _ _ _ _ _ _ _ _ _ _ _ _ _ _ _ _ _ _ _
Page 11

11
La “BRESSER Science ETD-101” est une loupe binoculaire, qui
permet de grossir les objets en continu et d’en obtenir une
vision stéréoscopique. Son optique donne une image
hautement contrastée, un large champ de vision et permet une
longue distance de travail. Cet instrument peut être aussi bien
utilisé pour des observations de routine, dans le secteur
médical et de la santé, vétérinaire ou forestier que pour les
départements de sécurité publique et instituts de recherche
scientifique. Il peut être également utilisé dans le domaine de
l’industrie pour les contrôles, les assemblages et les petites
réparations en électronique et pour les industries de précision.
I. COMPOSANTS
B
Bonnettes caoutchouc
C
Oculaire
D
Bague de correction dioptrique
E
Tube porte oculaire
F
Tête du microscope
g
Branchement électrique de l’éclairage incident
h
Molette de commande du zoom
i
Capuchon de l‘objectif
j
Molette de serrage en hauteur/colonne
1)
Molette de réglage de la mise au point
1!
Butée
1@
Prise pour alimentation électrique secteur
1#
Adaptateur secteur
1$
Molette de réglage de l’intensité lumineuse
(éclairage incident)
1%
Valets
1^
Platine / porte objet
1&
Molette de réglage de l’intensité lumineuse
(éclairage transmis)
1*
Vis de blocage de la tête
1(
Lampe de l‘éclairage incident
2)
Vis de réglage d’angle de l’éclairage incident
2!
Interrupteur marche/arrêt
II. CARACTERISTIQUES TECHNIQUES
1. Plage de grossissement du zoom : 0.7x - 4.5x.
2. Oculaires grand champ 10x : Ø = 20 mm.
3. Tête inclinée à 45° et orientable sur 360°.
4. Distance de réglage inter pupillaire: de 53 mm à 75mm.
5. Plage d’ajustement dioptrique des tubes porte oculaire :
–5 dpt - +5 dpt.
6. Traitement anti moisissure pour prolonger la vie de l‘instrument.
7.
L’adaptateur secteur est situé à l’extérieur de la base de
l‘instrument.
8.
Les modes de sélection et de réglage d’intensité de l’éclairages sont très simples. Il y a 3 modes : Lumière transmise,
lumière incidente et les deux modes d’éclairages combinés.
III. CARACTERISTIQUES PRINCIPALES
Paramètres des oculaires
Caractéristiques et paramètres des oculaires et objectifs
Type d’oculaire Grossissement Champ Ø / mm Long. focale ƒ / mm Remarques
Grand champ
10x 20 25
Oculaire plan 15x 15 16.7 optionnel
Oculaire plan 20x 12 12.5 optionnel
Oculaire plan 25x 9 10 optionnel
Oculaire réticulé 10x 18 25 optionnel
Oculaires : WF10x Plano 15x
Grossissement Champ de vision
Ø / mm
Grossissement Champ de vision
Ø / mm
Distance de travail
DT /mm
Principal :
7x - 45x 28.6 - 4.4 10.5x - 67.5x 21.4 - 3.3 90
Objectifs optionnels :
0.5x 3.5x - 22.5x 57.2 - 8.9 5.3x - 33.75x 42.9 - 6.7 137
0.75x 5.3x - 33.8x 38.1 - 5.9 7.9x - 50.6x 28.6 - 4.4 103
1.5x 10.5x - 67.5x 19 - 2.96 15.8x - 101.3x 14.3 - 2.2 48
2x 14x - 90x 14.3 - 2.2 21x - 135x 10.7 - 1.7 29
Oculaire : Plano 20x Plano 25x
Grossissement Champ de vision
Ø / mm
Grossissement Champ de vision
Ø / mm
Distance de travail
DT /mm
Principal:
14x - 90x 17.1 - 2.6 17.5x - 105x 12.9 - 2.1 90
Objectifs optionnels :
0.5x 7x - 45x 34.3 - 5.3 8.8x - 56.3x 25.7 - 4 137
0.75x 10.5x - 67.5x 22.9 - 3.6 13.1x - 84.4x 17.1 - 2.7 103
1.5x 21x - 135x 11.4 - 1.8 26.3x - 168.8x 8.6 - 1.3 48
2x 28x - 180x 8.6 - 1.3 35x - 225x 6.4 - 1 29
Page 12

12
IV. OPERATION
1. Brancher l’appareil sur le secteur.
2. Lorsque vous utilisez le “BRESSER Science ETD-101” en
éclairage transmis, vous devez placer l‘interrupteur (21) sur
marche en premier, puis régler la luminosité à l’aide de la
molette de réglage de l’intensité lumineuse (17). Placez
ensuite le disque porte-objet en plastique (16) sur la base et
enlever celui en verre organique (16).
Lorsque vous utilisez votre appareil en éclairage incident,
vous devez brancher le connecteur dans la prise (6) située
au sommet de la colonne et placer l‘interrupteur (21) et
ajuster l’intensité lumineuse à l’aide de la molette de
réglage (14). Régler ensuite l’angle et la luminosité de
l’éclairage en fonction de vos besoins.
Quand les 2 types d’éclairage sont utilisés en simultané,
vous devez ajuster l’intensité lumineuse des deux
éclairages pour obtenir le niveau d‘éclairage souhaité.
3. Si vous désirez changer de position d’observation, vous
pouvez désserrer la vis de blocage de la tête (18), puis la
tourner dans la position souhaitée puis la resserrer à
nouveau.
4. Tournez les bagues dioptriques (3) pour les placer sur "0" et
la molette du zoom (7) sur 4.5x. Observez à l’oculaire avec
votre oeil droit et effectuez la mise au point à l’aide de la
molette (10) pour obtenir une image nette du spécimen
observé. Observez ensuite à l’oculaire gauche avec oeil
gauche et ajustez sa dioptrie sans refaire la mise au point
avec la molette (10) jusqu’à l’obtention d’une image nette du
spécimen.
5. Tournez la molette du zoom (7) de 4.5x à 0.7x. Si l’image
n’est pas nette, vous devrez observer à travers les oculaires droite et gauche en réglant respectivement les bagues
dioptriques droite et gauche (3) pour obtenir une image
nette. Tournez ensuite à nouveau la molette du zoom (7) vers
4.5x. Si l’image obtenue n’est pas nette, vous devrez refaire
la mise au point à l’aide de la molette (10).En fonction du
réglage ci-dessus, vous pouvez obtenir une image nette et
continue de 4.5x à 0.7x.
6. Observez l’image avec les deux yeux. Ajustez la distance
inter pupillaire des porte oculaire (4) jusqu’à l’obtention d’un
champ de vision parfaitement superposé.
7. Si vous désirez changer d’objectif disponible en accessoire
optionnel, vous devez le vissez à l’intérieur du capuchon de
l‘objectif (8).
8. Si vous avez besoin d’un éclairage annulaire, vous pouvez
le fixer sur le capuchon de l‘objectif (8) avec une vis de
serrage.
V. CHANGEMENT DE L‘AMPOULE
1. Coupez l’alimentation à partir de l‘interrupteur (21), puis
débrancher l‘adaptateur du secteur (13) et de l‘embase (12).
2a. Eclairage incident : Débranchez le connecteur (6). Enlever
le couvercle de la lampe (19), extraire l’ampoule
défectueuse puis installer une nouvelle ampoule. Replacer
le couvercle de la lampe et le connecteur (6).
2b. Eclairage transmis: Enlevez le disque porte-objets (16) et
extraire l’ampoule défectueuse. Installer la nouvelle
ampoule et replacer le disque porte-objet.
2c. Eclairage annulaire : Dévisser la vis de fixation de l’éclaira-
ge annulaire, retirez l’éclairage defectueux et en installer un
nouveau. Resserrez ensuite la vis de blocage.
VI. ENTRETIEN
1. Nettoyage des optiques: Nettoyez les optiques à l’aide d’un
tissus spécial pour optique ou d’un chiffon doux imbibé d‘alcool (par exemple, isopropanol).
2. Nettoyage des parties peintes : La poussière sur les parties
peintes peut être enlevée avec un chiffon doux ou du coton.
Pour les taches de graisse, un coton légèrement imbibé de
white spirit est recommandé. Ne pas utiliser de dissolvants
organiques tels que l’alcool, éther ou autre diluant.
Organiques tels que l'alcool, l'éther ou autre pour nettoyer
les pièces ou les composants en plastique.
3. La loupe binoculaire est un instrument de précision. Évitez
de la démonter car cela pourrait l‘endommager et nuire à son
bon fonctionnement.
4. En cas de non utilisation prolongée, couvrez la loupe binoculaire avec sa housse de protection (faite de polymethylmethacrylate ou polyéthylène) et placez- la dans un endroit
sec et à l’abri de l‘humidité. Nous recommandons de stokker tous les objectifs et oculaires séparément dans une boite fermée avec sachet déshydratant.
VII. CERTIFICAT DE CONFORMITÉ UE
La société Meade Instruments Europe Gmbh & Co. KG, domiciliée à 46414 Rhede/Westf., Gutenbergstr. 2, Allemagne,
certifie la conformité de ce produit avec les directives de
l'UE ci-après:
EN 61326: 1997
EN 61000-3-2
Description du produit: Loupe binoculaire zoom
Type / Désignation: BRESSER Science ETD-101
Rhede, 20-7-2007
Meade Instruments Europe GmbH & Co. KG
Helmut Ebbert
Gérant
Page 13

13
VIII. GARANTIE
La période de garantie est de 2 ans et débute le jour de l’achat.
Veuillez conserver le ticket de caisse comme preuve de l'achat.
Pendant la période de garantie, les appareils défectueux sont
acceptés sur place par votre vendeur spécialisé et seront
éventuellement envoyés. Vous obtenez en échange et
gratuitement un appareil nouveau ou réparé. Lorsque la
période de garantie a pris fin, vous avez également la
possibilité d’apporter un appareil défectueux pour le faire
réparer.
Lorsque la période de garantie s’est écoulée, les réparations
éventuelles sont toutefois payantes.
Important :
Veillez à ce que l’appareil que vous rendez soit emballé
précautionneusement dans son emballage d’origine pour
éviter des dommages au cours du transport ! Veuillez y
ajouter le ticket de caisse (ou une copie). Vos droits légaux ne
sont pas restreints par cette garantie.
Votre vendeur spécialisé :
Nom: _ _ _ _ _ _ _ _ _ _ _ _ _ _ _ _ _ _ _ _ _ _ _ _ _ _ _ _ _ _ _ _
Code postal / lieu: _ _ _ _ _ _ _ _ _ _ _ _ _ _ _ _ _ _ _ _ _ _ _ _
Rue: _ _ _ _ _ _ _ _ _ _ _ _ _ _ _ _ _ _ _ _ _ _ _ _ _ _ _ _ _ _ _ _
Téléphone:_ _ _ _ _ _ _ _ _ _ _ _ _ _ _ _ _ _ _ _ _ _ _ _ _ _ _ _ _
Date d’achat: _ _ _ _ _ _ _ _ _ _ _ _ _ _ _ _ _ _ _ _ _ _ _ _ _ _ _
Date, signature: _ _ _ _ _ _ _ _ _ _ _ _ _ _ _ _ _ _ _ _ _ _ _ _ _ _
Page 14

14
_________________________________________________________________________________________________________________
_________________________________________________________________________________________________________________
_________________________________________________________________________________________________________________
_________________________________________________________________________________________________________________
_________________________________________________________________________________________________________________
_________________________________________________________________________________________________________________
_________________________________________________________________________________________________________________
_________________________________________________________________________________________________________________
_________________________________________________________________________________________________________________
_________________________________________________________________________________________________________________
_________________________________________________________________________________________________________________
_________________________________________________________________________________________________________________
_________________________________________________________________________________________________________________
_________________________________________________________________________________________________________________
_________________________________________________________________________________________________________________
_________________________________________________________________________________________________________________
_________________________________________________________________________________________________________________
_________________________________________________________________________________________________________________
_________________________________________________________________________________________________________________
_________________________________________________________________________________________________________________
_________________________________________________________________________________________________________________
_________________________________________________________________________________________________________________
_________________________________________________________________________________________________________________
_________________________________________________________________________________________________________________
_________________________________________________________________________________________________________________
_________________________________________________________________________________________________________________
_________________________________________________________________________________________________________________
_________________________________________________________________________________________________________________
_________________________________________________________________________________________________________________
_________________________________________________________________________________________________________________
_________________________________________________________________________________________________________________
_________________________________________________________________________________________________________________
_________________________________________________________________________________________________________________
_________________________________________________________________________________________________________________
Page 15

15
_________________________________________________________________________________________________________________
_________________________________________________________________________________________________________________
_________________________________________________________________________________________________________________
_________________________________________________________________________________________________________________
_________________________________________________________________________________________________________________
_________________________________________________________________________________________________________________
_________________________________________________________________________________________________________________
_________________________________________________________________________________________________________________
_________________________________________________________________________________________________________________
_________________________________________________________________________________________________________________
_________________________________________________________________________________________________________________
_________________________________________________________________________________________________________________
_________________________________________________________________________________________________________________
_________________________________________________________________________________________________________________
_________________________________________________________________________________________________________________
_________________________________________________________________________________________________________________
_________________________________________________________________________________________________________________
_________________________________________________________________________________________________________________
_________________________________________________________________________________________________________________
_________________________________________________________________________________________________________________
_________________________________________________________________________________________________________________
_________________________________________________________________________________________________________________
_________________________________________________________________________________________________________________
_________________________________________________________________________________________________________________
_________________________________________________________________________________________________________________
_________________________________________________________________________________________________________________
_________________________________________________________________________________________________________________
_________________________________________________________________________________________________________________
_________________________________________________________________________________________________________________
_________________________________________________________________________________________________________________
_________________________________________________________________________________________________________________
_________________________________________________________________________________________________________________
_________________________________________________________________________________________________________________
_________________________________________________________________________________________________________________
Page 16

ANL5806100MSP0109BRESSER
Meade Instruments Europe GmbH & Co. KG
Gutenbergstr. 2 · DE-46414 Rhede · Germany
Tel. +49 (0) 28 72 - 80 74-210
Fax +49 (0) 28 72 - 80 74-222
www.bresser.de · service@bresser.de
Technische Änderungen und Irrtümer vorbehalten
Reservation of technical alterations and errors
Sous réserve d’erreurs et de modifications techniques
 Loading...