

Page 1
Digitalkamera · Digital camera ·
FULL HD DASHCAM MIT BOARDCOMPUTER ANSCHLUSS
DE Bedienungsanleitung
EN Instruction manual
Page 2
DE
Besuchen Sie unsere Website über den folgenden QR Code
oder Weblink um weitere Informationen zu diesem Produkt oder
die verfügbaren Übersetzungen dieser Anleitung zu finden.
EN
Visit our website via the following QR Code or web link to find
further information on this product or the available translations
of these instructions.
FR
Si vous souhaitez obtenir plus d’informations concernant ce
produit ou rechercher ce mode d’emploi en d’autres langues,
rendez-vous sur notre site Internet en utilisant le code QR ou le
lien correspondant.
NL
Bezoek onze internetpagina via de volgende QR-code of
weblink, voor meer informatie over dit product of de beschikbare
vertalingen van deze gebruiksaanwijzing.
ES
¿Desearía recibir unas instrucciones de uso completas sobre
este producto en un idioma determinado? Entonces visite nuestra
página web utilizando el siguiente enlace (código QR) para ver
las versiones disponibles.
IT
Desidera ricevere informazioni esaustive su questo prodotto
in una lingua specifica? Venga a visitare il nostro sito Web al
seguente link (codice QR Code) per conoscere le versioni
disponibili.
www.bresser.de/download/3320011
www.bresser.de/warranty_terms
GARANTIE · WARRANTY · GARANTÍA · GARANZIA
Page 3

Inhaltsverzeichnis
1 Impressum ............................................................................ 5
2 Gültigkeitshinweis................................................................ 6
3 Zu dieser Anleitung.............................................................. 6
4 Verwendungszweck ............................................................. 6
5 Allgemeine Sicherheitshinweise......................................... 7
6 Teileübersicht und Lieferumfang...................................... 10
7 Display-Anzeigen................................................................ 12
8 Montage und Stromversorgung........................................ 13
9 Kameralinse ausrichten..................................................... 14
10 Speicherkarte einsetzen und formatieren........................ 15
11 Einstellungsmenüs............................................................. 16
12 Aufnahmen.......................................................................... 19
13 OBD-Datenanzeige in Videodateien.................................. 20
14 Wi-Fi Modus/ Kamera App................................................. 21
15 Gerät neu starten (Reset) .................................................. 21
16 Reinigung und Wartung..................................................... 21
17 Entsorgung ......................................................................... 22
iii
Page 4

18 EG-Konformitätserklärung ..................................................22
19 Garantie.................................................................................22
iv
Page 5

1 Impressum
Bresser GmbH
Gutenbergstr. 2
46414 Rhede
Germany
http://www.bresser.de
Für etwaige Gewährleistungsansprüche oder Serviceanfra-
gen verweisen wir auf die Informationen zu „Garantie“ und
„Service“ in dieser Dokumentation. Wir bitten um Verständnis, dass direkt an die Hersteller-Anschrift gerichtete Anfragen oder Einsendungen nicht bearbeitet werden können.
Irrtümer und technische Änderungen vorbehalten.
© 2017 Bresser GmbH
Alle Rechte vorbehalten.
Die Reproduktion dieser Dokumentation – auch auszugs-
weise – in irgendeiner Form (z.B. Fotokopie, Druck, etc.) sowie die Verwendung und Verbreitung mittels elektronischer
Systeme (z.B. Bilddatei, Website, etc.) ohne eine vorherige
schriftliche Genehmigung des Herstellers ist nicht gestattet.
Die in dieser Dokumentation verwendeten Bezeichnungen
und Markennamen der jeweiligen Firmen sind im Allgemeinen in Deutschland, der Europäischen Union und/oder weiteren Ländern waren-, marken- und/oder patentrechtlich geschützt.
© 2017 & TM Discovery Communications, LLC.
DMAX and associated logos are the trade marks of
Discovery Communications, LLC. Used under license.
All rights reserved.
OFFICIAL LICENSED PRODUCT.
Visit www.dmax.de
5 / 44
Page 6

2 Gültigkeitshinweis
Diese Dokumentation ist gültig für die Produkte mit den
nachfolgend aufgeführten Artikelnummern:
3320011
Anleitungsversion: v072017a
Bezeichnung dieser Anleitung: Manual_3320011_Full-
HD-Dashcam-OBD_de-en_DMAX_v072017a
Informationen bei Serviceanfragen stets angeben.
3 Zu dieser Anleitung
HINWEIS
Diese Bedienungsanleitung ist als Teil des Gerätes zu
betrachten!
Lesen Sie vor der Benutzung des Geräts aufmerksam die
Sicherheitshinweise und die Bedienungsanleitung.
Bewahren Sie diese Bedienungsanleitung für die erneute
Verwendung zu einem späteren Zeitpunkt auf. Bei Verkauf
oder Weitergabe des Gerätes ist die Bedienungsanleitung
an jeden nachfolgenden Besitzer/Benutzer des Produkts
weiterzugeben.
4 Verwendungszweck
• Dieses Gerät ist nicht dafür bestimmt, durch Personen
(einschließlich Kinder) mit eingeschränkten physischen,
sensorischen oder geistigen Fähigkeiten oder mangels
Erfahrung und/oder mangels Wissen benutzt zu wer-
6 / 44
Page 7
den, es sei denn, sie werden durch eine für ihre Sicherheit zuständige Person beaufsichtigt oder erhielten von
ihr Anweisungen, wie das Gerät zu benutzen ist.
• Dieses Gerät dient ausschließlich der privaten Nutzung.
• Das Gerät ist nur für den Betrieb in Innenräumen bestimmt!
5 Allgemeine Sicherheitshinweise
GEFAHR
Gefahr eines Stromschlags!
Dieses Gerät beinhaltet Elektronikteile, die über eine Stromquelle (Netzteil und/oder Batterien) betrieben werden. Bei
unsachgemäßer Verwendung dieses Produkts besteht die
Gefahr eines Stromschlags. Ein Stromschlag kann zu
schweren bis tödlichen Verletzungen führen. Beachten Sie
daher unbedingt die nachfolgenden Sicherheitsinformationen.
• Überprüfen Sie das Gerät, die Kabel und Anschlüsse
vor Inbetriebnahme auf Beschädigungen.
• Beschädigtes Gerät oder ein Gerät mit beschädigten
stromführenden Teilen niemals in Betrieb nehmen! Beschädigte Teile müssen umgehend von einem autorisierten Service-Betrieb ausgetauscht werden.
• Platzieren Sie Ihr Gerät so, dass es jederzeit vom
Stromnetz getrennt werden kann. Die Netzsteckdose
sollte sich immer in der Nähe Ihres Geräts befinden
und gut zugänglich sein, da der Stecker des Netzkabels als Trennvorrichtung zum Stromnetz dient.
• Um das Gerät vom Stromnetz zu trennen, ziehen Sie
immer am Netzstecker und niemals am Kabel!
7 / 44
Page 8
GEFAHR
Erstickungsgefahr!
Bei unsachgemäßer Verwendung dieses Produkts besteht
Erstickungsgefahr, insbesondere für Kinder. Beachten Sie
deshalb unbedingt die nachfolgenden Sicherheitsinformationen.
• Verpackungsmaterialien (Plastiktüten, Gummibänder,
etc.) von Kindern fernhalten! Es besteht Erstickungsgefahr!
GEFAHR
Unfallgefahr!
Bedienen Sie dieses Gerät nicht während der Fahrt. Es besteht Unfallgefahr!
GEFAHR
Explosionsgefahr!
Bei unsachgemäßer Verwendung dieses Produkts besteht
Explosionsgefahr. Beachten Sie unbedingt die nachfolgenden Sicherheitsinformationen, um eine Explosion zu vermeiden.
• Setzen Sie das Gerät keinen hohen Temperaturen aus
und schützen Sie es vor Wasser und hoher Luftfeuchtigkeit, um ein Auslaufen oder eine Explosion des integrierten Akkus zu vermeiden!
• Setzen Sie das Gerät keinen hohen Temperaturen aus.
Benutzen Sie nur das mitgelieferte Netzteil. Gerät nicht
kurzschließen oder ins Feuer werfen! Durch übermäßi-
8 / 44
Page 9
ge Hitze und unsachgemäße Handhabung können
Kurzschlüsse, Brände und sogar Explosionen ausgelöst werden!
HINWEIS
Gefahr von Sachschäden!
Bei unsachgemäßer Handhabung können das Gerät und/
oder die Zubehörteile beschädigt werden. Verwenden Sie
das Gerät deshalb nur entsprechend den nachfolgenden Sicherheitsinformationen.
• Bauen Sie das Gerät nicht auseinander! Wenden Sie
sich im Falle eines Defekts an Ihren Fachhändler. Er
nimmt mit dem Service-Center Kontakt auf und kann
das Gerät ggf. zwecks Reparatur einschicken.
HINWEIS
Gefahr von Spannungsschäden!
Für Spannungsschäden durch die Nutzung eines nicht geeigneten Netzteils übernimmt der Hersteller keine Haftung!
HINWEIS
Gefahr eines Datenverlustes!
Unterbrechen Sie niemals eine bestehende Datenverbindung zum Computer bevor Sie alle Daten übertragen haben. Durch eine Unterbrechung kann es zu Datenverlusten
kommen, für die der Hersteller keine Haftung übernimmt!
9 / 44
Page 10
HINWEIS
AV
RE S E T
USB
OFF ON
1
2
3
4
5
6
12
13
14
15
16
17
19
18
11
7
8
9
10
A
B
Gesetzliche Vorgaben beachten!
Erkundigen Sie sich vor dem Einsatz dieses Geräts nach
den gesetzlichen Vorgaben. Insbesondere zum Schutz von
personenbezogenen Daten gelten für die Speicherung von
Bild- und Video-Informationen besondere Vorschriften oder
gar Verbote. Auch für den Einsatz des Geräts im Straßenverkehr können abhängig von der Gesetzgebung des jeweiligen Landes besondere Regelungen gelten.
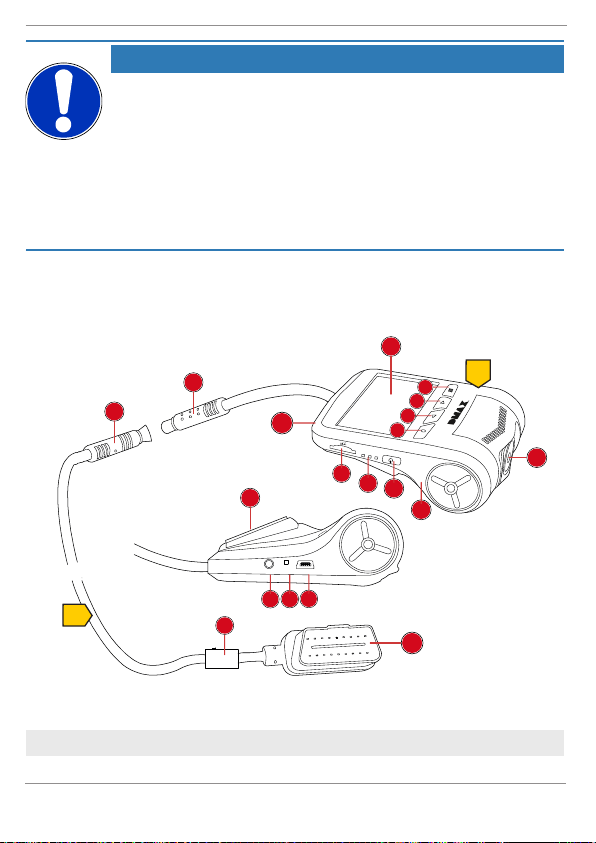
6 Teileübersicht und Lieferumfang
Abb.1: Alle Teile der Autokamera
1 LCD-Bildschirm 2 Kameralinse
10 / 44
Page 11

3 Gehäuse 4 EIN/AUS-Taste
5 Funktionsleuchten 6 microSD / TF Kartenein-
schub*
7 OK-Taste 8 UP-Taste
9 DOWN-Taste 10 MENU-Taste
11 Integriertes Mikrofon 12 Klebepad zur Montage an
Windschutzscheibe
13 AV-OUT 14 RESET-Knopf
15 USB-Anschlussbuchse 16 8-poliger Verbindungsste-
cker (male)
17 8-poliger Verbindungsste-
cker (female)
18 Ein/Ausschalter Kfz-Strom-
verbindung
19 OBD Kfz-Stecker
Lieferumfang
Autokamera (A), Strom-/ Datenkabel (B), Bedienungsanleitung
* SD-Karten bis max. 32 GB möglich. Nicht im Lieferumfang
enthalten.
11 / 44
Page 12
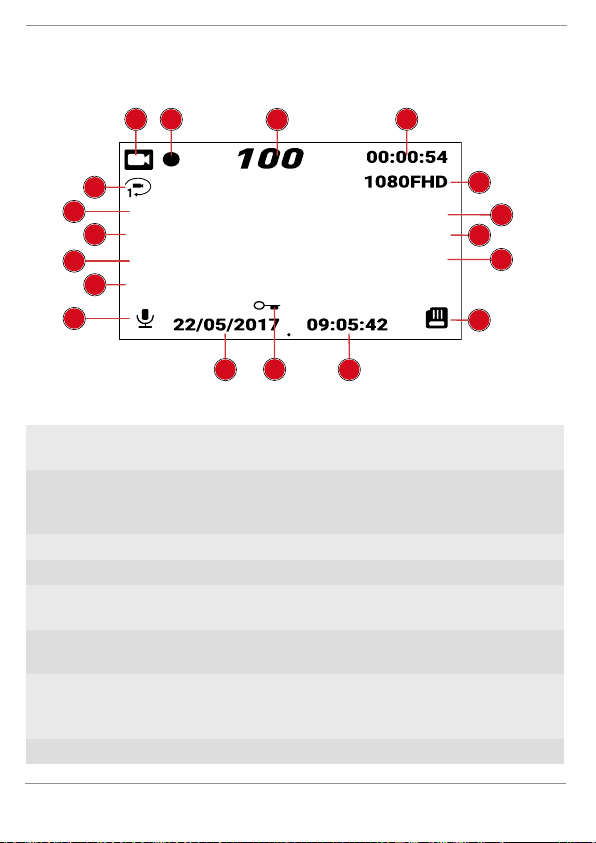
7 Display-Anzeigen
r/min
°C
0V
km
L
L/100km
L/100km
Km/h
18
7
9
5
6
8
17
16
15
14
13
2
3
4
12
10
11
1
Abb.2: Display-Anzeigen der Kamera
1 Video-Symbol 2 Videoaufnahme aktiv (Aufnahmesym-
3 Durchschnittliche
Fahrzeuggeschwin-
digkeit
5 Video-Auflösung 6 Drehgeschwindigkeit
7 Wassertemperatur 8 Stromspannung
9 microSD-Karte ein-
gelegt
11 Schreibgeschützte
Aufnahme
13 Tonaufnahme aktiv
oder inaktiv (durch-
gestrichen)
15 Ölverbrauch 16 Durchschnittlicher Kraftstoffverbrauch
12 / 44
bol)
4 Verbleibende Aufnahmezeit oder Ak-
tuelle Laufzeit
10 Uhrzeit
12 Datum
14 Kilometerstand
Page 13
17 Kraftstoffverbrauch 18 Loop-Aufnahme und Anzeige der
OBD Inter face
Dauer
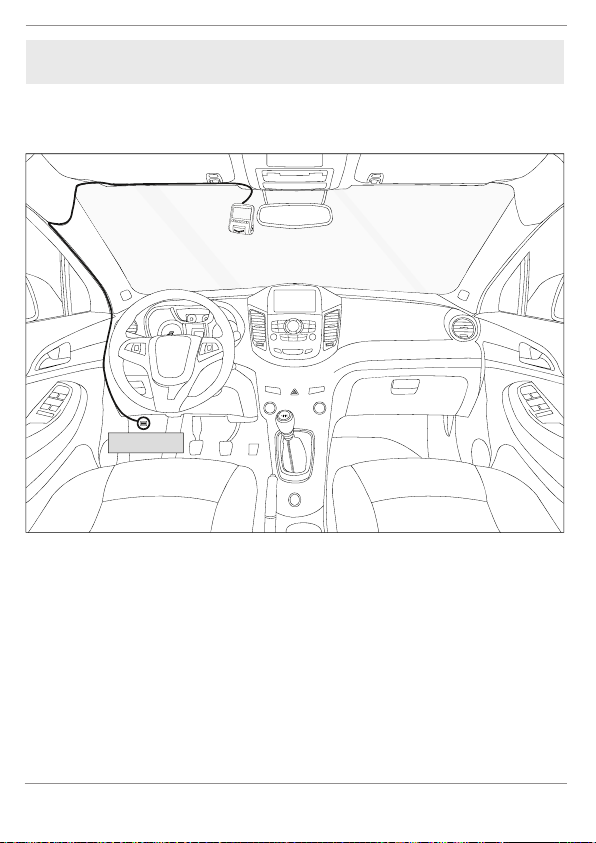
8 Montage und Stromversorgung
Abb.3:
1. Kfz-Ladekabel in das OBD Interface ihres Fahrzeugs
stecken. Die Position des OBD Interface variiert je nach
Fahrzeugmodell, meistens jedoch im Bereich unterhalb
des Lenkrads. Bitte schauen Sie vorab in die Anleitung
Ihres Fahrzeugs, um die genaue Position zu ermitteln.
2. Verlegen Sie das Strom-/Datenkabel so, dass die Sicht
des Fahrers nicht beeinträchtigt wird.
3. Verbinden Sie die Kamera mit dem Strom-/Datenkabel
(8-poliger Verbindungsstecker).
13 / 44
Page 14
4. Es wird empfohlen, die Kamera in der Nähe des Rückspiegels zu befestigen. Achten Sie bei der Wahl der
Position darauf, dass die Sicht des Fahrers nicht beeinträchtigt wird. Reinigen Sie die ausgewählte Stelle
sorgfältig.
5. Stellen Sie sicher, dass die Stelle trocken ist, bevor Sie
die Kamera anbringen. Ziehen Sie die Schutzfolie am
Klebepad ab und befestigen Sie die Kamera an der
ausgewählten Stelle.
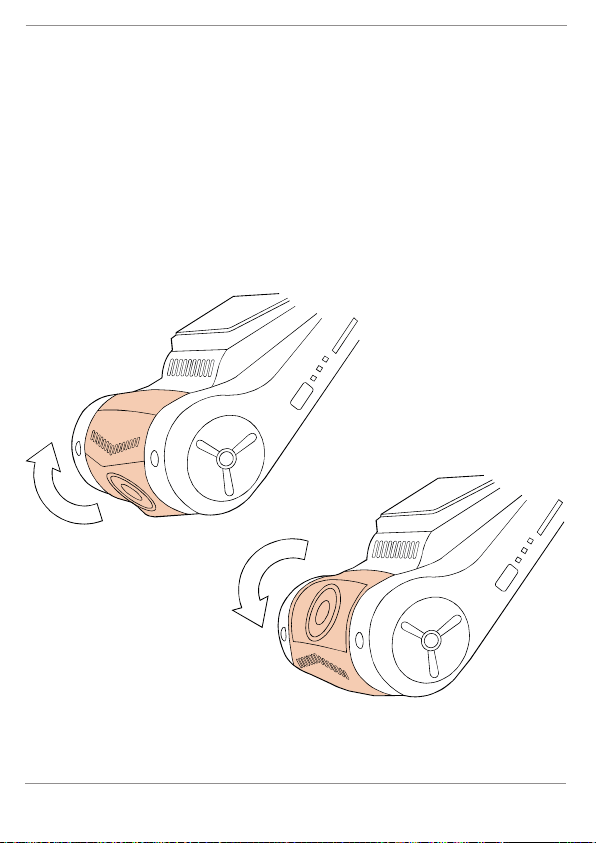
9 Kameralinse ausrichten
14 / 44
Richten Sie die Kameralinse so aus, dass sie gerade nach
vorne zeigt.
Page 15

10 Speicherkarte einsetzen und
formatieren
1. Geeignete microSD-Karte* mit der kürzeren Seite voran
in den microSD-Karteneinschub stecken. Die Kontakte
der Karte müssen dabei in Richtung des Displays zeigen.
2. Nach dem Herstellen der Stromversorgung schaltet
sich das Gerät automatisch ein und beginnt mit der Videoaufnahme. OK-Taste drücken, um die Aufnahme zu
stoppen.
3. MENU-Taste zweimal drücken, um ins Einstellungsmenü ‚Grundeinstellungen‘ zu gelangen.
4. Die UP-oder DOWN-Taste drücken, um den Menüpunkt ‚Formatieren‘ auszuwählen und OK-Taste
drücken.
5. Die UP-oder DOWN-Taste drücken, um ‚SD Karte‘ auszuwählen und OK-Taste drücken.
6. Im Info-Fester ‚Speicher formatieren/Alle Daten löschen‘ mit der UP- oder DOWN-Taste OK wählen und
OK-Taste drücken. Das Speichermedium wird formatiert.
HINWEIS!Durch die Formatierung gehen alle auf der
Speicherkarte vorhandenen Daten unwiderruflich verloren.
1. MENU-Taste drücken, um das Menü zu verlassen.
2. EIN/AUS-Taste etwa 2 Sekunden gedrückt halten, um
das Gerät auszuschalten.
3. Gerät von der Stromversorgung trennen.
*nicht im Lieferumfang enthalten
15 / 44
Page 16

11 Einstellungsmenüs
1. Im Aufnahmemodus die MENU-Taste drücken, um ins
Einstellungsmenü zu gelangen. Im WIFI-Modus nicht
möglich. Beenden Sie zuerst den WIFI Modus durch
gedrückt halten der UP-Taste.
2. Mit UP- oder DOWN-Taste durch die Menüpunkte navigieren.
3. OK-Taste drücken, um Auswahlmöglichkeiten des jeweiligen Menüpunkts aufzurufen.
4. Mit UP- oder DOWN-Taste die gewünschte Einstellung
auswählen (siehe nachfolgende Tabellen).
5. OK-Taste drücken, um die gewählte Einstellung zu bestätigen.
6. MENU-Taste erneut drücken, um ins Einstellungsmenü
für die Kamera-Grundeinstellungen zu gelangen.
7. Punkte 1-5 wiederholen, um die Grundeinstellungen
anzupassen oder MENU-Taste erneut drücken, um in
den Aufnahme- oder Wiedergabe-Modus zurückzukehren.
HINWEIS!Um die Einstellung in einem Menüpunkt
ohne Änderung abbrechen zu wollen, muss das Menü durch drücken der MENU-Taste zunächst vollständig verlassen und dann neu aufgerufen werden.
Menüpunkt Einstellmöglichkeit(en)
Auflösung (Resolution) Videoauflösung einstellen
Loop-Aufnahme (Loop Recording) Automatische Aufnahme aktivieren
(1080FHD, 720P oder VGA).
(1, 3 oder 5 Minuten) oder deaktivieren (OFF). Wenn aktiv, werden
bei vollem Speichermedium nicht
16 / 44
Page 17

Menüpunkt Einstellmöglichkeit(en)
schreibgeschützte Aufnahmen
überschrieben. Ist die Funktion deaktiviert, werden bei vollem Speichermedium keine Aufnahmen
mehr gemacht.
G-Sensor / Schwerkraft-Sensor
(Gravity Sensing)
Mit aktiviertem G-Sensor, speichert die Kamera in der Loop-Aufnahme bei plötzlicher Bewegung
(z.B. bei Kollision oder Aufprall)
automatisch eine Aufnahme die
geschützt ist. Diese Aufnahme
wird nicht durch neue Aufnahmen
nicht überschrieben.
Belichtung (Exposure) Belichtungswert einstellen (-2, -1,
0 , 1, 2).
Bewegungserkennung (Motion Detection)
Bewegungserkennung aktivieren
(ON) oder deaktivieren (OFF).
Wenn aktiv, wird bei einer Bewegung automatisch eine Video-Aufnahme entsprechend dem eingestellten Loop-Wert erzeugt.
Audioaufzeichnung (Record Audio)
Tonaufnahme aktivieren (ON) oder
deaktivieren (OFF).
Datumsanzeige (Date Stamp) Datumsstempel einblenden (ON)
oder ausblenden (OFF).
Tab.1: Einstellungsmenü Video-Aufnahme
Menüpunkt Einstellungsmöglichkeit(en)
WIFI WIFI aktivieren (ON) oder deakti-
vieren (OFF).
17 / 44
Page 18

Menüpunkt Einstellungsmöglichkeit(en)
Datum/Uhrzeit (Date/Time) Einstellen des aktuellen Datums
und der Uhrzeit sowie der Datumsanzeige. Werte mit UP- oder
DOWN-Taste ändern. OK-Taste
drücken, um zum nächsten Wert
zu springen.
Tastentöne (Beep Sound / Key Tone)
Tastentöne aktivieren (ON) oder
deaktivieren (OFF).
Parkwächter (Parking guard) Parkwächter aktivieren (ON) oder
deaktivieren (OFF).
Wenn dieser Modus aktiviert ist,
springt die Kamera an, wenn sich
das Auto bewegt, ohne das der
Motor an ist. (max. 24 Stunden
nach dem parken).
Sprache (Language) Menüsprache wählen.
Bildschirmschoner (Screen Saver) Bildschirmschoner einstellen (nach
1, 5 oder 10 Minuten aktivieren)
oder deaktivieren (OFF).
Frequenz (Frequency) Bildwiederholrate einstellen (50Hz
oder 60Hz).
Formatieren (Format) Speichermedium auswählen, um
es zu Formatieren.
ACHTUNG: Durch die Formatie-
rung gehen alle auf der Speicher-
karte vorhandenen Daten unwider-
ruflich verloren.
Standardeinstell. (Default Setting) Gerät auf die Standardeinstellun-
gen zurücksetzen (OK) oder ab-
brechen (Cancel).
18 / 44
Page 19

Menüpunkt Einstellungsmöglichkeit(en)
ACHTUNG: Durch das Zurückset-
zen auf die Standardeinstellungen
gehen alle vorgenommenen Ein-
stellungen verloren!
Version Anzeige der Geräteversion.
Tab.2: Einstellungsmenü Grundeinstellungen
12 Aufnahmen
Nach dem Formatieren des Speichermediums und dem Einschalten der Kamera beginnt diese automatische mit der Video-Aufnahme. Sollte die Aufnahme nicht automatisch starten, folgendermaßen vorgehen:
1. OK-Taste drücken, um Aufnahme zu starten. Aufnahmesymbol blinkt.
2. OK-Taste drücken, um Aufnahme zu beenden. Aufnahmesymbol verschwindet.
3. UP- oder DOWN-Taste drücken, um die vollständige
Display Anzeige zu erhalten.
4. DOWN-Taste gedrückt halten um das Mikrofon einoder auszuschalten.
5. EIN/AUS-Taste drücken um den Bildschirm ein- oder
auszuschalten.
19 / 44
Page 20

13 OBD-Datenanzeige in Videodateien
2
1
3
4
5
8
6
7
1 Fehlercode zur Erkennung ob
ein Fehler im Auto vorliegt.
3 Die Motordrehzahl pro Minu-
te.
5 Die Temperatur der Kühlflüs-
sigkeit, wenn der Motor läuft.
7 Aktuell zurückgelegte Kilome-
ter.
20 / 44
2 Spannungswert der Auto-Batte-
rie.
4 Die durchschnittliche Ge-
schwindigkeit des Autos angegeben in km/h.
6 Der durchschnittliche Benzin-
verbrauch auf 100 Kilometer.
8 Benzinverbrauch der aktuellen
Fahrt.
Page 21

14 Wi-Fi Modus/ Kamera App
1. Installieren Sie zuerst die App auf Ihrem Smartphone.
Suchen Sie dazu im Appstore oder dem Google Play
Store nach „Bresser DashCam“. DOWNLOAD: http://
www.bresser.de/download/3320011
2. UP-Taste gedrückt halten um WIFI zu aktivieren oder
deaktivieren und in den WIFI-Modus zu wechseln.
3. Die MENU-Taste ist im WIFI-Modus deaktiviert. Nutzen
Sie die Android oder iOS App um Einstellungen vorzunehmen.
4. Verbinden Sie jetzt die Kamera mit ihrem Smartphone
(Suchen Sie ein Netzwerk mit dem auf der Kamera angezeigten Namen „z.B. YPD**** “). Benutzen Sie das
angezeigte Passwort, meist „12345678“. Starten Sie
jetzt die App.
15 Gerät neu starten (Reset)
Bei einer Funktionsstörung kann das Gerät neu gestartet
werden. Dazu mit einem schmalen Gegenstand (z.B. Büroklammer) den RESET-Knopf vorsichtig und mit wenig Druck
eindrücken.
16 Reinigung und Wartung
• Schalten Sie das Gerät während Reinigungsarbeiten
oder wenn Sie es nicht benutzen aus.
• Reinigen Sie das Gerät nur äußerlich mit einem trockenen Tuch. Benutzen Sie keine Reinigungsflüssigkeit, um Schäden an der Elektronik zu vermeiden.
21 / 44
Page 22

• Das Gerät keinen Stößen, Erschütterungen, Staub,
dauerhaft hohen Temperaturen oder extremer Feuchtigkeit aussetzen. Dies kann zu Fehlfunktionen, Kurzschlüssen sowie zu Beschädigungen an Batterien und
Bauteilen führen.
17 Entsorgung
Entsorgen Sie die Verpackungsmaterialien sortenrein.
Informationen zur ordnungsgemäßen Entsorgung erhalten Sie beim kommunalen Entsorgungsdienstleister
oder Umweltamt.
Werfen Sie Elektrogeräte nicht in den Hausmüll!
Gemäß der Europäischen Richtlinie 2002/96/EG über
Elektro- und Elektronik-Altgeräte und deren Umsetzung in nationales Recht müssen verbrauchte Elektrogeräte getrennt gesammelt und einer umweltgerechten Wiederverwertung zugeführt werden.
18 EG-Konformitätserklärung
Eine „Konformitätserklärung“ in Übereinstimmung mit
den anwendbaren Richtlinien und entsprechenden
Normen ist von der Bresser GmbH erstellt worden.
Diese kann auf Anfrage jederzeit eingesehen werden.
19 Garantie
Die reguläre Garantiezeit beträgt 2 Jahre und beginnt am
Tag des Kaufs. Um von einer verlängerten, freiwilligen Garantiezeit wie auf dem Geschenkkarton angegeben zu profitieren, ist eine Registrierung auf unserer Website erforderlich.
22 / 44
Page 23

Die vollständigen Garantiebedingungen sowie Informationen zu Garantiezeitverlängerung und Serviceleistungen
können Sie unter www.bresser.de/garantiebedingungen
einsehen.
23 / 44
Page 24

Contents
1 Imprint ...................................................................................26
2 Validation ..............................................................................27
3 About this manual ................................................................ 27
4 Intended use .........................................................................27
5 General safety instructions ................................................. 28
6 Parts overview and scope of delivery ................................31
7 Screen display ...................................................................... 32
8 Installing and power supply ................................................ 34
9 Aligning the cameral lens....................................................35
10 Insert and format the memory card .................................... 36
11 Setup menu...........................................................................36
12 Recordings............................................................................ 39
13 OBD data display in video files...........................................40
14 Wi-Fi Mode / Camera App .................................................... 41
15 Restart the device (Reset) ...................................................41
16 Cleaning and maintenance..................................................41
17 Disposal ................................................................................42
xxiv
Page 25

18 EC Declaration of Conformity ........................................... 42
19 Warranty.............................................................................. 43
xxv
Page 26

1 Imprint
Bresser GmbH
Gutenbergstr. 2
46414 Rhede
Germany
http://www.bresser.de
For information regarding liability claims or service requests,
please refer to chapters "Warranty" and "Service" in this
documentation. We ask for your understanding, that any requests or submissions that have been addressed to the
manufacturer's address can not be processed.
Errors reserved - technical specifications subject to change.
© 2017 Bresser GmbH
All rights reserved.
It is not allowed to reproduce this documentation or parts of
it in any kind (e.g. photocopying, printing, etc) without written a permission of the manufacturer. It is also prohibitted to
use or transmit this documentation with electronic systems
(e.g. image file, website, etc).
The descriptions and brand names of the corresponding
firms used in this documentation are generally protected under trademark, brand and/or patent law for Germany, for the
European Union and/or other countries.
© 2017 & TM Discovery Communications, LLC.
DMAX and associated logos are the trade marks of
Discovery Communications, LLC. Used under license.
All rights reserved.
OFFICIAL LICENSED PRODUCT.
Visit www.dmax.de
26 / 44
Page 27

2 Validation
This document is valid for the products with the following
part numbers:
3320011
Version of manual: v072017a
Name of manual: Manual_3320011_Full-HD-Dashcam-
OBD_de-en_DMAX_v072017a
Information is always provided for service requests.
3 About this manual
NOTICE
This instruction manual should be considered part of
the device.
Before using the equipment, read the safety instructions
and operating instructions carefully.
Keep this instruction manual in a safe place to refer to at a
later date. If the equipment is sold or passed on, the instruction manual must also be passed on to each subsequent
owner of the product.
4 Intended use
• This device is not intended to be used by persons (including children) with limited physical, sensory or mental capabilities or those who lack the relevant experience and/or knowledge, unless they are supervised by
27 / 44
Page 28

a person responsible for their safety or have received
instructions from this person as to how the device is
used.
• This device is for private use only.
• The device is for indoor use only.
5 General safety instructions
DANGER
Risk of electric shock
This device has electronic parts operated via a power
source (power supply and/or batteries). Improper use of this
product can cause an electric shock. An electric shock can
cause serious or potentially fatal injuries. The following
safety information must be observed at all times.
• Before starting up the device, check the device, the
cables and the connections for signs of damage.
• Never use a damaged device or a device with damaged live parts. Damaged parts must be immediately
replaced by an authorised service company.
• Position your device so that it can be disconnected
from the power supply at any time. The power socket
should be installed near the device and should be easily accessible as the mains cable plug is used to disconnect the device from the power supply.
• To disconnect the device from the power supply, always pull on the plug. Never pull on the cable.
28 / 44
Page 29

DANGER
Risk of suffocation
Improper use of this product can result in suffocation. This
is particularly dangerous for children. The following safety
information must be observed at all times.
• Keep packaging materials (plastic bags, rubber bands
etc.) away from children. They can cause suffocation.
DANGER
Risk of accidents
Never operate this device while driving. This could cause an
accident.
DANGER
Risk of explosion
Improper use of this product can cause an explosion. The
following safety information must be observed at all times to
prevent an explosion.
• Do not expose the device to high temperatures and
protect it against water and high levels of moisture.
This will prevent the integrated battery from leaking or
exploding.
• Do not expose the device to high temperatures. Use
only the power supply provided. Never short-circuit the
device or throw it into a fire. Excessive heat and improper handling of this product can result in short-circuits, fires or even explosions.
29 / 44
Page 30

NOTICE
Risk of damage to property
Improper handling can result in damage to the device and/
or to the accessories. Always observe the following safety
information when using the device.
• Never disassemble the device. In the event of a fault,
please contact your specialist retailer. The specialist retailer will contact the service centre and send the
device for repair if necessary.
NOTICE
Risk of surge damage
The manufacturer accepts no liability for any surge damage
resulting from the use of an unsuitable power supply.
NOTICE
Risk of data loss
Never terminate an established data connection between
the device and the computer before all of the data has been
transferred. The manufacturer accepts no liability for data
loss resulting from the disconnection of the device.
NOTICE
Observe statutory requirements.
Before using this device, check the statutory requirements.
Particularly with regard to protection of personal data, certain provisions, or even prohibitions, apply when saving im-
30 / 44
Page 31

age and video information. Specific regulations may also
AV
RE S E T
USB
OFF ON
1
2
3
4
5
6
12
13
14
15
16
17
19
18
11
7
8
9
10
A
B
apply when using the device in road traffic depending on the
legislation of each particular country.
6 Parts overview and scope of
delivery
Illustration1: All parts of the in-car camera
1 LCD screen 2 Camera lens
3 Housing 4 ON/OFF button
5 function lights 6 microSD / TF card slot*
7 OK button 8 UP button
9 DOWN button 10 MENU button
31 / 44
Page 32

11 Integrated microphone 12 Adhesive pad for mounting
r/min
°C
0V
km
L
L/100km
L/100km
Km/h
18
7
9
5
6
8
17
16
15
14
13
2
3
4
12
10
11
1
on windshield
13 AV-OUT 14 RESET button
15 USB connector socket 16 8-pin connector (male)
17 8-pin connector (female) 18 ON/OFF button Car power
connection
19 OBD Car plug
Scope of delivery
In-car camera (A), Power/data cable (B), Instruction Manual
* SD cards with capacity up to 32 GB possible. Not included
in delivery.
7 Screen display
Illustration2: Camera display
32 / 44
Page 33

1 Video symbol 2 Record Video activated (recording
symbol)
3 Average vehicle
speed
4 Recording time remaining or current
run-time
5 Video resolution 6 Rotation speed
7 Water temperature 8 Voltage
9 microSD card inser-
10 Time
ted
11 Write protected re-
12 Date
cording
13 Record Audio activ-
14 Short mileage
ated or deactivated
(crossed out)
15 Oil consumption 16 Average fuel consumption
17 Fuel consumption 18 Loop recording and display time
33 / 44
Page 34

8 Installing and power supply
OBD Inter face
Illustration3:
1. Connect the Power/data cable to the OBD interface of
your vehicle. The position of the OBD interface varies
depending on the vehicle model, but mostly in the area
below the steering wheel. Please check the instructions
of your vehicle in advance to determine the exact position.
2. Route the Power/data cable so that the driver's visibility
is not affected.
3. Connect the camera to the Power/data cable (via 8-pin
connector).
34 / 44
Page 35

4. It is recommended to mount the camera near the rearview mirror. When selecting the position, make sure
that the driver's visibility is not affected. Clean the selected area carefully.
5. Make sure the surface is dry before installing the camera. Remove the protective film from the adhesive pad
and attach the camera to the selected location.
9 Aligning the cameral lens
Align the camera lens so that it is straight forward looking.
35 / 44
Page 36

10 Insert and format the memory card
1. Insert the appropriate microSD card* with the shorter
side forward in the microSD card slot. The contacts of
the card must point towards the display.
2. After the power is turned on the unit automatically turns
on and starts recording the video. Press the OK button
to stop recording.
3. Press the MENU button twice to enter the 'Basic settings' setup menu.
4. Press the UP or DOWN button to select 'Format' and
press the OK button.
5. Press the UP or DOWN button to select 'SD card' and
press the OK button.
6. In the Info window ‘Format memory / Delete all data’
use the UP or DOWN button to select OK and press
the OK button. The storage medium will be formatted.
NOTICE!Formatting means that all data on the memory
card will be irrevocably lost.
1. Press the MENU button to exit the menu.
2. Press and hold the ON / OFF button for 2 seconds to
switch off the device.
3. Disconnect the device from the power supply.
*not included
11 Setup menu
1. Press the MENU button to enter the setup menu in the
recording mode. This cannot be used in WIFI mode.
End the WIFI mode by holding down the UP button.
36 / 44
Page 37

2. Use the UP or DOWN buttons to navigate the menu
items.
3. Press the OK button to access the selection options for
the respective menu item.
4. Use UP or DOWN button to select the favored setting
(see the tables below).
5. Press the OK button to confirm the selected setting.
6. Press the MENU button again to enter the settings
menu for the camera basic settings.
7. Repeat steps 1-5 to adjust the basic settings, or press
the MENU button again to return to recording or playback mode.
NOTICE!In order to cancel the setting in a menu
point without modification, the menu must first be
completely exited by pressing the MENU button
and then opened again.
Menu item Adjustment (s)
Resolution Set video resolution (1080FHD,
720P or VGA).
Loop Recording Enable automatic recording (1, 3,
or 5 minutes) or disable (OFF). If
active, non-write-protected recordings will be overwritten when the
storage medium is full. If the function is deactivated, no more recordings will be made when the
storage medium is full.
G-Sensor / Gravity Sensing When the G-sensor is activated, in
the loop recording the camera
automatically saves a security recording during sudden movement
37 / 44
Page 38

Menu item Adjustment (s)
(for example during a collision or
impact). This recording will not be
overwritten by new recordings.
Exposure Set the exposure value (-2, -1, 0 ,
1, 2).
Motion Detection Enable (ON) or disable (OFF) mo-
tion detection. When active, a recording will automatically generated during a motion according to
the set loop value.
Record Audio Enable (ON) or disable (OFF)
sound recording.
Date Stamp Show (ON) or hide (OFF) the date
stamp.
Table1: Video recording menu
Menu item Adjustment (s)
WIFI Enable WIFI (ON) or disable
(OFF).
Date / Time Set the current date and time as
well as the date display. Press UP
or DOWN to change values. Press
the OK button to jump to the next
value.
Beep Sound / Key Tone Activate (ON) or deactivate (OFF)
the beep sounds.
Parking guard Enable (ON) or disable (OFF) the
parking guard.
When this mode is activated, the
38 / 44
Page 39

Menu item Adjustment (s)
camera turns on when the car is
moving without the engine being
on. (Max 24 hours after parking).
Language Select the menu language.
Screen Saver Set screen saver (activate after 1,
Frequency Adjust the image refresh rate
Format Select the storage medium for
Default Setting Reset the device to the default set-
Version Displays the device version.
5 or 10 minutes) or deactivate
(OFF).
(50Hz or 60Hz).
formatting.
NOTICE: Formatting will irrevoc-
ably lose all data on the memory
card.
tings (OK) or Cancel (Cancel).
NOTICE: Resetting to the default
settings will result in the loss of all
settings!
Table2: Settings menu Basic settings
12 Recordings
After formatting the storage medium and turning on the
camera, the automatic recording starts with video recording.
If the recording does not start automatically, proceed as follows:
1. Press the OK button to start recording. The recording
icon flashes.
39 / 44
Page 40

2. Press the OK button to stop recording. The recording
2
1
3
4
5
8
6
7
icon disappears.
3. Press the UP or DOWN button to get the full display.
4. Press and hold the DOWN button to turn the microphone on or off.
5. Press the ON / OFF button to turn the screen on or off.
13 OBD data display in video files
1 Error code to detect if there is
2 Voltage value of the car battery.
an error in the car.
3 The engine speed per minute. 4 The average speed of the car
indicated in km / h.
40 / 44
Page 41

5 The temperature of the cooling
liquid when the engine is running.
7 Current kilometers traveled. 8 Fuel consumption of the cur-
6 The average fuel consumption
per 100 kilometers.
rent trip.
14 Wi-Fi Mode / Camera App
1. First install the app on your smartphone. Look for
"Bresser DashCam" in the AppStore or Google Play
Store. DOWNLOAD: http://www.bresser.de/download/3320011
2. Hold the UP button to enable or disable WIFI and
switch to WIFI mode.
3. The MENU button is disabled in WIFI mode. Use the
Android or iOS app to make settings.
4. Now connect the camera to your smartphone (find a
network with the name displayed on the camera, such
as YPD ****). Use the displayed password, usually
"12345678". Start the app now.
15 Restart the device (Reset)
The device can be restarted in case of a malfunction. To do
this, use a small object (e.g. paperclip) to press the RESET
button carefully and with little pressure.
16 Cleaning and maintenance
• Switch off the device to perform maintenance tasks or
when the device is not in use.
41 / 44
Page 42

• Only clean the device externally using a dry cloth. Do
not use cleaning solution to prevent damage to the
electronic parts.
• Do not expose the device to impacts, vibrations, dust,
constant high temperatures or excessive humidity. This
can result in malfunctions, short-circuits or damage to
the batteries and components.
17 Disposal
Sort packaging into different materials for disposal.
Contact the local waste disposal service provider or
environmental agency for information about appropriate waste management.
Do not dispose of electrical devices with the household waste.
In accordance with European Directive 2002/96/EC regarding waste electrical and electronic equipment and
its incorporation into national law, used electrical
devices must be collected separately and recycled in
an environmentally friendly manner.
18 EC Declaration of Conformity
A declaration of conformity has been prepared by
Bresser GmbH in accordance with the applicable
guidelines and standards. This can be examined at
any time upon request.
42 / 44
Page 43

19 Warranty
The regular warranty period is two years and starts on the
day of purchase. To take advantage of the extended, voluntary warranty period specified on the presentation box, you
must register on our website.
Please see http://archive.bresser.de/download/war-
ranty_terms/warranty_terms.pdf for all of the warranty
conditions as well as information about extended warranties
and services.
43 / 44
Page 44

DE AT
CH
BE
Bei Fragen zum Produkt und eventuellen
Reklamationen nehmen Sie bitte zunächst mit dem
Service-Center Kontakt auf, vorzugsweise per
E-Mail.
E-Mail: service@bresser.de
Telefon*: +49 28 72 80 74 210
BRESSER GmbH
Kundenservice
Gutenbergstr. 2
46414 Rhede
Deutschland
* Lokale Rufnummer in Deutschland (Die Höhe der Gebühren je Telefonat
ist abhängig vom Tarif Ihres Telefonanbieters); Anrufe aus dem Ausland
sind mit höheren Kosten verbunden.
GB IE
Please contact the ser vice centre first for any
questions regarding the product or claims,
preferably by e-mail.
e-mail: service@bresseruk.com
Telephone*: +44 1342 837 098
BRESSER UK Ltd
Unit 1 starborough Farm,
Starborough Road, Nr Marsh Green,
Edenbridge, Kent TN8 5RB
Great Britain
* Number charged at local rates in the UK (the amount you will be charged
per phone call will depend on the tariff of your phone provider); calls from
abroad will involve higher costs.
FR BE
Si vous avez des questions concernant ce produit
ou en cas de réclamations, veuillez prendre contact
avec notre centre de services (de préférence via
e-mail).
e-mail: sav@bresser.fr
Téléphone*: +33 494 592 599
BRESSER France SARL
Pôle d'Activités de Nicopolis
260, rue des Romarins
83170 Brignoles
France
* Prix d'un appel local depuis la France ou Belgique
Service
NL BE
Als u met betrekking tot het product vragen of
eventuele klachten heeft kunt u contact opnemen
met het service centrum (bij voorkeur per e-mail).
e-mail: info@folux.nl
Teléfono*: +31 528 23 24 76
Folux B.V.
Smirnoffstraat 8
7903 AX Hoogeveen
Nederlands
* Het telefoonnummer wordt in het Nederland tegen lokaal tarief in rekening
gebracht. Het bedrag dat u per gesprek in rekening gebracht zal worden,
is afhankelijk van het tarief van uw telefoon provider; gesprekken vanuit
het buitenland zullen hogere kosten met zich meebrengen.
ES PT
Si desea formular alguna pregunta sobre el producto
o alguna eventual reclamación, le rogamos que se
ponga en contacto con el centro de servicio técnico
(de preferencia por e-mail).
e-mail: servicio.iberia@bresser-iberia.es
Teléfono*: +34 91 67972 69
BRESSER Iberia SLU
c/Valdemorillo,1 Nave B
P.I. Ventorro del cano
28925 Alcorcón Madrid
España
* Número local de España (el importe de cada llamada telefónica dependen
de las tarifas de los distribuidores); Las llamadas des del extranjero están
ligadas a costes suplementarios.
 Loading...