

Page 1
DE
Bedienungsanleitung
GB
Operating Instructions
FR
Mode d’emploi
NL
Handleiding
IT
Istruzioni per l’uso
ES
Instrucciones de uso
PT
Manual de utilização
Digitalmicro Bowl
Art. No. 88-53000
Page 2

DE
Bedienungsanleitung ................................................................................4
GB
Operating Instructions ...........................................................................22
FR
Mode d’emploi ........................................................................................38
NL
Handleiding .............................................................................................56
IT
Istruzioni per l’uso .................................................................................. 74
ES
Instrucciones de uso .............................................................................92
PT
Manual de utilização ............................................................................110
Page 3
B
C
D
E
F
H
J
G
i
1)
1!
1@
1%
1$
1#
Fig. 1
Fig. 2
Fig. 3
Page 4
GEFAHR für Ihr Kind!
Für die Arbeit mit diesem Gerät
werden häug scharfkantige
und spitze Hilfsmittel eingesetzt. Bewahren Sie deshalb dieses Gerät sowie alle Zubehörteile und Hilfsmittel
an einem für Kinder unzugänglichen
Ort auf. Es besteht VERLETZUNGS-
GEFAHR!
Kinder sollten das Gerät nur unter
Aufsicht benutzen. Verpackungsmaterialien (Plastiktüten, Gummibänder,
etc.) von Kindern fernhalten! Es besteht ERSTICKUNGSGEFAHR!
Die mitgelieferten Chemikalien und
Flüssigkeiten gehören nicht in Kinderhände! Chemikalien nicht trinken!
Hände nach Gebrauch unter ießendem Wasser gründlich säubern. Bei
versehentlichem Kontakt mit Augen
oder Mund mit Wasser ausspülen.
Bei Beschwerden unverzüglich einen
Arzt aufsuchen und die Substanzen
vorlegen.
Dieses Gerät beinhaltet Elektronikteile, die über eine Stromquelle (Netzteil und/oder Batterien) betrieben
werden. Lassen Sie Kinder beim
Umgang mit dem Gerät nie unbeaufsichtigt! Die Nutzung darf nur wie in
der Anleitung beschrieben erfolgen,
andernfalls besteht GEFAHR eines
STROMSCHLAGS!
BRAND-/EXPLOSIONSGEFAHR!
Setzen Sie das Gerät keinen
hohen Temperaturen aus. Benutzen Sie nur das mitgelieferte Netzteil oder die empfohlenen Batterien.
Gerät und Batterien nicht kurzschließen oder ins Feuer werfen! Durch
übermäßige Hitze und unsachgemäße Handhabung können Kurzschlüsse, Brände und sogar Explosionen
ausgelöst werden!
GEFAHR von Sachschäden!
Bauen Sie das Gerät nicht
auseinander! Wenden Sie
sich im Falle eines Defekts bitte an
Ihren Fachhändler. Er nimmt mit dem
Service-Center Kontakt auf und kann
das Gerät ggf. zwecks Reparatur einschicken.
Setzen Sie das Gerät keinen Temperaturen über 60° C aus!
HINWEISE zur Reinigung
Trennen Sie das Gerät
vor der Reinigung von der
Stromquelle (Netzstecker
ziehen oder Batterien entfernen)!
Reinigen Sie das Gerät nur äußerlich
mit einem trockenen Tuch. Benutzen
Sie keine Reinigungsüssigkeit, um
Schäden an der Elektronik zu vermeiden.
Reinigen Sie die Linsen (Okulare
und/oder Objektive) nur mit dem
beiliegeden Linsenputztuch oder mit
einem anderen weichen und fusselfreien Tuch (z.B. Microfaser) ab. Das
Tuch nicht zu stark aufdrücken, um
4
Page 5
ein Verkratzen der Linsen zu vermeiden.
Zur Entfernung stärkerer Schmutzreste befeuchten Sie das Putztuch
mit einer Brillen-Reinigungsüssigkeit
und wischen Sie damit die Linsen mit
wenig Druck ab.
Schützen Sie das Gerät vor Staub
und Feuchtigkeit! Bewahren Sie es
in der mitgelieferten Tasche oder
Transportverpackung auf. Batterien
sollten aus dem Gerät entfernt werden, wenn es längere Zeit nicht benutzt wird.
ENTSORGUNG
Entsorgen Sie die Verpa-
ckungsmaterialien sortenrein.
Informationen zur ordnungsgemäßen
Entsorgung erhalten Sie beim kommunalen Entsorgungsdienstleister
oder Umweltamt.
Werfen Sie Elektrogeräte nicht
in den Hausmüll!
Gemäß der Europäischen Richtlinie 2002/96/EG über Elektro- und
Elektronik-Altgeräte und deren Umsetzung in nationales Recht müssen
verbrauchte Elektrogeräte getrennt
gesammelt und einer umweltgerechten Wiederverwertung zugeführt
werden.
5
EG-Konformitätserklärung
Die Meade Instruments Euro-
pe GmbH & Co. KG, ansässig
in 46414 Rhede/Westf., Gutenbergstr. 2, Germany, erklärt für dieses Produkt die Übereinstimmung mit nachfolgend aufgeführten EG-Richtlinien:
EN 50022:2006
EN 55024:1998+A1:2001/A2:2003
EN 61000-3-2:2006
EN 61000-3-3:1995+A1:2001+A2:2005
Produktbeschreibung:
Digitalmicro Bowl
Typ / Bezeichnung:
44342
Rhede, 09.04.2009
Meade Instruments Europe GmbH &
Co. KG
Helmut Ebbert
Geschäftsführer
DE
Page 6

6
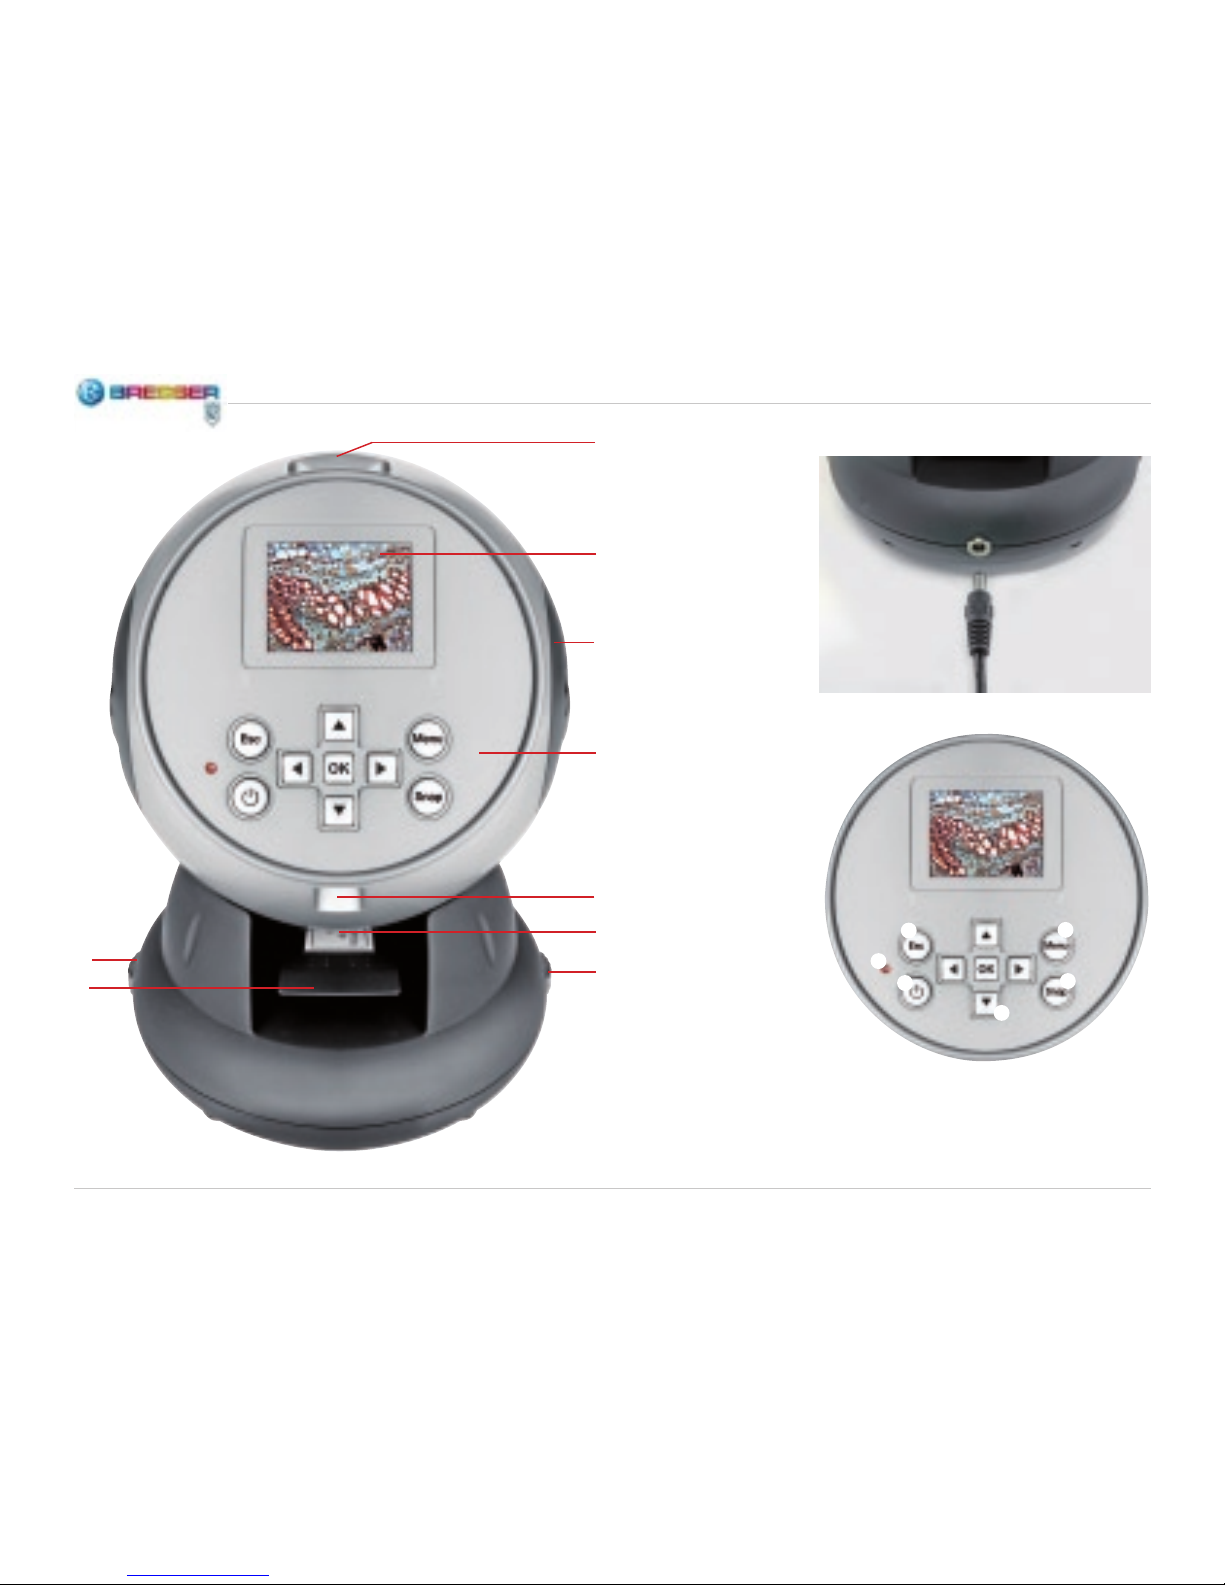
Alle Teile
1 SD-Speicherkartenschlitz
2 LCD-Monitor
3 Objektivrevolver
4 LCD-Modul
5 USB-Kabelanschluss (mini)
6 Objektivlinse
7 Fokussierrad
8 Objekttisch
9 Beleuchtung
10 Wechseltaste (Esc)
11 Monitor-Kontrollleuchte
12 Ein/Aus-Schalter (Hauptschalter)
13 Menü-Taste (Menu)
14 Aufnahmetaste (Snap)
15 Pfeil- und OK-Tasten
Aufstellen des Mikroskops
1. Nehme vorsichtig das Mikroskop
und die anderen Teile aus der Kartonschachtel heraus und platziere
sie auf einem Tisch oder einer anderen ebenen Fläche.
2. Nehme die Staubschutzhaube
vom Mikroskop ab.
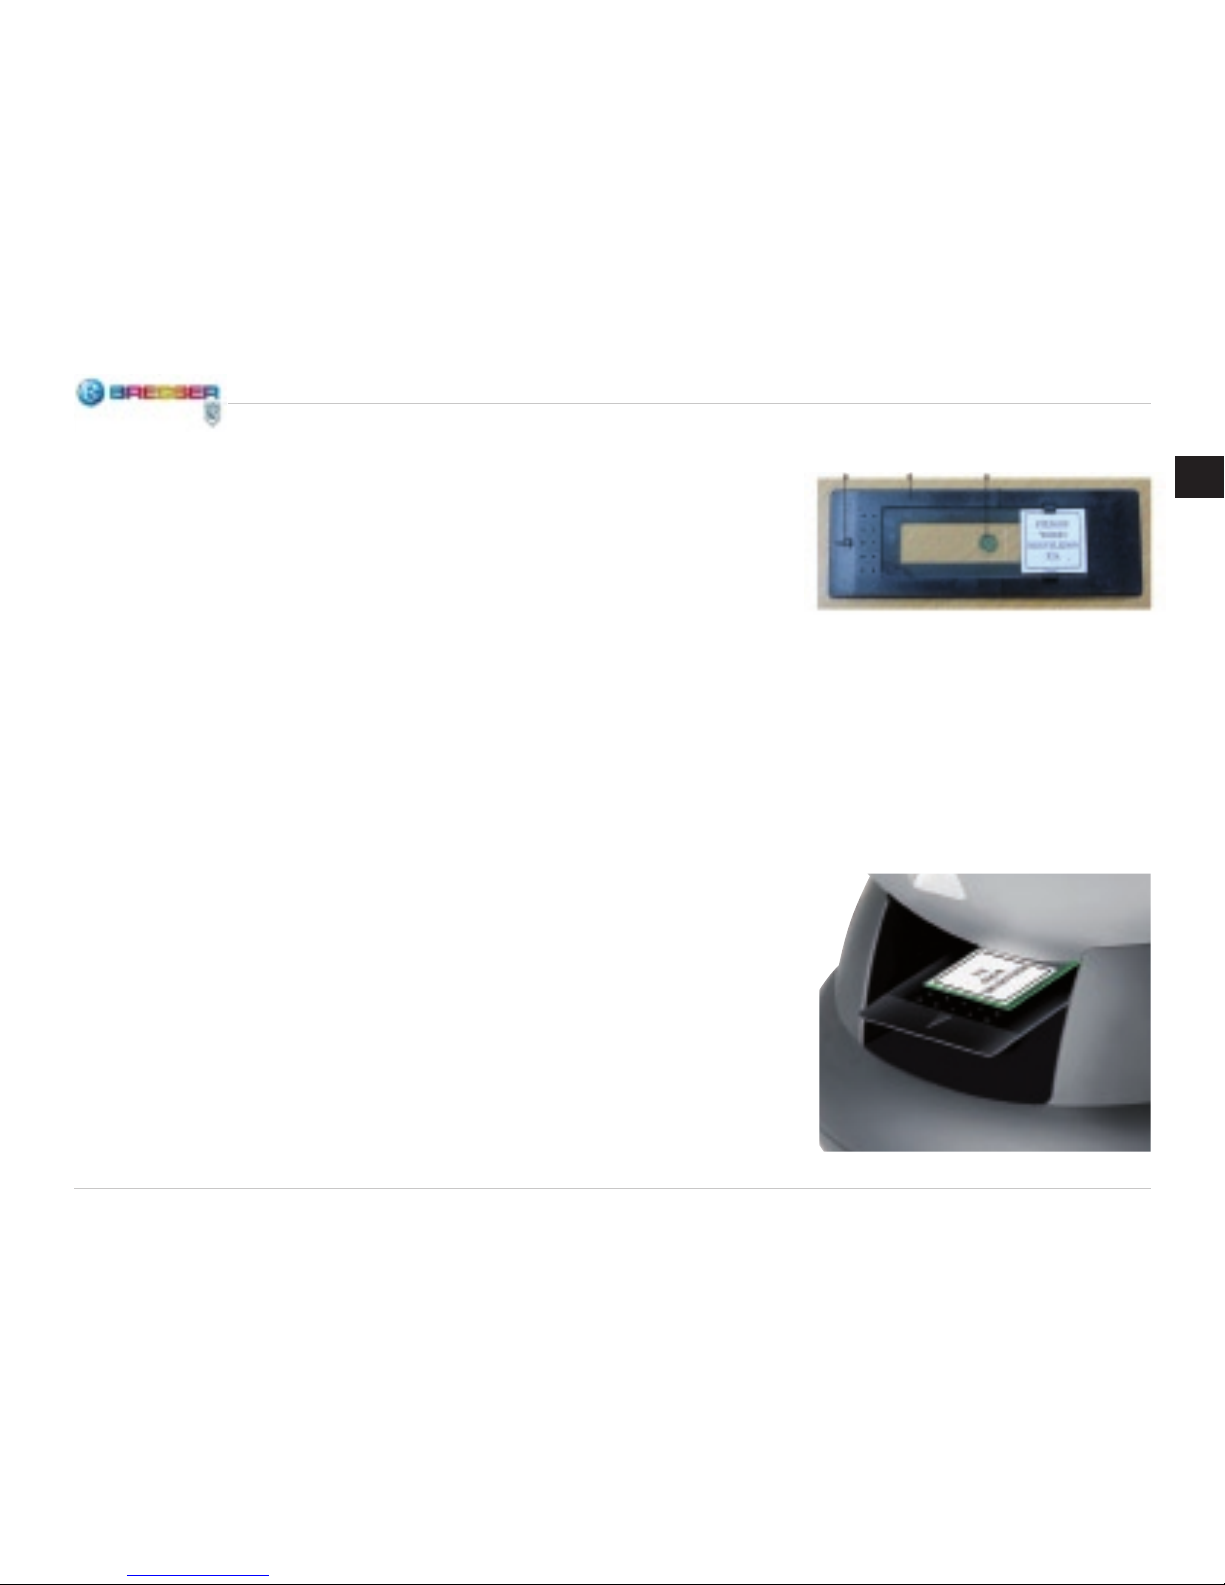
3. Stecke den kleinen Stecker (16)
am Ende des Netzadapterkabels
in die Eingangssteckdose (17) auf
der Rückseite des Mikroskopfußes (siehe Abb. 2).
4. Stecke den Netzstecker des Netzadapters in eine passende Netzsteckdose.
Bedienung des Mikroskops
Grundvoraussetzungen
Bevor du Objekte oder Präparate
betrachtest, musst du den LCDBildschirm und die Beleuchtung
einschalten und auch wissen, wie du
mit dem Objekttisch umgehst. Dann
bist du bereit mit dem Beobachten zu
beginnen.
LCD-Modul
Dieses Digitalmikroskop ist anders
als herkömmliche Mikroskope: der
LCD-Monitor ersetzt die Okulare,
die in herkömmlichen Mikroskopen
zur Betrachtung eingesetzt werden.
So ist es möglich, dass du deine Beobachtungen auf dem Bildschirm mit
Anderen teilen kannst. Zu Beginn der
Mikroskopbeobachtungen musst du
den LCD-Monitor durch Drücken des
Ein/Aus-Schalters einschalten (siehe
Abb. 3). Halte den Knopf solange
gedrückt bis die rote Kontrollleuchte
aueuchtet zum Zeichen dass der
LCD-Monitor eingeschaltet ist. Dies
ist im Grunde genommen alles, was
du tun musst um den LCD-Monitor
zum Mikroskopieren vorzubereiten.
Die verschiedenen Tasten des LCDModuls werden hauptsächlich für
Bildaufnahmen (Fotos und Videos)
gebraucht und werden später in dieser Anleitung besprochen.
Page 7
7
Beleuchtung
Die Beleuchtung (Abb. 1, Nr. 9) wird
zur Beobachtung von Präparaten
benötigt, wobei das Licht von unten
durch eine Öffnung im Objekttisch
durch das Präparat scheint.
Präparate von unterschiedlicher Größe, Dicke oder Farbvariation erfordern unterschiedliche Beleuchtungsstärken. Es gibt zwei Möglichkeiten
diese während der Beobachtung
zu ändern: Helligkeitsregelung mit
dem Einstellrad (siehe oben in Abb.
1) oder Änderung mit der EV-Funktion auf dem LCD-Monitor. Die EVFunktion (EV = exposure value for
brightness, Aufnahmehelligkeitswert)
erhöht oder erniedrigt die Helligkeit
des Bildes auf dem LCD-Monitor je
nachdem, ob du die Rechts- oder die
Links-Pfeiltaste (, ) gedrückt hast
(Abb. 3).
Wenn das betrachtete Präparat undurchsichtig oder von dunkler Farbe
ist, brauchst du gewöhnlich mehr
Licht um gewisse Chrakteristiken
oder Details zur Darstellung zu bringen. Dazu erhöhst du am besten
einfach die Lichtintensität der Beleuchtung, indem du das HelligkeitsEinstellrad bis zur höchsten Einstellung drehst.
Die optimale Beleuchtung kannst du
nden, indem du mit verschiedenen
Einstellungen experimentierst, da
jedes Objekt eine etwas andere Beleuchtung erfordert, genau so wie
auch dasselbe Objekt, wenn es mit
verschiedenen Vergrößerungen beobachtet wird.
Beobachtung eines Objekts
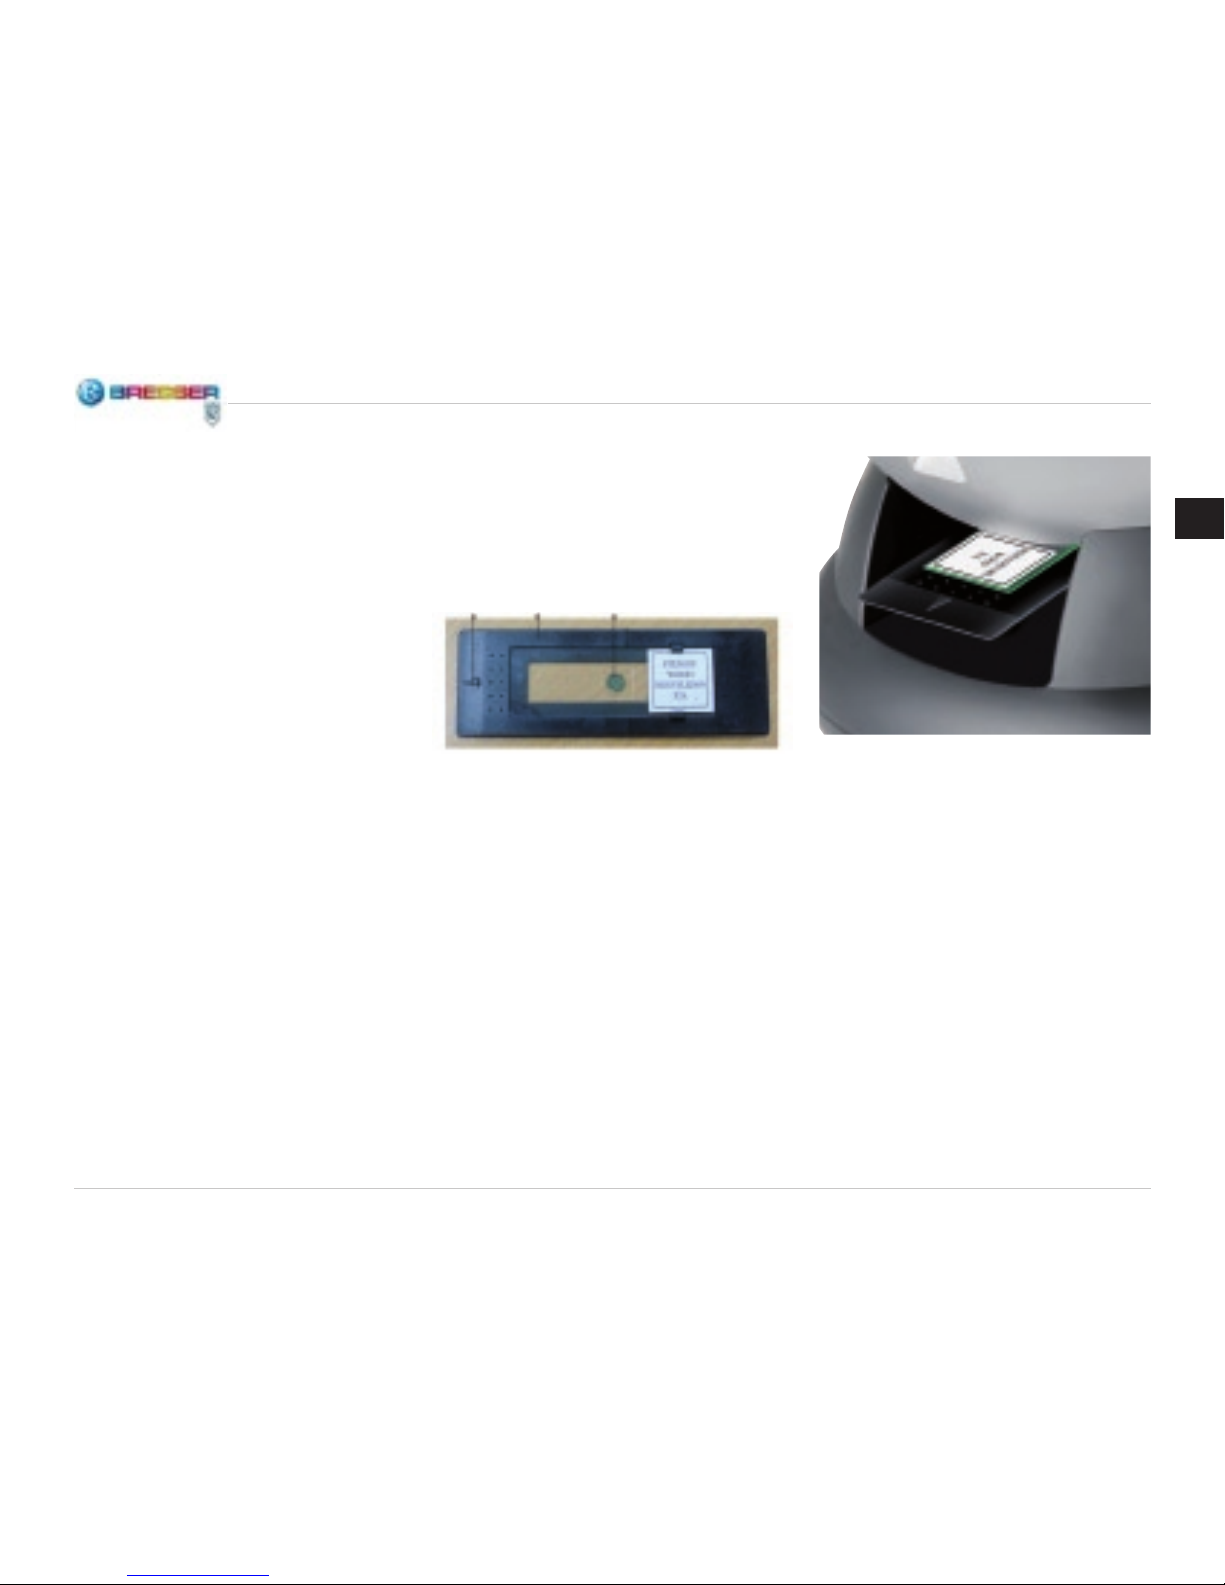
1. Lege das Präparat in den Präparat-
halter ein. Halte dabei das Präparat und den Präparathalter parallel
(Abb. 4).
2. Schiebe den Präparathalter in
Pfeilrichtung unter die Klammern
des Objekttisches (Abb. 5). Richte den Präparathalter vorwärts/
rückwärts und nach links/rechts
aus, so dass der gewünschte Ausschnitt des Präparats unter dem
Objektiv liegt.
Richtung Präparathalter Objekt
Abb. 4
Abb. 5
DE
Page 8

8
3. Mit Hilfe des Objektivrevolvers
(Abb. 1, Nr. 3) drehst du die Objektivlinsen (Abb. 1, Nr. 6) bis das
4x-Objektiv direkt über dem Präparat steht. Beginne das Mikroskopieren stets mit dem Objektiv,
das die niedrigste Vergrößerung
aufweist (4x bei diesem Mikroskop, was zu einer Gesamtvergrößerung 25x führt) und arbeite dich
dann zu höheren Vergrößerungen
voran. Mit dem 4x-Objektiv bekommst du das weiteste Sehfeld
und das hellste Bild. Stelle das
Bild mit Hilfe des Fokussierrades
(Abb. 1, Nr. 7) scharf.
4.
Bei Verwendung des 4x-Objektivs
kannst du auch die Vergrößerung
zwischen 25x und 200x variieren,
indem du den digitalen Zoom auf
dem LCD-Modul einsetzt. Benutze
dazu die Auf- und Ab-Pfeiltasten
(, ) am LCD-Modul. Auf der linken Seite des Bildschirms erscheint
eine Anzeige, bei welcher Zoomeinstellung man sich bendet.
5. Für höhere Vergrößerungen musst
du den Objektivrevolver auf die
Stellungen des 10x-Objektivs
oder des 40x-Objektivs (maximale
Vergrößerung) drehen. Nach dem
Objektivwechsel ist das Bild erneut scharf zu stellen. Bei Benutzung eines jeden Objektivs kannst
du auch die Gesamtvergrößerung
durch Einsatz des digitalen Zooms
erhöhen.
Achtung: Bevor du Objektive wechselst, fahre den Objekttisch mittels
des Fokussierrades in die niedrigste Position. So kannst du während
der Revolverdrehung nicht irgendwo anstoßen. Sei auch bei höheren
Vergrößerungen vorsichtig, wenn du
den Objekttisch nahe zur Objektivlinse herauf fährst, damit das Objektiv
nicht gegen das Präparat oder Objekt stößt und Schaden anrichtet.
Digitale Bilder
Grundoperationen
Einschalten
Halte den Ein/Aus-Schalter (siehe
Abb. 3) 1 bis 2 Sekunden gedrückt,
wenn das Gerät vorher ausgeschaltet
war. Die rote Monitor-Kontrollleuchte
leuchtet auf und das Gerät beginnt zu
arbeiten.
Ausschalten
Halte den Ein/Aus-Schalter (siehe
Abb. 3) 1 bis 2 Sekunden gedrückt,
wenn das Gerät eingeschaltet ist. Die
rote Monitor-Kontrollleuchte erlischt
nun und das Gerät schaltet sich aus.
Einstellung
Zur Änderung der gegenwärtigen
Geräteinstellung rufst du das Menü
durch Drücken der Menü-Taste
(Menu) auf. Drücke die Pfeiltasten
um eine entsprechende Einstellung
auszuwählen. Nach der Einstellung
Page 9
9
drückst du die OK-Taste zur Bestätigung.
Anzeige auf dem LCD-Monitor
Durch einmaliges oder mehrmaliges
Drücken der Wechseltaste (Esc) gelangst du in verschiedene Betriebsmodi (Betriebsarten). Diese werden
im Folgenden beschrieben.
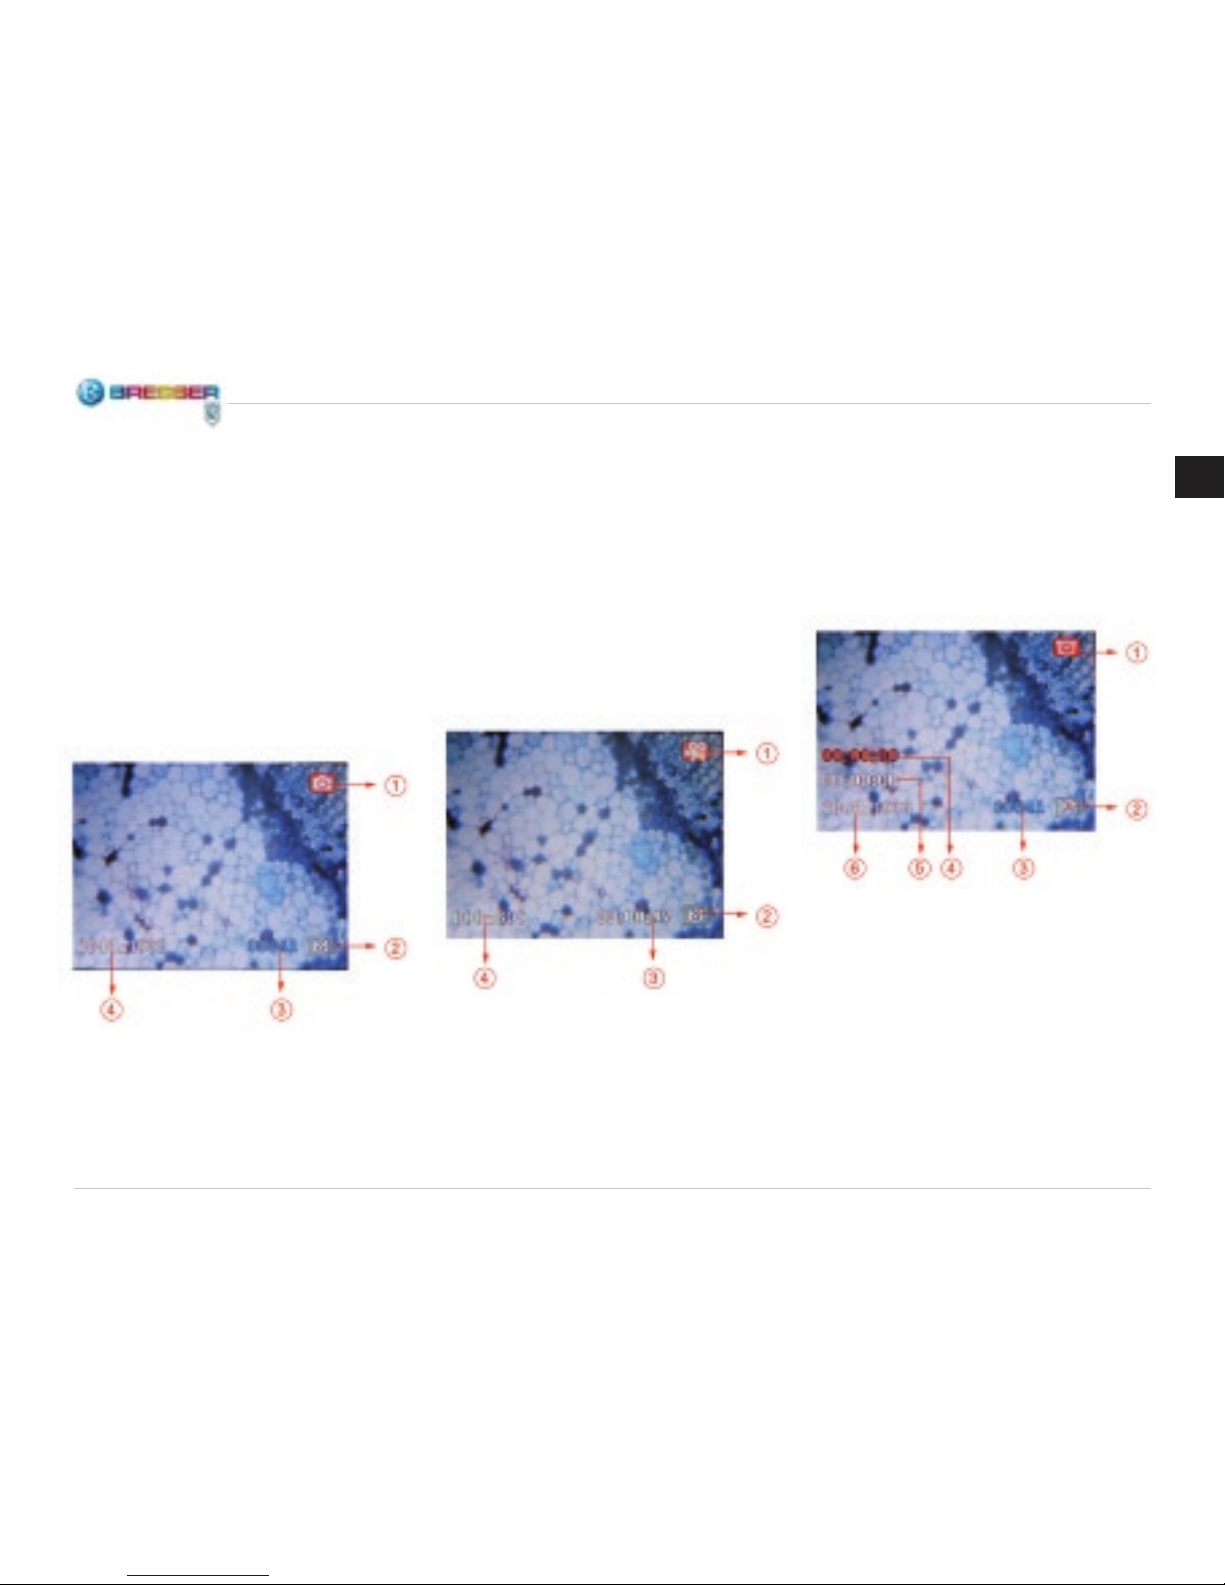
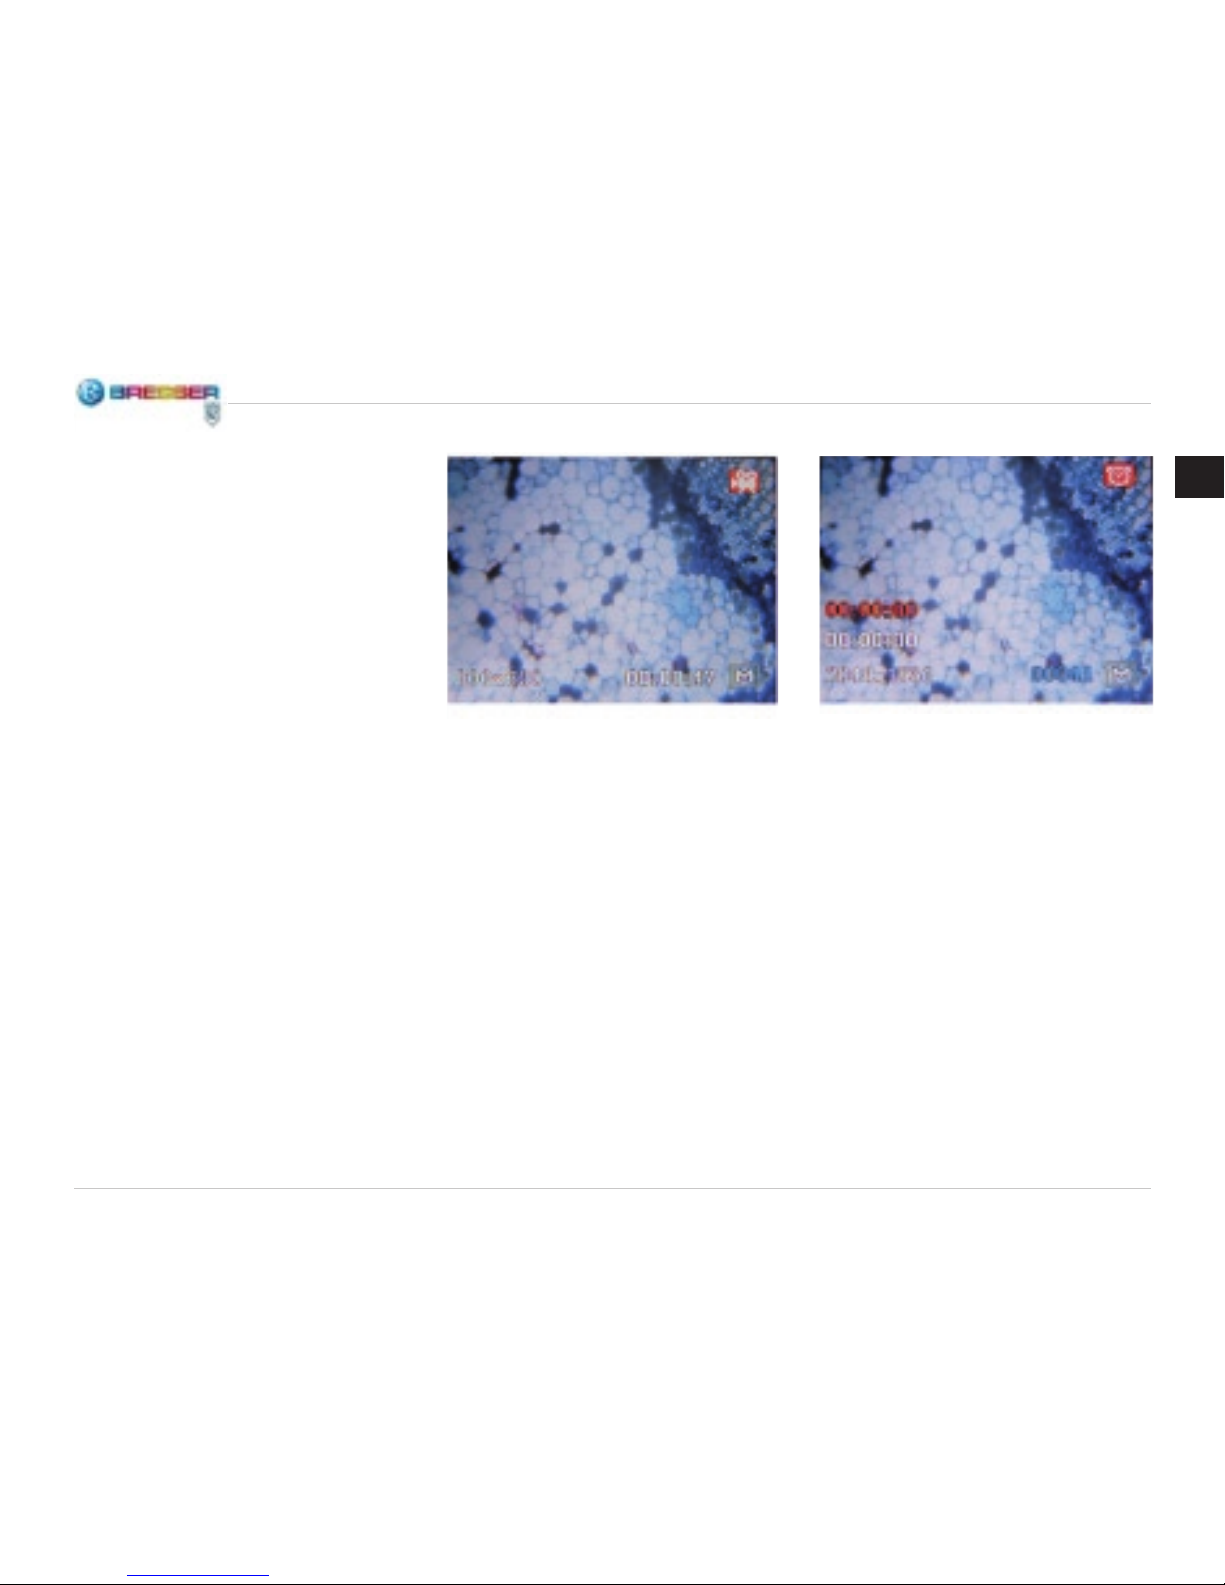
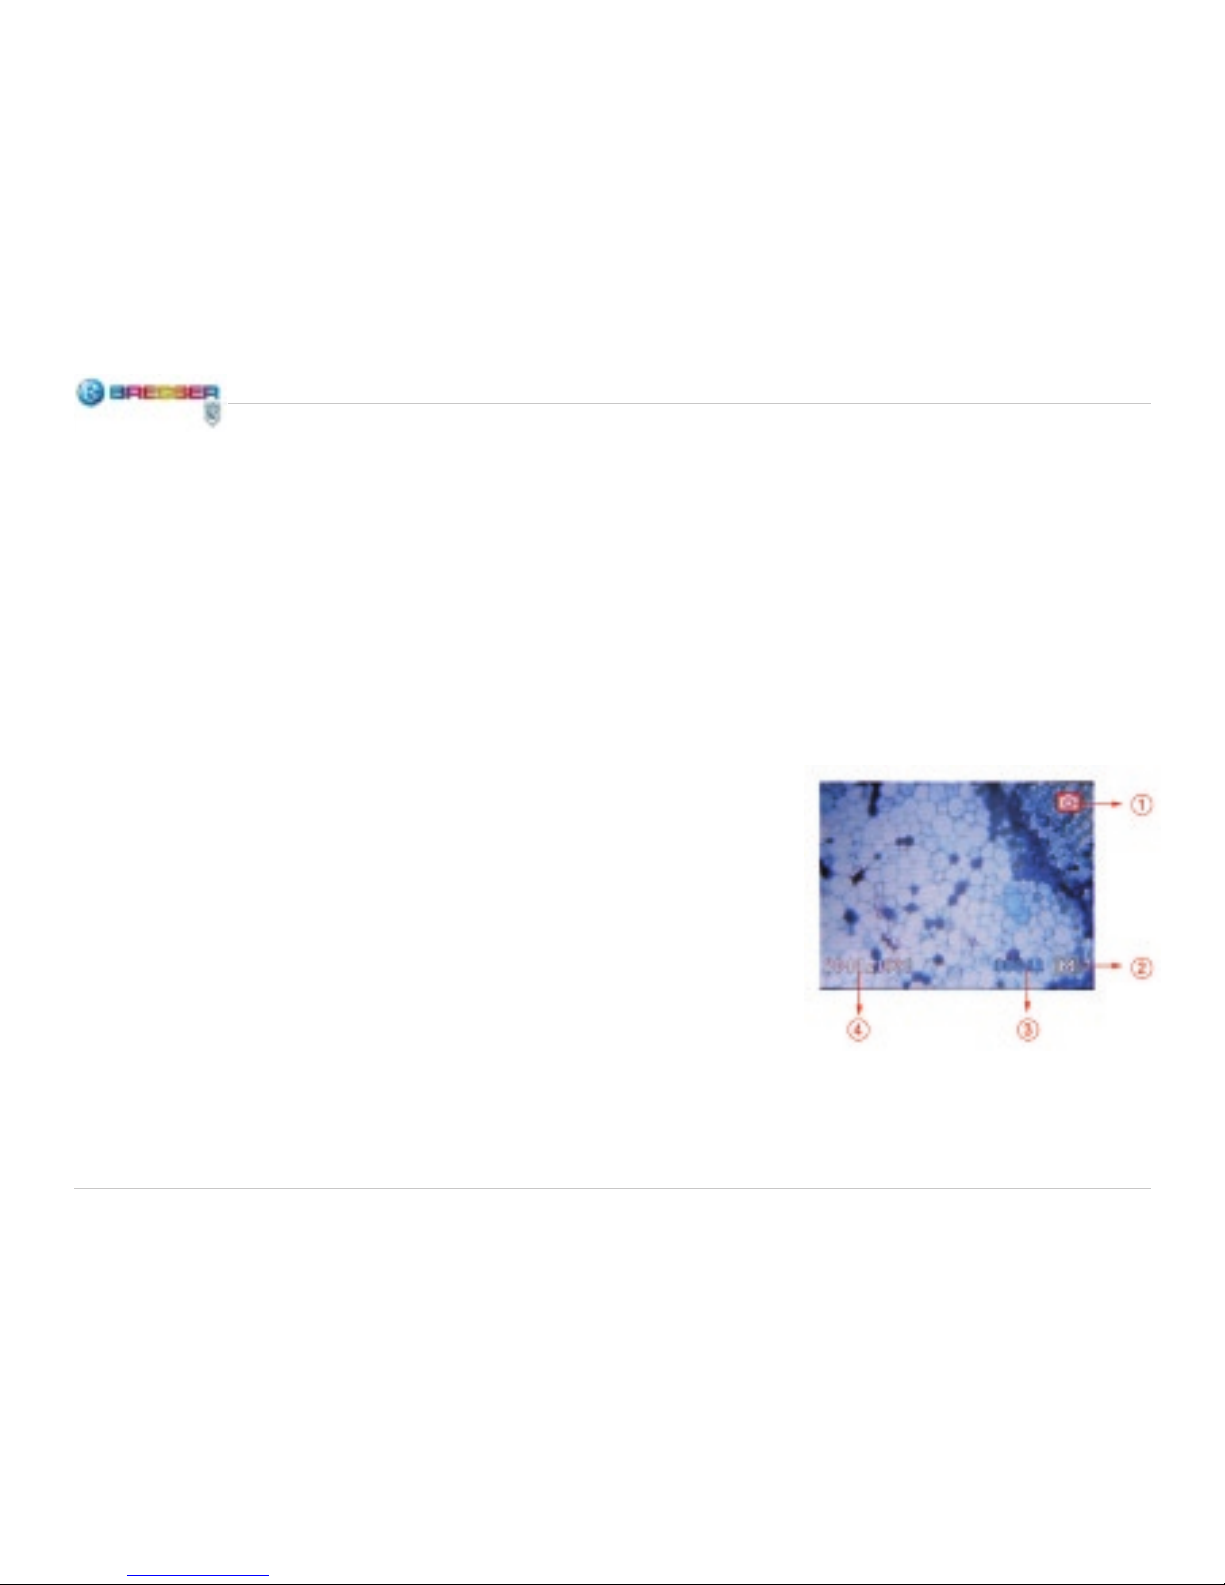
Digitalfoto-Modus
1 Symbol des Digitalfoto-Modus
2 Symbol des eingebauten Spei-
chers. Wenn du eine SD-Speicher-
karte eingesetzt hast, erscheint
statt dessen das Symbol der SDKarte.
3 Anzahl der Bilder, die noch im
Speicher aufgenommen werden
können
4 Auösung des Bildes (Anzahl der
Bildpunkte)
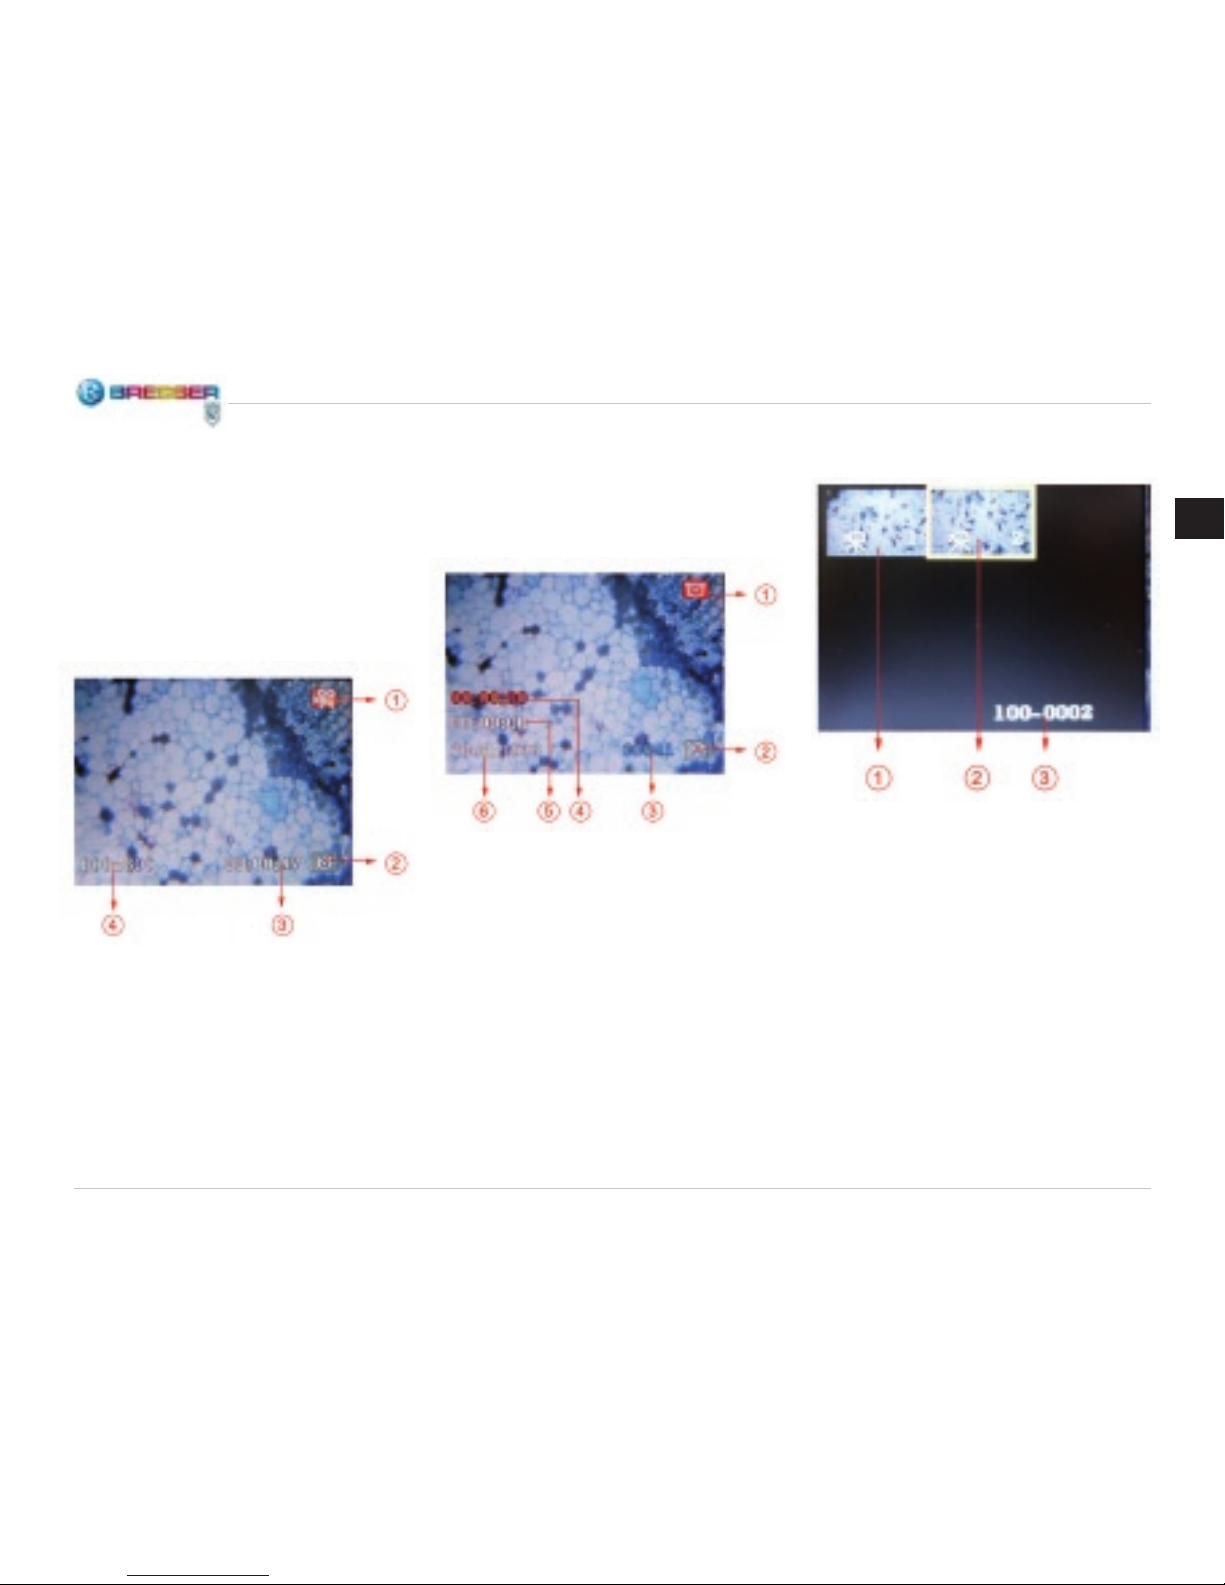
Digitalvideo-Modus
1 Symbol des Digitalvideo-Modus
2
Symbol des eingebauten Speichers.
Wenn du eine SD-Speicherkarte
eingesetzt hast, erscheint statt dessen das Symbol der SD-Karte.
3 Länge des Films, der noch im Spei-
cher aufgenommen werden kann
4 Auösung des Bildes (Anzahl der
Bildpunkte)
Selbstauslöser-Modus
1 Symbol des Selbstauslöser-Modus
2 Symbol des eingebauten Spei-
chers. Wenn du eine SD-Speicherkarte eingesetzt hast, erscheint
statt dessen das Symbol der SDKarte.
3 Anzahl der Bilder, die noch im
Speicher aufgenommen werden
können
Abb. 6
Abb. 7
Abb. 8
DE
Page 10
10
4 Eingestellte Wiederholungszeit für
Selbstauslöser
5 Selbstauslöser-Laufzeit
6 Auösung des Bildes (Anzahl der
Bildpunkte)
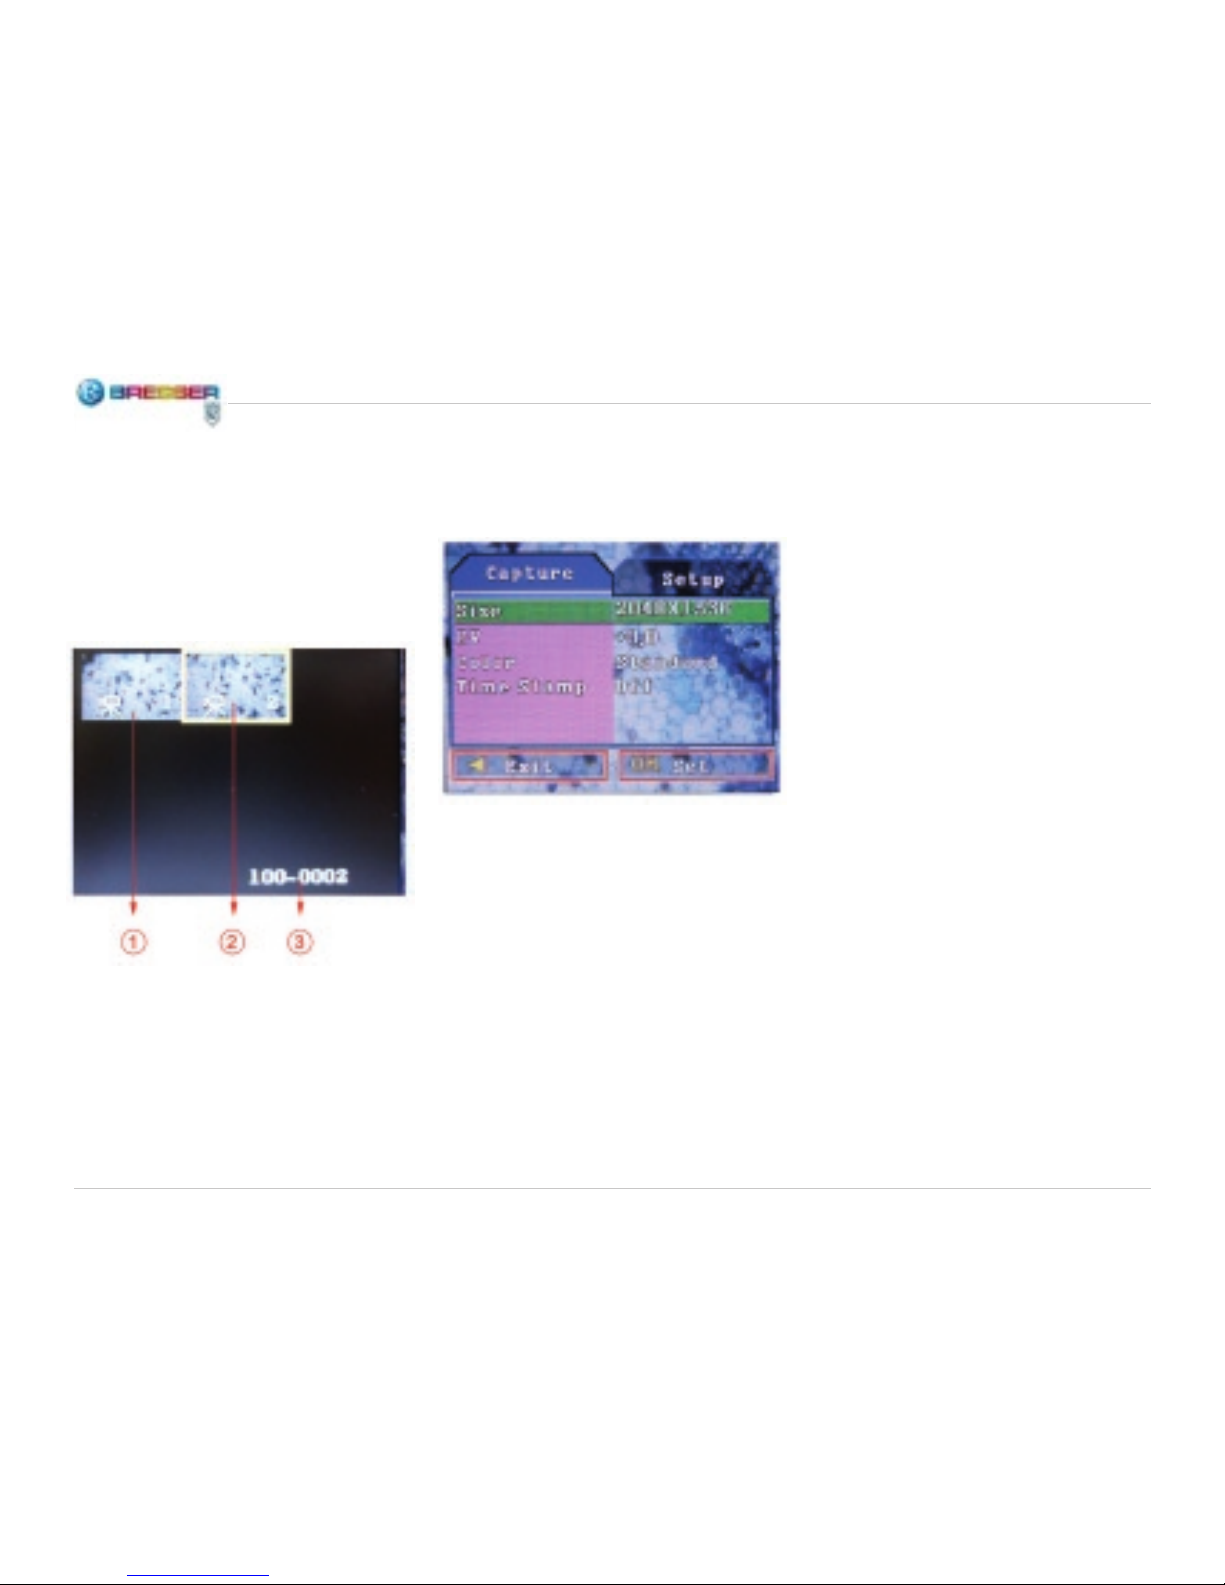
Aufnahmenverzeichnis-Modus
1 Vorschaubild für Foto oder Video
2 Ausgewählte Datei (gelbe Umran-
dung)
3 Name der gegenwärtig ausgewähl-
ten Datei
Einstellungen
Einstellungsmenü
Einstellung der Bildauösung
• Drücke im Digitalfoto-, Digitalvideo-
oder Selbstauslöser-Modus die
Menü-Taste (Menu) um das Einstellungsmenü zu öffnen.
• Wähle mit Hilfe der Pfeiltasten (
,
) die Option “Auösung” an. Drü-
cke die OK-Taste zur Bestätigung.
• Wähle mit den Pfeiltasten (
,
)
die benötigte Auösung an (5M =
2048×1536, 3M = 1600×1200,
2M = 1280×1024, 1.3M =
1024×768, VGA = 800×600 für
Fotos; VGA = 800×600, QVGA =
640×480 für Videos). Drücke OK
zur Bestätigung.
Die Auösung richtet sich nach der
Art von Bild, die du wünschst. Je höher die Auösung ist, desto besser ist
die Bildqualität, aber um so größer ist
auch der benötigte Speicherplatz, d.
h. um so weniger Aufnahmen können
abgespeichert werden. Am besten
ist es, den zur Verfügung stehenden
Flash-Speicher mit einer vernünftig
eingestellten Bildauösung zu nutzen.
Wie unten angeführt, hast du für die
Bildauösung fünf Optionen (Auswahlmöglichkeiten). Wenn du eine
bessere Bildqualität wünschst, wähle
bitte eine höhere Auösung aus. Die
mögliche Anzahl der Aufnahmen ist
je nach den Umständen unterschiedlich:
Abb. 9
Abb. 10
Page 11
11
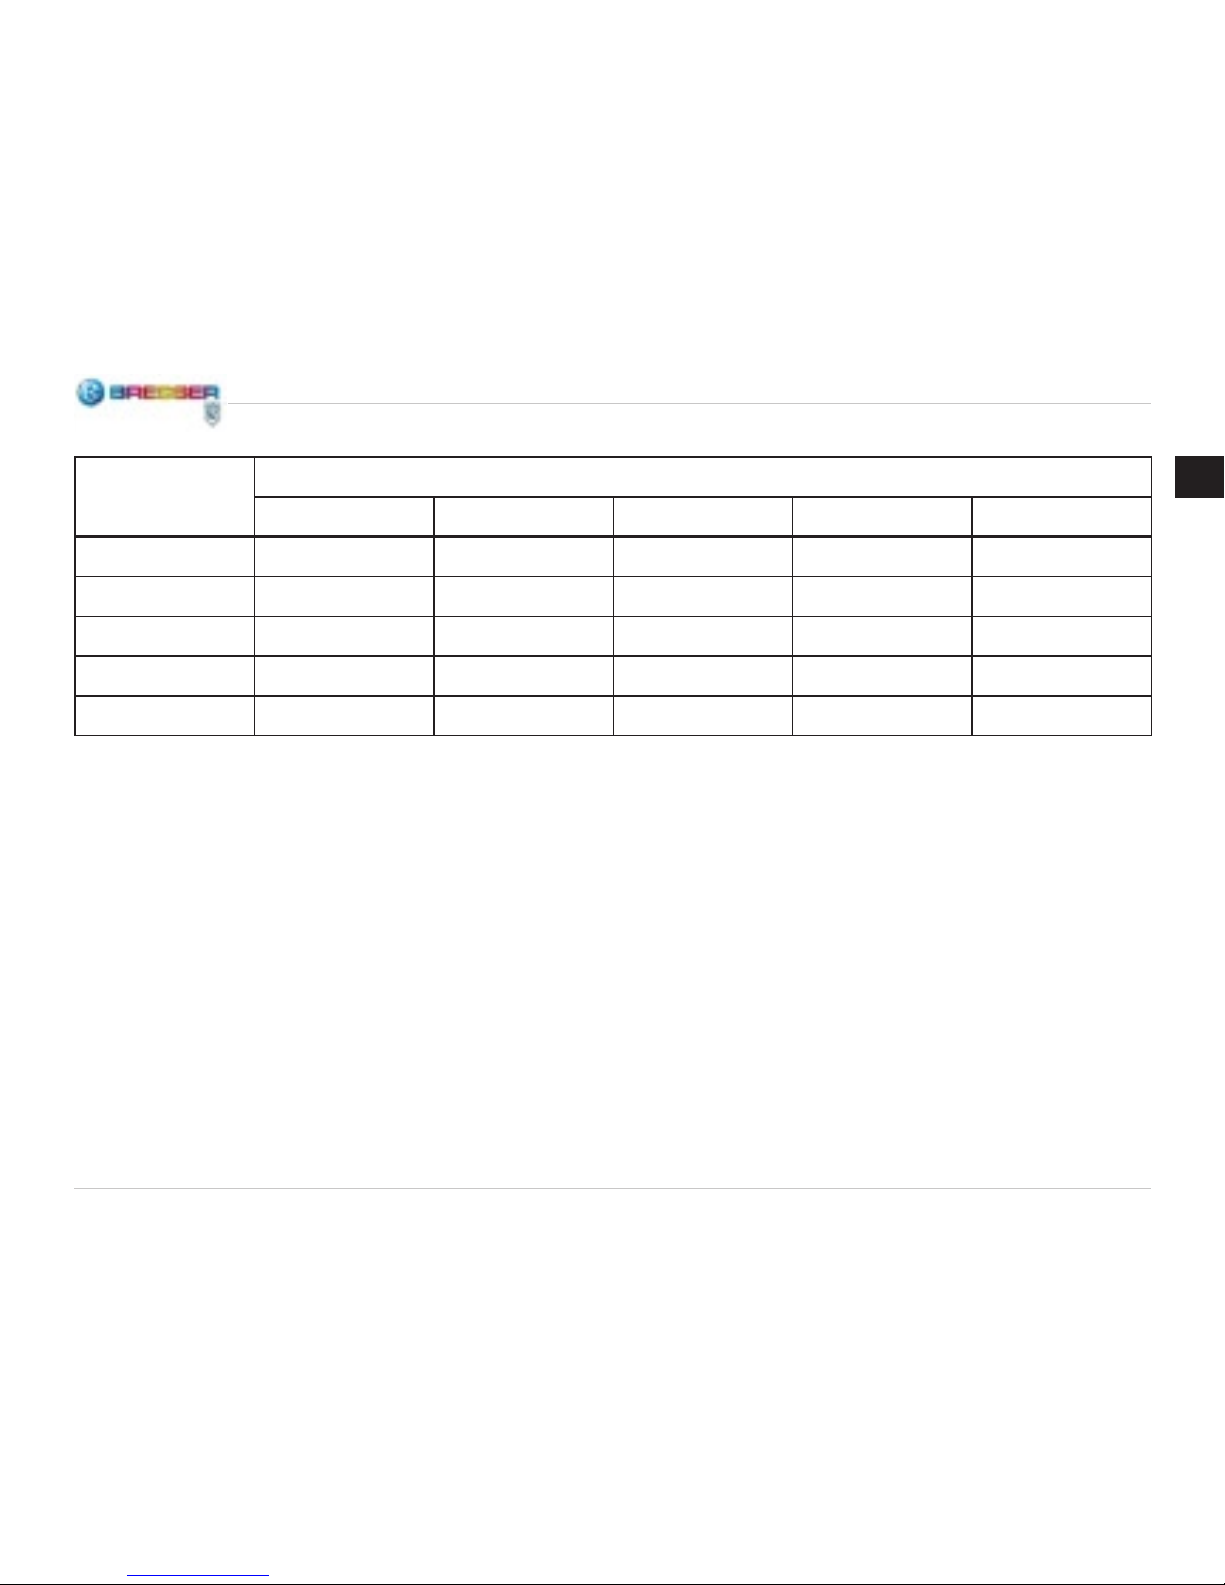
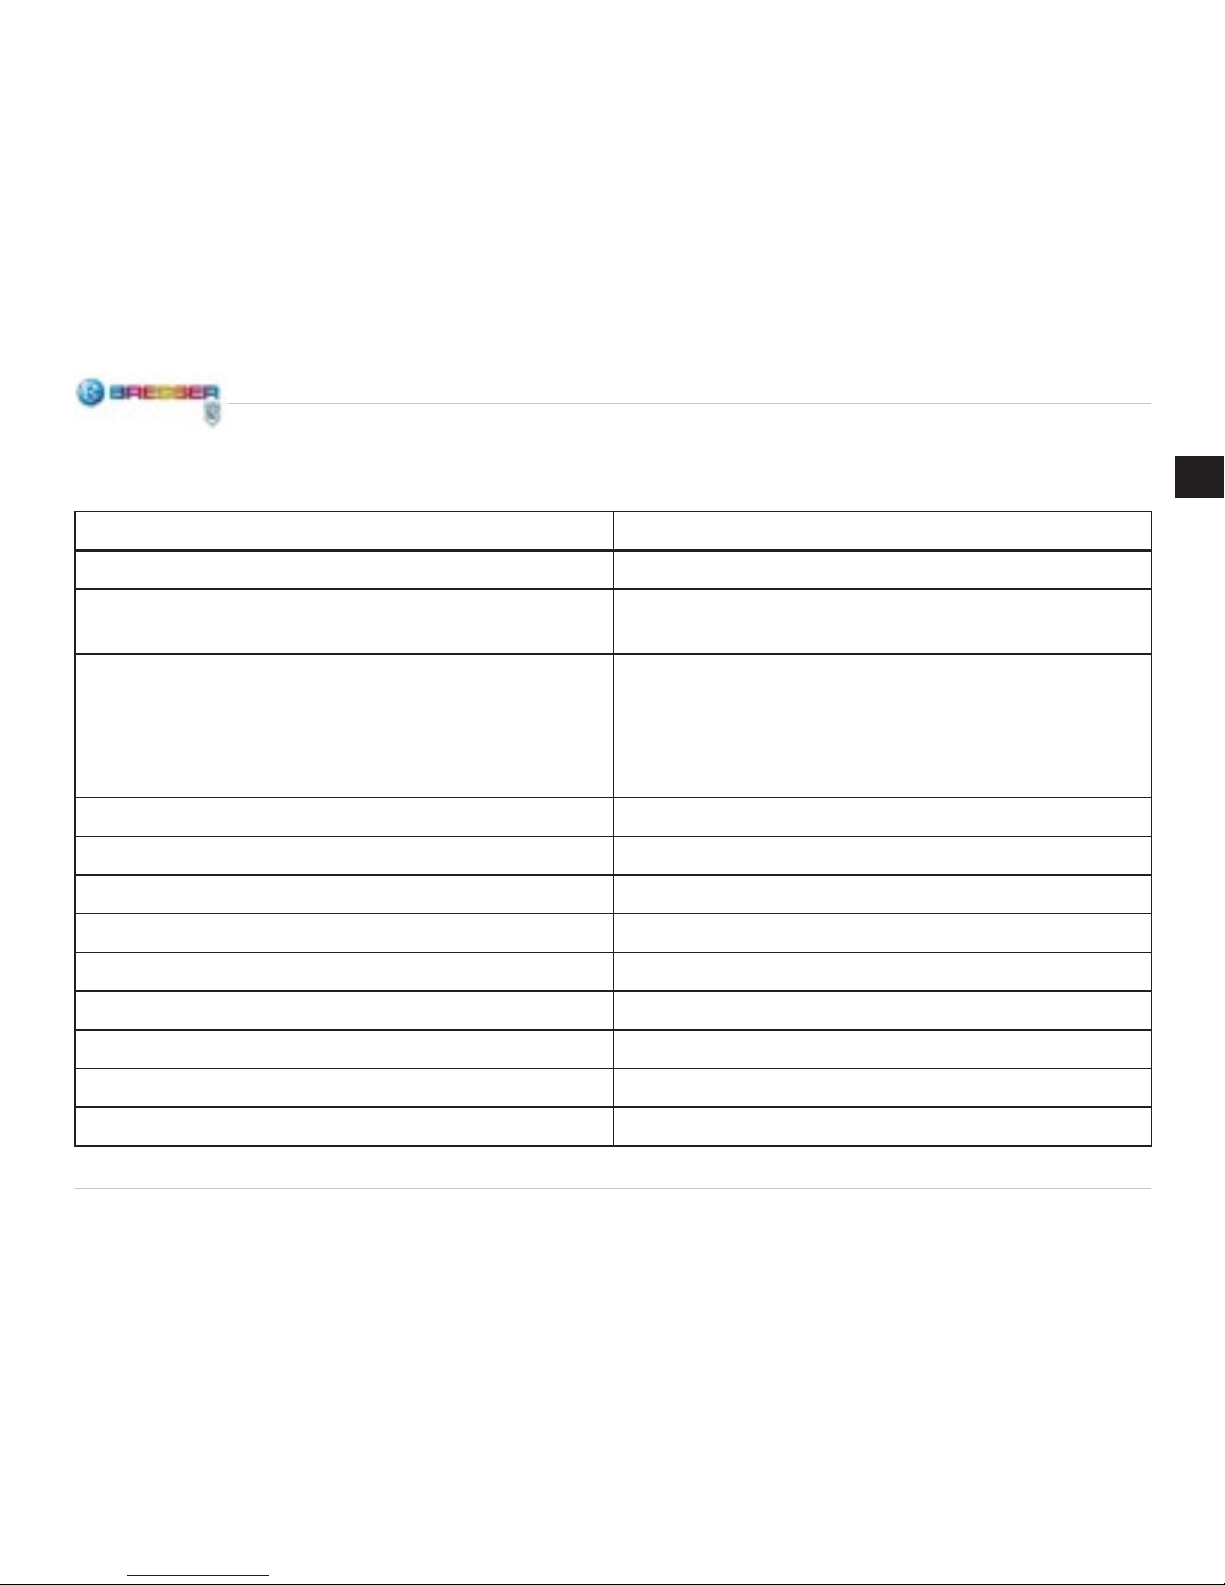
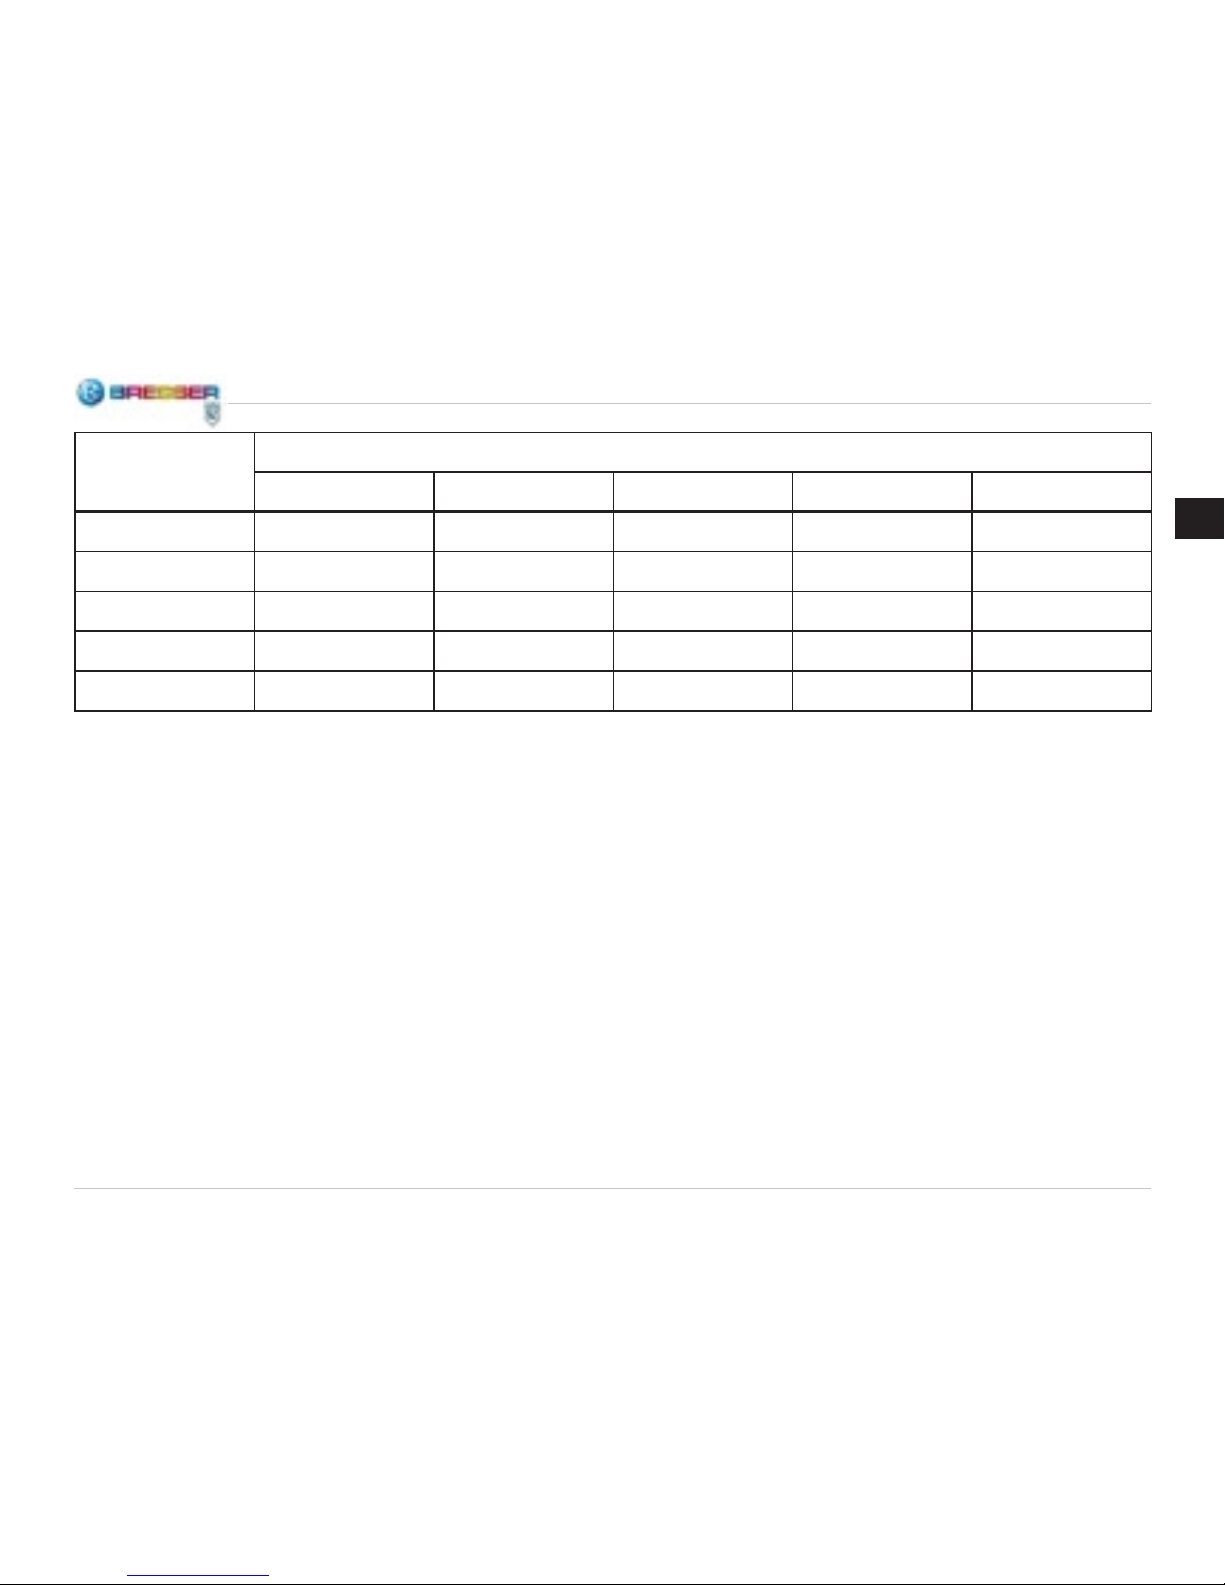
Auösung Speicherplatz
64M 128M 256M 512M 1G
2048×1536 120 240 480 960 1920
1600×1200 17 0 340 680 1360 2720
1280×1024 230 460 920 1840 3680
1024×768 310 620 1240 2480 4960
800×600 430 860 17 20 3440 6880
EV-Einstellung
• Drücke im Digitalfoto-, Digitalvideooder Selbstauslöser-Modus die
Menü-Taste (Menu) um das Einstellungsmenü zu öffnen.
• Wähle mit Hilfe der Pfeiltasten (
,
) die Option “EV” an. Drücke die
OK-Taste zur Bestätigung.
• Wähle mit den Pfeiltasten (
,
)
den gewünschten EV-Wert an (–2,
–5/3, –4/3, –1, … +2). Drücke
OK zur Bestätigung.
Einheit: Stück
EV = –2 ergibt ein sehr dunkles Bild,
EV = +2 ein sehr helles.
Einstellung von Farbeffekten
• Drücke im Digitalfoto- oder Selbstauslöser-Modus die Menü-Taste
(Menu) um das Einstellungsmenü
zu öffnen.
• Wähle mit Hilfe der Pfeiltasten (
,
) die Option “Farbe” an. Drücke
die OK-Taste zur Bestätigung.
• Wähle mit den Pfeiltasten (
,
)
zwischen den Farbeffekten “Stan-
dard” (normales Farbbild), “Kräftig”
(Farbbild mit kräftigen Farben),
“Vergilbt” (sepiagetöntes Bild) und
“Einfarbig” (Schwarzweißbild) aus.
Drücke OK zur Bestätigung.
Einstellung der Bildbeschriftung
Für den gewöhnlichen Umgang mit
den Bildern wie auch für die Datenverarbeitung besitzt das Gerät eine Bildbeschriftungsfunktion (für Aufnahmezeitpunkt). Bitte stelle Uhrzeit und Datum
ein, bevor du diese Funktion nutzt.
DE
Page 12

12
• Drücke im Digitalfoto- oder Selbstauslöser-Modus die Menü-Taste
(Menu) um das Einstellungsmenü
zu öffnen.
• Wähle mit Hilfe der Pfeiltasten (
,
) die Option “Zeitaufdruck” an.
Drücke die OK-Taste zur Bestätigung.
• Wähle mit den Pfeiltasten (
,
) zwischen “Aus” (kein Zeitaufdruck), “Datum” (Bildbeschriftung
mit Aufnahmedatum) und “Datum &
Zeit” (Bildbeschriftung mit Aufnahmedatum und -uhrzeit). Drücke OK
zur Bestätigung.
Spracheinstellung
• Drücke im Digitalfoto-, Digitalvideooder Selbstauslöser-Modus die
Menü-Taste (Menu) um das Einstellungsmenü zu öffnen.
• Wähle mit Hilfe der Pfeiltasten (erst
, dann
,
) die Option “Sprache” an. Drücke die OK-Taste zur
Bestätigung.
• Wähle mit den Pfeiltasten (
,
)
unter 9 Sprachen die gewünschte
aus. Drücke OK zur Bestätigung.
Einstellung von Uhrzeit und Datum
• Drücke im Digitalfoto-, Digitalvideooder Selbstauslöser-Modus die
Menü-Taste (Menu) um das Einstellungsmenü zu öffnen.
• Wähle mit Hilfe der Pfeiltasten (erst
, dann
,
) die Option “Datumseing.” an. Drücke die OK-Taste
zur Bestätigung; du gelangst nun
ins Eingabemenü.
• Wähle mit den Links- und RechtsPfeiltasten (
,
) die entsprechende Eingabe (Uhrzeit, Datum)
aus und mache mit den Auf- und
Ab-Pfeiltasten (
,
) die Einstellung. Nach der Eingabe drücke OK
zur Bestätigung.
Funktionen
Formatierfunktion
Dieses Gerät besitzt eine Formatierfunktion.
• Drücke im Digitalfoto-, Digitalvideooder Selbstauslöser-Modus die
Menü-Taste (Menu) um das Einstellungsmenü zu öffnen.
• Wähle mit Hilfe der Pfeiltasten (erst
, dann
,
) die Option “Format.” an. Drücke die OK-Taste zur
Bestätigung.
• Wähle mit den Pfeiltasten (
,
)
zwischen “Abbruch” (keine Formatierung, Rückkehr zum Menü) und
“Ausführ.” (Formatierung ausführen). Drücke OK zur Bestätigung.
Achtung: Nach der Formatierung
sind alle Daten gelöscht.
Page 13
13
Digitalfoto-Aufnahmefunktion
Bevor du Digitalfotos aufnimmst,
nimm bitte die entsprechenden Einstellungen dafür vor.
Achtung: Die Anzahl der Bilder, die
aufgenommen werden können, ist
proportional zum freien Flash-Speicherplatz.
• Nach dem Einschalten des Geräts
ist der Digitalfoto-Modus der Standardmodus.
• Drücke Aufnahmetaste (Snap) um
ein Foto aufzunehmen.
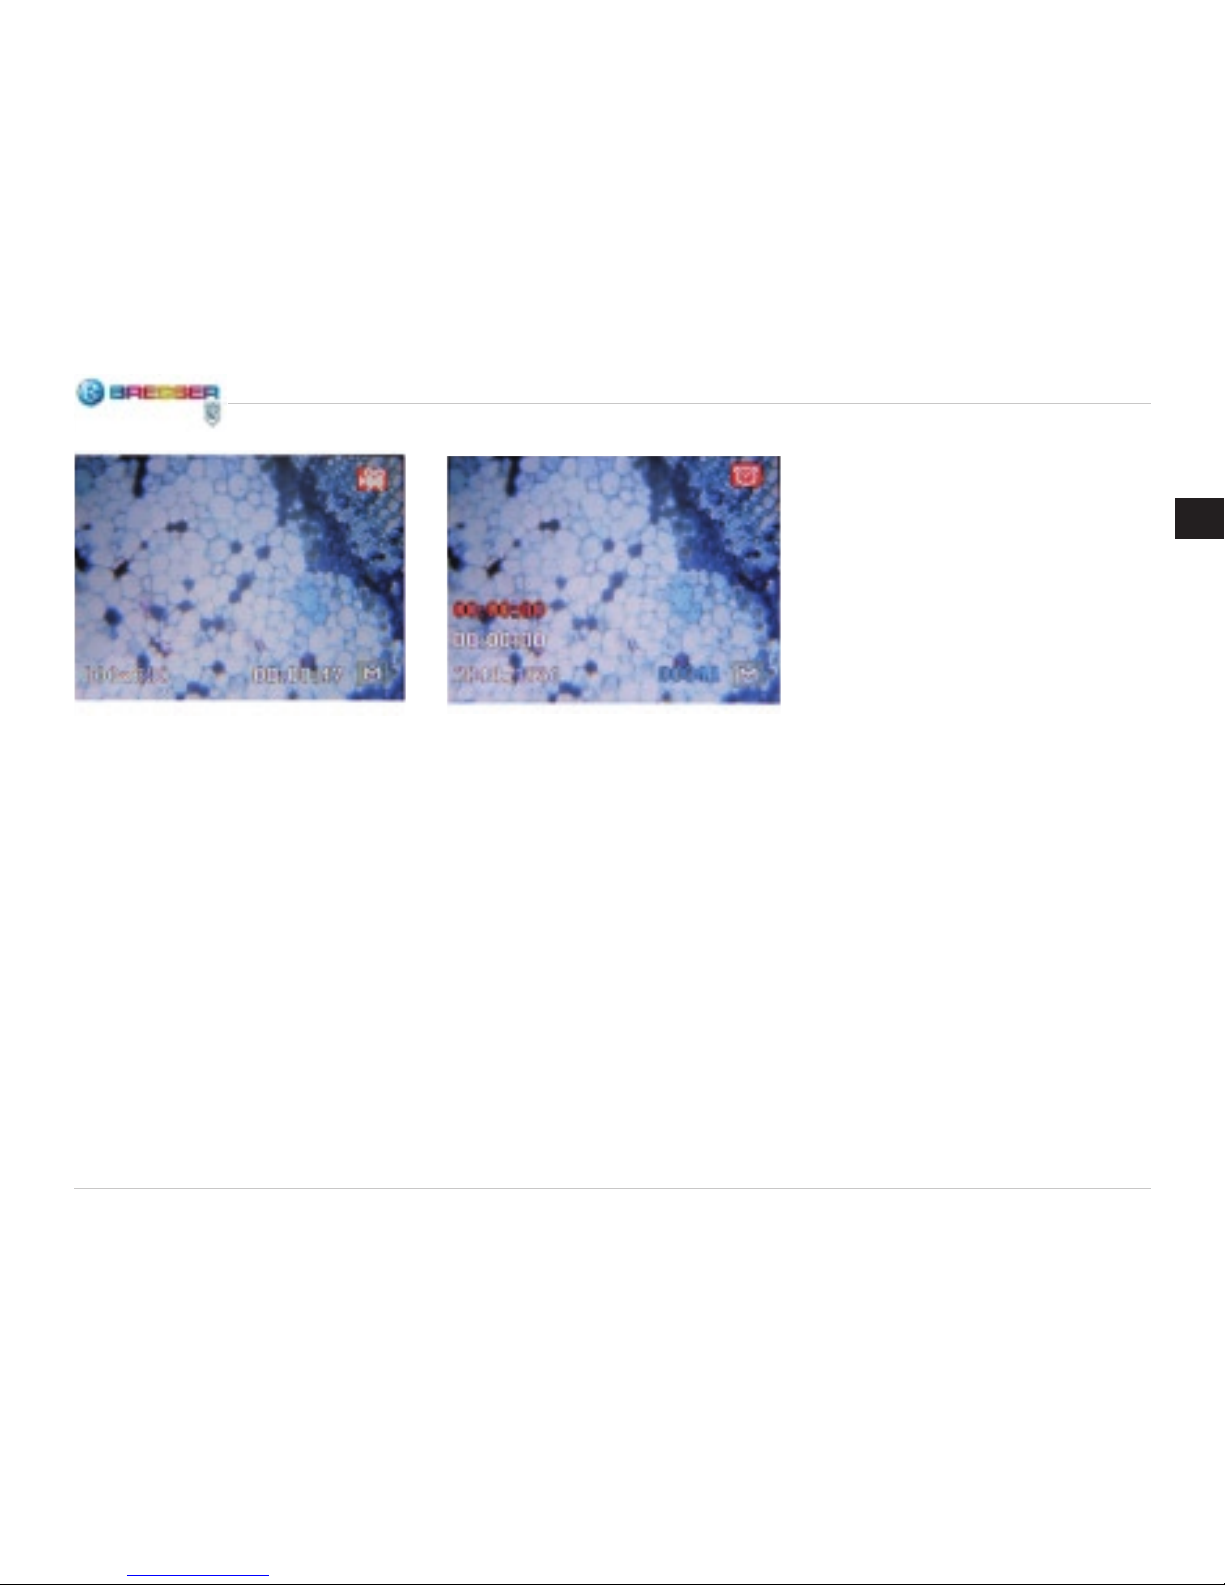
Digitalvideo-Aufnahmefunktion
Bevor du Digitalvideos aufnimmst,
nimm bitte die entsprechenden Einstellungen dafür vor.
Achtung: Die Filmlänge, die aufgenommen werden kann, ist proportional zum freien Flash-Speicherplatz.
• Durch Drücken der Wechseltaste (Esc) gelangst du in den
Digitalvideo-Modus. (Vom Digitalfoto-Modus aus drückst du die
Wechseltaste einmal um zum Digitalvideo-Modus zu gelangen.)
• Drücke die Aufnahmetaste (Snap)
um die Aufnahme zu starten.
•
Drücke die Aufnahmetaste nochmals
um die Aufnahme zu beenden.
Selbstauslöser-Aufnahmefunktion
Bevor du Selbstauslöser-Aufnahmen
machst, nimm bitte die entsprechenden Einstellungen dafür im Selbstauslöser-Modus vor.
• Durch Drücken der Wechseltaste (Esc) gelangst du in den
Selbstauslöser-Modus. (Vom
Digitalfoto-Modus aus drückst du
die Wechseltaste zweimal um zum
Selbstauslöser-Modus zu gelangen.)
• Drücke die OK-Taste um einen gelben Cursor aufzurufen. Wähle mit
den Links- und Rechts-Pfeiltasten
(
,
) die Wiederholzeit für die
Aufnahme (Stunde : Minute : Sekunde) aus und mache mit den
Auf- und Ab-Pfeiltasten (
,
)
die Einstellung. Nach der Eingabe
drückst du OK zur Bestätigung.
Abb. 11 Abb. 12
DE
Page 14

14
• Drücke die Aufnahmetaste (Snap)
um die Aufnahme der Fotos zu
starten.
• Um die Aufnahme zu beenden
drückst du die Aufnahmetaste
nochmals oder die Wechseltaste
(Esc).
• Bereich für die Wiederholzeit: 5
Sekunden bis 24 Stunden, in Stufen von 5 Sekunden.
Einstellung des digitalen Zooms
und des EV-Wertes
Manchmal ist die Abbildung eines
Objektdetails zu klein oder die Beleuchtung unzureichend, um eine zufriedenstellende Darstellung auf dem
LCD-Monitor zu erhalten. Hier helfen
Einstellungen des EV-Wertes und
des digitalen Zooms (elektronische
Vergrößerung) weiter.
• Drücke die Links- und die RechtsPfeiltasten (
,
) um den EV-Wert
einzustellen. Der EV-Wertebereich
reicht von –2,0 bis +2,0.
• Drücke die Auf- und die Ab-Pfeiltasten (
,
) um den elektronischen
Vergrößerungsfaktor einzustellen.
Dessen Wertebereich reicht von
1,00 bis 8,00.
Betrachten und Löschen von digitalen Fotos oder Videos
Betrachten von digitalen Fotos
oder Videos
• Durch Drücken der Wechseltaste
(Esc) gelangst du in den Aufnahmenverzeichnis-Modus. (Vom
Digi tal foto-Modus aus drückst du
die Wechseltaste dreimal um zum
Aufnahmenverzeichnis-Modus zu
gelangen.)
• Die Gesamtheit der gespeicherten Digitalfotos und Digitalvideos
(Video-Symbol: Filmkamera) wird
mit Hilfe des Bildschirms dargestellt. Mit den Pfeiltasten (
,
)
kannst du durch die Liste blättern,
wenn sie mehr Dateien enthält als
auf eine Bildschirmanzeige passt
(9 Dateien).
• Wähle mit den Pfeiltasten (
,
,
,
) ein Digitalfoto oder -video
aus. Sein Vorschaubild ist jeweils
mit einer gelben Umrandung versehen.
• Drücke die OK-Taste zur Bestätigung. Nun erscheint eine Vollbildschirmanzeige. (Durch nochmaliges Drücken von OK kannst du
diese wieder verlassen.)
• Wenn du ein Digitalvideo abspielen möchtest, wähle das Video
aus und drücke dann die OK-Taste
Abb. 13
Page 15

15
und darauf die Auf-Pfeiltaste ().
Wenn du die Auf-Pfeiltaste erneut
drückst, wird das Abspielen unterbrochen.
• Wenn du ein Digitalfoto betrachtest,
kannst du das Bild durch Drücken
der Auf- und Ab-Pfeiltasten (
,
)
vergrößern oder reduzieren.
• Drücke die Wechseltaste (Esc) um
vom Aufnahmenverzeichnis-Modus
in den Digitalfoto-Modus zurückzukehren.
Schutz von Dateien
Um die gespeicherten Daten vor unbeabsichtigtem Löschen zu schützen
besitzt das Gerät eine Schutzfunktion.
•
Durch Drücken der Wechseltaste (Esc) gelangst du in den Aufnahmenverzeichnis-Modus. (Vom
Digi talfoto-Modus aus drückst du
die Wechseltaste dreimal um zum
Aufnahmenverzeichnis-Modus zu
gelangen.)
• Drücke die Menü-Taste (Menu) um
das Speichermenü zu öffnen.
• Wähle mit Hilfe der Pfeiltasten (
,
) die Option “Schutz” an. Drücke
die OK-Taste zur Bestätigung.
• Wähle mit den Pfeiltasten (
,
)
zwischen “Einzel”, “Alle” und “Seite”. Drücke OK zur Bestätigung.
• Wähle mit Hilfe der Pfeiltasten (
,
) die Option “Set”. Drücke die
OK-Taste zur Bestätigung.
Einzel: Nur die mit der gelben Umrandung markierte Datei ist nun geschützt.
Alle: Alle gespeicherten Dateien sind
nun geschützt.
Seite: Wähle mit den Pfeiltasten (
,
, ,
) Dateien aus (jeweils markiert mit gelber Umrandung). Drücke
OK um die ausgewählte Datei zu
schützen.
Der Schutz einer Datei wird durch
ein Schloss-Symbol angezeigt. Der
Schutz kann mit “Abbruch” und OK
aufgehoben werden für ausgewählte
einzelne Dateien (in Schutz / Einzel) oder für alle Dateien (in Schutz
/ Alle).
Löschen von Dateien
• Durch Drücken der Wechseltaste
(Esc) gelangst du in den Aufnahmenverzeichnis-Modus. (Vom
Digitalfoto-Modus aus drücke die
Wechseltaste dreimal um zum
Aufnahmenverzeichnis-Modus zu
gelangen.)
• Drücke die Menü-Taste (Menu) um
das Speichermenü zu öffnen.
• Wähle mit Hilfe der Pfeiltasten (
,
) die Option “Löschen” an. Drü-
cke die OK-Taste zur Bestätigung.
• Wähle mit den Pfeiltasten (
,
)
zwischen “Einzel” und “Alle”. Drücke OK zur Bestätigung.
Einzel: Nur die mit der gelben Umrandung markierte Datei wird nun
gelöscht.
Alle: Alle gespeicherten Dateien werden nun gelöscht.
DE
Page 16

16
Einsatz einer SD-Speicherkarte
Wie du mit der SD-Speicherkarte
umgehst
• Wenn du keine SD-Karte eingesetzt hast, werden die Dateien im
internen Flash-Speicher gespeichert.
• Wenn du eine SD-Karte einsetzt,
dann so, dass die Kontakte zu
dir hin weisen. Schiebe die Karte
nicht rasch und mit Gewalt hinein;
das kann die SD-Karte beschädigen.
• Der LCD-Monitor zeigt ein SDKartensymbol. Der verfügbare
Speicherplatz auf der Karte wird
rechts unten auf dem Bildschirm
angezeigt.
• Bevor du die Karte wieder entnimmst, muss das Digitalmikroskop ausgeschaltet sein.
Kopieren von Daten auf die SDSpeicherkarte
• Durch Drücken der Wechseltaste
(Esc) gelangst du in den Aufnahmenverzeichnis-Modus. (Vom
Digitalfoto-Modus aus drückst du
die Wechseltaste dreimal um zum
Aufnahmenverzeichnis-Modus zu
gelangen.)
• Drücke die Menü-Taste (Menu) um
das Speichermenü zu öffnen.
• Wähle mit Hilfe der Pfeiltasten (
,
) die Option “Kopie>Karte” an.
(Wenn du keine SD-Karte eingesetzt hast, ist diese Funktion außer
Betrieb und steht nur in grauer
Schrift im Menü.) Drücke die OKTaste zur Bestätigung.
• Wähle mit den Pfeiltasten (
,
)
zwischen “Abbruch” (kein Kopiervorgang) und “Ausführ.” (Kopieren
der Daten). Drücke OK zur Bestätigung.
• Zum Übertragen der Daten ist eine
kurze Wartezeit erforderlich (“Bitte
warten”).
Verbindung zwischen Mikroskop
und PC
Benutze das USB-Kabel um deinen
PC mit dem Mikroskop zu verbinden.
Wenn die Verbindung erfolgreich
hergestellt worden ist, erkennt der
PC die neue Hardware selbstständig. Die Kontrolleuchte am Mikroskop leuchtet, aber die Digitalkamera
bleibt ausgeschaltet. Öffne auf deinem PC den entsprechenden Ordner des Wechseldatenträgers, lasse
dir die Dateien der im Flash-Speicher
gespeicherten Aufnahmen anzeigen
und kopiere diese auf deinen PC, wo
du mit ihnen weiter arbeiten kannst.
Achtung: Ziehe das USB-Kabel nicht
während der Datenübertragung heraus, sonst gehen die Daten verloren.
Page 17
17
Spezikationstabelle
Ausstattung Spezikationen
Mikroskoptisch mechanischer Objekttisch (2” x 2”)
Digitalkamera 2M CMOS (Anordnung 1600x1200 Pixel; Vergrößerung ca.
6,3x anstelle eines entsprechenden Okulars)
LCD-Monitor Hochauösender digitaler Dünnschichttransistor-Flachbild-
schirm („TFT-Display“): Diagonale 2”; Auösung 320x240 Pixel; Kontrastverhältnis 300; ca. 262000 darstellbare Farben;
Leuchtdichte 400 cd/m
2
), 8x digitaler Zoom (elektronische
Bildvergrößerung)
Scharfeinstellung stufenloses Fokussierrad (grob)
Objektive achromatische 4x, 10x und 40x
Interner Flash-Speicher 32 MB
USB-Kabel USB 2.0 mini
Objektivrevolver dreifach mit Einrastung
Beleuchtung eingebaute elektrische Beleuchtung: Leuchtdiode (6 V, 6 W)
Kondensor N.A. 0,65
Netzadapter Universal (Eingang: 100 bis 240 V, 50 oder 60 Hz)
Gewicht, Abmessungen 519 g; 162 mm x 155 mm x 215 mm
DE
Page 18

18
DANGER to your child!
Aids with sharp edges and tips
are sometimes used with this
device. Please store the device and
all of its accessories and aids out of
the reach of children. There is a risk
of INJURY.
Children should only use this device
under supervision. Keep packaging
materials (plastic bags, rubber bands,
etc.) away from children. There is a
risk of SUFFOCATION.
The chemicals and liquids provided
should be kept out of reach of children. Do not drink the chemicals!
Hands should be washed thoroughly
under running water after use. In
case of accidental contact with the
eyes or mouth rinse with water. Seek
medical treatment for ailments arising
from contact with the chemical substances and take the chemicals with
you to the doctor.
This device contains electronic components that are powered by either a
mains connection or batteries. Never
leave a child unsupervised with this
device. The device should only be
used as per these instructions otherwise there is a serious RISK of ELEC-
TRICAL SHOCK.
FIRE-/ DANGER OF EXPLOSION!
Do not expose the device to
high temperatures. Use only
the mains adapter supplied or those
battery types recommended. Never
short circuit the device or batteries
or throw into a re. Exposure to high
temperatures or misuse of the device
can lead to short circuits, re or even
explosion!
RISK of material damage.
Never take the device apart.
Please consult your dealer if
there are any defects. The dealer will
contact our service centre and send
the device in for repair if needed.
Do not subject the device to temperatures exceeding 60° C.
TIPS on cleaning
Remove the device from
it’s energy source before
cleaning (remove plug from
socket / remove batteries).
Clean the exterior of device with a dry
cloth. Do not use cleaning uids so
as to avoid causing damage to electronic components.
Clean the lens (objective and eyepiece) only with the cloth supplied or
some other soft lint-free cloth (e.g.
micro-bre). Do not use excessive
pressure - this may scratch the lens.
Dampen the cleaning cloth with a
spectacle cleaning uid and use it on
very dirty lenses.
Protect the device from dust and
moisture. Store the device in the bag
Page 19
19
EEC conformity explanation
Meade Instruments Europe
GmbH & Co KG, resident in
46414 Rhede/Westf., Gutenbergstr.
2, Germany, explains the agreement
with in the following specied EEC
guidelines for this product:
EN 50022:2006
EN 55024:1998+A1:2001/A2:2003
EN 61000-3-2:2006
EN 61000-3-3:1995+A1:2001+A2:2005
Product description:
Digitalmicro Bowl
Model /Description:
44342
Rhede, 09.04.2009
Meade Instruments Europe GmbH &
Co. KG
Helmut Ebbert
Managing director
supplied or in its original packaging.
Batteries should be removed from
the device if it is not going to be used
for a long period of time.
DISPOSAL
Dispose of the packaging
material/s as legally required.
Consult the local authority on the
matter if necessary.
Do not dispose of electrical
equipment in your ordinary
refuse. The European guideline
2002/96/EU on Electronic and
Electrical Equipment Waste and relevant laws applying to it require such
used equipment to be separately
collected and recycled in an environment-friendly manner.
GB
Page 20

20
These are the parts of your
microscope
1 SD Card Receptacle
2 LCD Monitor
3 Objective Nosepiece
4 LCD Module
5 Mini USB Cable Receptacle
6 Objective Lens
7 Focus Knob
8 Mechanical Stage
9 Illuminator
10 Esc Key
11 Monitor Control Light
12 On/off Switch (Main Switch)
13 Menu Key
14 Snap Key
15 Direction/OK Key
16 Power Adapter
17 Unit Outlet
Setting up your Microscope
1. Carefully remove the microscope
and the other components from
the package and place them on a
table or other at surface.
2. Remove the dust cover from the
microscope.
3. Plug the small adapter (16) at the
end of the power adapter cable in
the unit outlet (17) on the back of
the microscope base (see Fig. 2).
4. Plug the adapter part of the power
cable into an appropriate power
outlet.
Using the Microscope
Basic Prerequisites
Before you observe objects or specimens, you must turn on the LCD
monitor and the illuminator. You also
have to know how to operate the
mechanical stage. Then you will be
ready to start observing.
LCD Module
This digital microscope is different
than a conventional microscope. The
LCD monitor replaces the eyepieces
that are used on typical microscopes
for observing. As a result, it is pos-
sible to share your observations with
others by using the monitor. Before
you start observing, you must turn
on the LCD monitor by pressing the
on/off switch (see Fig. 3). Push and
hold the button until the red control
light turns on. This is the sign that
the LCD is activated. Basically, this
is all you have to do to get the LCD
monitor ready for observing. The different keys of the LCD module are
used mainly for taking pictures (photographs and videos) and they will be
explained later in these instructions.
Illumination
The illuminator (Fig. 1, No. 9) is required for the observation of prepared
specimens. The light comes through
an opening on the mechanical stage
from below and shines through the
specimen.
Specimens of different sizes, thickness or color variations require different levels of light. There are two ways
Page 21
21
to change this during observation:
regulate the brightness with the adjustment knob (see above in Fig. 1)
or changing the settings with the EV
functions on the LCD monitor. The
EV function increases or lowers the
brightness of the picture on the LCD
monitor; you can change it by pushing the right or left direction keys (,
) (Fig. 3).
If the specimen you are observing is
non-transparent or has a dark color,
you normally need more light in order
to bring out certain characteristics or
details. To do so, it is best if you simply increase the intensity of the light
by turning the brightness adjustment
knob to the highest setting.
You can nd the optimal lighting by
experimenting with different settings,
since each object requires its own
type of lighting. The same is true for
an object when different magnications are used.
Observing an Object
1. Place the specimen in the slide
holder. In doing so, keep the specimen and the slide holder parallel
(Fig. 4).
2. Place the slide holder, direction
arrow pointing inward, under the
clips of the mechanical stage (Fig.
5). Align the slide holder by moving it forwards/backwards and
to the left/to the right so that the
desired portion of the specimen is
under the objective.
3. With the aide of the objective
nosepiece (Fig. 1, No. 3), turn the
objective lenses (Fig. 1, No. 6) until the 4x objective is directly over
the specimen. Always start your
observations with the lowest magnication (4x for this microscope,
which leads to a total magnication
of 25x) and than proceed to work
through the higher magnications.
With the 4x objective, you will get
the widest eld of vision and the
brightest picture. Make the picture sharp by using the focus knob
(Fig. 1, No. 7).
Fig. 5
Direction Slide Holder Specimen
Fig. 4
GB
Page 22
22
4. When using the 4x objective, you
can also vary the magnication between 25x and 200x by using the
digital zoom on the LCD module.
To do so, use the up and down
keys (, ) on the LCD module.
A display will appear on the left
side of the monitor that shows the
current zoom setting.
5.
For higher magnications, you have
to turn the objective nosepiece to
the setting of the 10x objective or
the 40x objective (maximum magnication). After you change the
objective, you must focus the picture again. You can increase the
total magnication for each objective by using the digital zoom.
Attention: Before you change the
objective, move the mechanical
stage to the lowest position by using the focus knob. In this way, you
will not hit anything while turning the
nosepiece. Also, be careful when using the higher magnications. If you
move the mechanical stage too close
to the objective lens, you could the
specimen could hit the objective and
there could be damage.
Digital Pictures
Basic Operations
Activation
If the unit is off, push the on/off
switch (see Fig. 3) and hold it for 1
or 2 seconds. The red monitor control light activates and the unit starts
working.
Deactivation
If the unit is on, push the on/off
switch (see Fig. 3) and hold it for 1
or 2 seconds. The red monitor control light goes out, and the unit shuts
down.
Adjustment
To change the current unit settings,
call up the menu by pressing the
menu key. Push the direction keys
to select the corresponding settings.
After choosing a setting, press the
OK key to conrm it.
Display on the LCD Monitor
By pressing the Esc key once or multiple times, you access different operating modes. These are described
in the following.
Digital Photo Mode
1 Digital photo mode symbol
2 Symbol of the built-in memory. If
you have inserted an SD card, the
Fig. 6
Page 23
23
SD card symbol appears instead of
the memory symbol.
3 Number of pictures that can be
stored in the memory
4 Picture resolution (number of pix-
els)
Digital Video Mode
1 Digital video mode symbol
2 Symbol of the built-in memory. If
you have inserted an SD card, the
SD card symbol appears instead of
the memory symbol.
3 Amount of video that can be stored
in the memory
4 Picture resolution (number of pix-
els)
Self-timer Mode
1 Self-timer mode symbol
2 Symbol of the built-in memory. If
you have inserted an SD card, the
SD card symbol appears instead of
the memory symbol.
3 Number of pictures that can be
stored in the memory
4 Set the repeat time for the self-
timer
5 Self-timer runtime
6
Picture resolution (number of pixels)
Picture Index Mode
1 Display picture for photograph or
video
2 Selected le (yellow border)
3 Name of the currently selected le
Fig. 7
Fig. 8
Fig. 9
GB
Page 24

24
Settings
Setting Menu
Resolution Setting
• Press the menu key in either dig-
ital photo, digital video or self-timer
mode in order to open the settings
menu.
• Using the direction keys (, ),
select the option „Resolution.”
Press the OK key to conrm.
• Use the direction keys (, ) to
select the required resolution 5M
= 2048×1536, 3M = 1600×1200,
2M = 1280×1024, 1.3M =
1024×768, VGA = 800×600 for
photos; VGA = 800×600, QVGA
= 640×480 for videos). Press OK
to conrm.
The resolution depends on the type
of picture that you want. The higher
the resolution, the better the picture
quality. However, the required storage space is also higher, so fewer
pictures can be saved. It is best to
use the available ash memory with a
carefully adjusted picture resolution.
As listed below, you have ve options
for the picture resolution (selection
options). If you would like better image quality, select a higher resolution. The possible number of pictures
depends on the circumstances:
Fig. 10
Page 25
25
EV Settings
• Press the menu key in either digital
photo, digital video or self-timer
mode in order to open the settings
menu.
• Using the direction keys (, ),
select the option „EV.” Press the
OK key to conrm.
• Use the direction keys (, ) to
select the desired EV value (–2,
–5/3, –4/3, –1, … +2). Press OK
to conrm.
EV = -2 produces a very dark picture,
EV = +2 a very bright one.
Color Effect Settings
• Press the menu key in either digital
photo or self-timer mode in order to
open the settings menu.
• Using the direction keys (, ),
select the option „Color.” Press the
OK key to conrm.
• Use the direction keys (, ) to
select either “Standard” (normal
color picture), “Strong” (picture
with strong colors), „Sepia“ (sepiatoned picture) or „Black & White.“
Press OK to conrm.
Image Inscription Settings
The unit has an image inscription
function (for the time of the picture)
for the conventional use of the pictures as well as for data processing.
Please adjust the time and date before using this function.
• Press the menu key in either digital
photo or self-timer mode in order to
open the settings menu.
• Using the direction keys (, ),
select the option „Time Inscription.” Press the OK key to conrm.
• Use the direction keys (, ) to
Resolution Storage Space
64M 128M 256M 512M 1G
2048×1536 120 240 480 960 1920
1600×1200 17 0 340 680 1360 2720
1280×1024 230 460 920 1840 3680
1024×768 310 620 1240 2480 4960
800×600 430 860 17 20 3440 6880
Unit: one photo
GB
Page 26

26
select “Off” (no time inscription),
“Date” (image inscription with date)
and “Date & Time” (image inscription with date and time). Press OK
to conrm.
Language Settings
• Press the menu key in either digital photo, digital video or self-timer
mode in order to open the settings
menu.
• Using the direction keys (, ),
select the option „Language.”
Press the OK key to conrm.
• Select the desired language from
the 9 available using the direction
keys (, ). Press OK to con-
rm.
Date and Time Settings
• Press the menu key in either digital photo, digital video or self-timer
mode in order to open the settings
menu.
• Using the direction keys (, ),
select the option „Date.” Press the
OK key to conrm, and you will access the input menu.
• Use the left and right direction keys
(, ) to select the corresponding
data (time, date) and adjust it with
the down and up direction keys
(, ). After the input, press OK
to conrm.
Functions
Format Function
This unit has a delete function.
• Press the menu key in either digital photo, digital video or self-timer
mode in order to open the settings
menu.
• Using the direction keys (, ),
select the option „Format.” Press
the OK key to conrm.
• Use the direction keys (, ) to
select “Cancel” (no format, return
to menu) and “Format” (carry out
format). Press OK to conrm.
Attention: After formatting, all
data is deleted.
Digital Photo Function
Before taking digital photographs,
please adjust the corresponding settings.
Attention: The number of pictures
that can be taken is proportional
to the free ash memory storage
space.
• When you turn on the unit, the
digital photo mode is the standard
mode.
• Simply press the snap key to take
a picture.
Digital Video Function
Before taking digital videos, please
adjust the corresponding settings.
Attention: The amount of video that
can be recorded is proportional to the
free ash memory storage space.
Page 27
27
• You access the digital video menu
by pressing the Esc key. (You press
the Esc key once to access the
digital video mode when you are in
the digital photo mode.)
• Press the snap key to start recording.
• Press the snap key again to stop
recording.
Self-timer Function
Before using the self-timer function,
please adjust the corresponding settings in the self-timer mode.
• You access the self-timer mode by
pressing the Esc key. (You press
the Esc key twice to access the
self-timer mode when you are in
the digital photo mode).
• Press the OK key in order to display a yellow cursor. Use the left
and right direction keys (, ) to
select the repetition time for the
picture (hours : minutes : seconds) and adjust the setting with
the down and up direction keys
(, ). After the input, press OK
to conrm
• Press the snap key to start taking
the pictures.
• To stop taking pictures, press the
snap key again or the Esc key.
• Range for the repetition time: 5
seconds to 24 hours, in 5 second
intervals.
Digital Zoom and EV Value Settings
Sometimes, the picture of an object
is too small or the illumination is inadequate in order to get a satisfactory
image on the LCD monitor. Here, the
EV value and digital zoom (electronic
magnication) settings are very helpful.
• Press the left and right direction
keys (, ) to change the EV val-
ue. The EV vale range goes from
-2.0 to +2.0.
• Press the up and down keys (,
) to set the electronic magnication factor. This value range goes
from 1.00 to 8.00.
Fig. 11
Fig. 12
GB
Page 28
28
Viewing and Deleting Digital
Photos or Videos
Observing Digital Photos or
Videos
• You access the picture index mode
by pressing the Esc key. (You press
the Esc key three times to access
the picture index mode when you
are in the digital photo mode).
• All the saved digital photographs
and digital videos (video symbol:
video camera) are displayed with
the aide of the monitor. You can
browse through the list with the
direction keys (, ) if you have
more les than can be displayed
on the monitor (9 les).
• Use the direction keys (, ,
, ) to select a digital photo or
video. Its preview image is always
surrounded by a yellow border.
• Press the OK key to conrm. Now
a full-picture display appears. (You
can leave this picture again by
pressing OK once more.)
• If you would like to play a digital
video, select the video and press
the OK key and then the up key
(). When you press the up
key once again, the playback is
interrupted.
• When you are looking at a digital
photo, you can magnify or reduce
the image by pressing the up or
down keys (, ).
• Press the Esc key to go back to the
digital photo mode from the picture
index mode.
File Protection
The unit has a protection function
to prevent the unwanted deletion of
saved les.
• You access the picture index mode
by pressing the Esc key. (You press
the Esc key three times to access
the picture index mode when you
are in the digital photo mode).
• Press the menu key to open the
storage menu.
• Using the direction keys (, ),
select the option „Protection.”
Press the OK key to conrm.
• Use the direction keys (, ) to
select “Single,” “All” and „Page.“
Press OK to conrm.
• Using the direction keys (, ),
select the option „Set.” Press the
OK key to conrm.
Single: Only the le with the yellow
border is protected.
All: all saved les are protected.
Fig. 13
Page 29

29
Page: Use the direction keys (, ,
, ) to select les (each marked
with yellow borders). Press OK to
protect the selected les.
The le protection is displayed
through the lock symbol. The protection can be canceled with “Cancel”
and OK for individual les (in Protection / Single) or for all les (in Protection / All).
Deleting Files
• You access the picture index mode
by pressing the Esc key. (You press
the Esc key three times to access
the picture index mode when you
are in the digital photo mode).
• Press the menu key to open the
storage menu.
• Using the direction keys (, ),
select the option „Delete.” Press
the OK key to conrm.
• Use the direction keys (, ) to
select “Single,” and “All.” Press OK
to conrm.
Single: Only the le with the yellow
border is deleted.
All: all saved les are deleted.
Using an SD Card
How to use the SD card
• If you have not inserted a SD card,
the les will be saved in the ash
memory.
• When inserting a SD card make
sure the contacts are facing up. Do
not push the card in forcefully. This
can damage the SD card.
• The LCD monitor displays a SD
card symbol. The storage space
available on the SD card is displayed on the bottom right of the
monitor.
• Before you remove the card, the
digital microscope must be shut
off.
Copying Files to the SD Card
• You access the picture index mode
by pressing the Esc key. (You press
the Esc key three times to access
the picture index mode when you
are in the digital photo mode).
• Press the menu key to open the
storage menu.
• Using the direction keys (, ),
select the option „Copy>Card.” (If
you have not inserted a SD card,
this function is not selectable and
is displayed in a grey font in the
menu.) Press the OK key to conrm.
• Use the direction keys (, ) to
select either “Cancel” (no copying)
or “Copy” (copy the les). Press
OK to conrm.
• You will have to wait a little bit while
data is transferred to the card
(“Please wait”).
Connecting your Microscope to
a PC
Use the USB cable to connect the
microscope to a PC.
If the connection is done correctly,
the PC will automatically recognize
GB
Page 30
30
the new hardware. The control light
on the microscope lights up, but the
digital camera does not come on. On
your PC, open the corresponding
folder for the removable media and
display the pictures in the ash memory. You can copy these to your PC,
where you can work on them further.
Attention: Do not remove the USB
cable during the data transfer; otherwise, the information will be lost.
Technical Information
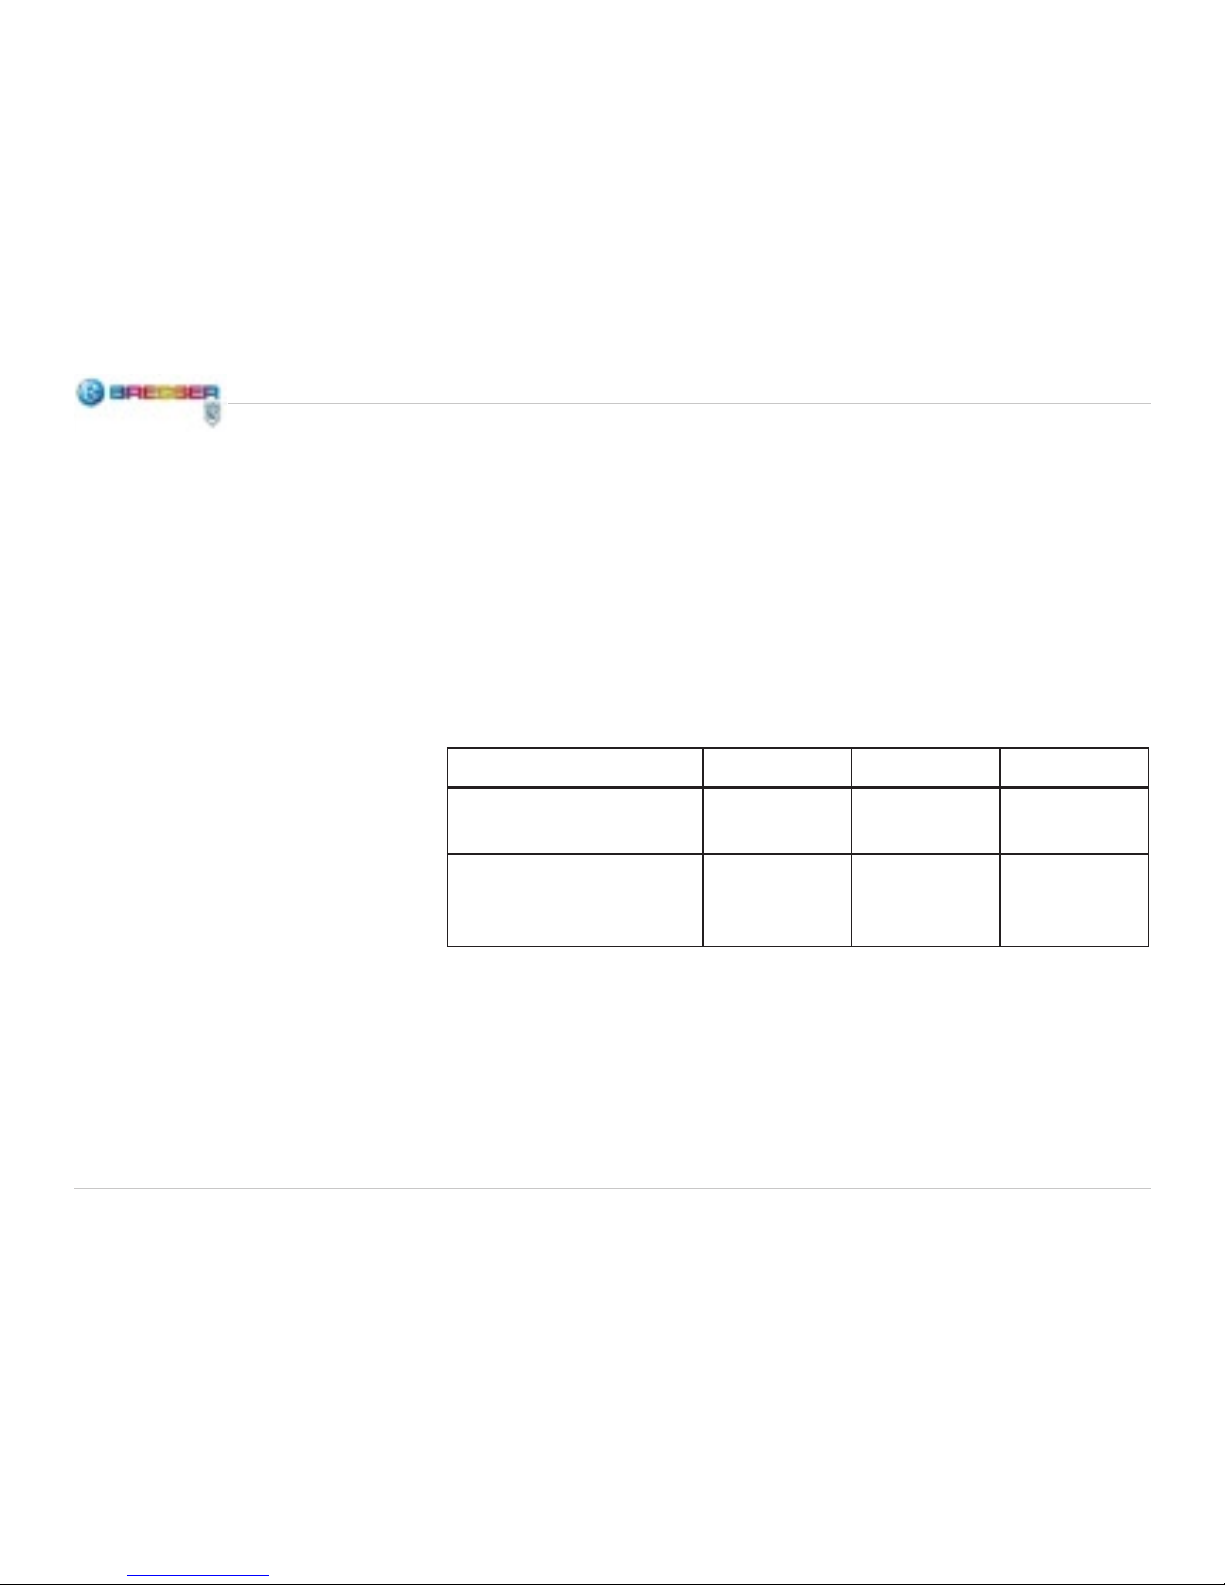
Magnication Table
Use the following table to determine
the total magnication of your microscope, according to which objective
is used in combination with which
monitor setting (normal or with digital
zoom).
Objective 4x 10x 40x
Digital image - normal
LCD monitor display
25x 65x 250x
Digital image - LCD
monitor display with
maximum, 8x zoom
200x 520x 2000x
Page 31

31
Specications Table
Equipment Specications Specications
Microscope Stage Mechanical stage (2” x 2”)
Digital Camera 2M CMOS (system 1600x1200 pixels; magnication approx.
6.3x in the place of a corresponding eyepiece)
LCD Monitor High resolution digital thin-lm transistor at-screen monitor
(TFT display) Diagonal 2”; resolution 320x240 pixels; contrast
ratio 300; approx. 26,2000 displayable colors; luminance
400 cd/m
2
), 8x digital zoom (electronic magnication)
Focus Adjustment Continuously variable focus knob (rough)
Objective Achromatic 4x, 10x and 40x
Internal ash memory 32 MB
USB Cable USB 2.0 mini
Objective Nosepiece Triple, clicks into place
Illumination Built-in electric illuminator: LED (6V, 6W)
Condenser N.A. 0,65
Power Adapter Universal (input: 100 to 240 V, 50 or 60 Hz)
Weight, Dimensions 519 g; 162 mm x 155 mm x 215 mm
GB
Page 32

32
DANGER pour votre enfant !
Le travail avec cet appareil
entraîne souvent l’utilisation
d’accessoires pointus et à angles
vifs. Conservez donc cet appareil
ainsi que tous ses accessoires à un
endroit inaccessible aux enfants.
RISQUE DE BLESSURES !
Les enfants ne devraient utiliser l’appareil que sous surveillance. Gardez
hors de leur portée les matériaux
d’emballage (sachets en plastique,
élastiques etc.) ! DANGER D’ÉTOUF-
FEMENT !
Les produits chimiques et les liquides
inclus à la livraison doivent être tenus
hors de la portée des enfants ! Ne pas
boire les produits chimiques ! Bien se
laver les mains sous l’eau courante
après utilisation. En cas de contact involontaire avec les yeux ou la bouche,
bien rincer à l’eau claire. En cas de
troubles, consultez sans tarder un médecin et montrez-lui les substances.
Cet appareil contient des pièces
électroniques fonctionnant à l‘aide
d’une source de courant (bloc secteur et/ou piles). Ne laissez jamais
vos enfants sans surveillance utiliser
cet appareil ! L’appareil doit impérativement être utilisé selon les instructions du mode d’emploi : DANGER
de CHOC ÉLECTRIQUE !
DANGER D’INCENDIE/
D’EXPLOSION !
N’exposez pas l’appareil à de
fortes températures. Utilisez
uniquement le bloc secteur inclus à
la livraison ou bien les piles recommandées. Ne court-circuitez pas
l’appareil avec les piles et ne les jetez
pas dans le feu ! Une chaleur excessive ou un mauvais maniement peut
provoquer des courts-circuits, des
incendies voire des explosions !
DANGER de dommages sur le
matériel !
Ne démontez jamais l’appareil !
En cas d’endommagement,
adressez-vous à votre revendeur. Il
prendra contact avec le centre de
service et pourra, le cas échéant,
envoyer l’appareil au service de réparations.
N’exposez jamais l’appareil à des
températures de plus de 60° C !
REMARQUES concernant le
nettoyage
Avant de procéder au nettoyage de l’appareil, sépa-
rez-le de la source de courant (retirez le bloc secteur de la prise
ou retirez les piles) !
Ne nettoyez que l’extérieur de l’appareil et à l’aide d’un chiffon propre.
N’utilisez pas de liquide de nettoyage
an d’éviter tout dommage au système électronique.
Page 33

33
Pour plus d’informations concernant
l’élimination conforme, contactez le
prestataire communal d’élimination des
déchets ou bien l’ofce de l’environnement.
Ne jetez pas d’appareils électri-
ques dans les ordures ménagères !
Selon la directive européenne
2002/96/EG relative aux déchets
d‘équipements électriques et électroniques et à sa mise en œuvre au niveau
du droit national, les équipements électriques doivent être triés et déposés à
un endroit où ils seront recyclés de façon écologique.
Pour nettoyer les lentilles (oculaires
et /ou objectifs), utilisez uniquement
le chiffon à lentilles ci-joint ou bien un
chiffon doux et non pelucheux (par
exemple en microbre). N’appuyez
pas trop fortement le chiffon sur les
lentilles pour ne pas les rayer.
Pour retirer des traces de saleté plus
résistantes, humidiez légèrement le
chiffon avec un liquide prévu pour le
nettoyage des lunettes et passez sur
les lentilles en exerçant une légère
pression.
Tenez l’appareil à l’abri de la poussière et de l’humidité ! Conservez-le
dans la sacoche incluse à la livraison
ou bien dans l’emballage de transport. Retirez les piles de l‘appareil
si vous ne n’utilisez pas pendant un
certain temps !
ÉLIMINATION
Éliminez les matériaux d’emballage selon le type de produit.
Certicat de conformité UE
La société Meade Instru-
ments Europe Gmbh & Co.
KG, domiciliée à 46414 Rhede/
Westf., Gutenbergstr. 2, Allemagne,
certie la conformité de ce produit
avec les directives de l‘UE ci-après:
EN 50022:2006
EN 55024:1998+A1:2001/A2:2003
EN 61000-3-2:2006
EN 61000-3-3:1995+A1:2001+A2:2005
Description du produit:
Digitalmicro Bowl
Type / Désignation:
44342
Rhede, 09-04-2009
Meade Instruments Europe GmbH &
Co. KG
Helmut Ebbert
Gérant
FR
Page 34

34
Voici les pièces de ton
microscope
1 Réceptacle de carte SD
2 Moniteur LCD
3 Nez de l’objectif
4 Module LCD
5 Connexion de câble USB (mini)
6 Lentille de l’objectif
7 Roue de focalisation
8 Table de l’objectif
9 Eclairage
10 Touche d’échappement (ESC)
11 Voyant de contrôle de moniteur
12 Interrupteur marche/Arrêt (Com-
mutateur central)
13 Touche Menu (Menu)
14 Touche d’enregistrement (Snap)
15 Touches èche et OK
16 Prise d’adaptateur réseau
17 Prise de l’appareil
Installation du microscope
1. Sors le microscope et les autres
pièces avec précaution de la boîte
en carton et place le sur une table
ou sur une surface plane.
2. Retire le couvercle anti-poussière
du microscope.
3. Introduis le petit connecteur (16)
à l’extrémité du câble d’adaptateur
réseau dans la prise d’entrée (17)
située à l’arrière du pied du microscope (voir illustr. 2).
4. Introduis la che secteur de
l’adaptateur réseau dans une prise
secteur correspondante.
Utilisation du microscope
Conditions de base
Avant de pouvoir contempler des
objets ou des préparations, tu dois
allumer l’écran LCD et l’éclairage et
également savoir comment utiliser la
table de l’objectif. Ensuite tu seras
prêt à commencer les observations.
Module LCD
Ce microscope numérique est différent d’un microscope traditionnel : le
moniteur LCD remplace les oculaires
qui sont utilisées dans les microscopes traditionnelles pour l’observation.
Il est donc possible que tu puisses effectuer des observations sur l’écran
avec d’autres pièces. Pour commencer les observations au microscope,
tu dois allumer le moniteur LCD en
appuyant sur l’interrupteur marche/
arrêt (voir illustr. 3). Maintiens le bouton appuyé jusqu’à ce que le voyant
de contrôle rouge clignote pour indiquer que le moniteur LCD est allumé.
C’est en substance ce que tu dois
faire pour préparer le moniteur LCD
à la microscopie. Les différentes
touches du module LCD sont surtout
nécessaires pour la prise d’images
(photo ou vidéo) et seront évoquées
plus loin dans ce manuel.
Page 35

35
Eclairage
L’éclairage (Illustr.) 1, N°. 9) est
nécessaire pour l’observation des
préparations, pour qu’il y ait de la lumière sur la préparation grâce à une
ouverture en dessous de la table de
l’objectif.
Les préparations de différentes grandeurs, grosseurs ou avec des variations de couleurs exigent différentes
forces d’éclairages. Il y a deux possibilités de les changer lors de l’observation : Réglage de la clarté avec
la roue de réglage (voir ci-dessus
illustr. 1) ou un changement avec la
fonction EV sur le moniteur LCD. La
fonction EV (EV = exposure value for
brightness, valeur d’exposition pour
la luminosité) augmente ou diminue
la clarté de l’image sur le moniteur
LCD selon la touche sur laquelle tu
appuies, à savoir la touche èche
droite ou la touche èche gauche
(, ) (Illustr. 3).
Si la préparation observée est louche
ou foncée, il te faut en principe plus
de lumière pour pouvoir présenter
certaines caractéristiques ou détails.
Pour ce faire, il vaut mieux que tu
augmentes l’intensité de la lumière
de l’éclairage, en tournant la roue de
réglage de la clarté au niveau le plus
élevé.
Tu peux trouver l’éclairage optimal
en essayant différents réglages, car
chaque objet exige un éclairage
quelque peu différent, ainsi que l’objet lui-même, s’il est observé avec
différents grossissements.
Observation d’un objet
1. Introduis la préparation dans le
support de préparation. Mets la
préparation et le support de préparation en parallèle (Illustr. 4).
2. Pousse le support de préparation
dans la direction de la èche sous
les chambres de la table de l’objet
(Illustr. 5). Oriente le support de
préparation en avant/en arrière et
vers la gauche/droite, pour que la
partie souhaitée de la préparation
soit sous l’objectif.
Fig. 5
Direction
Support de
préparation
Objet
Fig. 4
FR
Page 36

36
3. A l’aide du nez de l’objectif (Illustr.
1, N°. 3) tournes les lentilles de
l’objectif (Illustr. 1, N°. 6) jusqu’à
ce que l’objectif 4x soit directement sur la préparation. Commence toujours les expériences
au microscope avec l’objectif qui
montre le grossissement le plus
faible (4x pour ce microscope,
avec un grossissement général
de 25x) puis passe aux grossissements les plus élevés. Avec l’objectif 4x, tu obtiens le champ le
plus vaste et l’image la plus claire.
Règle l’image à l’aide de la roue de
focalisation (Illustr. 1, N°. 7) Vif
4.
En utilisant l’objectif 4x, tu peux
également faire varier le grossissement de 25x à 200x, en réglant
le zoom numérique sur le module
LCD. Utilise les touches des èches du dessus et du dessous (,
) sur le module LCD pour y parvenir. Sur le côté gauche de l’écran
un afchage apparaît, sur lequel se
trouve le réglage du zoom.
5. Pour des grossissements plus
élevés, tu dois tourner le nez de
l’objectif sur objectif 10x ou objectif 40x (grossissement maximal).
Une fois l’objectif changé, l’image
doit à nouveau être focalisée. En
utilisant un autre objectif tu peux
également augmenter le grossissement d’ensemble en utilisant le
zoom numérique.
Attention : Avant de changer l’objectif, place la table de l’objectif dans la
position la plus basse à l’aide de la
roue de focalisation. Cela t’évite de
buter n’importe où lors de la rotation
du nez. Fais également attention
aux grossissements les plus élevés,
lorsque tu montes la table de l’objectif près de la lentille de l’objectif, car
l’objectif peut se heurter à la préparation ou à l’objet et provoquer des
dommages.
Images numériques
Opérations fondamentales
Allumer :
Appuie sur l’interrupteur marche/arrêt (voir Illustr. 3) 1 à 2 secondes, si
l’appareil était précédemment éteint.
Le voyant rouge de contrôle du moniteur s’allume et l’appareil commence
à fonctionner.
Eteindre
Appuie sur l’interrupteur marche/
arrêt (voir Illustr. 3) 1 à 2 secondes,
quand l’appareil est éteint. Le voyant
rouge de contrôle du moniteur s’allume maintenant et l’appareil s’éteint.
Réglage
Pour changer le réglage actuel de
l’appareil, ouvre le menu en appuyant
sur la touche Menü (Menu). Appuie
sur les touches èches pour sélectionner un réglage approprié. Après
Page 37

37
le réglage, appuie sur la touche OK
pour conrmer.
Afchage sur le moniteur LCD
En appuyant une fois ou plusieurs
fois sur la touche d’échappement
(Esc), tu entres dans des modes de
fonctionnement différents (modes
d’opération). Ceux-ci seront décrits
dans les chapitres qui suivent.
Mode photo numérique
1
Symbole du mode photo numérique
2 Symbole de la mémoire intégrée
Si tu as installé une carte mémoire
SD, la carte SD apparaît au lieu de
ce symbole.
3 Nombre d’images, qui peuvent
encore être enregistrées dans la
mémoire
4 Résolution de l’image (nombre de
points d’images)
Mode vidéo numérique
1
Symbole du mode vidéo numérique
2 Symbole de la mémoire intégrée.
Si tu as installé une carte mémoire
SD, le symbole de la carte SD apparaît au lieu de cette dernière.
3 Durée du lm qui peut encore être
enregistré dans la mémoire.
4 Résolution de l’image (nombre de
points de l’image)
Mode déclencheur automatique
1 Symbole du mode déclencheur
automatique
2 Symbole de la mémoire intégrée.
Si tu as installé une carte mémoire
SD, le symbole de la carte SD apparaît au lieu de cette dernière.
3 Nombre d’images qui peuvent
encore être enregistrées dans la
mémoire
Fig. 6
Fig. 7
Fig. 8
FR
Page 38

38
4 Temps de répétition réglé pour le
déclencheur automatique
5 Durée de déclenchement automa-
tique
6 Résolution de l’image (nombre de
points de l’image)
Mode répertoire d’enregistrement
1 Image d’aperçu pour photo ou
vidéo
2 Fichier sélectionné (brodure jaune)
3 Nom du chier actuellement sélec-
tionné
Réglages
Menu réglage
Réglage de la résolution de
l’image
En mode photo numérique, vidéo
numérique ou déclencheur automatique, appuie sur la touche Menu pour
ouvrir le menu de réglage.
Sélectionne l’option « Résolution »
avec les touches èches (, ).
Appuie sur la touche OK pour conrmer.
Sélectionne la dénition souhaitée
avec les touches èches (, ) (5M
= 2048×1536, 3M = 1600×1200,
2M = 1280×1024, 1.3M =
1024×768, VGA = 800×600 pour
les photos ; VGA = 800×600, QVGA
= 640×480 pour les vidéos). Appuie
sur OK pour conrmer.
La résolution s’adapte au type d’image que tu souhaites. Plus haute est
la résolution, meilleure est la qualité
de l’image, mais plus grande est l’emplacement de mémoire nécessaire,
et moins d’enregistrements peuvent
être sauvegardés. Il vaut mieux utiliser la mémoire Flash disponible avec
une résolution d’image réglée raisonnablement.
Comme indiqué ci-dessous, tu as cinq
options pour la résolution de l’image
(choix possibles). Si tu souhaites
obtenir une meilleure qualité, sélectionne une dénition plus élevée. Le
nombre possible d’enregistrements
dépend des circonstances :
Fig. 9
Fig. 10
Page 39

39
Réglage EV
En mode photo numérique, vidéo
numérique ou déclencheur automatique, appuie sur la touche Menu pour
ouvrir le menu de réglage.
Sélectionne l’option « EV » avec les
touches èches (, ). Appuie sur
la touche OK pour conrmer.
Sélectionne les touches èches (,
) la valeur EV souhaitée (–2, –5/3,
–4/3, –1, … +2). Appuie sur OK
pour conrmer.
EV= -2 donne une mage très sombre,
EV = +2 une image très claire.
Réglage des effets de couleur
En mode photo numérique, vidéo
numérique ou déclencheur automatique, appuie sur la touche Menu pour
ouvrir le menu de réglage.
Sélectionne l’option « couleur » avec
les touches èches (, ). Appuie
sur la touche OK pour conrmer.
Sélectionne les touches èches (,
) les effets de couleur « Standard »
(image en couleur normale), « Fort »
(Image en couleur avec couleurs fortes), « jauni » (Image à ton sépia) et
« Uni » (image noir et blanc). Appuie
sur OK pour conrmer.
Réglage de l’inscription de
l’image
Pour le maniement habituel des images ainsi que pour le traitement des
données, l’appareil possède une
fonction d’inscription de l’image (pour
la date des enregistrements). Règle
l’heure et la date avant d’utiliser cette
fonction.
En mode photo numérique, vidéo
numérique ou déclencheur automatique, appuie sur la touche Menu pour
ouvrir le menu de réglage.
Sélectionne l’option « Inscription de
Dénition Emplacement de mémoire
64M 128M 256M 512M 1G
2048×1536 120 240 480 960 1920
1600×1200 17 0 340 680 1360 2720
1280×1024 230 460 920 1840 3680
1024×768 310 620 1240 2480 4960
800×600 430 860 17 20 3440 6880
Unité : Pièce
FR
Page 40

40
l’heure » avec les touches èches
(, ). Appuie sur la touche OK
pour conrmer.
Sélectionne avec les touches èches
(, ) „aucune“ (pas d’inscription
d’heure), « date » (inscription d’image
avec date d’enregistrement) et „date
et heure“ (inscription de l’image avec
enregistrement de la date et heure).
Appuie sur OK pour conrmer.
Réglage de la langue
En mode photo numérique, vidéo
numérique ou déclencheur automatique, appuie sur la touche Menu pour
ouvrir le menu de réglage.
Sélectionne l’option « Langues » avec
les touches èches (d’abord , puis
, ). Appuie sur la touche OK pour
conrmer.
Sélectionne avec les touches èches
(, ) la langue souhaitée parmi 9
langues. Appuie sur OK pour conrmer.
Réglage de l’heure et de la date
En mode photo numérique, vidéo
numérique ou déclencheur automatique, appuie sur la touche Menu pour
ouvrir le menu de réglage.
Sélectionne l’option « Date » avec les
touches èches (d’abord , puis ,
). Appuie sur la touche OK pour
conrmer ; tu es maintenant dans le
menu d’entrée.
Sélectionne avec les touches èches
gauche et droite (, ) l’entrée correspondante (heure,
date) et effectue le réglage avec les
touches haut et bas (, ). Après
l’entrée appuie sur OK pour conrmer.
Fonctions
Fonction de formatage
Cet appareil possède une fonction
de formatage.
En mode photo numérique, vidéo
numérique ou déclencheur automatique, appuie sur la touche Menu pour
ouvrir le menu de réglage.
Sélectionne l’option « Format » avec
les touches èches (d’abord , puis
, ). Appuie sur la touche OK pour
conrmer.
Sélectionne avec les touches èches (, ) « interruption » (aucun
formatage, retour au menu) et « Exportation ». (Exporter le formatage).
Appuie sur OK pour conrmer.
Attention : Après le formatage,
toutes les données sont effacées.
Fonction d’enregistrement photo
numérique
Avant d’enregistrer des photos numériques, effectue les réglages correspondants.
Attention : Le nombre d’images qui
peuvent être enregistrées est proportionnel à l’emplacement de mémoire
Flash libre.
Page 41

41
Emplacement de mémoire Flash
Après avoir allumé l’appareil, le mode
photo numérique est le mode standard.
Appuie sur la touche d’enregistrement (Snap) pour enregistrer une
photo.
Fonction d’enregistrement vidéo
numérique
Avant d’enregistrer des photos numériques, effectue les réglages correspondants.
Attention : La durée du lm qui peut
être enregistré est proportionnelle à
la mémoire mémoire Flash libre.
En appuyant sur la touche d’échappement (Esc), tu passes en mode
vidéo numérique. (du mode photo
numérique, appuie sur la touche
d’échappement une fois pour passer
en mode vidéo numérique.)
Appuie sur la touche d’enregistrement (Snap) pour commencer l’enregistrement.
Appuie encore sur la touche d’enregistrement pour terminer l’enregistrement.
Fonction d’enregistrement avec déclencheur automatique
Avant de faire un enregistrement
avec déclencheur automatique, effectue les réglages appropriés pour
ce dernier.
En appuyant sur la touche d’échappement (Esc), tu passes en mode
déclencheur automatique. (Du mode
photo numérique, appuie sur la touche d’échappement deux fois pour
passer en mode déclencheur automatique.)
Appuie sur la touche OK pour appeler le curseur jaune. Sélectionne
avec les touches èches gauche et
droite (, ) l’heure de la répétition
pour l’enregistrement (Heure: Minute
: Seconde) et effectue le réglage
avec les touches haut et bas (, ).
Après l’entrée, appuie sur OK pour
conrmer.
Fig. 11
Fig. 12
FR
Page 42

42
Appuie sur la touche d’enregistrement (Snap) pour commencer l’enregistrement des photos.
Pour terminer l’enregistrement, appuie encore sur la touche d’enregistrement ou sur la touche d’échappement (Esc).
Domaine pour la répétition : de 5 secondes à 24 heures, par tranches de
5 secondes.
Réglage du zoom numérique et
de la valeur EV
Parfois, l’illustration des détails de
l’objet est trop petite ou l’éclairage insufsant pour obtenir une représentation satisfaisante sur le moniteur
LCD. Dans ce cas les réglages de
la valeur EV et du zoom numérique
(grossissement électronique) apporte une aide supplémentaire.
Appuie sur les touches èches
gauche et droite (, ) pour régler
la valeur EV. Le domaine de valeur
EV varie de –2,0 à +2,0.
Appuie sur les touches èches haut
et bas (, ) pour régler le facteur
de grossissement électronique. Son
domaine de valeur varie de 1,00 à
8,00.
Observation et effacement de
photos numériques ou vidéo
Observer des photos ou des
vidéos numériques
En appuyant sur la touche d’échappement (Esc), tu passes en mode répertoire d’enregistrement. (Du mode
photo numérique, appuie trois fois
sur la touche d’échappement pour
passer en mode répertoire d’enregistrement.)
L’ensemble des photos numériques
et des vidéos numériques enregistrées (Symbole vidéo : caméra) seront représentées à l’aide de l’écran.
Avec les touches èches (, ),
tu peux faire déler la liste, si elle
contient plus de chiers que peut
en contenir l’afchage de l’écran (9
chiers).
Sélectionne avec les touches èches
(, , , ) une photo ou une
vidéo numérique. L’image d’aperçu
est systématiquement dotée d’une
bordure jaune.
Appuies sur la touche OK pour
conrmer. Maintenant, un afchage
plein écran apparaît. (En appuyant
plusieurs fois sur OK, tu peux à
nouveau quitter ce mode.)
Si tu souhaites passer une vidéo
numérique, sélectionne la vidéo et
appuie sur la touche OK et sur la
touche èche du haut (). Si tu
appuies à nouveau sur la touche è-
Fig. 13
Page 43

43
che du haut, la vidéo s’interrompt.
Si tu observes une photo numérique,
tu peux agrandir ou réduire l’image
en appuyant sur les touches du haut
et du bas (, ).
Appuie sur la touche d’échappement
(Esc) pour revenir au mode photo numérique du mode répertoire.
Protection de chiers
Pour protéger les données enregistrées des effacements non intentionnels, l’appareil dispose d’une fonction de protection.
En appuyant sur la touche d’échappement (Esc), tu passes en mode répertoire d’enregistrement. (Du mode
photo numérique, appuie trois fois
sur la touche d’échappement pour
passer en mode répertoire d’enregistrement.)
Appuie sur la touche Menu pour
ouvrir le menu de mémoire.
Sélectionne l’option « Protection »
avec les touches èches (, ). Ap-
puie sur la touche OK pour conrmer.
Sélectionne avec les touches èches (, ) entre „Unique“, „Tous“
et „Page ». Appuies sur OK pour
conrmer.
Sélectionne l’option « Régler » avec
les touches èches (, ). Appuie
sur la touche OK pour conrmer.
Unique : Seul le chier avec la bordure jaune est maintenant protégé.
Tous : Tous les chiers enregistrés
sont maintenant protégés.
Page : Sélectionne avec les touches
èches (, , , ) les chiers
(respectivement marqués d’une bordure jaune ). Appuie sur OK pour protéger le chier sélectionné.
La protection d’un chier est indiqué
par un symbole de clé. La protection
peut être suspendue avec « interruption » et OK pour certains chiers
sélectionnés (en protection / unique)
ou pour tous les chiers (en protection / tous).
Effacement des chiers
En appuyant sur la touche d’échappement (Esc), tu passes en mode répertoire d’enregistrement. (Du mode
photo numérique, appuie trois fois
sur la touche d’échappement pour
passer en mode répertoire d’enregistrement.)
Appuie sur la touche menu pour
ouvrir le menu de mémoire.
Sélectionne l’option « Effacement »
avec les touches èches (, ).
Appuie sur la touche OK pour conrmer.
Sélectionne avec les touches èches
(, ) entre „Unique“ et „Tous“. Appuie sur OK pour conrmer.
Unique : Seul le chier avec la bordure jaune est maintenant effacé.
Tous : Tous les chiers enregistrés
sont maintenant effacés.
FR
Page 44

44
Installation d’une carte
mémoire SD
Comment tu dois procéder avec
la carte mémoire SD
Si tu n’as installé aucune carte SD,
les données seront enregistrées
dans une mémoire Flash interne.
Si tu installes une carte SD, fais le de
sorte que les contacts soient orientés vers toi. N’introduis pas la carte
rapidement et avec violence ; cela
peut endommager la carte SD.
Le moniteur LCD montre un symbole
de carte. L’espace mémoire disponible sur la carte sera indiqué en bas à
droite sur l’écran.
Avant que tu ne retires la carte, le microscope numérique doit être éteint.
Copie de données sur la carte
mémoire SD
En appuyant sur la touche d’échappement (Esc), tu passes en mode répertoire d’enregistrement. (Du mode
photo numérique, appuie trois fois
sur la touche d’échappement pour
passer en mode répertoire d’enregistrement.)
Appuie sur la touche Menu pour
ouvrir le menu de mémoire.
Sélectionne l’option « Copie>Carte »
avec les touches èches (, ).
(Si tu as installé une carte SD, cette
fonction n’est pas active et est présente dans le menu en gris.) Appuie
sur la touche OK pour conrmer.
Sélectionne avec les touches èches
(, ) „interruption“ (aucun processus de copie) ou « exportation. »
(Copie de données). Appuie sur OK
pour conrmer.
Pour transmettre les données, un
court temps d’attente est imposé
(« Veuillez patienter »).
Connexion entre le microscope
et le PC
Utilise le câble USB pour raccorder
ton PC à ton microscope.
Si la connexion est réussie, le PC reconnaît le nouveau matériel tout seul.
Le voyant de contrôle sur le microscope s’allume, mais la caméra numérique reste éteinte. Ouvre sur ton
PC la commande correspondante
du support de données, afche les
chiers enregistrés sur la mémoire
Flash et copie ces derniers sur ton
PC, où tu pourras ensuite travailler
avec.
Attention : Ne retire pas le câble
USB pendant la transmission de données, autrement les données seront
perdues.
Page 45

45
Tableau des spécications
Equipement Spécications
Table du microscope Table du microscope mécanique (2” x 2”)
Caméra numérique 2M CMOS (Modèle 1600x1200 Pixel; Grossissement env.
6,3x à la place d’une oculaire correspondante)
Moniteur LCD Transistor à couche – écran plat de visualisation numérique
à haute résolution ((„TFT-Display“): Diagonale 2”; Résolution
320x240 Pixel; Rapport de contraste 300; env. 262000
couleurs représentables ; Brillance 400 cd/m
2
), zoom
numérique 8x (grossissement d’image électronique)
Focalisation Roue de focalisation progressive (gros)
Objectif achromatique 4x, 10x et 40x
Mémoire Flash interne 32 MB
Câble USB USB 2.0 mini
Nez de l’objectif Triple avec enclenchement
Eclairage
Eclairage électrique intégré : Diode électroluminescente (6 V, 6 W)
Condenseur N.A. 0,65
Adaptateur réseau Universel (Entrée : 100 à 204 V, 50 ou 60 Hz)
Poids, Dimensions 519 g; 162 mm x 155 mm x 215 mm
FR
Page 46

46
GEVAAR voor uw kind!
Bij het werken met dit ap-
paraat worden vaak scherpe
en puntige hulpmiddelen gebruikt.
Bewaar dit apparaat daarom samen
met alle onderdelen en hulpmiddelen
op een plaats die niet voor kinderen
toegankelijk is. Uw kind kan LETSEL
oplopen!
Kinderen dienen het apparaat uitsluitend onder toezicht te gebruiken. Houd verpakkingsmateriaal
(plastic zakken, elastiek, enz.) ver
van kinderen! Uw kind kan daardoor
STIKKEN!
De bijgeleverde chemicaliën en vloeistoffen mogen niet in de handen van
kinderen vallen! Chemische stoffen
niet drinken! Handen na gebruik met
stromend water grondig schoonmaken. Bij onbedoeld contact met ogen
of mond met water uitspoelen. Bij
klachten onmiddellijk een arts raadplegen en de substanties laten zien.
Dit apparaat bevat elektronische
onderdelen die via een stroombron
(stroomvoorziening of batterijen) worden aangedreven. Zorg dat kinderen
tijdens de bediening altijd onder toezicht staan! Gebruik mag uitsluitend
plaats vinden zoals in de gebruiksaanwijzing staat omschreven, anders
bestaat het GEVAAR van een ELEK-
TRISCHE SCHOK!
BRAND-/EXPLOSIEGEVAAR!
Stel het apparaat niet bloot
aan hoge temperaturen. Gebruik uitsluitend de meegeleverde
adapter of de aanbevolen batterijen.
Apparaat en batterijen niet kortsluiten
en niet in open vuur gooien! Door
overmatige hitte en onoordeelkundig
gebruik kunnen kortsluiting, brand en
zelfs explosies optreden!
GEVAAR voor materiële schade!
Demonteer het apparaat niet!
Neem in alle situaties waarin
zich een defect voordoet contact op
met uw vakhandel. Hij neemt contact
op met het servicecentrum en kan
het apparaat indien nodig ter reparatie opsturen.
Stel het apparaat niet bloot aan temperaturen boven de 60ºC!
TIPS voor het schoonmaken
Ontkoppel het apparaat
vóór het schoonmaken van
de stroombron (stekker uit
het stopcontact nemen of batterijen
verwijderen)!
Reinig het apparaat uitsluitend aan
de buitenzijde met een droge doek.
Gebruik geen reinigingsvloeistof om
schade aan de elektronische onderdelen te voorkomen.
Reinig de lenzen (oculairglazen en/
of objectiefglazen) uitsluitend met het
meegeleverde lenspoetsdoekje of
met een andere zachte en pluisvrije
doek (bv. Velcro). Druk het doekje er
Page 47

47
AFVALVERWERKING
Bied het verpakkingsmateriaal op
soort gescheiden als afval aan.
Informatie over de juiste afvalverwerking kunt u van uw plaatselijke afvalverwerkingsbedrijf of de milieudienst
krijgen.
Gooi elektrische apparaten niet
weg met het huisvuil!
Volgens de Europese Richtlijn
2002/96/EG over afgedankte elektrische en elektronische apparaten
alsmede de daaraan gerelateerde nationale wetgeving moeten gebruikte
elektrische apparaten gescheiden worden ingezameld en volgens de milieurichtlijnen worden gerecycled.
niet te stevig op om krassen op de
lenzen te voorkomen.
Om grotere vuildeeltjes te verwijderen maakt u het poetsdoekje nat met
een schoonmaakvloeistof voor brillen
en wrijft u daarmee de lenzen met
zachte druk af.
Bescherm het apparaat tegen stof
en vocht! Bewaar het in de meegeleverde tas of verpakking. De batterijen
dienen uit het apparaat te worden
verwijderd als het gedurende langere
tijd niet wordt gebruikt.
EU-Conformiteitsverklaring
Meade Instruments Europe
GmbH & Co. KG, gevestigd
te 46414 Rhede/Westf., Gutenbergstr. 2, Germany, verklaart dit
product conform aan de volgende
EG-richtlijnen:
EN 50022:2006
EN 55024:1998+A1:2001/A2:2003
EN 61000-3-2:2006
EN 61000-3-3:1995+A1:2001+A2:2005
Productbeschrijving:
Digitalmicro Bowl
Type / aanduiding:
44342
Rhede, 09-04-2009
Meade Instruments Europe GmbH &
Co. KG
Helmut Ebbert
Directeur
NL
Page 48

48
Dit zijn de onderdelen van je
microscoop
1 SD-geheugenkaartgleuf
2 LCD-monitor
3 Objectiefrevolver
4 LCD-module
5 USB-kabelaansluiting (mini)
6 Objectieens
7 Focusseerwiel
8 Objecttafel
9 Verlichting
10 Wisseltoets (ESC)
11 Monitor-controlelamp
12 Aan-/uit-schakelaar (hoofdscha-
kelaar)
13 Menu-toets (menu)
14 Opnametoets (snap)
15 Pijltjes- en OK-toetsen
16 Netadapterstekker
17 Apparaatstopcontact
De microscoop neerzetten en
aansluiten
1. Haal voorzichtig de microscoop en
de andere onderdelen uit de kar-
tonnen doos en zet ze op een tafel
of een ander vlak oppervlak.
2. Haal de stofkap van de microscoop.
3. Steek de kleine stekker (16) aan
het uiteinde van de netadapterkabel in het contact (17) aan de
achterkant van de microscoopvoet
(zie afb. 2).
4.
Steek de netstekker van de netadapter in een geschikt stopcontact.
Bediening van de microscoop
Eerste vereisten
Voordat je begint objecten of preparaten te bekijken, moet je het
LCD-beeldscherm en de verlichting
inschakelen en ook weten, hoe je
met de objecttafel omgaat. Dan kun
je beginnen met het onderzoek van
het allerkleinste.
LCD-module
Deze digitale microscoop is anders
dan de gebruikelijke microscopen:
de LCD-monitor vervangt de oculairen, waar je bij normale microscopen
doorheen kijkt. Zo kun je samen met
anderen objecten bestuderen en je
ervaringen delen. Als je met de microscoop begint te werken, zet je
de LCD-monitor aan door de aan/
uit-schakelaar in te drukken (zie afb.
3). Houdt de knop zolang ingedrukt,
tot het controlelampje oplicht. Als dit
lampje aan is, staat de LCD-monitor
aan. Dit is eigenlijk alles wat je moet
doen om de LCD-monitor op het microscoperen voor te bereiden. De
verschillende toetsen van de LCDmodule worden voornamelijk voor
beeldopnames (foto’s en video’s)
gebruikt en worden verderop in deze
handleiding behandeld.
Verlichting
De verlichting (afb. 1, nr. 9) is nodig
om de preparaten te kunnen bekijken, het licht valt dan van onderen
door een opening in de objecttafel en
schijnt door het preparaat heen.
Page 49

49
Preparaten van verschillende grootte,
dikte of kleur vragen om verschillende
lichtsterkten. Er zijn twee mogelijkheden om het licht tijdens de observatie
te wijzigen: Regeling van de helderheid met het regelwiel (zie boven in
afb. 1) of via het software-menu op
het beeldscherm. De EV-functie (EV
= exposure value for brightness, LW =
lichtwaarde bij opnames) verhoogt of
verlaagt de helderheid van het beeld
op de LCD-monitor, al naar gelang of
je de rechter of de linker pijltjestoets
(, ) ingedrukt houdt (afb. 3).
Als het preparaat dat je wilt bekijken
ondoorzichtig of donker van kleur is,
heb je over het algemeen meer licht
nodig om bepaalde kenmerken of details goed te kunnen zien. In dit soort
gevallen vergroot je het best de lichtintensiteit van de verlichting, doordat
je het wieltje om de helderheid mee
in te stellen helemaal open draait.
De optimale verlichting kun je vinden,
door met verschillende instellingen
te experimenteren, omdat elk object
om een iets andere belichting vraagt,
dit verandert bovendien weer met de
vergroting die je daarbij gebruikt.
Een object bekijken
1. Leg het preparaat in de preparaat-
houder. Houd het preparaat en de
preparaathouder daarbij evenwijdig aan elkaar (afb. 4).
2. Schuif de preparaathouder in de
richting van de pijl onder de klemmen van de objecttafel (afb. 5).
Richt de preparaathouder naar voren/naar achteren en naar links/
naar rechts uit, zodat het gedeelte
dat je preciezer wilt bekijken onder het objectief ligt.
3. Draai de objectieven (afb. 1, nr. 6)
met behulp van de objectiefrevolver (afb. 1, nr. 3) tot het objectief
met de 4x-vergroting direct boven
het preparaat staat. Begin altijd
met het objectief met de laagste
vergroting te microscoperen (4x
bij deze microscoop, waardoor
een totale vergroting van 25x
wordt bereikt) en werk dan naar
sterkere vergroting toe. Met het
4x-objectief krijg je het grootste
blikveld en de meest heldere af-
Afb. 5
Richting
Preparaathouder
Object
Afb. 4
NL
Page 50

50
beelding. Stel het beeld scherp
met behulp van de focusseerring
(afb. 1, nr. 7).
4. Met het 4x-objectief kun je de vergrotingsfactor trouwens variëren
tussen 25x en 200x door toepassing van de digitale zoom op de
LCD-module. Hiervoor gebruik je
de op en neer pijltjestoetsen (,
) van de LCD-module. Aan de
linker kant van het beeldscherm
verschijnt een cijfer, dat aangeeft
welke zoominstelling momenteel
actief is.
5. Voor sterkere vergrotingen zet je
de objectiefrevolver op de standen
van het 10x-objectief of het 40xobjectief (maximale vergroting).
Na het wisselen van objectief moet
het beeld opnieuw scherp worden
gesteld. Bij alle objectieven kun
je bovendien de totale vergroting
met de digitale zoom nog hoger
instellen.
Let op: Denk eraan om voordat je
van objectief wisselt, de objecttafel
met het focusseerwiel in de laagste
stand te zetten. Zo vermijd je dat de
revolver tegen het preparaat aanstoot. Let er bij grotere vergrotingen
ook steeds op dat je de objecttafel
met het focusseerwiel niet te hoog
naar de lens toebrengt, anders krijg
je misschien beschadigingen doordat het objectief tegen het preparaat
of het object stoot.
Digitale beelden
Eerste handelingen
Aanzetten
Houd de aan/uit-schakelaar (zie afb.
3) 1 à 2 seconden ingedrukt, als het
apparaat eerst uit stond. Het rode
monitor-controlelampje licht op en
het apparaat start op.
Uitzetten
Houd de aan/uit-schakelaar (zie afb.
3) 1 à 2 seconden ingedrukt, als het
apparaat aan staat. Het rode monitor-
controlelampje gaat nu uit en het apparaat sluit zichzelf af.
Instelling
Om de momentele apparaatinstelling
te wijzigen roep je het menu op door
op de menu-toets (menu) te drukken.
Druk op de pijltjestoetsen om een
bepaalde instelling te selecteren. Als
je de juiste instelling hebt gemaakt,
bevestig je je keuze door op de OKtoets te drukken.
Weergave op de LCD-monitor
Door één of meerdere keren op de
wisseltoets (Esc) te drukken, kom je
in verschillende bedrijfsmodi (functies). Deze worden hierna beschreven.
Page 51

51
Digitale foto-modus
1 Symbool voor de digitale foto-
modus
2 Symbool voor het ingebouwde ge-
heugen. Als je een SD-geheugenkaart hebt geplaatst, zie je hier het
symbool voor de SD-kaart staan.
3 Dit is het aantal plaatjes dat nog in
het geheugen kan worden opgenomen.
4 Resolutie van de afbeelding (aantal
beeldpunten oftewel pixels)
Digitale video-modus
1 Symbool voor de digitale video-
modus
2 Symbool voor het ingebouwde ge-
heugen. Als je een SD-geheugenkaart hebt geplaatst, zie je hier het
symbool voor de SD-kaart staan.
3 Filmtijd die nog in het geheugen
kan worden opgeslagen.
4 Resolutie van de afbeelding (aantal
beeldpunten oftewel pixels)
Zelfontspanner-modus
1 Symbool voor de zelfontspanner-
modus
2 Symbool voor het ingebouwde ge-
heugen. Als je een SD-geheugenkaart hebt geplaatst, zie je hier het
symbool voor de SD-kaart staan.
3 Dit is het aantal plaatjes dat nog in
het geheugen kan worden opgenomen.
4 Ingestelde herhalingstijd voor de
zelfontspanner.
5 Resterende tijd tot de volgende
opname.
Afb. 6
Afb. 7
Afb. 8
NL
Page 52

52
6 Resolutie van de afbeelding (aantal
beeldpunten oftewel pixels)
Foto- en lmarchief-modus
1 Preview van de foto of video.
2 Geselecteerd bestand (gele rand)
3 Naam van het geselecteerde be-
stand.
Instellingen
Instellingenmenu
Instelling van de beeldresolutie
• Druk in de digitale foto-, videoof zelfontspanner-modus op de
menu-toets (menu) om het instellingenmenu te openen.
• Selecteer met behulp van de pijltjestoetsen (, ) de optie “Resolutie” (Size). Druk ter bevestiging
op OK.
• Selecteer de resolutie met behulp
van de pijltjestoetsen (, ) (5M
= 2048×1536, 3M = 1600×1200,
2M = 1280×1024, 1.3M =
1024×768, VGA = 800×600 voor
foto’s; VGA = 800×600, QVGA =
640×480 voor video’s). Druk ter
bevestiging op OK.
De resolutie is afhankelijk van het
soort afbeelding dat je wenst. Hoe
hoger de resolutie, des te hoger de
beeldkwaliteit, maar des te groter
wordt ook het benodigde geheugen,
dus kun je minder opnames opslaan.
In de meeste situaties is het het best,
het beschikbare ash-geheugen met
een geschikte resolutie te gebruiken.
Zoals je hieronder kunt zien, heb je
voor de resolutie vijf opties (keuzemogelijkheden). Als je een betere
beeldkwaliteit wilt, neem dan een
hogere resolutie. Hoeveel opnames
je kunt opslaan, is afhankelijk van de
beschikbare geheugencapaciteit en
de gekozen resolutie:
Afb. 9
Afb. 10
Page 53

53
EV-instelling
• Druk in de digitale foto-, videoof zelfontspanner-modus op de
menu-toets (menu) om het instellingenmenu te openen.
• Selecteer met behulp van de pijltjestoetsen (, ) de optie “EV”.
Druk ter bevestiging op OK.
• Selecteer met de pijltjestoetsen
(, ) de optie gewenste EVwaarde (–2, –5/3, –4/3, –1, …
+2). Druk ter bevestiging op OK.
EV = –2 geeft een zeer donkere afbeelding , EV = +2 een zeer heldere.
Instelling van kleureffecten
• Druk in de digitale foto- of zelfontspanner-modus op de menu-toets
(menu) om het instellingenmenu te
openen.
• Selecteer met behulp van de
pijltjestoetsen (, ) de optie
“Kleur” (Color). Druk ter bevestiging op OK.
• Selecteer met de pijltjestoetsen
(, ) een van de kleureffecten
“Standard” (normaal kleurcontrast),
“Krachtig” (kleurenafbeelding met
krachtige kleuren), “Vergeeld”
(sepia kleuren) en “Eenkleurig”
(zwartwitfoto). Druk ter bevestiging
op OK.
Instellen van de bijschriften
Voor het normale beheer van de
afbeeldingen en de verwerking ervan beschikt het toestel over een
bijschriftfunctie (voor het tijdstip van
de opname). Stel eerst de datum en
de tijd in, voordat je deze functie gebruikt.
Resolutie Opslagruimte
64M 128M 256M 512M 1G
2048×1536 120 240 480 960 1920
1600×1200 17 0 340 680 1360 2720
1280×1024 230 460 920 1840 3680
1024×768 310 620 1240 2480 4960
800×600 430 860 17 20 3440 6880
Eenheid: stuks
NL
Page 54

54
• Druk in de digitale foto- of zelfontspanner-modus op de menu-toets
(menu) om het instellingenmenu te
openen.
• Selecteer met behulp van de pijltjestoetsen (, ) de optie “Tijdmarkering” (Timestamp). Druk ter
bevestiging op OK.
• Je kunt met de pijltjestoetsen (,
) kiezen tussen “Uit” (geen tijdmarkering), “Datum” (bijschrift met
het datum van de opname) en “Datum & tijd” (bijschrift met het datum
en de tijd van de opname). Druk ter
bevestiging op OK.
Instellen van de taal
• Druk in de digitale foto-, videoof zelfontspanner-modus op de
menu-toets (menu) om het instellingenmenu te openen.
• Selecteer met behulp van de pijltjestoetsen (eerst , dan , )
de optie “Taal” (Language). Druk
ter bevestiging op OK.
• Selecteer met de pijltjestoetsen
(, ) een van de beschikbare 9
talen. Druk ter bevestiging op OK.
Instellen van tijd en datum
• Druk in de digitale foto-, videoof zelfontspanner-modus op de
menu-toets (menu) om het instellingenmenu te openen.
• Selecteer met behulp van de pijltjestoetsen (eerst , dan , )
de optie “Datuminv.”. Druk ter bevestiging op OK, je komt nu in het
invoermenu.
• Selecteer met de links- en rechtspijltjestoetsen (, ) om welke
invoer het gaat (tijd, datum) en
voer de instelling in met behulp
van de op- en neer-pijltjestoetsen
(, ). Als je de juiste cijfers hebt
geselecteerd, druk je op OK ter
bevestiging.
Functies
Formateerfunctie
Dit toestel beschikt over een formateerfunctie.
• Druk in de digitale foto-, videoof zelfontspanner-modus op de
menu-toets (menu) om het instellingenmenu te openen.
• Selecteer met behulp van de pijltjestoetsen (eerst , dan , )
de optie “Format.”. Druk ter bevestiging op OK.
• Kies met de pijltjestoetsen (, )
voor “Annuleren” (geen formattering, je gaat terug naar het menu)
en “Uitvoer.” (formattering uitvoeren). Druk ter bevestiging op OK.
Let op: Na het formatteren zijn alle
gegevens gewist.
Page 55

55
Digitale foto-opnamemodus
Voordat je digitale foto’s opneemt,
dienen eerst bepaalde instellingen te
worden gedaan.
Nota bene: Het aantal foto’s dat kan
worden opgenomen, is proportioneel
afhankelijk van het vrije
ash-geheugen.
• Als je het apparaat aanzet, start het
altijd standaard op in de digitale
foto-modus.
• Druk op de opnametoets (Snap)
om een foto op te nemen.
Digitale video-opnamemodus
Voordat je digitale video’s opneemt,
dienen eerst bepaalde instellingen te
worden gedaan.
Nota bene: De lengte van de lm die
kan worden opgenomen, is proportioneel afhankelijk van het vrije
ash-geheugen.
• Druk op de wisseltoets (Esc) om in
de digitale video-modus te komen.
(Vanuit de digitale foto-modus druk
je één keer op de wisseltoets om
naar de digitale video-modus te
gaan.)
• Druk op de opnametoets (Snap)
om de lmopname te starten.
• Druk nog eens op de opnametoets
om de lmopname te beëindigen.
Zelfontspanner-opnamemodus
Voordat je zelfontspanner-opnames
maakt, dienen eerst bepaalde instellingen te worden gedaan.
• Gebruik de wisseltoets (Esc) om
in de zelfontspanner-modus te komen. (Vanuit de digitale foto-modus
druk je twee keer op de wisseltoets
om naar de zelfontspanner-modus
te gaan.)
• Druk op de OK-toets om een gele
cursor op te roepen. Selecteer met
de linker- en rechter-pijltjestoetsen
(, ) de herhalingstijd voor de
opname (uren : minuten : seconden) en wijzig de instelling met de
op- en neer-toetsen (, ). Druk
op OK om de invoer te bevestigen.
Afb. 11
Afb. 12
NL
Page 56

56
• Druk op de opnametoets (Snap)
om de opname van de foto‘s te
starten.
• Druk nog eens op de opnametoets
of op de wisseltoets (Esc) om de
opname te beëindigen.
• Bereik voor de herhalingstijd: 5 seconden tot 24 uur, in stappen van
5 seconden.
Instelling van de digitale zoom en
van de EV-waarde
Soms is de afbeelding van een detail
van het object te klein of is er te weinig licht, om het goed op de LCD-monitor te kunnen zien. Hierbij helpen
het instellen van de EV-waarde en
van de digitale zoom (elektronische
vergroting) je verder.
• Druk op de links- en rechts-pijltjestoetsen (◄, ◄) om de EV-waarde in
te stellen. Het bereik van de EVwaarde loopt van –2,0 tot +2,0.
• Druk op de op- en neer-pijltjestoetsen (◄, ◄) om de elektronische
vergrotingsfactor in te stellen. Het
bereik hiervan loopt van 1,00 tot
8,00.
Bekijken en wissen van digitale
foto’s of video’s
Bekijken van digitale foto’s of
video’s
• Gebruik de wisseltoets (Esc) om in
de foto- en lmarchiefmodus te komen. (Vanuit de digitale foto-modus
druk je drie keer op de wisseltoets
om naar de foto- en lmarchiefmodus te gaan.)
• Alle opgeslagen digitale foto’s en
lms (videosymbool: lmcamera)
wordt op het beeldscherm weergegeven. Met de pijltjestoetsen
(, ) kun je door de lijst heenbladeren, als er meer bestanden
zijn dan er op het scherm passen
(9 bestanden).
• Selecteer een digitale foto of video
met de pijltjestoetsen (, , ,
). De preview van een geselecteerd bestand krijgt een gele rand.
• Druk ter bevestiging op OK. Nu
vult de weergave het hele beeldscherm. (Door nog eens op OK te
drukken verlaat je deze weergave
weer.)
• Als je een digitale video wilt afspelen, selecteer het lmpje dan, druk
op de OK-toets en vervolgens op
de op-pijltjestoets (). Wanneer je
weer op de op-pijltjestoets drukt,
wordt het afspelen onderbroken.
• Als je naar een digitale foto kijkt,
kun je de afbeelding door het
indrukken van de op- en neer-
Afb. 13
Page 57

57
pijltjestoetsen (, ) vergroten of
verkleinen.
• Druk op de wisseltoets (Esc) om
van de foto- en marchiefmodus
terug te gaan naar de digitale fotomodus.
Beveiliging van bestanden
Om de opgeslagen bestanden te beschermen tegen onbedoeld wissen,
heeft het toestel een beveiligingsfunctie.
• Gebruik de wisseltoets (Esc) om in
de foto- en lmarchiefmodus te komen. (Vanuit de digitale foto-modus
druk je drie keer op de wisseltoets
om naar de foto- en lmarchiefmodus te gaan.)
• Druk op de menu-toets (menu) om
het geheugenmenu te openen.
• Selecteer met behulp van de pijltjestoetsen (, ) de optie “Beveiliging”. Druk ter bevestiging op
OK.
• Selecteer met de pijltjestoetsen
(, ) een van de opties “Enkel”,
“Alle” en “Pagina”. Druk ter bevestiging op OK.
• Selecteer met behulp van de pijltjestoetsen (, ) de optie “Set”.
Druk ter bevestiging op OK.
Enkel: Alleen het geel gemarkeerde
bestand is nu beveiligd.
Alle: De opgeslagen bestanden zijn
nu beveiligd.
Pagina: Selecteer met de pijltjestoetsen (, , , ) bepaalde bestanden (die dan steeds een gele rand
krijgen). En druk op OK om het geselecteerde bestand te beveiligen.
De beveiligde bestanden krijgen een
hangslot-symbool. De beveiliging kan
met “Annuleren” en OK worden opgeheven voor geselecteerde enkele
bestanden (in Beveiliging / Enkel) of
voor alle bestanden (in Beveiliging /
Alle).
Bestanden wissen
• Gebruik de wisseltoets (Esc) om in
de foto- en lmarchiefmodus te komen. (Vanuit de digitale foto-modus
druk je drie keer op de wisseltoets
om naar de foto- en lmarchiefmodus te gaan.)
• Druk op de menu-toets (menu) om
het geheugenmenu te openen.
• Selecteer met de pijltjestoetsen
(, ) de optie “Wissen”. Druk
ter bevestiging op OK.
• Kies met de pijltjestoetsen (, )
voor “Enkel” of “Alle”. Druk ter bevestiging op OK.
Enkel: Alleen het geel gemarkeerde
bestand wordt nu gewist.
Alle: Alle opgeslagen bestanden
worden nu gewist.
NL
Page 58

58
Het gebruik van een
SD-geheugenkaart
Hoe ga je met de
SD-geheugenkaart om
• Zolang je geen SD-kaart hebt geplaatst, worden de bestanden in
het interne ash-geheugen opgeslagen.
• Als je een SD-kaart in de gleuf
steekt, doe het dan zo, dat de contacten naar je toe wijzen. Schuif de
kaart er niet snel en met geweld in;
dat kan de SD-kaart beschadigen.
• De LCD-monitor toont het SDkaartsymbool. De beschikbare
hoeveelheid geheugen op de kaart
verschijnt rechtsonder in ieder
scherm.
• De digitale microscoop dient uit te
staan, voordat je de kaart er weer
uit haalt.
Bestanden naar de
SD-geheugenkaart kopiëren
• Gebruik de wisseltoets (Esc) om in
de foto- en lmarchiefmodus te komen. (Vanuit de digitale foto-modus
druk je drie keer op de wisseltoets
om naar de foto- en lmarchiefmodus te gaan.)
• Druk op de menu-toets (menu) om
het geheugenmenu te openen.
• Selecteer met de pijltjestoetsen
(, ) de optie “Kopie>kaart”.
(Als er geen SD-kaart in het apparaat zit, is deze functie niet actief
en wordt alleen in grijs weergegeven.) Druk ter bevestiging op OK.
• Kies met de pijltjestoetsen (, )
tussen “Annuleren” (niet kopiëren)
en “Uitvoer.” (bestanden kopiëren).
Druk ter bevestiging op OK.
• Het duurt even voordat de bestanden zijn overgezet (“Even geduld”).
Verbinding tussen de microscoop
en de PC
Gebruik de USB-kabel om je PC met
de microscoop te verbinden.
Als de verbinding goed werkt, herkent de PC de nieuwe hardware
vanzelf. Het controlelampje van de
microscoop licht op, maar de digitale
camera blijft uit. Open op de PC de
map van de microscoop, bekijk de
in het ash-geheugen opgeslagen
opnames en kopieer ze naar de PC,
van waaruit je met ze verder kunt
werken.
Let op: Trek de USB-kabel niet tijdens de gegevensoverdracht uit de
PC of de microscoop, anders gaan
de bestanden verloren.
Page 59

59
Tabel met specicaties
Toebehoren Specicaties
Microscooptafel mechanische objecttafel (2” x 2”)
Digitale camera 2M CMOS (met 1600x1200 pixels; vergroting ca. 6,3x in
plaats van een oculair)
LCD-monitor Plat digitaal hogeresolutie dunne-lm-transistor beeldscherm
(„TFT-monitor“): Diagonale beeldschermgrootte 2”; resolutie
320x240 pixels; contrastverhouding 300; kan ca. 262000
kleuren weergeven; luminantie 400 cd/m
2
), 8x digitale zoom
(elektronische beeldvergroting)
Scherpinstelling traploos focusseerwiel (grof)
Objectieven achromatische 4x, 10x en 40x
Intern ash-geheugen 32 MB
USB-kabel USB 2.0 mini
Objectiefrevolver drievoudig met kliksysteem
Verlichting
geïntegreerde elektrische verlichting: Lichtdiode (6 V, 6 W)
Condensor N.A. 0,65
Netadapter Universeel (ingang: 100 tot 240 V, 50 of 60 Hz)
Gewicht, afmetingen 519 g; 162 mm x 155 mm x 215 mm
NL
Page 60

60
PERICOLO per i bambini!
Nell’utilizzo del presente ap-
parecchio si ricorre spesso
all‘uso di strumenti ausiliari appuntiti
o dotati di spigoli taglienti. Conservare quindi l’apparecchio, gli accessori
e gli strumenti ausiliari in un luogo
inaccessibile ai bambini. PERICOLO
DI LESIONI!
Non lasciare mai incustoditi i bambini
quando usano l’apparecchio. Tenere i materiali di imballaggio (buste di
plastica, elastici, ecc.) lontano dalla
portata dei bambini! PERICOLO DI
SOFFOCAMENTO!
Le sostanze chimiche ed i liquidi in
dotazione non devono essere lasciati
in mano ai bambini! Non bere le sostanze chimiche! Dopo l‘uso lavare
accuratamente le mani risciacquandole abbondantemente con acqua
corrente. In caso di contatto accidentale con occhi o bocca risciacquare
abbondantemente con acqua. In caso
di disturbi a seguito del contatto con le
sostanze consultare immediatamente
un medico e mostrargli le sostanze.
Il presente apparecchio contiene
parti elettroniche che funzionano
con l’apporto di energia da sorgenti
elettriche (alimentatore e/o batteria). Non lasciare i bambini incustoditi mentre utilizzano l’apparecchio!
L’utilizzo dell‘apparecchio è consentito esclusivamente nel rispetto delle
istruzioni per l’uso fornite. In caso
contrario sussiste il RISCHIO di SCA-
RICHE ELETTRICHE!
PERICOLO DI INNESCO DI
INCENDI/ESPLOSIONE
Non esporre l‘apparecchio a
temperature elevate. Utilizzare
esclusivamente l’alimentatore in dotazione o le batterie consigliate. Non
cortocircuitare l’apparecchio e/o le
batterie e non metterli a contatto con
amme! L’esposizione a temperature
eccessive o un uso improprio dell‘ap-
parecchio può provocare cortocircuiti, incendi e addirittura esplosioni!
PERICOLO per danni a cose!
Non smontare l’apparecchio! In caso
di difetti all’apparecchio rivol-
gersi al rivenditore specializzato. Il rivenditore si metterà in contatto
con il servizio di assistenza clienti ed
eventualmente manderà l‘apparecchio in riparazione.
Non esporre l‘apparecchio a temperature superiori ai 60°C!
AVVERTENZE per la pulizia
Per pulire l’apparecchio,
scollegarlo dalla sorgente di
energia elettrica (scollegare
l’alimentatore oppure rimuovere le
batterie)!
Pulire l’apparecchio solo esternamente con un panno asciutto. Non
utilizzare liquido detergente per
Page 61

61
IT
informazioni sul corretto smaltimento, si prega di rivolgersi all‘azienda
municipale che si occupa dello smaltimento dei riuti o all’ufcio pubblico
competente.
Non gettare apparecchi elettrici
nei comuni riuti domestici!
Secondo la direttiva europea
2002/96/CE sulle apparecchiature
elettriche ed elettroniche e ai sensi
della legge nazionale che la recepisce, gli apparecchi elettrici devono
essere differenziati e smaltiti separatamente per poter essere trattati e
riciclati nel rispetto dell’ambiente.
evitare che i componenti elettronici
dell’apparecchio si danneggino.
Pulire le lenti (oculare e/o obiettivo)
solo con l‘apposito panno in dotazione oppure con un altro panno morbido che non lasci peli (per es. in microbra). Non premere con il panno
sulle lenti per evitare che si grafno.
Per rimuovere i residui di sporco più
ostinati inumidire il panno con un liquido detergente per occhiali e pulire le lenti esercitando solo una lieve
pressione.
Proteggere l’apparecchio da polvere
e umidità! Conservarlo nella custodia
in dotazione o nella confezione originale. Laddove l’apparecchio resti
inutilizzato per un periodo di tempo
prolungato, rimuovere le batterie.
SMALTIMENTO
Smaltire i materiali di imballaggio dopo averli suddivisi. Per
Dichiarazione di conformità CE
La Meade Instruments Euro-
pe GmbH & Co. KG, avente
sede a 46414 Rhede/Westf., Gutenbergstr. 2, Germania, dichiara che
il presente prodotto è conforme alle
seguenti direttive CE:
EN 50022:2006
EN 55024:1998+A1:2001/A2:2003
EN 61000-3-2:2006
EN 61000-3-3:1995+A1:2001+A2:2005
Descrizione del prodotto:
Digitalmicro Bowl
Modello / Descrizione:
44342
Rhede, 09-04-2009
Meade Instruments Europe GmbH &
Co. KG
Helmut Ebbert
Direttore amministrativo
Page 62

62
Il tuo microscopio è composto da
queste parti:
1 Fessura per schede SD
2 Monitor LCD
3 Revolver portaobiettivi
4 Modulo LCD
5 Presa per cavo USB (mini)
6 Lente dell’obiettivo
7 Ruota di messa a fuoco
8 Tavolino portaoggetti
9 Illuminazione
10 Tasto di uscita (Esc)
11 Spia luminosa del monitor
12 Interruttore acceso/spento (inter-
ruttore principale)
13 Tasto menu (Menu)
14 Tasto di acquisizione delle imma-
gini (Snap)
15 Tasti a freccia e tasto OK
16 Connettore dell’alimentatore
17 Presa dell’apparecchio
Montaggio del microscopio
1. Estrai con cautela il microscopio e
gli altri componenti dalla confezio-
ne e appoggiali su un tavolo oppure su un’altra supercie piana.
2. Rimuovi il rivestimento antipolvere
dal microscopio.
3. Inserisci il connettore piccolo (16)
del cavo di alimentazione nella
presa (17) situata sul retro della
base del microscopio (vedi g. 2).
4. Inserisci il connettore per il collegamento alla rete di alimentazione
in una presa idonea.
Uso del microscopio
Premesse di base
Prima di poter osservare oggetti o
preparati al microscopio, devi accendere lo schermo LCD e l‘illuminazione e devi anche sapere come si utilizza il tavolino portaoggetti. Una volta
soddisfatte queste premesse, puoi
cominciare le tue osservazioni.
Modulo LCD
Questo microscopio digitale è diverso dai microscopi tradizionali: il
monitor LCD sostituisce gli oculari
che sono invece di solito presenti nei
comuni microscopi per poter osservare. Lo schermo ti consente di condividere le tue osservazioni con altre
persone. Per cominciare le tue osservazioni al microscopio devi prima
accendere il monitor LCD premendo
l‘interruttore acceso/spento (vedi g.
3). Tieni premuto il tasto nché non la
spia luminosa rossa non si accenderà, indicando così che il monitor LCD
è attivo. In generale, questo è tutto
quello che devi fare per preparare il
monitor LCD prima di osservare al microscopio. I diversi tasti del modulo
LCD servono fondamentalmente per
catturare le immagini (fotograe e lmati) e saranno illustrati in un secondo tempo in questo manuale.
Illuminazione
L’illuminazione (g. 1, n. 9) è necessaria per osservare i preparati: la luce
proviene dal basso, passa attraverso
Page 63

63
la fessura nel tavolino portaoggetti e
attraversa il preparato.
A seconda delle dimensioni, dello
spessore e delle variazioni cromatiche dei preparati l’intensità dell’illuminazione deve essere regolata. Ci
sono due possibilità per regolare la
luminosità durante l‘osservazione:
puoi regolare la luminosità con la ruota di regolazione (vedi in alto la g. 1)
oppure modicarla con la funzione
EV del monitor LCD. La funzione EV
(EV = exposure value for brightness,
valore di esposizione o di intensità
luminosa) aumenta o diminuisce la
luminosità dell’immagine sul monitor
LCD quando premi il tasto a freccia
destro o sinistro (, ) (g. 3).
Se i preparati osservati sono opachi
oppure se sono di colore scuro, in
genere hai bisogno di più luce per
poterne rendere visibili certe caratteristiche o dettagli. In questo caso
aumenta l’intensità luminosa dell’illu-
minazione girando la ruota di regolazione della luminosità no a posizionarla sul massimo livello.
Puoi trovare l’illuminazione ottimale
provando a regolare diversi livelli.
Ogni oggetto richiede un‘illuminazione diversa e addirittura lo stesso oggetto richiede illuminazioni diverse a
seconda dei diversi ingrandimenti.
Osservazione di un oggetto
1. Sistema il preparato nel portapre-
parati. Tieni il preparato e il portapreparati in parallelo (g. 4).
2. Seguendo la direzione della frec-
cia, inserisci il portapreparati sotto le
clip di ssaggio del tavolino portaog-
getti (g. 5). Sposta il portapreparati
avanti/indietro e a destra/a sinistra
in modo tale la porzione di preparato
che desideri osservare si venga a trovare esattamente sotto l’obiettivo.
3. Con l’aiuto del revolver portaobiettivi (g. 1, n. 3) gira le lenti degli
obiettivi (g. 1, n. 6) nché l’obiettivo 4x non si troverà direttamente
sopra al preparato. Inizia sempre
le tue osservazioni al microscopio
con l’obiettivo che ha il potere di
ingrandimento minore (4x nel
caso di questo microscopio, con
un ingrandimento complessivo di
IT
Fig. 5
Senso
Portapreparati
Oggetto
Fig. 4
Page 64

64
25x) e aumenta progressivamente l’ingrandimento. Con l’obiettivo
4x hai il campo visivo più ampio e
l’immagine più luminosa. Metti a
fuoco l’immagine con la ruota di
regolazione della messa a fuoco
(g. 1, n. 7).
4. Quando usi l’obiettivo 4x puoi variare l‘ingrandimento da 25x a 200x
con lo zoom digitale del modulo
LCD. Per regolare lo zoom usa i
tasti a freccia su e giù (◄, ◄). Nella
parte sinistra dello schermo viene
visualizzata la regolazione dello
zoom attualmente selezionata.
5. Per ottenere ingrandimenti ancora maggiori devi girare il revolver
portaobiettivi sull’obiettivo 10x o
sull’obiettivo 40x (ingrandimento
massimo). Quando cambi l’obiettivo devi sempre regolare di nuovo
la messa a fuoco. Indipendentemente dall’obiettivo che utilizzi
puoi aumentare l’ingrandimento
complessivo con lo zoom digitale.
Attenzione! Prima di cambiare obiettivo abbassa il tavolino portaoggetti
per mezzo della ruota della messa
a fuoco e portalo nella posizione più
bassa. In questo modo potrai girare
il revolver portaobiettivi senza che la
lente dell’obiettivo vada a sbattere. Sii
cauto anche con gli ingrandimenti più
elevati: se porti il tavolino portaoggetti troppo vicino alla lente dell’obiettivo
l’obiettivo potrebbe sbattere contro il
preparato o l‘oggetto che stai osservando e rovinarsi.
Immagini digitali
Operazioni di base
Accensione
Tieni premuto l’interruttore acceso/
spento (vedi g. 3) per 1-2 secondi
se l’apparecchio era stato spento in
precedenza. La spia luminosa di colore rosso si illumina e l’apparecchio
si avvia.
Spegnimento
Tieni premuto l’interruttore acceso/
spento (vedi g. 3) per 1-2 secondi
se l’apparecchio è acceso. La spia
luminosa di colore rosso si spegne e
l’apparecchio si spegne.
Regolazione
Per modicare le regolazioni impostate sull‘apparecchio richiama il menu
premendo il tasto menu (Menu). Premi i tasti a freccia per selezionare la
regolazione che intendi modicare.
Dopo aver modicato la regolazione,
premi il tasto OK per confermare.
Indicazioni sul monitor LCD
Premendo una o più volte il tasto di
uscita (Esc) puoi accedere a diverse
modalità di funzionamento. Qui di seguito ne troverai una descrizione:
Page 65

65
Modalità fotograa digitale
1 Simbolo della modalità fotograa
digitale
2 Simbolo della memoria installa-
ta Se hai inserito una scheda SD
nell‘apposita fessura, invece di
questo simbolo compare il simbolo
della scheda SD.
3 Numero delle foto che possono es-
sere ancora memorizzate
4 Risoluzione dell’immagine (numero
di pixel)
Modalità video digitale
1 Simbolo della modalità video digi-
tale
2 Simbolo della memoria installa-
ta Se hai inserito una scheda SD
nell‘apposita fessura, invece di
questo simbolo compare il simbolo
della scheda SD.
3 Durata del lmato che si può anco-
ra registrare
4 Risoluzione dell’immagine (numero
di pixel)
Modalità di autoscatto
1
Simbolo della modalità di autoscatto
2 Simbolo della memoria installata Se
hai inserito una scheda SD nell‘apposita fessura, invece di questo
simbolo compare il simbolo della
scheda SD.
3 Numero delle foto che possono es-
sere ancora memorizzate
4 Intervallo di ripetizione impostato per
l‘autoscatto
5 Durata di funzionamento dell’
autoscatto
6 Risoluzione dell’immagine (numero
di pixel)
IT
Fig. 6
Fig. 7
Fig. 8
Page 66

66
Modalità directory
1 Anteprima della foto o del lmato
2 Dati selezionati (cornice gialla)
3 Nome dei dati attualmente selezio-
nati
Impostazioni
Menu impostazioni
Impostazione della risoluzione
dell’immagine
• Per accedere al menu impostazioni
premi il tasto menu (Menu) in modalità fotograa digitale, video digitale
o di autoscatto.
• Con i tasti a freccia (, ) seleziona l’opzione “Risoluzione”. Premi il
tasto OK per confermare.
• Con i tasti a freccia (, ) seleziona la risoluzione che vuoi im-
postare (5M = 2048×1536, 3M =
1600×1200, 2M = 1280×1024,
1.3M = 1024×768, VGA = 800×600
per le foto; VGA = 800×600, QVGA
= 640×480 per i lmati). Premi il tasto OK per confermare.
La risoluzione giusta dipende dal tipo
di immagine che vuoi ottenere. Quanto
maggiore è la risoluzione, tanto migliore è la qualità dell’immagine, ma tanto
maggiore è anche la memoria necessaria per salvare l’immagine. Per sfruttare al meglio la memoria ash disponibile ti consigliamo di non impostare
la risoluzione più alta, ma di scegliere
una buona risoluzione alternativa.
Nella tabella che segue sono riportate
cinque opzioni per la risoluzione (possibilità di selezione). Se la risoluzione
che hai impostato non è sufciente,
selezionane una maggiore. A seconda
della risoluzione che selezioni varia il
numero di immagini e lmati che puoi
memorizzare.
Fig. 9
Fig. 10
Page 67

67
Regolazione EV
• Per accedere al menu impostazioni
premi il tasto menu (Menu) in modalità fotograa digitale, video digitale o di autoscatto.
• Con i tasti a freccia (, ) selezio-
na l’opzione “EV”. Premi il tasto OK
per confermare.
• Con i tasti a freccia (, ) seleziona il valore EV che desideri impostare (–2, –5/3, –4/3, –1, … +2).
Premi il tasto OK per confermare.
EV = –2 l’immagine è molto buia, EV
= +2 l’immagine è molto luminosa.
Impostazione degli effetti
cromatici
• Per accedere al menu impostazioni premi il tasto menu (Menu)
in modalità fotograa digitale o di
autoscatto.
• Con i tasti a freccia (, ) selezio-
na l’opzione “Colore”. Premi il tasto
OK per confermare.
• Con i tasti a freccia (, ) seleziona l‘effetto cromatico che vuoi
impostare, scegliendolo tra le opzioni “Standard” normale immagine
a colori), “Forte” (l’immagine ha dei
colori molto intensi e accesi), “In-
giallito” (l’immagine è a toni color
seppia) e “Monocromo” (immagine
in bianco e nero) Premi il tasto OK
per confermare.
Impostazione della funzione di
iscrizione
Per gestire le immagini e per l’elaborazione dei dati, l’apparecchio è dotato della funzione di iscrizione delle
immagini (giorno e orario dell’acquisizione dell’immagine). Prima di usare
questa funzione devi impostare la
data e l‘ora.
IT
Risoluzione Memoria
64M 128M 256M 512M 1G
2048×1536 120 240 480 960 1920
1600×1200 17 0 340 680 1360 2720
1280×1024 230 460 920 1840 3680
1024×768 310 620 1240 2480 4960
800×600 430 860 17 20 3440 6880
Unità: pezzo
Page 68

68
• Per accedere al menu impostazioni premi il tasto menu (Menu)
in modalità fotograa digitale o di
autoscatto.
• Con i tasti a freccia (, ) seleziona l’opzione “Indicazione data/ora”.
Premi il tasto OK per confermare.
• Con i tasti a freccia (, ) selezio-
na l‘opzione che desideri impostare, scegliendo tra “Off” (nessuna
indicazione di data e ora), “Data”
(l’immagine viene corredata con
la data in cui è stata acquisita) e
“Data e ora” (l’immagine viene corredata con la data e l’ora in cui è
stata acquisita). Premi il tasto OK
per confermare.
Impostazione della lingua
• Per accedere al menu impostazioni
premi il tasto menu (Menu) in modalità fotograa digitale, video digitale o di autoscatto.
• Con i tasti a freccia (prima , poi
, ) seleziona l’opzione “Lingua”.
Premi il tasto OK per confermare.
• Con i tasti a freccia (, ) selezio-
na la lingua che desideri impostare
tra le 9 disponibili. Premi il tasto
OK per confermare.
Impostazione dell’ora e della data
• Per accedere al menu impostazioni
premi il tasto menu (Menu) in modalità fotograa digitale, video digitale o di autoscatto.
• Con i tasti a freccia (prima , poi ,
) seleziona l’opzione “Imp. data”.
Premi il tasto OK per confermare e
accedi al menu di immissione.
• Con i tasti a freccia sinistra e destra
(, ) seleziona la voce che vuoi
impostare (ora, data) e impostala
con i tasti a freccia su e giù (,
). Dopo l‘immissione premi il tasto OK per confermare.
Funzioni
Funzione di formattazione
Questo apparecchio è dotato di una
funzione di formattazione.
• Per accedere al menu impostazioni
premi il tasto menu (Menu) in modalità fotograa digitale, video digitale o di autoscatto.
• Con i tasti a freccia (prima
, poi
,
) seleziona l’opzione “Formato”. Premi il tasto OK per confermare.
• Con i tasti a freccia (, ) seleziona l‘opzione “Annulla” (nessuna
formattazione, ritorno al menu)
oppure “Esegui” (esecuzione della
formattazione). Premi il tasto OK
per confermare.
Attenzione! Quando si esegue la
formattazione tutti i dati vengono
cancellati.
Funzione di scatto di foto digitali
Prima di scattare le tue foto digitali
esegui tutte le necessarie impostazioni.
Attenzione! il numero di fotograe
che puoi scattare è proporzionale
alla memoria ash libera.
Page 69

69
• Quando l‘apparecchio si accende è in modalità fotograa digitale
(modalità standard).
• Premi il tasto di acquisizione delle
immagini (Snap) per scattare una
foto.
Funzione di registrazione di video
digitali
Prima di registrare i tuoi video digitali
esegui tutte le necessarie impostazioni.
Attenzione! La durata del lmato che
si può registrare è proporzionale alla
memoria ash libera.
• Premi il tasto di uscita (Esc) per accedere alla modalità video digitale.
(Dalla modalità fotograa digitale
devi premere il tasto di uscita una
volta sola per aprire la modalità video digitale.)
• Premi il tasto di acquisizione delle
immagini (Snap) per avviare la registrazione.
• Premi ancora una volta il tasto di
acquisizione delle immagini per
terminare la registrazione.
Funzione di autoscatto
Prima di utilizzare l’autoscatto esegui
tutte le necessarie impostazioni nella
modalità di autoscatto:
• Premi il tasto di uscita (Esc) per accedere alla modalità di autoscatto.
(Dalla modalità fotograa devi premere il tasto di uscita due volte per
aprire la modalità di autoscatto.)
• Premi il tasto OK per richiamare il
cursore giallo.
• Con i tasti a freccia destra e sinistra (, ) seleziona l’intervallo di
ripetizione per l’acquisizione delle
immagini (ora : minuti : secondi) e
con i tasti su e giù (, ) effettua
l’impostazione. Dopo l‘immissione
premi OK per confermare.
• Premi il tasto di acquisizione delle immagini (Snap) per scattare le
foto.
• Per terminare gli scatti premi ancora il tasto di acquisizione delle
immagini oppure il tasto di uscita
(Esc).
• Campo di impostazione dell’intervallo di ripetizione: da 5 secondi a
24 ore, in passi di 5 secondi l’uno.
IT
Fig. 11
Fig. 12
Page 70

70
Impostazione dello zoom digitale
e del valore EV
A volte la visualizzazione del dettaglio
di un oggetto è troppo piccola oppure l‘illuminazione non è sufciente per
visualizzare l’immagine sul monitor
LCD in maniera soddisfacente. In tali
casi si devono modicare le impostazioni del valore EV e dello zoom digitale (ingrandimento elettronico):
• Premi i tasti a freccia destra e sinistra (, ) per impostare il valore
EV. I valori EV selezionabili vanno
da –2,0 a +2,0.
• Premi i tasti a freccia su e giù (,
) per impostare il fattore di ingrandimento elettronico. I valori selezionabili vanno da 1,00 a 8,00.
Visualizzazione e cancellazione
di foto e video digitali
Visualizzazione di foto e video
digitali
• Premi il tasto di uscita (Esc) per
accedere alla modalità directory.
(Dalla modalità fotograa digitale
devi premere il tasto di uscita tre
volte per aprire la modalità directory.)
• Sullo schermo vengono visualizzate
tutte le foto digitali e tutti i video digitali (simbolo video: videocamera)
memorizzati. Con i tasti a freccia
(, ) puoi navigare l’elenco se il
numero di dati supera quello visualizzabile sullo schermo (9 dati).
• Con i tasti a freccia (, , ,
) seleziona una foto o un lmato
digitale. L’anteprima del dato selezionato è contrassegnata con una
cornice gialla.
• Premi il tasto OK per confermare.
In questo modo ritorni alla visualizzazione a pieno schermo. (Premendo ancora una volta il tasto OK
puoi uscire dalla visualizzazione a
pieno schermo.)
• Se vuoi riprodurre un video digitale, seleziona il lmato e premi il tasto OK e successivamente il tasto
a freccia su (). Se premi nuovamente questo tasto la riproduzione
del video si interrompe.
• Quando guardi una foto digitale
la puoi ingrandire o rimpicciolire
premendo i tasti a freccia su e giù
(, ).
• Premi il tasto di uscita (Esc) per
tornare dalla modalità directory alla
modalità fotograa digitale.
Fig. 13
Page 71

71
Protezione dei dati
Per proteggere i dati memorizzati in
modo tale da non cancellarli inavvertitamente l’apparecchio è dotato di
una funzione di protezione.
• Premi il tasto di uscita (Esc) per
accedere alla modalità directory.
(Dalla modalità fotograa digitale
devi premere il tasto di uscita tre
volte per aprire la modalità directory.)
• Premi il tasto menu (Menu) per
aprire il menu della memoria.
• Con i tasti a freccia (, ) seleziona l’opzione “Proteggi”. Premi il
tasto OK per confermare.
• Con i tasti a freccia (, ) seleziona l’opzione “Uno”, “Tutti” oppure “Pagina”. Premi il tasto OK per
confermare.
• Con i tasti a freccia (, ) seleziona l’opzione “Set”. Premi il tasto
OK per confermare.
Uno: viene protetto solo il dato contrassegnato con la cornice gialla.
Tutti: vengono protetti tutti i dati memorizzati.
Pagina: con i tasti a freccia (, ,
, ) seleziona i dati (contrasse-
gnati ciascuno con la cornice gialla). Premi OK per proteggere il dato
selezionato.
I dati protetti sono visualizzati con il
simbolo di una serratura. Per annullare la protezione premi “Annulla” e
OK per singoli dati (in “Proteggi” /
“Uno”) oppure per tutti (in “Proteggi”
/ “Tutti”).
Cancellazione di dati
• Premi il tasto di uscita (Esc) per
accedere alla modalità directory.
(Dalla modalità fotograa digitale
devi premere il tasto di uscita tre
volte per aprire la modalità directory.)
• Premi il tasto menu (Menu) per
aprire il menu della memoria.
• Con i tasti a freccia (, ) seleziona l’opzione “Cancella”. Premi il
tasto OK per confermare.
• Con i tasti a freccia (, ) selezio-
na l’opzione “Uno” oppure “Tutti”.
Premi il tasto OK per confermare.
Uno: viene cancellato solo il dato
contrassegnato con la cornice gialla.
Tutti: vengono cancellati tutti i dati
memorizzati.
Inserimento della scheda SD
Utilizzo della scheda di memoria
SD
• Se non hai inserito nessuna scheda SD i dati vengono memorizzati
nella memoria ash interna.
• Quando inserisci la scheda SD i
contatti della scheda devono essere rivolti verso di te. Non forzare
la scheda quando la inserisci nella
fessura, altrimenti si potrebbe danneggiare.
IT
Page 72

72
• Il monitor LCD visualizza il simbolo della scheda SD. La memoria
disponibile sulla scheda è visualizzata in basso a destra sullo schermo.
• Prima di estrarre la scheda devi
spegnere il microscopio digitale.
Copia di dati sulla scheda di
memoria SD
• Premi il tasto di uscita (Esc) per accedere alla modalità directory. (Dalla modalità fotograa digitale devi
premere il tasto di uscita tre volte
per aprire la modalità directory.)
• Premi il tasto menu (Menu) per
aprire il menu della memoria.
• Con i tasti a freccia (, ) selezio-
na l’opzione “Copia>Scheda”. (Se
non hai inserito nessuna scheda
questa funzione non è disponibile
ed è indicata nel menu con una
scritta di colore grigio.) Premi il tasto OK per confermare.
• Con i tasti a freccia (, ) selezio-
na l’opzione “Annulla” (non viene
seguita alcuna copia) oppure “Esegui” (i dati vengono copiati). Premi
il tasto OK per confermare.
• Per trasferire i dati sulla scheda
devi attendere qualche istante (“Attendere prego”).
Collegamento del microscopio
al PC
Per collegare il microscopio al PC
utilizza il cavo USB.
Se la connessione è stata creata con
successo, il PC riconosce da sé il
nuovo hardware. La spia di controllo
di colore rosso del microscopio si
illumina, ma la camera digitale resta
spenta. Nel PC apri la cartella del
supporto dati esterno, visualizza i dati
contenuti nella memoria ash e copiali sul computer con il quale potrai
ulteriormente elaborare le immagini.
Attenzione! non scollegare il cavo
USB durante la trasmissione dei dati,
altrimenti andranno persi.
Page 73

73
Tabella delle speciche tecniche
Dotazione Speciche
Tavolino portaoggetti Piatto portaoggetti meccanico (2” x 2”)
Camera digitale 2M CMOS (1600x1200 pixel; ingrandimento circa 6,3x al
posto dell‘oculare)
Monitor LCD Schermo a transistor a lm sottile (display TFT) digitale ad alta
risoluzione: diagonale 2”; risoluzione 320x240 pixel; contrasto 300; circa 262000 colori; luminanza 400 cd/m
2
), zoom
digitale 8x (ingrandimento elettronico dell’immagine)
Messa a fuoco Ruota di messa a fuoco con regolazione continua
(approssimativa)
Obiettivi Acromatici, 4x, 10x e 40x
Memoria ash interna 32 MB
Cavo USB USB 2.0 mini
Revolver portaobiettivi Triplo con scatto in posizione
Illuminazione Illuminazione elettrica integrata; diodo luminoso (6 V, 6 W)
Condensatore N.A. 0,65
Adattatore di alimentazione Universale (ingresso: da 100 a 240 V, 50 oppure 60 Hz)
Peso, dimensioni 519 g; 162 mm x 155 mm x 215 mm
IT
Page 74

74
¡PELIGRO para su hijo!
A menudo, para trabajar con
este aparato es necesario utilizar instrumentos cortantes o puntiagudos. Por consiguiente, guarde este
aparato junto con todos sus accesorios e instrumentos en un lugar que
esté fuera del alcance de los niños.
¡Existe PELIGRO DE PROVOCARSE
HERIDAS!
Los niños sólo deben utilizar el aparato bajo la supervisión de un adulto.
¡Mantener fuera del alcance de los
niños los materiales de embalaje (bolsas de plástico, cintas de goma, etc.)!
¡Existe PELIGRO DE ASFIXIA!
¡Los productos químicos y los líquidos
suministrados no deben llegar a manos de los niños! ¡No beber productos
químicos! Después de usarlo, limpiar
cuidadosamente las manos con agua
corriente. Si se produce un contacto
fortuito con los ojos o la boca, enjuagar con agua. En caso de molestias,
recurrir inmediatamente a un médico y
mostrarle las sustancias.
Este aparato incluye componentes
electrónicos operados a través de
una fuente de electricidad (equipo
de alimentación y/o pilas). ¡No deje
que los niños manejen nunca el
aparato sin su supervisión! ¡Sólo se
puede utilizar tal como se indica en el
manual de instrucciones, ya que en
caso contrario existe PELIGRO de
una DESCARGA ELÉCTRICA!
¡PELIGRO DE INCENDIO/
EXPLOSIÓN!
No exponga el aparato a tem-
peraturas elevadas. Utilice
exclusivamente el equipo de alimentación suministrado o las pilas recomendadas. ¡No poner en cortocircuito el aparato ni las pilas, ni arrojarlos
al fuego! ¡Si se calientan en exceso
o se manejan de modo inadecuado
se pueden producir cortocircuitos,
incendios o incluso explosiones!
¡PELIGRO de daños materiales!
¡No desmonte el aparato! En
caso de que perciba un defecto, diríjase a su tienda especializada.
En ella se pondrán en contacto con
el centro de servicio técnico y, si procede, enviarán el aparato para que
sea reparado.
¡No exponga el aparato a temperaturas superiores a 60 °C!
INDICACIONES sobre la limpieza
Antes de limpiarlo, retire el
aparato de la fuente de ali-
mentación eléctrica (extraer
el equipo de alimentación o retirar las
pilas).
Limpie el aparato con un paño seco
y sólo por la parte exterior. No utilice
ningún agente limpiador líquido, a n
de evitar daños en el sistema electrónico.
Page 75

75
ES
en su proveedor de servicios de eliminación de desechos municipal o bien
en su ocina de medio ambiente.
¡No deposite aparatos eléctricos
en la basura doméstica!
Con arreglo a la Directiva Europea
2002/96/CE sobre aparatos eléctricos y electrónicos usados y a su aplicación en las respectivas legislaciones
nacionales, los aparatos eléctricos
usados deben recopilarse por separado y destinarse a un reciclaje adecuado desde el punto de vista medioambiental.
Limpie las lentes (del ocular y/o del
objetivo) sólo con el paño especial
para lentes adjunto o con otro paño
suave y sin pelusas (p. ej. microbras). No ejercer una excesiva presión con el paño, a n de evitar que
las lentes se rayen.
Para eliminar restos persistentes
de suciedad, humedezca el paño
con un líquido de limpieza de gafas
y frote con él las lentes sin excesiva
presión.
¡Proteja el aparato del polvo y la
humedad! Guárdelo en el maletín
suministrado o en el embalaje de
transporte. Se recomienda retirar las
pilas del aparato si no se va a utilizar
durante un período prolongado.
ELIMINACIÓN
Elimine los materiales de embala-
je separándolos según su clase.
Puede obtener información sobre la
eliminación reglamentaria de desechos
Declaración de conformidad con la UE
Meade Instruments Europe
GmbH & Co. KG, con sede en
46414 Rhede/Westf., Gutenbergstr.
2, Alemania, declara que este producto está conforme con las Directivas
de la UE enumeradas a continuación:
EN 50022:2006
EN 55024:1998+A1:2001/A2:2003
EN 61000-3-2:2006
EN 61000-3-3:1995+A1:2001+A2:2005
Descripción del producto:
Digitalmicro Bowl
Modelo/Denominación:
44342
Rhede, 09.04.2009
Meade Instruments Europe GmbH &
Co. KG
Helmut Ebbert
Gerente
Page 76

76
Éstas son las partes de tu microscopio
1 Ranura para la tarjeta de memoria
SD
2 Monitor LCD
3 Revólver con objetivos
4 Módulo LCD
5 Conexión de cable USB (mini)
6 Lente de objetivo
7 Tornillo de enfoque
8 Platina
9 Iluminación
10 Tecla de cambio (esc)
11 Luz de control del monitor
12 Interruptor de encendido/apaga-
do (interruptor principal)
13 Tecla de menú (Menu)
14 Tecla de disparador (Snap)
15 Teclas de echa y OK
16 Adaptador enchufe red
17 Toma de corriente del aparato
Montaje del microscopio
1. Extrae con cuidado el microscopio y las demás piezas de la caja
de cartón y colócalos sobre una
mesa u otra supercie plana.
2. Retira del microscopio la cobertu-
ra de protección contra el polvo.
3. Introduce el pequeño enchufe
(16) que hay en el extremo del
cable adaptador de red en la toma
de corriente de entrada (17) que
hay en la parte trasera del pie del
microscopio (véase Fig. 2).
4. Introduce el enchufe del adap-
tador de red en una toma de red
adecuada.
Manejo del microscopio
Requisitos fundamentales
Antes de observar objetos o preparaciones debes conectar la pantalla
LCD y la iluminación, además de
haber aprendido cómo se maneja la
platina. Entonces ya estás listo para
iniciar las observaciones.
Módulo LCD
Este microscopio digital es distinto
de los microscopios tradicionales: el
monitor LCD sustituye a los oculares
que se utilizan en los microscopios
tradicionales para la observación.
Así es posible compartir con otras
personas tus observaciones mostradas en la pantalla. Para comenzar las
observaciones con el microscopio
debes encender el monitor LCD presionando el interruptor de encendido/apagado (véase Fig. 3). Mantén
presionado el botón hasta que la luz
roja de control se ilumine en señal de
que el monitor LCD está encendido.
En resumidas cuentas, es lo único
que tienes que hacer para preparar
el monitor LCD y poder utilizar el microscopio. Las diferentes teclas del
módulo LCD se utilizan fundamentalmente para hacer tomas de imagen
(fotos y vídeos), y hablaremos sobre
ellas más adelante en este manual.
Page 77

77
ES
Iluminación
La iluminación (Fig. 1, nº 9) es necesaria para la observación de preparaciones, y la luz brilla desde abajo por
una abertura que hay en la platina y
atraviesa la preparación.
Las preparaciones de diferente tamaño, grosor o variación de colores requieren intensidades de luz
diferentes. Hay dos posibilidades de
modicarlas durante la observación:
regulación de la claridad con el tornillo de ajuste (véase arriba en la Fig.
1) o modicación con la función EV
en el monitor LCD. La función EV (EV
= exposure value for brightness, valor de claridad de la toma) aumenta o
reduce la claridad de la imagen que
se muestra en el monitor LCD después de que hayas apretado la tecla
de echa derecha o izquierda (, )
(Fig. 3), respectivamente.
Si la preparación que vas a observar
es opaca o de color oscuro, lo nor-
mal es que necesites más luz para
poder representar determinadas características o detalles. Para ello, lo
mejor que puedes hacer es aumentar la intensidad de la iluminación girando el tornillo de ajuste de claridad
hasta una posición superior.
Puedes encontrar la iluminación óptima experimentando con diferentes
ajustes, dado que cada objeto requiere una iluminación ligeramente
diferente, algo similar a lo que ocurre
también cuando se desea contemplar el mismo objeto pero con aumentos distintos.
Observación de un objeto
1. Introduce la preparación del soporte para preparaciones. Para
ello, mantén en paralelo la preparación y el soporte para preparaciones (Fig. 4).
2. Desliza el soporte para preparaciones en la dirección de la echa
bajo los clips de la platina (Fig.
5). Alinea el soporte para preparaciones hacia adelante/atrás y a
derecha/izquierda, de modo que
el fragmento deseado de la preparación quede debajo del objetivo.
Fig. 5
Dirección
Soporte para
preparaciones
Objeto
Fig. 4
Page 78

78
3. Por medio del revólver con objetivos (Fig. 1, nº 3) giras las lentes
de objetivo (Fig. 1, nº 6) hasta que
el objetivo 4x queda justo sobre la
preparación. Comienza a utilizar el
microscopio siempre con el objetivo que presenta el aumento más
pequeño (en este microscopio es
4x, lo que conduce a un aumento total de 25x), y a continuación
vete poco a poco ascendiendo
hacia los aumentos mayores. Con
el objetivo 4x consigues el campo
visual más amplio y la imagen de
mayor claridad. Ajusta la imagen
mediante el tornillo de enfoque
(Fig. 1, nº 7).
4. Cuando utilizas el objetivo 4x también puedes variar el aumento entre 25x y 200x por medio del zoom
digital que hay en el módulo LCD.
Para ello, utiliza las teclas arriba y
abajo (, ) que hay en el módulo LCD. En la parte izquierda de la
pantalla se muestra una indicación
que representa en qué ajuste de
zoom te encuentras.
5. Para lograr aumentos mayores debes girar el revólver con objetivos
a las posiciones del objetivo 10x
o del objetivo 40x (aumento máximo). Después de cambiar de objetivo es necesario volver a ajustar
la nitidez de la imagen. Al utilizar
cada uno de los objetivos también
puedes elevar el aumento total por
medio del zoom digital.
Cuidado: antes de cambiar los objetivos, desplaza la platina por medio
del tornillo de enfoque hasta la posición más baja. De este modo te aseguras de que al girar el revólver no
tropieza en ningún lado. Al utilizar los
aumentos superiores, ten cuidado
si subes la platina cerca de la lente
del objetivo, ya que el objetivo podría
golpearse con la preparación o el objeto y sufrir desperfectos.
Imágenes digitales
Operaciones básicas
Encendido
Mantén presionado el interruptor de
encendido/apagado (véase Fig. 3)
durante 1 o 2 segundos si el aparato
ha sido apagado previamente. La luz
de control roja del monitor se ilumina
y el aparato empieza a funcionar.
Apagado
Mantén presionado el interruptor de
encendido/apagado (véase Fig. 3)
durante 1 o 2 segundos si el aparato está encendido. Ahora la luz de
control roja del monitor se apaga y el
aparato se desconecta.
Ajuste
Para modicar el ajuste actual del
aparato debes acceder al menú presionando la tecla de menú (Menu).
Presiona las teclas de echa y selecciona el ajuste correspondiente. Una
Page 79

79
ES
vez que lo hayas ajustado, debes
conrmar apretando la tecla OK.
Visualización en el monitor LCD
Presionando varias veces la tecla de
cambio (Esc) puedes acceder a los
distintos modos (tipos) de funcionamiento. A continuación vamos a describirlos.
Modo de fotografía digital
1 Símbolo del modo de fotografía
digital
2 Símbolo de la memoria incorpora-
da. Si has introducido una tarjeta
de memoria SD, en ese caso se
muestra en su lugar el símbolo de
la tarjeta SD.
3 Número de imágenes para las que
aún existe espacio en la memoria
4 Resolución de la imagen (número
de píxeles)
Modo de vídeo digital
1 Símbolo del modo de vídeo digital
2 Símbolo de la memoria incorpora-
da. Si has introducido una tarjeta
de memoria SD, en ese caso se
muestra en su lugar el símbolo de
la tarjeta SD.
3 Longitud de película para la que
aún hay espacio en la memoria
4 Resolución de la imagen (número
de píxeles)
Modo de autodisparador
1 Símbolo del modo de fotografía
digital
2 Símbolo de la memoria incorpora-
da. Si has introducido una tarjeta
de memoria SD, en ese caso se
muestra en su lugar el símbolo de
la tarjeta SD.
3 Número de imágenes para las que
aún existe espacio en la memoria
Fig. 6
Fig. 7
Fig. 8
Page 80

80
4 Tiempo de repetición ajustado para
el autodisparador
5 Tiempo de funcionamiento del au-
todisparador
6 Resolución de la imagen (número
de píxeles)
Modo de directorio de tomas
1 Vista previa para fotografía o vídeo
2 Archivo seleccionado (resaltado
con un marco amarillo)
3 Nombre del archivo actualmente
seleccionado
Ajustes
Menú de ajustes
Ajuste de la resolución de imagen
• Dentro del modo de fotografía digi-
tal, vídeo digital o autodisparador,
presiona la tecla de menú (Menu)
para abrir el menú de ajustes.
• Selecciona mediante las teclas de
echa (, ) la opción «Resolución». Presiona la tecla OK para
conrmar.
• Selecciona mediante las teclas de
echa (, ) la resolución necesaria (5M = 2048×1536, 3M =
1600×1200, 2M = 1280×1024,
1.3M = 1024×768, VGA =
800×600 para las fotografías; VGA
= 800×600, QVGA = 640×480
para los vídeos). Presiona OK para
conrmar.
La resolución se selecciona dependiendo del tipo de imagen que desees. Cuanto mayor sea la resolución
mejor será la calidad de la imagen,
pero también será mayor el espacio
de memoria que necesitas, por lo
que podrás guardar menos imágenes. Lo mejor es utilizar la memoria
ash disponible con un ajuste de resolución de imagen razonable.
Tal como se indica a continuación,
dispones de cinco opciones (posibilidades de selección) para la resolución de imagen. Si deseas una
calidad de imagen mejor tienes que
seleccionar una resolución superior.
El número posible de tomas que se
pueden guardar varía según las circunstancias:
Fig. 9
Fig. 10
Page 81

81
ES
Ajuste de EV
• Dentro del modo de fotografía digital, vídeo digital o autodisparador,
presiona la tecla de menú (Menu)
para abrir el menú de ajustes.
• Selecciona mediante las teclas de
echa (, ) la opción «EV». Presiona la tecla OK para conrmar.
• Selecciona mediante las teclas de
echa (, ) el valor EV deseado
(–2, –5/3, –4/3, –1, … +2). Presiona OK para conrmar.
EV = –2 produce una imagen muy
oscura, EV = +2 una muy clara.
Ajuste de efectos de color
• Dentro del modo de fotografía digital o autodisparador, presiona la
tecla de menú (Menu) para abrir el
menú de ajustes.
• Selecciona mediante las teclas de
echa (, ) la opción «Color».
Presiona la tecla OK para conrmar.
• Selecciona mediante las teclas de
echa (, ) entre los efectos
de color «Estándar» (imagen de
color normal), «Vivo» (imagen con
colores más vivos), «Amarillento»
(imagen en tono sepia) y «Un solo
color» (imagen en blanco y negro).
Presiona OK para conrmar.
Ajuste del rótulo de la imagen
Tanto para el manejo habitual de las
imágenes como para el procesamiento de datos, el aparato posee
una función de rotulación de imagen
(para reejar el momento de realización de la toma). Por favor, ajusta la
fecha y la hora antes de utilizar esta
función.
Resolución Espacio en la memoria
64M 128M 256M 512M 1G
2048×1536 120 240 480 960 1920
1600×1200 17 0 340 680 1360 2720
1280×1024 230 460 920 1840 3680
1024×768 310 620 1240 2480 4960
800×600 430 860 17 20 3440 6880
Unidad: toma
Page 82

82
• Dentro del modo de fotografía digital o autodisparador, presiona la
tecla de menú (Menu) para abrir el
menú de ajustes.
• Selecciona mediante las teclas de
echa (, ) la opción «Sobreimpresión de la hora». Presiona la
tecla OK para conrmar.
• Selecciona mediante las teclas de
echa (, ) entre «OFF» (sin sobreimpresión de la hora), «Fecha»
(rotulación de la imagen con la fecha de la toma) y «Fecha y hora»
(rotulación de la imagen con la fecha y la hora de la toma). Presiona
OK para conrmar.
Ajuste del idioma
• Dentro del modo de fotografía digital, vídeo digital o autodisparador,
presiona la tecla de menú (Menu)
para abrir el menú de ajustes.
• Selecciona mediante las teclas de
echa (primero , luego , ) la
opción «Idioma». Presiona la tecla
OK para conrmar.
• Selecciona mediante las teclas de
echa (, ) el idioma que desees entre los 9 disponibles. Presiona OK para conrmar.
Ajuste de la fecha y la hora
• Dentro del modo de fotografía digital, vídeo digital o autodisparador,
presiona la tecla de menú (Menu)
para abrir el menú de ajustes.
• Selecciona mediante las teclas de
echa (primero , luego , )
la opción «Introd. de fecha». Presiona la tecla OK para conrmar y
accedes entonces al menú de introducción.
• Selecciona mediante las teclas de
echa izquierda y derecha (, )
la introducción correspondiente
(hora, fecha) y realiza el ajuste mediante las teclas de echa arriba y
abajo (, ). Tras la introducción
presiona OK para conrmar.
Funciones
Función de formateo
Este aparato dispone de una función
de formateo
• Dentro del modo de fotografía digital, vídeo digital o autodisparador,
presiona la tecla de menú (Menu)
para abrir el menú de ajustes.
• Selecciona mediante las teclas de
echa (primero , luego , )
la opción «Formateo». Presiona la
tecla OK para conrmar.
• Selecciona mediante las teclas
de echa (, ) entre «Cancelar» (ningún formateo, regresar
al menú) y «Ejecutar» (ejecutar el
formateo). Presiona OK para conrmar.
Cuidado: tras el formateo se borran
todos los datos.
Page 83

83
ES
Función de toma de fotografías
digitales
Antes de tomar fotos digitales, realiza
por favor los ajustes correspondientes para ello.
Cuidado: el número de imágenes
que puedes tomar es proporcional al
espacio libre en la memoria ash.
• Tras el encendido del aparato, el
modo de fotografía digital es el
modo estándar.
• Presiona la tecla de disparador
(Snap) para tomar una fotografía.
Función de toma de vídeos
digitales
Antes de tomar vídeos digitales, realiza por favor los ajustes correspondientes para ello.
Cuidado: la longitud de las películas
que puedes tomar es proporcional al
espacio libre en la memoria ash.
• Presionando la tecla de cambio
(Esc) accedes al modo de vídeo
digital. (Partiendo del modo de fotografía digital debes presionar la
tecla de cambio una vez para acceder al modo de vídeo digital).
• Presiona la tecla de disparador
(Snap) para iniciar la grabación.
•
Presiona de nuevo la tecla de disparador para terminar la grabación.
Función de toma con
autodisparador
Antes de hacer tomas con el autodisparador, realiza por favor los ajustes
correspondientes para ello en el
modo de autodisparador.
• Presionando la tecla de cambio
(Esc) accedes al modo de autodisparador. (Partiendo del modo de
fotografía digital debes presionar la
tecla de cambio una vez para acceder al modo de autodisparador).
• Presiona la tecla OK para acceder
a un cursor amarillo. Selecciona
mediante las teclas de echa izquierda y derecha (, ) la hora
de repetición para la toma (hora
: minuto : segundo) y realiza al
ajuste mediante las teclas de e-
Fig. 11
Fig. 12
Page 84

84
cha arriba y abajo (, ). Tras
la introducción presiona OK para
conrmar.
•
Presiona la tecla de disparador
(Snap) para iniciar la toma de fotos.
• Para terminar la toma debes presionar de nuevo la tecla de disparador
o la tecla de cambio (Esc).
• Rango de tiempo de repetición: de
5 segundos a 24 horas en tramos
de 5 segundos.
Ajuste del zoom digital y del
valor EV
A menudo, la vista del detalle de un
objeto es demasiado pequeña o la
iluminación insuciente para conseguir una representación satisfactoria
en el monitor LCD. Para ello sirven
de ayuda los ajustes del valor de EV
y del zoom digital (aumento electrónico).
• Presiona las teclas de echa izquierda y derecha (, ) para
ajustar el valor de EV. El rango de
valores de EV va desde –2,0 hasta
+2,0.
• Presiona las teclas de echa arriba y abajo (, ) para ajustar el
factor de aumento electrónico. El
rango de estos valores va desde
1,00 hasta 8,00.
Visualización y eliminación de
fotos o vídeos digitales
Visualización de fotos o vídeos
digitales
• Presionando la tecla de cambio
(Esc) accedes al modo de vídeo
digital. (Partiendo del modo de
fotografía digital debes presionar
la tecla de cambio tres veces para
acceder al modo de directorio de
tomas).
• Mediante la pantalla se representa
la totalidad de las fotografías y vídeos digitales almacenados (símbolo de vídeo: cámara de vídeo).
Mediante las teclas de echa (,
) puedes navegar por la lista en
caso de que contenga más archivos de los que caben en una pantalla (9 archivos).
• Selecciona mediante las teclas de
echa (, , , ) una fotografía
o vídeo digital. Su vista previa aparece rodeada con un marco amarillo, respectivamente.
• Presiona la tecla OK para conrmar. Ahora se muestra una vista
a pantalla completa. (Presionando
de nuevo OK puedes volver a salir
de la vista completa).
• Si deseas reproducir un vídeo digital, selecciónalo y presiona la tecla
Fig. 13
Page 85

85
ES
OK, y a continuación la tecla de
echa arriba (). Si vuelves a presionar la tecla de echa arriba, se
interrumpe la reproducción.
• Cuando estás observando una fotografía digital, puedes aumentar
o reducir la imagen mediante las
teclas de echa arriba y abajo (,
).
• Presiona la tecla de cambio (Esc)
para regresar del modo de directorio de tomas al modo de fotografía
digital.
Protección de archivos
Para proteger los datos almacenados de una eliminación involuntaria,
el aparato posee una función de protección.
•
Presionando la tecla de cambio
(Esc) accedes al modo de vídeo
digital. (Partiendo del modo de fotografía digital debes presionar la tecla
de cambio tres veces para acceder
al modo de directorio de tomas).
• Presiona la tecla de menú (Menu)
para abrir el menú de almacenamiento.
• Selecciona mediante las teclas de
echa (, ) la opción «Protección». Presiona la tecla OK para
conrmar.
• Mediante las teclas de echa (,
) selecciona entre «Por separado», «Todos» y «Página». Presiona
OK para conrmar.
• Selecciona mediante las teclas de
echa (, ) la opción «Fijar».
Presiona la tecla OK para conrmar.
Por separado: sólo queda protegido
el archivo con el marco amarillo.
Todos: quedan protegidos todos los
datos almacenados.
Página: mediante las teclas de echa
(, , , ) selecciona archivos
(identicados respectivamente con
un marco amarillo). Presiona OK para
proteger el archivo seleccionado.
La protección de un archivo se indica
mediante un símbolo de candado. Se
puede retirar la protección mediante
«Cancelar» y OK para archivos seleccionados por separado (en Protección/Por separado) o para todos los
archivos (en Protección/Todos).
Eliminación de archivos
• Presionando la tecla de cambio
(Esc) accedes al modo de vídeo
digital. (Partiendo del modo de
fotografía digital debes presionar
la tecla de cambio tres veces para
acceder al modo de directorio de
tomas).
• Presiona la tecla de menú (Menu)
para abrir el menú de almacenamiento.
• Selecciona mediante las teclas
de echa (, ) la opción «Eliminar». Presiona la tecla OK para
conrmar.
• Mediante las teclas de echa (,
) selecciona entre «Por separado» y «Todos». Presiona OK para
conrmar.
Page 86

86
Por separado: sólo se elimina el
archivo con el marco amarillo.
Todos: se eliminan todos los
archivos almacenados.
Inserción de una tarjeta de
memoria SD
Cómo manejar una tarjeta de
memoria SD
• Si no has insertado ninguna tarjeta de
memoria SD, los archivos se almacenan en la memoria ash interna.
• Si insertas una tarjeta de memoria
SD, hazlo de modo que los contactos señalen hacia ti. No deslices la
tarjeta rápido y por la fuerza, ya que
esto puede dañar la tarjeta SD.
• El monitor LCD muestra un símbolo
de tarjeta SD. El espacio de memoria
disponible en la tarjeta se indica en la
parte inferior derecha de la pantalla.
• Antes de extraer de nuevo la tarjeta,
es necesario apagar el microscopio
digital.
Copia de datos en la tarjeta de
memoria SD
• Presionando la tecla de cambio
(Esc) accedes al modo de vídeo
digital. (Partiendo del modo de
fotografía digital debes presionar
la tecla de cambio tres veces para
acceder al modo de directorio de
tomas).
• Presiona la tecla de menú (Menu)
para abrir el menú de almacenamiento.
• Selecciona mediante las teclas de echa (, ) la opción
«Copia>Tarjeta». (Si no has insertado una tarjeta SD, esta función
aparece fuera de servicio y se
muestra con letra gris en el menú).
Presiona la tecla OK para conrmar.
• Selecciona mediante las teclas de
echa (, ) entre «Cancelar»
(ningún proceso de copia) y «Ejecutar» (copia de los datos). Presiona OK para conrmar.
• Para transferir los datos es necesario esperar durante un breve lapso
de tiempo («Por favor, esperar»).
Vinculación entre el microscopio
y el PC
Para vincular tu PC con el microscopio, utiliza el cable USB.
Si la vinculación se ha creado con
éxito, el PC reconoce automáticamente el hardware nuevo. La luz de
control del microscopio se ilumina,
pero la cámara digital permanece
apagada. Abre en tu PC la carpeta
correspondiente al dispositivo extraíble de almacenamiento de datos,
muestra en la pantalla las tomas almacenadas en la memoria ash y cópialas a tu PC, donde puedes seguir
procesándolas.
Cuidado: no extraigas el cable USB
durante la transferencia de datos, ya
que en ese caso se pierden.
Page 87

87
Tabla de especicaciones
Equipamiento Especicaciones
Mesa del microscopio platina mecánica (2” x 2”)
Cámara digital 2M CMOS (distribución 1600x1200 píxeles; aumento aprox.
6,3x en lugar del ocular correspondiente)
Monitor LCD Pantalla plana digital de alta resolución con transistor de pe-
lícula na («TFT-Display»): diagonal 2”; resolución 320x240
píxeles; relación de contraste 300; aprox. 262000 colores
representables; densidad de luz 400 cd/m
2
), zoom digital 8x
(aumento de imagen electrónico)
Tornillo micrométrico tornillo de enfoque continuo (aproximado)
Objetivos acromáticos 4x, 10x y 40x
Memoria ash interna 32 MB
Cable USB USB 2.0 mini
Revólver con objetivos triple con encaje
Iluminación iluminación eléctrica incorporada: diodo luminoso (6 V, 6 W)
Condensador N.A. 0,65
Adaptador de red universal (entrada: de 100 a 240 V, 50 o 60 Hz)
Peso, dimensiones 519 g; 162 mm x 155 mm x 215 mm
ES
Page 88

88
PERIGO para crianças!
Para trabalhar com este apa-
relho são utilizados meios auxiliares pontiagudos e com arestas
vivas. Por essa razão, guarde este
aparelho, e todos os componentes
e meios auxiliares, num local inacessível às crianças. RISCO DE FERI-
MENTOS!
As crianças só devem utilizar o aparelho sob vigilância. Manter os materiais da embalagem (sacos de plástico, elásticos, etc.) afastados das
crianças! RISCO DE ASFIXIA!
Os químicos e os líquidos fornecidos
devem ser mantidos afastados das
crianças! Não ingerir os químicos! Depois de os utilizar, lavar muito bem as
mãos em água corrente. No caso de
contacto acidental com os olhos ou
com a boca, lavar com água. Em caso
de dores, consultar imediatamente um
médico e apresentar a substância.
Este aparelho contém componentes electrónicos, que são operados
por uma fonte de corrente (fonte de
alimentação e/ou pilhas). Não deixe
as crianças sem vigilância durante o
manuseamento do aparelho! A utilização deve efectuar-se conforme o
manual, caso contrário há RISCO de
CHOQUE ELÉCTRICO!
RISCO DE INCÊNDIO/EXPLOSÃO!
Nunca sujeite o aparelho a al-
tas temperaturas. Utilize apenas a fonte de alimentação fornecida
ou as pilhas recomendadas. Não
curto-circuitar nem atirar para o fogo
o aparelho nem as pilhas! O calor excessivo e o manuseamento incorrecto podem provocar curto-circuitos,
incêndios e até explosões!
RISCO de danos materiais!
Não desmonte o aparelho!
Em caso de defeito, consulte
o seu distribuidor especializado. Ele
contactará o Centro de Assistência e
poderá enviar o aparelho para uma
eventual reparação.
Não sujeite o aparelho a temperaturas superiores a 60° C!
INDICAÇÕES sobre a limpeza
Antes de limpar a fonte de
corrente, desligue o aparelho (retirar a cha de rede
ou remover as pilhas)!
Limpe o aparelho apenas no exterior com um pano seco. Não utilize
produtos de limpeza, a m de evitar
danos no sistema electrónico.
Limpe as lentes (oculares e/ou objectivas) apenas com o pano de limpeza
fornecido ou com um outro pano macio e sem os (p. ex. em microbra).
Não exercer muita força com o pano,
para não arranhar as lentes.
Para remover restos de sujidade mais
difíceis humedeça o pano de limpeza
Page 89

89
ELIMINAÇÃO
Separe os materiais da embala-
gem. Pode obter mais informações sobre a reciclagem correcta nos
serviços municipais ou na agência do
meio ambiente.
Não deposite os seus aparelhos
electrónicos no lixo doméstico!
De acordo com a Directiva Europeia
2002/96/CE sobre aparelhos eléctricos e electrónicos e sua conversão
na legislação nacional, os aparelhos
electrónicos em m de vida devem ser
separados e sujeitos a uma reciclagem
ambientalmente correcta.
com um líquido de limpeza para óculos e limpe as lentes, exercendo uma
leve pressão.
Proteja o aparelho do pó e da humidade! Guarde-o na bolsa fornecida
ou na embalagem de transporte. As
pilhas devem ser retiradas do aparelho, se este não for usado durante
algum tempo.
Indicações de conformidade da UE
A Meade Instruments Euro-
pe GmbH & Co. KG, estabelecida em 46414 Rhede/Westf.,
Gutenbergstr. 2, Alemanha, explica
o acordo para este produto com as
seguintes directrizes da UE:
EN 50022:2006
EN 55024:1998+A1:2001/A2:2003
EN 61000-3-2:2006
EN 61000-3-3:1995+A1:2001+A2:2005
Descrição do produto:
Digitalmicro Bowl
Tipo / Designação:
44342
Rhede, 09-04-2009
Meade Instruments Europe GmbH &
Co. KG
Helmut Ebbert
Director
PT
Page 90

90
Estes são os componentes do teu
microscópio
1 Ranhura para o cartão de memó-
ria SD
2 Monitor LCD
3 Revólver das objectivas
4 Módulo do LCD
5 Ligação do cabo USB (mini)
6 Lente da objectiva
7 Roda de focalização
8 Suporte de objectos
9 Iluminação
10 Tecla de alternância (ESC)
11 Luz de controlo do monitor
12 Interruptor para ligar/desligar (In-
terruptor principal)
13 Tecla de menu (Menu)
14 Tecla de registo (Snap)
15 Teclas de seta e OK
16 Ficha do adaptador de rede
17 Tomada do aparelho
Montagem do microscópio
1. Retira cuidadosamente o micros-
cópio e os restantes componentes
da caixa de cartão e coloca-os sobre uma mesa ou outra superfície
plana.
2. Retira a tampa de resguardo do pó
do microscópio.
3. Insere a pequena cha (16) que
se encontra na extremidade
do cabo adaptador de rede na
tomada de entrada (17) que se
encontra na parte de trás do pé do
microscópio (ver g. 2).
4. Insere a cha de rede do adaptador de rede numa tomada adequada.
Operação do microscópio
Pré-requisitos base
Antes de observares objectos ou preparados, tens de ligar o ecrã LCD e
a iluminação e também tens de saber
como utilizar o suporte de objectos.
Em seguida, estarás pronto para iniciar as observações.
Módulo do LCD
Este microscópio digital é diferente
dos microscópios convencionais: o
monitor LCD substitui as ocultares
utilizadas nos microscópios convencionais para a observação. Desta
forma, podes partilhar as tuas observações no ecrã com outras pessoas.
No início das observações com o
microscópio, tens de ligar o monitor LCD premindo o interruptor para
ligar/desligar (ver g. 3). Mantém o
botão premido até a luz de controlo
acender, indicando que o monitor
LCD está ligado. Isto é basicamente
tudo o que tens de fazer para preparar o monitor LCD para examinar
objectos com o microscópio. As diferentes teclas do módulo do LCD são
utilizadas principalmente para registos de imagens (fotograas e vídeos)
e serão abordadas mais à frente neste manual de instruções.
Page 91

91
PT
Iluminação
Preparados de diferentes tamanhos,
espessuras ou variações de cor necessitam de diferentes intensidades
de iluminação. Existem duas possibilidades de alterar estas intensidades
durante a observação: através da
regulação da claridade com a roda
de ajuste (ver mais acima na g. 1)
ou da alteração com a função EV no
monitor LCD. A função EV (EV = exposure value for brightness, valor de
claridade da exposição) aumenta ou
reduz a claridade da imagem no monitor LCD consoante tenhas premido
a tecla de seta para a direita ou para
a esquerda (, ) (g. 3).
Se o preparado observado for opaco
ou de cor escura, deverás precisar
de mais luz para poderes ver determinadas características ou detalhes.
Para tal, basta aumentares a intensidade da luz da iluminação rodando
a roda de ajuste da claridade para a
denição mais elevada.
Podes obter a iluminação ideal experimentando diferentes denições,
uma vez que cada objecto exige uma
iluminação ligeiramente diferente, tal
como acontece quando o mesmo
objecto é observado com diferentes
ampliações.
Observação de um objecto
1. Coloca o preparado no suporte de
preparados. O preparado e o suporte de preparados têm de estar
em paralelo (g. 4).
2. Desloca o suporte de preparados
na direcção da seta colocando-o
por baixo das pinças do suporte
de objectos (g. 5). Alinha o su-
porte de preparados para a frente/para trás e para a esquerda/
direita de modo a que a secção
pretendida do objecto que por
baixo da objectiva.
3. Com a ajuda do revólver das objectivas (g. 1, n.º 3), roda a lente
da objectiva (g. 1, n.º 6) até a objectiva de 4x se encontrar directamente sobre o preparado. Começa sempre pela objectiva com
a ampliação mais reduzida (4x, no
caso deste microscópio, atingindo uma ampliação total de 25x) e
parte daí para as ampliações mais
Fig. 5
Direcção
Suporte de
preparados
Objecto
Fig. 4
Page 92

92
elevadas. Com a objectiva de 4x,
obterás o campo de visão mais
alargado e a imagem mais clara.
Aumenta a nitidez da imagem com
a ajuda da roda de focalização (g.
1, n.º 7).
4. Ao utilizares a objectiva de 4x, também podes variar a ampliação entre 25x e 200x, ajustando o zoom
digital no módulo do LCD. Para tal,
utiliza as teclas de seta para cima
e para baixo (, ) do módulo do
LCD. No lado esquerdo do ecrã, é
apresentada a indicação do ajuste
de zoom actual.
5. Para ampliações mais elevadas,
tens de rodar o revólver das objectivas para os ajustes da objectiva de 10x ou de 40x (ampliação
máxima). Após a troca da objectiva, tens de regular novamente a
nitidez da imagem. Se utilizares
uma destas objectivas, também
poderás aumentar a ampliação total introduzindo o zoom digital.
Atenção: antes de trocares de objectivas, coloca o suporte de objectos na posição mais reduzida através
da roda de focalização. Assim, não
será possível danicar o equipamento durante a rotação do revólver. Ao
utilizares ampliações mais elevadas,
tem também cuidado ao colocares
o suporte de objectos perto da lente
da objectiva para que a objectiva não
bata contra o preparado ou objecto e
se danique.
Imagens digitais
Operações básicas
Ligar
Mantém premido o interruptor para ligar/desligar (ver g. 3) durante 1 a 2
segundos, se o aparelho estiver desligado. A luz de controlo vermelha do
monitor acende-se e o aparelho começa a trabalhar.
Desligar
Mantém premido o interruptor para
ligar/desligar (ver g. 3) durante 1
a 2 segundos, se o aparelho estiver
ligado. A luz de controlo vermelha
do monitor apaga-se em seguida e o
aparelho desliga-se.
Ajuste
Para alterar os ajustes actuais do aparelho, chama o menu através da tecla
de menu (Menu). Prime as teclas de
seta para seleccionares o ajuste correspondente. Depois do ajuste, prime a tecla OK para conrmar.
Visualização no monitor LCD
Ao premires uma vez ou várias vezes
a tecla de alternância (Esc), podes
aceder aos diferentes modos de funcionamento. Estes modos de funcionamento são descritos em seguida.
Page 93

93
PT
Modo de fotograa digital
1 Símbolo do modo de fotograa
digital
2 Símbolo da memória utilizada. Se
tiveres introduzido um cartão de
memória SD, será apresentado o
símbolo do cartão SD em vez deste símbolo.
3 Quantidade de imagens que ainda
podem ser registadas na memória
4 Resolução da imagem (quantidade
de pixéis)
Modo de vídeo digital
1 Símbolo do modo de vídeo digital
2 Símbolo da memória utilizada. Se
tiveres introduzido um cartão de
memória SD, será apresentado o
símbolo do cartão SD em vez deste símbolo.
3 Duração do lme que ainda pode
ser registado na memória
4 Resolução da imagem (quantidade
de pixéis)
Modo de temporizador automático
1 Símbolo do modo de temporizador
automático
2 Símbolo da memória utilizada. Se
tiveres introduzido um cartão de
memória SD, será apresentado o
símbolo do cartão SD em vez deste símbolo.
3 Quantidade de imagens que ainda
podem ser registadas na memória
4 Tempo de repetição denido para
o temporizador automático
5 Tempo decorrido do temporizador
automático
Fig. 6
Fig. 7
Fig. 8
Page 94

94
6 Resolução da imagem (quantidade
de pixéis)
Modo de índice de registos
1 Miniatura da fotograa ou do vídeo
2 Ficheiro seleccionado (enquadra-
mento amarelo)
3 Nome do cheiro actualmente
seleccionado
Ajustes
Menu de ajustes
Ajuste da resolução da imagem
• No modo de fotograa digital, vídeo
digital ou temporizador automático,
prime a tecla de menu (Menu) para
abrir o menu de ajustes.
• Com a ajuda das teclas de seta
(, ), selecciona a opção “Resolução”. Prime a tecla OK para
conrmar.
• Com as teclas de seta (, ),
selecciona a resolução necessária (5M = 2048×1536, 3M =
1600×1200, 2M = 1280×1024,
1.3M = 1024×768, VGA =
800×600 para fotograas; VGA =
800×600, QVGA = 640×480 para
vídeos). Prime OK para conrmar.
A resolução adapta-se em função
do tipo de imagem que pretendes.
Quanto mais elevada for a resolução,
melhor será a qualidade da imagem.
No entanto, o espaço necessário na
memória também será superior, ou
seja, poderás guardar menos registos. O melhor será utilizar a memória
Flash disponível com uma resolução
razoável.
Conforme referimos mais abaixo,
existem cinco opções (possibilidades de escolha) de resolução da
imagem. Se pretenderes uma melhor
qualidade da imagem, selecciona
uma resolução superior. A quantidade de registos possíveis é diferente
consoante as circunstâncias:
Fig. 9
Fig. 10
Page 95

95
PT
Ajuste do EV
• No modo de fotograa digital, vídeo
digital ou temporizador automático,
prime a tecla de menu (Menu) para
abrir o menu de ajustes.
• Com a ajuda das teclas de seta
(, ), selecciona a opção “EV”.
Prime a tecla OK para conrmar.
• Com as teclas de seta (, ),
selecciona o valor EV pretendido
(–2, –5/3, –4/3, –1, … +2). Prime OK para conrmar.
EV = –2 apresenta uma imagem muito escura, EV = +2 apresenta uma
imagem muito clara.
Ajuste de efeitos de cor
• No modo de fotograa digital ou
temporizador automático, prime a
tecla de menu (Menu) para abrir o
menu de ajustes.
• Com a ajuda das teclas de seta
(, ), selecciona a opção “Cor”.
Prime a tecla OK para conrmar.
• Com as teclas de seta (, ),
escolhe entre os efeitos de cor
“Padrão” (imagem a cores normal),
“Intensa” (imagem a cores com
cores fortes), “Antiga” (imagem
em tons sépia) e “Monocromática”
(imagem a preto e branco). Prime
OK para conrmar.
Ajuste da legendagem de imagens
O aparelho possui uma função de
legendagem de imagens (para o momento do registo) para o tratamento
convencional das imagens e dos da-
Resolução Espaço na memória
64M 128M 256M 512M 1G
2048×1536 120 240 480 960 1920
1600×1200 17 0 340 680 1360 2720
1280×1024 230 460 920 1840 3680
1024×768 310 620 1240 2480 4960
800×600 430 860 17 20 3440 6880
Unidade: Peça
Page 96

96
dos. Dene a hora e a data antes de
utilizares esta função.
• No modo de fotograa digital ou
temporizador automático, prime a
tecla de menu (Menu) para abrir o
menu de ajustes.
• Com a ajuda das teclas de seta
(, ), selecciona a opção “Carimbo de data/hora”. Prime a tecla
OK para conrmar.
• Com as teclas de seta (, ), escolhe entre “Desligado” (nenhum
carimbo de data/hora), “Data”
(legenda da imagem com data do
registo) e “Data e Hora” (legenda
da imagem com data e hora do registo). Prime OK para conrmar.
Ajuste do idioma
• No modo de fotograa digital, vídeo
digital ou temporizador automático,
prime a tecla de menu (Menu) para
abrir o menu de ajustes.
• Com a ajuda das teclas de seta
(primeiramente e, em seguida,
), selecciona a opção “Idioma”.
Prime a tecla OK para conrmar.
• Com as teclas de seta (, ),
escolhe o idioma pretendido entre
os 9 disponíveis. Prime OK para
conrmar.
Ajuste da hora e data
• No modo de fotograa digital, vídeo
digital ou temporizador automático,
prime a tecla de menu (Menu) para
abrir o menu de ajustes.
• Com a ajuda das teclas de seta
(primeiramente e, em seguida,
), selecciona a opção “Prop. de
data”. Prima a tecla OK para conrmar e aceder ao menu inicial.
• Com as teclas de seta para a esquerda/direita (, ), escolhe a
unidade correspondente (hora,
data) e dene o ajuste com as teclas de seta para cima e para baixo
(, ). Após a introdução, prime
OK para conrmar.
Funções
Função de formatação
Este aparelho possui uma função de
formatação.
• No modo de fotograa digital, vídeo
digital ou temporizador automático,
prime a tecla de menu (Menu) para
abrir o menu de ajustes.
• Com a ajuda das teclas de seta (primeiramente e, em seguida, ),
selecciona a opção “Formatar”.
Prime a tecla OK para conrmar.
• Com as teclas de seta (, ), escolhe entre “Cancelar” (nenhuma
formatação, regresso ao menu) e
“Efectuar” (efectuar a formatação).
Prime OK para conrmar.
Atenção: Depois da formatação,
todos os dados se perderão.
Page 97

97
PT
Função de registo de fotograas
digitais
Antes de tirares fotograas digitais,
efectua os ajustes correspondentes.
Atenção: A quantidade de imagens
que é possível registar é proporcional
ao espaço livre na memória Flash.
• Depois de ligares o aparelho,
o modo de fotograa digital é o
modo padrão.
• Prime a tecla de registo (Snap)
para tirares uma fotograa.
Função de registo de vídeos
digitais
Antes de registares vídeos digitais,
efectua os ajustes correspondentes.
Atenção: A duração do lme que é
possível registar é proporcional ao
espaço livre na memória Flash.
• Ao premires a tecla de alternância
(Esc), podes aceder ao modo de
vídeo digital. (A partir do modo de
fotograa digital, prime a tecla de
alternância uma vez para aceder
ao modo de vídeo digital.)
• Prime a tecla de registo (Snap)
para iniciar o registo.
• Prime novamente a tecla de registo
para terminar o registo.
Função de registo com temporizador automático
Antes de efectuares registos com o
temporizador automático, efectua os
ajustes correspondentes necessá-
rios no modo de temporizador automático.
• Ao premires a tecla de alternância
(Esc), podes aceder ao modo de
temporizador automático. (A partir do modo de fotograa digital,
prime a tecla de alternância duas
vezes para aceder ao modo de
temporizador automático.)
• Prime a tecla OK para veres um
cursor amarelo. Com as teclas de
seta para a esquerda e para a direita (, ), escolhe o tempo de repetição do registo (Hora : Minutos
: Segundos) e dene o ajuste com
Fig. 11
Fig. 12
Page 98

98
as teclas de seta para cima e para
baixo (, ). Após a introdução,
prime OK para conrmar.
• Prime a tecla de registo (Snap) para
iniciar o registo das fotograas.
• Para terminar o registo, prime novamente a tecla de registo ou a tecla de alternância (Esc).
• Intervalo do tempo de repetição: 5
segundos a 24 horas, em espaços
de 5 segundos.
Ajuste do zoom digital e do valor
EV
Por vezes, a imagem dos detalhes
de um objecto é demasiado pequena
ou a iluminação é insuciente para
permitir uma representação satisfatória no monitor LCD. Neste caso, os
ajustes do valor EV e do zoom digital
(ampliação digital) mostram-se úteis.
• Prime as teclas de seta para a esquerda e para a direita (, ) para
ajustar o valor EV. O intervalo de valores EV varia entre –2,0 e +2,0.
• Prime as teclas de seta para cima
e para baixo (, ) para ajustar
o factor de ampliação electrónica.
Esse intervalo de valores varia entre 1,00 e 8,00.
Observar e eliminar fotograas
ou vídeos digitais
Observar fotograas ou vídeos
digitais
• Ao premires a tecla de alternância (Esc), podes aceder ao modo
de índice de registos. (A partir do
modo de fotograa digital, prime
a tecla de alternância três vezes
para aceder ao modo de índice de
registos.)
• A totalidade das fotograas e vídeos digitais (símbolo de vídeo: câmara de lmar) é apresentada com
a ajuda do ecrã. Com as teclas de
seta (, ), podes percorrer a
lista se esta contiver mais cheiros
do que é possível apresentar num
ecrã (9 cheiros).
• Com as teclas de seta (
,
, ,
), escolhe uma fotograa ou vídeo digital. A respectiva miniatura
estará rodeada por um enquadramento amarelo.
• Prime a tecla OK para conrmar.
Em seguida, será apresentada
uma visualização em ecrã inteiro.
(Se premires novamente OK, podes sair desta opção.)
• Se quiseres reproduzir um vídeo digital, escolhe o vídeo, prime a tecla
OK e, em seguida, a tecla de seta
para cima (). Se premires novamente a tecla de seta para cima, a
reprodução será interrompida.
Fig. 13
Page 99

99
PT
• Se observares uma fotograa digital, podes aumentar ou reduzir a
imagem premindo as teclas de seta
para cima e para baixo (, ).
• Prime a tecla de alternância (Esc)
para passares do modo de índice
de registos para o modo de fotograa digital.
Protecção de cheiros
O aparelho possui uma função de
protecção para proteger os dados
guardados contra uma eliminação
involuntária.
• Ao premires a tecla de alternância (Esc), podes aceder ao modo
de índice de registos. (A partir do
modo de fotograa digital, prime
a tecla de alternância três vezes
para aceder ao modo de índice de
registos.)
• Prime a tecla de menu (Menu) para
abrires o menu da memória.
• Com a ajuda das teclas de seta
(, ), selecciona a opção “Pro-
tecção”. Prime a tecla OK para
conrmar.
• Com as teclas de seta (, ),
escolhe entre “Individual”, “Todas”
e “Página”. Prime OK para conrmar.
• Com a ajuda das teclas de seta (,
), selecciona a opção “Denir”.
Prime a tecla OK para conrmar.
Individual: Apenas o cheiro assinalado pelo enquadramento amarelo
será protegido.
Todas: Todos os cheiros guardados
serão protegidos.
Página: Com as teclas de seta (,
, , ), escolhe os cheiros
(cada um assinalado com um enquadramento amarelo). Prime OK para
proteger o cheiro seleccionado.
A protecção de um cheiro é indicada através de um símbolo de cadeado. A protecção pode ser eliminada
através de “Cancelar” e OK no caso
de cheiros seleccionados individualmente (em Protecção/Individual)
ou para todos os cheiros (emProtecção/Todas).
Eliminação de cheiros
• Ao premires a tecla de alternância (Esc), podes aceder ao modo
de índice de registos. (A partir do
modo de fotograa digital, prime
a tecla de alternância três vezes
para aceder ao modo de índice de
registos.)
• Prime a tecla de menu (Menu) para
abrires o menu da memória.
• Com a ajuda das teclas de seta (,
), selecciona a opção “Eliminar”.
Prime a tecla OK para conrmar.
• Com as teclas de seta (, ),
escolhe entre “Individual” e
“Todas”. Prime OK para conrmar.
Individual: Apenas o cheiro assinalado pelo enquadramento amarelo
será eliminado.
Todas: Todos os cheiros guardados
serão eliminados.
Page 100

100
Utilização de um cartão de
memória SD
Como operar com um cartão de
memória SD
• Se não tiveres introduzido nenhum
cartão SD, os cheiros são guardados na memória Flash interna.
• Se tiveres introduzido um cartão
SD, os contactos deverão estar
voltados para ti. Não introduzas o
cartão de forma brusca nem com
força, pois poderás danicar o cartão SD.
• O monitor LCD apresenta o símbolo de um cartão SD. O espaço
disponível na memória do cartão é
apresentado no canto inferior direito do ecrã.
• Para retirares o cartão, o microscópio digital tem de estar desligado.
Copiar dados para o cartão de
memória SD
• Ao premires a tecla de alternância (Esc), podes aceder ao modo
de índice de registos. (A partir do
modo de fotograa digital, prime
a tecla de alternância três vezes
para aceder ao modo de índice de
registos.)
• Prime a tecla de menu (Menu) para
abrires o menu da memória.
• Com a ajuda das teclas de seta
(, ), selecciona a opção
“Cópia>Cartão”. (Se não tiveres introduzido nenhum cartão SD, esta
função não estará disponível e cará a cinzento no menu.) Prime a
tecla OK para conrmar.
• Com as teclas de seta (, ),
escolhe entre “Cancelar” (nenhum
processo de cópia) e “Efectuar”
(cópia dos dados). Prime OK para
conrmar.
• É necessário aguardar um pouco pela transferência dos dados
(“Aguarda”).
Ligação entre o microscópio e
o PC
Utiliza o cabo USB para ligares o teu
PC ao microscópio.
Se a ligação for estabelecida com
sucesso, o PC detectará automaticamente o novo hardware. A luz de
controlo do microscópio acende-se,
mas a câmara digital permanece
desligada. No teu PC, abre a pasta
correspondente do dispositivo de
armazenamento de dados amovível,
deixa que os cheiros dos registos
guardados na memória Flash sejam
apresentados e copia-os para o teu
PC, onde poderás continuar a trabalhar.
Atenção: Não retires o cabo USB durante a transmissão de dados; caso
contrário, os dados perder-se-ão.
 Loading...