

Page 1
Teleskop · Telescope · Télescope
Telescoop · Telescopio
Classic 70/350
Art. No. 4670350
DE
Bedienungsanleitung
EN
Instruction Manual
FR
Information d‘utilisateur
NL
Gebruikersinformatie
ES
Información de usuario
IT
Informazione degli utenti
25-10-2016
Page 2

Besuchen Sie unsere Website über den folgenden QR Code oder Weblink um weitere Informationen
DE
zu diesem Produkt oder die verfügbaren Übersetzungen dieser Anleitung zu finden.
Visit our website via the following QR Code or web link to find further information on this product or the
EN
available translations of these instructions.
Si vous souhaitez obtenir plus d’informations concernant ce produit ou rechercher ce mode d’emploi en
FR
d’autres langues, rendez-vous sur notre site Internet en utilisant le code QR ou le lien correspondant.
Bezoek onze internetpagina via de volgende QR-code of weblink, voor meer informatie over dit product
NL
of de beschikbare vertalingen van deze gebruiksaanwijzing.
¿Desearía recibir unas instrucciones de uso completas sobre este producto en un idioma determinado?
ES
Entonces visite nuestra página web utilizando el siguiente enlace (código QR) para ver las versiones
disponibles.
Desidera ricevere informazioni esaustive su questo prodotto in una lingua specifica? Venga a visitare il
IT
nostro sito Web al seguente link (codice QR Code) per conoscere le versioni disponibili.
GARANTIE · WARRANTy · GARANTíA · GARANzIA
www.bresser.de/warranty_terms
www.bresser.de/download/4670350
Page 3

Inhaltsverzeichnis
Inhaltsverzeichnis
1 Impressum ......................................................................................................................................................4
2 Eigenschaften ................................................................................................................................................. 4
3 Zu dieser Anleitung ........................................................................................................................................ 4
4 Verwendungszweck .......................................................................................................................................4
5 Allgemeine Sicherheitshinweise...................................................................................................................5
6 Produktabbildungen.......................................................................................................................................6
7 Lieferumfang...................................................................................................................................................6
8 Teileübersicht .................................................................................................................................................6
9 Standortwahl...................................................................................................................................................7
10 Stativ aufstellen ..............................................................................................................................................7
11 Optiktubus auf Stativ montieren ...................................................................................................................8
12 Zubehörteile anbringen.................................................................................................................................. 8
13 Verwendung von Okularen ............................................................................................................................9
14 Verwendung eines Amici-Prismas................................................................................................................9
15 Stativkopf bewegen........................................................................................................................................9
16 Justieren des Sucherfernrohrs .....................................................................................................................9
17 Vor der Beobachtung ...................................................................................................................................10
18 Beobachtung................................................................................................................................................. 10
19 Fehlerbeseitigung......................................................................................................................................... 10
20 Reinigung und Wartung...............................................................................................................................10
21 Entsorgung ...................................................................................................................................................11
22 Garantie .........................................................................................................................................................11
IM_4670350_de_en_BRESSER_v1016 iii
Page 4

1 | Impressum
1 Impressum
Bresser GmbH
Gutenbergstraße 2
46414 Rhede
Deutschland
http://www.bresser.de
Für etwaige Gewährleistungsansprüche oder Serviceanfragen verweisen wir auf die Informationen zu
„Garantie“ und „Service“ in dieser Dokumentation. Wir bitten um Verständnis, dass direkt an die Hersteller-Anschrift gerichtete Anfragen oder Einsendungen nicht bearbeitet werden können.
Irrtümer und technische Änderungen vorbehalten.
© 2016 Bresser GmbH
Alle Rechte vorbehalten.
Die Reproduktion dieser Dokumentation – auch auszugsweise – in irgendeiner Form (z.B. Fotokopie,
Druck, etc.) sowie die Verwendung und Verbreitung mittels elektronischer Systeme (z.B. Bilddatei,
Website, etc.) ohne eine vorherige schriftliche Genehmigung des Herstellers ist nicht gestattet.
Die in dieser Dokumentation verwendeten Bezeichnungen und Markennamen der jeweiligen Firmen
sind im Allgemeinen in Deutschland, der Europäischen Union und/oder weiteren Ländern waren-, marken- und/oder patentrechtlich geschützt.
2 Eigenschaften
– Achromatische Optik nach Fraunhofer
– Vergütete Objektivlinsen
– Solider Tubus aus Metall
– Höhenverstellbares Fotostativ mit Handführung
– Tauschutzkappe
3 Zu dieser Anleitung
HINWEIS
Diese Bedienungsanleitung ist als Teil des Gerätes zu betrachten!
Lesen Sie vor der Benutzung des Geräts aufmerksam die Sicherheitshinweise und die Bedienungsanleitung.
Bewahren Sie diese Bedienungsanleitung für die erneute Verwendung zu einem späteren Zeitpunkt
auf. Bei Verkauf oder Weitergabe des Gerätes ist die Bedienungsanleitung an jeden nachfolgenden
Besitzer/Benutzer des Produkts weiterzugeben.
4 Verwendungszweck
– Dieses Gerät ist nicht dafür bestimmt, durch Personen (einschließlich Kinder) mit eingeschränkten
physischen, sensorischen oder geistigen Fähigkeiten oder mangels Erfahrung und/oder mangels
Wissen benutzt zu werden, es sei denn, sie werden durch eine für ihre Sicherheit zuständige Per-
son beaufsichtigt oder erhielten von ihr Anweisungen, wie das Gerät zu benutzen ist.
– Dieses Produkt dient ausschließlich der privaten Nutzung.
– Es wurde entwickelt zur vergrößerten Darstellung von Naturbeobachtungen.
4 / 21 IM_4670350_de_en_BRESSER_v1016
Page 5

5 Allgemeine Sicherheitshinweise
GEFAHR
Erblindungsgefahr!
Schauen Sie mit diesem Gerät niemals direkt in die Sonne oder in die Nähe der Sonne. Es besteht
ERBLINDUNGSGEFAHR!
GEFAHR
Erstickungsgefahr!
Bei unsachgemäßer Verwendung dieses Produkts besteht Erstickungsgefahr, insbesondere für Kinder. Beachten Sie deshalb unbedingt die nachfolgenden Sicherheitsinformationen.
– Verpackungsmaterialien (Plastiktüten, Gummibänder, etc.) von Kindern fernhalten! Es besteht Er-
stickungsgefahr!
– Dieses Produkt beinhaltet Kleinteile, die von Kindern verschluckt werden können! Es besteht Ersti-
ckungsgefahr!
Impressum | 5
VORSICHT
Brandgefahr!
Bei unsachgemäßer Verwendung dieses Produkts besteht Brandgefahr. Beachten Sie unbedingt die
nachfolgenden Sicherheitsinformationen, um die Entstehung von Bränden zu vermeiden.
– Setzen Sie das Gerät – speziell die Linsen – keiner direkten Sonneneinstrahlung aus! Durch die
Lichtbündelung könnten Brände verursacht werden.
HINWEIS
Gefahr von Sachschäden!
Bei unsachgemäßer Handhabung können das Gerät und/oder die Zubehörteile beschädigt werden.
Verwenden Sie das Gerät deshalb nur entsprechend den nachfolgenden Sicherheitsinformationen.
– Bauen Sie das Gerät nicht auseinander! Wenden Sie sich im Falle eines Defekts an das für Ihr
Land zuständige Service-Center (siehe Kapitel „Service“).
– Setzen Sie das Gerät keinen Erschütterungen aus.
– Bauteile nicht über einen längeren Zeitraum direkter Sonneneinstrahlung aussetzen. Durch über-
mäßige Sonneneinwirkung kann das Material Schaden nehmen.
– Setzen Sie das Gerät keinen hohen Temperaturen aus und schützen Sie es vor Wasser und hoher
Luftfeuchtigkeit.
HINWEIS
Schutz der Privatsphäre
Achten Sie die Privatsphäre Ihrer Mitmenschen – schauen Sie mit diesem Gerät zum Beispiel nicht in
Wohnungen!
IM_4670350_de_en_BRESSER_v1016 5 / 21
Page 6
6 | Impressum
C
D
E
A
B
1
2
3
4
5
6
8
7
10
15
9
11
12
13
14
16
18
17
19
22
21
21
23
24
25
26
20
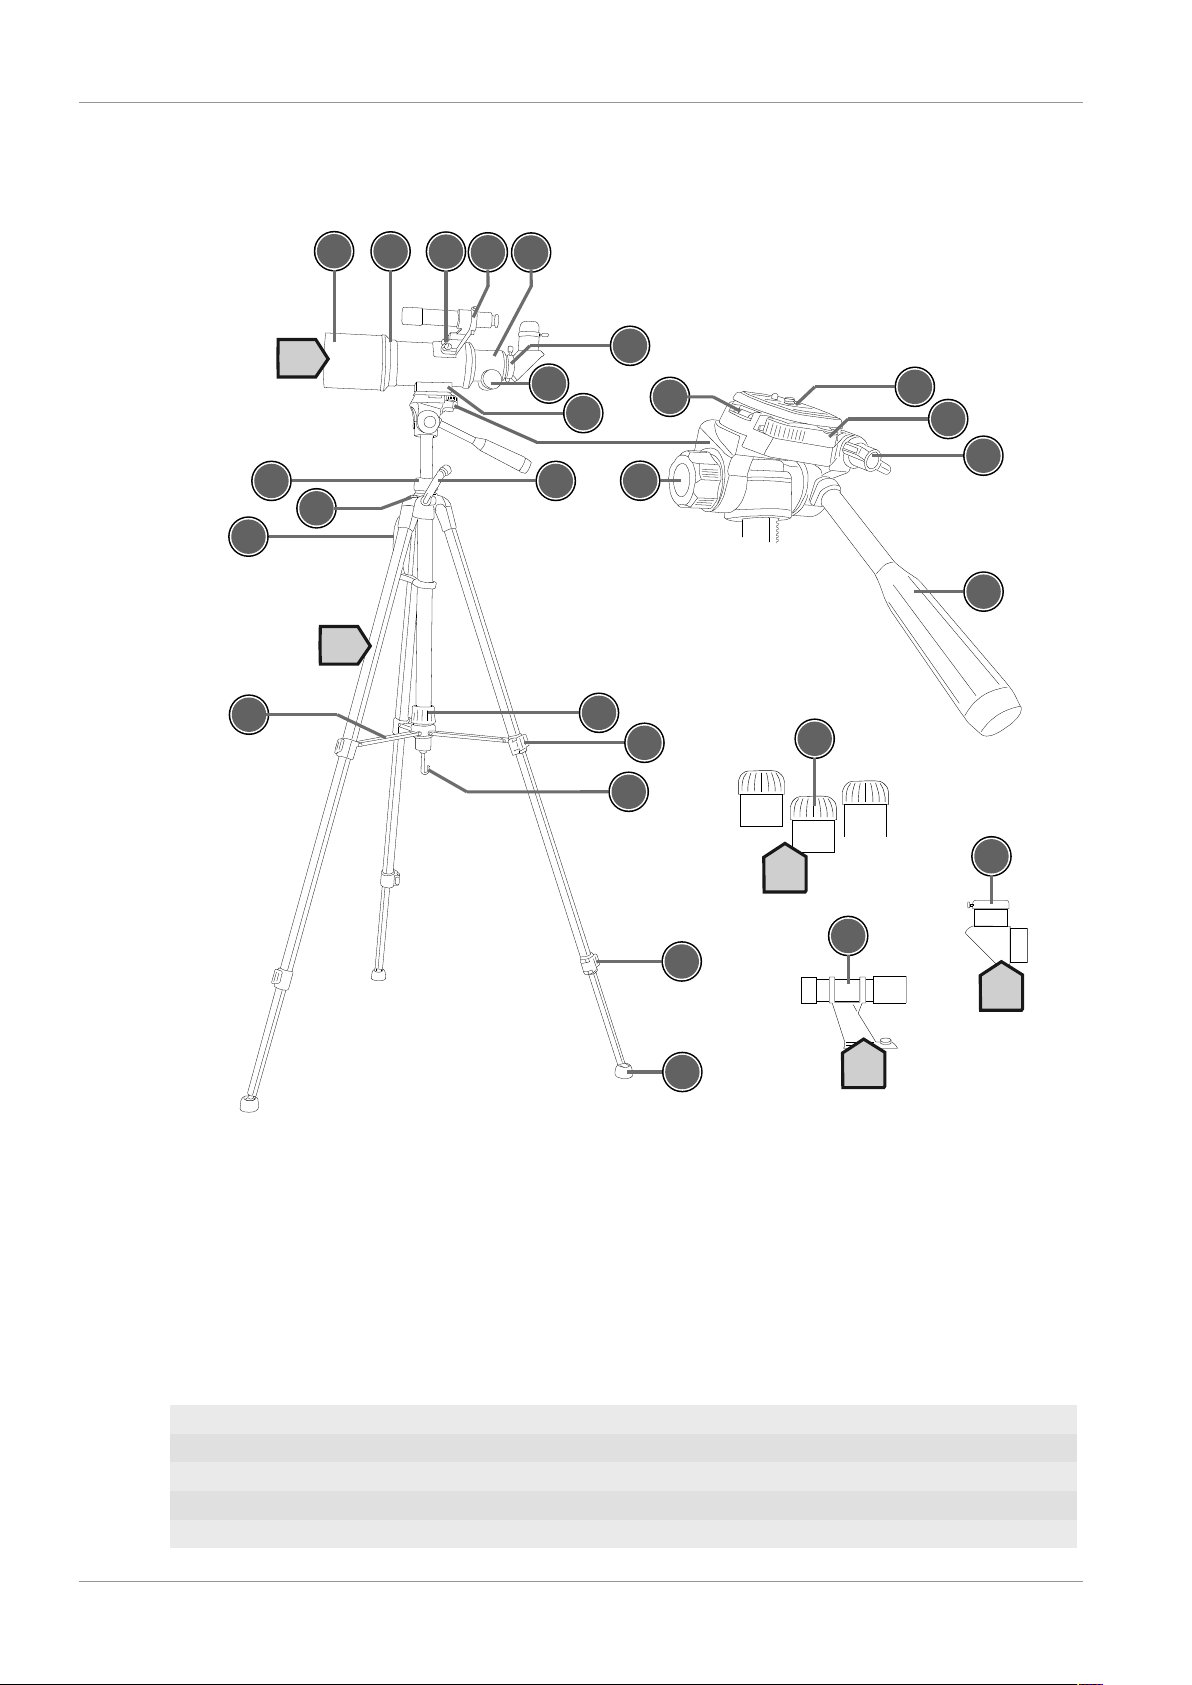
6 Produktabbildungen
Abb.1: Produktabbildungen
7 Lieferumfang
Optik mit Tubus (OTA) (A); Stativ (B); 3 Okulare (C); Amici-Prisma (D); Sucherfernrohr (E)
8 Teileübersicht
1 Tauschutzkappe
2 Objektivlinse
3 Fixierschraube (Halterung Sucherfernrohr)
4 Halterung (Sucherfernrohr)
5 Okularauszug
6 / 21 IM_4670350_de_en_BRESSER_v1016
Page 7

6 Okularaufnahme am Okularauszug
7 Fokusrad
8 Montierungsanschluss
9 Wasserwaage
10 Stativkopfplatte
11 Arretierungshebel (Stativkopfplatte)
12 Fixierschraube (Stativkopfneigung 90°)
13 Fixierschraube (horizontale Bewegung)
14 Führungsgriff und Fixierung (vertikale Bewegung)
15 Kurbel (Höhenverstellung)
16 Arretierungsring (Höhenverstellung)
17 Dosenlibelle
18 Transportgriff
19 Arretierungsring (Stativspinne)
20 Stativspinne (Strebe)
21 Klemmhebel (Stativbein)
22 Zubehörhaken
23 Gummifuß
Impressum | 9
Zubehör:
24 Okular
25 Amici-Prisma
26 Sucherfernrohr mit Halterung
9 Standortwahl
Einen dunklen Standort wählen, um eine Beeinträchtigung der Dunkeladaption durch Lichter zu vermeiden. Der Untergrund muss eben und stabil sein.
Nicht aus geschlossenen Räumen heraus beobachten. Teleskop und Zubehör ca. 30 Minuten vor Beobachtungsbeginn an den gewünschten Standort stellen, damit ein Temperaturausgleich gewährleistet ist.
10 Stativ aufstellen
1. Arretierungsring für die Stativspinne lösen.
2. Stativbeine langsam nach außen ziehen bis Stativspinne vollständig geöffnet ist.
3. Arretierungsring für die Stativspinne handfest anziehen.
4. Klemmhebel für die Stativbeine öffnen.
5. Stativbeine auf die gewünschte Höhe ausziehen. Darauf achten, dass sich die Luftblase der Dosenlibelle mittig im Kreis befindet, um einen waagerechten Stand zu gewährleisten. Gegebenenfalls die Stativbeine nachjustieren.
6. Klemmhebel für die Stativbeine schließen.
7. Arretierungsring für die Höhenverstellung lösen.
8. Stativkopf mittels Kurbel auf die gewünschte Höhe ausfahren.
9. Arretierungsring für die Höhenverstellung handfest anziehen.
IM_4670350_de_en_BRESSER_v1016 7 / 21
Page 8
11 | Impressum
1
2
3
4
5
7
8
9
6
11 Optiktubus auf Stativ montieren
HINWEIS
Optik während der Montage sichern
Optik während der Montage stets mit einer Hand sichern! Ein Herabfallen desselben führt zu irreparablen Schäden am Gerät.
1. Arretierungshebel für die Stativkopfplatte in Position FREE drücken und gleichzeitig die Stativkopfplatte aus der Halterung entnehmen.
2. Öse der Gewindeschraube an der Unterseite der Stativkopfplatte aufrichten.
3. Gewindeschraube der Stativkopfplatte in das Gewinde des Montierungsanschlusses des Optiktubus eindrehen, um die Stativkopfplatte am Optiktubus zu befestigen. Darauf achten, dass der Zapfen zur Fixierung in die entsprechende Bohrung greift.
4. Den Arretierungshebel in Position FREE drücken und den Optiktubus mit der montierten Stativkopfplatte in die Halterung einsetzen. Darauf achten, dass die Objektivlinse in die entgegengesetzte Richtung zum Führungsgriff zeigt.
5. Arretierungshebel in Position LOCK drücken.
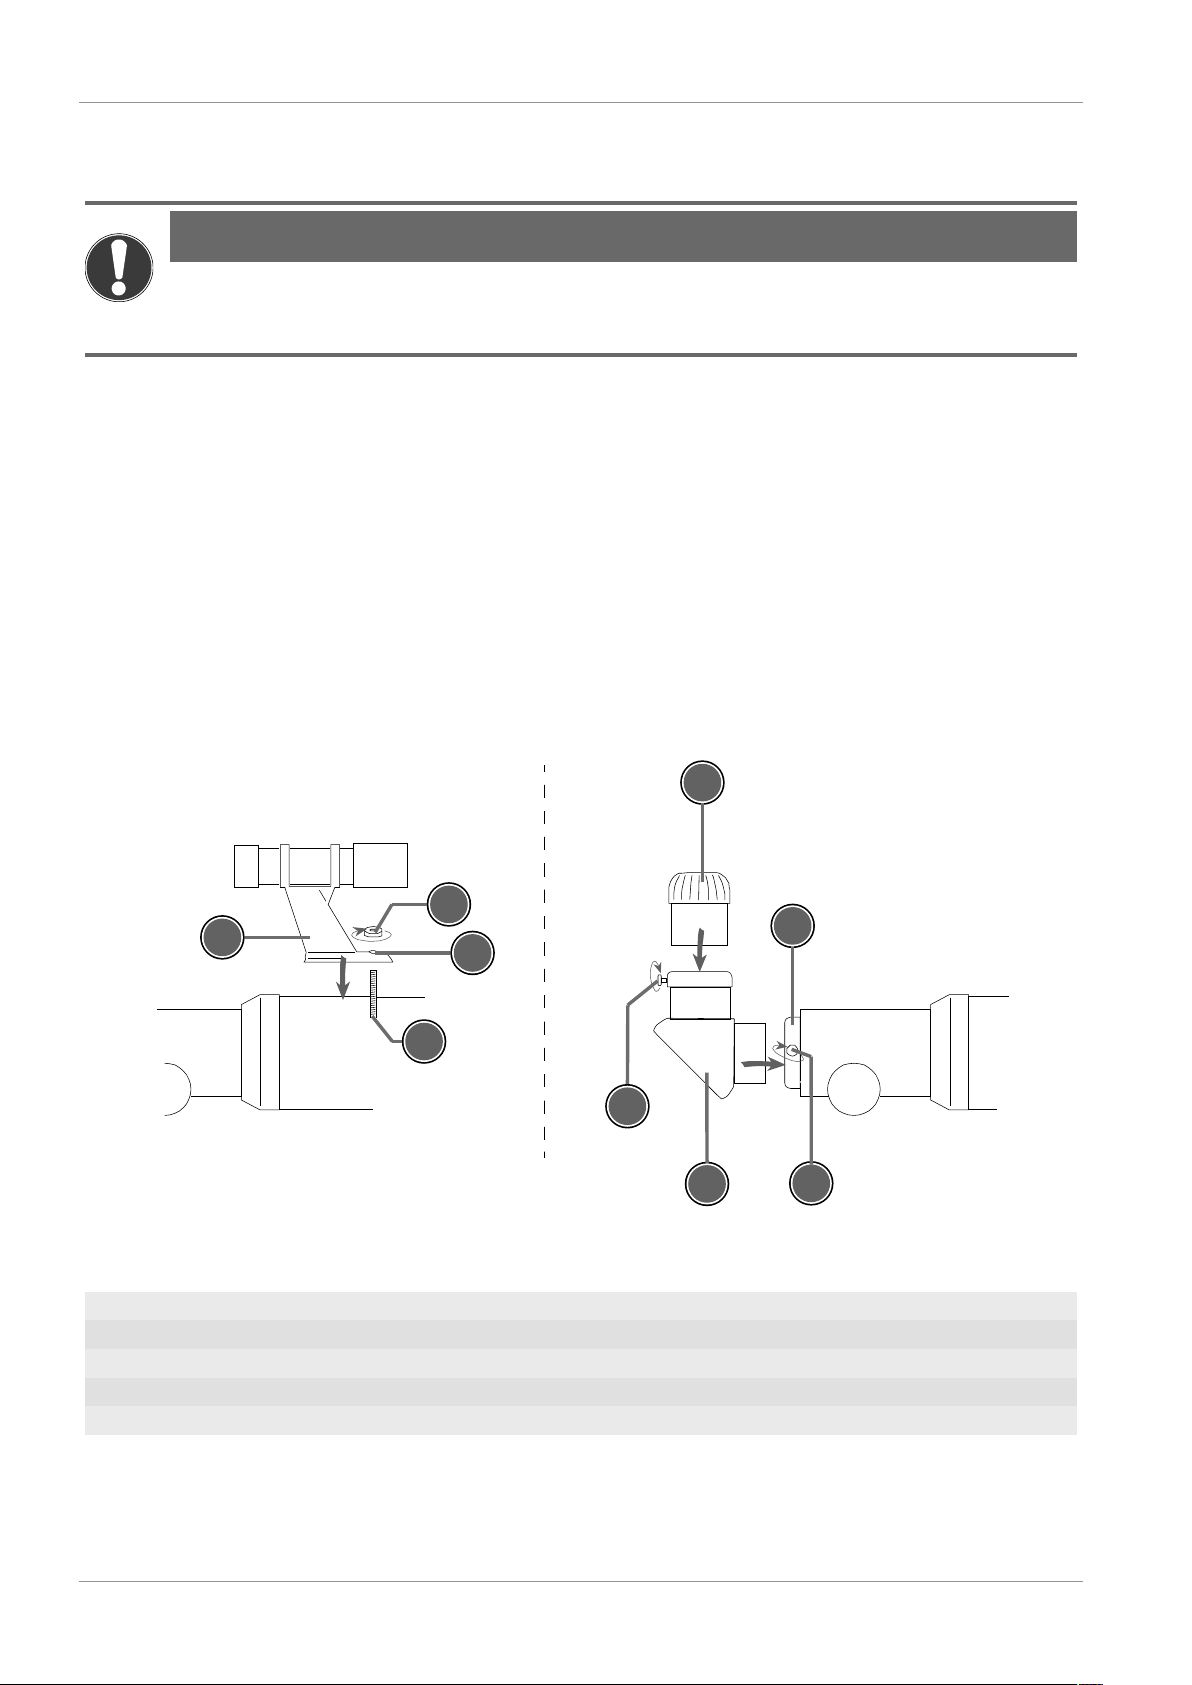
12 Zubehörteile anbringen
Abb.2: Achromat - Zubehör anbringen
1 Halterung (Sucherfernrohr) 2 Fixierschraube (Halterung Sucherfernrohr)
3 Bohrung (Fuß Halterung) 4 Gewindeschraube (Optischer Tubus)
5 Okular 6 Fixierschraube (Amici-Prisma)
7 Amici-Prisma 8 Okularaufnahme
9 Fixierschraube (Okularaufnahme)
1. Klemmschraube lösen.
2. Gewünschtes Zubehörteil in die Okularaufnahme einsetzen.
8 / 21 IM_4670350_de_en_BRESSER_v1016
Page 9

3. Klemmschraube handfest anziehen, so dass Zubehörteil sicher fixiert ist.
13 Verwendung von Okularen
Die Vergrößerung hängt von der Brennweite des Teleskops und des Okulars* ab. Durch Auswechseln
der Okulare kann die Vergrößerung variiert werden.
Beispiel:
Brennweite Teleskop : Brennweite Okular = Vergrößerung
350 mm : 20 mm = 17,5x
Beobachtungen stets mit einem Okular* mit hoher Brennweite (= niedrige Vergrößerung) beginnen.
(*abhängig vom jeweiligen Modell bereits im Lieferumfang enthalten)
14 Verwendung eines Amici-Prismas
Ein Amici-Prisma* wird zwischen Okularstutzen und Okular* eingesetzt. Es bewirkt eine Bildumkehrung zu einem aufrechten und seitenrichtigen Bild.
(*abhängig vom jeweiligen Modell bereits im Lieferumfang enthalten)
15 Stativkopf bewegen
Impressum | 13
HINWEIS
Arretierungsschrauben/-ringe nur handfest anziehen
Arretierungsschrauben und -ringe nur handfest anziehen. Durch zu festes Anziehen können Schrauben, Ringe und Gewindefassungen brechen!
1. Fixierschraube für die horizontale Bewegung lösen, um den Stativkopf nach rechts oder links zu
bewegen.
2. Fixierschraube handfest anziehen, um den Kopf in der gegenwärtigen horizontalen Position festzusetzen.
3. Führungsgriff entgegen dem Uhrzeigersinn drehen, um die Fixierung für die vertikale Bewegung
zu lösen und den Stativkopf nach oben oder unten zu kippen.
4. Führungsgriff im Uhrzeigersinn drehen, um den Kopf in der gegenwärtigen vertikalen Position festzusetzen.
5. Für eine um 90° gedrehte Beobachtungsposition der aufgesetzten Optik die Fixierschraube für die
Stativkopfneigeplatte lösen.
6. Neigeplatte nach rechts umklappen und Fixierschraube handfest anziehen, um die Neigeplatte in
dieser Position festzusetzen.
16 Justieren des Sucherfernrohrs
1. Okular mit größter Brennweite in den Zenitspiegel (bei Linsenteleskopen) oder direkt in den Okularstutzen (bei Spiegelteleskopen) einsetzen.
2. Markantes Objekt (z.B. Hausgiebel, Kirchturmspitze o.ä.) in ca. 300 m Entfernung mit dem Teleskop anvisieren.
3. Durch das Okular blicken und Teleskop so ausrichten, dass das Objekt mittig im Sichtfeld des
Okulars erscheint.
4. Durch das Sucherfernrohr blicken und durch drehen der Justierschrauben so einrichten, dass das
Objekt mittig im Fadenkreuz zu sehen ist.
5. Die Justierung des Sucherfernrohrs ist abgeschlossen, wenn durch das Okular und das Sucherfernrohr jeweils mittig exakt das gleiche Bild zu sehen ist.
IM_4670350_de_en_BRESSER_v1016 9 / 21
Page 10

17 | Impressum
HINWEIS
Bildumkehrung
Einige Sucherfernrohre besitzen keine integrierte optische Bildumkehrung. Das heißt, dass das Bild im
Sucherfernrohr „auf dem Kopf“ steht. Dies ist jedoch kein Fehler!
17 Vor der Beobachtung
Zum Schutz vor Staub und Schmutz sind Tubusöffnung und Okularstutzen mit Schutzkappen verschlossen. Schutzkappen vor der Beobachtung entfernen. Für die Lagerung die Kappen wieder aufsetzen.
18 Beobachtung
1. Teleskop grob auf das gewünschte Objekt (z.B. den Mond) ausrichten und durch das Sucherfernrohr blicken.
2. Durch horizontale und vertikale Verstellung des Teleskops das Objekt mittig im Fadenkreuz des
Suchers einstellen.
3. Durch das Okular blicken, um das Objekt vergrößert zu sehen.
4. Falls erforderlich, die Bildschärfe am Fokusrad einstellen.
5. Durch den Wechsel von einem Okular mit hoher Brennweite zu einem Okular mit niedriger Brennweite kann die Vergrößerung gesteigert werden.
19 Fehlerbeseitigung
Problem/Fehler Mögliche Lösung
Kein Bild Schutzkappen entfernen;
Unscharfes Bild Bildschärfe mittels Fokusrad einstellen
Keine Scharfeinstellung möglich Temperaturausgleich abwarten
Schlechtes Bild Nicht durch Glasscheiben beobachten
Objekt im Sucher, aber nicht im Teleskop sichtbar Sucher justieren
„Schiefes“ Bild trotz Amici-Prisma Okularstutzen des Amici-Prismas senkrecht aus-
20 Reinigung und Wartung
HINWEIS
Objektiv niemals aus der Fassung nehmen und Einstellschrauben nicht verändern!
Ein korrekter Wiedereinbau ohne Fachkenntnisse ist nicht möglich. Eine erhebliche Verminderung der
optischen Leistungsfähigkeit ist die Folge. In diesem Fall erlischt der Garantieanspruch!
Okular mit geringerer Vergrößerung wählen
richten
HINWEIS
Keine aggressiven Reinigungsmittel verwenden!
Verwenden Sie für die Reinigung der optischen Flächen keine
ne duftimprägnierten, gefärbten oder mit Lotion getränkten Tücher. Durch die Verwendung kann die
Optik dauerhaft Schaden nehmen!
10 / 21 IM_4670350_de_en_BRESSER_v1016
fotografischen Linsenreiniger sowie kei-
Page 11

Impressum | 21
– Gerät vor Staub und Feuchtigkeit schützen.
– Fingerabdrücke und ähnliche Verunreinigungen der optischen Flächen vermeiden.
– Vor der Verwendung muss die Restfeuchtigkeit vollständig abgebaut sein.
– Die Optik nicht zu häufig reinigen! Ein wenig Staub auf der Linsenvorderseite oder Spiegeloberflä-
che bewirkt keine nennenswerte Verringerung der Abbildungsqualität. Dies ist kein Anlass für eine
Reinigung.
– Falls erforderlich, Staub auf Linsenvorderseite oder Spiegeloberfläche mit einem Kamelhaarpinsel
vorsichtig entfernen oder mit einem Blasebalg weg blasen.
– Organische Verschmutzungen (z. B. Fingerabdrücke) mit einer Reinigungsflüssigkeit entfernen
(Mischverhältnis: drei Teile destilliertes Wasser, ein Teil Isopropylalkohol). Je halbem Liter Reinigungsflüssigkeit einen kleinen Tropfen eines biologisch abbaubaren Geschirrspülmittels beifügen.
Weiche, weiße Gesichtspflegetücher verwenden und Oberflächen vorsichtig mit kurzen, radialen
Wischbewegungen reinigen. Die Tücher möglichst häufig auswechseln.
– Bei hoher Luftfeuchtigkeit kann das verbaute Glas beschlagen und es kann zu Feuchtigkeitsbil-
dung kommen. Dies ist kein Mangel! Lassen Sie in diesem Fall das Gerät bei Zimmertemperatur
einige Zeit akklimatisieren, so dass die Restfeuchtigkeit abgebaut werden kann.
– Nachdem die Restfeuchtigkeit vollständig abgebaut ist, die Staubschutzkappen aufsetzen und das
Teleskop in einem geschlossenen Behältnis* an einem trockenen und schimmelfreien Platz
lagern. Es wird empfohlen, Zubehörteile in einem geschlossenen Behälter mit Trockenmittel zu
lagern.
– (*abhängig vom jeweiligen Modell kann ein Koffer bereits im Lieferumfang enthalten sein)
21 Entsorgung
Entsorgen Sie die Verpackungsmaterialien sortenrein. Informationen zur ordnungsgemäßen
Entsorgung erhalten Sie beim kommunalen Entsorgungsdienstleister oder Umweltamt.
Beachten Sie bei der Entsorgung des Geräts die aktuellen gesetzlichen Bestimmungen! Informationen
zur fachgerechten Entsorgung erhalten Sie bei den kommunalen Entsorgungsdienstleistern oder dem
Umweltamt.
22 Garantie
Die reguläre Garantiezeit beträgt 2 Jahre und beginnt am Tag des Kaufs. Um von einer verlängerten,
freiwilligen Garantiezeit wie auf dem Geschenkkarton angegeben zu profitieren, ist eine Registrierung
auf unserer Website erforderlich.
Die vollständigen Garantiebedingungen sowie Informationen zu Garantiezeitverlängerung und Serviceleistungen können Sie unter www.bresser.de/garantiebedingungen einsehen.
IM_4670350_de_en_BRESSER_v1016 11 / 21
Page 12

Contents
Contents
1 Imprint ...........................................................................................................................................................13
2 Features.........................................................................................................................................................13
3 About this Instruction Manual.....................................................................................................................13
4 Intended Use ................................................................................................................................................. 13
5 General safety instructions .........................................................................................................................14
6 Product images.............................................................................................................................................15
7 Scope of delivery..........................................................................................................................................15
8 Parts overview ..............................................................................................................................................15
9 Site location ..................................................................................................................................................16
10 Setting up the tripod ....................................................................................................................................16
11 Mounting the OTA on the tripod .................................................................................................................17
12 Installing accessories ..................................................................................................................................17
13 Using eyepieces ...........................................................................................................................................18
14 Using an Amici prism...................................................................................................................................18
15 Moving the tripod head ................................................................................................................................18
16 Adjusting the viewfinder..............................................................................................................................18
17 Before starting an observation ...................................................................................................................19
18 Observation................................................................................................................................................... 19
19 Troubleshooting ...........................................................................................................................................19
20 Cleaning and maintenance ..........................................................................................................................19
21 Disposal......................................................................................................................................................... 20
22 Warranty ........................................................................................................................................................20
xii IM_4670350_de_en_BRESSER_v1016
Page 13

1 Imprint
Bresser GmbH
Gutenbergstraße 2
46414 Rhede
Deutschland
http://www.bresser.de
For information regarding liability claims or service requests, please refer to chapters "Warranty" and
"Service" in this documentation. We ask for your understanding, that any requests or submissions that
have been addressed to the manufacturer's address can not be processed.
Errors reserved - technical specifications subject to change.
Copyright: 2016Bresser GmbH
All rights reserved.
It is not allowed to reproduce this documentation or parts of it in any kind (e.g. photocopying, printing,
etc) without written a permission of the manufacturer. It is also prohibitted to use or transmit this documentation with electronic systems (e.g. image file, website, etc).
The descriptions and brand names of the corresponding firms used in this documentation are generally protected under trademark, brand and/or patent law for Germany, for the European Union and/or
other countries.
Imprint | 1
2 Features
– Achromatic optics by Fraunhofer
– Coated objective lenses
– Solide metal tube
– Height adjustable photo tripod with handle
– Dew shield
3 About this Instruction Manual
NOTICE
These operating instructions are to be considered a component of the device.
Please read the safety instructions and the operating instructions carefully before use.
Keep these instructions for renewed use at a later date. When the device is sold or given to someone
else, the instruction manual must be provided to the new owner/user of the product.
4 Intended Use
– This device is not intended for use by individuals (including children) with limited physical, sensory
or mental capabilities or those lacking in experience and/or knowledge, unless they are supervised
by an individual responsible for their safety or have received instructions from them regarding the
use of the device.
– This product is intended only for private use.
– It was developed for the magnified display of things in nature.
IM_4670350_de_en_BRESSER_v1016 13 / 21
Page 14

5 | Imprint
5 General safety instructions
DANGER
Danger of blindness!
Never use this device to look directly at the sun or in the direct proximity of the sun. There is a risk of
BLINDNESS!
DANGER
Danger of choking!
In case of any improper use of this device, there is a risk of choking, especially for children. Therefore
please read the safety instructions below.
– Keep packaging material, like plastic bags and rubber bands, out of the reach of children, as these
materials pose a choking hazard!
– This product contains small parts that could be swallowed by children. There is a risk of choking!
CAUTION
Fire hazard!
In case of any improper use of this device, there is a risk of fire. Therefore please read the safety instructions below to avoid the initiation of burning.
– Do not place the device, particularly the lenses, in direct sunlight. The concentration of light could
cause a fire.
NOTICE
Risk of property damage!
In case of any improper use of this device and/or its accessories, there is a risk of property damage.
Therefore only use the device according to the safety instructions below.
– Do not disassemble the device. In the event of a defect, please contact the Service Centre in your
country (see chapter 'Service').
– Protect the device from severe shocks!
– Do not expose the components to direct sunlight for a longer time.
– Do not expose this device to higher temperatures and protect it from water and high humidity.
NOTICE
Privacy protection
Please heed the privacy of other people. Do not use this device to look into apartments, for example!
14 / 21 IM_4670350_de_en_BRESSER_v1016
Page 15

6 Product images
C
D
E
A
B
1
2
3
4
5
6
8
7
10
15
9
11
12
13
14
16
18
17
19
22
21
21
23
24
25
26
20
Imprint | 6
Illustration1: Product images
7 Scope of delivery
Optical tube assembly (OTA) (A); Tripod (B); 3 Eyepieces (C); Amici prism (D); Viewfinder (E)
8 Parts overview
1 Dew shield
2 Objective lens
3 Fixing screw (Viewfinder bracket)
4 Bracket (Viewfinder)
5 Eyepiece extension
IM_4670350_de_en_BRESSER_v1016 15 / 21
Page 16

9 | Imprint
6 Eyepiece holder
7 Focussing wheel
8 Mounting connection
9 Level
10 Tripod head plate
11 Locking lever (Tripod head plate)
12 Fixing screw (Tripod head inclination 90°)
13 Fixing screw (Horizontal movement)
14 Handle and fixation (vertical movement)
15 Crank handle (Height adjustment)
16 Locking ring (Height adjustment)
17 Circular level
18 Transport handle
19 Locking ring (Tripod bridge)
20 Tripod bridge (Strut)
21 Clamping lever (Tripod leg)
22 Hook for accessories
23 Rupper foot
Accessories:
24 Eyepiece
25 Amici prism
26 Viewfinder with bracket
9 Site location
Choose a dark location to avoid an interference of dark adaption throughout lights. A flat and stable
surface is recommended.
Do not observe from closed rooms. Approx. 30 minutes before starting an observation, position the
telescope and the accessories on the desired location to allow a temperature compensation.
10 Setting up the tripod
1. Loosen the locking ring for the tripod bridge.
2. Pull out the tripod legs slowly until the tripod bridge is opend completely.
3. Tighten the locking ring for the tripod bridge by hand.
4. Open the clamping lever for the tripod legs.
5. Pull out the tripod legs to the desired height. Make sure that the bubble of the circular level is in
the middle of the circle to ensure a horizontal plane stand.
6. Close the clamping lever for the tripod legs.
7. Loosen the locking ring for the height adjustment.
8. Pull out the tripod head to the desired height by using the crank handle.
9. Tighten the locking ring for the height adjustment by hand.
16 / 21 IM_4670350_de_en_BRESSER_v1016
Page 17

11 Mounting the OTA on the tripod
1
2
3
4
5
7
8
9
6
NOTICE
Save the OTA when installing it.
Save the OTA always with one hand when installing it! It can cause serious damage if the device is
falling down.
1. Press the locking lever for the tripod head plate and move to FREE position and take the plate out
of the holder at the same time.
2. Pull out the eyelet of the threaded bolt at the bottom side of the tripod head plate.
3. Screw the threaded bolt of the tripod head plate into the mounting connection of the OTA to attach
the plate to the OTA. Make sure that the fixing pin is reaching into the corresponding drill.
4. Press the and hold the locking lever in position FREE and put the OTA with the attached tripod
head plate into the holder. Make sure that the objective lens is pointing to the opposite side of the
handle.
5. Press the locking lever to position LOCK.
Imprint | 11
12 Installing accessories
Illustration2: Achromat - attaching accessories
1 Bracket (Viewfinder) 2 Fixing screw (Viewfinder bracket)
3 Drill (Foot bracket) 4 Threaded bolt (OTA)
5 Eyepiece 6 Fixing screw (Amici prism)
7 Amici prism 8 Eyepiece holder
9 Fixing screw (Eyepiece holder)
1. Loosen fixing screw.
2. Insert the desired accessory into the eyepiece holder.
3. Tighten the fixing screw by hand that the accessory ist fixed in a secure way.
IM_4670350_de_en_BRESSER_v1016 17 / 21
Page 18

13 | Imprint
13 Using eyepieces
The magnification range depends on the focal length of the telescope and the eyepieces*. The magnification can be varied by changing the eyepieces.
Example:
Focal length telecope : Eyepiece focal length = Magnification
350mm : 20mm = 17.5x
Use an eyepiece* with higher focal length (= lower magnification) when starting an observation.
(*depending on the model, it can be part of the content)
14 Using an Amici prism
An Amici prism* will be attached to the telescope between the eyepiece holder and the eyepiece*. It
allows for an image reversal to an upright and lateral image.
(*depending on the model, it can be part of the content)
15 Moving the tripod head
NOTICE
Tighten locking screws/rings only by hand.
Tighten locking screws/rings only by hand. Rings and threads can break when overtighten them!
1. Loosen the fixing screw for horizontal movement to move the tripod head to the right or to the left.
2. Tighten the fixing screw by hand to set the tripod in current horizontal position.
3. Loosen the fixation for vertical movement by turning the handle counterclockwise. Tilt the tripod
head up and down.
4. Turn the handle clockwise to to set the tripod head in current vertical position.
5. Loosen the fixing screw for the tripod tilt plate to tilt the the attached optics sidewards for a viewing
position up to 90 degrees.
6. Tilt the tilt plate to the right and tighten the fixing screw by hand to set the tilt plate in current position.
16 Adjusting the viewfinder
1. Insert an eyepiece with higher focal length into the diagonal mirror (for refracting telescopes) or
directly into the eyepiece holder (for reflecting telescopes).
2. With the telescope, target on a specific object (e.g. house gable, church spire or otherwise) at a
distance of approx. 300 meters.
3. Look through the eyepiece and align the telescope until the object is visible in the middle of the
eyepiece's field of view.
4. Look through the viewfinder and align it by turning the adjustment screws until the object is visble
in the middle of the viewfinder's hair cross.
5. The adjustment of the viewfinder is completed if the image is visible in the middle of the viewfinder
and the eyepiece in the same way.
18 / 21 IM_4670350_de_en_BRESSER_v1016
Page 19

NOTICE
Image reversal
Some viewfinder do not have an integrated optical image reversal. In this case, the image is visble upside down when looking through the viewfinder. This is not an error!
17 Before starting an observation
The tube opening and the eyepiece holder are protected by fust protection caps. Remove the protection caps before starting the observation. Replace cap when storing the it.
18 Observation
1. Point the telescope at the desired object (e.g. the moon) and look through the viewfinder.
2. Use the telescope's horizontal and vertical adjustment to center the object in the middle of the
viewfinder's hair cross.
3. Look through the eyepiece for an enlarged view of the object.
4. If neccessary, adjust the image sharpness by turning the focussing wheel.
5. The magnification can be enhanced by the change from an eyepiece with a high focal length to an
eyepiece with a lower focal length.
Imprint | 17
19 Troubleshooting
Problem/Error Possible solution
No image Remove protection caps
Use an eyepiece with lower magnification
Blurred image Adjust the sharpness by turning the focussing
wheel.
Focussing not possible Wait for temperature compensation
Bad image Do not observe through glass panes
Object visible in the viewfinder but not in the tele-
scope
'Crooked' image despite the use of an Amici prism Bring the eyepiece holder of the Amici prism to
Adjust the viewfinder
vertical position
20 Cleaning and maintenance
NOTICE
Never take the objective out of its socket and do not modify its adjustment screws.
It is not possible to reinstall the objective in an accurate manner without specialist knowledge. A significant reduction of the optical performance is the result. In this case the warranty claims become void!
NOTICE
Do not use aggressive cleaners!
Do not use photographic lens cleaners and cloths that have been perfume impregnated, coloured or
soaked with lotion, to clean any optical surfaces. If using such cleaning agents, the optics can be permanently damanged!
IM_4670350_de_en_BRESSER_v1016 19 / 21
Page 20

21 | Imprint
– Protect the device against dust and moisture.
– Avoid putting fingerprints and equal contaminations on any optical surfaces.
– Make sure the residual moisture is fully eliminated before use.
– Do not clean the optics too often! Some dust on the lens frontside or on the mirror surface will not
cause any significant differences in the image quality. This is no cause for cleaning.
– If neccessary, remove dust on the lens frontside or the mirror surface carefully by using a brush
made of camel hair or a bag bellow.
– Remove organic dirt (e.g. fingerprints) by using a special cleaning liquid (mixing ratio: one part of
distilled water and one part of isopropyl alcohol). Add a small drop of a biodegradable dishwasher
detergent on half a litre of this cleaning liquid. Use soft white towels for facial care and carefully
clean the optical surfaces with short circular movements. Exchange the towels more often.
– High humidity can cause the glass to fog up and can lead to local moisture build-up. This is not a
defect! In this case let the device acclimatise for a short period of time at room temperature, so
that the residual moisture can dissipate.
– After any residual moisture has been degraded, put on the dust protection caps and store the tele-
scope in a closed box* at a dry place that is free of mould. It is recommended to store also the accessories in a closed container with desiccant (bags).
– (*depending on the model a box can be part of the content)
21 Disposal
Dispose of the packaging materials properly, according to their type, such as paper or cardboard. Contact your local waste-disposal service or environmental authority for information
on the proper disposal.
Please take the current legal regulations into account when disposing of the device! Get more information on the proper disposal from the local waste-disposal service or environmental authority.
22 Warranty
The regular guarantee period is 2 years and begins on the day of purchase. To benefit from an extended voluntary guarantee period as stated on the gift box, registration on our website is required.
You can consult the full guarantee terms as well as information on extending the guarantee period and
details of our services at www.bresser.de/warranty_terms.
20 / 21 IM_4670350_de_en_BRESSER_v1016
Page 21

Page 22

Page 23

Page 24

Service
DE AT
CH BE
Bei Fragen zum Produkt und eventuellen
Reklamationen nehmen Sie bitte zunächst mit dem
Service-Center Kontakt auf, vorzugsweise per
E-Mail.
E-Mail: service@bresser.de
Telefon*: +49 28 72 80 74 210
BRESSER GmbH
Kundenservice
Gutenbergstr. 2
46414 Rhede
Deutschland
* Lokale Rufnummer in Deutschland (Die Höhe der Gebühren je Telefonat
ist abhängig vom Tarif Ihres Telefonanbieters); Anrufe aus dem Ausland
sind mit höheren Kosten verbunden.
GB IE
Please contact the service centre first for any
questions regarding the product or claims,
preferably by e-mail.
e-mail: service@bresseruk.com
Telephone*: +44 1342 837 098
NL BE
Als u met betrekking tot het product vragen of
eventuele klachten heeft kunt u contact opnemen
met het service centrum (bij voorkeur per e-mail).
e-mail: info@folux.nl
Teléfono*: +31 528 23 24 76
Folux B.V.
Smirnoffstraat 8
7903 AX Hoogeveen
Nederlands
* Het telefoonnummer wordt in het Nederland tegen lokaal tarief in rekening
gebracht. Het bedrag dat u per gesprek in rekening gebracht zal worden,
is afhankelijk van het tarief van uw telefoon provider; gesprekken vanuit
het buitenland zullen hogere kosten met zich meebrengen.
ES IT PT
Si desea formular alguna pregunta sobre el producto
o alguna eventual reclamación, le rogamos que se
ponga en contacto con el centro de servicio técnico
(de preferencia por e-mail).
e-mail: servicio.iberia@bresser-iberia.es
Teléfono*: +34 91 67972 69
BRESSER UK Ltd
Unit 1 starborough Farm,
Starborough Road, Nr Marsh Green,
Edenbridge, Kent TN8 5RB
Great Britain
* Number charged at local rates in the UK (the amount you will be charged
per phone call will depend on the tariff of your phone provider); calls from
abroad will involve higher costs.
FR BE
Si vous avez des questions concernant ce produit
ou en cas de réclamations, veuillez prendre contact
avec notre centre de services (de préférence via
e-mail).
e-mail: sav@bresser.fr
Téléphone*: 00 800 6343 7000
BRESSER France SARL
Pôle d'Activités de Nicopolis
260, rue des Romarins
83170 Brignoles
France
* Prix d'un appel local depuis la France ou Belgique
BRESSER Iberia SLU
c/Valdemorillo,1 Nave B
P.I. Ventorro del cano
28925 Alcorcón Madrid
España
* Número local de España (el importe de cada llamada telefónica dependen
de las tarifas de los distribuidores); Las llamadas des del extranjero están
ligadas a costes suplementarios.
 Loading...