

Page 1
Operating Instructions
AR-90 · AR-102 · AR-127S/L · AR-152S/L· NT-130 · NT-150S/L · NT-203
Page 2
2
General InformatIons / telescope features
g
f
e
C
I
B
d
1^
1%
H
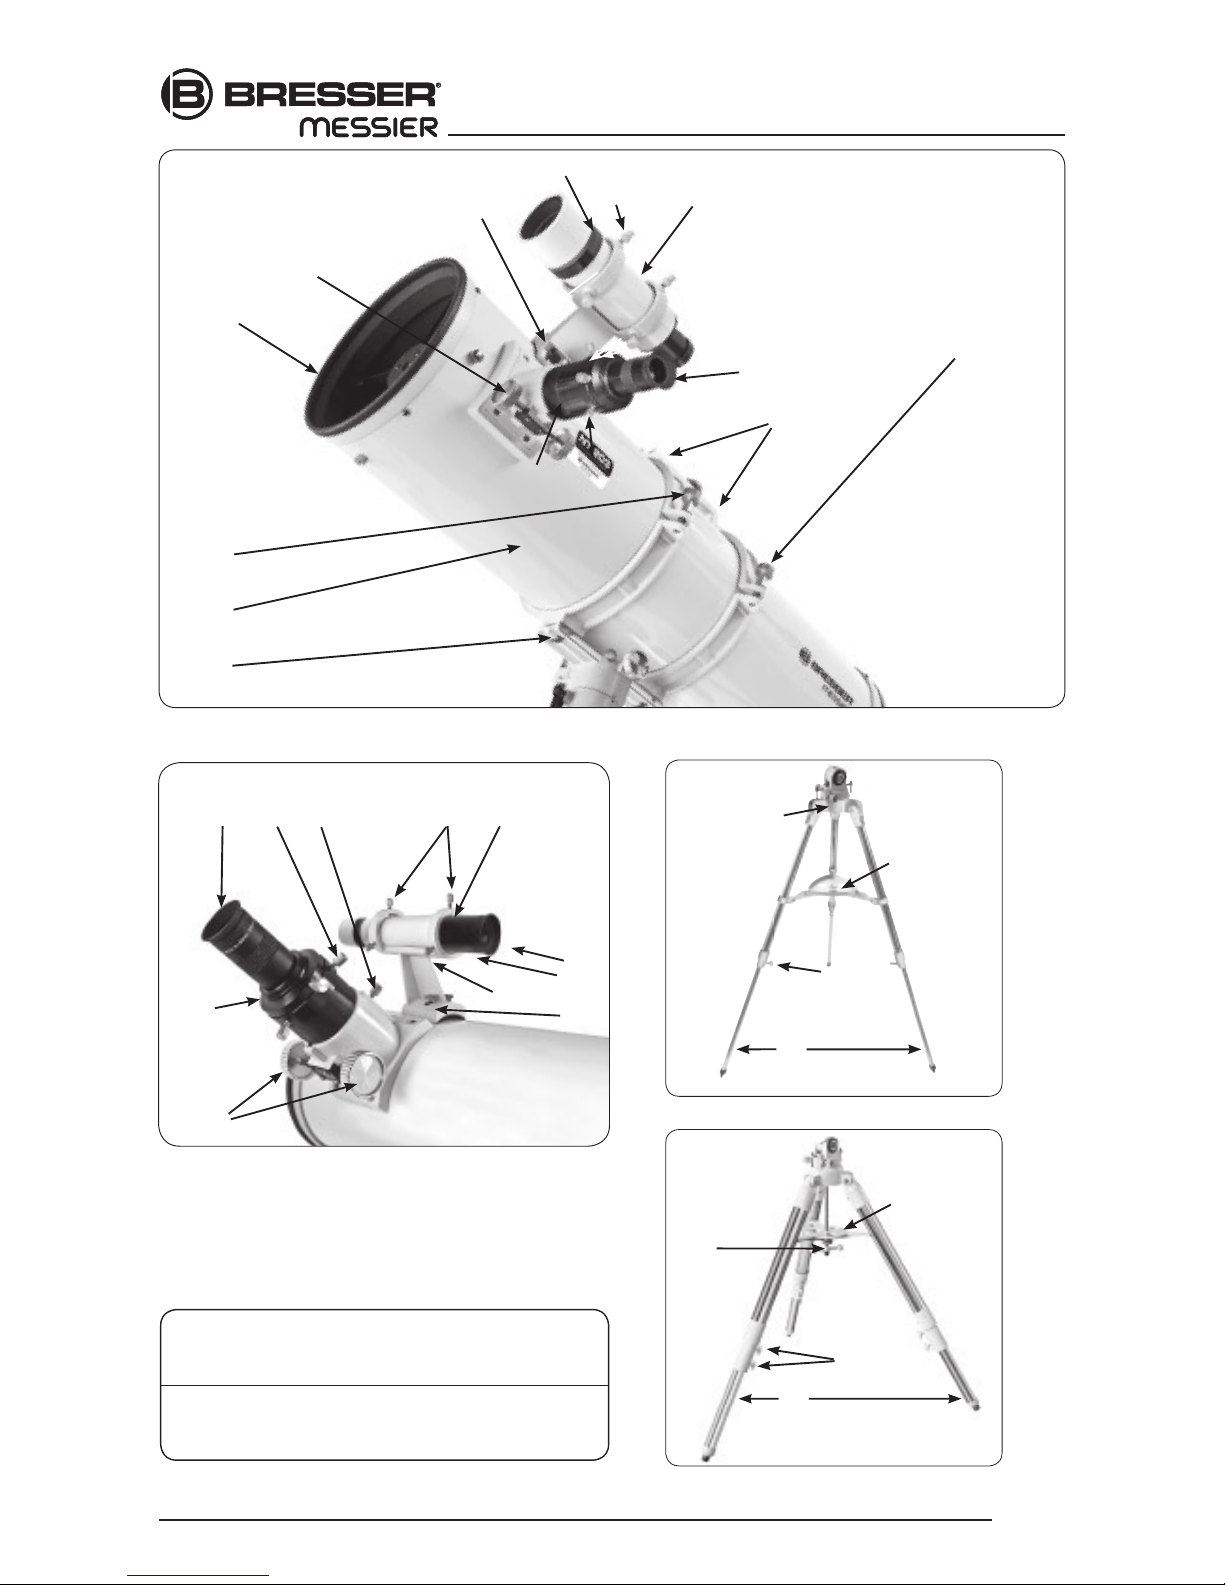
Fig. 1a: The Messier series telescope including a viewfinder. Optical Assembly (Newtonian model shown).
AR = Achromatic Refractor -
NT = Newton - Reflectortelescope
Technical Data Page 23!
Fig. 1c: The Exos2 Tripod
3%
3^
3&
3*
B
1)
C
d
e
f
H
I
J
1$
1#
1!
G
1#
Fig. 1c: The Exos1 Tripod
3&
3*
3^
3(
Page 3
Looking at or near the Sun will cause instant and irreversible damage to your eye!
General InformatIons / telescope features
3
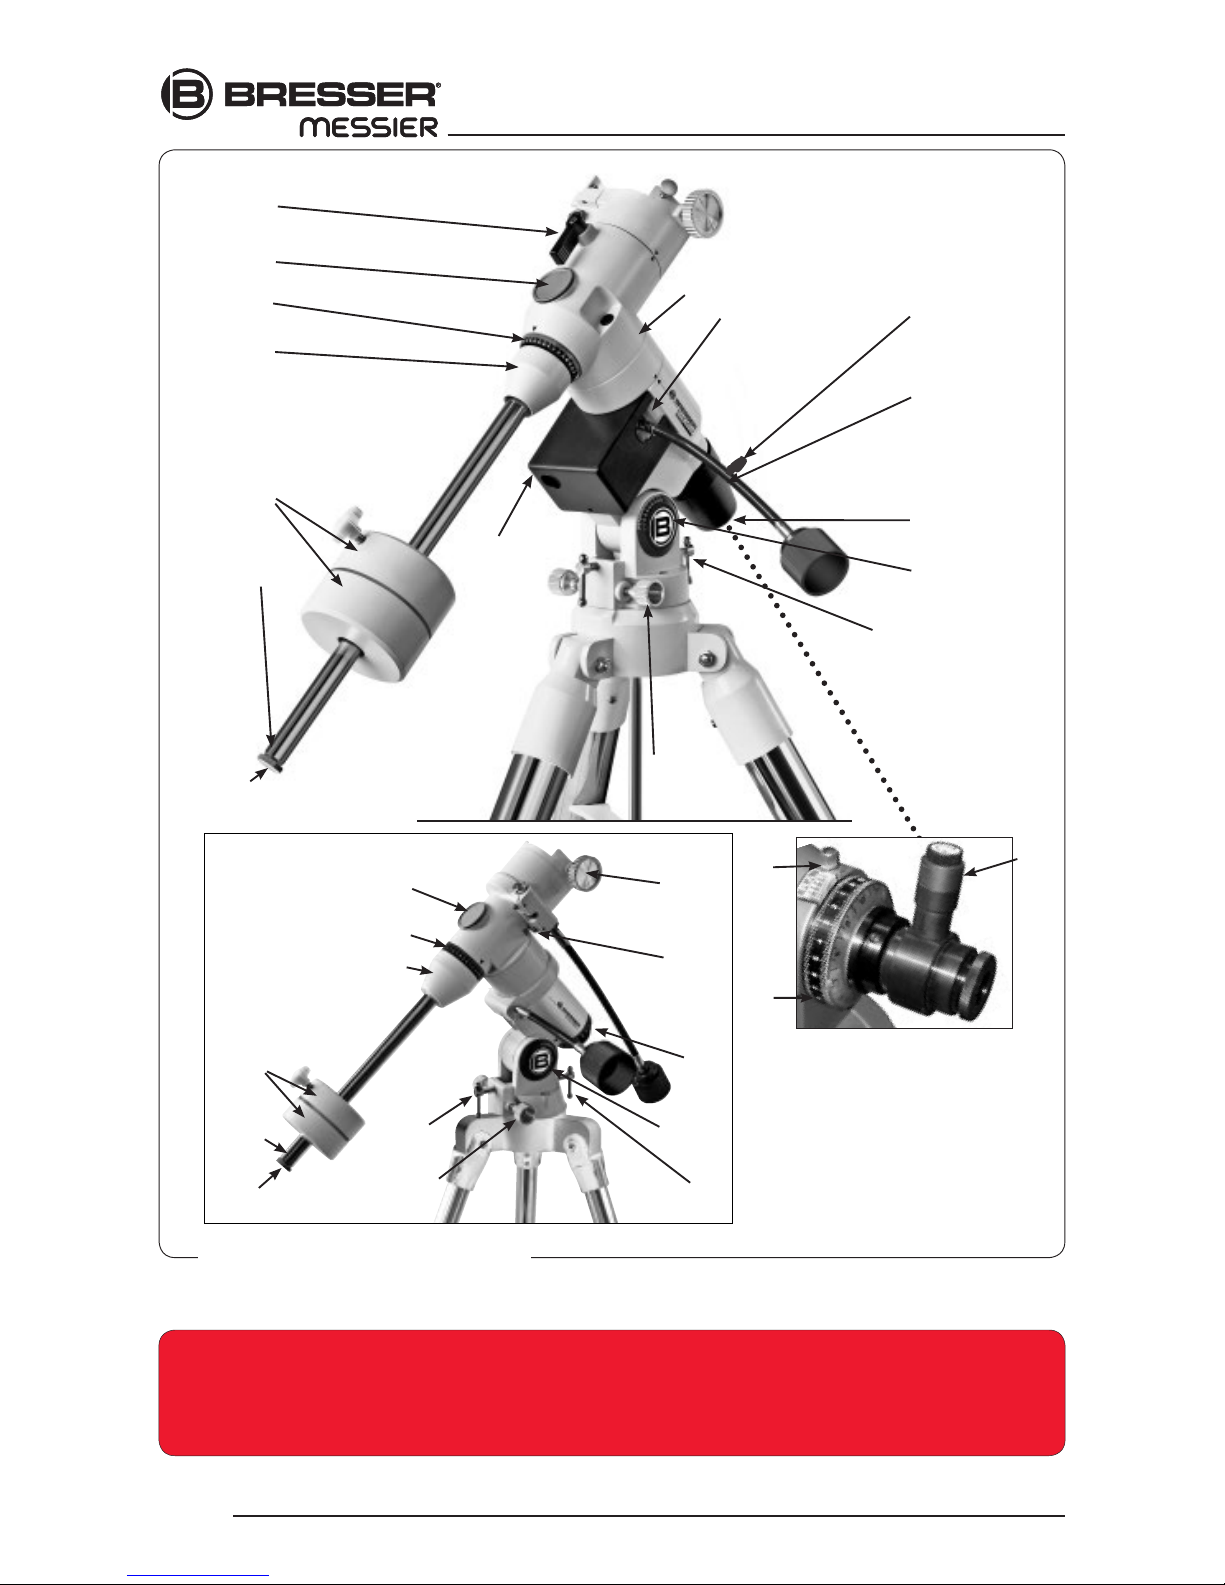
Fig. 1d, top:
The Messier series mount
EXOS2
Fig. 1d, left:
The Messier series mount
EXOS1
3$
2!
2@
2#
1(
1*
1&
2^
2&
2*
2(
2#
1&
1*
1(
2^
2@
2^
2&
2*
2(
3)
3!
3$
2!
Explanations of the points See page 5 ff
2$
3#
3@
3)
3!
WARNING!
Never use a Messier-Series Telescope to look at the Sun! Looking at or near the Sun will cause instant and irreversible
damage to your eye. Eye damage is often painless, so there is no warning to the observer that damage has occurred until
it is too late. Do not point the telescope or its viewfinder at or near the Sun. Do not look through the telescope or its viewfinder as it is moving. Children should always have adult supervision while observing.
Page 4

Index
4
IMPORTANT NOTE:
• All Bresser telescopes and accessories are under constant technical advancement. Slight changes of the product specifications,
which serve the improvement of the product, are reserved for this reason.
• No part of this manual may be reproduced, sent, transferred or be translated into another language in any form without written
permission of the Bresser GmbH. Errors and technical changes excepted.
• Please keep this guidance at hand for further looking up.
® The name „Bresser“ and the Bresser Logo are registered trademarks. „Messier“ is a trademark of the Bresser GmbH
© 2014 Bresser GmbH, Germany
Chapter Page
Messier series: Your personal
window to the universe ........................................................ 5
Description of the features
....................................................... 5
Assembling (Exos 1)
Telescope Assembly ........................................................... 8
How to Assemble Your Telescope ..................................... 8
Assembling (Exos 2)
Telescope Assembly ......................................................... 11
How to Assemble Your Telescope .................................... 11
First Steps
Balancing the Telescope .................................................. 13
Aligning the Viewfinder ..................................................... 14
Choosing an Eyepiece ....................................................... 16
Observation ......................................................................... 17
Observing by Moving the Telescope Manually ................. 17
Observe the Moon ............................................................ 17
Setting the Polar Home Position ....................................... 18
Maintenance ........................................................................ 19
Maintenance guidelines ....................................................... 19
Alignment (Collimation)
of the Newtonian Optical System ..................................... 20
Chapter Page
Inspecting the Optics ........................................................... 21
Customer Service ................................................................ 22
Technical Data AR-102, AR-127 S/L und AR-152 S/L ......... 23
Technical Data NT-150 S/L, NT-203, AR-90 und NT-130 ... 22
Appendix A: Celestial coordinates ....................................... 25
Locating the Celestial Pole .................................................. 26
Setting Circles ..................................................................... 26
To use the setting circles to locate an object
not easily found by direct visual observation .................... 26
Appendix B: Latitude Chart ................................................. 28
Appendix C: Polar Alignment .............................................. 30
Adjusting the polar viewfinder ............................................. 30
Polar alignment
by using the polar viewfinder Exos 2 only) ........................ 30
Appendix D: Basic astronomy ............................................. 32
Appendix E: Star maps ....................................................... 37
Page 5
telescope features
Looking at or near the Sun will cause instant and irreversible damage to your eye!
5
Messier series: Your personal
window to the universe
The Messier series models are versatile, high-resolution telescopes.
The Messier series models offer unmatched mechanical performance.
The Messier series telescopes reveal nature in an ever-expanding level of
detail. Observe the feather structure of an eagle from 150 yards or study
the rings of the planet Saturn from a distance of 800 million miles. Focus
beyond the Solar System and observe majestic nebulae, ancient star clusters,
and remote galaxies. Messier series telescopes are instruments fully capable of
growing with your interest and can meet the requirements of the most demanding advanced observer. Refer to Figures 1a through 1d for the following features:
Description of the features (Fig. 1a to 1d)
1 Eyepiece Thumbscrews: Tightens the eyepiece (see 3) in place.
Tighten to a firm feel only.
2 Eyepiece Holder: Holds eyepiece in place. Holders supplied for both
1.25“ and 2“ eyepieces (2“only for EXOS2 AR-models) Diagonal
Prism (not shown, achromatic refractor models only): Provides a more
comfortable right-angle viewing position. Slide the diagonal prism
directly into the eyepiece holder (see 2) and tighten the thumbscrew
on the eyepiece holder to a firm feel only. See page 10 for a photo
and more information.
3 Eyepiece: Place the supplied eyepiece into the eyepiece holder or
the diagonal prism and tighten in place with the eyepiece thumbscrew
(see 2). The eyepiece magnifies the image collected in the optical
tube.
4 8 x 50mm Viewfinder: (6x30 only for smaller models) A low-power,
wide-field sighting scope with reticle that enables easy centering of
objects in the telescope eyepiece.
5 Viewfinder Collimation Screws: Use these screws to adjust the
alignment of the viewfinder.
6 Viewfinder Front Cell and Locking Ring: Adjust the front cell to focus
the viewfinder. See step 3, page 10 for more details. The viewfinder is
supplied with a small dust cover placed over the front cell.
7 Viewfinder Bracket: Holds the viewfinder in place.
8 Focus Knobs: Moves the telescope’s focuser drawtube in a finely-
controlled motion to achieve precise image focus. The Messier series
telescopes can be focused on objects from a distance of about 500 ft.
to infinity. Rotate the focus knobs to focus on objects.
9 Dust Cover: Place the dust cover (not visible in photo) over the optical
tube when storing the telescope.
NOTE:
The dust cover should be replaced after each observing session. Allow
time for any dew that might have collected during the observing session
to evaporate prior to replacing the dust cover.
10 Optical Tube: The main optical component that gathers the light from
distant objects and brings this light to a focus for examination through
the eyepiece.
11 Cradle Assembly: Attaches to mount base. See 9.
13 Cradle Ring Lock Knobs (2 pcs.) and Washers
14 Cradle Rings: Part of the cradle assembly (see 11); hold the optical
tube firmly in place.
15 Viewfinder Bracket Screws: Tighten to a firm feel to hold viewfinder
securely in place (see 4). See page 10 for more information.
16 Focus Lock Knob: Designed to prevent the focuser drawtube from
moving when a heavy accessory, such as a camera, is attached to
B
Which eyepiece is suitable for
which application? See p. 16
“choosing an eyepiece”
H
How do I mount the viewfin-
der? See p. 10, 9/9a
E
How do I adjust the finder-
scope? See p. 14
1!
Want to learn more about
mounting the telescope? See
p. 8-10 (Exos1) / p. 11-12
(Exos2)
Page 6

telescope features
Looking at or near the Sun will cause instant and irreversible damage to your eye!
6
the focuser assembly. For normal observing with an eyepiece and diagonal prism, it is not necessary to use the lock knob.
17 Dec. Lock: Controls the manual movement of the telescope. Turning the
Dec. lock counterclockwise unlocks the telescope enabling it to be freely
rotated by hand about the Dec. axis. Turning the Dec. lock clockwise (to
a firm feel only) tightens the lock and prevents the telescope from being
moved free, but engages the manual Dec. drive shaft.
18 Polar Viewfinder Cap (for EXOS2 models only): Remove this cap when
using the polar viewfinder (see 29).
19 Declination (Dec.) Setting Circle: See APPENDIX A, page 25, for more
information.
20 Counterweight Shaft Base: Thread, along with the shaft, to the mount.
See page 9 (Exos1) or 12 (Exos2) for more information.
21 Counterweight and Counterweight Lock Knob: Counterbalances the
weight of the optical tube, and adds stability to the mount. Tighten the
lock knob on the side of the counterweight to a firm feel to prevent the
weight from sliding on the shaft.
22 Counterweight Shaft: Slide the counterweight onto this shaft (see 21).
23 Counterweight Safety Cap: Prevents the counterweight from
accidentally slipping off the end of the counterweight shaft.
24 R.A. manual Drive Assembly:
26 Latitude Adjustment:
Sets the latitude of your observing location. The
two handle screws work in a „push - pull“ operation—as you tighten one,
loosen the other. The T-handle above the azimuth control knobs (see 27)
is the North T-handle screw (South in the Southern Hemisphere). This
side of the mount must be pointed North (South in the Southern hemi
-
sphere) during the polar alignment procedure.
27 Fine Azimuth Control Knobs: Fine tune the side-to-side movement of
the telescope when centering Polaris in the telescope eyepiece or when
using the polar alignment viewfinder.
28 Latitude Dial: Set the latitude of the observing site on this dial using the
latitude T-handle screws. For more information see Step 6, page 9.
29 Polar Alignment Viewfinder (EXOS 2 only): Allows you to precisely polar
align the telescope.
30 Polar Alignment Viewfinder Reticle and LED Knob (EXOS 2 only):
Rotate the knob to switch on or off the LED that illuminates the reticle
within the polar alignment finder. Be sure to turn off the LED when
finished with the polar viewfinder. Powered by (factory-supplied)
batteries contained within. Polar viewfinder LED illumination is available
seperately.
31 Right Ascension (R.A.) Setting Circle: See APPENDIX A, page 25.
32 R.A. Setting Circle Lock Knob: Rotate the knob to lock the R.A. Setting
Circle in place.
33 R.A. Lock: Controls the manual movement of the telescope. Turning the
R.A. lock counterclockwise unlocks the telescope enabling it to be freely
rotated by hand about the R.A. axis. Turning the R.A. lock clockwise (to
a firm feel only) tightens the lock and prevents the telescope from being
moved free, but engages the R.A. manual shaft.
34 DEC-manual drive assembly
35 Tripod Leg Adjustment Knobs: Tighten to a firm feel to secure tripod
legs.
36 Variable Height Tripod Legs: Supports the telescope mount. The mount
attaches to the top of the tripod.
37 Accessory tray: Set extra eyepieces and other accessory on this
convenient tray.
38
Tripod Leg Braces: Make the tripod more secure and stable. See Fig. 3.
1&
Important:
Before loosening the DEC lock,
hold the optical tube in place;
otherwise it might swing through
and cause damage to the mount
or even hurt the operator.
2&
Want to learn more about
adjusting the latitude scale?
See p. 15, step 6.
DEFINITION:
In this manual, you will find the
terms “right aszension (RA),
Declination (DEC), Elevation
and Azimut”. These terms are
explained on p. 25
2(
Want to learn more about the
polar finder? See p. 30.
Page 7

telescope features
Looking at or near the Sun will cause instant and irreversible damage to your eye!
7
Messier Tips
Surf the Web
One of the most exciting resources for astronomy is the internet. The internet
is full of websites with new images, discoveries, and the latest astronomical
information.For example, when comet Hale-Bopp made its approach to our
Sun in 1998,astronomers around the world posted new photos daily.
You can find websites for almost any topic relating to astronomy on the inter-
net. Try the following key word searches: NASA, Hubble, HST, astronomy,
Messier, satellite, nebula, black hole, variable stars, etc.
Check out Bresser’s website for the latest product and technical information.
You’ll find our website at: http://www.bresser.de/
Here are some other sites you might find interesting:
• Sky & Telescope: http://www.Skyand Telescope.com
• Astronomy: http://www.astronomy.com
• The Starfield: http://users.nac.net/gburke/
• Astronomy Picture of the Day: http://antwrp.gsfc.nasa.goc/apod
• „Heaven´s Above“ www.heavens-above.com/
www.spacetelescope.org
• European Southern Observatory www.eso.org
Page 8
Looking at or near the Sun will cause instant and irreversible damage to your eye!
8
Assembling (Exos1)
Telescope Assembly
As you unpack your telescope, carefully note the following parts. The
assembly is shipped in separate boxes.
• Equatorial mount with polar alignment finder
• Heavy duty, adjustable steel tube tripod with leg braces, three tripod leg
lock knobs, and a captive mount locking knob
• Complete optical tube assembly including primary mirror with dust cover
and a rack-and-pinion focuser and eyepiece holders for both 1.25“ and 2“
eyepiece holders, tube cradle assembly with two rings and two lock knobs
• Eyepiece
• Counterweight and counterweight shaft. Some models include an
additional counterweight.
• 8 x 50mm or 6 x 30mm viewfinder
How to Assemble Your Telescope
The giftboxes contain the optical tube assembly and the tripod with the
equatorial mount. The accessories are located within compartments customcut into the styrofoam block inserts.
instructions on telescope assembly. The packaging contains the main tube
and tripod components, the tripod with mounting and accessories.
1. Remove the components from the packaging and familiarise yourself
with them. Please refer to illustrations 1a to 1d for details of telescope
assembly. When removing the tripod from its packaging keep it parallel
to the floor as the inner legs may otherwise slide out as they are not yet
screwed tight.
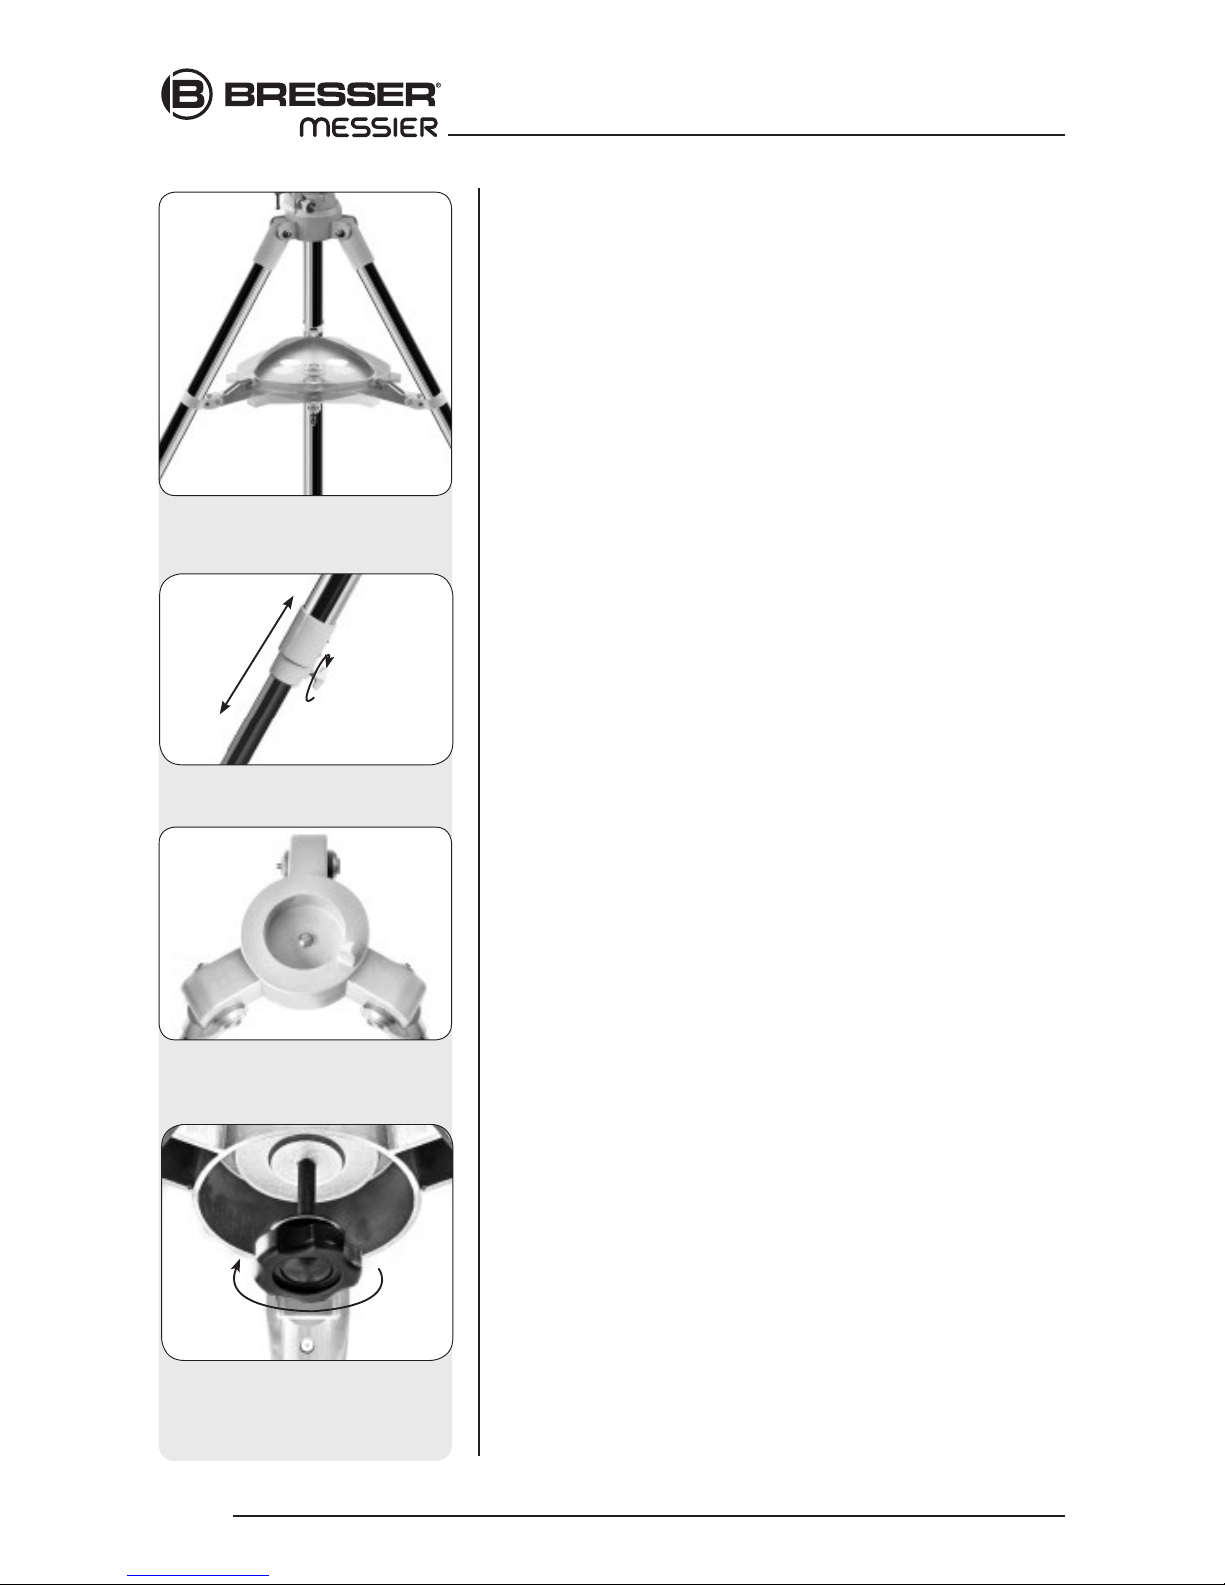
2. Assembly - tripod: The tripod legs are preassembled and already con-
nected to the tripod head and accessory tray. Remove the tripod from
the packaging and place it in front of you, with the tripod legs on the
floor. Grab two legs and pull them apart until fully spread out. The tripod
weight rests only on one leg. Now level the tripod and adjust third leg if
necessary. Pull out the bottom part of the leg to the desired length (Fig.
2b) and lock with the locking knob (3 pieces total) to a firm feel. Be careful not to over tighten the screws! These screws lock the inner leg segments to the desired tripod height.
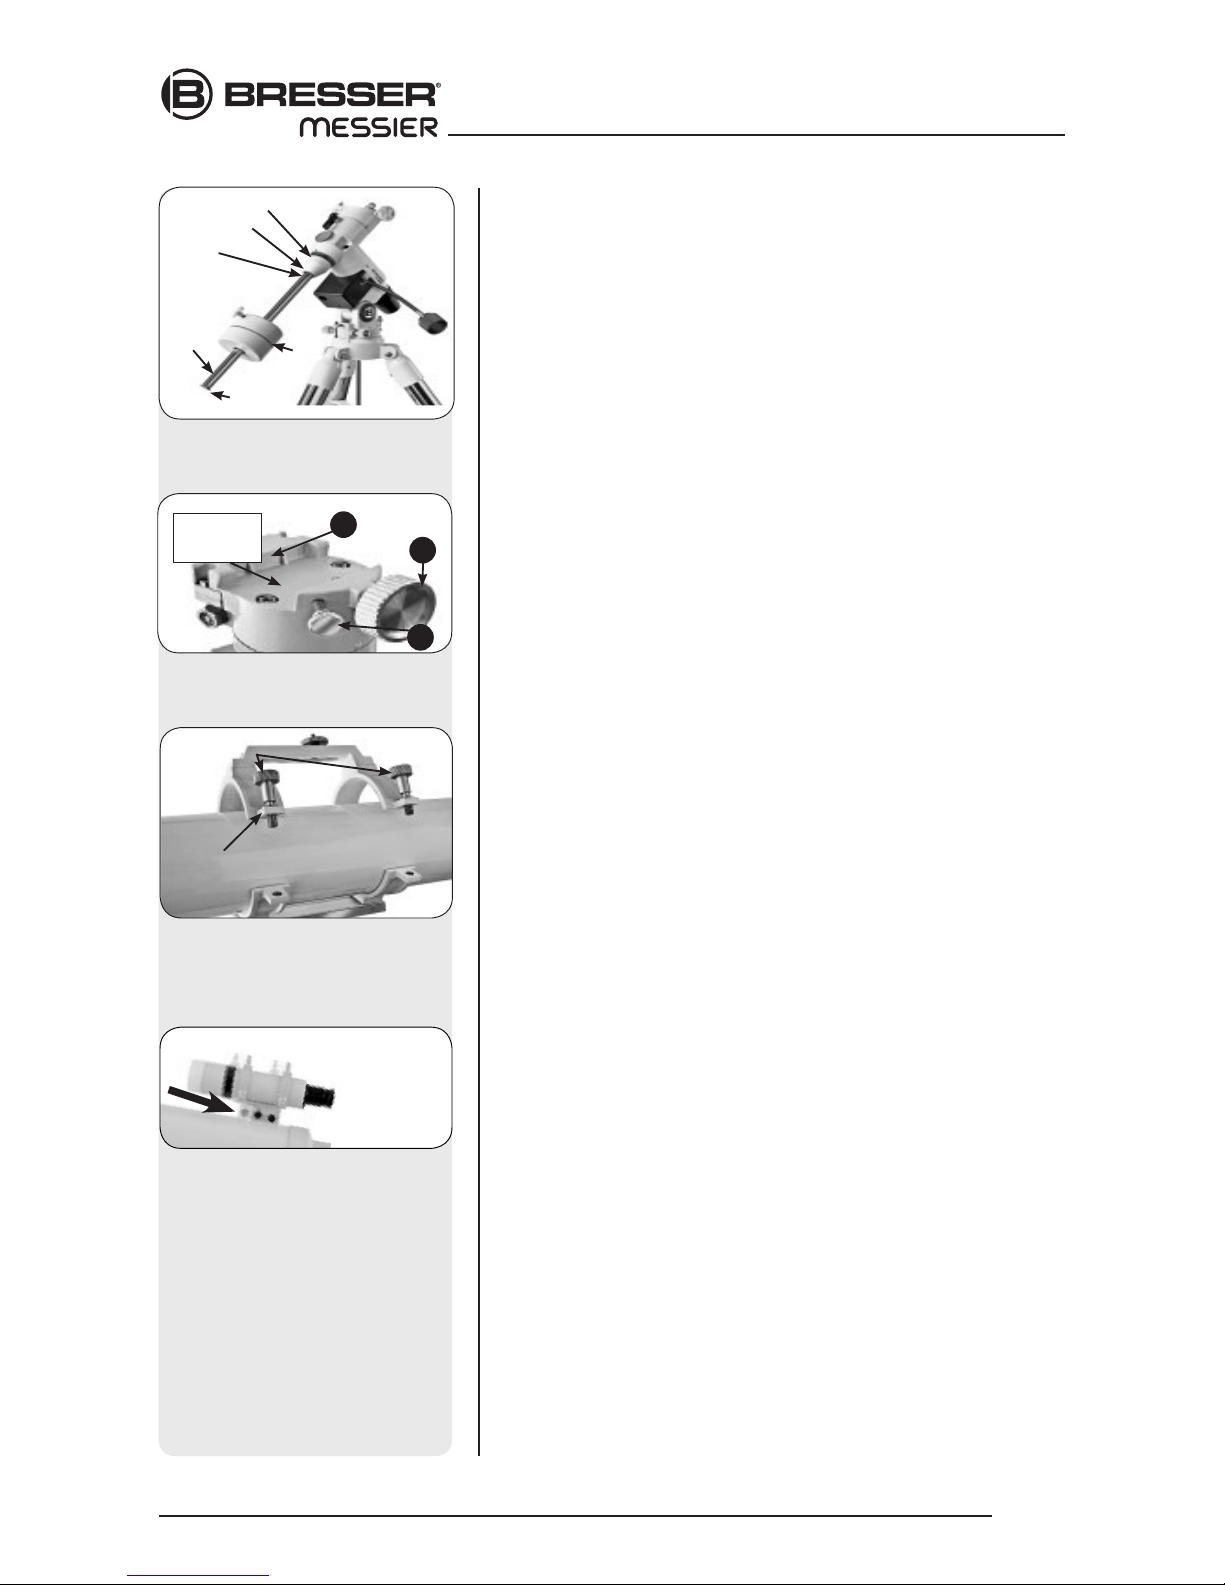
3. Assembly - mounting accessory tray: The accessory tray (Fig.: 2a) Is
placed on the tripod spider with the flat side facing down, then locked in
place turning the tray approximately 60° clockwise. The three gudgeons
of the tray should be centered on the spider vanes and lock in place.
Fig. 2a: The tripod
Fig. 2b: tripod leg locks
Fig. 2c: Tripod head
Fig. 2d: central mount locking
screw
assemblInG exos1
Page 9
Looking at or near the Sun will cause instant and irreversible damage to your eye!
9
5. Fastening the counterweight on the counterweight rod: insert the base
of the counterweight rod (20, illustration 1d) on the threaded end of the
rod and screw it on the counterweight rod (22, illustration 1). Then screw
both in the thread on the base of the declination axis and counter screw
rod to base. If you look through the large drill hole in the counterweight
you will see the bolt blocking the hole. Move the counterweight slightly
to make it disappear in its drill hole and reveal the hole. If it doesn‘t,
carefully loosen the counterweight screw until the bolt moves. Remove
the safety cover (23, illustration 1d) from the rod. Hold the counterweight
firmly whilst moving it to about the middle of the counterweight rod (22,
illustration 1d). Tighten the counterweight fastening screw and then
replace the safety cover.
NOTE:
If the counterweight ever slips, the safety cap (23, Fig. 1d) prevents the
counterweight from sliding entirely off the shaft. Always leave the safety cap
in place when the counterweight is on the shaft.
6. Set the latitude. Setting the latitude is easier if it is set before you attach
the optical tube to the assembly. Locate the latitude dial (28, Fig. 1d); note
that there is a triangular pointer above the dial located on the mount. The
pointer is not fixed; it moves as the mount moves.
Determine the latitude of your observing location. See APPENDIX B:
LATITUDE CHART, page 28-29, for a list of latitudes, or check an atlas.
Move the latitude T-handle screws in order to move the mount until the
pointer points to your latitude. The two T-handle screws (EXOS 2 only)
work in a „push - pull“ operation—as you tighten one, loosen the other.
When the pointer points at your latitude, tighten both screws until they
make contact with the mount.
At your observing site, set up the telescope assembly so that this leg
approximately faces North (or South in the Southern Hemisphere).
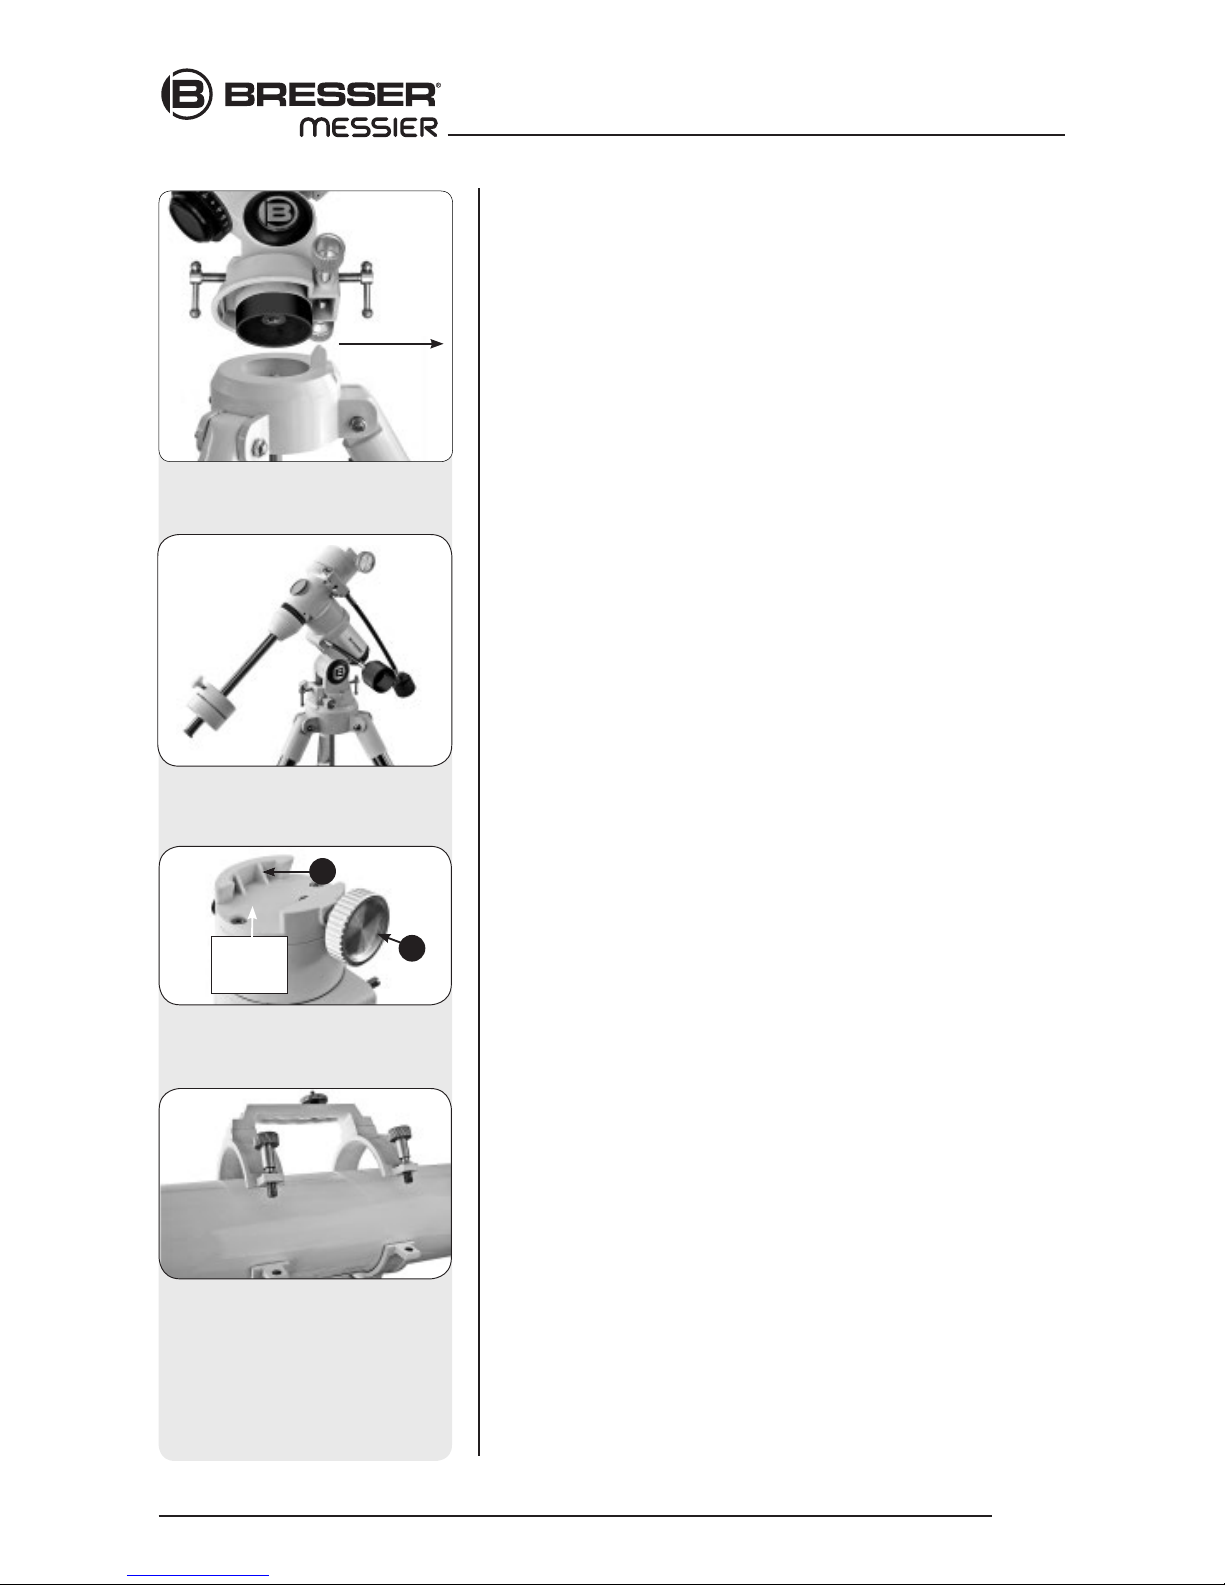
7. Attach the cradle assembly to the mount
–
Models R and N: Remove the
optical tube from the cradle and slide the cradle assembly (11, Fig. 1a)
onto the cradle mounting slot. See Fig. 2g. The rounded base of the cradle
assembly fits into the rounded portion of the mounting slot. Tighten both the
cradle locking knob and the secondary locking knob to a firm feel.
8. Position optical tube –
Models AR and NT:
Unscrew the cradle ring lock
knobs (13, Fig. 1a) and open the cradle rings. While firmly holding the
optical tube (10, Fig. 1a), position it onto the cradle rings (14, Fig. 1a)
with the mid-point of the optical tube’s length lying roughly in the center
of the cradle ring assembly. Point the tube so that the front end (this
end comes shipped with the dust cover (9, Fig. 1a) over it) is oriented
as depicted in Fig. 1a. Then close the cradle rings (14, Fig. 1a) over the
optical tube. Loosely tighten the cradle ring lock knobs just to hold the
tube securely in place until you balance it. See Balancing the telescope,
page 13.
Fig. 2h: Place the optical tube
in rings and loosely tighten the
cradle ring lock knobs.
Fig. 2g: Attach cradle to base mounting
and tighten locking (EXOS1)
Fig. 2f: Mounting the cradle (dovetail)
plate to the mount shaft (EXOS1)
n
assemblInG exos1
Fig. 2e:
installing the mounting on
the Exos1 tripod.
Cradle
mounting
slot
A
B
Page 10
Looking at or near the Sun will cause instant and irreversible damage to your eye!
10
9.
Attach viewfinder bracket
(Abb. 9b). Locate the viewfinder bracket screws
(15, Fig. 1b and Fig. 9a) and remove the nuts from the screws. Slide
the holes in the viewfinder bracket over the viewfinder bracket screws.
Replace the nuts and tighten to a firm feel only.
9a. Attach viewfinder tube:. Back off the viewfinder collimation screws (5,
Fig. 1b) and slide the viewfinder tube into the bracket. Orient the viewfinder eyepiece as depicted in Fig. 1b. Tighten the collimation screws to
a firm feel. See Aligning the viewfinder, page 14.
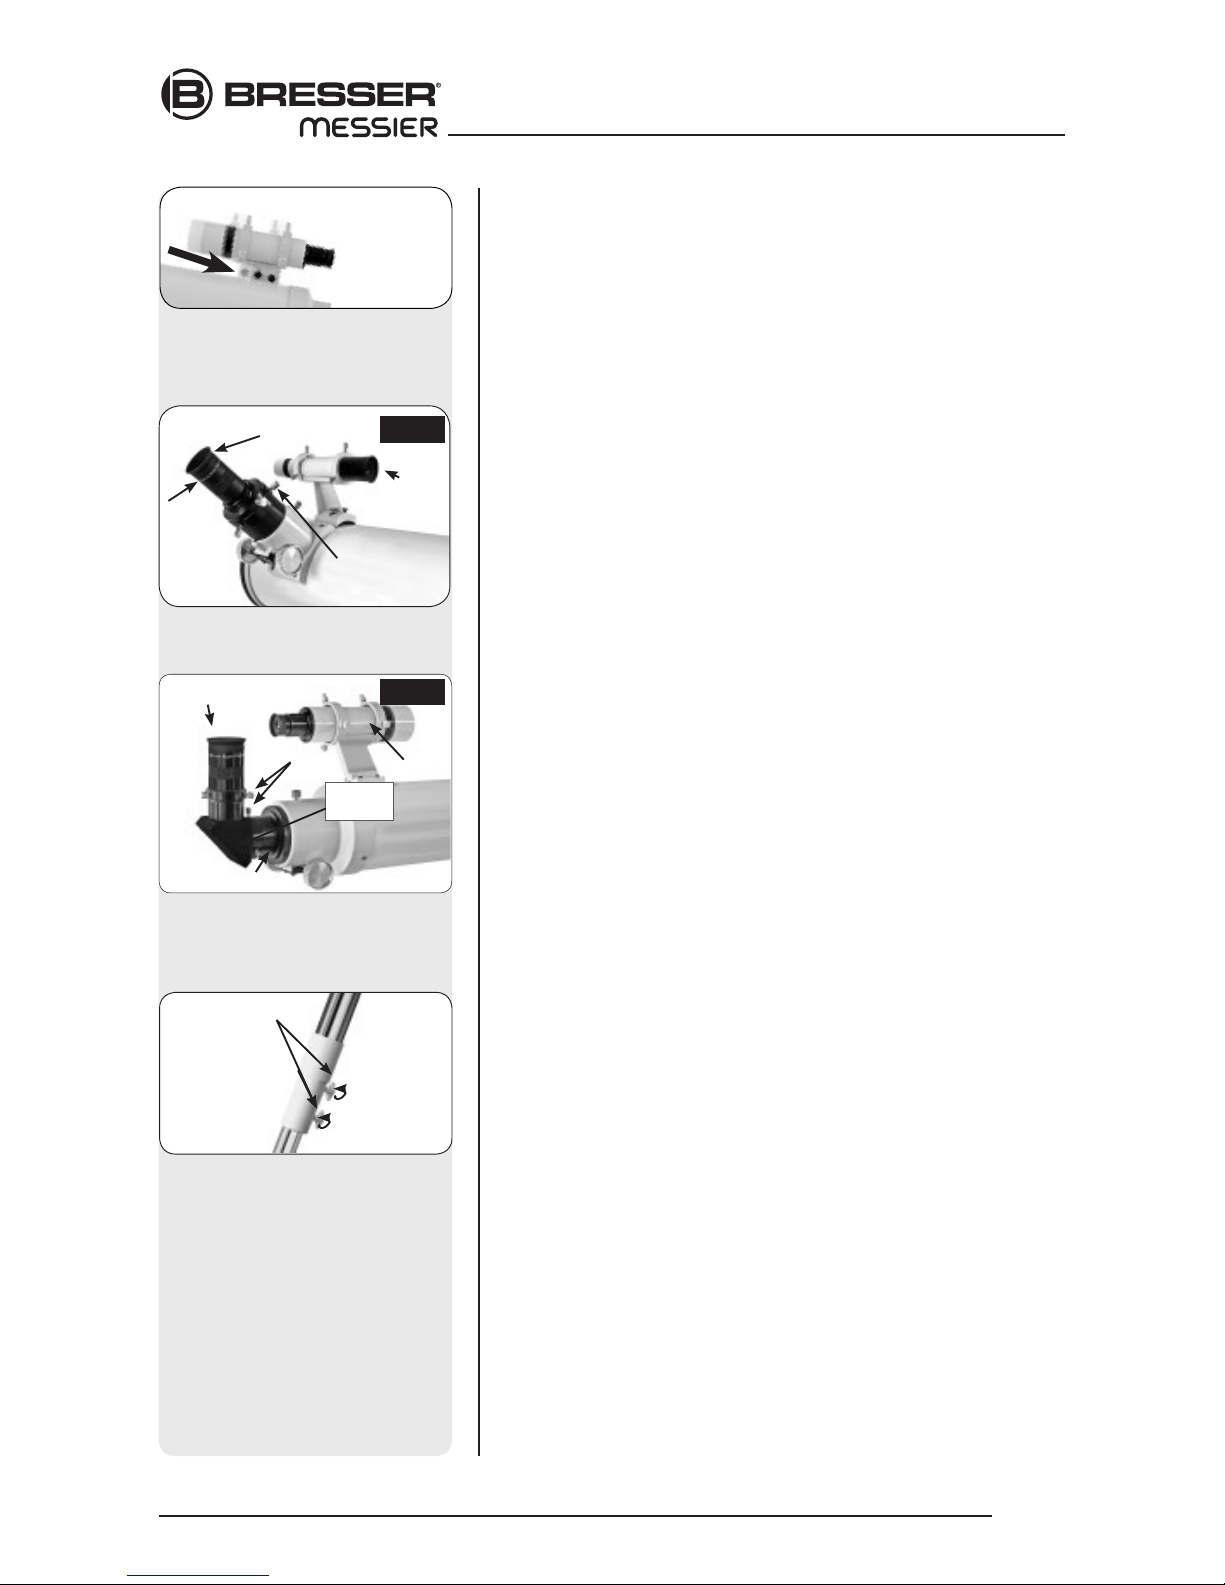
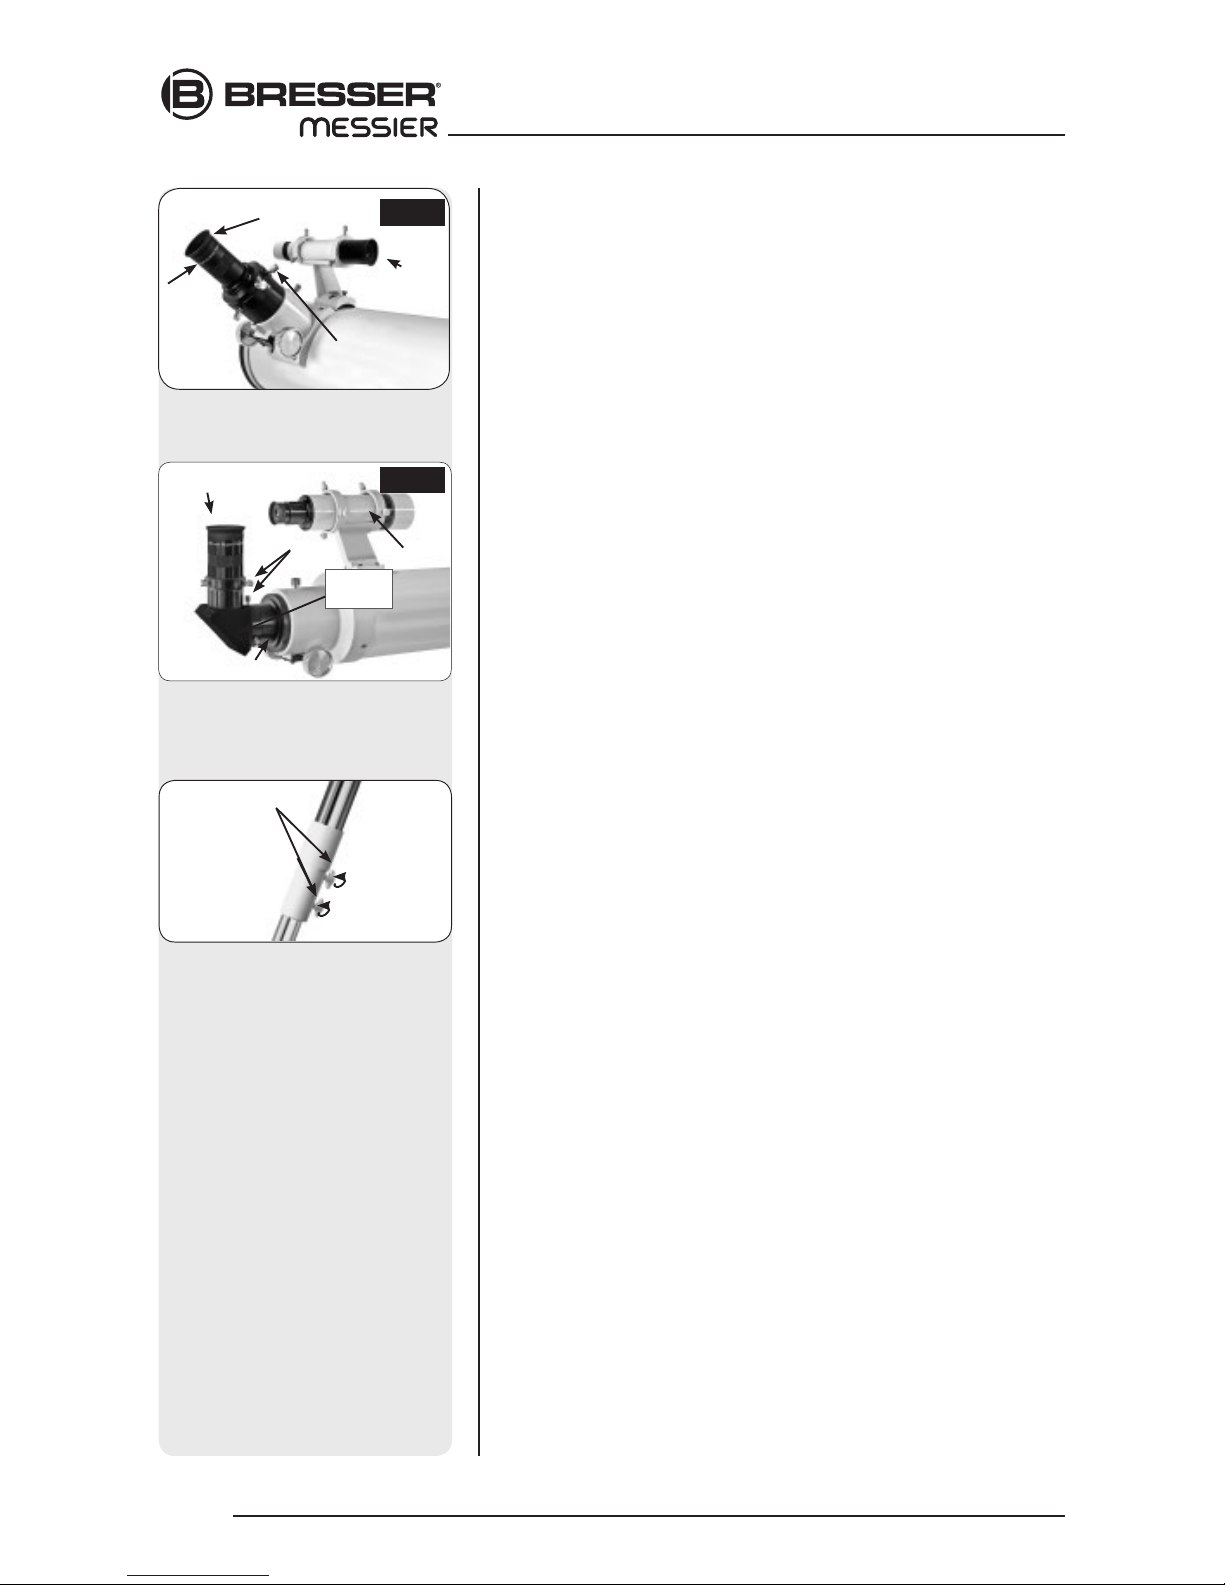
10. Insert the eyepiece: NT models (Fig. 10a): Lift to remove the dust cap
from the eyepiece holder on the focuser assembly. Set the dust cap
aside in a safe place and replace it when you have finished observing
to protect the eyepiece assembly. Back off the eyepiece thumbscrews
(1, Fig. 1a) and insert the supplied 25mm eyepiece (3, Fig. 1a) into the
the eyepiece holder. Tighten the holder thumbscrews to a firm feel to
secure the eyepiece. AR models (Abb. 10b): Lift to remove the dust cap
from the eyepiece holder on the focuser assembly. Set the dust cap
aside in a safe place and replace it when you have finished observing
to protect the eyepiece assembly. Back off the eyepiece thumbscrews
(1, Fig. 1b) and slide the diagonal prism into the holder and tighten the
thumbscrews to a firm feel only. Insert the supplied 25mm eyepiece (3,
Fig. 1b) into the the diagonal prism. Tighten the prism‘s thumbscrews to
a firm feel to secure the eyepiece.
11. Adjust the height of the tripod: Adjust the height of the tripod by
loosening the tripod lock knobs (Fig. 11). Extend the sliding inner
section of each tripod leg to the desired length; then tighten each knob.
Adjust the tripod to a height that is comfortable for viewing.
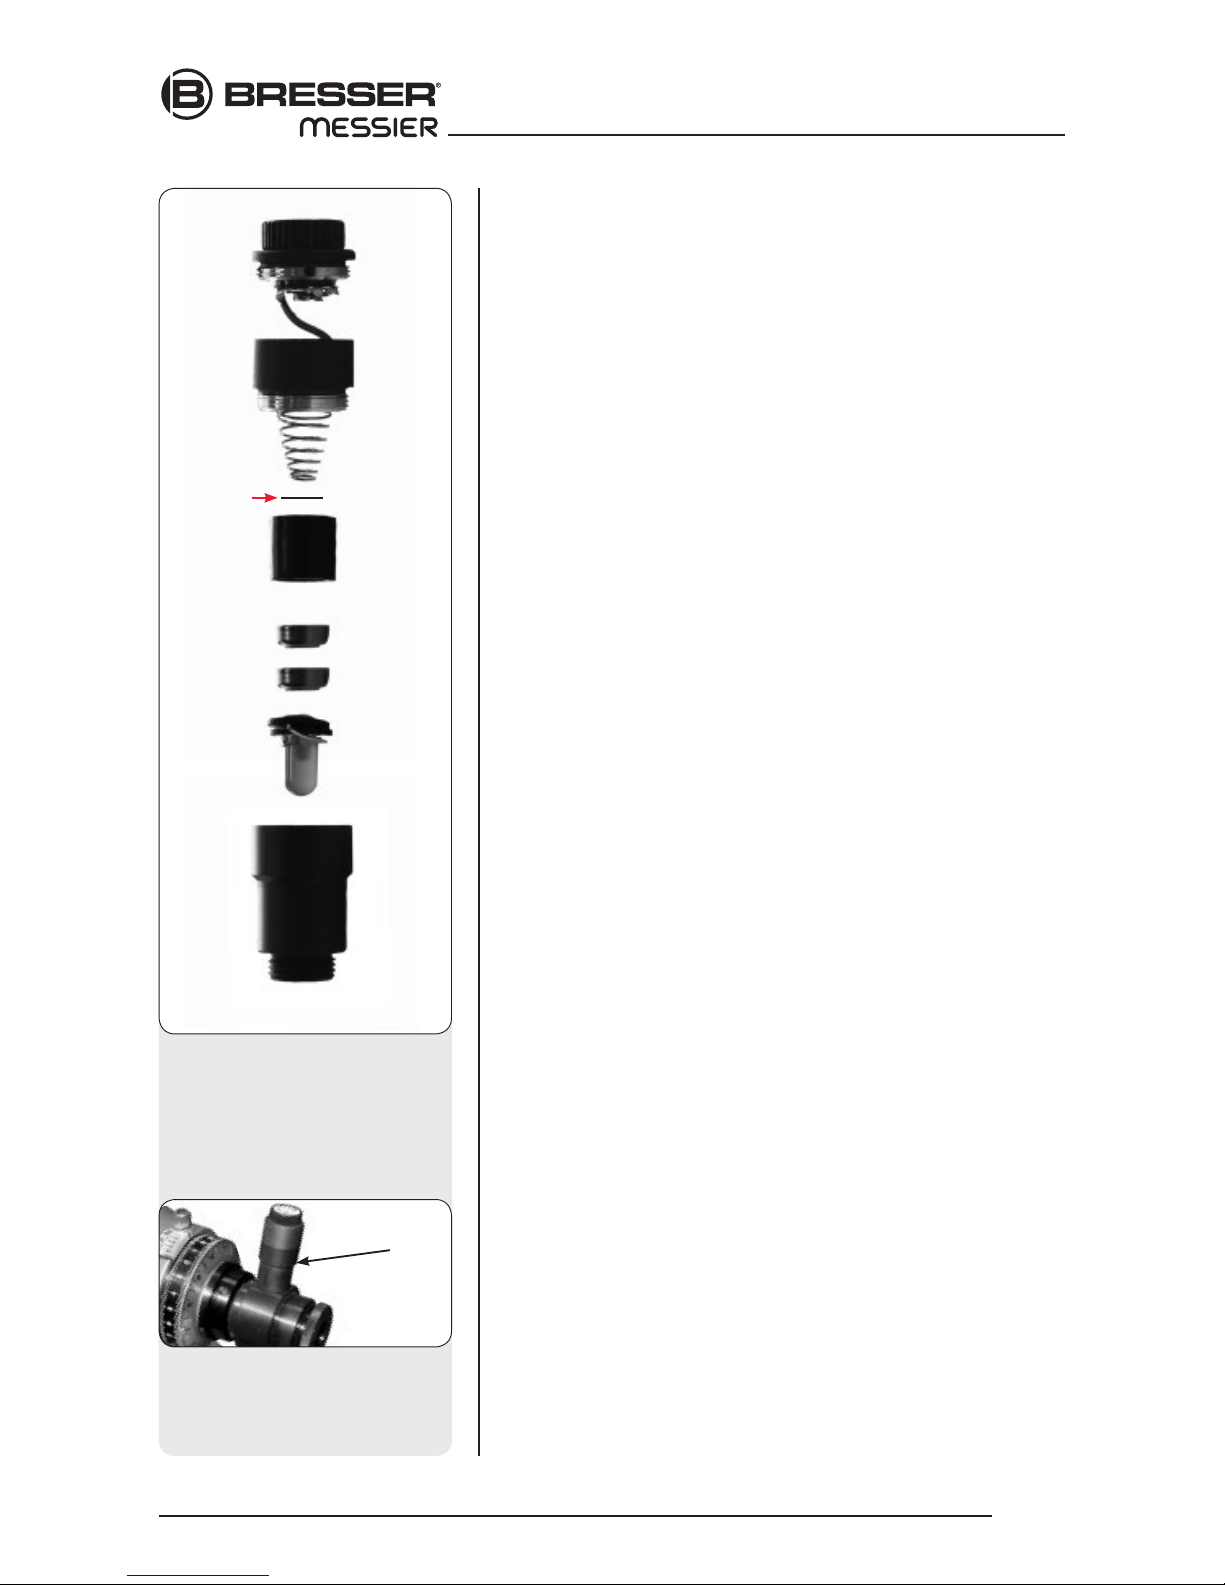
13. Remove Plastic from Reticle LED
*: The polar alignment reticle LED
(30, Fig. 1d) contains two watch batteries. The reticle‘s LED is shipped
with a plastic strip between the two batteries to protect battery life.
Unthread both the thumbscrew (F) and the threaded lid (E). Remove
the plastic strip before using. Refer to the reticle assembly in Fig. 13b
and note the orientation of the batteries. Place the batteries (C) into the
battery holder (D) before inserting into the reticle container (A).
NOTE:
The 2” focusers of the Messier Series from AR-102 or NT-130 on have a
built in extension tube. Depending on the accessories used, or when using
a camera, it might not be possible to reach the focus. Focus travel to the
inside might not be sufficient in the standard configuration. To reach focus,
unscrew the eyepiece holder, then the following 25mm extension tube.
Screw the eyepiece holder back in place.
Fig. 10b: Insert eyepiece into
diagonal prism and tighten
thumbscrews.
Eyepiece
Holder
Thumbscrews
Diagonal
prism
Viewfinder
AR
Fig. 10a: Insert eyepiece intor holder
and tighten thumbscrews.
Eyepiece
Holder
Thumbscrew
NT
Viewfinder
Fig. 11: Adjust the tripod height
using the leg lock knobs.
Leg lock knob
Fig. 9b: The finder scope assembly has a dovetail bracket, that
fits the holder that is mounted on
the optical tube.
assemblInG exos1
* Optional accessory for Exos 2
Page 11
Assembling (Exos2)
Telescope Assembly
As you unpack your telescope, carefully note the following parts. The assembly is shipped in separate boxes.
• Equatorial mount with polar alignment finder
• Heavy duty, adjustable steel tube tripod with leg braces, three tripod leg
lock knobs, and a captive mount locking knob
• Complete optical tube assembly including primary mirror with dust cover
and a rack-and-pinion focuser and eyepiece holders for both 1.25“ and 2“
eyepiece holders, tube cradle assembly with two rings and two lock knobs
• Eyepiece
• Counterweight and counterweight shaft. Some models include an additional
counterweight.
• 8 x 50mm or 6 x 30mm viewfinder
How to Assemble Your Telescope
The giftboxes contain the optical tube assembly and the tripod with the equatorial mount. The accessories are located within compartments custom-cut
into the styrofoam block inserts.
instructions on telescope assembly. The packaging contains the main tube
and tripod components, the tripod with mounting and accessories.
1. Remove the components from the packaging and familiarise yourself
with them. Please refer to illustrations 1a to 1d for details of telescope
assembly. When removing the tripod from its packaging keep it parallel
to the floor as the inner legs may otherwise slide out as they are not yet
screwed tight.
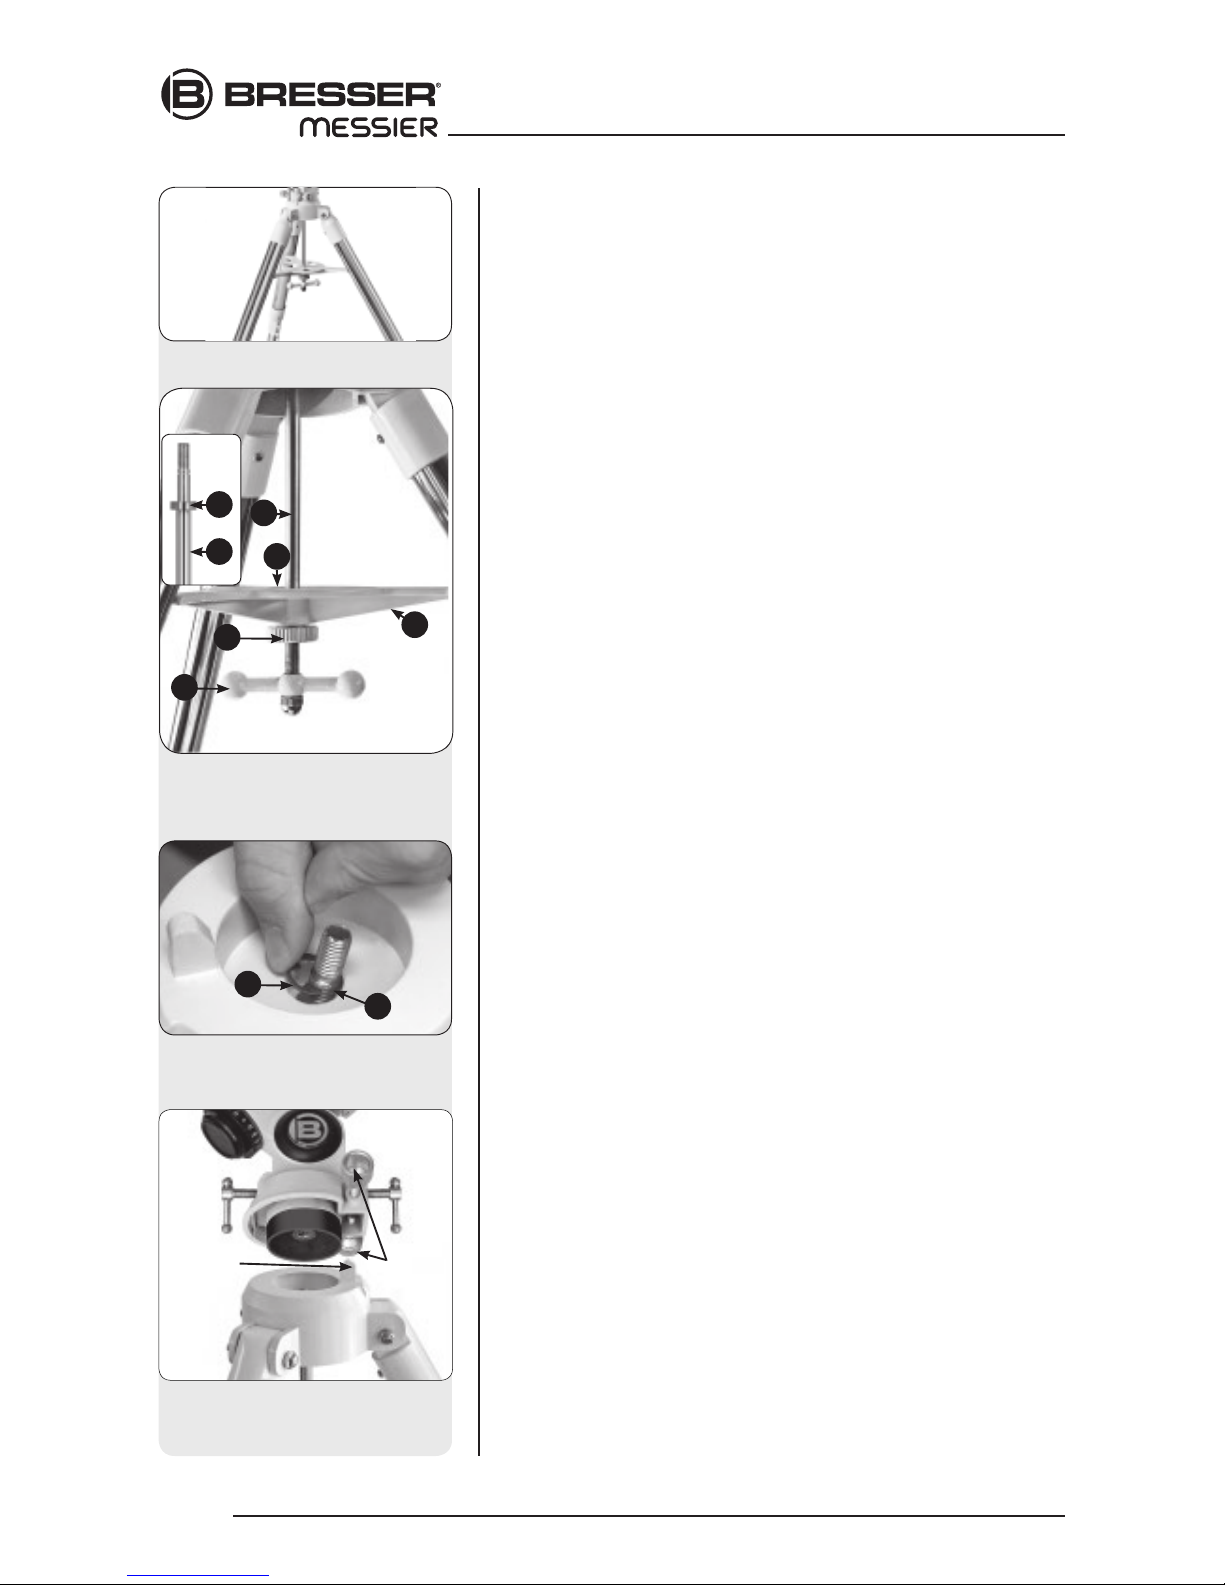
2. Locking the tripod legs. Spread the legs until the spider vanes of the
accessory plate are tautened (illustration. 3).
3. Fastening the spacing plate in place. To fasten the central screw (illustra-
tion 4, A) on the tripod first screw the tensioning screw (illustration 4, B)
on. This can be screwed right down as it serves to clamp the spacing
plate against the tripod legs. You can now insert the plate (illustration 4,
C) from above on the central screw. Make sure the plate bars (illustra-
tion 4, D) show downwards. Caution. It‘s important the following step is
applied to prevent thread damage. To prevent the threaded rod (illustration 4, E) being screwed into the mount too far use the gapping washer
(illustration 4, F) supplied. Insert it from above on the threaded rod so
that the wider chamfered side shows downwards. The spacing ring must
be on the threaded rod „step“. Now push the threaded rod from below
through the tripod base and slide the c-clip (illustration 4a, A) on the
recess (illustration 4a, B) in the threaded rod
4b. Fastening the mount on the tripod top. Place the mounting on the tri-
pod top. Make sure the projection on the tripod is between the azimuth
adjustment screws (illustration 5). To do so first loosen the azimuth
screws sufficiently to allow space for the projection. Place the mounting
on the tripod top in such a way that the projecting cylinder on the base
fits into the hole in the tripod base centre and fasten it in place using the
central screw. Tighten the screw hand tight.
5. Fastening the counterweight on the counterweight rod: insert the base of
the counterweight rod (20, illustration 1d) on the threaded end of the rod
and screw it on the counterweight rod (22, illustration 1). Then screw both
in the thread on the base of the declination axis and counter screw rod to
base. If you look through the large drill hole in the counterweight you will
see the bolt blocking the hole. Move the counterweight slightly to make
Looking at or near the Sun will cause instant and irreversible damage to your eye!
11
assemblInG exos2
Fig. 3: The tripod
Fig. 5: installing the mounting on
the tripod.
Fig. 4: Fastening the spacing plate
and distance washer in place.
E
F
E
C
B
A
D
Fig. 4a: Threaded rod fastening
using the C-clip
A
B
Gudgeon
Azimuth
fine adjustment
Page 12
it disappear in its drill hole and reveal the hole. If it doesn‘t, carefully
loosen the counterweight screw until the bolt moves. Remove the safety
cover (23, illustration 1d) from the rod. Hold the counterweight firmly
whilst moving it to about the middle of the counterweight rod (22, illustration 1d). Tighten the counterweight fastening screw and then replace the
safety cover.
NOTE:
If the counterweight ever slips, the safety cap (23, Fig. 1d) prevents the counterweight from sliding entirely off the shaft. Always leave the safety cap in place when
the counterweight is on the shaft.
6. Set the latitude. Setting the latitude is easier if it is set before you attach the
optical tube to the assembly. Locate the latitude dial (28, Fig. 1d); note that
there is a triangular pointer above the dial located on the mount. The pointer
is not fixed; it moves as the mount moves.
Determine the latitude of your observing location. See APPENDIX B:
LATITUDE CHART, page 28-29, for a list of latitudes, or check an atlas. Move
the latitude T-handle screws in order to move the mount until the pointer
points to your latitude. The two T-handle screws (EXOS 2 only) work in a
„push - pull“ operation—as you tighten one, loosen the other. When the point
er points at your latitude, tighten both screws until they make contact with the
mount. The EXOS 1 has on screw with similar operation.
At your observing site, set up the telescope assembly so that this leg approxi-
mately faces North (or South in the Southern Hemisphere).
7. Attach the cradle assembly to the mount – Models R and N: Remove the opti
cal tube from the cradle and slide the cradle assembly (11, Fig. 1a) onto the
cradle mounting slot. See Fig. 7. The rounded base of the cradle assembly fits
into the rounded portion of the mounting slot. Tighten both the cradle locking
knob and the secondary locking knob to a firm feel.
8. Position optical tube – Models AR and NT: Unscrew the cradle ring lock
knobs (13, Fig. 1a) and open the cradle rings. While firmly holding the optical
tube (10, Fig. 1a), position it onto the cradle rings (14, Fig. 1a) with the mid-
point of the optical tube’s length lying roughly in the center of the cradle ring
assembly. Point the tube so that the front end (this end comes shipped with
the dust cover (9, Fig. 1a) over it) is oriented as depicted in Fig. 1a. Then
close the cradle rings (14, Fig. 1a) over the optical tube. Loosely tighten the
cradle ring lock knobs just to hold the tube securely in place until you bal
-
ance it. See Balancing the telescope, page 13.
9.
Attach viewfinder bracket
(Abb. 9b). Locate the viewfinder bracket screws
(15, Fig. 1b and Fig. 9a) and remove the nuts from the screws. Slide
the holes in the viewfinder bracket over the viewfinder bracket screws.
Replace the nuts and tighten to a firm feel only.
9a. Attach viewfinder tube:. Back off the viewfinder collimation screws (5,
Fig. 1b) and slide the viewfinder tube into the bracket. Orient the viewfinder eyepiece as depicted in Fig. 1b. Tighten the collimation screws to
a firm feel. See Aligning the viewfinder, page 14.
10. Insert the eyepiece: NT models (Fig. 10a): Lift to remove the dust cap
from the eyepiece holder on the focuser assembly. Set the dust cap
aside in a safe place and replace it when you have finished observing
to protect the eyepiece assembly. Back off the eyepiece thumbscrews
(1, Fig. 1a) and insert the supplied 25mm eyepiece (3, Fig. 1a) into the
the eyepiece holder. Tighten the holder thumbscrews to a firm feel to
secure the eyepiece. AR models (Abb. 10b): Lift to remove the dust cap
from the eyepiece holder on the focuser assembly. Set the dust cap
aside in a safe place and replace it when you have finished observing
to protect the eyepiece assembly. Back off the eyepiece thumbscrews
(1, Fig. 1b) and slide the diagonal prism into the holder and tighten the
thumbscrews to a firm feel only. Insert the supplied 25mm eyepiece (3,
Fig. 1b) into the the diagonal prism. Tighten the prism‘s thumbscrews to
a firm feel to secure the eyepiece.
Looking at or near the Sun will cause instant and irreversible damage to your eye!
12
assemblInG exos2
Fig. 8a: Place the optical tube
in rings and loosely tighten the
cradle ring lock knobs.
Cradle rings
Lock
knobs
Fig. 9b: Viewfinder assembly.
Slide bracket into slot.
Fig. 6a: Attach counterweight
assembly (EXOS1)
Fig. 7: Mounting the cradle assembly
to the mount shaft (EXOS2)
Cradle
assembly set
A
B
C
Safety cap
Shaft
Lock knob
Counterweight
Shaft base
DEC-setting circle
Page 13
NOTE:
Two eyepiece holders are included with your EXOS2-NT-telescope - for both 1.25”
and 2” eyepieces. To change eyepiece holders, unscrew the attached holder from
the focuser and thread on the other holder.
11. Adjust the height of the tripod: Adjust the height of the tripod by
loosening the tripod lock knobs (Fig. 11). Extend the sliding inner
section of each tripod leg to the desired length; then tighten each knob.
Adjust the tripod to a height that is comfortable for viewing.
13. Remove Plastic from Reticle LED
*: The polar alignment reticle LED
(30, Fig. 1d) contains two watch batteries. The reticle‘s LED is shipped
with a plastic strip between the two batteries to protect battery life.
Unthread both the thumbscrew (F) and the threaded lid (E). Remove
the plastic strip before using. Refer to the reticle assembly in Fig. 13b
and note the orientation of the batteries. Place the batteries (C) into the
battery holder (D) before inserting into the reticle container (A).
Getting Started! – First Steps
Balancing the Telescope
In order for the telescope to be stable on the tripod and also for it to move
smoothly, it must be balanced. To balance the telescope, unlock the Right
Ascension or R.A. lock (33, Fig. 1d). When this axis is unlocked, the telescope pivots on the R.A. axis. Later in the procedure, you will also unlock
the Declination or Dec. lock (17, Fig. 1d). When unlocked, the telescope
pivots on the Dec. axis. Most of the motion of the telescope takes place by
moving about these two axes, separately or simultaneously. Try to become
familiar with these locks and observe how the telescope moves on each
axis. To obtain a fine balance of the telescope, follow the method below:
1. Firmly hold the optical tube secure so that it cannot accidentally
swing freely. Loosen the R.A. lock (33, Fig. 1d). The optical tube now
moves freely about the R.A. axis. Rotate the telescope so that the
counterweight shaft is parallel (horizontal) to the ground.
2. Unlock the counterweight lock knob and slide the counterweight (21,
Fig. 1d) along the counterweight shaft until the telescope remains in one
position without tending to drift down in either direction. Then re-tighten
the counterweight lock knob, locking the counterweight in position.
3. Again, hold the optical tube so that it cannot accidentally swing freely.
Lock the R.A. lock (33, Fig. 1d), and unlock the Dec. lock (17, Fig. 1d).
The telescope now is able to move freely about the Dec. axis. Loosen
the cradle ring lock knobs (13, Fig. 1a) so that the main tube slides easily back and forth in the cradle rings. Move the main tube in the cradle.
Looking at or near the Sun will cause instant and irreversible damage to your eye!
13
fIrst steps
Fig. 10b: Insert eyepiece into
diagonal prism and tighten
thumbscrews.
Eyepiece
Holder
Thumbscrews
Diagonal
prism
Viewfinder
AR
Fig. 10a: Insert eyepiece intor holder
and tighten thumbscrews.
Eyepiece
Holder
Thumbscrew
NT
Viewfinder
Fig. 11: Adjust the tripod height
using the leg lock knobs.
Leg lock knob
* Optional accessory for Exos 2
Page 14
Aligning the Viewfinder
The wide field of view of the telescope‘s viewfinder (4, Fig. 1a) provides
an easier way to initially sight objects than the main telescope‘s eyepiece
(3, Fig. 1a), which has a much narrower field of view. If you have not
already attached the viewfinder to the telescope tube assembly, follow
the procedure described in step 9, page 9.
In order for the viewfinder to be useful, it must be aligned to the main
telescope, so that both the viewfinder and telescope‘s optical tube (10, Fig.
1a) point at the same position in the sky. This alignment makes it easier to
find objects: First locate an object in the wide-field viewfinder, then look into
the eyepiece of the main telescope for a detailed view.
To align the viewfinder, perform steps 1 through 4 during the daytime;
perform step 5 at night. Both the 6 x 30mm and the 8 x 50mm viewfinders
align in an identical manner. Refer to Fig. 14.
1. Remove the dust covers from the optical tube and the viewfinder.
2. If you have not already done so, insert the low-power 25mm eyepiece
(3, Fig. 1b) into the eyepiece holder of the main telescope.
See step 10, page 13.
3. Look through the viewfinder eyepiece at an object at least one-half mile
away (Tip: Remove the viewfinder tube from the bracket to simplify this
operation). If the distant object is not in focus, turn the focus lock ring
counterclockwise to loosen the viewfinder front cell (6, Fig. 1b). Twist the
front cell until focus is achieved and retighten the focus lock ring.
4. Unlock the R.A. lock (33, Fig. 1d) and the Dec lock (17, Fig. 1d) so
that the telescope turns freely on both axes. Then point the main telescope at a tall, welldefined and stationary land object (e.g., the top of
a telephone pole) at least 200 yards distant and center the object in the
telescope‘s eyepiece. Focus the image by turning the focus knobs (8,
Fig. 1b). Retighten the R.A. and Dec. locks.
5. Look through the viewfinder and loosen or tighten, as appropriate, one
or more of the viewfinder collimation thumbscrews (5, Fig. 1b) until
the viewfinder’s crosshairs are precisely centered on the object you
previously centered in the main telescope‘s eyepiece. You are now ready
to make your first observations with your telescope.
Looking at or near the Sun will cause instant and irreversible damage to your eye!
14
fIrst steps
*Fig. 13a: Reticle LED assembly:
(A) Reticle container
(B) LED
(C) Batteries
(D) Battery holder
(E) Threaded lid
(F) On/off switch
Isolation pad
Typ 2x LR 44
*Fig. 13b: Before using the illumi-
nation for the first time, remove the
isolation pad (See Fig. 13a) from
the battery holder.
* Optional accessory for Exos 2
3)
Page 15

ATTENTION:
Never point the telescope directly at or near the Sun at any time! Observing
the Sun, even for the smallest fraction of a second, will result in instant and
irreversible eye damage, as well as physical damage to the telescope itself.
6. Check this alignment on a celestial object, such as a bright star or the
Moon, and make any necessary refinements, using the method outlined
above in steps 3 and 4.
With this alignment performed, objects first located in the wide-field
viewfinder will also appear in the telescope‘s eyepiece.
Choosing an Eyepiece
Looking at or near the Sun will cause instant and irreversible damage to your eye!
15
fIrst steps
Fig. 14: 8x50 Finder scope assembly
Collimation screws
Eyepiece
Holder
Fig. 14b: 6x30 finder scope assembly
Collimation screws
Eyepiece
Holder
Messier Tips
Further Study....
This manual gives only the briefest introduction to astronomy. If you are interested
in pursuing further studies in astronomy, a few topics are suggested below that are
worth reading up on. Try looking up some of these in the optional Autostar glossary.
Also included below is a small sampling of books, magazines, and organizations
that you might find helpful.
Topics
1. How is a star born? How does a solar system form?
2. How is the distance to a star measured? What is a light year? What is red shift
and blue shift?
3. How are the craters on our Moon formed? Is there water under the surface of the
Moon?
4. What is a black hole? A neutron star? A gamma burster? An Einstein lens?
5. What are stars made of? Why are stars different colors? How is the elementa
composition of a star determined? What is an Lyman Alpha forest?
6. What is the difference between a Type 1 and a Type II supernova?
7. What is the importance of studying the composition of comets? Where do
comets come from?
8. How old is our Sun? Will our Sun evolve into a planetary nebula or go
supernova?
9. What is the Inflationary Big Bang? What is dark matter? What are MACHO‘s?
10. How are extrasolar planets discovered? What is an accretion (or protoplanetary)
disk?
11. What are the differences between elliptical, spiral, and irregular galaxies? Can
globular clusters be older than the universe itself?
Books
1. The Guide to Amateur Astronomy by Jack Newton and Philip Teece
2. The Sky: A User’s Guide by David Levy
3. Turn Left at Orion by Guy Consolmagno & Dan Davis
4. Astrophotography for the Amateur by Michael Covington
5. Observing for the Fun of It by Melanie Melton
6. Will Black Holes Devour the Universe? and 100 Other Questions about
Astronomy by Melanie Melton
Magazines
1. Sky & Telescope, Box 9111, Belmont, MA 02178
2. Astronomy, Box 1612, Waukesha, WI 53187
Organizations
1. Astronomical League, Executive Secretary, 5675 Real del Norte, Las Cruces, NM
88012
2. The Astronomical Society of the Pacific, 390 Ashton Ave., San Francisco,
CA 94112
3. The Planetary Society, 65 North Catalina Ave., Pasadena, CA 91106
Page 16

A telescope’s eyepiece magnifies the image formed by the telescope’s
main optics. Each eyepiece has a focal length, expressed in millimeters, or
“mm.” The smaller the focal length, the higher the magnification. For example, an eyepiece with a focal length of 9mm has a higher magnification
than an eyepiece with a focal length of 25mm.
Your telescope comes supplied with a Plössl 25mm eyepiece which gives
a wide, comfortable field of view with high image resolution.
Low power eyepieces offer a wide field of view, bright, high-contrast images, and eye relief during long observing sessions. To find an object with
a telescope, always start with a lower power eyepiece such as the Super
Plössl 26mm. When the object is located and centered in the eyepiece,
you may wish to switch to a higher power eyepiece to enlarge the image as
much as practical for prevailing seeing conditions.
The power, or magnification of a telescope is determined by the focal length
of the telescope and the focal length of the eyepiece being used. To calcu-
late eyepiece power, divide the telescope‘s focal length by the eyepiece‘s
focal length. For example, a 25mm eyepiece is supplied with the Messier-
Series. The focal length of the 8“ Messier series model is 900mm (see
Specifications, page 23-24).
Telescope Focal Length ÷ Eyepiece Focal Length = Eyepiece Power
Telescope Focal Length = 1000mm
Eyepiece Focal Length = 25mm
Telescope Focal Length 1000 mm
Magnification = = = 40
Eyepiece Focal Length 25 mm
The magnification is therefore 40X (approximately).
Looking at or near the Sun will cause instant and irreversible damage to your eye!
16
fIrst steps
Fig. 15a+b: Jupiter; examples of
the right amount of magnification
and too much magnification.
Note: Seeing conditions vary
widely from night-tonight and
site-to-site. Turbulence in the air,
even on an apparently clear night,
can distort images. If an image
appears fuzzy and ill-defined,
back off to a lower power eyepiece for a more well-resolved
image.
(see Fig. 15a and 15b below).
Messier Tips
Too Much Power?
Can you ever have too much power? If the type of power you’re referring to is
eyepiece magnification, yes, you can! The most common mistake of the beginning
observer is to “overpower” a telescope by using high magnifications which the telescope’s aperture and atmospheric conditions cannot reasonably support.
Keep in mind that a smaller, but bright and well-resolved image is far superior to one
that is larger, but dim and poorly resolved (see Figs. 15a and 15b). Powers above
200X should be employed only under the steadiest atmospheric conditions.
Page 17

Observation
Observing by Moving the Telescope Manually
After the telescope is assembled and balanced as described previously,
you are ready to begin manual observations. View easy-to-find terrestrial
objects such as street signs or traffic lights to become accustomed to the
functions and operations of the telescope. For the best results during observations, follow the suggestions below:
• When you wish to locate an object to observe, first loosen the telescope’s
R.A. lock (33, Fig. 1d) and Dec. lock (17, Fig. 1d). The telescope can now
turn freely on its axes. Unlock each axis separately and practice moving
your telescope. Then practice with two unlocked axes at the same time.
It is very important to practice this step to understand how your telescope
moves, as the movement of an equatorial mount is not intuitive.
• Use the aligned viewfinder to sight-in on the object you wish to observe.
When the object is centered in the viewfinder’s crosshairs, re-tighten the
R.A. and Dec. locks.
• A telescope’s eyepiece magnifies the image formed by the telescope’s main
optics. Each eyepiece has a focal length, expressed in millimeters, or “mm.”
The smaller the focal length, the higher the magnification. For example, an
eyepiece with a focal length of 9mm has a higher magnification than an eyepiece with a focal length of 25mm. Low-power magnification eyepieces offer
a wide field of view, bright, high-contrast images, and relief of eye strain dur
ing long observing sessions. To observe an object with a telescope, always
start with a low power eyepiece such as the 25mm supplied with your telescope. When the object is centered and focused in the eyepiece, switch
to a higher power eyepiece to enlarge the image as much as practical for
prevailing viewing conditions.
• Once centered, an object can be focused by turning one of the knobs
of the focusing mechanism (8, Fig. 1b). Notice that when observing
astronomical objects, the field of view begins to slowly drift across the
eyepiece field. This motion is caused by the rotation of the Earth on its
axis. Objects appear to move through the field more rapidly at higher pow
ers. This can be compensated with the RA drive shaft or the (optional) RA
drive motor.
Observe the Moon
Point your telescope at the Moon (note that the Moon is not visible every
night). The Moon contains many interesting features, including craters,
mountain ranges, and fault lines. The best time to view the Moon is during its crescent or half phase. Sunlight strikes the Moon at an angle during these periods and adds a depth to the view. No shadows are seen
during a full Moon, making the overly bright surface to appear flat and
rather uninteresting. Consider the use of a neutral density Moon filter when
observing the Moon. Not only does it cut down the Moon‘s bright glare, but
it also enhances contrast, providing a more dramatic image.
Looking at or near the Sun will cause instant and irreversible damage to your eye!
17
observatIon
Important Note:
Objects appear upside-down
and reversed left- for-right when
observed in the viewfinder. With
refracting tele scope models,
objects viewed through the main
telescope with the diagonal mirror in place are seen right-sideup, but reversed left-for-right.
This image inversion is of no
consequence when observing
astronomical objects, and in fact
all astronomical telescopes yield
inverted images.
WARNING
Never use a Telescope to look
at the Sun! Looking at or near
the Sun will cause instant and
irreversibledamage to your eye.
Eye damage is often painless, so
there is no warning to theobserver
that damage has occurred until
it is too late. Do not point the telescope or its viewfinder at or near
the Sun. Do not look through the
telescope or its viewfinder as it is
moving. Children should always
have adult supervision while
observing.
Page 18

Setting the Polar Home Position
1. Level the mount, if necessary, by adjusting the length of the three tripod
legs.
2. Unlock the R.A. Lock (33, Fig. 1d). Rotate the Optical Tube Assembly
until the counterweight shaft is pointing straight down over the mount.
See Figs. 16a and 16b.
3. If you have not already done so, lift the telescope assembly and turn it
so that the tripod leg beneath the counterweight rod faces approximately
North (South in the Southern Hemisphere). Release the Dec. lock (17,
Fig. 1d) of the tripod, so that the optical tube (10, Fig. 1a) may be rotated. Rotate the optical tube until it points North (or South in the Southern
Hemisphere). Then re-tighten the lock. Locate Polaris, the North Star, if
necessary, to use as an accurate reference for due North (or Octantis
in the Southern Hemisphere). See LOCATING THE CELESTIAL POLE,
page 26.
4. If you have not already done so, determine the latitude of your observ-
ing location. See APPENDIX C: LATITUDE CHART, page 30-31, for a
list of latitudes of major cities around the world. Use the latitude T-handle
screws (26, Fig. 1d) to tilt the telescope mount so that the pointer
indicates the correct latitude of your viewing location on the latitude dial
(28, Fig. 1d). See step 6, page 12 for more information.
5. If steps 1 through 4 above were performed with reasonable accuracy,
your telescope is now sufficiently well-aligned to Polaris, the North Star,
for you to begin making observations. Once the mount has been placed
in the polar home position as described above, the latitude angle need
not be adjusted again, unless you move to a different geographical
location (i.e., a different latitude).
IMPORTANT NOTE:
For almost all astronomical observing requirements, approximate settings
of the telescope’s latitude and other settings are acceptable. Do not allow
undue attention to precise settings of polar home position of the telescope
to interfere with your basic enjoyment of the instrument.
Looking at or near the Sun will cause instant and irreversible damage to your eye!
18
observatIon
Fig. 16a: The polar home position,
side view.
Level
mount
Point leg to
north
Point optical
tube to north
The tripod leg
is to be aligned
north under the
counterweight
rod
North
Fig. 16b: The polar home position,
front view.
Level
mount
Point leg to
north
Point optical
tube to north
Page 19

maIntenance and servIce
Maintenance
Messier series telescopes are precision optical instruments designed to
yield a lifetime of rewarding applications. Given the care and respect due
any precision instrument, your Messier will rarely, if ever, require factory
servicing.
Maintenance guidelines include:
a. Avoid cleaning the telescope’s optics: A little dust on the front surface of
the telescope’s correcting lens causes virtually no degradation of image
quality and should not be considered reason to clean the lens.
b. When absolutely necessary, dust on the front lens should be removed
with gentle strokes of a camel hair brush or blown off with an ear syringe
(available at any pharmacy). DO NOT use a commercial photographic
lens cleaner.
c. Organic materials (e.g., fingerprints) on the front lens may be removed
with a solution of 3 parts distilled water to 1 part isopropyl alcohol. You
may also add 1 drop of biodegradable dishwashing soap per pint of
solution. Use soft, white facial tissues and make short, gentle strokes.
Change tissues often.
Caution:
Do not use scented or lotioned tissues or damage could result to the optics.
d. If the telescope is used outdoors on a humid night, water condensa-
tion on the telescope surfaces will probably result. While such condensation does not normally cause any damage to the telescope, it is
recommended that the entire telescope be wiped down with a dry cloth
before the telescope is packed away. Do not, however, wipe any of the
optical surfaces. Rather, simply allow the telescope to sit for some time in
the warm indoor air, so that the wet optical surfaces can dry unattended.
e. Do not leave your Messier inside a car on a warm summer day; exces-
sive ambient temperatures can damage the telescope.
Looking at or near the Sun will cause instant and irreversible damage to your eye!
19
Page 20

Looking at or near the Sun will cause instant and irreversible damage to your eye!
20
maIntenance and servIce
Alignment (Collimation) of the
Newtonian Optical System
All Bresser Newtonian telescopes are precisely collimated at the factory
before packing and shipment, and it is probable that you will not need to
make any optical adjustments before making observations. However, if
the telescope sustained rough handling in shipment, you may need to recollimate the optical system. Such re-collimation is not a difficult procedure
in any case.
The collimation procedure for the short focal length Newtonians is slightly
different from that of other Newtonian reflecting telescopes, because of the
„fast“ f/5 focal ratio of the primary mirror. In typical Newtonian reflectors with
more conventional focal ratios (i.e. longer focal ratios), when the observer
looks down the focuser tube (without an eyepiece in the focuser), the images
of the diagonal mirror, primary mirror, focuser tube, and the observer‘s eye
appear centered relative to each other. However, with the short focal ratio
primary mirror of the Newtonian, correct collimation requires that the diagonal
mirror be offset in 2 directions: (1) away from the focuser and (2) towards the
primary mirror, in equal amounts. This offset is approximately 1/8“ in each
direction. Note that these offsets have been performed at the factory prior to
shipment of your telescope. It is only necessary for you to confirm that the
telescope has not been badly jarred out of collimation, and to perform the
final fine-tuning of Step 4, below.
Fig. 31a shows a correctly collimated Newtonian telescope, as it appears
when viewed through the focuser with the eyepiece removed.
To check and, if necessary, set the optical collimation, follow these steps:
1. Observe through the focuser and orient your body so that the telescope‘s
primary mirror is to your right. The diagonal mirror will appear centered
as shown (2, Fig. 31a). If the diagonal appears off center, then adjust the
4 collimation screws on the plastic diagonal mirror housing.
2. If the reflection of the primary mirror (3, Fig. 31a) is not centered on the
surface of the diagonal mirror, adjust the 4 collimation screws on the
plastic diagonal mirror housing to center the reflection. As described
above, the 4 collimation screws (Fig. 31b) on the plastic diagonal mirror housing are used for two different adjustments during the collimation
procedure.
b c d e f g
Fig. 31a
Note:
The AR-(refractor) models do not
need any collimation
b
Focuser drawtube
c
Secondary mirror
d
Reflection of primary mirror
e
Reflection of secondary mirror
f
Reflection of observer’s eye
g
Primary mirror clips
Page 21

Looking at or near the Sun will cause instant and irreversible damage to your eye!
21
maIntenance and servIce
IMPORTANT NOTE:
Do not force the 4 screws past their normal travel, and do not rotate any
screw or screws more than 2 full turns in a counterclockwise direction (i.e.,
not more than 2 full turns in their „loosening“ direction), or else the diagonal
mirror may become loosened from its support. Note that the diagonal mirror
collimation adjustments are very sensitive: generally turning a collimation
screw 1/2-turn will have a dramatic effect on collimation.
3. If the reflection of the diagonal mirror is not centered within the reflection
of the primary mirror, adjust the 3 collimation screws located on the rear of
the primary mirror cell.
NOTE:
There are 6 screws (Fig. 31c) on the primary mirror cell. The 3 knurled
knobs are the collimation screws, and the 3 smaller thumb screws are locking screws. The locking screws must be loosened slightly in order to adjust
the collimation screws.
Proceed by „trial and error“ until you develop a feel for which collimation
screw to turn in order to change the image in any given way.
4. Perform an actual star test to confirm the accuracy of steps 1 through
3. Using the 25mm eyepiece, point the telescope at a moderately bright
(second or third magnitude) star, and center the image in the main
telescope‘s field of view.
5. Bring the star‘s image slowly in and out of focus until you see several
disks surrounding the star‘s center. If steps 1 through 3 were done
correctly, you will see concentric (centered with respect to each other)
circles (1, Fig. 32).
An improperly collimated instrument will reveal oblong or elongated circles
(2, Fig. 32). Adjust the 3 collimating screws on the primary mirror housing
until the circles are concentric on either side of the focus.
In summary, the 4 adjustment screws on the plastic diagonal mirror housing
change the tilt of the secondary mirror so that it is correctly centered in the
focuser drawtube, and so that the primary mirror appears centered when
looking into the focuser. The 3 collimating knobs on the primary mirror
change the tilt of the primary mirror so that it reflects the light directly up the
center of the drawtube.
Inspecting the Optics
A Note About the “Flashlight Test: If a flashlight or other high-intensity light
source is pointed down the main telescope tube, the view (depending upon
the observer’s line of sight and the angle of the light) may reveal what
appears to be scratches, dark or bright spots, or just generally uneven coatings, giving the appearance of poor quality optics. These items are only
seen when a high intensity light is transmitted through lenses or reflected
off the mirrors, and can be seen on any high quality optical system, including giant research telescopes.
The optical quality of a telescope cannot be judged by the “flashlight test;“
the true test of optical quality can only be conducted through careful star
testing.
Fig 31b: The four collimation
screws on the secondary mirror
housing
Fig. 31c: The six collimation
screws on the rear of the primary
mirror cell.
knurled knob
thumbscrew
Fig. 32: Correct (1) and incorrect
(2) collimation viewed during a star
test.
1 2
Page 22

Looking at or near the Sun will cause instant and irreversible damage to your eye!
22
maIntenance and servIce
Customer Service
If you have a question concerning your Messier series telescope, contact
the Bresser Customer Service Department.
In the improbable case of a malfunction, please contact first the Bresser
customer service before sending back the telescope. Please give complete
error descriptions and specific information about the defective part. The
great majority of servicing issues can be resolved by telephone, avoiding
return of the telescope to the factory. In any case, we need name, address,
phone number and/or email address of the customer.
Contact data:
• Post:
Bresser GmbH
Messier Kunden-Service
Gutenbergstraße 2
DE-46414 Rhede
• E-Mail:
service.apd@bresser.de
• Telefon:
+49 (0) 28 72 - 80 74 0
NOTE:
The production registration form is
on page 42. Please fill it out and
return it to Bresser. This is a condition of our original guarantee.
Page 23

Looking at or near the Sun will cause instant and irreversible damage to your eye!
23
technIcal data
AR-102 Achromatic refractor with EXOS 2
item number 47-02108
Optical design achromatic refractor
Clear aperture 4” = 102 mm
Focal length 1000 mm
Focal ratio f/10
Resolving power 1.11 arc sec
Coatings multi coated
Mount EXOS2 Aluminium-Guß, German type
equatorial
RA + DEC drive system flexible shafts
Max. practicle power 200x
Tripod adjustable steel-tube field tripod
Net weight 18.1 kg
AR-127 S/L Achromatic refractor with EXOS 2
item number 47-27638 / 47-27128
Optical design achromatic refractor
Clear aperture 5” = 127 mm
Focal length 635 mm or 1200 mm
Focal ratio f/5 or f/9,5
Resolving power 0.9 arc sec
Coatings multi coated
Mount EXOS2 Aluminium-Guß, German type
equatorial
RA + DEC drive system flexible shafts
Max. practicle power 250x
Tripod adjustable steel-tube field tripod
Net weight 20.2 kg or 21 kg
AR-152 S/L Achromatic refractor with EXOS 2
item number 47-52768 / 47-52128
Optical design achromatic refractor
Clear aperture 6” = 152 mm
Focal length 760 mm or 1200mm
Focal ratio f/5 or f/7,8
Resolving power 0.75 arc sec
Coatings multi coated
Mount MON2 Aluminium-Guß, German type
equatorial
RA + DEC drive system flexible shafts
Max. practicle power 300x
Tripod adjustable steel-tube field tripod
Net weight 24,6 kg or 24.8 kg
Page 24

Looking at or near the Sun will cause instant and irreversible damage to your eye!
24
technIcal data
NT-150 S/L Newtonian reflector with EXOS 2
item number 47-50758 / 47-50128
Optical design Newtonian reflector
Clear aperture 6” = 150 mm
Focal length 750mm / 1200 mm
Focal ratio f/5 or f/8
Resolving power 0.76 arc sec
Mount EXOS 2 Aluminium-Guß, German type
equatorial
RA + DEC drive system flexible shafts
Max. practical power 300x
Tripod adjustable steel-tube field tripod
Net weight 20,8 or 22.45 kg
NT-203 Newtonian Reflector with EXOS 2
item number 47-03108
Optical design Newtonian reflector
Clear aperture 8” = 203 mm
Focal length 1000 mm
Focal ratio f/5
Resolving power 0.56 arc sec
Mount EXOS 2 Aluminium-Guß, German type
equatorial
RA + DEC drive system flexible shafts
Max. practical power 400x
Tripod adjustable steel-tube field tripod
Net weight 25.1 kg
AR-90 Achromatic Refractor with EXOS 1
item number 47-90907
Optical design achromatic refractor
Clear aperture 3,5” = 90 mm
Focal length 900 mm
Focal ratio f/10
Resolving power 1.27 arc sec
Coatings multi-coated
Mount EXOS1 Aluminium-Guß, German type
equatorial
RA- und DEC-Antriebssystem über flexible Wellen
Max. practical power 180x
Tripod adjustable steel-tube field tripod
Net weight 12.25 kg
NT-130 Newtonian Reflector with EXOS 1
item number 47-30107
Optical design Newtonian refelctor
Clear aperture 5,1” = 130 mm
Focal length 1000 mm
Focal ratio f/7,7
Resolving power 0.88 arc sec
Mount EXOS1 Aluminium-Guß, German type
equatorial
RA + DEC drive system flexible shafts
Max. practical power 260x
Tripod adjustable steel-tube field tripod
Net weight 17,3 kg
Page 25

Looking at or near the Sun will cause instant and irreversible damage to your eye!
25
appendIx a: celestIal coordInates
Appendix A:
Celestial coordinates
For a sufficient tracking of an celestial object, the telescope mount has
to be aligned with the celestial pole.
By doing this, the mount’s axes are orientated in this way that they fit
to the celesial sphere.
If you want to align the telescope’s mount to the celestial pole, you
need some knowledge in which way an object at the sky can be
located while it is steadily moving across the sphere. This chapter provides a basic knowledge about equatorial coordiates, the celestial pole
and how objects can be found by their coordinates. You will also get
used to the meaning of “Right aszension” and “Declination”
A celestial coordinate system was created that maps an imaginary
sphere surrounding the Earth upon which all stars appear to be
placed. This mapping system is similar to the system of latitude and
longitude on Earth surface maps. In mapping the surface of the Earth,
lines of longitude are drawn between the North and South Poles and
lines of latitude are drawn in an East-West direction, parallel to the
Earth’s equator. Similarly, imaginary lines have been drawn to form
a latitude and longitude grid for the celestial sphere. These lines are
known as Right Ascension and Declination.
The celestial map also contains two poles and an equator just like a
map of the Earth. The poles of this coordinate system are defined as
those two points where the Earth’s north and south poles (i.e., the
Earth‘s axis), if extended to infinity, would cross the elestial sphere.
Thus, the North Celestial Pole (1, Fig. 34) is that point in the sky
where an extension of the North Pole intersects the celestial sphere.
The North Star, Polaris is located very near the North Celestial Pole.
The celestial equator (2, Fig. 34) is a projection of the Earth’s equator
onto the celestial sphere.
Just as an object‘s position on the Earth’s surface can be located
by its latitude and longitude, celestial objects may also be located
using Right Ascension and Declination. For example, you could
locate Los Angeles, California, by its latitude (+34°) and longitude
(118°). Similarly, you could locate the Ring Nebula (M57) by its Right
Ascension (18hr) and its Declination (+33°).
• Right Ascension (R.A.): This celestial version of longitude is
measured in units of hours (hr), minutes (min), and seconds (sec) on
a 24-hour „clock“ (similar to how Earth‘s time zones are determined
by longitude lines). The „zero“ line was arbitrarily chosen to pass
through the constellation Pegasus — a sort of cosmic Greenwich
meridian. R.A. coordinates range from 0hr 0min 0sec to 23hr 59min
59sec. There are 24 primary lines of R.A., located at 15-degree intervals along the celestial equator. Objects located further and further
East of the zero R.A. grid line (0hr 0min 0sec) carry higher R.A.
coordinates.
• Declination (Dec.): This celestial version of latitude is measured
in degrees, arcminutes, and arc-seconds (e.g., 15° 27‘ 33“). Dec.
locations north of the celestial equator are indicated with a plus (+)
sign (e.g., the Dec. of the North celestial pole is +90°). Dec. locations
south of the celestial equator are indicated with a minus
(–) sign (e.g., the Dec. of the South celestial pole is –90°). Any point
on the celestial equator (such as the the constellations of Orion,
Virgo, and Aquarius) is said to have a Declination of zero, shown as
0° 0‘ 0.
Fig. 33: Celestial sphere
14
15
16
17
18
19
20
21
22
23
0
1
12
11
10
9
8
7
5
6
4
3
2
13
Earth rotation
0° DEC
South celestial pole
Right Ascension
Star
Celestial Equator
-90° DEC
+90° DEC
D
e
c
l
i
n
a
t
i
o
n
Northern celestial pole
(near Polaris)
1
2
Page 26

Looking at or near the Sun will cause instant and irreversible damage to your eye!
26
appendIx a: celestIal coordInates
Every celestial object can be exactly determined by these coordinates.
Using setting circles prerequisites an advanced observing technique. If
you use them for the first time, first point a bright star (the guide star)
with known coordinates and adjust the setting circles to them. Now
you can do a “star hop” to the next star with known coorditates and
compare the setting circles with them. By this way, you will learn which
precise handling is necessary for a successful pointing.
Locating the Celestial Pole
To get basic bearings at an observing location, take note of where the
Sun rises (East) and sets (West) each day. After the site is dark, face
North by pointing your left shoulder toward where the Sun set. To pre-
cisely point at the pole, find the North Star (Polaris) by using the Big
Dipper as a guide (Fig. 35).
Note:
For nearly every purpose (except long-term astrophotography)
average settings of the mount’s azimuth and latitue are sufficient.
Therefore it is not necessary to spend too much time on perfekt
aligning the celestial pole!
Setting Circles
Setting circles included with the Messier-Series models permit the
location of faint celestial objects not easily found by direct visual
observation. With the telescope pointed at the North Celestial Pole,
the Dec. circle (19, Fig. 1d) should read 90° (understood to mean
+90°). Each division of the Dec. circle represents a 1° increment. The
R.A. circle (31, Fig. 1d) runs from 0hr to (but not including) 24hr, and
reads in increments of 5min.
Using setting circles requires a developed technique. When using
the circles for the first time, try hopping from one bright star (the
calibration star) to another bright star of known coordinates. Practice
moving the telescope from one easy-to-find object to another. In this
way, the precision required for accurate object location becomes
evident.
To use the setting circles to locate an object not easily found by direct
visual observation:
Insert a low-power eyepiece, such as a 25mm, into the focuser assembly. Pick out a bright star with which you are familiar (or is easily located) that is in the area of the sky in which your target object is located.
Look up the R.A. coordinate of the bright star, and also of the object
you wish to locate, in a star atlas. Point the object at the bright star.
Then loosen the R.A. setting circle lock knob (32, Fig. 1d) and turn the
R.A. setting circle to read the correct R.A. coordinate of the bright star;
lock the R.A. setting circle lock knob onto the object. Next, loosen the
R.A. lock (33, Fig. 1d) and turn the telescope in R.A. to read the correct R.A. coordinate of the object. Tighten the R.A. lock (33, Fig. 1d).
If the procedure has been followed carefully, the desired object should
now be in the telescopic field of a low-power eyepiece.
If you do not immediately see the object you are seeking, try searching
the adjacent sky area. Keep in mind that, with the 25mm eyepiece, the
field of view of the Messier series is about 0.5°. Because of its much
wider field, the viewfinder may be of significant assistance in locating and centering objects, after the setting circles have been used to
locate the approximate position of the object.
Fig. 34: Locating Polaris
Polaris
Ursa Minor
Ursa Maior
Cassiopeia
Page 27

Looking at or near the Sun will cause instant and irreversible damage to your eye!
27
appendIx a: celestIal coordInates
Messier Tips
Join an Astronomy Club. Attend a Star Party
One of the best ways to increase your knowledge of astronomy
is to join an astronomy club. Check your local newspaper, school,
library, or telescope dealer/store to find out if there’s a club in your area.
At club meetings, you will meet other astronomy and Meade enthusiasts with
whom you will be able to share your discoveries. Clubs are an excellent way
to learn more about observing the sky, to find out where the best observing
sites are, and to compare notes about telescopes, eyepieces, filters, tripods,
and so forth.
Often, club members are excellent astrophotographers. Not only will you be
able to see examples of their art, but you may even be able to pick up some
“tricks of the trade” to try out on your Messier-Series telescope. Many groups
also hold regularly scheduled Star Parties at which you can check out and
observe with many different telescopes and other pieces of astronomical
equipment.
Page 28

appendIx b: latItude chart
Looking at or near the Sun will cause instant and irreversible damage to your eye!
28
Appendix B: Latitude Chart
Latitude Chart for Major Cities of the World
To aid in the polar alignment procedure (see page 25), latitudes of major
cities around the world are listed below. To determine the latitude of an
observing site not listed on the chart, locate the city closest to your site.
Then follow the procedure below:
Northern hemisphere observers (N):
If the site is over 70 miles (110 km) north of the listed city, add one degree
for every 70 miles. If the site is over 70 miles South of the listed city,
subtract one degree per 70 miles.
Southern Hemisphere observers (S):
If the site is over 70 miles (110 km) north of the listed city, subtract one
degree for every 70 miles. If the site is over 70 miles South of the listed city,
add one degree per 70 miles.
EUROPE
City Country Latitude
Amsterdam Netherlands 52° N
Athen Greece 38° N
Berlin Germany 52° N
Bern Switzerland 47° N
Bonn Germany 50° N
Borken/Westf. Germany 52° N
Bremen Germany 53° N
Dresden Germany 51° N
Dublin Ireland 53° N
Düsseldorf Germany 51° N
Frankfurt/M. Germany 50° N
Freiburg Germany 48° N
Glasgow Scotland 56° N
Hamburg Germany 54° N
Hannover Germany 52° N
Helsinki Finland 60° N
Kopenhagen Denmark 56° N
Köln Germany 51° N
Leipzig Germany 51° N
Lissabon Portugal 39° N
London Great Britain 51° N
Madrid Spanien 40° N
München Germany 48° N
Nürnberg Germany 50° N
Oslo Norway 60° N
Paris France 49° N
Rom Italy 42° N
Saarbrücken Germany 49° N
Stockholm Schweden 59° N
Stuttgart Germany 49° N
Wien Austria 48° N
Warschau Poland 52° N
Page 29

appendIx b: latItude chart
Looking at or near the Sun will cause instant and irreversible damage to your eye!
29
UNITED STATES OF AMERICA
City Country Latitude
Albuquerque New Mexico 35° N
Anchorage Alaska 61° N
Atlanta Georgia 34° N
Boston Massachusetts 42° N
Chicago Illinois 42° N
Cleveland Ohio 41° N
Dallas Texas 33° N
Denver Colorado 40° N
Detroit Michigan 42° N
Honolulu Hawaii 21° N
Jackson Mississippi 32° N
Kansas City Missouri 39° N
Las Vegas Nevada 36° N
Little Rock Arkansas 35° N
Los Angeles Kalifornien 34° N
Miami Florida 26° N
Milwaukee Wisconsin 46° N
Nashville Tennessee 36° N
New Orleans Louisiana 30° N
New York New York 41° N
Oklahoma City Oklahoma 35° N
Philadelphia Pennsylvania 40° N
Phoenix Arizona 33° N
Portland Oregon 46° N
Richmond Virginia 37° N
Salt Lake City Utah 41° N
San Antonio Texas 29° N
San Diego Kalifornien 33° N
San Francisco Kalifornien 38° N
Seattle Washington 47° N
Washington District of Columbia 39° N
Wichita Kansas 38° N
SOUTH AMERICA
City Country Latitude
Asuncion Paraguay 25° S
Brasilia Brasil 24° S
Buenos Aires Argentinia 35° S
Montevideo Uruguay 35° S
Santiago Chile 34° S
ASIA
City Country Latitude
Peking China 40° N
Seoul South Korea 37° N
Taipei Taiwan 25° N
Tokio Japan 36° N
Victoria Hongkong 23° N
AFRICA
City Country Latitude
Kairo Egypt 30° N
Cape city South Africa 34° S
Rabat Marocco 34° N
Tunis Tunesia 37° N
Windhoek Namibia 23° S
Page 30

appendIx c: polar alIGnment
Looking at or near the Sun will cause instant and irreversible damage to your eye!
30
* Optional accessory for Exos 2
Appendix C: Polar Alignment
The Polar Alignment Viewfinder
Normally, a rough alignment with the celestial pole is sufficient for visual
purposes. However, for those observers who need to meet the more
demanding requirements of astrophotography, the polar alignment
viewfinder allows the telescope mount to be more precisely aligned with
true North. The Exos2 Mount can be equipped with a red LED illumination
for the finder scope (available separately).
Adjusting the polar viewfinder (EXOS 2 only)
A: Calibrating the month circle at the polar viewfinder scope (best done
while daytime)
1. Point the viewfinder against a bright surface (not in any case at the
sun!) and see the scaled line with the center cross (Fig. 36). Turn the
viewfinder’s eyepiece until the scales are focussed.
2. Now turn the month circle against the viewfinder until the 1st of May hits
the vertical line. The month circle is secured by a counterring; it should
be able to be turned but it should not come loose. Now you can put the
viewfinder back into the RA axis
3. On the month circle, there’s a second scale, marked “E 20 10 0 10 20
W”. Take a white pencil and mark the point on the viewfinder that is right
above the “0”. This can be also done by using a small piece of colored
tape.
B: Aligning the viewfinder’s optical axis to the RA axis
1. Starting at the polar home position (see p. 18), loosen the Dec lock, turn
the Dec axis by 90° and re-engage the Dec lock again. In this position,
the optical axis of the viewfinder is free.
2. Point the viewfinder at a terrestrial objekt like a phone pole, the tip of a
church tower or equiv. so that it lines up with the center cross of the reticle.
3. Ascertain whether the object moves out of the center cross when the
mount is rotated around its Dec axis.
4. If this is the case, correct 50% of the error by adjusting the hex screw of
the viewfinder holder. Now correct the remaining error by repositioning
the mount. Turn the RA axis by 90 / 180° and repeat this process until
the center cross stays on the desired object.
Polar alignment by using the polar viewfinder
(EXOS 2 only)
1. Set the polar home position (p. 18). Loosen the Dec lock, turn the Dec
axis by 90° and re-engage the lock.
2. Loosen the RA lock (33, Fig 1 d)
3. Remove the dust caps
4. If not done yet, remove the isolaton pad from the viewfinder’s illumination
(see p. 10, step 13).
5. Turn the illuminator switch clockwise to a comfortable brightness and
look throug the viewfinder. If necessary, focus the viewfinder until reticle
and stars appear sharp.
6. In the following step 7, use the latitude adjustment screws (Fig 1 d, 26)
and the azimuth adjustment screws (Fig 1 d, 27) to do the necessary fine
adjustments
Fig. 36: The view inside the polar
alignment viewfinder reticle (the
four stars show an association
near the southern celestial pole)
Fig. 35: The polar alignment
viewfinder
*
Reticle LED
knob
Eyepiece
3)
Page 31

Fig. 37: Detail: Polar viewfinder.
Polar finder scope illumination (30)
available separately.
Looking at or near the Sun will cause instant and irreversible damage to your eye!
31
appendIx c: polar alIGnment
3)
Observers on the northern hemishere:
N- 7 a) Determine the rough longitude of your observing site (example:
Munich is 12° E). Now determine the longitude of the time meridian
according to your local time. For the central european time, this is 15°
E (do not use daylight savings). Calculate the difference between both
longitudes; in our exampel with Munich, it is 3°
N- 7 b) Now set the secondary scale at your month ring (E 20 10...) to this
difference. If your observing site is east of the time meridian, turn to “E”, if
it is west of the meridian, turn to “W”. This setting has only to be changed
when the observing site changes by more than 2-3°.
N- 7 c) Loosen the RA setting circle locking screw (32, Fig 1 d), turn the
setting circle to “0” and tighten the screw again. In normal operation, this
screw should be loose!
N- 7 d) Now loosen the RA lock and turn the RA axis until the actual date at
the month match with the local time. In the picture shown, this would e.g.
be November 24th, 22:00 CET.
N- 7 e) Now adjust the mount using the azimuth and latitude knobs until
Polaris fits into the small circle between 40’ and 60’.
Observers on the southern hemisphere:
S- 7 a) Look at the trapezoid association in the polar viewfinder’s reticle.
They build the stars Sigma, Tau, Chi and Ypsilon Octantis. Turn the RA
axis until the “real” stars roughly cover the edge points in the trapezoid
figure.
S- 7 b) Probably both trapezoids may still be parallel shifted. Adjust this
offset by using the latitude and azimuth fine controls. Maybe an additional
RA correction is necessary.
Note:
Not all settings within the month/hour scale are possible because a german
equatorial mount is limited within its movements.
8. Tighten the RA wedging again and set the telescope to its polar home
position.
Note:
Don’t forget to switch off the reticle illuminatin after use.
Page 32

Looking at or near the Sun will cause instant and irreversible damage to your eye!
32
appendIx d: basIc astronomy
Appendix D: Basic astronomy
In the early 17th century Italian Scientist Galileo, using a telescope smaller
than your Messier, turned it skyward instead of looking at the distant trees
and mountains. What he saw, and what he realized about what he saw,
has forever changed the way mankind thinks about the universe. Imagine
what it must have been like being the first human to see moons revolve
around the planet Jupiter or to see the changing phases of Venus! Because
of his observations, Galileo correctly realized Earth‘s movement and posi-
tion around the Sun, and in doing so, gave birth to modern astronomy. Yet
Galileo‘s telescope was so crude, he could not clearly make out the rings of
Saturn.
Galileo‘s discoveries laid the foundation for understanding the motion
and nature of the planets, stars, and galaxies. Building on his foundation,
Henrietta Leavitt determined how to measure the distance to stars, Edwin
Hubble gave us a glimpse into the possible origin of the universe, Albert
Einstein unraveled the crucial relationship of time and light, and 21st- century
astronomers are currently discovering planets around stars outside our solar
system. Almost daily, using sophisticated successors to Galileo‘s telescope,
such as the Hubble Space Telescope and the Chandra X-Ray
Telescope, more and more mysteries of the universe are being probed and
understood. We are living in the golden age of astronomy. Unlike other
sciences, astronomy welcomes contributions from amateurs. Much of the
knowledge we have on subjects such as comets, meteor showers, double
and variable stars, the Moon, and our solar system comes from observations
made by amateur astronomers. So as you look through your Bresser
Messier-Series telescope, keep in mind Galileo. To him, a telescope was not
merely a machine made of glass and metal, but something far more—a win-
dow of incredible discovery. Each glimpse offers a potential secret waiting to
be revealed.
Objects in Space
Listed below are some of the many astronomical objects that can be seen
with your Messer series telescope:
The Moon
The Moon is, on average, a distance of 239,000 miles (380,000km) from
Earth and is best observed during its crescent or half phase when Sunlight
strikes the Moon’s surface at an angle. It casts shadows and adds a sense
of depth to the view (Fig. 50).
No shadows are seen during a full Moon, causing the overly bright Moon to
appear flat and rather uninteresting through the telescope. Be sure to use a
neutral Moon filter when observing the Moon. Not only does it protect your
eyes from the bright glare of the Moon, but it also helps enhance contrast,
providing a more dramatic image.
Using your Messier-Series telescope, brilliant detail can be observed on the
Moon, including hundreds of lunar craters and maria, described below.
Craters are round meteor impact sites covering most of the Moon’s surface.
With no atmosphere on the Moon, no weather conditions exist, so the only
erosive force is meteor strikes. Under these conditions, lunar craters can last
for millions of years.
Maria (plural for mare) are smooth, dark areas scattered across the lunar
surface. These dark areas are large ancient impact basins that were filled
with lava from the interior of the Moon by the depth and force of a meteor or
comet impact.
Fig. 42: The moon. Note the deep
shadows in the craters.
Fig. 43: The giant planet, Jupiter.
The four largest moons can be
observed in a different position
every night.
Fig. 43a: Jupiter, here in a higher
magnification. Note the detailed
cloud structures.
Page 33

Twelve Apollo astronauts left their bootprints on the Moon in the late 1960‘s
and early 1970‘s. However, no telescope on Earth is able to see these foot-
prints or any other artifacts. In fact, the smallest lunar features that may be
seen with the largest telescope on Earth are about one-half mile across.
Planets
Planets change positions in the sky as they orbit around the Sun. To
locate the planets on a given day or month, consult a monthly astronomy
magazine, such as Sky and Telescope or Astronomy. Listed below are the
best planets for viewing through the Messier-Series.
Venus is about nine-tenths the diameter of Earth. As Venus orbits the Sun,
observers can see it go through phases (crescent, half, and full) much like
those of the Moon. The disk of Venus appears white as Sunlight is reflected
off the thick cloud cover that completely obscures any surface detail.
Mars is about half the diameter of Earth, and appears through the telescope
as a tiny reddish-orange disk. It may be possible to see a hint of white at
one of the planet’s Polar ice caps. Approximately every two years, when
Mars is closest to Earth in its orbit, additional detail and coloring on the
planet‘s surface may be visible.
Jupiter is the largest planet in our solar system and is eleven times the
diameter of Earth. The planet appears as a disk with dark lines stretching across the surface (Fig. 43). These lines are cloud bands in the
atmosphere. Four of Jupiter’s moons (Io, Europa, Ganymede, and Callisto)
can be seen as “star-like” points of light when using even the lowest magnification. These moons orbit Jupiter so that the number of moons visible on
any given night changes as they circle around the giant planet.
Saturn is nine times the diameter of Earth and appears as a small, round
disk with rings extending out from either side (Fig. 44). In 1610, Galileo, the
first person to observe Saturn through a telescope, did not understand that
what he was seeing were rings. Instead, he believed that Saturn had “ears.”
Saturn’s rings are composed of billions of ice particles ranging in size from
a speck of dust to the size of a house.
The major division in Saturn‘s rings, called the Cassini Division, is
occasionally visible through the Messier-Series. Titan, the largest of
Saturn’s moons can also be seen as a bright, star-like object near the
planet.
Deep-Sky Objects
Star charts can be used to locate constellations, individual stars and
deep-sky objects. Examples of various deep-sky objects are given below:
Stars are large gaseous objects that are self-illuminated by nuclear fusion
in their core. Because of their vast distances from our solar system, all stars
appear as pinpoints of light, irrespective of the size of the telescope used.
Nebulae are vast interstellar clouds of gas and dust where stars are
formed. Most impressive of these is the Great Nebula in Orion (M42), a
diffuse nebula that appears as a faint wispy gray cloud. M42 is 1600 light
years from Earth. (Fig 45)
Open Clusters are loose groupings of young stars, all recently formed from
the same diffuse nebula. The Pleiades is an open cluster 410 light years
away (Fig. 46). Through the Messier-Series, numerous stars are visible.
Looking at or near the Sun will cause instant and irreversible damage to your eye!
33
appendIx d: basIc astronomy
Fig. 44: Saturn with its ring system.
Fig. 44a: Saturn, in a higher
magnification. It has the most
extensive ring structure in our
Solar System.
Fig. 45: A favourite Winter object:
M42, the great Orion Nebula.
Page 34

appendIx d: basIc astronomy
Looking at or near the Sun will cause instant and irreversible damage to your eye!
34
Constellations are large, imaginary patterns of stars believed by ancient civilizations to be the celestial equivalent of objects, animals, people, or gods.
These patterns are too large to be seen through a telescope. To learn the
constellations, start with an easy grouping of stars, such as the Big Dipper
in Ursa Major. Then, use a star chart to explore across the sky.
Galaxies are large assemblies of stars, nebulae, and star clusters that
are bound by gravity. The most common shape is spiral (such as our own
Milky Way), but galaxies can also be elliptical, or even irregular blobs. The
Andromeda Galaxy (M31) is the closest spiral-type galaxy to our own. This
galaxy appears fuzzy and cigar-shaped. It is 2.2 million light years away in
the constellation Andromeda, located between the large “W” of Cassiopeia
and the great square of Pegasus.
A “road map” to the stars
The night sky is full of wonders and miracles. Feel free to discover the
universe; You just need to follow a few helping lines on the “road map” to
the stars!
First, find the Big Dipper, which is part of the Ursa Major constellation. It
can be found the whole year through quite easily in Europe and Northern
America.
If you draw a line on the sky which prolongs Big Dipper’s handle backwards, you’ll finally reach the constellation of Orion. It is remarkable by the
“Orion Belt”: three stars in a line. The great Orion Nebula is located south of
the Orion Belt It is one of the most popular objects under amateur astrono-
mers.
Starting at the two “pointer stars” - both stars of the back part of Big Dipper
- draw a five times prolonged line north to the pole star. If you go ahead,
you’ll finally reach the big star square that is shared by Pegasus and
Andromeda.
The summer triangle is a remarkable region left of Big Dipper’s handle. It
consists of the three bright stars Vega, Deneb and Altair.
If you prolong the shaft, you get to the constellation of Scorpio. It is bended
like a Scorpion’s tail; it also looks like the letter “J”.
American amateurs performed the words “Arc to Arcturus and spike to
Spica”. They relate to stellar region that lies in the prolonge area of Big
Dipper’s handle. Follow the arc to Arcturus, the northern hemisphere’s
brightest star and “spike” downwards to Spica, the 16th-brightest Star of the
sky.
Fig. 46: The Pleiades (M45) is one
of the most beautiful open clusters.
Difficult to imagine stellar
distances? Learn more on p. 36
Page 35

Looking at or near the Sun will cause instant and irreversible damage to your eye!
35
appendIx d: basIc astronomy
Fig. 47: The Andromeda Galaxy
(M31), the biggest one in our local
group.
Fig. 48
Messier-Tipps
Star Charts
Star charts and planisphere are very
useful tools and are great aids in planning a night of celestial viewing.
A wide variety of star charts are available in books, in magazines, on the
internet and on CD Roms. For all
Messier telscopes the star chart soft-
ware „Cartes du Ciel“ is included with
your purchase.
Page 36

Looking at or near the Sun will cause instant and irreversible damage to your eye!
36
appendIx d: basIc astronomy
Distance between Stars
The distance between our Sun and the nearest star is about 4.3 light years or etwa 40 Billion km. This distance is so enormeous, that in a model where our
Earth is 25 mm (1 inch) distant from the sun, the distance to the next star would be 6.5 km/4 mi!
Our home galaxy, the Milky Way, inhabits round about 100’000’000’000 stars. With its spiral arms, it has a diameter of about 100’000 light years.
Distance between Earth and Moon
383.000 km / 240’000 mi
Distances between galaxies
Our Milky Way
Andromeda Galaxy (M31)
„Whirlpool“ Galaxy (M51)
Our sun
2,25 Mio. light years 35 Mio. light years
Distances in space
Fig. 49
Moon
Diameter = 3’456 km
Earth
Diameter = 12’664 km
Distance between Planets
The distance between the Sun and our Earth is 150’000’000 km / 93’750’000 mi or 1 AU (Astronomical unit)
Pluto has a very excentric orbit that brings him sometimes inside the orbit of Neptune
Mercury
Distance to the sun = 0.39 AU
Venus
Distance to the sun = 0.72 AU
Earth
Distance to the sun = 1.00 AU
Mars
Distance to the sun = 1.52 AU
Mercury
Distance to
the sun = 1.52 AU
Jupiter
Distance to
the sun = 5.20 AU
Saturn
Distance to
the sun = 9.54 AU
Uranus
Distance to
the sun = 19.2 AU
Neptun
Distance to
the sun = 30.1 AU
Pluto
Distance to
the sun = 24.6 AU to 52.6 AU
Earth
Distance to the sun = 1.00 AU
Distance = 4.3 light years
to the next star
Alpha Centauri A+B
Sun
Sun
Page 37

Looking at or near the Sun will cause instant and irreversible damage to your eye!
37
appendIx e: star maps
S
W
O
Fig. 50: Sky view (Beginning of January,
ca. 22 h), Facing south
N
O
W
Fig. 50a: Sky view in winter (Beginning of <January,
ca. 22 h), facing north
Winter
Page 38

appendIx e: star maps
38
S
W
O
Fig. 51: Sky view in spring (Beginning of April,
ca. 22 h), facing south
N
O
W
Abb. 51a: Sky view in spring (Beginning of April,
ca. 22 h), facing north
Spring
Page 39

appendIx e: star maps
39
Summer
S
W
O
Fig. 52: Sky view in summer (Beginning of July,
ca. 22 h), facing south
N
O
W
Fig. 52a: Sky view in summer (Beginning of July
ca. 22 h), facing north
Page 40

appendIx e: star maps
40
Autumn
S
W
O
Fig. 53: Sky view in autumn (Beginning of October,
ca. 22 h), facing south
N
O
W
Fig. 53a: Sky view in autumn (Beginning of October,
ca. 22 h), facing north
Page 41

Page 42

Page 43

Page 44

© 2014 Bresser GmbH. No part of this manual may be reproduced, sent, transferred or be translated into another language in any form without written permission of the Bresser GmbH.
Errors and technical changes excepted.
Bresser GmbH
Gutenbergstraße 2 • DE-46414 Rhede
Telefon: (0 28 72) 80 74 0
service.apd@bresser.de • www.bresser.de
ANLMESSIERGB0114BRESSER
Besuchen Sie uns auf • Find us on:
 Loading...