

brennenstuhl L DN 9850 FL PIR DE 3925, L DN 2810 FL PIR DE 3925, L DN 9850 FL DE 3925, L DN 5630 FL DE 3925, L DN 5630 FL PIR DE 3925 Operating Instructions Manual
Page 1
Slim LED-Strahler
Slim LED Light
L DN 2810 FL DE 3925 L DN 2810 FL PIR DE 3925
L DN 5630 FL DE 3925 L DN 5630 FL PIR DE 3925
L DN 9850 FL DE 3925 L DN 9850 FL PIR DE 3925
A Bedienungsanleitung . . . . . . . . . . . . . . . . . . . . . . . . . . . . . . . . . . . . 3
D Operating instructions
. . . . . . . . . . . . . . . . . . . . . . . . . . . . . . . . . . 8
G Mode d’emploi
. . . . . . . . . . . . . . . . . . . . . . . . . . . . . . . . . . . . . . . . . . . . . . 13
M Gebruiksaanwijzing
. . . . . . . . . . . . . . . . . . . . . . . . . . . . . . . . . . . . . . 18
J Istruzioni per l’uso
. . . . . . . . . . . . . . . . . . . . . . . . . . . . . . . . . . . . . . . . . 23
E Manual de instrucciones
. . . . . . . . . . . . . . . . . . . . . . . . . . . . . . . . . 28
N Instrukcja obsługi
. . . . . . . . . . . . . . . . . . . . . . . . . . . . . . . . . . . . . . . . . 33
17P028 Slim LED Strahler 170411.indd 1 11.04.2017 14:31:05
Page 2
17P028 Slim LED Strahler 170411.indd 2 11.04.2017 14:31:05
Page 3
3
A Bedienungsanleitung
Slim LED-Strahler
L DN 2810 FL DE 3925 L DN 2810 FL PIR DE 3925
L DN 5630 FL DE 3925 L DN 5630 FL PIR DE 3925
L DN 9850 FL DE 3925 L DN 9850 FL PIR DE 3925
Achtung: Lesen Sie vor der Montage des Strahlers diese Gebrauchsanweisung
bitte aufmerksam durch und bewahren Sie sie anschließend gut auf!
TECHNISCHE DATEN
Schutzklasse: I
Schutzart: IP 54
Nennspannung: 230 V~ 50/60 Hz
Leistungsfaktor: > 0,9
Typ: Leistung: Strom: Bewe-
gungsmelder:
Maße
Schutzabdeckung:
Maße: Gewicht: max.
projizierte
Fläche:
L DN 2810 FL
DE 3925
10 W
(28 x 0,36 W)
0,045 A nein 124,2 x 90,2 x 4 mm 136 x 146,5 x 40,5 mm 0,43 kg 0,01 m²
L DN 2810 FL
PIR DE 3925
10 W
(28 x 0,36 W)
0,045 A ja 124,2 x 90,2 x 4 mm 166 x 146,5 x 42,5 mm 0,49 kg 0,01 m²
L DN 5630 FL
DE 3925
30 W
(56 x 0,5 W)
0,13 A nein 201,6 x 146,6 x 4 mm 202 x 231 x 35 mm 1,25 kg 0,03 m²
L DN 5630 FL
PIR DE 3925
30 W
(56 x 0,5 W)
0,13 A ja 201,6 x 146,6 x 4 mm 252 x 231 x 40,5 mm 1,37 kg 0,03 m²
L DN 9850 FL
DE 3925
50 W
(98 x 0,5 W)
0,22 A nein 250,8 x 185,8 x 4 mm 235 x 276,5 x 40 mm 1,92 kg 0,05 m²
L DN 9850 FL
PIR DE 3925
50 W
(98 x 0,5 W)
0,22 A ja 250,8 x 185,8 x 4 mm 290 x 276,5 x 40,5 mm 2,0 kg 0,05 m²
Dieser Hochleistungs-LED-Strahler ist für Beleuchtungszwecke im Innen- und Außenbereich
geeignet und für die Festmontage vorgesehen.
17P028 Slim LED Strahler 170411.indd 3 11.04.2017 14:31:05
Page 4
4
A
Bedienungsanleitung
Slim LED-Strahler
SICHERHEITSHINWEISE
1. Die Installation und Wartung des Strahlers muss durch eine qualizierte Fachkraft erfolgen.
2. Elektroinstallationen dürfen nur unter Einhaltung der Sicherheitsvorschriften (VDE 0100 für
Deutschland) durchgeführt werden.
3. Zum Anschluss muss eine VDE-zertizierte Anschlussleitung (mindestens H05RN-F 3G1,0)
verwendet werden.
4. Der Strahler muss ordnungsgemäß geerdet werden.
5. Der Strahler darf ohne alle ordnungsgemäß angebrachten Dichtungsringe nicht benutzt
werden!
6. LED-Strahler sind extrem hell. Bitte niemals direkt in das Licht schauen.
7. Eine zerstörte Schutzabdeckung muss vor weiterer Benutzung des Strahlers durch eine
Original Brennenstuhl Schutzabdeckung ersetzt werden.
8. Wenn die Netzanschlussleitung des Strahlers oder die Anschlussbox beschädigt wird, muss sie
durch eine qualizierte Fachkraft ersetzt werden, um Gefährdungen zu vermeiden.
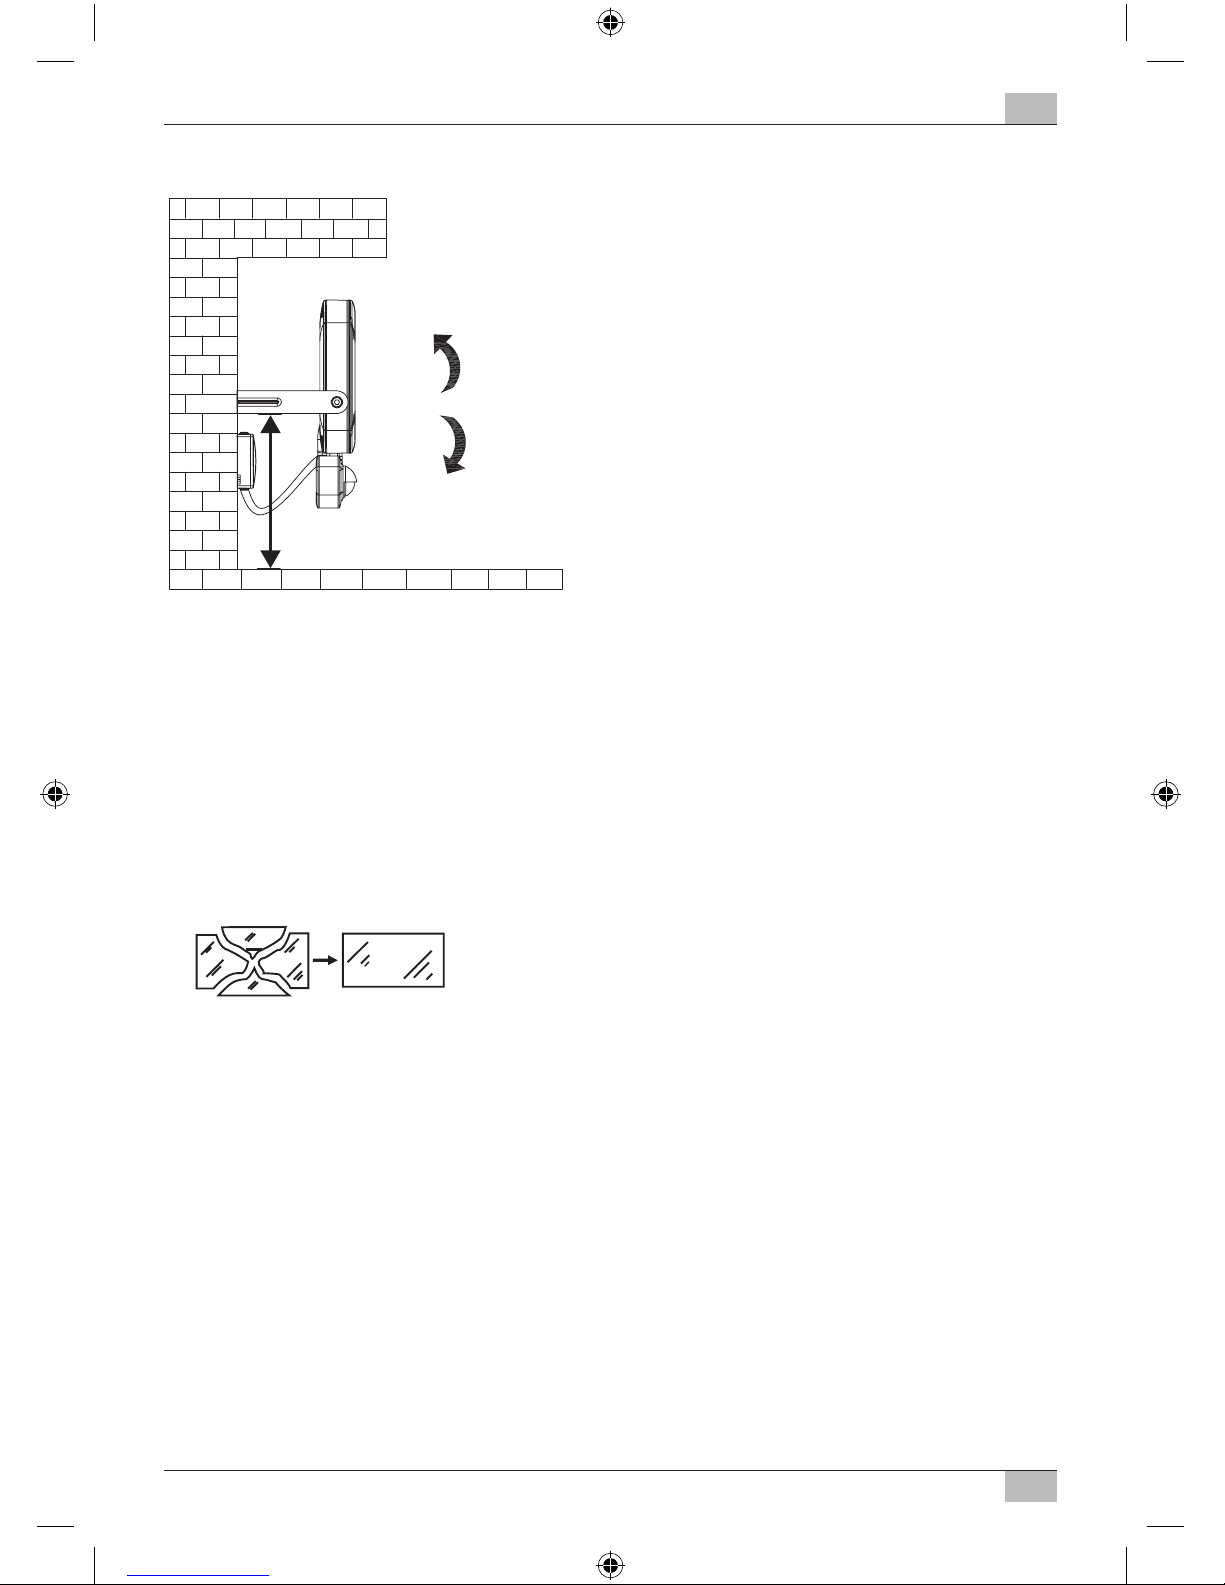
< 3 m
90°
100°
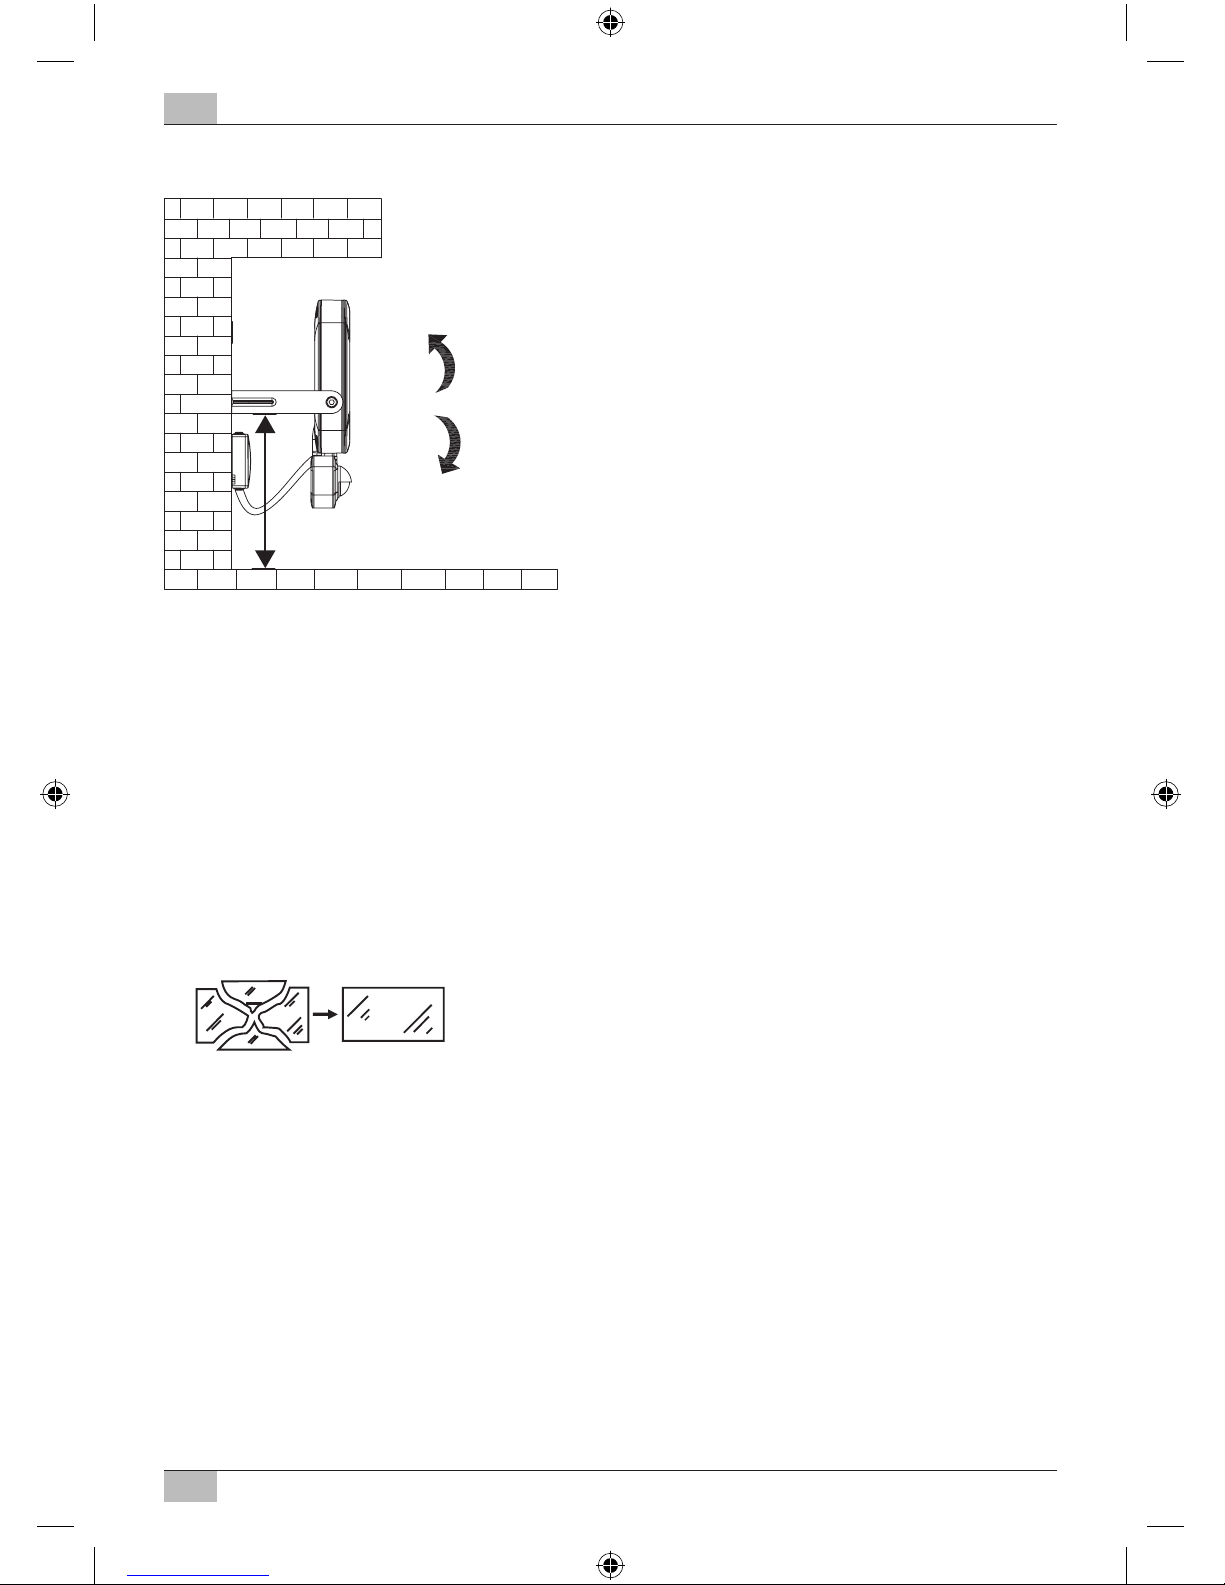
Der Strahler muss in einer Höhe von
weniger als 3 m montiert werden (Abb. 1).
Empfohlene Montagehöhe bei Modellen mit
Bewegungsmelder 2,5 m.
Der Strahler darf nicht für andere Zwecke
eingesetzt werden.
Abb. 1
17P028 Slim LED Strahler 170411.indd 4 11.04.2017 14:31:05
Page 5
5
Slim LED-Strahler Bedienungsanleitung
A
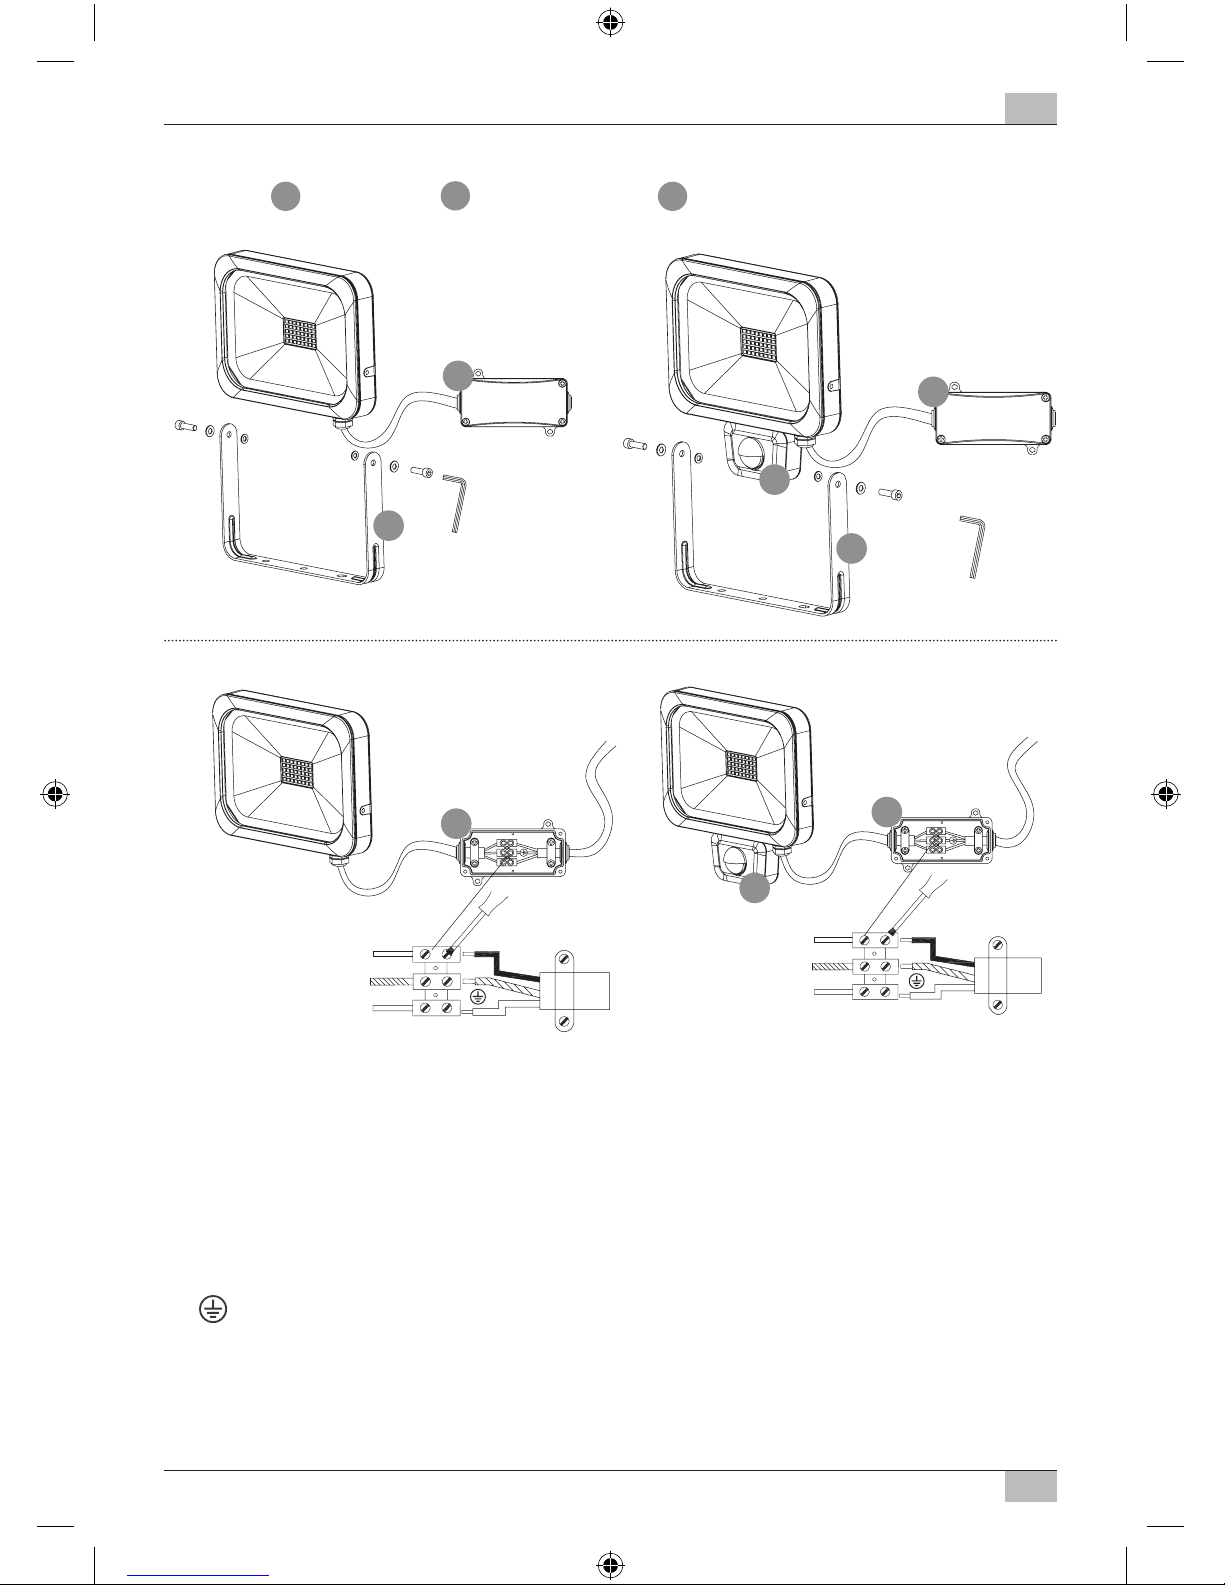
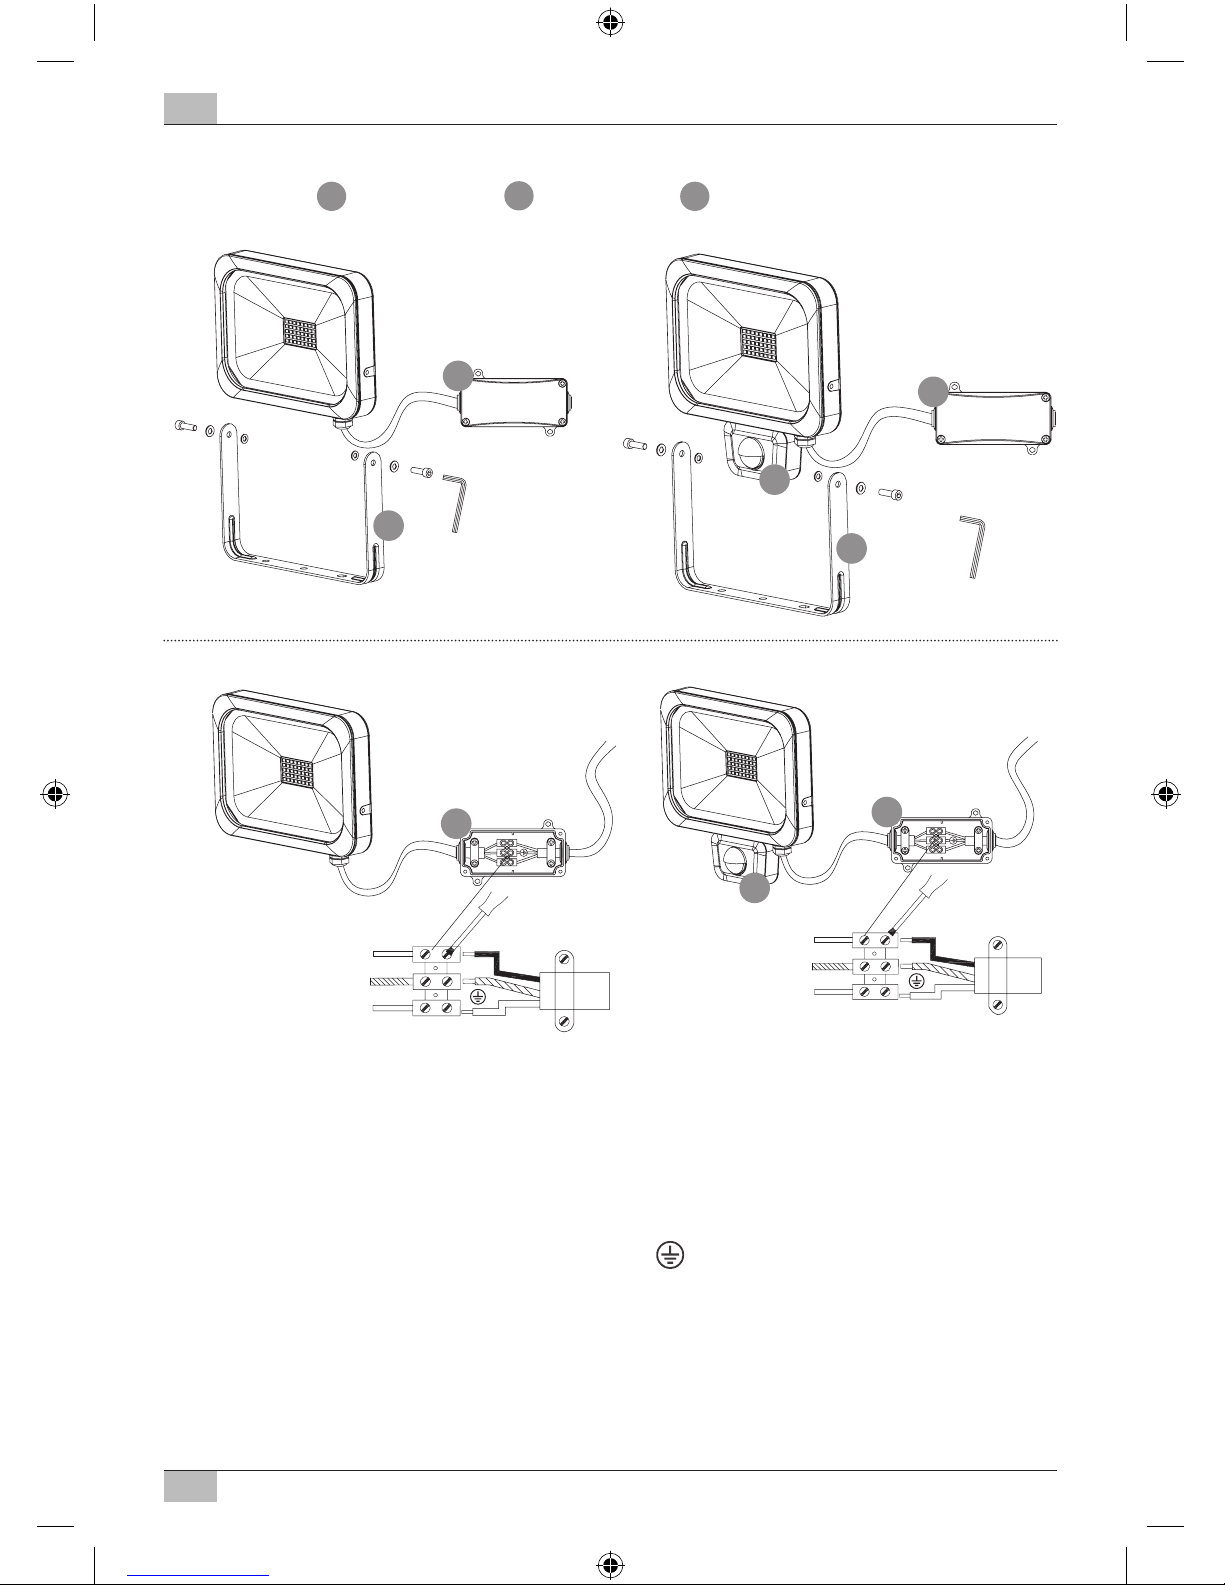
MONTAGE UND ANSCHLUSS AN STROMVERSORGUNG
Haltebügel
A
, Anschlussbox
B
, Bewegungsmelder
C
Abb. 2
L
N
N L
L
N
N L
C
C
B
< 3 m
90°
100°
B
A
B
A
B
C
< 3 m
90°
100°
B
A
A
B
1. Schalten Sie vor der Installation stets die Spannungsversorgung ab.
2. Montage-Position: Der Strahler sollte idealer Weise mit der Wandhalterung befestigt werden.
3. Entfernen Sie den Haltebügel von dem Strahler (Abb. 2).
4. Markieren Sie die Position der Bohrlöcher für die Befestigung des Haltebügels und bohren Sie
entsprechende Löcher in die Wand. Befestigen Sie den Bügel mit geeigneten Schrauben an der
Wand.
5. Önen Sie die vormontierte Anschlussbox.
6. Führen Sie die Anschlussleitung durch den mit einer Dichtung versehenen Kabeleingang
und schließen Sie sie entsprechend der Abb. 3 an der Lüsterklemme an (N = blaues Kabel,
= grün/gelbes Kabel, L = braunes Kabel).
7. Stellen Sie sicher, dass die Anschlussleitung ausreichend durch die Zugentlastung xiert wird.
8. Schrauben Sie die Abdeckung wieder auf die Anschlussbox. Achten Sie auf den korrekten Sitz
der Dichtung.
9. Befestigen Sie den Strahler am Haltebügel.
10. Stellen Sie die gewünschte Position der Lampe ein und ziehen Sie die Schrauben fest.
Abb. 3
17P028 Slim LED Strahler 170411.indd 5 11.04.2017 14:31:05
Page 6
6
A
Bedienungsanleitung
Slim LED-Strahler
FUNKTIONSBESCHREIBUNG
(nur für Versionen mit Bewegungsmelder)
Diese Lampe ist mit einem Infrarot-Sensor ausgestattet. Sie schaltet sich automatisch an, wenn der
Sensor im Umfeld Bewegungen feststellt.
Richten Sie den Bewegungsmelder möglichst nicht auf Schwimmbecken, Heizluftabzüge, Klimaanlagen oder Objekte, die starken Temperaturschwankungen ausgesetzt sind. Vermeiden Sie, den
Bewegungsmelder auf Bäume oder Büsche zu richten oder auf Plätze, an denen sich oft Haustiere
aufhalten könnten. Der Bewegungsmelder kann horizontal nach rechts und links gedreht werden.
Beachten Sie bei der Anbringung des Strahlers, dass der Bewegungsmelder am empndlichsten
auf Bewegungen reagiert, die quer durch sein Erfassungsfeld laufen und am wenigsten empndlich bei Bewegungen, die direkt auf das Gerät zulaufen.
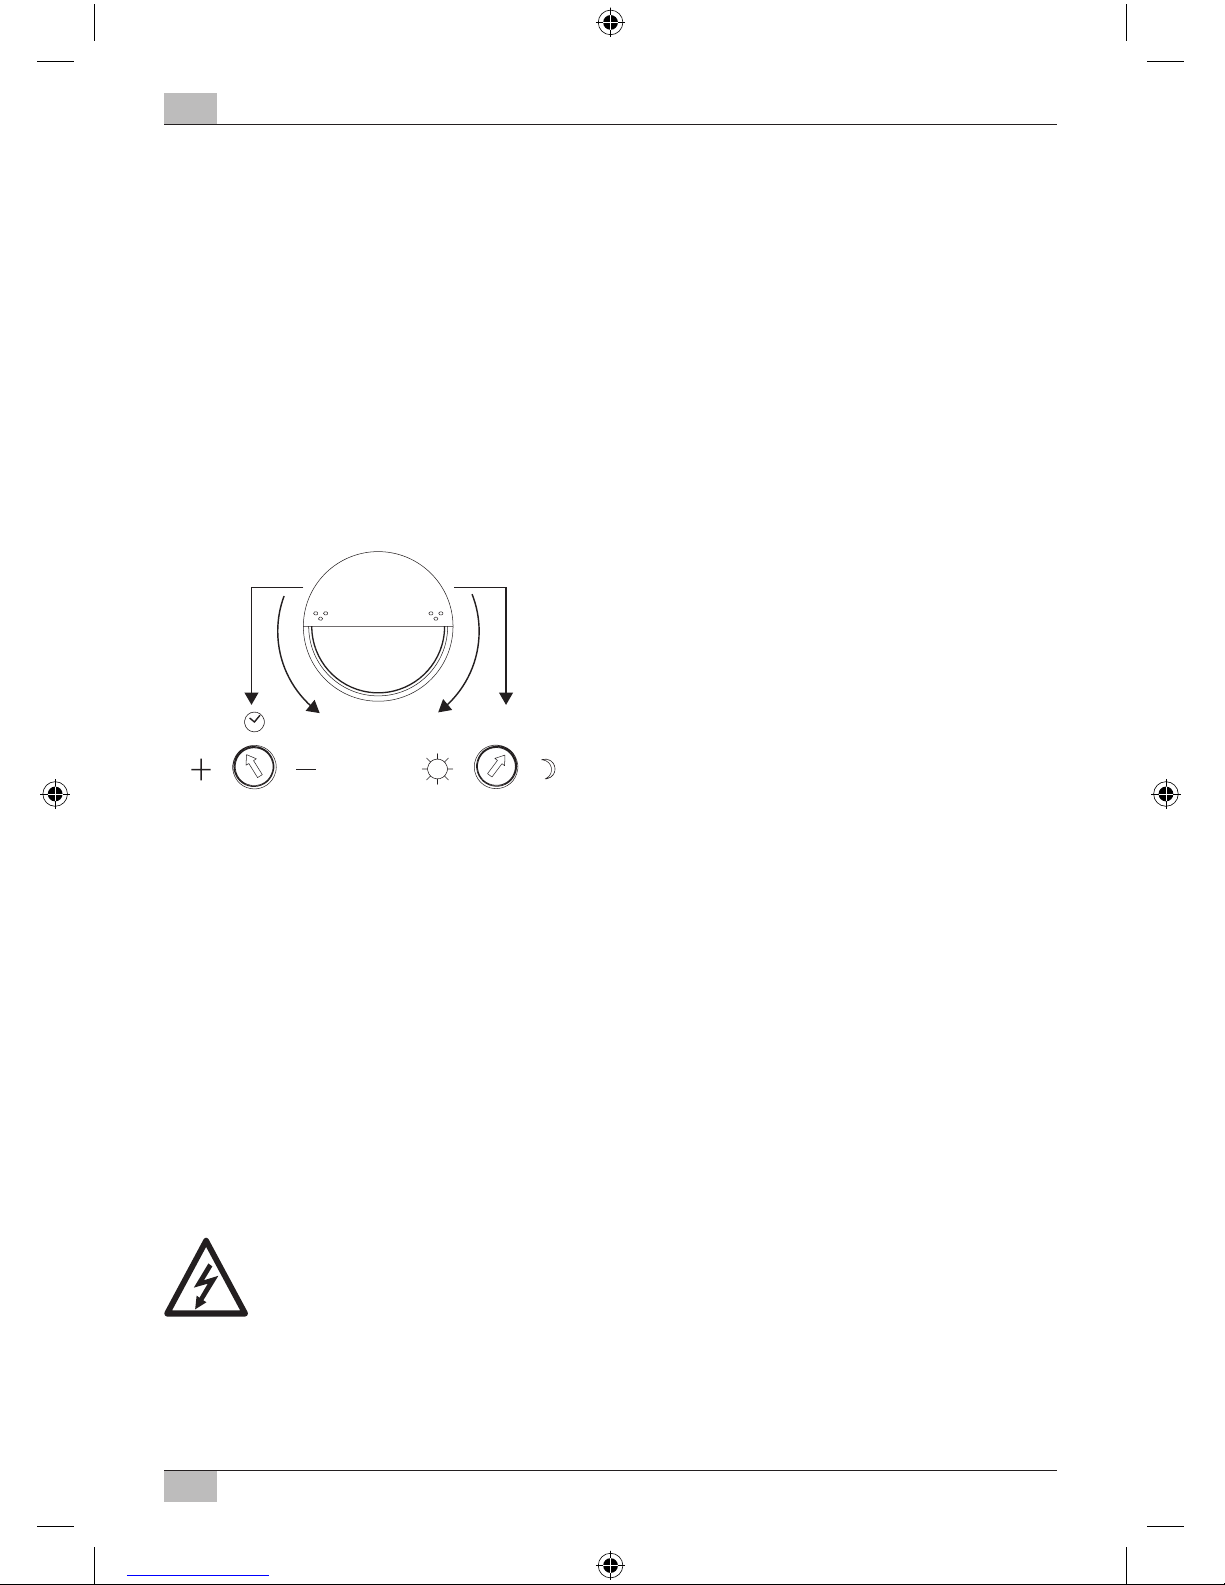
BEWEGUNGSMELDER EINSTELLEN
Abb. 4
L
N
N L
L
N
N L
C
C
B
< 3 m
90°
100°
180°
10 ± 5 sec. - 5 ± 1 min. 0 - 2000 LUX
B
A
B
A
B
Lichteinstellung (Sonne- und Mondsymbol, rechts):
Die Lichteinstellung bestimmt, ab welcher Helligkeit der Sensor des Strahlers einschaltet. Die Position (
) zeigt an, dass der Sensor am Tag und in der Nacht arbeitet, in der Position () arbeitet
der Sensor nur bei Nacht. Zum Einstellen warten Sie, bis die gewünschte Umgebungshelligkeit erreicht ist. Drehen Sie den Lichteinstellungsregler ganz auf das Symbol (
). Drehen Sie den Regler
langsam in Richtung Symbol (
), bis sich der Strahler durch Bewegung einschaltet.
Der Strahler wird sich nun ab der eingestellten Helligkeit beim Erkennen einer Bewegung einschalten.
Bewegungsmelder: passiver Infrarotsensor
Erfassungsbereich: bis zu 12 m/bis zu 90 ° (horizontal)
Zeiteinstellung: ca. 10 sec. bis 5 min.
Umgebungshelligkeit: 0 – 2000 Lux
WARTUNG
Achtung: Die LED-Leuchte enthält keine Komponenten, die gewartet werden müssen.
Die LED-Lichtquelle dieser Leuchte darf nur vom Hersteller oder einem von ihm beauftragten Servicetechniker oder einer vergleichbar qualizierten Person ersetzt werden.
Önen Sie niemals die Leuchte bei eingestecktem Netzstecker.
Vorsicht: Lebensgefahr durch elektrischen Schlag!
Drehen Sie die Abdeckung des Bewegungsmelders um 180° nach unten, dann erscheinen zwei
Regler (siehe Abb. 4).
Zeiteinstellung (Uhrsymbol, links):
Mit diesem Regler können Sie eine beliebige Einschaltzeit zwischen ca. 10 Sekunden und 5 Minuten wählen, nachdem die letzte Bewegung erfasst wurde. Durch Drehen des TIME-Reglers im
Uhrzeigersinn nimmt die Zeitspanne ab, gegen
den Uhrzeigersinn nimmt sie zu.
17P028 Slim LED Strahler 170411.indd 6 11.04.2017 14:31:05
Page 7
7
Slim LED-Strahler Bedienungsanleitung
A
REINIGUNG
Verwenden Sie keine Lösungsmittel, ätzende Reinigungsmittel oder ähnliches. Benutzen Sie zur
Reinigung nur ein trockenes oder leicht angefeuchtetes Tuch.
ENTSORGUNG
Elektrogeräte umweltgerecht entsorgen!
Elektrogeräte gehören nicht in den Hausmüll!
Gemäß Europäischer Richtlinie 2012/19/EU über Elektro- und Elektronikaltgeräte müssen
verbrauchte Elektrogeräte getrennt gesammelt und einer umweltgerechten Wiederverwertung zugeführt werden.
Möglichkeiten zur Entsorgung des ausgedienten Geräts erfahren Sie bei Ihrer Gemeindeoder Stadtverwaltung.
Adressen
Hugo Brennenstuhl GmbH & Co. KG
Seestraße 1 – 3 · D-72074 Tübingen
H. Brennenstuhl S.A.S.
4 rue de Bruxelles ∙ F-67170 Bernolsheim
lectra-t ag
Blegistrasse 13 · CH-6340 Baar
www.brennenstuhl.com
17P028 Slim LED Strahler 170411.indd 7 11.04.2017 14:31:05
Page 8
8
D Operating instructions
Slim LED Light
L DN 2810 FL DE 3925 L DN 2810 FL PIR DE 3925
L DN 5630 FL DE 3925 L DN 5630 FL PIR DE 3925
L DN 9850 FL DE 3925 L DN 9850 FL PIR DE 3925
Attention: Before assembly of the light, please carefully read the operating instructions and store
them at a proper location!
TECHNICAL DATA
Protection class: I
IP class: IP 54
Nominal voltage: 230 V~ 50/60 Hz
Power factor: > 0.9
Type: Power: Cur-
rent:
Motion
detector:
Dimensions of
protective cover:
Dimensions: Weight: max.
projected
area:
L DN 2810 FL
DE 3925
10 W
(28 x 0.36 W)
0.045 A no 124.2 x 90,2 x 4 mm 136 x 146.5 x 40.5 mm 0.43 kg 0.01 m²
L DN 2810 FL
PIR DE 3925
10 W
(28 x 0.36 W)
0.045 A yes 124.2 x 90,2 x 4 mm 166 x 146.5 x 42.5 mm 0.49 kg 0.01 m²
L DN 5630 FL
DE 3925
30 W
(56 x 0.5 W)
0.13 A no 201.6 x 146.6 x 4 mm 202 x 231 x 35 mm 1.25 kg 0.03 m²
L DN 5630 FL
PIR DE 3925
30 W
(56 x 0.5 W)
0.13 A yes 201.6 x 146.6 x 4 mm 252 x 231 x 40.5 mm 1.37 kg 0.03 m²
L DN 9850 FL
DE 3925
50 W
(98 x 0.5 W)
0.22 A no 250.8 x 185.8 x 4 mm 235 x 276.5 x 40 mm 1.92 kg 0.05 m²
L DN 9850 FL
PIR DE 3925
50 W
(98 x 0.5 W)
0.22 A yes 250.8 x 185.8 x 4 mm 290 x 276.5 x 40.5 mm 2.0 kg 0.05 m²
This high-power LED light is suitable for indoor and outdoor lighting purposes and for xed assembly.
17P028 Slim LED Strahler 170411.indd 8 11.04.2017 14:31:05
Page 9
9
Slim LED Light Operating instructions
D
Fig. 1
The light has to be assembled at a height of
less than 3 m (g. 1). Recommended assembly
height with models with motion detector 2.5 m.
The light must not be used for other purposes.
< 3 m
90°
100°
SAFETY INFORMATION
1. The light has to be installed and maintained by a qualied specialist.
2. Electric installations may only be completed complying with the safety regulations (VDE 0100
for Germany).
3. For the connection, a VDE-certied connection line (at least H05RN-F 3G1,0) must be used.
4. The light must be grounded properly.
5. The light must not be used without properly attached sealing rings!
6. LED lights are extremely bright. Please never look directly into the light.
7. If the protective cover is broken, it should be replaced by an original Brennenstuhl protective
cover before further use of the light.
8. If the mains connection line of the light or the connection box is damaged, it must be replaced
by a qualied specialist to avoid any risk.
17P028 Slim LED Strahler 170411.indd 9 11.04.2017 14:31:06
Page 10
10
D
Operating instructions
Slim LED Light
ASSEMBLY AND CONNECTION TO POWER SUPPLY
Holding bracket
A
, connection box
B
, motion sensor
C
Fig. 2
Fig. 3
1. Before the installation, always switch o the voltage supply.
2. Assembly position: The light should ideally be fastened by means of the wall bracket.
3. Remove the holding bracket from the light (g. 2).
4. Mark the position of the bore holes for fastening the mounting bracket and bore correspon-
ding holes into the wall. Fasten the bracket at the wall using suitable screws.
5. Open the pre-assembled connection box.
6. Lead the connection line through the cable entry provided with a seal and connect it to the
screw terminal according to g. 3 (N = blue cable,
= green/yellow cable, L = brown cable).
7. Make sure that the connection line is suciently xed by the tension relief.
8. Screw-x the cover to the connection box. Ensure correct seat of the seal.
9. Fasten the light at the holding bracket.
10. Adjust the desired position of the light and fasten the screws.
L
N
N L
L
N
N L
C
C
B
< 3 m
90°
100°
B
A
B
A
B
C
< 3 m
90°
100°
B
A
A
B
17P028 Slim LED Strahler 170411.indd 10 11.04.2017 14:31:06
Page 11

11
Slim LED Light Operating instructions
D
FUNCTIONAL DESCRIPTION
(only for versions with motion sensor)
This light is equipped with an infrared sensor. It is switched on automatically if the sensor detects
motion in the environment.
If possible, do not direct the motion sensor at swimming pools, heating air exhausts, air conditioning units or objects which are exposed to major temperature uctuations. Avoid directing the
motion sensor at trees or bushes or at places which could be frequently visited by pets. The motion
sensor can be horizontally rotated to the right and to the left.
When mounting the light remember that the motion sensor will react most sensitively to motions
crossing its eld of detection from one side to the other and least sensitively to motions directly
approaching the unit.
ADJUSTING THE MOTION SENSOR
Fig. 4
L
N
N L
L
N
N L
C
C
B
< 3 m
90°
100°
180°
10 ± 5 sec. - 5 ± 1 min. 0 - 2000 LUX
B
A
B
A
B
Rotate the cover of the motion sensor by 180°
downwards; two controllers will appear (see
g. 4).
Time adjustment (clock symbol, left):
Using this controller, you can select any switch-on
time between approx. 10 seconds and 5 minutes
after the last motion was detected. Rotating the
TIME controller clockwise decreases the time
period, rotating it counterclockwise increases it.
Light adjustment (sun and moon symbol, right):
The light adjustment determines from which brightness level the sensor will switch on the light.
The (
) position indicates that the sensor works by day and at night, in () position, the sensor
will only work at night. To adjust the sensor, wait until the desired ambient brightness is reached.
Completely rotate the light adjustment controller to the (
) symbol. Slowly rotate the controller
in the direction of the (
) symbol until the light is switched on by the motion.
The light will now be activated from the set brightness when a motion is detected.
Motion sensor: passive infrared sensor
Detection range: up to 12 m/up to 90° (horizontal)
Time adjustment: approx. 10 sec. to 5 min.
Ambient brightness: 0 – 2000 Lux
MAINTENANCE
Attention: The LED light does not contain components that require maintenance.
The LED light source of this light must only be replaced by the manufacturer, a service
technician sent by the manufacturer, or by another person with similar qualication.
Never open the light when the mains plug is still connected to the mains.
Caution: Risk of fatal injury from electrical current!
17P028 Slim LED Strahler 170411.indd 11 11.04.2017 14:31:06
Page 12
12
D
Operating instructions
Slim LED Light
CLEANING
Do not use solvents, caustic cleaning agents or similar products. Only use a dry or slightly moistened cloth for cleaning.
DISPOSAL
Dispose of electric appliances in an environmentally friendly manner!
Electric appliances must not be disposed of in household waste!
The European Directive 2012/19/EU on Waste Electrical and Electronic Equipment rules that
used electric appliances should be collected separately and recycled in an environmentally
friendly manner.
For possibilities of disposal of the used appliance, please contact your local or municipal
administration.
Addresses
Hugo Brennenstuhl GmbH & Co. KG
Seestraße 1 – 3 · D-72074 Tübingen
H. Brennenstuhl S.A.S.
4 rue de Bruxelles ∙ F-67170 Bernolsheim
lectra-t ag
Blegistrasse 13 · CH-6340 Baar
www.brennenstuhl.com
17P028 Slim LED Strahler 170411.indd 12 11.04.2017 14:31:06
Page 13

13
G Mode d’emploi
Projecteur LED compact
L DN 2810 FL DE 3925 L DN 2810 FL PIR DE 3925
L DN 5630 FL DE 3925 L DN 5630 FL PIR DE 3925
L DN 9850 FL DE 3925 L DN 9850 FL PIR DE 3925
Attention : Lisez attentivement le présent mode d’emploi avant
l’installation du projecteur et conservez-le ensuite précieusement !
CARACTÉRISTIQUES TECHNIQUES
Classe de protection : I
Indice de protection : IP 54
Tension nominale : 230 V~ 50/60 Hz
Facteur de puissance : > 0,9
Type : Puissance : Éner-
gie :
Détecteur de
mouvements :
Dimensions du
joint d‘étanchéité :
Dimensions : Poids : Surface de
projetée
maximale :
L DN 2810 FL
DE 3925
10 W
(28 x 0,36 W)
0,045 A non 124,2 x 90,2 x 4 mm 136 x 146,5 x 40,5 mm 0,43 kg 0,01 m²
L DN 2810 FL
PIR DE 3925
10 W
(28 x 0,36 W)
0,045 A oui 124,2 x 90,2 x 4 mm 166 x 146,5 x 42,5 mm 0,49 kg 0,01 m²
L DN 5630 FL
DE 3925
30 W
(56 x 0,5 W)
0,13 A non 201,6 x 146,6 x 4 mm 202 x 231 x 35 mm 1,25 kg 0,03 m²
L DN 5630 FL
PIR DE 3925
30 W
(56 x 0,5 W)
0,13 A oui 201,6 x 146,6 x 4 mm 252 x 231 x 40,5 mm 1,37 kg 0,03 m²
L DN 9850 FL
DE 3925
50 W
(98 x 0,5 W)
0,22 A non 250,8 x 185,8 x 4 mm 235 x 276,5 x 40 mm 1,92 kg 0,05 m²
L DN 9850 FL
PIR DE 3925
50 W
(98 x 0,5 W)
0,22 A oui 250,8 x 185,8 x 4 mm 290 x 276,5 x 40,5 mm 2,0 kg 0,05 m²
Ce projecteur LED haute performance est conçu pour une utilisation en intérieur et en extérieur et
pour une installation xe.
17P028 Slim LED Strahler 170411.indd 13 11.04.2017 14:31:06
Page 14

14
G
Mode d’emploi
Projecteur LED compact
Illustration 1
< 3 m
90°
100°
Le projecteur doit être installé à une hauteur
inférieure à 3 m (illustration 1). Installation recommandée à une hauteur de 2,5 m pour les
modèles avec détecteur de mouvements.
Le projecteur ne doit pas être utilisé à d’autres
ns.
CONSIGNES DE SÉCURITÉ
1. L’installation et l’entretien du projecteur doivent être eectués par un professionnel habilité.
2. Les installations électriques doivent être eectuées dans le respect des consignes de sécurité
uniquement (pour l’Allemagne : VDE 0100).
3. Pour le raccordement, un câble certié VDE doit être utilisé (au minimum H05RN-F 3G1,0).
4. Le projecteur doit être relié à la terre de manière réglementaire.
5. Le projecteur ne doit pas être utilisé sans joint d’étanchéité monté de manière réglementaire !
6. Les projecteurs LED sont extrêmement clairs. Ne regardez jamais directement dans le faisceau.
7. Si le point d’étanchéité est endommagé, veuillez le remplacer par une pièce de rechange
Brennenstuhl d’origine avant d’utiliser le projecteur.
8. Si le cordon d’alimentation du projecteur ou le boîtier de raccordement sont endommagés, ils
doivent être remplacés par un professionnel habilité an d’éviter tout danger.
17P028 Slim LED Strahler 170411.indd 14 11.04.2017 14:31:06
Page 15

15
Projecteur LED compact Mode d’emploi
G
INSTALLATION ET BRANCHEMENT ÉLECTRIQUE
Support de maintien
A
, boîtier de raccordement
B
, détecteur de mouvements
C
Illustration 2
L
N
N L
L
N
N L
C
C
B
< 3 m
90°
100°
B
A
B
A
B
C
< 3 m
90°
100°
B
A
A
B
Illustration 3
1. Avant de commencer l’installation, coupez l’alimentation en tension.
2. Installation : Le projecteur doit être installé idéalement sur le support mural.
3. Retirer le support de maintien du projecteur (illustration 2).
4. Marquez l’emplacement des trous de xation du support de maintien et percez les trous
correspondants dans le mur. Fixez le support au mur à l’aide de vis appropriées.
5. Ouvrez le boîtier de raccordement prémonté.
6. Faites passer le câble de raccordement par l’entrée de câbles pourvue d’un joint d’étanchéité
et raccordez-le au domino du projecteur conformément à l’illustration 3 (N = l bleu,
= l
vert/jaune, L = l brun).
7. Assurez-vous que le serre-câble soit bien resserré pour éviter qu’une traction du câble de
raccordement ne soit possible.
8. Revissez le couvercle du boîtier de raccordement. Veillez à ce que le joint d’étanchéité soit bien
en place.
9. Fixez le projecteur sur le support de maintien.
10. Placez le projecteur dans la position choisie et serrez les vis.
17P028 Slim LED Strahler 170411.indd 15 11.04.2017 14:31:06
Page 16

16
G
Mode d’emploi
Projecteur LED compact
DESCRIPTION DU FONCTIONNEMENT
(uniquement pour les versions avec détecteur de mouvements)
Ce projecteur est équipé d’un capteur infrarouge. Il s’allume automatiquement si le capteur détecte des mouvements aux alentours.
Si possible, ne dirigez pas le détecteur de mouvements vers des bassins, des ventilations à air
chaud, des systèmes de climatisation ou des objets exposés à de fortes variations de température.
Évitez de diriger le détecteur de mouvements vers des arbres ou des buissons, ou vers des endroits
abritant souvent des animaux domestiques. Le détecteur de mouvements peut être pivoté horizontalement vers la droite ou la gauche.
Lors de l’installation du projecteur, veillez à ce que le détecteur de mouvements soit le plus sensible aux mouvements traversant son champ de détection et le moins sensible à ceux arrivant
directement sur l’appareil.
RÉGLAGE DU DÉTECTEUR DE MOUVEMENTS
Illustration 4
L
N
N L
L
N
N L
C
C
B
< 3 m
90°
100°
180°
10 ± 5 sec. - 5 ± 1 min. 0 - 2000 LUX
B
A
B
A
B
Tournez la protection du détecteur de mouvements de 180° vers le bas ; deux régulateurs apparaissent (voir illustration 4).
Réglage du temps (icône représentant
une horloge, à gauche) :
Ce régulateur vous permet de choisir une durée
d’éclairage de 10 secondes à 5 minutes environ,
après la détection du dernier mouvement. En
tournant le régulateur de temps dans le sens des
aiguilles d’une montre, l’intervalle de temps diminue. Dans le sens inverse des aiguilles d’une
montre, il augmente.
Réglage de l’éclairage (symboles du soleil et de la lune, à droite) :
Le réglage de l’éclairage détermine le degré de luminosité à partir duquel le capteur du projecteur
s’allume. La position (
) indique que le capteur fonctionne la journée et la nuit. En position (),
le capteur ne fonctionne que la nuit. Pour le réglage, attendez que votre environnement atteigne
la luminosité ambiante souhaitée. Tournez complètement le régulateur d’ajustement de l’éclairage sur le symbole (
). Tournez lentement le régulateur vers le symbole () jusqu’à ce que le
projecteur s’allume suite à un mouvement.
Le projecteur s’allumera dorénavant lorsqu’il détectera un mouvement, à partir du degré de luminosité conguré.
Détecteur de mouvements : capteur infrarouge passif
Secteur de capture : jusqu’à 12 m/90° (à l’horizontale)
Durée de fonctionnement : de 10 secondes environ à 5 minutes
Luminosité ambiante : 0 – 2 000 lux
17P028 Slim LED Strahler 170411.indd 16 11.04.2017 14:31:07
Page 17

17
Projecteur LED compact Mode d’emploi
G
MAINTENANCE
Attention : Le projecteur ne contient aucun composant nécessitant un entretien.
Le système d’éclairage à LED de ce projecteur doit exclusivement être remplacé par
le fabricant ou l’un de ses techniciens agréés ou toute autre personne compétente
habilitée.
N’ouvrez jamais le projecteur si la che d’alimentation est raccordée à une prise secteur.
Attention : Danger de mort par électrocution !
NETTOYAGE
N’utilisez aucun solvant, produit de nettoyage abrasif ou autres produits similaires. Pour le
nettoyage, utilisez uniquement un chion sec ou légèrement humide.
MISE AU REBUT
Les appareils électriques doivent être mis au rebut conformément aux normes
environnementales !
Les appareils électriques ne doivent pas être mis dans les ordures ménagères !
Selon la directive européenne 2012/19/CE relative aux appareils électriques et électroniques
usagés, les appareils électriques doivent être collectés séparément et recyclés de manière
respectueuse de l’environnement.
Pour connaître les solutions de mise au rebut d’un appareil usagé, adressez-vous à votre
administration locale ou communale.
Adresses
Hugo Brennenstuhl GmbH & Co. KG
Seestraße 1 – 3 · D-72074 Tübingen
H. Brennenstuhl S.A.S.
4 rue de Bruxelles ∙ F-67170 Bernolsheim
lectra-t ag
Blegistrasse 13 · CH-6340 Baar
www.brennenstuhl.com
17P028 Slim LED Strahler 170411.indd 17 11.04.2017 14:31:07
Page 18

18
M Gebruiksaanwijzing
Slim LED-Straler
L DN 2810 FL DE 3925 L DN 2810 FL PIR DE 3925
L DN 5630 FL DE 3925 L DN 5630 FL PIR DE 3925
L DN 9850 FL DE 3925 L DN 9850 FL PIR DE 3925
Attentie: Lees voor de montage van de Straler deze gebruiksaanwijzing
alstublieft aandachtig door en bewaar hem vervolgens goed!
TECHNISCHE GEGEVENS
Beschermingsgraad: I
Beschermingsklasse: IP 54
Nominale spanning: 230 V~ 50/60 Hz
Vermogensfactor: > 0.9
Type: Vermogen: Stroom: Bewe-
gingssensor:
Afmetingen beschermingsplaat:
Afmetingen: Gewicht: max.
geprojecteerd
oppervlak:
L DN 2810 FL
DE 3925
10 W
(28 x 0,36 W)
0,045 A nee 124,2 x 90,2 x 4 mm 136 x 146,5 x 40,5 mm 0,43 kg 0,01 m²
L DN 2810 FL
PIR DE 3925
10 W
(28 x 0,36 W)
0,045 A ja 124,2 x 90,2 x 4 mm 166 x 146,5 x 42,5 mm 0,49 kg 0,01 m²
L DN 5630 FL
DE 3925
30 W
(56 x 0,5 W)
0,13 A nee 201,6 x 146,6 x 4 mm 202 x 231 x 35 mm 1,25 kg 0,03 m²
L DN 5630 FL
PIR DE 3925
30 W
(56 x 0,5 W)
0,13 A ja 201,6 x 146,6 x 4 mm 252 x 231 x 40,5 mm 1,37 kg 0,03 m²
L DN 9850 FL
DE 3925
50 W
(98 x 0,5 W)
0,22 A nee 250,8 x 185,8 x 4 mm 235 x 276,5 x 40 mm 1,92 kg 0,05 m²
L DN 9850 FL
PIR DE 3925
50 W
(98 x 0,5 W)
0,22 A ja 250,8 x 185,8 x 4 mm 290 x 276,5 x 40,5 mm 2,0 kg 0,05 m²
Deze high-performance LED-Straler is geschikt voor verlichtingsdoeleinden voor binnen en buiten en ontworpen voor vaste montage.
17P028 Slim LED Strahler 170411.indd 18 11.04.2017 14:31:07
Page 19

19
Slim LED-Straler Gebruiksaanwijzing
M
Afb. 1
< 3 m
90°
100°
De straler dient op een hoogte onder 3 m
gemonteerd te worden (Afb. 1). Aanbevolen
montagehoogte voor modellen met bewegingsmelder 2,5 m.
De straler mag niet voor andere doeleinden
ingezet worden.
VEILIGHEIDSINSTRUCTIE
1. De installatie en het onderhoud van de straler dienen door een erkende vakman te gebeuren.
2. Elektriciteitsinstallaties mogen alleen worden uitgevoerd volgens de veiligheidsvoorschriften
(in Duitsland de wet VDE 0100).
3. Voor het aansluiten dient een VDE-gecerticeerde aansluitkabel (minstens H05RN-F 3G1,0) ge-
bruikt te worden.
4. De straler dient correct geaard te worden.
5. De straler mag niet gebruikt worden zonder dat alle afdichtingsringen juist bevestigd zijn!
6. LED-Stralers zijn extreem helder. Alstublieft nooit direct in het licht kijken.
7. Een beschadigde beschermingsplaat dient voor verder gebruik van de straler door een origi-
nele Brennenstuhl beschermingsplaat vervangen te worden.
8. Indien de aansluitkabel voor de netspanning van de straler of de aansluitdoos beschadigd
wordt, dient hij door een erkende vakman vervangen worden, om blootstelling aan gevaren
te voorkomen.
17P028 Slim LED Strahler 170411.indd 19 11.04.2017 14:31:07
Page 20

20
M
Gebruiksaanwijzing
Slim LED-Straler
MONTAGE EN AANSLUITING OP DE STROOMVOORZIENING
Bevestigingsbeugel
A
, aansluitdoos
B
, bewegingsmelder
C
Afb. 2
L
N
N L
L
N
N L
C
C
B
< 3 m
90°
100°
B
A
B
A
B
C
< 3 m
90°
100°
B
A
A
B
Afb. 3
1. Schakel vóór het installeren altijd de stroomvoorziening uit.
2. Montage-positie: De straler dient in de ideale situatie met de wandhouder bevestigd worden.
3. Neem de bevestigingsbeugel van de straler (Afb. 2).
4. Markeer de positie van de boorgaten voor de bevestiging van de bevestigingsbeugels en boor
de overeenkomstige gaten in de muur. Bevestig de beugel op de wand met behulp van geschikte schroeven.
5. Open de voorgemonteerde aansluitdoos.
6. Voer de aansluitkabel door de van een afdichting voorziene kabel-ingang en sluit deze aan
overeenkomstig Afb. 3 op de stekkerdoos (N=blauwe kabel,
= groen/gele kabel, L = bruine
kabel).
7. Vergewis u ervan dat de aansluitkabel voldoende door de trekontlasting heen bevestigd wordt.
8. Schroef het deksel weer op de aansluitdoos. Controleer de correcte plaats van de afdichting.
9. Bevestig de straler op de bevestigingsbeugel.
10. Zet de lamp in de gewenste positie en draai de schroeven vast.
17P028 Slim LED Strahler 170411.indd 20 11.04.2017 14:31:07
Page 21

21
Slim LED-Straler Gebruiksaanwijzing
M
FUNCTIONELE BESCHRIJVING
(alleen voor versies met bewegingsmelder)
Deze lamp is voorzien van een infrarood-sensor. Hij schakelt automatisch in wanneer de sensor
een beweging in de omgeving detecteert.
Richt de bewegingsmelder liefst niet op zwembaden, warmeluchtroosters, airconditionings of
voorwerpen die onderhevig zijn aan sterke temperatuurschommelingen. Voorkom om de bewegingsmelder op bomen of struiken of op plaatsen waar zich vaak huisdieren kunnen bevinden te
richten. De bewegingsmelder kan horizontaal naar links en rechts gedraaid worden.
Let er bij het aanbrengen van de straler op dat de bewegingsmelder zo gevoelig mogelijk reageert
op bewegingen die dwars door zijn waarnemingsveld lopen en het minst gevoelig op bewegingen die direct op het apparaat af lopen.
BEWEGINGSMELDER INSTELLEN
Afb. 4
L
N
N L
L
N
N L
C
C
B
< 3 m
90°
100°
180°
10 ± 5 sec. - 5 ± 1 min. 0 - 2000 LUX
B
A
B
A
B
Draai het deksel van de bewegingsmelder 180°
naar beneden, dan verschijnen er twee regelaars
(zie Afb. 4).
Tijdinstelling (kloksymbool, links):
Met deze regelaar kunt u een gewenste inschakeltijd kiezen tussen ong. 10 seconden en 5 minuten nadat de laatste beweging waargenomen
werd. Door de TIME-regelaar met de klok mee te
draaien neemt de periode af, tegen de klok in
neemt hij toe.
Lichtinstelling (Zon en maan-symbool, rechts):
De lichtinstelling bepaalt vanaf welke helderheid de melder de straler inschakelt. De positie (
)
geeft aan, dat de melder overdag en ‘s nachts werkt, in de positie (
) wekt de melder alleen ‘s
nachts. Voor het instellen wacht u totdat de gewenste helderheid van de omgeving is bereikt.
Draai de lichtinstellingsregelaar helemaal op het symbool (
). Draai de regelaar langzaam in de
richting van symbool (
), totdat de straler zich door beweging inschakelt.
De straler zal zich alleen vanaf de ingestelde helderheid bij het herkennen van een beweging
inschakelen.
Bewegingsmelder: passieve infrarood-sensor
Waarnemingsbereik: tot 12 m/tot 90 ° (horizontaal)
Tijdinstelling: ong. 10 sec. tot 5 min.
Helderheid omgeving: 0 – 2000 Lux
ONDERHOUD
Attentie: De LED-lamp bevat geen componenten die moeten worden onderhouden.
De LED-lichtbron van deze lamp mag alleen door de fabrikant, een onderhoudstechnicus van de fabrikant of een ander vergelijkbaar technicus worden vervangen.
Open de lamp nooit wanneer de stekker nog in het stopcontact zit.
Opgelet: Levensgevaarlijk door elektrische schok!
17P028 Slim LED Strahler 170411.indd 21 11.04.2017 14:31:07
Page 22

22
M
Gebruiksaanwijzing
Slim LED-Straler
REINIGING
Gebruik geen oplosmiddelen, bijtende reinigingsmiddelen of gelijksoortige middelen. Gebruik
voor het schoonmaken van de lamp alleen een droge of licht bevochtigde doek.
AFVOER AFVAL
Elektrische apparaten milieuvriendelijk afvoeren!
Elektrische apparaten behoren niet bij het huisvuil!
Volgens Europese Richtlijn 2012/19/EU betreende elektrische en elektronische apparatuur moeten afgedankte elektrische apparaten gescheiden worden ingezameld en naar
een milieuvriendelijk recyclebedrijf afgevoerd worden.
Over mogelijkheden voor het afvoeren van afgedankte apparaten kunt u informatie vragen
bij uw gemeente of stadsbestuur.
Adressen
Hugo Brennenstuhl GmbH & Co. KG
Seestraße 1 – 3 · D-72074 Tübingen
H. Brennenstuhl S.A.S.
4 rue de Bruxelles ∙ F-67170 Bernolsheim
lectra-t ag
Blegistrasse 13 · CH-6340 Baar
www.brennenstuhl.com
17P028 Slim LED Strahler 170411.indd 22 11.04.2017 14:31:07
Page 23

23
J Istruzioni per l’uso
Faretto a LED Slim
L DN 2810 FL DE 3925 L DN 2810 FL PIR DE 3925
L DN 5630 FL DE 3925 L DN 5630 FL PIR DE 3925
L DN 9850 FL DE 3925 L DN 9850 FL PIR DE 3925
Attenzione: Prima di montare il faretto, leggere attentamente
le presenti istruzioni per l’uso e conservarle poi in modo idoneo.
DATI TECNICI
Classe di protezione: I
Tipo di protezione: IP 54
Tensione nominale: 230 V~ 50/60 Hz
Coeciente di rendimento: > 0,9
Modello: Potenza: Ten -
sione:
Sensore
di movimento:
Dimensioni
copertura
protettiva:
Dimensioni: Peso: Massima
supercie
proiettata:
L DN 2810 FL
DE 3925
10 W
(28 x 0,36 W)
0,045 A no 124,2 x 90,2 x 4 mm 136 x 146,5 x 40,5 mm 0,43 kg 0,01 m²
L DN 2810 FL
PIR DE 3925
10 W
(28 x 0,36 W)
0,045 A sì 124,2 x 90,2 x 4 mm 166 x 146,5 x 42,5 mm 0,49 kg 0,01 m²
L DN 5630 FL
DE 3925
30 W
(56 x 0,5 W)
0,13 A no 201,6 x 146,6 x 4 mm 202 x 231 x 35 mm 1,25 kg 0,03 m²
L DN 5630 FL
PIR DE 3925
30 W
(56 x 0,5 W)
0,13 A sì 201,6 x 146,6 x 4 mm 252 x 231 x 40,5 mm 1,37 kg 0,03 m²
L DN 9850 FL
DE 3925
50 W
(98 x 0,5 W)
0,22 A no 250,8 x 185,8 x 4 mm 235 x 276,5 x 40 mm 1,92 kg 0,05 m²
L DN 9850 FL
PIR DE 3925
50 W
(98 x 0,5 W)
0,22 A sì 250,8 x 185,8 x 4 mm 290 x 276,5 x 40,5 mm 2,0 kg 0,05 m²
Il presente faretto a LED ad alta potenza è adatto all’impiego quale fonte di illuminazione per ambienti interni ed esterni ed è previsto per montaggio sso.
17P028 Slim LED Strahler 170411.indd 23 11.04.2017 14:31:07
Page 24

24
J
Istruzioni per l’uso
Faretto a LED Slim
Illustr. 1
< 3 m
90°
100°
Il faretto deve essere montato a un’altezza inferiore a 3 m (illustr. 1). L’altezza di montaggio consigliata per i modelli con sensore di movimento
è di 2,5 m.
Il faretto non può essere utilizzato per altri scopi.
INDICAZIONI DI SICUREZZA
1. L’installazione e la manutenzione del faretto devono essere eseguite da personale specializzato.
2. Le installazioni elettriche possono essere eseguite sono nel rispetto delle disposizioni di legge
(VDE 0100 per la Germania).
3. Per il collegamento occorre utilizzare un cavo di collegamento certicato VDE (almeno
H05RN-F 3G1,0).
4. Il faretto deve essere correttamente messo a terra.
5. Il faretto non può essere utilizzato senza tutti gli anelli di tenuta regolarmente applicati.
6. I faretti a LED sono estremamente luminosi. Non guardare mai direttamente verso la fonte
luminosa.
7. Una copertura protettiva rotta deve essere sostituita con una copertura originale Brennen-
stuhl prima di continuare a utilizzare il faretto.
8. Qualora il cavo di allacciamento alla rete del faretto o la scatola di collegamento si danneggi, è
necessario farlo(a) sostituire da personale specializzato, per evitare pericoli.
17P028 Slim LED Strahler 170411.indd 24 11.04.2017 14:31:07
Page 25

25
Faretto a LED Slim Istruzioni per l’uso
J
MONTAGGIO E ALLACCIAMENTO ALL’ALIMENTAZIONE ELETTRICA
Staa di supporto
A
, scatola di collegamento
B
, sensore di movimento
C
Illustr. 2
L
N
N L
L
N
N L
C
C
B
< 3 m
90°
100°
B
A
B
A
B
C
< 3 m
90°
100°
B
A
A
B
Illustr. 3
1. Prima dell’installazione staccare sempre l’alimentazione elettrica.
2. Posizione per il montaggio: Il faretto andrebbe idealmente ssato con il supporto a parete.
3. Togliere la staa di supporto dal faretto (illustr. 2).
4. Segnare la posizione dei fori per il ssaggio della staa di supporto e trapanare i relativi fori
nella parete. Fissare la staa alla parete con le viti idonee.
5. Aprire la scatola di collegamento pre-montata.
6. Guidare il cavo di allacciamento attraverso l’entrata cavo provvista di una guarnizione e col-
legarlo al morsetto della lampada secondo l’illustr. 3 (N = cavo blu,
= verde / cavo giallo,
L = cavo marrone).
7. Accertarsi che il cavo di allacciamento venga sucientemente ssato tramite l’ancoraggio del
cavo.
8. Avvitare di nuovo il coperchio sulla scatola di collegamento. Prestare attenzione al corretto
alloggiamento della guarnizione.
9. Fissare il faretto alla staa di supporto.
10. Regolare la posizione desiderata della lampada e serrare saldamente le viti.
17P028 Slim LED Strahler 170411.indd 25 11.04.2017 14:31:08
Page 26

26
J
Istruzioni per l’uso
Faretto a LED Slim
DESCRIZIONE DEL FUNZIONAMENTO
(solo per modelli con sensore di movimento)
Questa lampada è dotata di un sensore a infrarossi. Si accende automaticamente qualora il sensore
rilevi dei movimenti nella zona circostante.
Non orientare, possibilmente, il sensore di movimento su piscine, scarichi di termoventilatori, impianti di climatizzazione od oggetti sottoposti ad elevate oscillazioni di temperatura. Evitare di
orientare il sensore di movimento su alberi o cespugli o su luoghi dove potrebbero essere tenuti
frequentemente degli animali domestici. Il sensore di movimento può essere ruotato orizzontalmente verso destra e verso sinistra.
Nell’installare il faretto, tener presente che il sensore di movimento reagisce più sensibilmente ai
movimenti che attraversano diagonalmente il suo campo di rilevamento e meno sensibilmente ai
movimenti diretti verso l’apparecchio.
REGOLAZIONE DEL SENSORE DI MOVIMENTO
Illustr. 4
L
N
N L
L
N
N L
C
C
B
< 3 m
90°
100°
180°
10 ± 5 sec. - 5 ± 1 min. 0 - 2000 LUX
B
A
B
A
B
Ruotare il coperchio del sensore di movimento
di 180° verso il basso, compariranno due regolatori (vedi illustr. 4).
Impostazione dell’ora (simbolo dell’orologio, a sinistra):
Con questo regolatore è possibile selezionare
un tempo di accensione a piacere compreso fra
circa 10 secondi e 5 minuti dopo la rilevazione
dell’ultimo movimento. Ruotando il regolatore
TIME in senso orario il lasso di tempo diminuisce, ruotandolo in senso antiorario aumenta.
Impostazione della luce (simbolo del sole e della luna, a destra):
La regolazione della luce determina da quale luminosità il sensore del faretto debba attivarsi. La
posizione (
) indica che il sensore funziona giorno e notte, in posizione () il sensore funziona
solo di notte. Per l’impostazione attendere il raggiungimento della luminosità ambiente desiderata. Ruotare completamente il regolatore di impostazione della luce sul simbolo (
). Ruotare len-
tamente il regolatore verso il simbolo (
), nché il faretto non si accenda tramite il movimento.
Da questo momento in poi, il faretto si accenderà, al rilevamento di un movimento, a partire dalla
luminosità impostata.
Sensore di movimento: sensore a infrarossi passivo
Campo di copertura: no a 12 m/no a 90 ° (orizzontalmente)
Impostazione tempo: da circa 10 sec. a 5 min.
Luminosità ambiente 0 – 2000 Lux
MANUTENZIONE
Attenzione: La lampada a LED non contiene componenti che necessitano di manuten-
zione.
La sorgente luminosa LED di questa lampada può essere sostituita solo dal fabbricante
o da un tecnico di servizio da lui incaricato o da una persona equiparabile qualicata.
Non aprire mai la lampada con spina inserita.
Attenzione: Pericolo di morte da scossa elettrica!
17P028 Slim LED Strahler 170411.indd 26 11.04.2017 14:31:08
Page 27

27
Faretto a LED Slim Istruzioni per l’uso
J
PULIZIA
Non utilizzare solventi, detergenti corrosivi o similari. Per la pulizia, servirsi unicamente di un panno asciutto o leggermente inumidito.
SMALTIMENTO
Smaltire gli apparecchi elettrici in modo ecocompatibile!
Gli apparecchi elettrici non devono essere messi con i riuti domestici!
Conformemente alla Direttiva Europea 2012/19/UE sugli apparecchi elettrici ed elettronici
gli apparecchi elettrici usati devono essere raccolti separatamente e riciclati in modo ecocompatibile.
Si possono richiedere le modalità di smaltimento dell’apparecchio inutilizzato presso la
propria amministrazione comunale o cittadina.
Indirizzi
Hugo Brennenstuhl GmbH & Co. KG
Seestraße 1 – 3 · D-72074 Tübingen
H. Brennenstuhl S.A.S.
4 rue de Bruxelles ∙ F-67170 Bernolsheim
lectra-t ag
Blegistrasse 13 · CH-6340 Baar
www.brennenstuhl.com
17P028 Slim LED Strahler 170411.indd 27 11.04.2017 14:31:08
Page 28

28
E Manual de instrucciones
Foco LED Slim
L DN 2810 FL DE 3925 L DN 2810 FL PIR DE 3925
L DN 5630 FL DE 3925 L DN 5630 FL PIR DE 3925
L DN 9850 FL DE 3925 L DN 9850 FL PIR DE 3925
Cuidado: ¡Antes de montar el foco lea cuidadosamente las
instrucciones de uso y guárdelas para cualquier consulta futura!
DATOS TÉCNICOS
Clase de protección: I
Clase de protección: IP 54
Tensión nominal: 230 V~ 50/60 Hz
Factor de potencia: > 0,9
Tipo: Potencia: Corriente: Sensor
de movimiento:
Dimensiones
de la cubierta
protectora:
Dimensiones: Peso: Área máx.
proyectada:
L DN 2810 FL
DE 3925
10 W
(28 x 0,36 W)
0,045 A no 124,2 x 90,2 x 4 mm 136 x 146,5 x 40,5 mm 0,43 kg 0,01 m²
L DN 2810 FL
PIR DE 3925
10 W
(28 x 0,36 W)
0,045 A sí 124,2 x 90,2 x 4 mm 166 x 146,5 x 42,5 mm 0,49 kg 0,01 m²
L DN 5630 FL
DE 3925
30 W
(56 x 0,5 W)
0,13 A no 201,6 x 146,6 x 4 mm 202 x 231 x 35 mm 1,25 kg 0,03 m²
L DN 5630 FL
PIR DE 3925
30 W
(56 x 0,5 W)
0,13 A sí 201,6 x 146,6 x 4 mm 252 x 231 x 40,5 mm 1,37 kg 0,03 m²
L DN 9850 FL
DE 3925
50 W
(98 x 0,5 W)
0,22 A no 250,8 x 185,8 x 4 mm 235 x 276,5 x 40 mm 1,92 kg 0,05 m²
L DN 9850 FL
PIR DE 3925
50 W
(98 x 0,5 W)
0,22 A sí 250,8 x 185,8 x 4 mm 290 x 276,5 x 40,5 mm 2,0 kg 0,05 m²
Este foco LED de alta potencia es adecuado para la iluminación de interiores y exteriores y está
diseñado para una instalación ja.
17P028 Slim LED Strahler 170411.indd 28 11.04.2017 14:31:08
Page 29

29
Foco LED Slim Manual de instrucciones
E
Fig. 1
< 3 m
90°
100°
El foco debe montarse a una altura no superior
de 3 m. (Fig. 1) Altura de montaje recomendada de 2,5 m. para modelos con sensor de movimiento.
El foco no puede ser utilizado para otros propósitos.
INDICACIONES DE SEGURIDAD
1. La instalación y el mantenimiento del foco debe ser realizada por un profesional cualicado.
2. Las instalaciones eléctricas solo deben realizarse en conformidad con las normas de seguridad
(VDE 0100 para Alemania).
3. Para la conexión debe utilizarse un cable certicado por la Federación alemana de electrotéc-
nicos VDE (al menos H05RN-F 3G1,0).
4. El foco debe estar correctamente conectado a una toma de tierra.
5. ¡Este foco no puede ser utilizado sin que se hayan colocado de forma correcta las juntas anula-
res!
6. Los focos LED son extremadamente brillantes. Por favor, no dirija su mirada directamente hacia
la luz.
7. En caso de que la cubierta protectora se dañe, ésta deberá ser reemplazada antes de volver a
utilizar el foco por una cubierta protectora original de Brennenstuhl.
8. En caso de que el cable de red del foco o de la caja de conexión esté dañado se deberá reem-
plazar por una persona cualicada para evitar situaciones de peligro.
17P028 Slim LED Strahler 170411.indd 29 11.04.2017 14:31:08
Page 30

30
E
Manual de instrucciones
Foco LED Slim
MONTAJE Y CONEXIÓN A LA RED ELÉCTRICA
Soporte
A
, caja de conexión
B
, sensor de movimiento
C
Fig. 2
L
N
N L
L
N
N L
C
C
B
< 3 m
90°
100°
B
A
B
A
B
C
< 3 m
90°
100°
B
A
A
B
Fig. 3
1. Apague siempre el suministro de corriente antes de la instalación.
2. Posición de montaje: Se recomienda que el foco esté jado al soporte de pared.
3. Retire el soporte del foco (Fig. 2).
4. Marque en la pared la posición de los agujeros por donde entrarán los tornillos del soporte y
realice los correspondientes agujeros. Fije el soporte a la pared con tornillos adecuados.
5. Abra la caja de conexiones que viene pre-instalada.
6. Pase el cable por el oricio para cable provisto con una junta y conéctelos como se muestra en
la gura 3 a la regleta del foco (N = cable azul,
= cable verde / amarillo, L = cable marrón).
7. Asegúrese de que el cable esté correctamente jado a través de la tracción compensada.
8. Vuelva a atornillar la tapa de la caja de conexiones. Asegúrese de que la junta encaja correcta-
mente.
9. Una el foco con el soporte de montaje.
10. Ajuste la posición deseada de la lámpara y apriete los tornillos.
17P028 Slim LED Strahler 170411.indd 30 11.04.2017 14:31:08
Page 31

31
Foco LED Slim Manual de instrucciones
E
DESCRIPCIÓN DE LA FUNCIÓN:
(Sólo para las versiones con sensor de movimiento)
Este foco está equipado con un sensor de movimiento infrarrojo. Se enciende automáticamente
cuando el sensor detecta movimiento en el ambiente.
No coloque el sensor de movimientos junto a piscinas, salidas de calefacción y climatización u
objetos que se exponen a cambios bruscos de temperatura. Evite dirigir el sensor de movimiento
hacia árboles o arbustos o en lugares donde suelen frecuentar las mascotas de casa. El sensor de
movimiento se puede girar horizontalmente a la derecha y a la izquierda.
Observe al montar el foco que el sensor de movimiento es más sensible a los movimientos que se
realizan a través de su campo de detección y menos sensible a los movimientos que tienen una
dirección directa (frontal) hacia el dispositivo.
AJUSTAR SENSOR DE MOVIMIENTO
Fig. 4
L
N
N L
L
N
N L
C
C
B
< 3 m
90°
100°
180°
10 ± 5 sec. - 5 ± 1 min. 0 - 2000 LUX
B
A
B
A
B
Gire la tapa del sensor de movimiento 180 grados
hacia abajo y aparecerán dos reguladores (ver
Fig. 4).
Ajuste del tiempo (icono del reloj, izquierda):
Con este regulador puede controlar el tiempo que
desee que se conecte el sensor de movimiento,
este tiempo puede variar de los 10 seg. hasta los 5
minutos después del último movimiento detectado. Gire el regulador TIME en dirección a las agujas
del reloj y el tiempo de detección disminuirá, si lo
gira en dirección opuesta al sentido de las agujas
el tiempo de detección aumentará.
Ajuste de iluminación (icono del sol y la luna, derecha):
El ajuste de iluminación determina a partir de qué intensidad de iluminación se debe activar el
sensor del foco. La posición (
) indica que el sensor está operativo tanto de día como de noche,
en posición (
) el sensor sólo funciona por la noche. Para el ajuste espere hasta que se haya alcanzado la iluminación de ambiente deseada. Gire el regulador del ajuste de iluminación hacia el
icono (
). Gire el regulador lentamente hacia el icono () hasta que el foco se encienda con el
movimiento.
El foco se encenderá ahora cuando detecte un movimiento dentro del alcance de iluminación
establecido.
Sensor de movimiento: sensor infrarrojo pasivo
Alcance de detección: hasta 12 m/hasta 90 ° (horizontal)
Ajustes de tiempo: aprox. 10 seg. hasta 5 min
Luminosidad del entorno: 0 – 2000 Lux
MANTENIMIENTO
Atención: El foco LED no tiene componentes que necesiten un mantenimiento.
El foco luminoso LED de esta lámpara únicamente debe ser sustituido por el fabricante
o por un técnico de servicio designado por éste o una persona con cualicación comparable.
No abra nunca la lámpara mientras esté conectado a la red eléctrica.
Cuidado: ¡Peligro de muerte por descarga eléctrica!
17P028 Slim LED Strahler 170411.indd 31 11.04.2017 14:31:09
Page 32

32
E
Manual de instrucciones
Foco LED Slim
LIMPIEZA
No utilice detergentes o disolventes para su limpieza. Utilice sólo un paño seco o ligeramente
humedecido.
ELIMINACIÓN
¡Desechar los dispositivos eléctricos de acuerdo con las regulaciones ambientales!
Los dispositivos eléctricos no deben tirarse a la basura doméstica.
En conformidad con la Directiva Europea 2012/19/CE sobre residuos de aparatos eléctricos
y electrónicos, los equipos eléctricos deben ser seleccionados, separados y reciclados para
que puedan volver a ser reutilizados.
Contacte con su ayuntamiento municipal u ocina local para informarse sobre las posibilidades de eliminación.
Direcciones
Hugo Brennenstuhl GmbH & Co. KG
Seestraße 1 – 3 · D-72074 Tübingen
H. Brennenstuhl S.A.S.
4 rue de Bruxelles ∙ F-67170 Bernolsheim
lectra-t ag
Blegistrasse 13 ∙ CH-6340 Baar
www.brennenstuhl.com
17P028 Slim LED Strahler 170411.indd 32 11.04.2017 14:31:09
Page 33

33
N Instrukcja obsługi
Naświetlacz LED Slim
L DN 2810 FL DE 3925 L DN 2810 FL PIR DE 3925
L DN 5630 FL DE 3925 L DN 5630 FL PIR DE 3925
L DN 9850 FL DE 3925 L DN 9850 FL PIR DE 3925
Uwaga: Przed przystąpieniem do montażu naświetlacza należy uważnie
przeczytać niniejszą instrukcję obsługi, którą następnie należy zachować!
DANE TECHNICZNE
Klasa ochrony: I
Stopień ochrony: IP 54
Napięcie znamionowe: 230 V~ 50/60 Hz
Współczynnik mocy: > 0,9
Typ: Moc: Prąd: Czujnik
ruchu:
Wymiary obudowy
ochronnej:
Wymiary: Ciężar: Maks.
powierzchnia
oświetlana:
L DN 2810 FL
DE 3925
10 W
(28 x 0,36 W)
0,045 A nie 124,2 x 90,2 x 4 mm 136 x 146,5 x 40,5 mm 0,43 kg 0,01 m²
L DN 2810 FL
PIR DE 3925
10 W
(28 x 0,36 W)
0,045 A tak 124,2 x 90,2 x 4 mm 166 x 146,5 x 42,5 mm 0,49 kg 0,01 m²
L DN 5630 FL
DE 3925
30 W
(56 x 0,5 W)
0,13 A nie 201,6 x 146,6 x 4 mm 202 x 231 x 35 mm 1,25 kg 0,03 m²
L DN 5630 FL
PIR DE 3925
30 W
(56 x 0,5 W)
0,13 A tak 201,6 x 146,6 x 4 mm 252 x 231 x 40,5 mm 1,37 kg 0,03 m²
L DN 9850 FL
DE 3925
50 W
(98 x 0,5 W)
0,22 A nie 250,8 x 185,8 x 4 mm 235 x 276,5 x 40 mm 1,92 kg 0,05 m²
L DN 9850 FL
PIR DE 3925
50 W
(98 x 0,5 W)
0,22 A tak 250,8 x 185,8 x 4 mm 290 x 276,5 x 40,5 mm 2,0 kg 0,05 m²
Wysokowydajny naświetlacz LED sprawdza się jako oświetlenie wewnętrzne i zewnętrzne oraz jest
przewidziany do montażu na stałe.
17P028 Slim LED Strahler 170411.indd 33 11.04.2017 14:31:09
Page 34

34
N
Instrukcja obsługi
Naświetlacz LED Slim
Rys. 1
< 3 m
90°
100°
Naświetlacz należy zamontować na wysokości
poniżej 3 m (rys. 1). Zalecana wysokość montażowa w przypadku modeli z czujnikiem ruchu
wynosi 2,5 m.
Używanie naświetlacza do innych celów jest zabronione.
WSKAZÓWKI BEZPIECZEŃSTWA
1. Instalacja i konserwacja naświetlacza to czynności, które muszą być wykonane przez wykwali-
kowanego specjalistę.
2. Prace z zakresu instalacji elektrycznej mogą być przeprowadzane tylko z zachowaniem przepi-
sów bezpieczeństwa (VDE 0100 dla Niemiec).
3. Do podłączenia należy użyć przewodu podłączeniowego z aprobatą VDE (minimum H05RN-
F 3G1,0).
4. Naświetlacz należy prawidłowo uziemić.
5. Użytkowanie naświetlacza bez prawidłowo założonych wszystkich pierścieni uszczelniających
jest zabronione!
6. Naświetlacze LED emitują ekstremalnie jasne światło. Nigdy nie patrzeć bezpośrednio w źró-
dło światła.
7. Zniszczoną obudowę ochronną należy wymienić na oryginalną obudowę ochronną marki
Brennenstuhl, zanim ponownie rozpoczniemy użytkowanie naświetlacza.
8. Jeżeli przewód zasilający naświetlacza lub skrzynka podłączeniowa ulegnie uszkodzeniu, musi
on/ona zostać wymieniony/a przez wykwalikowanego specjalistę w celu uniknięcia ewentualnych zagrożeń.
17P028 Slim LED Strahler 170411.indd 34 11.04.2017 14:31:09
Page 35

35
Naświetlacz LED Slim Instrukcja obsługi
N
MONTAŻ I PODŁĄCZENIE DO ZASILANIA ELEKTRYCZNEGO
Pałąk mocujący
A
, skrzynka podłączeniowa
B
, czujnik ruchu
C
Rys. 2
L
N
N L
L
N
N L
C
C
B
< 3 m
90°
100°
B
A
B
A
B
C
< 3 m
90°
100°
B
A
A
B
Rys. 3
1. Przed instalacją należy zawsze odłączać zasilanie elektryczne.
2. Pozycja montażowa: Optymalnym rozwiązaniem jest montaż naświetlacza przy użyciu uchwy-
tu ściennego.
3. Zdjąć pałąk mocujący z naświetlacza (rys. 2).
4. Zaznaczyć miejsca, w których mają być wykonane otwory służące do zamocowania pałąka
mocującego, a następnie wywiercić je w ścianie. Przymocować pałąk do ściany przy użyciu
odpowiednich śrub.
5. Otworzyć wstępnie zmontowaną skrzynkę podłączeniową.
6. Poprowadzić przewód zasilający przez wpust kablowy z uszczelką, a następnie podłączyć go
zgodnie z rys. 3 do łącznika świecznikowego (N = kabel niebieski,
= kabel zielono-żółty, L =
kabel brązowy).
7. Upewnić się, że przewód zasilający został dostatecznie dobrze przytwierdzony przez uchwyt
kablowy odciążający.
17P028 Slim LED Strahler 170411.indd 35 11.04.2017 14:31:09
Page 36

36
N
Instrukcja obsługi
Naświetlacz LED Slim
8. Ponownie przykręcić pokrywę na skrzynkę podłączeniową. Zwrócić uwagę na prawidłowe uło-
żenie uszczelki.
9. Zamocować naświetlacz na pałąku.
10. Ustawić naświetlacz w żądanej pozycji i dokręcić śruby.
OPIS DZIAŁANIA
(dotyczy tylko wersji z czujnikiem ruchu)
Naświetlacz wyposażony jest w czujnik podczerwieni. Załącza się automatycznie, gdy czujnik wykryje ruch w otoczeniu.
W miarę możliwości nie kierować czujnika ruchu w stronę basenu, wyciągów gorącego powietrza,
klimatyzatorów lub obiektów, które narażone są na duże wahania temperatury. Zwrócić uwagę,
aby czujnik ruchu nie był skierowany na drzewa, krzewy oraz miejsca, w których mogą przebywać
zwierzęta domowe. Czujnik ruchu można obracać w poziomie w prawo i w lewo.
Podczas mocowania naświetlacza należy pamiętać o tym, że czujnik ruchu reaguje najczulej na
ruchy, które przebiegają w poprzek jego pola detekcji, a najmniej czule w przypadku ruchów, które
zbliżają się do urządzenia na wprost.
USTAWIANIE CZUJNIKA RUCHU
Rys. 4
L
N
N L
L
N
N L
C
C
B
< 3 m
90°
100°
180°
10 ± 5 sec. - 5 ± 1 min. 0 - 2000 LUX
B
A
B
A
B
Obrócić osłonę czujnika ruchu o 180° w dół – pojawią się dwa regulatory (patrz rys. 4).
Ustawianie czasu (symbol zegara, z lewej
strony):
Za pomocą tego regulatora można wybrać dowolny czas załączenia w zakresie od ok. 10 sekund do 5 minut, po tym jak czujnik ruchu wykryje ostatni ruch. Obracanie regulatora w kierunku
zgodnym z ruchem wskazówek zegara zmniejsza
zakres czasowy, natomiast obracanie w kierunku
przeciwnym powoduje jego zwiększenie.
Ustawianie światła (symbol słońca i księżyca, z prawej strony):
Ustawienie światła określa próg jasności, po którego przekroczeniu czujnik włączy naświetlacz.
Pozycja (
) wskazuje, że czujnik pracuje w dzień i w nocy, w pozycji () czujnik pracuje tylko w
nocy. Aby dokonać ustawienia, należy odczekać do momentu nastania żądanej jasności otoczenia.
Przestawić pokrętło regulatora ustawienia światła całkowicie na symbol (
). Obracać regulator
powoli w kierunku symbolu (
) do momentu włączenia się naświetlacza w następstwie wykrycia
ruchu.
Od tego momentu naświetlacz będzie się włączać od ustawionego progu jasności po wykryciu
ruchu.
Czujnik ruchu: pasywny czujnik podczerwieni
Zakres detekcji: do 12 m / do 90 ° (w poziomie)
Ustawienie czasu: od ok. 10 sekund do 5 minut
Jasność otoczenia: 0 – 2000 lux
17P028 Slim LED Strahler 170411.indd 36 11.04.2017 14:31:09
Page 37

37
Naświetlacz LED Slim Instrukcja obsługi
N
KONSERWACJA
Uwaga: naświetlacz LED nie posiada elementów wymagających zabiegów konserwa-
cyjnych.
Źródło światła LED w naświetlaczu może zostać wymienione tylko przez producenta,
wyznaczonego przez niego serwisanta lub osobę o porównywalnych kwalikacjach.
Nigdy nie otwierać naświetlacza, jeżeli wtyczka jest podłączona do sieci.
Ostrożnie: niebezpieczeństwo porażenia prądem elektrycznym!
CZYSZCZENIE
Nie stosować rozpuszczalników, żrących środków czyszczących itp. Do czyszczenia używać tylko
suchej lub delikatnie zwilżonej ściereczki.
UTYLIZACJA
Sprzęt elektryczny należy utylizować w sposób bezpieczny dla środowiska naturalnego!
Urządzenia elektryczne to nie domowe śmieci czy odpadki!
Zgodnie z Dyrektywą Europejską 2012/19/UE w sprawie zużytego sprzętu elektrycznego
i elektronicznego, zużyte urządzenia elektryczne należy gromadzić osobno i przekazywać
do ponownego przetworzenia w sposób bezpieczny dla środowiska naturalnego.
O możliwościach utylizacji wysłużonego urządzenia dowiedzą się Państwo w urzędzie miasta lub gminy.
Adresy
Hugo Brennenstuhl GmbH & Co. KG
Seestraße 1 – 3 · D-72074 Tübingen
H. Brennenstuhl S.A.S.
4 rue de Bruxelles ∙ F-67170 Bernolsheim
lectra-t ag
Blegistrasse 13 · CH-6340 Baar
www.brennenstuhl.com
17P028 Slim LED Strahler 170411.indd 37 11.04.2017 14:31:09
Page 38

17P028 Slim LED Strahler 170411.indd 38 11.04.2017 14:31:09
Page 39

17P028 Slim LED Strahler 170411.indd 39 11.04.2017 14:31:09
Page 40

0496578/417
Hugo Brennenstuhl GmbH & Co. KG
Seestraße 1 – 3 · D-72074 Tübingen
H. Brennenstuhl S.A.S.
4 rue de Bruxelles ∙ F-67170 Bernolsheim
lectra-t ag
Blegistrasse 13 · CH-6340 Baar
www.brennenstuhl.com
17P028 Slim LED Strahler 170411.indd 40 11.04.2017 14:31:10
 Loading...