

Page 1
j
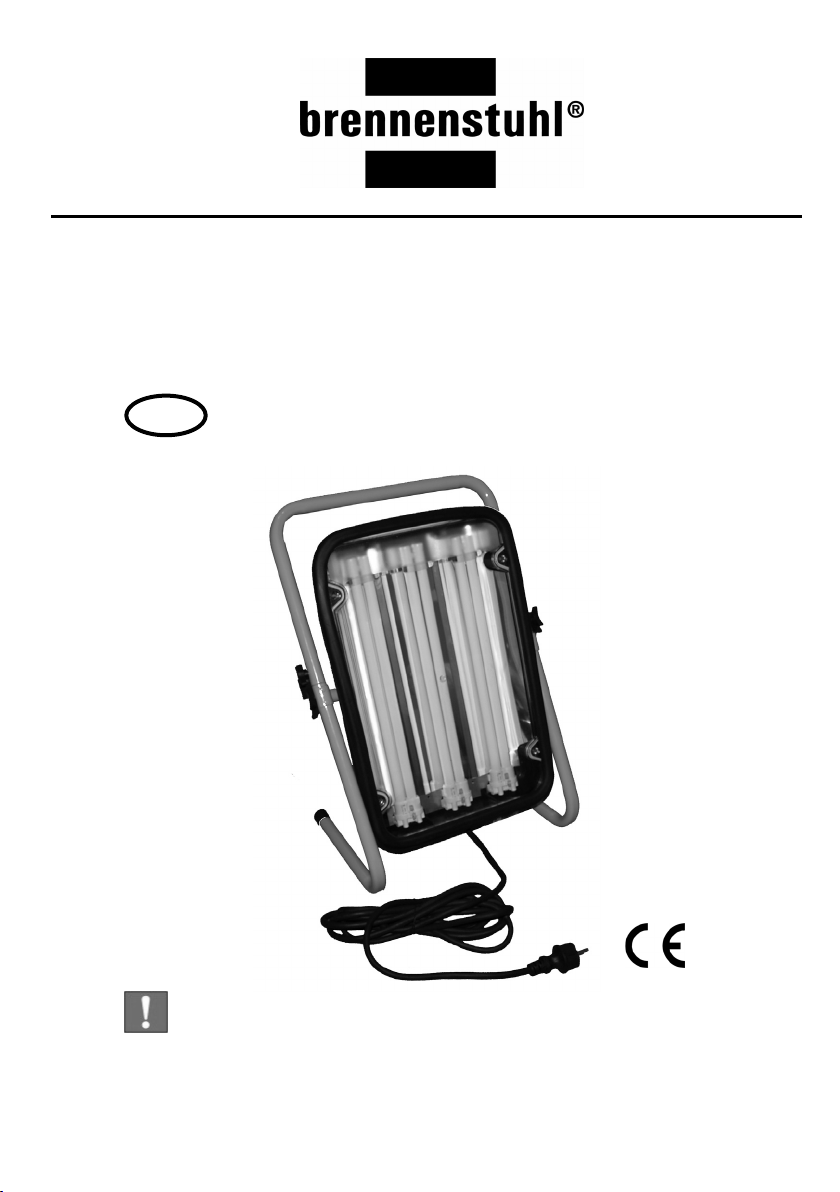
Power Jet-Light
3 x 36 W IP 54
DE
Bedienungsanleitung 3
GB
Operating Manual 12
FR
Mode d'emploi 21
NL
Handleiding 30
ES
Instrucciones de Uso 39
IT
Manuale d’uso 48
CZ
Návod pro obsluhu 57
Page 2

Page 3
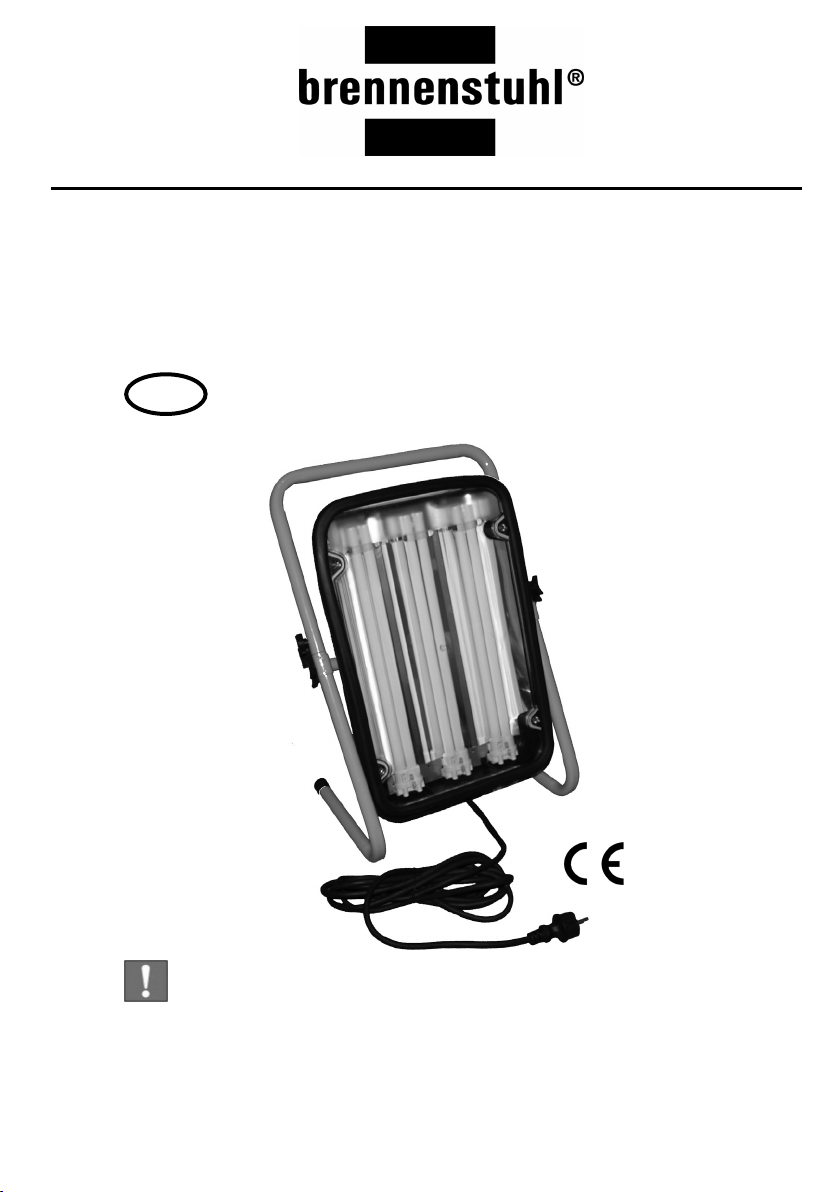
Power Jet-Light
3 x 36 W IP 54
DE
Bedienungsanleitung
WICHTIG:
Lesen und bewahren Sie diese Bedienungsanleitung auf.
Beachten und befolgen Sie die Sicherheitshinweise.
Page 4

Inhaltsverzeichnis
1
Einleitung .......................................................................................................................5
2 Lieferumfang ..................................................................................................................5
3 Sicherheitshinweise........................................................................................................ 5
4 Geräteübersicht.............................................................................................................. 6
5 Technische Daten ..........................................................................................................7
6 Bedienung und Montage ................................................................................................ 7
6.1 Erste Inbetriebnahme ................................................................................................ 8
6.2 Leuchtmittel wechseln ............................................................................................... 8
6.3 Zuleitung ersetzen ..................................................................................................... 9
7 Reinigung ..................................................................................................................... 10
8 Entsorgung................................................................................................................... 11
9 Fehlerliste.....................................................................................................................11
10 Garantie und Service.................................................................................................... 11
11 Konformitätserklärung .................................................................................................. 11
Page 5
Power Jet-Light 3 x 36 W IP 54
1 Einleitung
Diese Bedienungsanleitung muss vollständig und sorgfältig durchgelesen werden.
Sie ist Bestandteil des von Ihnen neu erworbenen Produktes und enthält wichtige Hinweise für den
Betrieb und die Handhabung. Es sind beim Gebrauch dieses Produktes immer alle Sicherheitshinweise
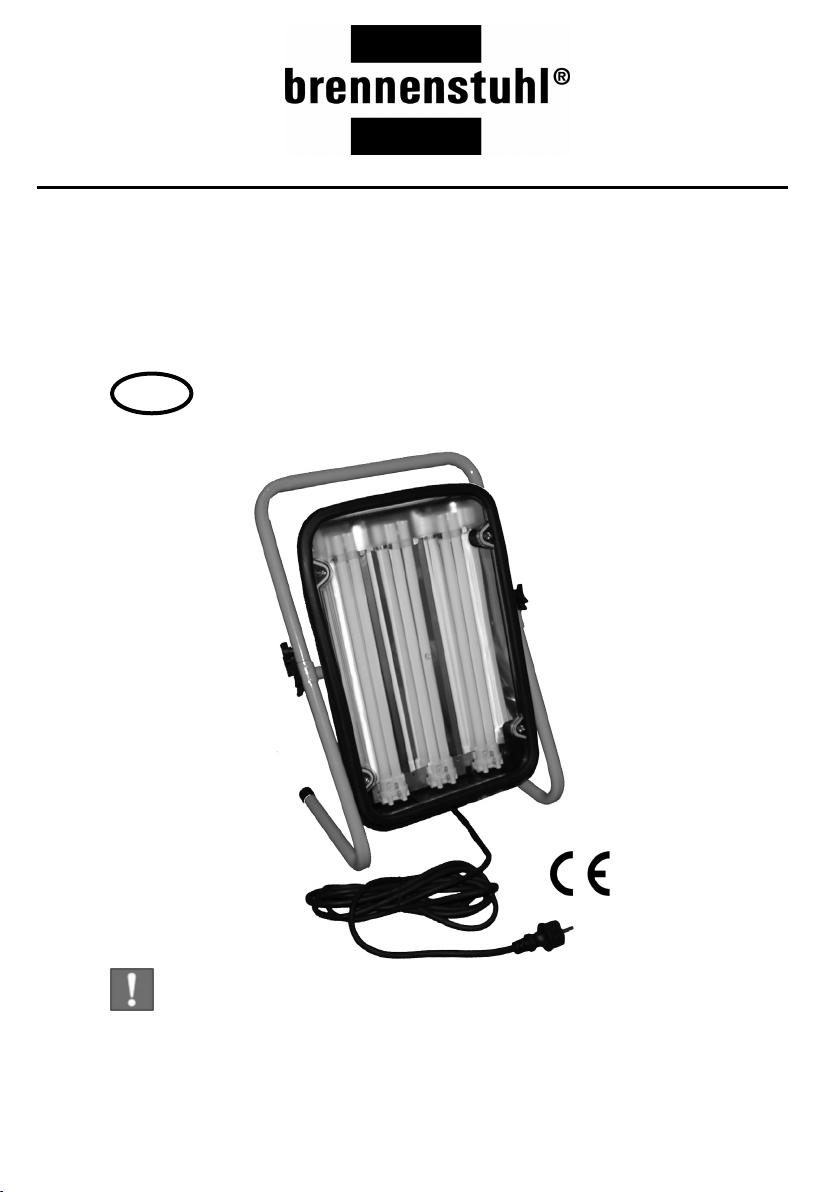
zu beachten. Die Power Jet- Light 3 x 36 W ist eine Arbeitsleuchte mit Steckdosen zum Stellen, Hängen
und Legen, sowie als tragbare Leuchte für den Innen- und Außenbereich geeignet.
Bei auftretenden Fragen bezüglich der Benutzung der Power Jet- Light 3 x 36 W kontaktieren Sie Ihren
Händler oder unsere Servicestelle. Die Bedienungsanleitung ist aufzubewahren und muss ggf. an Dritte
weitergereicht werden. Im Folgenden wird die Power Jet- Light 3 x 36 W, Arbeitsleuchte genannt.
2 Lieferumfang
1 x Leuchtenkörper inkl. drei Leuchtmittel
2 x Verstellschrauben
2 x Bügelschrauben
2 x Standbügel
1 x Haltebügel
1 x Bedienungsanleitung
3 Sicherheitshinweise
WICHTIG:
Beachten Sie die nachfolgenden Hinweise, um Verletzungen oder Sachschäden zu vermeiden.
Betriebsumgebung: Die Arbeitsleuchte ist gegen Feuchtigkeit und Spritzwasser geschützt. Beachten
Sie jedoch, dass das Gerät nicht wasserdicht ist.
GEFAHR: Bei Nichtbeachten besteht Lebensgefahr durch elektrischen Strom.
Bei auftretenden Schäden, welche durch das Nichtbeachten dieser Bedienungsanleitung, insbesondere
der Sicherheitshinweise und der Handhabung auftreten, erlischt die Garantie.
Ebenso wird für Folgeschäden keine Haftung übernommen.
Die Bedienungsanleitung ist aufzubewahren und muss ggf. an Dritte weitergereicht werden.
Die in dieser Bedienungsanleitung verwendeten Signalworte und Symbole haben folgende Bedeutung:
Symbol Signalwort/ Bedeutung Symbol Signalwort/ Bedeutung
GEFAHR:
Erhebliches Verletzungsrisiko von
Personen bzw. Lebensgefahr bei
Nichtbeachten
- Die Arbeitsleuchte ist nur an eine geerdete 230 V~ Schutzkontaktsteckdose anzuschließen.
- Bei erkennbaren Defekten ist das Betreiben der Arbeitsleuchte nicht gestattet.
- Öffnen Sie niemals die Arbeitsleuchte, außer beim Einsetzen des Leuchtmittels. Solche Eingriffe
bedeuten Lebensgefahr durch elektrischen Schlag.
- Aus Sicherheitsgründen ist das eigenmächtige Umbauen, Manipulieren und/oder das Verändern der
Arbeitsleuchte nicht erlaubt.
- Schauen Sie niemals direkt in das Licht.
- Die Arbeitsleuchte enthält keine Teile, welche vom Benutzer gewartet werden müssen.
- Verwenden Sie die Arbeitsleuchte nicht in explosionsgefährdeter Umgebung, in welcher sich
brennbare Flüssigkeiten, Gase oder Stäube befinden.
- Halten Sie Kinder von der Arbeitsleuchte fern.
- Überprüfen Sie regelmäßig die Arbeitsleuchte auf Beschädigungen.
WICHTIG:
Was Sie beachten sollten
Bedienungsanleitung 5 DE
Page 6
Power Jet-Light 3 x 36 W IP 54
- Zum Wechseln der Leuchtmittel muss die Arbeitsleuchte von der Netzspannung getrennt werden.
Ziehen Sie den Stecker aus der Steckdose.
- Reparaturen dürfen nur durch eine autorisierte Fachkraft durchgeführt werden.
- Lassen Sie die Arbeitsleuchte vor Berührung (z.B. beim Leuchtmittelwechsel) abkühlen.
- Halten Sie zu jeder Seite einen Mindestabstand von 50 cm zu brennbaren Materialien ein.
- Eine beschädigte Zuleitung darf ausschließlich vom Hersteller, seinem Servicevertreter oder einer
vergleichbaren Fachkraft durch eine gleichwertige Zuleitung ausgetauscht werden.
- Schalten Sie nie Mehrfachsteckdosen hintereinander.
- Achten Sie auf einen sicheren Stand der Arbeitsleuchte.
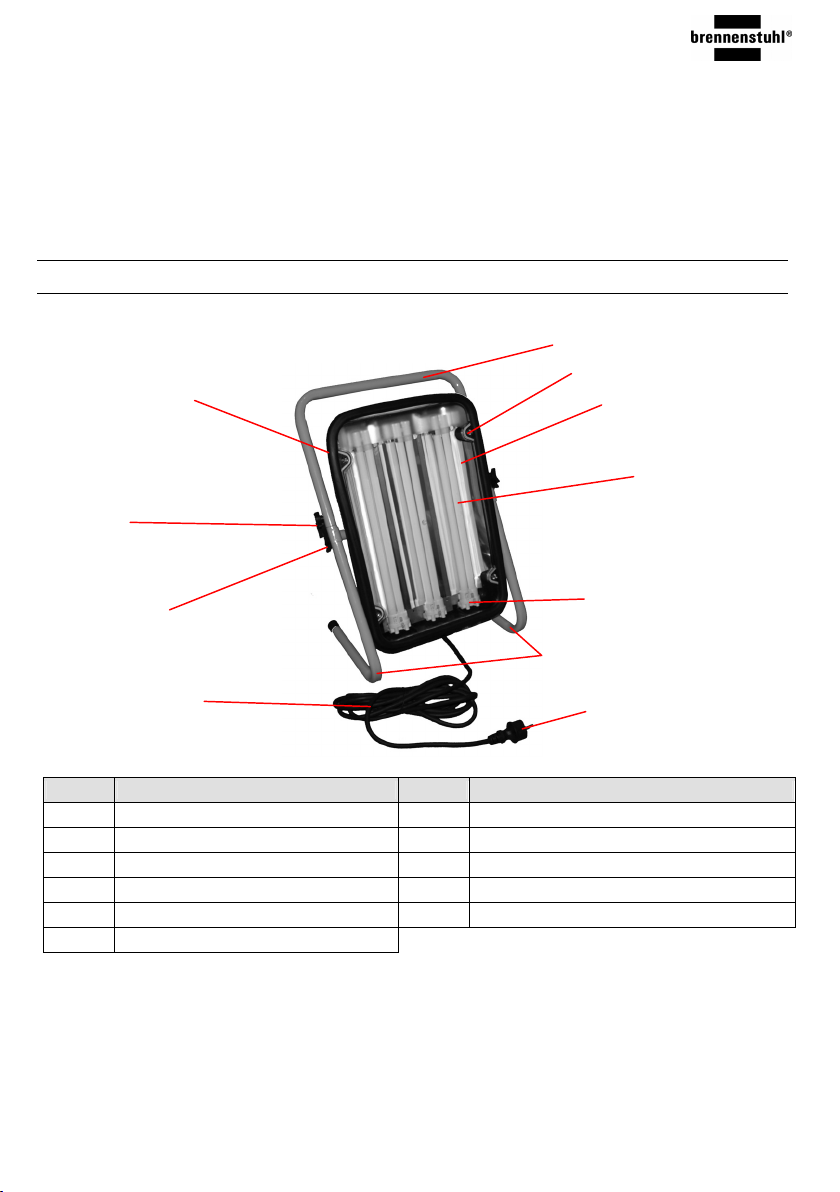
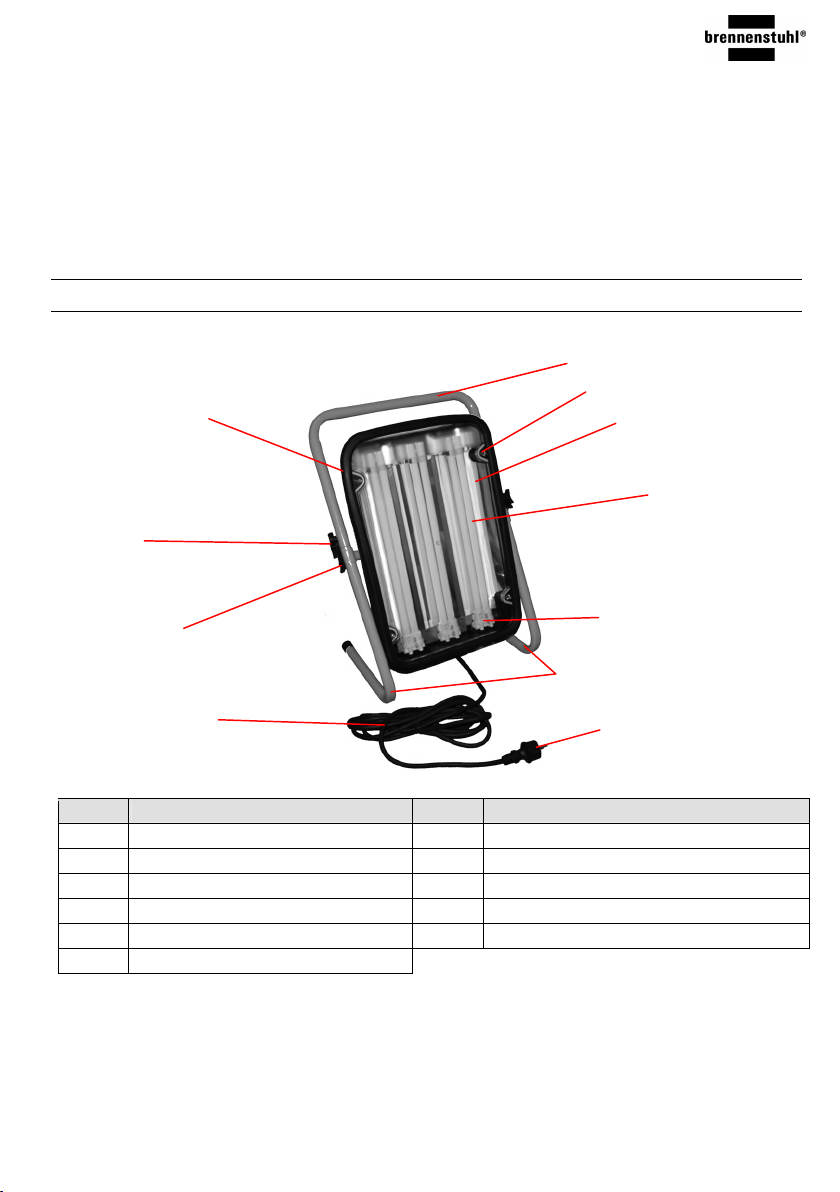
4 Geräteübersicht
Nachfolgend erhalten Sie einen Überblick über die Bedienteile und Anzeigen des Gerätes und eine kurze
Funktionsbeschreibung.
11
10
1
2
3
4
9
8
5
6
7
Pos. Bezeichnung Pos. Bezeichnung
1 Haltebügel 7 Stecker
2 Schutzabdeckungsschrauben 8 Zuleitung
3 Schutzabdeckung 9 Verstellschraube (Schnellverschluss)
4 Leuchtmittel 10 Bügelschraube
5 Fassung 11 Gummilippe
6 Standbügel
Bedienungsanleitung 6 DE
Page 7

Power Jet-Light 3 x 36 W IP 54
12
15
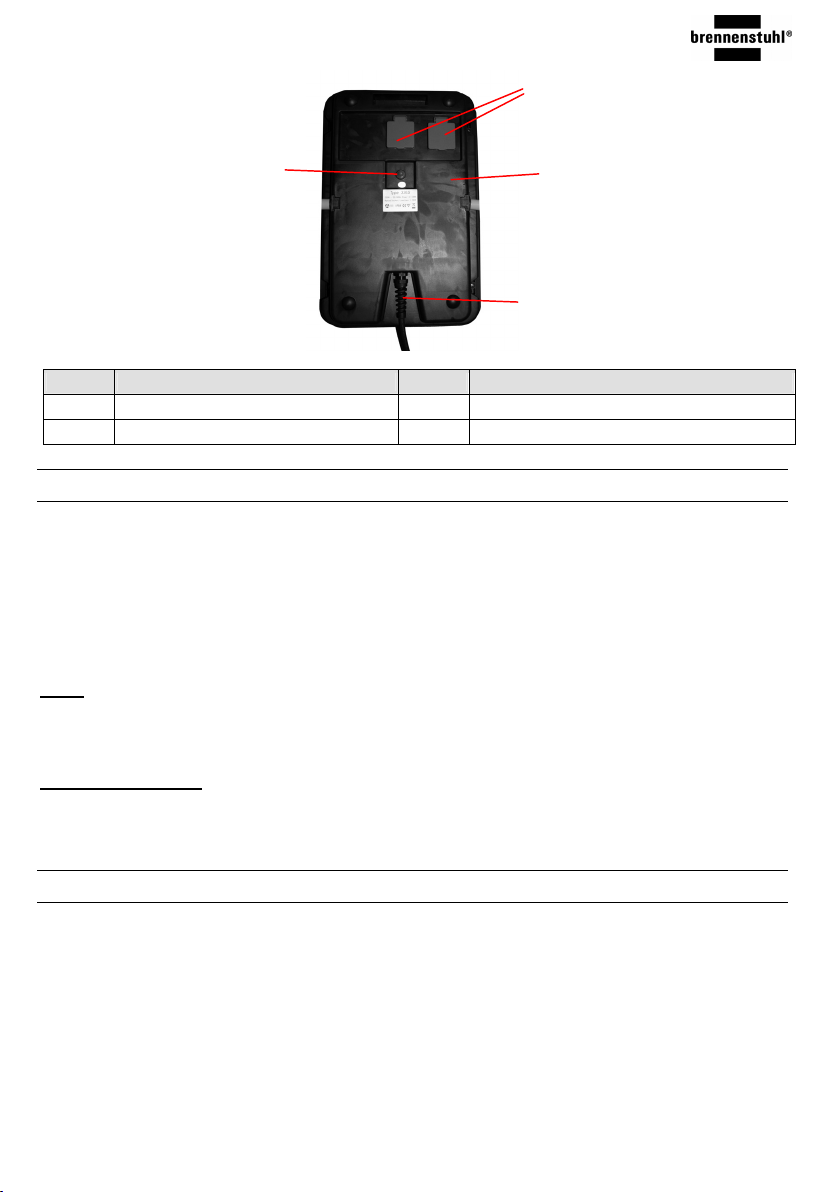
Pos. Bezeichnung Pos. Bezeichnung
12 Schutzkontaktsteckdosen 14 Leitungseinführung inkl. Biegeschutz
13 Gehäuse 15 EIN/ AUS Schalter
13
14
5 Technische Daten
Gerät Power Jet - Light 3 x 36 W
Art. Nr. 1 17261 0
Schutzart: IP 54 (spritzwassergeschützt, staubgeschützt)
Stromversorgung: 230 V~ 50 Hz
Kabel: Gummikabel H07RN-F 3G1,5
Kabellänge: ca. 5 m
Abmessungen (H x B x T): ca. 555 x 415 x 235 mm
Gewicht: 6,3 kg
Leuchte:
Leistungsaufnahme: bis 3 x 36 W (Leuchtmittel)
Leuchtmittel: 3 x 36 W, PL Kompaktlampe
Schutzklasse: II
Mehrfachsteckdoseneinsatz:
Schutzklasse: I
Max. Belastung: max. 3500 W
Bemessungsstrom: max. 16 A
6 Bedienung und Montage
Beachten Sie die nachfolgenden Hinweise, insbesondere die Sicherheitshinweise, um Fehlbedienungen
und mögliche Defekte zu vermeiden.
Bedienungsanleitung 7 DE
Page 8
Power Jet-Light 3 x 36 W IP 54
6.1 Erste Inbetriebnahme
Schritt Tätigkeit
1 Stecken Sie die Standbügel auf den Haltebügel. Verschrauben Sie die Bügelkonstruktion mit
2
3 Drücken Sie den EIN/ AUS Schalter. Die Arbeitsleuchte wird ein- bzw. ausgeschalten.
den Bügelschrauben.
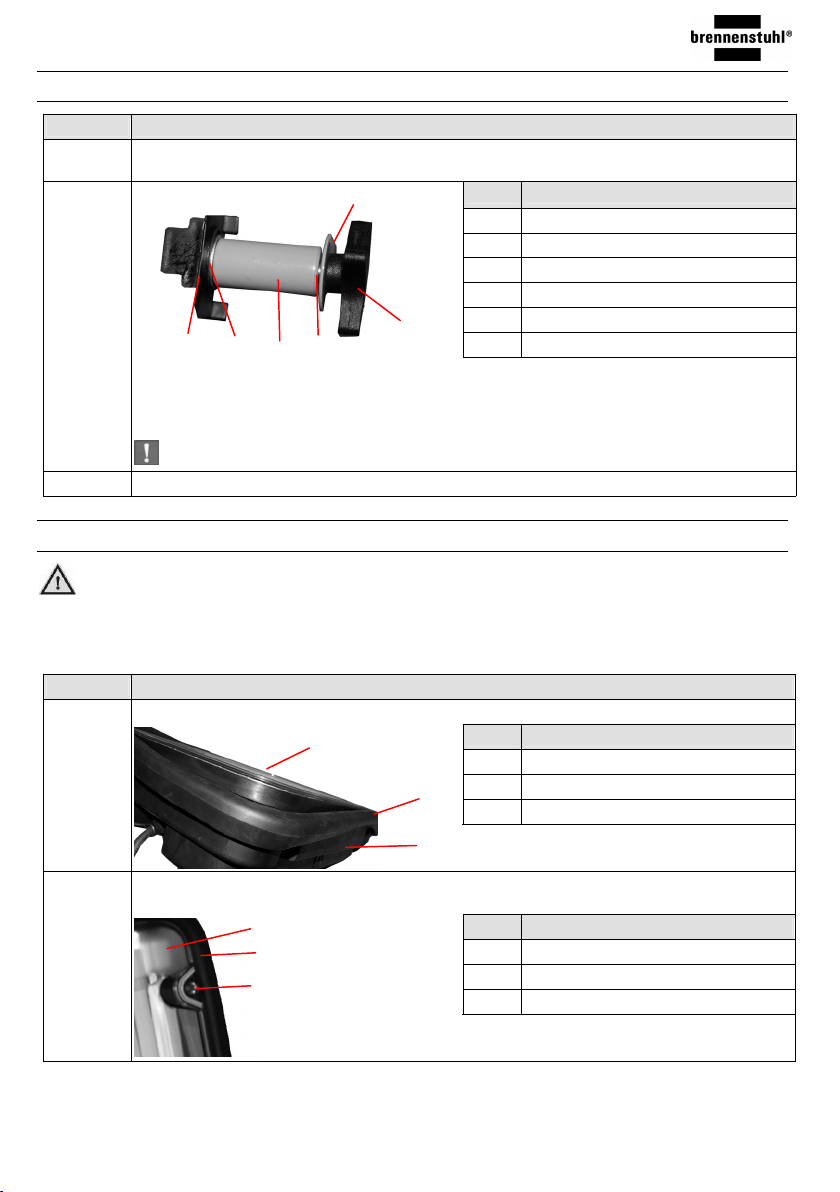
6
9
13
Befestigen Sie den Leuchtenkörper in der Mitte der Bügelkonstruktion. Verwenden Sie hierzu
die Distanzhülsen und die Verstellschrauben. Durch die Verstellschrauben kann der
Leuchtwinkel eingestellt werden.
WICHTIG: Kontrollieren Sie vor der ersten Inbetriebnahme alle Schraubverbindungen.
22
16
23
Pos. Bezeichnung
6 Standbügel (Bügelkonstruktion)
9 Verstellschraube
16 Distanzhülse
13 Gehäuse (Leuchtenkörper)
22 Unterlagsscheibe
23 Zahnscheibe
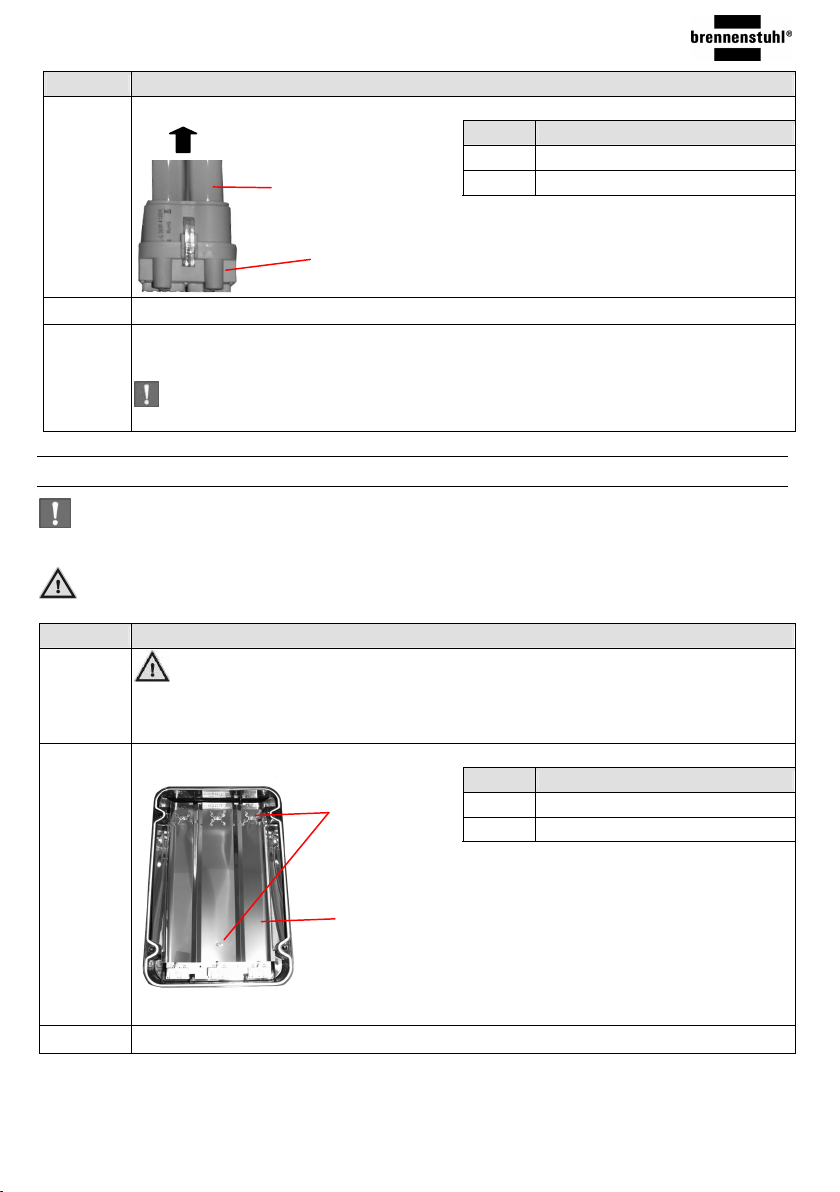
6.2 Leuchtmittel wechseln
GEFAHR:
Ziehen Sie vor Öffnen der Arbeitsleuchte den Netzstecker!
Lassen Sie die Arbeitsleuchte vor Berührung abkühlen (mindestens 15 Minuten).
Berührungen können zu Verbrennungen führen.
Schritt Tätigkeit
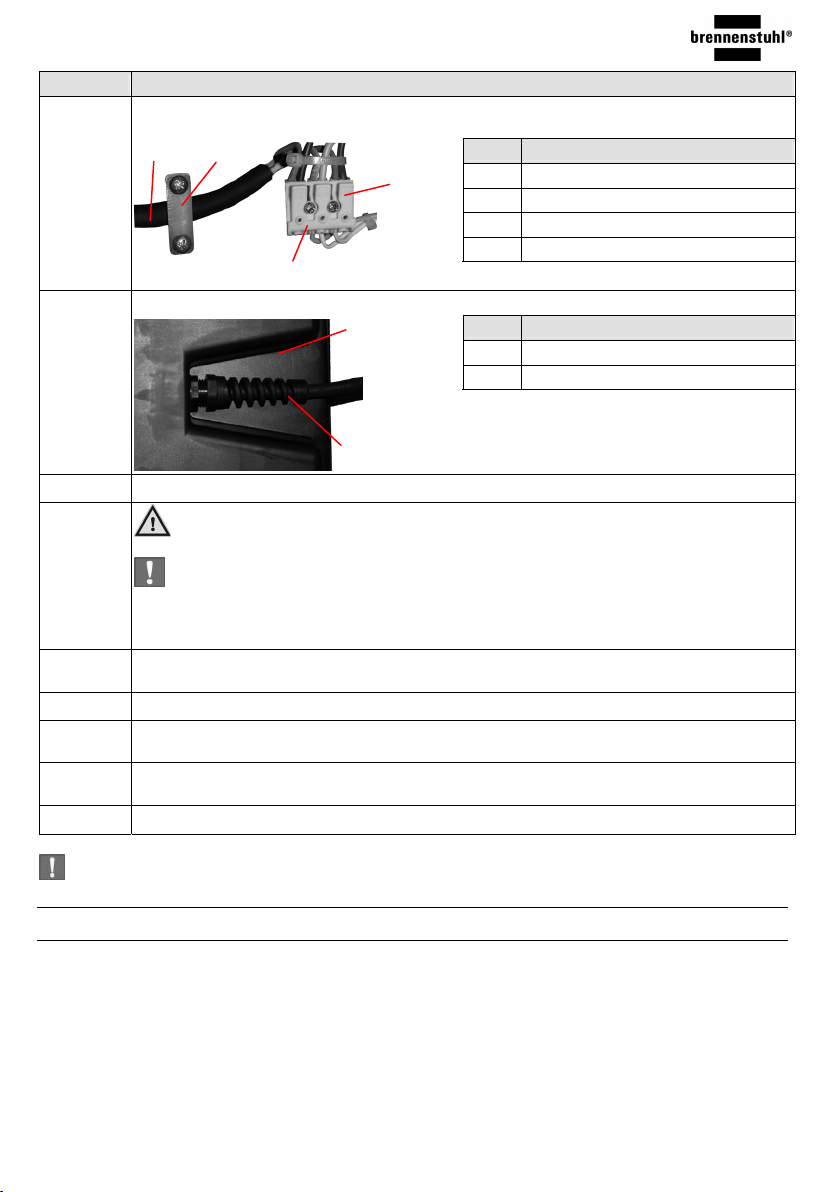
1
2
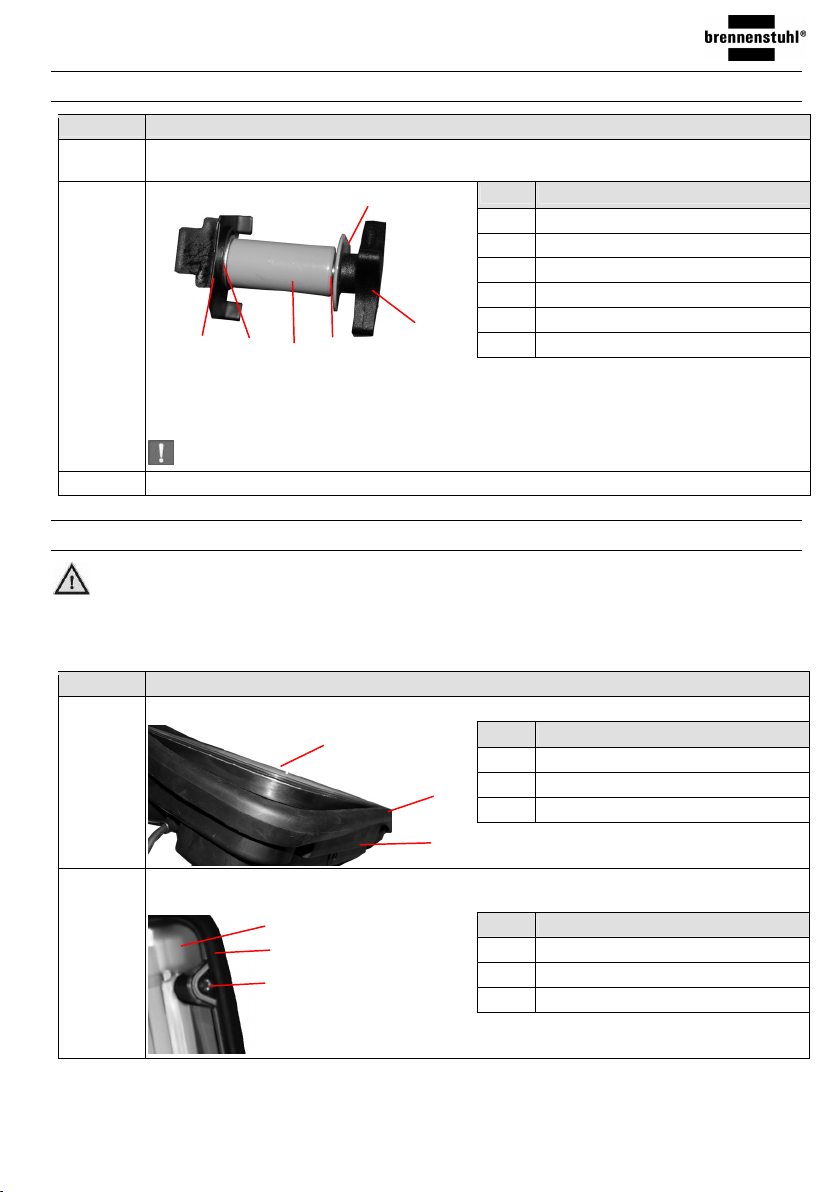
Legen Sie die Arbeitsleuchte auf den „Rücken“. Drücken Sie die Gummilippe nach unten.
3
Schrauben Sie die 4 Schutzabdeckungsschrauben aus der Schutzabdeckung.
Nehmen Sie die Schutzabdeckung ab.
3
11
2
Pos. Bezeichnung
3 Schutzabdeckung
11 Gummilippe
11
13 Gehäuse (Leuchtenkörper)
13
Pos. Bezeichnung
3 Schutzabdeckung
11 Gummilippe
2 Schutzabdeckungsschrauben
Bedienungsanleitung 8 DE
Page 9

Power Jet-Light 3 x 36 W IP 54
Schritt Tätigkeit
3
Ziehen Sie nun das Leuchtmittel nach oben aus der Fassung.
4
Pos. Bezeichnung
4 Leuchtmittel
5 Fassung
5
4 Setzen Sie das neue Leuchtmittel nach unten mit sanftem Druck ein.
5 Legen Sie die Schutzabdeckung auf das Gehäuse. Schrauben Sie die 4 Schutzabdeckungs-
schrauben in die Schutzabdeckung. Schieben Sie die Dichtung wieder über die
Schutzabdeckung.
WICHTIG: Achten Sie auf korrekten Sitz der Dichtung zwischen Gehäuse und
Schutzabdeckung.
6.3 Zuleitung ersetzen
WICHTIG: Eine beschädigte Zuleitung darf ausschließlich vom Hersteller, seinem Servicevertreter
oder einer vergleichbaren Fachkraft durch eine gleichwertige Zuleitung ausgetauscht werden.
GEFAHR: Solche Eingriffe bedeuten Lebensgefahr durch elektrischen Schlag.
Schritt Tätigkeit
1
2
GEFAHR: Ziehen Sie vor Öffnen der Arbeitsleuchte den Netzstecker!
Entnehmen Sie das Leuchtmittel (siehe Kapitel Leuchtmittel wechseln Schritt 1-3)
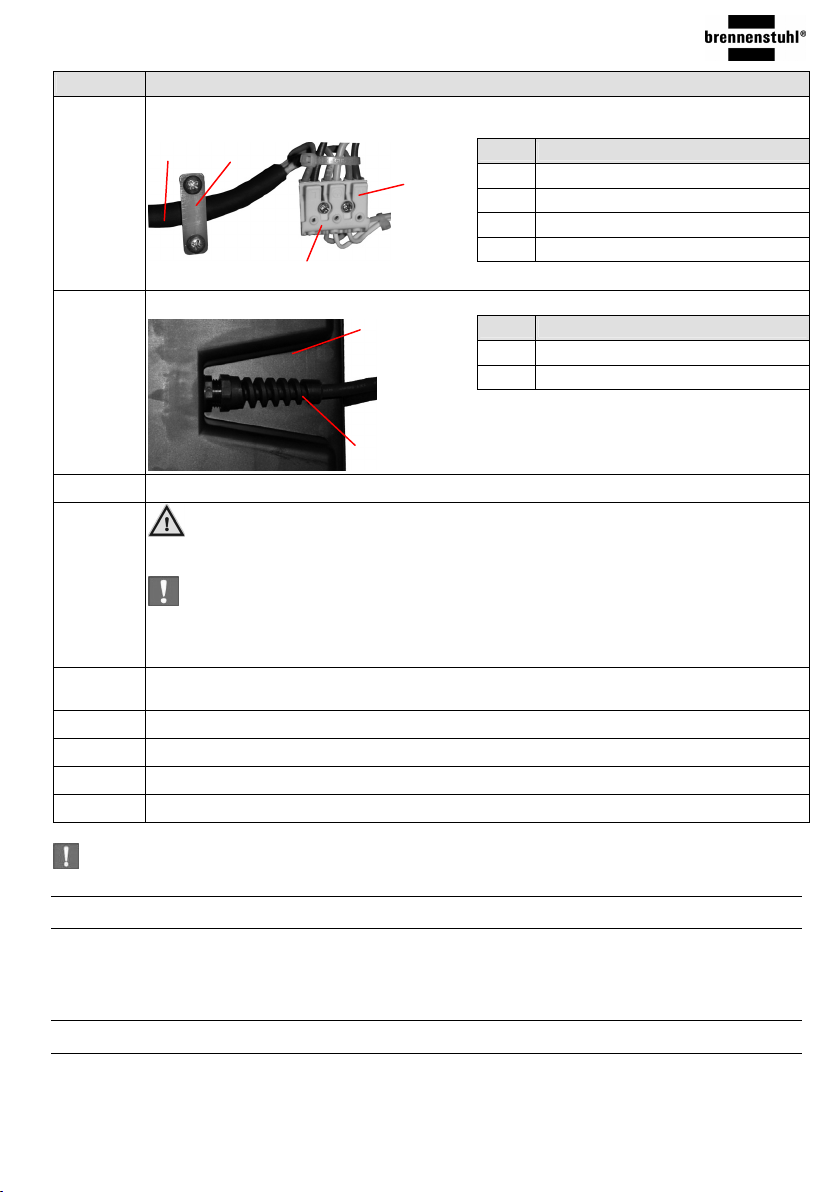
Schrauben Sie die 4 Reflektorschrauben heraus. Entnehmen Sie vorsichtig den Reflektor.
Pos. Bezeichnung
17
17 Reflektorschrauben
18 Reflektor
18
Unter dem Reflektor befindet sich eine Metallplatte.
3 Schrauben Sie die Schrauben aus der Metallplatte. Stellen Sie die Metallplatte auf.
Bedienungsanleitung 9 DE
Page 10
Power Jet-Light 3 x 36 W IP 54
Schritt Tätigkeit
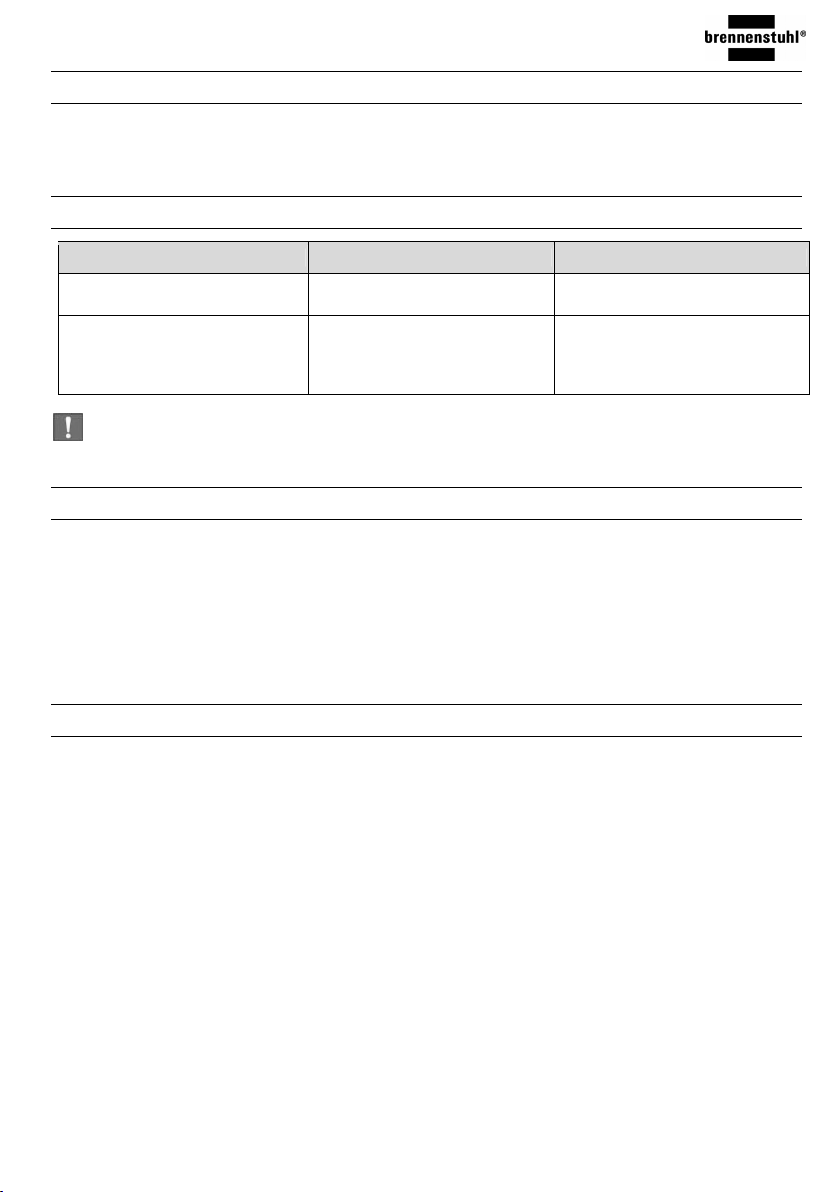
4
5
6 Ziehen Sie die alte Zuleitung heraus.
7
8 Klemmen Sie die Zuleitung an den Klemmenblock. Drücken Sie hierzu den Klemmtaster und
9 Verschrauben Sie die Leitungseinführung.
10 Positionieren Sie die Metallplatte. Befestigen Sie die Metallplatte mit den zuvor
11 Passen Sie den Reflektor in das Gehäuse ein. Befestigen Sie diesen mit den
12 Leuchtmittel montieren (siehe Kapitel Leuchtmittel wechseln Schritt 4+5)
Klemmen Sie die Leitung ab. Lösen Sie hierzu die Zugentlastung und drücken Sie die
Federkraftklemme am Klemmenblock.
8
19
20
21
Lösen Sie die Leitungseinführung, indem Sie diese entgegen des Uhrzeigersinns drehen.
13
14
WARNUNG: Verwenden Sie bei einem Wechsel der Zuleitung nur Originalzubehör
vom selben Leitungstyp und derselben Leitungslänge.
WICHTIG: Der grün/gelbe Schutzleiter muss immer 3 cm länger sein als die beiden
anderen Adern.
Ziehen Sie die Zuleitung ein.
schieben die Ader in den Klemmblock.
entnommenen Schrauben.
Reflektorschrauben.
Pos. Bezeichnung
8 Zuleitung
19 Zugentlastung
20 Federkraftklemme
21 Klemmenblock
Pos. Bezeichnung
13 Gehäuse
14 Leitungseinführung inkl. Biegeschutz
WICHTIG: Kontrollieren Sie vor der ersten Inbetriebnahme alle Schraubverbindungen.
7 Reinigung
Vor Reinigung Netzstecker ziehen. Aus Gründen der elektrischen Sicherheit ist das Gerät mit einem
trockenen oder einem feuchten Tuch zu reinigen. Verwenden Sie keine scharfen Reinigungsmittel bzw.
Chemikalien (Lösungsmittel, Benzin etc.) und keine rauen Schwämme. Arbeitsleuchte niemals in Wasser
tauchen.
Bedienungsanleitung 10 DE
Page 11
Power Jet-Light 3 x 36 W IP 54
8 Entsorgung
Am Ende der Lebensdauer des Produktes darf dieses nicht im normalen Hausmüll entsorgt werden.
Erkundigen Sie sich bei Ihrer Stadt- oder Gemeindeverwaltung nach Möglichkeiten einer umwelt- und
sachgerechten Entsorgung des Gerätes.
9 Fehlerliste
Fehler Mögliche Ursache(n) Abhilfe
Ein Leuchtmittel leuchtet nicht
mehr
Arbeitsleuchte hat keine Funktion - Stromversorgung oder Zuleitung
WICHTIG:
Alle weiteren Reparaturen dürfen nur von einer autorisierten Elektro-Fachkraft durchgeführt werden.
Leuchtmittel ist defekt Leuchtmittel wechseln
defekt
- keine Netzverbindung
- Schalter ist defekt
- Überprüfen Sie die geerdete
230 V~ Steckdose
- Überprüfen Sie das
Verlängerungskabel
10 Garantie und Service
Wir gewähren auf diesen Artikel eine Garantie von 2 Jahren.
Reparaturen nur über den autorisierten Fachhandel.
Beschädigungen durch unsachgemäße Handhabung, Nichtbeachten der Bedienungsanleitung sowie
Verschleißteile (z.B. Leuchtmittel) sind von der Garantie ausgeschlossen.
Für weitere Informationen empfehlen wir den Bereich Service/FAQ's auf unserer homepage
www.brennenstuhl.com.
11 Konformitätserklärung
In Übereinstimmung mit folgenden Europäischen Richtlinien wurde das CE- Zeichen angebracht:
2006 / 95 / EG Niederspannungsrichtlinie
2004 / 108 / EG EMV-Richtlinie
2009 / 125 / EG ErP-Richtlinie
Die Konformitätserklärung ist beim Hersteller hinterlegt.
Hersteller:
Hugo Brennenstuhl GmbH & Co. KG, Seestraße 1-3, 72074 Tübingen, Deutschland
Bedienungsanleitung 11 DE
Page 12
Power Jet-Light
3 x 36 W IP 54
GB
Operating Manual
IMPORTANT:
Read and maintain this operating manual
Observe and follow the security instructions.
Page 13

Table of Contents
Introduction...................................................................................................................14
1
2 Product Contents.......................................................................................................... 14
3 Security Instructions .....................................................................................................14
4 Device overview ...........................................................................................................15
5 Technical Data .............................................................................................................16
6 Operation and Installation............................................................................................. 16
6.1 Initial Operation........................................................................................................17
6.2 Change Illuminant.................................................................................................... 17
6.3 Replace wiring .........................................................................................................18
7 Cleaning .......................................................................................................................19
8 Waste Disposal ............................................................................................................19
9 Error list ........................................................................................................................ 20
10 Guarentee and Service.................................................................................................20
11 Declaration of Conformity ............................................................................................. 20
Page 14
Power Jet-Light 3 x 36 W IP 54
1 Introduction
This operating manual should be read completely and carefully.
It is part of your newly acquired product contains important instructions for the operation and handling. All
the security instructions are to be observed while using the product. The Power Jet- Light 3 x 36 W is a
work lamp with sockets is suited for placing, hanging and positioning as also as portable lamp for indoors
and outdoors.
In case of any questions with respect to the usage of the Power Jet- Light 3 x 36 W, please contact your
dealer or our service location. The operating manual is to be maintained and if necessary to be passed
on to third parties. The Power Jet-Light 3 x 36 W is called as work lamp hereinafter.
2 Product Contents
1 x Lamp body including three illuminants
2 x Adjusting screws
2 x U-Bolts
2 x Stand brackets
1 x Retaining bracket
1 x Operating manual
3 Security Instructions
IMPORTANT:
Please observe the following instructions in order to avoid injuries or material damages.
Operating environment: The work lamp is protected against dampness and splashing water. Please
note that the device is not waterproof.
DANGER: Failure to observe might lead to danger of life through electrical current.
The guarantee will not be valid in the case of damages that arise due to non-observance of this
instruction manual, especially the security instructions and handling.
No liability will likewise be assumed for subsequent damages.
The operating manual is to be maintained and if necessary to be forwarded to third parties.
The signals and symbols used in this operating manual have the following meaning:
Symbol Signal word/ Meaning Symbol Signal word/ Meaning
DANGER:
Significant risk of injury of persons
or danger to life in case of nonobservance
- The work lamp is to be connected only to an earthed 230 V~ shockproof socket.
- Operation of the work lamp in the case identifiable defects is not allowed.
- Never open the work lamp, except during insertion of the illuminant. Such interventions can mean
danger to life through electrical attack.
- Arbitrary conversion, manipulation and/ or change of the work lamp is not allowed due to security
reasons.
- Never look directly into the light.
- The work lamp does not contain any parts that have to be maintained by the user.
- Do not use the work lamp in explosion-prone environment, in which combustible liquids, gases or
dusts are present.
- Please maintain the work lamp at a safe distance from children.
IMPORTANT:
What you need to note
Operating Manual 14 GB
Page 15
Power Jet-Light 3 x 36 W IP 54
- Regularly check the work lamp for damages.
- The work lamp must be separated from the mains voltage in order for it to be replaced. Pull the
connector from the socket.
- Repairs should be carried out only by authorized personnel.
- Let the work lamp cool down before coming into contact (for example during replacement of the
illuminant).
- Observe a minimum distance of 50 cm on each side to combustible materials.
- Damaged cable line cannot be replaced. The work lamp is to be disposed appropriately.
- Never switch multiple shockproof sockets one after the other.
- Note the secure status of the work lamp.
4 Device overview
Below is a brief overview of the control panel and display of the device and a short functional description
11
10
1
2
3
4
9
8
5
6
7
Pos. Name Pos. Name
1 Retaining bracket 7 Connector
2 Protective cover bolt 8 Supply wiring
3 Protective cover 9 Adjusting screw (Quick release fastener)
4 Illuminant 10 Stirrup bolt
5 Socket 11 Rubber lip
6 Standing bracket
Operating Manual 15 GB
Page 16
Power Jet-Light 3 x 36 W IP 54
12
15
Pos. Name Pos. Name
12 Shockproof sockets 14 Bush including bending protection
13 Casing 15 Switch ON / OFF
13
14
5 Technical Data
Device Power Jet - Light 3 x 36 W
Type Nr. 1 17261 0
Protection type: IP 54 (splash water protected, dust protected)
Power consumption: 230 V~ 50 Hz
Cable: Rubber cable H07RN-F 3G1,5
Cable length: around 5 m
Dimensions (H x B x T): around 555 x 415 x 235 mm
Weight: 6.3 kg
Lamp:
Power consumption: up to 3 x 36 W (Illuminant)
Illuminant: 3 x 36 W, PL Compact lamp
Protection class: II
Multiple socket inserts:
Protection class: I
Max. Load: max. 3500 W
Rating current: max. 16 A
6 Operation and Installation
Please observe the following notes, especially the security notes in order to avoid faulty operations and
possible defects.
Operating Manual 16 GB
Page 17
Power Jet-Light 3 x 36 W IP 54
6.1 Initial Operation
Step Activity
1 Plug the standing bracket on to the retaining bracket. Bolt the U-Bolt structure with the
2
3 Press the ON / OFF switch. The work lamp will be switched on or off accordingly.
U-Bolts.
6
9
13
Fasten the lamp body in the middle of the U-bolt structure. For this purpose use the bolt
spacer and the adjusting screw. The light bracket can be set through the adjusting screw.
IMPORTANT: Before the initial operation, check all the bolted connections.
22
16
23
Pos. Name
6 Standing bracket (U-Bolt structure)
9 Adjusting screw
16 Bolt spacer
13 Casing (Lamp body)
22 Washer
23 Lock washer
6.2 Change Illuminant
DANGER:
Pull the mains plug before opening the work lamp!
Let the work lamp cool before touching it (at least 15 minutes).
Coming into contact can lead to burns.
Step Activity
1
2
Set the work lamp on its „back“. Press the rubber lip upwards.
3
Screw out the 4 protective covering bolts from the protective cover. Remove the protective
cover.
3
11
2
Pos. Name
3 Protective cover
11 Rubber lip
11
13 Casing (Lamp body)
13
Pos. Name
3 Protective cover
11 Rubber lip
2 Protective cover bolt
Operating Manual 17 GB
Page 18
Power Jet-Light 3 x 36 W IP 54
Step Activity
3
Now pull the illuminant upwards towards the clamp
4
Pos. Name
4 Illuminant
5 Clamp
5
4 Insert the new illuminant downwards with gentle pressure.
5 Lay the protective cover on the casing. Screw in the 4 protective cover bolts into the
protective cover. Push the seal over the protective cover again.
IMPORTANT: Please note the correct position of the seal between the casing and the
protective cover
6.3 Replace wiring
IMPORTANT: Damaged wiring should only be replaced with similar wiring by the manufacturer,
manufacturer’s service representative or similar authorized person.
DANGER: Such interventions may mean danger to life through electric attack.
Step Activity
1
2
DANGER: Pull the mains plug before opening the work lamp!
Remove the illuminant (See chapter change illuminant step 1-3)
Unscrew the 6 reflector screws. Carefully remove the reflector.
Pos. Name
17
17 Reflector screw
18 Reflector
18
A metal plate is present under the reflector.
3 Unscrew the bolts from the metal plate. Position the metal plate.
Operating Manual 18 GB
Page 19
Power Jet-Light 3 x 36 W IP 54
Step Activity
4
5
6 Unscrew the old wiring.
7
8 Clamp the wiring in the wire block. For this purpose, press the wire button and push the
9 Bolt the bush.
10 Position the metal plate. Fasten the metal plate with the previously removed bolts.
11 Fit the reflector in the casing. Fasten it with the reflector bolts.
12 Mount the illuminant (See chapter replace illuminant step 4+5).
Disconnect the wire. For this purpose, detach the pull relief and press the wire button to the
wire block.
8
19
20
21
Detach the bush by rotating in the anti-clockwise pattern.
13
14
WARNUNG: Use only original accessory of the same type during replacing the wiring
and the same wiring length.
IMPORTANT: The green / yellow earthing wire must always be 3 cm longer than both
the other wiring.
Retract the wiring.
wiring in the wire block.
Pos. Name
8 Wiring
19 Pull relief
20 Wire button
21 Wire block
Pos. Name
13 Casing
14 Bush including bending protection
IMPORTANT: Check all the bolted connections before the initial operation.
7 Cleaning
Pull the main plug before cleaning. Due to reasons of the electrical security, the device is to be cleaned
with a dry or damp cloth. Please do not use any sharp cleaning material or chemicals (solvents, petrol
etc) and no rough sponges. Never dip the working lamp in water.
8 Waste Disposal
The product should not be disposed in normal domestic waste at the end of its lifetime. Please enquire
with your city or municipal administration on possibilities of environmentally compatible and appropriate
disposal of the device.
Operating Manual 19 GB
Page 20
Power Jet-Light 3 x 36 W IP 54
9 Error list
Error Possible reason(s) Remedy
An illuminant is not shining
anymore
Work lamp is not functioning - Defective power supply or
IMPORTANT:
All further repairs should be carried out only by professionals.
There is a defect in the illuminant Replace illuminant
network cable
- No network connection
- Check the earthed
230 V~ socket.
- Check the extension cable
10 Guarentee and Service
We guarantee 2 years for this item.
Repairs are to be conducted only through the authorized specialized dealers.
Damages due to inappropriate handling, non-observance of the operating manual as also replacement
parts (For example illuminant) are exempted from the guarantee.
For further information please see our Service/FAQ section at www.brennenstuhl.com.
11 Declaration of Conformity
The CE-sign was applied in conformance with the following European directives:
2006 / 95 / EC Low Voltage Directive
2004 / 108 / EC EMC Directive
2009 / 125 / EC ErP Directive
The declaration of conformity is lodged with the manufacturer.
Manufacturer:
Hugo Brennenstuhl GmbH & Co. KG, Seestraße 1-3, 72074 Tübingen, Germany
Operating Manual 20 GB
Page 21
Power Jet-Light
3 x 36 W IP 54
FR
Mode d'emploi
IMPORTANT :
Lire et conserver ce mode d'emploi.
Suivre les consignes de sécurité.
Page 22

Table de matières
1 Introduction .................................................................................................................. 23
2 Contenu du colis........................................................................................................... 23
3 Consignes de sécurité.................................................................................................. 23
4 Vue d'ensemble de l'appareil ...................................................................................... 24
5 Spécifications ............................................................................................................... 25
6 Utilisation et montage................................................................................................... 25
6.1 Première mise en service ........................................................................................ 26
6.2 Remplacement des ampoules ................................................................................. 26
6.3 Remplacement du câble d'alimentation................................................................... 27
7
Nettoyage..................................................................................................................... 28
8 Traitement des déchets................................................................................................ 28
9 Liste des défauts .......................................................................................................... 29
10 Garantie et service ....................................................................................................... 29
11 Déclaration de conformité ............................................................................................ 29
Page 23
Power Jet-Light 3 x 36 W IP 54
1 Introduction
Ce mode d’emploi doit être lu complètement et attentivement.
Il fait partie du produit et contient des indications importantes pour son utilisation.
Il faut toujours suivre toutes les consignes de sécurité lors de l’utilisation du produit. La lampe peut être
posée ou suspendue, utilisée comme lampe portative à usage intérieur et extérieur.
Pour toutes questions concernant l’utilisation de la lampe, contactez votre marchand ou notre service
après-vente. Le mode d’emploi doit être conservé et transmis le cas échéant à des tiers.
Dans les paragraphes suivants la Power Jet-Light 3x 36 W est nommée lampe.
2 Contenu du colis
1 x châssis de lampe et trois ampoules
2 x vis de réglage
2 x boulons étrier
2 x archet de support
1 x étrier de support
1 x mode d'emploi
3 Consignes de sécurité
IMPORTANT :
Suivez les indications suivantes pour éviter toutes blessures ou dommages matériels.
Conditions opératoires : la lampe est protégée contre l’humidité et les projections d’eau. L’appareil n’est
cependant pas étanche.
DANGER : en cas de non-respect de ces consignes,il existe un danger de mort par électrocution.
Si des dégâts devaient résulter du non-respect de ce mode d’emploi, en particulier des consignes de
sécurité et de manipulation du produit, la garantie ne serait pas applicable.
Nous déclinons toute responsabilité en cas de dommages indirects.
Le mode d’emploi doit être conservé et transmis le cas échéant à des tiers.
Les symboles et termes signalétiques utilisés dans ce mode d’emploi ont la signification suivante :
Symbole Terme signalétique signification Symbole Terme signalétique signification
DANGER :
Risque de blessure important et
danger de mort en cas de nonrespect des consignes
- Il faut connecter la lampe à une seule prise avec contact de mise à la terre 230V~
- En cas de défauts reconnaissables, la lampe ne doit plus être mise en service
- Ne jamais ouvrir la lampe, sauf pour l’installation des ampoules. De telles interventions
- peuvent provoquer un danger de mort par électrocution.
- Pour des raisons de sécurité, la transformation et la manipulation arbitraires de la lampe ne sont pas
permises.
- Ne jamais fixer la lumière des yeux
- La lampe ne contient aucun élément qui puisse être réparé par l’utilisateur
- Ne pas utiliser la lampe à proximité de liquides combustibles, gaz ou poussière
- Eloigner les enfants de la lampe
- Contrôler régulièrement l’état de la lampe.
- Pour changer les ampoules, éteindre la lampe et débrancher la prise.
- Les réparations ne peuvent être faites que par une personne qualifiée autorisée
- Laisser refroidir la lampe avant de la toucher (pour remplacer les ampoules par exemple)
IMPORTANT :
Ce que vous devez respecter
Mode d'emploi 23 FR
Page 24

Power Jet-Light 3 x 36 W IP 54
- Respecter une distance minimale de 50 cm entre la lampe et tout obstacle inflammable
- Un câble endommagé ne doit pas être remplacé. La lampe doit être aliénée.
- Ne jamais connecter plusieurs multiprises les unes derrière les autres.
- Veiller à ce que la lampe soit stable.
4 Vue d'ensemble de l'appareil
Ci-dessous vous obtenez une vue d'ensemble sur les parties de commande et les affichages de
l'appareil et une brève description de fonction.
11
10
1
2
3
4
9
8
5
6
7
N° Désignation N° Désignation
1 Etrier de support 7 Fiche
2 Vis de la couverture de protection 8 Câble d'alimentation
3 Couverture de protection 9 Vis de déplacement (Fermeture rapide)
4 Luminaire 10 Boulon étrier
5 Douille 11 Lèvre de caoutchouc
6 Support
Mode d'emploi 24 FR
Page 25

Power Jet-Light 3 x 36 W IP 54
12
15
N° Désignation N° Désignation
12 Prises avec contact de mise à la terre 14 Introduction du câble avec protection contre
le courbage
13 Boîtier 15 Commutateur Marche/Arrêt
13
14
5 Spécifications
Appareil Power Jet - Light 3 x 36 W
N° Réf. 1 17261 0
Indice de protection : IP 54
Alimentation : 230 V~ 50 Hz
Câble : Câble en caoutchouc H07RN-F 3G1,5
Longueur du câble : env. 5 m
Dimensions (H x L x P) : env. 555 x 415 x 235 mm
Poids : 6,3 kg
Lampe :
Puissance : 3 x 36 W (Luminaire)
Ampoule : 3 x 36 W, PL lampe compacte
Classe de protection : II
Prises multiples installées :
Classe de protection : I
Charge maximale : 3500 W
Courant maximal : 16 A
6 Utilisation et montage
Respecter les indications suivantes, en particulier les consignes de sécurité pour éviter les erreurs de
manipulation et de montage.
Mode d'emploi 25 FR
Page 26

Power Jet-Light 3 x 36 W IP 54
6.1 Première mise en service
Etape Action
1 Mettre le support sur l’étrier. Visser l’ensemble avec les boulons.
2
13
22
Fixer le châssis de lampe. Pour cela utiliser les douilles d’écartement et les vis de réglage,
qui permettent également de régler l’angle de la lumière.
IMPORTANT : Contrôler tous les raccords vissés avant la première mise en service.
3 Appuyer sur le commutateur Marche -Arrêt.
16
23
6
N° Désignation
6 Support d’étrier
9 Vis de réglage
16 Douille d’écartement
13 Boîtier (Châssis de lampe)
22 Rondelle
9
23 Rondelle dentée
6.2 Remplacement des ampoules
DANGER :
Retirer la fiche d’alimentation avant l’ouverture de la lampe !
Laisser refroidir la lampe avant de la toucher (au moins 15 minutes). Risques de brûlures.
Etape Action
1
2
Coucher la lampe sur la face arrière. Pousser l’enveloppe en caoutchouc dans le coin vers le
bas.
3
Dévisser les 4 vis du globe de protection.
Oter le globe de protection.
3
11
2
N° Désignation
3 Globe de protection
11 Enveloppe en caoutchouc
11
13 Boîtier (Châssis de lampe)
13
N° Désignation
3 Globe de protection
11 Enveloppe en caoutchouc
2 Vis du globe de protection
Mode d'emploi 26 FR
Page 27

Power Jet-Light 3 x 36 W IP 54
Etape Action
3
Retirer maintenant l’ampoule en tirant vers le haut.
4
N° Désignation
4 Ampoule
5 Douille
5
4 Insérer la nouvelle ampoule avec une pression douce.
5 Placer le globe de protection. Visser les 4 vis du globe de protection. Replacer le joint sur le
globe de protection.
IMPORTANT : Faire attention à ajuster correctement le joint entre le boîtier et le globe
de protection
6.3 Remplacement du câble d'alimentation
IMPORTANT : Un câble endommagé peut être remplacé par un câble d’alimentation équivalent
exclusivement par le fabricant, son représentant ou une personne qualifiée
DANGER : De telles interventions signifient un danger de mort par électrocution.
Etape Action
1
2
DANGER : Retirer la fiche d'alimentation avant l'ouverture de la lampe!
Enlever les ampoules (voir chapitre Remplacement des ampoules Etape 1 à 3)
Dévisser les 4 vis du réflecteur. Prenez le réflecteur avec prudence
N° Désignation
17
17 Vis du réflecteur
18 Réflecteur
18
Sous le réflecteur se trouve une plaque métallique.
3 Dévisser les vis de la plaque métallique. Mettez la plaque métallique debout.
Mode d'emploi 27 FR
Page 28

Power Jet-Light 3 x 36 W IP 54
Etape Action
4
5
6 Retirer l’ancien câble.
7
8 Accrocher le câble à la plaque à bornes. Pour cela appuyer sur la touche de borne et
9 Visser l’embout du câble.
10 Positionner la plaque métallique. Fixer la plaque métallique avec les vis.
11 Adapter le réflecteur dans le boîtier. Fixer le réflecteur avec les vis.
12 Insérer les ampoules (voir chapitre Remplacement des ampoules Etape 4 et 5)
Déconnecter le câble. Pour cela détacher le délestage de traction et appuyer sur la touche
de borne sur la plaque à bornes.
8
19
20
21
Détacher l'embout du câble en le tournant dans le sens contraire des aiguilles d’une montre.
13
14
AVERTISSEMENT : Utiliser seulement des accessoires originaux identiques (même
type de câble et même longueur de câble) lors du remplacement du câble d'alimentation.
IMPORTANT : Le câble de la mise à la terre vert/jaune doit toujours être 3 cm plus long
que les autres câbles.
Introduire le câble d'alimentation.
introduire le câble dans la plaque à bornes.
N° Désignation
8 Câble d’alimentation
19 Délestage de traction
20 Touche de borne
21 Plaque à bornes
N° Désignation
13 Boîtier
14 Embout du câble avec renforcement
anti- pliure
IMPORTANT : Contrôler tous les raccords vissés avant la première mise en service.
7 Nettoyage
Retirer la fiche d’alimentation avant toute intervention. Pour des raisons de sécurité électrique il est
conseillé de nettoyer l'appareil avec un tissu sec ou légèrement humide. N’utiliser en aucun cas des
produits de nettoyage corrosifs, chimique (dissolvant, essence etc.) ou abrasifs. Ne jamais immerger la
lampe.
8 Traitement des déchets
En fin de vie, le produit ne peut être éliminé avec les déchets domestiques. Renseignez-vous auprès des
organismes compétents sur la filière d’aliénation possible.
Mode d'emploi 28 FR
Page 29

Power Jet-Light 3 x 36 W IP 54
9 Liste des défauts
Défaut Causes possibles Solution
Une ampoule ne s’allume pas L’ampoule est défectueuse Remplacer l’aAmpoule
La lampe ne fonctionne pas - Défaut d’alimentation ou câble
défectueux
IMPORTANT :
Toutes les autres réparations ne peuvent être faites que par une personne qualifiée autorisée
- Vérifier votre alimentation ou
votre rallonge
10 Garantie et service
Le produit est garanti 2 ans.
Les réparations ne peuvent être faites que par une personne qualifiée autorisée
Endommagements à cause du maniement inapproprié, non-respect du mode d'emploi aussi bien que les
pièces d’usure (p. ex. ampoules) sont exclus de la garantie.
Les pièces d’usure (par ex. les ampoules), les endommagements causés par une manipulation
inappropriée du produit et le non-respect du mode d'emploi, sont exclus de la garantie.
Pour obtenir de plus amples informations, nous recommandons une visite de notre site à la page
Service/FAQ www.brennenstuhl.com.
11 Déclaration de conformité
Symbole CE en accord avec les directives Européennes suivantes :
2006 / 95 / CE Directive Basse tension
2004 / 108 / CE Compatibilité électromagnétique
2009 / 125 / CE Directive ErP
La déclaration de conformité est déposée chez le producteur.
Producteur :
H. BRENNENSTUHL S.A.S.
5, rue de l’Artisanat – SOUFFELWEYERSHEIM
CS 94677 – 67458 MUNDOLSHEIM CEDEX
France
Mode d'emploi 29 FR
Page 30

Power Jet-Light
3 x 36 W IP 54
NL
Handleiding
BELANGRIJK:
Lees deze handleiding en bewaar ze.
Neem de veiligheidsaanwijzingen in acht en respecteer ze.
Page 31

Inhoudsopgave
Inleiding........................................................................................................................ 32
1
2 Leveringspakket ...........................................................................................................32
3 Veiligheidsaanwijzingen ...............................................................................................32
4 Overzicht van het apparaat ..........................................................................................33
5 Technische informatie ..................................................................................................34
6 Gebruik en montage..................................................................................................... 34
6.1 Eerste ingebruikname..............................................................................................35
6.2 Lampen vervangen.................................................................................................. 35
6.3 Snoer vervangen .....................................................................................................36
7 Reiniging ......................................................................................................................37
8 Afvalverwerking ............................................................................................................37
9 Lijst van defecten .........................................................................................................38
10 Garantie en Service...................................................................................................... 38
11 Conformiteitsverklaring.................................................................................................38
Page 32

Power Jet-Light 3 x 36 W IP 54
1 Inleiding
Deze handleiding moet volledig en zorgvuldig gelezen worden.
Ze is deel van een nieuw door U aangeschaft product en bevat belangrijke aanwijzingen voor het gebruik
en onderhoud. Bij het gebruik van dit product moeten altijd alle veiligheidsaanwijzingen gerespecteerd
worden. De Power Jet-Light 3 x 36 W is een werklamp met stekkerdozen om te plaatsen, te hangen en
te liggen, en ook als draagbare lamp voor binnen en buiten geschikt.
Bij vragen over het gebruik van de Power Jet – Light 3 x 36 W, gelieve contact op te nemen met Uw
handelaar of met onze servicedienst. Deze handleiding moet bewaard worden en moet c.q. aan derden
worden doorgegeven. Hier volgend wordt de Power Jet-Light 3 x 36 W, werklamp genoemd.
2 Leveringspakket
1 x lampenkast incl. drie lampen
2 x verstelschroef
2 x beugelschroeven
2 x staanbeugel
1 x handvat
1 x handleiding
3 Veiligheidsaanwijzingen
BELANGRIJK:
Neem de volgende aanwijzingen in acht, om verwondingen of productschade te vermijden.
Gebruiksomgeving: de werklamp is beschermd tegen vochtigheid en spatwater.
Let er wel op, dat het apparaat niet waterdicht is.
GEVAAR: bij het niet naleven van de aanwijzingen, bestaat er levensgevaar door stroomstoot.
Bij het optreden van schade door het niet in acht nemen van de handleiding, in het bijzonder de
veiligheids- en gebruiksaanwijzigingen, vervalt de garantie.
Ook wordt geen aansprakelijkheid overnomen voor gevolgschade.
De handleiding moet bewaard worden en moet c.q. aan derden worden doorgegeven.
De signaalwoorden en symbolen in deze handleiding hebben de volgende betekenis:
Symbool Signaalwoord/Betekenis Symbool Signaalwoord/ Betekenis
GEVAAR:
Aanzienlijk verwondingsrisico voor
personen resp. levensgevaar bij
het niet in acht nemen.
- De werklamp mag enkel aan een geaarde 230 V~ veiligheidsstekkerdoos aangesloten worden.
- Bij herkenbare defecten is het gebruik van de werklamp verboden.
- Open de werklamp nooit, tenzij bij het installeren van de lamp. Zulke ingrepen impliceren
levensgevaar door stroomstoot.
- Uit veiligheidsoverwegingen is het eigengerechtige verbouwen, manipuleren en/of veranderingen
aanbrengen aan de werklamp niet toegestaan.
- Kijk nooit direct in het licht.
- De werklamp bevat geen delen, die door de gebruiker onderhouden moeten worden.
- Gebruik de werklamp niet in een omgeving met explosiegevaar, waar brandbare vloeistoffen, gassen
of stoffen aanwezig zijn.
- Houd de werklamp buiten bereik van kinderen.
- Controleer regelmatig de werklamp op beschadigingen.
BELANGRIJK:
Wat U in acht moet nemen.
Bedieningshandleiding 32 NL
Page 33

Power Jet-Light 3 x 36 W IP 54
- Voor het wisselen van de lampen moet de werklamp van de netspanning ontkoppeld worden. Trek
de stekker uit de stekkerdoos.
- Reparaties mogen enkel door een geauthorizeerde vakman uitgevoerd worden.
- Laat de werklamp vóór het aanraken (bv bij het vervangen van de lamp) afkoelen.
- Respekteer een minimumafstand van 50 cm aan beide kanten voor brandbare materialen.
- Een beschadigd snoer mag enkel door de fabricant, zijn service-vertegenwoordiger of een
vergelijkbaar vakman met een gelijkwaardig snoer vervangen worden.
- Schakel nooit meervoudige stekkerdozen aaneen.
- Let op een veilige stand van de werklamp.
4 Overzicht van het apparaat
Hier vindt U een overzicht van de onderdelen en indicatoren van het apparaat en een korte
functiebeschrijving.
11
10
1
2
3
4
9
8
5
6
7
Pos. Benaming Pos. Benaming
1 Handvat 7 Stekker
2 Beschermingspaneelschroeven 8 Snoer
3 Beschermingspaneel 9 Verstelschroef (snelsluiting)
4 Lamp 10 Beugelschroef
5 Fitting 11 Rubberlip
6 Staanbeugel
Bedieningshandleiding 33 NL
Page 34

Power Jet-Light 3 x 36 W IP 54
12
15
Pos. Benaming Pos. Benaming
12 Veiligheidscontactstekkerdozen 14 Snoeraansluiting incl. buigbescherming
13 Kast 15 AAN/UIT (EIN/AUS) schakelaar
13
14
5 Technische informatie
Apparaat Power Jet - Light 3 x 36 W
Art. Nr. 1 17261 0
Veiligheidscategorie: IP 54 (beschermd tegen spatwater en stof)
Stroomvoorziening: 230 V~ 50 Hz
Kabel: rubberkabel H07RN-F 3G1,5
Kabellengte: ca. 5 m
Afmetingen (H x B x D): ca. 555 x 415 x 235 mm
Gewicht: 6,3 kg
Lampen:
Ingangsvermogen: tot 3 x 36 W (lamp)
Lamp: 3 x 36 W, PL compactlamp
Veiligheidscategorie: II
Gebruik meervoudige stekkerdozen:
Veiligheidscategorie: I
Max. belasting: max. 3500 W
Toelaatbare spanning: max. 16 A
6 Gebruik en montage
Neem de volgende aanwijzingen in acht, in het bijzonder de veiligheidsaanwijzingen, om verkeerd
gebruik en mogelijke defecten te vermijden.
Bedieningshandleiding 34 NL
Page 35

Power Jet-Light 3 x 36 W IP 54
6.1 Eerste ingebruikname
Stap Activiteit
1 Steek de staanbeugel op het handvat. Schroef de beugelconstructie met de
2
3 Duw op de AAN/UIT (EIN/AUS) schakelaar. De werklamp zal aan- resp. uitschakelen.
beugelschroeven vast.
6
9
13
Bevestig de lampenkast in het midden van de beugelconstructie. Gebruik daarvoor de
afstandshuls en de verstelschroeven. Aan de hand van de verstelschroeven kan de lichthoek
ingesteld worden.
BELANGRIJK: Controleer vóór de eerste ingebruikname alle schroefverbindingen.
22
16
23
Pos. Benaming
6 Staanbeugel (beugelconstructie)
9 Verstelschroef
16 Afstandshuls
13 Kast (lampenkast)
22 Rondel
23 Gekartelde rondel
6.2 Lampen vervangen
GEVAAR:
Trek vóór het openen van de werklamp de netstekker uit!
Laat de werklamp vóór het aanraken afkoelen (minstens 15 minuten).
Het aanraken kan tot brandwonden leiden.
Stap Activiteit
1
2
Leg de werklamp op zijn „rug“. Duw de rubberlip naar onder.
Schroef de 4 beschermingspaneelschroeven uit het beschermingspaneel.
Neem het beschermingspaneel weg.
3
11
2
3
Pos. Benaming
3 Beschermingspaneel
11 Rubberlip
11
13 Kast (lampenkast)
13
Pos. Benaming
3 Beschermingspaneel
11 Rubberlip
2 Beschermingspaneelschroeven
Bedieningshandleiding 35 NL
Page 36

Power Jet-Light 3 x 36 W IP 54
Stap Activiteit
3
Trek nu de lamp naar boven uit de fitting
4
Pos. Benaming
4 Lamp
5 Fitting
5
4 Plaats met zachte druk de nieuwe lamp naar onder.
5 Leg het beschermingspaneel op de lampenkast. Schroef de 4 beschermingspaneel-
schroeven in het beschermingspaneel. Schuif de pakking terug over het
beschermingspaneel.
BELANGRIJK: Zorg voor een juiste plaatsing van de pakking tussen de kast en het
beschermingspaneel.
6.3 Snoer vervangen
BELANGRIJK: Een beschadigd snoer mag enkel door de fabricant, zijn service-vertegenwoordiger
of een vergelijkbaar vakman met een gelijkwaardig snoer vervangen worden.
GEVAAR: Zulke ingrepen impliceren levensgevaar door stroomstoot.
Stap Activiteit
1
2
GEVAAR: Trek vóór het openen van de werklamp de netstekker uit!
Neem de lamp weg (zie hoofdstuk Lamp vervangen, stap 1-3)
Schroef de 4 reflectorschroeven uit. Neem voorzichtig de reflector weg.
Pos. Benaming
17
17 Reflectorschroef
18 Reflector
18
Onder de reflector bevindt zich een metaalplaat.
3 Schroef de schroeven uit de metaalplaat. Zet de metaalplaat rechtop.
Bedieningshandleiding 36 NL
Page 37

Power Jet-Light 3 x 36 W IP 54
Stap Activiteit
4
5
6 Trek het oude snoer uit.
7
8 Klem het snoer aan het klemblok. Duw daartoe op de klemknop en schuif de ader in het
9 Schroef de snoeraansluiting vast.
10 Positioneer de metaalplaat. Bevestig de metaalplaat met de voordien verwijderde schroeven.
11 Pas de reflector in de lampenkast. Bevestig met de reflectorschroeven.
12 Monteer de lampen (zie hoofdstuk Lamp vervangen, stap 4+5)
Klem het snoer af. Maak hiertoe de trekontlasting los en duw op de klemknop aan het
klemblok.
8
19
20
21
Maak de snoeraansluiting los, door ze tegen de klok in te draaien.
13
14
WAARSCHUWING: Gebruik bij het wisselen van het snoer enkel originele
wisselstukken van hetzelfde type vermogen en dezelfde snoerlengte.
BELANGRIJK: De groen/gele aardingkabel moet altijd 3 cm langer zijn dan de beide
andere aders.
Trek het snoer in.
klemblok.
Pos. Benaming
8 Snoer
19 Trekontlasting
20 Klemknop
21 Klemblok
Pos. Benaming
13 Kast
14 Snoeraansluiting incl.
buigbescherming
BELANGRIJK: Controleer vóór de eeste ingebruikname alle schroefverbindingen.
7 Reiniging
Vóór het reinigen de stekker uittrekken. Om veiligheidsredenen inzake electriciteit, moet het apparaat
met een droge of vochtige doek gereinigd worden. Gebruik geen scherpe reinigingsproducten resp
chemicaliën (solvent, benzine, enz.) en geen ruwe sponzen. De werklamp nooit in water onderdompelen.
8 Afvalverwerking
Aan het einde van de levensduur van het product, mag dit niet met het normale huisvuil verwijderd
worden. Vraag bij Uw gemeentehuis naar mogelijkheden voor een milieuvriendelijke en oordeelkundige
verwijdering van het apparaat.
Bedieningshandleiding 37 NL
Page 38

Power Jet-Light 3 x 36 W IP 54
9 Lijst van defecten
Defect Mogelijke oorza(a)k(en) Oplossing
Een lamp brandt niet meer De lamp is defect De lamp vervangen
Werklamp functioneert niet - Stroomvoorziening of netkabel is
defect
- Geen netverbinding
- Schakelaar is defect
BELANGRIJK:
Alle verdere reparaties mogen enkel door een geauthoriseerde electriciteitsvakman uitgevoerd worden.
- Controleer de geaarde
230 V~ stekkerdoos
- Controleer het verlengingssnoer
10 Garantie en Service
Wij bieden een garantie van 2 jaar op dit artikel.
Reparaties enkel via een geauthorizeerde vakhandel.
Beschadigingen door onvakkundig gebruik, het niet in acht nemen van de handleiding alsook
slijtagedelen (bv lamp) zijn niet in de garantie inbegrepen.
Meer informatie vindt u onder Service/FAQ's op onze homepage www.brennenstuhl.com.
11 Conformiteitsverklaring
Overeenkomstig de volgende Europese richtlijnen werd het CE- teken aangebracht:
2006/95/ EG laagspanningsrichtlijn
2004/108/EG EMC-richtlijn
2009/125/EG ErP-richtlijn
De conformiteitsverklaring is bij de fabrikant gedeponeerd.
Fabrikant:
Hugo Brennenstuhl GmbH & Co. KG, Seestraße 1-3, 72074 Tübingen, Duitsland
Bedieningshandleiding 38 NL
Page 39

Power Jet-Light
3 x 36 W IP 54
ES
Instrucciones de uso
Importante:
Lea y conserve estas instrucciones de uso.
Atienda y siga las indicaciones de seguridad.
Page 40

Índice de contenidos
Introducción.................................................................................................................. 41
1
2 Inventario .....................................................................................................................41
3 Indicaciones de Seguridad ........................................................................................... 41
4 Vista General del Aparato ............................................................................................ 42
5 Especificaciones Técnicas ........................................................................................... 43
6 Operación y Armado ....................................................................................................43
6.1 Primer Encendido.................................................................................................... 44
6.2 Cambiar el Tubo de Luz ..........................................................................................44
6.3 Reemplazar el cable de alimentación...................................................................... 45
7 Limpieza....................................................................................................................... 46
8 Eliminación................................................................................................................... 46
9 Lista de Errores............................................................................................................ 47
10 Garantía y Servicio Técnico ......................................................................................... 47
11 Acuerdo de Conformidad ............................................................................................. 47
Page 41

Power Jet-Light 3 x 36 W IP 54
1 Introducción
Estas instrucciones de uso deben ser leídas cuidadosamente y en forma completa.
Son una parte del producto que usted acaba de adquirir, y contienen indicaciones importantes
respectivas a su funcionamiento y manejo. Todas las indicaciones de seguridad deben ser observadas
siempre al usar este producto. La Power Jet- Light 3 x 36 W es una lámpara de trabajo con enchufe para
colocar, colgar y apoyar, y también apropiada como lámpara portátil para interiores y exteriores. En caso
de surgir preguntas respecto del uso de la Power Jet- Light 3 x 36 W contacte a su vendedor o nuestro
servicio técnico. Las instrucciones de uso deben ser conservadas y de ser necesario facilitadas a
terceros. En lo sucesivo, se llamará a la Jet-Light 3 x 36 W “lámpara de trabajo”.
2 Inventario
1 x Lámpara incl. tres tubos de luz
2 x Tornillos de ajuste
2 x Tornillos en U
2 x Pies
1 x Soporte
1 x Instrucciones de uso
3 Indicaciones de Seguridad
IMPORTANTE:
Observe las siguientes indicaciones para evitar heridas o daños materiales.
Ambiente de operación: La lámpara de trabajo está protegida contra humedad y salpicaduras
Tenga en cuenta, sin embargo, que la lámpara no es a prueba de agua.
PELIGRO: De no observarse existe riesgo de vida por corriente eléctrica.
En caso de producirse daños procedentes de no seguir estas instrucciones de uso, especialmente las
indicaciones de seguridad y de manejo, la garantía caduca.
Del mismo modo, no se asume ninguna responsabilidad por daños consecuentes.
Las instrucciones de uso deben ser conservadas y de ser necesario facilitadas a terceros.
Los rótulos y símbolos empleados en estas instrucciones de uso tienen el siguiente significado:
Símbolo Rótulo/ Significado Símbolo Rótulo/ Significado
PELIGRO:
Riesgo considerable de heridas a
personas o riesgo de vida de no
observarse.
- La lámpara de trabajo sólo debe conectarse a un enchufe amurado y puesto a tierra de 230 V~.
- En caso de defectos reconocibles, la operación de la lámpara de trabajo no está permitida.
- Nunca abra la die lámpara de trabajo, aparte de la inserción de tubos de repuesto. Tales
intervenciones implican riesgo de vida por shock eléctrico.
- Por razones de seguridad, la remodelación, manipulación y/o modificación de la lámpara de trabajo
no están permitidas.
- Nunca mire directamente hacia la luz.
- La lámpara de trabajo no contiene ninguna parte de la que el usuario deba hacer mantenimiento.
- No emplee la Lámpara de trabajo en un ambiente con riesgo de explosiones, en el que se
encuentren líquidos, gases o polvos combustibles.
- Manenga la lámpara de trabajo fuera del alcance de niños.
- Revise periódicamente la lámpara de trabajo en busca de signos de deterioro.
IMPORTANTE:
Lo que debe atender
Instrucciones de uso 41 ES
Page 42

Power Jet-Light 3 x 36 W IP 54
- Para el cambio de tubos, la Lámpara de trabajo debe estar desconectada de la red eléctrica. Retire
el macho del enchufe.
- Las reparaciones sólo pueden ser llevadas a cabo por personal autorizado.
- Deje enfriar la lámpara de trabajo antes de tocarla (p.ej. para el cambio de tubos).
- Mantenga una distancia mínima de 50 cm a cada lado respecto de materiales combustibles.
- Un cable de alimentación dañado no puede reemplazarse. La lámpara de trabajo debe ser
adecuadamente desechada.
- Nunca conecte múltiples enchufes en yuxtaposición.
- Procure un lugar de apoyo seguro para la lámpara de trabajo.
4 Vista General del Aparato
A continuación tiene un resumen acerca de las partes del aparato con ilustraciones y una breve
descripción de sus funciones .
11
10
1
2
3
4
9
8
5
6
7
Nro. Descripción Nro. Descripción
1 Soporte 7 Enchufe (macho)
2 Tornillos con cubierta de seguridad 8 Cable de alimentación
3 Cubierta de seguridad 9 Tornillo de ajuste (Ajuste y liberado rápido)
4 Tubo de luz 10 Tornillo en U
5 Portalámparas 11 Borde de goma
6 Pies
Instrucciones de uso 42 ES
Page 43

Power Jet-Light 3 x 36 W IP 54
12
15
13
14
Nro. Descripción Nro. Descripción
12 Enchufes con protección al contacto 14 Entrada de corriente incl. protección contra
flexión
13 Caja 15 Interruptor Encendido (EIN) / Apagado
(AUS)
5 Especificaciones Técnicas
Aparato Power Jet - Light 3 x 36 W
Art. Nr. 1 17261 0
Protección: IP 54 (protegido contra salpicaduras y polvo)
Suministro energético: 230 V~ 50 Hz
Cable: Cable de goma H07RN-F 3G1,5
Largo de cable aprox: 5 m
Medidas (Altura x Ancho x Largo): ca. 555 x 415 x 235 mm
Peso: 6,3 kg
Lámpara:
Potencia Absorbida: hasta 3 x 36 W (Tubo de luz)
Tubo de luz: 3 x 36 W, PL Lámpara Compacta Fluorescente
Protección clase: II
Unidad de enchufes integrados:
Protección clase: I
Max. carga: max. 3500 W
Tensión nominal: max. 16 A
6 Operación y Armado
Siga las siguientes indicaciones, especialmente las indicaciones de seguridad, para evitar una operación
errónea y posibles defectos.
Instrucciones de uso 43 ES
Page 44

Power Jet-Light 3 x 36 W IP 54
6.1 Primer Encendido
Paso Acción
1 Encastre el pie con el soporte de apoyo. Atornille la construcción de soporte con tornillos
2
3 Oprima el interruptor Encendido / Apagado (EIN/ AUS). La lámpara de trabajo se encenderá
en U.
6
13
Fije la lámpara en el medio de la construcción de soporte. Utilize para ello los espaciadores
y los tornillos de ajuste. Con los tornillos de ajuste también puede ajustarse el angulador.
IMPORTANTE: Controle todas las junturas atornilladas antes del primer encendido.
y apagará respectivamente.
22
16
23
Nro. Descripción
6 Pie (construcción de soporte )
9 Tornillo de ajuste
16 Espaciadores
13 Caja (Lámpara)
22 Arandela
9
23 Arandela dentada
6.2 Cambiar el Tubo de Luz
PELIGRO:
¡Desenchufe la lámpara de trabajo de la red eléctrica antes de abrir!
Deje enfriar lámpara de trabajo antes de tocarla (mínimo 15 minutos).
El contacto puede producir quemaduras.
Paso Acción
1
2
Apoye la lámpara de trabajo “al revés“. Presione en la esquina del borde de goma hacia
abajo.
3
Desatornille los 4 tornillos con cubierta de seguridad de la cubierta de seguridad.
Retire la cubierta de seguridad.
3
11
2
Nro. Descripción
3 Cubierta de seguridad
11 Borde de goma
11
13 Caja (Lámpara)
13
Nro. Descripción
3 Cubierta de seguridad
11 Borde de goma
2 Tornillos con cubierta de seguridad
Instrucciones de uso 44 ES
Page 45

Power Jet-Light 3 x 36 W IP 54
Paso Acción
3
Quite el tubo de luz del portalámparas tirando hacia arriba.
4
Nro. Descripción
4 Tubo de Luz
5 Portalámparas
5
4 Inserte el nuevo tubo aplicando presionando suavemente.
5 Coloque la cubierta de seguridad sobre la caja. Atornille los 4 tornillos con cubierta de
seguridad a la cubierta de seguridad. Presione el sello nuevamente sobre la cubierta de
seguridad.
IMPORTANTE: Observe la correcta posición del sello entre la caja y la cubierta de
seguridad.
6.3 Reemplazar el cable de alimentación
IMPORTANTE: Un cable de alimentación dañado sólo puede ser reemplazado por el fabricante, un
representante de su servicio técnico o personal competente similar, por un cable de alimentación
equivalente.
PELIGRO: Tales intervenciones implican un riesgo de vida por shock eléctrico.
Paso Acción
1
2
PELIGRO: ¡Desenchufe la lámpara de trabajo de la red eléctrica antes de abrir!
Retire el tubo de luz (ver el capítulo Retirar Tubo de luz, Pasos 1-3)
Desatornille los 4 tornillos del reflector. Retire el reflector con precaución.
Nro. Descripción
17
17 Tornillos del reflector
18 Reflector
18
Bajo el reflector se encuentra una plancha de metal.
3 Desatornille la plancha de metal. Levante la plancha de metal.
Instrucciones de uso 45 ES
Page 46

Power Jet-Light 3 x 36 W IP 54
Paso Acción
4
5
6 Retire el viejo cable de alimentación.
7
8 Fije el cable de alimentación al bloque terminal. Presione para ello la abrazadera de resorte
9 Atornille la entrada de corriente.
10 Coloque la plancha metálica. Fije la plancha metálica con los tornillos retirados
11 Introduzca el reflector en la caja. Ajústelo con los tornillos de reflector.
12 Coloque el tubo de luz (ver capítulo “Cambiar tubo de luz“, Pasos 4-5)
Desconecte la alimentación. Libere para ello el alivio de tensión y presione la abrazadera de
resorte contra el bloque terminal.
8
19
20
21
Libere la entrada de corrente girando en sentido antihorario.
13
14
PELIGRO: Al cambiar el cable de alimentación, utilize sólo repuestos originales del
mismo tipo y largo de cable.
IMPORTANTE: El conductor a tierra verde/amarillo siempre debe ser 3cm más largo
que los dos conductores restantes.
Introduzca el cable de alimentación.
y encastre el conductor al bloque terminal.
anteriormente.
Nro. Descripción
8 Cable de alimentación
19 Alivio de tensión
20 Abrazadera de resorte
21 Bloque terminal
Nro. Descripción
13 Caja
14 Entrada de corriente incl. protección
contra flexión
IMPORTANTE: Controle todas las junturas atornilladas antes del primer encendido.
7 Limpieza
Desconecte el enchufe a la red eléctrica antes de la limpieza. Por motivos de seguridad eléctrica, el
aparato debe limpiarse con un trapo seco o húmedo. No use limpiadores fuertes o químicos (solventes,
bencina, etc.) ni esponjas ásperas. Jamás sumerja el tubo de luz en agua.
8 Eliminación
Al final de la vida útil del producto, este no puede ser desechado junto con la basura doméstica común.
Infórmese en su autoridad municipal o comunal acerca de posibilidades de una eliminación adecuada y
ecológica del aparato.
Instrucciones de uso 46 ES
Page 47

Power Jet-Light 3 x 36 W IP 54
9 Lista de Errores
Error Causa(s) Posible(s) Solución
Un tubo ya no ilumina El tubo tiene una falla Cambiar el tubo
La lámpara de trabajo no funciona - Fallas en el suministro eléctrico
o el cable principal
- No hay conección a la red
IMPORTANTE:
Toda reparación ulterior debe ser llevada a cabo por electricistas competentes autorizados.
- Revise el enchufe a tierra de
230 V~
- Revise el alargador
10 Garantía y Servicio Técnico
Extendemos una garantía de 2 años para este artículo.
Reparaciones sólo a cargo del personal autorizado.
Los daños por uso inadecuado, no seguir las instrucciónes de uso, así como piezas de desgaste
(p.ej. los tubos) están excluídos de la garantía.
Para más información, consulte el área Atención al Cliente/FAQ en nuestra página web
www.brennenstuhl.com.
11 Acuerdo de Conformidad
Se aplicó el Sello-CE en conformidad con las siguientes Directivas Europeas:
Directivas de baja tensión 2006/95/CE
Directiva CEM 2004/108/CE
Normativa de ecodiseño 2009/125/CE
El acuerdo de conformidad es consignado por el fabricante.
Fabricante:
Hugo Brennenstuhl GmbH & Co. KG, Seestraße 1-3, 72074 Tübingen, Alemania
Instrucciones de uso 47 ES
Page 48

Power Jet-Light
3 lampade da 36W IP 54
IT
Manuale d’uso
IMPORTANTE:
Leggere e conservare il presente manuale d’uso.
Osservare ed attenersi alle informazioni di sicurezza.
Page 49

Indice
Introduzione.................................................................................................................. 50
1
2 Dotazione di serie......................................................................................................... 50
3 Informazioni di sicurezza .............................................................................................. 50
4 Panoramica delle funzioni ............................................................................................51
5 Scheda tecnica............................................................................................................. 52
6 Installazione e montaggio.............................................................................................52
6.1 Prima accensione .................................................................................................... 53
6.2 Sostituzione lampade ..............................................................................................53
6.3 Sostituzione cavo di alimentazione..........................................................................54
7 Pulizia........................................................................................................................... 55
8 Smaltimento .................................................................................................................55
9 Lista errori ....................................................................................................................56
10 Garanzia ed Assistenza................................................................................................ 56
11 Dichiarazione di conformità .......................................................................................... 56
Page 50

Power Jet-Light 3 x 36 W IP 54
1 Introduzione
Leggere attentamente il presente manuale d’uso in versione integrale.
Esso costituisce parte integrante del prodotto che avete appena acquistato e contiene informazioni
importanti relative al funzionamento ed al maneggio. Osservare sempre rigorosamente le informazioni di
sicurezza durante l’uso del prodotto. La lampada Power Jet- Light 3 x 36 W è una lampada per posto di
lavoro e può essere posta in piedi, appesa o disposta a terra; inoltre è adatta come lampada portatile per
l’illuminazione di ambienti interni o esterni.
Per ulteriori domande relativamente all’uso della lampada Power Jet- Light 3 x 36 W , vi invitiamo a
contattare il vostro rivenditore o il punto assistenza. Conservare il manuale d’uso ed eventualmente
consegnarlo a terzi nel caso di passaggio di proprietà. Di seguito il prodotto Power Jet- Light 3 x 36 W
sarà denominato lampada per posto di lavoro.
2 Dotazione di serie
1 corpo di illuminazione comprensivo di tre lampade
2 viti di regolazione
2 bulloni a U
2 piedistalli
1 impugnatura
1 manuale d’uso
3 Informazioni di sicurezza
IMPORTANTE:
Osservare le seguenti disposizioni per evitare danni a persone e oggetti.
Ambiente operativo: la lampada per posto di lavoro è impermeabile all’umidità e antispruzzo.
Attenzione però, l’apparecchio non è impermeabile all’acqua.
PERICOLO: L’inosservanza può comportare pericolo di morte per la presenza di tensione elettrica.
La garanzia non copre eventuali danni dovuti all’inosservanza del presente manuale d’uso, in particolare
delle informazioni di sicurezza e del maneggio del prodotto.
La casa produttrice declina ogni responsabilità anche nel caso di danni provocati da una delle seguenti
circostanze.
Conservare il manuale d’uso e consegnarlo a terzi nel caso di passaggio di proprietà.
Le indicazioni e i simboli utilizzati nel presente manuale d’uso hanno i seguenti significati:
Simbolo Indicazione/significato Simbolo Indicazione/significato
PERICOLO:
Elevato rischio per la salute di
persone e pericolo di morte in caso
di inosservanza
- La lampada deve essere collegata soltanto ad una presa 230 V con messa a terra.
- Nel caso di difetti evidenti l’uso della lampada per posto di lavoro non è ammesso.
- Non aprire per nessun motivo la lampada, a meno che non sia per inserire le lampade. Interventi di
questo tipo potrebbero causare pericolo di morte per la possibilità di scariche elettriche.
- Per motivi di sicurezza non sono ammessi interventi non autorizzati di riparazione, alterazione e/o
variazione della lampada per posto di lavoro.
- Non dirigere mai lo sguardo direttamente verso la luce.
- La lampada per il posto di lavoro non contiene componenti, la cui manutenzione possa essere
effettuata dall’utente.
IMPORTANTE:
Aspetti a cui si deve prestare
attenzione
Manuale d’uso 50 IT
Page 51

Power Jet-Light 3 x 36 W IP 54
- Non utilizzare la lampada in ambienti esposti al rischio di esplosione, dove siano presenti liquidi, gas
o polveri infiammabili.
- Tenere la lampada lontana dalla portata di bambini.
- Controllare regolarmente la presenza di eventuali danni sulla lampada per posto di lavoro.
- Prima di sostituire le lampade, staccare la lampada dalla presa di corrente. Staccare la spina dalla
presa.
- Eventuali riparazioni devono essere effettuate solo dal centro assistenza autorizzato.
- Prima di toccare la lampada (ad es. per la sostituzione delle lampade), attendere che si raffreddi
completamente.
- Mantenere eventuali materiali infiammabili ad una distanza minima di 50 cm da ciascun lato della
lampada.
- La sostituzione di un cavo danneggiato può essere effettuata esclusivamente dalla casa produttrice,
dal centro assistenza convenzionato o da un altro centro assistenza specializzato; il pezzo di
ricambio deve essere equivalente.
- Non collegare mai prese multiple in serie.
- Accertarsi che la lampada sia in posizione stabile.
4 Panoramica delle funzioni
Di seguito viene riportata una panoramica dei componenti e degli indicatori dell’apparecchio con una
breve descrizione.
11
1
2
3
4
10
9
8
5
6
7
Rif. Indicazione Rif. Indicazione
1 Impugnatura 7 Spina
2 Viti del coperchio di protezione 8 Cavo di collegamento
3 Coperchio di protezione 9 Vite di regolazione (innesto rapido)
4 Lampade 10 Bullone a U
5 Portalampada 11 Guarnizione in gomma
6 Piedistalli
Manuale d’uso 51 IT
Page 52

Power Jet-Light 3 x 36 W IP 54
12
15
Rif. Indicazione Rif. Indicazione
12 Presa con messa a terra 14 Passacavo con guaina flessibile
13 Scocca 15 Interruttore acceso/spento (ein/aus)
13
14
5 Scheda tecnica
Apparecchio Power Jet - Light 3 lampade da 36 W
Art. Nr. 1 17261 0
Tipo di protezione: IP 54 (antispruzzo, antipolvere)
Alimentazione: 230 V 50 Hz
Cavo: cavo in gomma H07RN-F 3G1,5
Lunghezza cavo:. ca 5 m
Dimensioni (H x L x P): ca. 555 x 415 x 235 mm
Peso: 6,3 kg
Lampade:
Assorbimento di potenza: fino a 3 x 36 W (lampade)
Lampade: 3 lampade compatte PL 3 x 36 W
Classe di protezione: II
Presa multipla:
Classe di protezione: I
Carico massimo: max. 3500 W
Corrente rilevata: max. 16 A
6 Installazione e montaggio
Attenersi strettamente alle seguenti istruzioni, in particolare alle informazioni di sicurezza, per evitare
malfunzionamenti ed eventuali guasti.
Manuale d’uso 52 IT
Page 53

Power Jet-Light 3 x 36 W IP 54
6.1 Prima accensione
Fase Intervento
1 Infilare l’impugnatura nei due piedistalli. Fissare la struttura così composta con le viti di
2
3 Premendo l’interruttore sulla posizione ACCESO/SPENTO (ein/aus) la lampada si accende o
regolazione.
6
9
13
Fissare il corpo di illuminazione al centro della struttura portante, servendosi dei distanziatori
e delle viti di regolazione. Le viti di regolazione permettono di regolare l’orientamento delle
lampade.
IMPORTANTE: prima di accendere la lampada per la prima volta controllare che tutte le
viti siano fissate correttamente.
si spegne.
22
16
23
Rif. Indicazione
6 Impugnatura (struttura portante)
9 Vite di regolazione
16 Distanziatore
13 Scocca (corpo illuminazione)
22 Rondella piana
23 Rondella dentata
6.2 Sostituzione lampade
PERICOLO:
Prima di aprire la lampada staccare la presa!
Prima di toccare la lampada attendere che si raffreddi completamente (almeno 15 minuti). Il contatto con
la stessa può causare bruciature.
Fase Intervento
1
2
Manuale d’uso 53 IT
Posizionare la lampada appoggiandola “di schiena”. Spingere la guarnizione in gomma verso
il basso.
3
Svitare le 4 viti del coperchio di protezione dal coperchio e toglierlo.
3
11
2
Rif. Indicazione
3 Coperchio di protezione
11 Guarnizione in gomma
11
13 Scocca (corpo illuminazione)
13
Rif. Indicazione
3 Coperchio di protezione
11 Guarnizione in gomma
2 Viti del coperchio di protezione
Page 54

Power Jet-Light 3 x 36 W IP 54
Fase Intervento
3
Sollevare ora la lampada estraendola dal portalampada
4
Rif. Indicazione
4 Lampada
5 Portalampada
5
4 Inserire la lampada di ricambio spingendola verso il basso con una leggera pressione.
5 Rimettere il coperchio di protezione sulla scocca, fissare le 4 viti del coperchio sullo stesso.
Far aderire la guarnizione al coperchio di protezione.
IMPORTANTE: la guarnizione deve essere posizionata correttamente tra la scocca ed il
coperchio di protezione.
6.3 Sostituzione cavo di alimentazione.
IMPORTANTE: la sostituzione di un cavo di alimentazione danneggiato può essere effettuata
esclusivamente dalla casa produttrice, dal centro assistenza convenzionato o da un centro assistenza
equipollente; il pezzo di ricambio deve essere equivalente.
PERICOLO: Interventi di questo tipo possono comportare pericolo di morte per la presenza di
scariche elettriche.
Fase Intervento
1
2
PERICOLO: Prima di aprire la lampada staccare la presa dall’alimentazione!
Togliere la lampada (cfr. capitolo “sostituzione della lampada” fase 1-3)
Svitare le 4 viti del riflettore. Togliere il riflettore con cautela.
Rif. Indicazione
17
17 Viti del riflettore
18 Riflettore
18
Sotto il riflettore è posizionata una lastra di metallo.
3 Svitare le viti dalla lastra di metallo. Sollevare la piastra.
Manuale d’uso 54 IT
Page 55

Power Jet-Light 3 x 36 W IP 54
Fase Intervento
4
5
6 Estrarre il cavo usato.
7
8 Serrare il cavo con la morsettiera. Premere il tasto del morsetto e infilare il filo nella
9 Avvitare il passacavo.
10 Posizionare la piastra in metallo e fissarla con le viti tolte precedentemente.
11 Inserire il riflettore nella scocca, fissandolo con le viti dello stesso.
12 Installare le lampade (cfr. Capitolo “sostituzione lampade fasi 4+5)
Stringere il cavo con un serracavo. Svitare il serracavo e premere il tasto del morsetto sulla
morsettiera.
8
19
20
21
Svitare il passacavo, girandolo in senso antiorario.
13
14
ATTENZIONE: utilizzare soltanto pezzi di ricambio originali del cavo, della stessa
tipologia e della stessa lunghezza.
IMPORTANTE: il cavo di guardia verde/giallo deve avere sempre una lunghezza di 3
cm superiore rispetto agli altri 2 fili.
Inserire il cavo.
morsettiera.
Rif. Indicazione
8 Cavo di alimentazione
19 Serracavo
20 Tasto del morsetto
21 Morsettiera
Rif. Indicazione
13 Scocca
14 Passacavo con guaina flessibile
IMPORTANTE: prima di accendere la lampada per la prima volta controllare che tutte le viti siano
fissate correttamente.
7 Pulizia
Prima di pulire l’apparecchio staccare la spina dalla corrente. Per motivi di sicurezza l’apparecchio deve
essere pulito con un panno umido o asciutto. Non utilizzare detergenti corrosivi, sostanze chimiche
(solventi, benzina, etc.) o spugne ruvide. Non immergere la lampada in acqua.
8 Smaltimento
Al termine del ciclo di vita del prodotto, esso non può essere gettato nella normale spazzatura.
Informatevi presso l’amministrazione cittadina o comunale sulle possibilità di smaltimento
dell’apparecchio nel rispetto ecologico e delle norme vigenti.
Manuale d’uso 55 IT
Page 56

Power Jet-Light 3 x 36 W IP 54
9 Lista errori
Errore Possibile(i) causa(e) Soluzione
Una lampada non emette più
luce
La lampada non dà segno di
funzionamento
IMPORTANTE!
Qualsiasi altro tipo di riparazione deve essere effettuato presso un centro assistenza o di elettronica
autorizzato.
La lampada è difettosa Sostituire la lampada
- L’alimentazione o il cavo di rete
sono difettosi
- Non c’è collegamento alla rete
- Verificare la presa di rete
230 V a terra.
- Verificare la prolunga.
10 Garanzia ed Assistenza
Il prodotto è coperto da garanzia valida 2 anni.
Le riparazioni devono essere eseguite solo nei centri assistenza autorizzati.
La garanzia non copre eventuali danni causati da un uso improprio e dall’inosservanza del manuale
d’uso, né danni causati da normale usura (es. lampade).
Per ulteriori informazioni consigliamo di consultare l'area Service/FAQ sul nostro sito
www.brennenstuhl.com.
11 Dichiarazione di conformità
In conformità alle seguenti Direttive Europee è stato assegnato il marchio CE:
2006/95/CE Direttiva bassa tensione
2004/108/CE Direttiva sulla compatibilità elettromagnetica
2009/125/CE Direttiva EuP
La dichiarazione di conformità è depositata dal produttore.
Produttore:
Hugo Brennenstuhl GmbH & Co. KG, Seestraße 1-3, 72074 Tübingen, Germania
Manuale d’uso 56 IT
Page 57

Power Jet-Light
3 x 36 W IP 54
CZ
Návod pro obsluhu
UPOZORNĚNÍ:
Přečtěte a uchovejte si pečlivě tento návod pro obsluhu.
Dodržujte a řiďte se bezpečnostními pokyny.
Page 58

Obsah
Úvod............................................................................................................................. 59
1
2 Obsah dodávky ............................................................................................................59
3 Bezpečnostní pokyny ................................................................................................... 59
4 Přehled zařízení ........................................................................................................... 60
5 Technická data............................................................................................................. 61
6 Obsluha a montáž ........................................................................................................ 62
6.1 První uvedení do provozu........................................................................................ 62
6.2 Výměna svítidel ....................................................................................................... 62
6.3 Výměna spojovacího vedení ................................................................................... 63
7 Čištění.......................................................................................................................... 64
8 Likvidace přístroje ........................................................................................................64
9 Seznam závad ............................................................................................................. 65
10 Záruka a servis............................................................................................................. 65
11 Prohlášení o shodě ...................................................................................................... 65
Page 59

Power Jet-Light 3 x 36 W IP 54
1 Úvod
Tento návod pro obsluhu si musíte kompletně a pozorně přečíst.
Je součástí Vašeho nového získaného produktu a obsahuje důležité pokyny pro provoz a manipulaci s
produktem. Při používání produktu musíte neustále dodržovat všechny bezpečnostní předpisy. Power
Jet- Light 3 x 36 W je pracovní lampa se zásuvkami vhodná k postavení, zavěšení nebo položení,
rovněž se může použít jako přenosné svítidlo do exteriéru a interiéru.
Při vzniklých závadách ohledně používání Power Jet- Light 3 x 36 W kontaktujte svého obchodníka nebo
náš servis. Návod pro obsluhu si pečlivě uschovejte a přiložte v případě odevzdání přístroje třetím
osobám. V následující části se dozvíte více o pracovní lampě Power Jet-Light 3 x 36 W.
2 Obsah dodávky
1 x těleso lampy vč. tří osvětlovacích prostředků
2 x regulační šroub
2 x šrouby rukojetě
2 x rukojeť stojanu
1 x držadlo
1 x návod pro obsluhu
3 Bezpečnostní pokyny
UPOZORNĚNÍ:
Dodržujte následující pokyny, abyste zamezili zraněním nebo věcným škodám.
Provozní prostředí: Ochranný síťový adaptér je chráněn proti vlhkosti a stříkající vodě. Dávejte pozor
nato, že produkt není vodotěsný.
NEBEZPEČÍ: Při nedodržování předpisů vzniká riziko ohrožení života úderem elektrického proudu.
Při škodách vzniklých nedodržením tohoto návodu pro obsluhu, obzvlášť způsobených nedodržením
bezpečnostních předpisů a správné manipulace, zaniká nárok na záruku.
Za následné škody nepřebíráme rovněž žádnou záruku.
Návod pro obsluhu si pečlivě uschovejte a přiložte v případě odevzdání přístroje třetím osobám.
Signální slova a symboly uvedené v tomto návodě pro obsluhu mají následující význam:
Symbol Signální slovo/ Význam Symbol Signální slovo/ Význam
NEBEZPEČÍ:
Značné nebezpečí poranění osob,
resp. ohrožení života při
nedodržování pokynů.
UPOZORNĚNÍ:
Co musíte dodržovat
- Pracovní lampa se může zapojit pouze do uzemněné 230 V~ zástrčky s ochrannými kontakty.
- Při zjevných poškozeních není povoleno používání pracovní lampy.
- Neotvírejte nikdy pracovní lampu, pouze při vkládání osvětlujících prostředků. Takové zásahy
znamenají ohrožení života úderem elektrickým proudem.
- Z bezpečnostních důvodů je zakázána samovolná přestavba, manipulace a/nebo provádění změn u
pracovní lampy.
- Nehleďte nikdy přímo do světla lampy.
- Pracovní lampa neobsahuje žádné části, které by musel uživatel udržovat.
- Nepoužívejte pracovní lampu nikdy v explozí ohroženém prostředí, ve kterém se nachází hořlavé
kapaliny, plyny nebo prach.
Udržujte děti v dostatečné vzdálenosti od pracovní lampy.
-
Návod pro obsluhu 59 CZ
Page 60

Power Jet-Light 3 x 36 W IP 54
- Kontrolujte pravidelně pracovní lampu kvůli jejímu možnému poškození.
- Při výměně osvětlovacích prostředků se musí pracovní lampa odpojit od síťového napětí. Vytáhněte
zástrčku ze zásuvky.
- Opravy může provádět pouze kvalifikovaný odborný personál.
- Nechte před kontaktem s pracovní lampou (např. při výměně osvětlovacích prostředků) lampu
vychladnout.
- Udržujte na každé straně minimální odstup 50 mm od hořlavých materiálů.
- Poškozené spojovací vedení může vyměnit pouze výrobce, jeho servisní zástupce nebo srovnatelná
odborně kvalifikovaná síla za přívod se stejnými hodnotami.
- Nikdy nezapojujte vícenásobné zásuvky za sebou.
- Dávejte pozor na bezpečný stav pracovní lampy.
4 Přehled zařízení
V následující části získáte přehled o ovládacích dílech a zobrazení přístroje, jakož i krátký popis
jednotlivých funkcí.
10
11
9
8
1
2
3
4
5
6
7
Pol. Název Pol. Název
1 Rukojeť 7 Konektor
2 Šrouby ochranného krytu 8 Přívod
3 Ochranný kryt 9 Regulační šroub
4 Svítidlo 10 Třmenový šroub
5 Obruba 11 Gumová čelist
6 Rukojeť stojanu
Návod pro obsluhu 60 CZ
Page 61

Power Jet-Light 3 x 36 W IP 54
12
15
Pol. Název Pol. Název
12 Zásuvky s ochranným kontaktem 14 Připojení vedení vč. ochrany před ohybem
13 Pouzdro 15 Vypínač ZAP./VYP
13
14
5 Technická data
Přístroj Power Jet - Light 3 x 36 W
Č. prod. 1 17261 0
Druh ochrany: IP 54 (s ochranou proti stříkající vodě a prachu)
Napájení proudem: 230 V ~ 50 Hz
Kabel: Gumový kabel H07RN-F 3G1,5
Délka kabelu: cca 5 m
Rozměry (Š x V x H): ca. 555 x 415 x 235 mm
Hmotnost: 6,3 kg
Svítidlo:
Příkon: až do 3 x 36 W (osvětlovací prostředky)
Svítidlo: 3 x 36 W, PL kompaktní lampa
Třída ochrany: II
Použití vícenásobných zásuvek:
Třída ochrany: I
Max. zatížení: max. 3500 W
Zatěžovací proud: max. 16 A
Návod pro obsluhu 61 CZ
Page 62

Power Jet-Light 3 x 36 W IP 54
6 Obsluha a montáž
Dodržujte následující pokyny, obzvlášť bezpečnostní pokyny, abyste zamezili chybám obsluhy a možným
defektům.
6.1 První uvedení do provozu
Krok Činnost
1 Zasuňte rukojeť stojanu do držadla. Sešroubujte konstrukci rukojetě pomocí šroubů rukojetě.
2
13
22
Upevněte těleso svítidla v středě konstrukce rukojetě. Použijte k tomu rozpěrné objímky a
regulační šrouby. Pomocí regulačních šroubů se dá nastavit úhel svítidla.
UPOZORNĚNÍ: Zkontrolujte před prvním použitím všechny šroubové spoje.
3 Stiskněte vypínač ZAP/VYP. Pracovní lampa se zapne nebo vypne.
16
23
6
Pol. Název
6 Rukojeť stojanu (konstrukce rukojetě)
9 Regulační šroub
16 Distanční pouzdro
13 Pouzdro (těleso svítidla)
22 Podlozka
9
23 Ozubena podlozka
6.2 Výměna svítidel
NEBEZPEČÍ:
Vytáhněte před otevřením pracovní lampy síťovou zástrčku!
Nechte před kontaktem s pracovní lampou (minimálně 15 minut) lampu vychladnout.
Kontakt s horkou lampou by mohl vést k popálení.
Krok Činnost
1
2
Položte pracovní lampu „na záda“. Stiskněte gumovou čelist směrem dolů.
3
Vyšroubujte 4 šrouby ochranného krytu z ochranného krytu.
Odstraňte ochranný kryt.
3
11
2
Pol. Název
3 Ochranný kryt
11 Gumová čelist
11
13 Pouzdro (těleso svítidla)
13
Pol. Název
3 Ochranný kryt
11 Gumová čelist
2 Šrouby ochranného krytu
Návod pro obsluhu 62 CZ
Page 63

Power Jet-Light 3 x 36 W IP 54
Krok Činnost
3
Vytáhněte teď svítidlo z objímky směrem nahoru.
4
Pol. Název
4 Svítidlo
5 Obruba
5
4 Vložte jemným stisknutím směrem dolů nové svítidlo.
5 Položte ochranný kryt na pouzdro. Našroubujte 4 šrouby ochranného krytu z ochranného
krytu. Nasuňte těsnění zpět na ochranný kryt.
UPOZORNĚNÍ: Dávejte pozor na správné osazení těsnění mezi pouzdrem a
ochranným krytem.
6.3 Výměna spojovacího vedení
UPOZORNĚNÍ: Poškozené spojovací vedení může vyměnit pouze výrobce, jeho servisní zástupce
nebo srovnatelná odborně kvalifikovaná síla za přívod se stejnými hodnotami.
NEBEZPEČÍ: Takové zásahy znamenají ohrožení života úderem elektrickým proudem.
Krok Činnost
1
2
NEBEZPEČÍ: Vytáhněte před otevřením pracovní lampy síťovou zástrčku!
Odstraňte svítidlo (viz kapitola Výměna svítidel kroky 1-3)
Vyšroubujte 4 šroubů reflektoru ven. Vyjměte opatrně reflektor.
Pol. Název
17
17 Šrouby reflektoru
18 Reflektor
18
Pod reflektorem se nachází kovová deska.
3 Vyšroubujte šrouby z kovové desky. Rozložte kovovou desku.
Návod pro obsluhu 63 CZ
Page 64

Power Jet-Light 3 x 36 W IP 54
Krok Činnost
4
5
6 Vytáhněte staré spojovací vedení ven.
7
8 Připevněte spojovací vedení pomocí bloku se svorkami. Stiskněte k tomu tlačítko pro svorky
9 Sešroubujte připojení vedení.
10 Upravte polohu kovové desky. Upevněte kovovou desku pomocí předtím vyjmutých šroubů.
11 Vložte reflektor do pouzdra. Upevněte reflektor pomocí šroubů reflektoru.
12 Namontujte svítidla (viz kapitola Výměna svítidel kroky 4-5)
Uvolněte svorky rozvodu. Uvolněte k tomu odlehčení od tahu a stiskněte tlačítko pro svorky
na bloku se svorkami.
8
19
20
21
Uvolněte připojení vedení tím způsobem, že jej budete otáčet v protisměru hodinových
ručiček.
13
14
UPOZORNĚNÍ: Používejte při výměně spojovacího vedení pouze originální
příslušenství stejného typu vodičů a stejné délky vodičů.
UPOZORNĚNÍ: Zelený/žlutý ochranný vodič musí být vždycky o 3 cm delší než obě
ostatní žíly.
Vložte spojovací vedení.
a zasuňte žílu do bloku se svorkami.
Pol. Název
8 Přívod
19 Odlehčení od tahu
20 Tlačítko pro svorky
21 Blok se svorkami
Pol. Název
13 Pouzdro
14 Připojení vedení vč. ochrany před
ohybem
UPOZORNĚNÍ: Zkontrolujte před prvním použitím všechny šroubové spoje.
7 Čištění
Před čištěním vytáhnete síťovou zástrčku. Z bezpečnostně-elektrických důvodů čistěte přístroj pomocí
suchého nebo navlhčeného hadříku. Nepoužívejte žádné agresivní čisticí prostředky, např. chemikálie
(rozpouštědla, benzin atd.) a žádné drsné houby. Neponořujte pracovní lampu nikdy do vody.
8 Likvidace přístroje
Na konci životnosti produktu se tento nemůže zlikvidovat jako běžný domovní odpad. Informujte se u
Vaší městské nebo obecní zprávy o možnostech odstranění přístroje, které neškodí životnímu prostředí.
Návod pro obsluhu 64 CZ
Page 65

Power Jet-Light 3 x 36 W IP 54
9 Seznam závad
Závada Možná příčina Odstranění
Jedno svítidlo nesvítí Svítidlo je defektní Výměna svítidel
Pracovní lampa je nefunkční - Napájení proudem nebo
spojovací vedení vadné
- žádné napětí ze sítě
- Vypínač je defektní
UPOZORNĚNÍ:
Všechny ostatní opravy může provádět jenom odborně zaškolený elektrikářský personál.
- Zkontrolujte uzemněnou zásuvku
230 V~
- Zkontrolujte prodlužovací kabel
10 Záruka a servis
Na tento produkt poskytujeme záruku v trvání 2 let.
Opravy pouze prostřednictvím autorizovaného personálu.
Na poškození způsobené neodbornou manipulací, nedodržením návodu pro obsluhu, jakož i
opotřebením dílů (např. osvětlovacích prostředků) se nevztahuje žádná záruka.
Pro další informace doporučujeme oblast servisu/FAQ na našich internetových stránkách
www.brennenstuhl.com.
11 Prohlášení o shodě
V shodě s následujícími evropskými směrnicemi vlastní produkt symbol CE:
2006 / 95 / EC Směrnice o nizkem napěti
2004 / 108 / ES Směrnice o elektromagneticke kompatibilitě
2009 / 125 / EC ErP-Směrnice
Prohlášení o shodě je uložené u výrobce.
Výrobce:
Hugo Brennenstuhl GmbH & Co. KG, Seestraße 1-3, 72074 Tübingen, Německo
Návod pro obsluhu 65 CZ
Page 66

Page 67

Page 68

Hugo Brennenstuhl GmbH & Co. KG · Seestraße 1-3 · 72074 Tübingen · Germany
H. Brennenstuhl S.A.S. · F-67460 Souffelweyersheim
lectra-t ag · Blegistrasse 13 · CH-6340 Baar
www.brennenstuhl.com
0416130/812
 Loading...