


OA IMPULSE PUSH
INSTRUCTIONS FOR USE
AW-CP020293 Rev B 10/15
This device is oered for sale by or on the order of a
physician or other qualied medical professional. This
device is not intended for reuse on a second patient. This
device is not intended to prevent injuries or reduce or
eliminate the risk of re-injury.
INDICATIONS: This brace can be congured to address
medial or lateral osteoarthritis. The brace is designed to
decrease joint pain by creating a space between the bones
on the aected side of the knee.
CONTRAINDICATIONS: This brace is contraindicated to
treat medial osteoarthritis with a lateral osteoarthritis
brace or to treat lateral osteoarthritis with a medial osteoarthritis brace.
CAUTION: Activity modication and proper rehabilitation
are an essential part of a safe treatment program. If any
additional pain or other symptoms occur while using this
device, discontinue use and seek medical attention.
CAUTION: This device is not intended to prevent injury, or
reduce or eliminate the risk of re-injury.
WARNING: Federal law restricts this device to sale by or on
the order of a licensed health care practitioner.
WARNING: For single patient use only.
CAUTION: Carefully read tting instructions and warnings
prior to use. To ensure proper performance of the brace,
follow all instructions. Failure to properly position the
brace and fasten each strap will compromise performance
and comfort.
CAUTION: This device has been developed for the indications listed above, and may be damaged by unusual
activities such as sports, falls, or other accidents, or
exposure of the hinges to debris or liquids. To avoid the risk
of accident and possible injury to the patient, discontinue
use if such an incident has occurred.
CAUTION: Do not leave this device in a car on a hot day, or
in any other place where the temperature may exceed
150F (65 C.) for any extended period of time.
E/U authorized
representative
MDSS GmbH
Schiffgraben 41
D-30175 Hannover
Germany
©
2015 Breg, Inc. All Rights Reserved
2885 Loker Ave E
Carlsbad, CA 92010 USA
Toll Free Tel: 1-800-321-0607
Local: +1-760-795-5440
Fax: +1-760-795-5295
www.Breg.com
OA IMPULSE PUSH
2
4
3
1
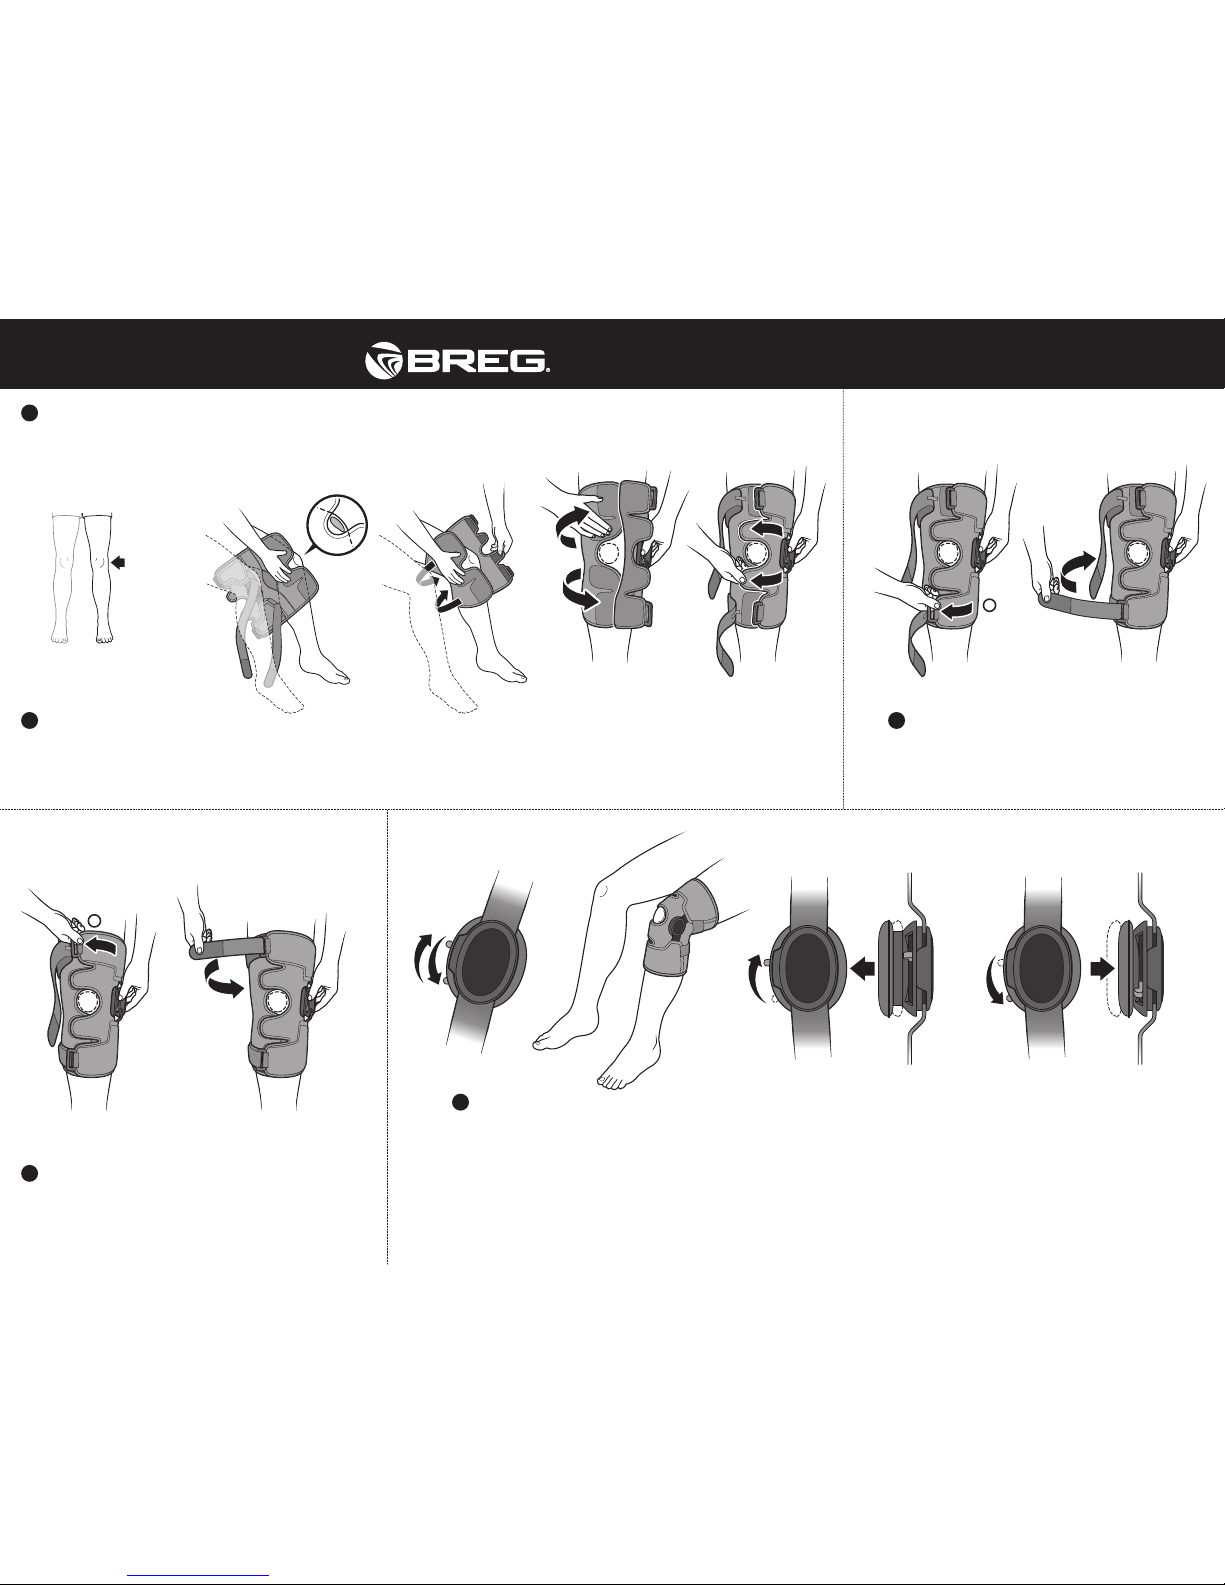
1
Open the Brace
Open by unfastening
the two-straps.
3
Secure the Lower Calf Closure Tab, 3
Follow with the calf strap, feeding it through the
D-ring and tighten with moderate tension.
4
Secure the Upper Thigh Closure Tab, 4
Follow with the thigh strap, feeding it through the
D-ring and tighten with moderate tension.
5
2
Apply the Brace
While sitting with the knee exed between 45 and 60 degrees, begin with the ‘soft
side’ of the brace and position the opening for the kneecap so that the opening
surrounds one side of the kneecap.
Wrap around the leg and secure the
two closure tabs, 1 and 2, closest to the
knee. The kneecap should be centered
in the opening created.
NOTE: Only adjust the hinge enough for relief. Walk after each adjustment. Too much force may cause discomfort and
excessive muscle soreness. Once you reach relief, don’t adjust the hinge any further. It takes at least a week for the leg to get
used to having pressure applied to it.
Adjust the hinge: Stand and walk in the brace to see how it feels on the leg. The hinge can be adjusted while
standing or sitting; however, the hinge adjustments are easier when sitting with your knee bent to 90 degrees. To
adjust the force of the hinge pressure, place thumb on red tab and slide tab up or down to desired position. If more
force is needed, sit down and adjust to an increased force setting. Walk again to test for relief.
For medial OA, position hinge on
the OUTSIDE of the knee, which is the
example for the following instructions.
For lateral OA position the hinge
on the inside of the knee.
4
3
 Loading...