

Page 1
Bruksanvisning
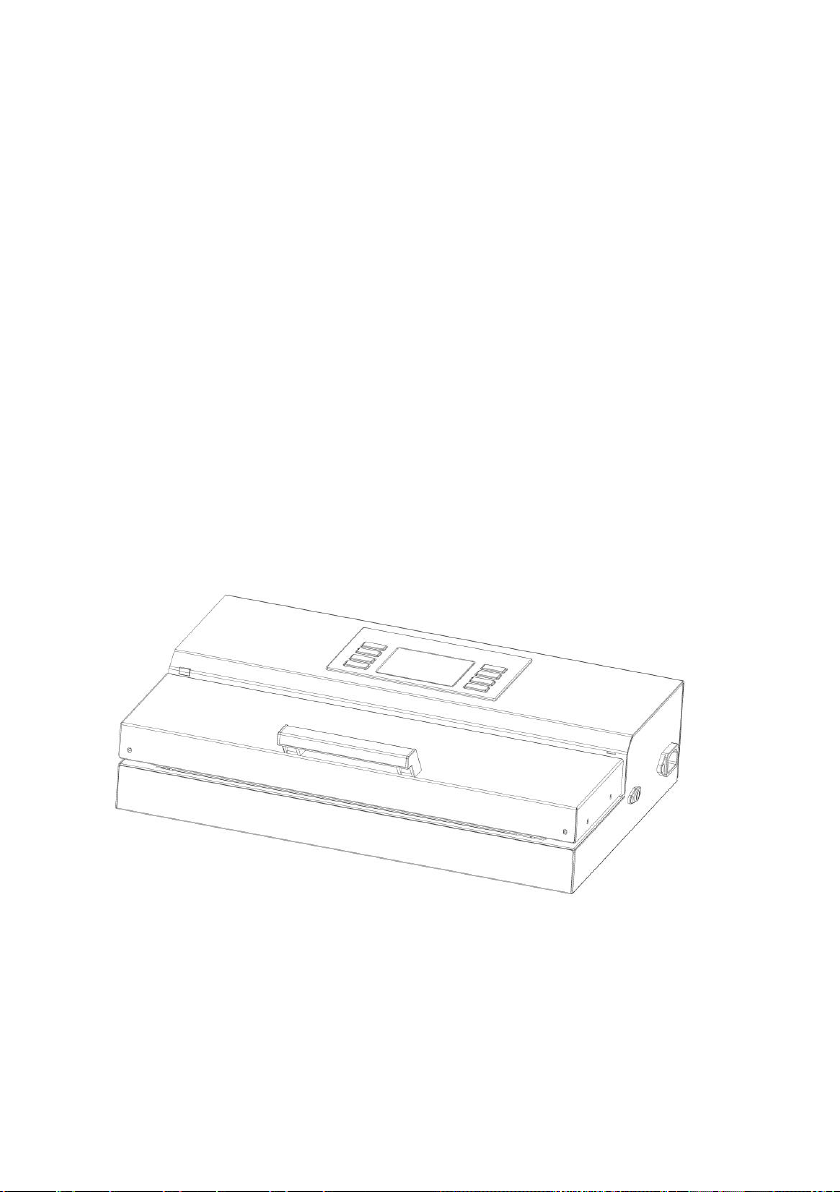
VR-200 PRO
Page 2

Sikkerhet
For din egen sikkerhet, kan du følge disse forholdsreglene når du bruker en vakuumpakker:
▪ Les bruksanvisningen nøye før du bruker maskinen for første gang.
▪ Ikke bruk denne vakuumpakkeren på våte eller varme overflater, eller nær en varmekilde.
▪ Ikke senk maskinen eller strømledningen i vann eller annen væske.
▪ Koble din vakuum maskin i jordede strømkilder, ikke bruk skjøteledning .
▪ Hvis du vil koble fra, koble direkte fra strømkilden . Ikke koble fra ved å trekke i ledningen.
▪ Ikke bruk apparatet med skadet strømledning .
▪ Bruk kun Vakuum maskin for tiltenkt bruk.
▪ Bruk kun tilbehør som er laget for å bruke Vakuum maskin.
Vakuumpakking og matsikkerhet
Vakuumpakking forlenger levetiden på matvarer ved å fjerne det meste av luft fra lukkede
beholdere og hindrer frisk luft å slippe inn. Vakuum emballasje bidrar til å bevare smake og
kvalitet. Det hjelper også for å bremse vekst av mikro organismer.
Mugg- Mugg kan ikke vokse uten oksygen, vakuum pakking kan nesten eliminere dette.
Gjær – Gjæring kan identifiseres ved lukt og smak. Gjær trenger vann, sukker og en
moderat temperatur for å vokse. Det kan også overleve uten luft. For å bremse veksten av
gjær kreves kjøling. Frysing stopper den helt.
Bakterier - Resultater av dette er en ubehagelig lukt, misfarging, myk eller slimete
konsistens. Som ved en hvilken som helst annen lagringsmåte, er det viktig å kontrollere
at maten ikke er forringet
For å oppbevare matvarer på en sikker måte, er det viktig å opprettholde lave temperaturer.
Man kan redusere veksten av mikroorganismer ved temperaturer på 4° C eller lavere.
Frysing ved -17ºC dreper ikke mikroorganismer, men stopper dem fra å vokse. For langtids
lagring, frys lett bedervelige matvarer selv om de er vakuumpakket.
Det er viktig å merke seg at vakuumpakking kan ikke reversere ødelagte matvarer. Det kan
bare forsinke endringer i kvalitet. Det er vanskelig å forutsi hvor lenge mat vil beholde topp
kvalitet, smak, utseende og konsistens fordi det avhenger av alder og tilstanden den dagen
Page 3

det ble vakuumpakket.
MERK: vakuumpakking er ikke en erstatning for kjøling eller frysing. Eventuelle
bedervelige matvarer som krever kjøling må fremdeles oppbevares i kjøleskap eller
fryses etter vakuumpakking.
Forberedelse Retningslinjer
Grønnsaker må forvelles før vakuum pakking. Denne prosessen stopper enzym påvirkning,
noe som kan føre til tap av smak, farge og tekstur. For å forvelle grønnsaker, legg dem i
kokende vann eller i mikrobølgeovnen til de er kokt. Deretter dypp grønnsakene i kaldt
vann for å stoppe kokeprosessen. Til slutt, tørke grønnsakene på et håndkle før vakuum
pakking. Grønnsaker som (brokkoli, rosenkål, kål, blomkål, grønnkål, neper) avgir naturlig
gasser under lagring. Derfor, etter forvelling, de må lagres i fryseren.
Page 4
Oversikt over VR-200 PRO
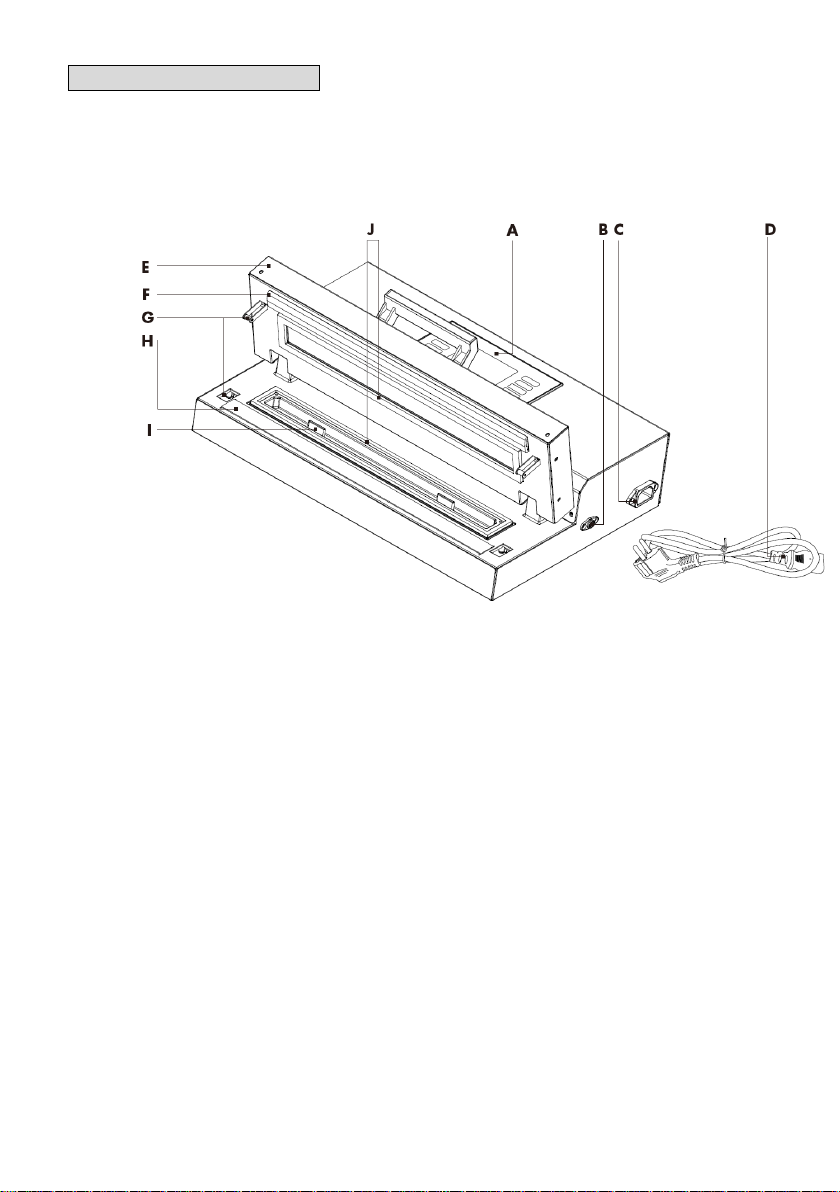
A. Kontroll panel
B. Tilkobling via vakuumslange for vakkumering av mat i vakuumbeholder
C. Stikkkontakt
D. Strønledning
E. Lokk
F. Silikon forsegling presslist
G. Lås for lokk – holder lokket lukket under vakuumering
H. Varmelist
I. Dryppe brett
J. Vakuumpakninger i lokket og undersiden av apparatet som omgir og tetter
vakuumkammeret
Ekstrautstyr
Ikke inkludert: Vakuumslange og vakummeringsboks m/lokk– om du ønsker å kjøpe,
kontakt nærmeste forhandler
Page 5
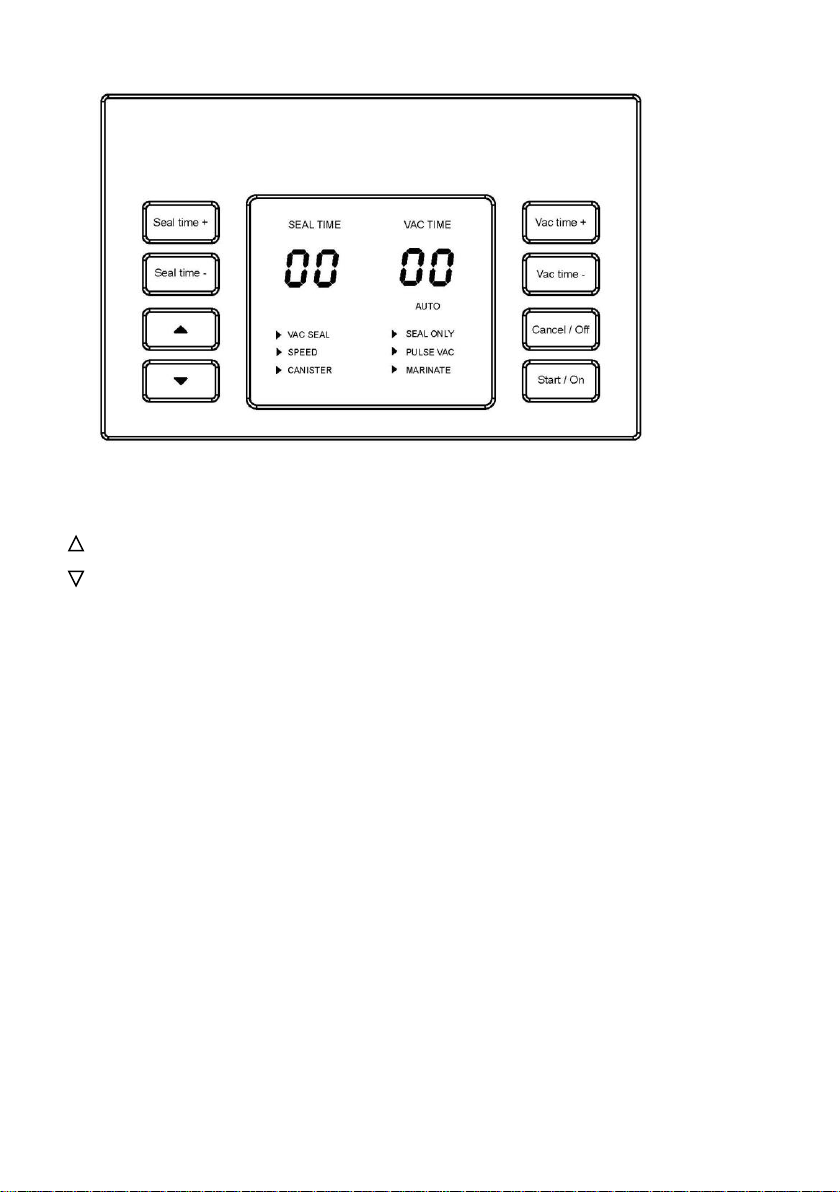
Seal time (+): Knappen for å øke sveisetiden
Seal time(-): Knappen for å redusere sveisetid
Knappen for å velge funksjon oppover
Knappen for å velge funksjon nedover
Vac time (+): Knappen for å øke vakuumerings tiden
Vac time (–): Knappen for å redusere vakuumerings tiden
Cancel / Off: Knappen for å avbryte den pågående arbeids prosessen, trykk og hold den
inne i 2 sekunder for å slå av.
Start / On: Knappen for å slå på vakuummaskin og start en arbeidsprosess
VAC SEAL: Når pekeren stopper på VAC SEAL, betyr det at maskinen skal utføre
vakuumering og forsegling. Automatisk vakuumerings prosess.
SEAL ONLY: Når pekeren stopper på SEAL ONLY. Kun forsegling
SPEED: Når pekeren stopper på SPEED teksten SPEED er på, betyr det at maskinen vil
fungere med høy hastighet, trykk på "start". Teksten SPEED slokker, maskinen vil pakkeren
gå tilbake til standard funksjonen og utføre prosessen med lav hastighet.
PULSE VAC: Når pekeren stopper ved puls VAC, vil brukeren kontrollere vakuumerings
prosessen 100 %. Dvs. manuell vakuumering
CANISTER: Denne funksjonen brukes hvis maskinen er koblet til vakuum beholder.
MARINATE: Denne funksjonen brukes for “marinering” i vakuum beholder.
Anbefalte innstillinger for forseglingstid ved gjentangende vakuumeringer
Page 6

Gjentagende vakuumeringer
Anbefalt forseglingstid
5 ganger
6 sekunder
10 ganger
5 sekunder
15 ganger
4 sekunder
20 ganger
3 sekunder
Mer enn 20 ganger
3 sekunder
Hvordan lage en passe stor pose
1. Velg stor nok pose/rull for det du skal vakuumpakke, legg til ekstra 5 cm. Med en saks
eller skarp kniv, kutt ønsket lengde fra rull. Sørg for å kutte i en rett linje..
2. Åpne lokket. Plasser den ene enden på forseglingslistene.
3. Lukk lokket.
4. Trykk på "Start/On" knappen og skjermen vil lyse opp.
5. Velg "Seal Only" funksjon, og trykk på "Start" -knappen direkte, slik at maskinen
begynner å forsegle posen med standardtiden, eller du kan kan justere forseglingen ved å
trykke "Seal tid (+)" "Seal tid (-)", og deretter trykke på start knappen.
6. Indikatoren for forseglingstid teller ned til 0 og forseglingsprosessen er ferdig.
Viktig: Gi maskinen tid til å kjøle seg ned. Vent minst 20 sekunder mellom forseglingene.
Ved veldig intens bruk stopper maskinen automatisk for å motvirke overoppheting. Hvis
dette hender; vent 20 minutter så maskinen rekker å kjøle seg ned.
Hvordan bruke vakuum poser
1. Plasser varene i en passe stor pose. Posen bør være 5-6 cm dypere enn varen.
2. Åpne lokket og plasser den åpne enden av posen I vakuumeringskammeret.
3. Lokk igjen maskinen og start maskinen.
4. Velg “Vac Seal” funksjonen. Trykk “start” knappen, maskinen vakuumerer og forsegler
automatisk. Bruker kan også endre vakuumeringstid og forseglingstid og så trykke på
“Start” knappen.
5. Når innstilt vakuumering er nådd forsegler maskinen automatisk.
6. Maskinen teller forseglingstiden ned til (0) og forsegling er utført. Maskinen slipper
posen automatisk.
Hvordan bruke “Pulse” Funksjon – Manuell vakuumering
Page 7

Fordi trykket under normal vakuum funksjon kan være høy, kan det noen ganger være lett
å ødelegge varer ved for høyt trykk i vakuumposen. I dette tilfellet kan du bruke '' PULSE ''
funksjon for å styre vakuum tid og trykk. Dvs. manuell vakuumering.
Når du pakker saftig mat, kan du også bruke denne funksjonen og hindre at væske blir
sugd opp. Løft lokk opp og plasser den åpne enden av posen i vakuumerings kammeret..
1. Velg "PULSE VAC" -funksjonen. Trykk på "START" -knappen for å aktivere pulse vacfunksjonen standby
2. Trykk deretter på '' VAC time + '' eller «VAC time-« -knappen kontinuerlig, til den når
trykket du vil ha. Følg med på vakuumposen for å bestemme hvor mye du vil
vakuumere. Under denne prosessen kan du stoppe vakuumeringen ved å slutte å
trykke på «VAC time +« eller «VAC time-« knappen; og trykk på knappen igjen for å
starte vakuumering igjen.
3. Når ønsket vakuumering er oppnådd, trykk "Start" -knappen for å starte forsegling.
4. Indikatoren viser SEAL TID og teller ned til 0, forsegling er ferdig.
Hvordan bruke VR-200 med vakuum beholder
MERK: Vakuumbeholder og tilkoblingsenhet er ikke med i pakken.
1. Vask og tørk vakuumbeholdere godt. Sørg for at alle flater er rene og tørre.
2. Plasser maten i beholderen og la det være plass mellom mat og lokk. (3
cm. er anbefalt)
3. Steng lokket og slå på maskinen
4. Velg “Canister” funksjon og trykk “start” knappen.
5. Enheten vil fortsette vakuumerings prosessen til luften er fjernet.
6. Maskinen stopper automatisk når den er ferdig.
Hvordan Marinere Mat
I marinerings modus, VR-200 kjører to runder med vakuum og slipper luft til beholderen,
Page 8

slik at matvarer får optimal inntrenging av marinade i minst mulig tid.
Vakuum beholderen er en perfekt partner til marinering av matvarer. Grunnen til at mat blir
marinert på så kort tid er at det åpner seg mikro-hull på matvarer, slik inntrenging blir svært
rask.
Viktige tips: når du bruker beholderen for marinering, bør det være en ventil på beholderen.
Pass på at ventilen på lokket på beholderen er i ”Open" posisjon, ikke i "Vacuum" når den
er i marinerings prosess.
1. Plasser maten i beholderen. Pass på at det ikke er pulver eller matrester på
pakningen til lokket og beholderen. Det skal være litt plass tilovers etter at maten
er plassert i beholderen. Lukk lokket
2. Still knappen på beholderen i “Open” posisjon.
3. Koble slangen til porten på maskinen og porten på beholderens lokk.
4. Steng lokket på maskinen og velg “Marinate” funksjon.
5. Trykk “Start” knappen.
6. Når VR-200 når vakuumtrykket, vil maskinen stoppe vakuumering automatisk og slippe
luft inn i beholderen, gjentar denne arbeidssyklusen kontinuerlig i 30 minutter og stopper
deretter automatisk.
7. Den ovennevnte syklus vil bli kjørt to ganger.
8. Trykk på "Off" knappen for å stoppe maskinen
Vedlikehold & Renhold
1. Ta alltid ut strømkontakten for renhold.
2. Må ikke senkes i vann eller annen væske.
3. Ikke bruk slipemiddler for å rengjøre maskinen.
4. Tørk utsiden med en fuktig varm klut.
5. For å rengjøre innsiden av enheten, tørk bort mat eller væske med et papirhåndkle.
6. Tørk alle deler godt før du kobler maskinen til for bruk.
7. Vakuumkammeret samlerr væsker som ble trukket ut av posen; den kan fjernes for
renhold, bruk en mild oppvask såpe og en varm, fuktig klut til å tørke vekk væske fra
vakuumkammeret. Tørk grundig.
8 . Lokket på maskinen låses opp når den ikke er i bruk.
Problemløser
Page 9

Ingenting hender når jeg trykker ’’VACUUM’’ knappen:
Kontroller at strømkabelen er riktig koblet til.
Sjekk at strømkabelen ikke er skadet.
Påse at posen er korrekt plassert i vakuum kammeret.
Vent 25 minutter, slik at apparatet rekker å kjøle seg ned, deretter prøve på nytt.
Luft blir ikke sugd ut av posen:
Kontroller at det ikke er noen åpninger, folder, rynker eller hull i posen.
Se etter løse, slitte eller sprukne Øvre og Nedre pakninger.
Matvarer med høyt væskeinnhold kan hindre at posen tetter skikkelig. Skjær posen
opp og tørk innsiden av posen og forsegle. Eventuelt, skift posen.
Sjekk om posen er riktig satt inn i maskinens vakuum kammer.
Kontroller at du har plassert posen på riktig sted.
Posen smelter:
Tetningslisten kan ha vært for varm under forsegling prosessen. La enheten avkjøles
i 20 sekunder mellom hver forsegling. Hvis posen fortsetter å smelte, la enheten
avkjøles med lokket i oppreist stilling i 25 minutter før bruk.
Luft siger tilbake I posen etter forsegling:
Sjekk forseglingen av posen. Det kan være et hull eller en rynke som tillater luft å sive
inn i posen. Skjær forsiktig posen opp og re - forsegle den, eller bruk en helt ny pose.
Pass på at det ikke er fuktighet eller rester fra maten til stede i posens forseglings
område. Du må kanskje kutte posen og re - forsegle den, eller bruk en helt ny pose.
Delvis frys mat varer med overflødig væske, før vakuumering.
Pass på at det ikke er noen matvarer med skarpe kanter som kan ha punktert posen.
Hvis du finner en punktering, bytt til en i en helt ny pose.
Pass på at væske ikke blir trukket til tetningslist området.
Se etter løse, slitte eller sprukne Øvre og Nedre pakninger.
Rester av matvarer med høyt væskeinnhold vil hindre posen fra å bli 100% tett. Skjær
posen opp, tørk innsiden av posen og forsegle igjen. Eventuelt bytt posen
Posen forsegles ikke:
Kontroller at det ikke er noen åpninger, folder, rynker eller hull i forseglings området.
Rester av matvarer med høyt væskeinnhold vil hindre posen fra å bli tett. Skjær posen
opp, tørk innsiden av posen og forsegle igjen. Eventuelt bytt posen
Page 10

Kontroller at forseglingens tiden er lang nok til å gjøre en god forsegling.
Kontroller at du har plassert posen riktig.
Kontroller at du har gitt apparatet tid til å kjøle seg ned. Vent 20 sekunder mellom hver
forsegling.
Bemerk
Page 11
Ved produktforbedring forbeholder vi oss retten til å foreta tekniske og visuelle
endringer på apparatet.
Viktig; ved destruksjon
Kast av apparatet og emballasjen må skje i samsvar med lokale bestemmelser og krav til
elektriske apparater og emballasje. Ta kontakt med din lokale avfallsselskap.
Apparater merket med dette symbolet må ikke kastes sammen med
husholdnings avfall! Du er juridisk bundet til å avhende gamle apparater separat fra
husholdningsavfallet. Informasjon om innsamlingspunkter hvor gamle apparater kan kastes
gratis er tilgjengelig hos lokale myndigheter.
Distributør
Breens Jaktutstyr AS
Drognestoppen 2
2150 Aarnes
Norway
Tel. +47 63 90 95 85
Epost: [email protected]
Page 12
User Manual
Vacuum Sealer VR-200
Page 13

Safety
For your safety, follow these precautions when using your Vacuum Sealer:
Read the manual carefully before using the appliance for the first time.
Do not use the Vacuum Sealer on wet or hot surfaces, or near a heat source.
Do not immerse the appliance or power cord in water or any other liquid.
Plug Vacuum Sealer into grounded power sources only, do not use extension cord.
To disconnect, unplug directly from power source. Do not disconnect by pulling on cord.
Do not operate appliance with damaged power cord.
Only use the Vacuum Sealer for its intended use.
Only use bags, rolls and canisters that are suited for vacuum sealing.
Vacuum Packaging and Food Safety
Vacuum packaging extends the life of foods by removing most of the air from sealed
bags/canisters and prevents fresh air escaping into the sealed bags/canisters, thereby
reducing oxidation. Vacuum packaging helps preserve flavor and overall quality. It also
helps inhibit the growth of aerobic microorganisms, which can lead to the problems noted
below under certain conditions:
Mold – Mold cannot grow in a low oxygen environment; therefore vacuum packaging can
virtually eliminate it.
Yeast – Results in fermentation, which can be identified by smell and taste. Yeast needs
water, sugar and a moderate temperature to grow. It can also survive with or without air.
Slowing the growth of yeast requires refrigeration, while freezing stops it completely.
Bacteria – Results in an unpleasant odor, discoloration and/or soft or slimy texture. Under
the right conditions, clostridium botulinum (the organism that causes Botulism) can grow
without air and cannot be detected by smell or taste. Although it is extremely rare, it can be
very dangerous.
As with any other storage container, it is important to inspect food for spoilage prior to
consuming.
Page 14

To preserve foods safely, it is important to maintain low temperatures. You can significantly
reduce the growth of microorganisms at temperatures of 4ºC or below. Freezing at -17ºC
does not kill microorganisms, but stops them from growing. For long-term storage, always
freeze perishable foods that have been vacuum packaged.
It is important to note that vacuum packaging cannot reverse the deterioration of foods. It
can only slow down changes in quality. It is difficult to predict how long foods will retain their
top-quality flavor, appearance or texture because it depends on the age and the condition
of the food on the day it was vacuumed packaged.
Note: vacuum packaging is not a substitute for refrigeration or freezing. Any perishable
foods that require refrigeration must still be refrigerated or frozen after vacuum
packaging.
Preparation Guidelines
Vegetables need to be blanched before vacuum packaging. This process stops the enzyme
action, which leads to loss of flavor, color and texture. To blanch vegetables, place them in
boiling water or in the microwave until they are cooked, but still crisp. Then, immerse the
vegetables in cold water to stop the cooking process. Finally, dry the vegetables on a towel
before vacuum packaging. Cruciferous vegetables (broccoli, sprouts, cabbage, cauliflower,
kale, turnips) naturally emit gases during storage. Therefore, after blanching, they must be
stored in the freezer only.
Page 15
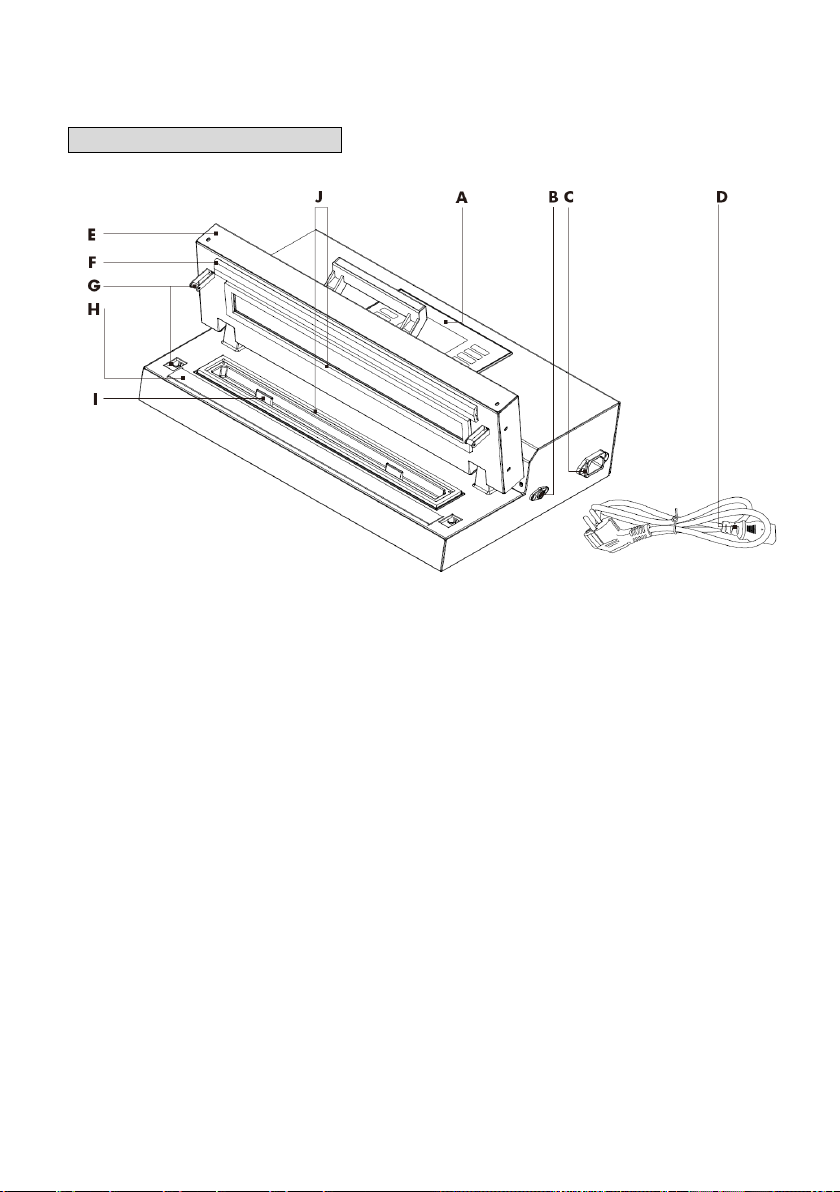
The Vacuum Sealer Features
A. Control panel
B. Vacuum outlet - to vac and seal a vacuum canister by connecting a vacuum
hose
C. Power socket
D. Power cord
E. Lid
F. Silicon sealing bar
G. Lock catch – keeps the lid closed during operation
H. Heating bar
I. Dripping tray
J. Vacuum gaskets in lid and base of the appliance surrounding and sealing the
vacuum chamber
Accessories
Not included: Vacuum hose and Vacuum canister with lid – if required, please contact
your vendor for purchasing.
Page 16
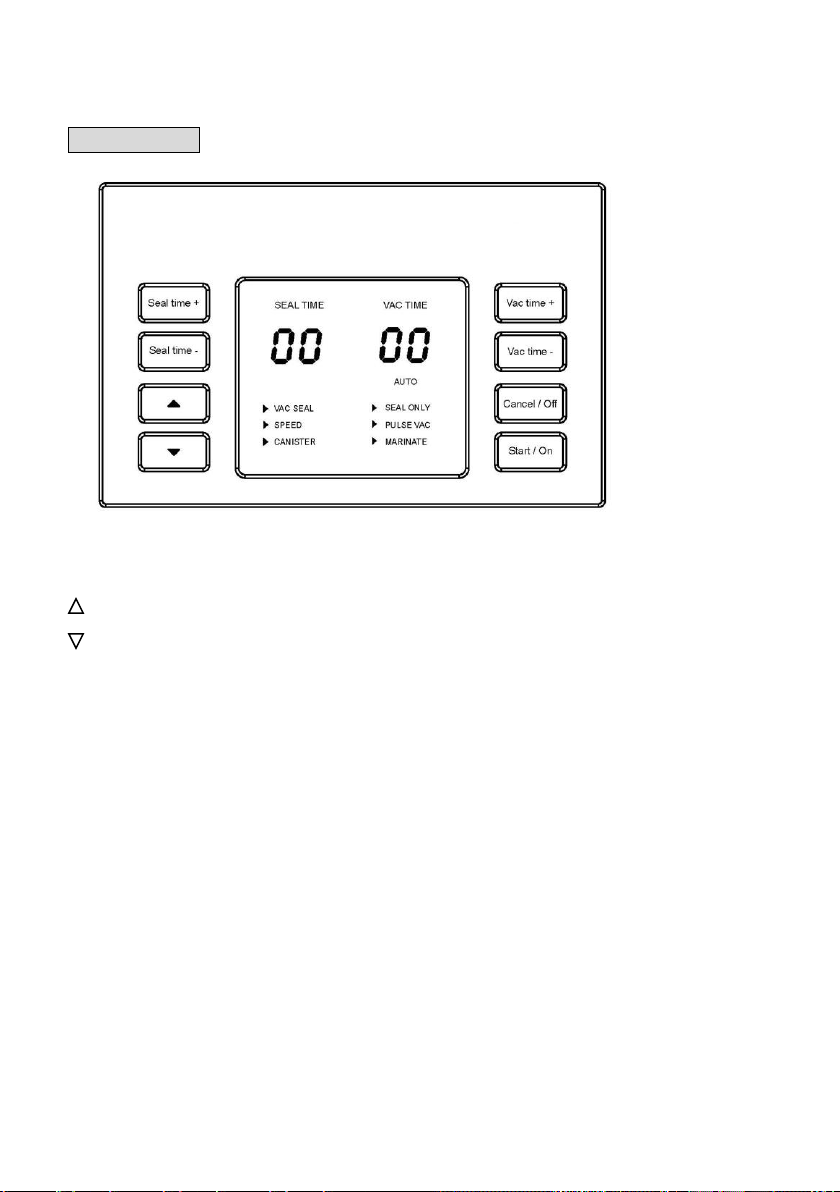
Control Panel
Seal time + : Button to increase the sealing time
Seal time - : Button to decrease the sealing time
Button to choose the function upwards
Button to choose the function downwards
Vac time + : Button to increase the vacuum time
Vac time - : Button to decrease the vacuum time
Cancel / Off: Button to cancel the on-going working process, press and hold it for 2 seconds
to turn off the appliance.
Start / On: Button to turn on the appliance and to start a working process.
VAC SEAL: When the pointer stops at VAC SEAL, it means that the appliance will perform
vacuum & seal.
SEAL ONLY: When the pointer stops at SEAL ONLY, the appliance will perform sealing
only.
SPEED: When the pointer stops at SPEED and the indicator light on SPEED is on, it means
the appliance will perform with high speed. Press “Start”, indictor light on SPEED will be off
and the appliance will perform with low speed.
PULSE VAC: When the pointer stops at PULSE VAC, the appliance will perform vacuum
with the control of the user.
CANISTER: This function is used when the appliance is connected to a vacuum canister.
Page 17

MARINATE: This function is used when you want to marinate food packed in a vacuum
Cumulative Usage Count
Suggested Seal Time
5 times
6 seconds
10 times
5 seconds
15 times
4 seconds
20 times
3 seconds
﹥20 times
3 seconds
canister.
Quick Reference For Setting Seal Time
(The data above is under environment temperature of 25 degrees Celsius.)
How to Make Custom Sized bags
1. Pull enough bag material to hold item to be vacuum packaged, plus 2 inches. With a
pair of scissors or sharp knife, cut desired bag length from bag roll. Make sure to cut
in a straight line. Plug in the power cord.
2. Open the lid. Place one end of cut bag onto the heating bar. Ensure that the bag lays
smooth on the heating bar and without any folds and gaps.
3. Close the lid. It will lock automatically when the appliance starts operation.
4. Press “On” button and the screen will light up.
5. Choose “Seal Only” function, and press “Start” button directly so that the appliance
starts to seal the bag with default time. Or you can adjust the seal time by pressing
“Seal time +””Seal time -” then press start button.
6. The indicator number of SEAL TIME counts down to 0 and the sealing process is done.
The custom sized bag is now ready for vacuum sealing.
CAUTION: The heating bar will be hot. Avoid contact! Leave the appliance cool down
for at least 20 seconds after each sealing process, before you start operation again. Under
very heavy usage, the appliance will shut off automatically to prevent overheating. If it does,
wait 20 minutes to allow the appliance to cool down.
How to Vacuum Seal with the Vacuum Bags
Page 18

1. Place the item(s) to be sealed into the pre-cut or custom sized bag. Leave at least 2
inches between the contents and the top of the bag to allow for bag contraction.
2. Open the lid and place the open end of the bag down into the sealing gasket area.
3. Close the lid and turn on the appliance.
4. Choose “Vac Seal” function. Press “Start” button and the sealer will perform vacuum
and sealing automatically. Or you can set vacuum time and/or seal time with
corresponding buttons and then press “Start” button.
5. Once it reaches the desired vacuum degree, the appliance will proceed to seal the bag
automatically.
6. The indicator number of SEAL TIME counts down to 0 and the working process is done.
The appliance will release the bag automatically.
CAUTION: The heating bar will be hot. Avoid contact! Leave the appliance cool down
for at least 20 seconds after each sealing process, before you start operation again. Under
very heavy usage, the appliance will shut off automatically to prevent overheating. If it does,
wait 20 minutes to allow the appliance to cool down.
How To Use “Pulse” Vac Function
Since the pressure under the normal vacuum function can be high, sometimes it is easy to
destroy some delicate items by high pressure in the vacuum bags. In this case, you can
use the ’’PULSE’’ vac function to control the vacuum time and pressure, and prevent
crushing delicate items. When packing some juicy foods, you can also use this function
and prevent liquid being sucked out.
1. Place the item(s) to be sealed into the pre-cut or custom sized bag. Leave at least 2
inches between the contents and the top of the bag to allow for bag contraction.
2. Open the lid and place the open end of the bag down into the sealing gasket area.
3. Close the lid and turn on the appliance.
4. Choose “PULSE VAC” function. Press “Start” button to make the pulse vac function
standby.
5. Then press the ’’VAC time +’’ or ’’VAC time -’’ button continually, till it reaches the
pressure that you want. You can watch the vacuum bag to decide the pressure. During
this process, you can stop vacuum by stop pressing the ’’VAC time +’’ or ’’VAC time -’’
Page 19

button, and press it again to vacuum again.
6. When the pressure reaches what it needs, press ’’Start’’ button to start sealing.
7. The indicator number of SEAL TIME counts down to 0 and the working process is done.
How to Use the Vacuum Sealer with a Canister
NOTE : Canister and hose are not included in the package.
1. Wipe canister cover, canister base and ensure they are clean and dry.
2. Place food into canister and leave at least one inch of space between food and cover.
3. Place cover onto canister, insert one end of the hose into port on appliance. Put the
other end onto port of the canister cover; press down firmly to ensure a tight fit.
4. Close the lid and turn on the appliance.
5. Choose “Canister” function and press “Start” button.
6. The appliance will continue to vacuum until air has been removed.
7. The appliance will stop automatically when the working process is done.
How To Marinate Foods
In the marinate mode, the appliance can run two cycles of vacuuming and releasing air to
the canister, allowing foods to get optimum pickle infusion in the least amount of time.
Vacuum canister is a perfect partner to marinating foods. The reason that foods can be
marinated in such a short time is that, it opens the micro-holes of the foods, allowing pickle
infusion very quickly.
Important tips: when using canister for marinating, there should be a knob on the canister
lid. Make sure the canister lid is in “Open” status but NOT “Vacuum” status when it is in the
marinate process.
1. Put items in the canister. Make sure there is no powder or food debris on the canister
lid gasket. Also please allow some space after the items are put into the canister. And
then close the lid for the canister.
2. Turn the knob on the caniter lid to “Open” position.
Page 20

3. Connect the hose to the port on the appliance and the port on the canister lid.
4. Close the lid of the appliance and choose “Marinate” function.
5. Press “Start” button.
6. When it reaches the vacuum pressure, the appliance will stop vacuumizing
automatically and then release air into the canister. This working cycle repeats
continually for 30 minutes and then stops automatically.
7. The appliance vacuums the canister again. The above mentioned cycle will be run two
times.
8. Press “Off” button to stop all working processes and turn off the appliance.
Care & Cleaning
1. Always switch off and unplug the appliance and wait some minutes to let it cool down
before cleaning.
2. Do not touch the heating bar or sealing bar shortly after operation.
3. Always wipe off spilled liquids immediately. Do not spill or pour any liquids on or into
the appliance or power cable.
4. Do not immerse the appliance, power cable or plug in water or any other liquid.
5. Do not place the appliance or power cable on wet surfaces to avoid risk of electric
shock.
6. Do not use abrasives to clean the appliance or any part of it.
7. Clean the appliance immediately after each use to avoid that leftover food will stick to
the heating bar.
8. Ensure not to damage the vacuum gaskets, heating bar and sealing bar when cleaning
the appliance.
9. When disconnecting the power cable, do not pull the power cable, but always grasp
the plugs.
10. Wipe the vacuum chamber, heating bar and sealing bar with a soft damp cloth. In the
vacuum chamber there are tiny holes used for sucking out the air, ensure not to spill
any liquids into these holes.
11. To dry the vacuum gaskets, it is best to dab with a dry cloth to avoid damage.
12. Dry all parts thoroughly before you plug in and operate the appliance again.
13. Keep the upper lid of the appliance open when not in use
Page 21
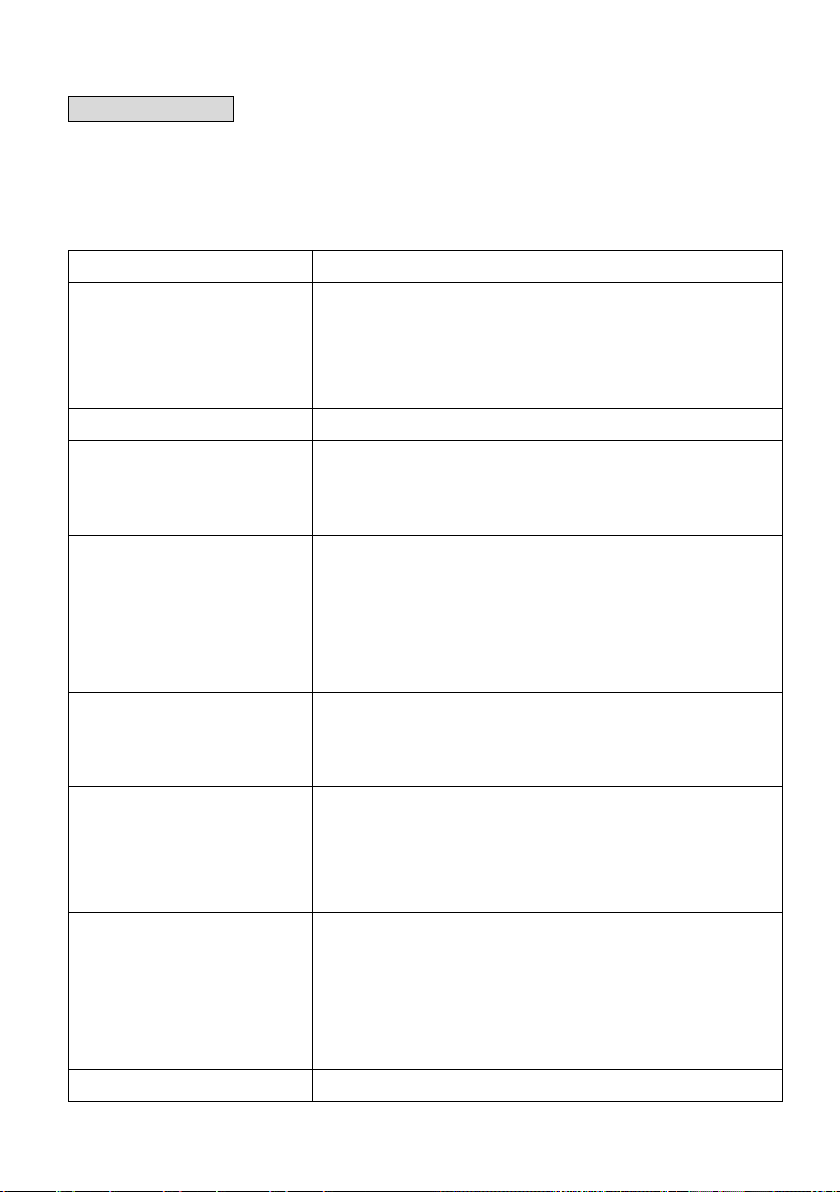
Possible Reasons
The Easy Solution
The bag is not positioned correctly.
The open end of the bag must reach into the vacuum
chamber conpletely. Additionally, ensure that the bag
lays even and smooth without any folds or gaps on the
heating bar and vacuum gasket.
The bag is not airtight.
Use another bag.
Parts of the contents in the
bag perforate the bag during
evacuation.
Remove sharp-edged items (e.g. bones) from the bag or
turn the edges inwards. Use another bag.
The vacuum gaskets on the
lid and base of the
appliance are loose, not
clean, worn out, or
damaged.
Carefully clean the vacuum gaskets using a soft damp
cloth. If the problem persists, send the appliance to an
authorized service centre for examination and repair.
The sealing time you have
set is too short or too high to
make a good sealing.
Adjust the seal time.
The appliance is overheated
and/or melting the bag.
Ensure that you have given the appliance enough time to
cool down. Wait 20 seconds between seals. Switch off
the appliance and with the lid open leave it cool down for
20 munutes.
Particles (Powder) or liquids
have been in the sealing
area of the bag.
The open end of the bag must be completely clean and
dry for making a good seal. Cut off the upper rim of the
bag and wipe clean the top of the bag. Perhaps, remove
some material from the bag to leave some more free
space on the top of the bag.
Foods with high liquid
Cut off the upper rim of the bag and wipe clean the top of
Trouble Shooting
The vacuum pump is working but the bag is not vacuumed, or air flows back into the
vacuumed bag, or the bag is not sealed.
Page 22

contents prevent the bag
from being sealed properly,
because high amounts of
liquid are sucked in during
evacuation.
the bag. Perhaps, remove some material from the bag to
leave some more free space on the top of the bag.
Partially freeze foods with excess liquids prior to vacuum
sealing. If you can’t, place a folded paper towel between
the food and the top of the bag, but below seal area.
Leave the paper towel in the bag to absorb excess liquid.
This way, during evacuation, liquids will not be sucked
out so easily.
Possible Reasons
The Easy Solution
The appliance is not live.
Ensure that the power cable is undamaged
and plugged in correctly at the power
supply and at the power socket of the
appliance. By connecting a lamp, ensure
that the mains power outlet is live.
The overheat protection is active.
Unplug the appliance and wait for at least
20 minutes. Then try again.
Possible Reasons
The Easy Solution
You have used improper bags.
Only use bags suitable for vacuum
sealers.
The heating bar is too hot during the
sealing process.
Allow the appliance to cool for 20 seconds
between uses.
The seal time is too high.
Reduce the seal time.
The appliance may be overheated.
Leave the appliance cool down for at least
20 minutes with the lid open. After each
sealing process, wait at least 20 seconds
before sealing the next bag.
You cannot switch on the appliance.
The bag melts or is ripped at the seal.
Page 23
Possible Reasons
The Easy Solution
The vacuum hose is not connected
properly.
Ensure that the correct end of the vacuum
hose is inserted properly into the vacuum
outlet of the appliance.
Ensure that the connection of the vacuum
hose on the vacuum port of the canister lid
is airtight.
The vacuum hose is damaged.
Contact your vendor for replacement.
The lid seal of the vacuum canister is
leaking.
Ensure that the lid seal of the canister and
the rim of the canister are completely
clean. If required, replace the seal. Use
another canister.
The canister is not vacuumed (function Vacuum Canister).
Remark
In the course of product improvement, we reserve the right to make technical
and optical modifications to the appliance.
Notes for disposal
Dispose of the appliance and packaging must be effected in accordance with the
corresponding local regulations and requirements for electrical appliances and packaging.
Please contact your local disposal company.
Appliances marked with this symbol must not be disposed of along with
Page 24

household refuse ! You are legally bound to dispose of old appliances separately from
household waste. Information about collection points where old appliances can be
disposed of free of charge is available from your local authorities.
Distributør
Breens Jaktutstyr AS
Drognestoppen 2
2150 Aarnes
Norway
Tel. +47 63 90 95 85
Epost: [email protected]
 Loading...