

Page 1

HS-250
Body Scale
User Instructions
AWT35-501170
Issue AA
Page 2

© Avery Weigh-Tronix, LLC 2013. All rights reserved.
No part of this publication may be reproduced, stored in an electronic retrieval system, or transmitted in any form
or by any means, electronic, mechanical, photocopying, recording or otherwise without the prior written consent of
the copyright owner, or as permitted by law or under license. Full acknowledgment of the source must be given.
Avery Weigh-Tronix is a registered trade mark of the Avery Weigh-Tronix, LLC. This publication was correct at the
time of going to print however, Avery Weigh-Tronix, LLC reserves the right to alter without notice the specification,
design, price or conditions of supply of any product or service at any time.
All third party brands and product names used within this document are trademarks or registered trademarks of
their respective holders.
HS250_u_en_501170.book AWT35-501170
Page 3

Table of Contents
page
Table of Contents ...................................................................................................................................... 3
Chapter 1 General information and warnings ......................................................................................... 5
About this manual ..............................................................................................................5
Text conventions ......................................................................................................... 5
Special messages ....................................................................................................... 5
Installation .......................................................................................................................... 6
Electrical installation .......................................................................................................... 6
Pluggable equipment ................................................................................................... 6
Safe handling of equipment with batteries .................................................................. 7
Routine maintenance ......................................................................................................... 7
Cleaning the machine ........................................................................................................ 7
Training .............................................................................................................................. 7
Sharp objects ..................................................................................................................... 7
Disposal ............................................................................................................................. 8
FCC and EMC declarations of compliance ........................................................................ 8
Chapter 2 Introduction .............................................................................................................................. 9
Front panel ......................................................................................................................... 9
Keyboard ................................................................................................................... 10
Display ....................................................................................................................... 11
Battery Operation ............................................................................................................. 11
Print Format ..................................................................................................................... 12
Chapter 3 Installation .............................................................................................................................. 13
Unpacking ........................................................................................................................ 13
Leveling the scale ............................................................................................................ 13
Installation ........................................................................................................................ 14
Chapter 4 Operation ................................................................................................................................ 15
Initial Start-up ................................................................................................................... 15
Power ON/OFF .......................................................................................................... 15
Zeroing the scale ....................................................................................................... 15
Using a tare weight .................................................................................................... 15
Change unit of measure ............................................................................................ 15
Hold function ............................................................................................................. 16
Print function ............................................................................................................. 16
BMI function .............................................................................................................. 16
Precision x10 ............................................................................................................. 17
Chapter 5 Parameters .............................................................................................................................. 18
Chapter 6 Calibration .............................................................................................................................. 21
Chapter 7 Maintenance ........................................................................................................................... 23
General ............................................................................................................................ 23
Cleaning .................................................................................................................... 23
Error codes ...................................................................................................................... 24
Determine the problem .................................................................................................... 24
Check the load cell ........................................................................................................... 24
Check PCB Voltages ....................................................................................................... 24
AC Power .................................................................................................................. 24
Adaptor Voltage ......................................................................................................... 25
HS-250 Medical Scale User Instructions 3
Page 4

PCB Input Voltage ..................................................................................................... 25
Troubleshooting ............................................................................................................... 26
Chapter 8 Specifications ......................................................................................................................... 27
General specifications ...................................................................................................... 27
Load cell specifications .................................................................................................... 28
4 HS-250 Medical Scale User Instructions
Page 5
1 General information and warnings
1.1 About this manual
This manual is divided into chapters by the chapter number and the large text at the top
of a page. Subsections are labeled as shown by the 1 and 1.1 headings shown above.
The names of the chapter and the next subsection level appear at the top of alternating
pages of the manual to remind you of where you are in the manual. The manual name
and page numbers appear at the bottom of the pages.
1.1.1 Text conventions
Displayed messages appear in bold italic type and reflect the case of the displayed
message.
1.1.2 Special messages
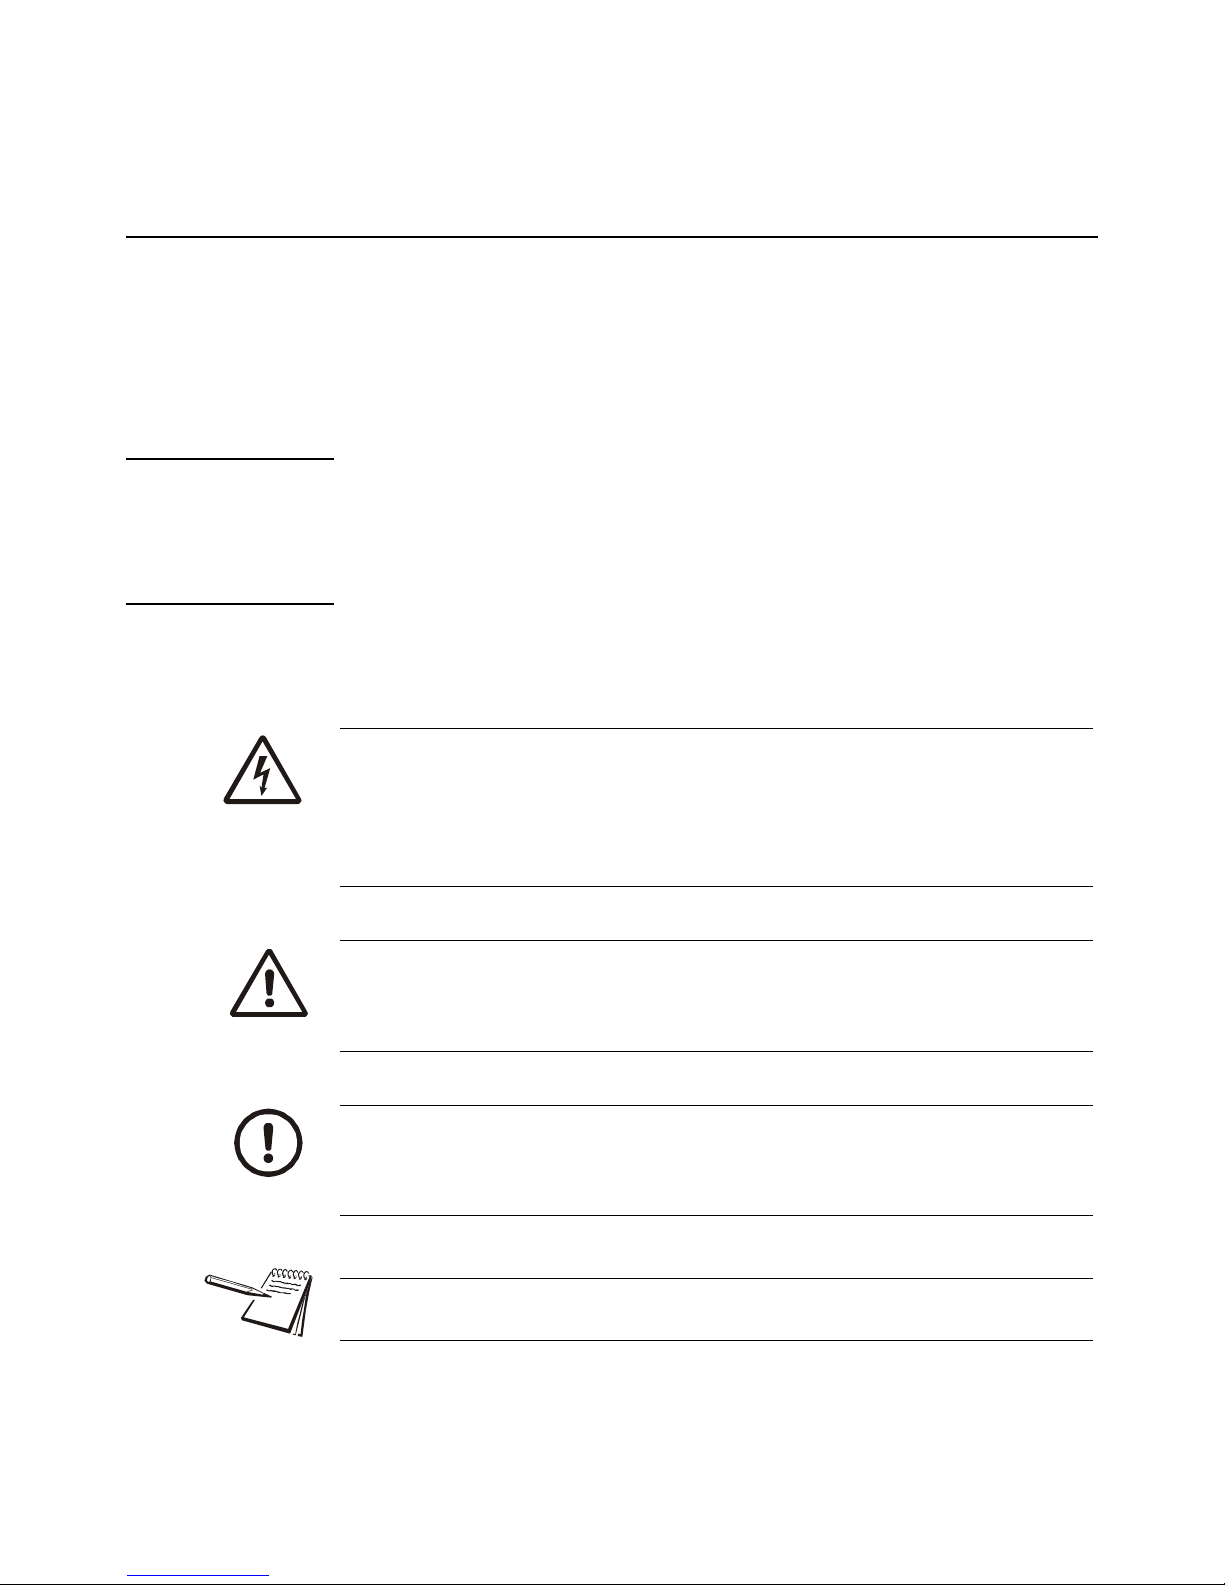
Examples of special messages you will see in this manual are defined below. The
signal words have specific meanings to alert you to additional information or the relative
level of hazard.
ELECTRICAL WARNING!
THIS IS AN ELECTRICAL WARNING SYMBOL.
ELECTRICAL WARNINGS MEAN THAT FAILURE TO FOLLOW
SPECIFIC PRACTICES OR PROCEDURES MAY RESULT IN
ELECTROCUTION, ARC BURNS, EXPLOSIONS OR OTHER HAZARDS
THAT MAY CAUSE INJURY OR DEATH.
WARNING!
This is a Warning symbol.
Warnings mean that failure to follow specific practices and procedures may
have major consequences such as injury or death.
CAUTION!
This is a Caution symbol.
Cautions give information about procedures that, if not observed, could result
in damage to equipment or corruption to and loss of data.
NOTE: This is a Note symbol. Notes give additional and important information, hints
and tips that help you to use your product.
HS-250 Medical Scale User Instructions 5
Page 6
1.2 Installation
WARNING: Disconnect all power to this unit before installing, cleaning, or
servicing. Failure to do so could result in bodily harm or damage the unit.
Make sure that it is placed securely on a flat and level surface.
Follow the instructions in this manual.
Keep the operating instructions and the declaration of conformity in a safe place.
Do not drop the scale or subject it to violent shocks.
When using the scale with AC power, ensure that the supply cable is routed in such a
way as to exclude any type of tripping hazard.
Use only the type of battery stated.
Have repairs carried out only by authorized persons.
1.3 Electrical installation
CAUTION: The power cable must be connected to an earth-grounded electrical
outlet. The electrical supply must have a circuit breaker with an appropriate
rating to protect from over-current conditions.
For your protection, all electrical (110V or 230V) equipment used out of doors or
in wet or damp conditions should be supplied from a correctly fused power
source and protected by an approved ground fault protection device (RCD,
GFCI etc.)
IF IN DOUBT SEEK ADVICE FROM A QUALIFIED ELECTRICIAN.
1.3.1 Pluggable equipment
Pluggable equipment must be installed near an easily accessible socket outlet.
6 HS-250 Medical Scale User Instructions
Page 7
1.3.2 Safe handling of equipment with batteries
CAUTION: Danger of explosion if battery is incorrectly replaced. Replace only
with the same or equivalent type recommended by the manufacturer. Dispose
of used batteries according to the manufacturer’s instructions.
ATTENTION: Il y a danger d'explosion s'il y a remplacement incorrect de la
batterie, remplacer uniquement avec une batterie du même type ou d'un type
équivalent recommandé par le constructeur. Mettre au rebut les batteries
usagées conformément aux instructions du fabricant.
1.4 Routine maintenance
IMPORTANT: This equipment must be routinely checked for proper operation
and calibration.
Application and usage will determine the frequency of calibration required for
safe operation.
1.5 Cleaning the machine
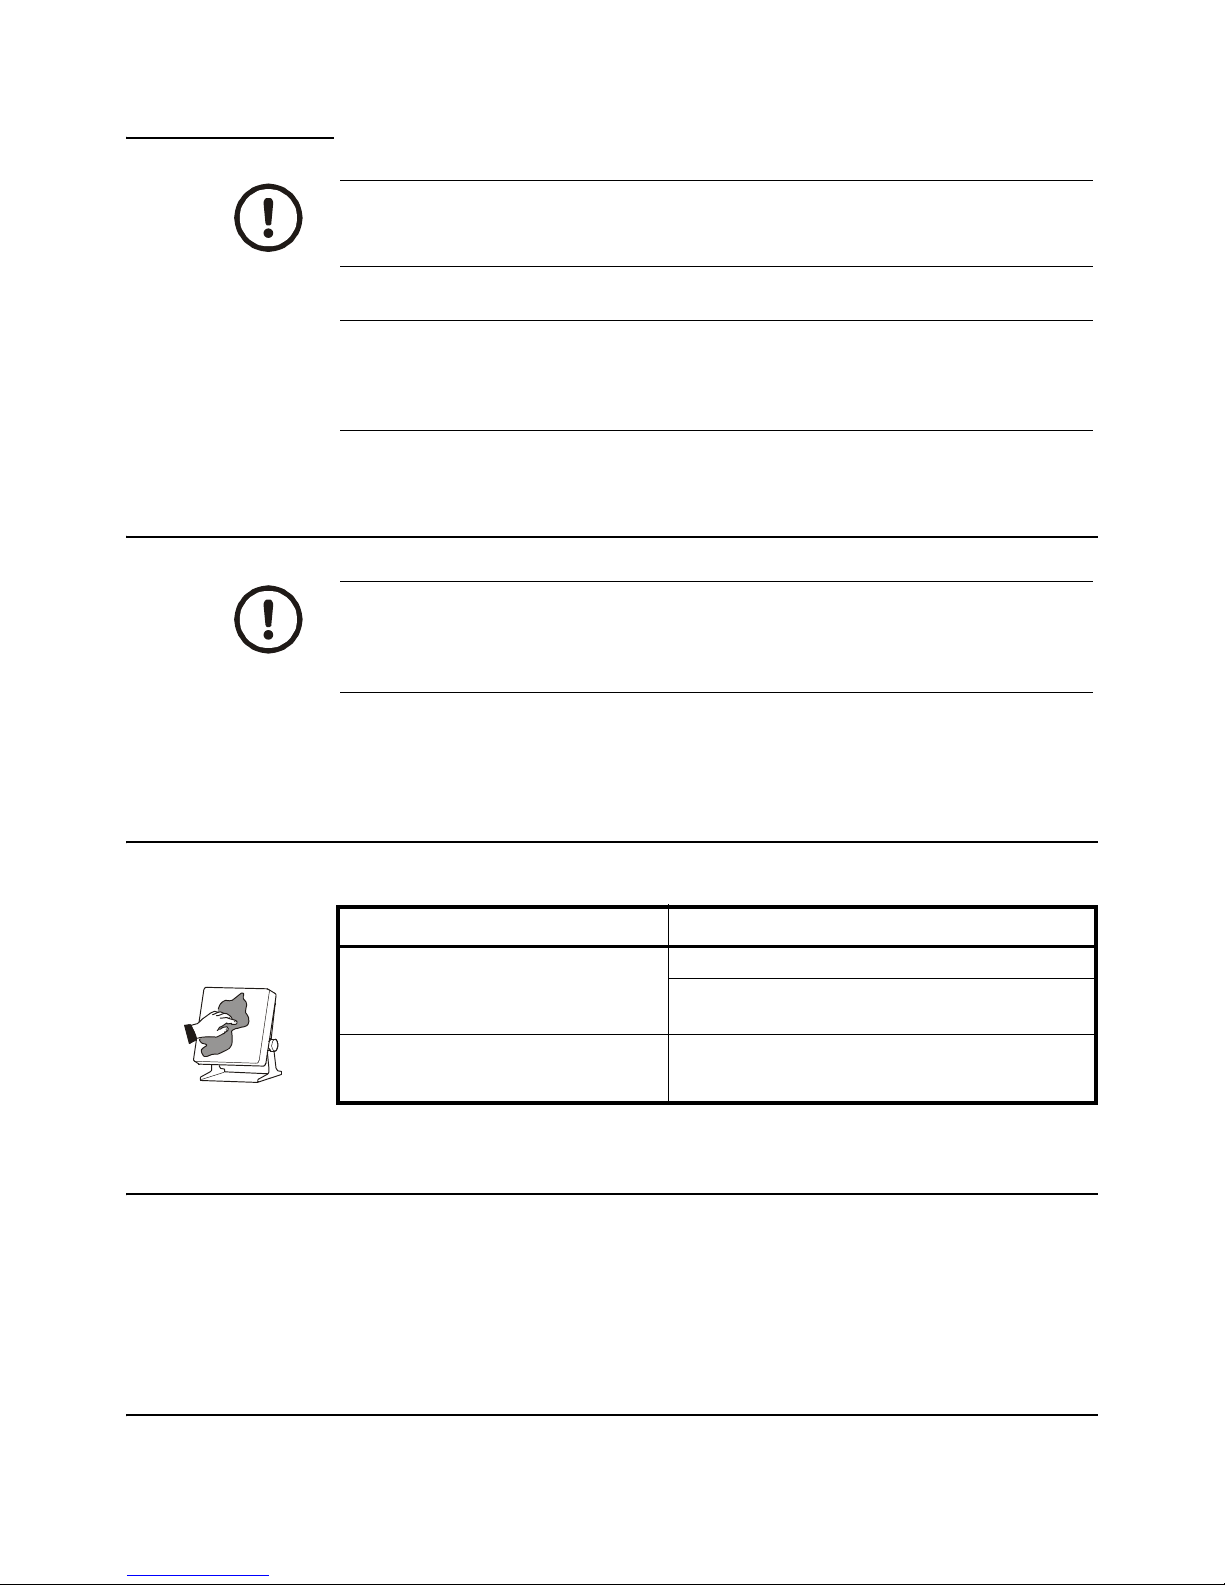
Table 1.1 Cleaning DOs and DON’Ts
DO DO NOT
Wipe down the outside of standard products
with a clean cloth, moistened with water and
a small amount of mild detergent
Spray the cloth when using a proprietary
cleaning fluid
1.6 Training
Do not attempt to operate or complete any procedure on a machine unless you have
received the appropriate training or read the instruction books.
To avoid the risk of RSI (Repetitive Strain Injury), place the machine on a surface which
is ergonomically satisfactory to the user. Take frequent breaks during prolonged usage.
1.7 Sharp objects
Attempt to clean the inside of the machine
Use harsh abrasives, solvents, scouring cleaners or
alkaline cleaning solutions
Spray any liquid directly on to the display windows
Do not use sharp objects such as screwdrivers or long fingernails to operate the keys.
HS-250 Medical Scale User Instructions 7
Page 8

1.8 Disposal
Disposing of the device
Do not dispose of the device in domestic waste. The device must be disposed of
properly as electronic waste. Follow the national regulations which apply in your case.
For further information, contact Brecknell.
Batteries
Do not throw used batteries away in domestic waste. Dispose of batteries at collection
points in the vicinity. When buying new batteries, select those low in harmful
substances and containing no mercury (Hg), cadmium (Cd) or lead (Pb).
1.9 FCC and EMC declarations of compliance
United States
This equipment has been tested and found to comply with the limits for a Class A digital device, pursuant to Part 15 of the FCC Rules.
These limits are designed to provide reasonable protection against harmful interference when the equipment is operated in a
commercial environment. This equipment generates, uses, and can radiate radio frequency energy and, if not installed and used in
accordance with the instruction manual, may cause harmful interference to radio communications. Operation of this equipment in a
residential area is likely to cause harmful interference in which case the user will be required to correct the interference at his own
expense.
Canada
This digital apparatus does not exceed the Class A limits for radio noise emissions from digital apparatus set out in the Radio
Interference Regulations of the Canadian Department of Communications.
Le présent appareil numérique n’émet pas de bruits radioélectriques dépassant les limites applicables aux appareils numériques de
la Classe A prescrites dans le Règlement sur le brouillage radioélectrique edicté par le ministère des Communications du Canada.
European Countries
WARNING: This is a Class A product. In a domestic environment, this product may cause radio interference in which the user may be
required to take adequate measures.
8 HS-250 Medical Scale User Instructions
Page 9
2 Introduction
ON
OFF
SLIM
NORMAL OVERWEIGHT
Max 250 kg/550 lb
Min 2 kg/4 lb
e = 0.1 kg/0.2 lb
HOLD
PRINT
F
BMI
TARE
W1 W2
STABLE
ZERO
TARE
NET
GROSS
DRINK PT BMI HOLD M1 M2 M3 M4
cm
inch
lb
kg
This manual covers the HS-250 body scale. Use the included information to familiarize
yourself with the parts, function, calibration and troubleshooting of the HS-250. The
HS-250 amplifies signals from a load cell, converts it to digital data and displays it as a
mass value.
Other features of the scale include:
l BMI (Body Mass Index) bar graph
l Wheels on the bottom for easy movement
l Rubber mat on the platform surface
l One inch LCD with backlit display
l Seven tactile feedback keys
l Battery operation for up to 22 hours of continuous use (without backlight)
l 250kg/550lb capacity
l Height measurement from 90-200cm or 35-80 inches
2.1 Front panel
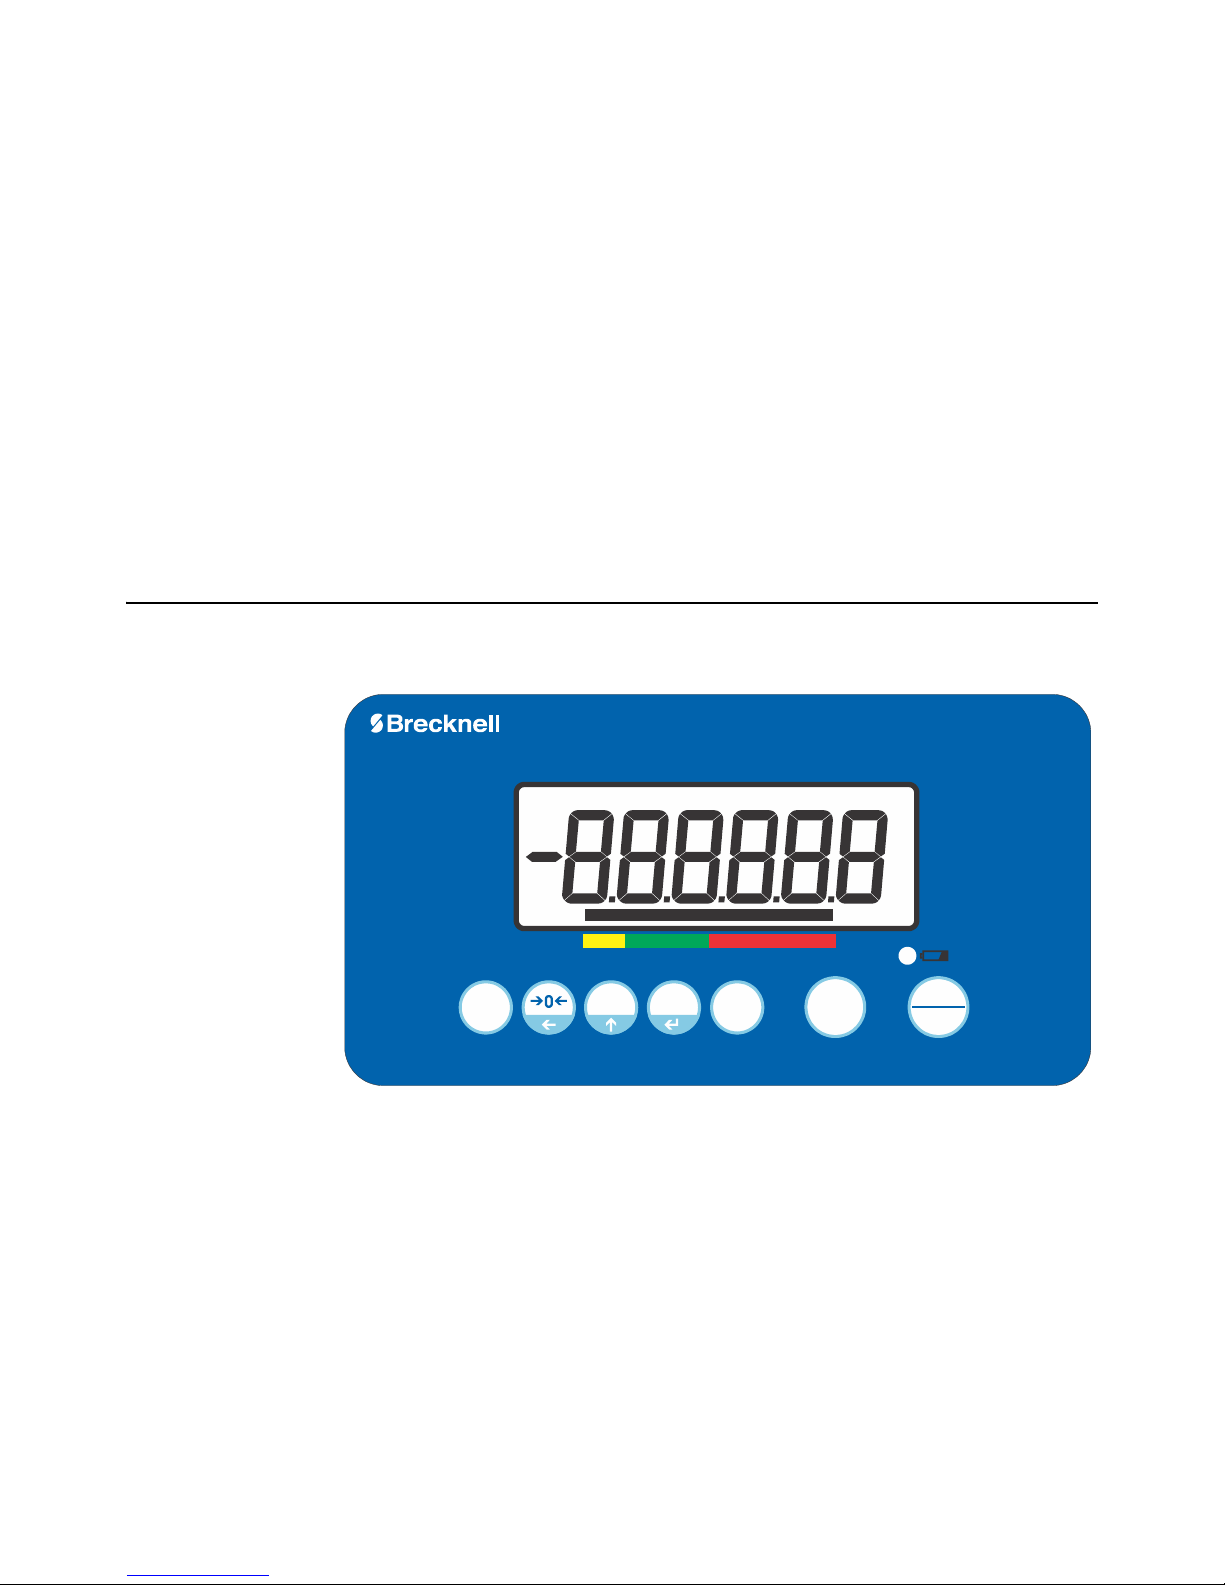
The front panel, shown in Figure 2.1, consists of the keyboard and the digital, LCD
display.
HS-250 Medical Scale User Instructions 9
Figure 2.1 Front panel of the HS-250
Page 10
2.1.1 Keyboard
ON
OFF
HOLD
BMI
PRINT
F
TAR E
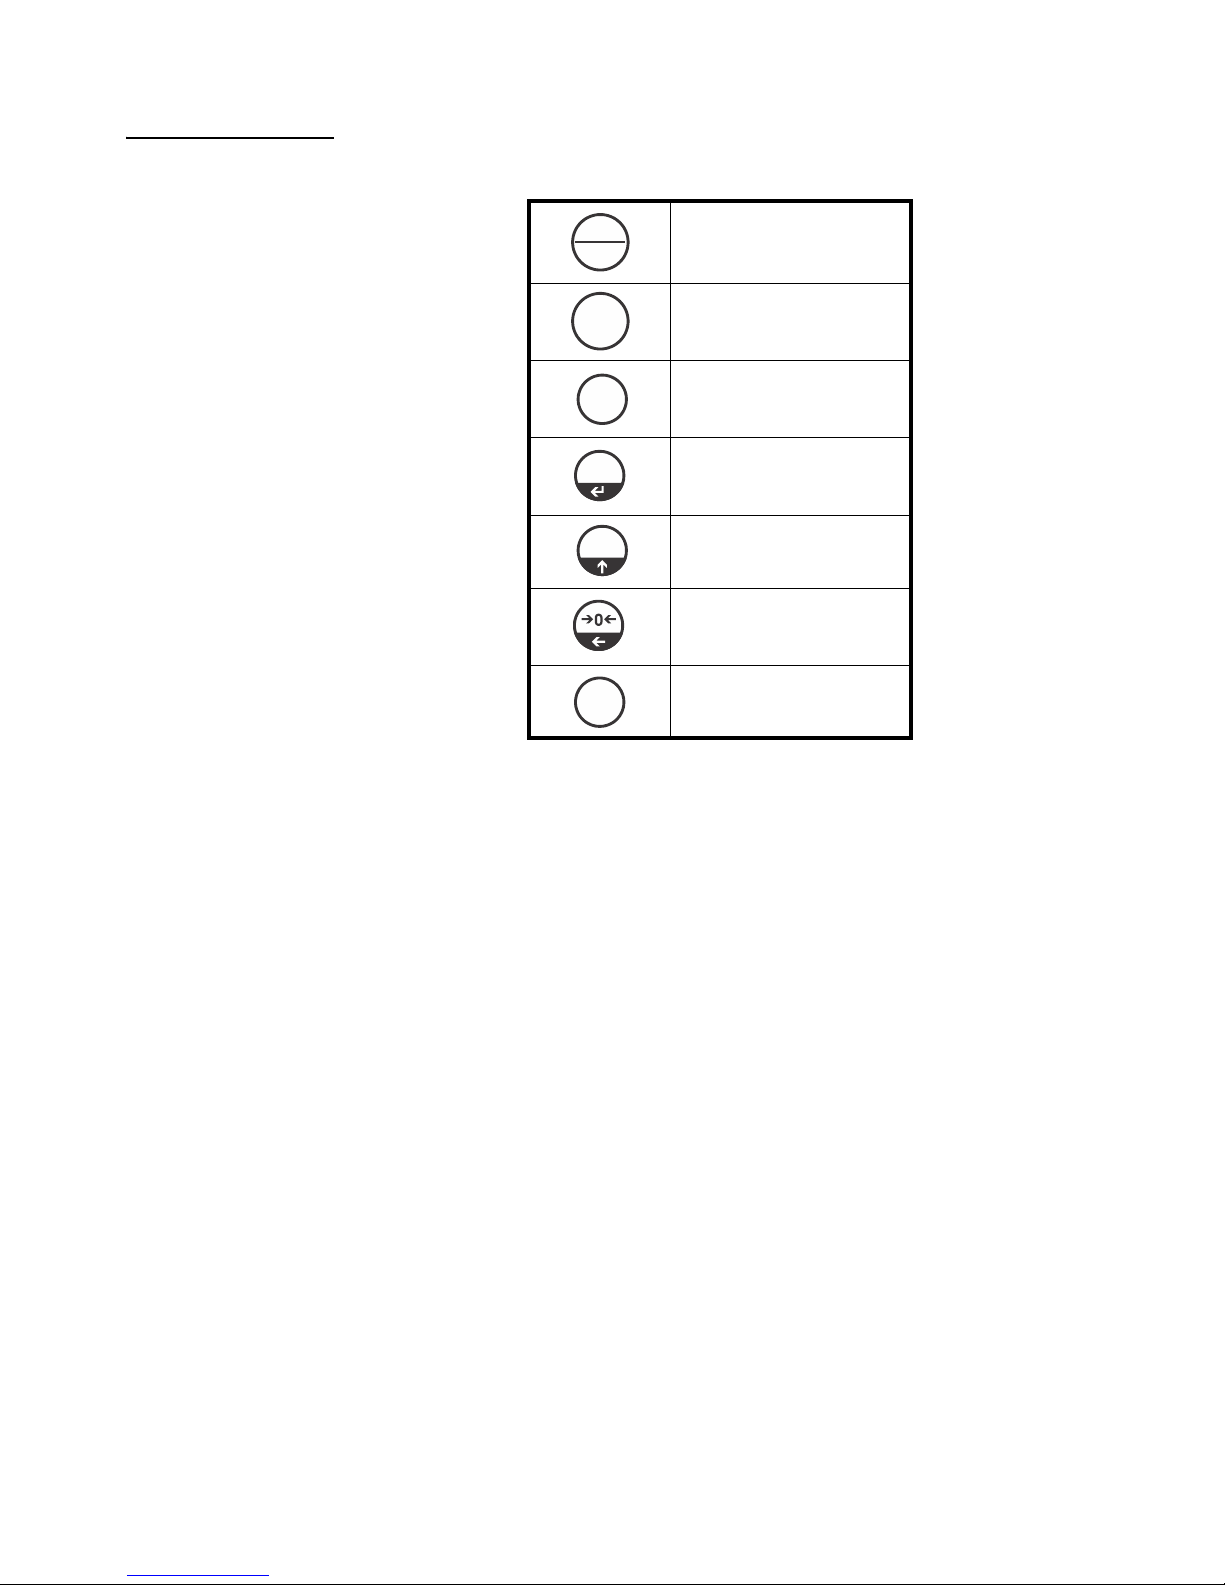
The keyboard has seven keys. The function of each is described below.
Turns the scale power on/off
Set to Hold mode
Set to BMI mode
Print the weight information
Change unit of measure: kg / lb
Zero the scale
Subtracts weight of container
10 HS-250 Medical Scale User Instructions
Page 11
2.1.2 Display
W1 W2
STABLE
ZERO
TAR E
NET
GROSS
DRINK PT BMI HOLD M1 M2 M3 M4
cm
inch
lb
kg
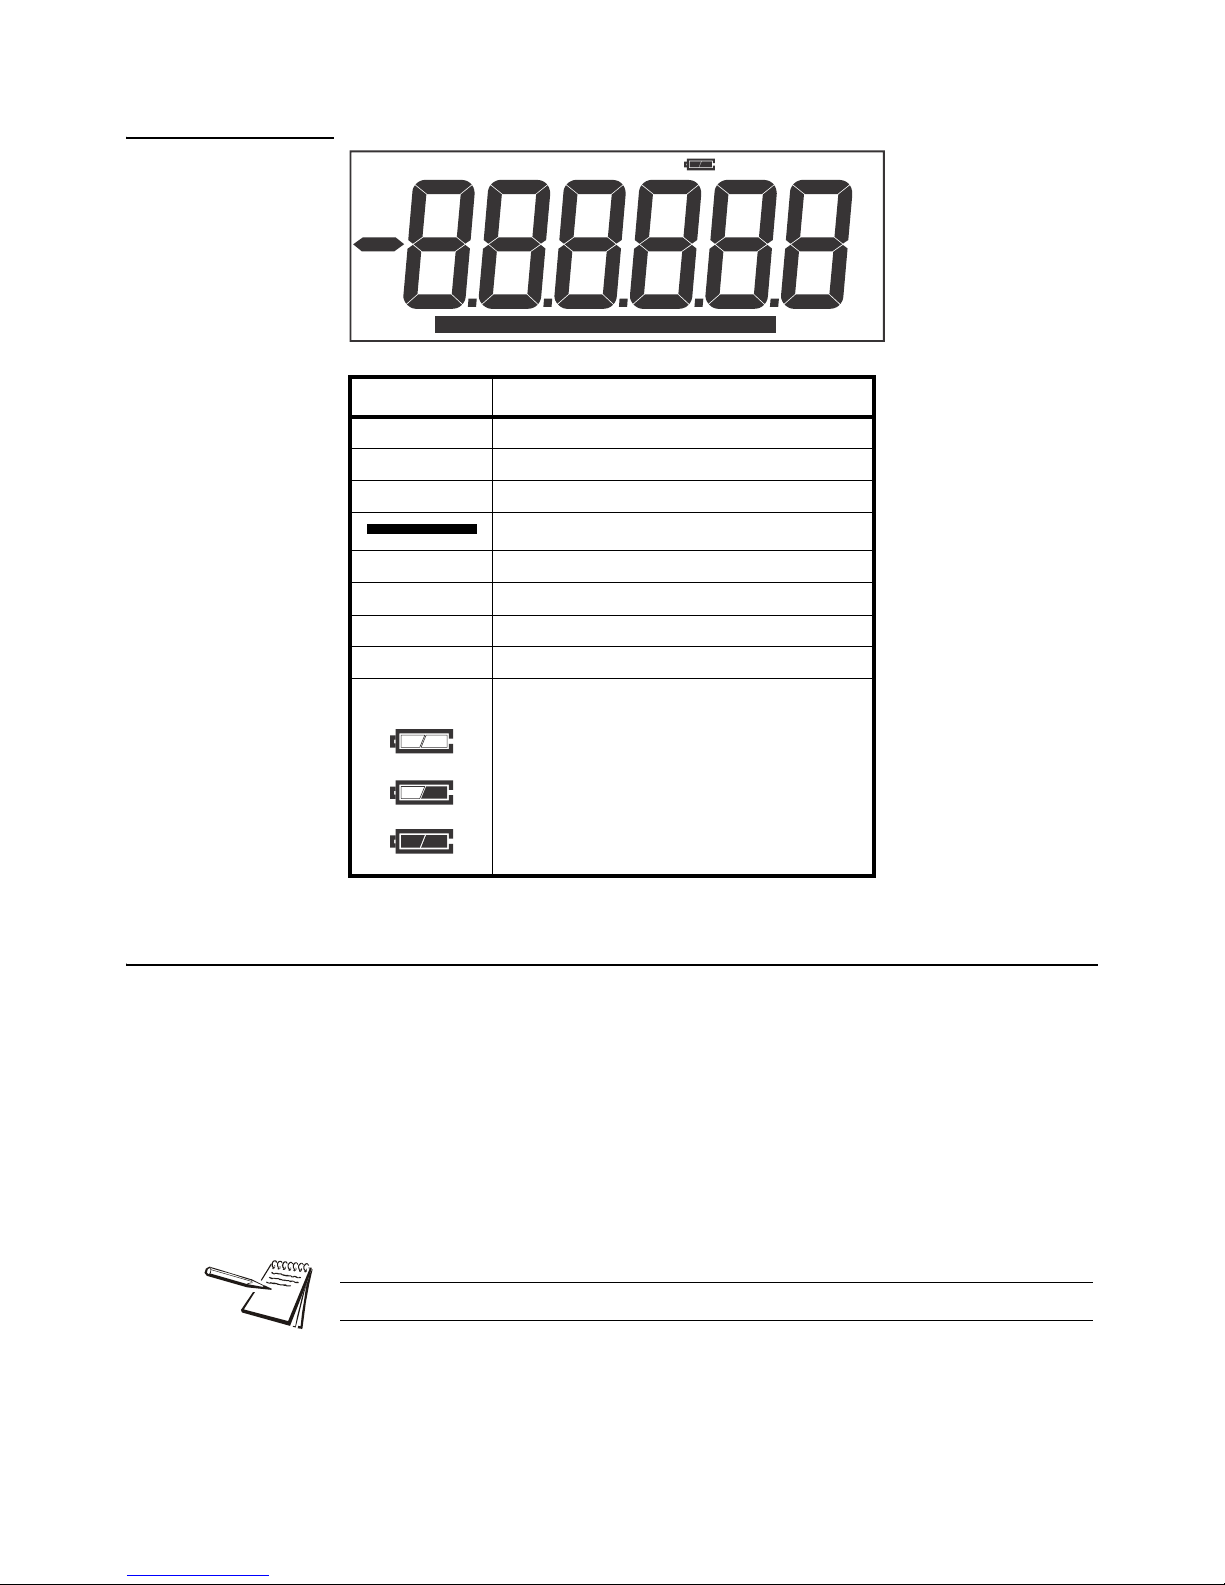
DISPLAY FUNCTION
STABLE Indicator for scale stability
ZERO Indicator for stable zero weight
TAR E Indicator for tare weight display
Indicator for BMI graph
NET Indicator for net weight
GROSS Indicator for gross weight
cm / inch Indicator for measuring units
lb / kg Indicator for weight units
Indicator for status of battery
2.2 Battery Operation
The HS-250 can be operated from the battery if desired. The battery life is 16 hours
with the backlight and 22 hours without the backlight.
The battery symbol on the LCD display appears when the battery needs charging. After
the symbol appears, the scale will operate for several minutes before it automatically
switches off to protect the battery.
To charge the battery plug the AC adaptor into the jack on the back of the indicator and
into an appropriate AC power source. The scale does not need to be turned on.
The battery should be charged for 12 hours for full capacity.
Charge the battery before using the scale for the first time.
Voltage has dropped
Low Voltage
Fully Charged
HS-250 Medical Scale User Instructions 11
Page 12
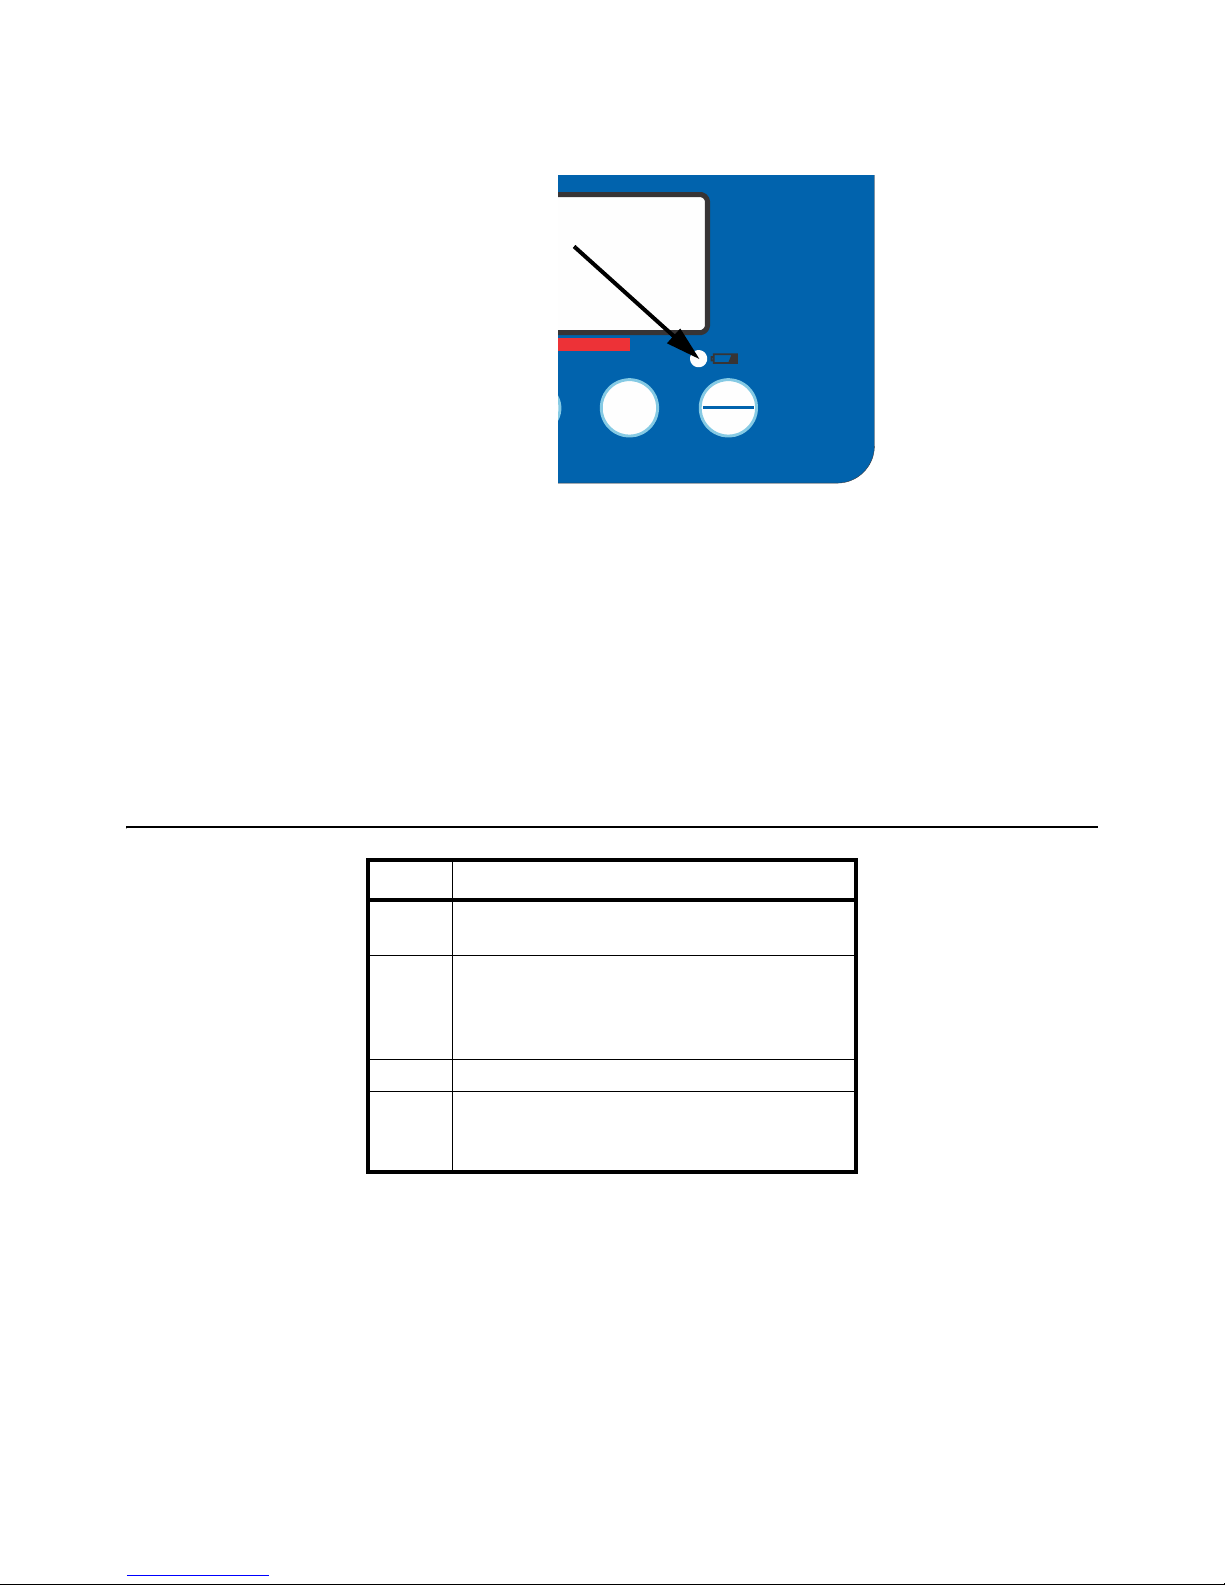
While the scale is charging, the colored LED shown in Figure 2.2 will show the charging
ON
OFF
Max 250 kg/550 lb
Min 2 kg/4 lb
e = 0.1 kg/0.2 lb
HOLD
status. If it is red the battery is nearly discharged. If it is yellow the battery is being
charged. If the LED is green the battery is fully charged.
Figure 2.2 Battery charging status light
l If the battery fails to hold an adequate charge, contact Brecknell. Be sure to
properly recycle all batteries.
l Do not put batteries in the regular trash.
l Do not use any other power adaptor than the one supplied with the scale.
l Verify that the AC power socket outlet is properly protected.
2.3 Print Format
PRT Print format
0
2012/08/09 11:00
60.0 kg
2012/08/09 11:00
1
60.0 kg
170.0cm
20.7BMI
2 60.0 kg
60.0 kg
3
170.0cm
20.7BMI
12 HS-250 Medical Scale User Instructions
Page 13

3 Installation
Not level Level
3.1 Unpacking
Carefully take the scale out of its package and make sure it’s not damaged and all
accessories are included.
l Remove the scale from the carton.
l Remove the protective covering. Store the packaging and use if you need to
l Remove the transport bolt under the scale platform. See the sticker on the
l Inspect the scale for damage.
l Make sure all components are included
Accessories:
1. Scale
2. AC Adaptor
3. Product manual
transport the scale later.
platform.
3.2 Leveling the scale
Place the scale on a flat, stable floor area.
Check the bubble level located at the base of the column. If the bubble is not centered,
adjust the leveling feet until the bubble reaches the center, as shown below. Check the
level if you move the scale to a new location.
HS-250 Medical Scale User Instructions 13
Page 14
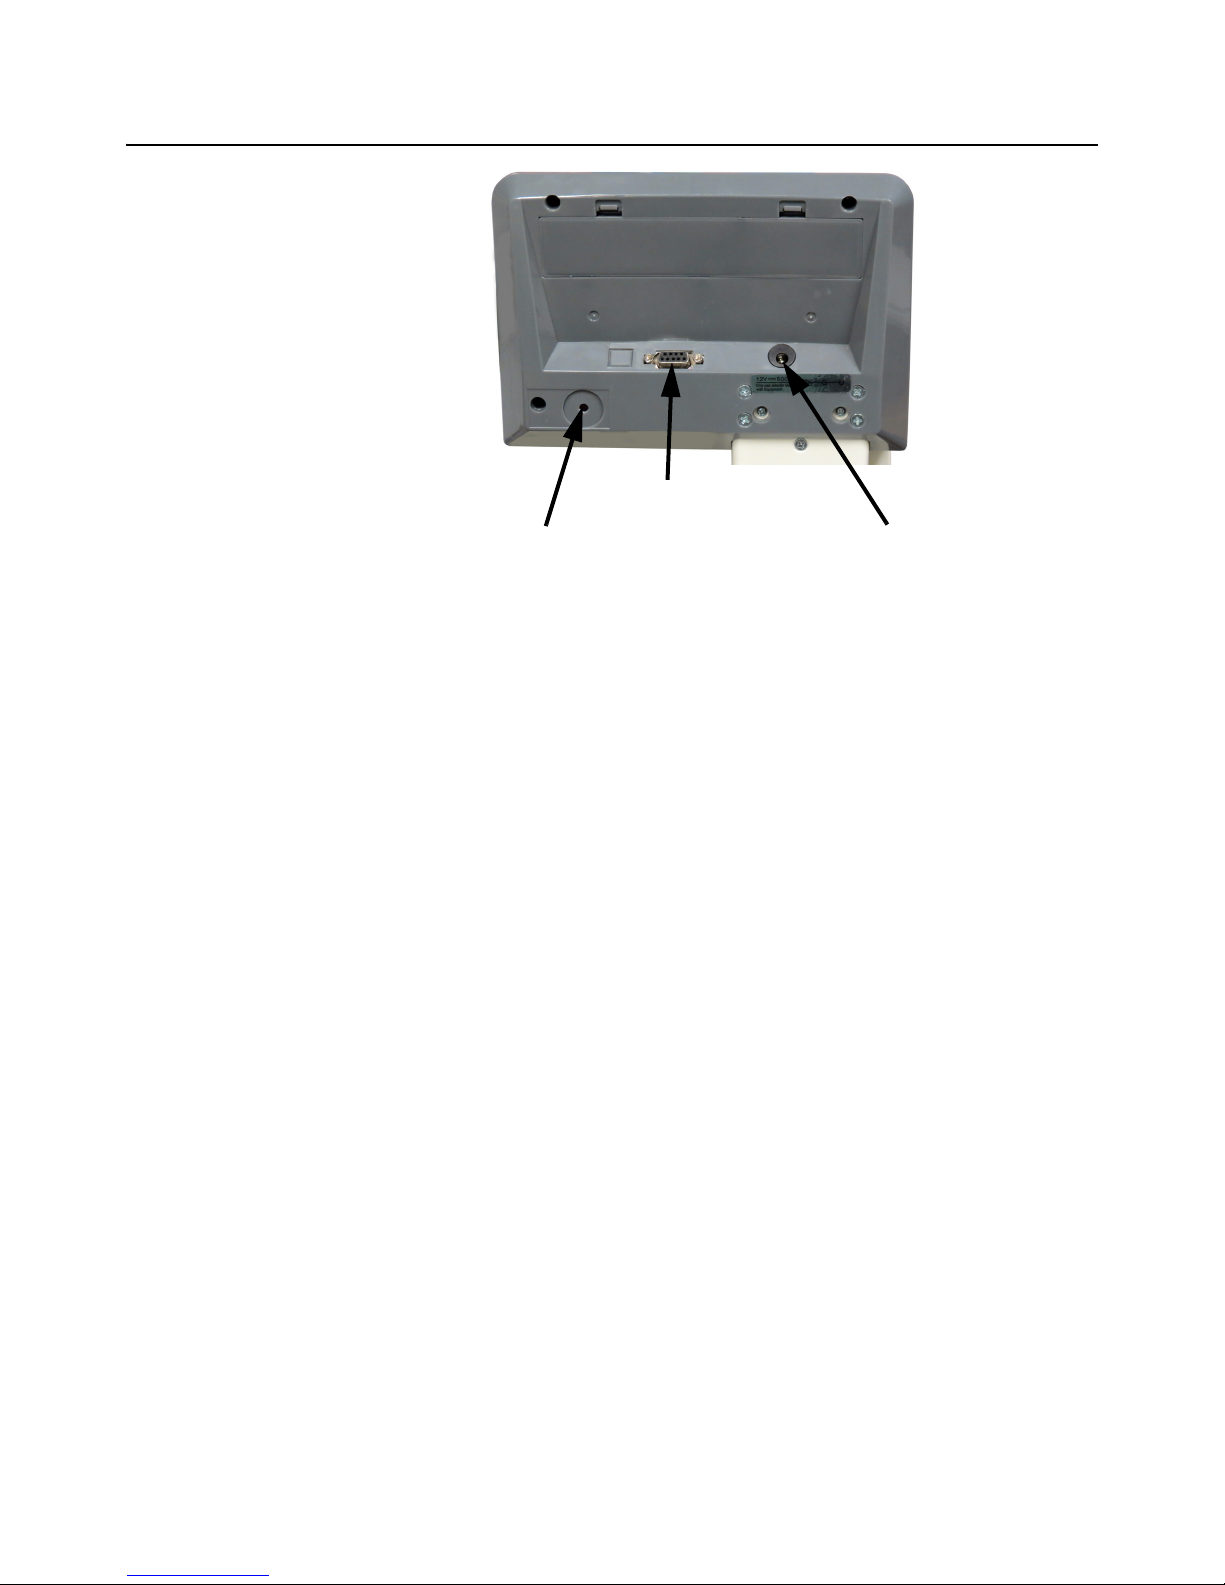
3.3 Installation
Calibration switch
RS-232 connector
AC adaptor jack
1. Place the scale on a level, stable area of the floor.
2. Connect the AC adaptor pin to the adaptor jack on the back of the indicator
Figure 3.1 Back of the indicator head
head. See Figure 3.1.
3. Connect the AC adaptor to an appropriate power socket. Pluggable equipment
must be installed near an easily accessible socket outlet with a protective
ground/earth contact.
4. Display will show the version number and will perform a self-check test.
5. After self-checking the display will be in normal weighing mode.
6. It is recommended that you allow the unit to warm-up for 15 minutes to allow
the electronics to stabilize.
7. Calibrate the scale as explained in Calibration on page 21. Use appropriate
calibration weights that are a minimum of 1/3 of the scale capacity.
Your scale is now ready for operation.
14 HS-250 Medical Scale User Instructions
Page 15

4 Operation
ON
OFF
ON
OFF
TAR E
TAR E
TAR E
F
4.1 Initial Start-up
Allow the scale to warm-up for 15 minutes after power up before using. This allows the
electronics to stabilize for maximum accuracy.
4.1.1 Power ON/OFF
1. Press to power up the scale …
2. If you want to switch off the unit, press again.
4.1.2 Zeroing the scale
The display illuminates and a self-test is started.
Press to zero the scale and prepare it for weighing.
4.1.3 Using a tare weight
You can tare the weight of any container by pressing . The net weight of the object
being weighed is then displayed.
1. Load weight on the platform.
2. Press …
The tare weight is subtracted and 0 is displayed.
3. Place object to be weighed on the platform …
The net weight is displayed and the NET anuunciator lights.
4. Remove all weight from the platform and the tare weight, with a negative sign
in front of it, is displayed.
5. To remove the tare, press with no weight on the scale …
4.1.4 Change unit of measure
Press to toggle the unit of measure between kg and lb.
HS-250 Medical Scale User Instructions 15
The tare weight is cleared, 0 is displayed and the GROSS annunciator
lights.
Page 16
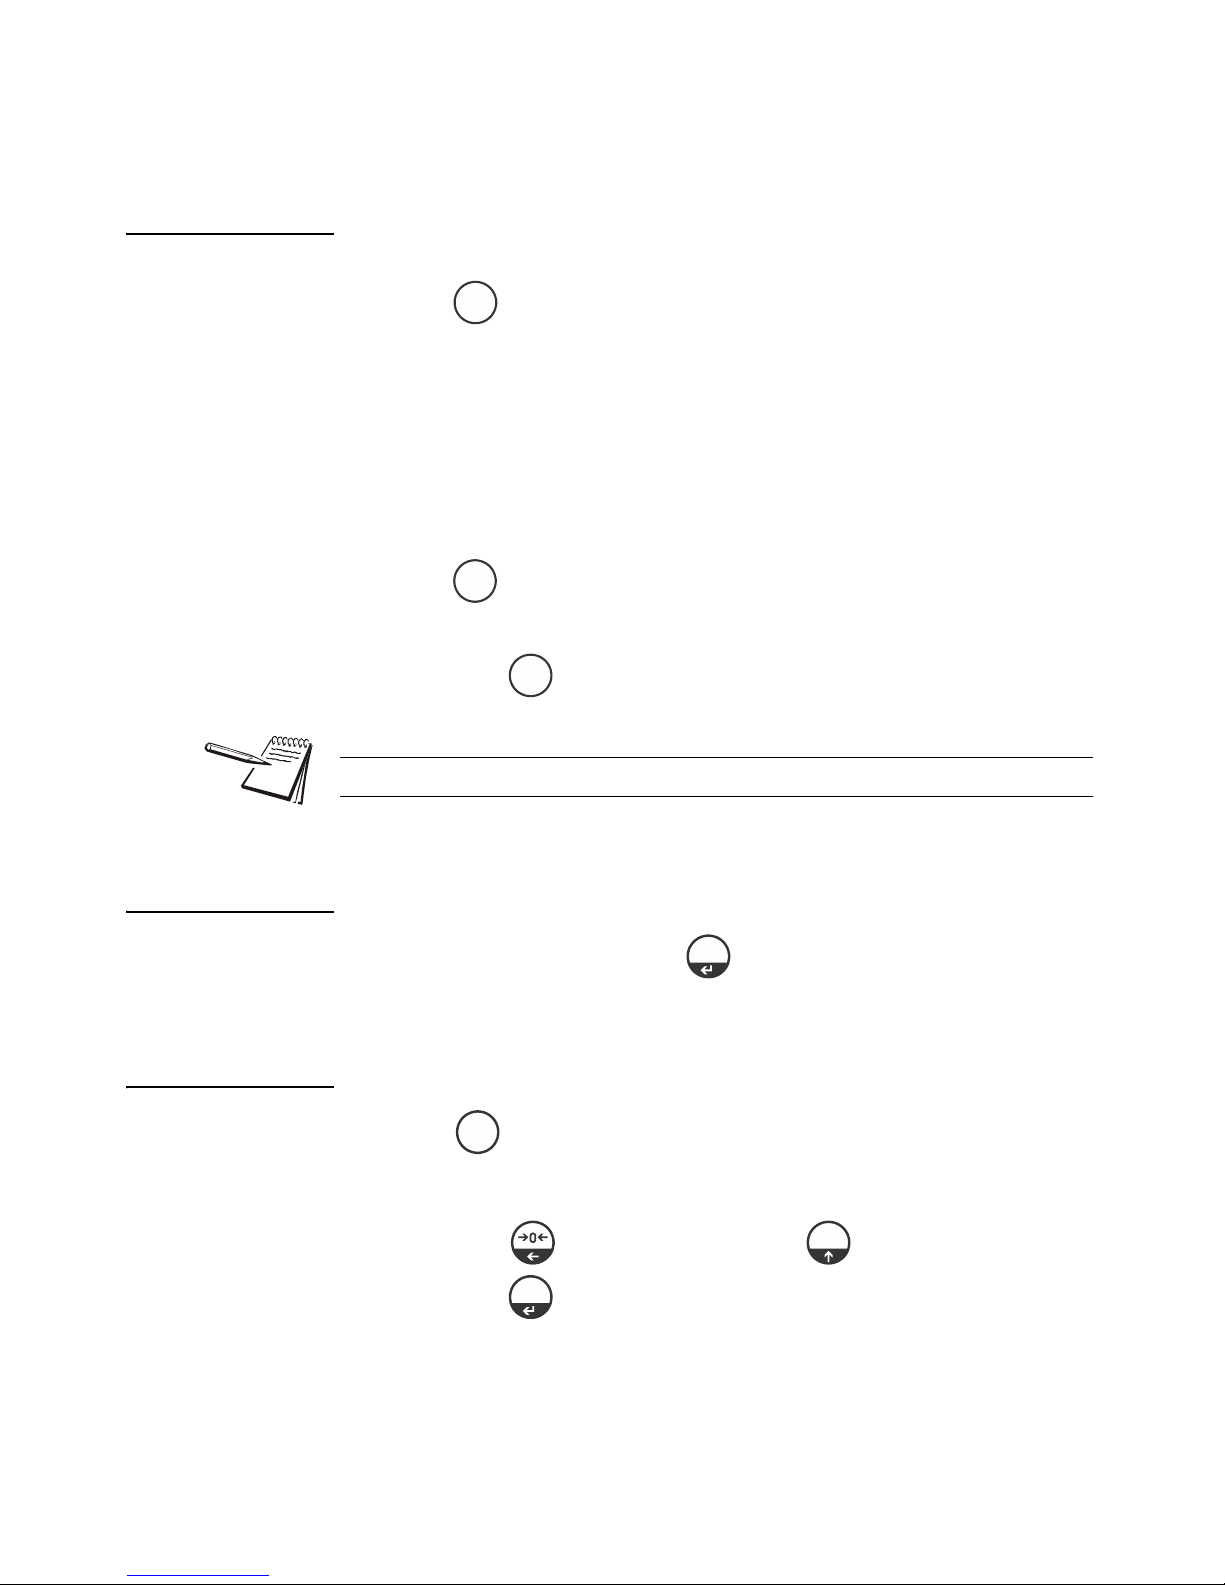
If you want to change the unit of measurement for height, see parameter F5 StU in
HOLD
HOLD
HOLD
PRINT
BMI
F
PRINT
Parameters on page 18.
4.1.5 Hold function
1. To keep a weight displayed even after the weight is removed from the scale,
2. Load the scale …
3. Remove the weight …
press before loading the scale …
The HOLD annunciator appears and dashes (------), fill the display.
After the weight stabilizes, the scale beeps, the dashes disappear and
the weight is displayed.
The weight continues to be displayed for 10 seconds or until you press
again, whichever occurs first.
Normal weight is then displayed and the Hold function is off until you
press again.
You cannot perform a zero or tare during a Hold function.
4.1.6 Print function
If a printer is attached and active, press to print the weight value. You can disable
the print function. See the F2 parameter in the Parameter Menu Table on page 19.
4.1.7 BMI function
1. Press while in weighing mode …
The display shows the last height.
Press to change digit, and press to increase the value,
press to confirm it …
Display enters the BMI mode. BMI is displayed.
2. A person can stand on the scale and their BMI value will be shown and the
BMI graph bar will display.
16 HS-250 Medical Scale User Instructions
Page 17

3. Press and the display will return to normal weighing mode.
BMI
TAR E
4.1.8 Precision x10
To see a more accurate weight value, press and hold for two seconds …
The display shows one more decimal place. The last digit will blink for
five seconds, then it will go back to normal weighing value automatically.
HS-250 Medical Scale User Instructions 17
Page 18
5 Parameters
PRINT
F
PRINT
F
PRINT
PRINT
F
TAR E
BMI
TAR E
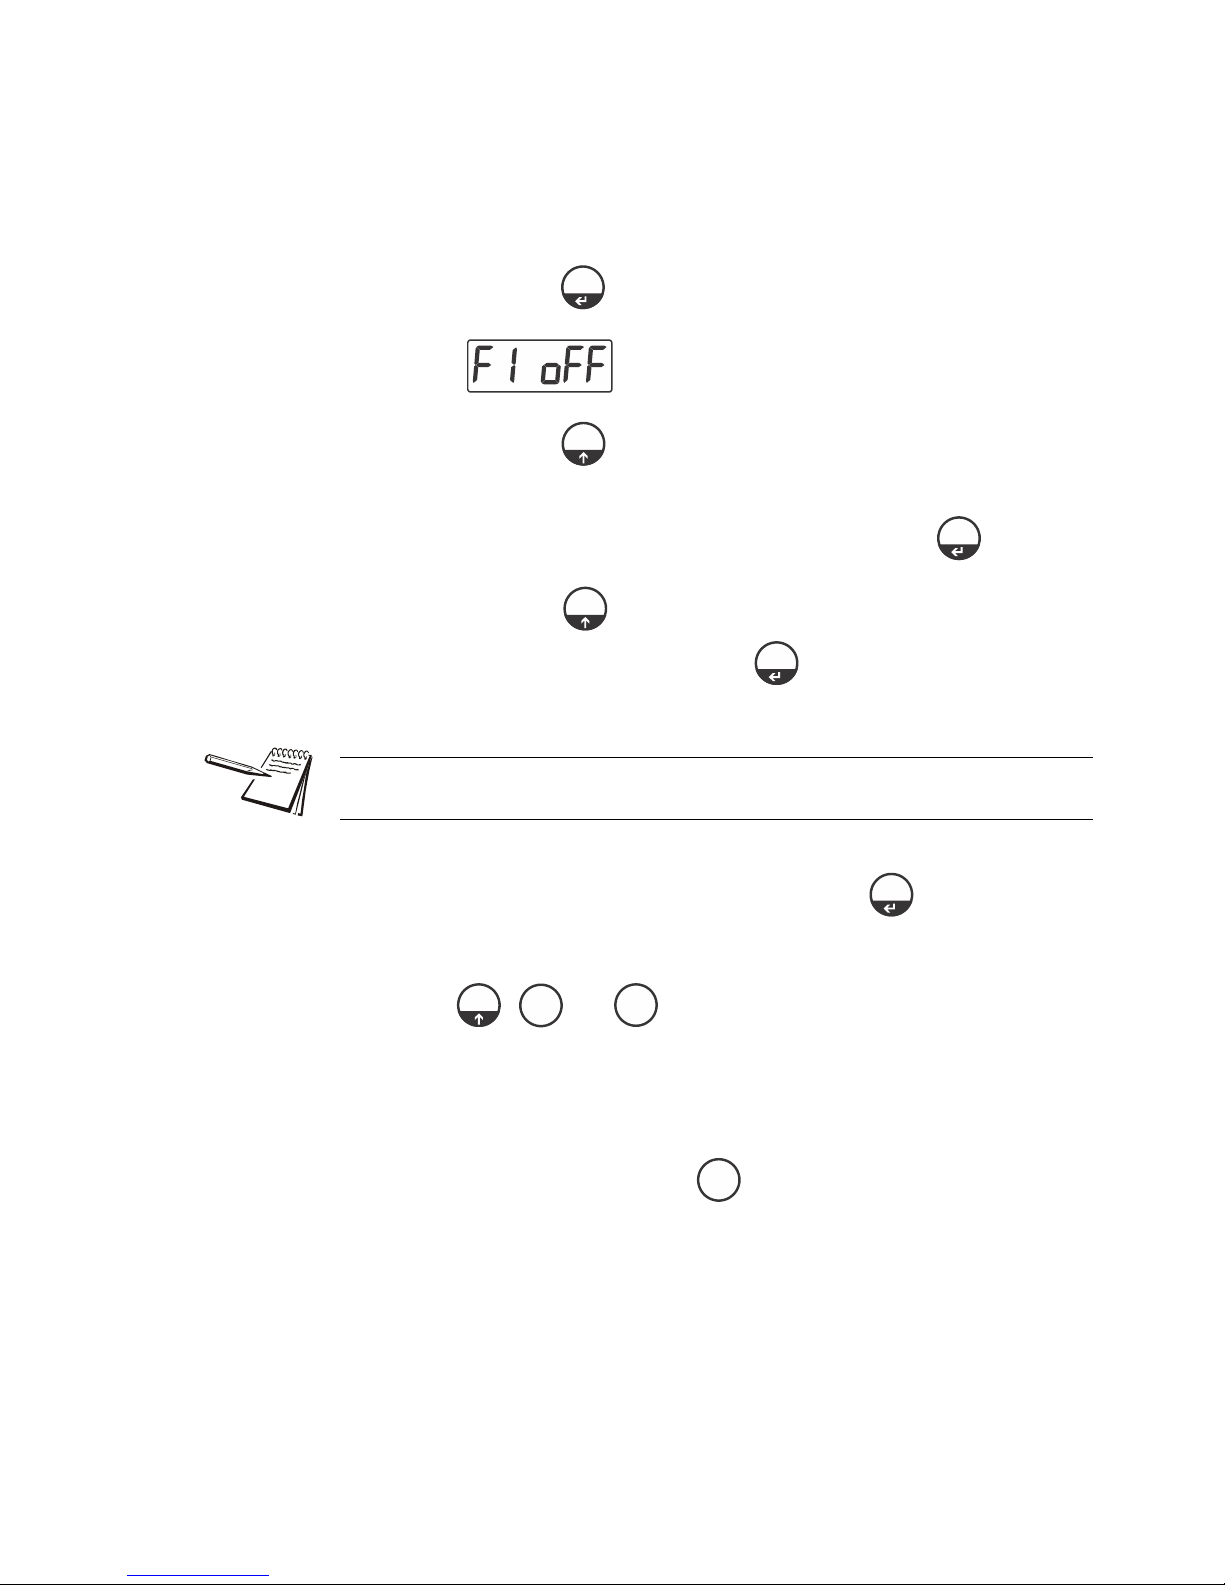
Follow these steps to access the scale parameters, navigate the menus and select the
desired parameters.
1. To access the parameter menu, power up the scale and during the self-checking
countdown, press …
2. Repeatedly press to scroll through the menu list. See the list of menus in
the Parameter Menu Table below.
3. To enter a menu and see the parameter items within, press .
4. Repeatedly press to scroll through the items in a menu. When the item
you want to choose is displayed, press to accept it and the display will
return to the menu list.
is displayed. This is the first menu.
Before you can enter the tCH menu you must press the calibration switch, shown in
Figure 3.1.
5. To access the tCH menu, with tCH displayed, press …
Pin is displayed.
6. Press , and keys in succession …
P1 SPd is displayed. This is the first item in the tCH menu
7. Follow the above navigation rules to access and set the parameters in the
table below.
8. To escape from the menu, press . You may have to press it more than
once, depending on where you are in the menu structure.
18 HS-250 Medical Scale User Instructions
Page 19
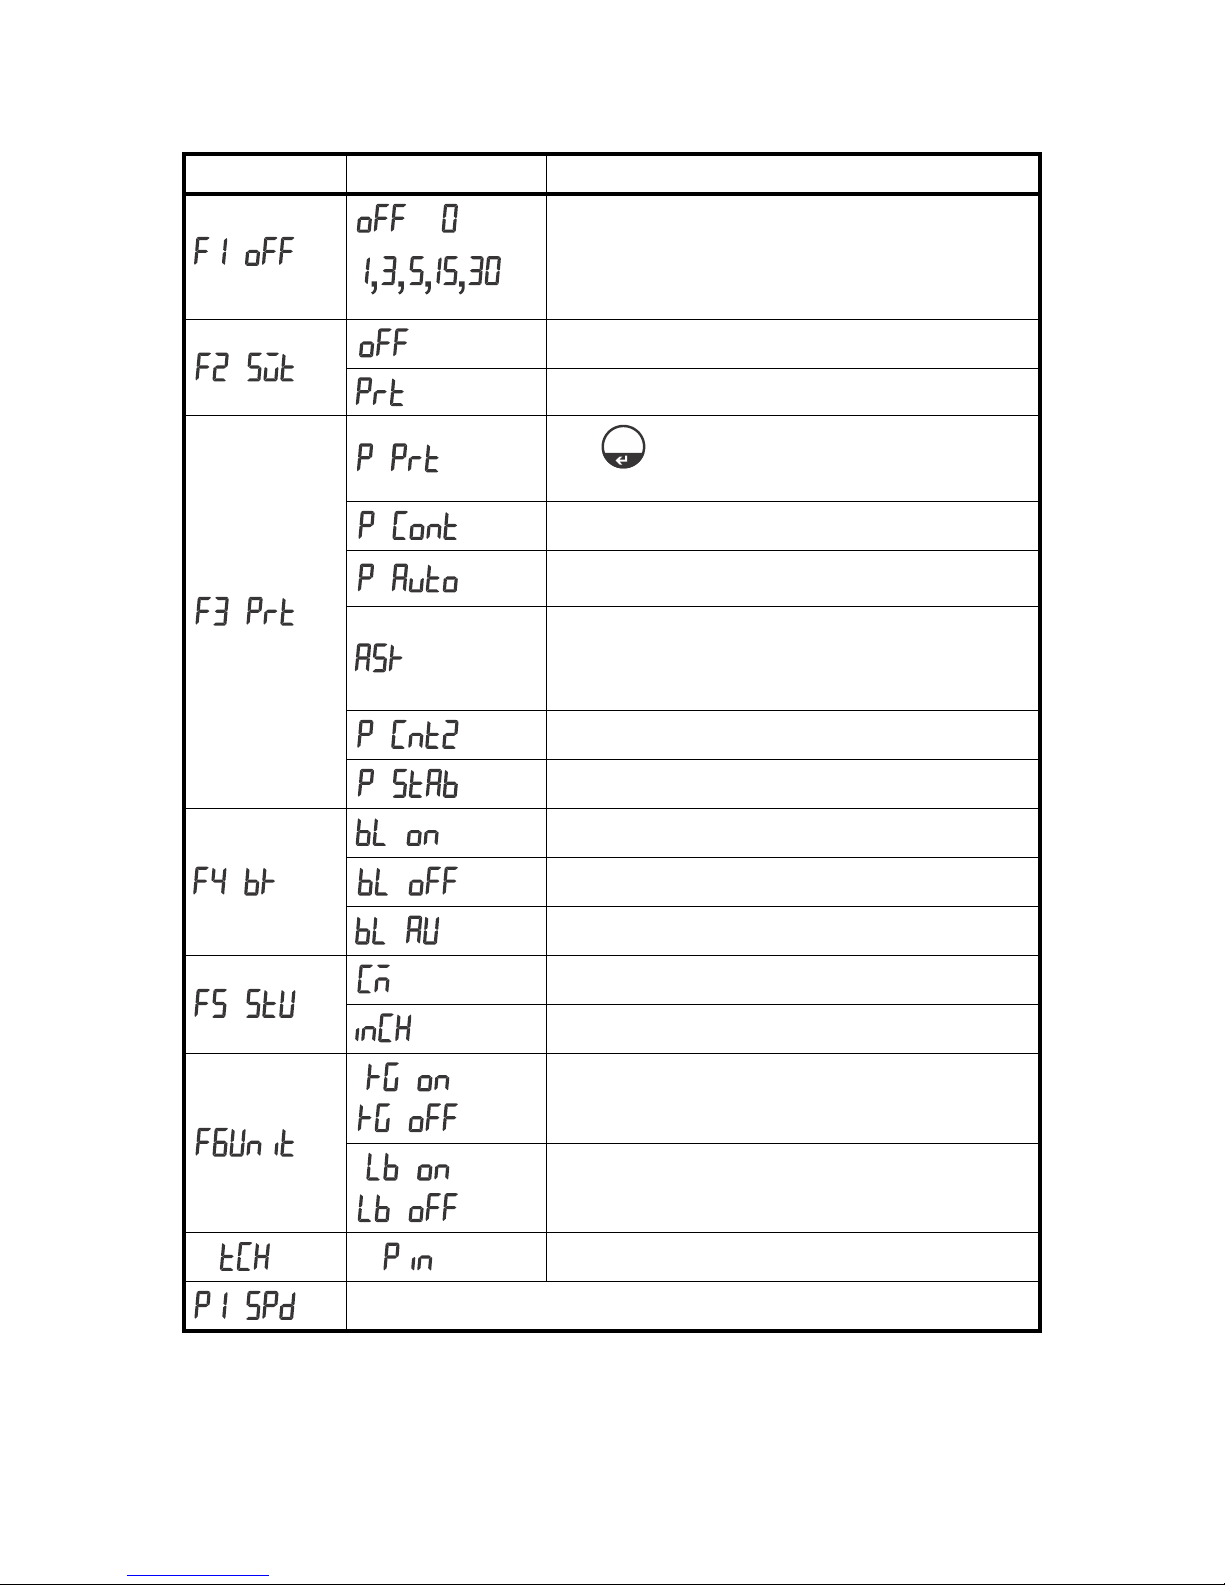
Parameter Menu Table
PRINT
Menu Sub Menu Description
Use to set the auto power-off time.
Unit is in minutes.
If you select 0, it will not auto power-off.
Disable print function.
Enable print function.
Press , weight value will be added to the memory and print
the print out
Send data continuously.
Automatic accumulation.
Individual weighing values are automatically added
ASK mode
Command R: read data
Command T: Tare
Command Z: Zero
Send data by another continuous mode.
Send data when the weighing values is stable
Set the backlight always on.
Set the backlight always off.
Set the backlight automatically on.
Select unit cm
Select unit inch
Enable/ disable unit kg
Enable/ disable unit lb
Enter the password
Set A/D convert speed(7.5/15/30/60)
HS-250 Medical Scale User Instructions 19
Page 20
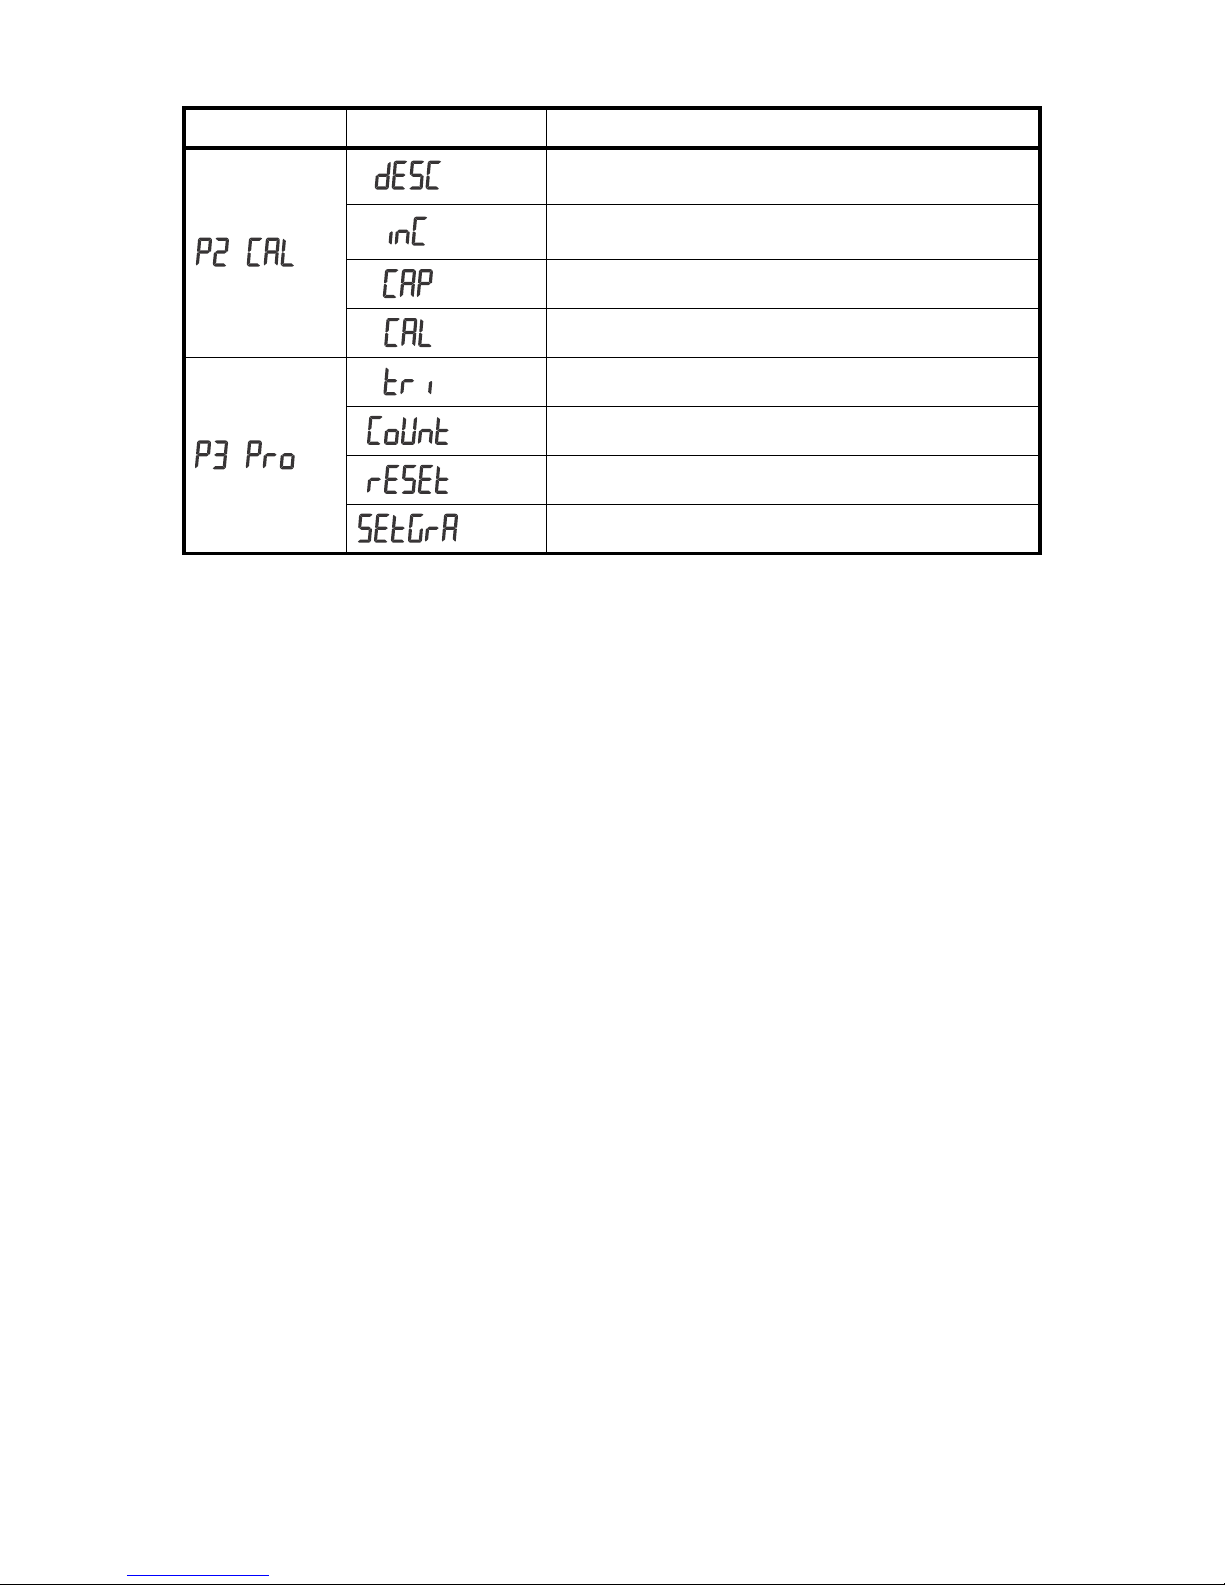
Menu Sub Menu Description
To set decimal points.
Options: 0, 0....0, 0..00, 0.000, 0.0000
To set increment
Options: 1, 2, 5, 10, 20, 50
Set capacity
Enter calibration
Factory settings
To show the scale internal count
Reset the scale
Set the gravity value
20 HS-250 Medical Scale User Instructions
Page 21
6 Calibration
PRINTFPRINT
F
TAR E
BMI
F
PRINT
F
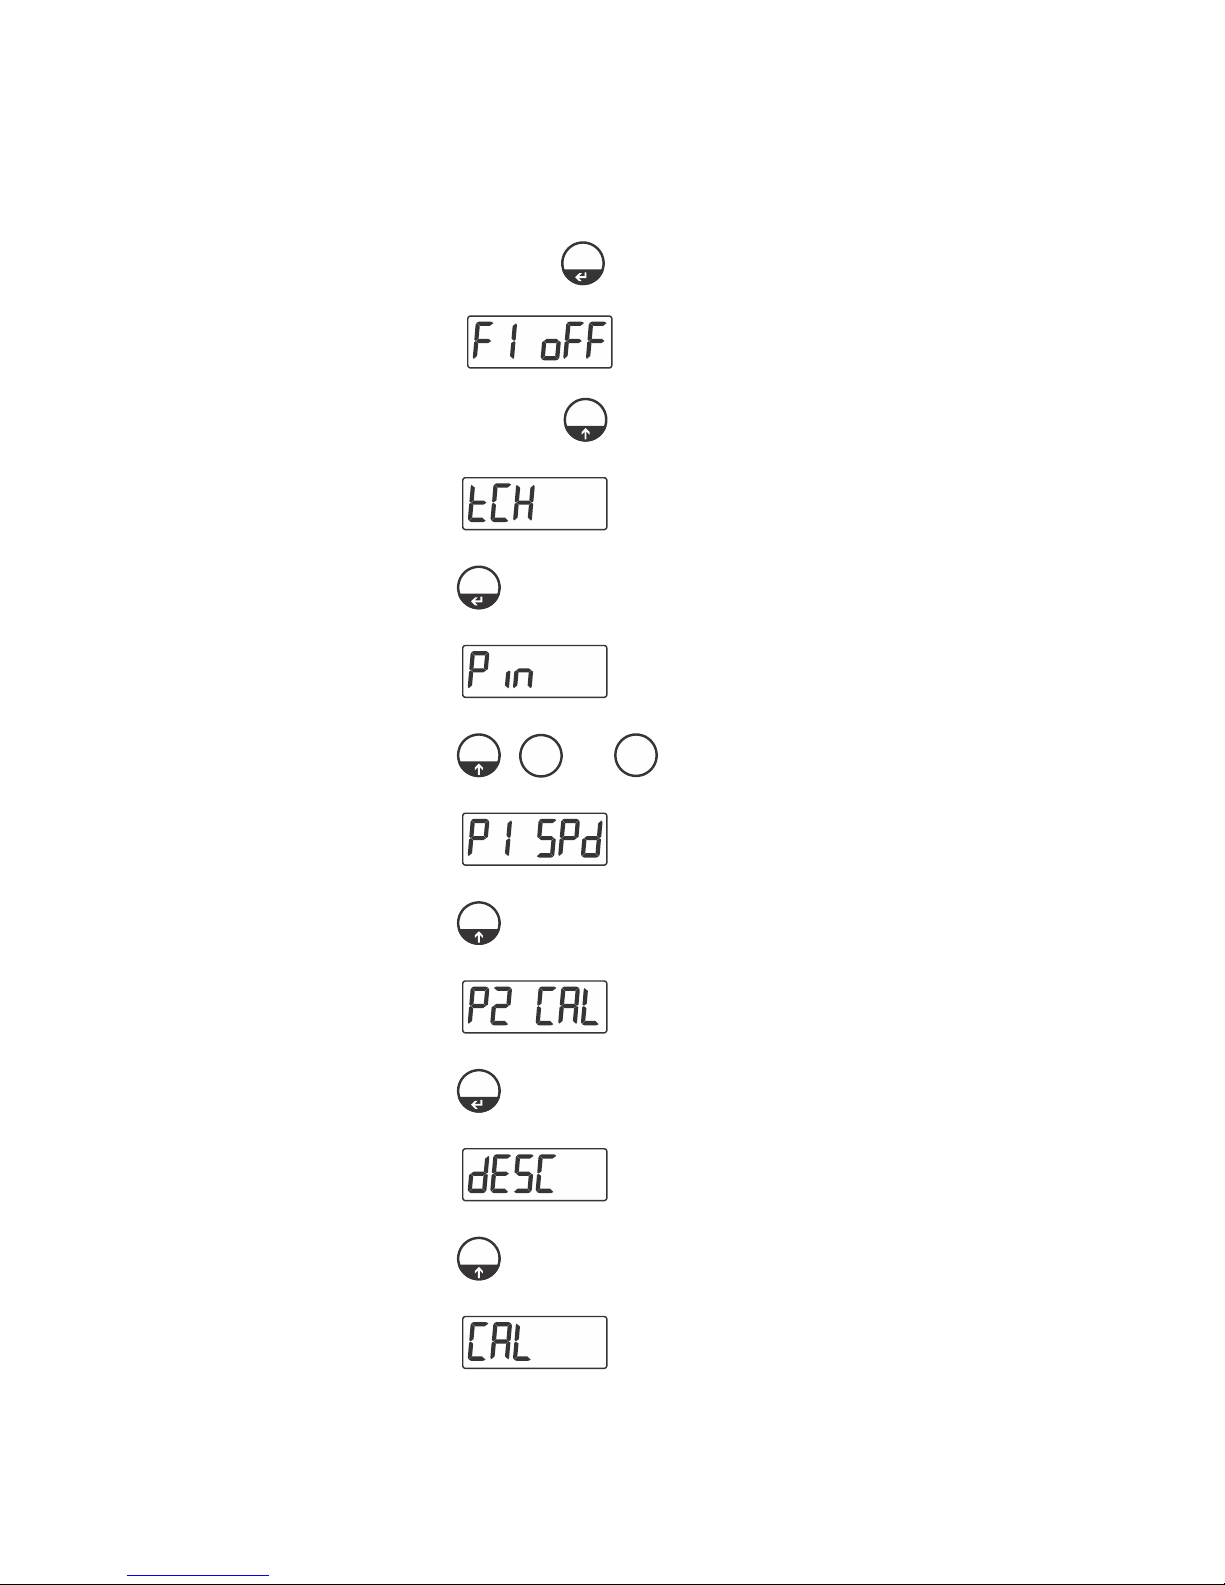
Follow these steps to calibrate the scale
1. Access the parameter menu. Power up the scale and during the self-checking
countdown, press …
2. Repeatedly press until …
3. Press …
is displayed.
.is displayed.
is displayed.
4. Press , and in succession …
is displayed.
5. Press …
is displayed.
6. Press to enter calibration …
is displayed.
7. Press …
HS-250 Medical Scale User Instructions 21
is displayed.
Page 22
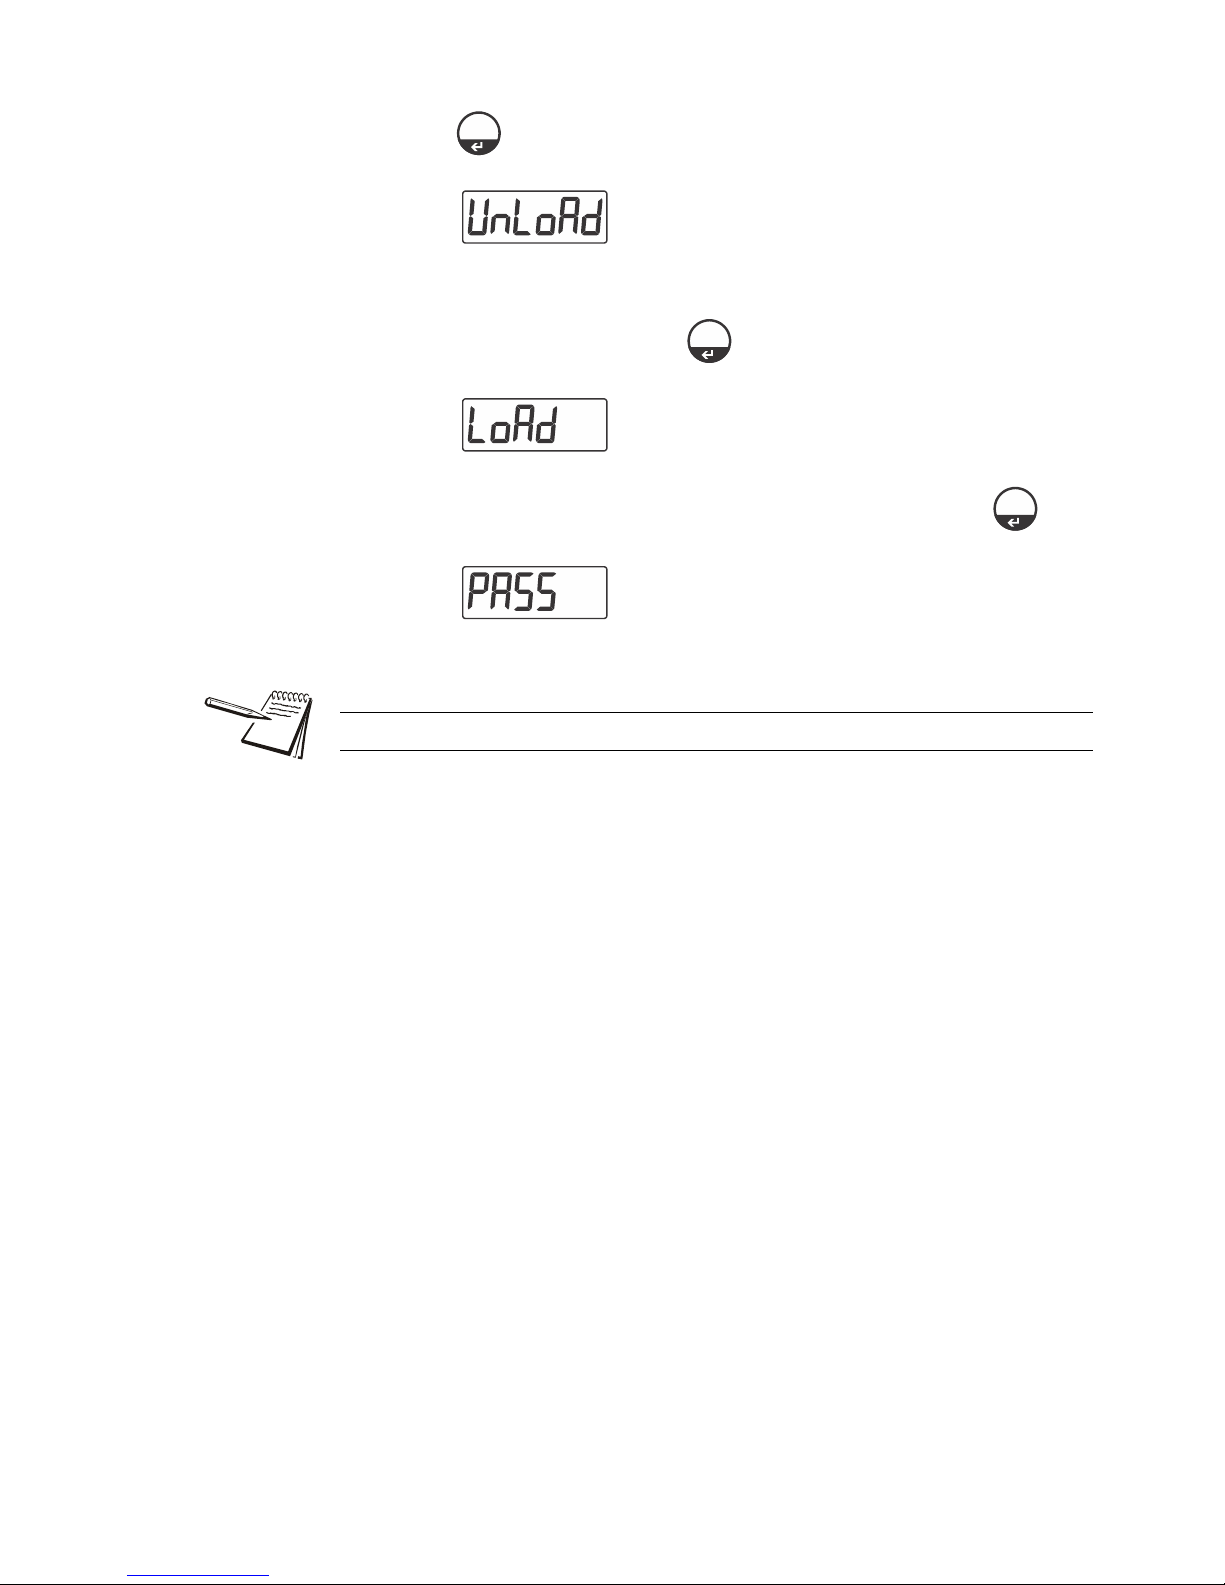
8. Press …
PRINT
PRINT
PRINT
is displayed.
9. Remove any weight from the scale.
10. When the scale is stable, press …
is displayed.
11. Place the test weight on the scale. After the scale is stable, press …
is displayed and then the scale will start the self-test
and return to normal weighing mode.
The unit (kg / lb) is the same as the last displayed one.
22 HS-250 Medical Scale User Instructions
Page 23
7 Maintenance
WARNING: Disconnect all power to this unit before installing, cleaning, or
servicing. Failure to do so could result in bodily harm or damage the unit.
CAUTION: Permit only qualified persons to service the instrument.
Before connecting or disconnecting any components, remove the power.
Failure to observe these precautions bodily harm or damage to or destruction
of the equipment.
7.1 General
If the scale does not operate properly, fix the problem as soon as possible.
Determine whether the problem is constant or intermittent. Problems can be caused by
mechanical or electrical influences.
7.1.1 Cleaning
Check the following:
l Water
l Corrosive materials
l Vibrations or temperature or wind
l Physical damage
Check the scale cables for damage, and check all connections and connectors for any
loose contact or incorrect connection
l Disconnect the power before cleaning.
l Use a cloth with mild suds and light cleaning agents.
l Make sure that fluid does not get into the device.
l Use a clean and soft cloth for drying.
HS-250 Medical Scale User Instructions 23
Page 24
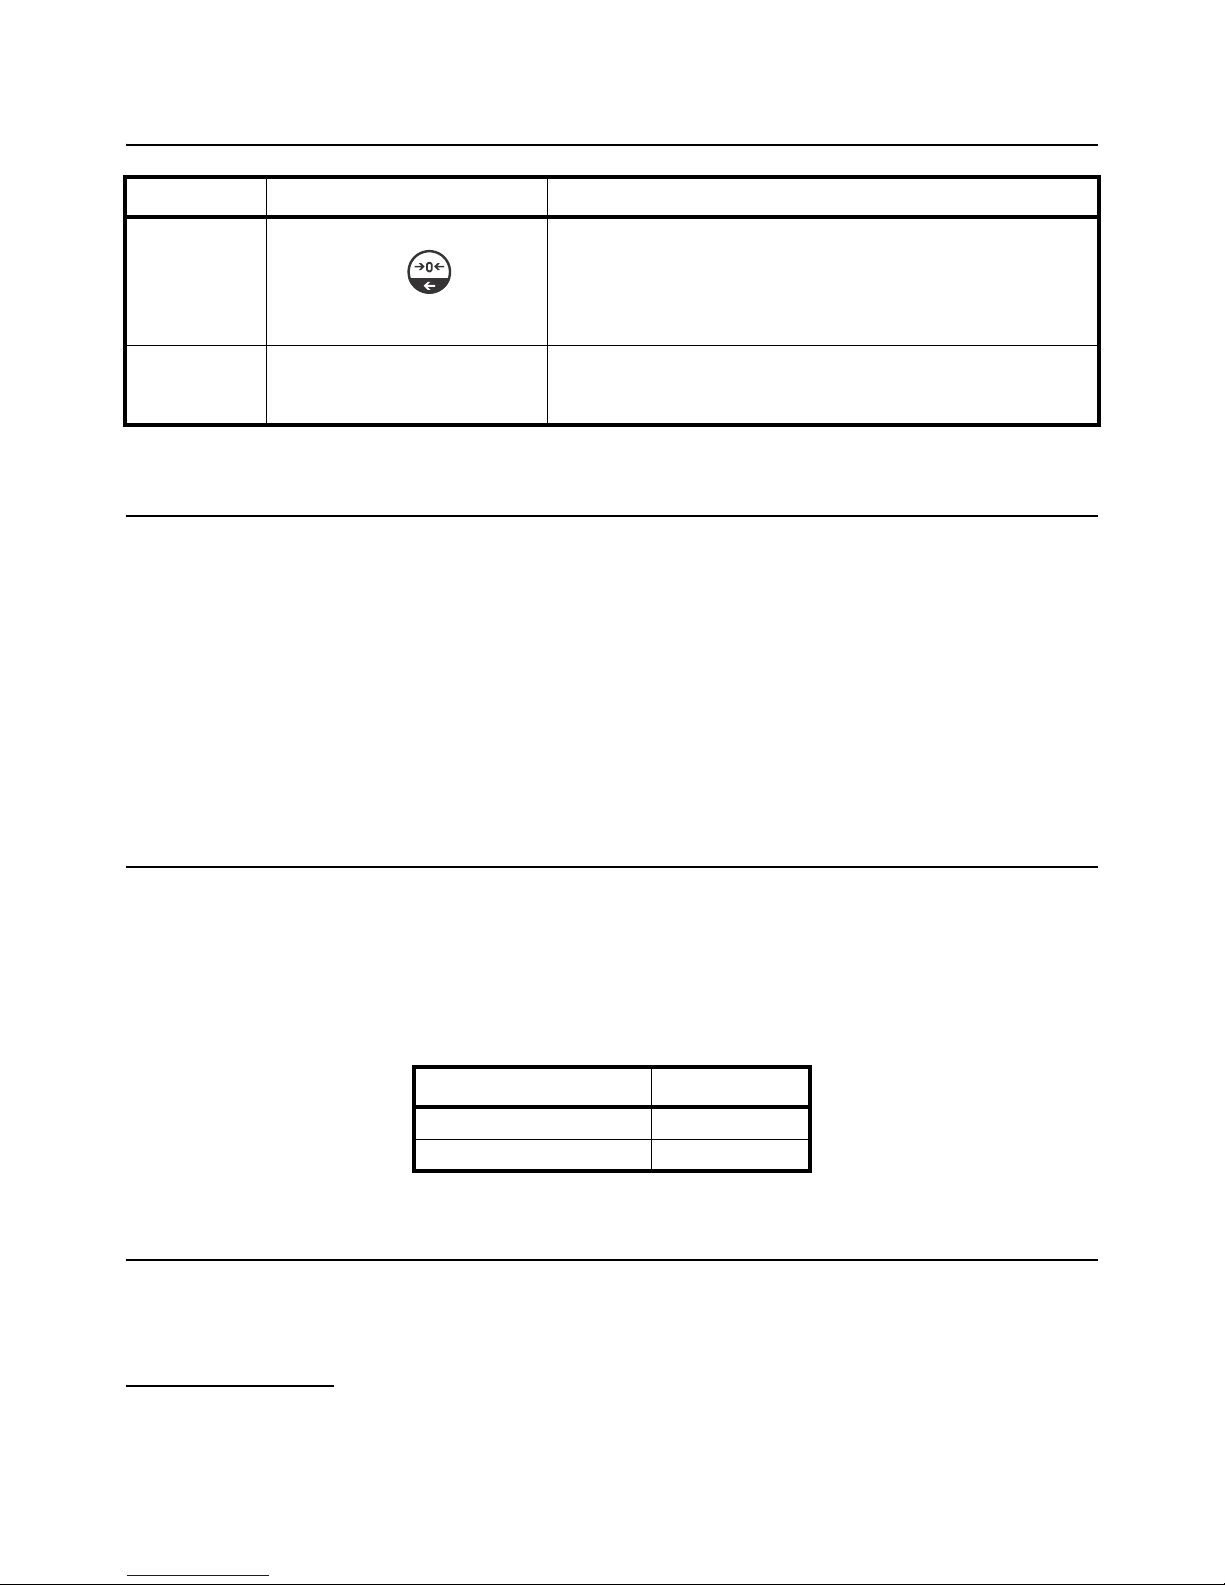
7.2 Error codes
Error Code Description Possible Causes
Err 4 Zero range exceeded, due to turning
on or by pressing
Goods on the platform
Overload, when zeroing the scale
Improper calibration
Load cell problem
PCB problem
Err 6 A/D Count out of the range Platform not installed
Load cell problem
PCB problem
7.3 Determine the problem
Determine whether the problem is in the PCB or the Load Cell
l Remove power from the system, and disconnect the load cell connection
from the PCB
l Connect the PCB to a load cell simulator
l Reapply power and test the PCB
l If problem goes away, its source is probably in the load cell. Check the
wiring, connecter, load cell and mechanical components of the load cell.
If problem persists, its source is probably in the PCB. Check the PCB voltages,
connectors, cables and function programs
7.4 Check the load cell
l Remove power from the system, and disconnect the PCB from the load cell
l Check for moisture or foreign material inside.
l Make sure all leads are connected correctly.
l Check load cell for proper input and output resistances
Load Cell Connections
Measuring Points Resistance
Red (+ Exc) to White (–Exc) 420 ±20Ω
Green (+Sig) to Black (–Sig) 350Ω ±5Ω
7.5 Check PCB Voltages
If the problem is in the PCB, use a multimeter to check the following voltages
7.5.1 AC Power
Check the AC power socket out put voltage.
l Voltage must be between -20% and +10% of the normal AC voltage.
24 HS-250 Medical Scale User Instructions
Page 25

7.5.2 Adaptor Voltage
Check the adaptor output cable connecter voltage
l Voltage must be minimum 9VDC and maximum 15VDC
7.5.3 PCB Input Voltage
Check the PCB input power connector voltage:
l Voltage must be minimum 9VDC in to the pin AD+
l Check Battery Voltage and Charging Voltage
1. Check the Battery Voltage:
2. Check the Battery Charging Voltage:
Voltage must be minimum 6VDC. If below the 6VDC connect the
adaptor for charging
The battery voltage below the 5.5VDC, replace the battery and install
new 6V/3.4Ah battery.
Remove the battery connection terminals (Red and Black) from the
battery.
Connect the power and turn on the scale
Voltage into the terminal must be a minimum of 6.5VDC
HS-250 Medical Scale User Instructions 25
Page 26

7.6 Troubleshooting
Problems Possible cause Common Solutions
Display is blank. No self test Mains power is turned off.
Power supply faulty or not plugged in.
Battery is not charged.
On/Off switch problem.
Blank display after self test Pan not installed.
Unstable weight, load cell damaged.
OL or ------- Maximum capacity exceeded.
Load cell or mechanics damaged.
Power supply faulty.
------- or NULL displayed Weight is on the platform is below permissible
limit.
Pan not installed correctly.
Power supply faulty.
Load cell or mechanism faulty.
Display is unstable Platform touching some external object.
Air variation or any vibrations.
Temperature changed.
Load cell or connections faulty.
Power supply faulty.
Weight value incorrect Calibration error.
Platform of load cell touching somewhere.
Wrong unit of measure.
Cannot use full capacity Over load protection stoppers or transport locks
are not removed.
Parameters are set incorrectly.
AD problem.
Load cell or mechanism damaged.
Platform Corner Weight
different
Battery not charging Mains voltage problem.
Over load protection stoppers or transport locks
are not removed.
Load cell or mechanism damaged.
Charging circuit problem.
Battery Problem.
Check power is getting inside the scale and on/
off switch is working.
Verify the voltages, can be found on the power
labels.
Check the pans are installed correctly.
Try turning on again.
Check the platform is installed correctly.
Try to turn on the scale again.
Re-calibrate the scale.
Check the platform is installed correctly.
Try to turn on the scale again.
Re-calibrate the scale.
Check the scale is in acceptable location.
Check the connectors and load cell.
Check the power supply and battery.
Use accurate weight for calibration.
Check the platform is not touching any external
object.
Check the load cell is installed propely.
Check the parameter settings.
Check the load cell and connectors.
Check the stoppers and locks under the
platform.
Check the weighing unit and parameter settings.
Check the load cell.
Check the stoppers and locks under the
platform.
Use accurate weight for the calibration.
Check the load cell.
Check the mains and adaptor.
Check the battery.
Check the charging circuit.
26 HS-250 Medical Scale User Instructions
Page 27
8 Specifications
8.1 General specifications
Model HS-250
Maximum Capacity 250kg
Readability 100g
Resolution 1/2,500
Tare range -249.9kg
Minimum Capacity 200g
Linearity ± 20g
Common Specifications
Interface RS-232 Output Optional
Stabilization Time 2 Seconds typical
Operating Temperature 0°C - 40°C / 32°F - 104°F
Power supply (external) 12V/500mA AC power adapter or 2000mAh Ni-MH batteries (optional, size AA)
Calibration Automatic External
Calibration as per Directive
90/384/EEC
Medical product as per Directive
93/42/EEC
ADC Σ-Δ
Display 25 mm high 6 digits LCD with auto backlight and loading bar graph
Housing Aluminium pan and pole, ABS plastic indicator
Pan Size 355x360mm
Height measuring range From approx. 90cm to 200 cm (2'11'' to 6'8'')
Class III medical approval
Class I
HS-250 Medical Scale User Instructions 27
Page 28

8.2 Load cell specifications
Model No L6E
Rated Capacity (kg) 2.5/3/5/6/8/10/15/20/30/35/40/50
Sensitivity 2.0±0.2 mv/v
Excitation Voltage 5~12V
Material Aluminum
Cable 0.3~3m Φ 4mm
Input Resistance 409Ω ±6Ω/1065Ω ±15Ω
Out put Resistance 350Ω ±3Ω/1000Ω ±10Ω
Temperature Range -35°C ~ +65°C
Safe overload 150%F.S
Ultimate overload 300%F.S
Error ±0.0233%F.S
Creep (20min) ±0.020%F.S
Zero Balance 0±5%mV/V
Max. Platform Size 250x350mm
28 HS-250 Medical Scale User Instructions
Page 29

Page 30

Brecknell
1000 Armstrong Dr., Fairmont, MN 56031
Toll free: 800-637-0529, Tel: 507-238-8702
Fax: 507-238-8271
Email: [email protected]
www.brecknellscales.com
Brecknell
Foundry Lane
Smethwick, West Midlands B66 2LP
Tel: +44 (0) 845 246 6717
Fax: +44 (0) 845 246 6718
Email: [email protected]
www.brecknellscales.co.uk
 Loading...