

Page 1
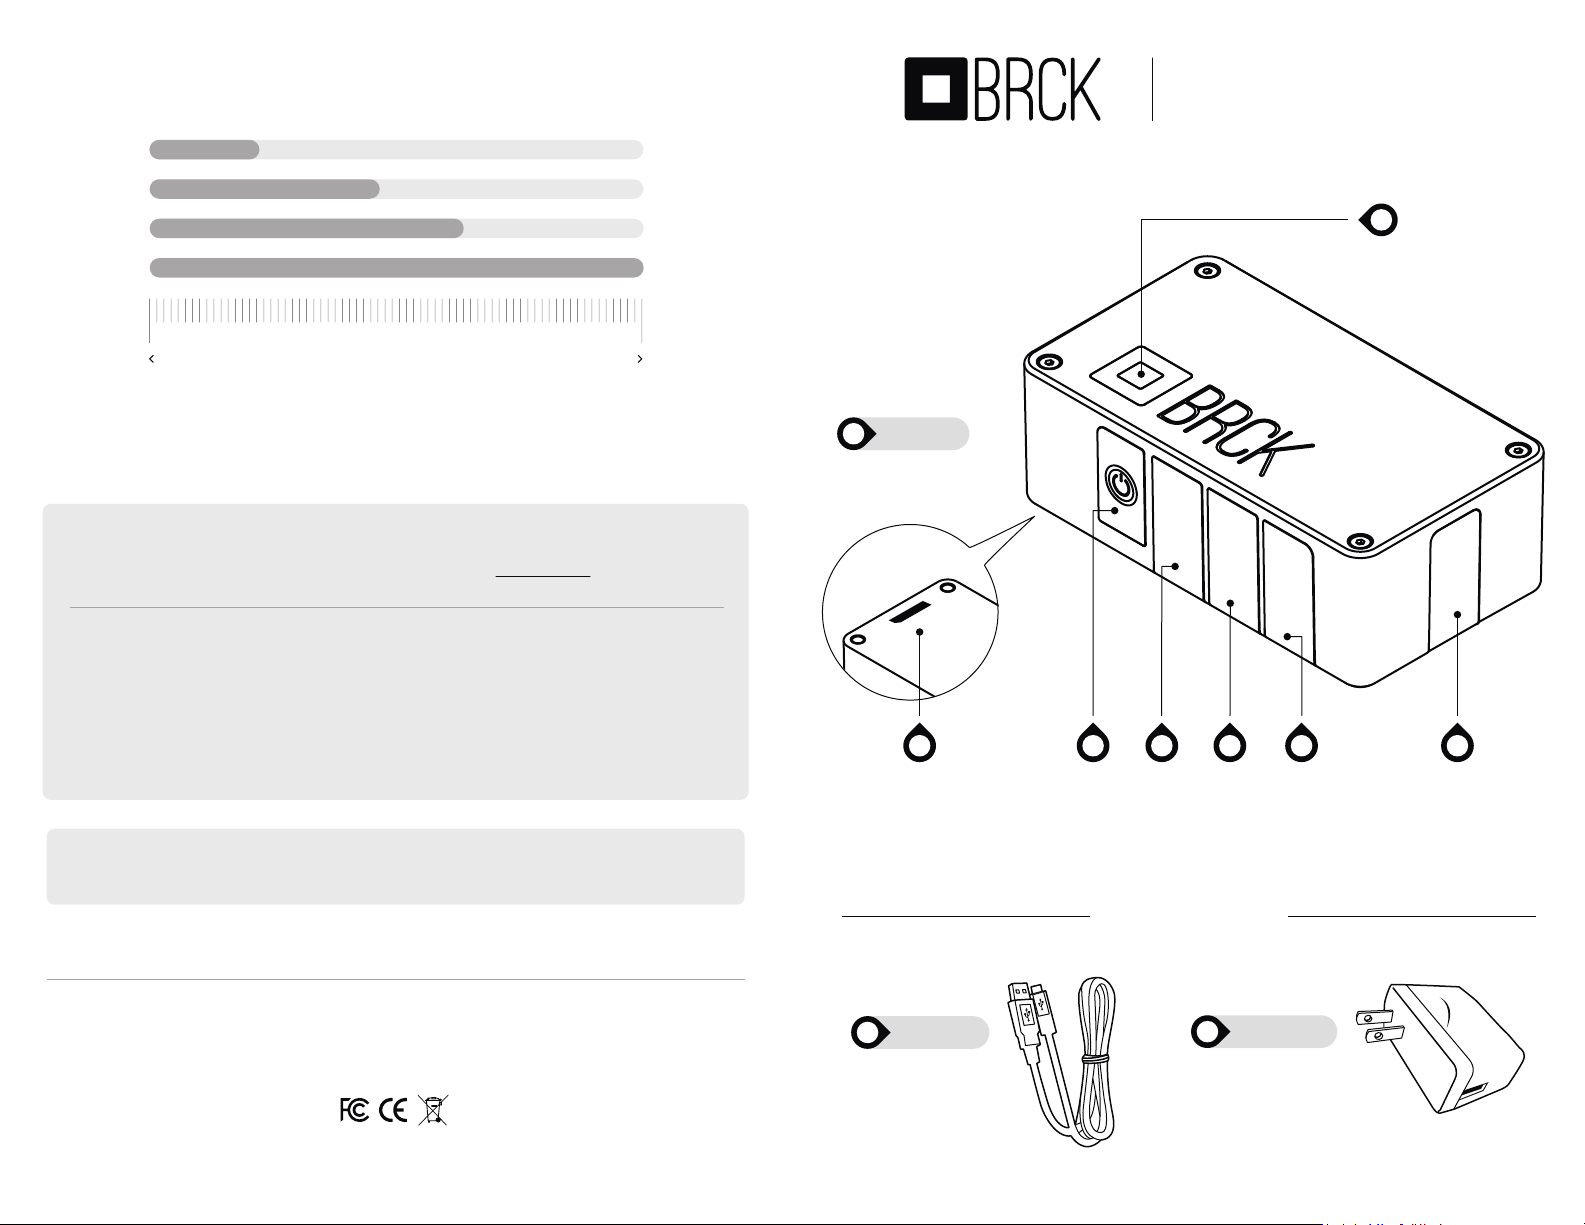
APPROXIMATE internet speeds
®
QUICK START GUIDE
SETUP YOUR BRCK IN 7 SIMPLE STEPS
EDGE / GPRS
3G
wifi
ETHERNET
0 mbps 100 mbps
Speed approximation
appendix
BRCK < NAME > : The default name of your BRCK, where < NAME > is a randomly generated code for setup
°
Browser : A software application for presenting resources on the World Wide Web.
°
Status Light : The top guide light on your BRCK (fig A - 1)
°
AUX USB : USB slot to connect external devices eg: phone, tablets etc - 500mA Max (fig A - 3)
°
Ethernet Port : Ethernet slot used to connect an ethernet cable (RJ45 cable) to another router (fig A - 4)
°
SIM Port : SIM card slot used to Insert a data enabled SIM card (fig A - 5)
°
Power Micro-USB Port : Micro-USB slot used to charge the BRCK using the provided USB cable (fig A - 5)
°
Cell RP-SMA : Antenna expansion port (attach antenna for better coverage) (fig A - 6)
°
GPIO connection : The bottom port used to connect external devices (fig A - 7)
°
The major web browsers are Google Chrome, Mozilla Firefox, Internet Explorer, Opera, Safari & Lynx
A
Model: BRCK V1
THE BRCK
BOTTOM
1
STATUS LIGHT
AUX
USB
ETHERNET
27
POWERGPIO CONNECTION
AUX
USB
ETHERNET
SIM
POWER
USB
4 5 63
SIM
POWER
USB
CELL
SMA
CELL
SMA
Warranty : 6 month warranty against defects in materials and workmanship.
For more information see http://www.brck.com/warranty
This device complies with Part 15 of the FCC Rules. Operation is subject to the following two conditions:
1. This device may not cause harmful interference
2. This device must accept any interference received, including interference that may cause undesired operation.
BRCK.com © All rights reserved. BRCK is a product of Ushahidi, Inc.
B
USB CABLE
accessories
POWER PLUGC
Page 2
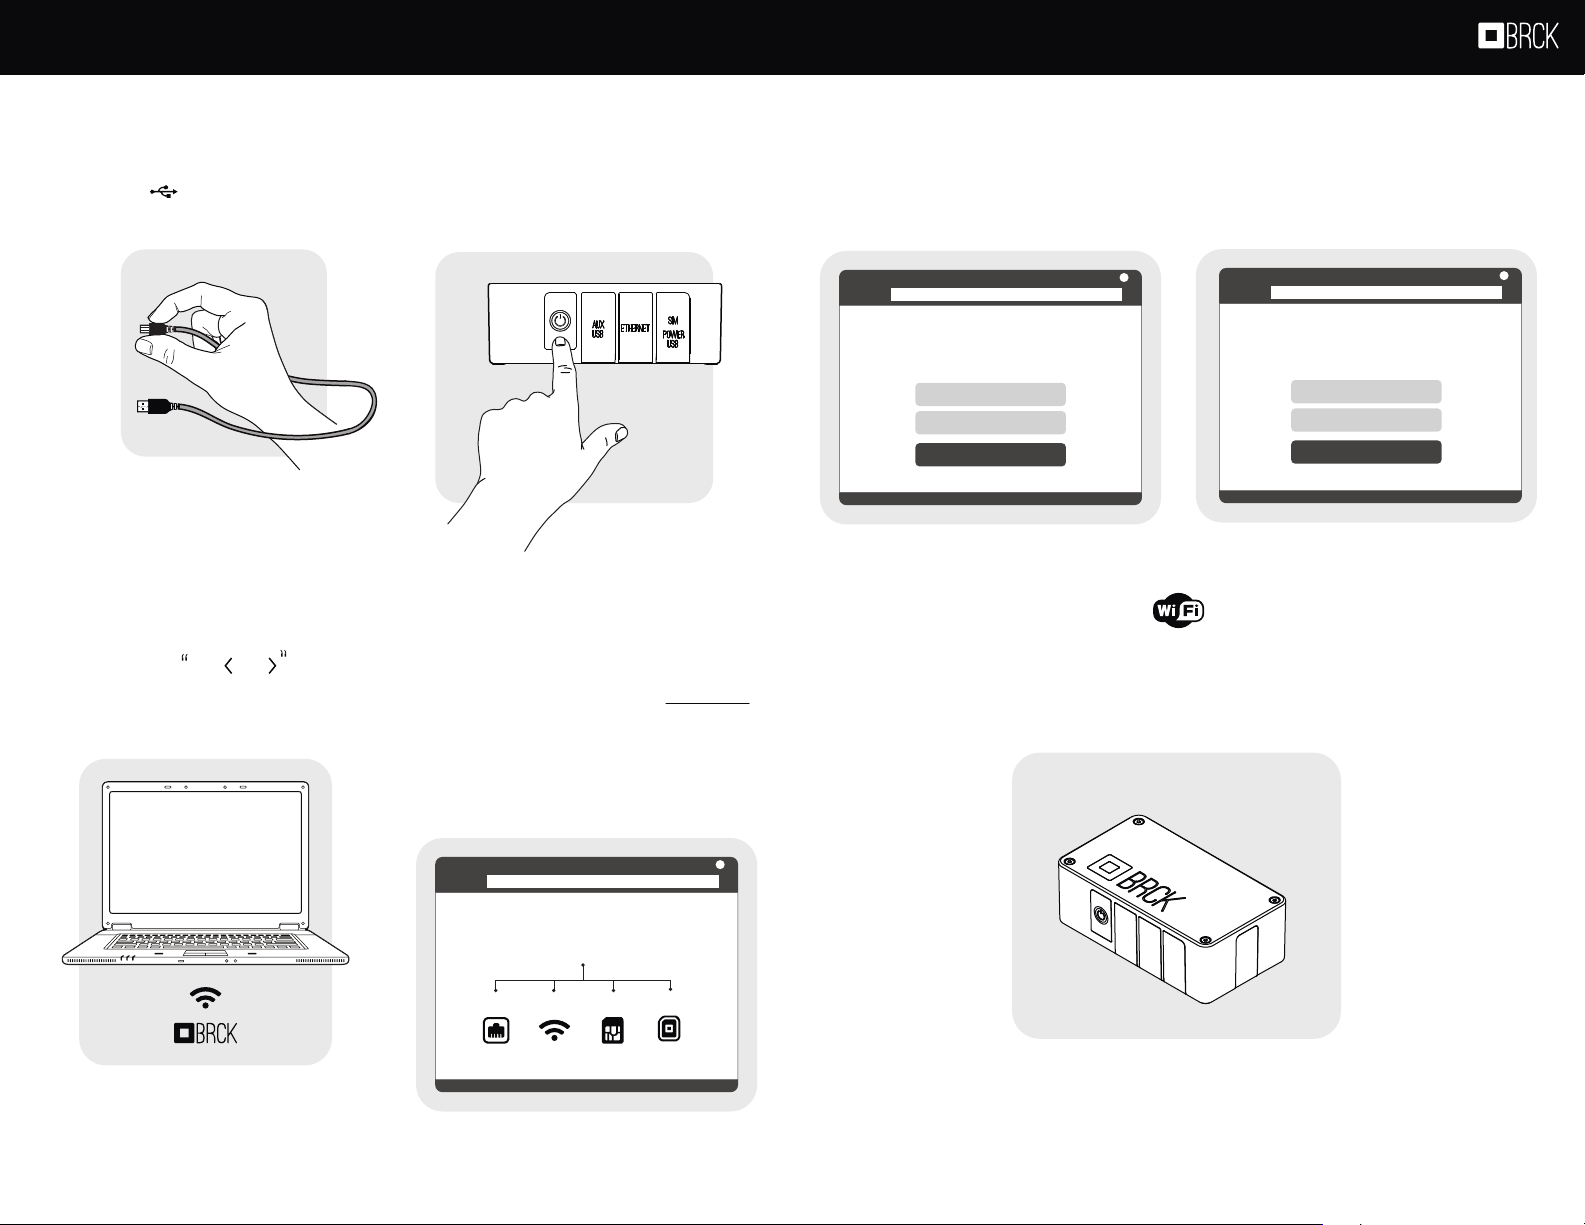
Setting up your first BRCK should take you about 10 minutes to get started, following these 7 steps below
Plug in your Brck to power
Connect the USB power cable to
your BRCK
1
Micro-USB
port
( fig A : 5 )
USB Port
{
name
Connect to WiFi signal
On your computer, smartphone or tablet search for
the BRCK WiFi signal and connect
3
BRCK
Turn on your BRCK
On the side of the BRCK press the
power button to turn on your BRCK
2
Note: Holding the power button
for 15 seconds will disconnect the
battery from the BRCK and reset
the EEPROM.
go to http://my.brck.com on a
4
browser
( Chrome, Firefox, Safari, Internet Explorer )
Signup or login
Setup to a new account or login to an already
existing profile
5
http://my.brck.com
.........
SIGN UP
7
Setup BRCK’S wiFI name & password
Configure your BRCK’S WiFi in the Preferences
section of your BRCK’s Dashboard
6
http://my.brck.com
mybrck<name>
.........
Yay! You are connected
Connect your devices with your BRCK’s WiFi signal
(maximum 20)
UPDATE
Not connected? Make sure you have either plugged
in an Ethernet cable, look for another WiFi connection,
or insert a SIM card with data enabled.
http://my.brck.com
INTERNET
Ethernet
WiFi
SIM
BRCK Net
AUX
USB
ETHERNET
SIM
POWER
USB
Having trouble connecting? visit : my.brck.com/help.
N
ote: The power button is the disconnecting device, and
will disconnect all networks from the BRCK
CELL
SMA
Page 3

CONFORMITY ASSESSMENT ISSUES
FCC/IC Regulatory notices
Modification statement
BRCK Inc has not approved any changes or modifications to this device by the user. Any changes or
modifications could void the user’s authority to operate the equipment.
BRCK Inc n’approuve aucune modification apportée à l’appareil par l’utilisateur, quelle qu’en soit la nature.
Tout changement ou modification peuvent annuler le droit d’utilisation de l’appareil par l’utilisateur.
Interference statement
This device complies with Part 15 of the FCC Rules and Industry Canada licence-exempt RSS standard(s).
Operation is subject to the following two conditions: (1) this device may not cause interference, and (2) this
device must accept any interference, including interference that may cause undesired operation of the device.
Le présent appareil est conforme aux CNR d'Industrie Canada applicables aux appareils radio exempts de
licence. L'exploitation est autorisée aux deux conditions suivantes : (1) l'appareil ne doit pas produire de
brouillage, et (2) l'utilisateur de l'appareil doit accepter tout brouillage radioélectrique subi, même si le
brouillage est susceptible d'en compromettre le fonctionnement.
Wireless notice
This equipment complies with FCC and IC radiation exposure limits set forth for an uncontrolled environment.
This equipment should be installed and operated with minimum distance of 20 cm between the radiator and any
person and must not be collocated with other transmitters except otherwise authorised.
This device is approved to be used with a PIFA antenna with a maximum gain of 0 dBi.
This product integrates and is authorized to be co‐located with a Novatel Wireless, MC545 High-Speed Data
Modem (FCC ID: NBZNRM-MC545; IC: 3229A-MC545).
Cet appareil est conforme aux limites d'exposition aux rayonnements de la IC pour un environnement non
contrôlé. Cet équipement doit être installé et utilisé à une distance minimum de 20 cm entre le radiateur et
toute personne et ne doit pas être co‐implanté avec d'autres émetteurs, sauf autorisation contraire.
Ce dispositif est approuvé pour être utilisé avec une antenne PIFA avec un gain maximum de 0 dBi.
Ce produit intègre et est autorisé à être co‐localisés avec une Novatel Wireless, MC545 High-Speed Data
Modem (FCC ID: NBZNRM-MC545; IC: 3229A-MC545).
FCC Class B digital device notice
This equipment has been tested and found to comply with the limits for a Class B digital device, pursuant to
part 15 of the FCC Rules. These limits are designed to provide reasonable protection against harmful
interference in a residential installation. This equipment generates, uses and can radiate radio frequency energy
and, if not installed and used in accordance with the instructions, may cause harmful interference to radio
communications. However, there is no guarantee that interference will not occur in a particular installation. If
this equipment does cause harmful interference to radio or television reception, which can be determined by
turning the equipment off and on, the user is encouraged to try to correct the interference by one or more of the
following measures:
Page 4

- Reorient or relocate the receiving antenna.
- Increase the separation between the equipment and receiver.
- Connect the equipment into an outlet on a circuit different from that to which the receiver is connected.
- Consult the dealer or an experienced radio/TV technician for help.
CAN ICES-3 (B) / NMB-3 (B)
This Class B digital apparatus complies with Canadian ICES-003.
Cet appareil numérique de classe B est conforme à la norme canadienne ICES-003.
 Loading...